

Kolpin 53550 User Manual
Rev. 2
(
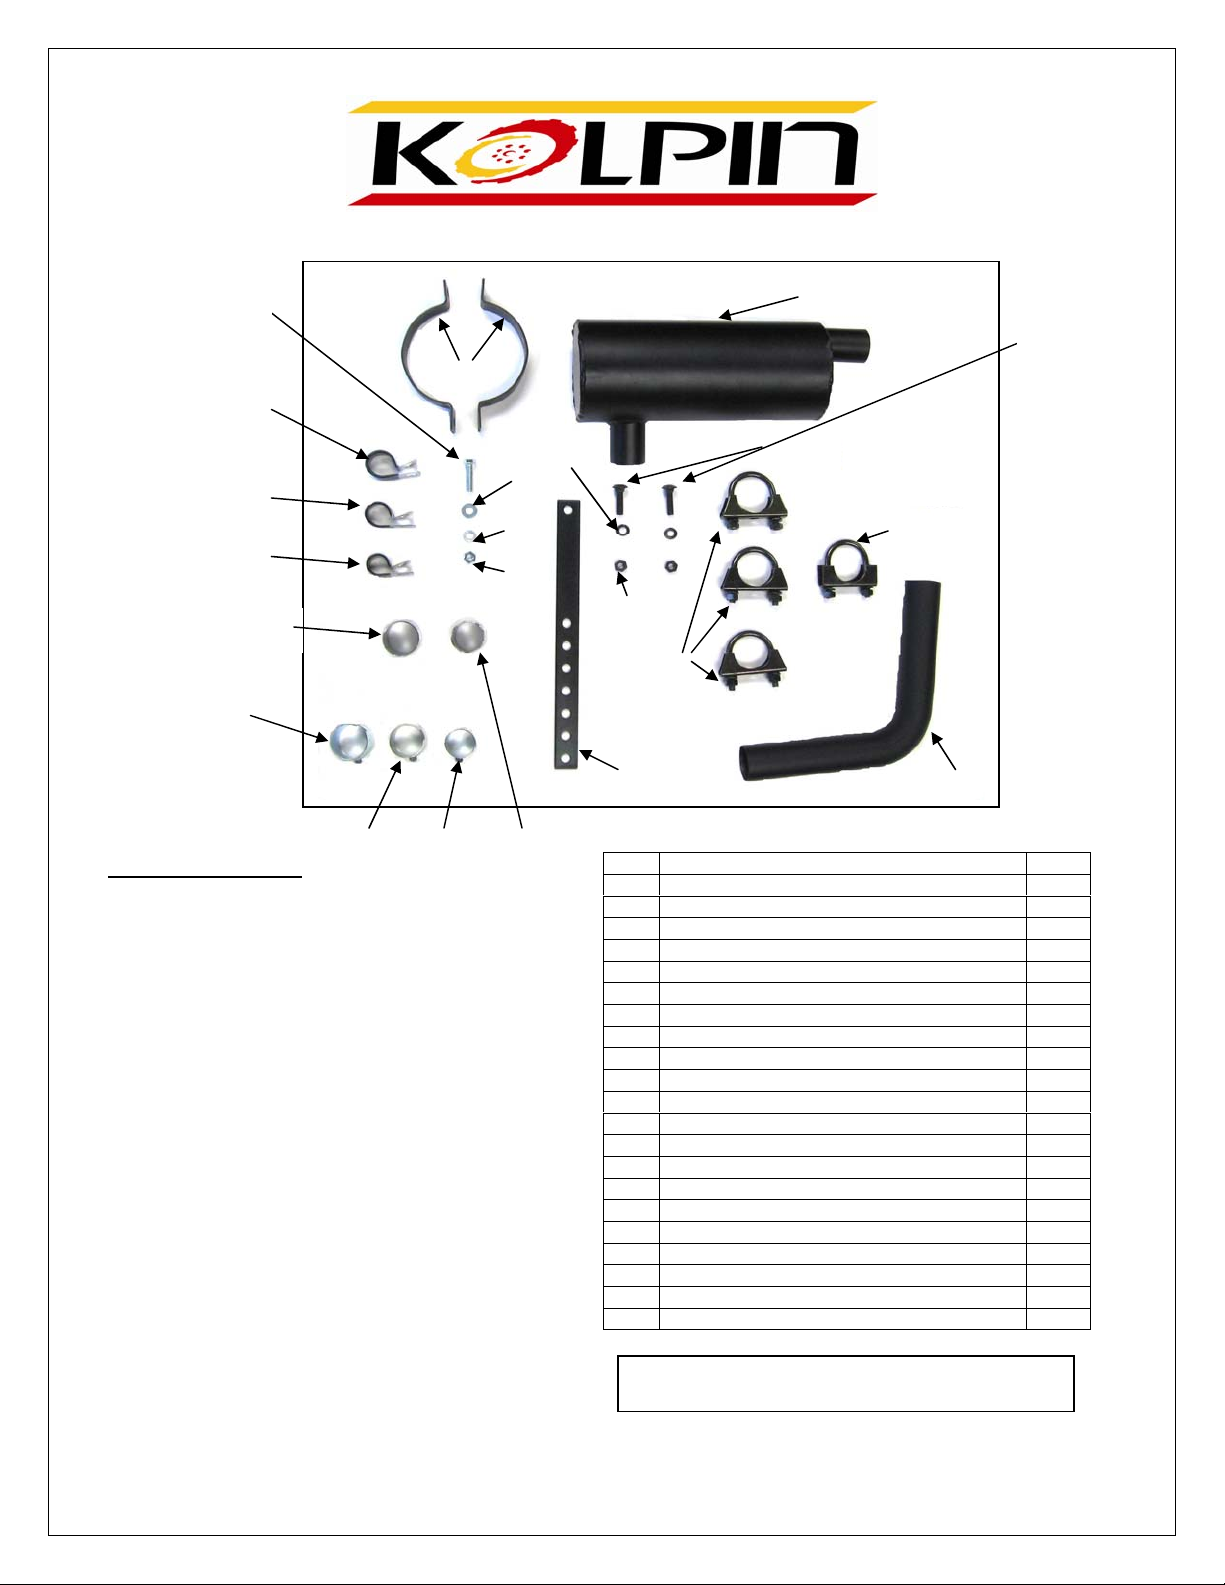
53550 Stealth Exhaust 2.0
18
9
2
19
16
20
14
7
10
21
17
5
3 4
15
13 12 11
Safety Considerations:
1. Wear gloves during installations and be careful
when handling the metal pieces as some may have
sharp edges that can cause very bad cuts very
easily.
2. Do not block the visibility of the taillight on your
machine with the Stealth Exhaust.
3. CAUTION – BURN HAZARD!!! Although the
Stealth exhaust does not get as hot as your OEM
muffler, be aware that under some conditions it
can cause severe burns. Like any other exposed
exhaust on an ATV, your Stealth Exhaust can get
hot enough to burn exposed skin. NOTE: A
Heat Shield (Kolpin P/N – 53560) is an available
option should you desire it.
General Installation Instructions – For Universal
Exhaust Kit
There are four basic mounting positions for the
system. Direct mount to the rear of existing
muffler, mid mount (such as Polaris example),
him mount tor rear of the ATV rack or Frame, and
high mount to extended rear rack/basket. These
instructions are general for all mounts, and are to be
used with the attached pictures of the different applications. Depending on your riding style and uses, the
higher mounts are generally more desirable for more extreme riding (dips, creek bottoms, etc.) to keep from
dragging the Kolpin Stealth Exhaust system. Leave at least 2 to 3 inches between the muffler and any
plastic components, to keep from melting or distorting the plastic.
NO. DESCRIPTION QTY.
1 Kolpin Stealth Exhaust 1
2 Mounting Bands 2
3 “L” Shaped Tube 1
4 Mounting Strap (8 Holes) 1
5 1.50” Muffler Clamp 3
6 1.375” Muffler Clamp 1
7 25mm R Shaped Mounting Strap 1
8 28mm R Shaped Mounting Strap 1
9 31mm R Shaped Mounting Strap 1
10 Large Weld on Adapter 1
11 Small Weld on Adapter 1
12 Split Adapter Bushing 57 (1.125” to 1.25”) 1
13 Split Adapter Bushing 58 (1.25” to 1.375”) 1
14 Split Adapter Bushing 59 (1.375” to 1.50”) 1
15 Black Carriage Bolt (8mm x 35.5mm) 2
16 Black Lock Washer (8mm) 10
17 Black Nut (8mm) 10
18 Hex Head Bolt (8mm x 36.25mm) 1
19 Flat Washer (8.75 mm) 1
20 Lock Washer (8mm) 1
21 Nut (8mm) 1
Number in parentheses ( ) indicates corresponding number
in the BOM
Bill of Materials).

Rev. 2
Installation Tip: Use orange hi-temp silicone on all connections for tighter and quieter seal of components.
1. 1 3/8” or 1 ½” Outlet – The first step is to determine what is necessary to make the outlet on your ATV
exhaust have the 1 3/8” O.D. or 1 ½” O.D. male outlet needed to adapt to the Stealth Exhaust 2.0. For ATV’s
that have a male outlet, use the Adapter Bushings (12, 13, or 14 in BOM) in the kit (see instruction supplement)
to bush it up to the 1 ½” size. If your OEM outlet points down, you may need to cut it so it points more directly
out the rear of the machine. Be sure to leave the outlet long enough (at least 1 ½”) to slide the bushings on it
and attach the Stealth Exhaust 2.0. If you are mounting the Stealth Exhaust 2.0 directly to the existing outlet o n
your ATV (as in the pictures of the Yamaha Grizzly), use the smaller 1 3/8” muffler clamp for this connection.
Also, use the high temp silicone (not included) for this type of attachment.
For ATV’s (such as Honda) with no male outlet – Use the weld on adapters (10, or 11) See the
instruction supplement.
DIRECT MOUNT: Weld on the 1 3/8” O.D. adapter, and install the Stealth Exhaust directly over the adapter,
and clamp it with 1 3/8” Muffler Clamp.
HIGH MOUNT USING ELBOW ADAPTER. Weld on 1 ½” O.D. adapter; then the adapter elbow will slide
over the weld on adapter. Now clamp that using the 1 ½” muffler clamp. Hold the proper adapter centered over
the outlet and weld it in place. Wire feed or any type of light metal welding works well for this. If your OEM
muffler is stainless steel, generally Type 309 wire or rod works best. If you do not have welding capabilities,
most welding shops will do it for a minimal fee. It is suggested you disconnect the battery, and put the welding
ground as close as possible to the weld area to prevent any damage to the ATV’s electrical system. You can
also remove your muffler to weld on the adapter. Weld on adapters can be used to adapt most any ATV to the
Stealth Exhaust 2.0.
BOLT ON ADAPTERS 53520: A universal bolt on adapter is available for many applications, such as the
Honda Rancher 300, the Forman 400 and 450, or any ATV with a flat or concave outlet on the OEM muffler.
There are bolt on Adapters available specifically for the Hon da Rubicon (53530) or the Suzuki Vinson (53535
2003 or Older only).
53535
2. Mount Muffler – Determine how and where you want to mount your Stealth Exhaust 2.0 and install it
using the rubber coated mounting clamps and the Mounting Bands (2) in the kit. Select the proper rubber
coated clamps, (there are three sizes, 8, 9, or 10 depending on your rack Diameter), for the frame or rear rack on
your ATV and slide the clamp over the over that. Then install the Mounting Bands (2) over the muffler using
the supplied Bolts and Nuts (15, 16, and 17) and hang it in place, using the 8 holed Mounting Strap (4), which
you can bend, cut or drill to better accommodate your needs for your application. Hang the Stealth Exhaust2.0
in place, but do not tighten at this point.
3. 80 Degree Adapter Elbow Connection(3) – Hold the special adapter elbow in place, between the
ATV’s muffler outlet and the Stealth Exhaust inlet. Determine where to cut the adapter elbow to fit. BE
CAREFULL NOT TO CUT THE ADAPTER TO SHORT! Cut the adapter to fit with a hack saw. Do not
distort the tube by clamping it to tight in the vice. Be sure to clean the burs from the cut end with a file or some
sandpaper. This will also allow it to slide on easily. To assemble the elbow into place, you will have to loosen
the muffler hanger or take the muffler back off. The next step is to put the adapter in place and make sure it fits
correctly. Attach it using the 1 ½” clamps form the kit. Again, you can use some orange hi-temp sealant on this
connection. Now, reassemble your muffler and hangers into place and tighten all mounts and clamps.
Direct Mount – If your ATV already has a male outlet, simply slide the supplied bushings on your ATV
outlet and install the Stealth Exhaust directly on it using the smaller 1 3/8” muffler clamp. (See Grizzly
Pictures). For a direct mount to the rear of the ATV’s muffler with the installed 1 3/8” weld on outlet, use the
1 3/8” muffler clamp. You can use some high temp silicone on this connection and on the bushings.

Rev. 2
53550 Stealth Exhaust 2.0
Supplemental Instructions for the Weld on Adapter and the Adapter Bushings.
SPLIT TYPE ADAPTER BUSHINGS –
together in steps to bush the existing outlet on your ATV’s muffler to the proper size, to accommodate the Kolpin
Stealth Exhaust 2.0. The bushings can be gently expanded or squeezed together to make installation easier. The
bushings are identified by part numbers as follows:
1. 57 – 1 1/8” to 1 ¼”
2. 58 – 1 ¼” to 1 3/8”
3. 59 – 1 3/8” to 1 ½”
To achieve the proper installation and seal without damaging the stealth muffler inlet, the bushings must be used in
these steps, per the above example.
Models with 1 1/8” O.D. male outlet, such as Yamaha Grizzly.
1. First install the number 57 bushing that goes from 1 1/8” to 1 ¼” on the OEM muffler outlet.
2. Next, over the number 57 bushing install the number 58 bushing. This will take it from 1 ¼” to 1 3/8”.
3. If you are direct mounting the stealth muffler, you now have the proper 1 3/8” O.D. outlet need ed on
your ATV to install the Kolpin Stealth Exhaust 2.0. Simply clamp it down using the muffler clamp
provided. For a maximum seal, use orange hi-temp silicone on the bushings and any connection points.
4. If you are using the adapter elbow to connect the Stealth Exhaust 2.0 to your ATV’s muffler such as for
a mid or high mount, you will have to us the third bushing, number 59. This bushing goes from 1 3/8”
to 1 ½”. You will now have the proper size, 1 ½” O.D., to us the elbow adapter and clamp it down over
the bushing assembly and connect it to the Stealth Exhaust 2.0
Models with 1 ¼” O.D. male outlet, such as the Sportsman series.
1. First, install the number 58 bushing that goes from 1 ¼” to 1 3/8” on stock muffler outlet.
2. If you are direct mounting the Stealth Exhaust 2.0, you now have the proper 1 3/8” O.D.
outlet on you ATV to correctly install the Stealth Exhaust 2.0. Clamp it down with the 1 3/8” muffler
clamp. For the best seal, use orange hi-temp silicone on the bushing and connections.
3. If you are using the adapter elbow to connect the Stealth Exhaust 2.0 to your ATV’s muffler (such as
mid or high mount), you will have to use a second bushing. Use the number 59 bushing that goes from
1 3/8” to 1 ½”, and slide it over the other bushing. You will then have the proper size, 1 ½” O.D., to use
the elbow adapter and clamp it down over the bushing assembly and connect it to the Stealth Exhaust
2.0
WELD ON ADAPTERS (10, or 11) – There are two weld on adapters in this kit, they should be used as
follows.
1. If you are direct mounting the Stealth Exhaust 2.0 use the smaller 1 3/8” O.D. x 2” Long Adapter. After
welding this adapter on, you will have the proper 1 3/8” O.D. size to direct mount the Stealth Exhaust
2.0. If you decide later to use the elbow adapter to connect your muffler, you can slide the number 59
busing on to the weld on adapter, and this will give you the 1 ½” O.D. size to use the elbow adapter.
2. If you are using the elbow adapter to connect your Stealth Exhaust 2.0, (such as mid or high mount), use
the larger 1 ½” size to use the elbow adapter. Again, for the best seal, use hi-temp orange silicone on
connections for the best result.
WELDING SUGGESTIONS: If your ATV’s stock muffler is stainless steel (Such as most Hond as), type 309
welding wire or rod for dissimilar metals is recommended and may produce a better weld. This is a
common welding material at welding shops.
www.kolpinpowersports.com customerservice@kolpin.com
The three (3) split type adapter bushings are designed to be used
Kolpin Powersports, Inc.
205 N. Depot Street, Fox Lake, WI 53933
Tel. : 877-9KOLPIN or 920-928-3118
 Loading...