

Page 1

AKMH
Deutsch Betriebsanleitung, Hygienische Servomotoren
English Instructions Manual, Hygienic Servomotors
Edition: B, March 2014
Part Number AKMH-Manual-GE-EN
Originalsprache Deutsch
European Version (CE region)
Bewahren Sie alle Anleitungen während der gesamten Nutzungsdauer
des Produkts als Produktkomponente auf. Händigen Sie alleAnleitungen künftigen Anwendern/Besitzern des Produkts aus.
Designed to EHEDG standards
Keep allmanuals as a product component during the life
span ofthe product. Passall manuals to future users and
owners of the product.
Page 2

Record of Document Revisions
Revision Remarks
-, 08/2013 Beta launch version
A, 12/2013 Hiperface DSL andSFD3 feedbacks released, technical data updated, hints
B, 03/2014 Part number scheme updated, typos corrected, FDA standards added,
for machine builders, hygienic standards fulfilled by AKMH, CE Declaration
andConformity, Hygienic Standards Conformity Declaration
CE Declaration, cable gland updated, dimension drawings updated
Technische Änderungen zur Verbesserung der Leistung der Geräte ohne vorherige Ankündigung vorbehalten.
Gedruckt in der Tschechischen Republik.
Dieses Dokument ist geistiges Eigentum von Kollmorgen. Alle Rechte vorbehalten. Kein Teil dieses Werkes
darf in irgendeiner Form (Fotokopie, Mikrofilm oder in einem anderen Verfahren) ohne schriftliche Genehmigung
von Kollmorgen reproduziert oder unterVerwendung elektronischer Systeme verarbeitet, vervielfältigt oder verbreitet werden.
Technical changes which improve the performance of the device may be made without prior notice!
Printed in CzechRepublic.
This document is the intellectual property of Kollmorgen. All rights reserved. No part of this work may be reproduced in any form (by photocopying, microfilm or any other method) or stored, processed, copiedor distributed
by electronic means without the written permission of Kollmorgen.
2 Kollmorgen | March 2014
Page 3

AKMH Installation | Table of Contents
Table of Contents
1 Allgemeines 6
1.1 Über diesesHandbuch 6
1.2 Verwendete Symbole 6
1.3 Verwendete Abkürzungen 6
2 Sicherheit 7
2.1 Das sollten Sie beachten 7
2.2 Bestimmungsgemäße Verwendung 9
2.3 Nicht bestimmungsgemäße Verwendung 10
2.4 Europäische Richtlinien und Normen für den Anlagenbauer 10
2.5 Handhabung 11
3 Produktidentifizierung 13
3.1 Lieferumfang 13
3.2 Zubehör 13
3.3 Typenschild 13
3.4 Typenschlüssel 14
3.4.1 Rahmengröße, Flansch und Wellenoptionen 15
3.4.2 Wellendichtung Optionen 16
3.4.3 Rotorlänge Optionen 16
3.4.4 Wicklungstyp Optionen 16
3.4.5 Kabellänge Optionen 16
3.4.6 Feedback Optionen 16
3.4.7 Haltebremse 17
3.4.8 AnschlussOptionen 17
4 Technische Beschreibung 18
4.1 Allgemeine technische Daten 18
4.2 Standardausrüstung 18
4.2.1 Schutzart 18
4.2.2 Isolierstoffklasse 18
4.2.3 Oberfläche 18
4.2.4 Wellenende 19
4.2.5 Schutzeinrichtung 19
4.2.6 Schwinggüte 19
4.3 Hygienisches Design 20
4.3.1 Geprüfte Eigenschaften gegenüber Reingungsmittel 21
4.3.2 Reinigungsplan 21
5 Mechanische Installation 22
5.1 Wichtige Hinweise 22
5.2 Flanschmontage, Frontmontage 23
5.3 O-Ring Dichtungen 23
5.4 Kabelinstallation 24
5.4.1 Standard Verdrahtung 24
5.4.2 Schlauch Verdrahtung 24
6 Elektrische Installation 25
6.1 Wichtige Hinweise 25
6.2 Anschlussder Motoren 25
6.3 Farbkodierung der Adern 26
6.4 Leitfaden für dieelektrischeInstallation 26
7 Inbetriebnahme 27
7.1 Wichtige Hinweise 27
7.2 Leitfaden für dieInbetriebnahme 28
7.3 Beseitigen vonStörungen 28
8 Begriffsdefinitionen der technischen Daten 29
Kollmorgen | March 2014 3
Page 4

AKMH Installation | Table of Contents
9 General 30
9.1 About thismanual 30
9.2 SymbolsUsed 30
9.3 Abbreviationsused 30
10 Safety 31
10.1 You should payattention to this 31
10.2 Use asdirected 33
10.3 Prohibited use 34
10.4 European Directivesand Standards for the machine builder 34
10.5 Handling 35
11 Package 37
11.1 Delivery package 37
11.2 Accessories 37
11.3 Nameplate 37
11.4 Model number description 38
11.4.1 Frame size, flange and shaftoptions 39
11.4.2 Shaft seal options 40
11.4.3 Rotor length options 40
11.4.4 Winding type options 40
11.4.5 Cable length options 40
11.4.6 Feedback options 40
11.4.7 Holding brake option 41
11.4.8 Connection options 41
12 Technical Description 42
12.1 General technicaldata 42
12.2 Standard features 42
12.2.1 Protection class 42
12.2.2 Insulation material class 42
12.2.3 Surface 42
12.2.4 Shaft end 43
12.2.5 Protectivedevice 43
12.2.6 Vibration class 43
12.3 Hygienicdesign 44
12.3.1 Tested properties with respect tocleaning agents 45
12.3.2 Cleaning plan 45
13 Mechanical Installation 46
13.1 Important Notes 46
13.2 Flange mounting, Face mounting 47
13.3 O-ring sealing 47
13.4 Cable installation 48
13.4.1 Standard cabling 48
13.4.2 Tube cabling 48
14 Electrical Installation 49
14.1 Important notes 49
14.2 Connecting the motor 49
14.3 Wire color coding 50
14.4 Guide for electrical installation 50
15 Setup 51
15.1 Important notes 51
15.2 Guide for setup 52
15.3 Trouble Shooting 52
16 Definition of Terms for Technical Data 53
17 Technical Data 54
17.1 Dictionary for technical data tables 54
4 Kollmorgen | March 2014
Page 5
AKMH Installation | Table of Contents
17.2 TechnicalData AKMH2 55
17.3 TechnicalData AKMH3 56
17.4 TechnicalData AKMH4 57
17.5 TechnicalData AKMH5 58
17.6 TechnicalData AKMH6 59
18 Dimension drawings 60
18.1 DimensionsAKMH2 (Ax flanges) 60
18.2 DimensionsAKMH2 (Cx flanges) 61
18.3 Radial/axialforces AKMH2 61
18.4 DimensionsAKMH3 (Ax flanges) 62
18.5 DimensionsAKMH3 (Cx flanges) 63
18.6 Radial/axialforces AKMH3 63
18.7 DimensionsAKMH4 (Ax flanges) 64
18.8 DimensionsAKMH4 (Cx flanges) 65
18.9 Radial/axialforces AKMH4 65
18.10 DimensionsAKMH5 (Ax flanges) 66
18.11 DimensionsAKMH5 (Cx flanges) 67
18.12 Radial /axialforces AKMH5 67
18.13 DimensionsAKMH6 (Ax flanges) 68
18.14 DimensionsAKMH6 (Cx flanges) 69
18.15 Radial/axialforces AKMH6 69
19 Approvals 70
19.1 Underwriters Laboratories 70
19.2 EC Declaration of Conformity 70
19.3 HygienicStandards, Declaration of Conformity 71
20 Record of document revisions 72
Kollmorgen | March 2014 5
Page 6
AKMH Installation | Table of Contents
1 Allgemeines
1.1 Über dieses Handbuch
Dieses Handbuch beschreibt die Synchron-Servomotoren der Serie AKMH (Advanced Kollmorgen Motor Hygienic). Die Motoren werden im Antriebssystem zusammen mit den Servoverstärkern betrieben. Beachten Sie daher die gesamte Dokumentation des Systems,
bestehendaus:
l Betriebsanleitungdes Servoverstärkers
l Handbuch Bus-Kommunikation (z.B EtherCAT)
l Online Hilfe der Inbetriebnahmesoftwaredes Servoverstärkers
l Regionales Zubehörhandbuch
l BetriebsanleitungMotorserie AKMH (dieses Handbuch)
Weitere Hintergrundinformationen finden Sie im "Produkt-WIKI", erreichbar unter www.wiki-
kollmorgen.eu.
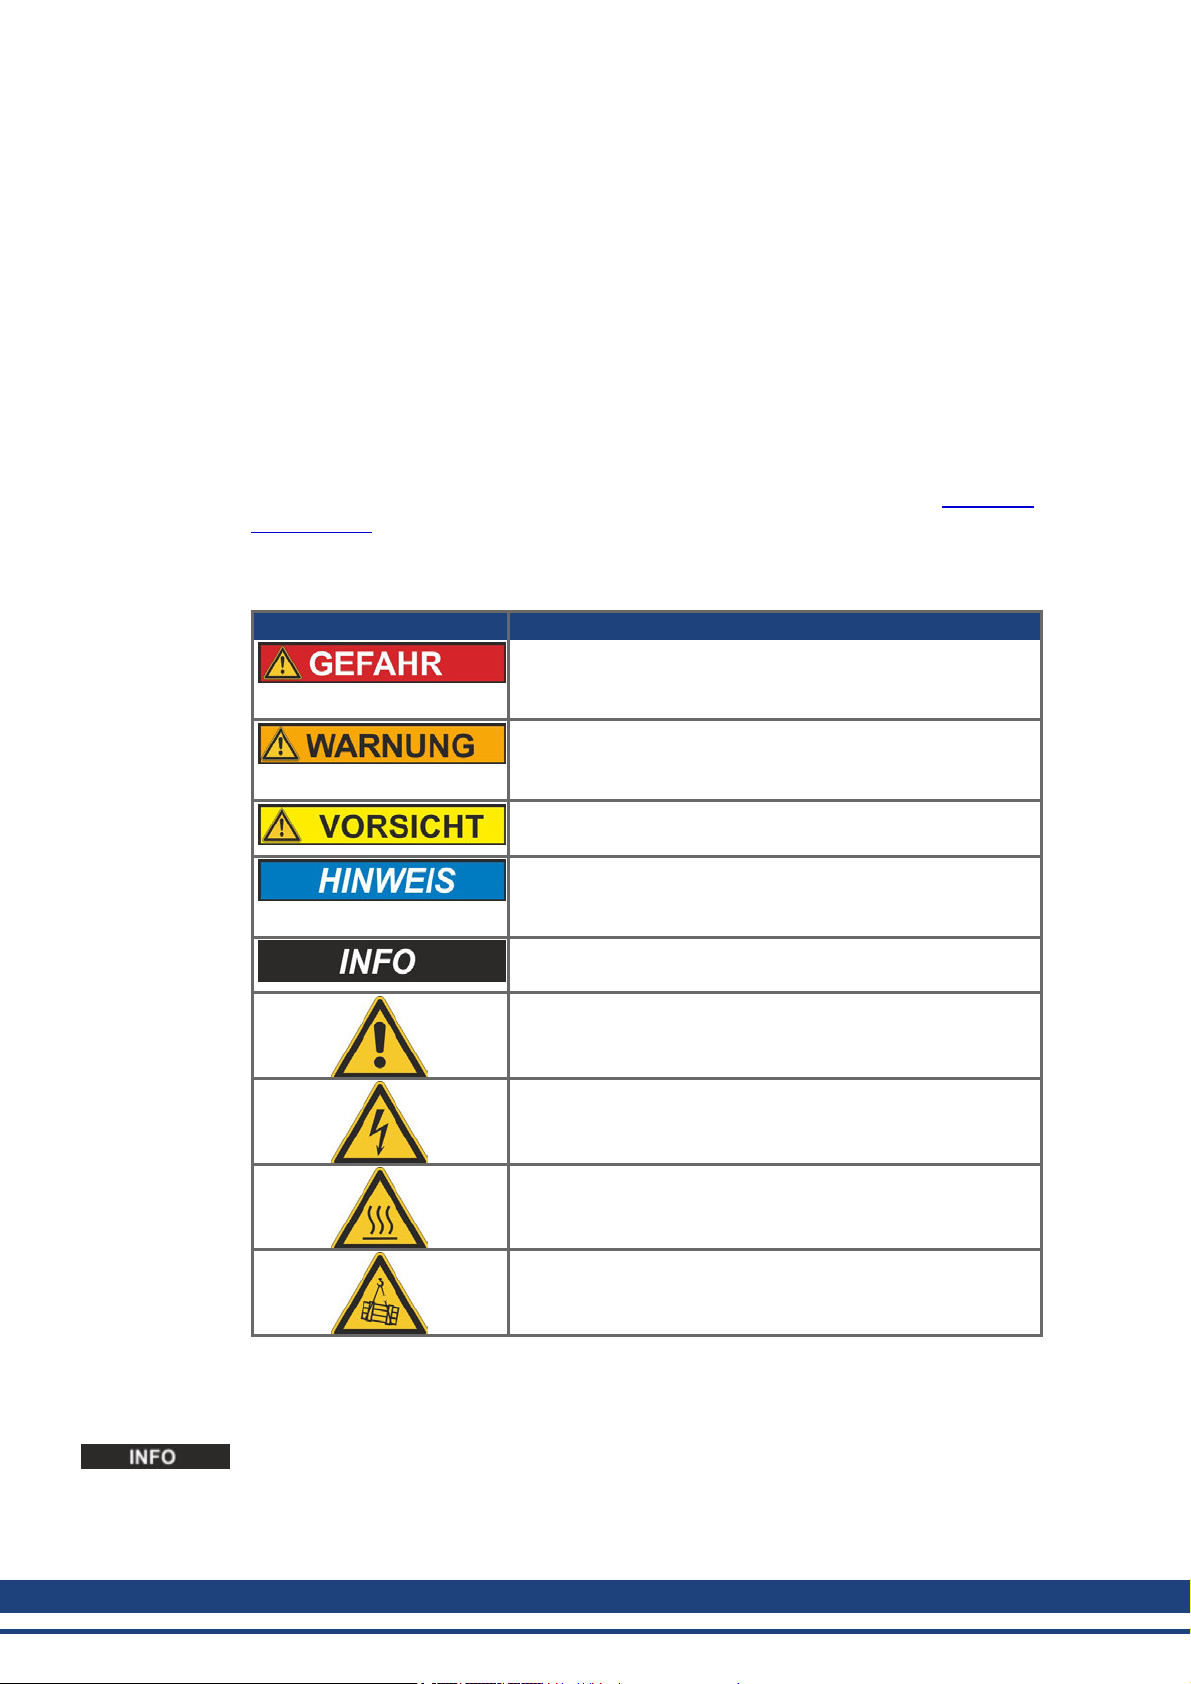
1.2 Verwendete Symbole
Symbol Bedeutung
Weist auf eine gefährlicheSituation hin, die, wenn sie nicht
vermieden wird, zum Tode oder zu schweren, irreversiblen
Verletzungen führen wird.
Weist auf eine gefährlicheSituation hin, die, wenn sie nicht
vermieden wird, zum Tode oder zu schweren, irreversiblen
Verletzungen führen kann.
Weist auf eine gefährlicheSituation hin, die, wenn sie nicht
vermieden wird, zu leichten Verletzungen führen kann.
Dies ist kein Sicherheits-Symbol. Dieses Symbol weist auf
eine Situation hin, die, wenn sie nicht vermieden wird, zu Beschädigung von Sachen führen kann.
Dies ist kein Sicherheits-Symbol. Dieses Symbol weist auf
wichtige Informationen hin.
Warnung vor einer Gefahr (allgemein). Die Art der Gefahr wird
durch den nebenstehenden Warntext spezifiziert.
1.3 Verwendete Abkürzungen
Verwendete Kürzel für technische Daten siehe Kapitel"Begriffsdefinitionen" (➜ # 29).
Die Symbolik (➜ # 29)bedeutet in diesem Dokument : "siehe Seite 29".
6 Kollmorgen | March 2014
Warnung vor gefährlicher elektrischer Spannung und deren
Wirkung.
Warnung vor heißer Oberfläche.
Warnung vor hängender Last.
Page 7

2 Sicherheit
Dieses Kapitel hilft Ihnen, Gefahren zu erkennenund zu vermeiden.
2.1 Das sollten Sie beachten
Dokumentation lesen!
Lesen Sie vor der Montage und Inbetriebnahme die vorliegendeDokumentation. Falsches
Handhaben des Motors kann zu Personen- oder Sachschäden führen. Der Betreiber muss
daher sicherstellen, dass alle mit Arbeiten am Motor betrauten Personen das Handbuch
gelesen und verstanden haben und dass die Sicherheitshinweise in diesem Handbuch beachtet werden.
Technische Daten beachten!
Halten Sie die technischen Daten und die Angaben zu den Anschlussbedingungen (Typenschild und Dokumentation) ein. Wenn zulässige Spannungswerte oder Stromwerte überschritten werden, können die Motoren z.B. durch Überhitzung geschädigt werden.
Risikobeurteilung erstellen!
Der Maschinenherstellermuss eine Risikobeurteilung für die Maschine erstellen und geeignete Maßnahmentreffen, dass unvorhergesehene Bewegungen nicht zu Schäden an Personen oder Sachen führen können. Aus der Risikobeurteilung leiten sich eventuell auch
zusätzliche Anforderungen an das Fachpersonal ab.
AKMH Installation | Table of Contents
Fachpersonal erforderlich!
Nur qualifiziertes Fachpersonal darf Arbeiten wie Transport, Montage, Inbetriebnahme und
Instandhaltung ausführen. Qualifiziertes Fachpersonal sind Personen, die mit Transport, Aufstellung, Montage, Inbetriebnahme und Betrieb von Motoren vertraut sind und über die ihrer
Tätigkeit entsprechenden Mindestqualifikationen verfügen:
l Transport: nur durch Personal mit Kenntnissen in derBehandlungelektrostatisch gefähr-
deter Bauelemente
l Hygiene: nur durch Fachleute mit Kenntnissen der für den Anwendungsbereich gültigen
Hygienevorschriften.
l Mech. Installation: nurdurch Fachleute mit maschinenbautechnischer Ausbildung.
l Elektr. Installation: nur durch Fachleute mit elektrotechnischer Ausbildung.
l Inbetriebnahme: nurdurch Fachleute mit weitreichenden Kenntnissen in den Bereichen
Elektrotechnik / Antriebstechnik
Das Fachpersonal muss ebenfalls IEC 60364 / IEC 60664 und nationale Unfallverhütungsvorschriften kennen und beachten.
Passfeder sichern!
Entfernen oder sichern Sie eine eventuell vorhandene Wellen-Passfeder, falls der Motor
ohne angekoppelte Last laufen soll, um ein Wegschleudern der Passfeder und die damit verbundene Verletzungsgefahr zu vermeiden.
Ungleiche Metalle vermeiden!
Das Motorgehäuse besteht aus Edelstahl. Vermeiden direkten Kontakt des Motors an aktivereMetalle wie Aluminium oder Stahl, um galvanische Korrosion zu verhindern. Galvanische
Korrosion kann zur Kontaminierung des Produkts, Zerstörung der Motorbefestigung und Ausfall des Motors führen. Eine zerstörte Motorbefestigung könnte zu Stromschlaggefahr durch
Abriss der elektrischen Anschlüsse oder der Motorleitungführen.
Kollmorgen | March 2014 7
Page 8
AKMH Installation | Table of Contents
Heiße Oberfläche!
Während des Betriebes könnenMotoren ihrerSchutzart entsprechend heiße Oberflächen
besitzen. Leichte Verbrennungsgefahr!Die Oberflächentemperatur kann 100°C überschreiten. Messen Sie die Temperatur und warten Sie, bis der Motor auf 40°C abgekühlt ist,
bevor Sie ihn berühren.
Erdung! Hohe Spannungen!
Stellen Sie die ordnungsgemäße Erdung des Motors mit der PE-Schieneim Schaltschrank
als Bezugspotential sicher. Ohne niederohmige Erdung ist keine personelle Sicherheit
gewährleistet und es besteht Lebensgefahr durch elektrischen Schlag.
Das Fehlen von optische Anzeigen gewährleisten nicht die Spannungsfreiheit. Leistungsanschlüsse können Spannung führen, auch wenn sich der Motor nicht dreht.
Ziehen Sie keine Stecker während des Betriebs. Es besteht die Gefahr von Tododer
schweren gesundheitlichen Schäden beim Berühren freiliegender Kontakte. In ungünstigen
Fällenkönnen Lichtbögen entstehen und Personen und Kontakte schädigen.
Warten Sie nach dem Trennen der Servoverstärker von denVersorgungsspannungen
mehrere Minuten, bevor Sie spannungsführende Teile (z.B. Kontakte, Gewindebolzen)
berühren oder Anschlüsse lösen.
Kondensatoren im Servoverstärker führen mehrere Minuten nach Abschalten der Versorgungsspannungen gefährliche Spannungen. Messen Sie zur Sicherheit die Spannungim
Zwischenkreis und warten Sie, bis die Spannung unter 60V abgesunken ist.
Hängende Lasten sichern!
Eingebaute Haltebremsen sind nicht funktional sicher. Insbesondere bei hängender Last (Vertikalachsen) kann die funktionale Sicherheit nur mit einer zusätzlichen, externen mechanischen Bremse erreicht werden.
Chemische Verträglichkeit der Motorleitungen bewerten!
BewertenSie vor dem Langzeiteinsatz die Verträglichkeit derverwendeten Reinigungsmittel
mit dem Motorkabel. Langfristige Exposition des Motorkabels mit unverträglichen Chemikalien kann zur Kontaminierung des Produkts, Ausfall des Motors und Stromschlaggefahr
durch freiliegende stromführende Teile des Motorkabels führen.
Chemische Verträglichkeit des optionalen Kabelschlauchs bewerten!
Der optionale Silikonschlauch schützt die Kabel und elektrische Schnittstellen gegenüber
Reinigungslösungen und verhindert Emissionen aus dem Mantel des Motorkabels. Bewerten
Sie vor dem Langzeiteinsatz die Verträglichkeit der verwendeten Reinigungsmittel mit dem
Silikonschlauch. Setzen Sie denSilikonschlauch keinen starken Mineralsäuren aus. Langfristige Exposition der Silikonschlauch mit unverträglichen Chemikalien kann zur Kontaminierung des Produkts, Ausfall des Motors und Stromschlaggefahr durch freiliegende
stromführende Teile des Motorkabels führen.
8 Kollmorgen | March 2014
Page 9

2.2 Bestimmungsgemäße Verwendung
l Synchron-Servomotoren der Serie AKMH sind insbesondere als Antrieb fürMaschinen in
denBereichen Nahrungsmittel, Kosmetik, Pharmazie, Medizin und ähnliche mit hohen
Ansprüchen an die Hygiene und Dynamik konzipiert.
l Der Betrieb von AKMH Motoren ist in Applikationen mit indirektem Kontakt zu Lebens-
mitteln erlaubt. In diesen Anwendungen muss das Motorkabel im Silikonschlauch geschützt werden (siehe Anschlussoptionen, (➜ # 17)).
l Sie dürfen die Motoren nur unter Berücksichtigung derin dieser Dokumentation defi-
nierten Umgebungsbedingungen betreiben.
l Der Betrieb von AKMH Motoren ist in Umgebungen mit ätzendenSäuren und Laugen
unter Berücksichtigung der im KapitelHygienisches Design (➜ # 20) definierten Bedingungen erlaubt.
l Die Motoren der Serie AKMH sind ausschließlich dazu bestimmt, von Kollmorgen Serv-
overstärkern drehzahl- und/oderdrehmomentgeregelt angesteuert zu werden.
l Die Motoren werden als Bauteile in elektrische Anlagen oder Maschinen eingebaut und
dürfen nur als integrierte Bauteile der Anlage in Betrieb genommen werden.
l Der in die Motorwicklungen eingebaute Thermoschutzsensor muss ausgewertet und über-
wacht werden.
l Eingebaute Haltebremsen sind als Stillstandsbremsen ausgelegt undfür dauernde,
betriebsmäßige Abbremsvorgänge ungeeignet.
l Die Konformität des Servosystems zu den in der EG-Konformitätserklärung (➜ # 70)
genannten Normen garantieren wir nur, wenn von uns gelieferte Komponenten (Servoverstärker, Motor, Leitungen usw.) verwendet werden.
AKMH Installation | Table of Contents
EHEDG Anwendungen
l Halten Sie die zulässige Einbaulagen abhängig vom Flanschtyp (B5, B14, V18 nach DIN
EN 60034-7) bei der Montage ein (➜ # 22).
l Der Motor sollte derart montiert werden, dass das Motorkabel zur Seite oder nach unten
aus dem Motor austritt. Das Kabel sollte in einem Bogen verlegt werden, damit Reinigungsflüssigkeit abtropfen kann.
l Zur Abdichtung des Montageflansches muss der O-Ring benutzt werden.
l Verwenden Sie Dichtungsschrauben (Befestigungsset) für die Motorbefestigung.
l Schließen Sie die Zentrierbohrung in der Welle mit einer Dichtungsschraube (Befes-
tigungsset), wenn das Wellende freiliegt.
l Vermeiden Sie direkten Kontakt von Metall auf Metall bei Montage und Anschluss.
Kollmorgen | March 2014 9
Page 10

AKMH Installation | Table of Contents
2.3 Nicht bestimmungsgemäße Verwendung
l AKMH Motoren dürfen nicht in Applikationen mit dauerndem, direkten Kontakt mit Lebens-
mitteln eingesetzt werden.
l StandardAKMH Kabel sind nicht ausreichend für die Installation im indirekten Kontakt mit
Lebensmitteln. Beim Einsatz in diesen Applikationmuss das Motorkabel im Silikonschlauch geschützt werden (siehe Anschluss Optionen).
l Der Betrieb von standard AKMH Motoren in explosionsgefährdeten Bereichen ist ver-
boten.
l AKMH Motoren dürfen nicht in Reinraum Anwendungeneingesetzt werden.
l AKMH Motoren dürfen nicht mit nach obenweisender Welle montiert werden. Dies ver-
meidet die Ansammlung von Schmutz und Flüssigkeiten im Wellendichtbereich.
l Der bestimmungsgemäße Betrieb des Motors ist untersagt, wenn die Maschine, in die er
eingebaut wurde,
- nicht den Bestimmungen derEG Maschinenrichtlinie entspricht,
- nicht die Bestimmung der EMV-Richtlinie erfüllt,
- nicht die Bestimmung der Niederspannungs-Richtlinie erfüllt.
l Eingebaute Haltebremsen alleine dürfen nicht für die Sicherstellung der funktionalen
Sicherheit benutzt werden.
2.4 Europäische Richtlinien und Normen für den Anlagenbauer
AKMH Motoren sind Bauteile, die zum Einbau in elektrische Anlagen oder Maschinen im
Industriebereich bestimmt sind. Bei Einbau in Maschinen oder Anlagen ist die Aufnahme des
bestimmungsgemäßen Betriebes solange untersagt, bis festgestellt wurde, dass die Maschine oder Anlage den Bestimmungen der
l EG-Maschinenrichtlinie (2006/42/EG) und
l EG-EMV-Richtlinie (2004/108/EG)und
l EG-Niederspannungsrichtlinie (2006/95/EG) entspricht.
Normen zur Einhaltung der EG-Maschinenrichtlinie (2006/42/EG)
l DIN EN 60204-1 (Sicherheit und elektrische Ausrüstung von Maschinen)
l DIN EN ISO 14159 (Sicherheit von Maschinen - Hygieneanforderungen an die
Gestaltung von Maschinen )
l DIN EN 1672-2 (Nahrungsmittelmaschinen - Hygieneanforderungen)
Kollmorgen AKMH Motoren halten die Anforderungen dieser Normen ein.
Der Maschinen- / Anlagenhersteller muss prüfen, ob bei seiner Maschine/ Anlage noch weit-
ereals die hier genannten Normenoder Richtlinien anzuwenden sind.
Normen zur Einhaltung der EG-Niederspannungsrichtlinie (2006/95/EG)
l EN 60204-1 (Sicherheit und elektrische Ausrüstung von Maschinen)
l EN 60439-1 (Niederspannungs-Schaltgerätekombinationen)
Normen zur Einhaltung der EG-EMV-Richtlinie (2004/108/EG)
l EN 61000-6-1 / 2 (Störfestigkeit im Wohn- oder Industriebereich)
l EN 61000-6-3 / 4 (Störaussendung im Wohn-oder Industriebereich)
Die Einhaltung der durch die EMV-Gesetzgebung geforderten Grenzwerte der Anlage oder
Maschine liegt in der Verantwortung des Herstellers der Anlage oder Maschine.
10 Kollmorgen | March 2014
Page 11
2.5 Handhabung
Transport
l Klimaklasse 2K3 nach EN61800-2, IEC 60721-3-2
l Temperatur: -25..+70°C, max. 20K/Stunde schwankend
l Nur von qualifiziertem Personal in der Original-Verpackung des Herstellers
l Vermeiden Sie harte Stöße, insbesondere auf das Wellenende
l Überprüfen Sie bei beschädigter Verpackung den Motor auf sichtbare Schäden. Inform-
Heben Sie den Motor nicht am Kabel hoch! Die Kabelduchführung kann
sich lösen oder undicht werden, wenn das Kabel das Gewicht des
Motors tragen muss. Dies kann zum Ausfall des Motors oder zum Stromschlag führen.
AKMH Installation | Table of Contents
Luftfeuchtigkeit:relative Feuchte 5% ... 95% nicht kondensierend
ieren Sie denTransporteur undgegebenenfalls den Hersteller.
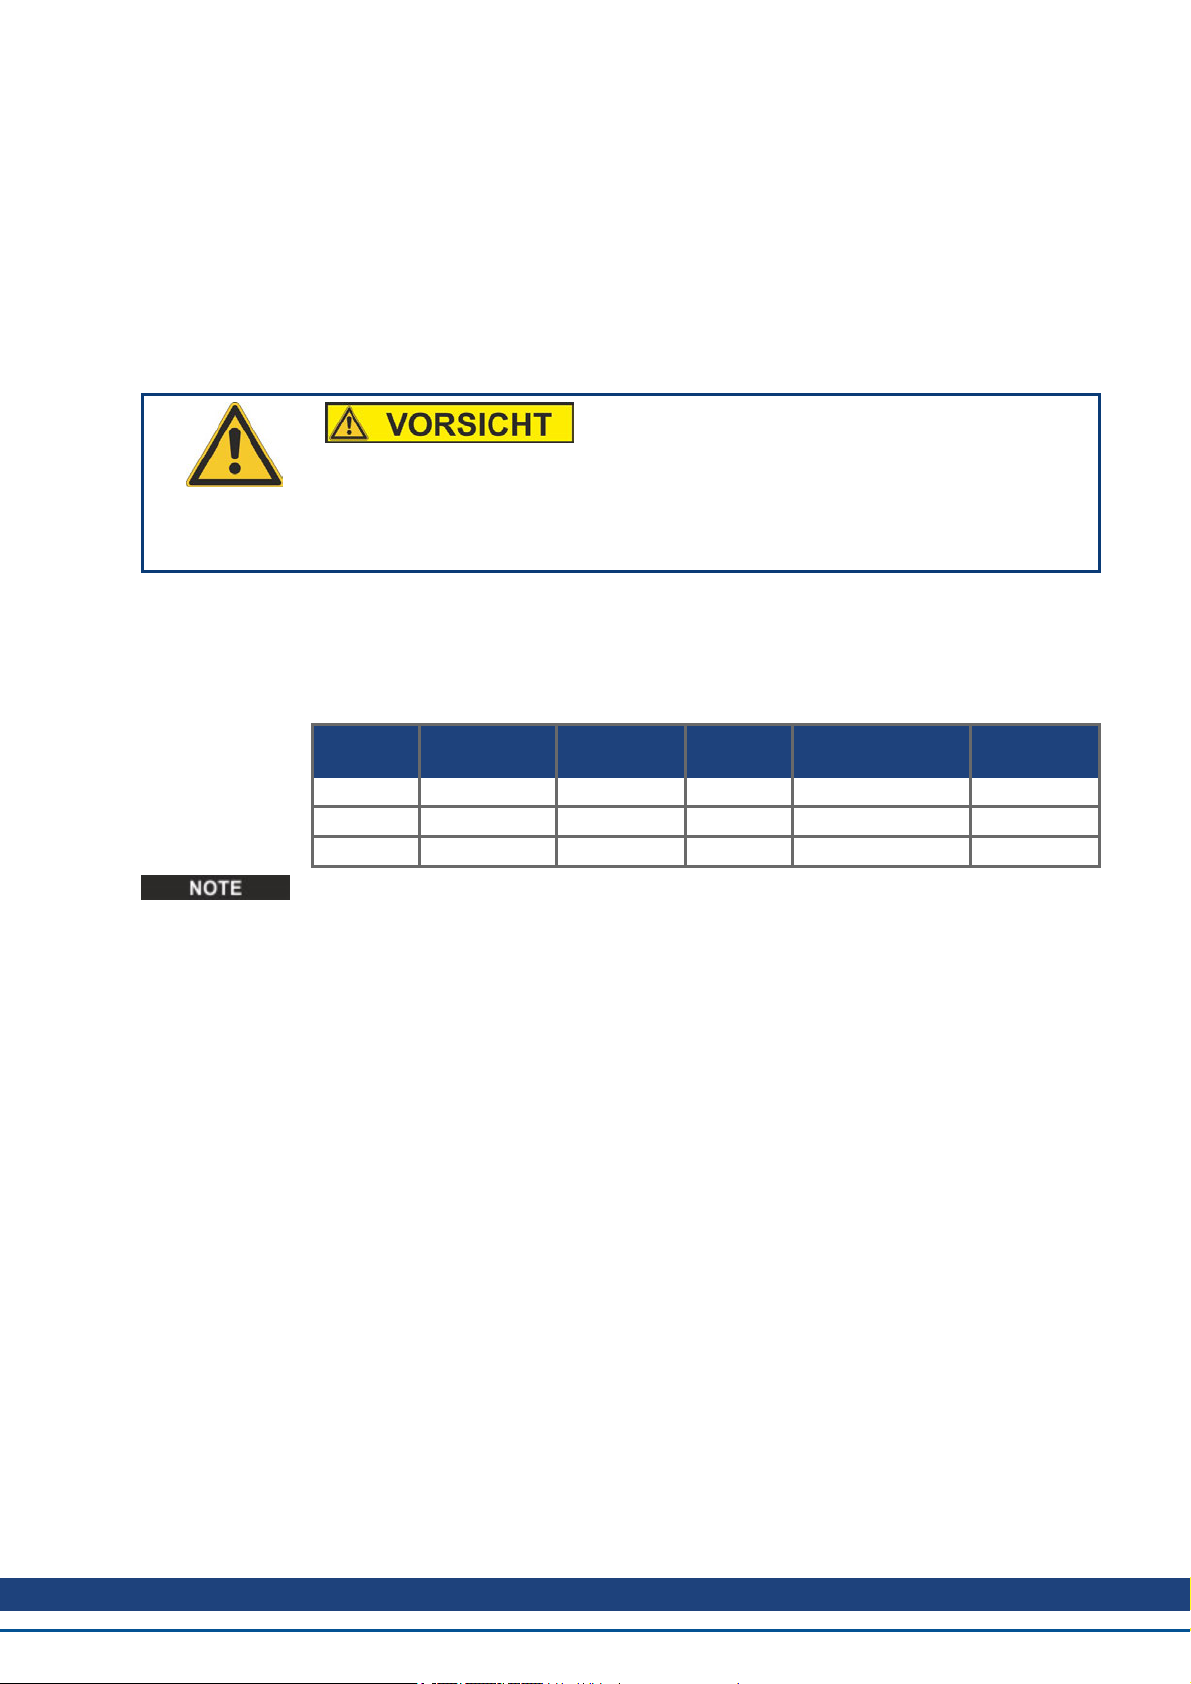
Verpackung
l Kartonverpackung mit Instapak
l Den Kunststoffanteil können Sie an den Lieferanten zurückgeben
Motortyp Verpackung max.
®
-Ausschäumung.
Stapelhöhe
Motortyp Verpackung max.
Stapelhöhe
AKMH2 Karton 7 AKMH5 Karton/Holzkiste 6
AKMH3 Karton 6 AKMH6 Holzkiste 6
AKMH4 Karton 6
Verpackungen horizontal stapeln (Motorwelle zurSeite, nicht nach oben/unten).
Lagerung
l Klimaklasse 1K4 nach EN61800-2, IEC 60721-3-2
l Lagertemperatur -25...+55°C, max. 20K/Stunde schwankend
l Luftfeuchtigkeit relative Feuchte 5% ... 95% nicht kondensierend
l Nur in der Originalverpackung des Herstellers lagern
l Max. Stapelhöhe: siehe Tabelle in Kapitel "Verpackung"
l Lagerdauer:ohne Einschränkung
Kollmorgen | March 2014 11
Page 12

AKMH Installation | Table of Contents
Wartung
l Wartung und Reinigung nur von qualifiziertem Personal
l Bei normalem Betrieb ist der AKMH Motor nahezu wartungsfrei. Einige Komponenten soll-
ten jedoch regelmäßig überprüft werden.
o
Jährlich: prüfen auf korrekten Sitz des Wellendichtrings, sichtbare Abnutzung und Beschädigungen, die die Funktion beeinträchtigen könnten. Bei Beschädigungen oder nach
2 Betriebsjahren den Wellendichtring austauschen.
o
Jährlich: Kabel und Schlauchmaterial (sofern verwendet) auf Beschädigungen prüfen.
Bei Schnitten oder Beschädigungen austauschen.
o
Jährlich: prüfen auf korrekten Sitz der O-Ringe, sichtbare Abnutzung und Beschädigungen, die die Funktion beeinträchtigen könnten. Bei Beschädigungen die ORinge (Flanschdichtung, Dichtung Abschlusskappe) austauschen.
Wenn der O-Ring zwischen Flansch und Motorgehäuse beschädigt ist, muss der Motor
ersetzt werden.
o
Jährlich bzw. alle 2500 Betriebsstunden: prüfen auf Kugellagergeräusche. Wenn Sie
Geräusche feststellen, darf der Motor nicht weiterbetrieben werden - die Lager müssen
erneuert werden (vom Hersteller).
o
Nach 20.000 Betriebsstundenunter Nennbedingungen: Erneuern der Kugellager
(Motor an Hersteller schicken).
l Öffnen der Motoren bedeutet den Verlust der Gewährleistung.
Reinigung
l Reinigung nur durch Fachpersonal.
l Reinigung nur bei freigeschaltetem (spannungsfrei) Antrieb.
l Beachten Sie die Grenzen des IP69K Standards für Druck, Temperatur, Winkel und
Abstand des Reingungsmittelstrahls.
l Beachten Sie die Vorgaben fürdie chemische Verträglichkeit.
l Verwenden Sie keine Drahtbürsten oder Schaber zur Reinigung der Motoroberfläche und
derKabel. Entfernen Sie Schmutz durch Abspritzen (IP69K Grenzen einhalten) oder
Abwischen.
Reparatur, Entsorgung
Reparaturen des Motors darf nur der Hersteller durchführen, Öffnen derGeräte bedeutet Verlust der Gewährleistung. Gemäß derWEEE-2002/96/EG-Richtlinien nehmen wir Altgeräte
undZubehör zur fachgerechten Entsorgung zurück, sofern die Transportkosten vom
Absender übernommen werden. Schicken Sie denMotor zur Reparatur bzw. Entsorgung an:
KOLLMORGEN Europe GmbH
Pempelfurtstr. 1
D-40880 Ratingen
12 Kollmorgen | March 2014
Page 13
3 Produktidentifizierung
3.1 Lieferumfang
Sie erhalten einen Karton mit Instapak®-Ausschäumung. Enthalten ist:
l Motor der Serie AKMH
l Produkthandbuch gedruckt, einmal pro Lieferung.
l O-Ring für die Flanschabdichtung.
3.2 Zubehör
IEC Befestigungsset mit Schrauben zur Flanschbefestigung und Abdichtung der Wellenbohrung.
Bestellnummer Beschreibung
MTG-KIT-AKMH2-IEC Befestigungskit AKMH2, Ax Flanschmontage/ Cx Frontmontage
MTG-KIT-AKMH3-IEC Befestigungskit AKMH3, Ax Flanschmontage/ Cx Frontmontage
MTG-KIT-AKMH4-IEC Befestigungskit AKMH4, Ax Flanschmontage/ Cx Frontmontage
MTG-KIT-AKMH5-IEC Befestigungskit AKMH5, Ax Flanschmontage/ Cx Frontmontage
MTG-KIT-AKMH6-IEC Befestigungskit AKMH6, Ax Flanschmontage/ Cx Frontmontage
AKMH Installation | Table of Contents
NEMA Befestigungssets sind im amerikanischen Selection Guide beschrieben (verfügbar
auf der Kollmorgen Website www.kollmorgen.com).
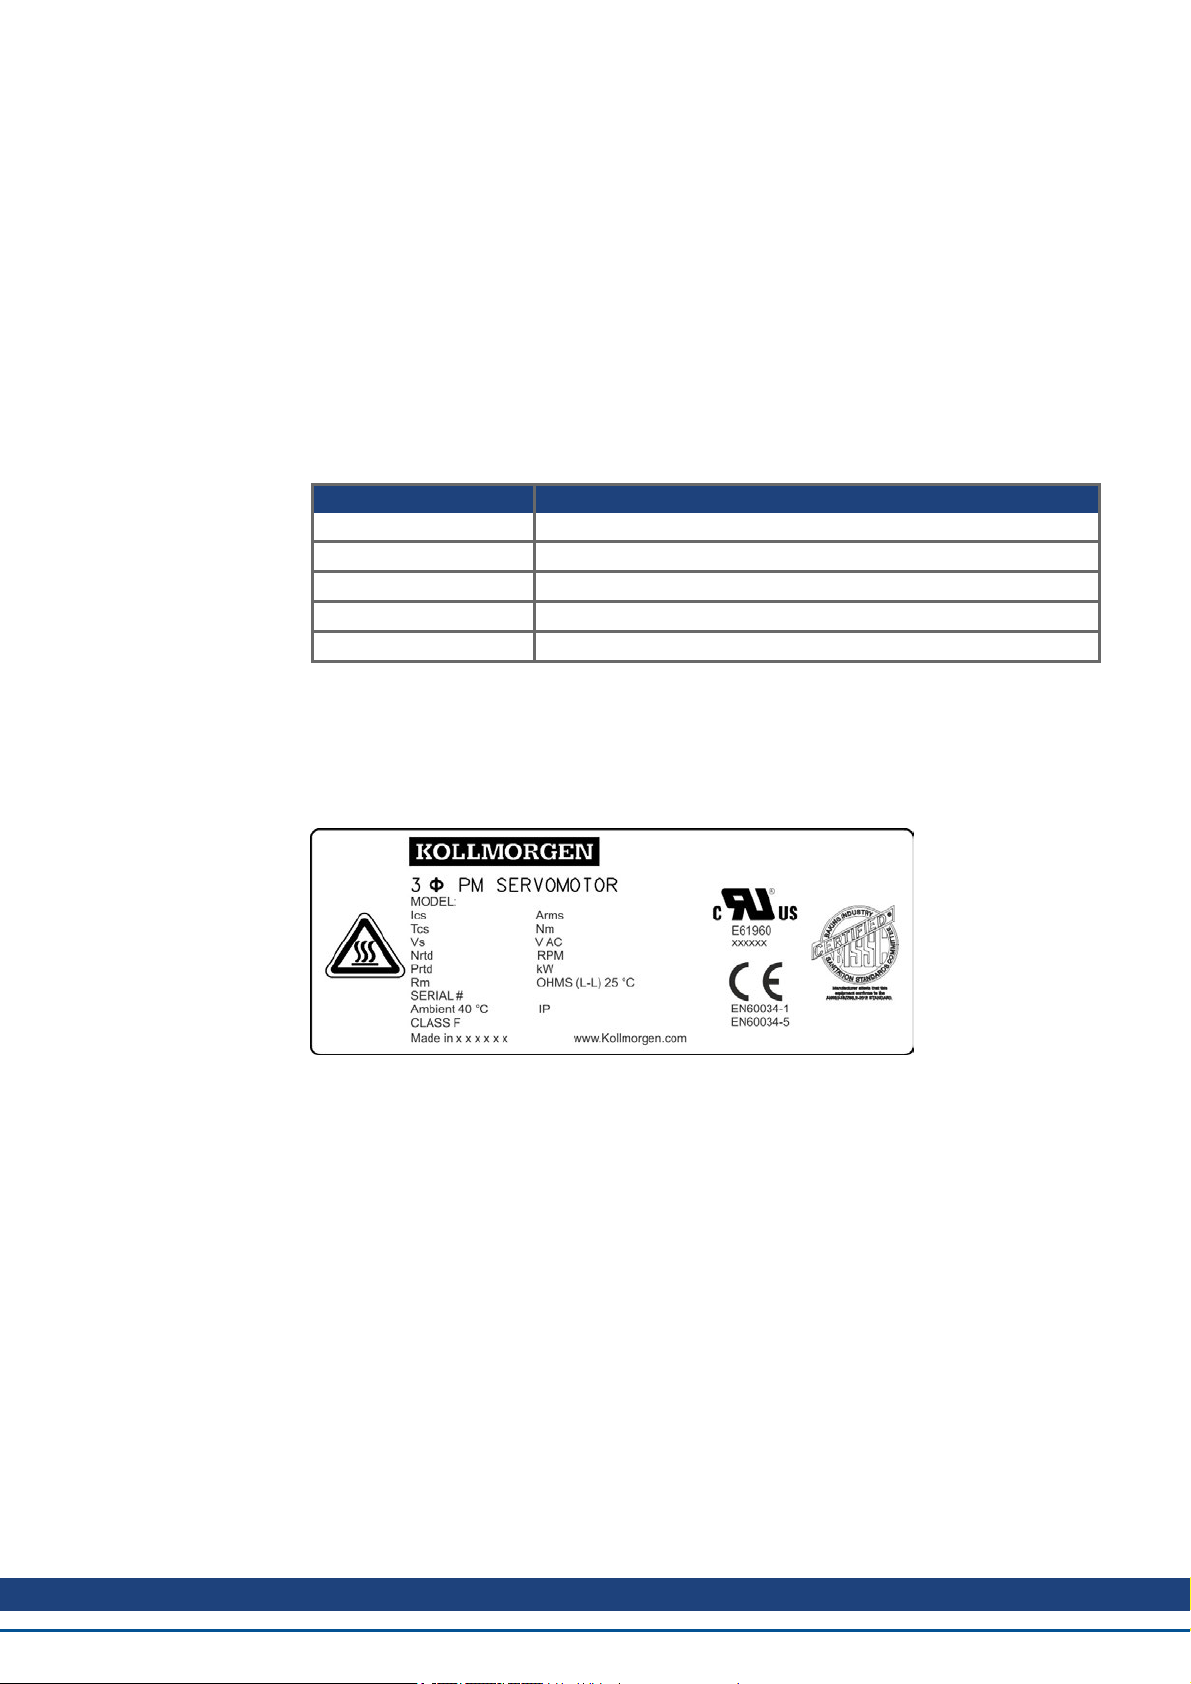
3.3 Typenschild
Bei AKMH Motoren ist das Typenschild seitlich in das Gehäuse gelasert.
Legende:
MODEL Typenbezeichnung
Ics I
Tcs M
Vs U
Nrtd nn Nenndrehzahl bei U
Prtd Pn Nennleistung
Rm R25 Wicklungswiderstand bei 25°
SERIAL Seriennummer
AMBIENT zulässige maximale Umgebungstemp.
Das Baujahr des Motors ist in der Seriennummer kodiert: die ersten beiden Ziffern der Seriennummer bezeichnen das Jahr, z.B. bedeutet "13" 2013.
0rms
N
Stillstandsstrom
0
Stillstandsdrehmoment
Netzspannung
N
Kollmorgen | March 2014 13
Page 14
AKMH Installation | Table of Contents
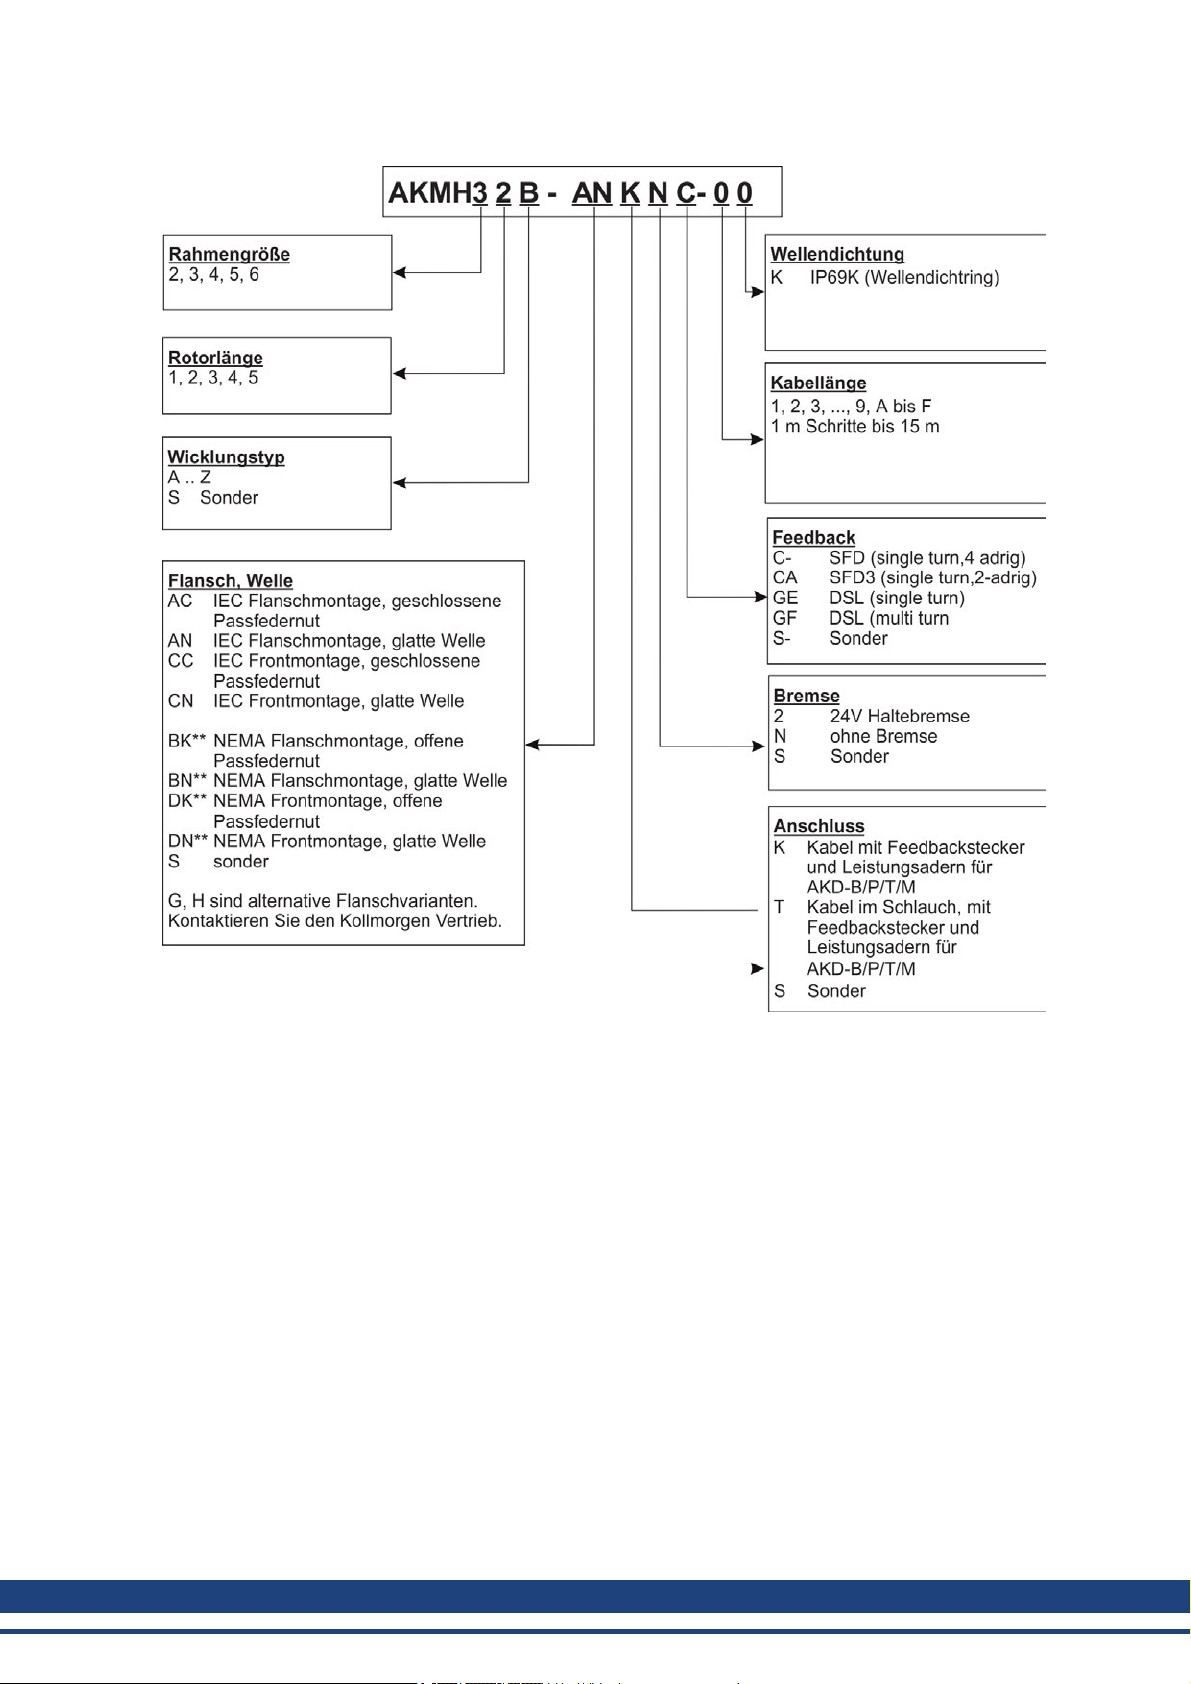
3.4 Typenschlüssel
** = NEMA Flanschtypen sind im amerikanischen Selection Guide beschrieben
(verfügbar auf der Kollmorgen Website www.kollmorgen.com).
14 Kollmorgen | March 2014
Page 15
3.4.1 Rahmengröße, Flansch und Wellenoptionen
Maßzeichnungen finden Sie in Kapitel "Dimension Drawings" (➜ # 60).
AKMH Installation | Table of Contents
Rahmen-
größe
Flansch-
typ
Flansch∅Zentrierung∅Welle∅Genauig-
keit Zen-
trierung
Genauig-
1)
keit
Welle
Toleranz-
klasse Zen-
2)
trierung
2 A, C 79 mm 40 mm 11 mm j6 k6 N
3 A, C 89 mm 60 mm 14 mm j6 k6 N
4 A, C 114mm 80 mm 19 mm j6 k6 N
5 A, C 148mm 110 mm 24 mm j6 k6 N
6 A, C 186mm 130 mm 32 mm j6 k6 N
1) gem. EN 60034-7 …… 2) gem. EN 42955…… 3) gem. EN 50347
Flanschmontage (Flanschtypen Ax, Bx):
Die Grundbauform für Flanschmontage ist die Bauform IM B5 nach DIN EN 60034-7.
Legen Sie zur Abdichtung den O-Ring in die Flanschnut ein.
3)
Frontmontage (Flanschtypen Cx, Dx):
Die Grundbauform für Frontmontage ist die Bauform IM B14 nach DIN EN 60034-7.
Legen Sie zur Abdichtung den O-Ring in die Flanschnut ein.
Welle
Die Kraftübertragung erfolgt über das zylindrische Wellenende mit Anzugsgewinde.
Kode Beschreibung Bemerkungen
C GeschlossenePassfedernut Passfedernut gemäß DIN 748,
Passfeder gemäß DIN 6885 T1 Form A.
Material derPassfeder: rostfreier Stahl 1.4404
Zentrierbohrung mit Gewinde
Material derWelle: rostfreier Stahl 1.4404
N Glatte Welle Zentrierbohrung mit Gewinde
Material derWelle: rostfreier Stahl 1.4404
Kollmorgen | March 2014 15
Page 16
AKMH Installation | Table of Contents
3.4.2 Wellendichtung Optionen
Anwendungen z.B. im Lebensmittelbereich undder pharmazeutischen Industrie stellen hohe
Anforderungen an die Hygiene und somit auch an die Schutzklasse. AKMH Motoren sind vorbereitet für die Schutzklasse IP69K. Die mechanischen und elektrischen Schnittstellen des
Motors sind die kritischen Bereiche für diese Anforderungen.
Die mechanische Schnittstelle (Flansch und Welle)wird meist an ein Getriebe oder an einen
Maschinenflansch angeschlossen. Die Flanschabdichtung wird dabei mit einem FDA geprüften O-Ring sichergestellt.
Wenn der AKMH an einen Maschinenflansch mit ungeschütztem Wellenbereich gekoppelt
werden soll, stellt der Wellendichtring (Option K) die IP69K-gemäße Abdichtung sicher. Der
Wellendichtring ist ein FDA zugelassener, einlippiger, mineralisierter Teflon Ring.
Wellendichtung Option Flanschdichtung Schutzart
K O-Ring IP69K
3.4.3 Rotorlänge Optionen
Die Rotorlänge ist ein Faktor für die Gesamt-Motorlänge. Die Rotorlänge hängt von der verwendeten Magnetgröße ab. Kollmorgen definiert die Länge mit einer einstelligen Nummern (1
bis 5) von kurz nach lang. Innerhalb jeder Rotorlänge sind zahlreiche Wicklungsvarianten definiert. Maßzeichnungen findenSie im Kapitel "DimensionDrawings" (➜ # 60).
3.4.4 Wicklungstyp Optionen
Kollmorgen definiert die Wicklungmit einem einzelnen Buchstaben (A bis Z) von niedrigem
zu hohem Strom. Technische Daten der Wicklungen finden Sie im Kapitel Technische Daten
(➜ # 54).
3.4.5 Kabellänge Optionen
Durch die hohen Anforderungen an die Schutzklasse bei hygienischen Anwendungen kann
keine Steckerlösung für den elektrischen Anschluss am Motor realisiert werden. Das
Anschlusskabel ist daher fest am Motor angeschlossen.
Kollmorgenbietet Kabel in 1m Schritten an. Die kleinste Länge ist 1m, maximal dürfen die
Kabel 15m lang sein. Die Kodierung ist hexadezimal (1, 2, 3, ..., 9, A bis F).
Das Motor Gesamtgewicht hängt ab vom Motortyp und von der Kabellänge. Das Gewicht
Ihres Motortyps finden Sie in den technischen Daten (➜ # 54)(➜ # 54)
3.4.6 Feedback Optionen
Ein nachträglicher Einbau ist nicht möglich.
Kode Beschreibung Modell Bemerkungen Bremse möglich
C- SFD, Smart Feedback Device Size 15 Single-turn, 4 adrig Nein
CA SFD3, Smart Feedback Device 3 Size 15 Single-turn, 2 adrig Ja
GE HIPERFACE DSL EKS36 Single-turn Ja
GF HIPERFACE DSL EKM36 Multi-turn Ja
16 Kollmorgen | March 2014
Page 17
3.4.7 Haltebremse
Die Motoren mit DSL und SFD3 Rückführung sind wahlweise mit eingebauter Haltebremse
erhältlich. Ein nachträglicher Einbau ist nicht möglich. Die Federdruckbremse (24V DC)
blockiert im spannungslosenZustand den Rotor.
Die Haltebremsen sind als Stillstandsbremsen ausgelegt und für dauernde, betriebsmäßige
Abbremsvorgänge ungeeignet. Bei häufiger betriebsmäßiger Abbremsung ist ein vorzeitiger
Verschleiß und Ausfall der Haltebremse wahrscheinlich.
Die Motorlängevergrößert sich bei eingebauter Haltebremse.
Die Haltebremsen können direkt vom Servoverstärker angesteuert werden (nicht funktional
sicher!), dann erfolgt das Löschen der Bremswicklung im Servoverstärker — eine
zusätzliche Beschaltung ist nicht erforderlich. Beachten Sie hierzu die Betriebsanleitung des
Servoverstärkers. Wird die Haltebremse nicht vom Servoverstärker direkt angesteuert,
muss eine zusätzliche Beschaltung (z.B. Varistor)vorgenommenwerden. Sprechen Sie
hierzu mit unserem Kundendienst.
AKMH Installation | Table of Contents
Wenn bei hängender Last (Vertikalachsen) die Motorhaltebremse gelöst
ist und gleichzeitig der Servoantrieb keine Leistung erbringt, kann die
Last herunterfallen! Verletzungsgefahr für das Bedienpersonal der Maschine. Die funktionale Sicherheit kann bei vertikalen Achsen nur mit einer
zusätzlichen, externen mechanischen Bremse erreicht werden.
3.4.8 Anschluss Optionen
Das Hybridkabel beinhaltet Adern für Leistung und Feedback und einen Schlauch zum Druckausgleich des Innendrucks im Motor.
Kodes K und T Kabel vorbereitet für AKD-B/P/T/M. Feedback Stecker angeschlagen,
Abhängig von den Anforderungen der Applikation können Sie zwischen Standardverdrahtung
(washdown) oder Verdrahtung für hygienisches Umfeld (Lebensmittel) wählen.
Nicht-Lebensmittel Anwendungen werden mit Washdown Hybridkabeln verdrahtet (K).
Lebensmittel Anwendungen erforderneine spezielle Lösung mit einem schlauchgeführten
Hybridkabel (T).
BewertenSie die Verträglichkeit der verwendeten Reinigungsmittel mit dem Motorkabel
bzw. dem Silikonschlauch. Langfristige Exposition der Motorkabels mit unverträglichen Chemikalien kann zur Kontaminierung des Produkts, Ausfall des Motors und eventueller Stromschlaggefahrdurch freiliegende stromführende Teile des Motorkabels führen.
Kode Type Querschnitt Min. Bie-
K Hybridkabel (4x2.5+2x(2x1.0) + t*)
T Hybridkabel im
Schlauch
Leistungsadern und Schirm vorbereitet für den Anschluss an den AKD
Stecker X9 (siehe Betriebsanleitung des Verstärkers).
Bemerkungen
geradius
(4x4.0+2x(2x1.0) +t*)
(4x2.5+2x(2x1.0) + t*)
(4x4.0+2x(2x1.0) +t*)
150mm
165mm
150mm
165mm
SFD:
4 Leistungsadern, 4 Signaladern, keine Bremsadern
DSL/SFD3: 4 Leistungsadern,
2 Signaladern, 2 Bremsadern
* interner Schlauch für Druckausgleich
Kollmorgen | March 2014 17
Page 18
AKMH Installation | Table of Contents
4 Technische Beschreibung
4.1 Allgemeine technische Daten
Umgebungstemperatur
(bei Nenndaten)
Leistungsreduzierung
(Ströme und Momente)
Kugellager-Lebensdauer ≥ 20.000 Betriebsstunden
Technische Daten der Motortypen finden Sie im Kapitel "Technical Data" (➜ # 54).
4.2 Standardausrüstung
4.2.1 Schutzart
Wellendichtung Option Flanschdichtung Schutzart
0...+40°C bei Aufstellhöhe bis 1000m über NN
Sprechen Sie bei Umgebungstemperaturen über 40°C oder
gekapseltem Einbau der Motoren unbedingt mit unserer Applikationsabteilung.
1%/K im Bereich 40°C...50°C bis 1000m überNN
Bei Aufstellhöhen über 1000m überNN und 40°C
l 6%bei 2000m über NN
l 17%bei 3000m überNN
l 30%bei 4000m überNN
l 55%bei 5000m überNN
Keine Leistungsreduzierung bei Aufstellhöhen über 1000m
über NN und Temperaturreduzierung um 10K / 1000m.
K O-Ring IP69K
Die Schutzklasse IP69K wurde definiert für Reinigung mit hohem Druck und hoher Temperatur gemäß DIN 40050-9.
Kode "6" beschreibt die Resistenz gegen Staub,
Kode "9" beschreibt die Resistenz gegen Hochdruckreinigung aus kurzerDistanz,
Kode "K" beschreibt die Temperatur des Reinigungsmittels.
4.2.2 Isolierstoffklasse
Die Motoren entsprechen der Isolierstoffklasse F nach IEC 60085 (UL 1446 class F).
4.2.3 Oberfläche
Das Motorgehäuse besteht aus rostfreiem Stahl 1.4404.
Die Rauheit der Oberfläche ist < 0,8 µm und entspricht den EHEDG Vorgaben.
18 Kollmorgen | March 2014
Page 19

4.2.4 Wellenende
AKMH Installation | Table of Contents
Die Kraftübertragung erfolgt über das zylindrische Wellenende, Passung k6 nach EN50347
mit Anzugsgewinde. Für die Lebensdauer der Lager sind 20.000 Betriebsstunden zugrunde
gelegt.
Radialkraft
Treiben die Motoren über Ritzel oder Zahnriemen an, so tretenhohe Radialkräfte auf.
Die zugelassenen Werte am Wellenende abhängig von derDrehzahl entnehmen Sie denDiagrammenim Kapitel "Dimension Drawings" (➜ # 60). Die zugelassenen Maximalwerte
finden Sie in den technischen Daten. Bei Kraftangriff an der Mitte des freien Wellenendes
kann FR10% größer sein.
Axialkraft
Bei der Montage von Ritzel oder Riemenscheiben auf die Welle und bei Betriebvon z.B. Winkelgetrieben treten Axialkräfte auf.
Die zugelassenen Werte am Wellenende abhängig von derDrehzahl entnehmen Sie denDiagrammenim Kapitel "Dimension Drawings" (➜ # 60). Die zugelassenen Maximalwerte
finden Sie in den technischen Daten.
Kupplung
Als ideale spielfreie Kupplungselemente haben sich doppelkonische Spannzangen eventuell
in Verbindung mit Metallbalg-Kupplungenbewährt.
4.2.5 Schutzeinrichtung
In der Standardausführung ist jeder Motor mit einem potentialfreien Temperatursensor ausgestattet. Der Schaltpunkt liegt bei 155°C ± 5%. Schutz gegen kurzzeitige, sehr hohe Überlastung bietet der Sensor nicht. Der Sensor ist bei Verwendung unserer vorkonfektionierten
Leitungen in das Überwachungssystem der digitalen Servoverstärker integriert.
4.2.6 Schwinggüte
Die Motoren sind in Schwinggüte A nach EN 60034-14 ausgeführt. Das bedeutet für einen
Drehzahlbereich von 600-3600 U/min und einerAchshöhe zwischen 56-132 mm eine zulässige Schwingstärke von 1,6 mm/s als Effektivwert.
Drehzahl [U/min] max. rel. Schwingweg [µm] max. Run-out [µm]
<= 1800 90 23
> 1800 65 16
Kollmorgen | March 2014 19
Page 20
AKMH Installation | Table of Contents
4.3 Hygienisches Design
Die "Food and Drug Administration" (FDA) ist eine Agentur des "United States Department of
Health and Human Services". Die FDA ist verantwortlich für den Schutz und die Förderung
deröffentlichenGesundheit durch die Regulierung und Überwachung der Lebensmittelsicherheit, Impfstoffe, Biopharmazeutika, Bluttransfusionen, medizinische Geräte und
andere Produkte.
Alle äußerlichen Materialien des AKMH Motors bis auf die Kabel sind FDA geprüfte Materialien. Ein direkter Kontakt zu unverpackten Lebensmitteln ist nicht zulässig.
Die "European Hygienic Engineering andDesign Group" (EHEDG) ist eine europäische
Nicht-Regierungs-Organisation, die sich der Weiterentwicklung von hygienischem Design
undLebensmitteltechnik widmet. Die europäische Gesetzgebung verlangt, dass die Handhabung, Herstellung, Verarbeitung, Verpackung von Lebensmitteln hygienisch, mit hygienischen Maschinen in hygienischen Räumlichkeiten unter Einhaltung der
Lebensmittelhygiene-Richtlinie, der Maschinenrichtlinie und der Richtlinie fürMaterialien mit
Kontakt zu Lebensmitteln durchgeführt wird.
Der AKMH Motor ist konform zu den europäischenHygienerichtlinien.
Anforderungen IP69K EHEDG (i.V.)
O-Ring erforderlich erforderlich
FDA Schlauch erforderlich -
Wellendichtung erforderlich erforderlich
Lebensmittel Nicht-Lebensmittel
Einsatzgebiet: Lebensmittel- und Getränkeindustrie, kein direkter Kontakt
mit unverpackten Lebensmitteln.
Beispiel: Schneiden, Verpacken und Füllen ohne direkten Kontakt zum
Lebensmittel, Motor seitlich oder unter dem Lebensmittel.
Standards: UL, CE, RoHs, BISSC, EHEDG in Vorbereitung,
DIN EN ISO 14159 und DIN EN 1672-2 werden eingehalten
Oberfläche: Edelstahl 1.4404, Rauheit < 0,8 µm
Beständigkeit: Gegen geprüfte Reinigungsmittel (➜ # 21), korrosionsfest
Schutzart: IP69K
Befestigungsschrauben*: Edelstahl 1.4404, DichtungFDA 21 CFR 175.300
O-Ring: EPDM, FDA 21 CFR 177.2600
Welle: Edelstahl 1.4404
Wellendichtring: Mineralisches PTFE, einlippig,
Mineral: FDA 21 CFR 175.300
PTFE: FDA 21 CFR 177.1500
Schraube für Zentrierbohrung*: Edelstahl 1.4404, Dichtung FDA 21 CFR 175.300
Lagerfett: Lebensmitteltauglich, gemäß FDA 21CFR 178.3570
Kabeldurchführung: Edelstahl 1.4404, Silikondichtung FDA 21 CFR 177.2600
Kabelschlauch: Silikon FDA 21CFR 177.2600
Typenschild: Gehäuse laserbeschriftet
Baugröße: AKMH2 bis AKMH6
* Optional, im Befestigungskit enthalten
20 Kollmorgen | March 2014
Page 21

4.3.1 Geprüfte Eigenschaften gegenüber Reingungsmittel
Im Prüflabor derECOLAB Deutschland GmbH wurde die Resistenz der Washdown und
Washdown Food Oberflächen gegen folgendeindustrielle Reinigungsmittel geprüft:
l P3-topactive DES
l P3-topax 12
l P3-topax 56
l P3-topax 66
l P3-topax 990
Dabei wurden die Oberflächen 28 Tage lang bei 21°C Temperatur in das jeweilige Reinigungsmittel getaucht.
Dies entspricht ca. 2500 Reinigungszyklen mit jeweils 15 minütigem Kontakt zum Reinigungsmittel bzw. 1500 Reinigungszyklen mit Reinigung und nachfolgender Desinfektion.
Kollmorgen kann eine Gewährleistung der Motorlebensdauer nurbei Einsatz der getesteten
Reinigungsmittel geben. Andere als die oben genannten Reinigungsmittel kann Kollmorgen
auf Anfrage testen und gegebenenfalls freigeben.
4.3.2 Reinigungsplan
Empfohlener Reinigungsplan mit den getesteten Reinigungsmitteln:
AKMH Installation | Table of Contents
Spülen mit Wasser (40°... 50°C)
Spülen mit niedrigem Druck. Von oben nach unten in Richtung zum Abfluss. Den Abfluss
reinigen.
Schaumreinigung
Schäumen von oben nach unten.
Alkalisch: P3-topax 66 (2-5%, täglich 15min)
Sauer: P3-topax 56 (2%, wennerforderlich 15 min)
Temperatur: kalt bis zu 40°C
Desinfektion
Absprühen mit Wasser (40°... 50°C) mit niedrigem Druck. Von oben nach unten.
Sprühdesinfektion: P3-topax 990 (1-2%, wenn erforderlich 30-60 min)
Schaumdesinfektion: P3-topactiv DES (1-3%, wenn erforderlich 10-30 min)
Kollmorgen | March 2014 21
Page 22
AKMH Installation | Table of Contents
5 Mechanische Installation
Maßzeichnungen finden Sie im Kapitel "Dimension Drawings" (➜ # 60).
5.1 Wichtige Hinweise
Nur Fachleute mit Maschinenbau-Kenntnissen dürfen den Motor montieren.
l Schützen Sie die Motoren undKabel vor unzulässiger Beanspruchung. Bei Transport und
Handhabung dürfen keine Bauelemente beschädigt werden. Vermeiden Sie Kratzer in der
Edelstahloberfläche.
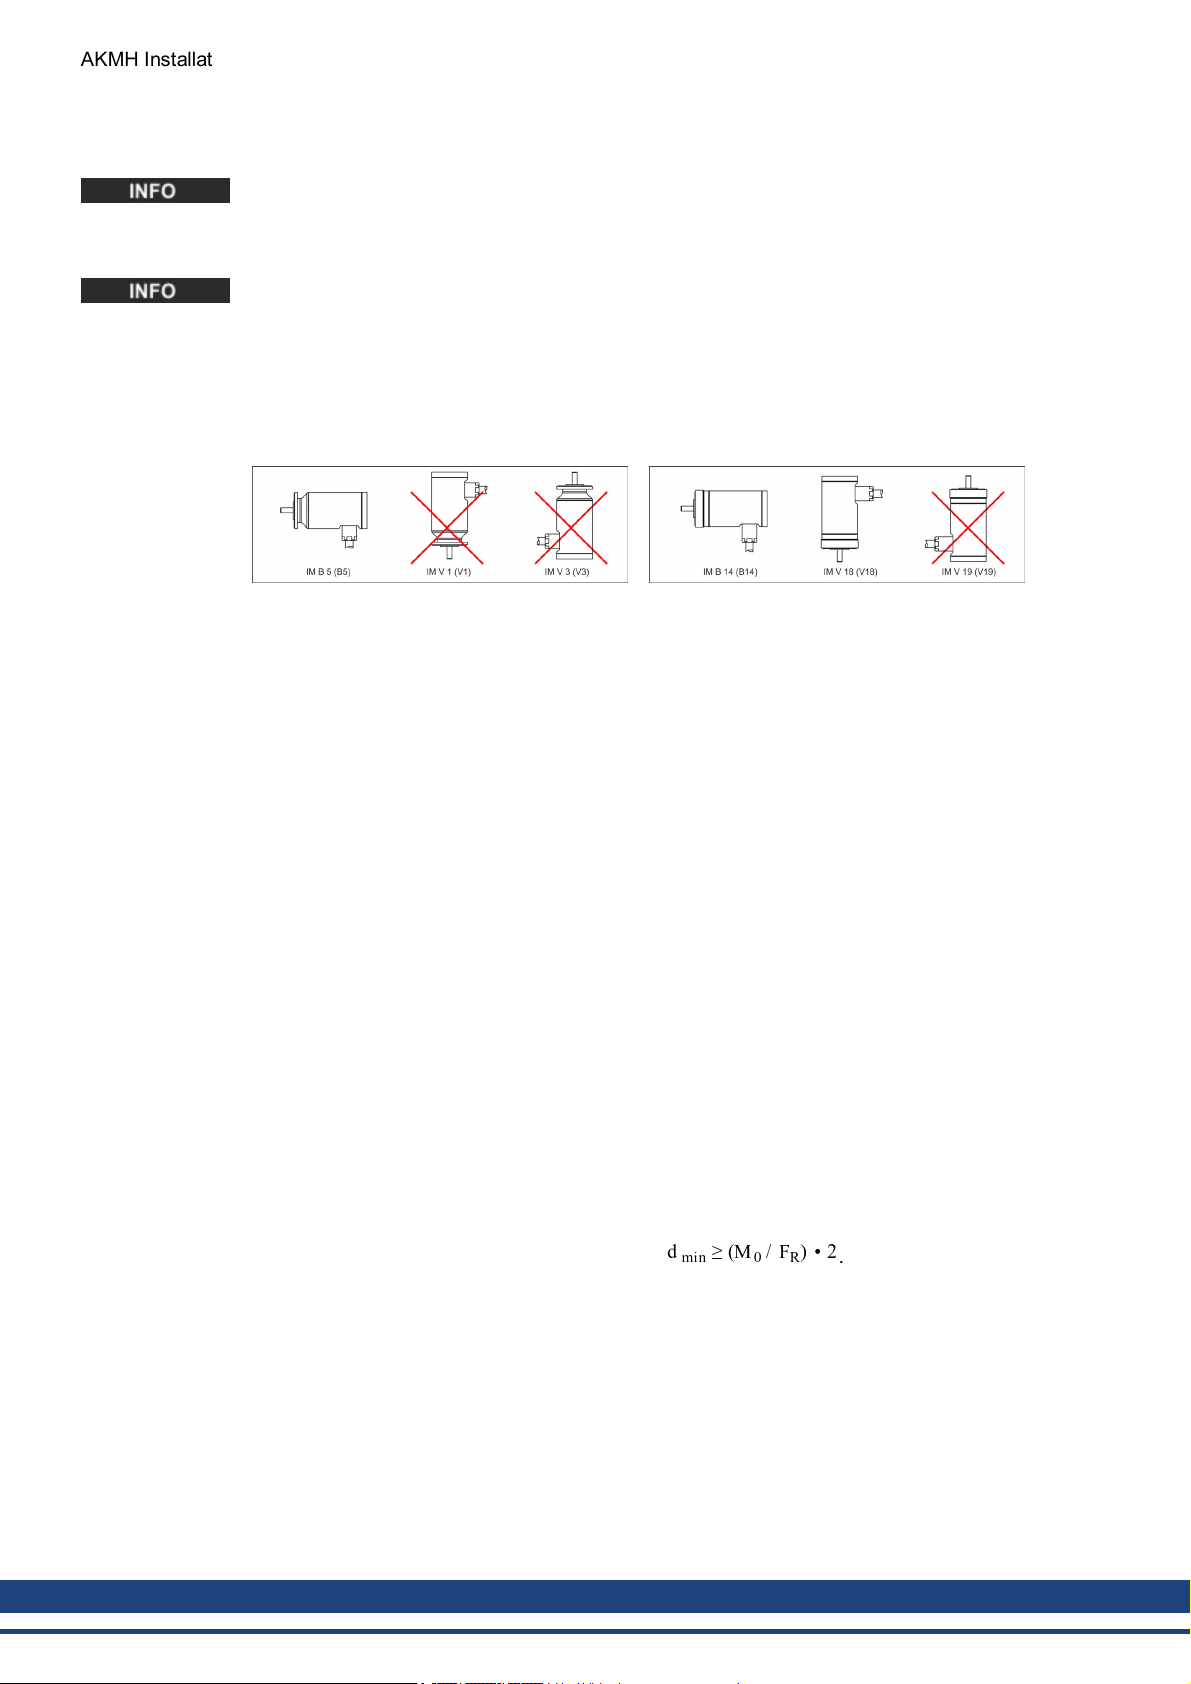
l AKMH Motoren dürfen nicht mit nach obenweisender Welle montiert werden.
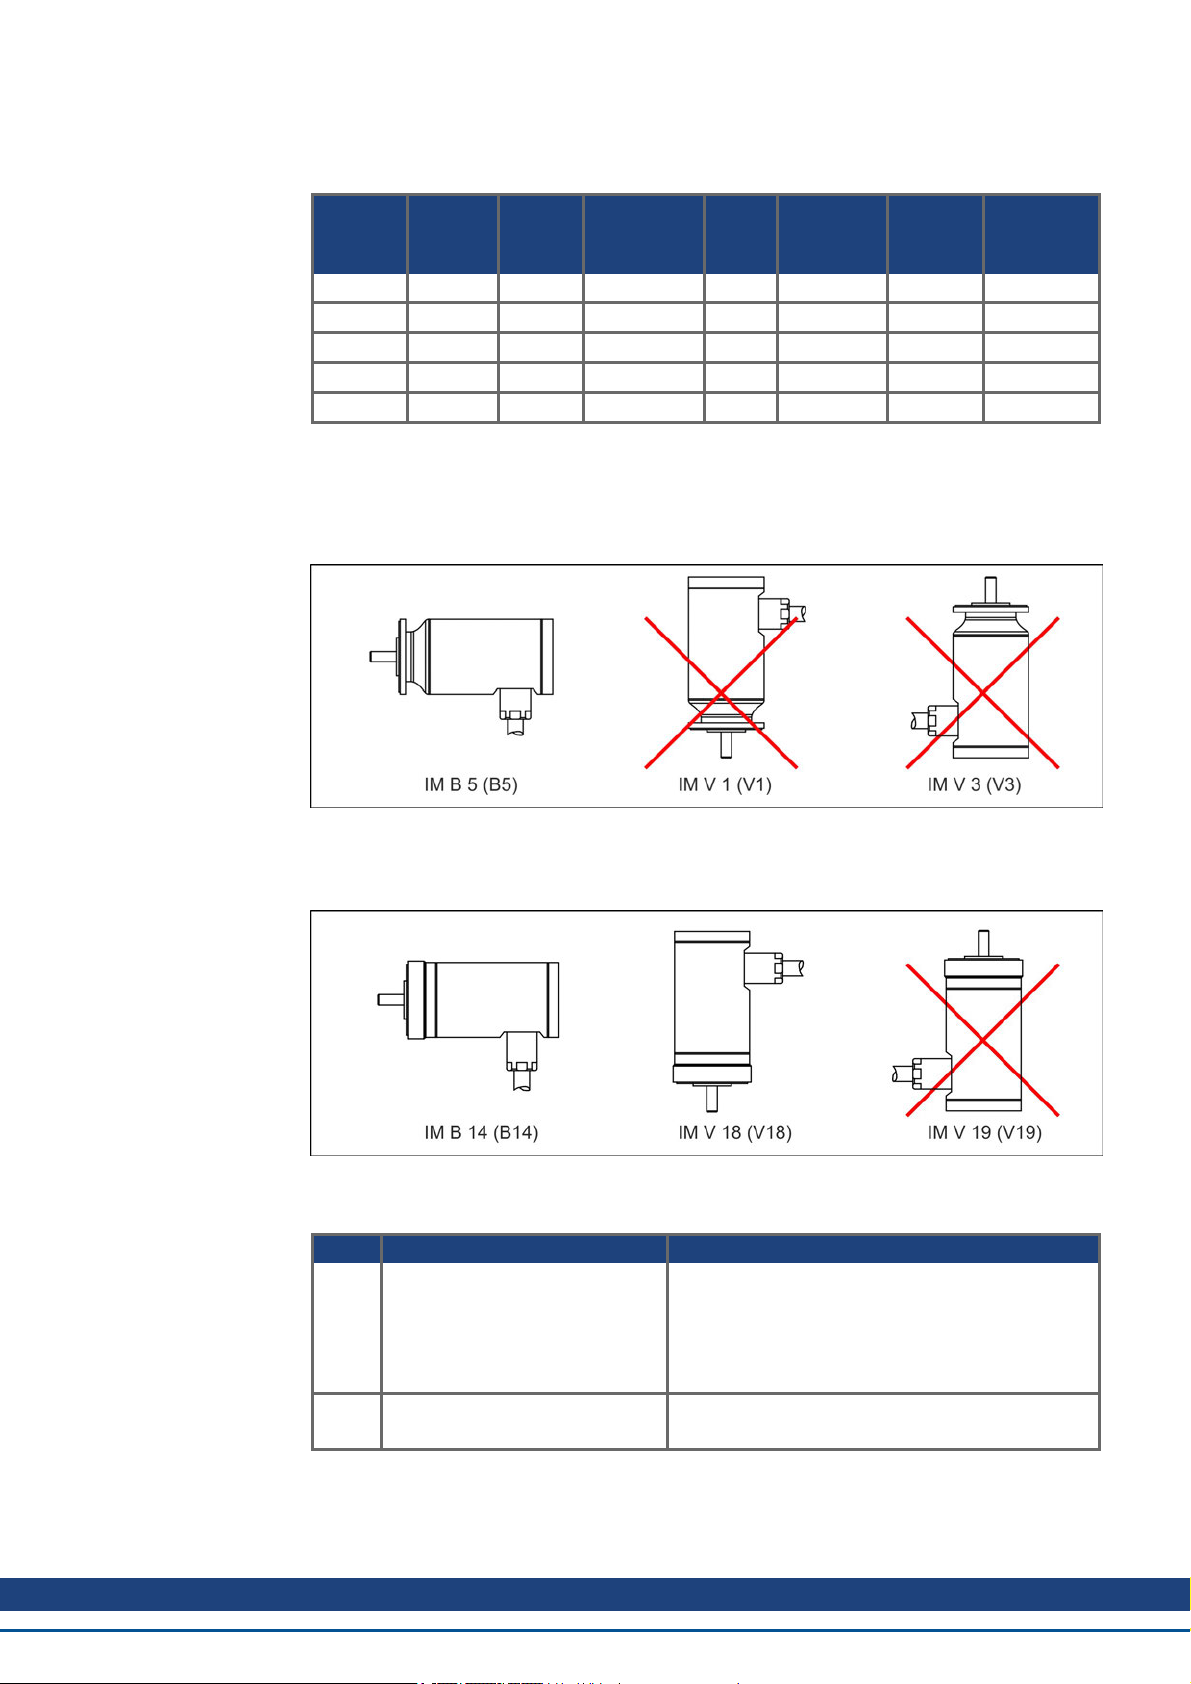
l Grundbauform für die Montage nach DIN EN 60034-7:
Flanschmontage (Flanschtypen Ax, Bx) Frontmontage (Flanschtypen Cx, Dx)
Erlaubt: B5 Erlaubt: B14, V18
l Zur Abdichtung des Montageflansches muss der im Lieferumfang enthaltene O-Ring
benutzt werden.
l Verwenden Sie Dichtungsschrauben für die Motorbefestigung.
l Schließen Sie bei freiliegendem Wellenende die Zentrierbohrung in der Welle mit einer
Dichtungsschraube.
l Der Motor sollte derart montiert werden, dass das Motorkabel zur Seite oder nach unten
aus dem Motor austritt. Montieren Sie eine Zugentlastung falls erforderlich.
l Stellen Sie die ungehinderte Belüftung der Motoren sicher und beachten Sie die zulässige
Umgebungs- und Flanschtemperatur. Bei Umgebungstemperaturen über 40°C sprechen
Sie mit unserer Applikationsabteilung. Sorgen Sie für ausreichende Wärmeabfuhr in der
Umgebung und am Motorflansch.
l Flansch und Welle sind bei Lagerung und Einbau besonders gefährdet — vermeiden Sie
daher rohe Kraftanwendung. Benutzen Sie zum Aufziehen von Kupplungen, Zahnrädern
oder Riemenscheiben unbedingt das vorgesehene Anzugsgewinde in der Motorwelle und
erwärmenSie, sofern möglich, die Abtriebselemente. Schläge oder Gewaltanwendung
führen zur Schädigung von Kugellagern und Welle.
l Verwenden Sie nach Möglichkeit nur spielfreie, reibschlüssige Spannzangen oder Kup-
plungen. Achten Sie auf korrektes Ausrichten der Kupplung. Ein Versatz führt zu unzulässigen Vibrationen und zur Zerstörung von Kugellagern undKupplung.
l Vermeiden Sie unter allen Umständen eine mechanisch überbestimmte Lagerung der
Motorwelle durch starre Kupplung und externe Lagerung (z.B. im Getriebe).
l Vermeiden Sie möglichst eine axiale Belastung der Motorwelle. Eine axiale Belastung ver-
kürzt die Lebensdauer des Motors erheblich.
l Prüfen Sie die Einhaltungder zulässigen Radial- und Axialbelastungen F
Bei Verwendung eines Zahnriemen-Antriebs ergibt sich der minimal zulässige Durchmesser des Ritzels z.B. nach der Gleichung:
undFA.
R
.
22 Kollmorgen | March 2014
Page 23

5.2 Flanschmontage, Frontmontage
Galvanische Korrosion kann zur Kontaminierung des Produkts, Zerstörung der Motorbefestigung und Ausfall des Motors führen. Eine zerstörte Motorbefestigung könnte zu Stromschlaggefahr durch Abriss der
elektrischen Anschlüsse oder der Motorleitung führen.
Das Motorgehäuse besteht aus Edelstahl. Vermeiden direkten Kontakt
des Motors an aktivere Metalle wie Aluminium oder Stahl, um galvanische Korrosion zu verhindern.
AKMH Motoren können entweder von der Flanschrückseite oder von der Vorderseite verschraubt werden.
AKMH Installation | Table of Contents
Flanschmontage (A):
Durchgangsbohrungen im Flansch ermöglichenMontage von der Rückseite mit
Dichtungsschrauben.
Nur B5 Montage gemäß EN60034-7.
Verwenden Sie zur Einhaltung der Hygienerichtlinien das optionale AKMH Befestigungsset
(➜ # 13) mit den passenden Dichtungsschrauben für Welle und Flansch.
5.3 O-Ring Dichtungen
Legen Sie den O-Ring (im Lieferumfang)in die Nut am Flansch des Motors (sieheGrafik
oben), drücken Sie den Motor gegen den Gegenflansch (z.B. Getriebeflansch) und befestigen Sie den Motor mit den Dichtungsschrauben.
Frontmontage (C):
Gewinde im Flansch ermöglichen Montage von der Frontseite mit Dichtungsschrauben.
Nur B14/V18 Montage gemäß
EN60034-7.
Kollmorgen | March 2014 23
Page 24

AKMH Installation | Table of Contents
5.4 Kabelinstallation
Der Motor sollte derart montiert werden, dass das Motorkabel zur Seite oder nach unten aus
dem Motor austritt. Das Kabel sollte in einem Bogen verlegt werden, damit Reinigungsflüssigkeit abtropfen kann.
Die Kabeldurchführung kann sich lösen oder undicht werden, wenn keine
Zugentlastung am Kabel verwendet wird. Dies könnte zu einem unerwarteten Verhalten des Motors und Stromschlaggefahr frei liegender elektrischer Abschlüsse führen.
5.4.1 Standard Verdrahtung
Die standard Verdrahtung kann in allen Anwendungen eingesetzt werden, nur nicht im
Lebensmittelbereich.
Beachten Sie den minimalenKabelbiegeradius (150mm bzw. 165mm, (➜ # 17)).
BewertenSie vor dem Langzeiteinsatz die Verträglichkeit der verwendeten Reinigungsmittel
mit dem Motorkabel. Im Lebensmittelbereich muss die Schlauchoption fürdas Kabel verwendet werden.
5.4.2 Schlauch Verdrahtung
Ein Silikonschlauch schützt das Kabel und die elektrischen Anschlüsse im Motor vor den
Reinigungsmitteln und verhindert Emissionen aus dem Mantel des Motorkabels.
Beachten Sie den minimalenKabelbiegeradius (150mm bzw. 165mm, (➜ # 17)).
Setzen Sie den Silikonschlauch keinen starken Mineralsäuren aus. Bewerten Sie vor dem
Langzeiteinsatz die Verträglichkeit der verwendeten Reinigungsmittel mit dem Silikonschlauch. Setzen Sie den Silikonschlauch keinen starken mechanischen Belastungen
aus. Nach der Montage und in regelmäßigen Zeitabständen sollte der Schlauch auf Risse
oder Schnitte überprüft werden.
24 Kollmorgen | March 2014
Page 25

6 Elektrische Installation
6.1 Wichtige Hinweise
Nur Fachleute mit elektrotechnischer Ausbildung dürfen denMotor verdrahten.
Verdrahten Sie die Motoren immer im spannungsfreien Zustand, d.h.
keine der Betriebsspannungen eines anzuschließenden Gerätes darf eingeschaltet sein. Es besteht die Gefahr von Tod oder schweren gesundheitlichen Schäden beim Berühren freiliegender Kontakte.
Sorgen Sie für eine sichere Freischaltung des Schaltschrankes (Sperre,
Warnschilder etc.). Erst bei der Inbetriebnahme werden die einzelnen
Spannungen eingeschaltet.
Lösen Sie die elektrischen Anschlüsse der Motoren nie unter Spannung.
Gefahr durch elektrischen Schlag! In ungünstigen Fällen können Lichtbögen entstehen und Personen und Kontakte schädigen.
AKMH Installation | Table of Contents
Restladungen in den Kondensatoren des Servoverstärkers können bis
zu 10 Minuten nach Abschalten der Netzspannung gefährliche Werte aufweisen. Leistungsanschlüsse können Spannung führen, auch wenn sich
der Motor nicht dreht. Messen Sie die Spannung im Zwischenkreis und
warten Sie, bis die Spannung unter 60V abgesunken ist.
Beachten Sie auch die Hinweise in den Anschlussplänen in der Betriebsanleitung des verwendeten Servoverstärkers.
6.2 Anschluss der Motoren
Kollmorgen liefert AKMH Motoren mit fest montiertem Kabel auf der Motorseite und montierten Feedback Stecker sowie lose Aderenden fürden Leistungsanschluss auf der Verstärkerseite für AKD-B/P/T/M Servoverstärker.
Führen Sie die Verdrahtunggemäß den gültigen Normen und Vorschriften aus (z.B.
EN60204). Falsch installierte Abschirmung führt zu EMV Störungen und hat negative Auswirkungen auf die Systemfunktion. Die Steckerbelegung finden Sie in der Betriebsanleitung
des verwendeten Servoverstärkers.
Die maximale Kabellänge ist 15 m.
Technische Daten unserer Leitungen finden Sie im Produkt-WIKI.
Kollmorgen | March 2014 25
Page 26

AKMH Installation | Table of Contents
6.3 Farbkodierung der Adern
Leistungsadern Bremsadern Feedbackadern
Leistung Farbe Bremse Farbe DSL Farbe SFD3 Farbe SFD Farbe
U blau BR+ rot COM+ braun oder blau DATA+ weiß DATA+ weiß
V braun BR- blau COM- weiß DATA- braun DATA- braun
W schwarz - - - - - - Up rot
PE grün/gelb - - - - - - 0V blau
6.4 Leitfaden für die elektrische Installation
1. Prüfen Sie die Zuordnung von Servoverstärker und Motor. Vergleichen Sie Nennspannung
undNennstrom der Geräte.
2. Bei Anschluss an AKD-B/P/T/M Servoverstärkern mit 230V Nennspannung (AKD-xzzz06
Typen) müssen die Aderendhülsenauf den Motorleistungsadern um ca. 2-3 mm gekürzt
werden.
3. Achten Sie auf einwandfreie Erdung von Servoverstärker und Motor. EMV-gerechte
Abschirmung und Erdung siehe Betriebsanleitung des AKD. Erden Sie Montageplatte und
Motorgehäuse.
4. Der Schirm muss am Servoverstärker aufgelegt werden (siehe auch Betriebsanleitung
des AKD).
5. Legen Sie Abschirmungen großflächig (niederohmig) über metallisierte Steckergehäuse
bzw. EMV-gerechte Kabelverschraubungen auf.
System mit AKMH
und AKD-P
26 Kollmorgen | March 2014
Page 27

7 Inbetriebnahme
7.1 Wichtige Hinweise
Nur Fachleute mit weitreichenden Kenntnissen in den Bereichen Elektrotechnik und Antriebstechnik dürfendie Antriebseinheit Servoverstärker/Motor in Betrieb nehmen.
Es treten Spannungen bis zu 900V auf. Lebensgefahr durch elektrischen
Schlag! Prüfen Sie, ob alle spannungsführenden Anschlussteile gegen
Berührung sicher geschützt sind.
Lösen Sie die elektrischen Anschlüsse der Motoren nie unter Spannung.
Restladungen in den Kondensatoren des Servoverstärkers können bis zu
10 Minuten nach Abschalten der Netzspannung gefährliche Werte aufweisen. Steuer- und Leistungsanschlüsse können Spannung führen,
auch wenn sich der Motor nicht dreht.
AKMH Installation | Table of Contents
Messen Sie die Spannung im Zwischenkreis und warten Sie, bis die
Spannung unter 60V abgesunken ist.
Die Oberflächentemperatur des Motors kann im Betrieb 100°C überschreiten. Gefahr leichter Verbrennungen! Prüfen (messen) Sie die Temperatur des Motors.
Warten Sie, bis der Motor auf 40°C abgekühlt ist, bevor Sie ihn berühren.
Während der Inbetriebnahme ist nicht auszuschließen, dass der Antrieb
ungeplant eine Bewegung durchführt.
Stellen Sie sicher, dass auch bei ungewollter Bewegung des Antriebs
keine Gefährdung von Personen oder Sachen eintreten kann.
Die Maßnahmen, die Sie dazu in Ihrer Anwendung treffen müssen,
ergeben sich aus der Risikobeurteilung der Anwendung.
Kollmorgen | March 2014 27
Page 28

AKMH Installation | Table of Contents
7.2 Leitfaden für die Inbetriebnahme
Das Vorgehen bei derInbetriebnahme wird exemplarisch beschrieben. Je nach Einsatz der
Geräte kann auch ein anderes Vorgehen sinnvoll und erforderlich sein.
1. Prüfen Sie Montage und Ausrichtung des Motors.
2. Prüfen Sie die Abtriebselemente (Kupplung, Getriebe, Riemenscheibe)auf festen Sitz
undkorrekte Einstellung (zulässige Radial- und Axialkräfte beachten).
3. Prüfen Sie die Verdrahtung und Anschlüsse am Servoverstärker. Achten Sie auf ordnungsgemäße Erdung.
4. Prüfen Sie die Funktion der Haltebremse, sofern vorhanden. (24V anlegen, Bremse muss
lüften).
5. Prüfen Sie, ob der Rotor des Motors sich frei drehen lässt (eventuell vorhandene Bremse
vorher lüften). Achten Sie auf Schleifgeräusche.
6. Prüfen Sie, ob alle erforderlichen Berührungsschutz-Maßnahmen für bewegte und
spannungsführende Teile getroffen wurden.
7. Führen Sie weitere für Ihre Anlage spezifischen und notwendigen Prüfungen durch.
8. Nehmen Sie nun entsprechend der Inbetriebnahmeanweisung des Servoverstärkers den
Antrieb in Betrieb.
9. Nehmen Sie bei Mehrachs-Systemen jede Antriebseinheit Servoverstärker/Motor einzeln
in Betrieb.
7.3 Beseitigen von Störungen
Abhängig von den Bedingungenin Ihrer Anlage können vielfältige Ursachen für die auftretende Störung verantwortlich sein. Beschrieben werden vorwiegend die Fehlerursachen,
die den Motordirekt betreffen. Auftretende Auffälligkeiten im Regelverhaltenhaben meist ihre
Ursache in fehlerhafter Parametrierung des Servoverstärkers. Informieren Sie sich hierzu in
derDokumentation des Servoverstärkers und der Inbetriebnahmesoftware.
Bei Mehrachssystemen können weitere versteckte Fehlerursachen vorliegen.
Fehler Mögliche Fehlerursachen Maßnahmen
Motor dreht nicht —Servoverstärker nicht freigegeben
Motor geht durch —Motorphasenvertauscht —Motorphasen korrekt auflegen
Motor schwingt —Abschirmung Feedbackleitung
Fehlermeldung
Bremse
Fehlermeldung
Endstufenfehler
Fehlermeldung
Motortemperatur
Bremse greift
nicht
—Sollwertleitung unterbrochen
—Motorphasen vertauscht
—Bremse ist nicht gelöst
—Antrieb ist mechanisch blockiert
unterbrochen
—Verstärkung zu groß
—Kurzschluss in der Spannungs- versorgung der Motorhaltebremse
—defekte Motorhaltebremse
—Motorleitung hat einen Kurz- oder
Erdschluss
—Motor hat einen Kurz- oderErdschluss
—Motorthermoschalter hat angesprochen
—Feedbackstecker lose
—Feedbackleitung unterbrochen
—Gefordertes Haltemoment zu hoch
—Bremse defekt
—Motorwelle axial überlastet
—ENABLE-Signal anlegen
—Sollwertleitung prüfen
—Motorphasen korrekt auflegen
—Bremsenansteuerung prüfen
—Mechanik prüfen
—Motor austauschen
—Motordefaultwerte verwenden
—Kurzschluss beseitigen
—Motor austauschen
—Motor austauschen
—Motor austauschen
—Abwarten, bis der Motor abgekühlt ist. Danach überprüfen,
warum der Motor zu heiß wird.
—Stecker prüfen
—Replace motor
—Auslegungüberprüfen
—Motor austauschen
—Axiale Last prüfen, reduzieren
28 Kollmorgen | March 2014
Page 29

AKMH Installation | Table of Contents
8 Begriffsdefinitionen der technischen Daten
Technische Daten zum Motor finden Sie im Kapitel "Technical Data" ab (➜ # 54).
Alle Angaben bei 40°C Umgebungstemperatur und 100K Wicklungsübertemperatur.
Nenndatenermittlung bei konstanter Temperatur des Gegenflansches von 65°C.
Die Daten können eine Toleranz von +/- 10% aufweisen.
Stillstandsdrehmoment M0[Nm]
Das Stillstandsdrehmoment kann bei Drehzahl 0<n<100 min-1undNenn-Umgebungsbedingungen unbegrenzt lange abgegebenwerden.
Nenndrehmoment Mn[Nm]
Das Nenndrehmoment wird abgegeben, wenn der Motor bei Nenndrehzahl Nennstrom aufnimmt. Das Nenndrehmoment kann im Dauerbetrieb (S1) bei Nenndrehzahl unbegrenzt
lange abgegeben werden.
Stillstandsstrom I
0rms
[A]
Der Stillstandsstrom ist der Sinus-Effektiv-Stromwert, den der Motor bei 0<n<100 min-1aufnimmt, um das Stillstandsdrehmoment abgeben zu können.
Spitzenstrom (Impulsstrom) I
0max
[A]
Der Spitzenstrom (Sinus-Effektivwert) ist ein Mehrfaches des Stillstandsstroms abhängig
von der Wicklung. Der Spitzenstrom des verwendeten Servoverstärkers muss kleiner sein.
Drehmomentkonstante K
Trms
[Nm/A]
Die Drehmomentkonstante gibt an, wie viel Drehmoment in Nm der Motormit 1A SinusEffektivstrom erzeugt. Es gilt M=I x KT(bis maximal I = 2 x I0)
Spannungskonstante K
Erms
[mVmin]
Die Spannungskonstante gibt die auf 1000U/min bezogene induzierte Motor EMK als SinusEffektivwert zwischen zwei Klemmen an.
Rotorträgheitsmoment J [kgcm²]
Die Konstante J ist ein Maß für das Beschleunigungsvermögen des Motors. Mit I0ergibt sich
z.B. die Beschleunigungszeit tbvon 0 bis 3000 min-1zu :
mit M0in Nm und J in kgcm²
Thermische Zeitkonstante tth[min]
Die Konstante tthgibt die Erwärmungszeit des kalten Motors bei Belastung mit I0bis zum
Erreichen von 0,63 x 100 Kelvin Übertemperatur an.
Bei Belastung mit Spitzenstrom erfolgt die Erwärmung in wesentlich kürzerer Zeit.
Lüftverzögerungszeit t
[ms] / Einfallverzögerungszeit t
BRH
[ms] der Bremse
BRL
Die Konstanten geben die Reaktionszeiten der Haltebremse bei Betrieb mit Nennspannung
am Servoverstärker an.
U
N
Netznennspannung
U
n
Zwischenkreisspannung.
Kollmorgen | March 2014 29
Page 30

AKMH Installation | Table of Contents
9 General
9.1 About this manual
This manual describes the AKMH (Advanced Kollmorgen Motor Hygienic) series of synchronous servomotors (standard version). The motors are operated in drive systems together
with Kollmorgen servo amplifiers. Please observe the entire system documentation, consisting of:
l Instructions Manual for the drive
l Bus Communication manual (e.g. EtherCAT)
l Online help of the amplifier's setup software
l Regional accessories manual
l Instructions Manual of the AKMH series of motors
More background information can be found in our "Product WIKI", available at www.wiki-koll-
morgen.eu.
9.2 Symbols Used
Warning Symbols
Symbol Indication
Indicates a hazardous situationwhich, if not avoided, will
result in death or serious injury.
Indicates a hazardous situationwhich, if not avoided, could
result in death or serious injury.
Indicates a hazardous situationwhich, if not avoided, could
result in minor or moderate injury.
This is not a safety symbol.
Indicates situations which, if not avoided, could result in property damage.
This is not a safety symbol.
This symbol indicates important notes.
Warning of a danger (general). The type of danger is specified
by the text next to the symbol.
Warning of danger from electricity and its effects.
Warning of hot surfaces
9.3 Abbreviations used
Abbreviations used for technical data see chapter "Definition of terms" (➜ # 53).
In this document, the symbolism (➜ # 53) means: see page53.
30 Kollmorgen | March 2014
Warning of suspended loads.
Page 31

10 Safety
This section helps you to recognize and avoid dangers to people and objects.
10.1 You should pay attention to this
Read the documentation!
Read the available documentation before installation and commissioning. Improper handling
of the motor can cause harm to people or damage to property. The operatormust therefore
ensure that all persons entrusted to work on the motor have read and understood the manual
andthat the safety notices in this manual are observed.
Pay attention to the technical data!
Adhere to the technical data andthe specifications on connection conditions (rating plate and
documentation). If permissible voltage values or current values are exceeded, the motors
can be damaged, e.g. through overheating.
Perform a risk assessment!
The manufacturer of the machine must generate a risk assessment for the machine, and
take appropriate measures to ensurethat unforeseen movements cannot cause injury or damageto any person or property. Additional requirements on specialist staff may also result
from the risk assessment.
AKMH Installation | Table of Contents
Specialist staff required!
Only properly qualified personnel are permitted to perform such tasks as transport,
assembly, setup and maintenance. Qualified specialist staff are persons who are familiar
with the transport, installation, assembly, commissioning and operationof motors and who
bring their relevant minimum qualifications to bearon their duties:
l Transport: only by personnel with knowledge of handling electrostatically sensitive com-
ponents.
l Hygienics: only by personnel with expensive knowledge of the hygienic standards and
directives which are valid forthe application.
l Mechanical Installation: only by mechanically qualified personnel.
l Electrical Installation: only by electrically qualified personnel.
l Setup: only by qualified personnel with extensive knowledge of electrical engineering and
drive technology
The qualified personnel must know and observe IEC 60364 / IEC 60664 and national accident prevention regulations.
Secure the key!
Remove any fitted key (if present) from the shaft before letting the motor run without coupled
load, to avoid the dangerous results of the key being thrown out by centrifugal forces.
Avoid dissimilar metals!
The motor housing is made of stainless steel. Avoid direct coupling of this motor to more
active metals such as aluminum or carbon steel to prevent galvanic corrosion. Galvanic corrosion could result in contaminationof product, failure of motor mountingand motor failure.
Failure of the motor mounting could lead to electrocution hazard due to failure of electrical terminations or the motor cable as a result strain on the motor cable.
Kollmorgen | March 2014 31
Page 32

AKMH Installation | Table of Contents
Hot surface!
The surfaces of the motors can be very hot in operation, according to their protection category. Risk of minor burns! The surface temperature canexceed 100°C. Measurethe temperature, and wait until the motor has cooled down below 40°C before touching it.
Earthing! High voltages!
It is vital that you ensure that the motor housing is safely earthed to the PE (protective earth)
busbar in the switch cabinet. Risk of electric shock. Without low-resistance earthing no personal protection can be guaranteed and there is a risk of death from electric shock.
Not having optical displays does not guarantee an absence of voltage. Power connections
may carry voltage even if the motoris not turning.
Do not unplug any connectors during operation. Thereis a risk of death or severe injury from
touching exposed contacts. Power connections may be live even when the motor is not rotating. This can cause flashovers with resulting injuries to persons and damage to the contacts.
After disconnecting the drive from the supply voltage, wait several minutes before touching
any components which are normally live (e.g. contacts, screw connections) or opening any
connections.
The capacitors in the drive can still carry a dangerous voltage several minutes after switching
off the supply voltages. To be quite safe, measure the DC-link voltage and wait until the voltagehas fallen below 60V.
Secure hanging loads!
Built-in holdingbrakes do not ensure functional safety!
Hanging loads (vertical axes) require an additional, external mechanical brake to ensure personnel safety.
Evaluate chemical compatibility of the motor cable!
Compatibility of the cable to cleaning solutions used in the application should be evaluated
before subjecting the cable to long-term exposure to chemicals. Long-term exposure of the
motor cable to chemicals not compatible with the motor cable could result in contamination of
product, motor failure, and electrocution hazard due to the exposure of high voltage wiring
inside the motor cable.
Evaluate chemical compatibility of the optional cable tube!
Silicone tubing protects the cable and electrical interfaces on these motors from exposure to
cleaning solutions and avoids emissions from the motor cable. Exposure of the silicone tubing to strong mineral acids should beavoided to avoid chemical degradation of the silicone
tubing. Compatibility of the silicone tubing with cleaning solutions used in the application
should be evaluated before subjecting the silicone tubing to long-term exposure to chemicals.
Long-term exposure of the silicone tubing to chemicals not compatible with the silicone tubing
could result in contamination of product, motor failure, and electrocution hazarddue to the
exposure of highvoltage wiring inside the motor cable.
32 Kollmorgen | March 2014
Page 33

10.2 Use as directed
l The AKMH series of synchronous servomotors is designed especially for drives for food
& beverage, chemical, pharmaceutical machinery andsimilar with high requirements for
hygienics and dynamics.
l The use of AKMH motors is allowed in applications with indirect contact to food and bev-
erage. The motors are acceptable for use in food splash zones. When applying in these
applications, the tubing option over the motor cable is required (see Connection Options
(➜ # 41)).
l The user is only permitted to operate the motors under the ambient conditions which are
defined in this documentation.
l The use of AKMH motors is allowed in environments with caustic acids and bases with
respect to the defined conditions in chapter Hygienic Design (➜ # 44).
l The AKMH series of motors is exclusively intended to be driven by drives under speed
and/ or torque control.
l The motors are installed as components in electrical apparatus or machines and can only
be commissioned and put into operation as integral components of such apparatus or
machines.
l The thermal sensor which is integrated in the motorwindings must be connected and eval-
uated.
l The holding brakes are designedas standstill brakes and arenot suited for repeated oper-
ational braking.
l The conformity of the servo system to the standards mentioned in the EC Declaration of
Conformity (➜ # 70) is only guaranteed when the components (drive, motor, cables etc.)
that are used have been supplied by us.
AKMH Installation | Table of Contents
EHEDG applications
l Observe the allowed mounting positions depending onthe flange type (B5, B14, V18
according to EN 60034-7), see (➜ # 46).
l Mount the cable exit in the “down” or "side" region and install the cable with a drip-loop to
promote drainageafter washdown.
l Use o-ring for face or flange interface at motor mounting.
l Use sealed screws for motor mounting (mounting kit).
l Cover the shaft centerhole with a sealed screw (mounting kit) if the shaft end is exposed.
l Avoid direct contact of metal to metal when mounting or connecting the motor.
Kollmorgen | March 2014 33
Page 34

AKMH Installation | Table of Contents
10.3 Prohibited use
l AKMH motors should not be used in applications with continuous, direct contact with
food.
l StandardAKMH cables are not sufficient for installationin food splash zones. When apply-
ing in these applications, the tubing option for the cable is required.
l StandardAKMH motors should not be applied in explosion-prone, hazardous envi-
ronments.
l StandardAKMH motors should not be used in clean room applications.
l AKMH motors should not be mounted vertically with shaft upwards to avoid harboring dirt,
soil, and liquids.
l Commissioning the motor is prohibited if the machine in which it was installed
- does not meet the requirements of the EC Machinery Directive,
- does not comply with the EMC Directive,
- does not comply with the Low Voltage Directive.
l Built-in holding brakes without further equipment must not be used to ensure functional
safety.
10.4 European Directives and Standards for the machine builder
AKMH motors are components that are intended to be incorporated into electrical plant and
machines for industrial use. When the motors are built into machines or plant, the motor must
not be used until it has been established that the machine or equipment fulfills the requirements of the
l EC Machinery Directive (2006/42/EC)
l EC EMC Directive (2004/108/EC)
l EC Low Voltage Directive (2006/95/EC)
Standards to be applied for conformance with the EC Machinery Directive
(2006/42/EC)
l DIN EN 60204-1 (Safety and Electrical Equipment in Machines)
l DIN EN ISO 14159 (Safety of machinery - Hygiene requirements for the design of machin-
ery)
l DIN EN 1672-2 (Food processing machinery - Hygiene requirements)
Kollmorgen AKMH motors meet these standards.
The machine manufacturer must check whether other standards or EC Directives must be
applied to the machine.
Standards to be applied for conformance with the EC Low Voltage Directive
(2006/95/EC)
l IEC 60204-1(Safety and Electrical Equipment in Machines)
l IEC 60439-1(Low-voltage switchgear and controller assemblies)
Standards to be applied for conformance with the EC EMC Directive (2004/108/EC)
l IEC 61000-6-1 / 2 (Interference Immunity in Residential & Industrial Areas)
l IEC 61000-6-3 / 4 (Interference Generation in Residential & Industrial Areas)
The manufacturer of the machine is responsible for ensuring that it meets the limits required
by the EMC regulations.
34 Kollmorgen | March 2014
Page 35

10.5 Handling
AKMH Installation | Table of Contents
Transport
l Climate category 2K3 according to EN61800-2, IEC 60721-3-2
l Temperature-25...+70°C, max. 20K/hr change
l Humidityrel. humidity 5% - 95% , nocondensation
l Only by qualified personnel in the manufacturer’s original recyclable packaging
l Avoid shocks, especially to the shaft end
l If the packaging is damaged, check the motor for visible damage. Inform the carrierand, if
appropriate, the manufacturer.
The motor should not be picked up by the cable! The cable bushing could
come loose or allow for contamination to get inside the motor, if the cable
must support the weight of the motor. This could lead to electrocution hazard due to failure of electrical terminations.
Packaging
l Cardboard packing with Instapak
l You can return the plastic portion to the supplier (see "Disposal").
®
foam cushion.
Motor
type
Packing Max. stacking
height
Motor
type
Packing Max. stacking
height
AKMH2 Cardboard 7 AKMH5 Cardboard/
wooden crate
AKMH3 Cardboard 6 AKMH6 Wooden crate 6
AKMH4 Cardboard 6
If packages arebeing stacked, they must be in the horizontal orientation.
Storage
l Climate category 1K4 according to EN61800-2, IEC 60721-3-2
l Storage temperature- 25...+55°C, max. variation 20K/hr.
l Humidityrel. humidity 5% - 95%, no condensation
l Store only in the manufacturer’s original recyclable packaging
l Max. stacking heightsee table in chapter "Packaging"
l Storage timeunlimited
6
Kollmorgen | March 2014 35
Page 36

AKMH Installation | Table of Contents
Maintenance
l Maintenance should be done by qualified personnel only.
l The AKMH motor is designed to be maintenance free for normal use. Some components
however should be inspected time by time.
o
Once per year: inspect for wear including shaft grooving, seal drag, and particulate
wear. Replace the seal in case of cuts or perforations. It is recommended that seals be
replaced every 2 years under normal operating conditions.
o
Once per year: inspect cables and tubes. Replace the cable or tube in case of cuts or
perforations.
o
Once per year: inspect o-rings for wear including cuts, perforations, and any visible
damage that might compromise the sealing of the joints. In case of damages the orings (flange seal and seal of rear cover) should be replaced. If the o-ring between
flange and motor housing is damaged, the motor must be replaced.
o
Once per year respectively after 2500 hours of operation: check the motor for bearing
noise. If any noises are heard, stop the operationof the motor, the bearings must be
replaced (by the manufacturer).
o
After 20000 hours of normal operation: replace all bearings after 20,000 hours of operation under rated conditions (by the manufacturer).
l Opening the motor invalidates the warranty.
Cleaning
l Cleaning only by qualified personnel.
l Cleaning should take place only when theservo system is de-energized.
l Follow IP69K standards for wash-down pressure, temperature, angle, and distance for
spray nozzle.
l Follow chemical compatibility guidelines for washdown and cleaning.
l Do not use wire brush or friction cleaning methods for the motor and cable surface. Use
wash down (IP69K) and wipe down practices only.
Repair / Disposal
Repairof the motor must be done by the manufacturer. Opening the motor invalidates the warranty. In accordance to the WEEE-2002/96/EG-Guidelines we take old devices and accessories back for professional disposal, if the transport costs are taken overby the sender.
Send the devices to:
KOLLMORGEN Europe GmbH
Pempelfurtstr. 1
D-40880 Ratingen
36 Kollmorgen | March 2014
Page 37

11 Package
11.1 Delivery package
l Motor from the AKMH series.
l Instructions manual printed, one perdelivery.
l O-ring for flange sealing.
11.2 Accessories
IEC mounting kits with shaft center screw and flange screws.
Part Number Description
MTG-KIT-AKMH2-IEC MountingHardware AKMH2, Ax flange / Cx front mounting
MTG-KIT-AKMH3-IEC MountingHardware AKMH3, Ax flange / Cx front mounting
MTG-KIT-AKMH4-IEC MountingHardware AKMH4, Ax flange / Cx front mounting
MTG-KIT-AKMH5-IEC MountingHardware AKMH5, Ax flange / Cx front mounting
MTG-KIT-AKMH6-IEC MountingHardware AKMH6, Ax flange / Cx front mounting
NEMA mountingkits aredescribed in the US selection guide, available from the Kollmorgen
website www.kollmorgen.com).
AKMH Installation | Table of Contents
11.3 Nameplate
With AKMH motors the nameplate is laser marked on the housingside.
Legend:
Year of manufacturing is coded in the serial number: the first two digits of the serial number
arethe year of manufacturing, e.g. "13" means 2013.
MODEL Motor type
Ics I
0rms
Tcs M
0
Vs U
N
Nrtd nn Rated speed @ U
Standstill current
Standstill torque
Mains voltage
N
Prtd Pn Rated power
Rm R25 Winding resistance @ 25°
SERIAL Serial no.
AMBIENT Maximum ambient temperature
Kollmorgen | March 2014 37
Page 38

AKMH Installation | Table of Contents
11.4 Model number description
** = NEMA flanges are described in the US selection guide, available from the Kollmorgen
website www.kollmorgen.com).
38 Kollmorgen | March 2014
Page 39

11.4.1 Frame size, flange and shaft options
Dimension drawings can befound from page .
AKMH Installation | Table of Contents
Framesize Flange
type
Flange
diameter
∅
Pilot
diameter
∅
Shaft
diameter
∅
Accuracy
1)
pilot
Accuracy
2)
shaft
2 A, C 79 mm 40 mm 11 mm j6 k6 N
3 A, C 89 mm 60 mm 14 mm j6 k6 N
4 A, C 114 mm 80 mm 19 mm j6 k6 N
5 A, C 148 mm 110 mm 24 mm j6 k6 N
6 A, C 186 mm 130 mm 32 mm j6 k6 N
1) acc. to EN 60034-7……2) acc. to EN 42955……3) acc. to EN 50347
Flange mounting (flange types Ax, Bx):
The basic style for flange mountingis style IM B5 according to EN 60034-7.
Mount the FDA approved o-ring for flange sealing.
Tolerance
class pilot
3)
Face mounting (flange types Cx, Dx):
The basic style for face mounting is style IM B14 according to EN 60034-7.
Mount the FDA approved o-ring for flange sealing.
Shaft
Power transmission is made through the cylindrical shaft end (with a shaft center thread).
Code Description Description
C Closed key way Key way according to DIN 748.
Key according to DIN 6885 T1 form A.
Key material: stainless steel 1.4404
Shaft center locking thread
Shaft material: stainless steel 1.4404
N Smooth shaft Shaft center locking thread
Shaft material: stainless steel 1.4404
Kollmorgen | March 2014 39
Page 40

AKMH Installation | Table of Contents
11.4.2 Shaft seal options
Hygienics for food and beverageor medical applications require highlevel protection class.
For AKMH motors, IP69K is defined. The mechanical and electrical motor interfaces are the
most critical areas to fulfill the requirements.
The mechanical interface (flange and shaft) will usually be connected either to a machine
flange or to a gearbox. Flange sealing is done with the FDA approved o-ring.
If AKMH is connected to a machine flange with unsealed shaft region, then the shaft seal
(option "K") ensures the IP69K shaft sealing. The shaft seal is an FDA approved, single lip,
mineral filled Teflonring.
Shaft seal option Flange sealing Protection class
K O-Ring IP69K
11.4.3 Rotor length options
Rotor length is one of the parameters which define the overall motorlengths. Rotor length
depends on the used permanent magnet size. Kollmorgen defines the rotorlength with a single number (1 to 5) from short to long. Within every rotorlength several windings are defined.
Drawings can be found in chapter "DimensionDrawings" (➜ # 60).
11.4.4 Winding type options
Kollmorgen defines windings with a single character (A to Z) from low currect to high current
windings. Technical data referring to the windings can be found in chapter Technical Data (➜
# 54).
11.4.5 Cable length options
Due to protection class requirements for hygienic applications it is not possible to offer a connector solution for AKMH motors. The motors must be orderedwith fixed cables and a
defined cable length.
Kollmorgenoffers cable length in increments of 1 m. Minimum cable length is 1 m, maximum
cable length are 15 m. Coding is hexadecimal (1, 2, 3, ..., 9, A to F).
Total motorweight depends on the motor type and cable length. The weight data of your
motor type is given in the technical data section (➜ # 54)
11.4.6 Feedback options
Retrofitting a feedback is not possible.
Code Description Model Remarks Brake possible
C- SFD, Smart Feedback Device Size 15 Single Turn, 4 lines No
CA SFD3, Smart Feedback Device 3 Size 15 Single Turn, 2 lines Yes
GE HIPERFACE DSL EKS36 Single Turn Yes
GF HIPERFACE DSL EKM36 Multi Turn Yes
40 Kollmorgen | March 2014
Page 41

11.4.7 Holding brake option
All motors with DSL and SFD3 feedback option are optionally available with a holding brake.
Retrofitting a brake is not possible. A spring applied brake (24V DC) is integrated into the
motors. When this brake is de-energized it blocks the rotor.
If there is a suspended load (vertical axes), the motor's holding brake is
released, and, at the same time, the servo drive does not produce any output, the load may fall down!
Risk of injury for the personnel operating the machine. Functional safety
in case of hanging loads (vertical axes) can be ensured only by using an
additional, external, mechanical brake.
The holding brakes are designed as standstill brakes and are not suited for repeated operational braking. In the case of frequent, operational braking, premature wear and failure of the
holding brake is to be expected.
The motor length increases when a holding brake is mounted.
The holding brake can be controlled directly by the drive (no functional safety !), the winding
is suppressed in the drive — additional circuitry is not required (see instructions manual of
the used drive). If the holding brake is not controlled directly by the drive, an additional wiring
(e.g. varistor)is required. Consult our support department.
AKMH Installation | Table of Contents
11.4.8 Connection options
The hybrid cable combines power and feedback signals and is connected inside the motor.
The cable includes a tube for pressure compensation:
Codes K and T Cable prepared for AKD-B/P/T/M. Feedback connector is assembled,
Depending on the application requirements you can select either standard (washdown)
cablingor hygienic (food) cabling.
Non food applications can be connected with washdown hybrid cable (K).
Food applications require a special solution with a tube covered hybrid cable (T).
Compatibility of the cable to cleaning solutions used in the application should be evaluated
before subjecting the cable to long-term exposure to chemicals. Long-term exposure of the
motor cable to chemicals not compatible with the motor cable could result in contamination
of product, motor failure, and electrocution hazarddue to the exposure of high voltage wiring
inside the motor cable.
Code Type Cross Section Min.
K Hybrid cable (4x2.5+2x(2x1.0) + t*)
T Tube covered
hybrid cable
Power lines and shield is prepared for connecting the X9 connector of the
drive (see drive installation manual).
Remarks
Bending
Radius
(4x4.0+2x(2x1.0) +t*)
(4x2.5+2x(2x1.0) + t*)
(4x4.0+2x(2x1.0) +t*)
150mm
165mm
150mm
165mm
SFD Gen2: 4 power lines, 4 signal lines, nobrake lines
DSL/SFD3: 4 power lines, 2 signal lines, 2 brake lines
* inside tube forpressure compensation
Kollmorgen | March 2014 41
Page 42

AKMH Installation | Table of Contents
12 Technical Description
12.1 General technical data
Ambient temperature 0...+40°C for site altitudeup to 1000m amsl
Power derating
(currents and torques)
Ball-bearing life ≥ 20,000 operating hours
(at rated values)It is vital to consult our applications department
for ambient temperatures above 40°C and encapsulated
mounting of the motors.
1% / K in range 40°C...50°C up to 1000m amsl
for site altitude above 1000m amsl and 40°C
l 6% up to 2000m amsl
l 17% up to 3000m amsl
l 30% up to 4000m amsl
l 55% up to 5000m amsl
No derating for site altitudes above 1000m amsl
with temperature reduction of 10K / 1000m
Technical data for every motor type can be found in chapter "Technical Data" from p.xxx .
12.2 Standard features
12.2.1 Protection class
Shaft seal option Flange sealing Protection class
K O-Ring IP69K
Protection class IP69K has been created for high pressureand high temperature cleaning
according to DIN 40050-9.
Code "6" defines the resistancy against dust,
code "9" defines the resistancy against short distance highpressure cleaning,
code "K" defines the temperature of the cleaning liquid.
12.2.2 Insulation material class
The motors come up to insulation material class F according to IEC 60085(UL1446class F).
12.2.3 Surface
This motor housing is 1.4404 stainless steel. Surface roughness is less than 0.8 µm according to EHEDG.
42 Kollmorgen | March 2014
Page 43

12.2.4 Shaft end
AKMH Installation | Table of Contents
Power transmission is made through the cylindrical shaft end, fit k6 to EN 50347, with a locking thread. Bearing life is calculated with 20.000 operating hours.
Radial force
If the motors drive via pinions or toothed belts, then high radial forces will occur. The permissible values at the end of the shaft may be read from the diagrams in chapter "Dimension
Drawings" (➜ # 60). The maximum values at rated speed arelisted in the technical data.
Power take-off from the middle of the free end of the shaft allows a 10% increase in FR.
Axial force
When assembling pinions or wheels to the axis and use of e.g. angular gearheads axial
forces arise. The permissible values at the end of the shaft may be readfrom the diagrams in
chapter "Dimension Drawings" (➜ # 60). The maximum values at rated speed are listed at
the technical data.
Coupling
Double-coned collets have proved to be ideal zero-backlash coupling devices, combined, if
required, with metal bellows couplings.
12.2.5 Protective device
The standard version of each motor is fitted with an electrically isolated temperature sensor
(rated temperature 155°C ± 5%). The sensor does not provide any protection against short,
heavy overloading. The sensor is integrated into the monitoring system of the AKD. Sensor
characteristics diagram:
12.2.6 Vibration class
The motors are made to vibration class A according to EN 60034-14.
For a speed range of 600 rpm to 3600 rpm and a frame size between 56 mm and 132 mm, this
means that the actual value of the permitted vibration severity is 1.6 mm/s.
Velocity [rpm] max. rel. Vibration Displacement [µm] max. Run-out [µm]
<= 1800 90 23
> 1800 65 16
Kollmorgen | March 2014 43
Page 44

AKMH Installation | Table of Contents
12.3 Hygienic design
The Food and Drug Administration (FDA) is an agency of the United States Department of
Health and Human Services. The FDA is responsible for protecting and promoting public
health through the regulation and supervision of food safety, vaccines, biopharmaceuticals,
blood transfusions, medical devices and other products.
All exterior materials of the AKMH motor, with the exception of the cable, are FDA approved.
Any direct contact with unpacked foodstuffs is not permitted.
The "European Hygienic Engineering and DesignGroup" (EHEDG) is a European-based non
government organization devoted to the advancement of hygienic design and food engineering. European legislationrequires that handling, preparation, processing, packaging, etc.
of food is done hygienically, with hygienic machinery in hygienic premises (the food hygiene
directive, the machine directive and the food contact materials directive).
The AKMH motor is conform to the European hygienic directives.
Requirements IP69K EHEDG (pending)
O-Ring necessary necessary
Cable tube necessary -
Shaft seal necessary necessary
Food-Grade Non-Food-Grade
Application Area: Foodstuffs anddrinks industry, no direct contact with unpacked
foodstuffs. Pharmazeutical, medical laboratories.
Example: Cutting, packing and filling without direct contact with foodstuffs.
Motor laterally orbelow the food.
Standards: UL, CE, RoHs, BISSC, EHEDG (pending),
according to DIN EN ISO 14159 and DIN EN 1672-2
Surface: Stainless steel 1.4404, roughness < 0.8 µm
Immunity: Against tested industrial cleaning agent (➜ # 45), corrosion-proof
Degree of protection: IP69K
Mounting screw*: Stainless steel 1.4404, sealant FDA 21 CFR 175.300
O-Ring: EPDM, FDA 21 CFR 177.2600
Shaft: Stainless steel 1.4404
Rotary shaft seal: Mineral filled PTFE, single lip,
mineral: FDA 21 CFR 175.300
PTFE: FDA 21 CFR 177.1500
Shaft center screw*: Stainless steel 1.4404, sealant FDA 21 CFR 175.300
Bearing grease: food-gradeas per FDA 21 CFR 178.3570
Cable gland: Stainless steel 1.4404, Silicone seal FDA 21 CFR 177.2600
Cable tube: Silicone FDA 21 CFR 177.2600
Name plate: Laser marked in housing
Size: AKMH2 to AKMH6
* optional, included in the mounting kit
44 Kollmorgen | March 2014
Page 45

12.3.1 Tested properties with respect to cleaning agents
The testing lab of ECOLAB Deutschland GmbH tested the resistance of the Washdown and
Washdown Food surfaces to the following industrial cleaning agents:
l P3-topactive DES
l P3-topax 12
l P3-topax 56
l P3-topax 66
l P3-topax 990
In the process, the surfaces were immersed in the respective cleaning agent at 21°C temperature for 28 days. This corresponds to approx. 2,500 cleaningcycles with 15-minute contact each with the cleaning agent or 1,500 cleaningcycles with cleaning andsubsequent
disinfection.
Kollmorgen can only give a guarantee for themotor's lifecycle if the tested cleansing agents
areused. Any cleansing agent other than those mentioned above can be tested by Kollmorgen upon request and, if appropriate, be approved.
12.3.2 Cleaning plan
Recommended cleaning plan (short form) with tested cleaning agents:
AKMH Installation | Table of Contents
Flushing with water (40 °... 50 °C)
Flushing with low pressure. From top to bottom in the direction of the drain. Clean the drain.
Foam cleaning
Foaming from top to bottom.
Alkaline: P3-topax 66 (2-5%, 15 min daily)
Acid: P3-topax 56 (2%, if necessary 15 min)
Temperature: cold, up to 40 °C
Disinfection
Spraying with wayer (40 °... 50 °C) with low pressure. From top to bottom.
Spray disinfection: P3-topax 990(1-2%, if necessary 30-60 min)
Foam disinfection: P3-topactiv DES (1-3%, if necessary 10-30 min)
Kollmorgen | March 2014 45
Page 46

AKMH Installation | Table of Contents
13 Mechanical Installation
Dimension drawings can befound in chapter "Dimension Drawings" (➜ # 60).
13.1 Important Notes
Only qualified staff with knowledgeof mechanical engineering are permitted to assemble the
motor.
l Protect motor and cable from unacceptable stresses. During transport and handlingno
components must be damaged. Avoid scratches on the stainless steel surface.
l Shaft end upwards mounting is not allowed in hygienic applications.
l Basic styles for flange mounting according to EN 60034-7:
Flange mounting (flange types Ax, Bx) Face mounting (flange types Cx, Dx)
allowed: B5 allowed: B14, V18
l Use o-ring (part of delivery) for face or flange interface at motor mounting.
l Use sealed screws for motor mounting.
l If the shaft is exposed, cover the shaft center hole with sealed screw.
l Mount the cable exit in the “down” or lower hemisphere region to promote drainage after
washdown. Add a strain relief to the cable if necessary.
l Ensure an unhindered ventilation of the motors and observe the permissible ambient and
flange temperatures. For ambient temperatures above 40°C please consult ourapplications department beforehand. Ensure that there is adequate heat transfer in the surroundings and the motor flange.
l Motor flangeand shaft are especially vulnerable during storage and assembly — so avoid
brute force. It is important to use the locking thread which is provided to tighten up couplings, gear wheels or pulley wheels and warm up the drive components, where possible.
Blows or the use of force will lead to damage to the bearings and the shaft.
l Wherever possible, use only backlash-free, frictionally-locking collets or couplings.
Ensure correct alignment of the couplings. A displacement will cause unacceptable vibration and the destruction of the bearings and the coupling.
l In all cases, do not create a mechanically constrained motor shaft mounting by using a
rigid coupling with additional external bearings (e.g. in a gearbox).
l Avoid axial loads on the motor shaft, as far as possible. Axial loadingsignificantly short-
ens the life of the motor.
l Check the compliance to the permitted radial and axial forces F
When you use a toothed belt drive, the minimal permitted diameterof the pinion e.g. follows from the equation:
andFA.
R
.
46 Kollmorgen | March 2014
Page 47

13.2 Flange mounting, Face mounting
Galvanic corrosion could result in contamination of product, failure of
motor mounting and motor failure. Failure of the motor mounting could
lead to electrocution hazard due to failure of electrical terminations or the
motor cable as a result strain on the motor cable.
The motor housing is stainless steel. Avoid direct coupling of the motor to
more active metals such as aluminum or carbon steel to prevent galvanic
corrosion.
AKMH motors can be mounted either from the rear side of the flangeor from the front side.
AKMH Installation | Table of Contents
Flange mount (A):
Through-bores allow mounting with
sealedscrews from rear side.
B5 mounting only according to
EN60034-7.
Use the optional AKMH mounting kits (➜ # 37)which will include the correct sealed screws
for flange andcenter shaft, to meet the hygienic requirements.
13.3 O-ring sealing
Place the FDA approved o-ring (part of delivery) to to the groove of the motor flange (see
graphics above), then press the motor to the counter flange (for example the gearbox flange)
andfix the sealed screws.
Flange mount (C):
Threads allow mounting with sealed
screws from the front side.
B14/V18 mounting only according to
EN60034-7.
Kollmorgen | March 2014 47
Page 48

AKMH Installation | Table of Contents
13.4 Cable installation
Mount the cable exit in the “down”or lower hemisphere regionto promote drainage after washdown.
Create a drip loop so that any liquids or chemicals that spray or splash on to the cable will
travel down to the loop anddrip off instead of running down the cable directly on to the motor
strain relief bushing.
The cable bushing could come loose or allow for contamination to get inside the
motor, if no strain relief on the cable is used. This could lead to unexpected
behavior of the motor and electrocution hazard due to failure of electrical terminations.
13.4.1 Standard cabling
Standard cable is usable in all applications except food grade applications.
Observe the minimum bending radius for the cable (150/165 mm, (➜ # 41)).
Compatibility of the cable to cleaning solutions used in the application should be evaluated
before subjecting the cable to long-term exposure to chemicals. Using the motorin foodgrade applications requires the tube option for the cable.
13.4.2 Tube cabling
Silicone tubing protects the cable and electrical interfaces on these motors from exposure to
cleaning solutions and avoids emissions from the motor cable.
Observe the minimum bending radius for the cable in tube (150/165 mm, (➜ # 41)).
Exposure of the silicone tubing to strong mineral acids should be avoided. Compatibility of
the silicone tubing with cleaning solutions used in the application should be evaluated before
subjecting the silicone tubing to long-term exposure to chemicals. Avoid exposure of the silicone tubing with strong mechanical stress. After installation and at regular intervals check
the tube for cracks or cuts.
48 Kollmorgen | March 2014
Page 49

14 Electrical Installation
14.1 Important notes
Only staff qualified and trained in electrical engineering are allowed to wire up the motor.
Always make sure that the motors are de-energized during assembly and
wiring, i.e. no voltage may be switched on for any piece of equipment
which is to be connected.
There is a risk of death or severe injury from touching exposed contacts.
Ensure that the switch cabinet remains turned off (barrier, warning signs
etc.). The individual voltages will only be turned on again during setup.
Never undo the electrical connections to the motor while it is energised.
Risk of electric shock ! In unfavorable circumstances, electric arcs can
arise causing harm to people and damaging contacts.
AKMH Installation | Table of Contents
A dangerous voltage, resulting from residual charge, can be still present
on the capacitors up to 10 minutes after switch-off of the mains supply.
Even when the motor is not rotating, control and power leads may be live.
Measure the DC-link voltage and wait until it has fallen below 60V.
To wire up the motor, use the wiring diagrams in the Installation and Setup Instructions of the
drive which is used.
14.2 Connecting the motor
Kollmorgen delivers AKMH motors with fixed cables on the motor side and mounted feedback connectors and flying leads for power connection on thedrive side for AKD-B/P/T/M
devices.
Carry out the wiring in accordance with the valid standards and regulations. Incorrectly
installed shielding leads to EMC interference and has an adverse effect on system function.
Pinout of the drive's end can be found in the matching drive installation manual.
The maximum cable length is 15 m.
For a detaileddescription of cables, please refer to the Product-Wiki.
Kollmorgen | March 2014 49
Page 50

AKMH Installation | Table of Contents
14.3 Wire color coding
Power lines Brake lines Feedback lines
Power Color Brake Color DSL Color SFD3 Color SFD Color
U blue BR+ red COM+ brown or
V brown BR- blue COM- white DATA- brown DATA- brown
W black - - - - - - Up red
PE green/yellow - - - - - - 0V blue
14.4 Guide for electrical installation
1. Check that the drive and motor match each other. Compare therated voltage and rated
current of the unit.
2. If the motor must be connected to an AKD-B/P/T/M drive with 230V rated supply voltage
(AKD-xzzz06 types), then the ferrule tips supplied on motor power wires must be trimmed
by approximately 2 to 3 mm.
3. Ensure that there is proper earthing of the drive and the motor. Use correct earthing and
EMC-shielding according to the AKD installation manual. Earth the mounting plate and
motor housing.
4. The shielding must be connected to the drive (refer to the AKD installation manual).
5. Connect up all system shielding via a wide surface-area contact (low impedance) and metallized connector housings or EMC-cable glands.
System with AKMH
and AKD-P
DATA+ white DATA+ white
blue
50 Kollmorgen | March 2014
Page 51

15 Setup
15.1 Important notes
Only specialist personnel with extensive knowledgein the areas of electrical engineering /
drive technology are allowed to commission the drive unit of drive and motor.
Deadly voltages can occur, up to 900V. Risk of electric shock! Check that
all live connection points are safe against accidental contact.
Never undo the electrical connections to the motor when it is live. Risk of
electric shock! The residual charge in the capacitors of the drive can
produce dangerous voltages up to 10 minutes after the mains supply has
been switched off. Even when the motor is not rotating, control and power
leads may be live. Measure the DC-link voltage and wait until it has fallen
below 60V.
AKMH Installation | Table of Contents
The surface temperature of the motor can exceed 100°C in operation.
Danger of light burns! Check (measure) the temperature of the motor.
Wait until the motor has cooled down below 40°C before touching it.
The drive performing unplanned movements during commissioning cannot be ruled out.
Make sure that, even if the drive starts to move unintentionally, no danger
can result for personnel or machinery. The measures you must take in
this regard for your task are based on the risk assessment of the application.
Kollmorgen | March 2014 51
Page 52

AKMH Installation | Table of Contents
15.2 Guide for setup
The procedure for setup is described as an example. A different method may be appropriate
or necessary, depending on the application of the equipment.
1. Check the assembly and orientation of the motor.
2. Check the drive components (clutch, gear unit, belt pulley) for the correct seating and setting (observe the permissible radial and axial forces).
3. Check the wiring and connections to the drive. Check that the earthing is correct.
4. Test the function of the holding brake, if used (apply 24V, brake must be released).
5. Check whether therotor of the motor revolves freely (release the brake, if necessary).
Listen out for grinding noises.
6. Check that all the required measures against accidental contact with live and moving
parts have been carried out.
7. Carry out any further tests which arespecifically required for your system basedon the
risc assessment.
8. Now commission the drive according to the AKD setup instructions.
9. In multi-axis systems, individually commission each drive unit (drive and motor).
15.3 Trouble Shooting
The following table is to be seen as a “First Aid” box. There can be a large number of different
reasons for a fault, depending on theparticular conditions in your system. The fault causes
described below are mostly those which directly influence the motor. Peculiarities which
show up in the control loop behaviour can usually be traced back to an error in the parameterization of the drive. The documentation for the drive and the setup software provides information on these matters.
For multi-axis systems there may be furtherhidden reasons for faults.
Fault Possible cause Measures
Motor doesn’t
rotate
Motor runs away —Motor phases in wrong sequence —Correct the phase sequence
Motor oscillates —Break in the shielding of the feedback
Error message:
brake
Error message:
output stage fault
Error message:
motor temperature
Brake does not
grip
—Drive not enabled
—Break in setpoint lead
—Motor phases in wrong sequence
—Brake not released
—Drive is mechanically blocked
cable
—amplifier gain to high
—Short-circuit in the supply voltage
lead to the motor holding brake
—Faulty motor holding brake
—Motor cable has short-circuit or earth
short
—Motor has short-circuit or earth short
—Motor thermostat has switched
—Loose feedback connector or break in
feedback cable
—Required holding torquetoo high
—Brake faulty
—Motor shaft axially overloaded
—Supply ENABLE signal
—Check setpoint lead
—Correct the phase sequence
—Check brake controls
—Check mechanism
—Replace motor
—use motor default values
—Remove the short-circuit
—Replace motor
—Replace motor
—Replace motor
—Wait until the motor has
cooleddown. Investigate why
the motor becomes too hot.
—Check connector
—Check the dimensioning
—Replace motor
—Check the axial load, reduce
52 Kollmorgen | March 2014
Page 53

16 Definition of Terms for Technical Data
Technical data for every motor type can be found in chapter "Technical Data" (➜ # 54).
All data valid for 40°C environmental temperature and 100K overtemperature of the winding.
Determination of nominal dates with constant temperature of adapter flange of 65°C. The
data can have a tolerance of +/- 10%.
AKMH Installation | Table of Contents
Standstill torque M
0 [Nm]
The standstill torque can be maintained indefinitely at a speed 0<n<100 rpm andrated
ambient conditions.
Rated torque M
n [Nm]
The rated torqueis produced whenthe motoris drawing the rated current at the ratedspeed.
The rated torquecan be produced indefinitely at the rated speed in continuous operation (S1).
Standstill current I
0rms [A]
The standstill current is the effective sinusoidal current which the motor draws at 0<n<100
rpm to produce the standstill torque.
Peak current (pulse current) I
0max [A]
The peak current (effective sinusoidal value) is several times the rated current depending on
the motor winding. The actual value is determined by the peak current of the drivewhich is
used.
Torque constant K
Trms [Nm/A]
The torque constant defines how much torque in Nm is produced by the motor with 1A r.m.s.
current. The relationship is M=I x KT(upto I = 2 x I0)
Voltage constant K
Erms
[mV/min
-1]
The voltage constant defines the induced motor EMF, as an effective sinusoidal value
between two terminals, per 1000 rpm
Rotor moment of inertia J [kgcm²]
The constant J is a measure of the acceleration capability of the motor. For instance, at I0the
acceleration time tbfrom 0 to 3000 rpm is given as:
with M0in Nm and J in kgcm²
Thermal time constant t
th [min]
The constant tthdefines the time for the cold motor, under a load of I0, to heat up to an overtemperature of 0.63 x 10⁵ Kelvin. This temperature rise happens in a much shorter time when
the motor is loaded with the ratedcurrent.
Release delay time t
[ms] / Engage delay time t
BRH
[ms] of the brake
BRL
These constants define the response times of the holding brake when operated with the rated
voltage from the servo amplifier.
U
N
Rated mains voltage
U
n
DC-Bus link voltage.
Kollmorgen | March 2014 53
Page 54

AKMH Installation | Table of Contents
17 Technical Data
17.1 Dictionary for technical data tables
English Deutsch Italiano Español
Data Daten Dati Datos
Symbol [Unit] Symbol [Einheit] Simbolo [unità] Símbolo [unidad]
Electrical data Elektrische Daten Dati elettrici Datos eléctricos
Standstill torque Stillstandsdrehmoment Coppia cont. allo stallo Par motor de parada
Standstill current Stillstandsstrom Corrente cont. allo stallo Corriente de parada
max. Mains voltage max. Netz-Nennspannung Tensione di rete nom. max. Tensión max del red
Rated speed Nenndrehzahl Velocità nominale Velocidad nominal
Rated torque Nenndrehmoment Coppia nominale Par motor nominal
Rated power Nennleistung Potenza nominale Potencia nominal
Peak current Spitzenstrom Corrente di picco Corriente máxima
Peak torque Spitzendrehmoment Coppia di picco Par motor motor máximo
Torque constant Drehmomentkonstante Costante di coppia Constante de par motor
Voltage constant Spannungskonstante Costante di tensione Constante de tensión
Winding resistance Wicklungswiderstand Resistenza avvolgimento Resistencia de la bobina
Winding inductance Wicklungsinduktivität Induttivà avvolgimento Inductividad de la bobina
Mechanical data Mechanische Daten Dati meccanici Datos mecánicos
Rotor moment of inertia Rotorträgheitsmoment
Pole number Polzahl Numero di poli N° de polos
Static friction torque Statisches Reibmoment Momento di aderenza statica Par estático de fricción
Thermal time constant Thermische Zeitkonstante Costante di tempo termica Constante térmica de tiempo
Weight standard Gewicht standard Peso standard Peso de estándar
Radial load permitted at
shaft end
Axial load permitted Zulässige Axialkraft Soll. assiale ammessa Fuerza axial admitido
Minimum cross section Minimaler Querschnitt Sezione max. Sección máx.
Reference flange Bemessungsflansch Flangia di calcolo Brida de la referencia
Derating in case of builtin Encoder (and Brake)
Zulässige Radialkraft am
Wellenende
Begrenzung der Nennwerte
bei eingebautem Encoder
(und Bremse)
Momento di inerzia del
rotore
Soll. radiale ammessa sull
estr. dell'albero
Riducendo le imposte nel
caso del codificatore (e del
freno) incorporati
Momento de inercia del rotor
Fuerza radiale admitido en el
extremo del eje
El reducir la capacidad normal
en caso de codificador (y de
freno) incorporados
English Deutsch Italiano Español
Brake data Bremsendaten Dati freno Datos de frenos
Holding torque Haltemoment Coppia di arresto Momento de parada
Operating voltage Anschlussspannung Tensione di allaciamento Tensión de conexión
Electrical power Elektrische Leistung Potenza elettrica Potencia eléctrica
Moment of inertia Trägheitsmoment Momento d'inerzia Momento de inerciame
Release delay time Lüftverzögerungszeit Ritardo al rilascio Tiempo de respuesta
Engage delay time Einfallverzögerungszeit Ritardo all'incidenza Tiempo de reacción
Weight of the brake Gewicht der Bremse Peso del freno Peso de freno
Typical backlash typisches Spiel Gioco tipico Contragolpe típico
54 Kollmorgen | March 2014
Page 55

17.2 Technical Data AKMH2
AKMH Installation | Table of Contents
Data
Symbol
[Unit]
Electrical data
Standstill torque* M0[Nm]** 0.317 0.633 0.654 0.897 0.904 0.917 1.12 1.12 1.13
Standstill current I
[A]** 1.33 1.18 2.31 1.89 2.36 3.71 1.91 2.41 3.38
0rms
max. Mains voltage UN[VAC] 480
Rated speed nn[rpm] 8000 3500 8000 5000 6500 8000 4000 5500 8000
U
N
=
Rated torque* Mn[Nm] 0.255 0.583 0.41 0.765 0.688 0.593 1.04 0.981 0.839
230V
400V
480V
Rated power Pn[kW] 0.21 0.21 0.35 0.40 0.47 0.50 0.44 0.57 0.70
Rated speed nn[rpm] 8000 8000 8000 8000 8000 8000 8000 8000 8000
U
N
=
Rated torque* Mn[Nm] 0.255 0.4 0.41 0.58 0.58 0.59 0.83 0.83 0.84
Rated power Pn[kW] 0.21 0.34 0.35 0.49 0.49 0.49 0.70 0.70 0.70
Rated speed nn[rpm] 8000 8000 8000 8000 8000 8000 8000 8000 8000
U
N
=
Rated torque* Mn[Nm] 0.255 0.4 0.41 0.58 0.58 0.58 0.83 0.83 0.83
Rated power Pn[kW] 0.21 0.34 0.35 0.49 0.49 0.49 0.70 0.70 0.70
Peak current I
Peak torque M
Torque constant K
Voltage constant K
Winding resistance Ph-Ph
[A] 7.9 7.0 13.7 11.0 13.9 21.6 11.1 14.0 19.5
0max
[Nm] 1.57 3.03 3.07 4.35 4.37 4.41 5.50 5.51 5.53
0max
[Nm/A] 0.30 0.61 0.32 0.52 0.42 0.27 0.63 0.50 0.36
Trms
[mVmin] 19.5 39 20.4 33.8 27 17.6 40.8 32.4 23.4
Erms
R
[Ω]
25
Winding inductance Ph-Ph L [mH] 19.0 35.5 9.7 17.3 11.1 4.68 18.7 11.8 6.16
Mechanical data
Rotor moment of inertia J [kgcm²] 0.107 0.161 0.216 0.27
Pole number - 6 6 6 6
Static friction torque MR[Nm] 0.081 0.084 0.086 0.089
Thermal time constant tTH[min] 29 32 34 37
Weight flange mounting** G [kg] 3.6 4.1 4.6 5.1
Weight face mounting** G [kg] 4.0 4.5 5.0 5.5
Radial load permitted FR[N] max. 140, (➜ # 61)
Axial load permitted FA[N] max. 600, (➜ # 61)
Derating depending on model options for M0and I
orms
Built-in brake % i.p. i.p. i.p. i.p.
Built-in Hiperface DSL % i.p. i.p. i.p. i.p.
Power cable acc. EN60204-1:2006 Table 6, Column B2
Minimum cross section mm² 1 1 1 1 1 1 1 1 1
Fixed cable cross section mm² 2.5 2.5 2.5 2.5 2.5 2.5 2.5 2.5 2.5
AKMH
21C 22C 22E 23D 23E 23F 24D 24E 24F
13.0 20.0 5.24 8.79 5.46 2.36 9.04 5,46 2.96
(evaluation in process)
* Rated data with reference flange Aluminium 254mm * 254mm * 6.35mm
** cable weight adder (0.32 kg/m)
Brake data
Holding torque @ 120°C MBR[Nm] 1.42 Release delay time t
Operating voltage UBR[VDC] 24 ± 10 % Engage delay time t
Electrical power PBR[W] 8.4 Brake weight adder GBR[kg] 0.5
Moment of inertia JBR[kgcm²] 0.012 Typical backlash [°mech.] 0.46
Kollmorgen | March 2014 55
[ms] 20
BRH
[ms] 18
BRL
Page 56

AKMH Installation | Table of Contents
17.3 Technical Data AKMH3
Data
Symbol
[Unit]
31C 31E 31H 32C 32E 32H 33C 33E 33H
AKMH
Electrical data
Standstill torque* M0[Nm]** 1.00 1.04 1.08 1.72 1.77 1.82 2.25 2.32 2.38
Standstill current I
[A]** 1.29 2.76 5.59 1.30 2.56 4.92 1.27 2.20 4.78
0rms
max. Mains voltage UN[VAC] 480
Rated speed nn[rpm] 2500 6000 8000 1500 3500 7000 1000 2000 5500
U
N
=
Rated torque* Mn[Nm] 0.95 0.86 0.76 1.66 1.57 1.13 2.22 2.20 1.64
230V
Rated power Pn[kW] 0.25 0.54 0.64 0.26 0.57 0.83 0.23 0.46 0.94
Rated speed nn[rpm] 6000 8000 8000 3000 7000 8000 2000 4500 8000
U
N
=
Rated torque* Mn[Nm] 0.82 0.74 0.76 1.57 1.10 0.95 2.14 1.82 0.88
400V
Rated power Pn[kW] 0.51 0.62 0.64 0.49 0.81 0.80 0.45 0.86 0.74
Rated speed nn[rpm] 6000 8000 8000 3500 8000 8000 2500 5000 8000
U
N
=
Rated torque* Mn[Nm] 0.82 0.74 0.76 1.52 0.92 0.95 2.09 1.72 0.88
480V
Rated power Pn[kW] 0.51 0.62 0.64 0.56 0.77 0.80 0.55 0.90 0.74
Peak current I
Peak torque M
Torque constant K
Voltage constant K
Winding resistance Ph-Ph
[A] 6.90 15.0 29.3 7.2 14.1 27.5 7.4 12.9 28.1
0max
[Nm] 4.41 4.52 4.59 8.10 8.24 8.39 11.5 11.7 11.9
0max
[Nm/A] 0.85 0.41 0.21 1.4 0.73 0.39 1.86 1.10 0.52
Trms
[mVmin] 54.5 26.1 13.7 89.8 47.1 24.8 120 70.6 33.4
Erms
R
[Ω]
25
21.4 4.76 1.31 23.8 6.32 1.71 26.6 9.03 1.98
Winding inductance Ph-Ph L [mH] 37.5 8.6 2.4 46.5 12.8 3.53 53.6 18.5 4.1
Mechanical data
Rotor moment of inertia J [kgcm²] 0.33 0.59 0.85
Pole number 8 8 8
Static friction torque MR[Nm] 0.093 0.099 0.105
Thermal time constant tTH[min] 24 32 40
Weight flange mounting** G [kg] 4.1 5 5.9
Weight face mounting** G [kg] 4.5 5.4 6.4
Radial load permitted FR[N] max. 200, (➜ # 63)
Axial load permitted FA[N] max. 600, (➜ # 63)
Derating depending on model options for M0and I
(data evaluation in process)
orms
Built-in brake % i.p. i.p. i.p.
Built-in Hiperface DSL % i.p. i.p. i.p.
Power cable acc. EN60204-1:2006 Table 6, Column B2
Minimum cross section mm² 1 1 1 1 1 1 1 1 1
Fixed cable cross section mm² 2.5 2.5 2.5 2.5 2.5 2.5 2.5 2.5 2.5
* Rated data with reference flange Aluminium 254mm * 254mm * 6.35mm
** cable weight adder (0.32 kg/m)
Brake data
Holding torque @ 120°C MBR[Nm] 2.5 Release delay time t
Operating voltage UBR[VDC] 24 ± 10 % Engage delay time t
Electrical power PBR[W] 10.1 Brake weight adder GBR[kg] 0.7
Moment of inertia JBR[kgcm²] 0.012 Typical backlash [°mech.] 0.46
56 Kollmorgen | March 2014
[ms] 25
BRH
[ms] 10
BRL
Page 57

17.4 Technical Data AKMH4
AKMH Installation | Table of Contents
Data
Symbol
[Unit]
41C 41E 41H 42C 42E 42H 42J 43E 43H 43L 44E 44H 44K
AKMH
Electrical data
Standstill torque* M0[Nm]** 1.85 1.92 1.96 3.22 3.28 3.40 3.42 4.56 4.68 4.59 5.64 5.77 5.76
Standstill current I
[A]** 1.39 2.71 5.32 1.35 2.63 5.76 8.06 2.68 5.24 10.9 2.79 5.49 9.90
0rms
max. Mains voltage UN[VAC] 480
Rated speed nn[rpm] 1200 3000 6000 — 1800 4500 6000 1500 3000 6000 1200 2500 5000
U
N
=
Rated torque* Mn[Nm] 1.78 1.74 1.47 — 2.99 2.63 2.23 4.15 3.77 2.39 5.13 4.59 3.1
230V
Rated power Pn[kW] 0.22 0.55 0.92 — 0.56 1.24 1.40 0.65 1.18 1.50 0.64 1.20 1.62
Rated speed nn[rpm] 3000 6000 6000 1500 3500 6000 6000 2500 6000 6000 2000 5000 6000
U
N
=
Rated torque* Mn[Nm] 1.68 1.44 1.47 2.98 2.72 2.21 2.23 3.83 2.44 2.39 4.76 3.31 2.55
400V
Rated power Pn[kW] 0.53 0.90 0.92 0.47 1.00 1.39 1.40 1.00 1.53 1.50 1.00 1.64 1.60
Rated speed nn[rpm] 3500 6000 6000 2000 4000 6000 6000 3000 6000 6000 2500 6000 6000
U
N
=
Rated torque* Mn[Nm] 1.65 1.44 1.47 2.91 2.61 2.21 2.23 3.68 2.44 2.39 4.52 2.58 2.55
480V
Rated power Pn[kW] 0.60 0.90 0.92 0.61 1.10 1.39 1.40 1.16 1.53 1.50 1.18 1.62 1.60
Peak current I
Peak torque M
Torque constant K
Voltage constant
Winding resistance
[A] 7.3 14.3 28.0 7.00 13.7 30.0 42.0 13.7 27.2 55.8 14.5 28.1 50.5
0max
[Nm] 6.82 6.95 7.00 12.6 12.8 13.1 13.1 18.3 18.7 18.4 23.5 23.5 23.5
0max
[Nm/A] 1.34 0.71 0.37 2.4 1.26 0.59 0.43 1.72 0.89 0.42 2.04 1.06 0.59
Trms
K
Erms
[mVmin]
R
[Ω]
25
86.3 45.6 23.7 154 80.9 38.3 27.5 111 57.4 27.5 132 68.0 37.8
21.3 6.04 1.58 27.5 7.80 1.67 0.82 8.63 2.12 0.57 8.66 2.25 0.70
Winding inductance L [mH] 66.1 18.4 5.0 97.4 26.8 6.0 3.1 32.6 8.8 2.0 33.9 9.1 2.8
Mechanical data
Rotor moment inertia J [kgcm²] 0.81 1.45 2.09 2.73
Pole number 10 10 10 10
Static friction torque MR[Nm] 0.214 0.23 0.238 0.25
Thermal time constant tTH[min] 40 51 63 74
Weight flange mount** G [kg] 6.1 7.4 8.8 10.2
Weight face mount** G [kg] 6.9 8.2 9.6 11.0
Radial load permitted FR[N] max. 450, (➜ # 65)
Axial load permitted FA[N] max. 1400, (➜ # 65)
Derating depending on model options for M0and I
(data evaluation in process)
orms
Built-in brake % i.p. i.p. i.p. i.p.
Built-in Hiperface DSL % i.p. i.p. i.p. i.p.
Power cable acc. EN60204-1:2006 Table 6, Column B2
Min. cross section mm² 1 1 1 1 1 1 1 1 1 1.5 1 1 1
Fixed cross section mm² 2.5 2.5 2.5 2.5 2.5 2.5 2.5 2.5 2.5 4 2.5 2.5 2.5
* Rated data with reference flange Aluminium 254mm * 254mm * 6.35mm
** cable weight adder (2.5 mm² cable: 0.32 kg/m, 4 mm² cable: 0.41 kg/m)
Brake data
Holding torque @ 120°C MBR[Nm] 6 Release delay time t
Operating voltage UBR[VDC] 24 ± 10 % Engage delay time t
Electrical power PBR[W] 12.8 Brake weight adder GBR[kg] 1.14
Moment of inertia JBR[kgcm²] 0.068 Typical backlash [°mech.] 0.37
Kollmorgen | March 2014 57
[ms] 35
BRH
[ms] 15
BRL
Page 58

AKMH Installation | Table of Contents
17.5 Technical Data AKMH5
Data
Symbol
[Unit]
51E 51H 51L 52E 52H 52L 52M 53H 53L 53P 54H 54L 54P
AKMH
Electrical data
Standstill torque* M0[Nm]** 3.47 3.39 3.47 6.15 6.29 6.45 6.39 8.60 8.68 8.49 10.5 10.4 10.6
Standstill current I
[A]** 2.38 5.02 10.0 2.43 4.81 9.5 10.7 5.29 9.43 15.2 4.12 9.29 14.5
0rms
max. Mains voltage UN[VAC] 480
Rated speed nn[rpm] 1200 3000 5500 — 1800 3500 4500 — 3000 3500 1000 2500 3000
U
N
=
Rated torque* Mn[Nm] 3.28 2.75 1.45 — 5.32 3.53 1.18 — 4.09 2.09 9.31 5.13 2.52
230V
Rated power Pn[kW] 0.41 0.86 0.84 — 1.00 1.29 0.56 — 1.28 0.77 3.00 1.34 0.79
Rated speed nn[rpm] 2500 5500 5500 1500 3500 4500 4500 3000 3500 3500 1800 3000 3000
U
N
=
Rated torque* Mn[Nm] 2.98 1.41 1.45 5.39 3.44 1.19 1.18 4.06 2.14 2.09 7.62 2.47 2.52
400V
Rated power Pn[kW] 0.78 0.81 0.84 0.85 1.26 0.56 0.56 1.28 0.78 0.77 1.44 0.78 0.79
Rated speed nn[rpm] 3000 5500 5500 2000 4000 4500 4500 3500 3500 3500 2000 3000 3000
U
N
=
Rated torque* Mn[Nm] 2.82 1.41 1.45 5.08 2.44 1.19 1.18 2.12 2.14 2.09 7.09 2.47 2.52
480V
Rated power Pn[kW] 0.89 0.81 0.84 1.06 1.02 0.56 0.56 0.78 0.78 0.77 1.48 0.78 0.79
Peak current I
Peak torque M
Torque constant K
Voltage constant
Winding resistance
[A] 13.8 30.0 59.5 15.0 29.5 58.0 65.5 33.0 59.0 95.5 27.5 62.5 98.0
0max
[Nm] 15.0 15.0 15.2 28.9 29.1 29.5 29.4 41.8 42.0 41.7 53.3 53.3 55.1
0max
[Nm/A] 1.72 0.8 0.41 2.79 1.44 0.75 0.66 1.75 0.99 0.60 2.57 1.13 0.74
Trms
K
Erms
[mVmin]
R
[Ω]
25
110 51.3 26.6 179 92.7 48.3 42.4 112 63.9 38.4 166 72.9 47.3
9.00 2.00 0.58 8.98 2.37 0.63 0.51 2.12 0.71 0.30 3.22 0.67 0.32
Winding inductance L [mH] 36.6 7.9 2.1 44.7 11.9 3.24 2.50 11.4 3.64 1.30 18.3 3.5 1.5
Mechanical data
Rotor moment inertia J [kgcm²] 3.42 6.22 9.12 11.92
Pole number 10 10 10 10
Static friction torque MR[Nm] 0.622 0.640 0.658 0.677
Thermal time constant tTH[min] 46 58 69 80
Weight flange mount** G [kg] 8.9 11.1 13.4 15.7
Weight face mount** G [kg] 10.4 13.6 14.9 17.2
Radial load permitted FR[N] max. 635, (➜ # 67)
Axial load permitted FA[N] max. 1740, (➜ # 67)
Derating depending on model options for M0and I
(data evaluation in process)
orms
Built-in brake % i.p. i.p. i.p. i.p.
Built-in Hiperface DSL % i.p. i.p. i.p. i.p.
Power cable acc. EN60204-1:2006 Table 6, Column B2
Min. cross section mm² 1 1 1 1 1 1 1.5 1 1 2.5 1 1.5 2.5
Fixed cross section mm² 2.5 2.5 4 2.5 2.5 4 4 2.5 4 4 2.5 4 4
* Rated data with reference flange Aluminium 305mm * 305mm * 12.7mm
** cable weight adder (2.5 mm² cable: 0.32 kg/m, 4 mm² cable: 0.41 kg/m)
Brake data
Holding torque @ 120°C MBR[Nm] 14.5 Release delay time t
Operating voltage UBR[VDC] 24 ± 10 % Engage delay time t
Electrical power PBR[W] 19.5 Brake weight adder GBR[kg] 1.8
Moment of inertia JBR[kgcm²] 0.173 Typical backlash [°mech.] 0.31
58 Kollmorgen | March 2014
[ms] 80
BRH
[ms] 15
BRL
Page 59

17.6 Technical Data AKMH6
AKMH Installation | Table of Contents
Data
Symbol
[Unit]
62H 62L 62M 63H 63L 63M 64K 64L 65K 65L 65M
Electrical data
Standstill torque* M0[Nm]** 10.6 10.8 10.9 14.6 14.8 15.0 18.7 19.0 21.9 22.2 22.2
Standstill current I
[A]** 5.3 11.9 13.1 5.2 10.6 13.0 8.7 12.1 9.1 11.1 12.6
0rms
max. Mains voltage UN[VAC] 480
Rated speed nn[rpm] 1000 2500 3000 — 1800 2000 1200 1500 1000 1300 1500
U
N
=
Rated torque* Mn[Nm] 10.5 9.6 9.1 — 13.4 13.3 17.1 16.8 20.1 19.7 19.4
230V
Rated power Pn[kW] 1.10 2.52 2.86 — 2.53 2.79 2.15 2.64 2.12 2.68 3.44
Rated speed nn[rpm] 1800 5000 5500 1500 3000 4000 2000 3000 2000 2500 2700
U
N
=
Rated torque* Mn[Nm] 9.93 4.95 3.33 13.6 11.1 7.9 15.6 12.5 17.7 16.0 16.1
400V
Rated power Pn[kW] 1.87 2.59 1.92 2.14 3.49 3.31 3.27 3.93 3.71 4.19 5.03
Rated speed nn[rpm] 2000 5500 5500 1800 3500 4500 2500 3500 2200 2800 3000
U
N
=
Rated torque* Mn[Nm] 9.86 3.31 3.33 13.2 9.6 5.7 14.2 10.0 17.1 14.5 13.5
480V
Rated power Pn[kW] 2.07 1.91 1.92 2.49 3.52 2.69 3.72 3.67 3.94 4.25 5.69
Peak current I
Peak torque M
Torque constant K
Voltage constant
Winding resistance
[A] 27.1 60.0 67.0 28.0 55.4 69.0 46 64 49 61 68
0max
[Nm] 39.8 40.1 40.2 57.9 58.4 58.8 75.1 75.6 91.4 92 92
0max
[Nm/A] 2.2 1.00 0.91 3.00 1.50 1.24 2.28 1.66 2.54 2.1 1.85
Trms
K
Erms
[mVmin]
R
[Ω]
25
142.1 65.5 58.8 194.5 98.2 79.9 147 107 164 133 119
3.320 0.757 0.587 3.45 0.957 0.627 1.43 0.767 1.35 1.07 0.747
Winding inductance L [mH] 25.4 5.40 4.40 28.1 7.4 4.9 11.8 6.2 11.4 7.6 6.1
Mechanical data
Rotor moment of inertia J [kgcm²] 16.9 24.2 31.6 40
Pole number - 10 10 10 10
Static friction torque MR[Nm] 1.05 1.1 1.15 1.2
Thermal time constant tTH[min] 58 62 75 88
Weight flange mounting** G [kg] 19.6 23.1 26.7 30.2
Weight face mounting** G [kg] 22.1 25.6 29.2 32.7
Radial load permitted FR[N] max. 1250, (➜ # 69)
Axial load permitted FA[N] max. 2200, (➜ # 69)
Derating depending on model options for M0and I
orms
Built-in brake % i.p. i.p. i.p. i.p.
Built-in Hiperface DSL % i.p. i.p. i.p. i.p.
Power cable acc. EN60204-1:2006 Table 6, Column B2
Minimum cross section mm² 1 1.5 1.5 1 1.5 1.5 1 1.5 1 1.5 1.5
Fixed cable cross section mm² 2.5 4 4 2.5 4 4 2.5 4 2.5 4 4
AKMH
(data evaluation in process)
* Rated data with reference flange Aluminium 457mm * 457mm * 12.7mm
** cable weight adder (2.5 mm² cable: 0.32 kg/m, 4 mm² cable: 0.41 kg/m)
Brake data
Holding torque @ 120°C MBR[Nm] 25 Release delay time t
Operating voltage UBR[VDC] 24 ± 10 % Engage delay time t
Electrical power PBR[W] 25.7 Brake weight adder GBR[kg] 3.4
Moment of inertia JBR[kgcm²] 0.61 Typical backlash [°mech.] 0.24
Kollmorgen | March 2014 59
[ms] 105
BRH
[ms] 20
BRL
Page 60

AKMH Installation | Table of Contents
18 Dimension drawings
All drawings are drawings in principle (not scaled). 3D Models areavailable from www.kol-
lmorgen.com.
18.1 Dimensions AKMH2 (Ax flanges)
60 Kollmorgen | March 2014
Page 61

18.2 Dimensions AKMH2 (Cx flanges)
AKMH Installation | Table of Contents
18.3 Radial/axial forces AKMH2
Radialkräfte am Wellenende / Radial Force at shaft end
Kollmorgen | March 2014 61
Page 62

AKMH Installation | Table of Contents
18.4 Dimensions AKMH3 (Ax flanges)
62 Kollmorgen | March 2014
Page 63

18.5 Dimensions AKMH3 (Cx flanges)
AKMH Installation | Table of Contents
18.6 Radial/axial forces AKMH3
Radialkräfte am Wellenende / Radial Force at shaft end
Kollmorgen | March 2014 63
Page 64

AKMH Installation | Table of Contents
18.7 Dimensions AKMH4 (Ax flanges)
64 Kollmorgen | March 2014
Page 65

18.8 Dimensions AKMH4 (Cx flanges)
AKMH Installation | Table of Contents
18.9 Radial/axial forces AKMH4
Radialkräfte am Wellenende / Radial Force at shaft end
Kollmorgen | March 2014 65
Page 66

AKMH Installation | Table of Contents
18.10 Dimensions AKMH5 (Ax flanges)
66 Kollmorgen | March 2014
Page 67

18.11 Dimensions AKMH5 (Cx flanges)
AKMH Installation | Table of Contents
18.12 Radial /axial forces AKMH5
Radialkräfte am Wellenende / Radial Force at shaft end
Kollmorgen | March 2014 67
Page 68

AKMH Installation | Table of Contents
18.13 Dimensions AKMH6 (Ax flanges)
68 Kollmorgen | March 2014
Page 69

18.14 Dimensions AKMH6 (Cx flanges)
AKMH Installation | Table of Contents
18.15 Radial/axial forces AKMH6
Radialkräfte am Wellenende / Radial Force at shaft end
Kollmorgen | March 2014 69
Page 70

AKMH Installation | Table of Contents
19 Approvals
19.1 Underwriters Laboratories
Recognized for UL and Canada in File E61960.
19.2 EC Declaration of Conformity
70 Kollmorgen | March 2014
Page 71

19.3 Hygienic Standards, Declaration of Conformity
AKMH Installation | Table of Contents
Kollmorgen | March 2014 71
Page 72

AKMH Installation | Table of Contents
20 Record of document revisions
Revision Remarks
-, 08/2013 Beta launch version
A, 12/2013 Hiperface DSL andSFD3 feedbacks released, technical data updated, hints
for machine builders, hygienic standards fulfilled by AKMH, CE Declaration
andConformity, Hygienic Standards Conformity Declaration
B, 03/2014 Part number scheme updated, typos corrected, FDA standards added,
CE Declaration, cable gland updated, dimension drawings updated
72 Kollmorgen | March 2014
Page 73

AKMH Installation |
-- / --
Kollmorgen | March 2014 73
Page 74

AKMH Installation |
-- / --
74 Kollmorgen | March 2014
Page 75

About KOLLMORGEN
Kollmorgen is a leading provider of motion systems and components for machine builders. Through worldclass knowledge in motion, industry-leading quality and deep expertise in linking and integrating standard and
custom products, Kollmorgen delivers breakthrough solutions that are unmatched in performance, reliability
andease-of-use, giving machine builders an irrefutable marketplace advantage.
For assistance with your application needs, visit www.kollmorgen.com or contact us at:
North America
KOLLMORGEN
203A West Rock Road
Radford, VA 24141 USA
Web: www.kollmorgen.com
Mail: support@kollmorgen.com
Tel.: +1 - 540 - 633 - 3545
Fax: +1 - 540 - 639- 4162
Europe
KOLLMORGEN Europe GmbH
Pempelfurtstraße 1
40880 Ratingen, Germany
Web: www.kollmorgen.com
Mail: technik@kollmorgen.com
Tel.: +49 - 2102 - 9394 - 0
Fax: +49 - 2102- 9394 - 3155
Asia
KOLLMORGEN
Rm 2205, Scitech Tower, China
22 Jianguomen Wai Street
Web: www.kollmorgen.com
Mail: sales.asia@kollmorgen.com
Tel.: +86 - 400 666 1802
Fax: +86 - 10 6515 0263
 Loading...