

Kole Audio electronic PH1-2000D, PH4-1000, PH2-2400, PH2-2000, PH4-1400 User Manual
...

OWNERS MANUAL
PH4-800 / PH4-1000 / PH4-1400
PH1-2000D / PH1-4000D / PH1-5500D
PH2-700 / PH2-1000 / PH2-1500 / PH2-2000 / PH2-2400


- 2 -
INTRODUCTION
Kole Audio amplifiers provide high-performance sound reinforcement for your mobile
audio equipment. Its versatility enables compatibility with optional Equalizers,
Frequency Dividing Crossover Networks, and other audio processors in a customized
system. The Multi-Mode bridging capabilities allow flexibility in hosting several different
speaker configurations.
To achieve optimum performance, it is highly recommended that you read this
Owners Manual before beginning installation.
WARNING
High powered audio systems in a vehicle are capable of generating "Live Concert"
high levels of sound pressure. Continued exposure to excessively high volume sound
levels may cause hearing loss or damage. Also, operation of a motor vehicle while
listening to audio equipment at high volume levels may impair your ability to hear
external sounds such as; horns, warning signals, or emergency vehicles, thus
contributing to a potential traffic hazard. In the interest of safety, Kole Audio
recommends listening at lower volume levels while driving.

- 3 -
Before beginning the installation, consider the following:
1. Do you plan to add additional mobile electronics equipment in the future?
If you plan to expand your system by adding other components sometime in the
future, ensure adequate space is left and cooling requirements are met.
2. Should you use high or low level inputs?
Your Amplifier has been designed to accept Low-Level(Pre-Amp outputs from your
radio) source signal. If your radio/source is equipped with Pre-Amp outputs, it is
possible to utilize them to drive the Amplifier and the 2 front speakers. Then, use the
built-in power of your radio to drive the 2 rear speakers.
3. Are your components matched?
The RMS power rating of your speaker(s) must be equal or greater than the RMS
power rating of your amplifier. Your speaker(s) also must be 2 - 8 Ohms impedance
for stable amplifier operation. Impedance information is normally printed on the
speaker basket or magnet.
4. Where will the amplifier be installed?
Consider both the length of your leads, and routing when determining the mounting
location. It is best to run power and RCA wiring on opposite sides of the vehicle to
prevent induced noise. Pre-amp input jacks require a length of high quality shielded
male to male RCA patch cord.
PLANNING YOUR SYSTEM ................................................................
WIRING CONNECTION ....................................................................
CONTROL FUNCTIONS .....................................................................
SPEAKER CONNECTION MONO CHANNEL ..................................
2 CHANNEL ............................................
4 CHANNEL ............................................
TROUBLE SHOOTING GUIDE ............................................................
SPECIFICATION .................................................................................
WARNING .........................................................................................
3
4
5, 6, 7
8, 9
10, 11
12, 13, 14
15
16, 17
18
TABLE OF CONTENTS
PLANNING YOUR SYSTEM
- 4 -
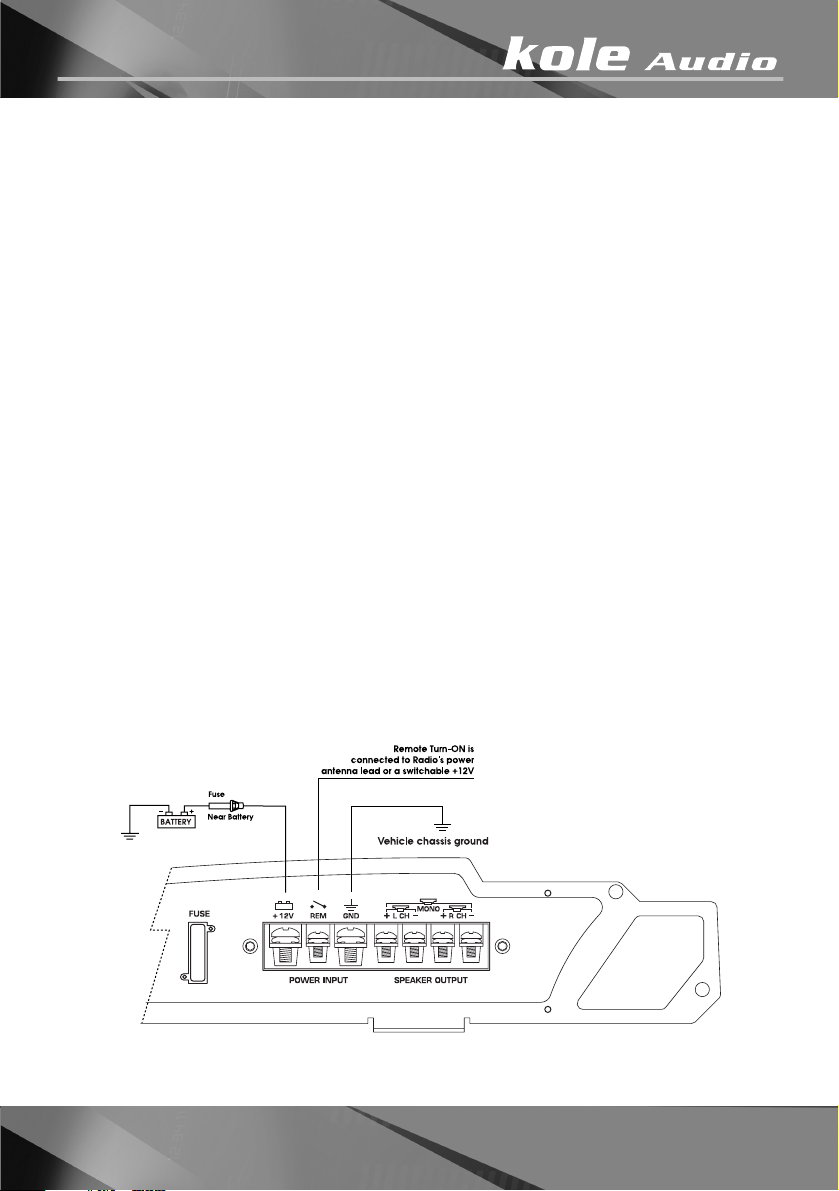
CONNECTING THE POWER (Fig.1)
CAUTION:
AS A PRECAUTION, DISCONNECT THE POWER WIRE FROM THE BATTERY WHILE MAKING THE
POWER AND GROUND CONNECTIONS TO THE AMPLIFIER.
4/8 GAUGE(Thicker if planning for additional Amplifiers) wire is recommended for
both the power and ground wires. 12 Gauge, for the remote turn-on wire. Both
types are available at most Mobile Audio Dealers or Installation Shop.
(1) Ground : To Vehicle Chassis
To avoid unwanted ignition noise caused by ground loop, it is essential that the
Amplifier be grounded to a clean, bare, metal surface of the vehicle's Chassis
NOTE :
GROUND WIRE SHOULD NOT BE EXTENDED MORE THAN 3 FT. (1 METER).
(2) +12 Volt(Fused) Constant Power: To Battery (+)
Due to the power requirements of the Amplifier, this connection should be made
directly to the positive (+) terminal of battery. For safety measures, install an in-line
Fuse Holder (not included) as close to the battery positive (+) terminal as
possible with an ampere rating; not to exceed total value of fuses in Amp.
(3)
Remote Turn-On Input: To remote turn-on output of Car Stereo
This Amplifier is turned "ON" remotely when the vehicle's stereo is turned "ON".
NOTE :
IF YOUR RADIO DOES NOT HAVE A +12 VOLT OUTPUT LEAD WHEN THE RADIO IS TURNED ON, THE "REMOTE"
TERMINAL ON THE AMPLIFIER CAN BE CONNECTED TO VEHICLE'S ACCESSORY CIRCUIT THAT IS LIVE WHEN THE
KEY IS "ON".
FIG. 1
 Loading...