

Page 1

©2009 Kolcraft®Enterprises, Inc. All Rights Reserved. B30-R1 11/08
Page 2
2
READ ALL INSTRUCTIONS BEFORE ASSEMBLY AND USE OF
PRODUCT. Failure to follow these warnings and the
instructions could result in serious injury or death. Make sure
bassinet is fully assembled and secure before use.
IMPORTANT SAFETY INFORMATION:
When NOT to Use Your Bassinet
• FALL HAZARD - To help prevent falls, do not use this
product when the infant begins to push up on hands and
knees or is 3 months old or weighs 15 lbs. (6.8 kg), whichever comes first.
• Accidents can happen quickly, so check your child frequently.
• CAUTION: Toys intended to be assembled by adult!
Preparing Your Bassinet for a Safe Sleep Environment
• AVOID SUFFOCATION HAZARDS: Use ONLY bassinet
pad and sheet provided by Kolcraft. If you choose to ignore
this warning, you must use a sheet designed to fit the
dimensions of this bassinet mattress. Make sure the sheet
securely tucks at least 2” (5 cm.) under the bassinet pad on
all sides to avoid entanglement.
• Infants can suffocate in gaps between an extra pad and
side of bassinet/cradle & on soft bedding.
• NEVER USE additional mattresses, pillows, comforters,
padding or sheets.
•STRANGULATION HAZARDS: Strings can cause
strangulation! Do not place items with a string around a
child’s neck, such as hood strings or pacifier cords. Do
not suspend strings over a bassinet or cradle or attach
strings to toys.
• DO NOT place more than one infant in bassinet.
Other Things to Avoid
• DO NOT carry or move bassinet with child in it.
•
DO NOT use around pets or other children without wheel
locks on.
• DO NOT use in a motor vehicle.
WARNING
Continued on next page
Page 3

3
• NEVER use near stairs or steps.
• To reduce the risk of SIDS (Sudden Infant Death
Syndrome), pediatricians recommend healthy infants be
placed on their back to sleep unless otherwise advised
by a physician.
• ALWAYS attach clips tightly to the bassinet frame according to
instructions. Check frequently.
• DO NOT add additional strings or straps to attach to crib or
bassinet.
FCC Statement (United States Only)
This equipment has been tested and found to comply with
the limits for a Class B digital device, pursuant to Part 15 of the
FCC Rules. These limits are designed to provide reasonable
protection against harmful interference in a residential installation.
This equipment generates, uses and can radiate radio frequency
energy and, if not installed and used in accordance with the
instructions, may cause harmful interference to radio communications.
However, there is no guarantee that interference will not occur in a
particular installation. If this equipment does cause harmful
interference to radio or television reception, which can be determined
by turning the equipment off and on, the user is encouraged to try to
correct the interference by one or more of the following measures:
•Reorient or relocate the receiving antenna.
•Increase the separation between the equipment and receiver.
•Consult the dealer or experienced radio / TV technician for help.
Note: Changes or modifications not expressively approved by
the manufacturer responsible for compliance could void the user’s
authority to operate the equipment.
Page 4
4
ADVERTENCIA
LEA TODAS LAS INSTRUCCIONES ANTES DE ENSAMBLAR Y USAR
ESTE PRODUCTO. El no cumplir con las instrucciones y las advertencias
podria causar lesiones graves y hasta la muerte. Asegúrese de que el
moisés está completamente ensamblado y asegurado antes de usar.
INFORMACIÓN IMPORTANTE DE SEGURIDAD:
Cuando NO utilizar su moisés
• PELIGRO DE CAÍDA - Para ayudar a evitar caídas, no utilice este
producto cuando el niño empiece a empujarse con las manos y las
rodillas o tenga 3 meses de edad o pese 15 libras (6.8 kg), cualquiera
que sea lo que ocurra primero.
• Los accidentes pueden suceder en un instante. Vigile a su bebé con
frecuencia.
• PRECAUCIÓN: Los juguetes están pretendidos para ensamblar por
el adulto.
Cómo preparar su moisés para que su bebé duerma en un ambiente seguro
• EVITE PELIGROS DE ASFIXIA: Use ÚNICAMENTE el colchón y la sábana
provista por Kolcraft. Si usted decide a ignorar esta advertencia, usted
debe de usar una sabána designada a la medida de los dimensiones del
colchón del moisés. Asegúrese de que la sábana ceñida se encuentre
bien ajustada por lo menos 2” (5 cm.) por debajo del colchón a todo su
alrededor para evitar que el bebé quede enreda do accidentalmente.
• El bebé se puede asfixiar en los huecos entre un extra colchón y los
lados del moisés/cuna y en la colchonetas.
• NUNCA USE colchónes adicionales, alcolchonados, almohadas,
colchonetas o sábanas.
•
EVITE DAÑOS POR ESTRANGULAMIENTO: ¡Las tiras pueden
causar estrangulación! No coloque artículos con tiras alrededor del cuello
del niño, tales como capuchas con tiras o chupones con tiras. No
coloque tiras colgando sobre el moisés o cuna o adjunta las cuerdas al
juguete.
• NO coloque más de un bebé en el moisés.
Otras cosas a evitar
• NO transporte o mueva el moisés con el bebé adentro.
• NO use el moisés cerca de animales domésticos o de otros niños sin
asegurar los frenos.
• NO use el moisés dentro de un vehículo de motor.
Continuación en la página siguiente
Page 5

5
• NUNCA use el moisés cerca de escaleras o escalones.
• Para reducir el riesgo de SIDS (Síndrome de Muerte Infantíl), los
pediatras recomiendan que los infantes sanos sean situados en su espalda para dormir, a menos que se aconseje lo contrario por el médico.
•Una SIEMPRE todos los aseguradores que se proporcionan
(cierres) de forma segura a la cuna o al moisés de acuerdo con las
instrucciones. Compruebe con frecuencia.
• NO añada cuerdas o tiras tradicionales para unirlas a la cuna o al
moisés.
NOTA FCC (Válido sólo en los Estados Unidos)
Este equipo ha sido probado y se ha hallado que cumple con los
límites para el dispositivo digital de la clase B, en cumplimiento de la
Parte 15 de las reglas de la FCC. Estos límites están diseñados para pro
porcionar una protección razonable contra la interferencia dañina en una
instalación residencial. Este equipo genera, usa y puede radiar energía
de radio frecuencia y, si no se instala de acuerdo con las instrucciones,
puede causar una interferencia dañina con las comunicaciones de radio.
Sin embargo, no hay garantía de que la interferencia no ocurrirá en una
instalación en particular. Se puede determinar si este equipo causa inter
ferencias dañinas a un receptor de radio o televisión, apagando el
equipo y encendiéndolo de nuevo. El usuario puede corregir la interfer
encia tomando una o más de las siguientes medidas:
•Reorientar o relocalizar la antena de recepción.
•Incrementar la separación entre el equipo y el receptor.
•Consulte a un vendedor o técnico experimentado de radio/televisión
para obtener ayuda.
Nota: Los cambios o modificaciones que no estén
expresamente aprobados por el fabricante responsable del cumplimiento
pueden anular la autoridad del usuario para operar el equipo.
Page 6
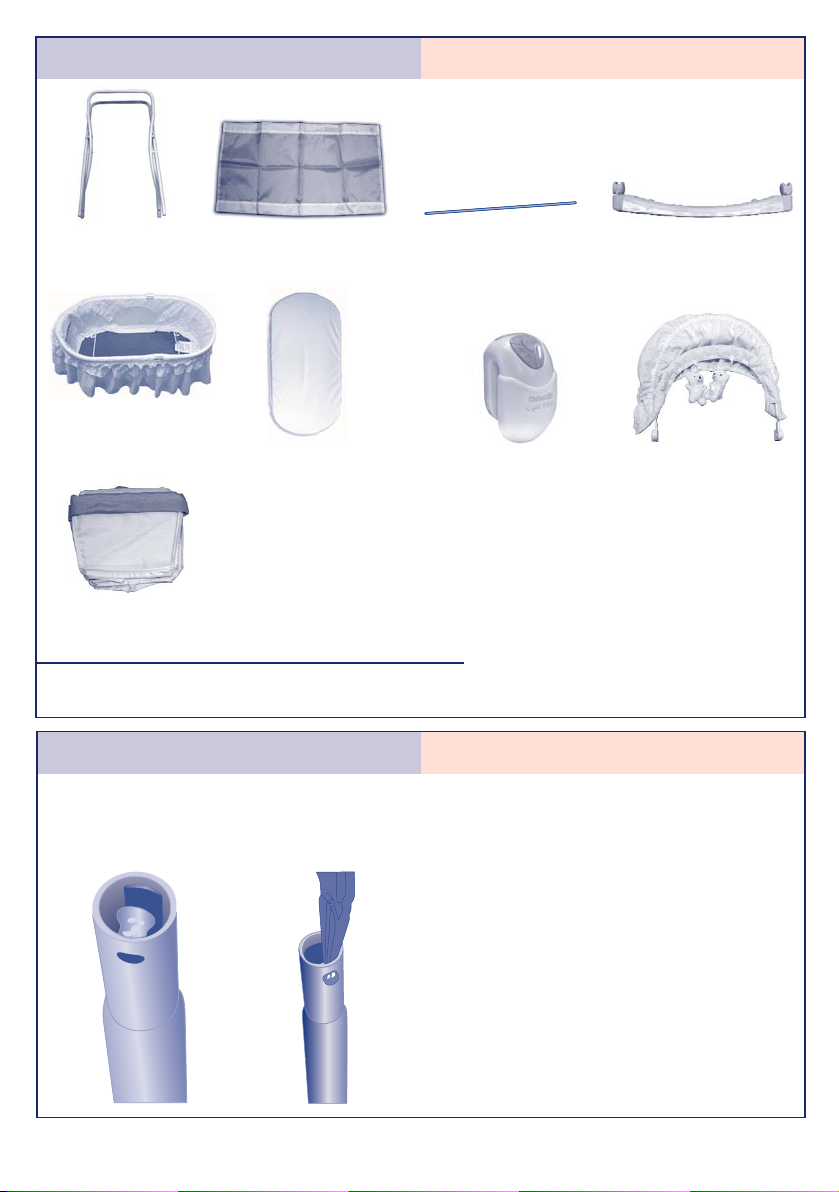
Parts List Lista de partes
Light Vibes®Deluxe
Electronics
Electrónicos de Tender
Vibes
®
con música
Canopy with Toys*
Toldo con juguetes*
6
Frame
Soporte
Bassinet
Moisés
Tool Needed: Phillips Screwdriver
Herramienta necesitado: Destornillador de estrella
Bassinet Pad & Sheet
Colchoncito del
moisés y sábana
Rocking Bases (2)
Base mecedora (2)
*Toys may vary
*Juguetes pueden variar
Folding Baskets (2)
Canasta plegable (2)
Basket Rods (2)
Varillas de canasta
Trouble Shooting
Resolución de problemas
NOTE: If your spring-loaded button becomes
out of place, take pliers and feed button into
hole.
NOTA: Si el botón con resorte se sale de su
sitio, vuelva a meter el botón en su sitio con
unas pinzas.
Correct
Alignment
Alineación
correcta
Wrong
Alignment
Alineación
incorrecta
Fabric Sleeve
Funda de género
Page 7
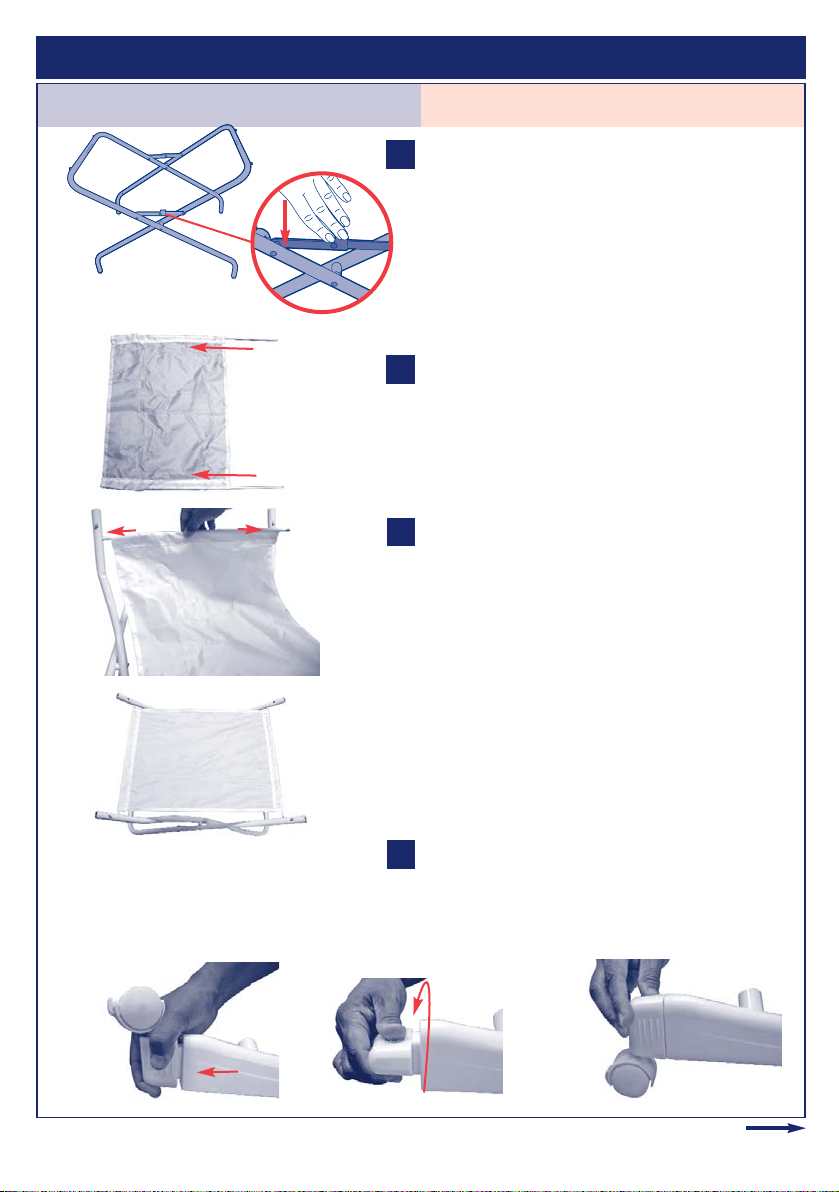
To Assemble Bassinet Stand Para ensamblar la base del moisés
7
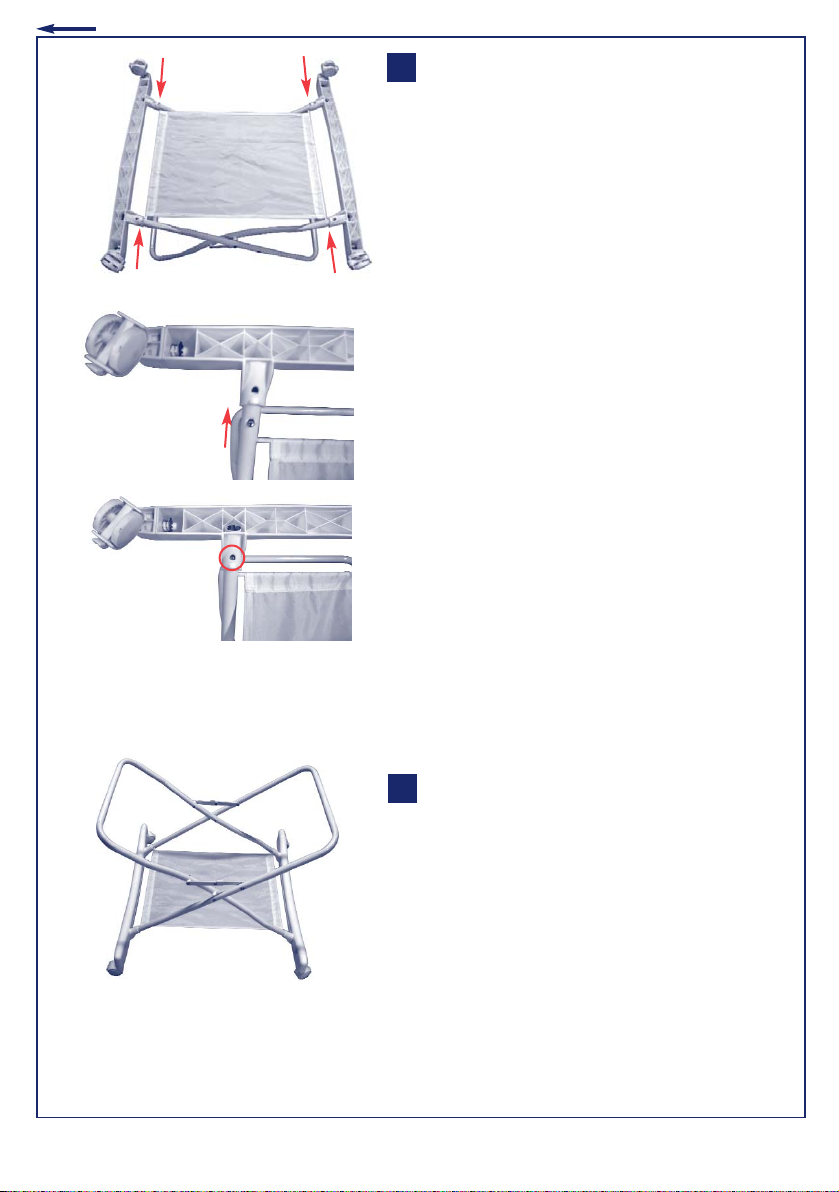
Open frame. Push down on the side locks to
secure frame. Make sure frame locks are
straight before use.
Estructura abierta. Al empujar los laterales, la
estructura se traba de manera segura.
Asegúrese de que la traba de la estructura
esté derecha antes de usar el producto.
Insert basket rods through fabric sleeve.
Inserte las varillas de la canasta a través de la
funda de género.
Insert the ends of the rods into the frame
holes on the bottom of the frame as shown.
This will pull the fabric sleeve taut to hold the
folding baskets.
Inserte los extremos de las varillas adentro de
los orificios de la parte inferior de la estructura como se muestra. Esto tensará la funda
de género para que sostenga las canastas
plegables.
Take the rocking base and flip casters down
by pulling the end cap and rotating over.
Lleve la base mecedora y las ruedas movibles
hacia abajo, tirando del protector terminal y
haciéndolo girar.
1
2
2
3
How to Assemble Your Bassinet / Cómo ensamblar su moisés
3
3
Continued on next page
Continuación en la página siguiente
1
Basket Rod
Varillas de
canasta
Basket Rod
Varillas de
canasta
4a 4b 4c
4
Page 8
8
Insert the frame into the rocking base by
pushing in on the spring loaded buttons and
inserting the bottom of the frame tubes into
the rocking base as shown. The spring
loaded buttons should pop out of the rocking
base to ensure a secure fit.
See Page 6 for Troubleshooting.
Inserte la estructura en la base mecedora
empujando hacia adentro los botones
accionados por resortes e insertando la
parte inferior de los tubos de la estructura
adentro de la base mecedora, como se
muestra. Los botones accionados por
resortes deben salir hacia afuera en la base
mecedora para garantizar su adaptación
segura.
Vea página 6 para resolución de problemas.
The bassinet stand should stand straight as
shown in the photo.
La base del moisés debe permanecer
derecha, como se muestra en la foto.
5
5a
5b
6
6
Page 9

To Set Up Foldable Baskets
Para preparar las canastas plegables
9
Unfold the baskets
Despliegue las canastas.
Insert the bottom flap to retain basket shape.
Inserte la solapa inferior para conservar la
forma de la canasta.
Store baskets on the fabric sleeve and fill
with up to 5 pounds in each basket, of baby’s
items.
Almacene las canastas en la funda de género
y llénelas hasta con 5 libras en cada canasta
de artículos para bebés.
To Clean: Baskets can be wiped clean with a
damp cloth.
Para Limpiar: Las canastas se pueden limpiar
con un trapo húmedo.
1
2
2
3
1
3
Page 10

10
1
2
4
To Assemble Bassinet Para ensamblar el moisés
Do not remove floorboard from bassinet
cover. Open the support bars and clip each
leg into the hooks on the floorboard.
No saque la tabla del suelo de la cubierta del
moisés. Abra las barras de soporte y ajuste cada
pata en los enganches en la tabla del suelo.
Fasten all the snaps on bassinet cover to
floorboard.
Asegure todos los broches de la cubierta del
moises a la tabla de la base.
CAUTION: Do not use this product if all
snaps cannot be completely fastened.
PRECAUCIÓN: No use este producto si los
broches no estan completamente asegurados.
Replace bassinet pad in bassinet, making
sure bassinet is flat and firmly in place.
Ponga el colchoncito dentro del moisés.
Presione el colchoncito asegurándose que
esté plano y se encuentre fijo en su sitio.
CAUTION:
Fitted bassinet sheet should
securely wrap at least 2” (5 cm) beneath entire
pad to reduce chance of entanglement.
PRECAUCIÓN: La sábana ceñida del moisés
debe quedar bien sujeta 5 cm. (2 pulgadas) por
debajo y alrededor del colchón para disminuir
el riesgo de que el bebé quede enredado.
NOTE: See page 21 for instructions to order
replacement parts.
NOTA: Mire la página 21 para instrucciones
como encargar sábanas de susituta.
Open bassinet locking attachment clips on
the bottom of the bed. Place U-shaped
balance clips onto the top rail.
Abra los clips de unión de cierre de la cuna
en la parte inferior de la cama. Sitúe los clips
de balance en forma de U en el raíl superior.
1
2
3
4
Hooks
Ganchos
U-shaped balance clips
los clips de balance en forma de U
Continued on next page
Continuación en la página siguiente
U-Shaped balance clips
Clips de balance en
forma de U
Locking attachment clips
clips de unión
Page 11

11
5
Close the locking attachment clips to secure
bassinet bed to frame.
Cierre los clips de unión para asegurar la
cama de la cuna al soporte.
NOTE: Pull up to ensure secure.
NOTA: Jale hace arriba para asegurar que
este seguro
5
Requires 3 “AA” batteries (not included). To
insert batteries, use a Phillips screwdriver to
unfasten battery cover.
Requiere 3 pilas “AA” (no incluídas). Para
poner las pilas use un desarmador de cruz
para quitar la tapa.
Place 3 “AA” batteries in battery compartment as shown.
Inserte 3 pilas “AA” en el compartimento
como se muestra.
Secure battery cover by inserting the cover
tabs into the slots in the compartment. Snap
the cover shut and tighten screw to secure in
place.
Asegure la cubierta de la batería insertando
las pestañas cubiertas en las ranuras en el
compartimiento. Cierre la cubierta y atornille
el tornillo para asegurarlo en su lugar.
CAUTION: Do not mix old and new batteries. Do not mix alkaline, standard (carbonzinc) or rechargeable (nickel-cadmium) batteries. Remove batteries before storing this
product for a prolonged period of time.
PRECAUCIÓN: Por favor no mezcle pilas
usadas con pilas nuevas. No mezcle pilas de
alcalino, pilas estándar (zinc-carbono) y pilas
recargables (níquel-cadmio). Sáquele las pilas
si va a guardar el producto por un período
de tiempo prolongado.
To Install batteries in Light Vibes
®
Deluxe Electronics
Para instalar las pilas en el
mecanismo electrónico
1
2
3
1
2
Page 12

Para conectar el mecasnismo
electonico
CAUTION:
Toys to be assembled by an
adult.
PREAUCIÓN:
Los juguetes deben ser
ensamblados por un adulto.
Attach the Light Vibes
®
deluxe electronics by
pushing downward. Make sure the speaker
side faces the interior of the bassinet.
Una el Light Vibes
®
soporte presionando hacia
abajo. Asegúrese de que el lado de la bocina
está mirando hacia el interior del moisés.
TO REMOVE: Pull up on the Light Vibes
®
deluxe electronics.
PARA REMOVER: Estire del dispositivo electrónico Light Vibes
®
.
12
1
To Attach Canopy Para sujetar el toldo
Attach canopy by snapping ends to the frame.
Una el toldo abrochando los extremos a la
estructura.
Velcro fabric together.
Una el material usando el Velcro.
Pull back canopy fabric over bassinet frame.
Jale la tela del toldo sobre el marco del moisés.
1
2
2
1
1
3
3
To Attach Light Vibes
®
Deluxe Electronics
Page 13

13
How to Properly Use Your New Bassinet / Cómo usar su nuevo moisés correctamente
To Use Brakes Para usar los frenos
Push levers on wheels down to lock.
Oprima las palancas en las ruedas, hacia
abajo para asegurarlas.
Pull levers up to unlock.
Jale las palancas hacia arriba para soltarlas.
2
WARNING
Avoid accidents. Do not use the
bassinet with the wheels unlocked
around stairs or other children.
ADVERTENCIA
Evite accidentes. No use el moisés
cerca de escaleras o de otros niños
sin poner los frenos.
1
Locked
Cerrado
Unlocked
Cerrado
Page 14

14
Para usar el mecanismo electrónico
1
2
To turn on electronics, locate on/off switch on
the side of the unit and move switch to the
“ON” position (I).
Para prender el mecanismo electrónico localice el interruptor Apagar/Prender (On/Off) en
el lateral de la unidad y mueva el interruptor
a la posición “ON” (prender) (I).
To use the Light Vibes Electronics, follow the
diagram below.
Para usar el mecanismo electrónico, siga el
diagrama abajo.
NOTE: To prolong life of batteries, make sure
on/off switch is in the off (O) position when
not in use.
NOTA: Para prolongar la vida de las baterías,
asegúrese de que el interruptor on/off (prender / apagar) esté en la posición “off” (O)
cuando no lo esté usando.
The vibrations and music will automatically
shut off after 10 minutes. The light will automatically shut off after 1 minute.
Las vibraciónes y música se apagan automáticamente después de 10 minutos. La luz se apaga
automáticamente después de 1 minuto.
1
Off
Apagar
On
Prender
Vibration -
Vibración -
Vibration +
Vibración +
Vibration
Vibración
Sleep
Music
Música
para
dormir
Nature Sounds
Sonidos de la
naturaleza
Volume + or -
Volumen + o -
Check Light
Luz de
comprobación
Playtime
Music
Música
para jugar
Lullabies
Nanas
2
To Use Light Vibes
®
Deluxe Electronics
Page 15

15
To Convert to Rocking Base Para convertir la base mecedora
CAUTION: Do not use if one end is in rock
position and the other end is in roll position.
For correct use, lower all wheels for “roll
mode” and raise all wheels for “rock mode”.
PRECAUCIÓN: No utilice la cuna si un punta
está en la posición de mecedora y el otro
está en la posición rodante. Para el uso correcto, eleve ambos puntas para el "modo
rodar" y baje ambos puntas para el "modo
mecer".
NOTE: Remove child before adjusting
between rock and roll modes.
NOTA: remueva al niño antes de cambiar
entre los modos mecer y rodar.
Flip each caster one at a time. When wheels
are in the down position, gently pull the end
cap horizontally and rotate it 180 degrees
until the wheels are in the up position as
shown.
Haga girar cada rueda de a una por vez.
Cuando las ruedas se encuentren hacia abajo,
suavemente tire el protector terminal horizontalmente y rótelo 180 grados hasta que las
ruedas queden hacia arriba, como se muestra.
Ensure all four corners of the bassinet are
secured in the up position for a gentle rocking motion.
Cersiórese de que las cuatro esquinas del
moisés estén aseguradas hacia arriba para
lograr un suave movimiento mecedor.
1
2
Rocking Base
Base mecedora
1a
1b
2
Page 16

To Convert to Rolling Base
Para convertir a la base que rueda
16
CAUTION: Do not use if one end is in rock
position and the other end is in roll position.
For correct use, lower all wheels for “roll
mode” and raise all wheels for “rock mode”.
PRECAUCIÓN: No utilice la cuna si un punta
está en la posición de mecedora y el otro
está en la posición rodante. Para el uso correcto, eleve ambos puntas para el "modo
rodar" y baje ambos puntas para el "modo
mecer".
NOTE: Remove child before adjusting
between rock and roll modes.
NOTA: remueva al niño antes de cambiar
entre los modos mecer y rodar.
When the wheels are in the up position, gently pull the end cap horizontally and rotate
180 degrees until the wheels are in the down
position as shown.
Cuando las ruedas se encuentren hacia arriba, suavemente tire el protector terminal
horizontalmente y rótelo 180 grados hasta
que las ruedas queden hacia abajo como se
muestra.
Ensure all four corners of the bassinet are
secured in the down position to roll the
bassinet.
Cersiórese de que las cuatro esquinas del
moisés estén aseguradas hacia abajo para
lograr hacer rodar el moisés.
1
2
Rolling Base
Base rodante
1a
1b
2
Page 17

17
TO REMOVE BASSINET COVER
PARA REMOVER LA CUBIERTA DEL
MOISÉS
Unsnap the clips around bassinet frame to
remove bassinet.
Desabroche the clips alrededor del marco del
moisés para quitar el moisés.
Remove canopy and bassinet pad.
Remueva la cubierta y el colchón.
Unsnap bassinet cover from bassinet floor
board.
Desabroche la cubierta del moisés de la tabla
de la base.
Remove bassinet cover from floorboard.
Remueva la cubierta del suelo.
TO WASH BASSINET COVER
PARA LAVAR LA CUBIERTA DEL MOISÉS
Hand wash bassinet cover with water and
mild soap.
Lave de mano la cubierta del moisés con
agua y jabó suave.
Line Dry. Do not dry this bassinet cover in
clothes dryer. This may shrink the cover.
Tiéndala a secar. No ponga a secar la cubier
ta del moisés en la secudora. Esto puede
encoger la cubierta.
CAUTION: For the safety of your child, it is
vital that the bassinet cover is re-mounted
completely and correctly.
PRECAUCIÓN: Para la seguridad de sus
niños, es de vital importancia que la cubierta
del moisés sea vuelta a instalar completamente y en la forma correcta.
Care & Maintenance / Cuidado & Manteniniento
1
2
3
4
Continued on next page
Continuación en la página siguiente
1
4
Page 18

Canopy Clip
Sujetador del toldo
Canopy Frame
Estructura del toldo
1
18
1
2
3
Slits
Ranuras
1
2
Continued on next page
Continuación en la página siguiente
TO REMOVE BASSINET CANOPY FROM
FRAME FOR CLEANING
PARA REMOVER EL TOLDO DEL MOISÉS
DE LA ESTRRUCTURA PARA LIMPIADO
To remove the canopy from the canopy
frame, hold the clip area and pull up or back
on the canopy frame until the notch on the
frame pops out of the clip.
Para remover el toldo de la estructura del
toldo, sujete el área del clip y jale hacia arriba o hacia atrás en la estructura del toldo
hasta que la ranura en la estructura salga del
clip.
Slide the canopy off the frame.
Deslice el toldo fuera de la estructura.
To clean, hand wash canopy with water and
mild soap.
Pliegue el toldo con agua y jabón suave.
Line dry. Do not dry canopy in clothes dryer.
It may shrink canopy.
Seque colgado. No seque el toldo en la
secadora de ropa. Puede que haga encoger
el toldo.
TO PROPERLY RE-MOUNT THE BASSINET
COVER
PARA VOLVER INSTALAR LA CUBIERTA
DEL MOISÉS
Replace floorboard into bassinet cover
with snaps and hooks facing up.
Reemplace el suelo en la cubierta del moisés
con los cierres y ganchos mirando hacia arriba.
Turn bassinet over and slide plastic anchor
through slits to secure bassinet cover.
Gire el moisés y deslice el ancla de plástico a
través de las ranuras para asegurar la
cubierta del moisés.
Turn bassinet upright and place folded
bassinet frame on floorboard and inside
bassinet cover.
Ponga el moisés en posición recta y sitúe el
marco sin desplegar en el suelo del moisés y
dentro de la cubierta del moisés.
2
1
2
Page 19

19
Pull up bassinet frame to unfold support bars
and clip each support leg into the hooks on
the floorboard.
Estire del marco del moisés para desplegar
las barras de soporte y ajuste cada pata de
soporte a los ganchos en el suelo del moisés.
Fasten all snaps on bassinet cover to
floorboard.
Asegure todos los broches de la cubierta del
moisés a la tabla de la base.
Attach canopy and replace bassinet pad in
bassinet, making sure pad is flat and firmly in
place.
Una la cubierta y ponga el colchoncito dentro
del moisés. Presione el colchoncito
asegurándose que esté plano y se encuentre
fijo en su sitio.
CAUTION: Fitted bassinet sheet should
securely wrap at least 2" (5 cm) beneath entire
pad to reduce chance of entanglement.
PRECAUCIÓN: La sábana ceñida del moisés
debe quedar bien sujeta 5 cm. (2 pulgadas)
por debajo y alrededor del colchón para
disminuir el riesgo de que el bebé quede
enredado.
Open bassinet locking attachment clips on
the bottom of the bed. Place U-shaped balance clips onto the top rail.
Abra los clips de unión de cierre de la cuna
en la parte inferior de la cama. Sitúe los clips
de balance en forma de U en el raíl superior.
Close the locking attachment clips to secure
bassinet bed to frame.
Cierre los clips de unión para asegurar la
cama de la cuna al soporte.
NOTE: Pull up to ensure secure.
NOTA: Jale hace arriba para asegurar que
este seguro.
6
7
8
8
7
U-shaped balance clips
los clips de balance en forma de U
6
Hooks
Ganchos
4
5
4
5
Page 20

20
Limited Warranty / Garantía limitada
Kolcraft®warrants this product to be free of defects in materials and workmanship, as
follows: For a period of ONE YEAR from the date of purchase, Kolcraft will repair or
replace, at its option, the defective product. If you have a problem or are not satisfied
with this product, please contact the Consumer Service Department at Kolcraft.
REPAIR OR REPLACEMENT AS PROVIDED UNDER THIS WARRANTY IS THE EXCLUSIVE
REMEDY OF THE CONSUMER. KOLCRAFT SHALL NOT BE LIABLE FOR ANY
INCIDENTAL OR CONSEQUENTIAL DAMAGES FOR BREACH OF ANY EXPRESS OR
IMPLIED WARRANTY ON THIS PRODUCT, EXCEPT TO THE EXTENT REQUIRED BY APPLICABLE LAW. ANY IMPLIED WARRANTY OF MERCHANTABILITY OR FITNESS FOR A PARTICULAR PURPOSE ON THIS PRODUCT IS LIMITED TO THE DURATION OF THIS WARRANTY.
Some states do not allow the exclusion or limitation of warranties set forth above, so the
above exclusions may not apply to you. This warranty gives you specific legal rights, and
you may also have other rights which vary from state to state. We sincerely thank you for
your purchase of this Kolcraft product.
To obtain warranty service, please call Kolcraft’s Consumer Service Department at
1-800-453-7673 in U.S. and Canada, 1-910-944-9345 outside U.S. and Canada or contact
us via email at customerservice@kolcraft.com
If the product is returned to Kolcraft’s Consumer Service Department for repair or
replacement, it must be shipped prepaid and adequately insured.
For further information visit www.kolcraft.com
RECALL WEBSITE
: HELP KEEP YOUR CHILD SAFE. Check www.recall.gov to see if any
products you use with your child or any of your child's toys have been recalled.
Kolcraft
®
garantiza que este producto estará libre de defectos en materiales y fabricación
de la siguiente manera: Por un período de UN AÑO después de la fecha de compra,
Kolcraft reparará o reemplazará, a su opción, el producto defectuoso. Si usted tiene un
problema o no está satisfecho con este producto, por favor diríjase al Departamento de
Servicio al Consumidor de Kolcraft.
LA REPARACIÓN O EL REEMPLAZO SEGÚN SE DISPONE EN ESTA GARANTÍA ES EL
REMEDIO EXCLUSIVO DE CONSUMIDOR. KOLCRAFT NO SE HARÁ RESPONSABLE DE
NINGÚN DAÑO INCIDENTAL O EMERGENTE POR VIOLACIÓN DE CUALQUIER
GARANTÍA EXPRESA O IMPLÍCITA DE ESTE PRODUCTO, SALVO EN LA MEDIDA
REQUERIDA POR LA LEY APLICABLE. CUALQUIER GARANTÍA IMPLÍCITA DE
COMERCIABILIDAD O IDONEIDAD PARA UN FIN EN PARTICULAR DE ESTE PRODUCTO
ESTÁ LIMITADA EN DURACIÓN AL TÉRMINO DE ESTA GARANTÍA.
Algunos estados no permiten la exclusión o limitación de garantías según se dispone
anteriormente, de manera que es posible que las antedichas exclusiones no sean
aplicables a usted. Esta garantía le otorga derechos legales específicos y es posible que
también disponga de otros derechos, los cuales pueden variar de un estado a otro. Le
agradecemos sinceramente por haber comprado este producto Kolcraft.
Para obtener servicio de garantía, llame al Departamento de Servicio al Consumidor de
Kolcraft al 1-800-453-7673 en Estados Unidos y Canada; fuera de Estados Unidos y
Canada: 1-910-944-9345 o envianos un mensaje por correo electrónico a
customerservice@kolcraft.com.
Si el producto se devuelve al Departamento de Servicio al Consumidor de Kolcraft para
ser arreglado o reemplazado, debe mandarse con el flete pagado y debidamente
asegurado.
Para mayor información visítenos en www.kolcraft.com
SITIO DE WEB DE HACER VOLVER: MANTENGA A SU HIJO SEGURO. Compruebe
www.recall.gov para ver si cualquiera de los productos que utiliza con su hijo o cualquiera
de sus juguetes han sido retirados.
Page 21

21
Personal Record Card / Tarjeta de registro personal
Once in a while, we are less than perfect and one of our products reaches a customer with
a problem. In most cases, we can solve your problem with replacement parts. Please
contact us before you return one of our products to the store. Once a product is returned,
it cannot be resold. The materials and the energy used to make it are wasted.
Please fill in the information in the space provided and attach a copy of your purchase
receipt. You will need this information to obtain warranty service.
You will need this information to obtain warranty service. You can find Model Number and
Date of Manufacture on a sticker located on the Bassinet leg.
Ocasionalmente no logramos la perfección y uno de nuestros productos presenta algún
problema al llegar al cliente. En la mayor parte de los casos podemos resolver el problema
con piezas de reemplazo. Sírvase ponerse en contacto con nosotros antes de devolver uno
de nuestros productos a la tienda. Una vez que se devuelve un producto, no se pude
volver a vender. Se desperdician los materiales y la energía que se usó en su fabricación.
Por favor escriba la información en el espacio provisto y adjunte una copia de su recibo de
compra. Usted necesitará esta información para obtener los servicios incluidos en la
garantía.
Usted encontrará el Número de Modelo y la Fecha de Fabricación en una etiqueta situada
en la pata del moisés.
Please direct any comments, questions or replacement part requests to:
Favor de remitir cualquier comentario, preguntas o pedidos de piezas de
respuesto a:
Kolcraft®Enterprises, Inc. Consumer Service Department
10832 NC Highway 211 East
Aberdeen, NC 28315
1-800-453-7673 in U.S. & Canada, 1-910-944-9345 outside U.S. & Canada
Eastern Standard Time, 8 am-6:45 pm Monday - Thursday, 8 am-3:30 pm Friday
1-800-453-7673 en los Estados Unidos y en Canada, 1-910-944-9345 fuera de los Estados
Unidos y Canada tiempo estándar del este, 8 am-6:45 pm Lunes - Jueves, 8 am-3:30 pm
Viernes
fax / fax: 910-944-3490
e-mail / correo electrónico: customerservice@kolcraft.com
Model / Style Number:
Número de Modelo/Estilo: _________________________
Date of Manufacture:
Fecha de fabricación: ______________________________
Date of Purchase:
Fecha de compra: _________________________________
Page 22

22
Page 23

Circle the Part You Need
Marque con un círculo el repuesto
que necesita
Las piezas de repuesto se pueden ver un
poco diferentes de como se muestran abajo.
Replacement parts may look slightly
different than what is shown below.
23
Replacement Parts List / Lista de piezas de repuesto
Basket Rod
Varillas de Canasta
$2.00 each/cada uno
Light Vibes®Deluxe
Electronics
Electrónicos de Tender
Vibes
®
con música
$9.00
Canopy with Toys
Toldo con juguetes
$15.00
Vinyl Pad
Panel de vinilo
$14.00
Fitted Sheet
La sábana cenida
$9.00
Floorboard
El suelo
$10.00
Bassinet Frame
Marco del moisés
$20.00
Bassinet Cover
La cubierta del moisés
$27.00
Frame
Soporte
$15.00
Fabric Sleeve
Funda de género
$6.00
Folding Basket
Canasta plegable
$12.00 each/ cada
Canopy Clip
Clip del toldo
$2.00 each/ cada
Rocking Base
Base mecedora
$15.00 each/ cada
Page 24

24
Replacement Parts Order Form / Formulario para ordenar piezas de repuesto
Model Number -
No de modelo
Date of Manufacture -
Fecha de fabricación
Total -
Total
:
Shipping & Handling* -
Gastos de envío*:
$5.00
Sales Tax** -
Impuestos
**:
Total Due -
Total a pagar
:
*$15.00 outside the continental U.S.
*U.S. $15,00 para fuera de continente de EE.UU
**NC Residents Only 7%
**Residentes de North Carolina nomas 7%
❑
Check or money order (in US dollar) enclosed (payable to Kolcraft
Enterprises, Inc.)
Cheque o giro adjunto (a nombre de Kolcraft Enterprises, Inc.)
❑
Charge to credit card
Cobrar a la tarjeta de crédito
❑ Visa ❑ Mastercard
Account# -
Cuenta No
:
3 Digit Security Code -
3 numeros de código de dígito de seguridad
:
Expiration Date -
Fecha de vencimiento
:
/
Signature -
Firma
:
Ship to -
Enviar a
:
Name - Nombre
Address - Dirección
City, State, Zip - Ciudad, Estado, Código postal
( )
Telephone - Teléfono
Email Address - Correo electrónico
Complete the following form. Your
model number and date of manufacture
must be included on the form to ensure
proper replacement parts.
Complete el siguiente formulario. Debe
incluir en el formulario el número de su
modelo y fecha de fabricación para
asegurarse de que obtenga las piezas de
repuesto adecuadas.
 Loading...