

Kolcraft Jeep Traveler Tandem Instruction Sheet

©2009 Kolcraft®Enterprises, Inc. S76-T-R2 2/09
Jeep®Traveler Tandem Stroller
Instruction Sheet
Hoja de Instrucciones para la carriola
acoplada para viajeros Jeep
®
Mode d’emploi pour poussette
tandem de voyage de Jeep
®

2
Avoid serious injury from falling or sliding out. Always use Restraint
System. Your child's safety depends on you. Proper stroller use cannot be
assured unless you follow these instructions. DO NOT USE STROLLER
UNTIL YOU READ AND UNDERSTAND THESE INSTRUCTIONS.
IMPORTANT SAFETY INFORMATION:
How to Keep Your Child Safe While Using this Stroller
•
Adult Assembly Required.
• NEVER LEAVE YOUR CHILD UNATTENDED WHILE IN STROLLER.
Accidents can happen quickly while your back is turned. You must
always keep your child in view while your child is in the stroller,
even when sleeping. Do not use this product as a bed. Your child
may become tangled in straps or pads and suffocate.
• Always use restraint system to keep child from standing up or
falling out of the stroller. Do not use product without full 5 point
harness restraint. Removing the shoulder straps will not
adequately restrain child.
• Always place the child in the front seat before placing another in
the back seat. When removing children, always remove the child
in the back seat first before removing the child in the front. Failure
to do so may cause the stroller to become unstable and tip.
• Always lock the stroller open before allowing your child in or near
the stroller. This prevents injuries caused by stroller collapsing.
•
Only use this stroller with children who weigh less than 40 lbs. (18.14
kg) or are less than 40” (1 meter) tall, per seat.
This stroller can hold a
maximum of 80 lbs (36.28 kg.) dual occupancy, and use by larger
children may cause it to tip.
• Use this stroller in the reclined position until child can sit up
unassisted.
• Always set the wheel brakes when stroller is not moving, especially
on an incline. This prevents the stroller from rolling away.
• Always fasten the canopy onto the seat back when using the
stroller in the reclined position.
What to Avoid While Using this Stroller
• Always balance the weight of the stroller evenly. To prevent the
stroller from becoming unstable or tipping:
• Do not place parcels or accessory items on the stroller canopy,
seat, or over the handle.
• Do not put more than 10 lbs. (4.54 kg) in the basket.
WARNING
Continued on next page

3
• Do not allow children to play with or hang onto the stroller.
• Do not put more than 3 lbs. (1.36 kg) in each cargo bag.
• Never use this stroller on stairways or escalators.
• DO NOT lift by tray or toys.
• Make sure children are clear of any moving parts if you adjust the
stroller, otherwise they may be injured.
• THIS IS NOT AN EXERCISE STROLLER! Do not use this product
while running, jogging, in-line skating or participating in other
athletic activities.
• DO NOT put child in basket.
• Take care when folding and unfolding to prevent finger pinching.
• Product may become unstable if a parcel bag, other than the one
recommended by the manufacturer is used.
• DO NOT allow children to climb into stroller unassisted. Stroller
may tip over and injure child.
• Only use replacement parts supplied by the manufacturer.
How to Use this Stroller with Your Infant Car Seat
• AVOID SERIOUS INJURY FROM FALLS:
• This product is only to be used with certain Infant Car Seats. See
below for list of compatible Infant Car Seats.
• When using this product with your Infant Car Seat, infant must
always be secured in the car seat with the car seats harness.
• To ensure your Infant Car Seat is properly installed on the stroller,
make sure it is:
• Facing the person pushing the stroller.
• Tightly secured to the stroller with the red restraint straps.
• If at any time your Infant Car Seat does not secure properly to the
stroller, or if you have questions about assembly or use of the
stroller, Do Not use this product. Call Kolcraft at 1-800-453-7673.
• Make sure the stroller is fully unfolded and securely latched before
attaching your Infant Car Seat. This prevents finger pinching and
injuries caused by stroller collapsing.
• Only transport infants that are within the size and weight
limitations of your Infant Car Seat, as described in the instruction
manual provided by the Infant Car Seat manufacturer.
Continued on next page

4
• THE FOLLOWING INFANT CAR SEATS CAN BE USED IN THIS
STROLLER’S REAR SEAT:
• If your Infant Car Seat is not one of the models listed above, DO
NOT use your infant car seat in the rear seat of this stroller. Other
Infant Car Seat models will not fit properly and may result in serious
injury to your child.
•
DO NOT USE THE FOLLOWING CAR SEATS WITH THIS STROLLER!
This list is not inclusive.
Baby Trend
®
, Britax®, Century®, Chicco®, Combi®, Cosco®, EvenFlo®,
Graco®, Maxi-Cosi®, Peg Perego®and Safety 1st®are trademarks of
their respective owners. They are not associated with Kolcraft
Enterprises, Inc. and no approval by them is to be implied.
•
Century®Vanté™5
•
Cosco®Designer 22®Series
•
Cosco®Eddie Bauer® Opus 35
®
•
Cosco®First Ride DX
•
Safety 1st®Designer®22
•
Safety 1st®Starter
™
•Baby Trend®Flex-Loc
•Baby Trend
®
Latch-Loc
•Britax
®
The Companion
•Britax
®
Handle with Care
®
•Century®Avanta™Series
•
Chicco®Key Fit & Key Fit
30
•Combi®Connection
™
•
Combi®Ty ro
™
•
Cosco®Arriva®Series
•
Cosco®Turn-A-Bout
®
•
Cosco®Eddie Bauer®Caress
•
Evenflo®Cozy Carry
™
•
Evenflo®Discovery
™
•Evenflo®Embrace
™
•
Evenflo®On-My-Way
™
•
Evenflo®Portabout
™
•
Graco®Safe Seat
™
•
Graco®Snug Ride™Series
•Maxi-Cosi®Mico
™
•
PegPerego®Primo Viaggio
•
PegPerego®SIP
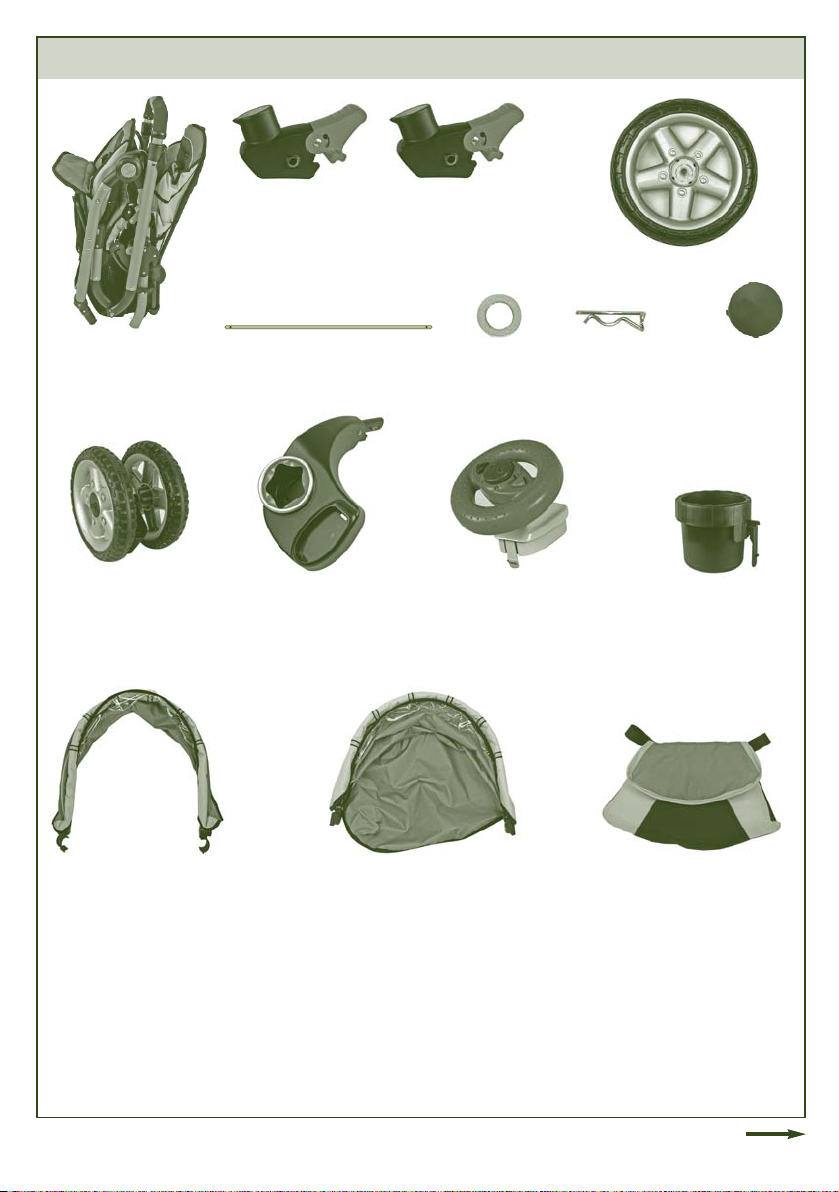
Parts List
5
Stroller Frame
Rear Wheels
(2)
Brake Assembly
Right (with ★)
Front Tray
Washers
(2)
Cotter
Pins (2)
Hub Caps
(2)
Parent Cup
Holder
(select models)
Rear Axle
Brake Assembly
Left (with ▲)
Front Canopy
Front Wheel
Assembly (2)
To y
(select models)
Rear Canopy Cargo Bags (2)
Continued on next page
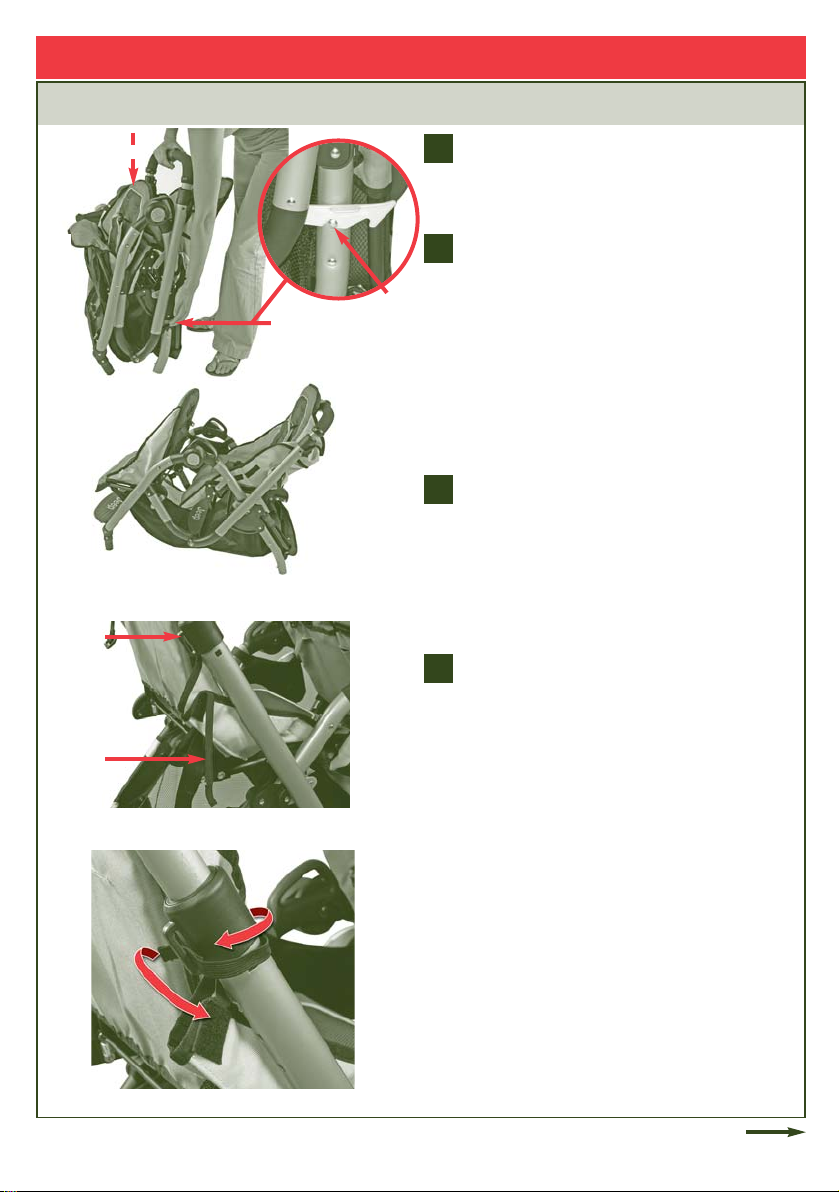
To Open Stroller
Remove any cardboard inserts or plastic
ties used to protect the product during
shipment.
To open
Stroller Frame
, a) pull up on the
Automatic Locking Latch with 1 hand,
gently move it to the lower left of the post.
Place other hand on the foam handle while
tilting stroller on its back legs b) push
down on foam handle to open frame.
NOTE: Keep hands/fingers away from
side locks and other moving parts when
unfolding the stroller!
Unfold to full open position.
If the elastic strap on the sides of the
rear seat is not secured to the rear seat
wing, wrap the strap around the front of
the handle tube, thread it through the
plastic slot at the back and secure the
end of it to the seat wing.
2
3
How to Assemble Your Stroller
1
6
2
3
Automatic
Locking Latch
b
a
Post
Continued on next page
4
Elastic
Strap
Plastic
Slot
4
4

7
5
6
7
5
6
7
a
b
c
Rotate the front footrest forward and
down until it snaps onto the support
tube.
Raise the rear storage basket tube
up until it clicks and remains horizontal.
To extend handle, a) first push and hold
the safety lock at the top of the handle
to the left. Second, b) while holding the
safety lock to the left, squeeze the
folding trigger to unlock the handle and
c) lift upwards to one of 3 height
positions:
•Low - Medium - High
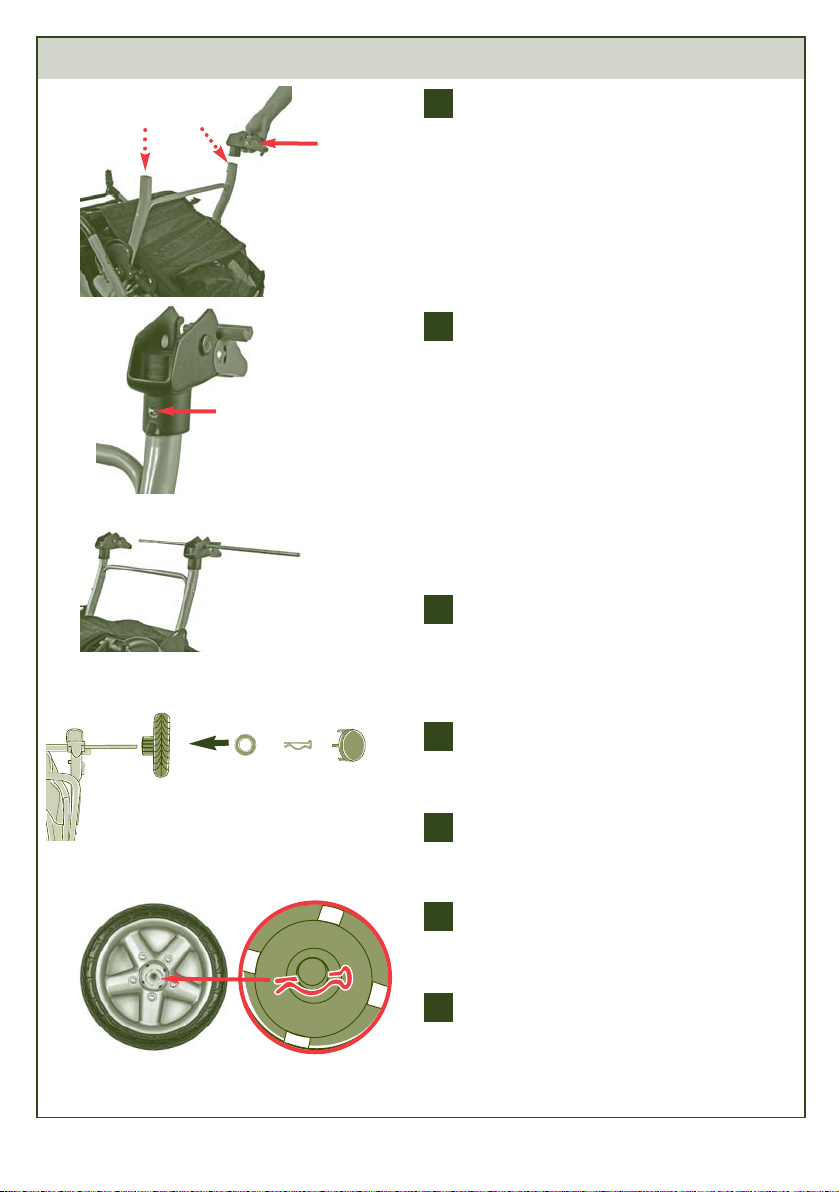
To Assemble Rear Wheels
8
2
1
2
Brake Lever
Symbol
1 & 2
3
4
5
6
7
4 - 7
5
Button
3
Turn stroller over as shown. There is a
LEFT and RIGHT brake assembly.
Be sure to assemble them onto the
correct rear leg tube. LEFT and RIGHT
will be identified as shown. Each brake
assembly will have either a triangle or a
star on the bottom of the part.
• TRIANGLE = “▲” LEFT
• STAR = ”★“ RIGHT
Position
Brake Assembly
as shown, with
brake lever pointing towards stroller
handle. Push brake assembly completely
onto rear leg tube until spring loaded
button clicks into place.
NOTE: If brake assembly does not click
and hold in place, the spring button is
stuck and not protruding through the
hole in the tube. Use a screwdriver or
pliers to move the button so that it
protrudes out of the hole in the tube.
Remove and discard protective foam
sleeves from ends of rear axle. Insert
axle into outside hole of brake assembly
and slide it through frame.
Slide a rear wheel onto the axle then
slide a washer onto the axle.
Fit straight part of cotter pin through
hole on axle as shown.
Assemble other rear wheel to axle with
washer and cotter pin.
Line up each of the 4 tabs of the hub
cap with the 4 slots in the wheel and
snap hub cap into place. Repeat for
second side.
▲
★
 Loading...