

Kolcraft Jeep S77-T-R3 Instruction Sheet

©2009 Kolcraft®Enterprises, Inc.
S77-T-R3 11/08
Jeep®Liberty 3-Wheel Stroller
Instruction Sheet
Instrucciones para carriola de 3 ruedas
Jeep
®
Liberty
Feuillet d'Instructions pour Poussette
à Trois Roues pour Jeep
®
Liberty

2
Avoid serious injury from falling or sliding out. Always use Restraint System.
Your child's safety depends on you. Proper stroller use cannot be assured
unless you follow these instructions. DO NOT USE STROLLER UNTIL YOU
READ AND UNDERSTAND THESE INSTRUCTIONS.
IIMMPPOORRTTAANNTT SSAAFFEETTYY IINNFFOORRMMAATTIIOONN::
HHooww ttoo KKeeeepp YYoouurr CChhiilldd SSaaffee WWhhiillee UUssiinngg tthhiiss SSttrroolllleerr
•
AAdduulltt AAsssseemmbbllyy RReeqquuiirreedd..
•
NNEEVVEERR LLEEAAVVEE YYOOUURR CCHHIILLDD UUNNAATTTTEENNDDEEDD WWHHIILLEE IINN SSTTRROOLLLLEERR
.
Accidents can happen quickly while your back is turned. You must
always keep your child in view while your child is in the stroller,
even when sleeping. Do not use this product as a bed. Your child
may become tangled in straps or pads and suffocate.
•
AAllwwaayyss uussee rreessttrraaiinntt ssyysstteemm ttoo kkeeeepp cchhiilldd ffrroomm ssttaannddiinngg uupp oorr
ffaalllliinngg oouutt ooff tthhee ssttrroolllleerr..
Do not use product without full 5-point
Harness Restraint. Removing the shoulder straps will not
adequately restrain child.
•
AAllwwaayyss lloocckk tthhee ssttrroolllleerr ooppeenn bbeeffoorree aalllloowwiinngg yyoouurr cchhiilldd iinn oorr nneeaarr
tthhee ssttrroolllleerr..
This prevents injuries caused by stroller collapsing.
•
OOnnllyy uussee tthhiiss ssttrroolllleerr wwiitthh cchhiillddrreenn wwhhoo wweeiigghh lleessss tthhaann 4400 llbbss.. ((1188..11
kkgg)) oorr aarree lleessss tthhaann 4400”” ((11 mmeetteerr)) ttaallll,, aanndd wwhhoo’’ss hheeaadd rreessttss bbeellooww tthhee
ttoopp ooff tthhee sseeaatt bbaacckk..
Use by larger children may damage the stroller,
or cause a hazardous unstable condition to exist.
•
UUssee tthhiiss ssttrroolllleerr iinn tthhee rreecclliinneedd ppoossiittiioonn uunnttiill cchhiilldd ccaann ssiitt uupp uunnaassssiisstteedd.
.
•
AAllwwaayyss sseett tthhee wwhheeeell bbrraakkeess wwhheenn ssttrroolllleerr iiss nnoott mmoovviinngg,, eessppeecciiaallllyy
oonn aann iinncclliinnee..
This prevents the stroller from rolling away.
•
AAllwwaayyss ffaasstteenn tthhee ccaannooppyy oonnttoo tthhee sseeaatt bbaacckk wwhheenn uussiinngg tthhee
ssttrroolllleerr iinn tthhee rreecclliinneedd ppoossiittiioonn..
WWhhaatt ttoo AAvvooiidd WWhhiillee UUssiinngg tthhiiss SSttrroolllleerr
•
AAllwwaayyss bbaallaannccee tthhee wweeiigghhtt ooff tthhee ssttrroolllleerr eevveennllyy..
To prevent the
stroller from becoming unstable or tipping:
• Do not place parcels or accessory items on the stroller canopy,
seat, or over the handle.
• Do not put more than 10 lbs. (4.54 kg) in the basket.
• Do not put more than 2.5 lbs. (1.13 kg) in each cargo bag (select models).
WARNING
Continued on next page

•
DDOO NNOOTT
place more than 3 lbs.(1.36 kg) in the parent tray to avoid
tipping!
• Do not allow children to play with or hang onto the stroller.
•
NNeevveerr uussee tthhiiss ssttrroolllleerr oonn ssttaaiirrwwaayyss oorr eessccaallaattoorrss..
•
DDOO NNOOTT lliifftt bbyy ttrraayy oorr ttooyyss..
•
MMaakkee ssuurree cchhiillddrreenn aarree cclleeaarr ooff aannyy mmoovviinngg ppaarrttss
if you adjust the
stroller, otherwise they may be injured.
•
TTHHIISS IISS NNOOTT AANN EEXXEERRCCIISSEE SSTTRROOLLLLEERR!!
Do not use this product
while running, jogging, in-line skating or participating in other
athletic activities.
•
DDOO NNOOTT ppuutt cchhiilldd iinn bbaasskkeett..
•• RReefflleeccttoorrss aarree ffoorr ddeeccoorraattiivvee ppuurrppoossee oonnllyy..
•
TTaakkee ccaarree wwhheenn ffoollddiinngg aanndd uunnffoollddiinngg ttoo pprreevveenntt ffiinnggeerr ppiinncchhiinngg..
• Product may become unstable if a parcel bag, other than the one
recommended by the manufacturer is used.
•
DDOO NNOOTT
allow children to climb into stroller unassisted. Stroller
may tip over and injure child.
• Keep air filled wheels at a recommended tire pressure of 30 p.s.i.
(210 kPa) (select models).
• Only use replacement parts supplied by the manufacturer. If you
have a flat air filled tire, you may use a standard bicycle tire repair
kit or take it to a bicycle shop to be repaired. (Select Models)
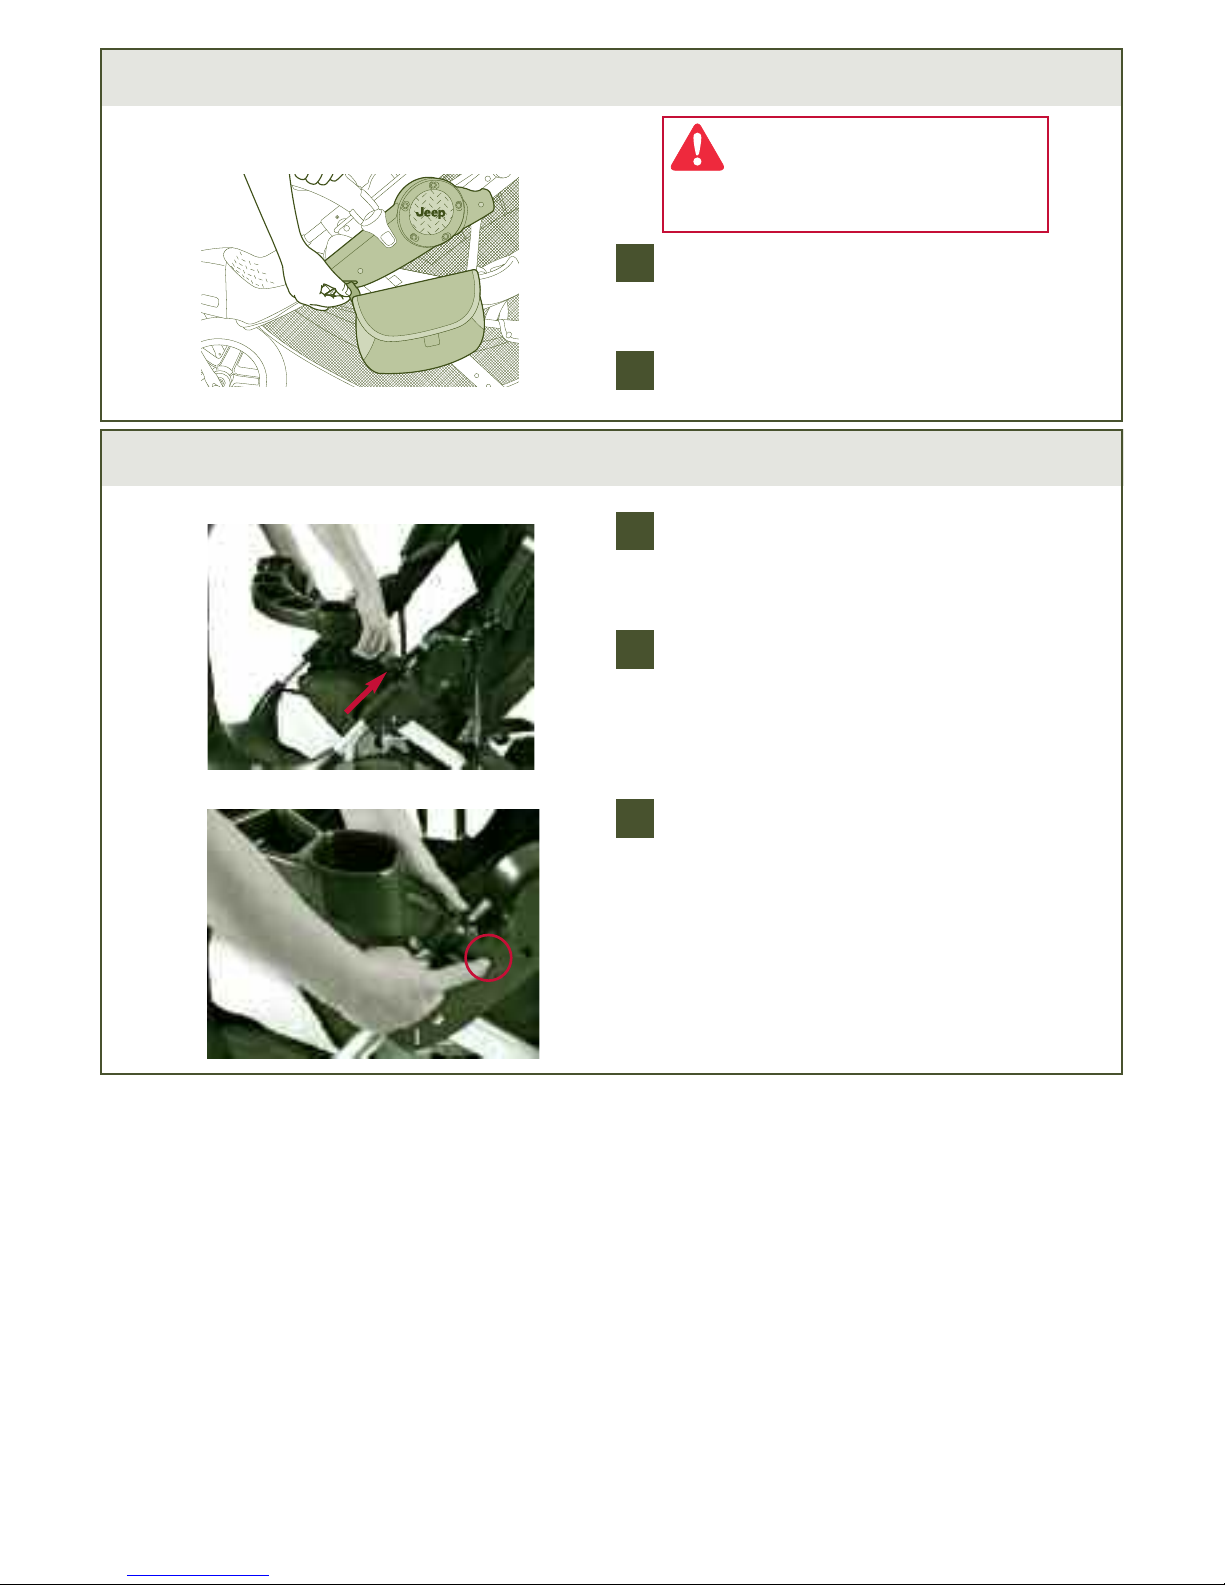
How to Use this Stroller with Your Infant Car Seat
•• AAVVOOIIDD SSEERRIIOOUUSS IINNJJUURRYY FFRROOMM FFAALLLLSS::
• This product is only to be used with certain Infant Car Seats. See below
for list of compatible Infant Car Seats.
• When using this product with your Infant Car Seat, infant must always
be secured in the car seat with the car seat harness.
• To ensure your Infant Car Seat is properly installed on the stroller,
make sure it is:
• Facing the person pushing the stroller.
• Tightly secure to the stroller with the car seat restraint straps.
• If at any time your Infant Car Seat does not secure properly to the
stroller, or if you have questions about assembly or use of the stroller,
Do Not use this product. Call Kolcraft at 1-800-453-7673.
• Only transport infants that are within the size and weight limitations of
your Infant Car Seat, as described in the instruction manual provided
by the Infant Car Seat manufacturer.
3
Continued on next page
4
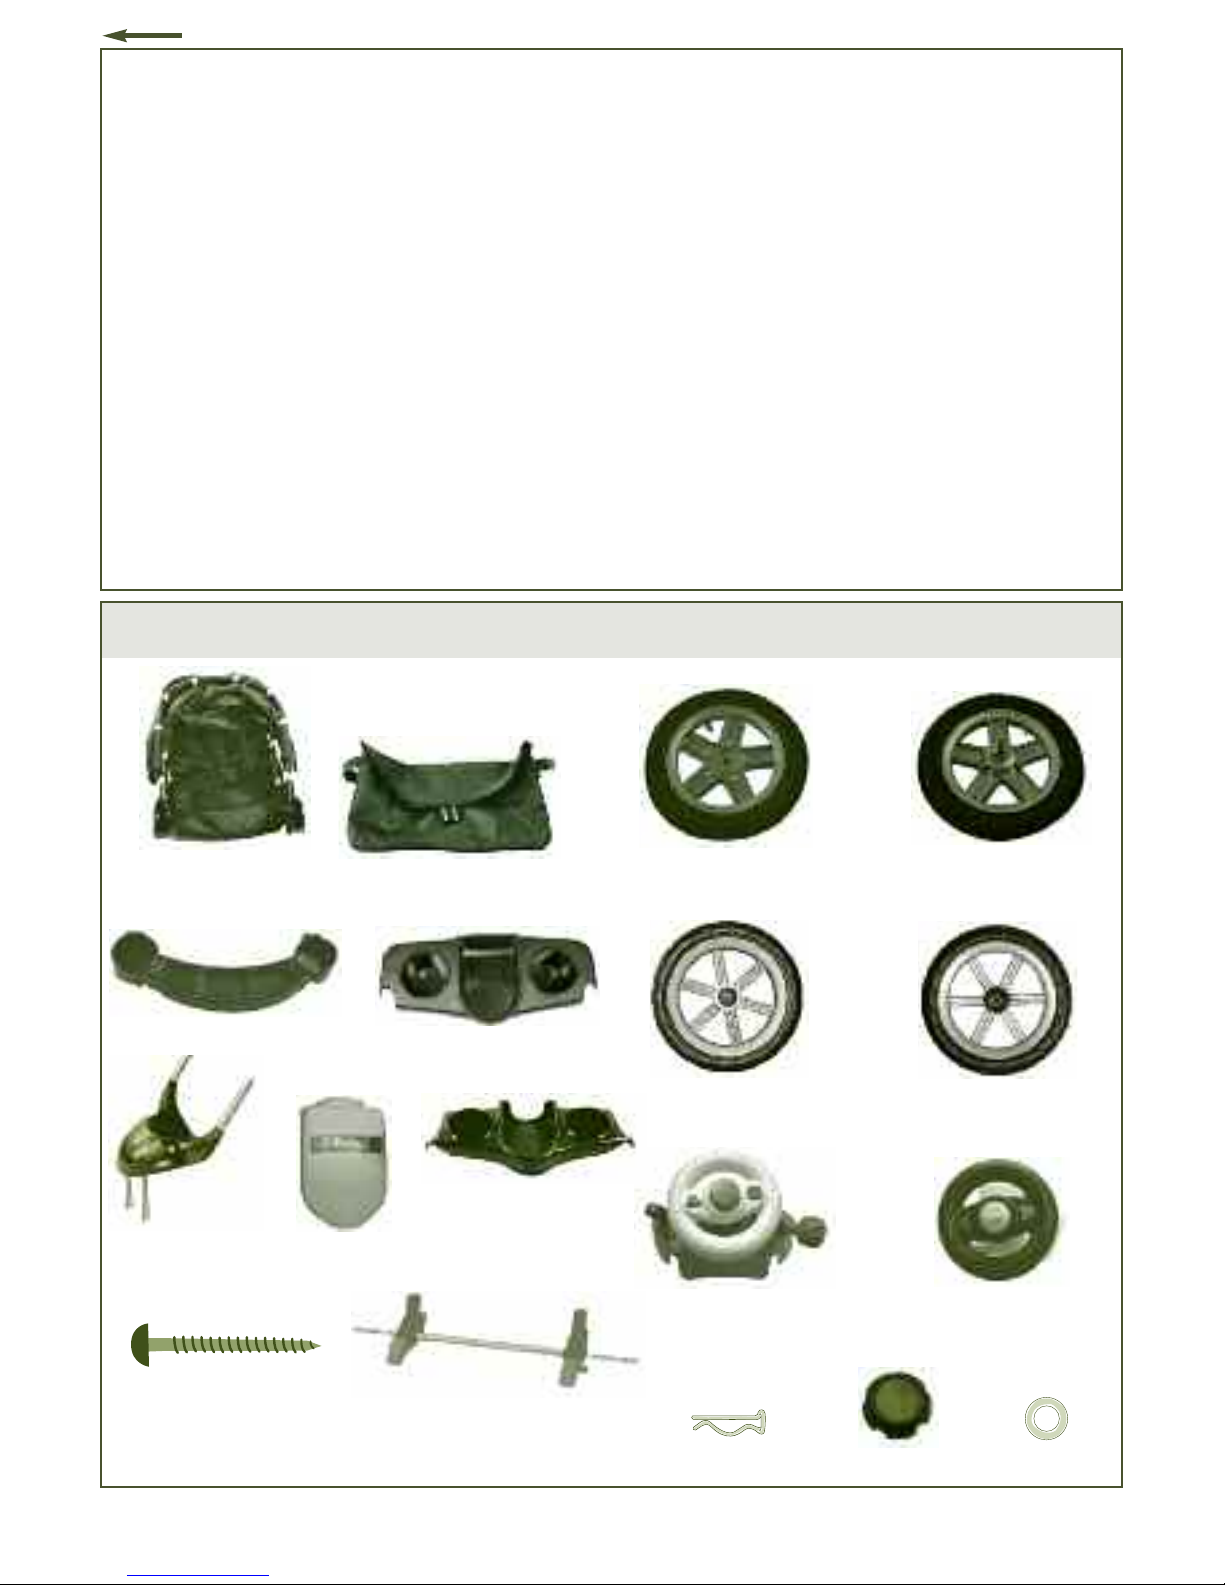
Parts List
Stroller Frame
Front Wheel
Air Filled
(Select Models)
Rear Wheels (2)
Air Filled
(Select Models)
iBaby
™
(Select Models)
Front Wheel
Assembly
Front Tray
Electronic Toys
(Select Models)
Basic Parent Tray
(Select Models)
1” Screws (2)
Cargo Bags (2)
(Select Models)
• THE FOLLOWING INFANT CAR SEATS CAN BE USED WITH THIS STROLLER:
• If your Infant Car Seat is not one of the models listed above, DO
NOT use your infant car seat with this stroller. Other Infant Car
Seat models will not fit properly and may result in serious injury to
your child.
Britax®, Chicco®, Graco®, and Peg Pérego®are trademarks of their
respective owners. They are not associated with Kolcraft
®
Enterprises, Inc. and no approval by them is to be implied.
Cotter Pins (2) Hub Caps (2)
•
Britax®Companion
®
•
Chicco®Key Fit & Key Fit 30
•
Graco®Snug Ride™Series
Non Electronic Toys
(Select Models)
Washers (2)
•
Graco®Safe Seat
™
•
Peg Pérego®Primo Viaggio SIP
Front Wheel
EVA
(Select Models)
Rear Wheels (2)
EVA
(Select Models)
iBaby™ Parent Tray
(Select Models)
Tool Needed: Phillips Screwdriver
Brake Assembly
with Rear Axel
5
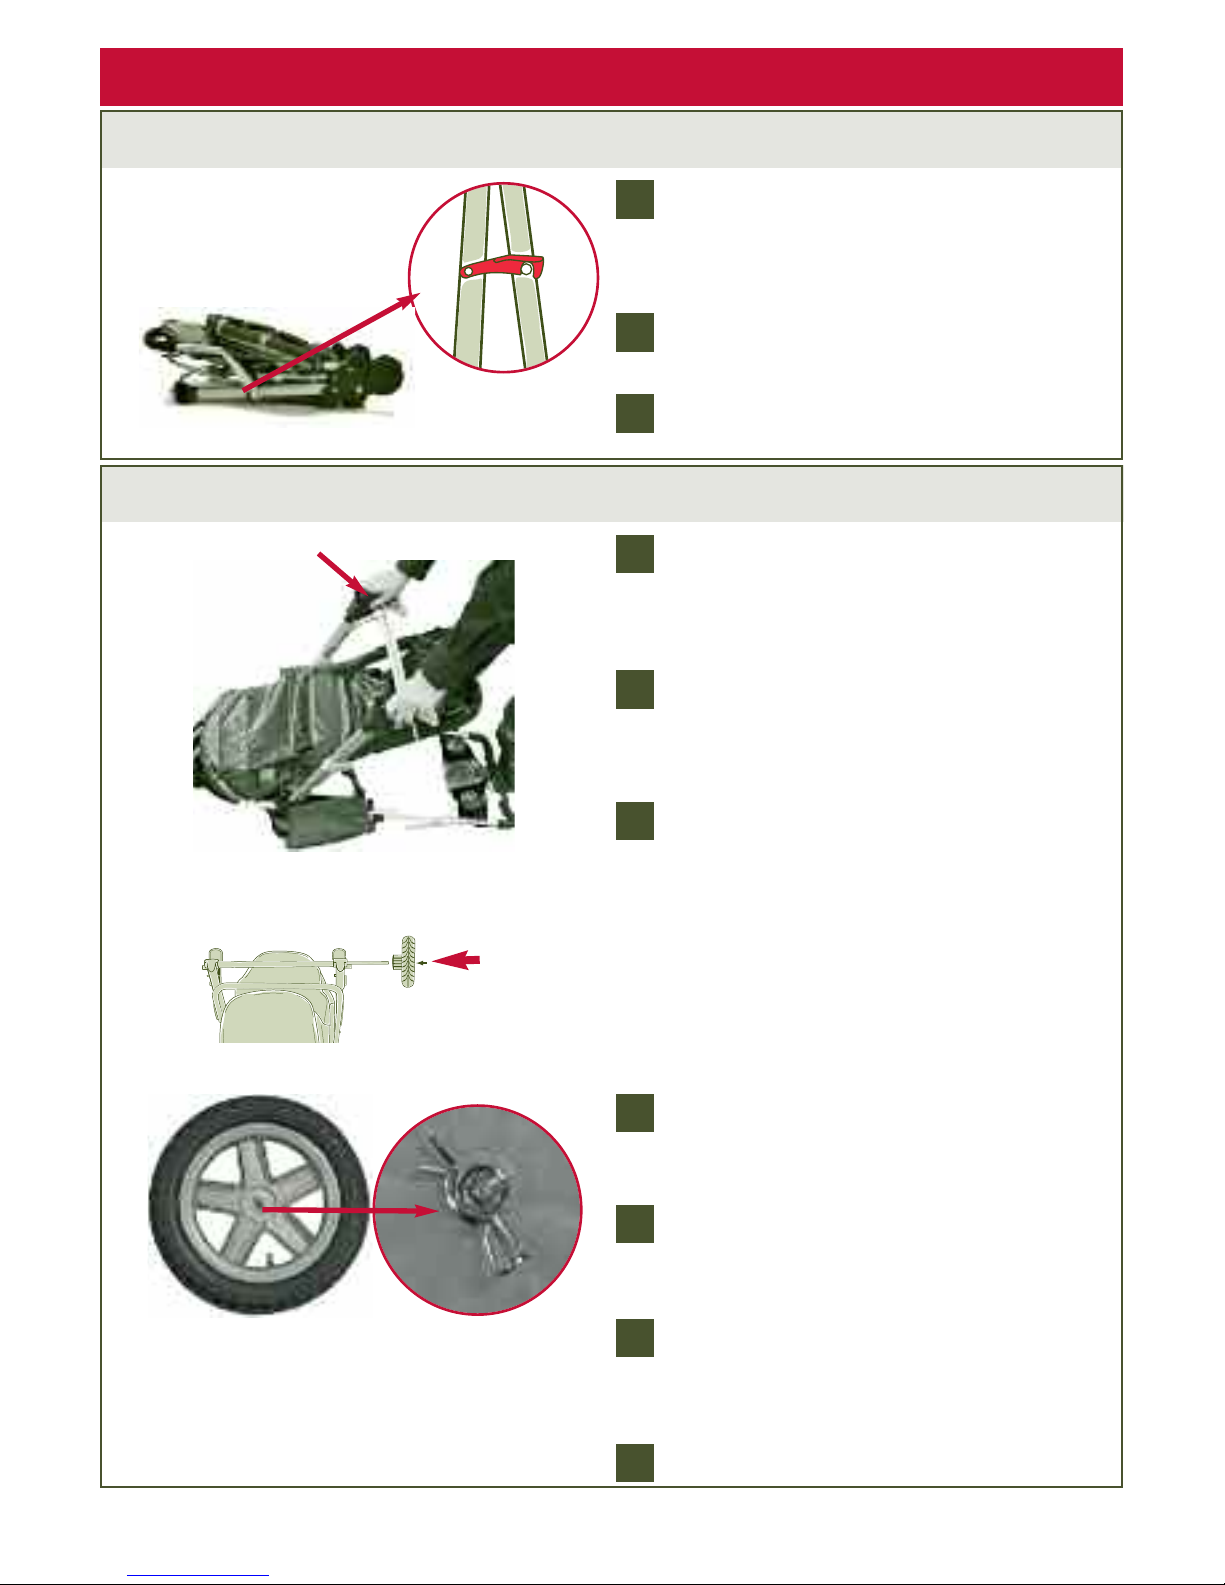
How to Assemble Your Stroller
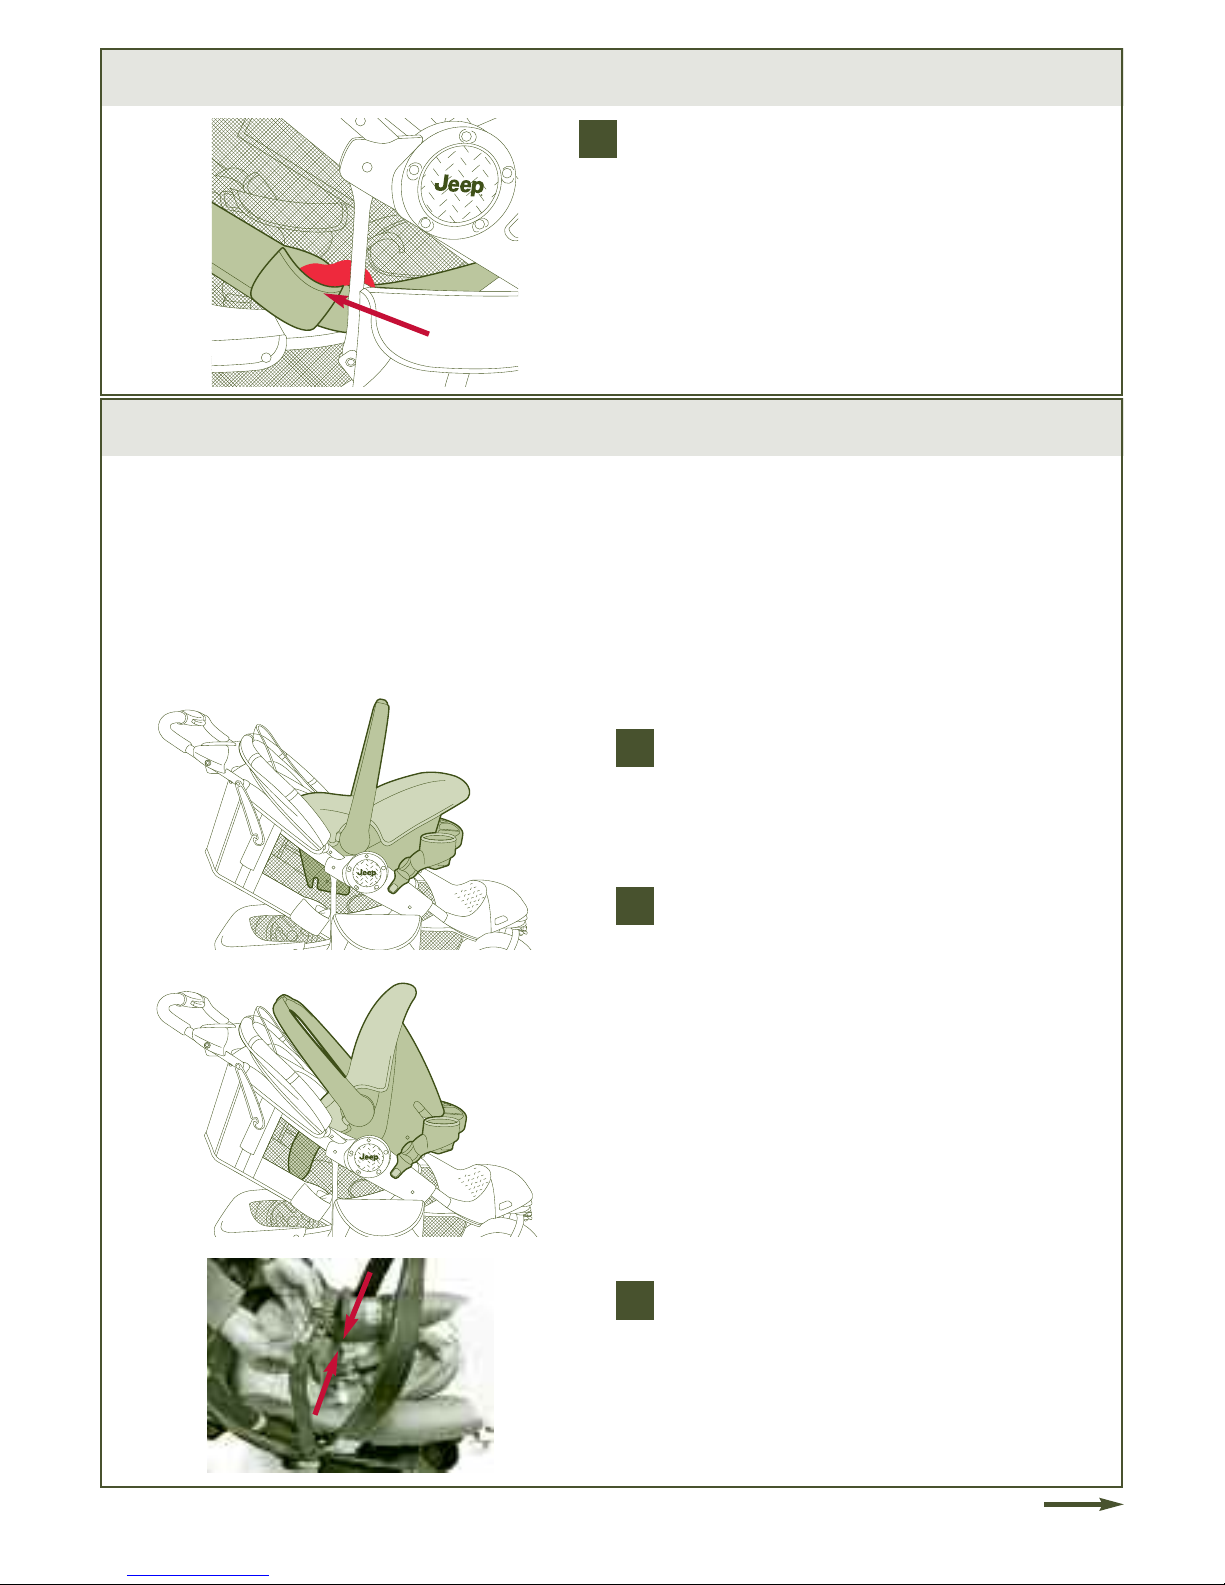
To Open Stroller
Remove any cardboard inserts or plastic
ties used to protect the product during
shipment.
Release the locking latch.
Unfold, making sure both side locks snap
into place.
2
3
2
1
To Assemble Rear Wheels
Remove and discard protective plastic
sleeve from ends of brake assembly with
rear axle. Place stroller on floor with seat
facing down.
Position brake assembly with rear axle as
shown, with brake levers pointing
towards stroller handle.
Push both sides of brake assembly onto
rear leg tubes at the same time until
spring loaded buttons click into place.
NNOOTTEE::
Make sure that spring loaded
buttons pop through.
CCAAUUTTIIOONN::
If spring loaded buttons DO
NOT pop through, front wheel assembly
could fall off during use.
Slide a rear wheel onto the axle then
slide a washer onto the axle.
Fit straight part of cotter pin through
hole on axle as shown.
Line up each of the tabs in the hub cap
with the slots in the wheel, snap hub cap
into place.
Repeat for second side.
2
3
1
4
5
6
7
2
4
5
6
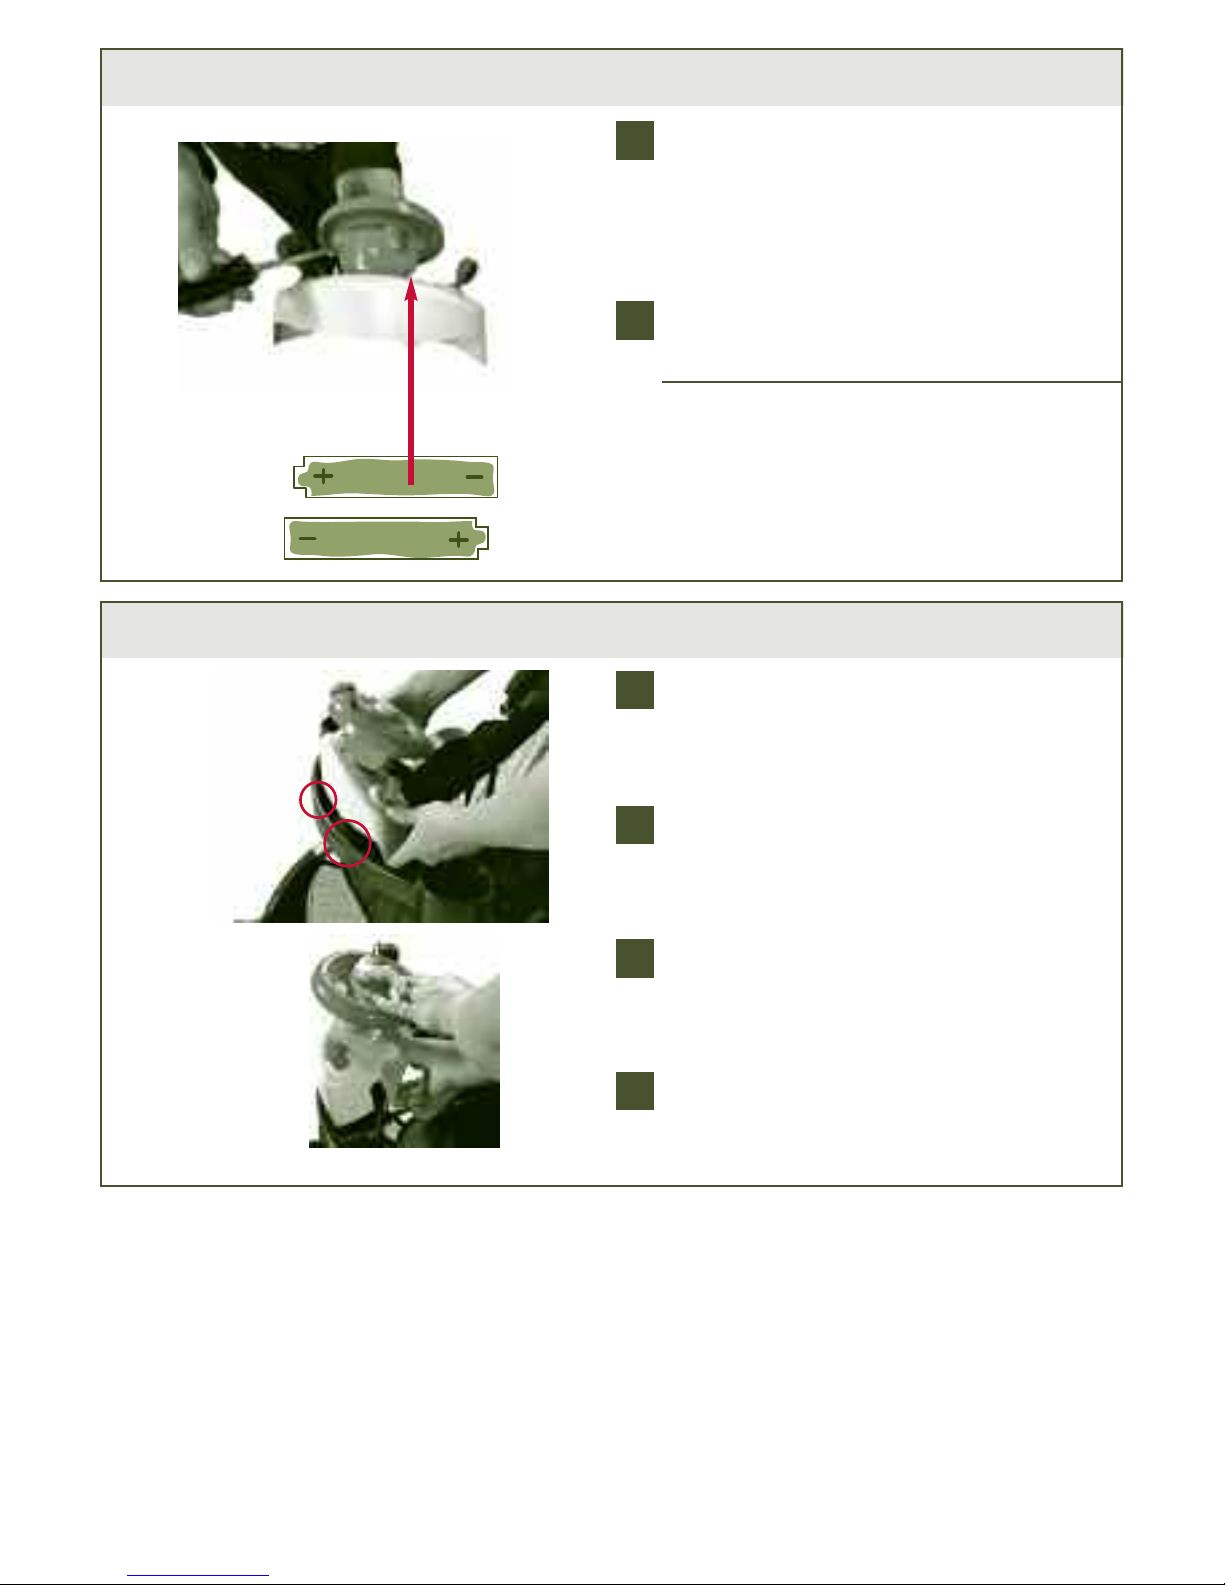
To Assemble Front Wheel Tube
1
Place stroller so the handle bar and rear
wheels are touching the floor.
Position front wheel assembly over
plastic side housings.
Align tubes with plastic housings and
push front wheel assembly on the frame.
You may need to depress the spring
loaded buttons slightly while assembling
the tubes.
NNOOTTEE::
If your spring loaded button
becomes out of place, take pliers and
feed button into hole.
NNOOTTEE::
Make sure that spring loaded
buttons pop through.
CCAAUUTTIIOONN::
If spring loaded buttons DO
NOT pop through, front wheel assembly
could fall off during use.
Secure Front Wheel Tube to the front
frame tubes using screws. The screws
should be aligned into the 2 holes
located on the underside of plastic
side housing. Secure with a Phillips
screwdriver on both sides.
2
3
4
4
2
3
Side Housing
7
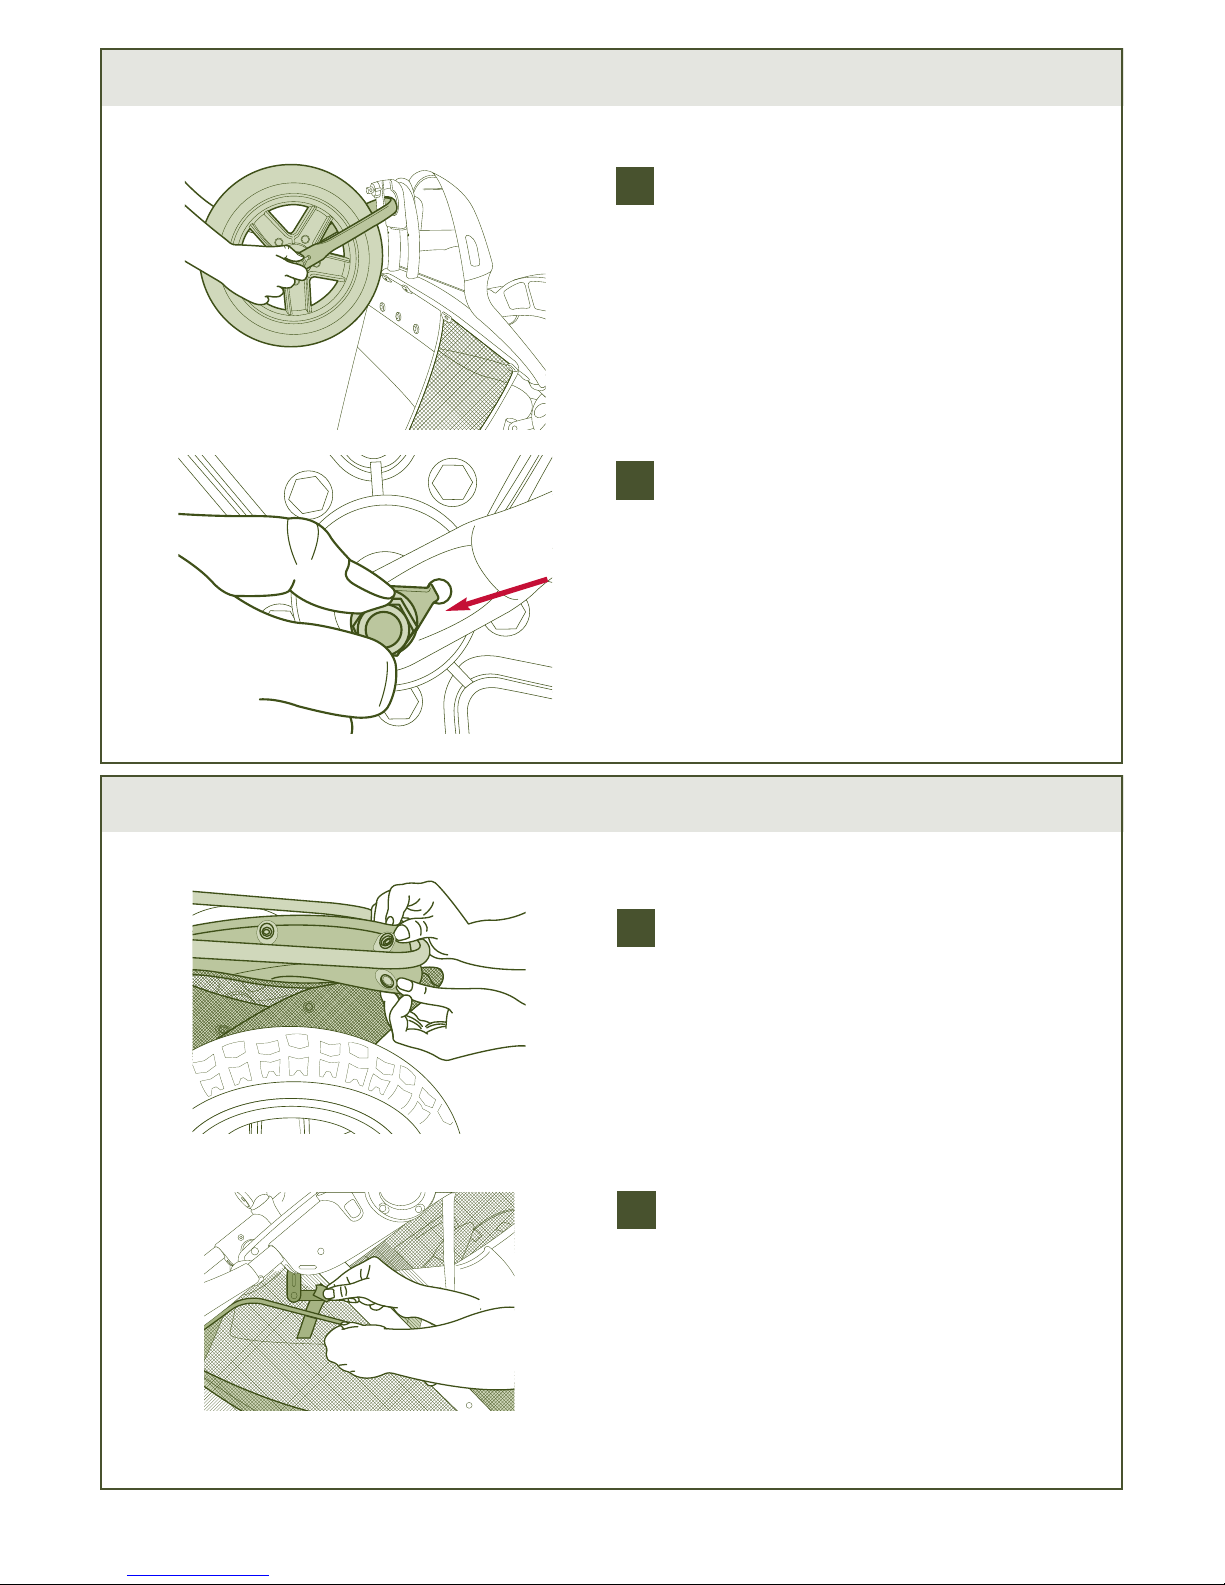
To Attach Front Wheel
1
Discard plastic protective bar at the end
of stroller fork. Align front wheel axle
with cutouts in the front wheel fork. You
may need to loosen the nuts on both
end of the axle in order to make room
for the front wheel fork.
Ensure that the tab on the tear drop
shaped washer is aligned with the hole
on the front fork as shown. Tighten nut
with wrench. Repeat for other side.
Secure rear portion of the fabric storage
basket by snapping the basket around
cargo tube.
Fasten velcro strap on side of storage
basket to seat tube. Repeat on opposite
side.
2
To Attach Storage Basket
1
2
1
2
1
2
8
To Attach Cargo Bags
(select models)
To attach cargo bags, feed and secure
one end of Velcro strap through slot on
the plastic side housings.
Secure other side of cargo bag to
vertical support tube using velcro straps.
1
2
1
WARNING
DDOO NNOOTT
put more than 2.5 lbs.
(1.13 kg) in each cargo bag.
To Attach Front Tray
Align posts on tray with receptacles on
plastic side housings.
Push until each side clicks in place.
To release, push one button and swivel
tray.
1
2
1
3
3
To Attach Toys (select models)
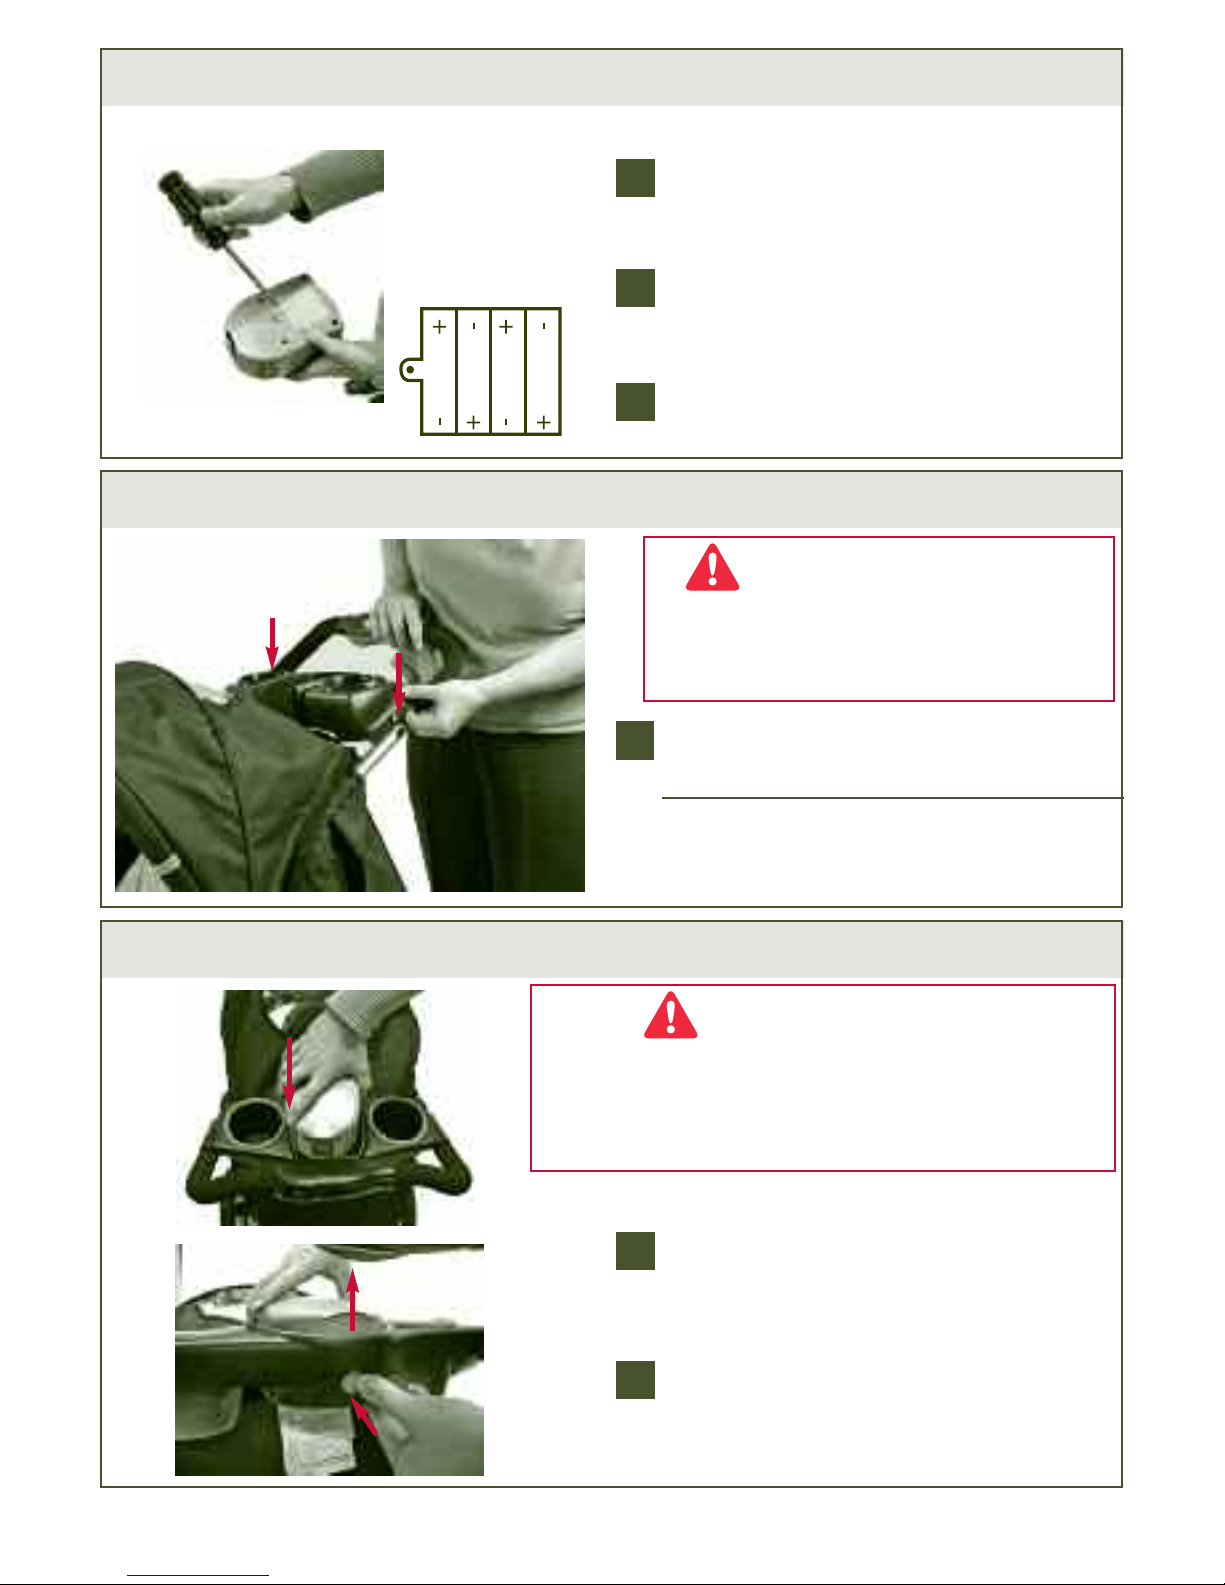
To Install Batteries in Electronic Toys (select models)
To insert batteries, use a Phillips head
screwdriver to unfasten battery cover.
Insert batteries as shown. Requires 2
“AA” batteries (Not Included). Secure
battery cover.
Turn switch on ‘
II
’ to play sounds. To turn
off, move switch to ‘
OO
’.
CCAAUUTTIIOONN::
Do not mix old and new
batteries. Do not mix alkaline, standard
(carbon-zinc) or rechargeable (nickel
cadmium). Remove battery(ies) before
storing this product for a prolonged
period of time.
1
2
1
Place toy so that they face the child in
the stroller.
Align tabs on back of toy with slots in
child tray.
Press down firmly on toy until front and
back tabs lock toy securely in place.
To remove toy from tray, pull front wall of
toy toward seat and rotate toy upward
until rear tabs release.
1
2
2
3
4
4
9
10
To Install Batteries into iBaby
™
(select models)
Requires 4 “AAA” Batteries (Not Included).
Use a Phillips screwdriver to remove the
battery door.
Place batteries in the compartment
following polararity directions.
Screw the battery door back onto the
unit and replace the foam.
1
2
1
3
Install iBaby™Sound System (select models)
To attach iBaby™, align device over center
compartment of iBaby
™
parent tray. Push
down to snap into place.
To remove iBaby™, with one hand
depress button on rear of device and
lift device up with other hand.
1
WARNING
• Loud volume can damage your child’s hearing. When
turning on music, gradually adjust the volume to a
comfortable listening level so child is not startled.
• Do not place hot liquids in this tray. Hot liquids can
burn your child.
2
1
To Attach Parent Tray
Align tray holes with posts near handle
and snap on.
TTOO RREEMMOOVVEE
, pull each side up and out.
For cleaning, parent tray is top rack
dishwasher safe.
1
WARNING
DDOO NNOOTT
place more than 3 lbs.
(1.36 kg) in this tray to avoid tipping!
DDOO NNOOTT
place hot liquids in this tray.
Hot liquids can burn your child.
2
How to Properly Use Your New Stroller
11
WARNING
Avoid serious injury from falling or sliding
out. Always use restraint system. Do not
use product without full 5-point Harness
Restraint. Removing the shoulder straps
will not adequately restrain child.
Adjust Restraint
System Harness
To Secure Child In Stroller
Lock both foot brakes to keep stroller
from rolling.
Place child in stroller.
Hook shoulder straps to waist belt.
To fasten restraint system buckles - push
together. Be sure both buckles are
fastened to secure child safely.
To unsnap restraint system buckles press tabs to release.
For proper fit, adjust shoulder straps and
waist band as shown.
1
3
2
3
4
5
6
4
6
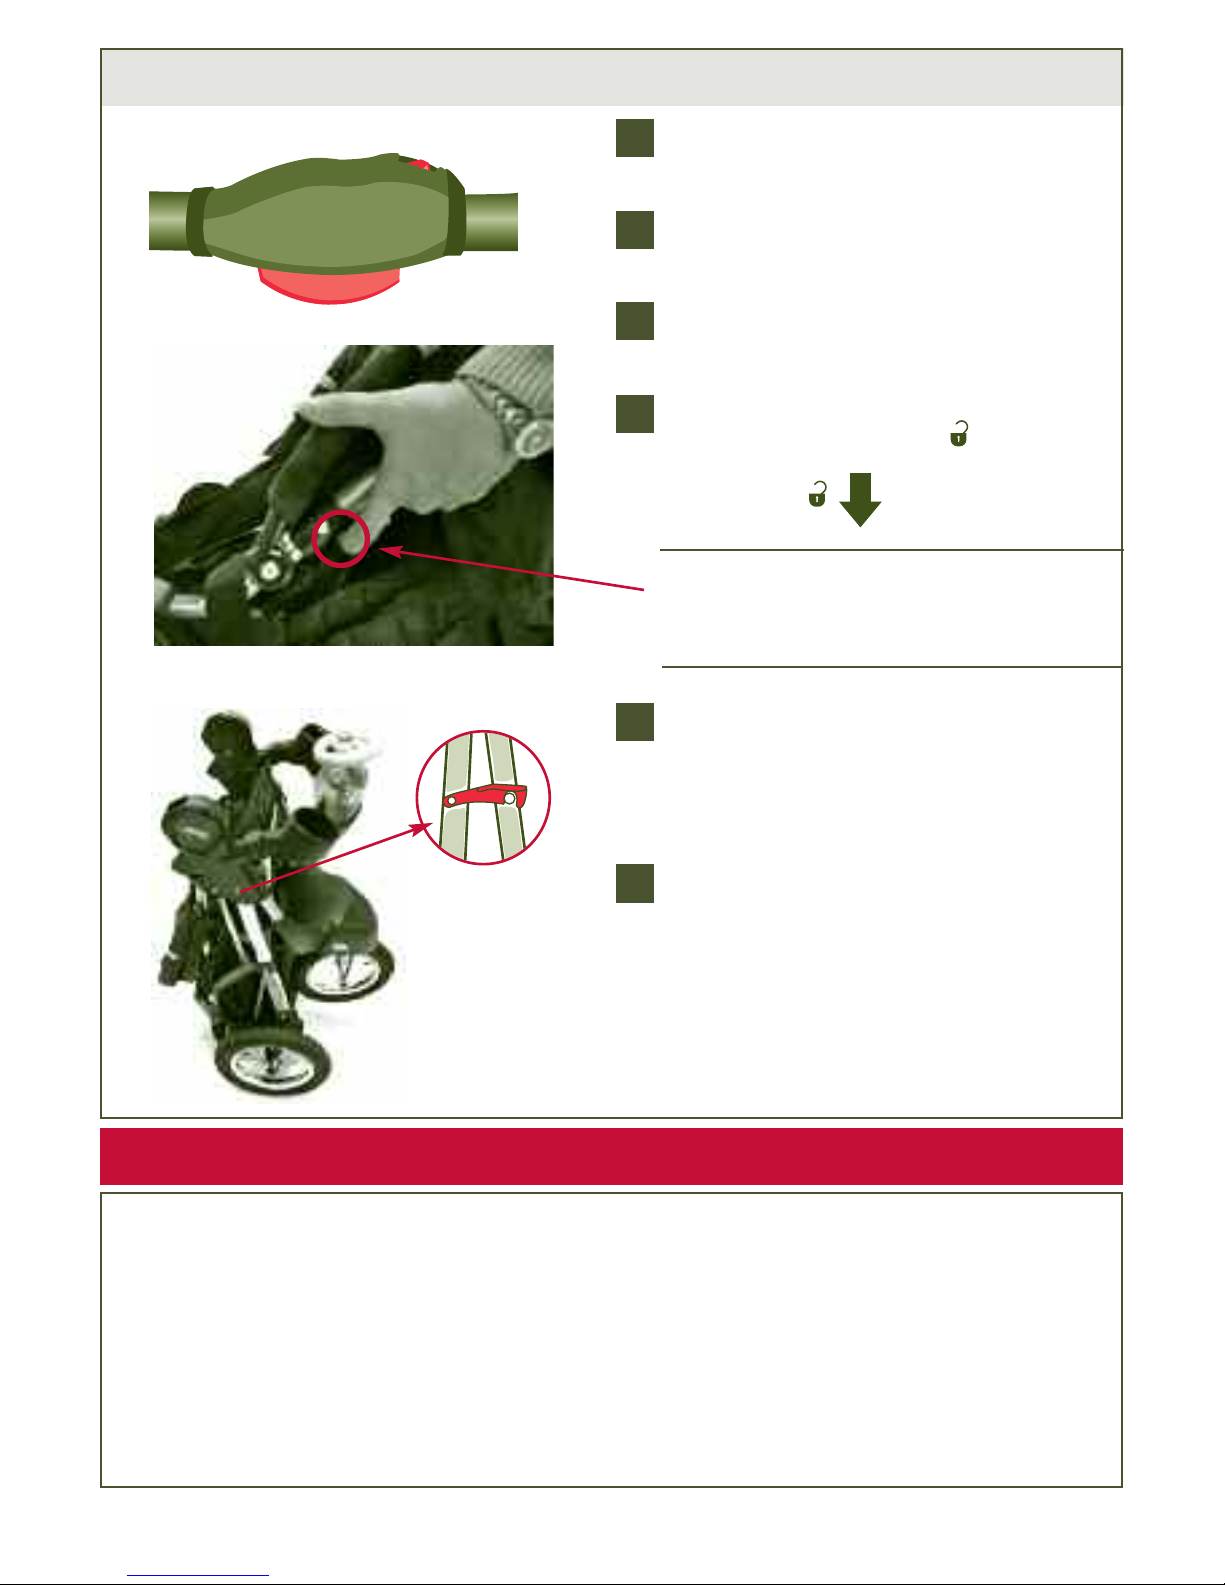
To Operate Brakes
1
TTOO LLOOCCKK BBRRAAKKEE::
Push both brakes
down to lock wheels.
TTEESSTT::
Push stroller slightly to make sure
brakes are engaged.
TTOO UUNNLLOOCCKK BBRRAAKKEE::
Lift up on brakes.
2
Unlock
Lock
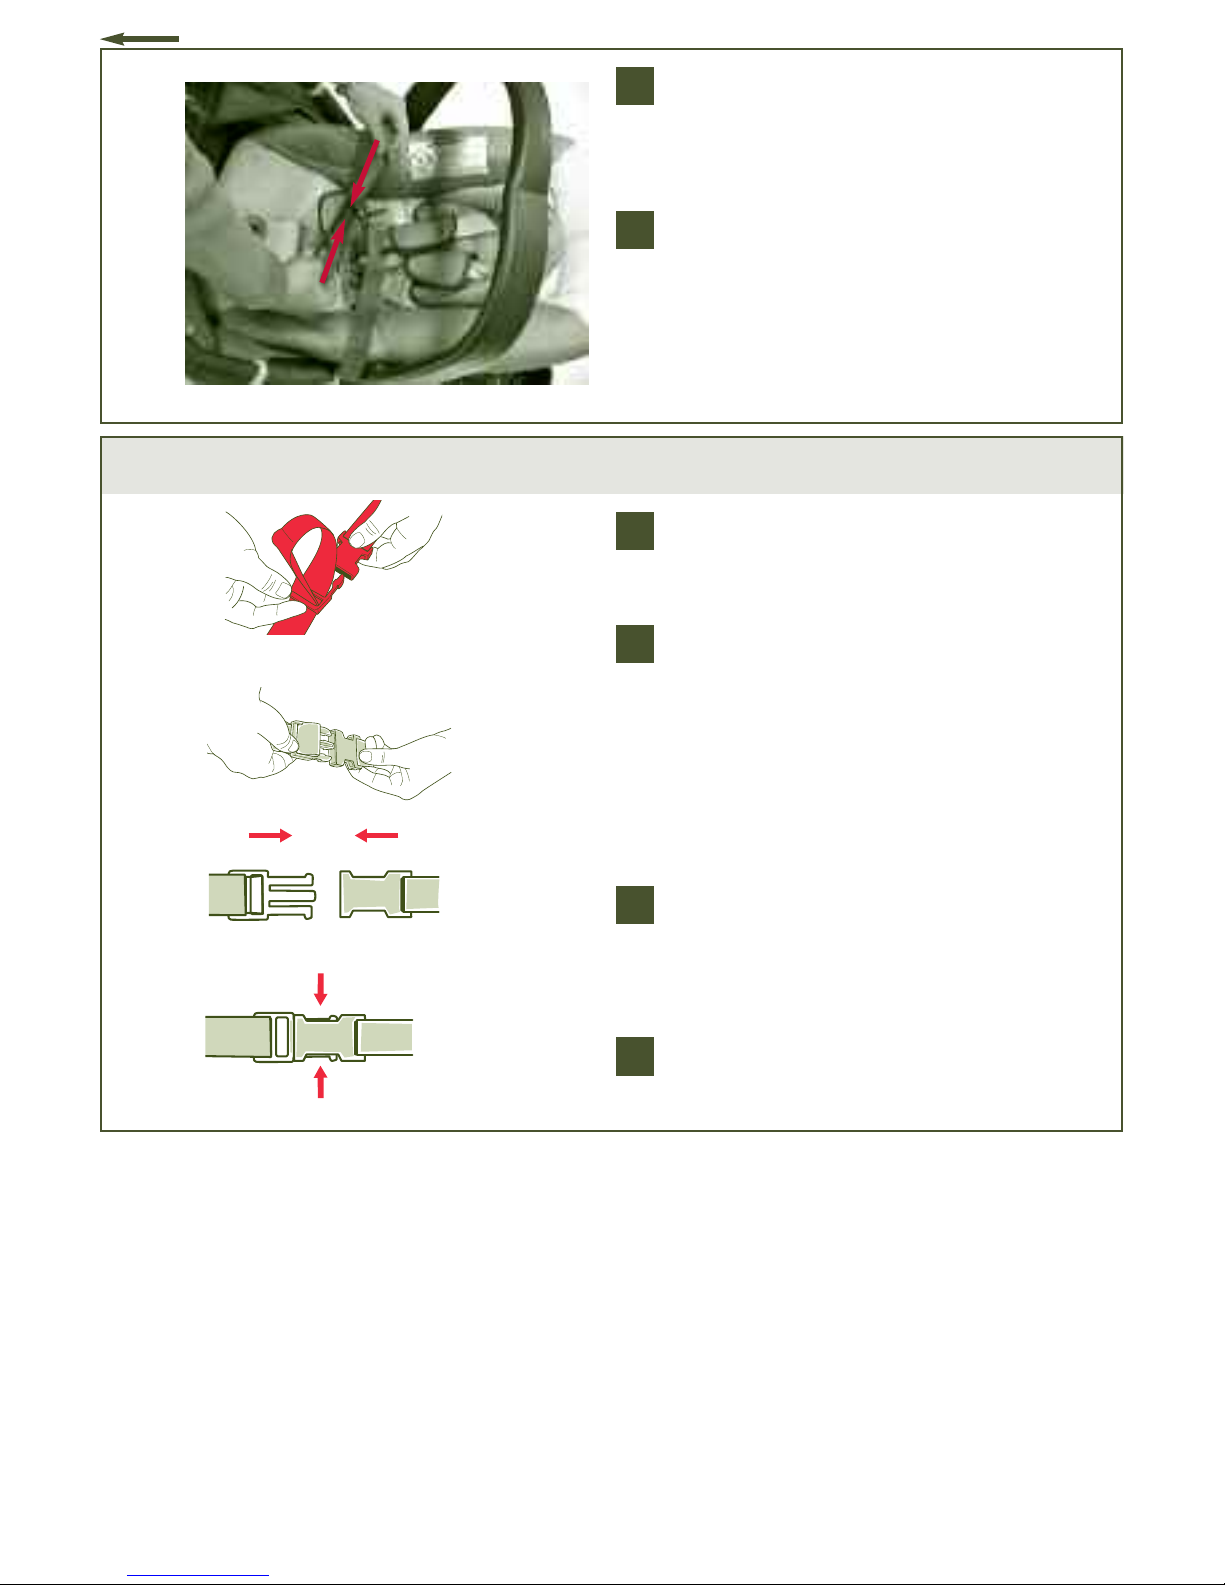
To Install Car Seat
Car Seat Restraint Storage
12
2
XX
1
Recline stroller seat first and push canopy
back.
Place car seat in seating area of stroller
so that child is facing handle of stroller.
Make sure the car seat is resting against
front tray and that the car seat is level.
Your child’s head should be slightly
above their knees. Do not let infant car
seat sit on top of tray.
NNOOTTEE:
:
Your Infant Car Seat may have a
level indicator. It is not necessary for
use with this stroller and the indicator
may fall outside the recommended
area. The level indicator is for use while
the Infant Car Seat is in an automobile.
Thread RED infant car seat restraint belts
located in the side pockets through the
clips on the top of the car seat.
NNOOTTEE
: Some car seats do not have clips.
Secure belt over lowest point of car
seat.
Restraint belts for the Infant Car Seat are
red and are located in the small pockets
on each side of the stroller seat.
CCAAUUTTIIOONN::
When not using your red
infant car seat restraint belts, store them
inside pocket. Failure to store restraint
belts may cause strangulation.
2
1
BBeellooww iiss aa lliisstt ooff ccaarr sseeaattss tthhaatt wwiillll ffiitt oonn tthhee JJeeeepp®®LLiibbeerrttyy 33--WWhheeeell SSttrroolllleerr..
If your Infant Car
Seat is not one of the models listed below, DO NOT use your infant car seat with this stroller.
Other Infant Car Seat models will not fit properly and may result in serious injury to your child.
3
3
Continued on next page
•
Britax®Companion
®
•
Chicco®Key Fit & Key Fit 30
•
Graco®Snug Ride™Series
•
Graco®Safe Seat
™
•
Peg Pérego®Primo Viaggio SIP
Restraint belts
1
13
Tighten belt as much as you can to
secure infant car seat (see TO SECURE
INFANT CAR SEAT section). Fasten
buckle.
To ensure your Infant Car Seat is secure,
pull up on shell of car seat by child’s feet.
Infant Car Seat should not move more
than 1/4 of an inch. If it becomes loose,
repeat Step 3. DO NOT use this product
with your Infant Car Seat if it moves more
than 1/4”. Serious injury or death may
result from poor installation.
4
5
4
To Secure Infant Car Seat
1
4
Lock both foot brakes to keep stroller
from rolling.
To fasten car seat restraint belts - open
up loop of the restraint belt. Adjust belt
until the buckles almost touch.
Pull end tab of restraint belt to set.
Push buckles together to secure.
To unsnap Restraint Belt - press tabs.
2
3
4
2
3
3
14
To Operate Swivel Wheel Lock
1
LLOOCCKK FFRROONNTT SSWWIIVVEELL::
Adjust front
wheel so that wheel is straight and lock
is forward. Push lock to right.
UUNNLLOOCCKK FFRROONNTT SSWWIIVVEELL::
Push lock to
left.
NNOOTTEE::
On rough surfaces, lock the
wheel to keep straight. On smooth
surfaces, unlock to allow the wheel to
swivel.
To Recline Seat
WARNING
To avoid finger entrapment or pinching, do not adjust
the seat back while child is in the stroller. To avoid head
entrapment, always fasten the canopy to the seat back
when using the stroller in the reclined position.
2
To recline seat back, loosen belt.
To raise seat back, tighten belt.
1
2
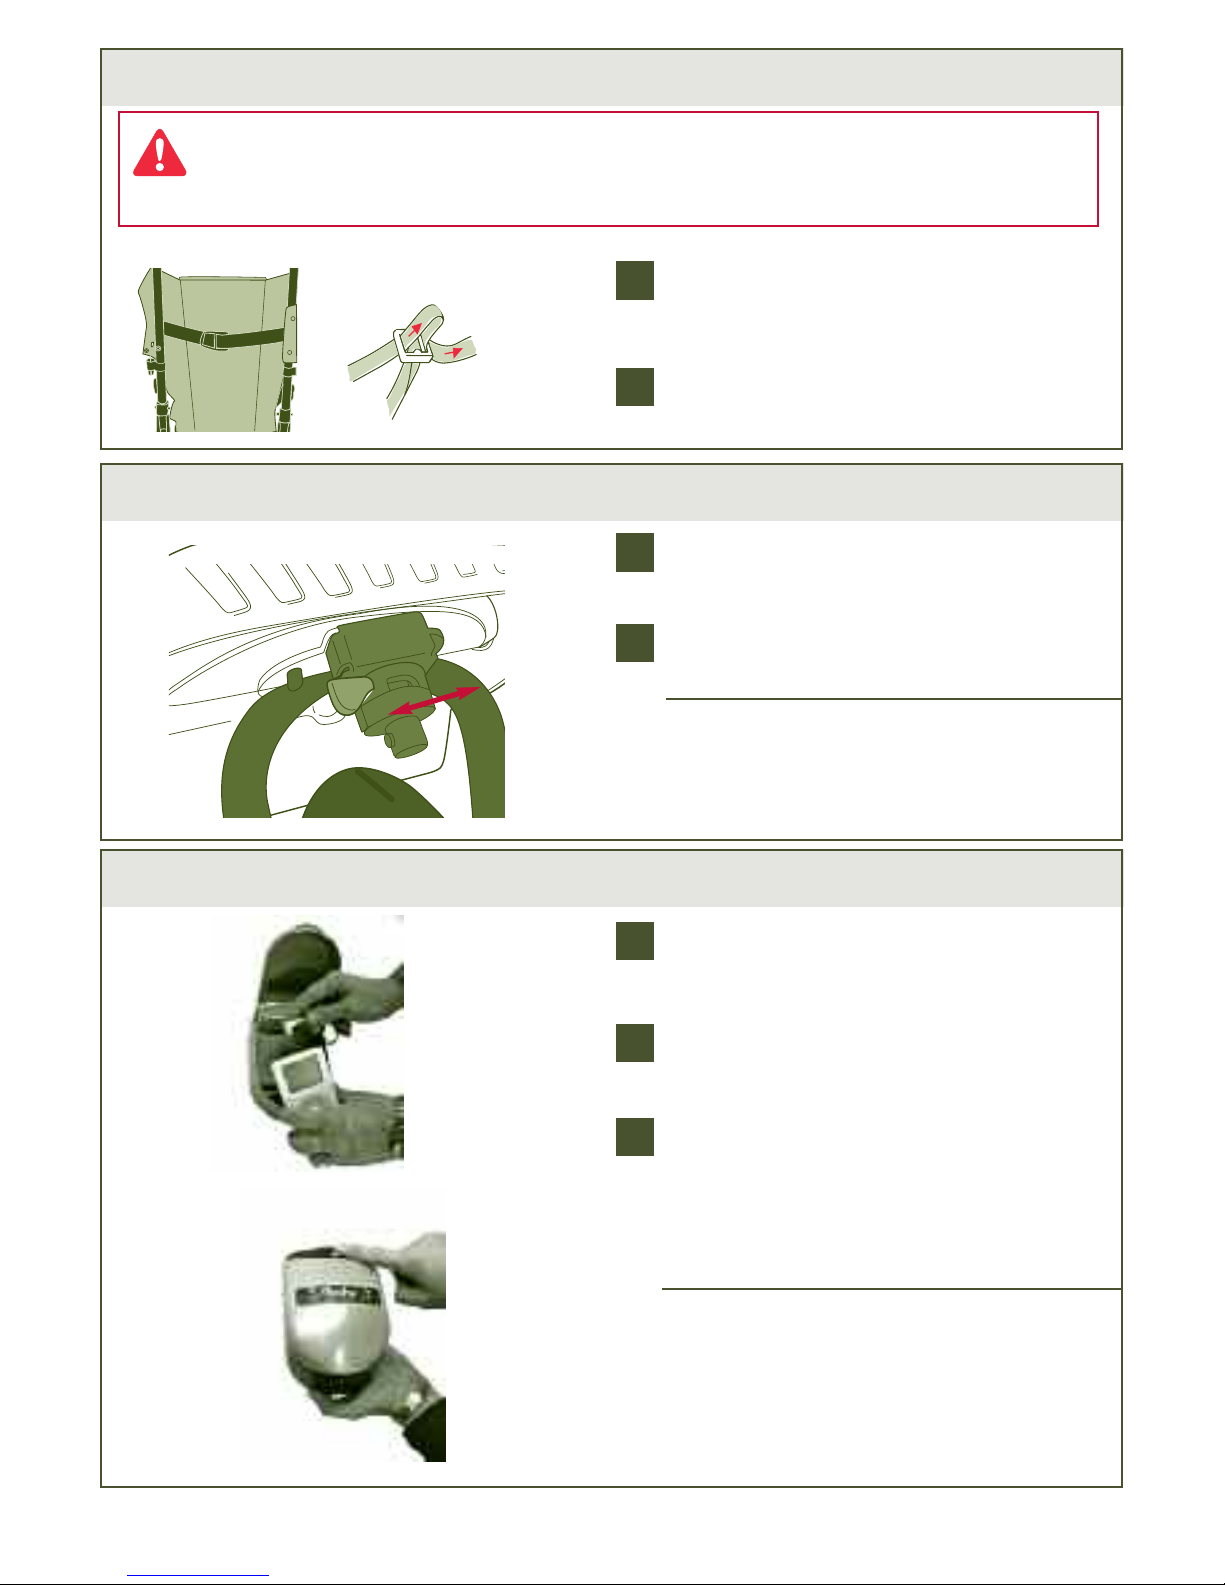
To Operate iBaby
™
(select models)
1
Connect the iBaby™plug to the headphone jack of your personal sound system (iPod
®**
or MP3 player).
Turn on iBaby
™
by locating the power button
as shown. A red light will indicate that the
power is on.
To avoid startling your child, adjust
volume on your personal sound system
to its lowest level. Turn on your personal
sound system and slowly increase
volume to a comfortable listening level
for you and your child.
NNOOTTEE::
If sound cuts out or becomes distorted, check your personal sound system battery
level. If battery level is okay and sound is still
distorted, replace iBaby’s
™
batteries.
DDOO NNOOTT
leave iBaby™in a hot car or outside in the rain.
For use with iPhone
™
a seperate jack adapter
can be purchased at Apple Retailers.
2
3
1
2
15
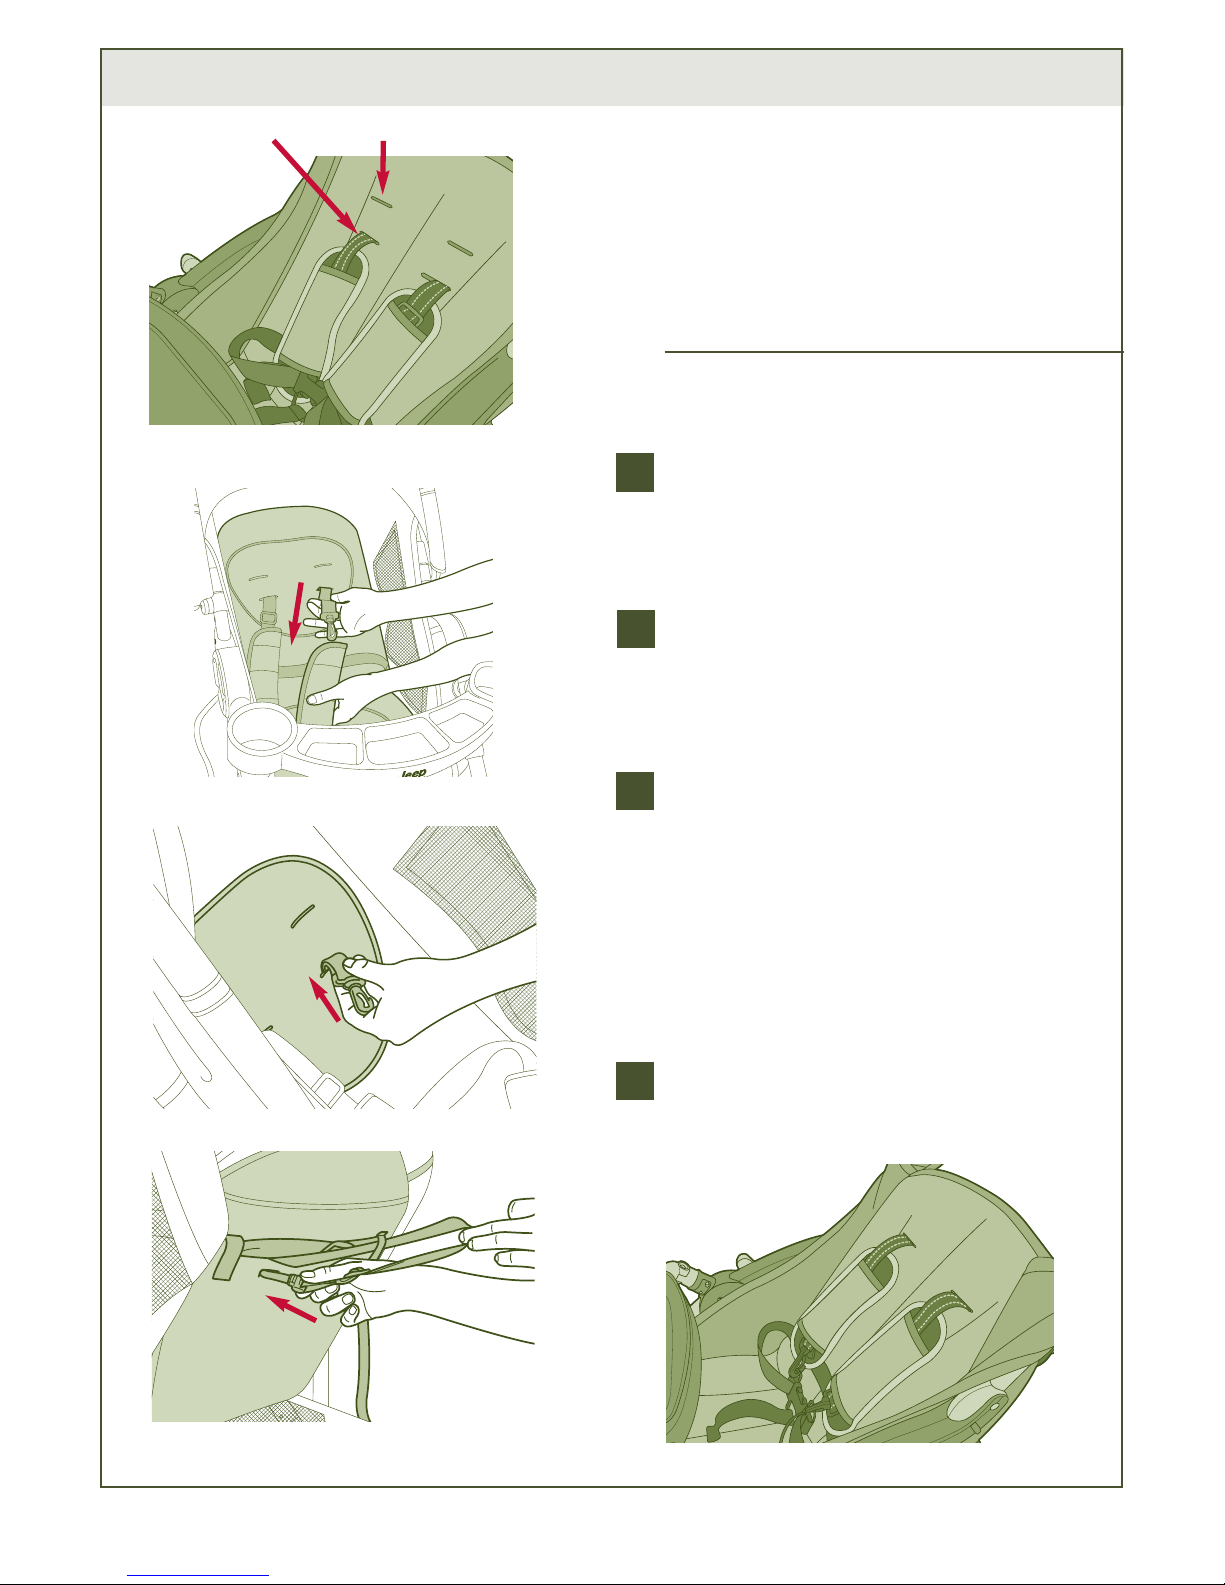
NNOOTTEE::
For a secure fit, straps should be
at or below the child's shoulder. Adjust
straps to higher position as your child
grows.
To readjust shoulder restraints, unbuckle
shoulder strap from waist strap. Remove
fabric shoulder sleeve.
Feed and push buckle back through the
slot that is currently used.
On the back of the seat locate the
slot for higher position and push
buckle through slot as shown. Repeat
for second side.
Replace fabric shoulder sleeve and
reattach shoulder strap to waist strap.
1
3
To Adjust Shoulder Strap Height
2
Lower Higher
4
1
3
2
16
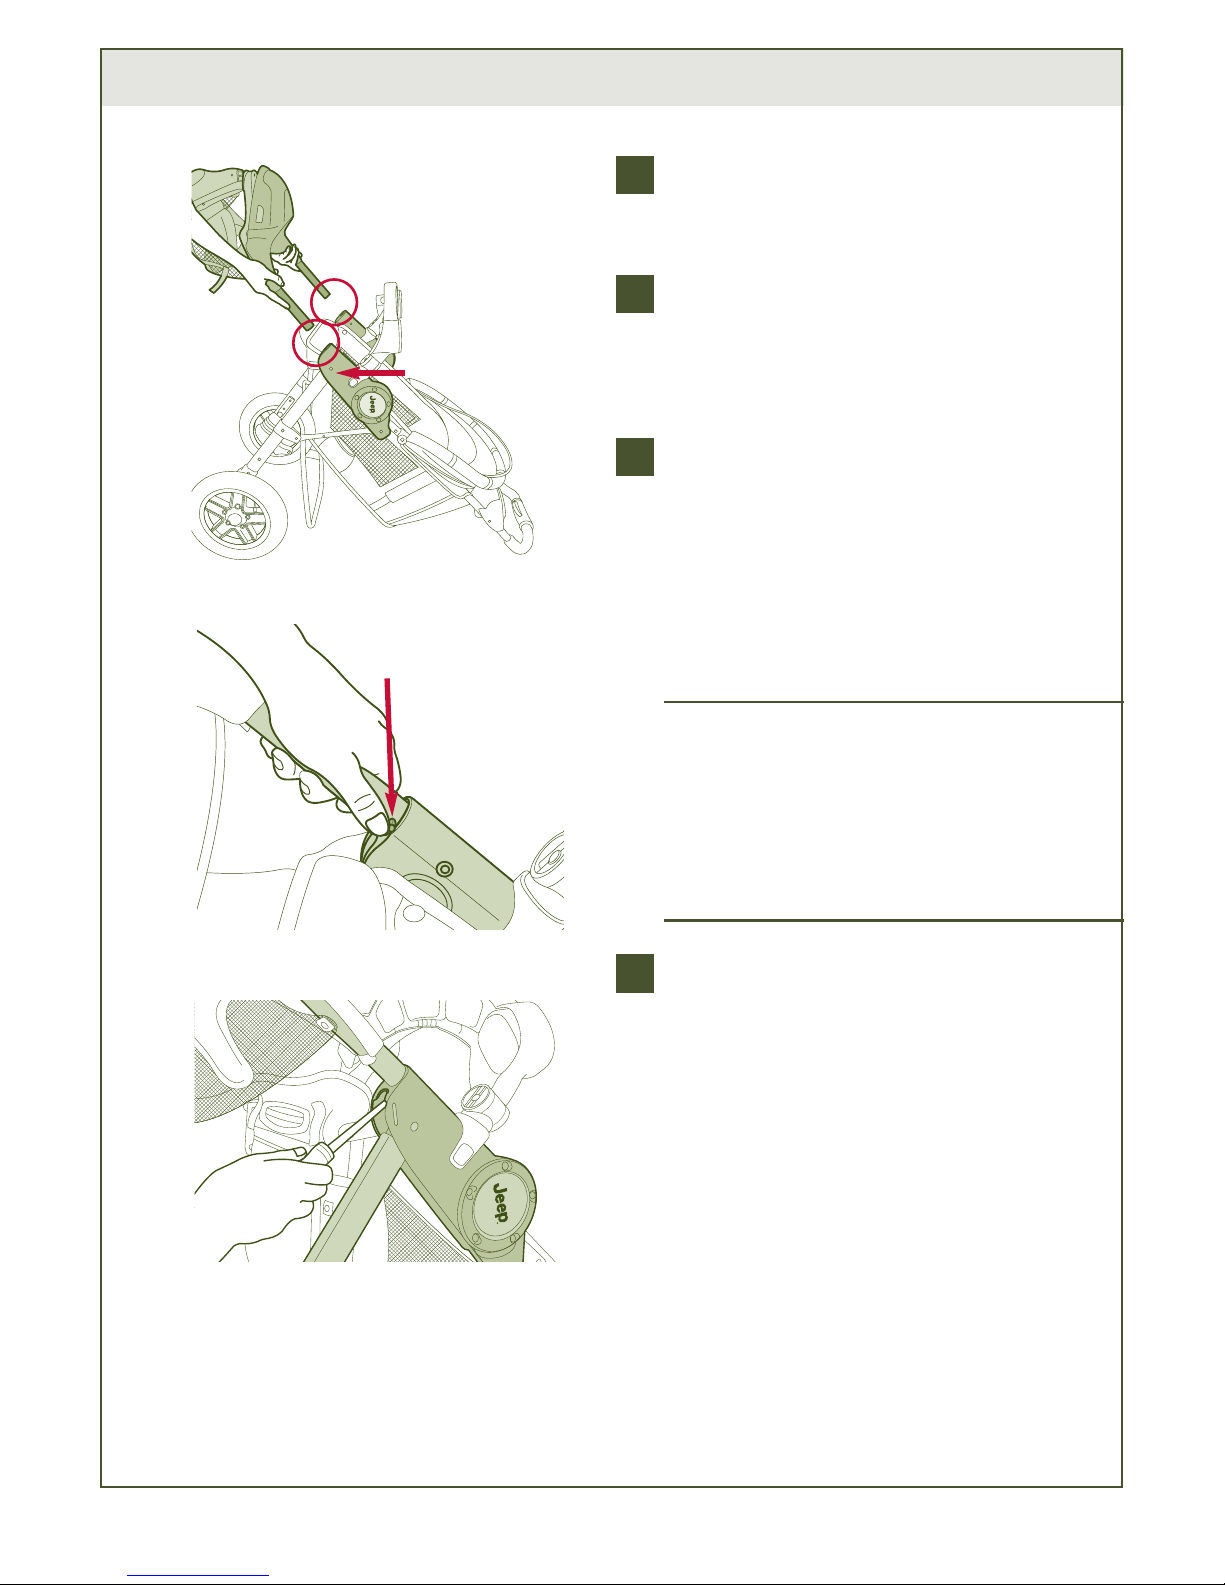
To Fold Stroller
1
Lock brakes.
Recline seat fully.
Close canopy.
((AA))
Push and hold red button to left with
thumb to unlock position
((BB))
then
squeeze large red lever on handle to
fold stroller.
NNOOTTEE::
If 1-Hand fold feature does not
operate properly, pull up latches on
frame to fold.
Push stroller down to fold.
Engage locking latch.
2
3
4
5
6
4b
4a
6
Care & Maintenance
•
To keep your stroller running smoothly and avoid squeaking wheels use a silicone or graphite
based lubricant. It is important to get it into the axle and the wheel assembly.
• Clean metal parts with a damp cloth and wipe dry.
• Clean woven fabric or vinyl parts with mild soap and water solution.
• Dry wet stroller with a soft cloth to prevent rusting.
• When storing stroller, never stack other items on top of it; this may damage the stroller.
• Periodically check for worn parts, loose screws, torn materials or stitching.
• Replace any damaged parts immediately.
****iiPPoodd iiss aa rreeggiisstteerreedd ttrraaddeemmaarrkk ooff AAppppllee CCoommppuutteerr,, IInncc..
AAppppllee CCoommppuutteerr,, IInncc.. iiss nnoott aassssoocciiaatteedd wwiitthh KKoollccrraafftt®®EEnntteerrpprriisseess,, IInncc.. oorr JJeeeepp®®aanndd nnoo
aapppprroovvaall bbyy tthheemm iiss ttoo bbee iimmpplliieedd..
 Loading...