

Kokido RC32 User Manual

UTONOMOUS POOL ROBOT
A
USER MANUAL
ROBOT DE PISCINE AUTONOME
MANUEL D’UTILISATION
ROBOT DE PISCINA AUTOMÁTICO
MANUAL DE USUARIO
AUTOMATISCHE ZWEMBADREINIGER
HANDLEIDING
ROBOT DA PISCINA AUTOMATICO
MANUALE DELL'UTENTE
AUTONOMER POOL-ROBOTER
BEDIENUNGSANLEITUNG

1
Table Of Contents
SAFETY WARNINGS & INSTRUCTIONS
HOW THE ROBOT WORKS
GETTING STARTED
Charging The Battery
Set-Up Before Use
Floor Squeegee assembly
Clip-on Rake/ Brush Assembly
Adjustment of Trajectory
Locking pin P.13
Bumper P.13
Pool Preparation
OPERATION
EMPTYING THE DEBRIS COMPARTMENT
P.7
P.10
P.11
P.11
P.12
P.12
P.12
P.13
P.13
P.14
P.15
MAINTENANCE & STORAGE
BATTERY DISPOSAL
How to remove the battery pack
TROUBLESHOOTING
P.16
P.17
P.17
P.19
Remark: Product/parts photos/drawings in this manual are for demonstration only.
Product/parts in photos/drawings may vary with the model purchased.

2
Table des matières
AVERTISSEMENTS ET INSTRUCTIONS
FONCTIONNEMENT DU ROBOT
POUR COMMENCER
Chargement de la batterie
Assemblage avant utilisation
Installation des nervures de capture
Assemblage du râteau et de la brosse
Ajustement de la trajectoire
Goupille de verrouillage P.27
Pare-chocs P.27
Préparation de la piscine
FONCTIONNEMENT
VIDER LE COMPARTIMENT A DEBRIS
P.21
P.24
P.25
P.25
P.26
P.26
P.26
P.27
P.27
P.28
P.29
ENTRETIEN & STOCKAGE
RECYCLAGE DE LA BATTERIE
Comment retirer la batterie
DEPANNAGE
P.30
P.31
P.32
P.33
Remarque: Les photos / dessins de produits / pièces de ce manuel sont uniquement
à titre de démonstration. Le produit / les pièces dans les photos / dessins peuvent
varier en fonction du modèle acheté

3
Índice de contenidos
AVISOS E INSTRUCCIONES DE
SEGURIDAD
FUNCIONAMIENTO DEL LIMPIAFONDOS
PRIMEROS PASOS
Carga de la batería
Montaje previo al uso
Instalación de la escobilla del suelo
Instalación del rastrillo/escobilla a presión
Ajuste de la trayectoria
Pasador de seguridad P.41
Parachoques P.41
Preparación de la piscina
FUNCIONAMIENTO
VACIADO DEL COMPARTIMENTO DEL
FILTRO
P.35
P.38
P.39
P.39
P.40
P.40
P.40
P.41
P.41
P.42
P.44
MANTENIMIENTO Y ALMACENAMIENTO
ELIMINACIÓN DE LA BATERÍA
Cómo retirar el paquete de baterías
RESOLUCIÓN DE PROBLEMAS
P.44
P.45
P.46
P.47
Observación: Las fotografías/ilustraciones del producto o de sus piezas que
aparecen en este manual solo se incluyen a modo de muestra. El producto o las
piezas que aparecen en las fotografías/ilustraciones pueden variar respecto al
modelo adquirido.

4
WAARSCHUWINGEN EN
Inhoudsopgave
VEILIGHEIDSAANWIJZINGEN
HOE WERKT DE ROBOT
AAN DE SLAG
De batterij laden
Voorbereiding
Montage Vloerwissers
Hark/ Borstelmontage met clipbevestiging
Afstelling van Traject
Borgpen P.55
Bumper P.55
Voorbereiding van het Zwembad
WERKING
DE FILTERBAK LEEGMAKEN
P.49
P.52
P.53
P.53
P.54
P.54
P.54
P.55
P.55
P.56
P.58
ONDERHOUD EN OPSLAG
DE BATTERIJ WEGWERPEN
De accu verwijderen
PROBLEMEN OPLOSSEN
P.58
P.59
P.60
P.61
Opmerking: Foto's/tekeningen van (onderdelen van) het product in deze handleiding
dienen alleen ter illustratie. Foto's/tekeningen van (onderdelen van) het product
kunnen verschillen van het model dat u hebt aangeschaft.

5
Indice
AVVERTENZE DI SICUREZZA & ISTRUZIONI
COME FUNZIONA IL ROBOT
GUIDA INTRODUTTIVA
Ricarica della batteria
Configurazione prima dell'uso
Montaggio della spatola per pavimento
Rastrello ad aggancio/ Assemblaggio
spazzola
Regolazione della traiettoria
Perno di bloccaggio
Paraurti
Preparazione della piscina
FUNZIONAMENTO
P.63
P.66
P.67
P.67
P.68
P.68
P.68
P.69
P.69
P.69
P.69
P.70
SVUOTAMENTO DEL FILTRO
MANUTENZIONE E STOCCAGGIO
SMALTIMENTO DELLA BATTERIA
Come rimuovere la batteria
RISOLUZIONE DEI PROBLEMI
P.72
P.72
P.73
P.74
P.75
Precisazione: I prodotti/foto dei pezzi/bozzetti nel presente manuale sono solo a
scopo dimostrativo. I prodotti/pezzi nelle foto/bozzetti possono variare rispetto al
modello acquistato.

6
Inhaltsverzeichnis
SICHERHEITSWARNUNGEN UND
-HINWEISE
BETRIEB DES ROBOTERS
VOR DER INBETRIEBNAHME
Aufladen des Akkus
Zusammenbau vor Verwendung
Montage des Bodenschrubbers
Aufsteckbarer Abstreifer/Bürste
Einstellung der Reinigungsstrecke
Sperrstift S.83
Stoßstange S.83
Vorbereitung des Beckens
BEDIENUNG
S.77
S.80
S.81
S.81
S.82
S.82
S.82
S.83
S.83
S.84
LEEREN DES SCHMUTZFACHS
WARTUNG UND LAGERUNG
ENTSORGUNG DES AKKUS
Herausnehmen des Akkus
STÖRUNGSBESEITIGUNG
S.85
S.86
S.87
S.88
S.89
Kommentare Produkte/Teile auf den Fotos/Zeichnungen in dieser Anleitung dienen
nur zur Veranschaulichung. Produkte/Teile auf den Fotos/Zeichnungen können beim
gekauften Artikel variieren.

7
SAFETY WARNINGS & INSTRUCTIONS
Read and follow all instructions in this manual and on the equipment. Failure to do so
could result in severe or fatal injuries.
SAVE THESE INSTRUCTIONS
WARNING!
- This is not a TOY. Children should be kept out of reach from this robot
and its accessories.
- Never allow children to operate this product.
- You should not operate this electric vacuum when people/pets are
present in the water.
- This robot is not intended for use by someone with reduced physical,
sensory or mental capabilities or a lack of experience and knowledge
unless they have been given instructions concerning the appliance and
are under supervision of the person responsible for their safety.
- Make sure the robot is fully immersed in the water before operation. The
minimum water level required to operate the robot must reach above the
swivel head of the robot. Operating the robot when it is not immersed in
the water correctly could damage the unit and void the warranty as a
result.
- Maximum operating depth in water is 3 meters (10 ft).
- Maximum water temperature: 5˚C (41˚F) –35˚C (95˚F)
- Only use the detachable supply unit (external adaptor) provided with this
robot to charge the battery.
- Detachable supply unit (external adaptor)
- Connect the external adaptor to a power source through a residential
current device (RCD) / a ground fault circuit interrupter (GFCI). If in doubt,
consult a qualified professional electrician.
- Do not use this robot if any damage is detected.
- Replace damaged parts as soon as possible. Only use parts certified by
the distributor or manufacturer.
- Turn off the robot, disconnect the external adaptor from the power source,
and unplug the external adaptor from the charging cable, before
detaching the robot from the charging cable.
- Disconnect the robot from the supply mains and make sure the robot is
power OFF prior to servicing it such as cleaning the filter and swivel
smoothing-ring.
- The battery installed is a rechargeable Li-ion battery pack. Never attempt
to replace it.
- The robot is only to be recharged with external adaptor and charging
cable delivered with this product.
- DO NOT handle the robot, external adaptor and charging cable while it is
charging with wet limbs and without shoes.
- You should not operate this robot when people/pets are present in the
water.
- DO NOT use this robot without an intact filter in place, otherwise your
warranty will be voided as a result.

8
- Suction entrapment hazard: This robot generates suction. Do not allow
hair, body, or any loose parts of your clothing to make contact with the
suction hole of the robot during its operation.
- Never insert body parts, clothing or other objects into the openings and
moving parts of the robot.
- DO NOT use this robot to pick up any toxic substance, flammable or
combustible liquids such as gasoline, or in the presence of explosive or
flammable fumes.
- Under no circumstances should you attempt to disassemble the robot
and replace the impeller, motor, and battery by yourself.
- Never insert fingers and any object to touch the impeller.
- This robot shall not be used by children.
- The battery must be removed from the robot before it is scrapped.
- This robot contains a battery that are only to be removed by skilled
persons.
- The robot must be disconnected from the supply mains as the battery is
removed.
- For detail regarding battery dsiposal, refer to the section "Battery
Disposal” in this manual
- The battery must be disposed safely in accordance with local ordinances
or regulations.
- The robot contains a maintenance-free, rechargeable lithium-ion battery
pack, which must be disposed properly. Recycling is required; please
contact your local authorities for more information.
- External adaptor and charging cable:
Never use the external adaptor and charging cable for anything
other than charging the battery of the robot that is supplied in the
same pack.
The external adaptor and charging cable should not be used
outdoors, nor exposed to rain, humidity, any liquid or heat.
The transformer ( or external adaptor) is to be located outside zone
1
Keep the external adaptor and charging cable out of reach of
children.
Never use the external adaptor and charging cable if any damage is
detected.
DO NOT handle the external adaptor and charging cable with wet
hands.
Keep the external adaptor disconnected from power when it is not in
use.
Never attempt to open the external adaptor.
If the supply cord is damaged, it must be replaced by the
manufacturer, its service agent or an equally-qualified person in
order to prevent hazards of any kind.
Make sure the robot is completely dry before charging.
CAUTION!
- This robot is designed for underwater use only; it is not an all-purpose vacuum
cleaner. DO NOT attempt to use it to clean anything other than your pool.

9
- Use only original accessories delivered with this product.
- DO NOT use this robot right after pool-shocking. It is recommended to first leave
the pool circulating for at least 24-48 hours.
- If you are planning on using the robot in a saltwater pool, make sure all salt are
dissolved before placing it into the water.
- It is not recommended to use this robot with another automatic cleaner/cleaner
simultaneously.
- Avoid picking up hard, sharp objects with this product which may damage the
robot and filter.
- To avoid damaging the external adaptor and charging cable, do not attempt to
carry the robot by the cord of external adaptor / charging cable or pull the cord to
disconnect it from the power source and charging cable.
- Charge the robot indoors in a clean, dry area with good ventilation and away from
sunlight.
- DO NOT leave the robot charged for over 10 hours.
- If the robot will not be used for an extended period, detach it from the charging
cable and use a damp cloth to clean and dry the robot and its accessories. Make
sure to charge the robot to about 30% to 50% of the battery capacity before it is
stored. Store in a well-ventilated area away from sunlight, heat, ignition sources,
pool chemicals, and children. Recharge the robot every three months.
- All actions concerning the disassembly of the swivel head (ie. battery disposal)
can only be carried by an authorized technician.
Above warnings and cautions are not intended to incorporate all possible
instances for risks and / or severe injuries. Pool / spa owners should always
exercise extra caution and common sense when utilizing the product.

10
HOW THE ROBOT WORKS
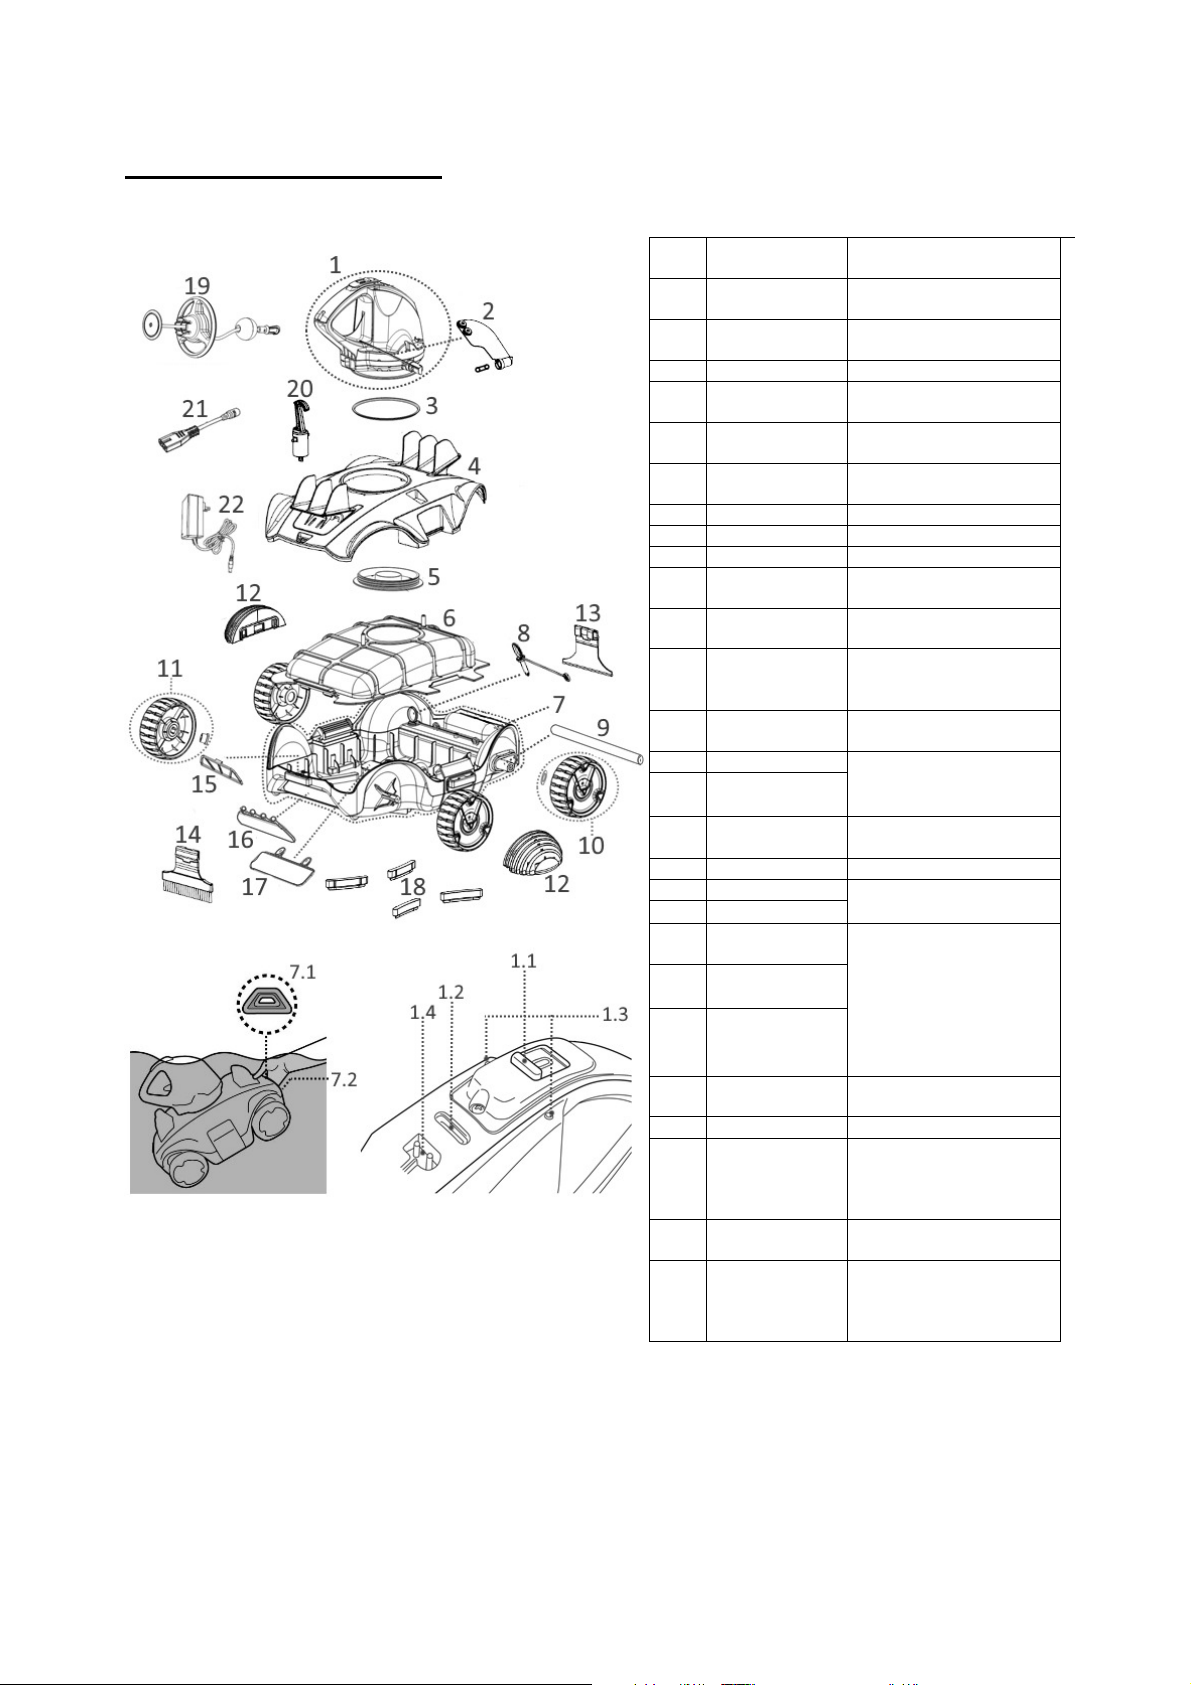
Replacement Parts
002/US (USA)
1. Swivel head
Sliding switch ---------
1.1.
Power indicating
1.2.
light
1.3. Water sensors ---------
1.4. Charging port --------Side flap (with
2.
side side pin)
Swivel
3.
smoothing-ring
4. Top cover RC32ASM03
Swivel head
5.
bottom screw
plate
6. Filter cover RC30-09
7. Base
Yellow triangle
7.1.
pattern
Grip (under
7.2.
Yellow triangle
pattern)
8. Locking pin RC30-10-014
9. Wheel axle
Rear wheel (with
10.
washer)
Front wheel
11.
(with washer)
12. Bumper x 2 RC30-18
13. Clip-on rake
14. Clip-on brush
Draining filter
15.
plate
Drainage outlet
flap
Suction mouth
17.
flap
Floor Squeegee
18.
x 4
19. Float RC30ASM06
Hook (with
20.
V-clip) for
Telescopic pole)
21. Charging cable RC30-17-001
22. Adaptor
Number
RC30ASM07
RC30ASM07/US (USA)
---------
RC30-07
RC30-08-004
RC30-05-005
RC32ASM04
RC32ASM04/US (USA)
---------
---------
RC30ASM08
RC30-12
RC32ASM10
RC30ASM09 16.
RC30-10-012
RC30-16
RC30-17-002 (EU)
RC30-17RC30-17-002/AU
(Australia/New Zealand)
The robot has a water-propelling nozzle at the bottom of the swivel head. Water is first
sucked in through the suction mouth at the bottom of the robot, which then goes through
the filter and is discharged via the propelling nozzle. Water jetting from the nozzle propels
the robot forward. Once the robot stops against an obstacle such as the pool wall, its side
flap sways and its swivel head turns 180o, allowing the robot to move in the opposite
direction. The robot moves in a generally straight pattern in one direction and in an arc
pattern in the other direction. The robot vacuums the pool bottom as it moves, collecting
debris in its compartment.

11
GETTING STARTED
Charging The Battery
IMPORTANT NOTE: Fully charge the robot (about 5-6 hrs) before using it for the first
time.
WARNING!
Use only the original external adaptor and charging cable provided.
Make sure the robot and the charging port are clean and dry before set-up.
Make sure the robot is off by sliding the switch to the OFF position prior to charging.
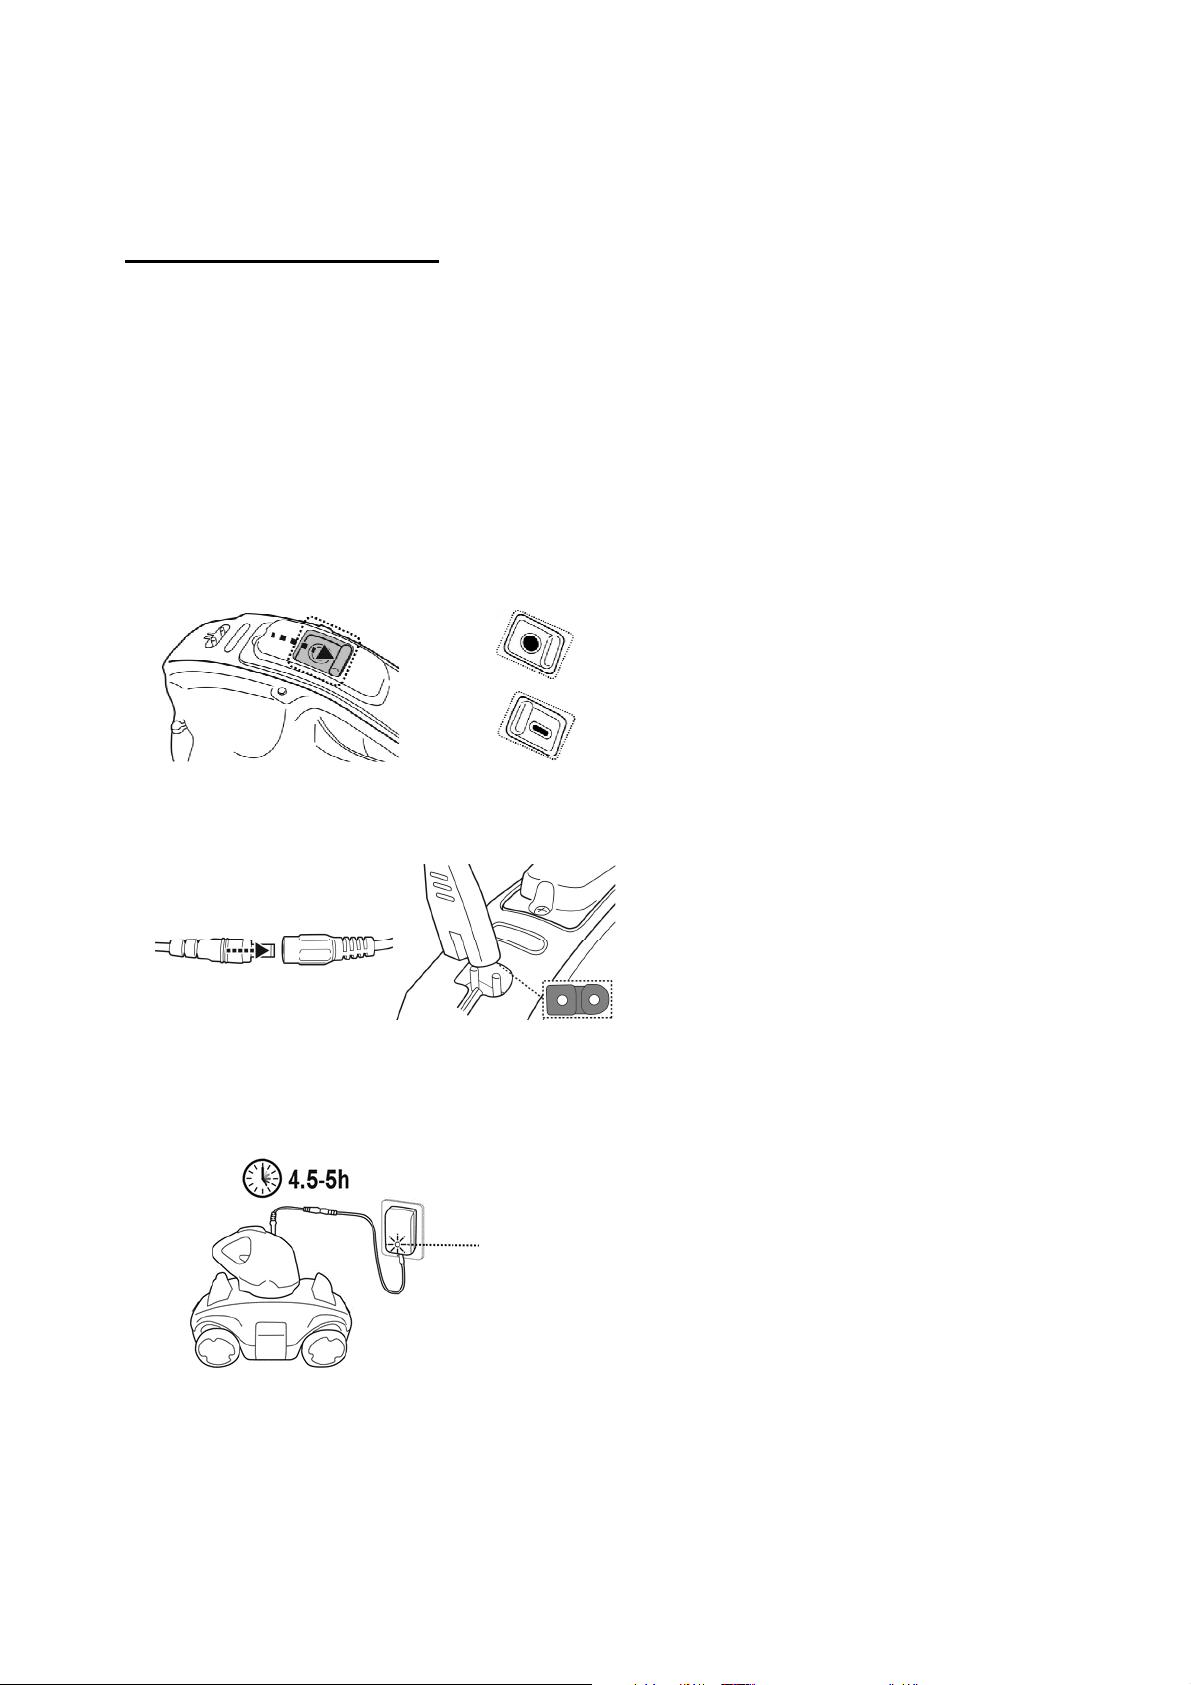
1. Place the unit on a flat surface. Slide the switch to the OFF position.
2. Connect the adaptor cable to the charging cable. Align and insert the plug of the
charging cable into the charging port at the top of the unit.
3. Connect the external adaptor to the power source. Once the robot begins charging,
the indicator light on the external adaptor will turn red.
Normally, it takes about 4.5-5 hours to reach a full charge. The indicator light on the
external adaptor will turn green when the robot is charged.
RED light - Charging
GREEN light - Charged
OFF
ON
Immediately disconnect the external adaptor from the power source if you detect any
of the following:
- Offensive or unusual odor
- Excessive heat
- Deformation, cracks, leaks
- Smoke
4. When charging is complete, disconnect the external adaptor from the power source
and unplug the charging cable from the unit and external adaptor.
Normally the robot can operate up to 90 minutes on a full charge.
12
Note: Clean the debris compartment regularly. Excessive debris inside the debris
compartment increases the burden to the motor operation and shortens the operating
duration as a result.
NOTE: Rechargeable lithium-ion battery is classified as a consumable item. It has a
limited life and will gradually lose its capacity to hold a charge. Therefore, the running
time of the robot will gradually reduce after repeated charging and discharging
throughout its product life.
Replace the battery by swapping for a new swivel head. Follow step 1 in “How to
remove battery pack” section to detach the swivel head and reverse the steps to
install a new one.
NOTE: Let the robot rest for around 30 to 40 minutes before charging it again.
Set-Up Before Use
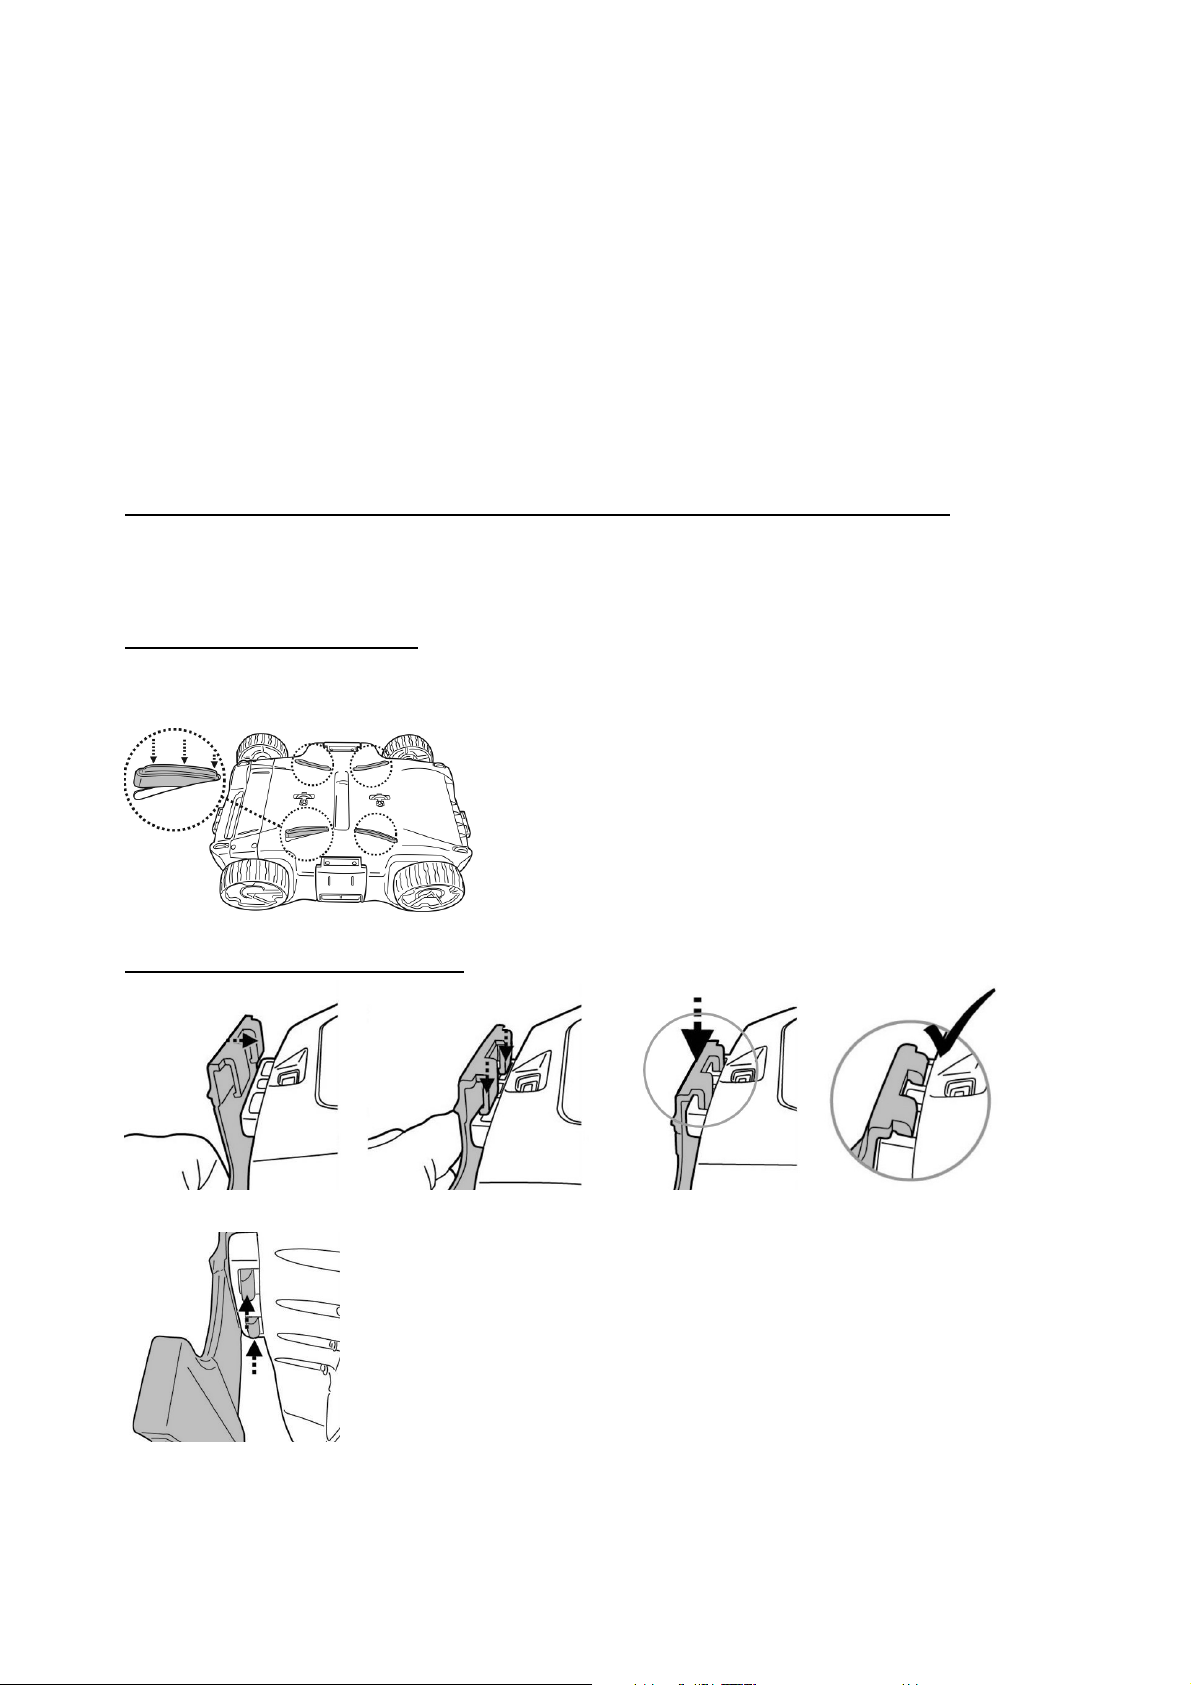
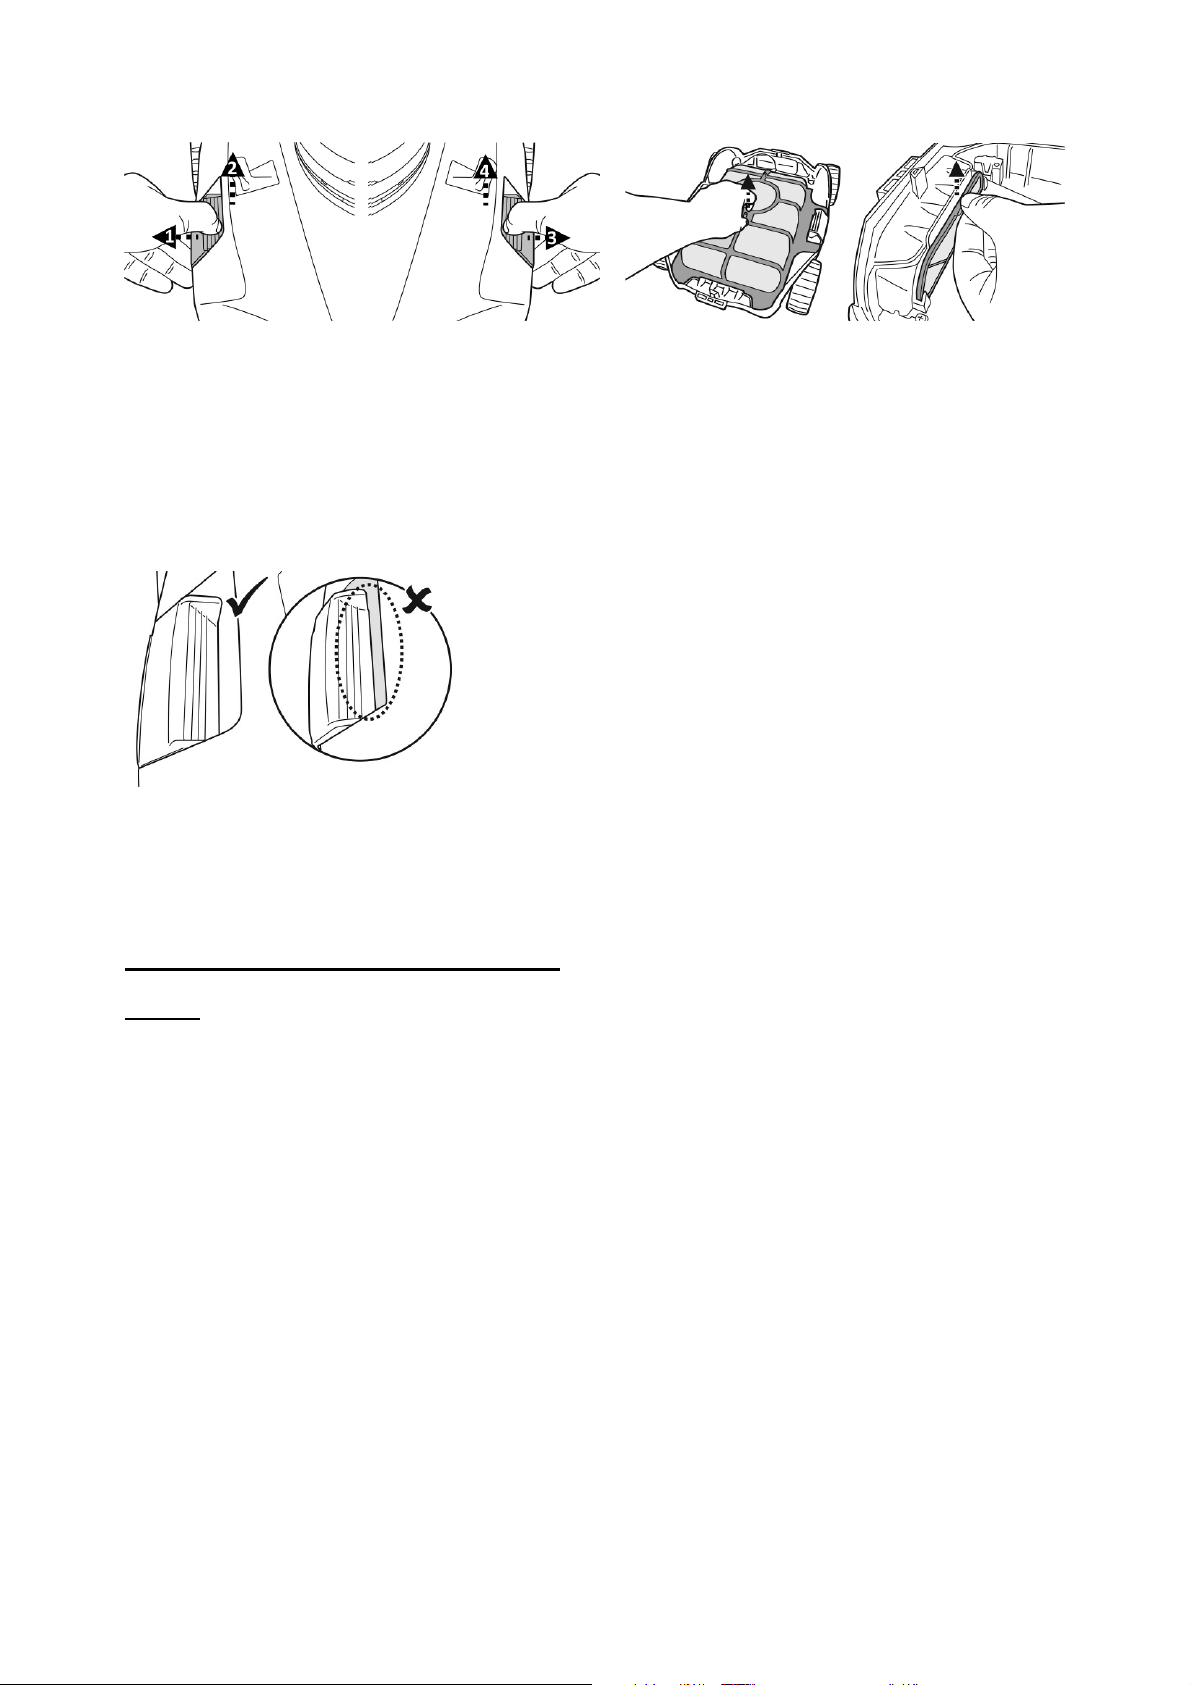
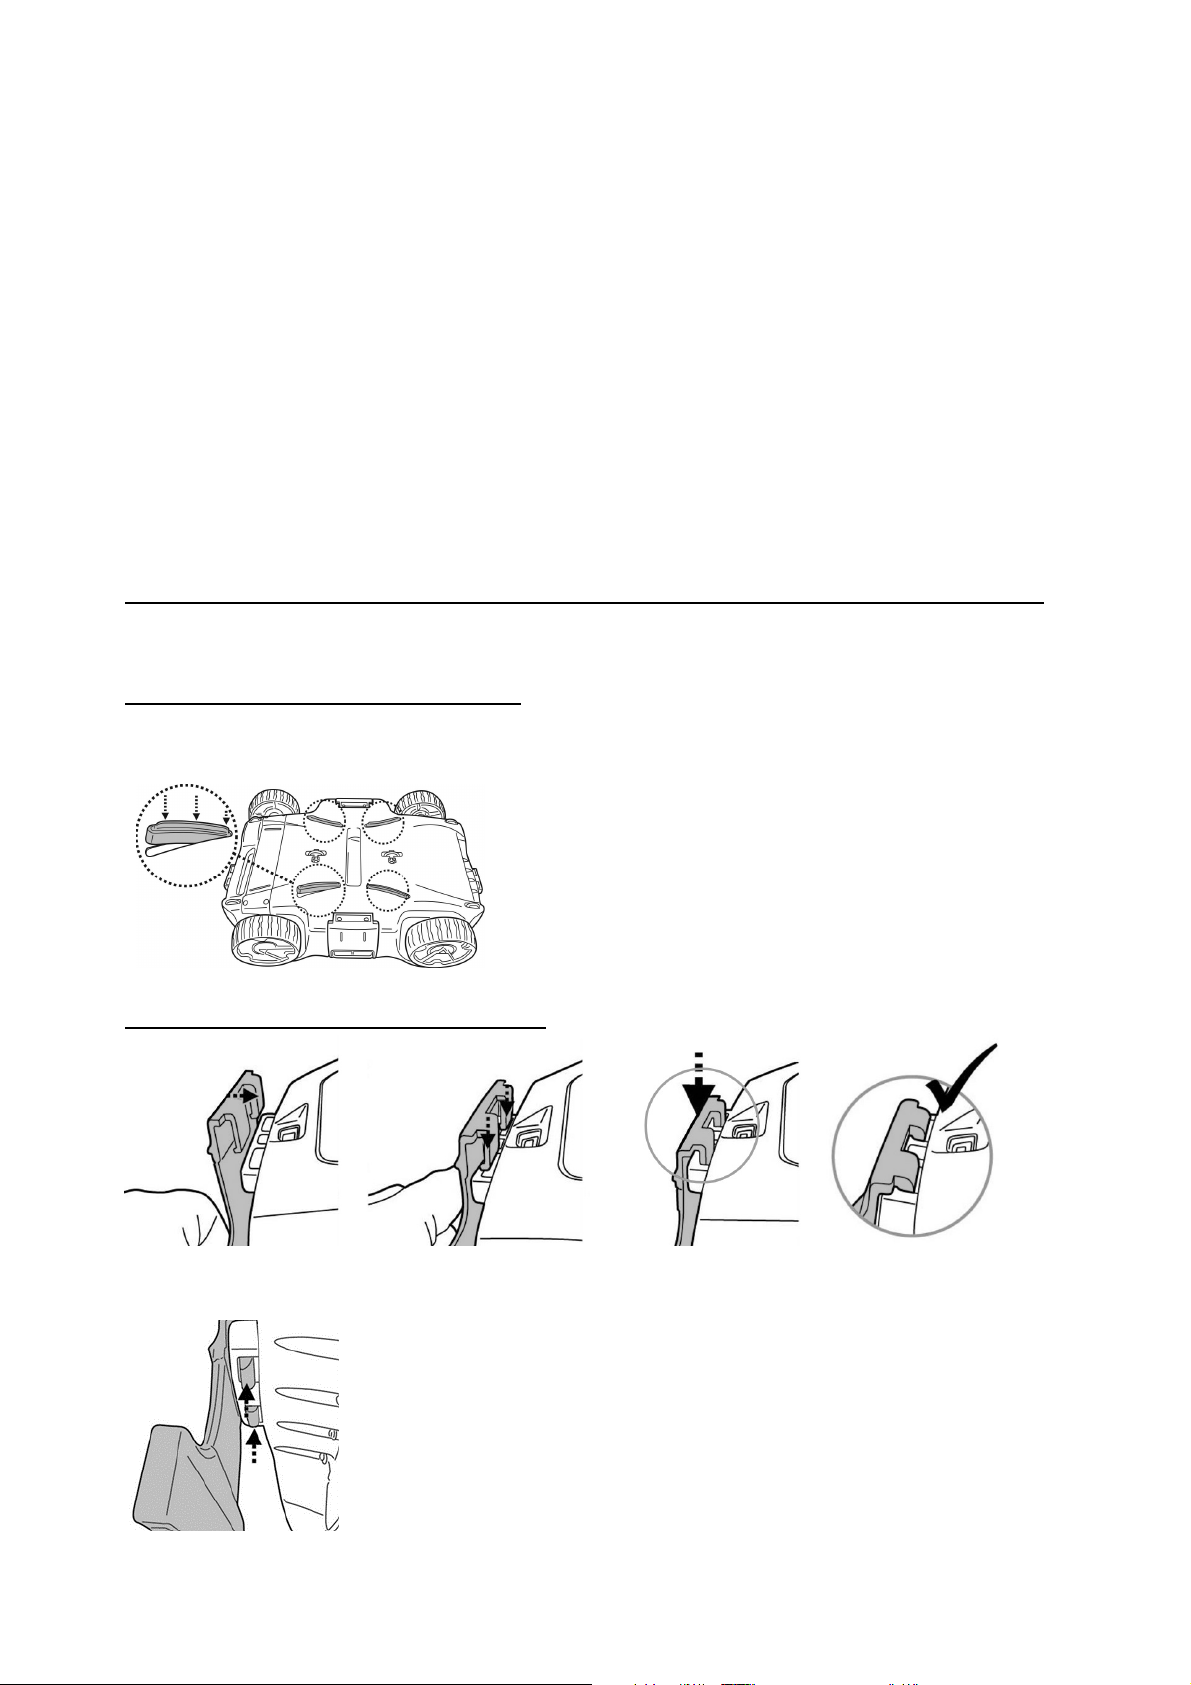
Floor Squeegee Assembly
Align and insert all squeegees into the notches at the underside of the robot
Clip-on Rake/ Brush Assembly
TIPS: Press on the two hook ends to remove the rake/brush
13
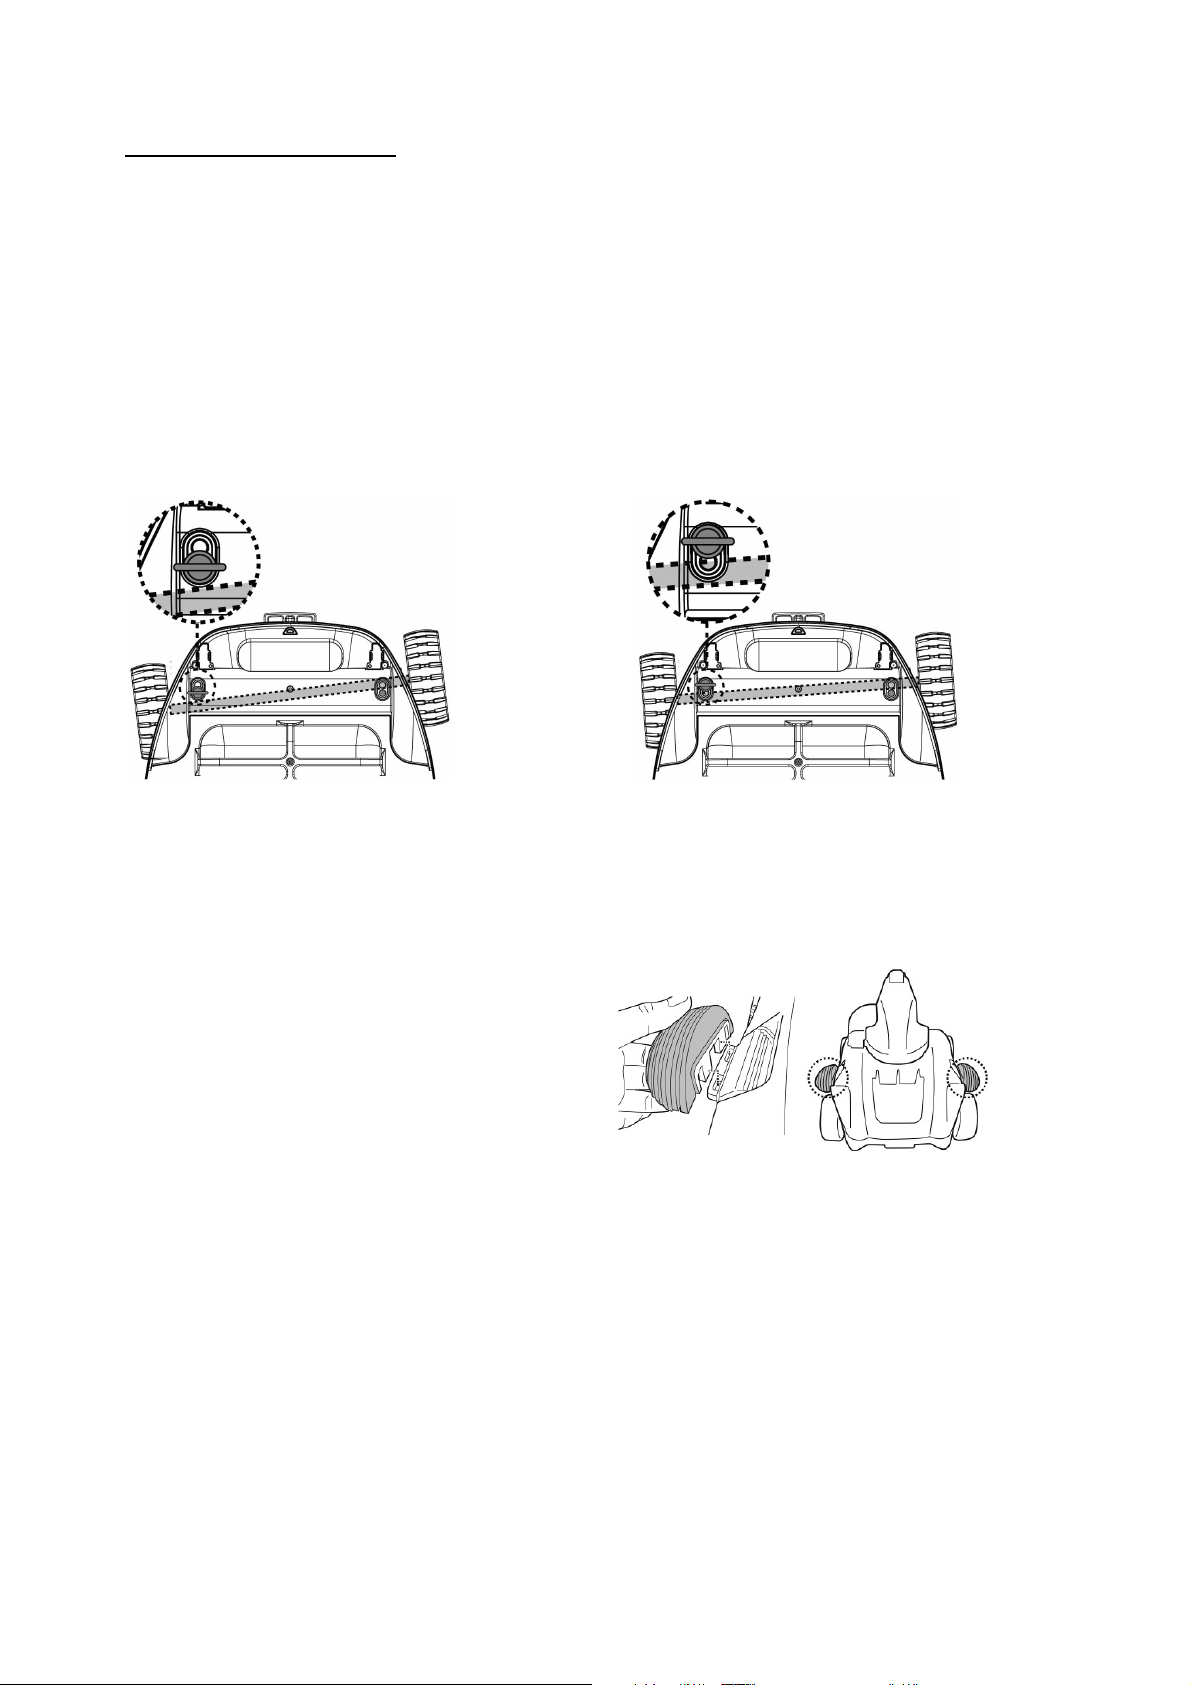
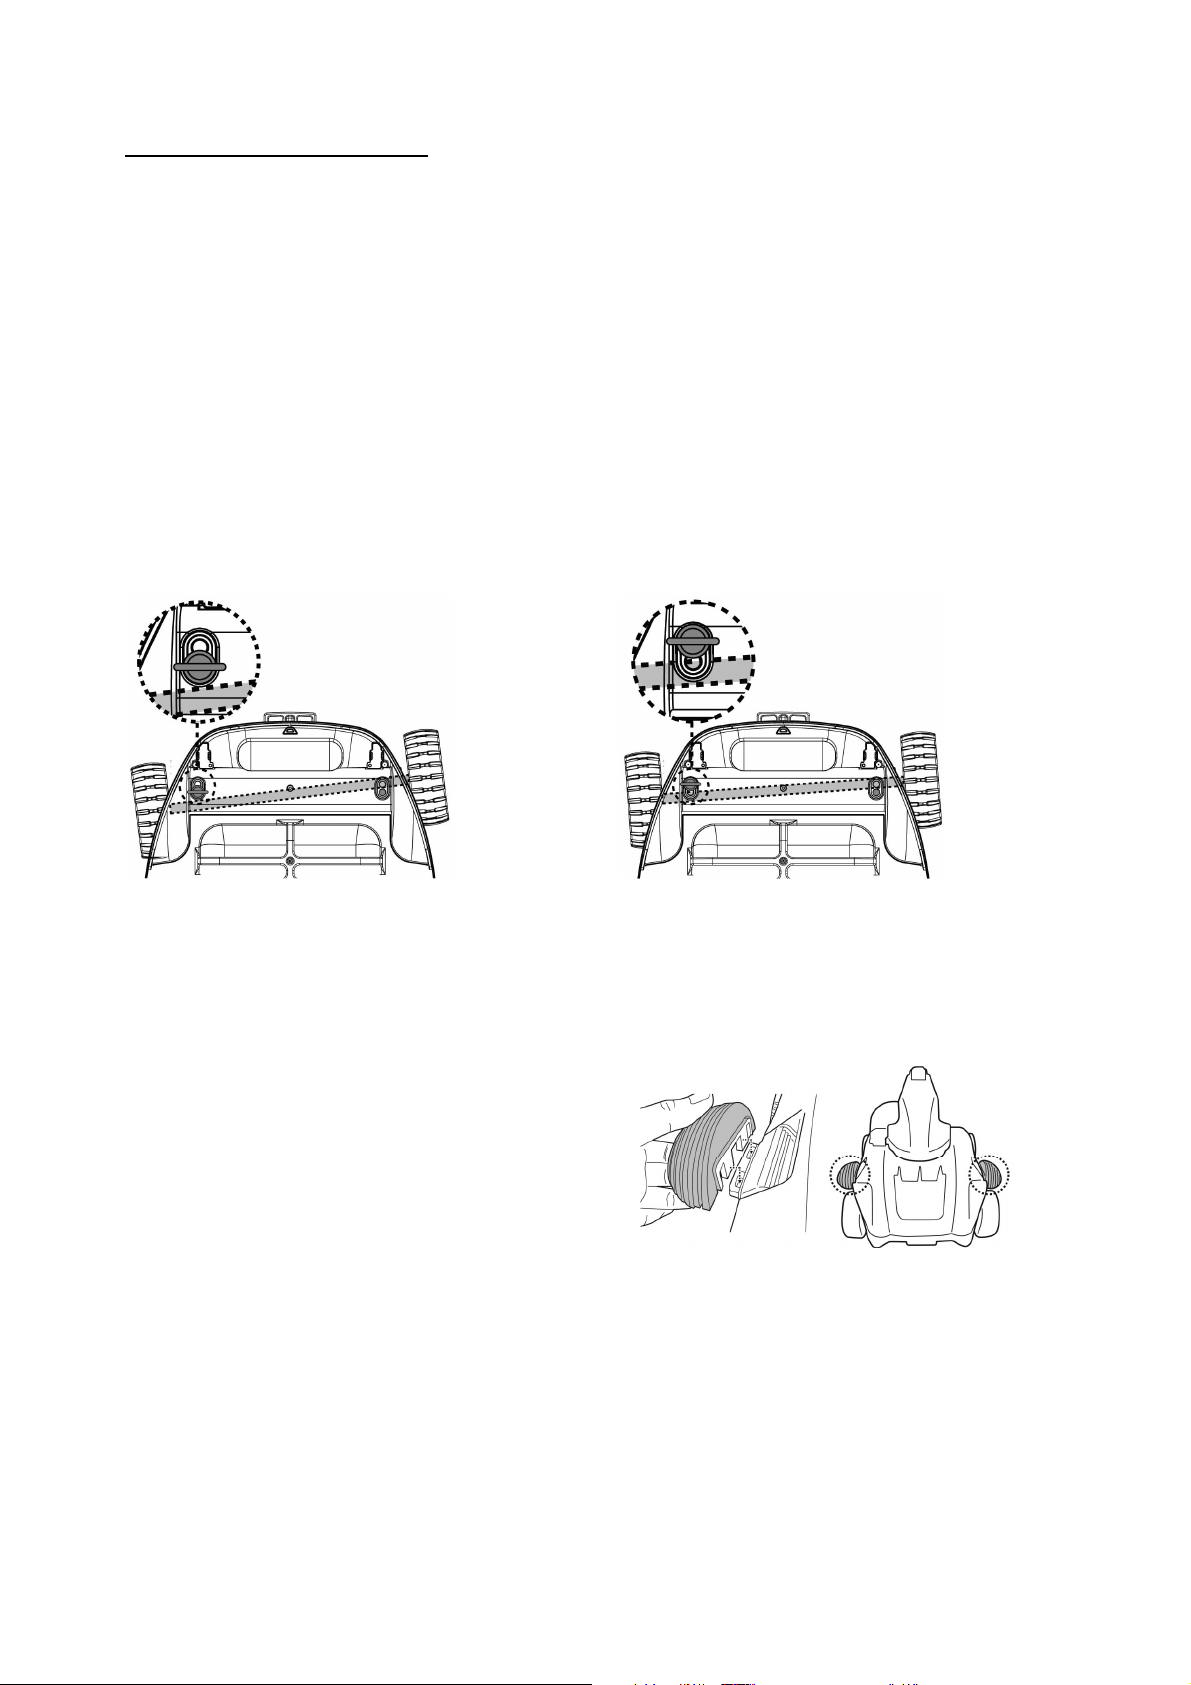
Adjustment of Trajectory
Locking Pin
The trajectory of the robot is dependent on the position of the pin that fixes the axle to
a certain angel. There are rwo locking pins: the one on the right is fixed and should
remain untouched. Alter only the position of the pin on left.
Recommended settings:
For pools where the shortest length is 3
meters or below. (Factory setting)
For pools where the shortest length is 3
meters or above
Bumper
The bumper is optional and can be used in the following situation:
If the robot tends to follow the perimeter of
the round pool, clipping a bumper on each
side of the robot will eliminate this pattern.
Pool Preparation
- If there are stones, roots or metal corrosion in contact with the underside of the liner,
discard them prior to using the robot. If necessary, seek assistance from a qualified
professional.
- If the liner is brittle, damaged or wrinkled, contact a qualified professional to perform
the necessary repairs or perform a liner replacement prior to using the robot.
- It may be advisable to turn off the filtration system as water circulation in the pool
may affect the movement pattern of the robot.
- Remove any pool ladder, surface skimmer, and other floating objects from the pool
as they may obstruct the movement of the robot’s float and, consequently, the
movement of the robot also.
14
- If you are using a saltwater pool, make sure all salt are dissolved before placing the
Power indicator light
robot into the water.
OPERATION
WARNING! Make sure the robot is off.
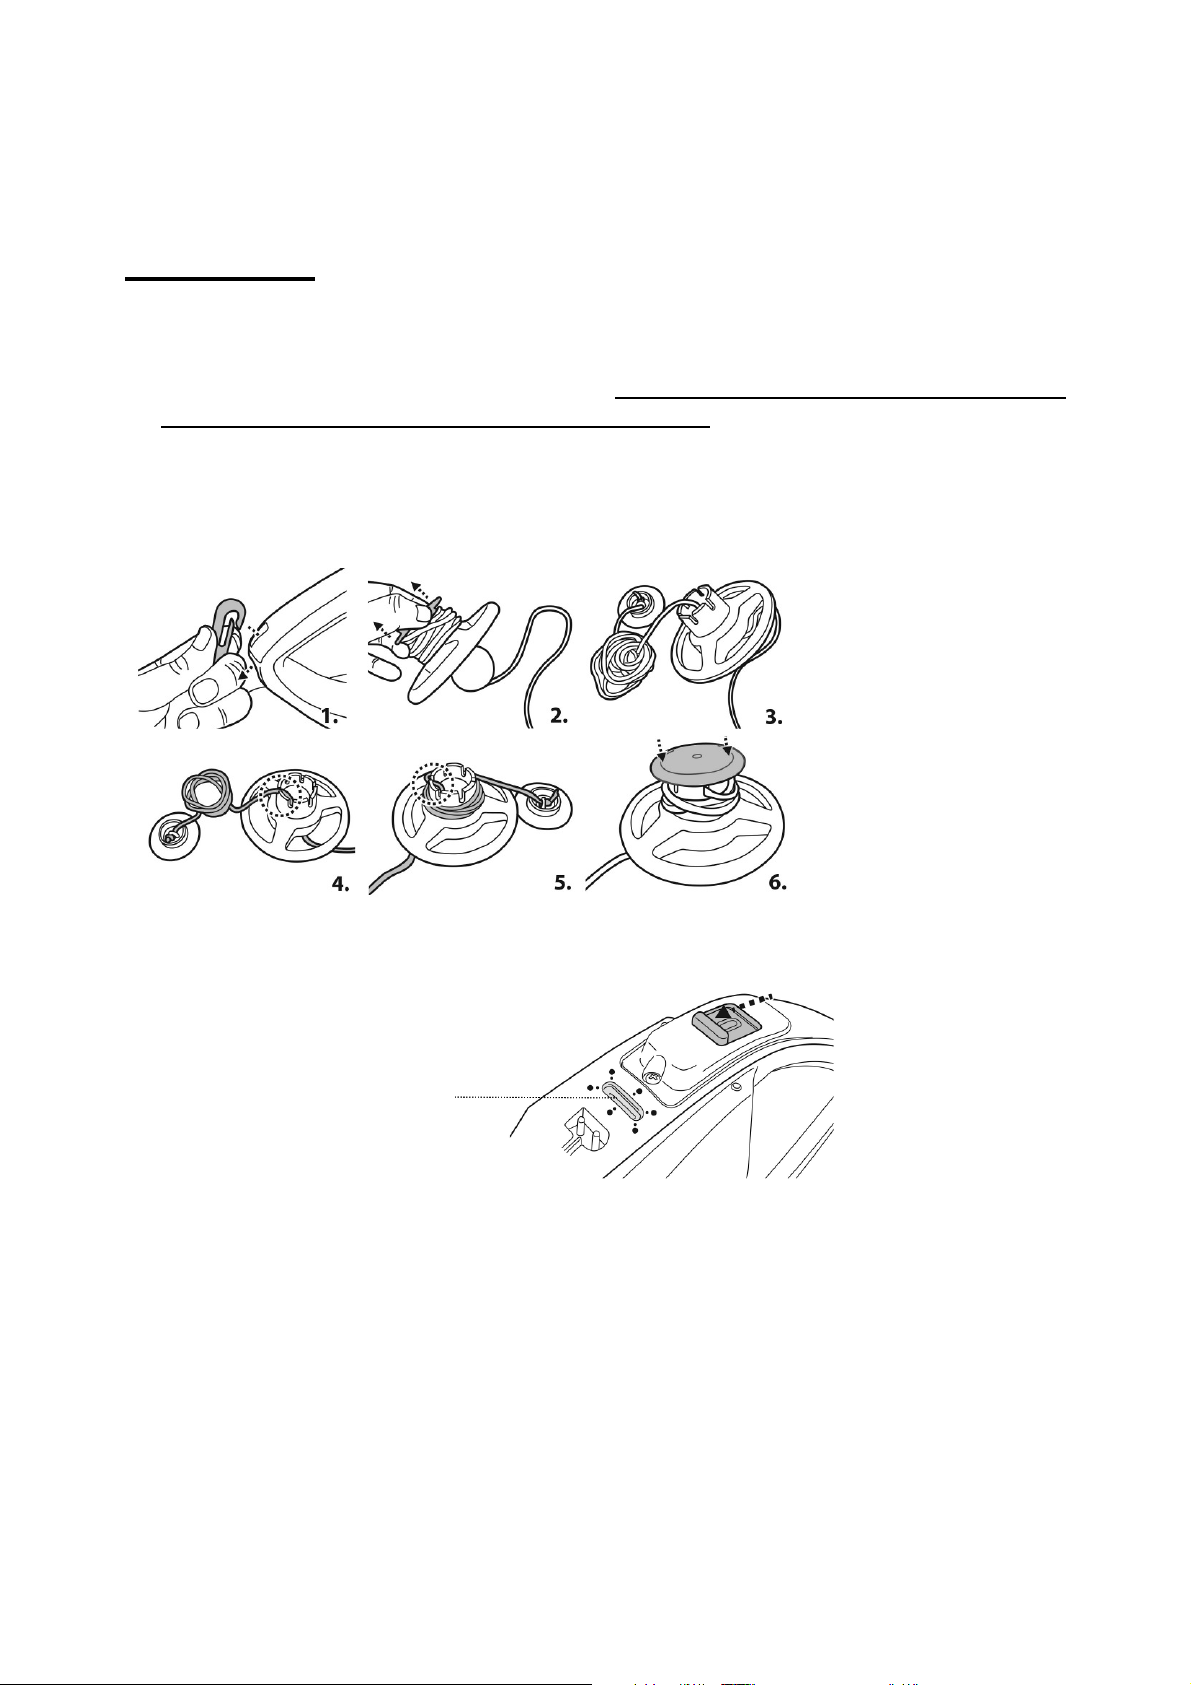
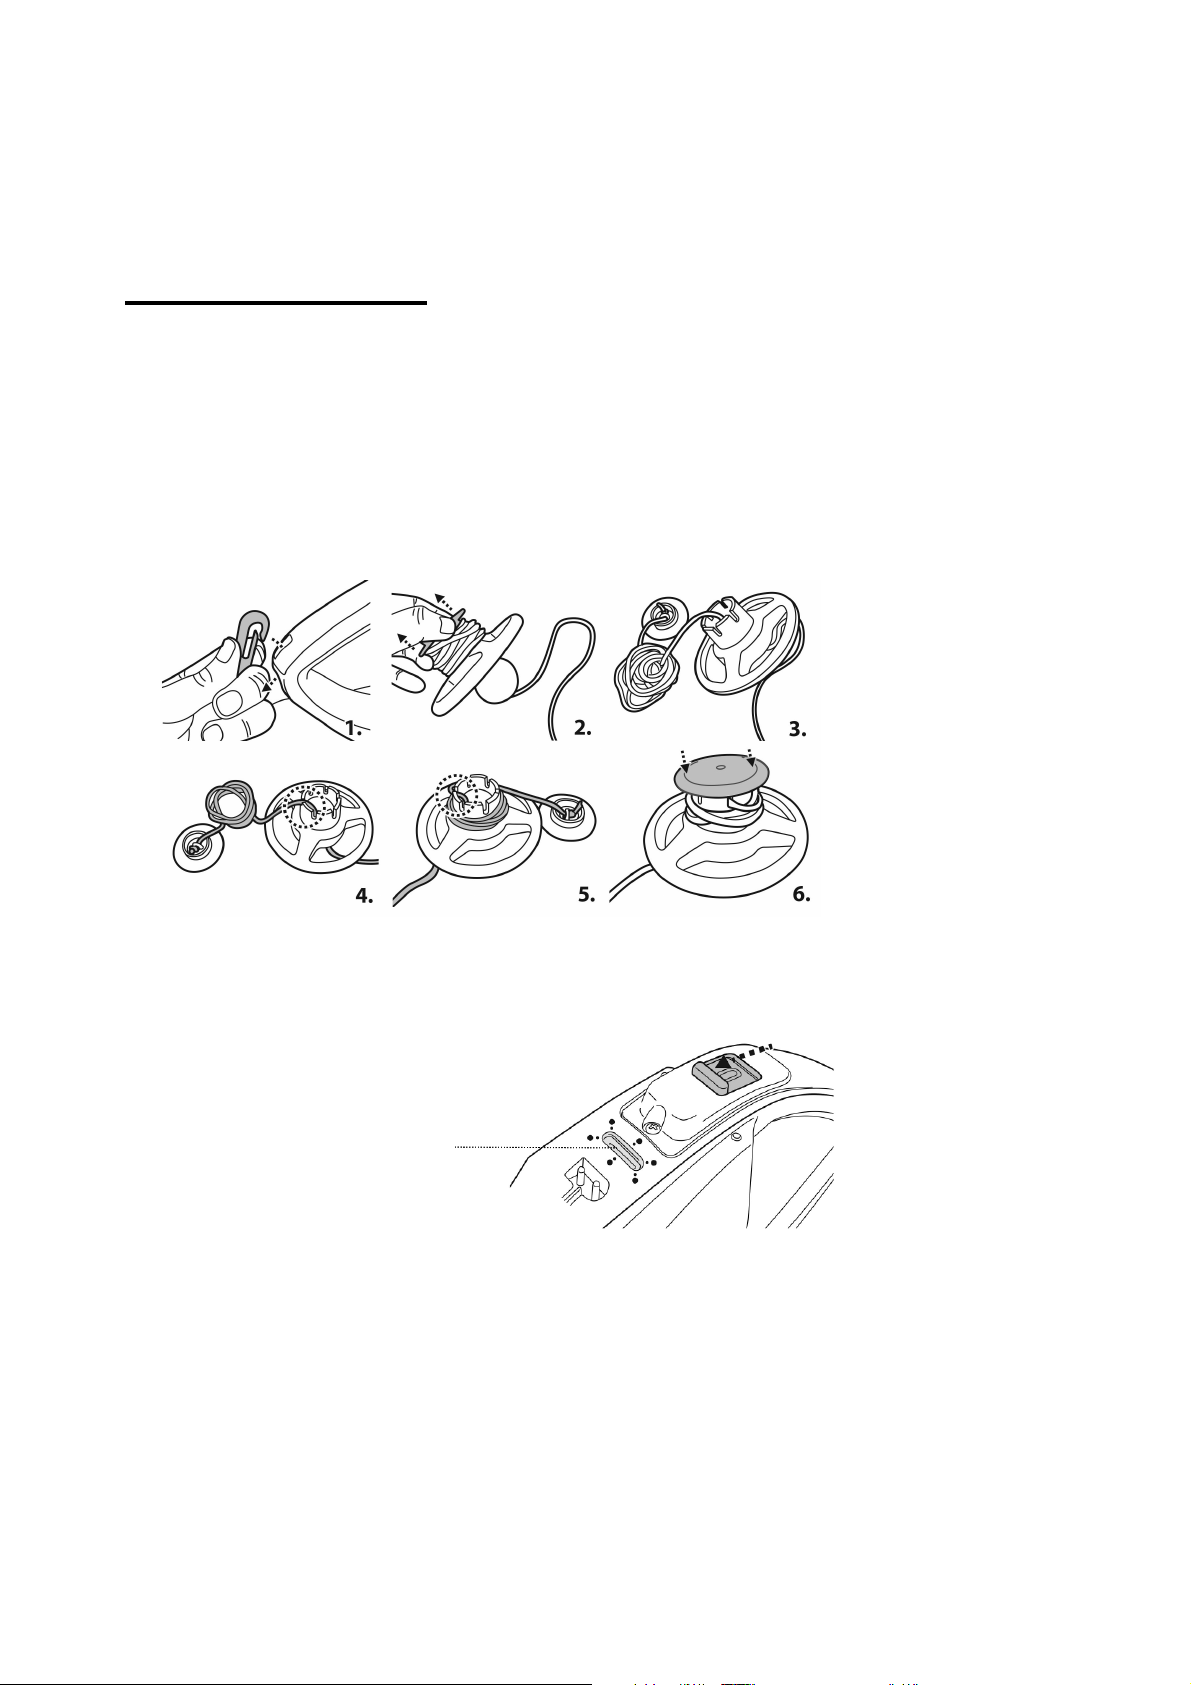
1. Bring your robot to the side of your pool. NOTE: Do not place the robot in the pool
corner and against the pool wall as starting location. Attach the hook of the float to the
handle of the swivel head. Pry to detach the float cover and release the rope from the
float to a length equivalent to the depth of pool water plus about 0.5 meters (1.6 feet).
Put the rope inside the notch and roll the rope around the post until the cover almost
reaches the post. Put the rope inside the notch and close the cover as shown.
2. Slide the power switch to the ON position and the power indicator light will turn on.
ATTENTION: Motor activates only when the robot is submerged in water completely
(Green)
3. Immerse the robot into the water and operation will automatically begin as water level
covers the sensors at the top of the swivel head. Let the robot sink to the pool floor and
observe the cleaner's first forward and reversed movements across the pool bottom. If
the robot runs along the pool wall instead of perpendicular to it, reposition it to make sure
that its front/back faces the pool wall.
Power indicator light starts to blink when 10 minutes of usage remains.
Power indicator light :
No light -
Light - Power on
Power off / no power
15
Blinking light - Battery power will be exhausted within 10 minutes.
NOTE:
- Refrain from making any physical contact with both water sensors.
To retrieve the robot from the pool, if you cannot catch it by hand use the hook
provided. Attach the hook to a telescopic pole (not provided) and use it to retrieve the
float
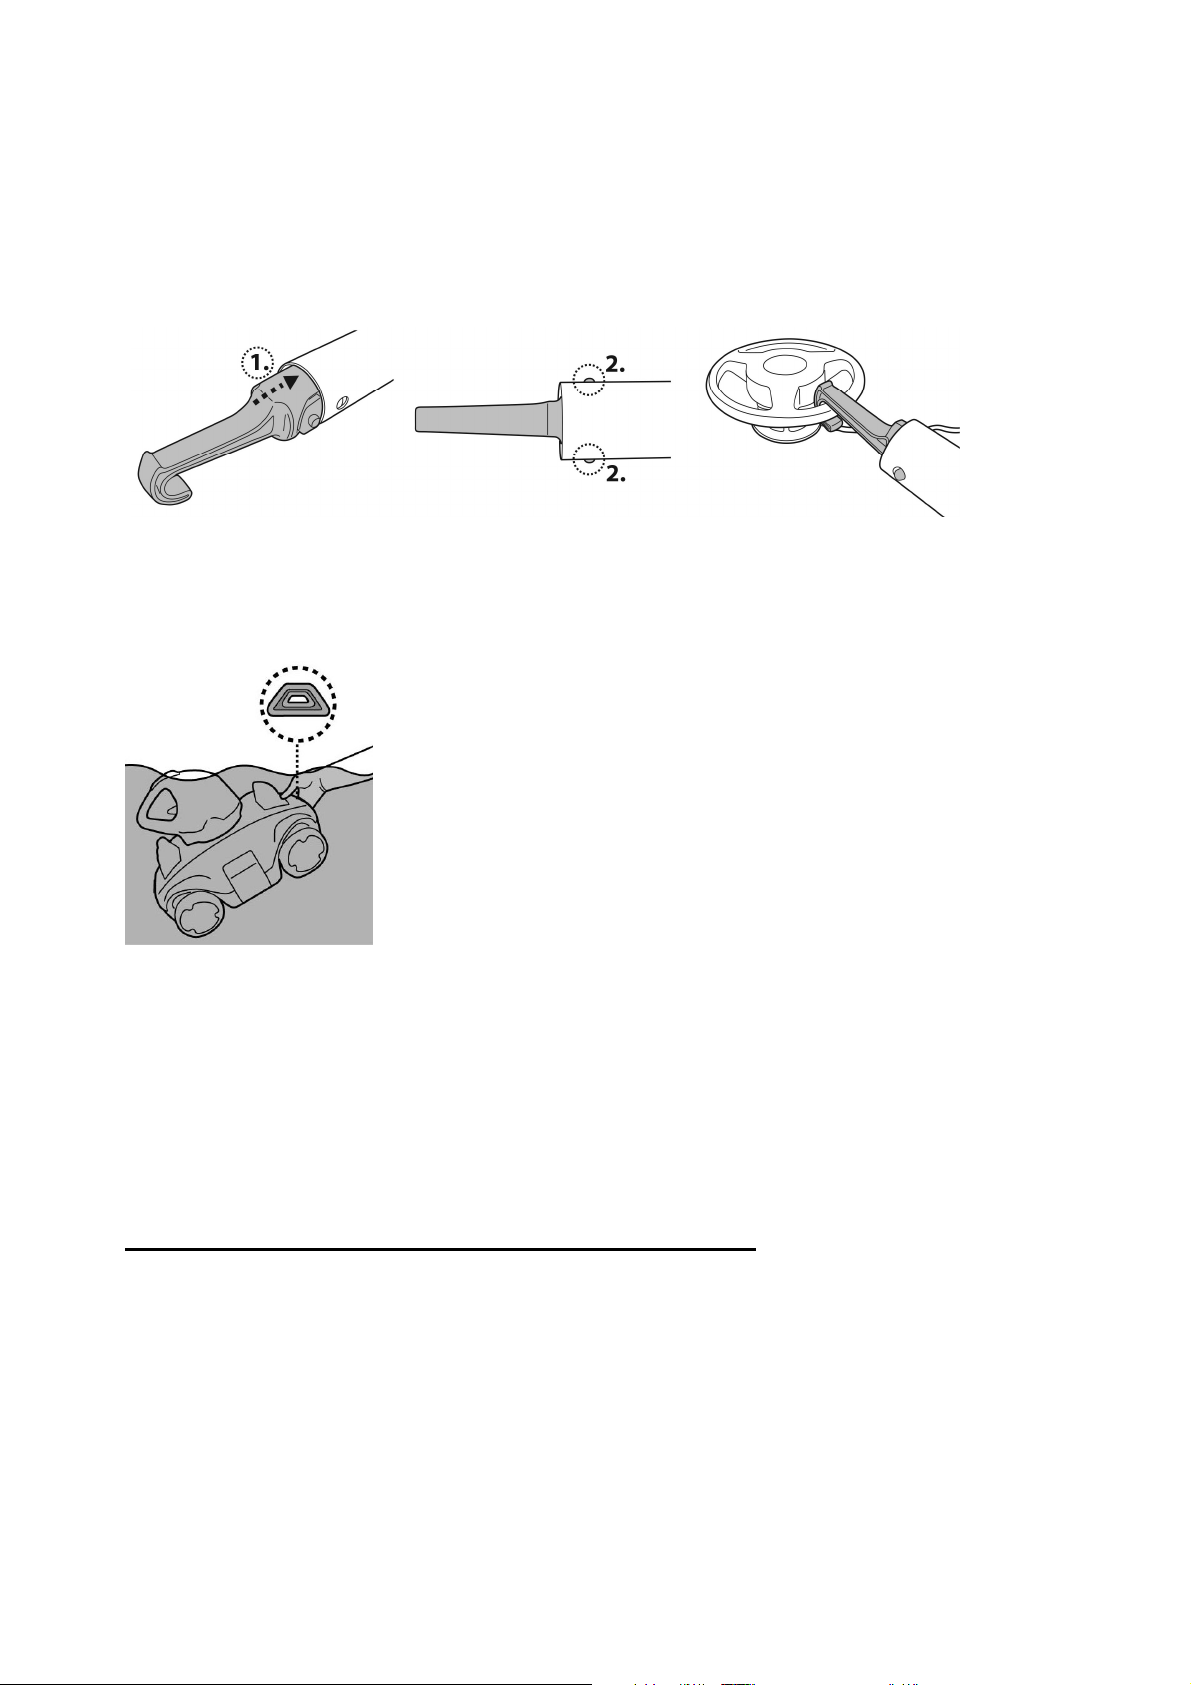
As the robot reaches the water surface, locate the end with yellow triangle (as shown in
the image below) and grab onto the robot via the grip (Note: holding the other end of the
robot will lead to escape of debris through the drainage outlet) to lift the cleaner to drain
the water out of the robot.
5. Slide the power switch OFF. Rinse the robot with fresh water after every use. DO NOT
use any detergent.
NOTE: To ensure the most efficient cleaning, when your pool is quite dirty, it is
recommended to empty the debris compartment after the first 30min of operation,
or whenever the robot’s movement has slowed down noticeably. Then return the robot
(with an emptied debris compartment) to the pool, and let it run through the remaining of
its cycle.
EMPTYING THE DEBRIS COMPARTMENT
WARNING! Using the robot without its filter cover in place will VOID your
warranty.
In order to maximize the cleaning efficiency, clean the debris compartment and the filter
cover before and after each use.
CAUTION! Before cleaning the debris compartment, make sure the robot is OFF.
1. Place the cleaner on a flat surface. Pull one side clip outwards to lift one side of the
cover and repeat the steps on the other side to lift the entire top cover to expose the
filter cover and filter plate.
16
2. Detach the filter cover and filter plate and remove the debris from the compartment. It
is recommended to clean the filter cover net and draining filter plate with splashing water.
If brushing is deemed necessary, use only a soft brush to clean it carefully and gentlyto
avoid damaging it.
3. After cleaning, make sure that both draining filter plate and filter cover are in place and
the body top cover is correctly installed and secured by the side clips.
CAUTION! Replace a damaged filter cover immediately with a new one before the next
operation.
MAINTENANCE & STORAGE
NOTE:
1. Battery discharges on its own during storage. Make sure to fully charge the robot
before storage.
2. You must re-charge the battery at least once every three months when it is not in use.
Unplug the external adaptor from the socket and then unplug the charging cable from
the external adaptor and robot.
Detach accessories from the robot. If necessary, rinse the robot and accessories with
fresh water. DO NOT use detergent.
Be sure to drain the water from the robot before storing it.
Use a damp cloth to clean and dry the robot and its accessories.
Store them in a well-ventilated area away from sunlight, heat, ignition sources, pool
chemicals and from children. Ambient temperature for storage should be 10˚C – 25˚C
(50˚F – 77˚F). NOTE: A higher storage temperature may reduce the battery life.
WARNING!
- Under no circumstances should you attempt to disassemble the swivel head and
replace the impeller, motor and battery by yourself.
- To replace a damaged squeegee, push it out of the cavity and replace with a new
one.

17
CAUTION!
Excessive heat can damage the battery and reduce the lifespan of your robot as a
result.
Consult your dealer regarding battery replacement if the following happens:
- Battery does not charge fully.
- Battery operation time is noticeably reduced. Observe and record the run times
of the first few operations (on a full charge). Use these run times as a reference
point to compare with run times of older batteries.
The battery must be removed from the robot before it is scrapped.
The robot must be disconnected from the supply mains when the battery is being
removed.
The battery is to be disposed safely in accordance with local ordinances or regulations.
NOTE: Incorrect maintenance may reduce the battery life and affect its capacity as a
result.
BATTERY DISPOSAL
Your robot is equipped with a maintenance-free rechargeable lithium-ion battery pack,
which must be disposed of properly. Recycling is required; please contact your local
authority for more information.
WARNING! Never attempt to disassemble a battery pack
Remove all personal items such as rings, bracelets, necklaces and watches when the
battery pack is unwired from the robot.
A battery can produce a short circuit current high enough to weld a ring (or similar item)
to metal, causing a severe burn in the process.
Wear complete eye protection, gloves and protective clothing when the battery pack is
being removed.
Avoid touching the wires altogether and avoid contact between them and any metal
items, which could cause sparking and/or short circuit the battery.
Never smoke or allow a spark or flame in the vicinity of the battery or the robot.
Do not expose the battery to fire or intense heat as this may result in an explosion.
CAUTION!
If a battery leak occurs, avoid any contact with the leaking fluids and place the damaged
battery in a plastic bag.
- If leaking fluids come in contact with skin and clothing, wash immediately with plenty
of soap and water.
- If leaking fluids come in contact with eyes, do not rub eyes, immediately flush eyes
with cool running water for at least 15 minutes and do not rub them. Seek medical
attention as soon as possible.
How to remove the battery pack (To be done by authorized technician)
Recommended tools (not included): Screwdriver.
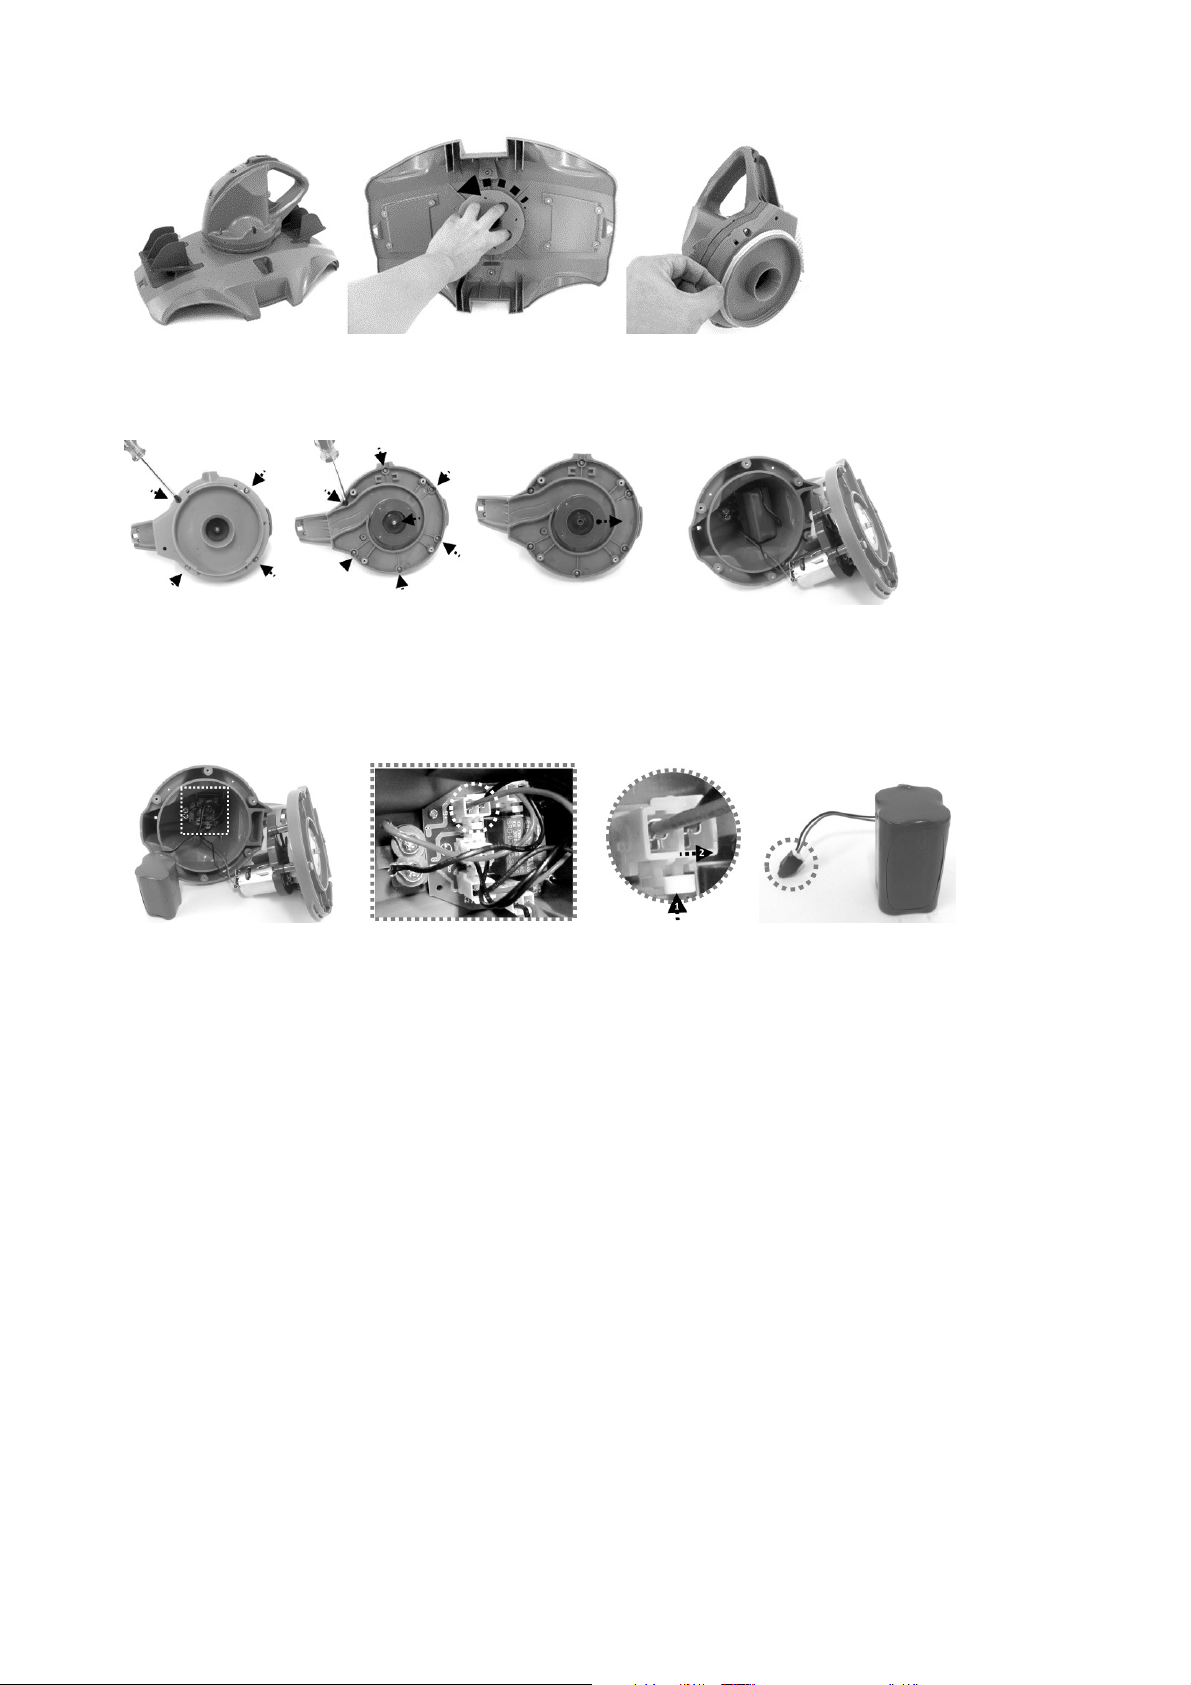
1. Follow section “EMPTYING THE DEBRIS COMPARTMENT” to release the
top cover (preassembled with the swivel head). Place the cover upside down and
release the swivel head by turning its bottom locking plate anticlockwise. Remove
the swivel smoothing-ring.
18
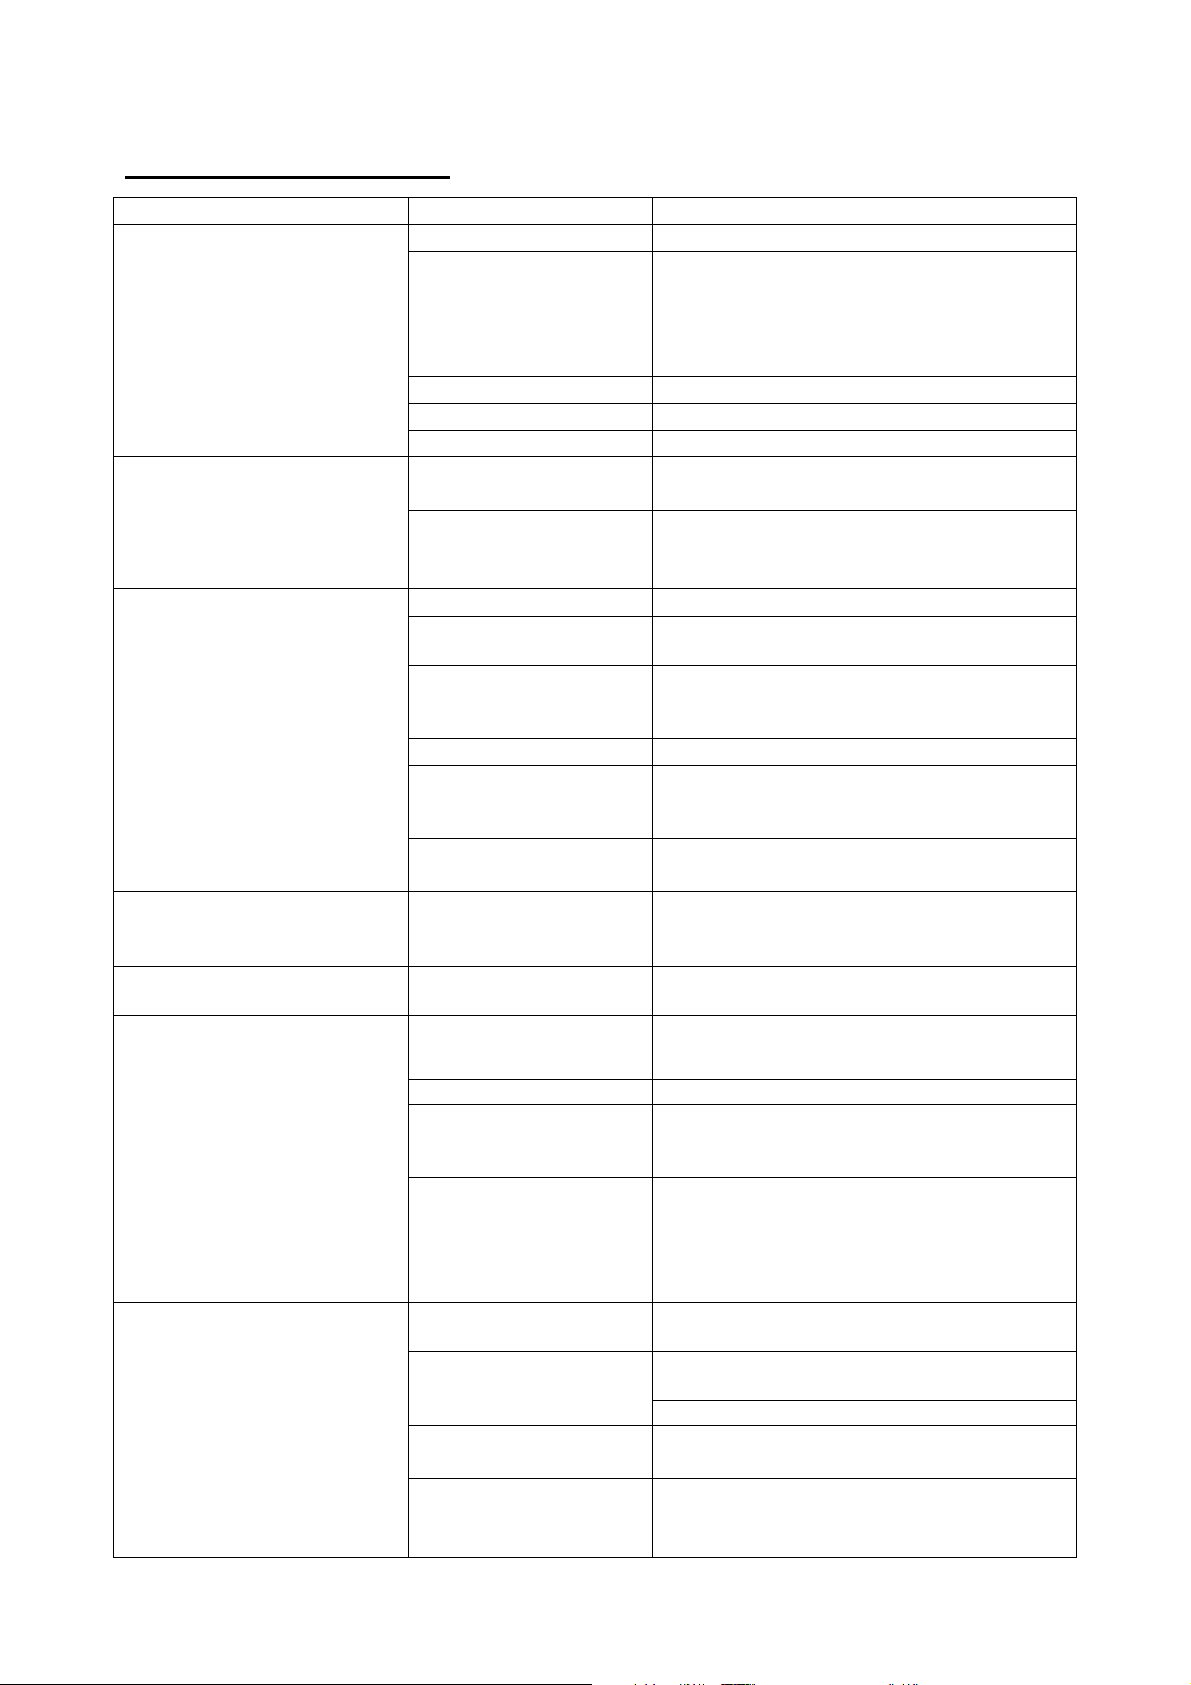
2. Use the screwdriver to unscrew the 4 screws located at the bottom of the head
to release the bottom plate first. Then unscrew all the screws at the base as
shown. Remove the impeller and pry open the base to expose head inside.
3. Remove out the battery pack to expose the PCBA. To detach the battery
connection wire, press on the clip of the connector to pull it out. NOTE: Wrap the
connector immediately with insulating tape in order to avoid any short circuit
caused by the contact of both wire terminals.
19
TROUBLESHOOTING
Problem Possible Cause Solution
Robot does not capture the debris Battery is running out Charge the robot again.
Impeller is jammed
Suction mouth is clogged Remove clogged objects from the suction mouth.
Impeller is broken Contact your dealer for replacement.
Debris compartment is full Clean both debris compartment and filter cover.
Robot stopped moving in the middle of
pool but swivel head is still turning
Robot does not cover the entire poo Debris compartment is full Clean the debris compartment
Robot moves along the pool wall Position of wheel axle is not set
Robot trapped in the narrow ledge of
an in-ground pool
Robot moves slowly or does not move
at all.
Robot stopped by obstacle or
large creases in the pool liner.
Robot is stopped by suction
from the main drain of pool
floor
Operation time is shorter as
expected
Moving direction is interrupted
by water circulation generated
by filtration system
Wheel is jammed Check and remove debris from the wheel.
Position of wheel axle is not set
properly. Bumper is required
Robot moves along the pool
wall of round pool
properly / bumper is required
Not enough space for robot
turning in other direction
Debris compartment is full Clean both debris compartment and filter cover.
Power off the robot and inspect the hole under the swivel
head to see if the impeller is jammed by large debris. If
necessary, contact your dealer for further instructions.
WARNING! Make sure the robot is off before
the unit is serviced.
Check to see that if there is anything obstructing the
cleaner. Remove the obstacle.
Turn off the filtration system as instructed in manual.
Clean the filter compartment and recharge the robot for
4.5- 5 hrs
Turn off the filtration system as instructed in manual.
Follow instruction to adjust wheel axle setting and apply
bumper.
Make sure the bumpers have been installed as instructed
in manual.
Follow instruction to adjust wheel axle setting and apply
bumper.
Follow instruction to put bumper on both end of robot.
Swivel head does not turn or turn
noticeably slowly
Suction mouth is clogged Remove clogged objects from the suction mouth
Filter cover screen is clogged Flush the screen with water to remove small particles. If
brush is deem necessary, use a soft brush to clean the
screen gently.
Impeller is jammed
Power off the robot and inspect the hole under the swivel
head to see if the impeller is jammed by large debris. If
necessary, contact your dealer for further instructions.
WARNING! Make sure the robot is off before
the unit is serviced.
Swivel head bottom is jammed
Side flap does not come up.
Swivel smoothing- ring is
broken
Swivel head bottom plate fitting
on the head is stripping
threaded
Check and remove any debris that may be trapped under
the swivel head.
Check and remove any debris that hinders the
movement of the flap.
Check that the two floats are on the flap.
Replace with a new swivel smoothing-ring. Contact your
dealer for replacement parts.
Unfasten the plate completely and fasten again. (Avoid
stripping threaded fitting.)
20
Debris escapes from the robot
Debris leaks outside at the filter cover Filter cover net is damaged
Float sinks Float is broken and water leaks
Robot cannot be charged / recharged Battery is damaged Contact dealer for battery replacement.
Suction mouth’s flap ( at
cleaner bottom) is damaged
Debris clogged at suction
mouth and prevents the flap to
close.
Draining filter plate is broken or
not in place
in
Suction mouth’s flap works like a door to prevent the
debris from escaping from the debris compartment.
Contact dealer for replacement parts and instruction.
Remove clogged debris from the suction mouth.
Make sure the draining filter plate is in place and replace
with a new one if necessary before next use.
Replace with a new filter cover. Contact your dealer for
replacement parts.
Replace with a new float. Contact your dealer for
replacement parts.
WARNING! DO NOT replace the battery by
yourself. This could result in severe or fatal injuries and
the warranty will be voided as a result.
Charging cable is not
completely connected with
external adaptor and robot.
External adaptor is out of order Contact dealer for replacement.
Make sure that the charger cable is connected with
external adaptor and robot properly and completely.
Refer to instruction manual.
WARNING! Using the wrong external adaptor
will result in damaging the robot / battery and voiding the
warranty as a result.
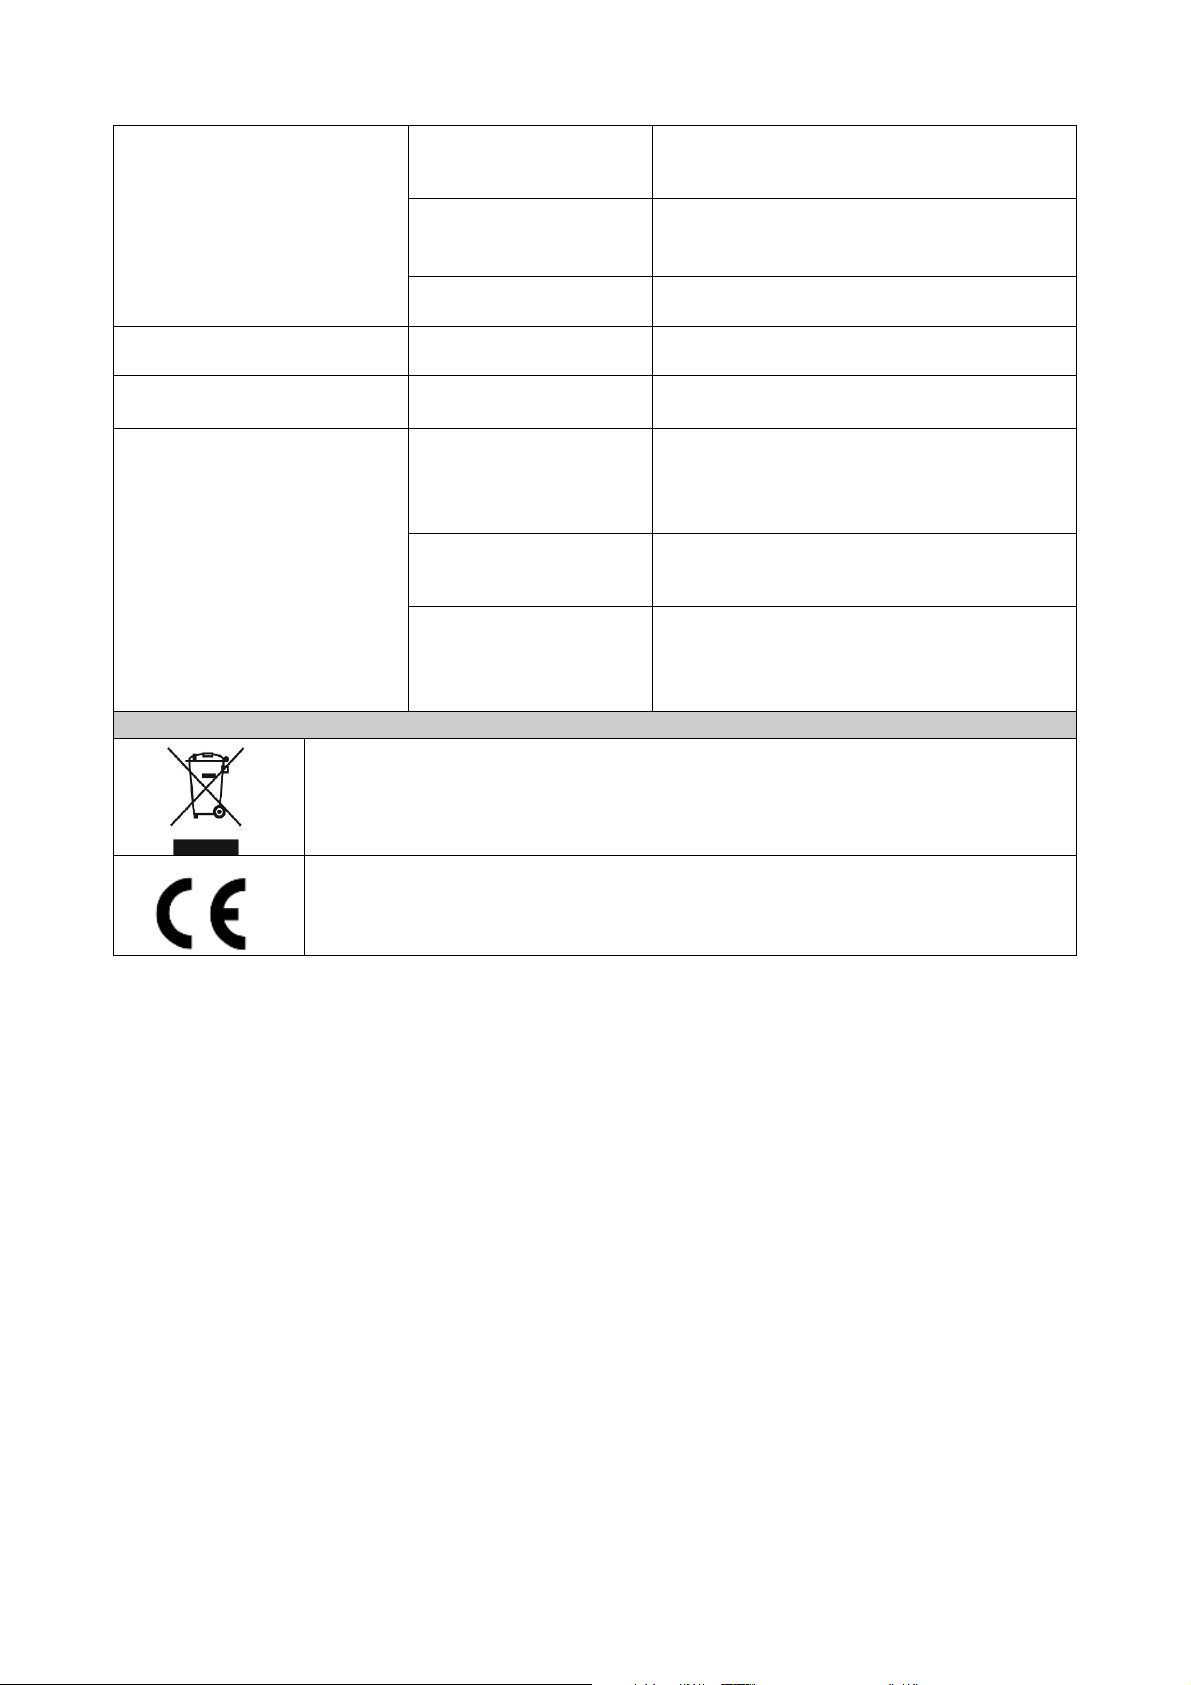
Environmental Programmes, WEEE European Directive
Please respect the European Union regulations and help to protect the environment.
Return non-working electrical equipment to a facility appointed by your municipality that
properly recycles electrical and electronic equipment. Do not dispose them in unsorted waste
bins. For items containing removable batteries, remove batteries before disposing of the
product.
© 2018 Kokido Development Ltd. 18009028
All rights reserved. No part of this document may be reproduced or transmitted in any form or
by any means, electronic, mechanical, photocopying, recording, or otherwise, without prior
written permission of Kokido Development Ltd. (V1)
If soft copy of this instruction manual is required, please contact our customer service by email:
customerservice@kokido.com
SAVE THESE INSTRUCTIONS
Manufacturer: Kokido Development Limited.Unit 1319, Sunbeam Centre, 27 Shing Yip Street, Kwun Tong, Kowloon, HK
21
AVERTISSEMENT & INSTRUCTIONS
Lire et respecter toutes les instructions de ce manuel. Ne pas le faire pourrait
entraîner des blessures graves ou mortelles.
CONSERVER CE MANUEL
AVERTISSEMENT!
- Ce produit n'est pas un jouet. Les enfants doivent être gardés hors de
portée de ce robot et de ses accessoires.
- Ne jamais laisser les enfants utiliser ce produit.
- Ne pas utiliser ce produit lorsque des personnes/animaux sont dans
l’eau.
- This robot is not intended for use by someone with reduced physical,
sensory or mental capabilities or a lack of experience and knowledge
unless they have been given instructions concerning the appliance and
are under supervision of the person responsible for their safety.
- Ce robot n'est pas destiné à être utilisé par une personne ayant des
capacités physiques, sensorielles ou mentales réduites, ou ayant un
manque d'expérience et de connaissances, à moins d'avoir reçu des
instructions concernant l'appareil et d’être sous la surveillance d’une
personne responsable de leur sécurité.
- Assurez-vous que l’aspirateur électrique est complètement immergé
dans l'eau avant de commencer l'opération. Le niveau d'eau minimum
requis pour faire fonctionner l'appareil doit être au-dessus de la tête
rotative du robot. Le produit est uniquement destiné à être utilisé sous
l'eau dans une piscine; Toute autre utilisation annulera la garantie.
- Profondeur maximale d’utilisation : 3 mètres (10 ft).
- Température de l’eau maximum: 5˚C (41˚F) –35˚C (95˚F)
- Pour recharger la batterie, utiliser uniquement l'unité d'alimentation
détachable (transformateur) fournie avec ce robot.
- Unité d'alimentation détachable (transformateur).
- Connecter le transformateur à une source d'alimentation par
l'intermédiaire d'un dispositif de courant résidentiel (RCD) ou d'un
disjoncteur de fuite à la terre (GFCI). En cas de doute, consultez un
électricien professionnel qualifié.
Ne pas utiliser cet aspirateur électrique si des dommages sont détectés.
- Remplacer les pièces endommagées dès que possible. N'utiliser que des
pièces certifiées par le distributeur ou le fabricant.
- Mettre l'appareil hors tension, débrancher d’abord le transformateur de la
source d'alimentation, puis du câble d’alimentation et ensuite
déconnecter le robot du câble d’alimentation.
- Débrancher le robot du réseau d'alimentation et s’assurer qu’il est en
position éteinte avant d'effectuer tout entretien, tel que le nettoyage du
filtre ou de l’anneau de lissage pivotant.
- La batterie installée est une batterie rechargeable Li-ion. Ne jamais
essayer de la remplacer.
- Recharger ce robot uniquement à l’aide du transformateur et du câble de
d’alimentation livré avec ce produit.

22
- Durant la charge, NE PAS manipuler le robot, le transformateur ou le
câble d’alimentation en condition d’humidité ou sans chaussures.
- NE PAS utiliser ce robot sans un filtre en bon état, la garantie serait
annulée.
- Risque d'entrave par aspiration: ce robot génère de l'aspiration. Ne pas
laisser les cheveux, le corps ou les parties flottantes de vos vêtements
dans la plage d'aspiration du produit pendant son fonctionnement.
- Ne jamais introduire une partie du corps, vêtements ou autres objets
dans les ouvertures ou les parties mobiles du robot.
- NE PAS utiliser ce robot pour ramasser des substances toxiques,
inflammables ou combustibles comme l'essence, ni en présence de
vapeurs explosives ou inflammables.
- Ne jamais tenter de démanteler les pièces de ce robot, remplacer la
turbine, le moteur ou la batterie par vous-même.
- Ne jamais insérer les doigts ou quelconque objet dans la turbine.
- Ce robot ne doit pas être utilisé par des enfants.
- La batterie doit être retirée du robot avant qu’il soit mis au rebut.
- Ce robot contient une batterie qui ne peut être retirée que par des
personnes qualifiées.
- Le robot doit être déconnecté du réseau d'alimentation lors du retrait de
la batterie.
- Pour plus de détails sur la mise au rebut de la batterie, se reporter à la
section "Mise au rebut de la batterie" de ce manuel.
- La batterie doit être détruite en toute sécurité conformément aux
réglementations locales.
- Ce robot inclus une batterie rechargeable au lithium-ion qui ne nécessite
pas d’entretien, et qui doit être détruite correctement. Le recyclage est
obligatoire, veuillez contacter les autorités locales pour plus
d'informations.
- Transformateur et câble d’alimentation:
Utiliser le transformateur et le câble d’alimentation uniquement pour
recharger la batterie du robot fourni dans le même pack.
Le transformateur et le câble d’alimentation ne doivent pas être
utilisés à l'extérieur, ni exposés à la pluie, à l'humidité, à des liquides
ou à la chaleur.
Le transformateur (ou le transformateur) doit être situé à l'extérieur
de la zone 1
Garder le transformateur et le câble d’alimentation hors de portée
des enfants.
Ne jamais utiliser le transformateur ou le câble d’alimentation s’ils
sont endommagés.
NE PAS manipuler le transformateur ou le câble d’alimentation avec
les mains humides.
Conserver le transformateur hors tension lorsqu'il n'est pas en
usage.
Ne jamais essayer d'ouvrir le transformateur.
Si le cordon d'alimentation est endommagé, il doit être remplacé par
le fabricant, son agent de service ou une personne également
qualifiée afin d'éviter tout danger.

23
S’assurer que le robot est complètement sec avant de le recharger.
MISE EN GARDE!
- Ce robot est conçu pour une utilisation sous l'eau uniquement; ce n'est pas un
aspirateur tout usage. NE PAS essayer d'utiliser l’aspirateur électrique pour nettoyer
autre chose que votre piscine.
- N'utilisez que des accessoires d'origine fournis avec ce produit.
- NE PAS utiliser ce robot juste après la mise en service de la piscine. Il est
recommandé de laisser d'abord la piscine fonctionner pendant au moins 24 à 48
heures.
- Ne pas utiliser cet aspirateur électrique avec un autre aspirateur / nettoyeur
électrique simultanément.
- NE PAS utiliser cet aspirateur électrique juste après la mise en service de la piscine.
Il est recommandé de laisser d'abord la piscine fonctionner pendant au moins 24 à 48
heures.
- Pour les piscines d'eau salée, s’assurer que tout le sel est dissous avant de placer
le robot dans l'eau.
- Il n'est pas recommandé d'utiliser ce robot simultanément avec un autre aspirateur
électrique.
- Éviter de ramasser des objets durs et tranchants avec ce produit. Cela peut
endommager le robot et le filtre.
- Ne pas porter le robot par le cordon du transformateur ou par le câble d’alimentation
afin de ne pas les endommager, ne pas tirer sur le câble pour le débrancher de la
source d'alimentation.
- Charger le robot à l'intérieur, dans un endroit propre et sec, avec une bonne
ventilation et à l'abri du soleil.
- NE PAS laisser l’aspirateur électrique branché sur le secteur pendant plus de 10
heures.
- Si le robot n'est pas utilisé pendant une période prolongée, s’assurer que le cable
d’alimentation est débranché et utiliser un chiffon humide pour le nettoyer puis le
sécher, faire de même pour les accessoires. S’assurer de recharger l’aspirateur
électrique à 30%- 50% avant de le stocker. L’entreposer dans un endroit bien ventilé,
à l'abri de la lumière du soleil, de la chaleur, des sources d'ignitions, des produits
chimiques de la piscine et des enfants. Recharger l’aspirateur électrique tous les trois
mois.
- Toute intervention qui demande l’ouverture de la tête pivotante (i.e.: recyclage de la
batterie) doit être effectuée uniquement par le personnel habilité.
Les avertissements et mises en garde ci-dessus ne sont pas destinés à lister
tous les cas possibles de risques et / ou de blessures graves. Les Propriétaires
de piscine doivent toujours faire preuve de prudence et de bon sens lors de
l'utilisation du produit.
24
SCHEMA DU ROBOT
Numéro de pièce
002/US (USA)
detachee
1. Tête pivotante
Interrupteur
1.1.
coulissant
Voyant
1.2.
d’utilisation
1.3. Capteurs d'eau --------Port
1.4.
d’alimentation
Volet latéral (à
2.
broche)
Anneau de
3.
lissage pivotant
4. Capot RC32ASM03
5. Plaque pivotante RC30-05-005
6. Couvercle filtrant RC30-09
7. Base
Motif triangulaire
7.1.
jaune
Poignée (sous le
7.2.
motif triangulaire
jaune)
Goupille de
8.
verrouillage
9. Essieu de roue
Roue arrière
10.
(avec rondelle)
Roue avant
11.
(avec rondelle)
12. Pare-chocs x 2 RC30-18
13. Râteau
14. Brosse
Plaque filtrante
15.
du drain
Trappe de
16.
vidange
Rabat de la
17.
bouche
d'aspiration
Nervures de
18.
capture x 4
19. Flotteur RC30ASM06
Crochet (avec
système V-clip)
20.
pour manche
télescopique
Câble
21.
d’alimentation
22. Transformateur
RC30ASM07
RC30ASM07/US (USA)
---------
---------
---------
RC30-07
RC30-08-004
RC32ASM04
RC32ASM04/US (USA)
---------
---------
RC30-10-014
RC30ASM08
RC30-12
RC32ASM10
RC30ASM09
RC30-10-012
RC30-16
RC30-17-001
RC30-17-002 (EU)
RC30-17RC30-17-002/AU
(Australia/New Zealand)
Ce robot inclus une buse de d’évacuation de l'eau située en bas de la tête pivotante.
L'eau est d'abord happée par la bouche d'aspiration située en dessous du robot, passe à
travers le filtre puis est rejetée par la buse d’évacuation. Le jet d'eau de la buse propulse
le robot vers l'avant. Une fois que le robot s'arrête contre un obstacle, comme la paroi de
la piscine, son volet latéral et sa tête pivotante tournent de 180 degrés. Le robot se dirige
alors dans la direction opposée. Le robot se déplace en ligne droite dans une direction,
25
puis courbe sa trajectoire dans le sens inverse. Tout en se déplaçant, le robot aspire le
fond de la piscine capturant ainsi les débris à l'intérieur du compartiment prévu à cet
effet.
POUR COMMENCER
Chargement de la batterie
REMARQUE IMPORTANTE: Charger complètement le robot (environ 5-6 heures) avant
la première utilisation.
AVERTISSEMENT!
Utiliser uniquement le transformateur et le câble d’alimentation fournis.
S’assurer que le robot et le port de charge sont propres et secs avant de les
charger.
S’assurer que le robot est éteint en mettant l'interrupteur sur position OFF avant la
mise en charge.
1. Placer l'appareil sur une surface plane. Mettre l'interrupteur en position OFF.
2. Connecter le câble le transformateur au câble d’alimentation. Aligner et insérer la
fiche du câble de chargement dans le port de chargement situé sur le dessus de
l'appareil.
3. Connecter le transformateur à la source d'alimentation. Une fois que le robot
commence à charger, le voyant du transformateur devient rouge.
En temps normal, il faut environ 4,5 à 5 heures pour une charge complète. Le voyant
de l'transformateur devient vert lorsque le robot est chargé.
Voyant rouge – En charge
Voyant vert - Chargé
ETEINT
ALLUME
Déconnecter immédiatement le transformateur de la source d’alimentation en cas de:
- Odeur forte ou inhabituelle
- Chaleur excessive
- Déformation, fissure ou fuite
- Fumée
26
4. Lorsque la charge est terminée, déconnecter l'transformateur de la source
d'alimentation et débrancher le câble d’alimentation du transformateur.
A pleine charge et en condition d’utilisation normale, l’aspirateur électrique peut
fonctionner jusqu'à 90 minutes.
Remarques:
- Nettoyez régulièrement le compartiment à débris. Des débris excessifs à
l'intérieur de ce dernier augmentent l’effort de fonctionnement du moteur et
raccourcissent ainsi la durée de fonctionnement.
- La batterie rechargeable au lithium-ion est classée comme consommable. Elle a
une durée de vie limitée et perdra graduellement sa capacité de tenir la charge.
Par conséquent, le temps de fonctionnement du robot diminue progressivement
après rechargement et déchargement répétés tout au long de sa durée de vie.
- Le remplacement de la batterie se fait par l’instalation d’une nouvelle tête
pivotante. Suivre l'étape 1 de la section «Comment retirer la batterie» pour
détacher la tête pivotante et inverser les étapes pour en installer une
nouvelle.
REMARQUE: Laissez le robot reposer pendant 30 à 40 minutes avant de le recharger.
Assemblage avant utilisation
Installation des nervures de capture
Aligner et insérer chaque nervure de capture dans les encoches situées en dessous du
robot.
Assemblage du râteau et de la brosse
ASTUCE:Appuyer sur les deux extrémités du crochet pour retirer le râteau ou la
brosse
27
Ajustement de la trajectoire
Goupille de verrouillage
La trajectoire du robot dépend de la position de la goupille qui fixe l'axe à un certain
ange. Il y a deux goupilles de verrouillage: celle de droite est fixe et ne doit pas
bouger. Modifier uniquement la position de la broche de gauche.
Réglages ecommendés:
Pour les piscines dont la longueur la plus
courte est de 3 mètres ou moins. (Réglage
d'usine)
Pour les piscines dont la longueur la plus
courte est de 3 mètres ou plus
Pare-chocs
Le pare-chocs est facultatif et sera utilisé dans les situations suivantes:
Si le robot a tendance à suivre le
périmètre d’une piscine ronde, clipser un
pare-chocs de chaque côté du robot
permettra de remédier à ce
comportement.
Préparation de la piscine
- S'il y a des cailloux, des racines ou de déchets métalliques sur le liner, les retirer avant
utilisation du robot. Si nécessaire, demander l'aide d'un professionnel qualifié.
- Si le liner est friable, endommagé ou froissé, contacter un professionnel qualifié pour
effectuer les réparations nécessaires ou effectuer un remplacement du liner avant
utilisation du robot.
- Il est conseillé d'éteindre le système de filtration pour éviter la circulation de l'eau dans
la piscine ce qui peut affecter le mouvement du robot.
28
- Retirer l'échelle, le skimmer de surface et autres objets flottants de la piscine, cela peut
gêner le mouvement du flotteur et, par conséquent, le mouvement du robot.
- Pour les piscines d'eau salée, s’assurer que tout le sel est dissous avant de placer le
robot dans l'eau.
FONCTIONNEMENT
AVERTISSEMENT! S’assurer d'éteindre le robot avant de commencer.
1. Avant d’utiliser ce robot, fixer le crochet du flotteur à la poignée de la tête pivotante.
Détacher le cache du flotteur et libérer la corde du flotteur d’une longueur équivalente
à la profondeur de l'eau de la piscine plus environ 0,5 mètre (1,6 pied). Placer la
corde à l'intérieur de l'encoche et enrouler la corde autour de l’enrouleur jusqu'à ce
que le cache soit proche de la partie centrale. Placer la corde dans l'encoche et
fermer le cache comme indiqué.
2. Mettre l'interrupteur en position ON, le témoin d'alimentation s'allume.
ATTENTION: le moteur ne s'active que lorsque le robot est complètement immergé
dans l'eau
Voyant
d'alimentation (vert)
3. Plonger le robot dans l'eau, le moteur se met en marche automatiquement lorsque le
niveau d'eau recouvre les capteurs situés en haut de la tête pivotante. Laisser le
robot s'enfoncer au fond de la piscine puis observer ses mouvements avant et arrière.
Si le robot se déplace le long de la paroi de la piscine plutôt que perpendiculairement,
le repositionner en s’assurant que l’avant/arrière fait face à la paroi de la piscine.
Le voyant d’utilisation commence à clignoter lorsque l'autonomie est réduite à 10
minutes.
 Loading...