

Kokido DRAKBOT RC20CBX/EU, DRAKBOT RC20CBX/US Owner's Manual

ROBOTIC POOL CLEANER
OWNER’S MANUAL
ROBOT ÉLECTRIQUE DE PISCINE
MANUEL D’UTILISATION
ROBOT ELÉCTRICO DE PISCINA
MANUAL DEL PROPIETARIO

1
Table Of Contents
IMPORTANT PRECAUTIONS
KNOW MORE ABOUT YOUR CLEANER
Introduction P.6
Specification P.6
Components P.7
HOW THE CLEANER WORKS
SET UP
Placement of Power Supply and Control unit P.9
Connecting the cleaner cable to the Power Supply and
Control unit
Installing the brush on the cleaner P.9
Selection of mesh filter plate P.10
Propelling nozzle setting P.10
OPERATION
Submerging the cleaner into the pool P.13
Working mode selection P.14
Power connection P.14
CARE & MAINTENENCE
Cleaning the cleaner compartment and mesh filter
plate
Storage of the cleaner P.16
TROUBLESHOOTING
P.4
P.6
P.8
P.9
P.9
P.12
P.15
P.15
P.17
Remark: Product/parts photos in this manual are for demonstration only.
Product/parts in photos may vary with the model purchased.

2
Table des matières
PRECAUTIONS IMPORTANTES
MIEUX CONNAITRE VOTRE ROBOT
Introduction P.21
Spécifications P.21
Composants P.22
COMMENT FONCTIONNE LE ROBOT
INITIALISATION
Positionnement du bloc alimentation & panneau de
contrôle
Connexion du câble du robot au bloc alimentation &
panneau de contrôle
Installation de la brosse sur le robot P.24
Sélection du cadre filtrant P.25
Réglage des buses P.25
FONCTIONNEMENT
Immersion du robot dans la piscine P.28
Sélection du mode de fonctionnement P.29
Connexion électrique P.30
ENTRETIEN & MAINTENANCE
Nettoyage du compartiment du robot et du plateau de
filtration
Stockage du robot P.32
DEPANNAGE
P.19
P.21
P.23
P.24
P.24
P.24
P.27
P.30
P.30
P.32
Remarque : Les photos du produit/des pièces dans ce manuel sont
présentées uniquement à titre d’exemple. Le produit/les pièces peuvent
varier selon le modèle acheté.

3
Indice
PRECAUCIONES IMPORTANTES
SABER MÁS SOBRE SU LIMPIAFONDOS
Introducción P.36
Especificaciones P.36
Componentes P.37
COMO SE MUEVE EL LIMPIAFONDOS
INSTALACIÓN
Colocación de la fuente de alimentación y la unidad de
control
Conectar el cable del limpiador a la fuente de
alimentación y la unidad de control
Instalar el cepillo en la aspiradora
Selección del panel filtrante P.40
Boquilla propulsora P.40
FUNCIONAMENTO
Sumergir el limpiafondos en la piscina P.43
Selección del modo de trabajo P.44
Conexión alimentación P.45
CUIDADO Y MANTENIMIENTO
Limpieza del compartimiento y filtro de malla placa
limpia
Almacenamiento del limpiafondos P.47
SOLUCIÓN DE PROBLEMAS
P.34
P.36
P.38
P.39
P.39
P.39
P.39
P.42
P.45
P.45
P.47
Observación: Las fotos de producto/piezas de este manual son sólo para
demostración. Producto / piezas en las fotografías pueden variar según el
modelo adquirido.

4
IMPORTANT PRECAUTIONS
Read and Follow All Instructions.
Failure to heed the following warnings can result in fatal injury,
electrocution or drowning.
WARNING! This appliance is not intended for use by persons (including
children) with reduced physical, sensory or mental capabilities, or a lack of
experience and knowledge, unless they are under supervision to operate, or
given instruction concerning the use of the appliance by a person responsible
for their safety.
WARNING! The Power Supply & Control unit should be placed in a dry,
sheltered area at least 3.5 meters (11.5 feet) from the edge of the pool. The
Power Supply & Control unit should not be left exposed in the rain or placed
in puddles of water. NEVER submerge this unit in water.
WARNING! The power cord must be connected to a receptacle protected by
a residential current device (RCD)/ ground fault circuit interrupter (GFCI). Do
not use an extension cord to connect the cleaner to electric supply; provide a
properly-located electric outlet. The Power Supply & Control unit should be
placed near the electric outlet.
WARNING! NEVER operate the cleaner when there are people in the pool.
WARNING! Check the power cord and cable for damages before initiating
operation. NEVER operate the cleaner or Power Supply & Control unit if the
power cord or floating cable is worn or damaged. Contact the local dealer
immediately for a replacement. Locate the cord or cable to prevent it from
being damaged by lawn movers, hedge trimmers and other equipment.
WARNING! If the power cord is damaged, it must be replaced by the
manufacturer or its service agent or a similarly qualified person in order to
avoid any potential hazards.
WARNING! In order to prevent overheating and potential damage to the
components, users should never cover the power supply and control unit.
WARNING! NEVER open the power supply and control unit. Only a qualified
electrician / personnel should open the power supply and control unit, motor
assembly, otherwise the warranty will be invalidated.
WARNING! It is necessary to change parts or assemblies as soon as possible
if they are damaged. Only use parts certified by the manufacturer or
distributor.
WARNING! Do not attempt to repair the cleaner, power supply and control
unit, power cord and cable yourself.
WARNING! Do not remove electrical components, motor & power supply
screws. There are no user serviceable parts (except filter tray & mesh filter
plate) inside. Refer servicing to authorized service personnel only.
WARNING! Children should not be allowed to operate this cleaner.
WARNING! Keep the device out of children’s reach.
5
WARNING! Cleaner and components must be kept away from being used as
means of access to the pool by children.
WARNING! Inspect the cleaner compartment and mesh filter plate regularly
for debris.
WARNING! In order to avoid causing severe damage to the cleaner, do not
switch on the cleaner until it is fully submerged in water.
WARNING! If there are stones, roots or metal corrosion in contact with the
underside of the liner, clean them out before operating the cleaner. If
necessary, have a qualified professional do the cleaning.
WARNING! If the liner is brittle or damaged, have a qualified professional
perform the necessary repairs or liner replacement before operating the
cleaner.
WARNING! Remove articles from the pool deck/top frame before operating
the cleaner.
WARNING! Remove the pool ladder from the pool before operating the
cleaner.
CAUTION: NEVER lift the cleaner out of water by pulling the cable directly. To
lift the cleaner out of the water, gently drag the cable slowly until the cleaner
nears water level, then lift the device out of water using the handle on the
cover.
CAUTION: Remove hazardous obstacles such as children’s toys, floating
loungers and chemical dispensers, etc. from the pool before placing the
cleaner in water and initiating operation.
CAUTION: The cleaner must be installed and operated as specified in this
manual.
In order to achieve optimal performance, before power on, make sure air
already evacuates from the cleaner under the water (no more air bubbles
coming from the cleaner) and sinks completely to the pool bottom.
Do not attempt to adjust the floats along the electrical cable. Leave them in
their default positions.
The filter unit should be cleaned each time after use; otherwise this could
potentially affect the cleaning performance. Excessive debris inside the
cleaner will change the cleaner weight that deviate cleaner’s moving path and
speed.
When not in use, the cleaner should be removed from the water and stored in
a cool and ventilated spot away from direct sunlight.
In order to prevent the Power Supply & Control unit from being accidentally
carried into the pool during operation, the user is strongly recommended to
use a rope to secure the unit.
Do not lift the protective film on the control panel.
Switch off the pool filtration system while the cleaner is in operation.
Keep this manual for future reference.

6
KNOW MORE ABOUT YOUR CLEANER
Introduction
The Robotic Pool Cleaner is ideal for cleaning above ground / in ground pools with
either flat bottom or slope of maximum of 15o. In addition to being efficient, it is also
capable of capturing minute particles as small as 180 µm in size.
The cleaner works on 24V direct current.
Specification
1. Rated input voltage:
RC20CBX/EU : 230VAC~50Hz
RC20CBX/US : 110VAC~60Hz
2. Output Voltage: DC 24V
3. Rated input power: 150W
4. Working model: Auto: 1hr/1.5hrs/2hrs
5. Cable length: 12m (39ft).
6. Filtering capacity: 18m³/h
7. Filtering capability: 180µm (for fine mesh), 250µm (for coarse mesh)
8. Pool Water temperature for cleaner operation: 10°C - 35°C (50°F - 95°F)
9. Running speed: 20m/min
10. IP Grade: cleaner (IPX8); Power Supply & Control unit(IPX5)
11. Ambient temperature for power unit : 10°C - 40°C (50°F – 104°F)
12. Maximum pool depth :2.0m
13. Ability to climb wall: NO
14. Ability to climb slope: maximum of 15o

7
Components
1. Cleaner cover with cable
2. Filter tray
3. Replaceable mesh filter plate x 2
(fine mesh x 1 & coarse mesh x1)
4. Cleaner bottom
5. Rope and hook
6. Brush bar
7. Power Supply & Control unit
Remark: Product/parts photos in this manual are for demonstration only.
Product/parts in photos may vary with the model purchased.
8
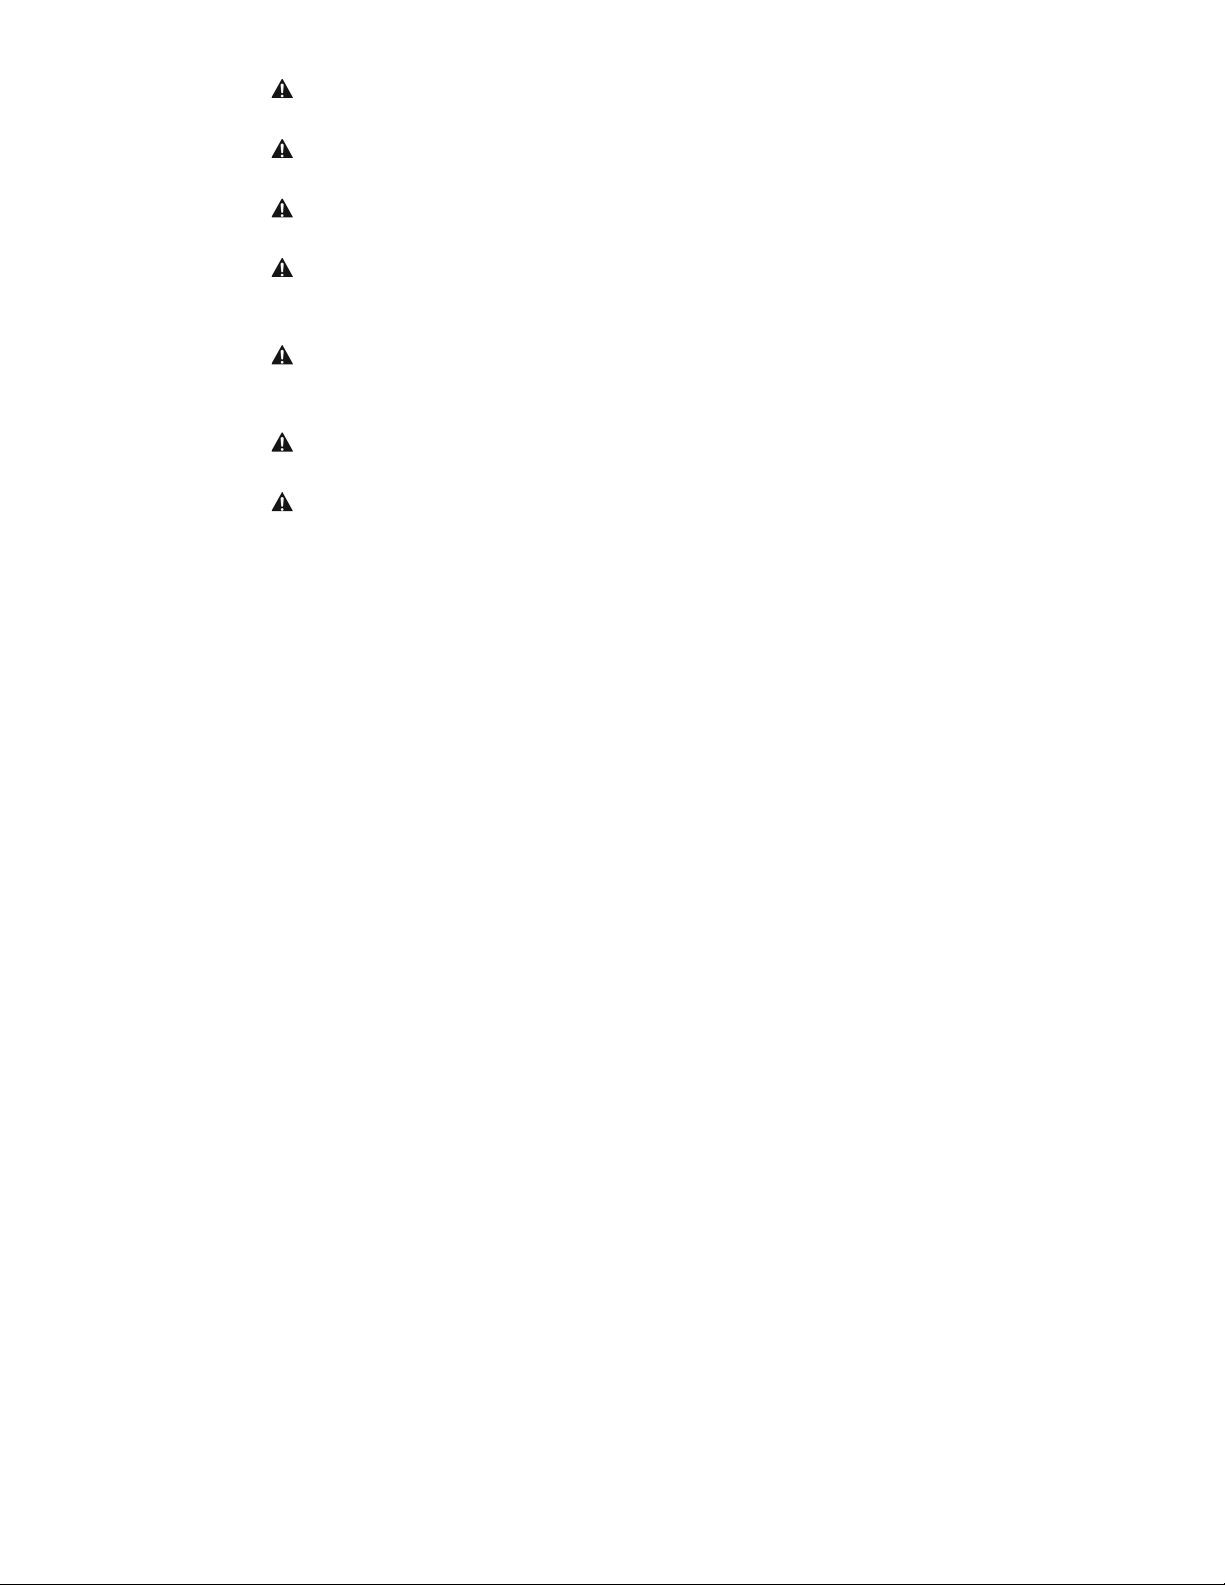
HOW THE CLEANER WORKS
The cleaner has two adjustable propelling nozzles on both ends. Water is first sucked in
from the bottom (suction nozzle on both ends) of the cleaner, goes through the mesh
filter plate and is then discharged from the propelling nozzle. Water jetting from the
nozzle propels the cleaner forward. Propelling nozzles are opened alternately so that
the cleaner moves back and forth on the pool floor. While moving, cleaner bottom will
suck and store the debris inside (underneath the mesh).
Setting the propelling nozzles to different degree markings (0°..20°..40°) will lead
cleaner moves in following different patterns. Cleaners moves approximately in a
straight line when the nozzle is positioned at 0°. Setting the propelling nozzle position
to other degrees will make the cleaner turn to left / right side against the propelling
nozzle turning direction and then move along a radian path. The larger degree the
propelling nozzle is positioned to, the larger radian path the cleaner will follow.
NOTE: Cleaner DOES NOT automatically reverse upon contact with the pool wall. The
cleaner’s forward & backward movement duration varies according to the settings
under “CYCLE” mode.
9
SET UP
Placement of power supply and control unit
Make sure the Power Supply & Control unit is placed at a spot where the length of the
cable allows the cleaner travels to reach every corner of the pool.
WARNING! The Power Supply & Control unit should be placed in a dry, sheltered area
at least 3.5 meters (11.5 feet) from the edge of the pool. The Power Supply & Control
unit should not be left exposed in the rain or placed in puddles of water. NEVER
submerge this unit in water.
In order to prevent the Power Supply & Control unit from being accidentally carried
into the pool during the operation, the user is strongly recommended to use a rope &
hook provided to secure the unit to a fixed location.
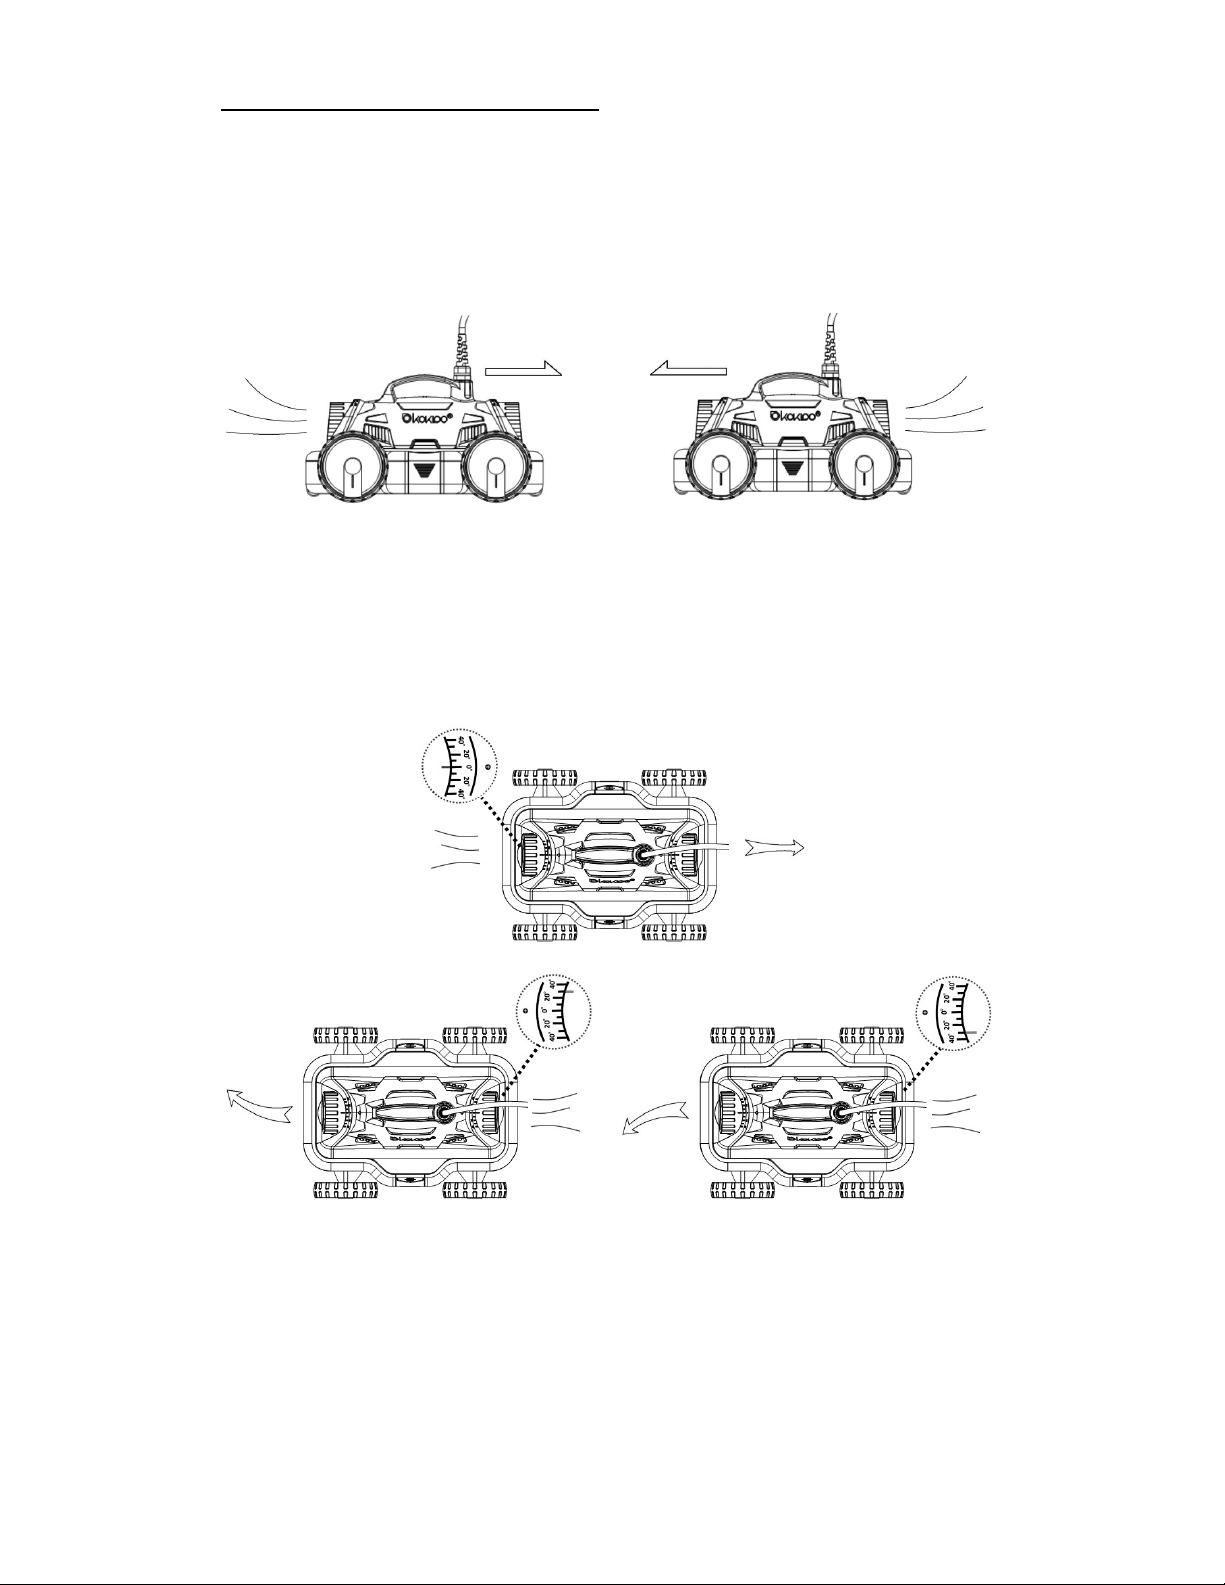
Connecting the cleaner cable to the Power Supply and Control
unit
WARNING!
- Do not connect Power Supply & Control unit to the power before connecting the
cable.
- Never touch the plug and socket with wet hand or body, or while standing in water.
Plug the cable into the socket of the Power Supply & Control unit by aligning the notch
on the plug to the rib on the top of socket inside. Push the plug into the socket and
turn the plug screw cap clockwise.
Installing the brush on the cleaner
- Align the hooks on the bar with the holes on the cleaner’s bottom as shown, and
press each hook into the holes until they are all secured.

10
- To release the brush bar, push the hook to release the it from the hole.
Selection of mesh filter plate
There are 2 different types of mesh included: fine mesh and coarse mesh. If most
debris on pool floor are larger in size such as leaves, use the coarse mesh filter plate.
Once the large debris is cleaned, stop the cleaner and change to the fine mesh.
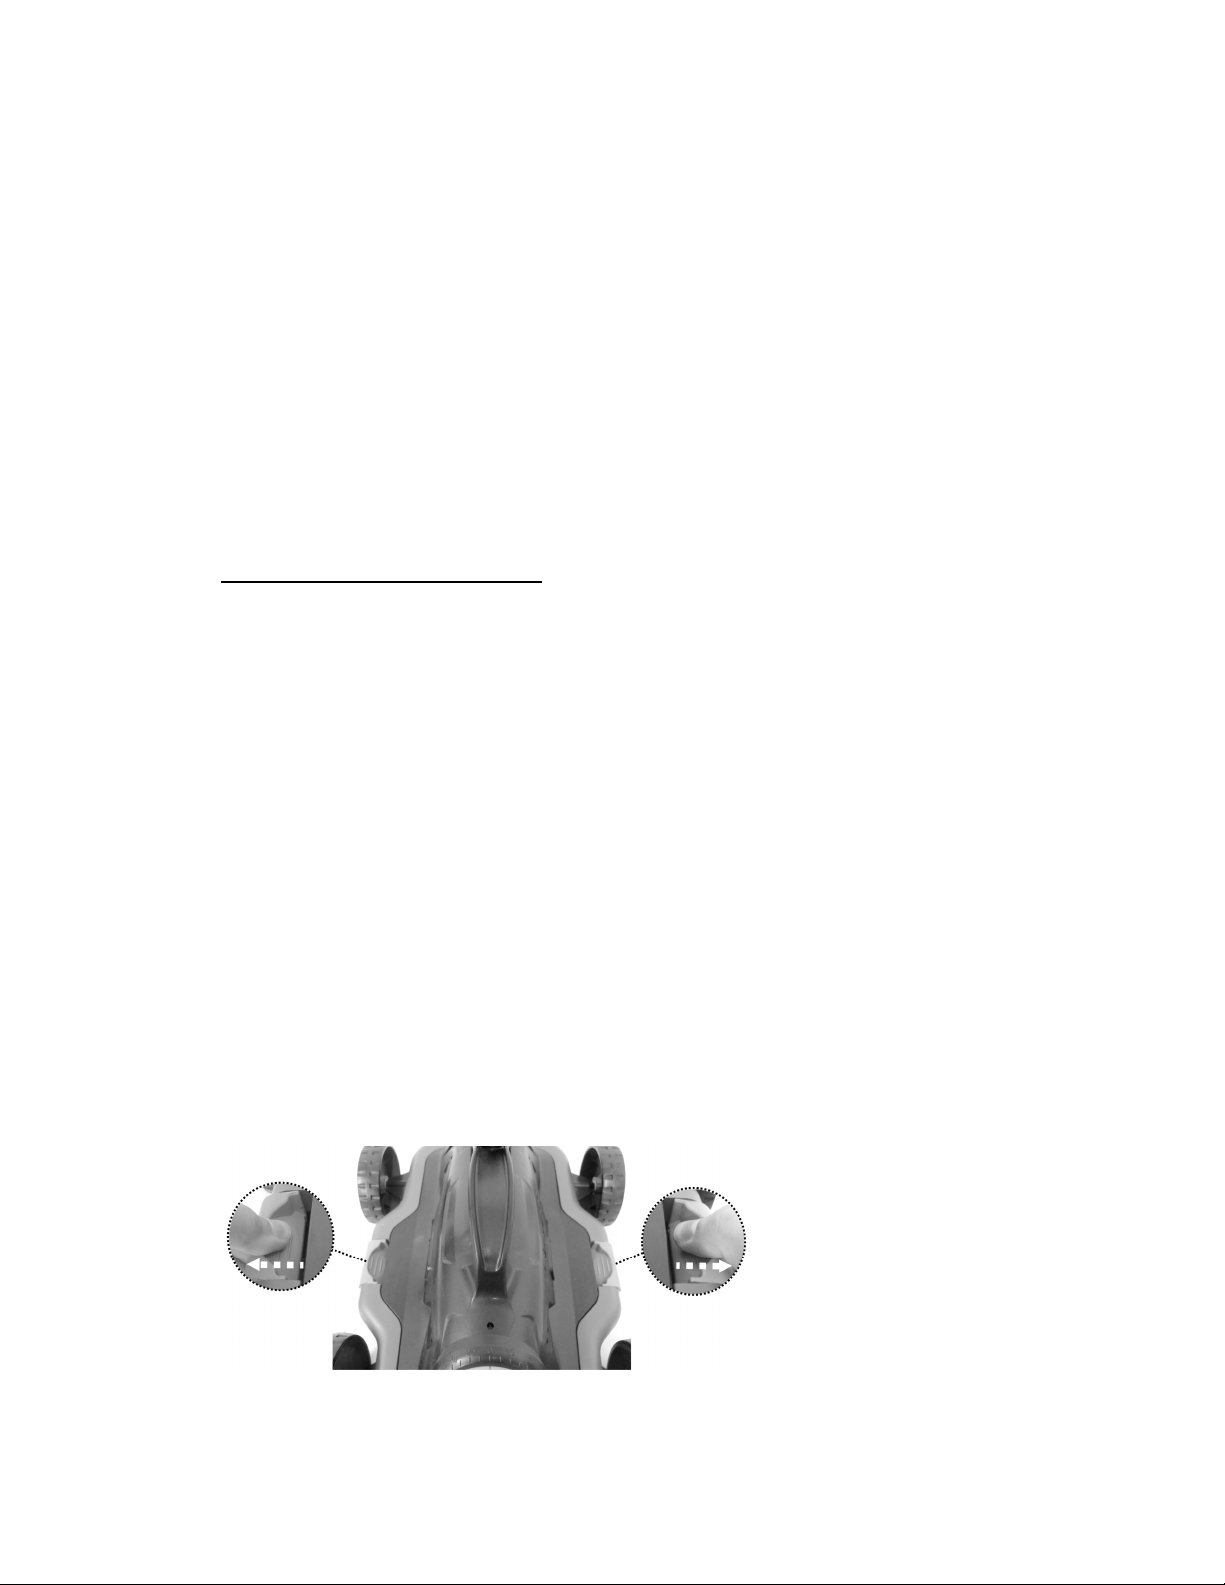
Propelling nozzle setting
Remark: Degree marking provided below are for setting purposes, its number does not
reflect its turning angle. You may regard them as direction and radian path cleaner
moves along.
Below setting instructions are recommended as an initial start for different pools and
situations; you can select a proper nozzle setting depending on your pool situation and
the working principles mentioned above.
Setting 1 (recommended for rectangular / square/oval pool)
Nozzle setting
0° / 30°
Moving path

11
Setting 2 (recommended for round pool only, not for square/rectangular/oval pool)
Nozzle setting
20° / 20°
Moving path
Setting 3 (recommended when cable twist happens on Setting 1)
Nozzle setting 0° / 20°
Moving path
Setting 4 (recommended when cleaner does not reach all pool areas)
Nozzle setting 0° / 40°
Moving path

12
Because the propelling nozzle can be turned 360°, after
implementing aforementioned settings, make sure the
smallest flap of 3 on propelling nozzle opening is positioned
at the bottom. Here is an example of the nozzle set at 0°
degree marking.
In case, it is difficult to clean the
debris from certain spots or
corners, turn propelling nozzle
180° from the original degree
setting (smallest flap is therefore
positioned on top) to divert water
jetting towards the pool floor in
order to move the debris or fine
particles to an area where the
cleaner has access.
OPERATION
WARNING!
- To prevent your cleaner cable from getting pulled and twisted, it is recommended to
turn off your pool’s filtration system while your cleaner is in operation.
- NEVER operate the cleaner when people are in the pool.
- Check the power cord and cable for cuts before starting the operation. NEVER operate
the cleaner or Power Supply & Control unit if the power cord or floating cable is worn
or damaged. Locate the cord or cable so as to prevent it from being damaged by the
lawn movers, hedge trimmers and other equipment.
- In order to avoid overheating and potential damage of components, never cover the
power supply and control unit.
- NEVER permit children to operate this cleaner.
- Do not use the cleaner if the pool temperature does not fall into this range:
10°C – 40°C (50°F – 104°F)
- If there are stones, roots or metal corrosion in contact with the underside of the liner,
clean them out before operating the cleaner. If necessary, have a qualified professional
do the cleaning.
- If the liner is brittle or damaged, have a qualified professional perform the necessary
repairs or liner replacement before operating the cleaner.
- Remove articles from the pool deck/top frame before operating the cleaner.
- Remove the pool ladder from the pool before operating the cleaner.
CAUTION:
- In order to avoid causing severe damage to the cleaner, do not switch on the cleaner
until it is fully submerged in water.
- Remove hazardous obstacles such as children’s toys, floating loungers and chemical
dispensers, etc. from the pool before placing the cleaner in water and initiating
operation.
- The cleaner must be installed and operated as specified in this manual.
13
- Do not restart the cleaner immediately after it stops. Wait for at least 30 seconds
before restart.
- Do not drive the cleaner out of water. Otherwise, it will damage the cleaner
- Must clean out the debris from the cleaner and mesh filter plate before each
operation. Refer to “CARE & MAINTENANCE” section for how to clean the debris.
Excessive debris inside the cleaner will change the cleaner’s weight and speed; cause it
to deviate from the selected path.
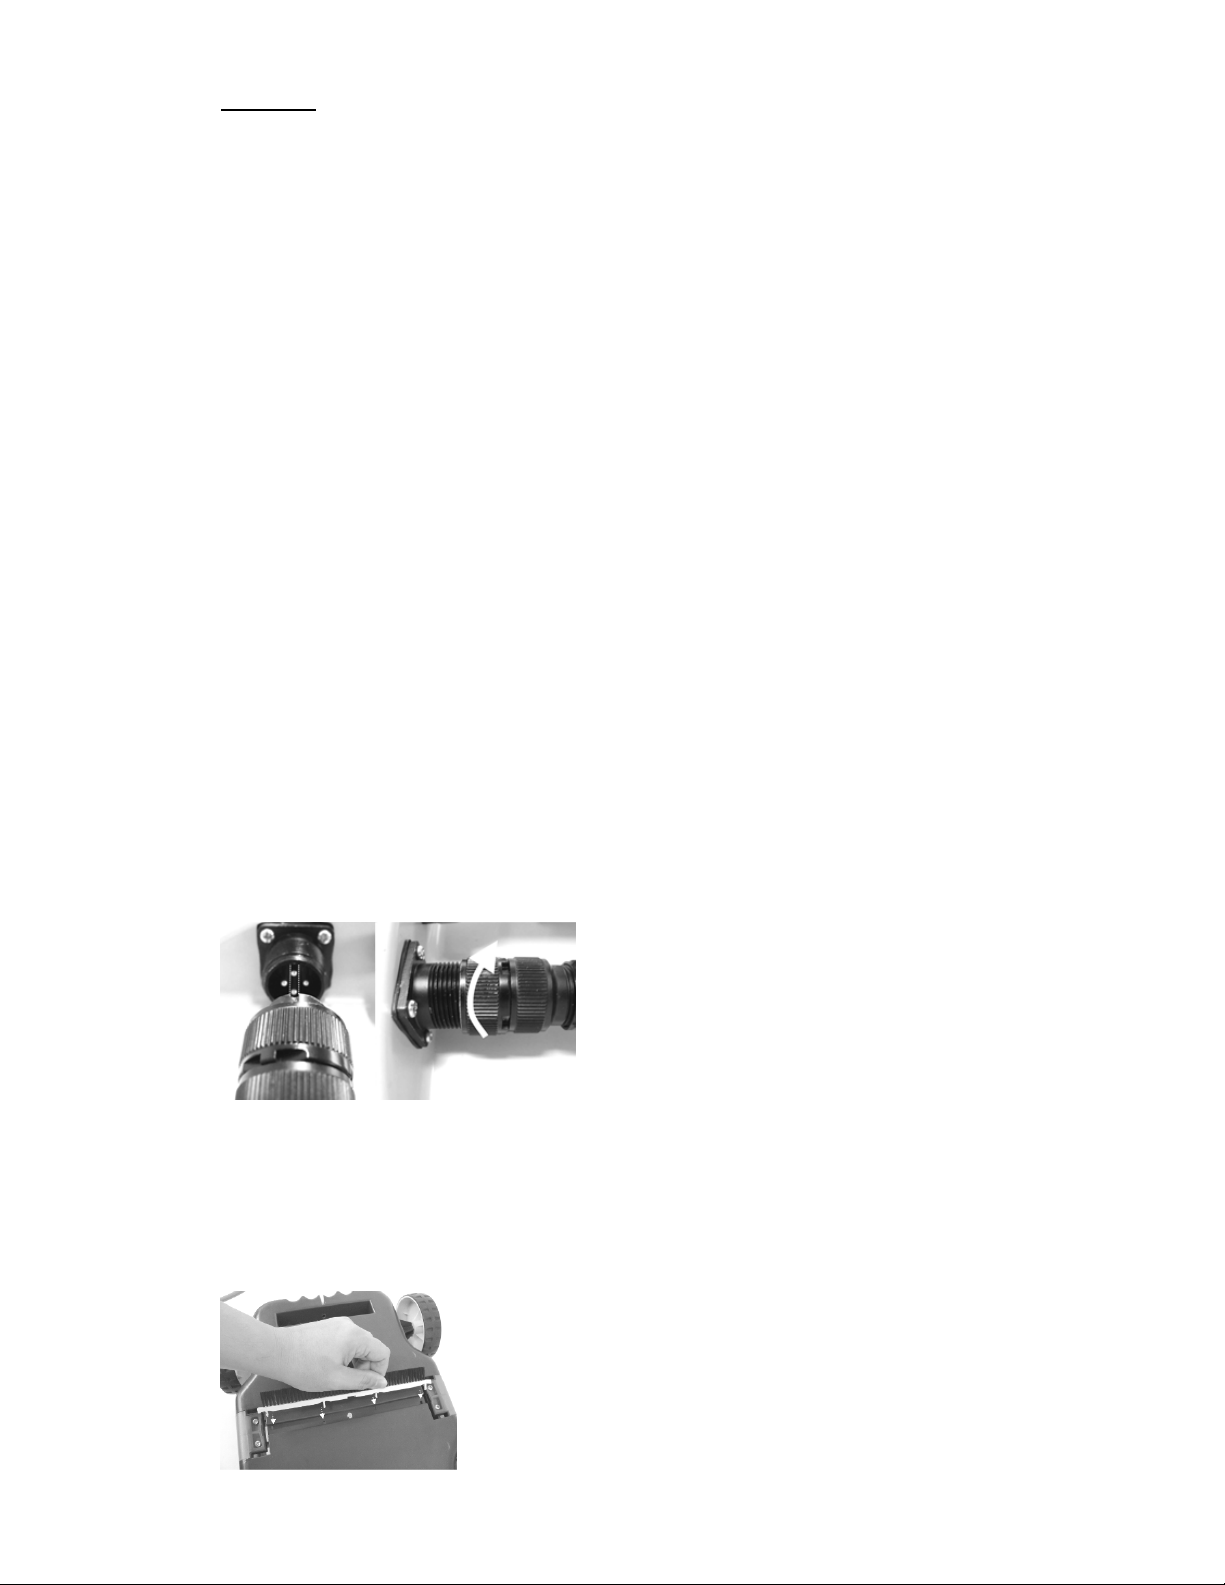
Submerging the cleaner into the pool
- Use the cleaner handle to lift the device, hold the cable with your free hand, and
gently place the cleaner into the water. Make sure the front of the cleaner (other side
of the cable) is facing the water upon entry. Continue to hold the cable until the
cleaner is filled with water (no more bubbles escaping) and begins to sink to the pool
bottom. Release the rest of the cable. The cleaner is ready to operate.
For pools with a flat bottom, release the cleaner from the middle of the longer side of
the pool.
For sloped pools, release the cleaner from the flat bottom side of the pool and make
sure the cleaner is facing towards the slope
Note:
1. In order to avoid causing scratches / damage to the pool wall (particularly
vinyl and soft wall pools), be sure to prevent the cleaner from making any
form of contact with the pool wall during placing the cleaner to the pool.
2. Make sure the mesh filter plate is in place before placing the cleaner into the
water.
3. Make sure the fiter tray is secured by the side knobs. Side knobs should
completely clip into the cleaner, as shown below, by pressing the knob
inward.
14
CAUTION:
2 hours operation.
mode
is
sel
ected
.
- Ensure all the air inside has been evacuated completely (when you no longer see air
bubbles discharged from the cleaner) and the cleaner sinks to the bottom of the pool.
- Spread out the floating cable over the pool water surface as evenly as possible, and
make sure there are no kinks or coils in the cable.
- Do not place the cable plug in water.
- Do not move the floats along the cable
Working mode selection
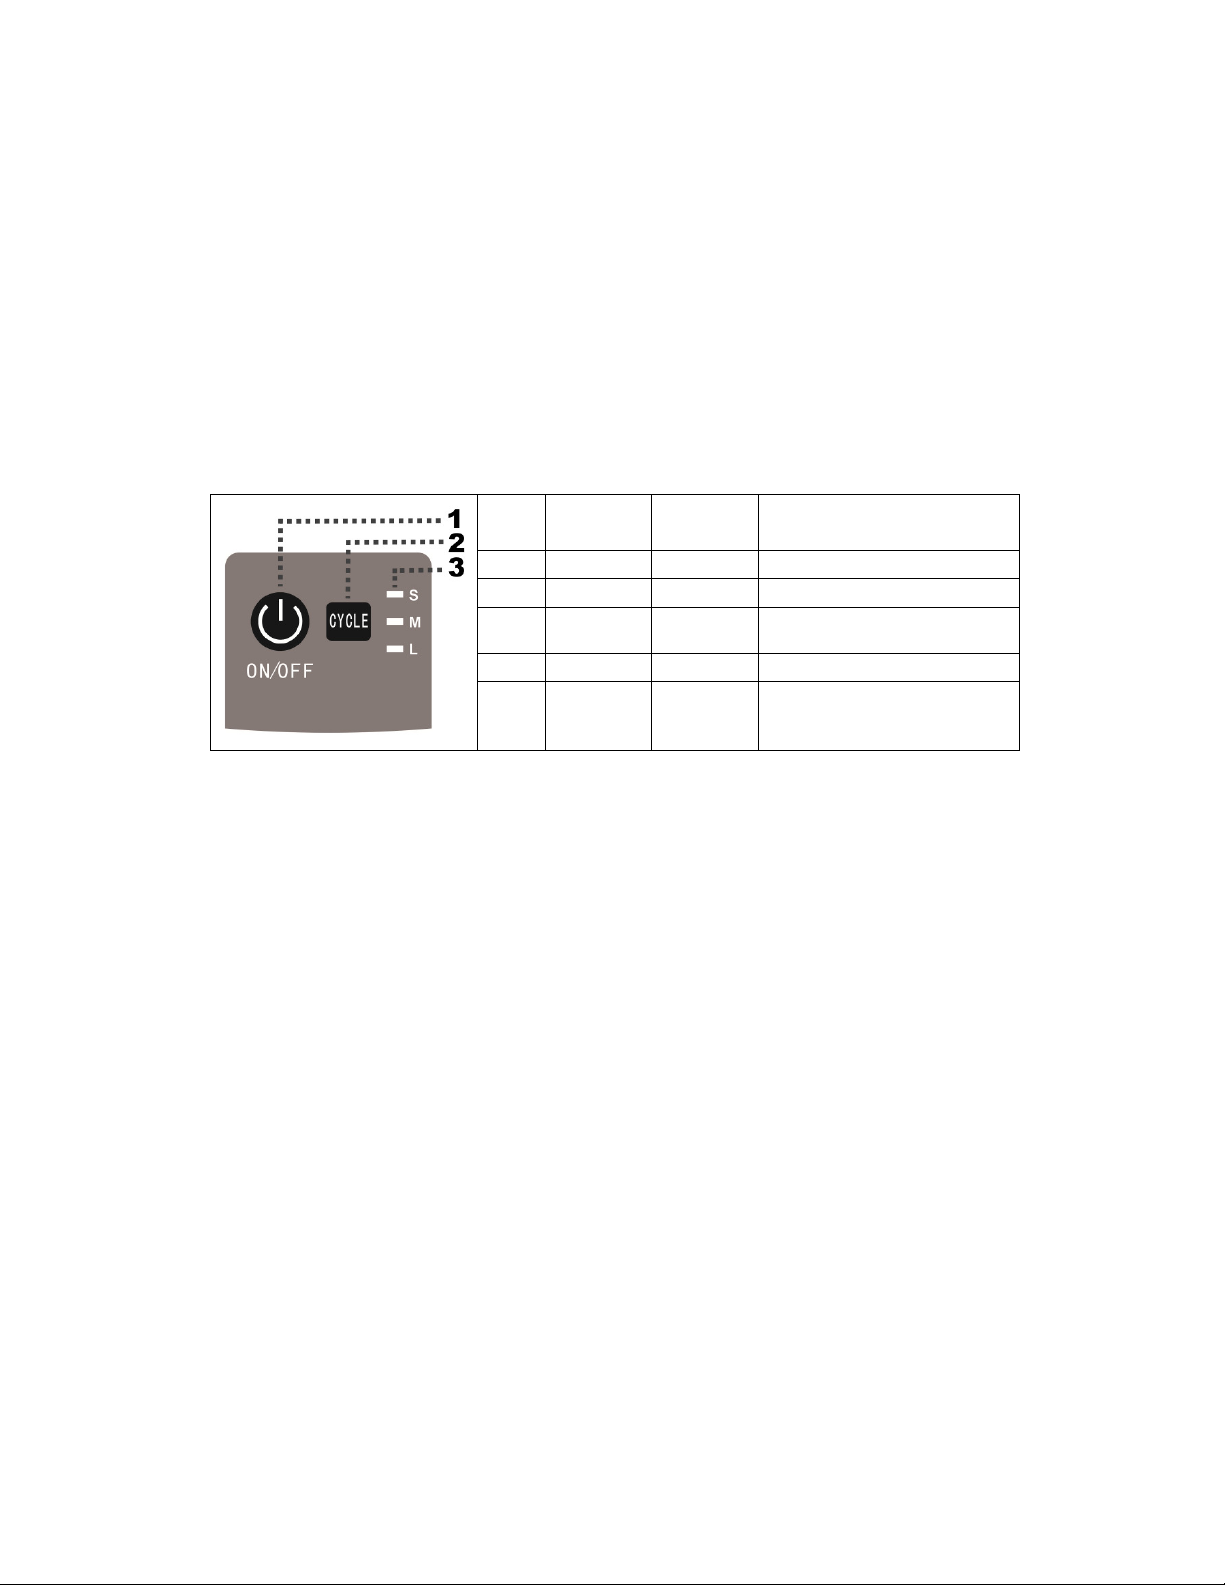
Control Panel
CAUTION! Do not lift the protective film on the control panel.
Item Feature
1 ON/OFF
2 CYCLE S
M
L
Indicator
3
light bar
*Tap (hold for 1 second) the button to trigger the feature.
Tap “ON/OFF” to power on; indicator light of mode used during last operation begins to
flash. Tap “CYCLE” button to select desired mode. Once the operation is finished, all 3
indicator lights will flash simultaneously.
Pool shape, water depth and its bottom flatness are potential factors affecting the
cleaner moving in the pool. If your pool size is already the maximum size that the
cleaner is recommended for, select “L” mode, otherwise, select “M’’ as the initial start.
Observe the cleaner moving pattern and change to other selection if necessary. In
addition, make sure the nozzle setting is properly selected.
Note: It will restart the last operated mode over again every time you power on the
unit.
CAUTION: Do not restart the cleaner immediately after stopping. Wait for at least 30
seconds before restarting.
Selection
mode
Function
Power On/Off
About 1 hour operation.
About 1.5 hours
operation.
About
Corresponding light bar
begin to flash after the
Power connection
WARNING!
- The power cord must be connected to a receptacle protected by a residential current
device (RCD)/ground fault circuit interrupter (GFCI). Do not use an extension cord to
connect the cleaner to electric supply; provide a properly-located electric outlet. The
15
Power Supply & Control unit should be placed near the electric outlet.
- The Power Supply & Control unit should be placed in a dry, sheltered area at least 3.5
meters (11.5 feet) from the edge of the pool. The Power Supply & Control unit should
not be left exposed in the rain or placed in puddles of water. NEVER submerge this unit
in water.
- Check the power cord and cable for damages before initiating the operation. NEVER
operate the cleaner or Power Supply & Control unit if the power cord or cable is worn
or damaged. Locate the cord or cable to prevent it from being damaged by the lawn
movers, hedge trimmers and other equipment.
Prior to connecting the power supply to the cleaner, make sure the rated voltage and
frequency (hertz) of your electric outlet match the Power supply & control unit’s
rated input voltage: 230VAC, frequency: 50Hz or 110VAC, frequency: 60Hz
Now, connect the plug to the electric outlet. Tap the On/Off button and select the cycle
mode to start the cleaning.
CARE & MAINTENANCE
Cleaning the cleaner compartment and mesh filter plate
WARNING!
Cease the operation of the cleaner and switch off the power before removing the
cleaner from the pool.
Caution
- The cleaner may become very heavy when filled with water.
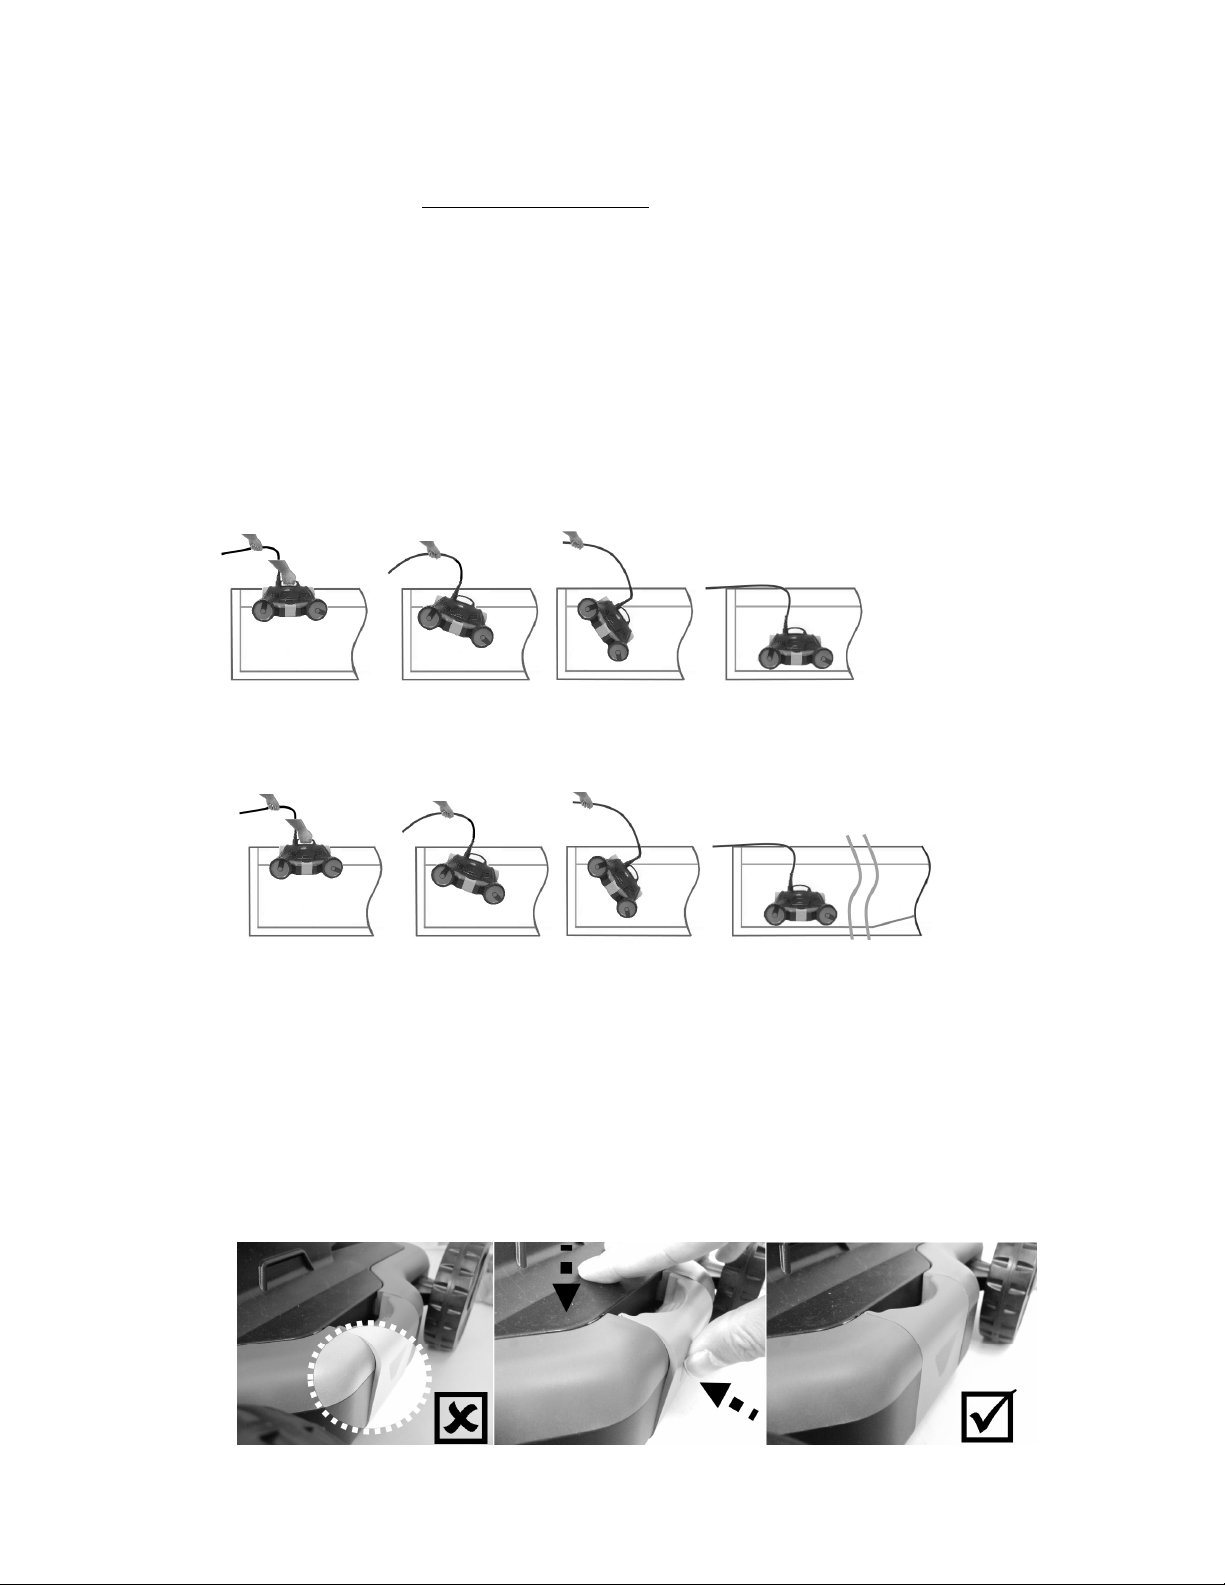
1. Pull the cable gently and carefully to lift the cleaner to water surface, lift it by the
handle and hold one end of the cleaner with the other hand, tilt the cleaner above
the water for about 10-15 seconds to drain out the water from inside before carrying
it away from the pool.
Note:
- In order to avoid scratches / damage to the pool wall (particularly vinyl and soft wall
pools), prevent the cleaner from being in contact with the pool wall while moving the
cleaner out of the water.
2. Place the cleaner on a stable and flat surface and pull the side knob outward to
release the cover.
CAUTION! Never detach the cover directly by force without releasing the knobs as it
could damage the unit and the knobs.
 Loading...