

KOHSEL ELEPHANT M40, M65, M65-D, M115, M115-D Installation Manual
...
Installation Guide / Montageanleitung
Montagevejledning / Instructions de montage
M40, M40-D, M65, M65-D, M115, M115-D
230V Energizers-Dual
GB · D · DK · F

Installation of ELEPHANT Energizer
Before you start the installation of the
controller it is important that the instructions
are studied carefully. A correct installation is
essential if you want an optimal functionality
of your Energizer.
Earth Connection
In order that your electric fence generates the
best possible shock, it is important that the
connection to earth is perfect, An earth rod is
usually 2 m long and produced in 20-25 mm
galvanised iron pipe. It is recommended that
the earth rod be inserted at least 1.5 m into
the earth. The connection from the energizers
earth clamp to the earth rod can be a piece
of galvanised fence wire. You can also use
a high-voltage cable. Never use a standard
electrical cable. Secure the connection to
the earth rod with a stainless collar band or a
stainless/galvanised steel bolt.
See also “Checking the Earth Connection”.
The connection to the fence
If the Energizer is placed a long distance
from the fence, the use of high-voltage cable
is recommended to connect the fencing clip
on the controller to the wire connection.
Especially in tunnels or alongside buildings
high-voltage insulated fencing cable must
be used. Normal electric wire must never be
used.
Check the Earth Connection
When you have finalized the connection
to the fence, a test of the installation is
recommended. As shown in the diagram
you can make a good temporary connection
from the fence to earth approx. 100 m from
the Energizer.
DIY testing of your electric fence
Detach the earth connection and the wire to
the fence from the terminals. Hold a screwdriver on one terminal at a distance of 2-4
mm from the other terminal. If the electric
fence is working as normal, a spark will jump
between the two terminals.
If you are in any doubt that you have a sound
enclosure, walk along the fence with an old
transistor radio. When you pass a poor insulator, poor leakage to ground or other poor
conditions, radio distortion will occur. The
closer you come to the site, the more distortion you will hear on the radio.
Possible faults
Poor earth connection
See how to create a perfect earth connection
under “Checking the fence”.
Poor wire joints
Poor insulators, especially on iron poles.
Spark flashover on a fence pole can often be
heard clearly.
If the connection to earth, wire joints and insulators is in working order, you can assume
that the fence is generating an even current
all around the enclosure.
Guarantee
If your electric fence is not working properly,
you must dismantle it and return it to where
you bought it. Remember to bring your receipt. Electric fences that are less than 3
years old are repaired free of charge, on the
condition that the damage has not been caused by unauthorised intervention or by the
device having been connected to an incorrect voltage. The guarantee does not cover
misuse, neglect or lightening damage. There
is no guarantee or compensation for indirect
damage.
Connect the Energizer, touch the wire - running from the earth clip on the energizer to
the earth rod - and note if a shock appears.
If so, the earth connection is not adequate
and you must add an extra earth rod. Continue this operation until the wire from the
earth clip on the energizer to the earth rod
does not give any shocks.
Remember to remove the temporary earth
connection when the testing is finished.
See also www.elephant.as
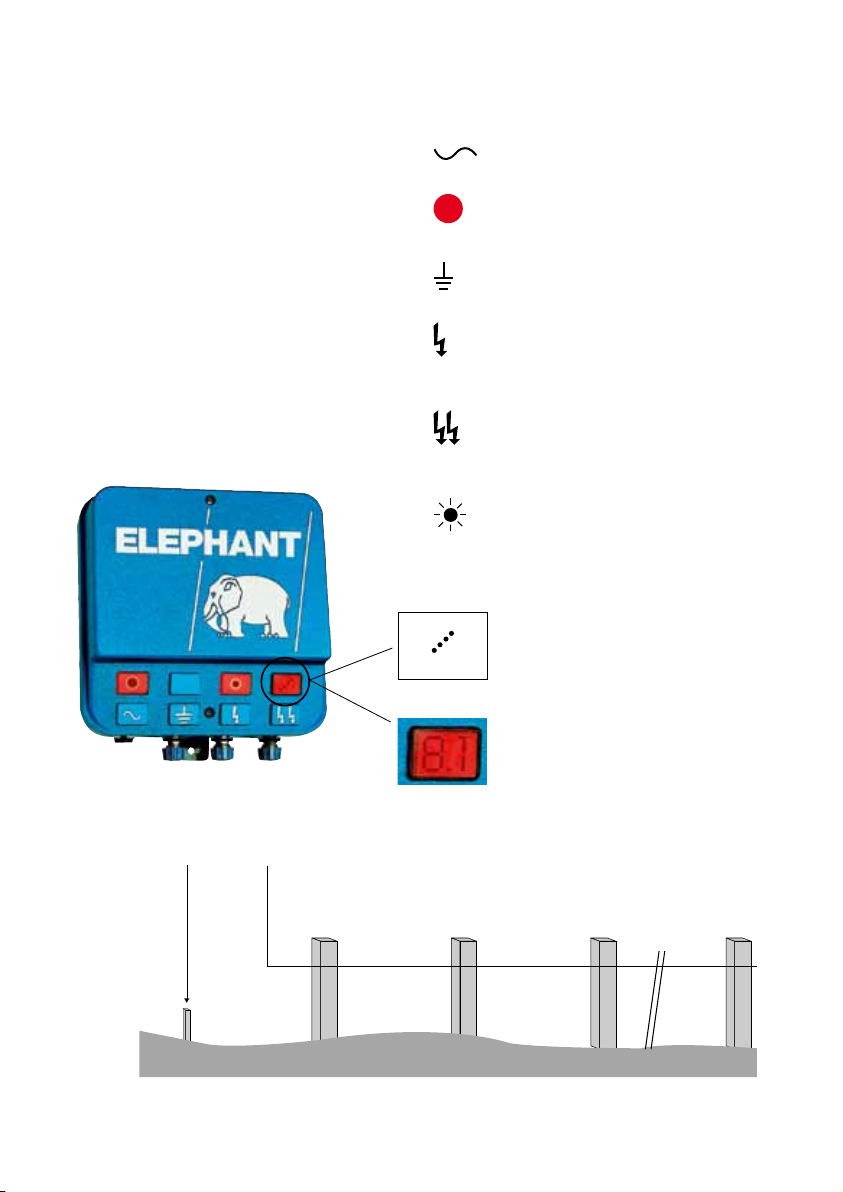
Cable with plug for 230V
main
Lights when the energizer
is ON
Earth Clips to be connected
to the earth rod
Fence Clips (medium
output) for smaller fencing
application
Fence Clips (high output)
for larger fencing
application
Flashes when the voltage
is above 2000V
M40, M65, M115
Voltage indicated by 4 lamps
when voltage is higher than
1000, 2000, 3000 and 4000 volt.
M40D, M65D, M115D (”D”
for digital) Voltage indicated by
clear number (Ex. 8,1=8100 volt)
Temporary short-circuit approx
100m from the energizer

Montage des Weidezaungeräde
Bevor Sie den Zaun montieren, ist es sehr
wichtig diese Montageanleitung zu lesen. Ihr
Elektrozaun kann nur bei korrekter
Montage voll genutzt werden. Es ist
besonders wichtig, dass die Erdverbindung,
die Verbindung zum Zaun und die Zusammenfügung des Zaunes stimmen.
einen elektrischen Schlag verspüren, ist die
Erdverbindung nicht in Ordnung, und Sie
müssen noch einen Rohrerder in die Erde
setzen. Bitte wiederholen Sie diesen Schritt
so lange, bis Sie einen elektrischen Schlag
spüren. Denken Sie bitte daran, die provisorische Erdverbindung zu entfernen, wenn
Sie die Installation beendet haben.
Erdverbindung
Für die beste Funktion Ihres Elektrozaun ist
die Verbindung zur Erde sehr wichtig. Ein
Rohrerder hat eine Länge von 2 Metern und
besteht aus 20-25 mm galvanisiertem Eisenrohr. Man benötigt mindestens 2 Rohrerder.
Die Verbindung zwischen der Elektrozaun
Erdklemme und einem Rohrerder kann ein
Stück galvanisierter Zaundraht sein. Man
kann aber auch ein Hochspannungskabel
verwenden. In keinem Fall gewöhnliche elektrische Leitungen verwenden. Die Verbindung zum Rohrerder wird durch eine rostfreie
Spange oder einen rostfreien/galvanisierten
Stahlbolzen hergestellt.Wenn Sie, wie in
der Zeichnung beschrieben, einen 10 m
langen am Rohrerder befestigten Zaundraht
eingraben, erreichen Sie eine noch bessere
Erdverbindung.
Verbindung zum Zaun
Falls Ihr Elektrozaun weit vom eigentlichen
Zaun entfernt liegt, wäre es sinnvoll, ein
Hochspannungskabel für die Verbindung
der Zaunklemme zum Zaun zu verwenden.
Besonders bei Straßenunterführungen
oder entlang Gebäuden sollte ein hochspannungsisoliertes Zaunkabel verwendet
werden. In keinem Fall gewöhnliche elektrische Leitungen verwenden.
Mögliche Fehler
Schlechte Erdverbindung oder schlechte
Drahtverbindung Wenn sowohl
die Erd- als auch die Drahtverbindung in
Ordnung sind, können Sie davon ausgehen,
dass der Zaun gleichmäßig unter Strom
steht. Schlechtes Isoliermaterial, besonders
an Eisenpfählen Funkenüberschlag an einem
Zaunpfahl ist oft deutlich zu hören. Gehen
Sie am Zaun entlang und nehmen Sie ein
Transistorradio mit. Bei Streuung hören Sie
im Radio Knackgeräusche.
Garantie
Wenn Ihr Elektrozaun nicht funktioniert,
bauen sie es ab und liefern es bei Ihrem
Händler ab. Ist Ihr Elektrozaun nicht älter als
3 Jahre, wird es bei Vorlage einer
Quittung und unter Voraussetzung einer
sachgerechten Behandlung kostenlos
repariert. Die Garantie deckt nicht im
Falle von Missbrauch, Blitzeinschlag und
unsachgemäßer Behandlung sowie
bei Folgeschäden.
Kontrolle des Zaunes
Wenn Sie die Verbindung zum Zaun abgeschlossen haben, müssen Sie kontrollieren,
ob Ihre Installation erfolgreich war. Wie in
der Zeichnung beschrieben, muss eine provisorische Verbindung zwischen dem Zaun
und der Erde ca. 100 m vom Elektrozaun
entfernt hergestellt werden. Schalten Sie Ihr
Elektrozaun ein und kontrollieren Sie durch
Antasten, ob der Draht - ausgehend von der
Erdklemme am Elektrozaun zum Rohrerder
- unter Strom steht. Wenn Sie am Draht
 Loading...