

Kohler Wave Series, Wave 9084T-B4, Wave 9085T-B4 Installation Instructions Manual

SERVICE PARTS
INSTALLATION INSTRUCTIONS
WAVEWAVE
9085T:898753**
9085T:871578
9085T:870944
9085T:865176**
9085T:836671
9085T:865177**
1222603**
9085T:1229466**
9085T:3007075
9084T-B4 Single Lever Kitchen Faucet
9085T-B4 Single Lever Kitchen Faucet
3010495**
9085T:836009
9085T:836669
9085T:865112
9085T:3005433
9085T:101131
9085T:865187
9085T:836670
871556**
880073
865171
834460
834683
834683
9084T:871567
880002**
9084T:1024405
1222603**
9084T:1229487**
9084T:870532
9084T:871509
9084T:835384
9084T:1177149
9084T:820886
9084T:833730
9084T-B4 Single Lever Kitchen Faucet
9085T-B4 Single Lever Kitchen Faucet
BEFORE YOU BEGIN
All information is based on the latest product information available at the time of publication. Kohler Co. reserves
the right to make changes in product characteristics, packaging, or availability at any time without notice.
Please leave these instructions for the consumer. They contain important information.
NOTES:
1. Flush the water supply pipes thoroughly to remove debris.
2. Inspect the supply tubing for damage. Replace as neccessary.
3. Observe local plumbing codes.
4. Don’t remove the inlet hose during the installation process, otherwise it will not be installed.
HANDLE OPERATION
Lift the handle genty. Turn clockwise for hot water, counter-clockwise for cold water. There are two stops in both
flow and hot water control conserve water and energy.
ROUGH-IN DIMENSIONS
23°
400
233
189
Max 50
Ø33~Ø38
166
210
237
335
15°
189
166
235
Max 40
Ø38~Ø41
9084T:835598
**Color code must be specified when ordering
1230983-2A-D 4
390
G1/2˝
9084T-B4
G1/2˝
390
9085T-B4
1230983-2A-D 1
INSTALLATION
INSTALLATION CHECKOUT
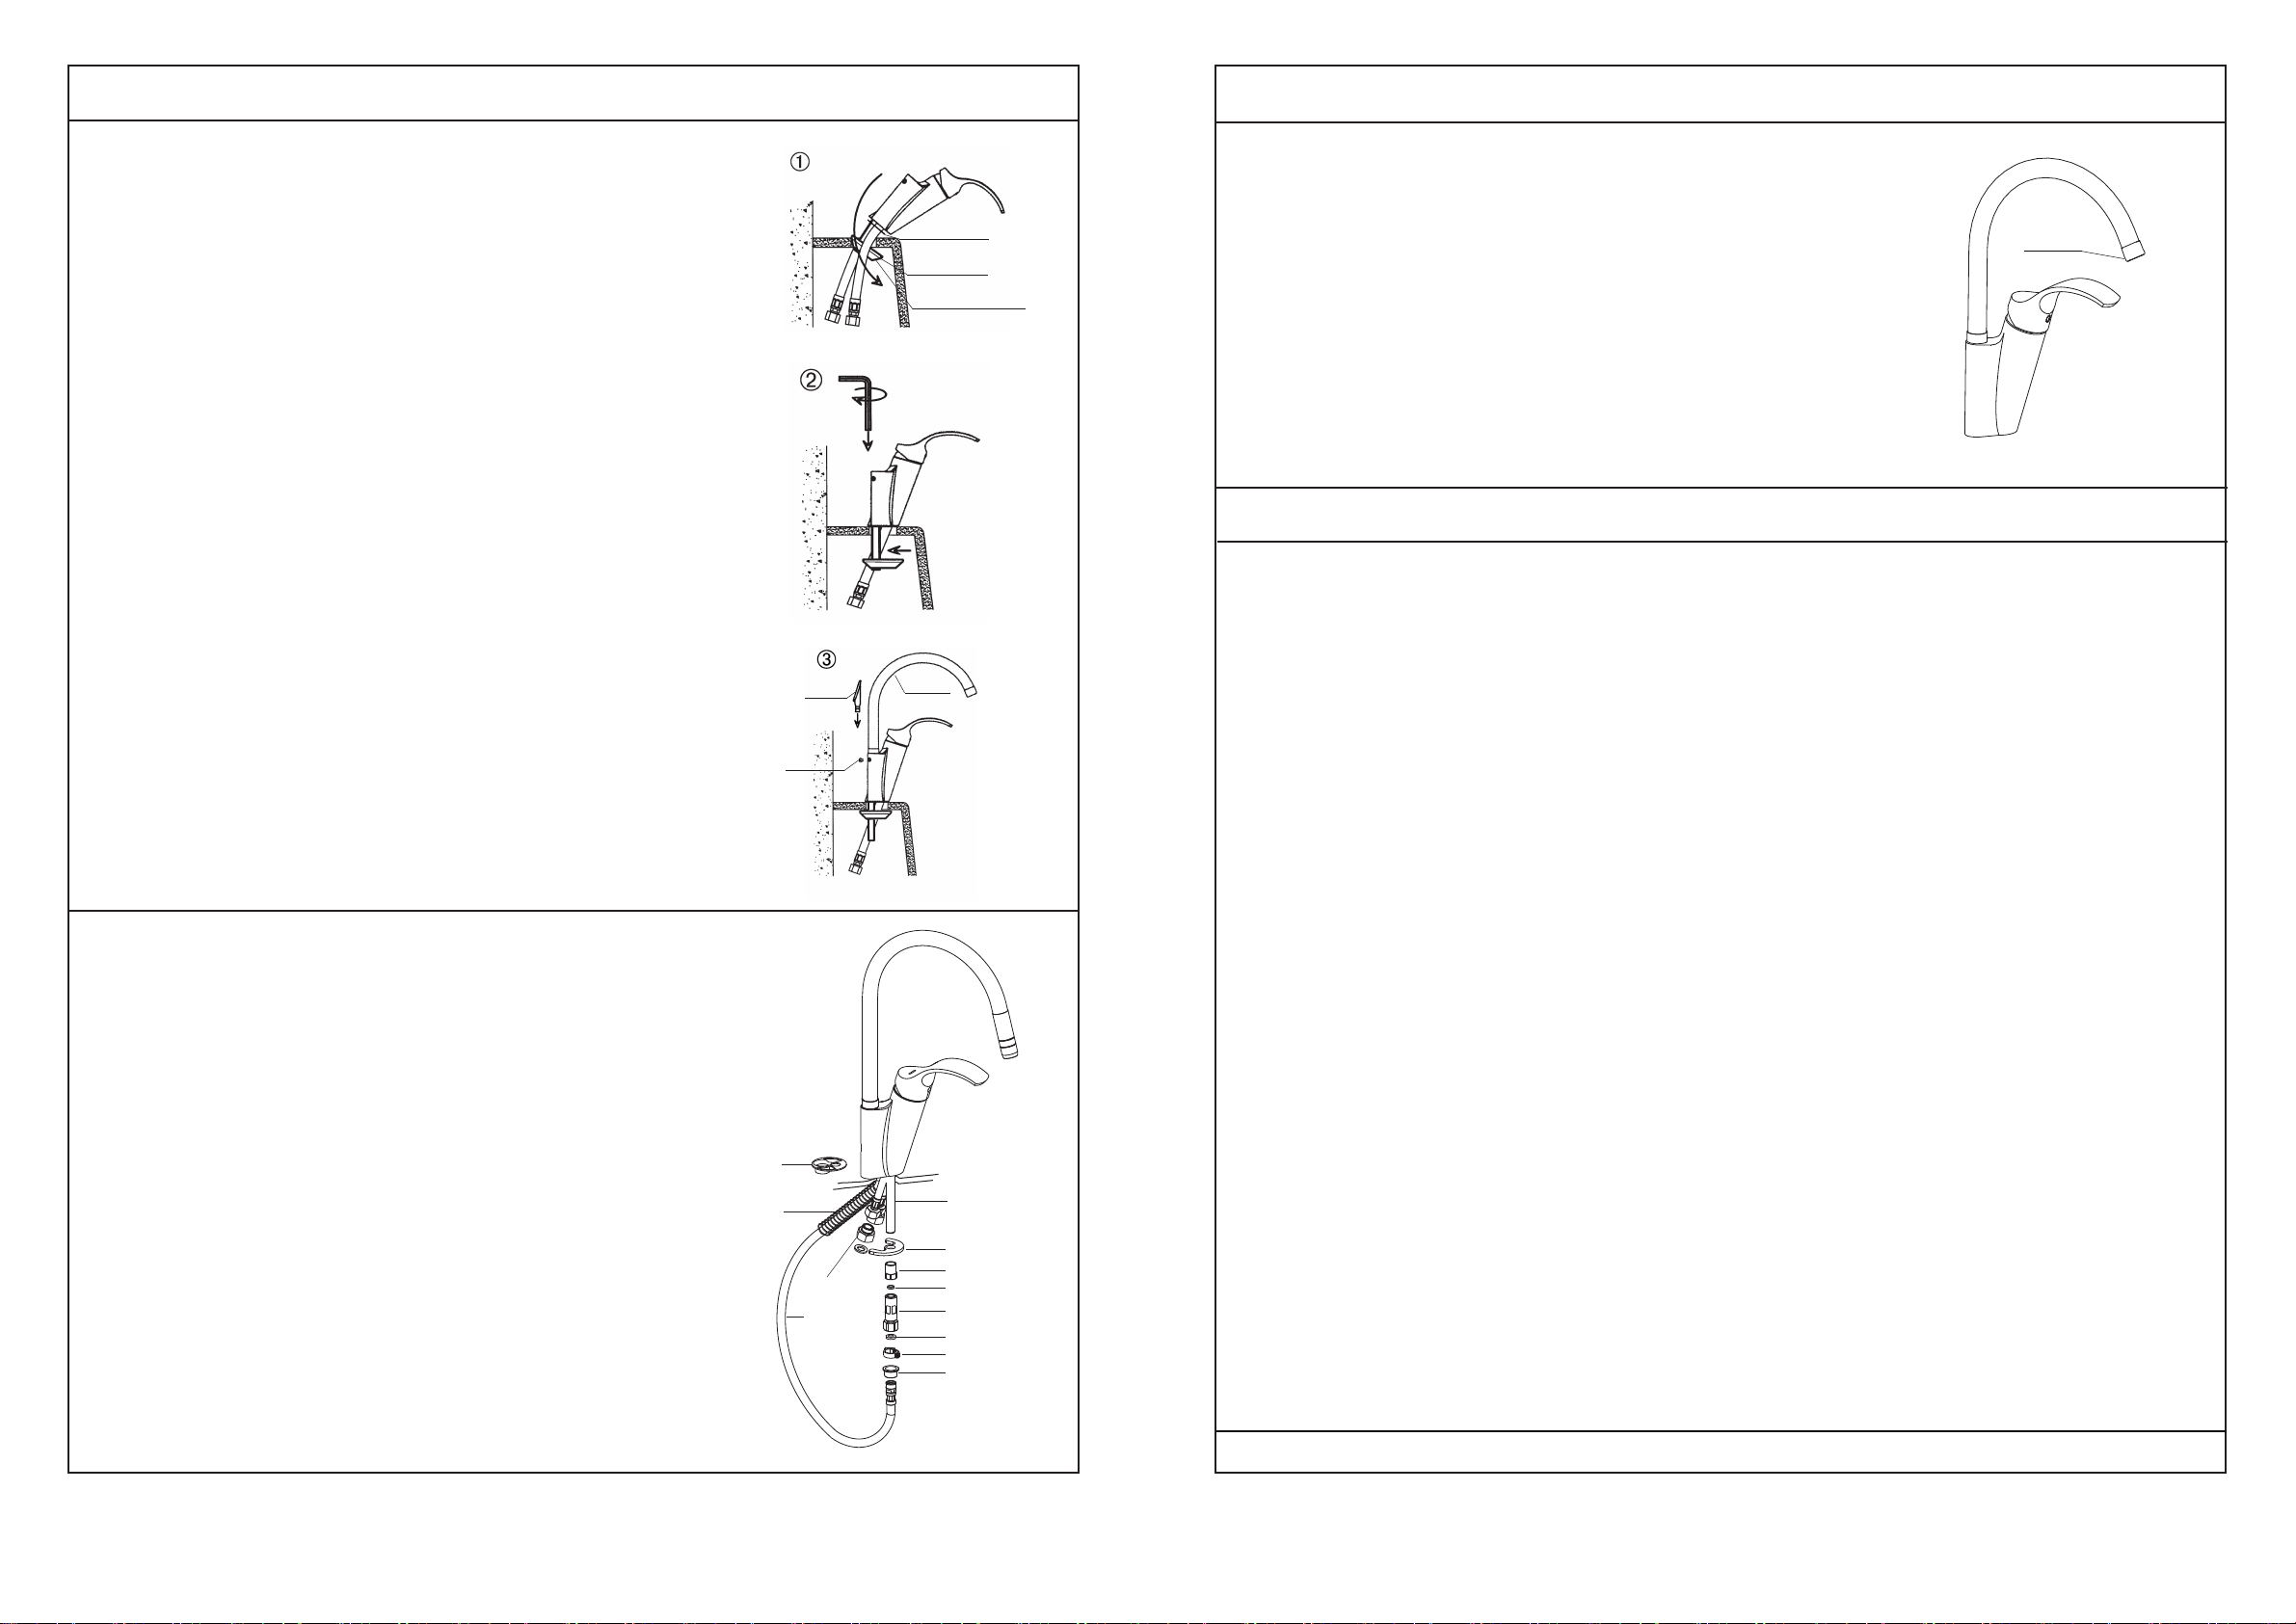
For 9084T-B4
Slip the washer A over the flexible hoses and mounting stud, and into the
groove on the body assembly.
(1) Insert flexible hoses, washer B and connecting nut into hole in deck.
Position connecting nut between flexible hoses.
(2) Position the spout, make sure the handle towards forward. Tighten the
spout with hex wrench. Check the nut whether is centered and the
flexible hoses whether are hung freely.
(3) Insert the spout kit into the outlet hole. Tighten the screw by hex
wrench.
(4) Insert the plug into mounting hole.
Plug
Washer A
Washer B
Connecting Nut
Spout
Ensure that all coupling nuts are tight.
Ensure that the handle is in the off postion.
Aerator
Turn on the main water supply, and check for leaks. Repair as needed.
Remove the aerator. Run hot and cold water through the faucet for about
one minute to remove any debris. Check for leaks. Remove any debris
from the aerator assembly. Shut the faucet off, and reinstall the aerator
assembly.
CLEANING INSTRUCTIONS
All Finishes: Clean the finish with mild soap and warm water. Wipe entire surface completely dry with clean soft
cloth. Many cleaners may contain chemicals, such as ammonia, chlorine, toilet cleaner etc, which could adversely
affect the finish and are not recommended for cleaning.
Do not use abrasive cleaners or solvents on Kohler faucets and fittings.
Attach the hoses to water supplies. When facing front of faucet, the left
hose is hot water, the right hose is cold water.
For 9085T-B4
For new installation, assemble faucet to sink before installing.
Silde guide into the groove of the body. Insert the hoses into the
mounting hole.
From underside of the sink, place the bracket and nut onto the shank,
Position the faucet so that the handle is toward the front and the two
hoses are symmetrical. Tighten the nut to secure faucet to sink.
Slide the spring to the spray hose. Install the ring and plastic clip to
secure the spring. Adjust the position of the plastic clip according to user
experience.
Make sure the washers are put into the connector. Connect the connector
and spray hose. And then thread the connector to the shank.
Thread the inlet hoses to the water supplies with the adapters. When
facing the front of the faucet, the left hose is hot water, the right is cold
water.
Guide
Spring
Screw
Adapter
Spray hose
Shank
Bracket
Nut
Washer
Connector
Washer
Plastic clip
Ring
"LEAD FREE" is marked on the back of the faucet signifying its compliance with the United States AB1953
1230983-2A-D 2
1230983-2A-D 3
 Loading...