

Kohler Real Rain Showerhead, K-76728 Installation And Care Manual

Installation and Care Guide
Real Rain Showerhead
K-76728
M product numbers are for Mexico (i.e. K-12345M)
Los números de productos seguidos de
M corresponden a México (Ej.
K-12345M)
Français, page“ Français-1”
Español, página“ Español-1”
1287911-2-B
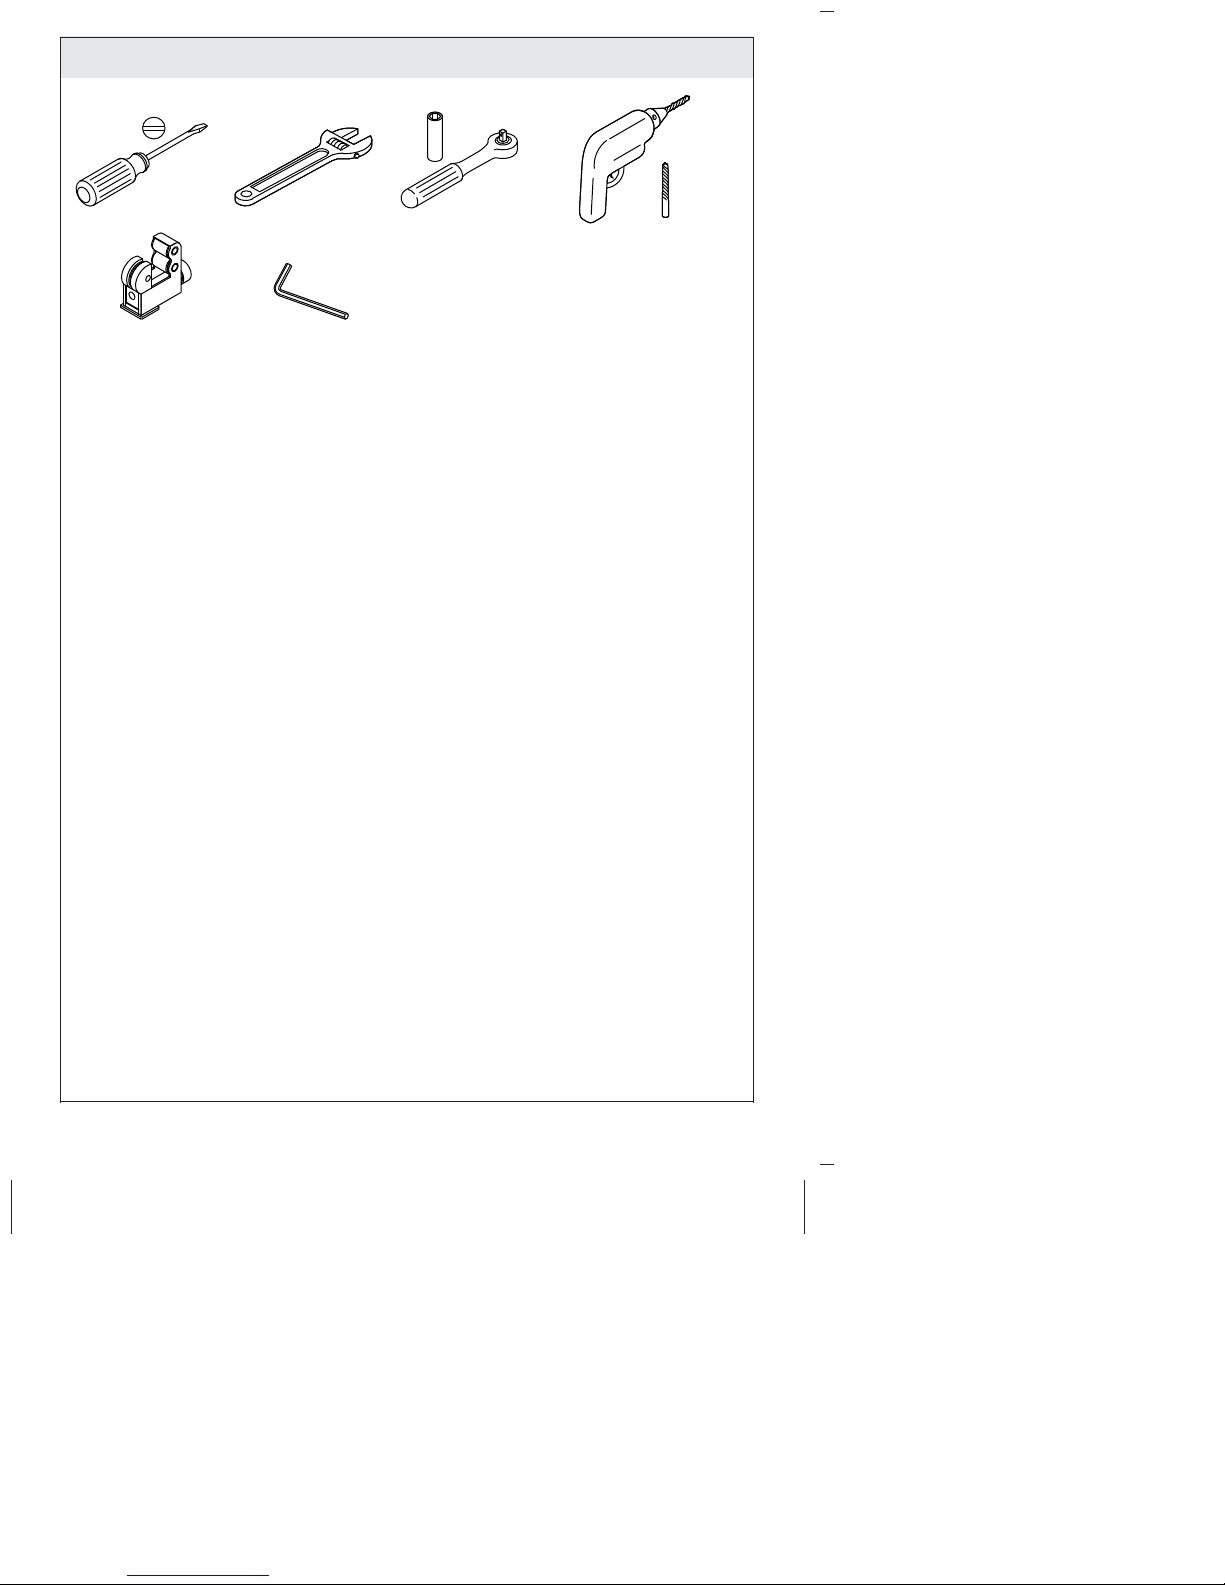
Tools and Materials
Pipe Cutter
3/16"
3/8"
Plus:
• 2x4s
• Drop ear elbow
• 3/8" copper tubing
• Conventional woodworking and
plumbing tools and materials
1287911-2-B 2 Kohler Co.

5" (127 mm)
14" (356 mm)
16" (406 mm)
18" (457 mm)
7"
(178 mm)
3-7/8"
(98 mm)
19"
(483 mm)
Roughing-In
Kohler Co. 3 1287911-2-B
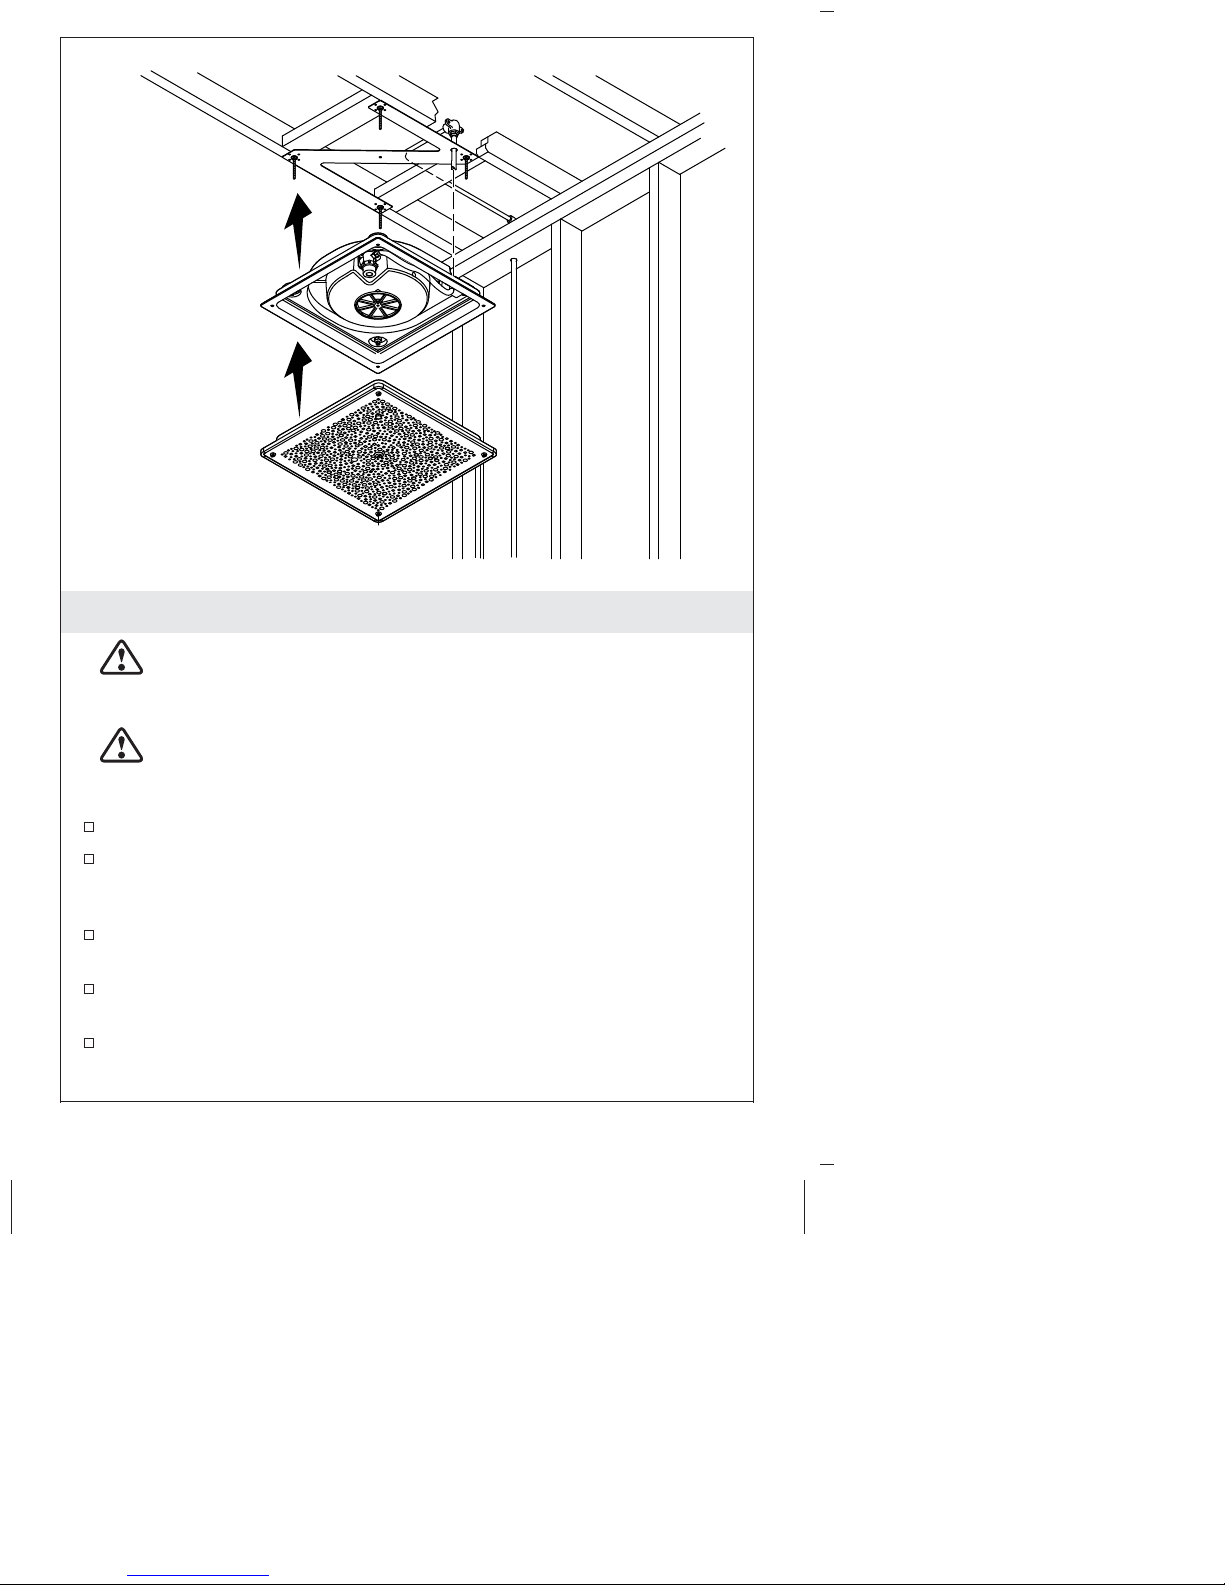
Before You Begin
WARNING: Risk of scalding. High water temperature can
cause severe burns. Set the water temperature at or below
120°F (49°C) following the adjustment procedure in the valve
Installation and Care Guide.
CAUTION: Risk of personal injury. If the rain panel is not
securely held in place during installation, the product may
fall causing personal injury. Get help when installing the
panel assembly and waterways.
Observe all local plumbing and building codes.
Read these instructions and determine all required components
along with their installation locations before beginning this
installation.
A shower valve must be installed upstream for temperature and
shut off control.
Requires DTV or push button valve K-76746 and panel trim
K-76732.
A dropped ceiling (not shown) is required in the shower area
where this product is to be installed.
1287911-2-B 4 Kohler Co.

Before You Begin (cont.)
IMPORTANT! Risk of product damage. Ensure cutout and framed
opening of dropped ceiling meet the required dimensions listed. If
the finished ceiling thickness exceeds 4-1/2″ (114 mm), shim behind
the mounting bracket.
This product is designed for ceiling-mount installation only. Do
not install to a shower wall.
For service parts information, visit your product page at
www.kohler.com/serviceparts.
Kohler Co. 5 1287911-2-B

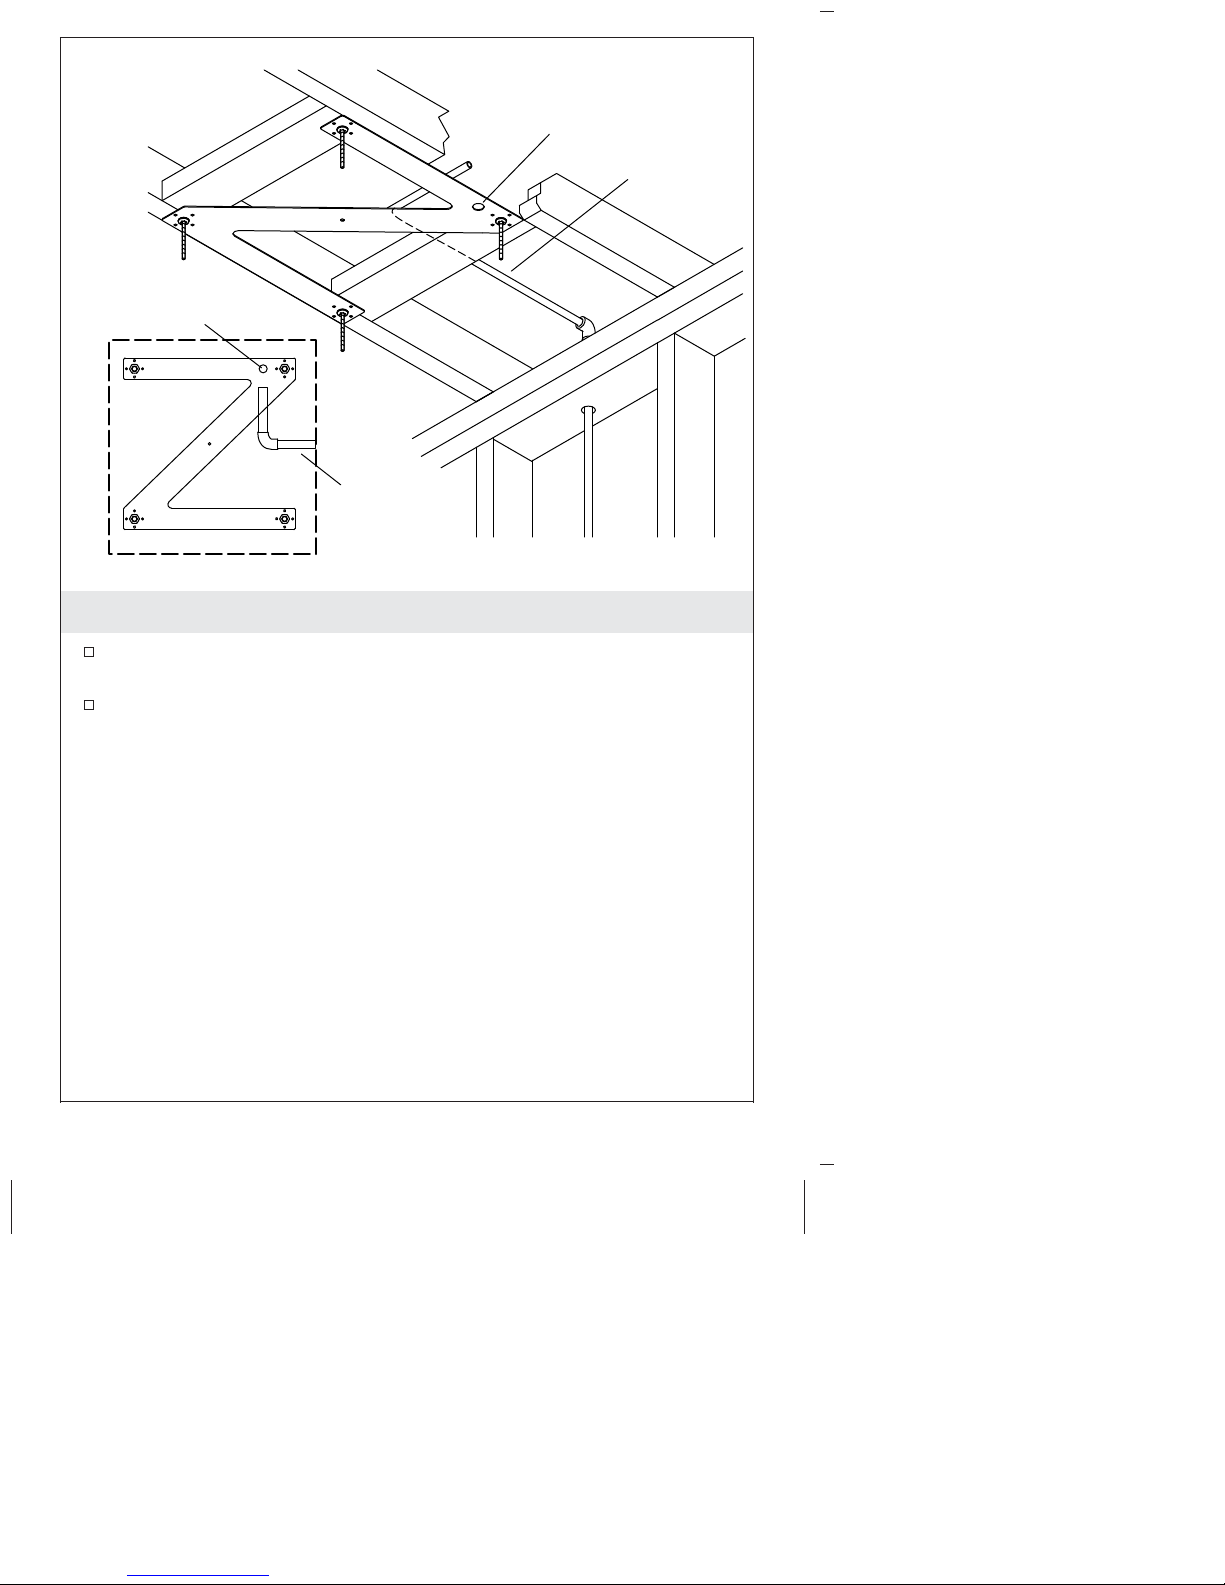
Inlet Pipe
Hole
1. Install the Support Framing and Bracket
NOTE: These instructions show one possible ceiling configuration.
Adapt to fit your application.
Using 2x4s, construct support framing to mount the bracket. The
face of each 2x4 should be installed flush with the face of the
ceiling joists.
Ensure that each corner of the bracket can be mounted to the
support framing with at least 2 screws.
CAUTION: Risk of personal injury. If the bracket is not
securely held in place during installation, the product may
fall causing personal injury.
Align the bracket so that its edges are parallel to the shower
walls. Orient the inlet pipe hole for the easiest connection to the
water supply.
Install the bracket with at least 2 #8 1-1/2″ screws per corner.
Screws may be installed in any two of the four holes per corner.
1287911-2-B 6 Kohler Co.
Inlet Pipe
Hole
Inlet Pipe
Hole
Water
Supply
2. Install the Water Supply
Install the push button or digital valve using the separate
instructions provided.
Route the water supply to the ceiling where the shower is to be
installed.
Water
Supply
Kohler Co. 7 1287911-2-B

Drop Ear Elbow
Water
Supply
3/8"
Copper
Inlet
Pipe
3. Install the Drop Ear Elbow
Connect a length of 3/8″ copper inlet pipe approximately 12″ (305
mm) long to the drop ear elbow.
Install the drop ear elbow so that the copper inlet pipe drops
through the inlet pipe hole in the bracket. Add support as
necessary.
Connect the water supply to the drop ear elbow.
1287911-2-B 8 Kohler Co.
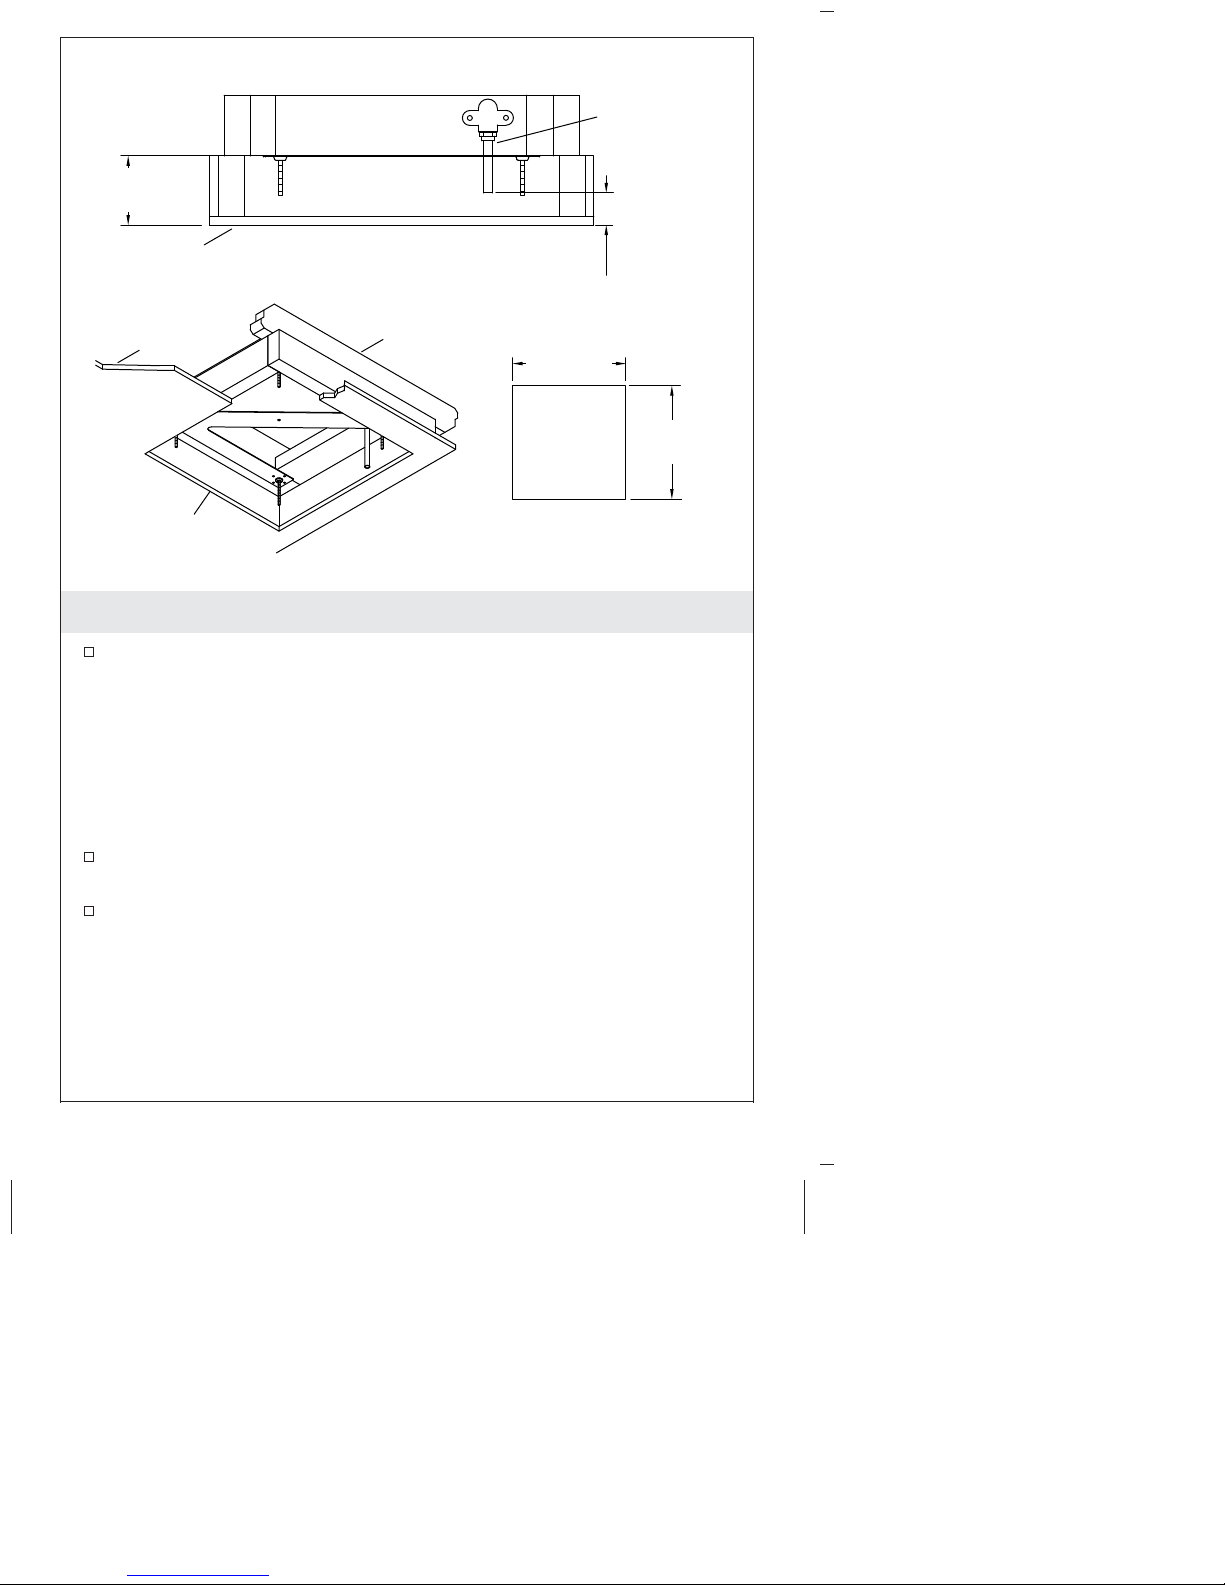
4"
(102 mm)
Copper
Inlet Pipe
Finished
Ceiling
Finished
Ceiling
Ceiling
Joist
18-1/8"
1-1/4"
(32 mm)
(460 mm)
18-1/8"
(460 mm)
Cutout
Cutout
4. Install the Dropped Ceiling
Construct a 4″ (102 mm) minimum to 4-1/2″ (114 mm) maximum
dropped ceiling in the shower area. The framed cutout should be
centered around the bracket, with the framing 18-1/8″ (460 mm)
+/- 1/8″ (3 mm) apart in both directions.
IMPORTANT! Risk of product damage. Ensure cutout and framed
opening of dropped ceiling meet the required dimensions listed. If
the finished ceiling thickness exceeds 4-1/2″ (114 mm), shim behind
the mounting bracket.
Trim copper inlet pipe to 1-1/4″ (32 mm) above the plane of the
finished ceiling opening.
De-burr, clean, and lubricate copper inlet pipe to prevent damage
to the water inlet gasket when the shower unit is installed.
Kohler Co. 9 1287911-2-B
Leveling
Nut
Sealing
Washer
5. Install the Shower Unit
CAUTION: Risk of personal injury. If the shower unit is
not securely held in place during installation, the product
may fall causing personal injury.
Thread a leveling nut onto each stud on the bracket.
Install the shower unit to the bracket. Each leveling nut should
stick through the shower unit. The copper inlet pipe should stick
through the water inlet gasket. Loosely install four sealing
washers (metal side down) and nuts on the leveling nuts.
Place a level across the shower unit and level by adjusting the
leveling nuts.
Hold the leveling nuts and tighten the nuts.
Ensure the foam gasket is compressed between the shower unit
and the ceiling. Fill any gaps with 100% silicone sealant.
Stud
Nut
1287911-2-B 10 Kohler Co.

6. Final Water Connections
Turn on the water to flush debris from the system.
Turn off the water and install the quick-connect elbow to the
copper inlet pipe.
Connect the manifold hose to the manifold.
Kohler Co. 11 1287911-2-B

Locked
Unlocked
7. Install the Rain Panel Assembly
Install the rain panel trim K-76732 using the separate installation
guide provided.
Secure the rain panel assembly to the back panel by pushing the
corner fasteners upwards until a ″click″ is heard from each corner.
Ensure each corner fastener is in the locked position as shown.
Install the center fastener with a 3/16″ hex wrench.
Install the logo cap over the center fastener.
Fold the covers onto the four corner fasteners.
1287911-2-B 12 Kohler Co.
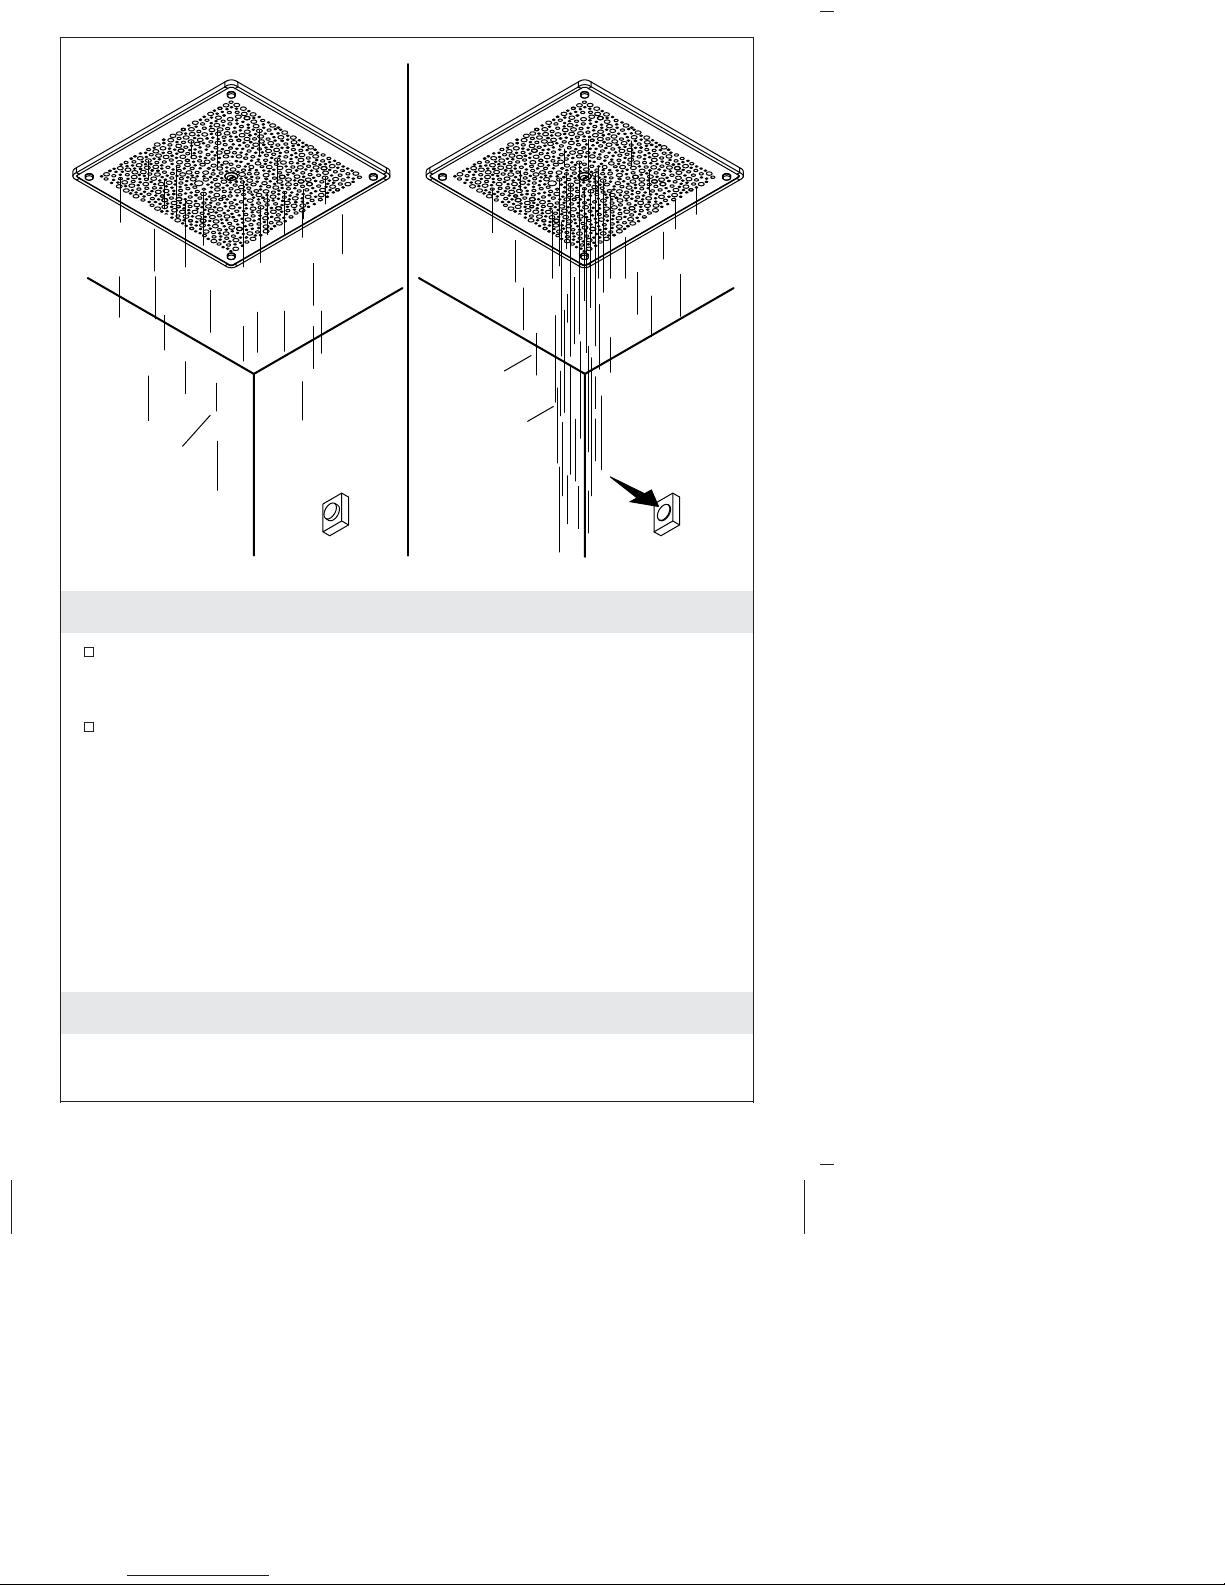
Drips
Drips
Stream
8. Operation
When the shower is turned on, rain droplets will gradually drip
from the rain nozzles and water will briefly stream from the
deluge nozzles until the panel reaches full flow.
Activate the deluge function by pressing the push button valve or
the icon on the digital valve user interface. Water will stream
from the centermost deluge nozzles for about eight seconds.
NOTE: For optimal deluge performance, wait about 30 seconds
between activations of the deluge function. Activating the deluge
function more frequently may reduce the amount of water streaming
from the deluge nozzles and dripping from the rain nozzles.
NOTE: When the water is turned off, the deluge function will
activate automatically. Water will continue to drip until no water is
retained in the showerhead.
Care and Cleaning
For best results, keep the following in mind when caring for your
KOHLER product:
Kohler Co. 13 1287911-2-B

Care and Cleaning (cont.)
•
Use a mild detergent such as liquid dishwashing soap and warm
water for cleaning. Do not use abrasive cleaners that may scratch
or dull the surface.
•
Carefully read the cleaner product label to ensure the cleaner is
safe for use on the material.
•
Always test your cleaning solution on an inconspicuous area
before applying to the entire surface.
•
Do not allow cleaners to sit or soak on the surface.
•
Wipe surfaces clean and rinse completely with water immediately
after cleaner application. Rinse and dry any overspray that lands
on nearby surfaces.
•
Use a soft, dampened sponge or cloth. Never use an abrasive
material such as a brush or scouring pad to clean surfaces.
For detailed cleaning information and products to consider, visit
www.kohler.com/clean. To order Care & Cleaning information, call
1-800-456-4537.
1287911-2-B 14 Kohler Co.

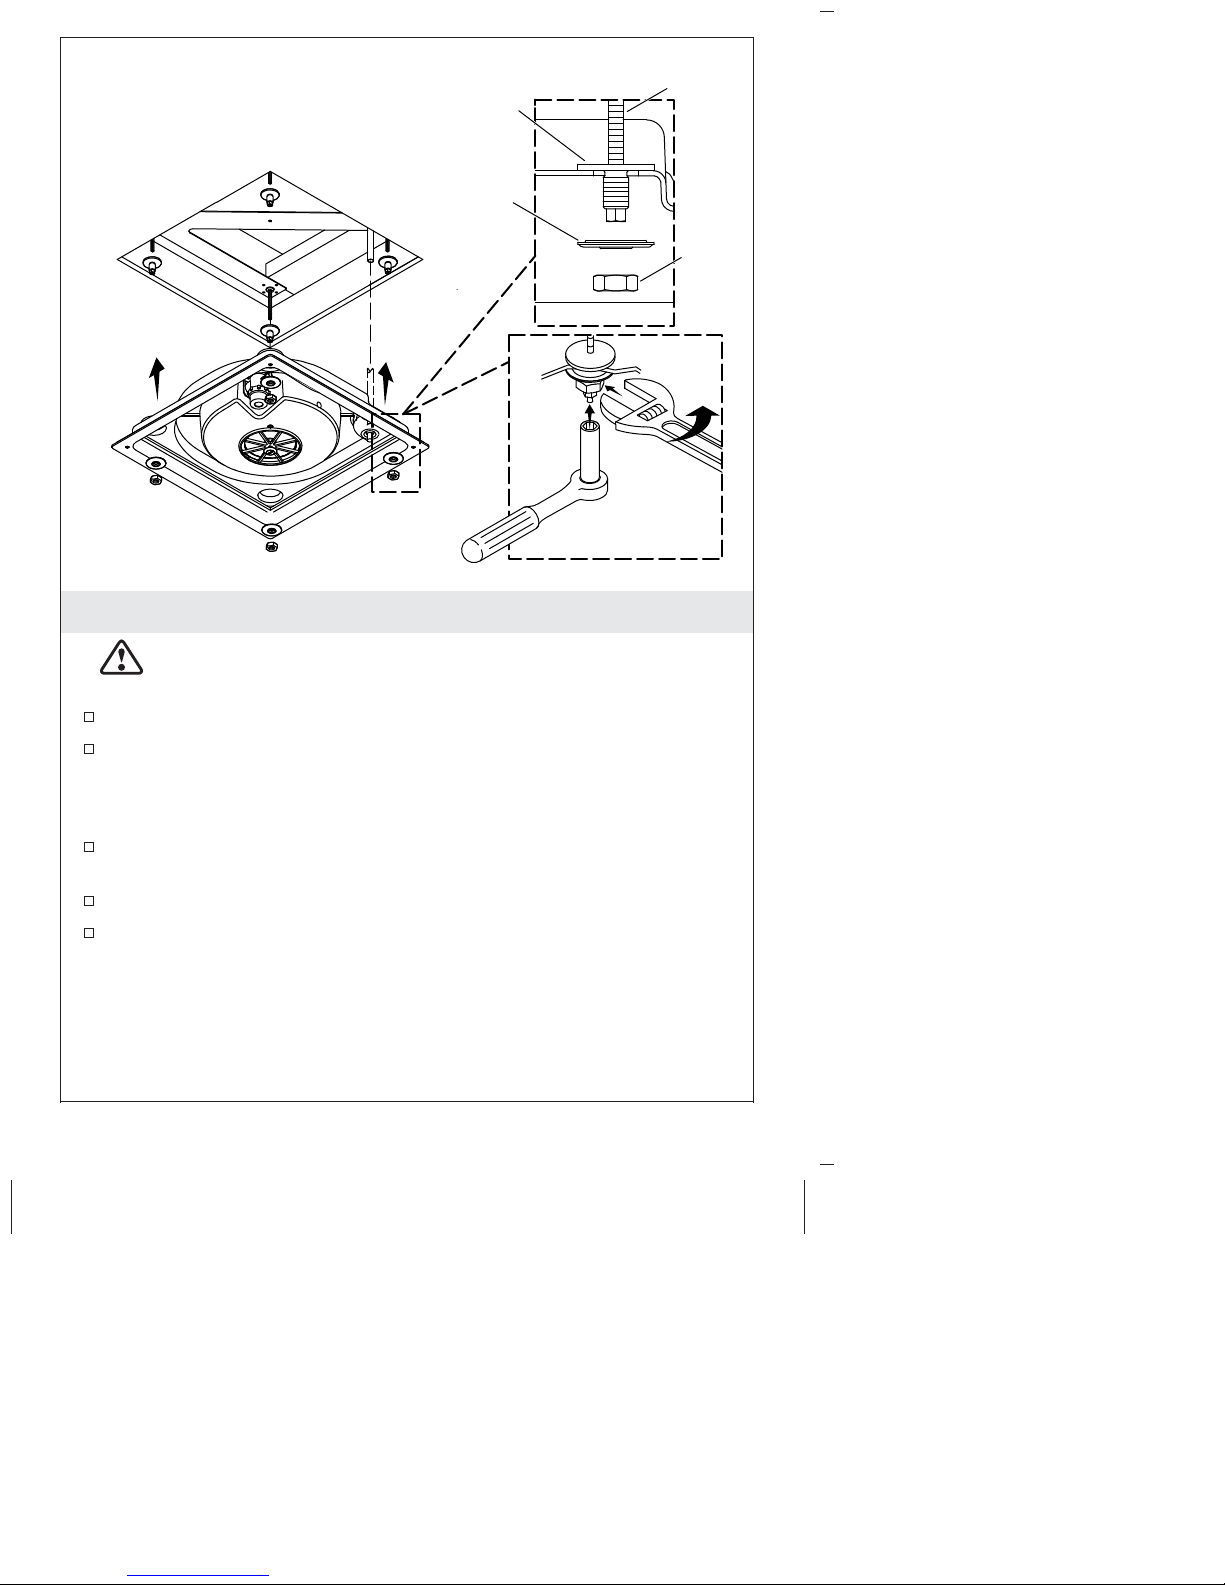
Corner
Fastener
Cover
Logo Cap
Center Fastener
Filter Replacement
Remove the Rain Panel
Remove the logo cap. Remove the center fastener with a 3/16″
hex wrench.
Gently pry the corner fastener covers off to reveal the corner
fasteners.
Locked
Unlocked
IMPORTANT! Risk of product damage. The corner fasteners are of
a quick connect type. Only use hand tools on these fasteners.
While supporting the panel, turn each corner fastener 90 degrees
to the unlocked position. Remove the rain panel.
Kohler Co. 15 1287911-2-B
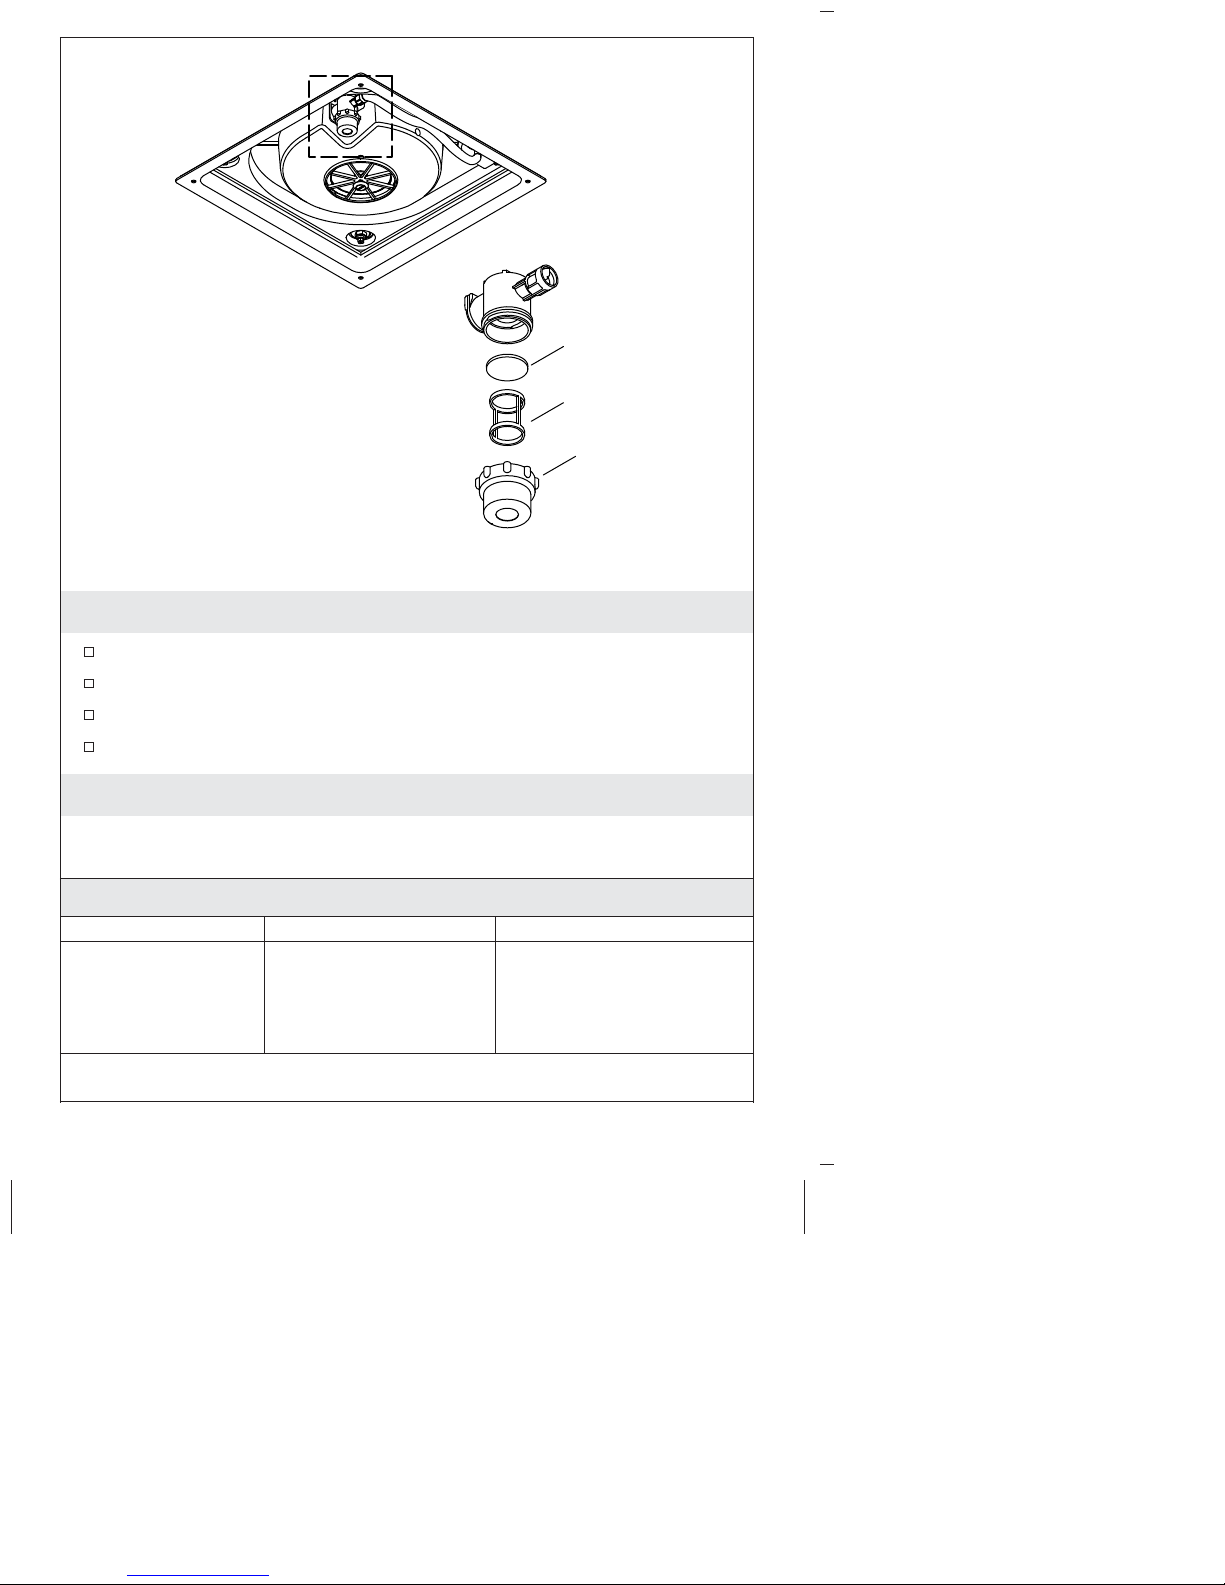
Felt Filter
Screen Filter
Filter Cap
Filter Replacement, cont.
Unscrew the filter cap to remove.
Rinse the screen filter and filter cap.
Replace the felt filter.
Reinstall the filter assembly and rain panel.
Troubleshooting
This troubleshooting guide is for general aid only. For service and
installation issues or concerns, call 1-800-4KOHLER.
Troubleshooting Table
Symptoms Probable Cause Recommended Action
1. Incomplete rain
coverage.
A. Nozzles are
clogged.
A. Rub nozzles clean
with a finger or soft
brush. Clean panel
per care and cleaning
guide.
1287911-2-B 16 Kohler Co.

Troubleshooting (cont.)
Troubleshooting Table
Symptoms Probable Cause Recommended Action
2. Dirty rain
panel or
clogged
nozzles.
3. Deluge
function too
brief.
4. Deluge
function not
working.
B. Shower unit is not
level.
C. Flow into tank is
reduced.
A. Hard water
deposits on
nozzles.
A. Push button valve
released too
quickly.
A. Push button valve
K-76746 not
shutting off water.
B. Ensure all four
corner fasteners are
secured. Remove the
rain panel. Level the
shower unit. Refer to
″Install the Shower
Unit″ section.
Reinstall rain panel.
C. Remove the rain
panel. Unscrew filter
cap. Rinse out screen
filter and filter cap,
replace felt filter.
Reinstall filter
assembly and rain
panel.
A. Rub nozzles clean
with a finger or soft
brush. Clean the rain
panel. Refer to Care
and Cleaning section.
A. For deluge function,
ensure the push
button valve is
depressed completely
for at least one
second.
A. Remove valve
escutcheon and
button. Adjust center
screw until the screw
head is flush with
the leak shield.
Reinstall the button
and escutcheon.
Lifetime Limited Warranty
KOHLER®Faucet Lifetime Limited Warranty
Kohler Co. warrants its Faucets* manufactured after January 1, 1997, to
be leak and drip free during normal residential use for as long as the
original consumer purchaser owns his or her home. If the Faucet
should leak or drip during normal use, Kohler Co. will, free of charge,
Kohler Co. 17 1287911-2-B

Lifetime Limited Warranty (cont.)
mail to the purchaser the cartridge necessary to put the Faucet in good
working condition. This warranty applies only to Kohler Faucets
installed in the United States of America, Canada or Mexico (″North
America″).
Kohler Co. also warrants all other aspects of the faucet or accessories
(″Faucet″)*, (except gold, non-Vibrant
, non-chrome finishes) to be free
®
of defects in material and workmanship during normal residential use
for as long as the original consumer purchaser owns his or her home.
This warranty applies only to Kohler Faucets installed in North
America. If a defect is found in normal residential use, Kohler Co. will,
at its election, repair, provide a replacement part or product, or make
appropriate adjustment. Damage to a product caused by accident,
misuse, or abuse is not covered by this warranty. Improper care and
cleaning will void the warranty**. Proof of purchase (original sales
receipt) must be provided to Kohler Co. with all warranty claims.
Kohler Co. is not responsible for labor charges, installation, or other
incidental or consequential costs. In no event shall the liability of
Kohler Co. exceed the purchase price of the Faucet.
If the Faucet is used commercially or is installed outside of North
America, or if the finish is gold, non-Vibrant or a painted or powder
coated color finish, Kohler Co. warrants the Faucet to be free from
defects in material and workmanship for one (1) year from the date the
product is installed, under Kohler Co.’s standard one-year limited
warranty.
If you believe that you have a warranty claim, contact Kohler Co.,
either through your Dealer, Plumbing Contractor, Home Center or
E-tailer, or by writing Kohler Co., Attn.: Customer Care Center, 444
Highland Drive, Kohler, WI 53044, USA. Please be sure to provide all
pertinent information regarding your claim, including a complete
description of the problem, the product, model number, color, finish,
the date the product was purchased and from whom the product was
purchased. Also include your original invoice. For other information,
or to obtain the name and address of the service and repair facility
nearest you, call 1-800-4-KOHLER (1-800-456-4537) from within the
USA and Canada, and 001-800-456-4537 from within Mexico, or visit
www.kohler.com within the USA, www.ca.kohler.com from within
Canada, or www.mx.kohler.com in Mexico.
KOHLER CO. AND/OR SELLER ARE PROVIDING THESE
WARRANTIES IN LIEU OF ALL OTHER WARRANTIES,
EXPRESSED OR IMPLIED, INCLUDING BUT NOT LIMITED TO
THE IMPLIED WARRANTIES OF MERCHANTABILITY AND
FITNESS FOR A PARTICULAR PURPOSE. KOHLER CO. AND/OR
SELLER DISCLAIM ALL LIABILITY FOR SPECIAL, INCIDENTAL
1287911-2-B 18 Kohler Co.

Lifetime Limited Warranty (cont.)
OR CONSEQUENTIAL DAMAGES. Some states/provinces do not
allow limitations of how long an implied warranty lasts or the
exclusion or limitation of such damages, so these limitations and
exclusions may not apply to you. This warranty gives the consumer
specific legal rights. You may also have other rights that vary from
state/province to state/province.
This is Kohler Co.’s exclusive written warranty.
*Trend
faucets, MasterShower®tower, BodySpa systems and
®
components; WaterHaven®tower, systems and components; Tripoint
faucets, Polished Gold, non-Vibrant and painted or powder coated
finishes, fittings; all items within the ″Fixture Related″ section of the
Kohler Faucets Price Book, drains, Duostrainer®sink strainers,
soap/lotion dispensers, Moxie
Wireless Speaker; and faucets used in
®
commercial settings, and outside North America, are covered by
Kohler Co.’s one-year limited warranty.
**Never use cleaners containing abrasive cleansers, ammonia, bleach,
acids, waxes, alcohol, solvents or other products not recommended for
chrome. This will void the warranty.
One-Year Warranty
For Mexico
KOHLER CO.
It is recommended that at the time of purchase, you verify that all
accessories and components are complete in this package.
This Kohler product is warranted to be free of defects in material and
workmanship for one (1) year from the date of purchase as shown on
the invoice or receipt.
1. Kohler Co. will only service its commercialized products through its
authorized distributors.
2. To obtain warranty service, please present the invoice and
corresponding warranty.
3. Through its authorized distributors, Kohler Co. promises to repair
the defective product or provide a new replacement or an equivalent
model (in those cases that the model has been discontinued) when the
product is beyond repair, without any charge to the consumer.
4. The time of repair will not exceed six (6) weeks commencing on the
date the product is received.
5. It is recommended that the consumer save the invoice or receipt as
®
Kohler Co. 19 1287911-2-B

One-Year Warranty (cont.)
additional protection, as it may substitute the warranty in the case that
there is a discrepancy in the validity of the warranty.
EXCEPTIONS AND RESTRICTIONS
The Warranty will not be valid in the following cases:
1. When the product is not operated in accordance with the
instructions concerning use and operation set forth in the owner’s
manual or installation instructions, and when the recommendations
and warnings included are not observed.
2. When the product has been modified or dismantled partially or
totally; or has been used in a negligent fashion and as a consequence
has suffered damages attributable to the consumer, individual, or
hardware not authorized by Kohler Co.
3. This warranty does not cover the damages as a result of disaster
such as fire or acts of God, including flooding, earthquake, or electric
storms, etc. To obtain a list of distributors in your area where you can
exercise your rights under this warranty, please call 001-800-456-4537.
KOHLER CO., KOHLER, WI 53044 U.S.A.
IMPORTER:
COMERCIALIZADORA INTERCERAMIC, S.A. DE C.V.
AV. CARLOS PACHECO NO. 7200, COL. MADERA 65
CHIHUAHUA, CHIH., MEXICO C.P. 31060
R.F.C. CIN141022IE9
TEL: 52 (614) 429-11-11
IMPORTER:
GAMA MATERIALES Y ACEROS, S.A. DE C.V.
AVE LOS ANGELES NO. 1800
COL VALLE DEL NOGALAR, SAN NICOLAS DE LOS GARZA
N.L. MEXICO
R.F.C. GMA901220U11
TEL: 81-1160-5500
1287911-2-B 20 Kohler Co.
 Loading...