

Page 1
PowerWAVE 1000
(1–3 kVA)
User Manual
Page 2

TS_600_00 PW1000 1-3kVA User Manual 6/4/17
Page 3

TS_600_00 PW1000 1-3kVA User Manual 6/4/17
Document Control
PDF ISSUE DATE REVISION SUMMARY
TS_600_00 06/04/2017 First Issue
Page 4

TS_600_00 PW1000 1-3kVA User Manual 6/4/17
Uninterruptible Power Supplies Ltd has taken every precaution to
produce an accurate, complete and easy to understand manual and will
therefore assume no responsibility nor liability for direct, indirect or
accidental personal or material damage due to any misinterpretation of or
accidental mistakes in this manual.
© 2017 Uninterruptible Power Supplies Ltd
This manual may not be copied or reproduced without written permission
of Uninterruptible Power Supplies Ltd.
USEFUL CONTACTS
www.upspower.co.uk UPS Limited web site
service@upspower.co.uk Service department – booking service, fault reporting etc.
technical@upspower.co.uk Technical queries
sales@upspower.co.uk Hardware sales
servicesales@upspower.co.uk Extended warranty agreements etc
Page 5

TS_600_00 PW1000 1-3kVA User Manual 6/4/17 I
Table of Contents
Safety 1
1.1 Description of symbols used in this manual 1
1.2 User precautions 1
1.3 Important safety notes 2
1.4 Storage instructions 2
General Description 3
2.1 Introduction 3
2.1.1 Advanced design features 3
2.1.2 PW1000 1-3kVA Model range 4
2.2 UPS Operating principles 4
2.2.1 Basic block diagram 4
2.2.2 System operating modes 5
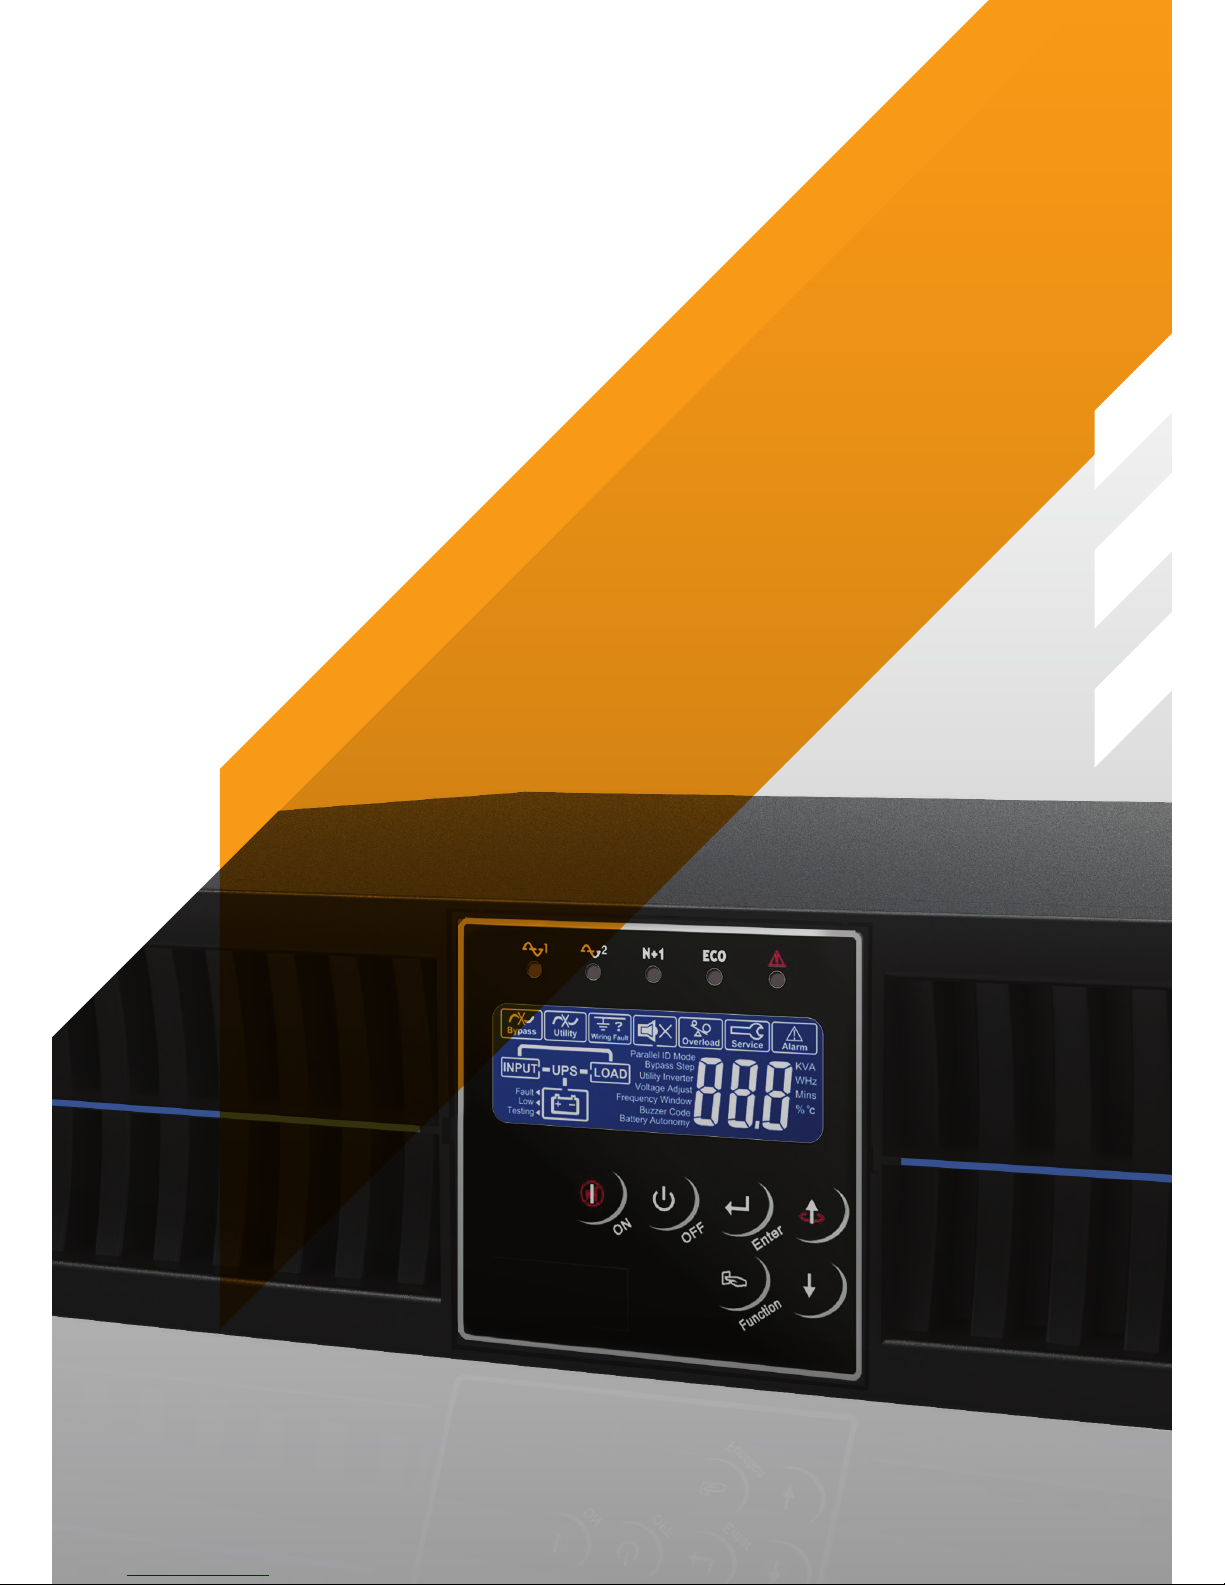
2.3 Operator control panel 7
2.3.1 LED Indicators 7
2.3.2 Operator keypad 8
2.3.3 LCD Display 8
2.4 UPS Rear view 10
2.4.1 Communication Ports 10
2.5 External battery cabinet 12
2.6 Warranty 13
2.6.1 Extended warranty 13
2.6.2 Additional service/maintenance support 13
Installation 14
3.1 Unpacking the UPS equipment 14
3.2 Selecting a suitable installation location 14
3.2.1 Clearances 15
3.3 Assembling the UPS mounting hardware 17
3.3.1 Hardware accessories pack 17
3.3.2 Stand-alone Tower assembly 17
3.3.3 Rack installation 17
3.4 Assembling the external battery cabinet mounting hardware 20
3.4.1 Stand-alone tower installation 20
3.4.2 Combined tower installation 21
3.4.3 Rack installation 21
3.5 Electrical installation 22
3.6 Initial UPS power-up and commissioning 22
Operation 23
4.1 Introduction 23
4.2 UPS start-up procedures 24
4.2.1 How to start the UPS (from utility mains) 24
4.2.2 How to start the UPS (from battery) 25
Page 6

:
II TS_600_00 PW1000 1-3kVA User Manual 6/4/17
4.2.3 How the monitor the UPS input/output operating conditions 26
4.3 UPS shut down procedures 27
4.3.1 How to turn off the UPS (from ON INVERTER or ECO Mode) 27
4.3.2 How to turn off the UPS (from ON BATTERY Mode) 27
4.4 Manual load transfer between inverter and bypass 27
4.5 Functions menu 28
4.5.1 How to disable the alarm buzzer operation 28
4.5.2 How to perform a battery test 28
4.5.3 Functions menu 29
4.5.4 Operating parameters setting menu 30
Maintenance 31
5.1 Introduction 31
5.2 Scheduled maintenance 31
5.2.1 Preventative maintenance inspection 31
5.2.2 Battery maintenance and testing 31
Troubleshooting 33
6.1 Introduction 33
6.2 Fault identification 33
6.2.1 Error codes 33
6.2.2 Audible warning alarm 33
6.2.3 Warning symbols 34
6.3 Troubleshooting a fault condition 34
6.4 Troubleshooting an operational problem 35
6.5 UPS Fault handling 35
6.5.1 Output load short circuit when the output supply is via inverter 36
6.5.2 Output short-circuit when the output supply via the bypass line 36
6.5.3 Inverter/internal over-temperature 36
6.5.4 Inverter over-current and output voltage out of tolerance 36
6.6 UPS System reset 36
Options 37
7.1 Communications options 37
7.2 RS-232 Computer serial interface 37
7.3 Emergency Power Off (EPO) / Remote ON/OFF (ROO) 38
7.4 CS141 /SMNP adapters 38
7.5 AS400 (dry contact) card 39
Specification 40
Page 7

TS_600_00 PW1000 1-3kVA User Manual 6/4/17 1
1
Safety
1.1 Description of symbols used in this manual
1.2 User precautions
WARNING: The warning symbol is used where there is danger of an electrical shock, equipment damage or
personal injury.
CAUTION: The caution symbol is used to highlight important information to avoid possible equipment
malfunction or damage.
WARNING: Do not attempt to install this UPS system until you are satisfied that you have read and understood
ALL the safety instructions and hazard warnings contained in this manual.
WARNING: Keep this manual with the UPS for future reference.
WARNING: DO NOT OPEN THE CASE. If you open the case of the UPS you will be exposed to dangerous
voltages. The UPS does not contain any user-serviceable parts, so do not attempt to repair this unit yourself as
doing so will void your warranty. If the UPS malfunctions it must be serviced or repaired by a trained engineer.
Always contact your local service agent if repair is necessary.
WARNING: Do not disconnect the power cord from the UPS AC Input socket while the UPS is turned on. The
UPS is equipped with an EMI filter, and to prevent a potential leakage current hazard the AC mains supply must
be securely grounded at all times. You should double check that the UPS supply earth connection is properly
grounded before you connect AC mains to the UPS.
WARNING: Uninterruptible Power Supplies Ltd will assume no responsibility or liability for accidents or injuries
due to incorrect operation or manipulation of the UPS or peripheral equipment.
CAUTION: The PW1000 1-3kVA is a Class A UPS product (according to EN 62040-3).
In a domestic environment the UPS may cause radio interference and the user may be required to undertake
additional measures.
Page 8

1: Safety
2 TS_600_00 PW1000 1-3kVA User Manual 6/4/17
1.3 Important safety notes
1. The UPS warranty will become null and void if liquids are spilt on the UPS case, or foreign objects are dropped into
the unit. Such mishaps could severely damage the UPS and present a shock hazard to anyone who touches the unit.
2. The ventilation grills on the UPS front panel must be kept free of obstruction at all times.
3. The UPS is must be installed in a sheltered and controlled environment away from direct sunlight. The operating
temperature should be between 0~40°C (ideally 20°C) with relative humidity of 0~90%, non-condensing. Further
details concerning the installation environment are included in the installation chapter of this manual.
4. Before installing the equipment you must check to ensure that the input voltage stated on the UPS data-plate on the
back of the unit matches your local utility supply voltage.
5. The UPS warranty will be rendered void, and the manufacturer reserves the right to refuse replacement or
compensation, if the UPS malfunctions due to:
• Accidental damage to the UPS.
• Damage or malfunction due to installing the UPS in an environment that does not meet the conditions specified in
this manual.
• Damage or malfunction due to improper installation, configuration or maintenance carried out by an unauthorised
person.
1.4 Storage instructions
If you intend to store the UPS for an extended period, in a moderate climate, the batteries should be charged for 12 hours
every 3 months by connecting the UPS to the utility supply. If the ambient temperature at the storage location is above
25°C, this should be carried out every 2 months.
CAUTION: Please read the following notes carefully prior to installation and use.
CAUTION: Always switch off the UPS before moving it.
Page 9

TS_600_00 PW1000 1-3kVA User Manual 6/4/17 3
2
General Description
2.1 Introduction
Congratulations on your purchase of the PW1000 1-3kVA UPS.
High reliability, low operating cost and excellent electrical performance are just some of the highlights of this innovative
UPS solution.
Uninterruptible Power Supplies Ltd. specialises in the installation and maintenance of Uninterruptible Power Systems; and
this UPS is just one example of our wide range of state-of-the-art power protection devices that will provide your critical
equipment with a steady and reliable power supply for many years.
2.1.1 Advanced design features
By using the latest technological developments in power engineering, the PW1000 1-3kVA represents a new generation of
transformerless UPS-System. Its advanced double conversion Voltage and Frequency Independent (VFI) topology
responds fully to both the highest availability and environmentally friendly requirements, compliant with IEC 62040-3 (VFISS-111) standards. A full UPS specification is provided in Chapter 8 of this manual.
Following, are some of this unit’s advanced design features:
• True online technology continuously supplies your critical applications with stable, regulated, transient-free pure
sine-wave AC power.
• High-Frequency Transformerless technology and tower-convertible enclosure enables the UPS to be integrated
into even the most difficult environments with space constraints.
• User-friendly design that permits simple and trouble-free installation. All units are supplied with input and output
power cables as standard.
• Smart battery management system which extends the battery life span.
• Highly efficient PWM sine-wave technology yields excellent UPS efficiency. The high crest factor of the inverter
handles peak inrush current loads and so avoids a need to upgrade to a UPS with a higher power rating.
• Compliant with various stringent international EMC standards for electromagnetic interference & protection.
• Selection of output voltages (200/208/220/230/240) available to match the UPS to local supply specifications or
specific load voltage requirements.
• A selectable bypass voltage tolerance (low/high sensitivity) restricts the range of voltages that can be applied to the
load when the UPS operates on bypass. The ranges are ±15% (low sensitivity) and ±10%V (high sensitivity). For
example, if the output voltage setting is 230V the bypass sensitivity Low range is 230V ±15%.
• Selectable 50Hz or 60 Hz operation.
• Fully digitized control logic for better functionality and enhanced power protection. Digital signal processing (DSP)
also provides efficient communication capabilities for enhanced remote control and monitoring flexibility.
• Active power factor correction (PFC) control function constantly maintains the UPS input power factor to >0.99 at
100% load, with resulting outstanding energy efficiency.
• Wide input voltage tolerance, from 110V~300V, allows the UPS to operate normally without draining the battery
unnecessarily during significant mains voltage dips, which helps extend the battery service life.
• DC-start function permits the UPS to be started during a utility power failure if required.
• Overload protection system automatically switches the UPS to bypass mode if an overload occurs and
automatically switch back to inverter mode once the overload condition ceases. Should the output become shortcircuited, the UPS puts the system in stand-by mode, provides visible and audible alarms, and turns off the output
supply automatically until the short circuit situation is resolved manually.
Page 10
2: General Description
4 TS_600_00 PW1000 1-3kVA User Manual 6/4/17
2.1.2 PW1000 1-3kVA Model range
The PW1000 1-3kVA UPS range comprises 1 kVA, 2 kVA and 3 kVA models, each of which is designed as a selfcontained UPS comprising a rectifier, battery charger, inverter, static switch and battery pack. All the models in this range
are easy to install, and supplied with suitably terminated power cables.
The PW1000 1-3kVA operates as a stand-alone UPS module and can be mechanically configured as a floor-standing
tower unit or installed in a standard 19 inch rack. An accessory pack which contains all the parts necessary to configure
the unit for either type of installation is supplied with the UPS.
Optional external battery cabinets are available to increase the UPS autonomy time. The battery cabinet design
compliments the UPS cabinet and the two cabinets can be mechanically connected together to form a single unit when
installed as a tower system – see chapter 3 (Installation) for mechanical configuration details.
2.2 UPS Operating principles
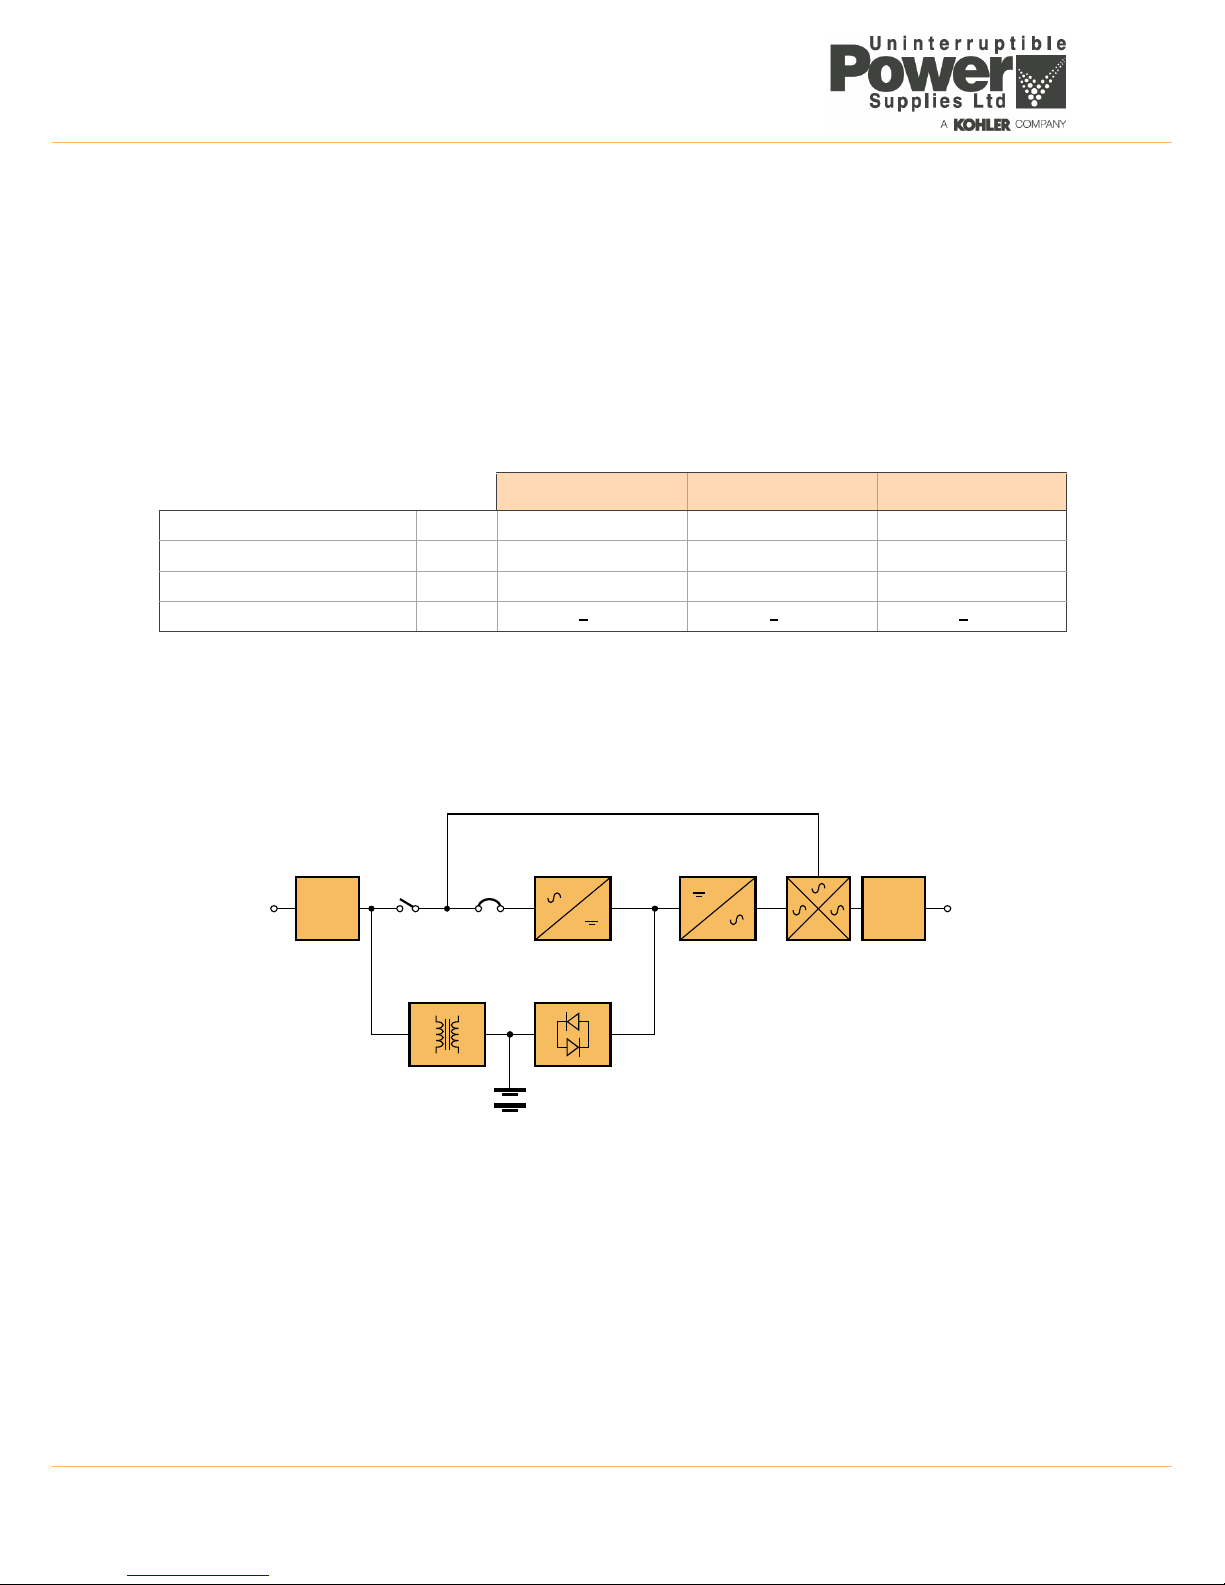
2.2.1 Basic block diagram
Figure 2.1 UPS Functional block diagram
EMI Filters
The UPS has an input and output EMI filter to reduce the effects of electromagnetic noise generated by the UPS on other
adjacent equipment – e.g. reduces external radio interference.
Battery charger
A regulated battery charger, power from the AC Input supply, charges the battery whenever the input supply is available.
DC/DC Boost converter
In times of AC Input supply failure, the DC/DC Boost Converter turns on and boosts the battery voltage to a level suitable
for use by the inverter. It provides a regulated DC output for the inverter while the battery voltage decays during discharge
and includes voltage and current monitoring and overload protection.
1 kVA 2 kVA 3 kVA
Maximum output power (0.9 pf) kVA (kW) 1.0 (0.9) 2.0 (1.68) 3.0 (2.7)
Dimensions (WxHxD) mm 440 x 88 x 400 440 x 88 x 600 440 x 88 x 600
Weight (with internal batteries) kg 12 22 26.5
Sound level dBA <
50 <50 <50
EMI
FILTER
EMI
FILTER
AC/DC (PFC)
CONVER TER
DC/AC
INVERTER
STATIC
SWITCH
BATTERY
CHARGER
DC/DC BOOST
CONVER TER
BATTERY
AC
Input
AC
Output
Bypass Line
Safety
Relay
Input
CB
Page 11
TS_600_00 PW1000 1-3kVA User Manual 6/4/17 5
2: General Description
AC/DC Converter
As its name suggests, the AC/DC Converter converts the AC Input supply into a controlled DC supply that is suitable for
use by the inverter. The converter uses a leading-edge switched-mode technique which produces an input power factor of
almost unity over its full operating range (0.99 at full rated linear load) and thereby maximises the UPS efficiency.
The converter can satisfy the inverter DC power demands over an AC Input voltage range of between 110V~300V which
means that the battery is not called upon during power dips (brownouts), thereby maximising battery life and availability.
DC/AC Inverter
The inverter converts the DC voltage connected to its input, from the AC Input supply via the AC/DC converter or from the
battery via the DC/DC converter, and produces a regulated AC Output voltage that is suitable to power the connected load
equipment. The control logic associated with the Inverter power block is substantial, and in addition to the controlling the
output sine wave voltage it also provides various levels of overload protection, frequency regulation and synchronisation,
and output voltage error detection.
Static switch
The static switch provides a means of connecting the UPS AC Output (load) to the inverter output or the bypass line,
which is connected directly to the UPS AC Input. The control logic within this power block will transfer the load to the
bypass supply in the event of overload or UPS (inverter) malfunction. The load can also be transferred between the
inverter and bypass line manually if required. Note that a controlled transfer can take place only if the inverter and bypass
line are synchronised in frequency and phase.
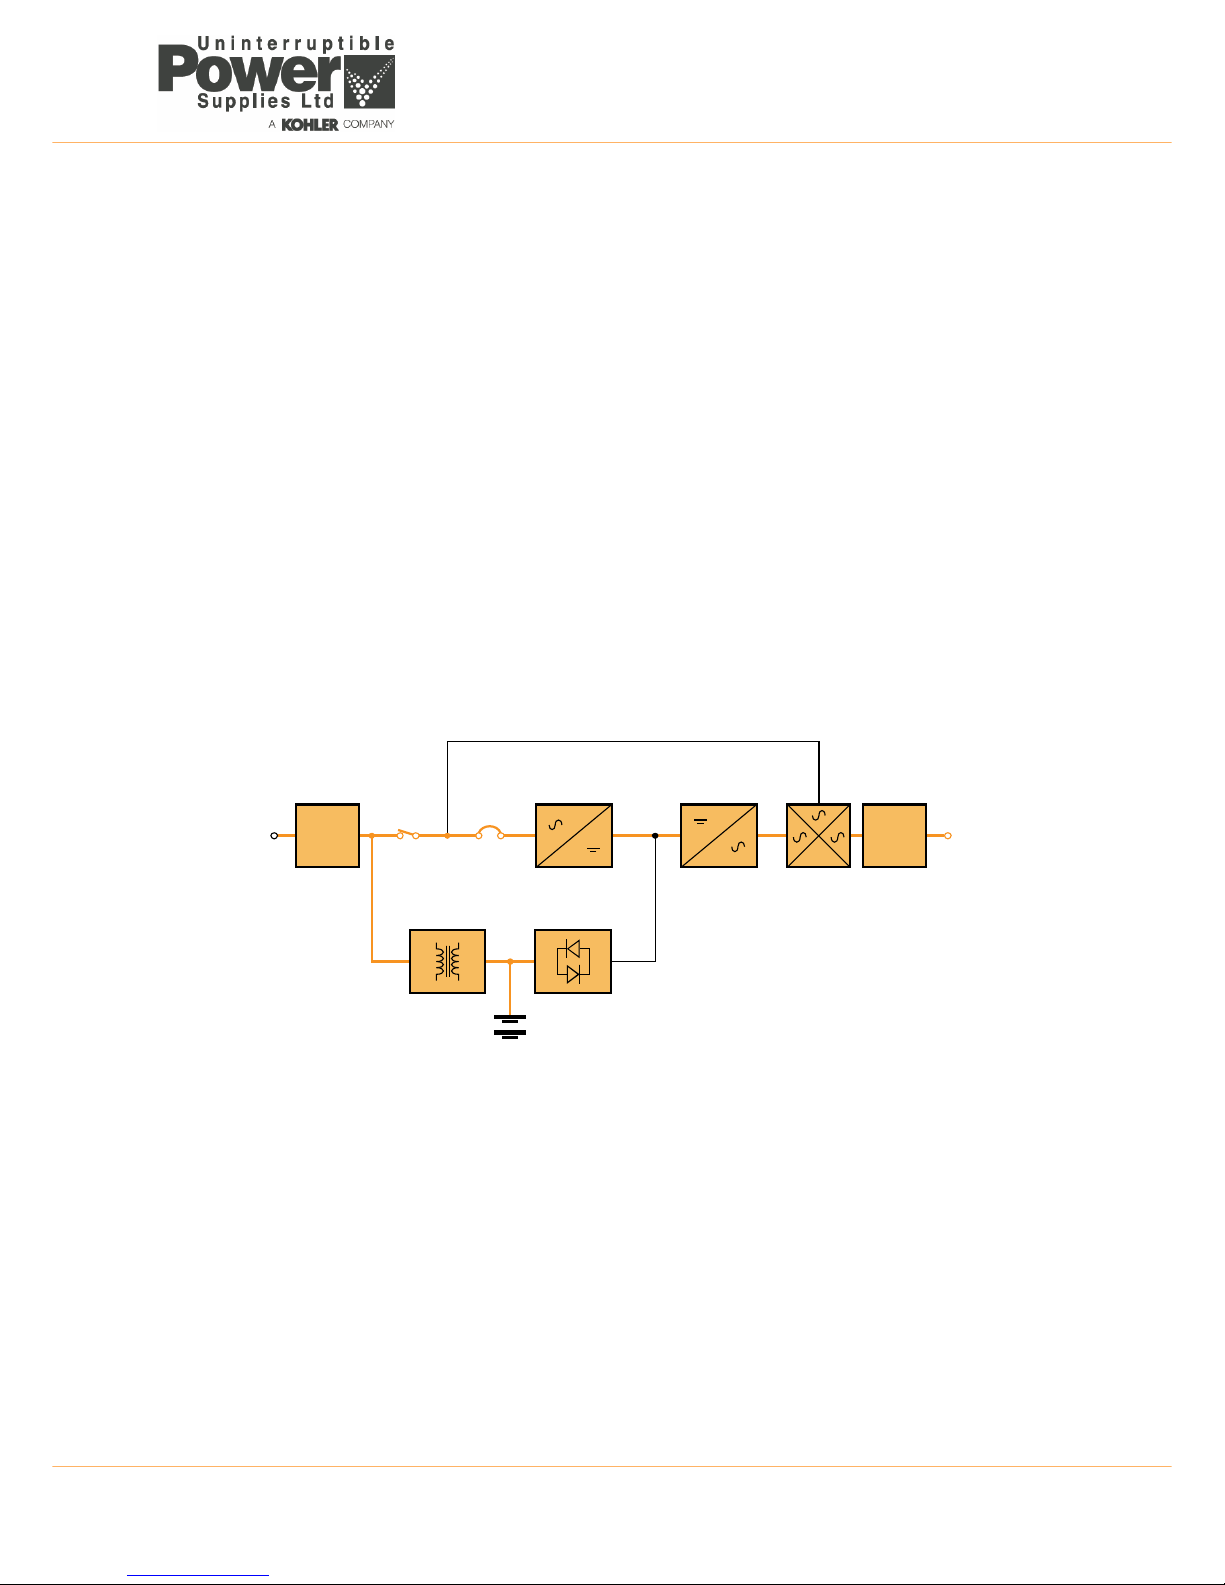
2.2.2 System operating modes
ON-INVERTER operation
Figure 2.2 ON-INVERTER operation
• The battery is being permanently charged by the battery charger.
• The AC/DC converter is processing the AC Input supply and turning it into controlled DC.
• The inverter is converting the AC/DC converter output back into AC suitable for the load.
• The static switch is connecting the inverter output to the UPS AC Output terminals.
EMI
FILTER
EMI
FILTER
AC/DC (PFC)
CONVER TER
DC/AC
INVERTER
STATIC
SWITCH
BATTERY
CHARGER
DC/DC BOOST
CONVER TER
BATTERY
AC
Input
AC
Output
Bypass Line
Safety
Relay
Input
CB
Page 12
2: General Description
6 TS_600_00 PW1000 1-3kVA User Manual 6/4/17
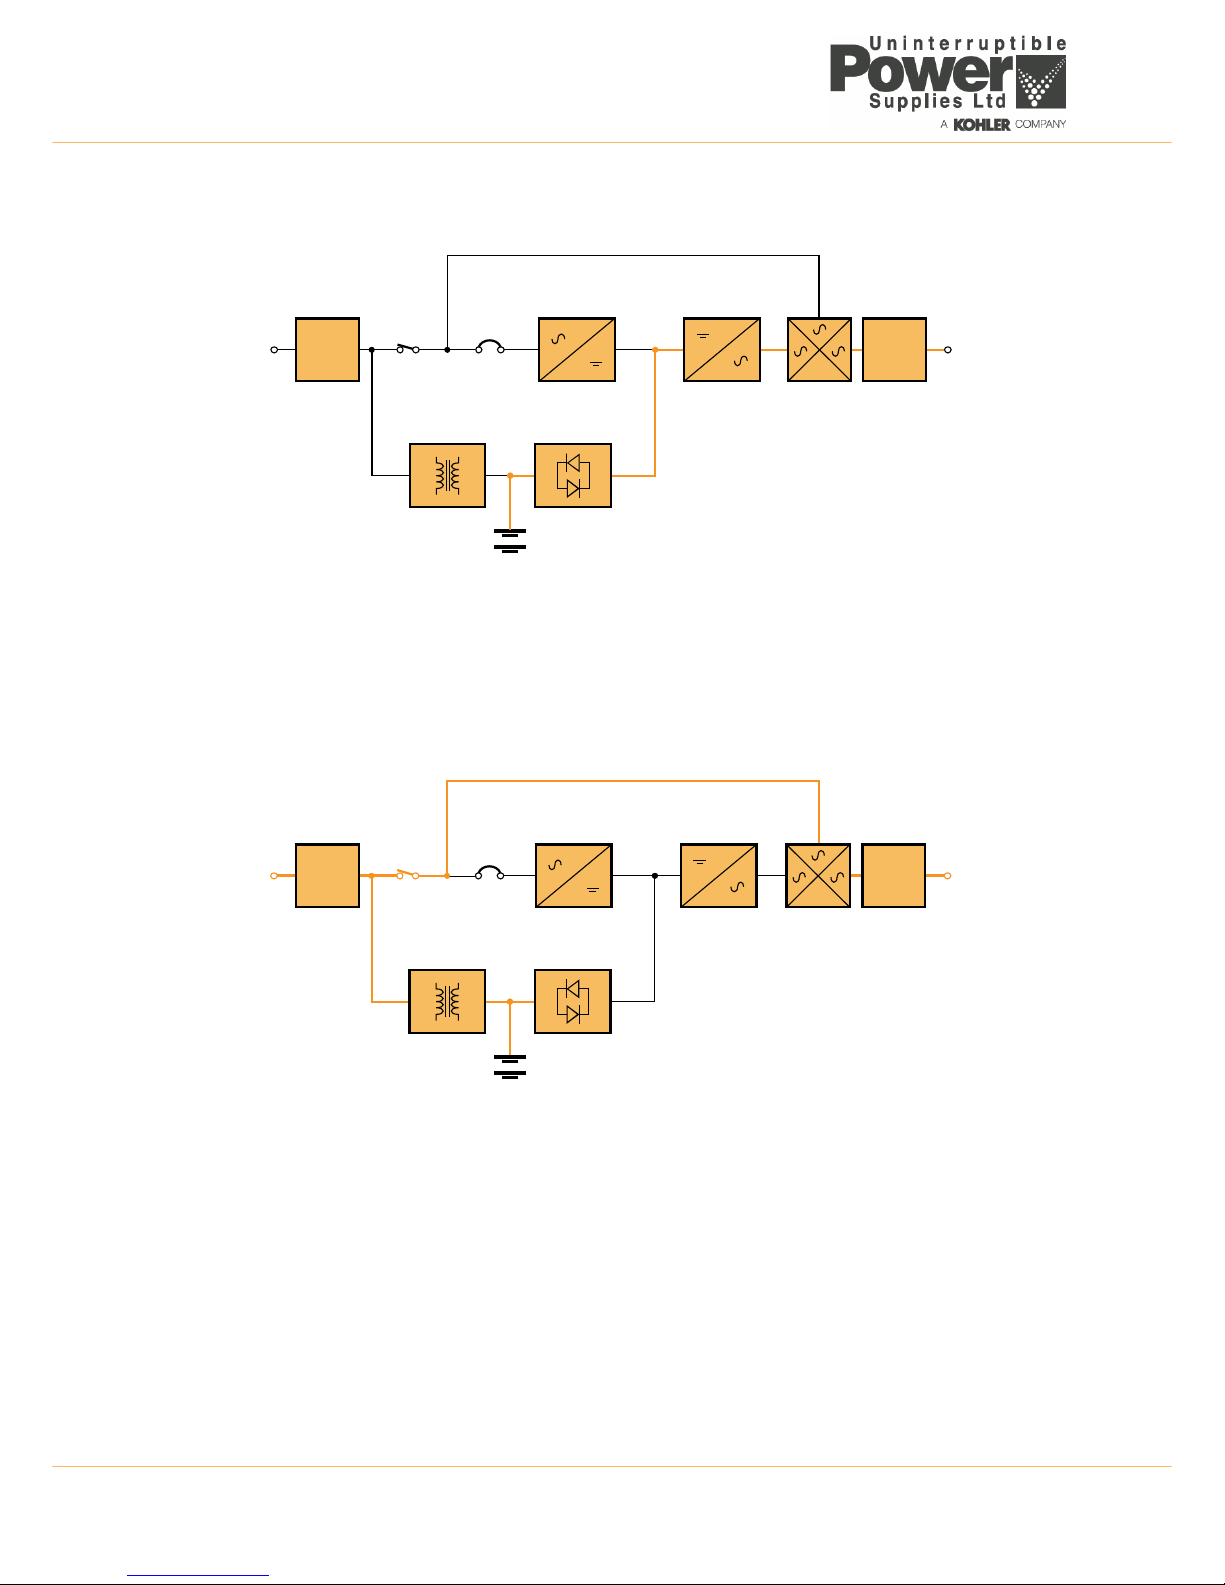
ON BATTERY operation
Figure 2.3 ON-BATTERY operation
• The battery is discharging through the DC/DC boost converter which presents the inverter with a controlled input
voltage as the battery discharges.
• The Inverter is converting the DC/DC boost converter output back into AC suitable for the load.
• The static switch is connecting the inverter output to the UPS output terminals.
• The load will continue to receive its regulated power until the battery discharges to its low voltage cut-out level.
ON BYPASS operation
Figure 2.4 ON-BYPASS operation
• The battery is being permanently charged by the battery charger as long as the battery charger is still serviceable
and able to operate. If the load has transferred to bypass due to an internal malfunction the battery charger may
have shut down.
• The AC/DC converter, DC/DC boost converter and inverter are all inoperative.
• The static switch is connecting the bypass line to the UPS output terminals.
Note: When operating in this mode the load is unprotected from utility power disturbances.
EMI
FILTER
EMI
FILTER
AC/DC (PFC)
CONVER TER
DC/AC
INVERTER
STATIC
SWITCH
BATTERY
CHARGER
DC/DC BOOST
CONVER TER
BATTERY
AC
Input
AC
Output
Bypass Line
Safety
Relay
Input
CB
EMI
FILTER
EMI
FILTER
AC/DC (PFC)
CONVER TER
DC/AC
INVERTER
STATIC
SWITCH
BATTERY
CHARGER
DC/DC BOOST
CONVER TER
BATTERY
AC
Input
AC
Output
Bypass Line
Safety
Relay
Input
CB
Page 13
TS_600_00 PW1000 1-3kVA User Manual 6/4/17 7
2: General Description
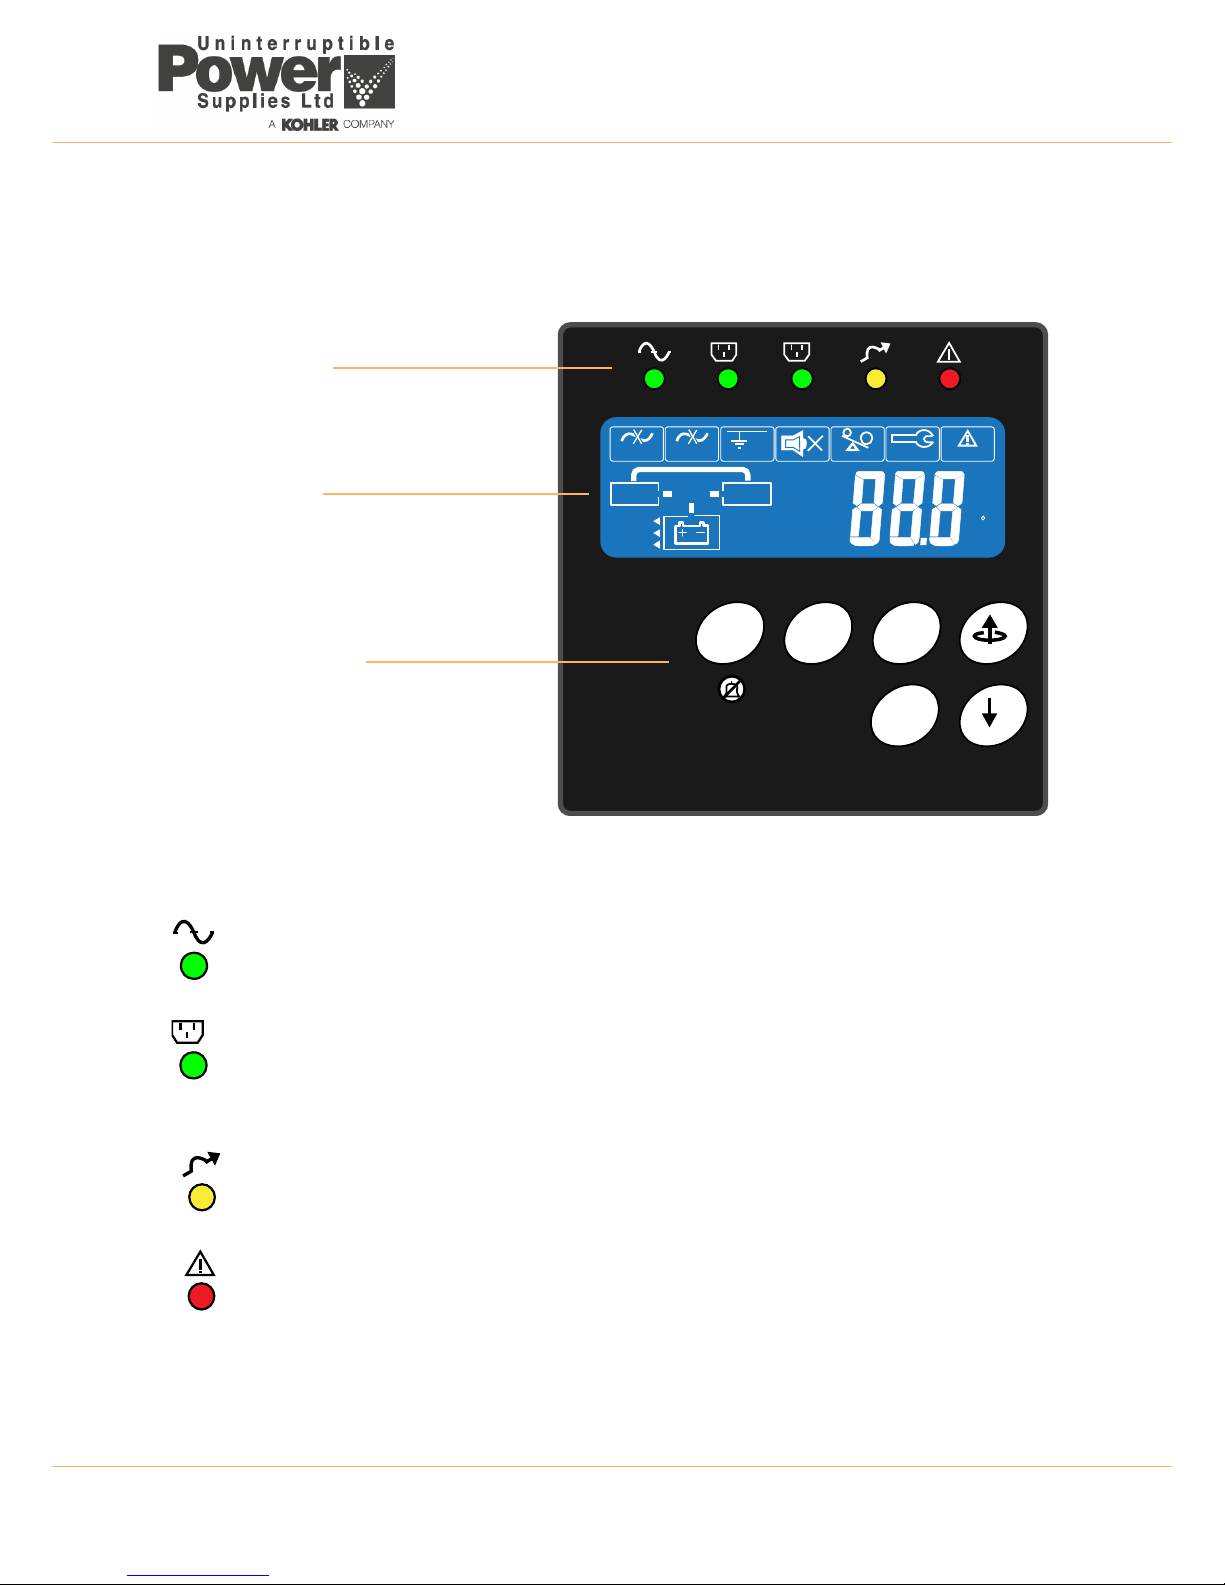
2.3 Operator control panel
The UPS is controlled from the operator control panel located on the front of the unit.
The user-friendly UPS control panel comprises three areas:
Figure 2.5 Operator control panel
2.3.1 LED Indicators
Input mains supply status
This led is permanently ON if the mains supply is within in the normal operating range of 160~300 VAC, and
flashes if the supply falls to 120~159 VAC. If the led is OFF it indicates a mains supply failure.
Programmable outlet status
The programmable outlets are normally connected to less critical loads which can be shed when the utility
power fails. This reduces the load on the battery as it discharges and thereby increases the back-up time for
the more critical loads which are connected to the unswitched UPS outlet(s). The indicators are permanently
ON when the outlets are live.
Bypass supply status
This led is permanently ON when the UPS is operating in the ECO mode and flashes when the load is
transferred to bypass – either manually or due to a detected fault.
UPS fault indication
This LED illuminates to indicate the presence of a fault condition within the UPS that needs attention. It is
usually accompanied by an audible alarm.
ON OFF Enter
Function
INPUT
UPS
LOAD
Service
Overload
Utility
?
Wiring Fault
Alarm
Bypass
Fault
Parallel IDMode
KVA
WHz
Mins
%
C
BypassStep
Utility Invert er
VoltageAdjust
Buzzer Code
BatteryAutonomy
FrequencyWindow
Low
Testi ng
1
2
Led indicators
A row of LEDs indicate the UPS input and
output power status, together with a
general fault warning.
LCD Display
Provides indication of the UPS operating
mode together with the input, output, and
battery supply parameters. It also displays
error messages and UPS set-up data via a
system of configuration menus.
Operator Keypad
The keypad contains 6 keys that are used
to navigate through the UPS control menu
system and turn the UPS OFF/ON.
1
Page 14
2: General Description
8 TS_600_00 PW1000 1-3kVA User Manual 6/4/17
2.3.2 Operator keypad
2.3.3 LCD Display
The LCD display contains a row of warning symbols, a mimic diagram which indicates the power path through the UPS, a
battery status indicator and a multi-function 3-digit numerical display which can be selected to indicate a range of
operating parameters. Each of these areas are described below.
Figure 2.6 LCD Display
ON Button
This button is used to turn ON the UPS and activate certain functions when operated in combination
with other buttons (as described later in this chapter). The button must be pressed for approximately
one second to turn ON the UPS – accompanied by double ‘beep’.
This symbol shows that the ON button is also used to cancel the audible alarm. When the alarm is
cancelled, the audible warning will turn OFF but the alarm LED will remain ON if the fault is still present.
OFF Button
This button must be pressed for approximately one second to turn OFF the UPS – accompanied by
double ‘beep’.
ENTER Button
The ENTER button is used to select a parameter from the UPS monitoring and configuration menus.
UP (BACK) Button
This button is used to navigate UP through the UPS menus, or change a menu parameter. It is also
used with the ON button to manually transfer the load between the UPS and bypass supply.
DOWN (NEXT) Button
During normal operation, this button is used to scroll through the metered parameters shown on the
LCD display. It is also used in conjunction with the ON button to access the UPS configuration menus.
FUNCTION Button
This button is used to access the UPS configurations display menu.
ON
OFF
Enter
Function
INPUT
UPS
LOAD
Service
Overload
Utility
?
Wiring Fault
Alarm
Bypass
Fault
Parallel ID Mode
KVA
WHz
Mins
%
C
Bypass Step
Utility Inverter
VoltageAdjust
Buzzer Code
BatteryAutonomy
Frequency Window
Low
Testing
Warning symbols
Mimic diagram
Battery status
Metering parameters
3-Digit alpha-numeric display
Page 15
TS_600_00 PW1000 1-3kVA User Manual 6/4/17 9
2: General Description
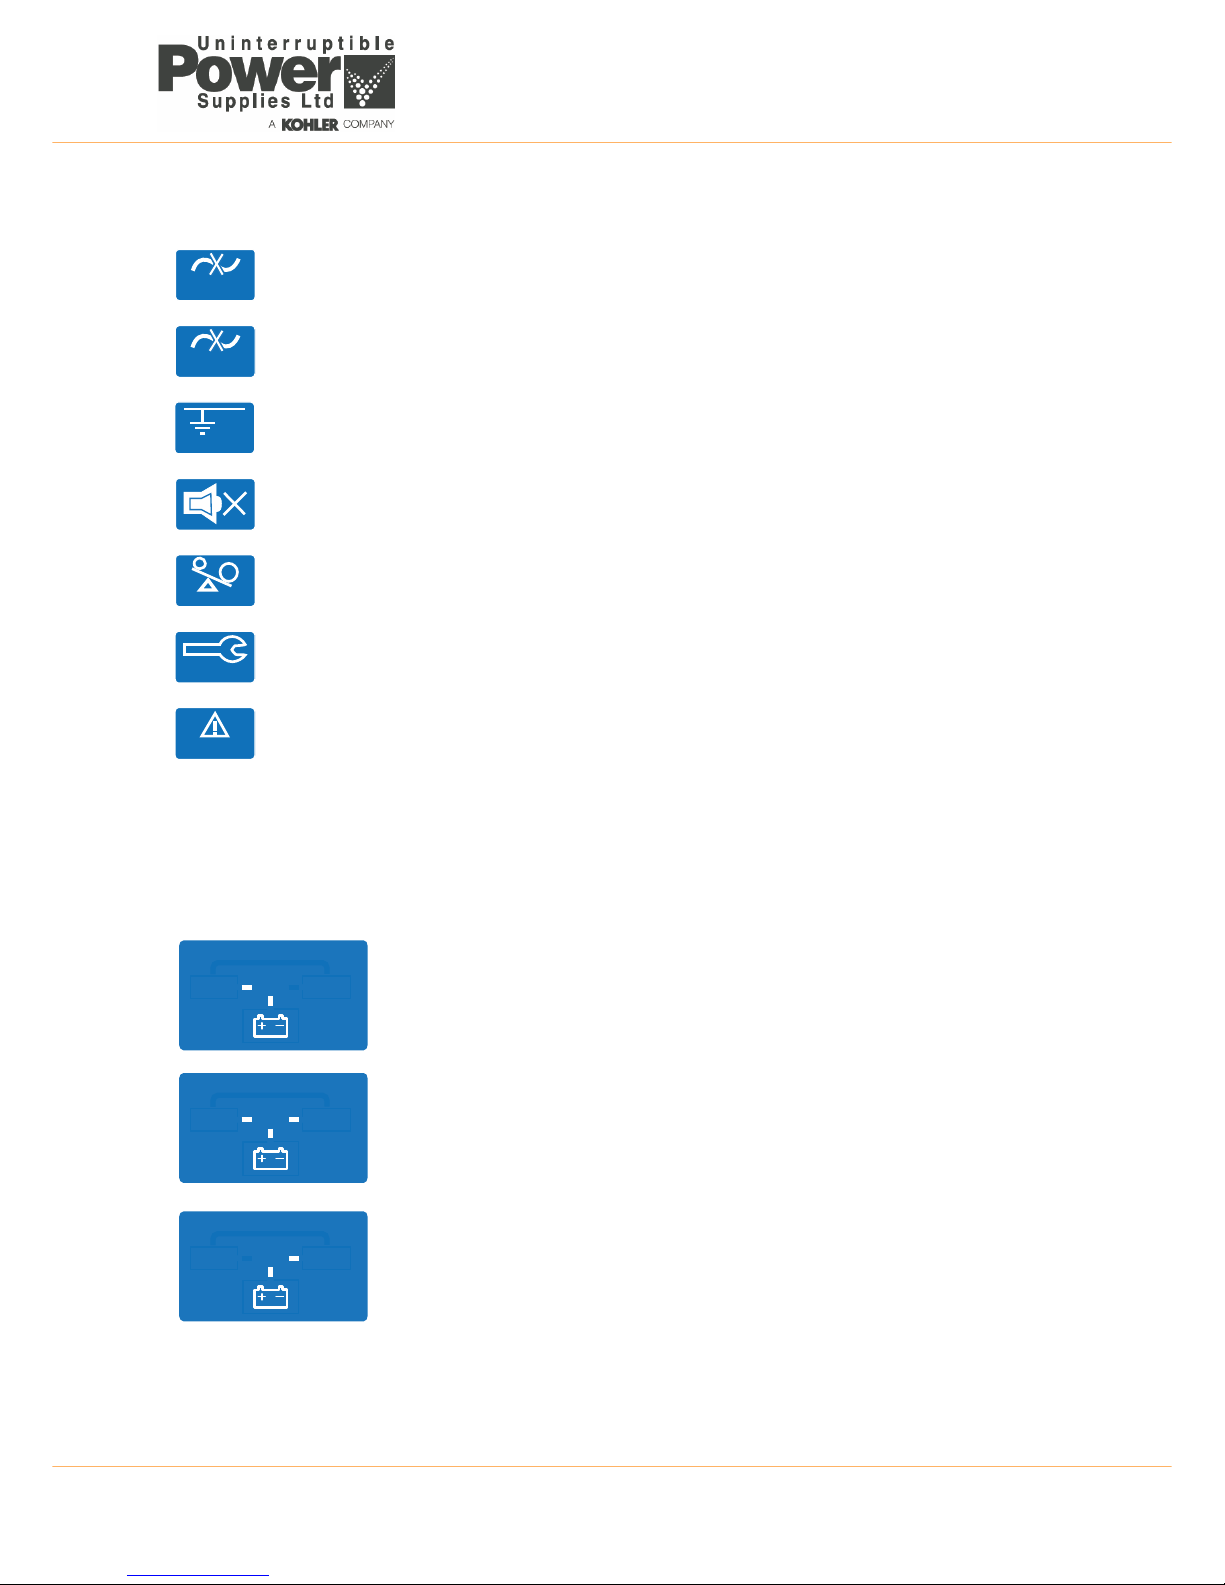
Warning symbols
Mimic diagram
The LCD Mimic diagram indicates the existing power flow through the UPS. The INPUT, UPS, LOAD and BATTERY
symbols are permanently shown on screen and their interconnecting lines appear, or disappear, depending on the UPS
mode of operation – see the table below.
Bypass input abnormal:
UPS fails to transfer to bypass, bypass abnormal in ECO mode
Utility input abnormal:
The utility mains supply is outside the UPS pre-set operating window
Wiring fault:
Site wiring problem such as reversed Line-Neutral connection
Alarm buzzer silent
The alarm buzzer has been silenced or disabled
Overload:
The UPS output is overloaded
Service:
The UPS is operating in its service mode
Alarm:
An alarm condition is present. This remains active after the audible alarm is reset if the alarm still exists.
UPS OFF
This mimic is displayed when the utility power is first applied to the UPS, or if the UPS is
turned OFF. It shows that the battery is being charged from the utility supply (INPUT) but
the LOAD is not connected to the UPS, and is therefore unpowered.
ON INVERTER
This mimic is displayed during normal UPS operation. It shows the battery being
charged from the utility supply (INPUT) and the LOAD connected to the UPS output
(Inverter), and is therefore being supplied with processed, backed-up power.
ON BATTERY
This mimic is displayed if the utility supply fails. It shows the battery now providing the
UPS (Inverter) and LOAD power. The battery will sustain the UPS output until it is fully
discharged, whereupon the UPS will shut down.
Bypass
Utility
?
Wiring Fault
Overload
Service
Alarm
INPUT
UPS
LOAD
INPUT
UPS
LOAD
INPUT
UPS
LOAD
Page 16

2: General Description
10 TS_600_00 PW1000 1-3kVA User Manual 6/4/17
Battery status indicators
There are three ‘flags’ to the left of the battery icon which indicate the battery status.
Fault
Indicates a battery fault and is normally accompanied by an illuminated Alarm warning symbol
and an audible warning from the buzzer. An error code will be shown on the LCD 3-digit
alphanumeric display which helps with fault identification.
Low
When the UPS is operating ON BATTERY the Low flag will turn on when the battery is nearing its end of discharge. This is
accompanied by an increase in the number of short successive beeps produced by the alarm buzzer.
Testing
The Testing flag flashes when a battery test is operation – see paragraph 4.5.2.
Meter Display
When the UPS is turned ON, you can use the DOWN and UP buttons to scroll through the measurement display screens.
The display sequence is as numbered in the table below and loops around in either direction.
2.4 UPS Rear view
2.4.1 Communication Ports
Several communication options can connected to the PW1000 1-3kVA. These are described briefly below with further
details provided in Chapter 7 (Options).
USB port (Figure 2.7 item 3)
A USB type B socket is provided to allow the UPS to be connected to a PC using a standard USB peripheral interface
cable. The USB communication protocol complies with USB version 1.0 (1.5 Mbps) and USB HID version 1.0. This facility
can be used in conjunction with UPS monitoring and shut down software (not supplied).
RS-232 Interface port (Figure 2.7 item 2)
The RS-232 port allows the UPS to be connected to a PC and provides the same functions as the USB port.
Emergency power off (EPO) (Figure 2.7 item 1)
If an external emergency power off (EPO) facility is required, the external circuit must be connected to the two pin plug
located on the rear panel. A plug-in connector with screwed terminal connections is supplied ready fitted to the EPO
socket to simplify the connection of the external cable if the UPS is located in a confined space, such as when it is rack
mounted. The EPO input requires a normally-open contact which closes to active the EPO function. If the UPS is shut
down by the EPO input (closed), it has to be restarted manually after the EPO input is removed (opened).
Optional interface cards (Figure 2.7 item 4)
An optional SNMP/ CS141 interface card can be fitted in the card slot to enable the UPS to be integrated into a network
monitoring and control system.
ON BYPASS
This mimic is displayed if the UPS develops a fault, or is overloaded, whereupon the
LOAD is transferred to the bypass line and connected directly to the utility supply
(INPUT). The battery will remain on charge if the UPS battery charger is healthy.
1 Utility Voltage (V) 4 Inverter Frequency (Hz) 7 Battery Voltage (V)
2 Utility Frequency (Hz) 5 Inverter Load % 8 Battery Autonomy (mins)
3 Inverter voltage (V) 6 Inverter Load (A) 9 UPS Temperature (°C)
INPUT
UPS
LOAD
INPUT
UPS
LOAD
Fault
Low
Testi ng
Page 17

TS_600_00 PW1000 1-3kVA User Manual 6/4/17 11
2: General Description
Figure 2.7 Rear panel detail
AC INP UT
AC OUTPUT
INPUT BREAKER
EXT>BAT.
INTERFACE
12
EPO
RS232USB
AC OUTPUT
INPUT BREAKER
INTERFACE
AC INPUT
1
2
EPO
RS232USB
AC OUTPUT
INPUT BREAKER
BREAKER
OUTPUT
BREAKER
OUTPUT
INTERFACE
AC INPUT
AC OUTPUT
1
2
EPO
RS232USB
1
2
3
810 9
10
4 6 7
5
8
8
1 kVA
2 kVA
3 kVA
Model
Model
Model
1 Emergency Power Off (by dry contact) 7 Unswitched AC Outlets
2 RS232 Port 8 Two switched (programmable) AC outlets
3 USB Port 9 Mains input supply circuit breaker
4 Communications card options slot 10 Cooling fans
5 External battery connector 11/12 Output circuit breaker (CB) for AC Outlets 7/8
6 AC Input (utility mains) power socket 13 16A Unswitched AC Outlet
7
9
56 4 7
1
2
3
114 896 7
510 7813 12
1
2
3
Page 18

2: General Description
12 TS_600_00 PW1000 1-3kVA User Manual 6/4/17
2.5 External battery cabinet
An external battery pack can be connected to the UPS to extend the UPS autonomy time, where required. The batteries
are contained in a purpose-designed, matching cabinet which can be installed as a stand-alone unit or attached to the
UPS cabinet to form a single tower assembly.
When the external battery cabinet is rack-mounted it should be installed immediately below the UPS cabinet.
Note: If required, up to three external battery cabinets can be connected to the UPS – see Figure 2.8.
The following external battery cabinets are available:
Figure 2.8 External battery cabinet
Up to three external battery cabinets can be added to the UPS system by connecting the output cable of the first cabinet
(5) to the input connector of the second cabinet (4).
230V–1kVA 230V–2kVA 230V–3kVA
Battery voltage 36V 72V 72V
Battery number and capacity 6x 7Ah 12x 7Ah 12x 9Ah
Battery strings 2x Strings of 3 batts. 2x Strings of 6 batts. 2x Strings of 6 batts.
Dimensions (WxHxD) in/mm 17.3 x 3.5 x 15.8 in (2U)
440 x 88 x 400 mm
17.3 x 3.5 x 23.6 in (2U)
440 x 88 x 600 mm
17.3 x 3.5 x 23.6 in (2U)
440 x 88 x 600 mm
Weight kg/lb 11kg / 24.25lb 17.5kg / 38.6lb 17.5kg / 38.6lb
DC BREAKER
To Ext. Battery
UPS. BAT.
1 2 543
1 DC Breaker (option) – Battery over-current protection
2 DC Fuses – Battery over-current protection
3 Earth – Safety earth bonding
4 Input connector – For additional extended battery cabinets
5 DC Power cord – Battery cable to UPS cabinet
Page 19

TS_600_00 PW1000 1-3kVA User Manual 6/4/17 13
2: General Description
2.6 Warranty
The PW1000 1-3kVA UPS is supplied with a limited warranty that the UPS and its component parts are free from defects
in materials and workmanship for a period of one year from the date of commissioning or fifteen months from the date of
original delivery, whichever is the sooner. This warranty is the only warranty given and no other warranty, expressed or
implied, is provided.
This warranty does not apply to any losses or damages caused by misuse, abuse, negligence, neglect, unauthorised
repair or modification, incorrect installation, inappropriate installation environment, accident, act of God, or inappropriate
application. If the UPS fails to conform to the above within the warranty period then Uninterruptible Power Supplies Ltd.
will, at its sole option, repair or replace the UPS. All repaired or replaced parts will remain the property of Uninterruptible
Power Supplies Ltd.
As a general policy, Uninterruptible Power Supplies Ltd. does not recommend the use of its products in:
• life support applications where failure or malfunction of the product can be reasonably expected to cause failure of
the life support device, or to significantly affect it’s safety or effectiveness.
• applications concerned with direct patient care.
Uninterruptible Power Supplies Ltd. will not knowingly sell its products for use in such applications unless it receives in
writing assurances satisfactory to Uninterruptible Power Supplies Ltd. that:
• the risks of injury or damage have been minimized.
• the customer assumes all such risks.
• the liability of Uninterruptible Power Supplies Ltd. is adequately protected under the circumstances.
2.6.1 Extended warranty
The standard warranty may be enhanced by protecting the UPS with an extended warranty agreement (maintenance
contract).
An extended warranty agreement enhances the standard warranty by providing the following:
• regular preventative maintenance inspections.
• guaranteed speed of response to operational problems.
• 24 hour telephone support.
• fully comprehensive cover (excluding batteries and capacitors).
Contact the Service Support Hotline on 0800 731 3269 for further details.
2.6.2 Additional service/maintenance support
In addition to providing support for the PW1000 1-3kVA UPS, Uninterruptible Power Supplies Ltd. can provide
maintenance and support on a wide range of different UPS products. If you are interested in an extended warranty for your
PW1000 1-3kVA UPS, or for any other UPS products you may have, please contact us at the following address:
CAUTION: The UPS contains batteries that must be re-charged for a minimum of 12 hours every three months
to prevent deep-discharging. Batteries that have been deep-discharged, for whatev er reason, are not covered
by this warranty.
Uninterruptible Power Supplies Ltd.
Woodgate
Bartley Wood Business Park
Hook
Hampshire
RG27 9XA
Tel: 01256 386700
0800 731 3269 (24 Hr.)
Fax: 01256 386701
Email: service@upspower.co.uk
Page 20

14 TS_600_00 PW1000 1-3kVA User Manual 6/4/17
3
Installation
3.1 Unpacking the UPS equipment
The manufacturer has designed robust packaging for your product to help ensure it reaches you in good order; however,
accidents and damage may sometimes occur during shipment. You should inspect the UPS carefully upon receipt and if
there are signs of damage you must inform the carrier and dealer immediately.
Save any recyclable packaging for re-use or dispose of it appropriately and correctly.
1. Remove the UPS from the packing carton.
2. Check the package contents. The standard unit includes:
a) User Manual.
b) IEC output cables (for UPS with IEC sockets only).
c) IEC input power cable (for UPS with IEC sockets only).
d) A UPS accessories kit which allows the UPS to be configured for Tower or Rack installation.
3. Before proceeding, check the data plate on the rear of the UPS and verify that the unit’s voltage and power ratings
comply with the equipment order details. Contact the dealer immediately if this is incorrect.
3.2 Selecting a suitable installation location
As the UPS weighs several kilograms, the location where it is to be installed must be able to safely support its weight.
To ensure correct operation and a long service life, always install the UPS in accordance with the following environmental
standards:
• The ambient temperature and humidity must be within the limits specified in Chapter 8 of this manual. The battery
temperature must be maintained at 20°C to ensure its lifespan is not reduced
• The UPS is not designed for outdoor use
• The installed location must be clean, dry and free of excessive dust
• The UPS must not be installed in a corrosive environment or in the vicinity of flammable items
• The ventilation grills at the front of the UPS and extractor fans at the rear of the UPS must not be obstructed
• The UPS equipment must be installed with the clearances illustrated in Figure 3.2 as a minimum
CAUTION: Read the safety information contained in chapter 1 before installing the UP S.
WARNING: Under no circumstances should you connect electrical power to a damaged unit or attempt to
start it using its internal batteries.
Page 21

TS_600_00 PW1000 1-3kVA User Manual 6/4/17 15
3: Installation
3.2.1 Clearances
Figure 3.1 Tower installation clearances
Figure 3.1 shows the required clearances when planning a PW1000 tower installation. The total width of the system
hardware can range from 88mm, for a stand-alone UPS cabinet, up to 352mm where the maximum of three (optional)
battery cabinets are attached to the UPS cabinet – only one battery cabinet shown in the diagram above.
The left hand diagrams show the ‘operating’ clearances necessary to provide adequate cooling. For maintenance, at least
800mm side access is required, and where necessary the cables connected to the UPS should be made sufficiently long
to allow the UPS to manoeuvred to a position where the clearances shown in the right hand diagrams are obtainable.
Y Z
A
Front
A1 B11400mm
1000mm
Min. Clearance
For Maintenance
A
B
C
TOP
200mm
200mm
800mm
400mm
Min. Clearance
Normal Operation
A
B
C
TOP
200mm
200mm
800mm
400mm
Min. Clearance
Normal Operation
Y
B B
B1
A1
Y
C
Y
Z Z
Up to 3 battery cabinets can
be connected to the UPS
making maximum total
system width of 352mm
Y
Z
UPS Cabinet
88 x 405mm
Battery Cabinet
88 x 405mm
Notes
Up to 3 battery cabinets can
be connected to the UPS
making maximum total
system width of 352mm
Y
Z
UPS Cabinet
88 x 405mm
Battery Cabinet
88 x 405mm
Notes
A
Front
A
B
C
TOP
200mm
200mm
800mm
400mm
Min. Clearance
Normal Operation
A
B
C
TOP
200mm
200mm
800mm
400mm
Min. Clearance
Normal Operation
B B
B1
A1
C
Up to 3 battery cabinets can
be connected to the UPS
making maximum total
system width of 352mm
Y
Z
UPS Cabinet
88 x 600mm
Battery Cabinet
88 x 600mm
Notes
Up to 3 battery cabinets can
be connected to the UPS
making maximum total
system width of 352mm
Y
Z
UPS Cabinet
88 x 600mm
Battery Cabinet
88 x 600mm
Notes
A1 B11600mm
1000mm
Min. Clearance
For Maintenance
A1 B11600mm
1000mm
Min. Clearance
For Maintenance
Z
PW1000 1kVA
(Tower Clearances)
PW1000 2kVA / 3kVA
(Tower Clearances)
Y Z
A
Front
A1 B11400mm
1000mm
Min. Clearance
For Maintenance
A
B
C
TOP
200mm
200mm
800mm
400mm
Min. Clearance
Normal Operation
Y
B B
B1
A1
Y
C
Y
Z Z
Up to 3 battery cabinets can
be connected to the UPS
making maximum total
system width of 352mm
Y
Z
UPS Cabinet
88 x 405mm
Battery Cabinet
88 x 405mm
Notes
A
Front
A
B
C
TOP
200mm
200mm
800mm
400mm
Min. Clearance
Normal Operation
B B
B1
A1
C
Up to 3 battery cabinets can
be connected to the UPS
making maximum total
system width of 352mm
Y
Z
UPS Cabinet
88 x 600mm
Battery Cabinet
88 x 600mm
Notes
A1 B11600mm
1000mm
Min. Clearance
For Maintenance
Z
PW1000 1kVA
(Tower Clearances)
PW1000 2kVA / 3kVA
(Tower Clearances)
Page 22

3: Installation
16 TS_600_00 PW1000 1-3kVA User Manual 6/4/17
Figure 3.2 Rack mounted installation clearances
When the UPS is rack-mounted a minimum of 200mm should be available between the rear of the UPS and the back of
the rack cabinet to enable adequate ventilation and provide space for cabling. It is permissible to install the PW1000 1kVA
model in a cabinet with a depth of 600mm, although this will only provide 195mm rear clearance rather than the desired
200mm shown in the above diagram.
The rack cabinet must have a ventilated door and a minimum clearance of 800mm must be provided at the front and rear
of the cabinet to allow full UPS access for installation and maintenance.
B
PW1000
1.0 kVA
(440x405mm )
600 mm
Rack
Front
A
B
PW1000
2.0 / 3.0 kVA
(440x600mm)
800 mm
Rack
Front
A
C1
C1
C1
C2
800mm
800mm
0mm
115°
A
B
C1
D
Min. Clearance
250mmC2
D D
It is necessary to open the door fully to fit/
remove the assembly. If the cabinet is
placed against a wall ensure sufficient
space is provided (C2).
The rack doors must be ventilated.
E
E
200mm E
Page 23

TS_600_00 PW1000 1-3kVA User Manual 6/4/17 17
3: Installation
3.3 Assembling the UPS mounting hardware
3.3.1 Hardware accessories pack
The accessories pack which is shipped inside the UPS packing carton contains all the hardware required to safely install
your UPS as a tower or rack-mounted system.
Figure 3.3 Accessories pack
3.3.2 Stand-alone Tower assembly
1. Turn the UPS on its side and,
using screws (D) provided,
attach the four tower feet (A) to
the base of the enclosure as
shown in Figure 3.4.
Note: You will have to remove
the M3 screws already fitted to
the UPS side panels in order to
make way for the new feet
attachments.
2. Carefully lift the assembly and
stand it on its feet.
3. If necessary, rotate the UPS
LCD control panel so that it is
correctly orientated. To achieve
this, carefully pull the control
panel forward to unclip it from its
mounting, rotate it to the correct angle, then relocate it and press it back into place.
4. This completes the tower hardware configuration.
3.3.3 Rack installation
The PW1000 1-3kVA UPS and battery enclosure(s) can be installed on adjustable mounting rails fitted in a standard 19
inch rack. If the UPS is to be connected to an external batteries, you should install the battery cabinet(s) immediately
below the UPS following the same procedure as for mounting the UPS. The UPS/Battery enclosures are then connected
together using the supplied cable.
Due to their relative weights, it is preferable to mount UPS and battery enclosures near the bottom of the rack.
Key Point: Always mount the batteries below the UPS and as far away from other heat-generating sources as
possible.
A
B
C
D E F
G
A x4 Tower feet E x8 M3 x 6mm Countersunk
B x2 Rack mounting handles F x6 M4 x 8mm Countersunk
C x2 Rack mounting side-plates G x1 EPO connecting socket
D x8 M3 x 6mm Domed
A
D
Figure 3.4 Tower assembly
Page 24

3: Installation
18 TS_600_00 PW1000 1-3kVA User Manual 6/4/17
Rack mounting handles
When rack-mounting the UPS, mounting handles are attached to the front of both side of the UPS. These are used to help
you when inserting/removing the UPS and also provide a means of securing the UPS once it is in position.
Figure 3.5 Rack mounting handles
1. Attach the rack-mounting handles (B) to the side-plates (C) using three M4x8mm countersunk screws (F).
2. Secure the side-plates to the front of both sides of the UPS, as shown, using four M3x6mm countersunk screws (E).
Note: You will have to remove the M3 screws already fitted to the UPS side panels in order to make way for the new
handle attachments.
Adjustable mounting rails
Figure 3.6 UPS Rack mounting kit
E
B
C
F
B1 1 x Adjustable mounting rail (Left)
B2 1 x Adjustable mounting rail (Right)
B3 2 x Adapter plate
B4 2 x Rack mounting handle
B5 12 x Captive nuts
B6 8 x Dome head bolts
B1
B4B3 B5
B6
B7
B2
B1
B2
Page 25

TS_600_00 PW1000 1-3kVA User Manual 6/4/17 19
3: Installation
The adjustable mounting rail kit contains a pair of mounting rails (left and right handed) that are fitted to each side of the
cabinet and secured by two screws – front and back. The length of the rails is adjustable between 543 mm and 925 mm,
making them compatible with most standard 19 inch rack assemblies of 600 mm to 900 mm depth.
1. Extend the adjustable mounting rail and hold in place (see Figure 3.6).
2. Align the two holes in the back of the adjustable mounting rail with the holes in the cabinet’s
vertical fixing rail (see Figure 3.7).
3. Identify and mark the two vertical fixing rail holes to which the adjustable mounting rail is to
be fixed.
4. Clip captive nuts (B5) to the two vertical fixing rails holes identified above.
5. Secure the rear of the adjustable mounting rail to the vertical fixing rail using two dome
headed bolts (B6).
6. With the rear of the adjustable mounting rail secured in place, and the adjustable mounting
rail extended, identify the four fixing points that will align with the equipment mounting
handles and clip four captive nuts to the required fixing points.
7. Secure the adjustable mounting rail to the rack’s front vertical fixing rail using two
countersunk bolts (B7) and adapter plate (B3) (see Figure 3.8).
8. Repeat the above steps to fit the second adjustable mounting rail.
Figure 3.8 2U Adjustable rail front mounting
9. When both mounting rails are fitted, carefully insert the UPS / Battery enclosure into the rack so that it rests correctly
on the rails. Then secure it in place using the four dome head bolts (B6) as shown in Figure 3.8.
WARNING: The UPS / Battery enclosure is heavy. When lifting the equipment ensure that adequate manpower
is available and any mechanical lifting aids are suitable for the weights involved.
WARNING: When inserting the enclosure into the rack ensure that it is held level. If it is inserted at an angle it
could pivot about the back of the mounting rail runners if the front of the enclosure is tilted upwards.
B6
B2
Figure 3.7
B5
B3
B7
B6
Adjustable rail
Rack fixing rail
Adapter plate
B3
Page 26

3: Installation
20 TS_600_00 PW1000 1-3kVA User Manual 6/4/17
3.4 Assembling the external battery cabinet mounting hardware
If an optional external battery cabinet is included as part of the UPS system it can be installed in one of three ways:
• as a stand-alone tower unit located adjacent to, but independent of, the UPS cabinet
• as a ‘combined tower,’ where the battery cabinet is attached to the UPS cabinet to form a single tower assembly
• rack-mounted immediately below the UPS cabinet
The hardware accessories pack which is shipped inside the packing carton contains all the hardware required to safely
install the battery cabinet using either of these methods.
Figure 3.9 External battery cabinet hardware kit
3.4.1 Stand-alone tower installation
1. Attach the four tower feet to the base of the cabinet in the same manner described in paragraph 3.3.2 for the main
UPS cabinet.
2. Stand the battery cabinet on its feet and place it adjacent to the UPS cabinet, as shown below.
Figure 3.10 Battery cabinet tower assembly
A B C
E F
G
A x4 Tower feet F x6 M4 x 8mm Countersunk
B x2 Rack mounting handles G x2 Cabinet attachment link
C x2 Rack mounting side-plates H x1 6-pin Anderson securing plate
D x8 M3 x 6mm Domed I x1 4-pin Anderson securing plate
E x8 M3 x 6mm Countersunk
H I
D
A
D
Page 27

TS_600_00 PW1000 1-3kVA User Manual 6/4/17 21
3: Installation
Connect the battery cabinet to the UPS
1. On the UPS back panel, remove the screw securing the
hinged battery connector cover plate and let the cover plate
fall open.
2. Connect the DC cable from the battery cabinet to the
external battery connector on the back of the UPS cabinet.
3. With the battery cable inserted, fit the Anderson securing
plate over the battery connector plug.
4. Attach the Anderson securing plate (H) or (I) to the UPS
back panel using the screw you previously removed from
the hinged cover plate.
5. Remove the screw from the protective earth terminal on the
UPS rear panel.
6. Connect the earth tail from the DC cable to the UPS cabinet
chassis earth.
7. This completes the mechanical installation.
3.4.2 Combined tower installation
Figure 3.12 shows the method used to join the
battery cabinet to the UPS cabinet. This entails fitting
a small cabinet attachment link (G) between the
cabinets at the top and bottom and only fitting the
feet to the cabinets’ outer-edge. Proceed as follows:
1. Determine which side the battery cabinet is to be
installed relative to the UPS cabinet (either side
is permissible).
2. Remove the centre screws from mid-way along
the cabinet inner-sides where the attachment
links (G) are to be fitted. Note that a link is fitted
to the top and bottom of the cabinets, as shown
in Figure 3.12.
3. Lay the battery cabinet on its side and attach the
feet to its outer edge only (see Figure 3.10).
4. With the battery cabinet still on its side (with the
feet pointing downwards), carefully place the
UPS cabinet on top of the battery cabinet and fit
the two attachment links using the supplied
dome-headed screws (D). Ensure that the front
of the cabinets are correctly aligned before you
fully tighten the screws.
5. With the two cabinets now firmly held together, fit the two outer feet to the UPS cabinet.
6. Carefully stand the assembled tower upright and move to its intended installation location.
7. Connect the battery cables to the UPS as described above and illustrated in Figure 3.11.
8. This completes the mechanical installation.
3.4.3 Rack installation
When the battery cabinet is rack-mounted, install in the same manner used to install the UPS (see paragraph 3.3.3).
Figure 3.11 Battery cable connection
I
G
G
G
G
Figure 3.12 Combined tower installation
Page 28

3: Installation
22 TS_600_00 PW1000 1-3kVA User Manual 6/4/17
3.5 Electrical installation
Carry out the following electrical installation procedure once the UPS, and external battery cabinet where applicable, have
been mechanically installed at their intended location.
1. Connect the UPS AC INPUT power socket to the utility mains supply using the supplied power cable.
2. If an external battery cabinet is used, connect the battery power cable and protective earth cable to the UPS as shown
in Figure 3.11.
3. If the UPS is installed in an equipment rack, connect a protective earth bonding cable between the rack and the UPS
earth screw located adjacent to the battery connector (see Figure 2.7).
4. The optional UPS communications card and other optional facilities, such as the emergency power off cables, can be
connected at this stage or installed later (see chapter 7 for details)
3.6 Initial UPS power-up and commissioning
The UPS operating parameters are set to default values by the manufacturer. These basic settings can be changed to suit
a particular site or application requirements using the following commissioning procedure.
1. If the load equipment is connected to the UPS, either disconnect it or ensure that the load power switches are OFF.
2. Connect utility mains power to the UPS and turn on the UPS following the instructions in paragraph 4.2.1, but do not
connect power to the load at this stage.
3. Scroll through the Functions menu, as described in paragraph 4.5.3, and make a note of any operating parameters
that require changing.
4. Make any required operating parameter changes as described in paragraph 4.5.4.
5. Turn off the UPS (paragraph 4.3.1) but leave the utility mains connected for at least four hours to charge the battery.
6. Once the battery is charged, turn on the UPS and carry out a battery test as described in paragraph 4.5.2.
7. If the battery test is successful, the UPS can be brought into operation.
8. Check all metered parameters to ascertain that the input/battery/output indications are correct.
9. Congratulations. Your UPS is now fully operational and providing protected power for your load.
WARNING: Do not disconnect the power cable while the UPS is operating as the cable provides the UPS
protective earth connection.
WARNING: Ensure you use the correct external battery cabinet. The 1kVA UPS uses a 36V external battery
pack whereas the 2kVA/3kVA UPS uses a 72V battery pack.
CAUTION: The commissioning procedure must be carried out by an electrically-trained engineer.
CAUTION: We recommend that the battery is charged for further 4 hours before you connect any mission-
critical load to the UPS. This is to ensure that the battery is charged to a level that enables the UPS to perform
to its full specification.
Page 29

TS_600_00 PW1000 1-3kVA User Manual 6/4/17 23
4
Operation
4.1 Introduction
This chapter describes the UPS operating and set-up procedures.
The UPS is essentially a ‘plug-and-play’ unit and does not require a trained operator to turn it off and on.
Set-up procedures are included in this chapter to enable you to re-configure the UPS operating parameters to suit
particular local requirements. The factory default settings are satisfactory for the majority of installations, but if you find it
necessary to makes any adjustments this should be done before the UPS is put into service.
UPS Operating procedures
• How to start the UPS (from utility mains) - see paragraph 4.2.1
• How to start the UPS (from battery) - see paragraph 4.2.2
• How the monitor the UPS input/output operating conditions - see paragraph 4.2.3
• How to turn off the UPS (from ON INVERTER or ECO Mode) - see paragraph 4.3.1
• How to turn off the UPS (from ON BATTERY Mode) - see paragraph 4.3.2
• How to disable the alarm buzzer operation - see paragraph 4.5.1
• How to perform a battery test - see paragraph 4.5.2
UPS Set-up procedures
• Functions menu - see paragraph 4.5.3
• Operating parameters setting menu - see paragraph 4.5.4
CAUTION: If adjustment is necessary it should be carried out by an electrically-trained engineer who is aware
of the effects on the system of any changes made.
Page 30

4: Operation
24 TS_600_00 PW1000 1-3kVA User Manual 6/4/17
4.2 UPS start-up procedures
4.2.1 How to start the UPS (from utility mains)
1. Connect the UPS AC INPUT to the utility mains supply using the power cable provided.
2. Ensure that the UPS output circuit breakers and battery breaker in the external battery cabinet (if used) are closed.
3. Connect the load equipment to the UPS AC OUTPUT power outlets – we recommend that the individual load power
switches are turned OFF at this stage.
4. Turn ON the UPS utility mains supply.
a) The UPS control system will boot-up and initially
turn on all the LEDs and LCD symbols.
(If the UPS fails to power-up, check that the input
breaker is closed on the back of the unit.)
b) After a few seconds the UPS fans will start, and the
LEDs and LCD symbols will extinguish.
c) This will be followed by the default UPS OFF
screen. The LCD mimic should indicate the UPS OFF
mode and the only active LED should be the green
input mains LED (as shown here).
5. Verify that the indicated utility supply voltage is correct.
6. Press and hold the ON button until the buzzer beeps
twice (1-2 seconds).
a) UPS should turn ON.
7. IF THE UPS IS SET TO OPERATE IN ON INVERTER
MODE (standard):
a) The LCD mimic diagram should change to indicate
the ON INVERTER mode.
b) The two programmable power outlet LED
indicators should change to Green.
8. IF THE UPS IS SET TO OPERATE IN ECO MODE:
a) The UPS should turn ON, as above, then after
approximately 5 seconds the LCD mimic diagram
should change to indicate the ON BYPASS mode.
b) The yellow BYPASS LED should turn on.
9. Check the UPS output voltage and frequency on the
LCD meter.
10. Although not essential, we advise that you perform a
battery test before you turn on the load to ensure that
the UPS batteries perform correctly. The battery test
procedure is detailed in paragraph 4.5.2.
11. If the battery test is satisfactory, and UPS output
voltage is correct, turn ON the load power switches.
12. Check the UPS output current and percentage load on the LCD meter.
13. The UPS is now fully operational and providing uninterruptible* power to your load equipment.
*If the UPS is operating in
ECO
mode there will be a slight break in the supply if the utility mains fails while the UPS
switches to the ON
BATTERY
mode.
INPUT
UPS
LOAD
V
Utility
1
2
Figure 4.1
INPUT
UPS
LOAD
V
Utility
1
2
Figure 4.2
INPUT
UPS
LOAD
V
Utility
1
2
Figure 4.3
Page 31

TS_600_00 PW1000 1-3kVA User Manual 6/4/17 25
4: Operation
4.2.2 How to start the UPS (from battery)
If there is no utility mains power available, the UPS can be started directly from battery power. This requires the battery to
be fully charged and should only be attempted if the battery has previously been on charge for at least four hours.
Note: Depending on the load demand the UPS will only function on battery for a short time unless the utility mains supply
is connected.
1. Connect the load equipment to the UPS AC OUTPUT power outlets – we recommend that the individual load power
switches are turned OFF at this stage.
2. Ensure that the UPS output circuit breakers and battery breaker in the external battery cabinet (if used) are closed.
3. Press and hold the ON button for approximately three seconds, until the buzzer beeps twice, then release it.
4. Within a further ten seconds, press and hold the ON button once again (for 3 seconds), until the buzzer sounds
another two beeps.
Note: If you fail to press the ON button for the second time within the allowed ten seconds the UPS will shut down and
you will have to start the procedure again.
a) The UPS control system will boot-up and initially turn on all the LEDs and LCD symbols for approximately one
second.
b) After approximately five seconds the UPS fans will start, and the LEDs and LCD symbols will extinguish.
5. This will be followed by the default UPS ON BATTERY
screen.
a) The LCD mimic diagram should change to indicate
the ON BATTERY mode.
b) The two green programmable power outlet LEDs
should turn on.
c) The utility mains status LED should remain OFF.
d) The Utility Abnormal icon should be displayed on
the LCD screen.
e) The alarm buzzer will beep once per second to
inform you that the battery is discharging.
6. Check the UPS output voltage and frequency on the
LCD meter.
7. Turn ON the individual load power switches.
8. Check the UPS output current and percentage load on the LCD meter.
9. The UPS is now fully operational in its ON BATTERY mode.
CAUTION: Restore the UPS utility mains supply as soon as possible.
INPUT
UPS
LOAD
V
Utility
1
2
Utility
Figure 4.4
Page 32

4: Operation
26 TS_600_00 PW1000 1-3kVA User Manual 6/4/17
4.2.3 How the monitor the UPS input/output operating conditions
When the UPS is turned ON, you can use the DOWN and UP buttons to scroll through the measurement display screens.
The display sequence is as numbered in the table below and loops around in either direction.
A rectangular box appears around the INPUT, LOAD and BATTERY icons to indicate which is associated with the meter
display, as Illustrated in the examples below.
Figure 4.5 LCD Meter display (sample screens)
1 Utility Voltage (V) 4 Inverter Frequency (Hz) 7 Battery Voltage (V)
2 Utility Frequency (Hz) 5 Inverter Load % 8 Battery Autonomy (mins)
3 Inverter voltage (V) 6 Inverter Load (A) 9 UPS Temperature (°C)
INPUT
UPS
LOAD
V
Utility
INPUT
UPS
LOAD
V
Inverter
INPUT
UPS
LOAD
V
Battery
Utility (input) voltage
Inverter (output) voltage
Battery (charge) voltage
Page 33

TS_600_00 PW1000 1-3kVA User Manual 6/4/17 27
4: Operation
4.3 UPS shut down procedures
4.3.1 How to turn off the UPS (from ON INVERTER or ECO Mode)
Use this procedure to shut down the UPS when it is operating in the ON INVERTER or ECO mode.
1. Press and hold the OFF button for approximately 5
seconds.
a) The UPS will disconnect the load power and the two
programmable power outlet LED indicators should
turn OFF.
b) The utility input mains LED should remain ON.
c) The LCD mimic should indicate the UPS OFF mode,
which shows that the battery is still being charged
from the utility mains.
d) The cooling fans will remain running.
2. Disconnect (or turn OFF) the Utility input supply.
a) All LED indicators and the LCD panel will turn off.
b) The cooling fans will stop.
3. The UPS is now totally shut down.
4.3.2 How to turn off the UPS (from ON BATTERY Mode)
Use this procedure to shut down the UPS when it is operating in the ON BATTERY mode.
1. Press and hold the OFF button for approximately 5 seconds.
a) The UPS will disconnect the load power. and the two programmable power outlet LED indicators should turn
OFF.
b) All LED indicators and the LCD panel will turn off.
c) The cooling fans will remain running for approximately 10 seconds and then shut down.
2. The UPS is now totally shut down.
4.4 Manual load transfer between inverter and bypass
Use this procedure to manually transfer the load between the inverter and bypass.
1. With the UPS operating ON INVERTER, transfer the
load to bypass by pressing the ON and UP buttons
simultaneously for three seconds.
a) The load will transfer to bypass.
b) The BYPASS LED will flash off/on.
c) The buzzer will beep at approximately 3 second
intervals.
2. To transfer the load from bypass to inverter repeat the
process by pressing the ON and UP buttons
simultaneously for three seconds.
a) The load will transfer to inverter
b) The BYPASS LED will turn off
c) The buzzer alarm will silence.
INPUT
UPS
LOAD
V
Utility
1
2
Figure 4.6
INPUT
UPS
LOAD
V
Utility
1
2
Figure 4.7
Page 34

4: Operation
28 TS_600_00 PW1000 1-3kVA User Manual 6/4/17
4.5 Functions menu
4.5.1 How to disable the alarm buzzer operation
If an alarm condition arises, the buzzer can be silenced by briefly pressing the ON button. However there may be
circumstances where you would like to disable the buzzer permanently.
1. With the UPS running, press the FUNCTION button. This will take you immediately to the Buzzer ON/OFF screen.
2. Press the UP button to change the Buzzer operational status between OFF-ON, as required. A cross (X) appears next
to the buzzer icon when it is disabled.
Figure 4.8 Buzzer ON/OFF
3. When the required status is displayed, press the FUNCTION button to return to the default LCD screen.
4.5.2 How to perform a battery test
When a battery test is performed, the UPS operates in ON BATTERY mode for 10 seconds to monitor the battery
performance. If the battery doesn’t satisfy the test criteria a fault is displayed on the LCD panel.
1. With the UPS turned ON, press the FUNCTION button
twice. This will take you to the Battery Test screen, which
will indicate that the battery test is OFF.
2. Press the UP button to start the battery test.
3. During the test, the following indications should appear.
a) The warning buzzer will beep once per second (if the
buzzer is enabled).
b) The LCD mimic will change to ON BATTERY mode.
c) The Testing flag to the left of the battery icon will
flash off/on to indicate that the test is in progress.
d) The LCD returns to the Monitor menu during the
battery test.
4. When the test is completed, the UPS will switch back to its
normal operating mode and the following indications
should appear.
a) The warning buzzer will stop.
b) The LCD mimic will change to ON INVERTER mode.
[or ECO mode if selected]
c) The Testing flag to the left of the battery will turn off.
d) The LCD remains indicating the battery autonomy.
5. The UPS is now operating in its normal operating mode
and the LCD metering can be selected as normal, using the UP and DOWN buttons.
CAUTION: The battery must be fully charge d before you select a battery test. Do not initiate the test unti l the
UPS has been switched on with the battery being charged for at least four hours.
Buzzer
Buzzer
Testi ng
INPUT
UPS
LOAD
Mins
BatteryAutonomy
Testi ng
INPUT
UPS
LOAD
Mins
BatteryAutonomy
Figure 4.9 Battery Test
Page 35

TS_600_00 PW1000 1-3kVA User Manual 6/4/17 29
4: Operation
4.5.3 Functions menu
The Functions menu, shown in Figure 4.10, can be
accessed when the UPS is operating by pressing the
FUNCTION button. The menu allows the operator to enable/
disable the buzzer, initiate a battery test and observe (but
not change) several UPS configuration set-up values.
Once the menu is open you can scroll down through the
screens by pressing the DOWN button, as shown.
Buzzer:
Allows the UPS buzzer to be enabled or disabled. This is
described in detail in paragraph 4.5.1.
Testing:
Initiates a battery test by switching the UPS to ON BATTERY
mode for 10 minutes and monitoring the battery
performance. This is described in detail in paragraph 4.5.2.
Bypass Voltage Window:
Displays the bypass voltage window setting. This shows the
acceptable bypass voltage range that can be connected to
the load when the UPS is operating ON BYPASS and can be
either Lo (±15%)or Hi (±10%). This percentage relates to
the set inverter operating voltage – for example, if the
inverter voltage setting is 230V the bypass sensitivity Lo
range is 230V ±15%, i.e., 195.5-264.5V.
Bypass Frequency Window:
Displays the bypass frequency window to which the inverter
will synchronise, which is either1 [±1Hz] or 3 [±3Hz].
Inverter Voltage:
Displays the selected inverter output voltage setting, which
is either [200V], [208V], [220V], [230V] or [240V].
Mode:
Displays the selected UPS operating mode, which be either
Std (standard) or Eco.
Inverter Voltage Adjustment:
Displays any applied output voltage offset adjustment,
which can be either [-3%], [-2%], [-1%], [0%], [+1%], [+2%]
or [+3%].
Buzzer
Testing
V
Inverter
Voltage
Hz
Bypass
Frequency Window
%
Inverter
VoltageAdjust
Mode
Bypass
Voltage
Window
Function
Figure 4.10 Functions menu
Page 36

4: Operation
30 TS_600_00 PW1000 1-3kVA User Manual 6/4/17
4.5.4 Operating parameters
setting menu
Figure 4.11 shows the operating
parameters than can be accessed
and adjusted by the user.
1. Ensure that the UPS output is
turned OFF.
2. To access the settings menu,
press the ON and DOWN
buttons simultaneously for
three seconds, until the buzzer
beeps twice.
3. Press the DOWN button
repeatedly to scroll down to
the parameter the you wish to
change.
4. To change a parameter, press
the UP button to scroll through
the option range until the
required value is shown.
5. To select the chosen value
press the DOWN button.
a) This will temporarily store
the value and scroll down
to the next parameter
menu screen.
6. When you reach the final
screen (Inverter Voltage
Adjust), press the ENTER
button.
a) Any changes are now
saved.
b) The LCD return to its
default screen
7. Turn OFF the UPS utility mains
supply and allow 1 minute for
the UPS electronics to fully
power down.
8. When the utility mains power
is next turned on, the UPS will
operate with the new
parameter settings applied.
CAUTION: These
parameters should be
adjusted by an
electrically-trained
engineer who is aware of
the effects on the system
of any changes made.
Buzzer
Testing
V
Inverter
Voltage
Hz
Bypass
Frequency Window
Mode
Bypass
Voltage
Window
Mode
Frequency
%
Inverter
VoltageAdjust
Enter
ON
Figure 4.11 Operating parameter setting menu
Hi
Lo
1
3
200
208
220
230
240
Std
Eco
3
2
1
0
50
60
3
2
1
0
(See paragraph 4.5.1)
(See paragraph 4.5.2)
Page 37

TS_600_00 PW1000 1-3kVA User Manual 6/4/17 31
5
Maintenance
5.1 Introduction
The UPS does not contain any user-serviceable parts, so the day-to-day maintenance requirements are minimal other
than to ensure that the environment in which the UPS is installed is kept cool and dust free. A clean, controlled operating
environment will help maximise the useful working life and reliability of both the UPS and its batteries.
5.2 Scheduled maintenance
The UPS system and batteries should receive regular preventative maintenance from a trained engineer to maximise both
the useful working life and system reliability. If the UPS is commissioned by a Uninterruptible Power Supplies Ltd. service
engineer, the engineer will leave a service record book with the UPS which will be used to log its full service history.
We recommend that the UPS system is maintained every six months by an Uninterruptible Power Supplies Ltd. trained
engineer or approved service agent, who will complete the following. Preventative maintenance inspections form an
integral part of all Extended Warranty Agreements (maintenance contracts) offered by Uninterruptible Power Supplies Ltd.
5.2.1 Preventative maintenance inspection
During a preventative maintenance inspection a trained Uninterruptible Power Supplies engineer will check and validate:
• Site environmental conditions
• Integrity of the electrical installation
• Cooling airflow
• Load characteristics
• Integrity of alarm and monitoring systems
• Operation of all installed options
• All stored event logs
5.2.2 Battery maintenance and testing
The batteries should be inspected and tested every six months, depending on the ambient temperature.
The battery test takes approximately two minutes to complete and can be performed only if:
• There are no alarm conditions present.
• The battery is fully charged.
• The UPS input mains supply is present.
The battery test procedure can be carried out from the UPS front panel and performed irrespective of the UPS operating
mode (ON-INVERTER or ON-BYPASS/ECO) and whether or not the load is connected.
WARNING: Do not remove the covers from the UPS case. If you remove a cover from the UPS case you will
be exposed to potentially lethal voltages.
Page 38

5: Maintenance
32 TS_600_00 PW1000 1-3kVA User Manual 6/4/17
Battery disposal and recycling
Batteries contain dangerous substances that can harm the environment if disposed of carelessly. If you have a faulty
battery it should be checked and replaced by a trained Uninterruptible Power Supplies engineer who will dispose of any
faulty batteries in accordance with any regulations set by local environmental waste disposal organisations.
WARNING: Do not attempt to remove or replace the UPS battery yourself. If a battery is faulty ALWAYS seek
assistance form Uninterruptible Power Supplies Ltd. or one of its local service agents.
Page 39

TS_600_00 PW1000 1-3kVA User Manual 6/4/17 33
6
Troubleshooting
6.1 Introduction
If the UPS shuts down due to a fault condition, caused by an internal malfunction or severe overload, it might need to be
reset to bring it back into operation – see paragraph 6.6. Depending on the nature of the fault, the UPS may either shut
down entirely and disconnect the load supply or transfer the load to the internal bypass.
6.2 Fault identification
Unless there is a total UPS failure, the UPS will generally:
• illuminate the red FAULT LED
• display a Buzzer Code (error code) number on the LCD screen – the code indication may be steady or flashing
depending on other factors
• sound the audible warning alarm – the audible warning may be cancelled by pressing the ON button briefly
• illuminate the warning symbols at the top of the LCD screen if applicable
6.2.1 Error codes
6.2.2 Audible warning alarm
Figure 6.2 Audible warning alarm interpretation
Buzzer Codes
05
Weak or faulty battery
06
Output short-circuited
07
EPO Operated
11
UPS Over temperature
12
Inverter overload
14
Fan failure
28
Bypass overload
39
Low input voltage (<160V) or disconnected battery
Audible Alarm (beeps)
Continuous beep UPS Faulty, Inverter shut down, keypad error, all functions inhibited
Single beep every two seconds UPS Faulty, load continued to be supplied via inverter or bypass.
Single beep every second UPS On-Battery mode, battery discharging
Quick and short successive beeps Battery low, nearing end of discharge
Two quick and short beeps Confirm / RS232 port receiving.
One quick and short beep Service Mode OK
INPUT
UPS
LOAD
Alarm
Buzzer Code
1
2
Figure 6.1 LCD Fault Display (Fan failure example)
Page 40

6: Troubleshooting
34 TS_600_00 PW1000 1-3kVA User Manual 6/4/17
6.2.3 Warning symbols
6.3 Troubleshooting a fault condition
If the UPS develops a fault during operation (red FAULT illuminated), you should check the error codes listed below for
appropriate solutions. Should the problem persist, please contact your local service agent for assistance.
Bypass input abnormal:
UPS fails to transfer to bypass, bypass abnormal in ECO mode
Utility input abnormal:
The utility mains supply is outside the UPS pre-set operating window
Wiring fault:
Site wiring problem such as reversed Line-Neutral connection
Alarm buzzer silent
The alarm buzzer has been silenced or disabled
Overload:
The UPS output is overloaded
Service:
The UPS is operating in its service mode
Alarm:
An alarm condition is present. This remains active after the audible alarm is reset if the alarm still exists.
Buzzer Code Possible Solution
05 / 39
Battery problem:
1. When applicable, check that the external battery connections have been made correctly.
2. Measure the battery voltage to ensure it is charged and in good condition.
Recharge battery for 8 hours if necessary.
3. Simulate a utility supply outage to establish that UPS is able to provide DC back-up.
4. Seek advice from your local service agent if you find no problem with the above.
06
Emergency Power Off (EPO):
1. If the external EPO mechanism has been intentionally operated, investigate the reason and rectify any external
problems before you restore the UPS operation.
2. If the external EPO mechanism has not been intentionally operated, investigate the external EPO circuit to trace
the source of the erroneous EPO command. The external circuit applies a short circuit to the EPO connector on
the back of the UPS to effect an EPO shut down.
3. If the external EPO circuit is not faulty, seek advice from your local service agent.
Overload:
1. Disconnect any non critical loads from the UPS output until the overload ceases.
2. Check the condition of the output cables and connectors to determine that they are undamaged and the insulation
is sound. Replace the output cables if necessary.
3. Seek advice from your local service agent if you find no problem with the above.
11
UPS Over temperature:
1. Remove any objects obstructing the ventilation louvres.
2. Check to ensure that the cooling fans are working properly (see also buzzer code
14), and contact your local
service support centre to replace the fans if necessary.
3. Seek advice from your local service agent if you find no problem with the above.
Bypass
Utility
?
Wiring Fault
Overload
Service
Alarm
Overload
Page 41

TS_600_00 PW1000 1-3kVA User Manual 6/4/17 35
6: Troubleshooting
6.4 Troubleshooting an operational problem
6.5 UPS Fault handling
ON INVERTER overload
The UPS is equipped with an electronic overload protection feature which switches the load to the bypass line after 30
seconds if the UPS load rises to between 105% ~ 120% of its rated capacity. This is reduced to 10 seconds for loads
between 121% ~ 150%, with an instant transfer taking place for loads greater than 150%.
If the load transfer is due to starting a load with a high inrush current, the overload will be short-lived, and once the current
being drawn from the bypass falls below <105% of rated load, the UPS will switch back to inverter mode automatically.
If the UPS appears to be repeatedly momentarily overloading, it could be due to the inrush currents being produced as
various multiple loads are started.
ON BATTERY overload
When operating ON BATTERY, the UPS overload characteristics are identical to when operating ON INVERTER. The
difference is that, due to the lack of bypass supply, the UPS is unable to transfer the load to bypass if the load capacity/
time characteristic is exceeded, so the UPS will shut down.
Site wiring/earth fault:
1. Check that the utility AC source ‘L’ & ‘N’ have been wired correctly.
2. Check that the earth/ neutral voltage does not exceed the limits specified in chapter 8.
3. Seek advice from your local service agent if you find no problem with the above.
14
Fan error:
1. Verify that the ventilating fans are functioning properly.
2. Contact your local service agent for fan replacement. Do not attempt to replace them yourself.
Other For all other error codes, seek advice from your local service agent.
Symptom Possible Solution
UPS fails to provide battery back-up, or the back-up time
is shorter than its specified performance.
1. Charge the battery for eight hours.
2. If the back-up time remains unsatisfactory after 8 hours of charging,
please contact your local service agent for battery replacement.
UPS operation appears to be normal but there is no
output to load.
1. Check that all output power cords are connected correctly.
2. If the problem is with one of the programmable outlets, seek service
support who will check the programmable outlets settings and recalibrate
them if necessary.
3. If the problem persists, seek advice from your local service agent.
The UPS switches to battery mode then back to on-line
mode, when the connected device is turned on.
Or, the UPS switches back and forth between battery
and on-line mode.
1. Check for a faulty UPS input cable or utility supply wall receptacle and
replace/repair any faulty item found.
2. If the problem persists, seek advice from your local service agent.
Strange noise and/or odour emitted by UPS 1. Shut down the UPS system immediately.
2. Turn off the utility mains supply.
3. Seek advice from your local service agent.
Buzzer Code Possible Solution
?
Wiring Fault
Page 42

6: Troubleshooting
36 TS_600_00 PW1000 1-3kVA User Manual 6/4/17
ON BYPASS overload
The UPS bypass line is also equipped with overload protection. Its overload capacity/time characteristics are illustrated in
the table below.
6.5.1 Output load short circuit when the output supply is via inverter
If output load is short circuited while it is being supplied via the inverter:
1. The inverter will immediately shut down and disconnect the supply to the load.
2. The FAULT led will illuminate and the audible alarm will beep continuously.
3. The UPS will not switch on automatically after the short-circuit condition is eliminated. It has to be re-started manually.
6.5.2 Output short-circuit when the output supply via the bypass line
If the output load is short-circuited while the UPS is operating in ON BYPASS mode:
1. The utility supply fuse/breaker will open to prevent the output load from damage.
2. You must replace the fuse with a fuse of the same rating after the cause of the short-circuit condition has been
rectified.
6.5.3 Inverter/internal over-temperature
If the UPS experiences an internal over-temperature when the utility supply is normal it will switch to ON BYPASS mode
and switch back to ON INVERTER mode when the over-temperature situation has been eliminated.
If over temperature occurs when the utility supply is abnormal:
1. The audible alarm will beep continuously.
2. The FAULT led will illuminate.
3. The inverter will shut down and disconnect the load supply.
6.5.4 Inverter over-current and output voltage out of tolerance
If the UPS develops a fault and its inverter delivers an over-current and out-of-tolerance voltage:
1. The UPS will switch to ON BYPASS mode as long as the utility supply is normal.
2. The UTILITY led, BYPASS led and FAULT led will illuminate.
If these fault conditions occur when the utility supply is abnormal:
1. The inverter will shut down and disconnect the load supply.
2. The FAULT led will illuminate.
6.6 UPS System reset
The UPS control system may ‘lock-up’ following a critical abnormal failure condition. If the UPS appears unresponsive to
control operations you can reset it using the following procedure:
1. Note and record the error code shown on the LCD screen, and check the information in this chapter to help analyse
the cause of the UPS problem. This will be useful if you need to contact the service support centre later.
2. Press an hold the OFF button for at least five seconds.
3. Turn off the utility mains power supply and allow one minute for the UPS control power supply to completely shut
down.
4. The UPS control system is now reset and, if the cause of previous fault condition is no longer apparent, you should be
able to turn on the UPS as normal.
5. If you are unable to restart the UPS then please seek service support.
Load (%) 106-120 121-130 131-135 136-145 146-148 149-157 158-176 177-187 >188
Delay Time (sec) 250 125 50 20 5 2 1 0.32 0.16
Page 43

TS_600_00 PW1000 1-3kVA User Manual 6/4/17 37
7
Options
7.1 Communications options
The UPS has several provisions for communicating with external devices and systems, including:
• External Emergency Power Off (EPO) or Remote On/Off (ROO).
• RS-232 and USB ports to provide communication with monitoring software installed on a remote PC.
• Optional card slot that can be used with an intelligent CS141 card for local or area network UPS monitoring and
control, or a Dry Contact relay card to provide volt-free signalling that can be integrated into an external alarm
monitoring or building management system.
All communication ports, including the optional cards, can be active and used simultaneously to monitor the UPS status;
however, only one communication interface at a time can control the UPS. This is determined on a priority basis, with the
higher priority interface gaining control.
The interface control priorities are as follows:
• EPO input port
• Optional interface card
• Optional USB
• Optional RS-232
7.2 RS-232 Computer serial interface
Figure 7.1 RS-232 Serial communications port
Note: The USB port is connected in parallel with RS-232 port and outputs the same data stream.
When used in conjunction with suitable software, the RS-232 and USB ports allow the connected PC to continuously
monitor the input mains voltage and UPS status, and display appropriate operating data and messages.
The RS-232 connector is a 9-pin female D-type and can be connected to a PC using standard serial cable wired as shown
in Figure 7.1. The maximum permitted RS-232 cable length is 15 metres.
AC INPU T
AC OUTP UT
INPUT BREAKER
EXT>BAT.
INTERFACE
12
EPO
RS232USB
9-pin D-Type
PC connection
PC Monitoing UPS
using RS232 port
25-pin D-Type
PC connection
1
2
3
4
5
6
7
8
9
1
2
3
4
5
6
7
8
9
PC UPS
RXD
TXD
Gnd
1
2
3
4
5
6
7
8
9
25
1
2
3
4
5
6
7
8
9
PC UPS
RXD
TXD
Gnd
RS-232 Interface settings
Baud Rate 2400 bps
Data Length 8 bits
Stop bit 1
Parity None
Pin 5: GND
Pin 3: RXD
Pin 2: TXD
Page 44

7: Options
38 TS_600_00 PW1000 1-3kVA User Manual 6/4/17
7.3 Emergency Power Off (EPO) / Remote ON/OFF (ROO)
Figure 7.2 EPO Connection
The Emergency Power Off (EPO) option allows you to turn off the UPS using an external switch or contact that is wired to
the EPO terminal block on the back of the UPS. The external circuit consists of a ‘normally open’ external contact that will
power-off the UPS when the contact is closed.
When the EPO circuit is activated the UPS output is
shut down, removing power to the load, but the
battery charger remains operational to maintain
battery charging. An EPO alarm is shown on the LCD
display but you can still scroll through and monitor
the UPS input, battery and output metering.
Once the external EPO command is removed, the
UPS must be restarted by pressing the UPS ON
button to restore the UPS to normal operation.
The external EPO connection should be made using
a screened, single pair cable (0.5mm²) with a
maximum length of 100 metres.
7.4 CS141 /SMNP adapters
Figure 7.4 SNMP Adapters
Simple Network Management Protocol (SNMP) is a world-wide, standardised communication protocol that can be used to
monitor any network-connected device via a simple control language and display the results in a browser-based
application. The software agent built in to the CS141 adapter card makes the UPS data available in this SNMP format
which can then be utilized by a number of UPS management software applications.
The card contains a serial interface, which can be connected directly to a computer’s serial port, and an RJ-45 connector
which allows it to be connected to a network using a standard CAT-5 cable. The SNMP adapter can be configured via
Telnet, http (browser) or serial connection. For normal operation, at least one Ethernet network connection is necessary.
AC INP UT
AC OUTP UT
INPUT BREAKER
EXT>BAT.
INTERFACE
12
EPO
RS232USB
Emergency Power Off
device
INPUT
UPS
LOAD
Alarm
1
2
Figure 7.3 EPO Warning
AC INPUT
AC OUTP UT
INPUT BREAKER
EXT>BAT.
INTERFACE
12
EPO
RS232USB
Internal CS 141 card fitted
in the Interface slot
Optional external CS 141 card
connected to the RS-232 port
Page 45

TS_600_00 PW1000 1-3kVA User Manual 6/4/17 39
7: Options
Once installed, the UPS-Management software agent, which is already installed in the card, monitors the UPS operation
and outputs its data in SNMP format to the connected network. The card enables automated generation of event/alarm
emails, server controlled shut down (with optional licenses) and other tasks, and can also be integrated with BMS software
over a local area network (LAN) for SNMP or Modbus information over IP.
Uninterruptible Power Supplies Ltd. offer monitoring software with SNMP functionality for Novell, OS/2, and Windows that
run both on INTEL and on ALPHA, DEC VMS and Apple.
An optional external SNMP adapter can be connected to the UPS via its RS232 port if the UPS card slot is in use (e.g.
DCE card fitted) but SNMP facilities are still required.
RCCMD
RCCMD (Remote Console Command Module) for ‘multi-server shut down’ is an independent software module intended
for transmitting and receiving ‘remote commands’. Using the ‘RCCMD send’ function, the SNMP adapter can send status
messages to connected users or initiate automatic shut down throughout the whole network. Our CS141 SNMP adapters
are fully compatible with RCCMD.
7.5 AS400 (dry contact) card
The DCE dry contact card provides volt-free
signalling outputs that can be integrated into an
external alarm monitoring panel or building
management system.
All the output connections at pins 1-7 are
switched by relays whose pole contacts are
connected to terminal 8 (common). Figure 7.5
shows an example of the INVERTER ON relay.
Note that all the outputs to terminals 1-7 are linkselectable to be either short-circuited or opencircuited to the common Pin 8 when the
monitored parameter is ‘active’. Details for
configuring the links are provided in the
documentation that accompanies the card.
Terminals 9 an 10 are inputs that can be used to
shut down the UPS when en external voltage of
6-25VDC is applied, as shown.
AC INPU T
AC OUTP UT
INPUT BREAKER
EXT>BAT.
INTERFACE
12
EPO
RS232USB
1
2
3
4
5
6
7
8
9
10
UPS ON-BYPASS
DCE CARD
UTILITY ABNORMAL (n/c contact)
UTILITY NORMAL (n/o contact)
INVERTER ON
BATTERY LOW
BATTERY ABNORMAL
UPS ALARM
COMMON
6-25VDC
Relay contacts
SHUT DOWN UPS (+ve signal)
SHUT DOWN UPS (-ve signal)
Figure 7.5 Dry Contact card (DCE)
Page 46

40 TS_600_00 PW1000 1-3kVA User Manual 6/4/17
8
Specification
Model Rating 1 kVA 2 kVA 3 kVA
Apparent output power VA 1000 2000 3000
Real output power (@180-300VAC, PF=0.9) W 900 1800 2700
Autonomy time (standard battery 100% load) min. >4 >4 >3
Topology Double conversion on-line VFI-SS-111
Form factor 19"-Rack / Tower
Input:
Nominal voltage VAC Single phase, 110 - 300 VAC (@60% load)
Single phase, 150 - 300 VAC (@75% load)
Single phase, 180 - 300 VAC (@100% load)
Frequency Hz 50 or 60 Hz, ± 5 Hz
Power factor >
0.99 at full rated linear load
Input power connection 10A IEC 320-C14 10A IEC 320-C14 16A IEC 320-C20
Output:
Voltage VAC Single phase, 230 VAC, selectable at 200/208/220/230/240 VAC
2 switched programmable outputs (setting via software)
Switching time Inverter-Bypass (typical) ms 4ms (typical) 4ms (typical) / 0ms (optional)
Voltage regulation % ±1 (until low battery warning)
Frequency Hz 50/60 Hz, ±0.2% Unless synchronised to line
Synchronisation window Hz ±3 Hz or ±1 Hz (selectable)
Voltage distortion (THD) % ≤ 3% (linear load), ≤ 7% (non linear load)
Overload capability (AC Mode)
(Tolerance ±1%)
% <105% Load = continuous operation,
from 106%...120% Load = transfer to bypass after 30 Sec.
from 121%...150% Load = transfer to bypass after 10 Sec
>150% Load = transfer to bypass immediately
Buzzer continuously alarms
Overload capability (BATTERY Mode)
(Tolerance ±1%)
% Up to 105% Load = continuous operation,
from 106%...120% Load = shut down after 30 Sec.
from 121%...150% Load = shut down after 10 Sec
>150% Load = shut down immediately
Buzzer continuously alarms
Page 47

TS_600_00 PW1000 1-3kVA User Manual 6/4/17 41
8: Specification
Overload capability (BYPASS Mode)
(Tolerance ±1%)
% Up to 105% Load = continuous operation,
from 106%...120% Load = shut down after 250 Sec.
from 121%...130% Load = shut down after 125 Sec.
from 131%...135% Load = shut down after 50 Sec.
from 136%...145% Load = shut down after 20 Sec.
from 146%...148% Load = shut down after 5 Sec.
from 149%...157% Load = shut down after 2 Sec.
from 158%...176% Load = shut down after 1 Sec.
from 177%...187% Load = shut down after 0.32 Sec.
>188% Load = shut down after 0.16 Sec.
Buzzer continuously alarms
Short circuit handling In normal mode: output breaker / electronic circuit
In battery mode: output breaker / electronic circuit
In bypass mode: input fuse
Over-temperature (AC Mode) Switch to bypass
Over-temperature (On Battery Mode) Immediate UPS shutdown
Crest factor 3:1
Heat dissipation (approx) W 150 275 415
Output power connection (3) 10A IEC 320-C13 (6) 10A IEC 320-C13 (6) 10A IEC 320-C13
(1) 16A IEC 320-C19
Efficiency:
Mains operation (Full linear load @230V) % 90 91 91
Battery mode (Full linear load) % 86 87 87
ECO (bypass) mode (Full linear load @230V) % 97 97 97
Environment:
Temperature (°C) °C Operating: 0°C~40°C / Storage: -10°C~50°C
(The battery must be maintained at 20°C to ensure its
lifespan is not reduced)
Altitude m 0-2000m up to 40°C / 3000m up to 35°C
Humidity % 0%...90%, non-condensing
Sound level dBA <
50 dBA
Batteries:
Quantity (internal) 3 6 6
Type VRLA 12V / 7.2Ah 12V / 7.2Ah 12V / 9.0Ah
Rated battery voltage VDC 36 72 72
Battery back-up time (@50%, 70%, 100% load) Mins >11, >8, >4 >11, >8, >4 >9, >6, >3
Charge current (Standard / Extended charger) A 2.1A, 3.1A 1.5A, 3.1A 1.5A, 3.1A
Recharge time to 90% Hrs 4 Hrs 4 Hrs 4 Hrs
Float charging voltage VDC 40.95 ±1% 81.9 ±1% 81.9 ±1%
Bulk charging voltage VDC 42.3 ±1% 84.6 ±1% 84.6 ±1%
Discharging current (with UPS and Mains OFF) uA < 30uA
Life cycle (typical) Up to 5 years, if maintained at 20°C ambient temperature
Model Rating 1 kVA 2 kVA 3 kVA
Page 48

8: Specification
42 TS_600_00 PW1000 1-3kVA User Manual 6/4/17
Communications:
Standard interfaces EPO, RS-232
Optional interfaces 2nd RS-232, USB, CS141 SNMP card, Dry contact relay card
Compatible platforms Windows, Linux, Mac etc
Mechanical Data:
Dimensions (WxWxD) mm
in
440 x 88 x 405
17.3 x 3.5(2U) x 15.9
440 x 88 x 600
17.3 x 3.5(2U) x 23.6
440 x 88 x 600
17.3 x 3.5(2U) x 23.6
Weight lbs/kg 25.8 /11.7 48 / 21.8 54.2 / 24.6
Input power connection 10A IEC 320-C14 10A IEC 320-C14 16A IEC 320-C20
Output power connection (3) 10A IEC 320-C13 (6) 10A IEC 320-C13 (6) 10A IEC 320-C13
(1) 16A IEC 320-C19
Other connectors 1 x USB, 1 x RS232, 1 x 2-pole EPO Connector 1 x Interface Slot
Options:
Accessories External bypass
External battery module(s)
Output distribution
19"- rack rails (up to 1 Meter)
Compatibility:
Operating systems Windows, Unix (and derivatives), OS/2, Novell, AppleOS
Audible Alarms:
Battery mode Will sound every 1.5 Seconds
Battery low Resounds every 2.0 Seconds
Overload Resounds every 3.0 Seconds
General error Will sound permanently (or every 3 Seconds)
Standards:
Safety IEC/EN 62040-1-1
EMC-Compatibility EN 62040-2, EN 61000-3-2, EN61000-3-3,
Performance features IEC/EN 62040-3
Product certification CE
Protection Class IP 20
Manufacturing standards ISO 9001.2000
Model Rating 1 kVA 2 kVA 3 kVA
Page 49

TS_600_00 PW1000 1-3kVA User Manual 6/4/17 43
8: Specification
External battery cabinet
Model Rating 230V / 1kVA 230V / 3kVA
Battery voltage VDC 36 72
Battery capacity Ah 9 9
Battery strings 4x Strings of 3 batts. 2x Strings of 6 batts.
Dimensions (WxHxD) in/mm in
mm
17.3 x 3.5 x 16.9 (2U)
440 x 88 x 30
17.3 x 3.5 x 16.9 (2U)
440 x 88 x 30
Weight (9Ah) kg/lb 37.8kg / 83.26lb 37.8kg / 83.26lb
Output current (max) A 50 50
Operating environment 0~40°C / 32~104°F
(Battery must be maintained at 20°C to ensure its lifespan is not reduced)
30-90%RH non-condensing
Storage environment -15~45°C / 5~113°F
30-90%RH non-condensing
Compliance CE / cTUVus
 Loading...