

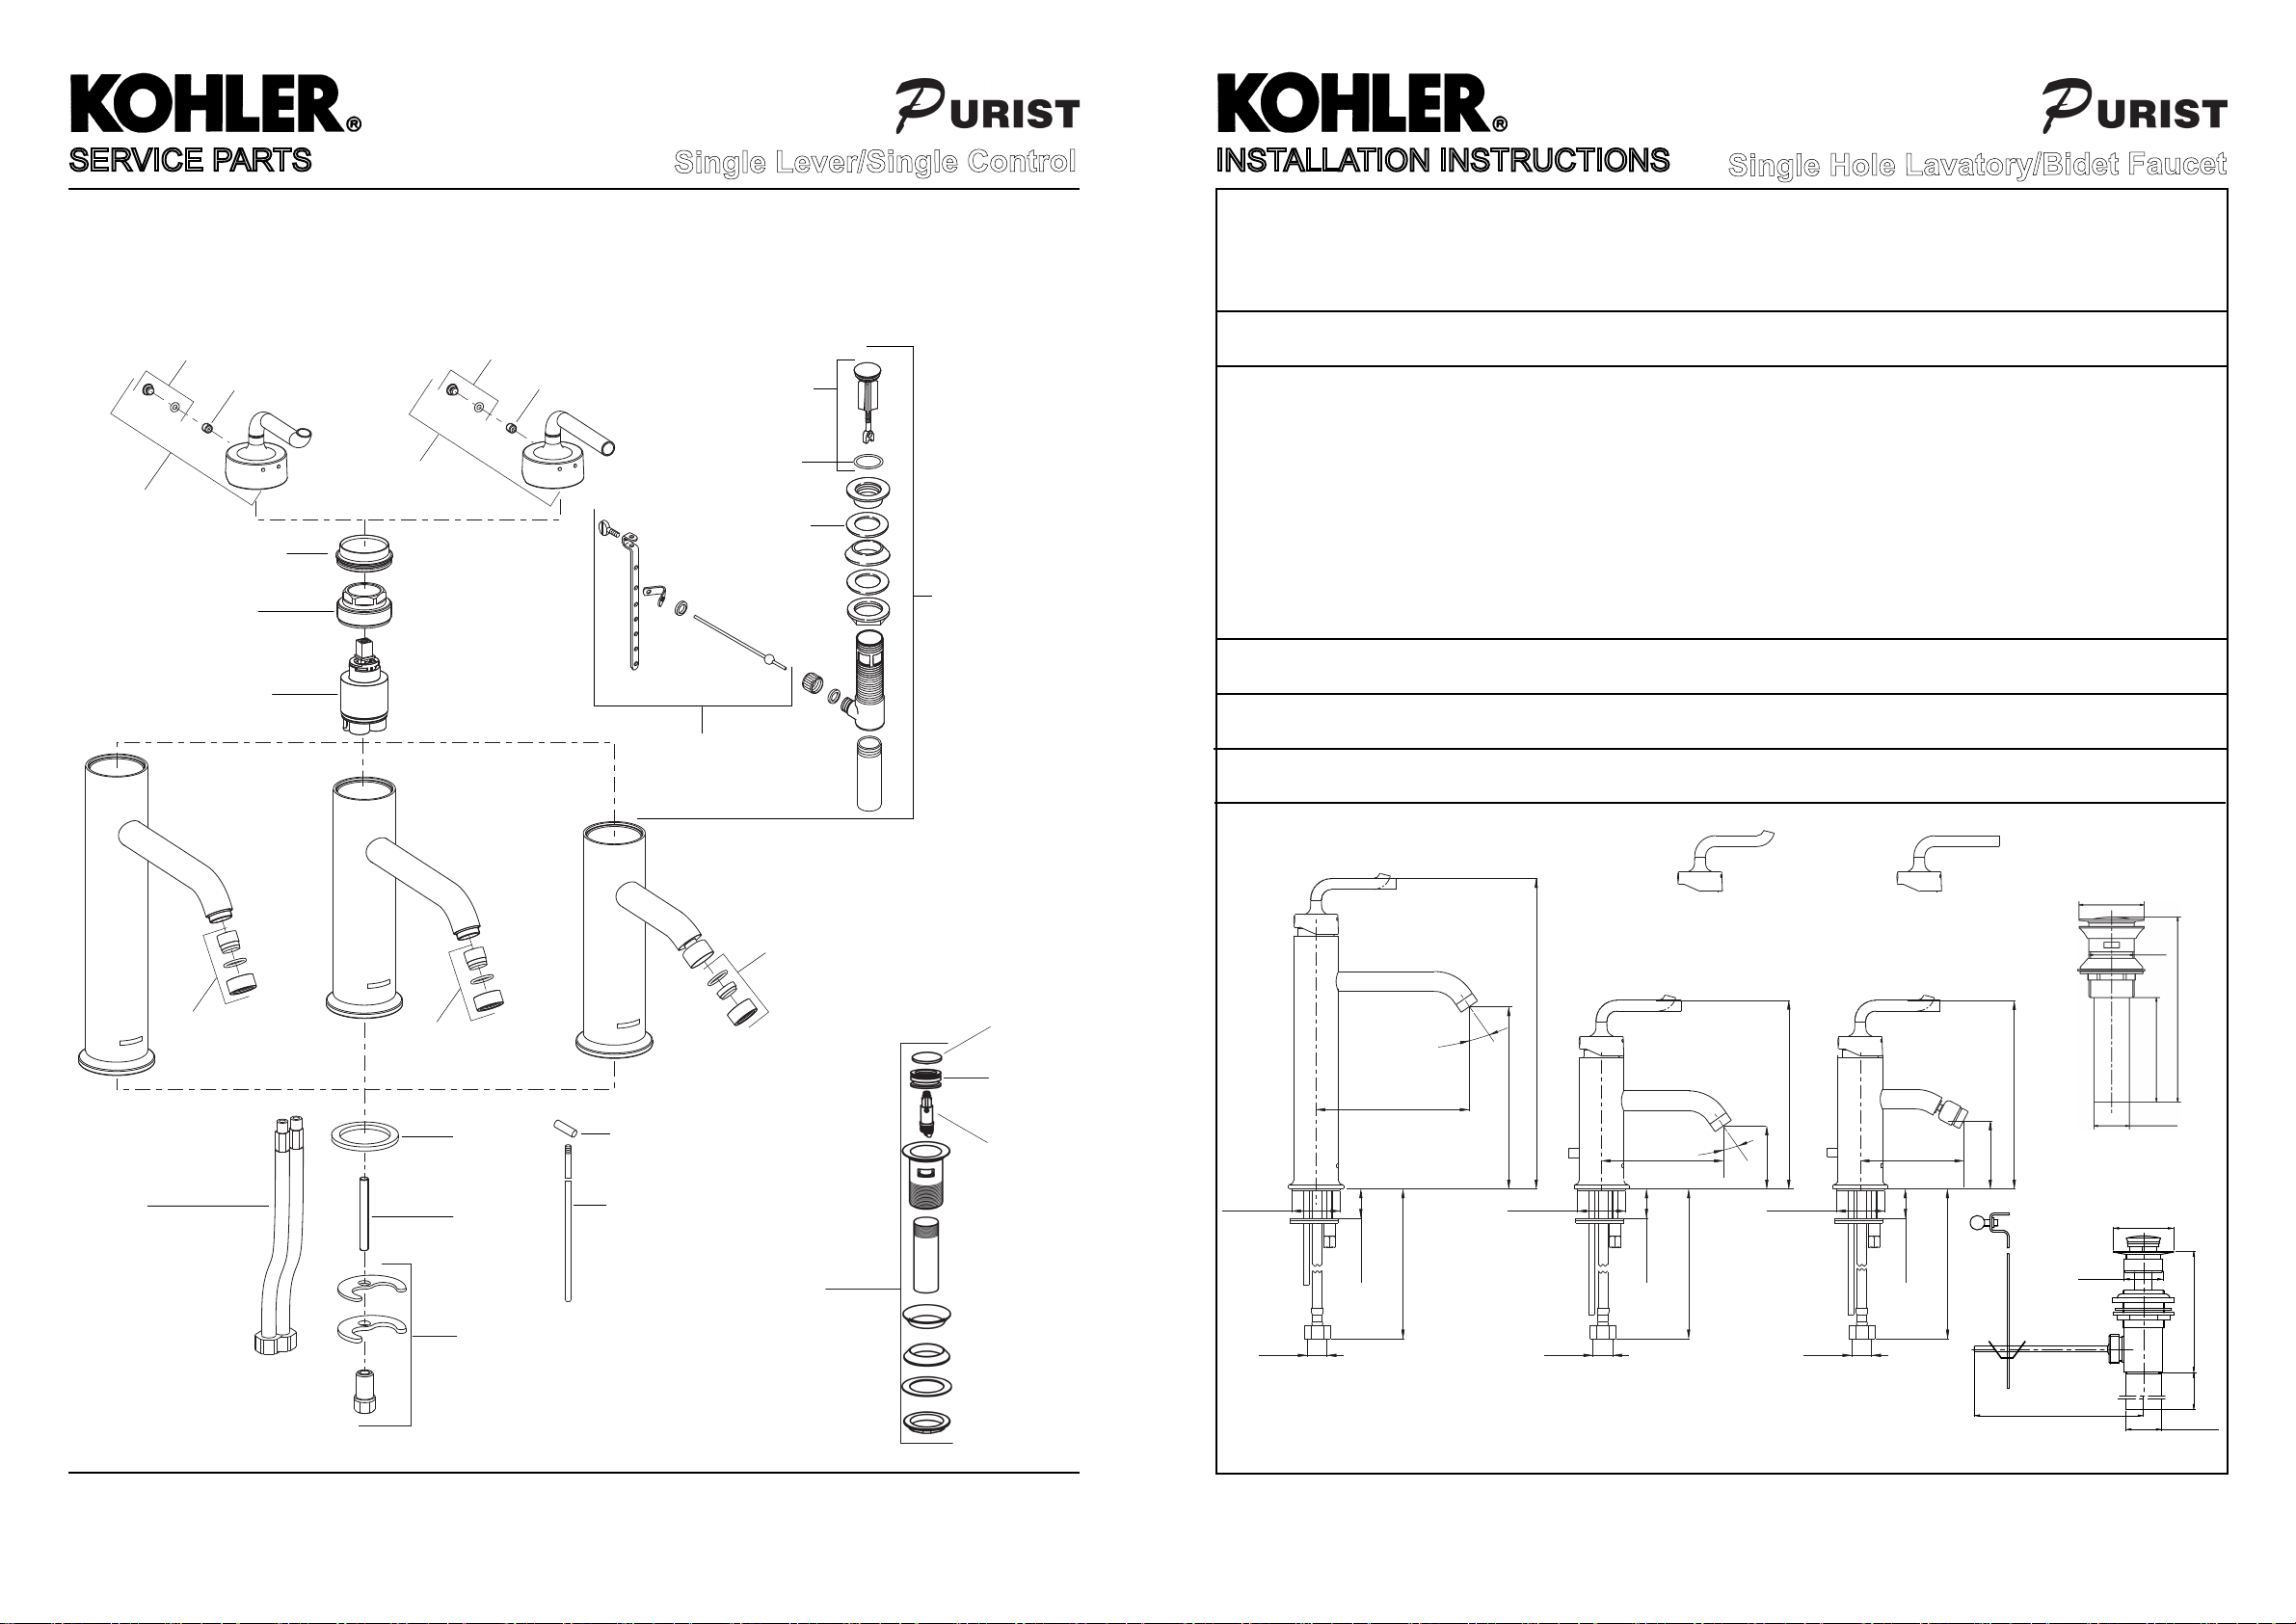
SERVICE PARTS
14402 SINGLE HOLE LAVATORY FAUCET
14404 SINGLE HOLE TALL LAVATORY FAUCET
14434 SINGLE HOLE BIDET FAUCET
1032012**
Plug Button Kit
76713
Screw
1048356**
Sculpted Lever
Handle Kit
1026689**
Bonnet
1056867**
Nut
1014338
Valve
1049039**
Straight Lever
Handle Kit
1032012**
Plug Button Kit
76713
Screw
Single Lever/Single Control
880008**
Stopper
1080817
O-ring
880406
Washer
834753**
Pop Up Drain
(Only for 14402-4/4A
& 14434-4/4A)
880037
Link Kit
INSTALLATION INSTRUCTIONS
Single Hole Lavatory/Bidet Faucet
14402 SINGLE HOLE LAVATORY FAUCET
14404 SINGLE HOLE TALL LAVATORY FAUCET
14434 SINGLE HOLE BIDET FAUCET
BEFORE YOU BEGIN
All information is based on the latest product information available at the time of publication. Kohler Co.
reserves the right to make changes in product characteristics, packaging, or availability at any time without
notice.
Please leave these instructions for the consumer. They contain important information.
NOTES:
1. Flush the water supply pipes thoroughly to remove debris.
2. Inspect the supply tubing for damage. Replace as necessary.
3. If possible install faucet and drain before installing lavatory or bidet.
HANDLE OPERATION
Lift the handle gently. Turn left for hot water, right for cold water.
ROUGH-IN DIMENSIONS
1077946**
Areator
1069787**
834754
Hose
1024405(Only for India)
**Color code must be specified when ordering
(Only for Thailand)
1077946**
Areator
1069787**
(Only for Thailand)
1049041
Washer
1049040
Stud
836664
Mounting
Hardware
1077947**
Areator
1069788**
1023123**
Lift Knob
(Not for 14402-4ND/4AND
& 14404-4/4A)
21220**
Lift Rod
(Not for 14402-4ND/4AND
& 14404-4/4A)
1095926**
Click Drain
(Only for 14404-4/4A)
(Only for Thailand)
102888**
Stopper
1102889
Washer
1102892
Piston Kit
14402-4/14404-4/14434-4
Sculpted Level Handle
35°
159
Ø32-Ø35
Max. 40
350(450 for India)
G1/2˝
308
165
Ø32-Ø35
G1/2˝
35°
139
Max. 50
360(460 for India)
66
Ø32-Ø35
14404 14402 14434
14402-4A/14402-4A/14402-4A
Straight Level Handle
198
109
Max. 50
G1/2˝
198
70
360(460 for India)
176.5
Ø56
Ø42
173~185
101
Ø31.75
Only for 14404-4/4A
Ø54
Ø36.5
108
97.5
Ø31.75
Only for 14434-4/4A
1049889-2A-B 4
1049889-2A-B 1

INSTALLATION
How To Install The Lift Rod Assy
(Not For 14402-4ND/4AND 14404-4/4A)
Unscrew the lift rod knob(1) from the lift rod(2). Insert the lift rod into the hole from
underside of the faucet until the groove of the faucet. Screw the lift rod knob to the
lift rod, tightened by hand.
How To Install The Faucet
Install the stud(3) into the faucet body(6). Put the washer(4) into the bottom of body
through the flexible hoses(5) and the stud. Insert hoses and stud into the hole of
lavatory or bidet. Position the faucet. From underside of the lavatory or bidet, fit the
bracket(7) and washer(8) on the stud. Secure the faucet by tightening nut(9).
Attach the hoses to water supplies. When facing front of faucet, the left hose is hot
water, the right hose is cold water.
Take off ‘V’-clip(26) and the retaining nut(27). Fit the plastic washer(41) and
retaining nut onto the ball lever rod(29). Insert the ball lever assembly into the drain
26
27
lever hole(22) and through the stopper hole. Tighten the retaining nut.
28
1
2
Be sure that the ball lever rod points to the back of the bidet, tighten the locknut.
NOTE: Do not reposition the drain after the locknut is tightened, or you may break
29
the putty seal. Remove any excess putty.
2
Slide lift rod(2) into the hole on link(31). According to the lift rod length, bend the
link. Connect the link onto ball lever rod with ‘V’ clip(26). Position the lift rod, ensure
30
the distance between the lift knob and the faucet body is about 10mm.
31
6
4
5
3
7
8
Push the ball lever rod(29) down to the open position. Tighten thumb screw(30).
Connect the tailpiece to the trap. The tailpiece should extend 25mm to 50mm into
the trap.
26
29
How To Install The Drain
(For 14404-4/4A)
Remove the locknut(15), plastic washer(14), rubber gasket(13) and tailpiece(12)
from the drain body. Supply enough tape or sealant to tailpiece thread. Reinstall
the tailpiece. Insert the drain body into the lavatory. Put the rubber gasket (Tapered
side up), plastic washer and locknut back to the drain body in turn. Tighten the
locknut.
Note: If needed, apply a ring of plumbers putty or other sealants around the
underside of the drain flange(10), instead of using rubber washer(11).
Do not reposition the drain after the locknut is tightened, or you may break the
putty or sealant seal. Remove any excess putty or sealant seal.
How To Install The Drain
(For 14402-4/4A 14434-4/4A)
Uninstall the stopper(16), drain flange(18) and washer(19) from drain body(24).
Slide washer onto the underside of the drain flange. Uninstall the tailpiece(25) from
the drain body. Supply enough tape or sealant to tailpiece thread. Reinstall the
tailpiece. Insert the drain body with gasket(20), steel washer(21) and locknut(23)
into the lavatory or bidet from underside, with the drain lever hole(22) facing the
rear.
NOTE: If necessary, apply a ring of plumbers putty around the underside of the
drain flange, instead of using washer(19).
Thread the drain flange onto the drain body. Hand tighten the locknut from the
underside of the lavatory or bidet. Place stopper into drain body, aligning the flat
side of stopper hole(17) with the drain lever hole(22).
16
17
18
19
20
22
25
9
10
11
Drain Body
12
13
14
15
Apply Plumbers Putty
涂油灰
21
23
24
INSTALLATION CHECKOUT
Ensure all coupling nuts are tightened. Ensure that handle is in the off position.
Open the drain and turn on the main water supply. Check for leaks and repair
as required.
Remove aerator assembly(32). Turn on the tap. Run hot and cold water
through spout for about one minute to remove any debris. Check for leaks at
this time. Remove any debris from aerator assembly. Shut off the tap. Reinstall
32
aerator assembly.
CLEANING INSTRUCTIONS
All Finishes: Clean the finish with mild soap and warm water. Wipe entire surface completely dry with a clean
soft cloth. Many cleaners may contain chemicals, such as ammonia, chlorine, toilet cleaner etc. which could
adversely affect the finish and are not recommended for cleaning.
Do not use abrasive cleaners or solvents on Kohler faucets and fittings.
1049889-2A-B 2
1049889-2A-B 3
 Loading...