

Kohler PRO 5.4 DES Owner's Manual
38 590 01 Rev. B
KohlerPower.com
PRO 5.4 DES
Generator Owner's Manual
IMPORTANT: Read all safety precautions and instructions carefully before
operating equipment.
Ensure engine is stopped and level before performing any
maintenance or service.
Record product information to reference when ordering parts or obtaining warranty coverage.
Specifi cation
Serial Number
Purchase Date
EN
ESS
FRC
2 38 590 01 Rev. BKohlerPower.com
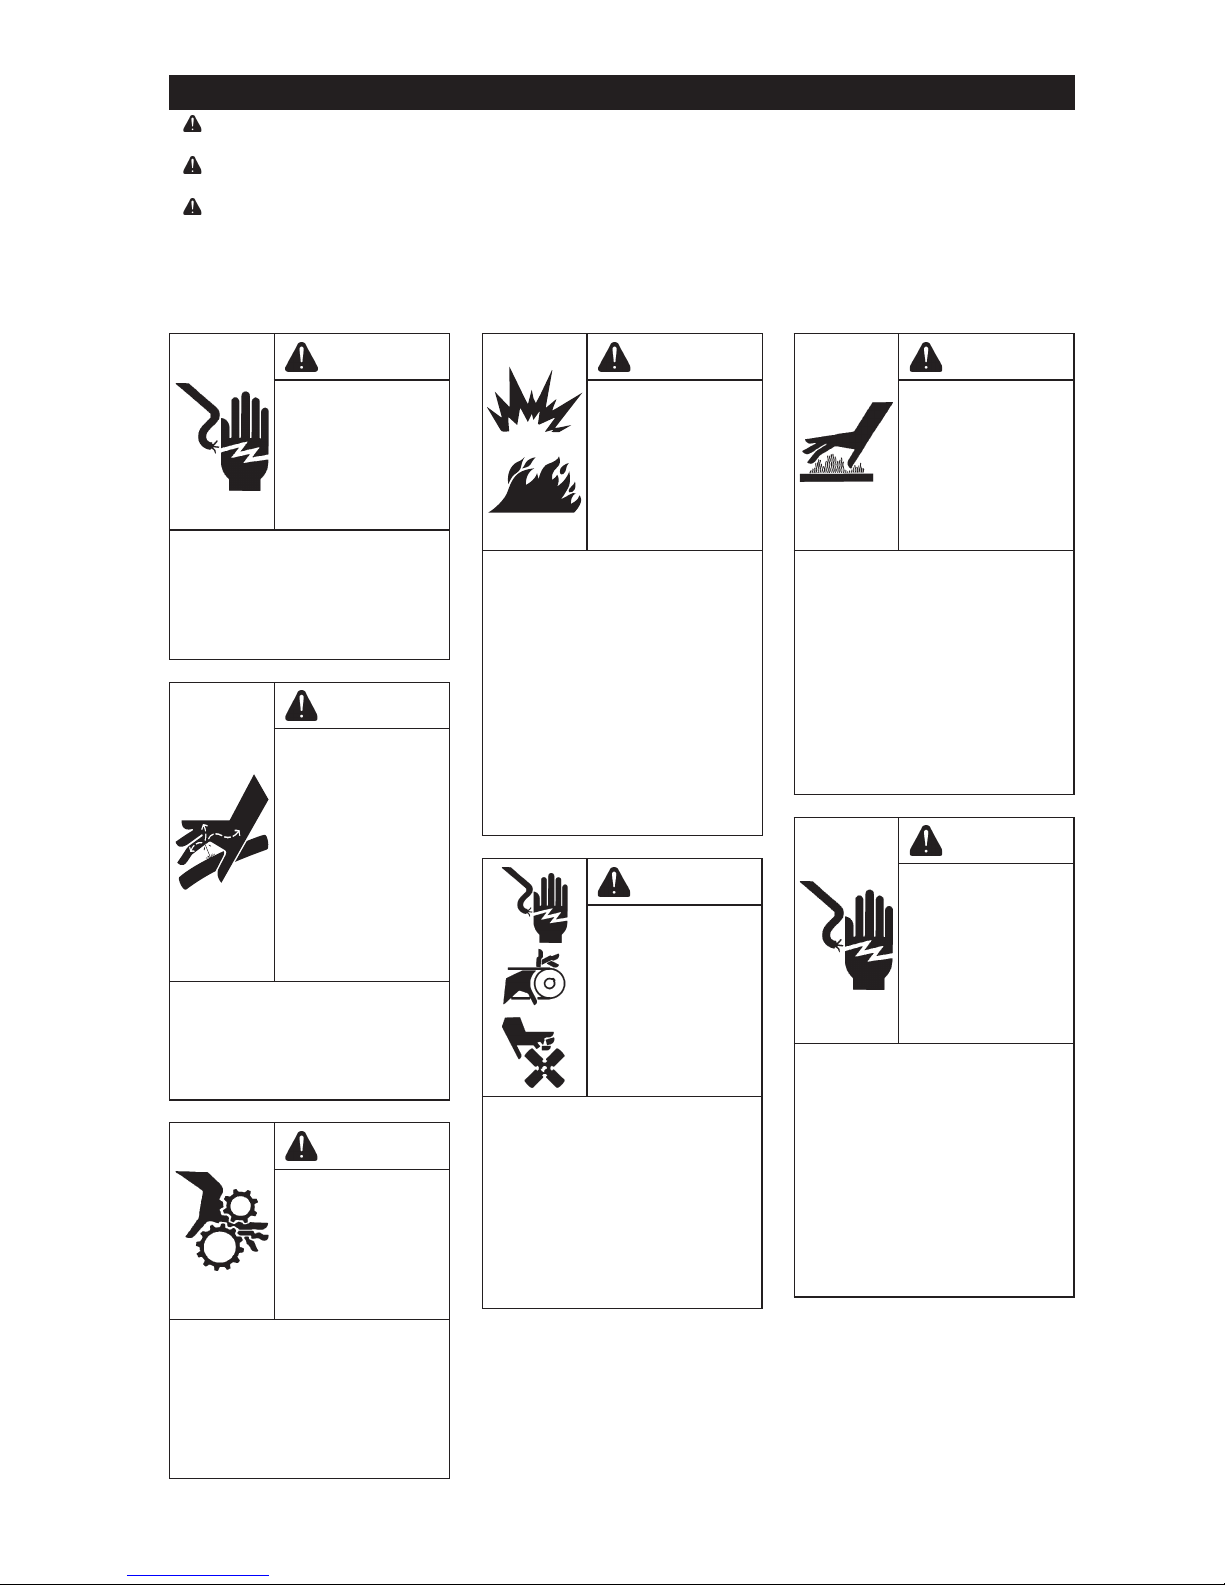
CAUTION
Electrical Shock
can cause injury.
Do not touch
wires while
generator is
running.
Never operate generator in
rain or snow.
Never touch generator
with wet hands or electrical
shock may occur.
WARNING
High Pressure
Fluids can
puncture skin
and cause
severe injury or
death.
Do not work
on fuel system
without proper
training or safety
equipment.
Fluid puncture injuries are
highly toxic and hazardous.
If an injury occurs, seek
immediate medical
attention.
WARNING
Rotating Parts
can cause
severe injury.
Stay away while
generator is in
operation.
Keep hands, feet, hair,
and clothing away from all
moving parts to prevent
injury. Never operate
generator with covers,
shrouds, or guards
removed.
WARNING
Fuel can cause
fi res and severe
burns.
Do not fi ll fuel
tank while
engine is hot or
running.
Fuel is fl ammable and its
vapors can ignite. Store fuel
only in approved containers,
in well ventilated,
unoccupied buildings. Do
not fi ll fuel tank while engine
is hot or running, since
spilled fuel could ignite if
it comes in contact with
hot parts or sparks from
ignition. Do not start engine
near spilled fuel. Never use
fuel as a cleaning agent.
WARNING
Accidental
Starts can cause
severe injury or
death.
Disconnect and
ground spark
plug lead(s)
before servicing.
Before working on
generator or equipment,
disable engine as follows:
1) Disconnect spark plug
lead(s). 2) Disconnect
negative (–) battery cable
from battery.
Do not allow children to
operate generator.
WARNING
Hot Parts can
cause severe
burns.
Do not touch
engine while
operating or just
after stopping.
Never operate generator
with heat shields or guards
removed. Do not modify
generator.
Place generator in a place
where pedestrians or
children are not likely to
touch generator.
Be sure to carry generator
only by its carrying handles.
WARNING
Hazardous
Voltage.
Backfeed to
utility system
can cause
property
damage, severe
injury, or death.
Never plug a portable
generator directly into a
building outlet.
If generator is used for
standby power, have a
certifi ed, licensed electrician
install an automatic
transfer switch to prevent
inadvertent interconnection
of standby and normal
sources of supply.
Safety Precautions
DANGER: A hazard that will result in death, serious injury, or substantial property damage.
WARNING: A hazard that could result in death, serious injury, or substantial property damage.
CAUTION: A hazard that could result in minor personal injury or property damage.
NOTE: is used to notify people of important installation, operation, or maintenance information.
Read this manual carefully before operating this machine. This manual should stay with this
machine if it is sold.
3
38 590 01 Rev. B
KohlerPower.com
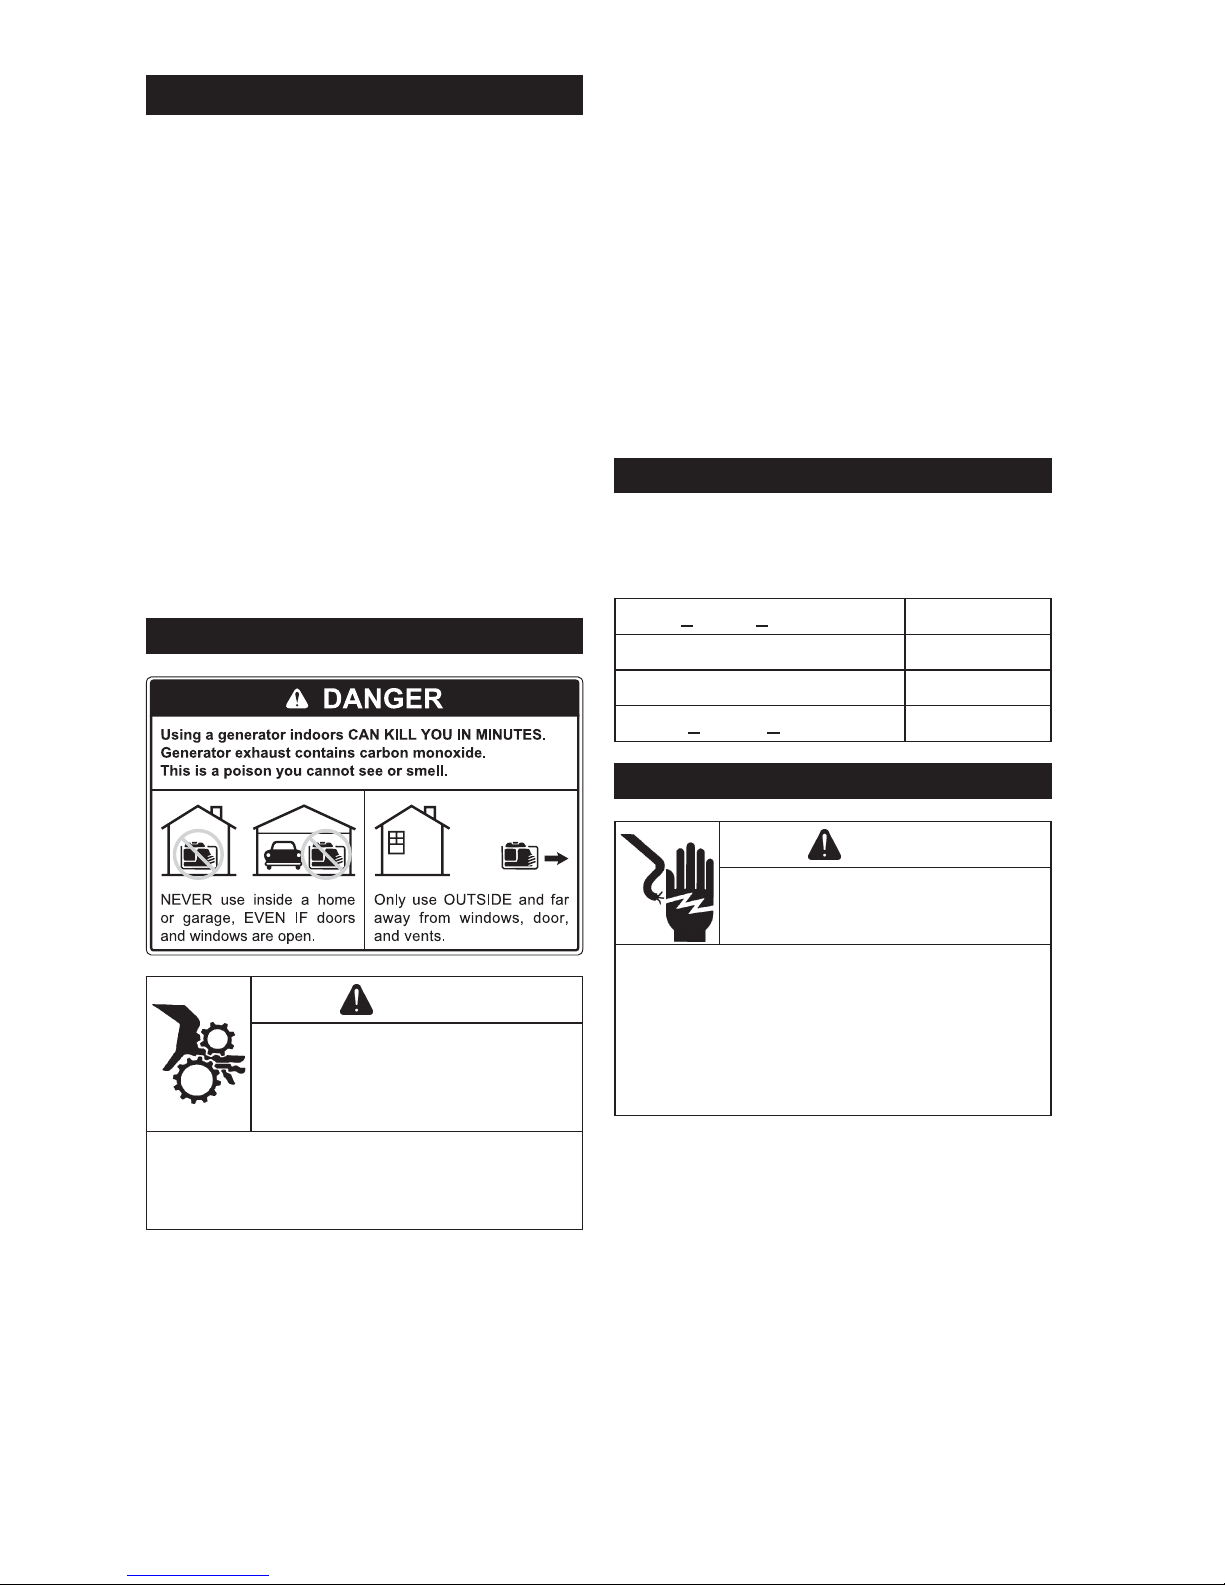
California Proposition 65 Warning
Engine exhaust from this product contains chemicals known
to State of California to cause cancer, birth defects, or other
reproductive harm.
California Proposition 65 Warning
This product contains chemicals known to State of California
to cause cancer, birth defects, or other reproductive harm.
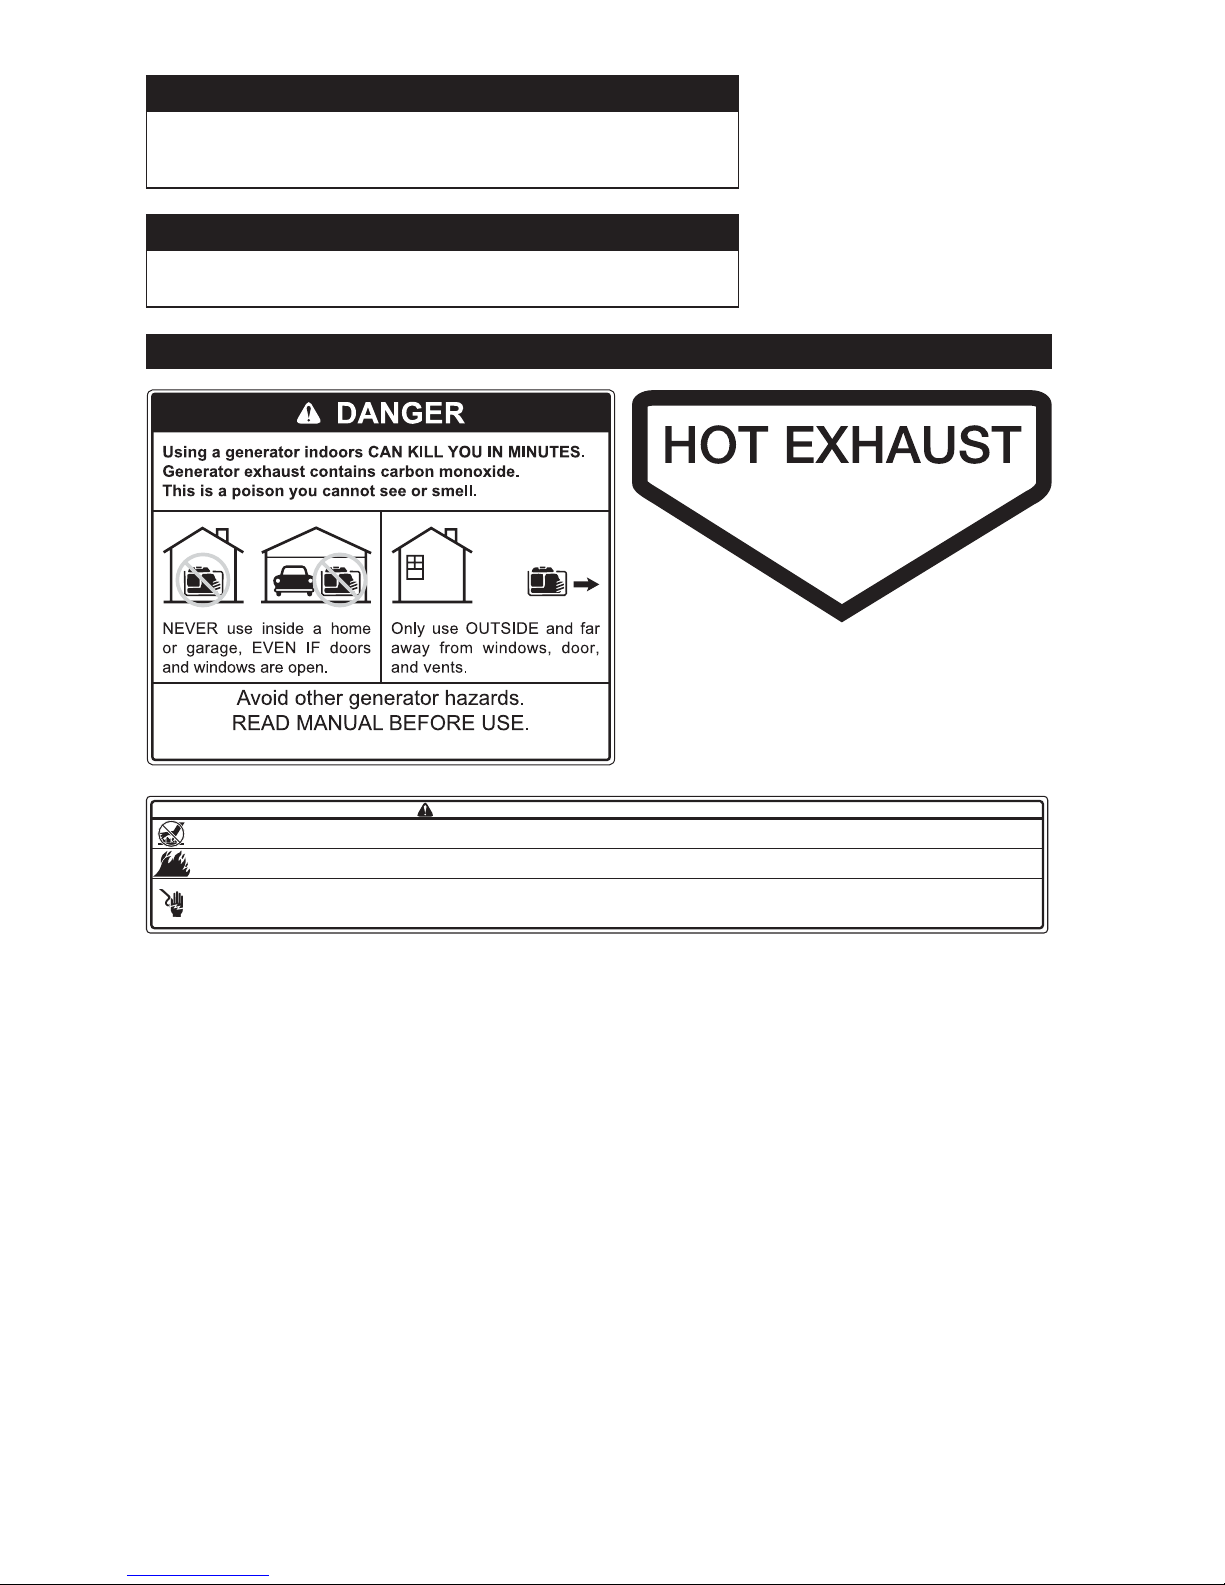
Important Labels on Generator
WARNING / ADVERTENCIA / AVERTISSEMENT
Ɣ Hot parts can cause severe burns. / Las piezas calientes pueden causar quemaduras graves. / Les pièces chaudes peuvent causer de graves brûlures.
Ɣ Do not touch generator while operating or just after stopping. / No toque el generador durante el funcionamiento o inmediatamente después de pararse. / Ne touchez pas le générateur pendant qu'il tourne ou si
vous venez tout juste de l'arrêter.
Ɣ Explosive Fuel can cause fires and severe burns. / La explosión del carburante puede provocar incendios y quemaduras graves. / Carburant explosif pouvant causer des incendies et des brûlures graves.
Ɣ Do not fill fuel tank while generator is hot or running. / No llene el tanque de combustible mientras el generador esté caliente o funcionando. / N'ajoutez pas de carburant si le moteur est chaud ou s'il tourne.
Ɣ Electrical shock can cause injury. / Las descargas eléctricas pueden provocar lesiones. / Les chocs électriques peuvent causer des blessures.
Ɣ Do not touch wires while generator is running. / No toque los cables con el generador en funcionamient. / Ne touchez pas aux le générateur pendant que le moteur tourne.
Ɣ Do not connect generator to a building's electrical system unless using an isolation (transfer) switch installed by a certified, licensed electrician. / No conecte el generador al sistema eléctrico de un edificio a menos
que use un aislamiento (transferencia) interruptor instalado por un electricista certificado y certificado. / Ne branchez pas le générateur dans le système électrique d’un bâtiment sauf si un commutateur-converteur
a été installé par un électricien agréé et compétent.
EN
4 38 590 01 Rev. BKohlerPower.com
I
W
Q
X
Y
U
S
T
N
M
J
K
L
G
H
C
D
E F
A
B
J
G
H
AE
AD
AC AB
AA
Z
P
O
R
V
X
AI
AG
AF
AH
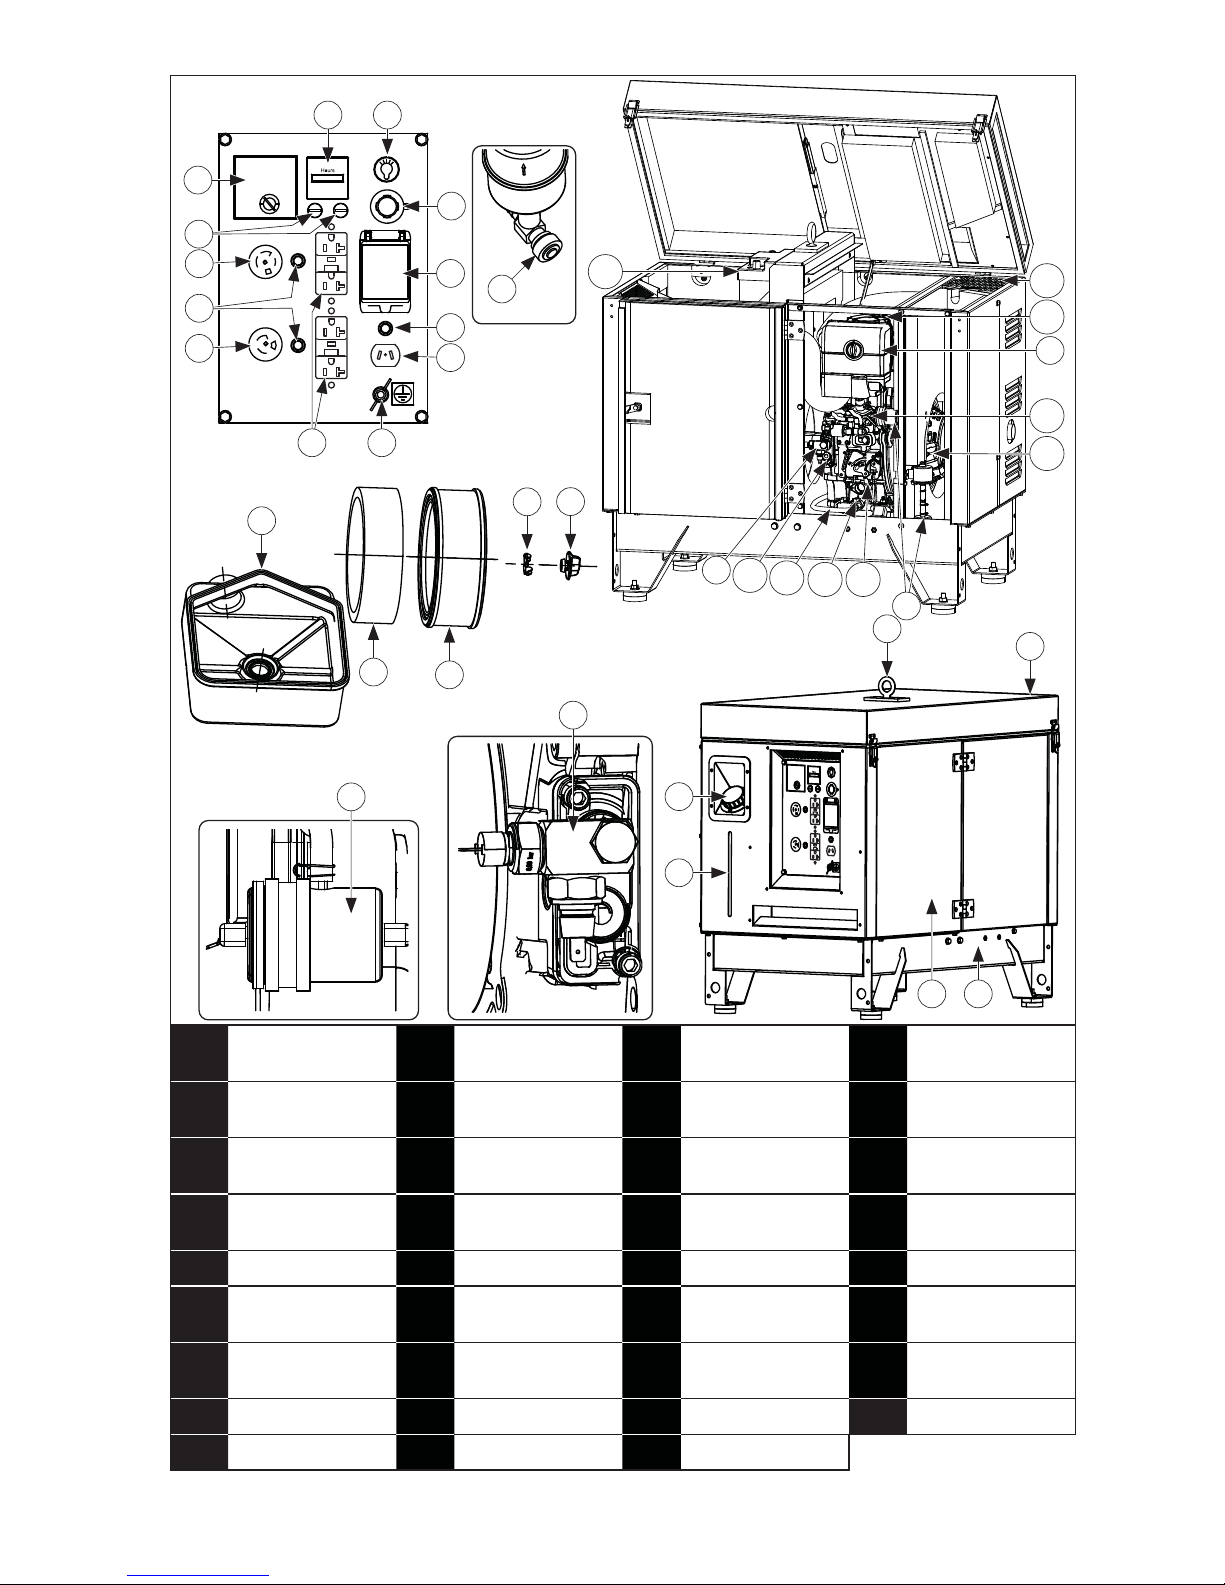
A
Generator Top
Cover
B Lifting Ring C Fuel Tank Cap D
Fuel Level
Indicator
E
Engine Access
Door
F
Retention
Container
G Fuel Filter H Solenoid Valve
I Fuel Valve J
Air Cleaner
Cover
K Precleaner L Paper Element
M Wing Nut N
Air Cleaner
Cover Nut
O
240/120V/30A
Electrical Socket
P
120V/30A
Electrical Socket
Q Circuit Breaker R Fuse S MODYS T Pilot Light
U Hour Meter V
Remote Start
Socket
W Ground Terminal X Circuit Protector
Y
12V DC
Receptacle
Z
GFCI
Receptacle
AA
Recoil Starter
Handle
AB Stop Lever
AC Oil Drain Valve AD Oil Drain Hose AE Oil Filter AF Dipstick
AG Oil Fill Cap AH Exhaust Silencer AI Starter Battery
5
38 590 01 Rev. B
KohlerPower.com
Pre-Start Checklist
1. Ensure generator is at least 3.3 ft. (1 m) from
building or other equipment and not covered
with any material.
2. Refer to all warning labels prior to starting.
3. Check oil level. Add oil if low. Do not overfi ll.
4. Check fuel level. Add fuel if low. Stop
refueling when indicator reaches F (full)
level. Check fuel system components and
lines for leaks. Never refuel while unit is
running.
5. Test GFCI receptacles (Z).
6. Check starter battery.
7. Ground generator.
8. Check that air cleaner components and all air
inlets are unobstructed, equipment covers,
and guards are in place and securely
fastened.
9. Ensure electrical devices (load) are not
connected to generator.
Starting
WARNING
Rotating Parts can cause severe
injury.
Stay away while generator is in
operation.
Keep hands, feet, hair, and clothing away
from all moving parts to prevent injury. Never
operate generator with covers, shrouds, or
guards removed.
Electric Start:
1. Turn main AC circuit breaker (Q) OFF.
2. Turn fuel (I) ON.
3. Ensure generator top cover (A) and engine
access door (E) is closed.
4. Turn MODYS (S) key to ON position.
5. Press START button on MODYS (S).
Recoil Start:
1. Turn main AC circuit breaker (Q) OFF.
2. Turn fuel (I) ON.
3. Ensure generator top cover (A) is closed.
4. Turn solenoid valve (H) on.
5. Turn MODYS (S) key to ON position.
6. Slowly pull recoil starter handle (AA), until
there is some resistance then let it return to
its initial position slowly.
7. Pull recoil starter handle hard (AA), quickly
then let it return to its initial position slowly.
Repeat operation until engine starts as
necessary.
8. Turn solenoid valve (H) off.
9. Close engine access door (E) to engine of
generator.
Cold Weather Starting
When starting generator in low ambient
temperatures, allow engine to idle before
connecting a load. Follow chart for temperature
and time.
< -4° F (< -20° C) 5 minutes
-4° to 14° F (-20° to -10° C) 2 minutes
14° to 23° F (-10° to -5° C) 1 minutes
> 41° F (> 5° C) 20 seconds
Operation
WARNING
Hazardous Voltage. Backfeed to
utility system can cause property
damage, severe injury, or death.
Never plug a portable generator directly into
a building outlet.
If generator is used for standby power,
have a certifi ed, licensed electrician install
an automatic transfer switch to prevent
inadvertent interconnection of standby and
normal sources of supply.
Once pilot light (T) illuminates and generator
has reached a steady running speed
(approximately 3 minutes):
1. Check that circuit protectors (X) are pushed
in. Press if necessary.
2. Connect appliances to electrical sockets of
generator.
3. Hour meter (U) shows number of hours that
generator has worked.
Angle of Operation
Do not operate this engine exceeding maximum
angle of operation; see specifi cation table.
Engine damage could result from insuffi cient
lubrication.
EN
6 38 590 01 Rev. BKohlerPower.com
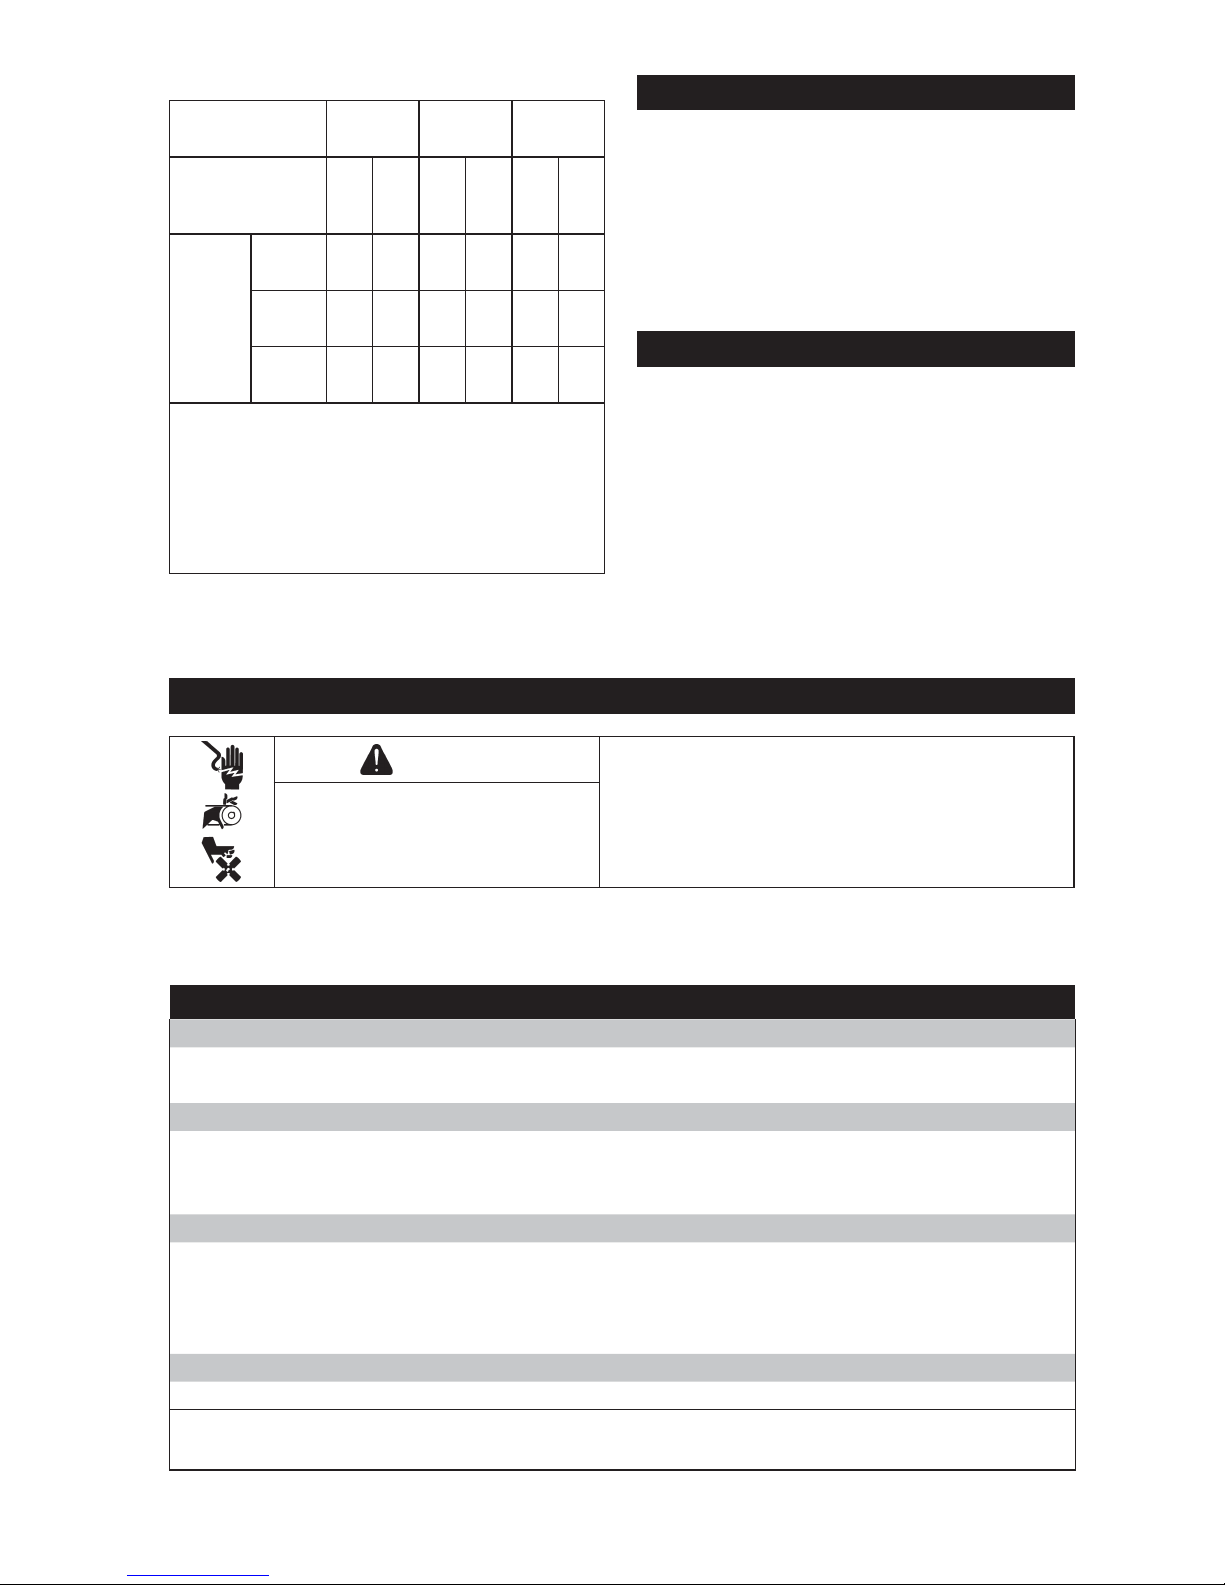
Cable Selection
Generator
Socket Type
10 A 16 A 32 A
Recommended
Cable Cross
Section
mm
2
AWG
mm
2
AWG
mm
2
AWG
Length
of
Cable
Used
0 to
50 m
4106 9107
51 to
100 m
10 7 10 7 25 3
101 to
150 m
1
10 7 16 5 35 2
1
This cable length is maximum permitted
length, and must not be exceeded.
Installation method=cables on raceway
or non-drilled tablet/Permitted drop in
voltage=5%/Multi-core conductors/Cable
type PVC 70°C (e.g. H07RNF)/Ambient
temperature=86° F (30° C).
Maintenance Instructions
WARNING
Before working on generator or equipment,
disable engine as follows: 1) Disconnect spark
plug lead(s). 2) Disconnect negative (–) battery
cable from battery.
Do not allow children to operate generator.
Accidental Starts can cause
severe injury or death.
Disconnect and ground spark
plug lead(s) before servicing.
Safety is an obligation of owner. Periodic inspection, adjustment and lubrication will keep your
generator in safest and most effi cient condition possible. Most important points of generator
inspection, adjustment, and lubrication are explained on following pages.
Maintenance Schedule
After fi rst 50 Hours of operation
● Service/replace precleaner (K).
● Change oil and fi lter (AE).
Every 250 Hours
1
● Change oil.
● Replace air cleaner element (L).
● Replace fuel fi lters (G).
Every 500 Hours
1
● Replace internal oil fi lter (AE).
● Replace fuel fi lters (G).
● Clean fuel tank.
● Clean spark arrester.
Every 500 Hours
2
● Set and clean injectors.
1
Perform these procedures more frequently under severe, dusty, dirty conditions.
2
Have a Kohler portable dealer perform this service.
Stopping
1. Disconnect electrical devices and allow
engine to run without any load for 1-2
minutes.
2. Turn MODYS (S) key to OFF position
(generator stops).
3. Open engine access door (E), close fuel
valve (I).
4. Close engine access door (E).
Engine Speed
NOTE: Do not tamper with governor setting to
increase maximum engine speed.
Overspeed is hazardous and will void
warranty.
7
38 590 01 Rev. B
KohlerPower.com
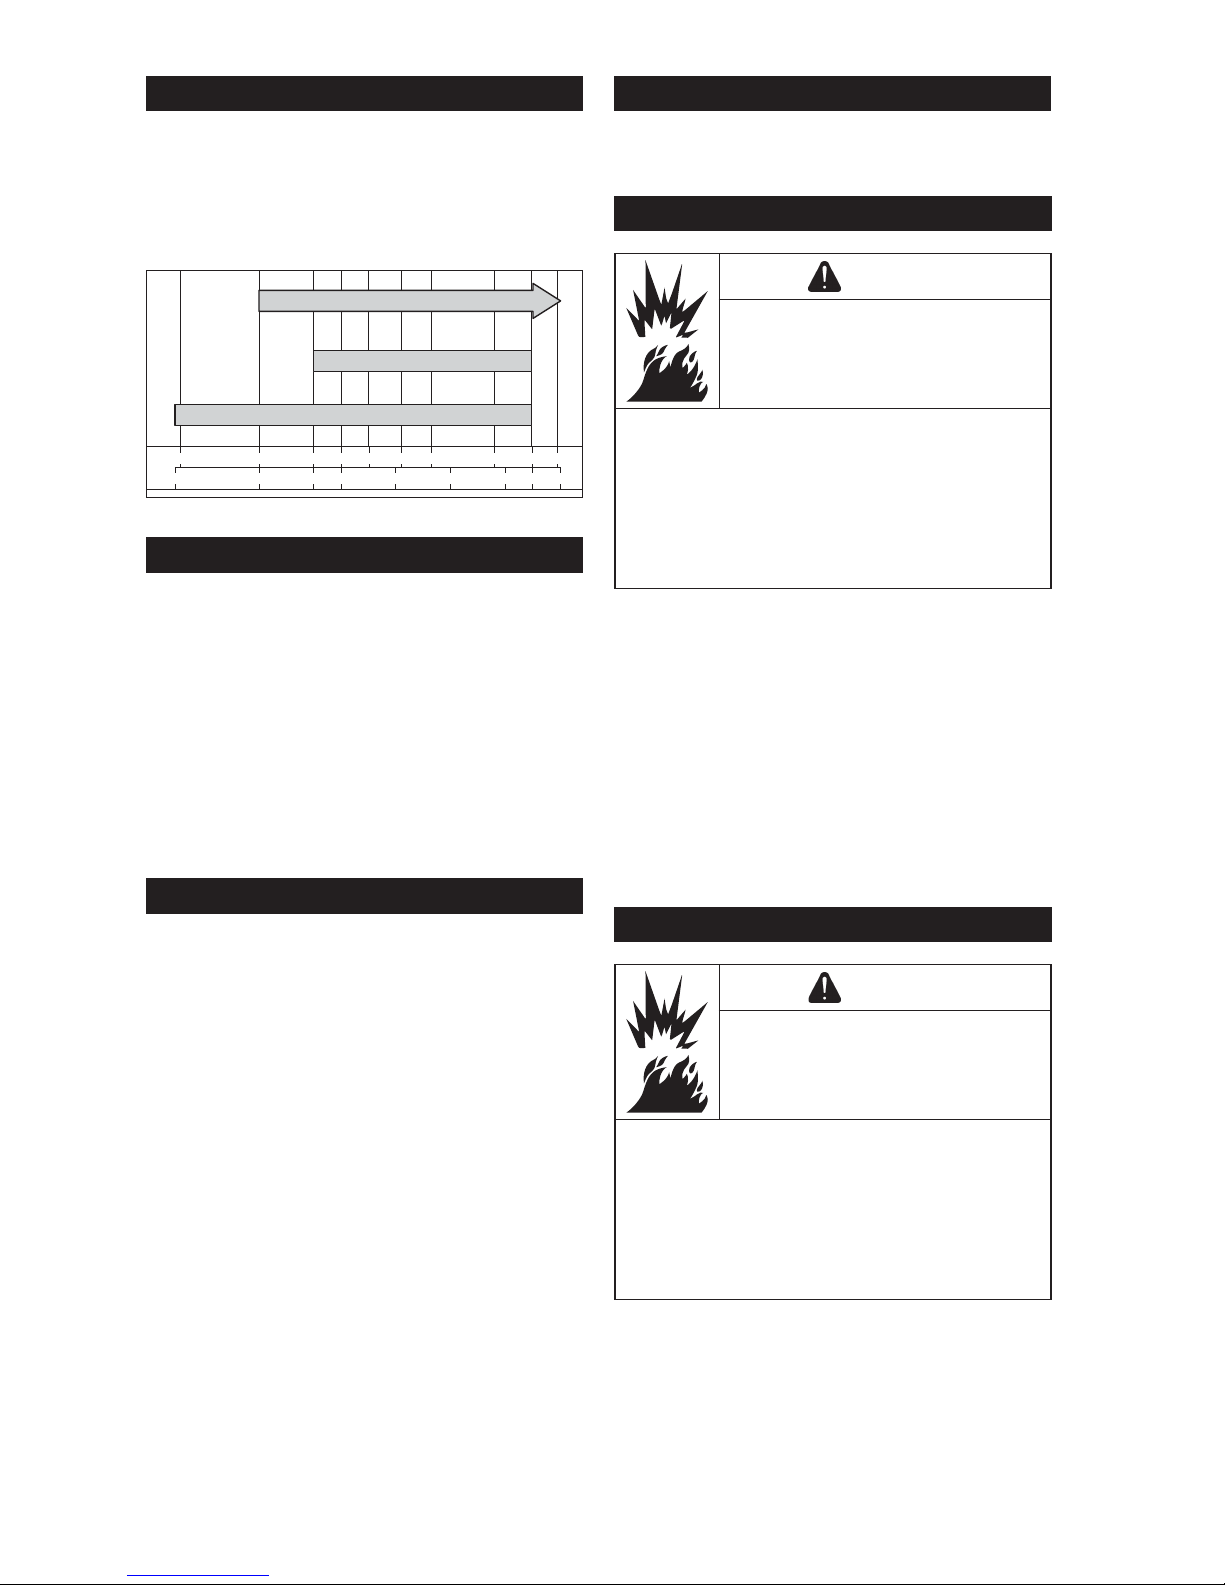
Oil Recommendations
We recommend use of Kohler oils for best
performance. Other high-quality detergent
oils (including synthetic) of API (American
Petroleum Institute) service class CH-4 or
higher are acceptable. Select viscosity based
on air temperature at time of operation as
shown in table below.
°F
-20 5
-15 -5
23 32 40 60
50 80 95 100
°C
-30
0
10 20 30 35
40
5W-30*
15W-40
SAE 30
*Synthetic base oil.
Check Oil Level
Ensure engine oil level is between upper
and lower limit of dipstick (AF). Add oil as
necessary.
1. Remove dipstick (AF); wipe oil off.
2. Reinsert dipstick (AF) into tube; press
completely down.
3. Remove dipstick (AF); check oil level. Level
should be at top of indicator on dipstick (AF).
4. If oil is low on indicator, add oil up to top of
indicator mark.
5. Reinstall and secure dipstick (AF).
Change Oil and Filter
Change oil while engine is warm (not hot), not
immediately after stopping engine.
1. Clean area around oil fi ll cap (AG) and
remove. Obtain oil drain hose (AD) and
orient it outside of engine access door (E)
into a container. Open oil drain valve (AC)
and allow oil to drain completely.
2. Close oil drain valve (AC).
3. Using a hex wrench, remove oil fi lter screw
and remove oil fi lter (AE).
4. Coat new oil fi lter seal with clean engine oil
and clean oil fi lter holder.
5. Install new oil fi lter (AE), reinstall screw and
tighten it correctly.
6. Fill crankcase with new oil. Level should be
at top of indicator on dipstick (AF).
7. Reinstall oil fi ll cap (AG) and tighten securely.
8. Start engine; check for oil leaks. Stop engine;
correct leaks. Recheck oil level. Place oil
drain hose (AD) to original position.
9. Dispose of used oil and fi lter in accordance
with local ordinances.
Oil Sentry™ (if equipped)
This feature is designed to prevent engine
from starting in a low oil or no oil condition. Oil
Sentry™ will shut down a running engine.
Fuel Recommendations
WARNING
Fuel can cause fi res and severe
burns.
Do not fi ll fuel tank while engine is
hot or running.
Fuel is fl ammable and its vapors can ignite.
Store fuel only in approved containers, in well
ventilated, unoccupied buildings. Do not fi ll
fuel tank while engine is hot or running since
spilled fuel could ignite if it comes in contact
with hot parts or sparks from ignition. Do not
start engine near spilled fuel. Never use fuel
as a cleaning agent.
Fuel must meet these requirements:
● Clean, fresh, commercial-grade diesel fuel.
● ASTM D-975 - 1D or 2D, EN590, or
equivalent.
● Biodiesel fuels less than 20% methyl ester or
B20 are acceptable. Fuels meeting
specifi cation of BQ-9000, EN 14214 or
equivalent are recommended.
● Aviation fuels include JP5, JP4, JP8 and,
JET-A (if 5% oil is added).
● Do not overfi ll fuel tank.
Check Fuel Level
WARNING
Fuel can cause fi res and severe
burns.
Do not fi ll fuel tank while engine is
hot or running.
Fuel is fl ammable and its vapors can ignite.
Store fuel only in approved containers, in well
ventilated, unoccupied buildings. Do not fi ll
fuel tank while engine is hot or running since
spilled fuel could ignite if it comes in contact
with hot parts or sparks from ignition. Do not
start engine near spilled fuel. Never use fuel
as a cleaning agent.
Visually check fuel level indicator (D). If
necessary, add fresh clean fuel free from water.
1. Unscrew fuel tank cap (C).
2. Fill fuel tank using a funnel, taking care not to
spill any fuel. Do not overfi ll tank (there
should not be any fuel in fi ller neck).
3. Screw fuel tank cap (C) back on.
EN
8 38 590 01 Rev. BKohlerPower.com
2. Separate precleaner (K) from paper element
(L); service precleaner (K) and replace paper
element (L).
3. Check condition of rubber seal and replace if
necessary.
4. Install new paper element (L) on base; install
precleaner (K) over paper element (L);
reinstall element cover and secure with wing
nut (M).
Reinstall air cleaner cover (J) and secure with
air cleaner cover nut (N).
Air Cooling
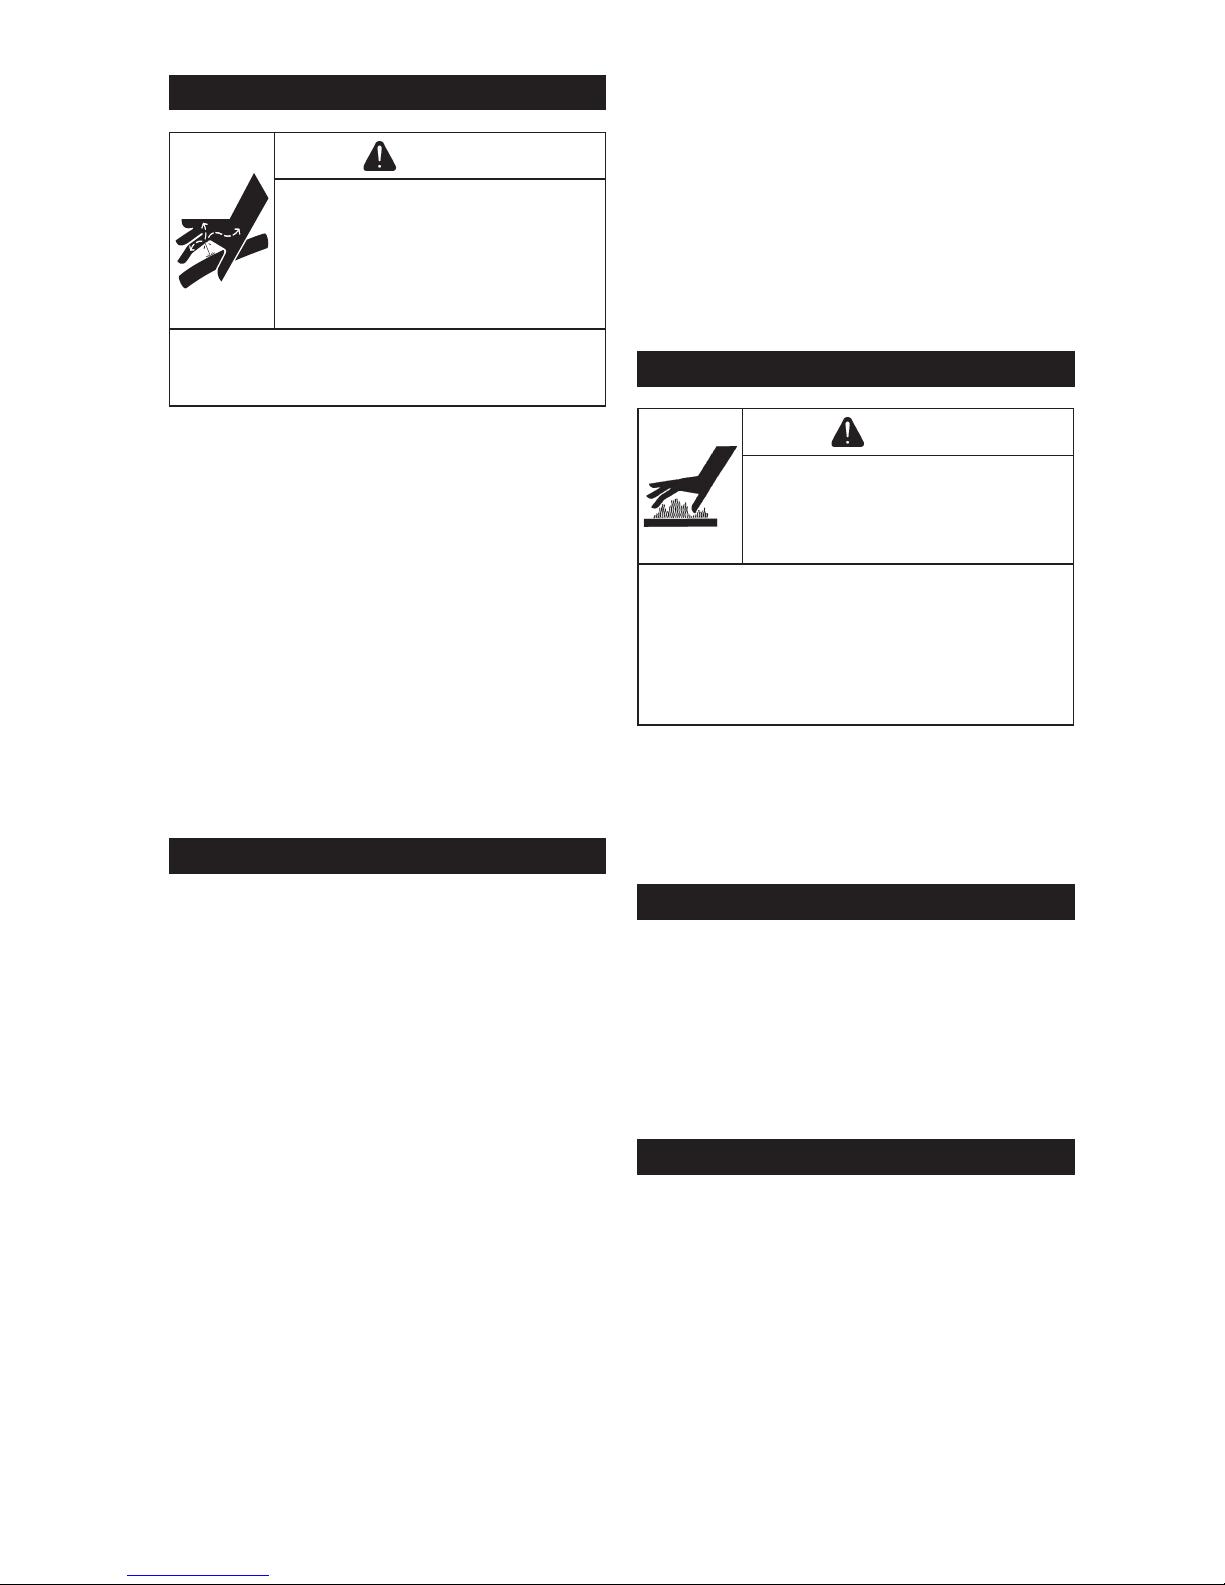
WARNING
Hot Parts can cause severe
burns.
Do not touch engine while
operating or just after stopping.
Never operate generator with heat shields or
guards removed. Do not modify generator.
Place generator in a place where pedestrians
or children are not likely to touch generator.
Be sure to carry generator only by its
carrying handles.
Proper cooling is essential. To prevent over
heating, ensure air cooling inlet and outlet
areas are clean and unobstructed. Avoid
spraying water at wiring harness or any
electrical components. Refer to Maintenance
Schedule.
Ground Terminal
Ground terminal (W) connects earth line for
prevention of electric shock. When electric
device is grounded, be sure to ground
generator also.
Connect generator to ground: Attach a 6 AWG
(10 mm2) copper wire to generator’s ground
connection and to a galvanized steel grounding
rod (not provided) driven 3.3 ft. (1 m) into
ground.
Connecting Alternating Current (AC)
NOTE: Ensure all electric devices including
lines and plug connection are in good
condition before connection to
generator.
NOTE: Ensure total load is within generator
rated output.
NOTE: Ensure receptacle load current is within
receptacle rated current.
1. Start engine.
2. Ensure AC pilot light (T) is on.
3. Plug into AC receptacle (O, P or Z).
4. Turn on any electric devices.
Fuel Filters
WARNING
High Pressure Fluids can
puncture skin and cause severe
injury or death.
Do not work on fuel system
without proper training or safety
equipment.
Fluid puncture injuries are highly toxic
and hazardous. If an injury occurs, seek
immediate medical attention.
NOTE: This generator is equipped with 2 fuel
fi lters; these 2 fi lters must be replaced
at same time. Fuel will run out during
this operation; provide an appropriate
container.
1. Close fuel valve (I).
2. Remove 1 fuel fi lter (G) by removing hose
clips and loosening screw on retaining clip, if
equipped.
3. Install new fuel fi lter (G) by tightening screw
on retaining clip, if equipped.
4. Reconnect hoses, securing them with clips.
5. Follow previous steps for second fuel fi lter
(G).
6. Wipe away any traces of fuel with a clean
cloth and check that there are no leaks.
Air Cleaner
NOTE: Operating engine with loose or
damaged air cleaner components
could cause premature wear and
failure. Replace all bent or damaged
components.
NOTE: Paper element (L) cannot be blown out
with compressed air.
Loosen air cleaner cover nut (N) and remove
air cleaner cover (J).
Precleaner:
1. Remove precleaner (K) from paper element
(L).
2. Replace or wash precleaner (K) in warm
water with detergent. Rinse and allow to air
dry.
3. Saturate precleaner (K) with new engine oil;
squeeze out excess oil.
4. Reinstall precleaner (K) over paper element
(L).
Paper Element:
1. Clean area around paper element (L).
Remove wing nut (M), element cover, and
paper element (L) with precleaner (K).
9
38 590 01 Rev. B
KohlerPower.com
AC Rated Power
AC rated power is maximum amount of power
generator can support.
AC Surge Power
AC surge power is additional power generator
momentarily produces to aid in starting of
electrical devices requiring power above
generator's rated power requirements.
GFCI Receptacle
CAUTION
Electrical Shock can cause injury.
Do not touch wires while
generator is running.
Never operate generator in rain or snow.
Never touch generator with wet hands or
electrical shock may occur.
To reduce chance of electrical shock:
1. Do not attempt to operate equipment if
ground fault circuit interrupter (GFCI) RESET
button pops out repeatedly during use.
2. Remember that only receptacles labeled
GFCI have ground fault circuit interrupter
protection.
Ground Fault Circuit Interrupter (GFCI) stops
power to protected receptacles (Z) if a ground
fault (electrical leak) is detected. If RESET
button pops out, equipment plugged into
receptacle (Z) may be faulty. If this happens,
check equipment carefully. If equipment
appears to be in good condition, press RESET
button fi rmly until a click is heard. This will
restore power. If RESET button pops out again,
unplug equipment immediately. Contact a
Kohler portable dealer before attempting to use
it again.
GFCI Receptacle Test
1. Start generator.
2. Press TEST button, if functioning properly
RESET button should pop out, stopping
power to outlet.
3. If GFCI operation is correct, push RESET
button in. If GFCI operates incorrectly,
contact a Kohler portable dealer.
Overload (Capacity of Generator)
Never exceed rated load of generator (in Amps
and/or Watts) when it is running continuously.
See specifi cations table for rated outputs.
Before connecting and operating generator,
calculate electrical power required by electric
appliances (in Watts). This electrical power
rating is usually found on manufacturer's
plate on bulbs, electrical appliances, motors,
etc. Sum total of power required by these
appliances should not exceed nominal power
rating of generator.
Circuit protectors (X) and circuit breaker (Q) will
stop power to protected receptacles (O, P or
Z) when an overload of a connected electrical
device is detected or AC output voltage rises to
protect generator and any connected electric
devices.
When overload occurs and power generation
stops, proceed as follows:
1. Turn off any connected electric devices and
stop generator.
2. Reduce total wattage of connected electric
devices within application range.
3. Check for blockages in cooling air inlet and
outlet areas and around control unit. If any
blockages are found, remove them.
4. After checking, restart generator.
Battery Charging Using DC Receptacle
CAUTION
Electrical Shock can cause injury.
Do not touch wires while
generator is running.
Never operate generator in rain or snow.
Never touch generator with wet hands or
electrical shock may occur.
NOTE: This section refers to charging 12V
batteries in other equipment like motor
vehicles or off-road vehicles. No
jump-starting is possible.
NOTE: Follow safety procedures when
handling batteries to avoid damage to
electrical components and battery
explosions. Refer to battery
manufacturers safety data sheet on
safety risks of working with batteries.
Refer to battery manufacturer's
instruction on battery charging/
maintaining procedures.
NOTE: Generator DC rated voltage is 12V DC
circuit protector (X) will turn off
automatically if current above rated
fl ows during battery charging. Start
generator fi rst, then connect generator
to battery for charging. Before starting
to charge battery, ensure DC circuit
protector (X) is in RESET position. If
DC circuit protector (X) turns off again,
stop charging battery immediately and
contact a Kohler portable dealer.
EN

10 38 590 01 Rev. BKohlerPower.com
NOTE: Do not connect a VRLA (valve
regulated lead acid) battery. To charge
a VRLA battery, a special (constantvoltage) battery charger is required.
NOTE: Do not connect any load to battery or
use engine starter motor while
charging. This causes high current to
fl ow through generator which will burn
out coil.
NOTE: Prior to charging battery, remove
positive and negative cables to battery.
1. Start generator.
2. Press DC circuit protector (X) in.
3. Connect red battery charger lead to positive
battery terminal. Connect black battery
charger lead to negative battery terminal. Do
not reverse these positions. Connect cord to
DC receptacle (Y).
Operating Range of DC Power Supply
(Charging 12V battery only):
This power source is designed to charge
batteries up to 40Ah that are half-discharged.
Do not charge batteries of a higher capacity
than 40Ah.
12V Battery:
Time required for recharging a battery varies
depending on discharge level of battery. When
specifi c gravity of battery reaches 1.26 to 1.28,
charging is complete. When charging, check
battery’s specifi c gravity once an hour. Average
time for charging a half-discharged 40Ah
battery is approximately 5 hours. Be sure to
check battery fl uid level before charging.
DC Circuit Protector
NOTE: Reduce load of connected electric
device below specifi ed rated output of
generator if DC circuit protector (X)
turns off. If DC circuit protector (X)
turns off again, stop using device
immediately and contact a Kohler
portable dealer.
DC circuit protector (X) button will pop out,
stopping power to DC receptacle (Y) when
electric device being connected to generator is
operating at current above rated fl ows. To use
this equipment again, press DC circuit protector
(X) button.
Starter Battery
As starter battery (AI) is maintenance-free, just
check condition and tightness of connections
and its general cleanliness.
Generator and Retention Container
NOTE: Clean inside and outside of generator
regularly. Clean generator more
frequently if it is installed in a densely
wooded area or in a corrosive
atmosphere, or if it has been made
dirty by dust or organic material (rotting
leaves, moss, fecal matter, etc.).
NOTE: When cleaning exterior, a cleaning
foam may be used and wiped off using
a soft, absorbent cloth. Stubborn stains
may be removed using a suitable
solvent (white spirit or equivalent) and
wiped off using a soft, absorbent cloth.
1. Wash outside of generator using water with a
mild detergent added (e.g. car shampoo).
2. Rinse with clear fresh water to remove any
trace of cleaning product.
3. Open generator top cover (A) and engine
access door (E).
4. Check that there is no fl uid or debris in
retention container (F). If necessary, pump
fl uid into a suitable container.
5. Any fl uids present in retention container (F)
(rainwater, engine oil or fuel) must be
recycled or eliminated according to local
regulations in force.
6. Close generator top cover (A) and engine
access door (E).
Transporting Generator
Before transporting generator, check that
bolts are correctly tightened, close fuel valve
and disconnect battery. Generator should be
transported in its normal operating position;
never lay it on its side. Ensure where generator
is to be stored or used is carefully prepared
beforehand.
Repairs/Service Parts
We recommend that you use a Kohler portable
dealer for all maintenance, service, and
replacement parts for engine. To fi nd a Kohler
portable dealer visit KohlerPower.com or call
1-800-544-2444 (U.S. and Canada).
Storage
Long-term storage of your generator will require
some preventative procedures to guard against
deterioration.
NOTE: Do not connect with any electrical
devices (unloaded operation).
If generator will be out of service for 2 months
or more follow procedure below.
1. Replace fuel fi lter (G).
2. Add STP® Diesel Fuel Injector Treatment to
fuel following directions on bottle.
3. Start engine, ensure there are no fuel leaks
and then stop engine.
4. While engine is still warm, change oil and
replace oil fi lter (AE).
5. Clean precleaner (K).
6. Clean generator.
7. Cover generator with a protective cover to
protect it against dust and store it in a clean
and dry place.
11
38 590 01 Rev. B
KohlerPower.com
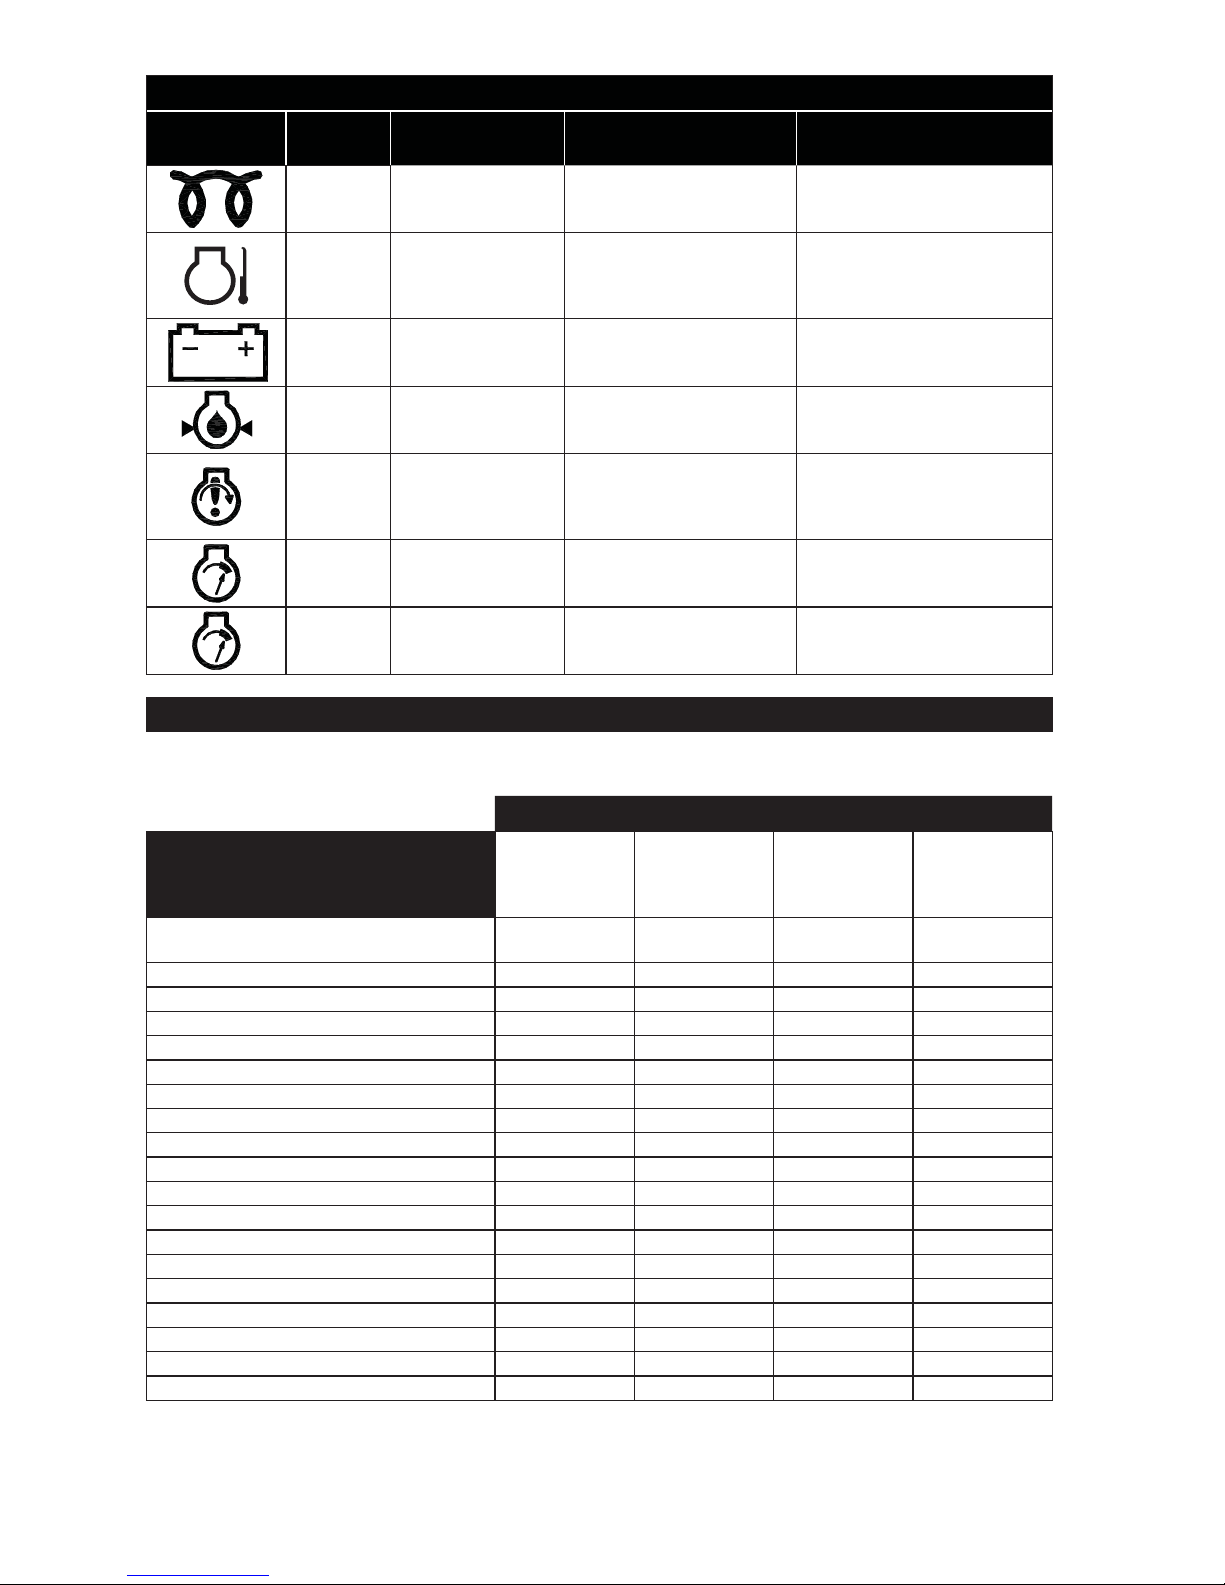
Repairing Minor Faults - MODYS Alarms and Faults
Pictograms
Color of
LED
Type of Fault Issue Possible Solution
Green Plug preheating
No issue: plug
preheating sequence
–
Red
Engine
temperature
Shutdown: abnormal
engine temperature
Allow generator to cool
down and check air
cleaner and vents on
enclosure.
Red
Battery or
charging
alternator
Problem with alternator
charge output or weak
battery
Contact a Kohler
portable dealer.
Red
Oil pressure or
low oil level
Shutdown: incorrect oil
pressure or low oil level
Allow generator to cool
down, top up and check
oil level.
Red Non-starting fault
3 consecutive
unsuccessful starting
attempts
Check that generator has
been started according to
recommendations in this
manual.
Red Overspeed
Shutdown: generator
rotation speed
excessive
Contact a Kohler portable
dealer.
Flashing
Red
Speed too low
Shutdown: insuffi cient
generator rotation
speed
Contact a Kohler portable
dealer.
Troubleshooting
Do not attempt to service or replace major engine components, or any items that require special
timing or adjustment procedures. This work should be performed by a Kohler portable dealer.
Problem
Possible Cause
Engine Not
Starting/
Running
Abnormally
Engine
Stopped
No Electric
Current
Tripping
of Circuit
Breaker
Load connected to generating set
during start-up
●
Start and Stop control ON or OFF ●
Oil level too low ●●
Unsuitable fuel ●
Fuel level too low ●●
Fuel valve closed ●
Clogged fuel fi lter ●
Clogged air fi lter ●
Fuel supply blocked or leaking ●
Faulty starter battery ●
Blocked ventilation inlets ●
Circuit protectors not actuated ●
Faulty appliance supply cord ●
Faulty electrical sockets ●
Faulty alternator ●
Device connected or faulty cord ●
Overload ●
Battery Incorrectly Connected ●●
Faulty MODYS Fuses (R) ●
EN
12 38 590 01 Rev. BKohlerPower.com
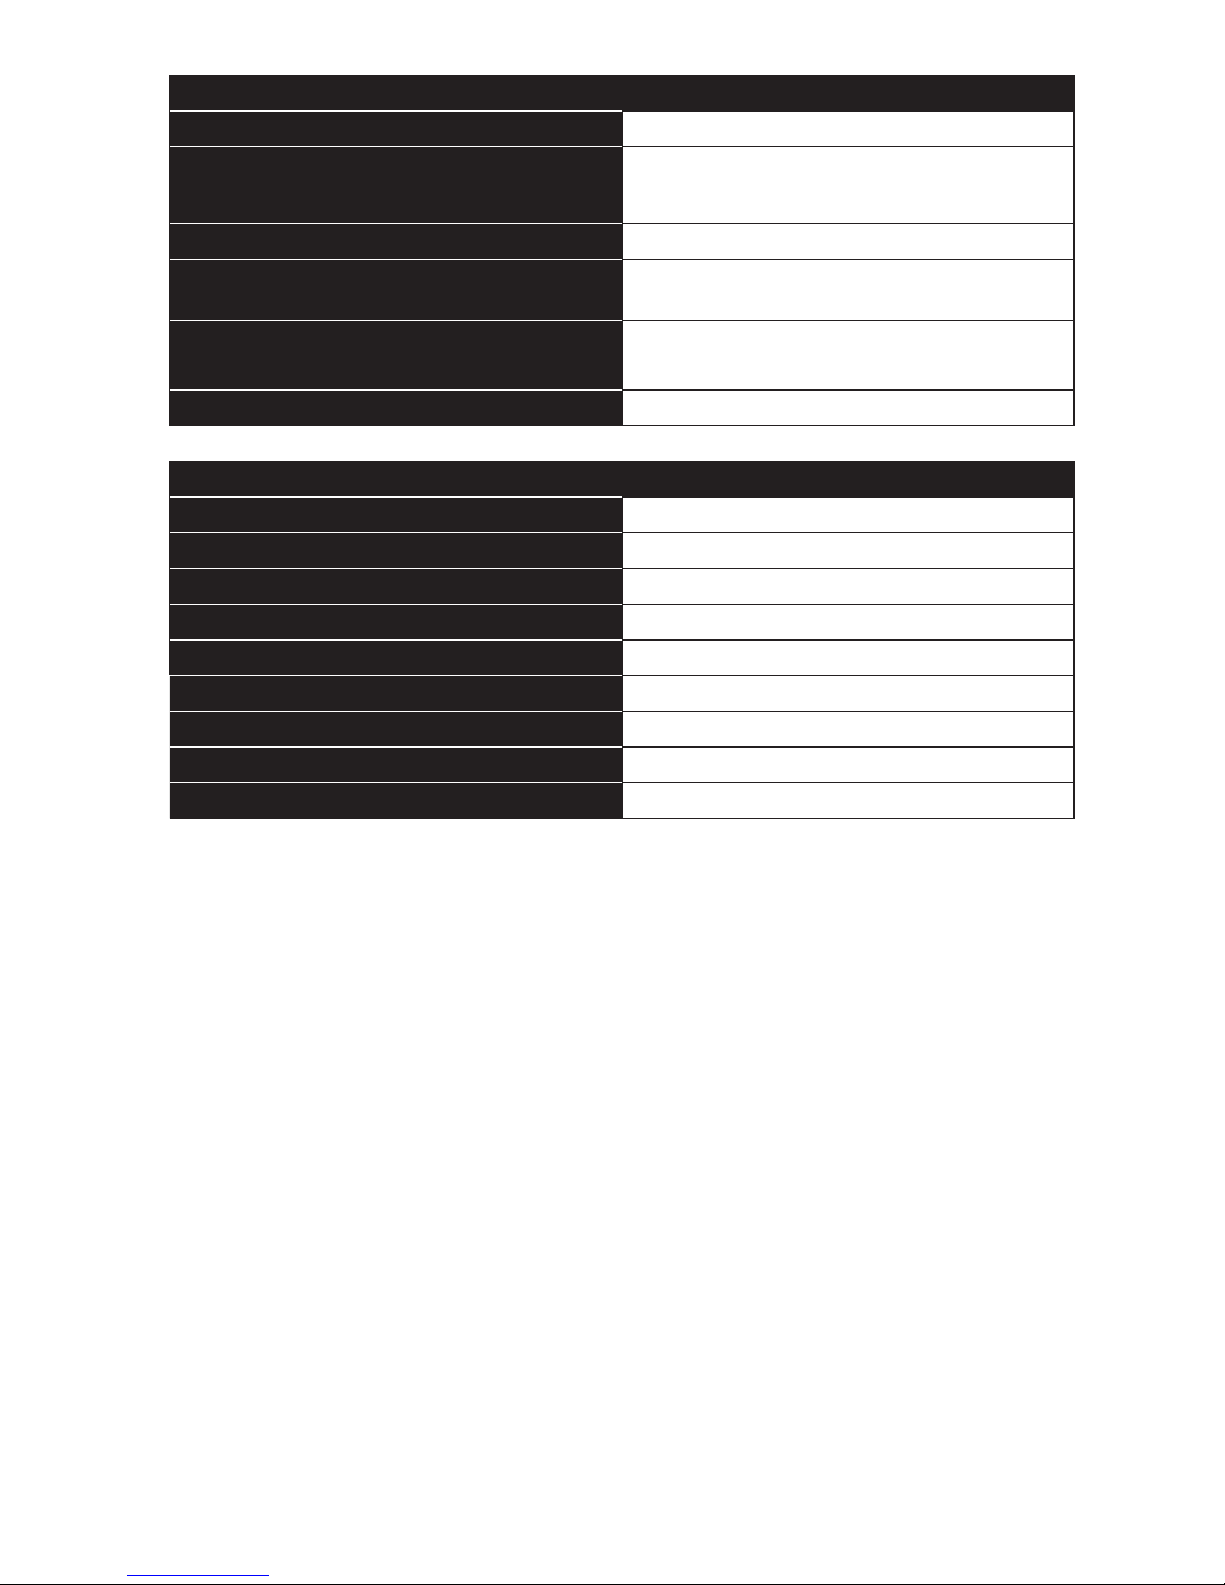
Specifi cations
Model
PRO 5.4 DES
Overall Dimensions
19.2 in. (990 mm) Length
15.6 in. (610 mm) Width
16.7 in. (940 mm) Height
Dry Weight 437 lbs. (198 kg)
AC Rated Power 4700 Watt
(120 Volts x 39.2 Amps)
(240 Volts x 19.6 Amps)
AC Surge Power 5400 Watt
(120 Volts x 45.0 Amps)
(240 Volts x 22.5 Amps)
DC Rated Power 100 Watt (12 Volts x 8.3 Amps)
Engine Specifi cations
Bore
3.4 in. (86 mm)
Stroke 3.0 in. (76 mm)
Displacement 27 cu. in. (442 cc)
Oil Capacity (Refi ll) 1.6 U.S. qt. (1.5 L)
Maximum Angle of Operation (@ full oil level)* 25°
Run Time 18.3 hours (1/2 load)
Fuel See fuel section
Fuel Tank Capacity 6 Gal. (22.7 L)
Noise Level 65-68 dB(A) @ 7 m
*Exceeding maximum angle of operation may cause engine damage from insuffi cient lubrication.
Additional specifi cation information can be found in service manual at KohlerPower.com.
Exhaust Emission Control System for model PRO 5.4 DES is EM, DDI and EGR for U.S. EPA,
California, and Europe.
 Loading...