

Page 1

Installation Guide
Bedpan Washers
K-13931 K-13938
M product numbers are for Mexico (i.e. K-12345M)
Los números de productos seguidos de
M corresponden a México (Ej.
K-12345M)
Français, page “Français-1”
Español, página“Español-1”
1034409-2-A
Page 2
Thank You For Choosing Kohler Company
We appreciate your commitment to Kohler quality. Please take a few
minutes to review this manual before you start installation. If you
encounter any installation or performance problems please don’t
hesitate to contact us. Our phone numbers and web site are listed on
the back cover. Thanks again for choosing Kohler Company.
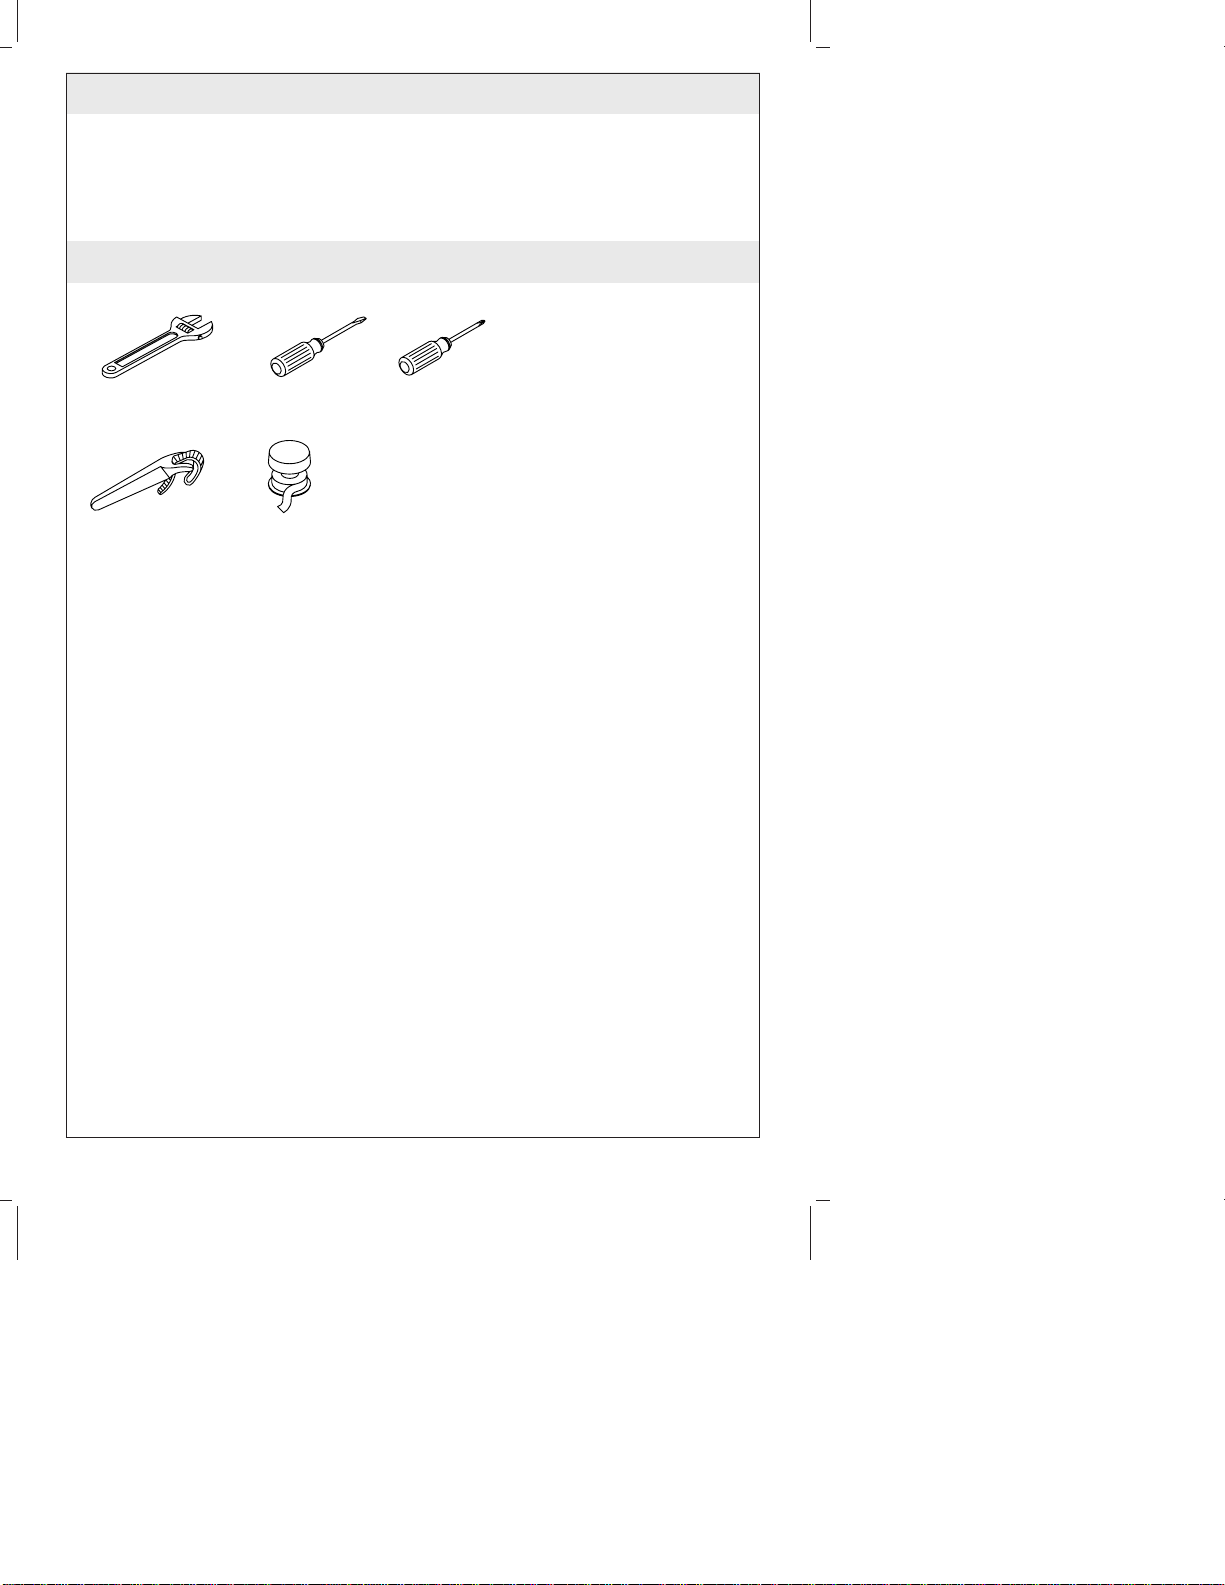
Tools and Materials
Plus:
• 9/16" or larger drill
bit for wall material
Adjustable
Wrench
Blade
Screwdriver
Phillips
Screwdriver
• Piping support
brackets
• Rags
Strap
Wrench
Thread
Sealant
1034409-2-A 2 Kohler Co.
Page 3
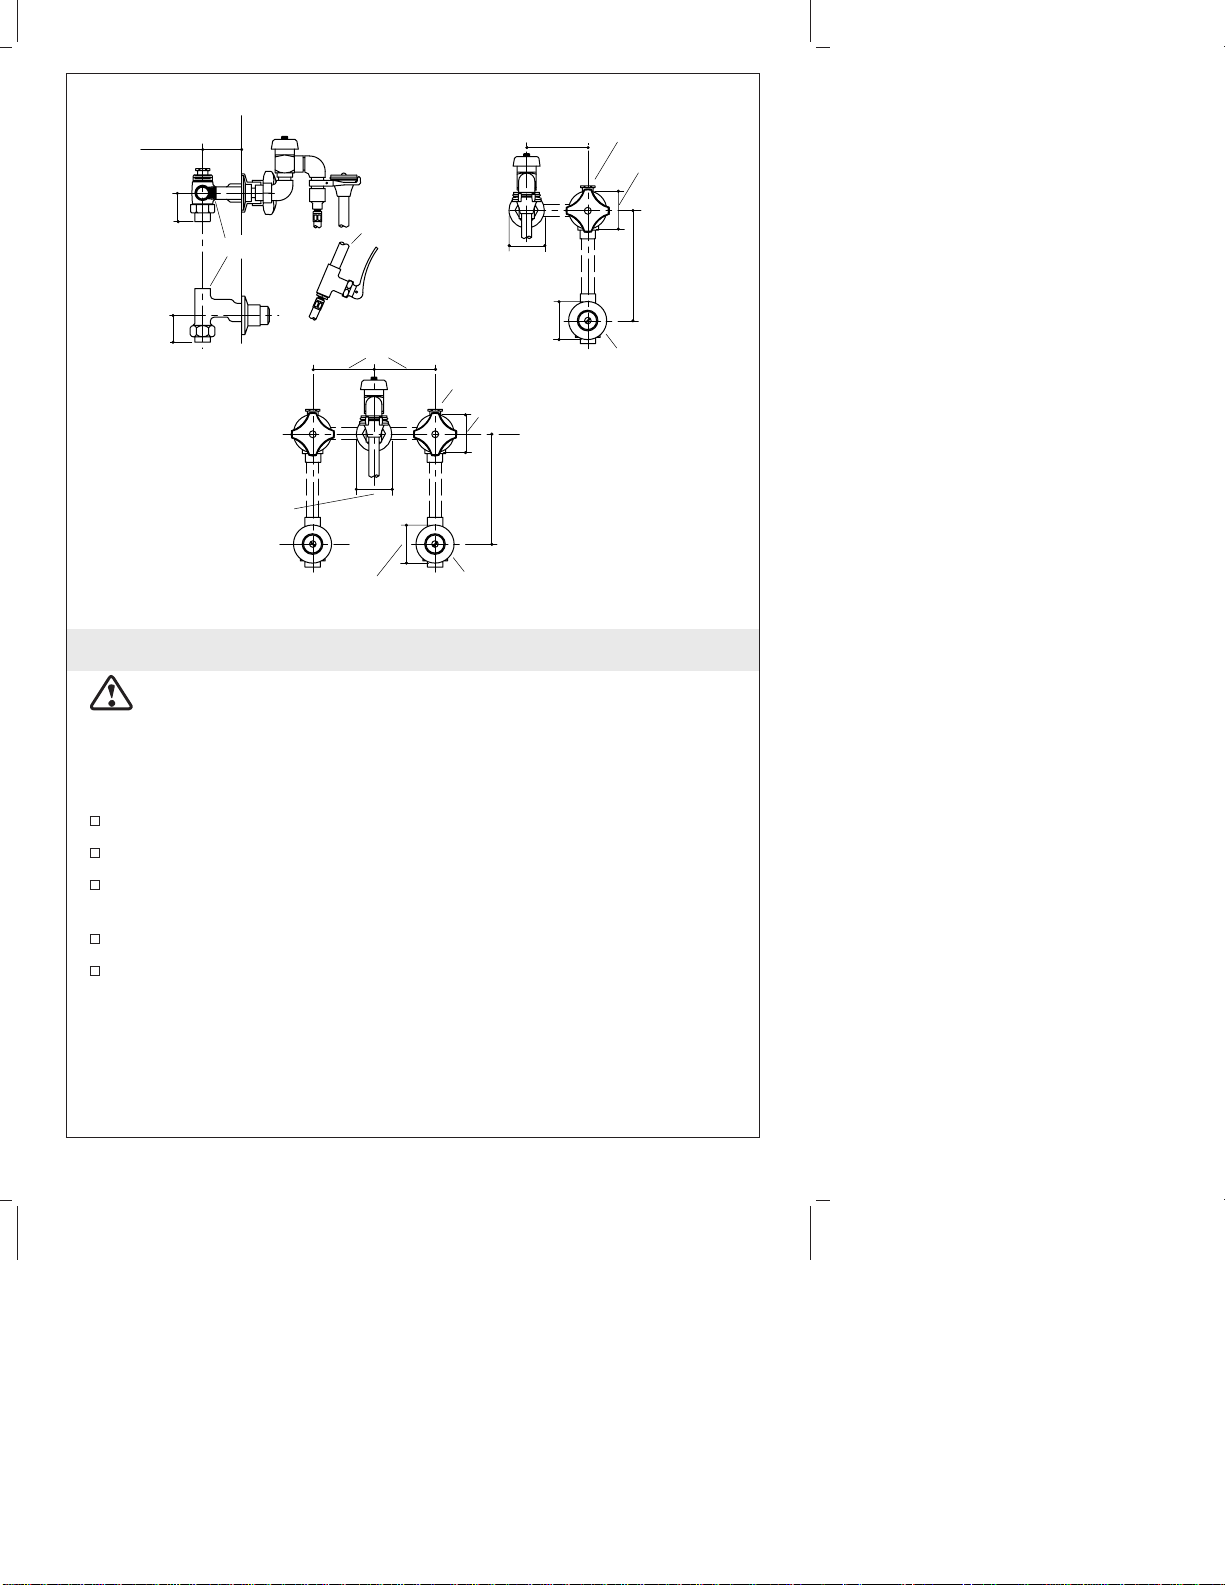
2-1/4" (5.7 cm)
Min.
3" (7.6 cm)
Max.
1-3/4"
(4.4 cm)
1-3/4"
(4.4 cm)
1/2" N.P.T.
K-13938
K-13931
Spray
4"(10.2 cm)
4"
(10.2 cm)
2-5/16"
(5.9 cm) D.
2-1/2"
(6.4 cm) D.
1/2" Supply
Valve
2-1/2" (6.4 cm) D.
1/2" Supply
Valve
2-1/2"
(6.4 cm) D.
8" (20.3 cm)
1/2" Supply
Valve
2-5/16" (5.9 cm) D.
2-1/2" (6.4 cm) D.
8" (20.3 cm) Optional
1/2" Supply
Valve
Before You Begin
CAUTION: Risk of property damage. To support the bedpan
washer and piping, provide sufficient reinforcement or mounting
brackets as required inside the wall.
NOTE: Refer to the roughing-in diagram for dimensional
information.
Shut off the main valve and water supply.
Observe all local plumbing codes and building codes.
Plumb using 1/2″ NPT pipe or 1/2″ copper tubing, elbows, and
adapters. Secure the piping to reinforcements in the wall.
Do not remove plastic thread protectors until instructed.
Kohler Co. reserves the right to make revisions in the design of
bedpan washers without notice, as specified in the Price Book.
Kohler Co. 3 1034409-2-A
Page 4
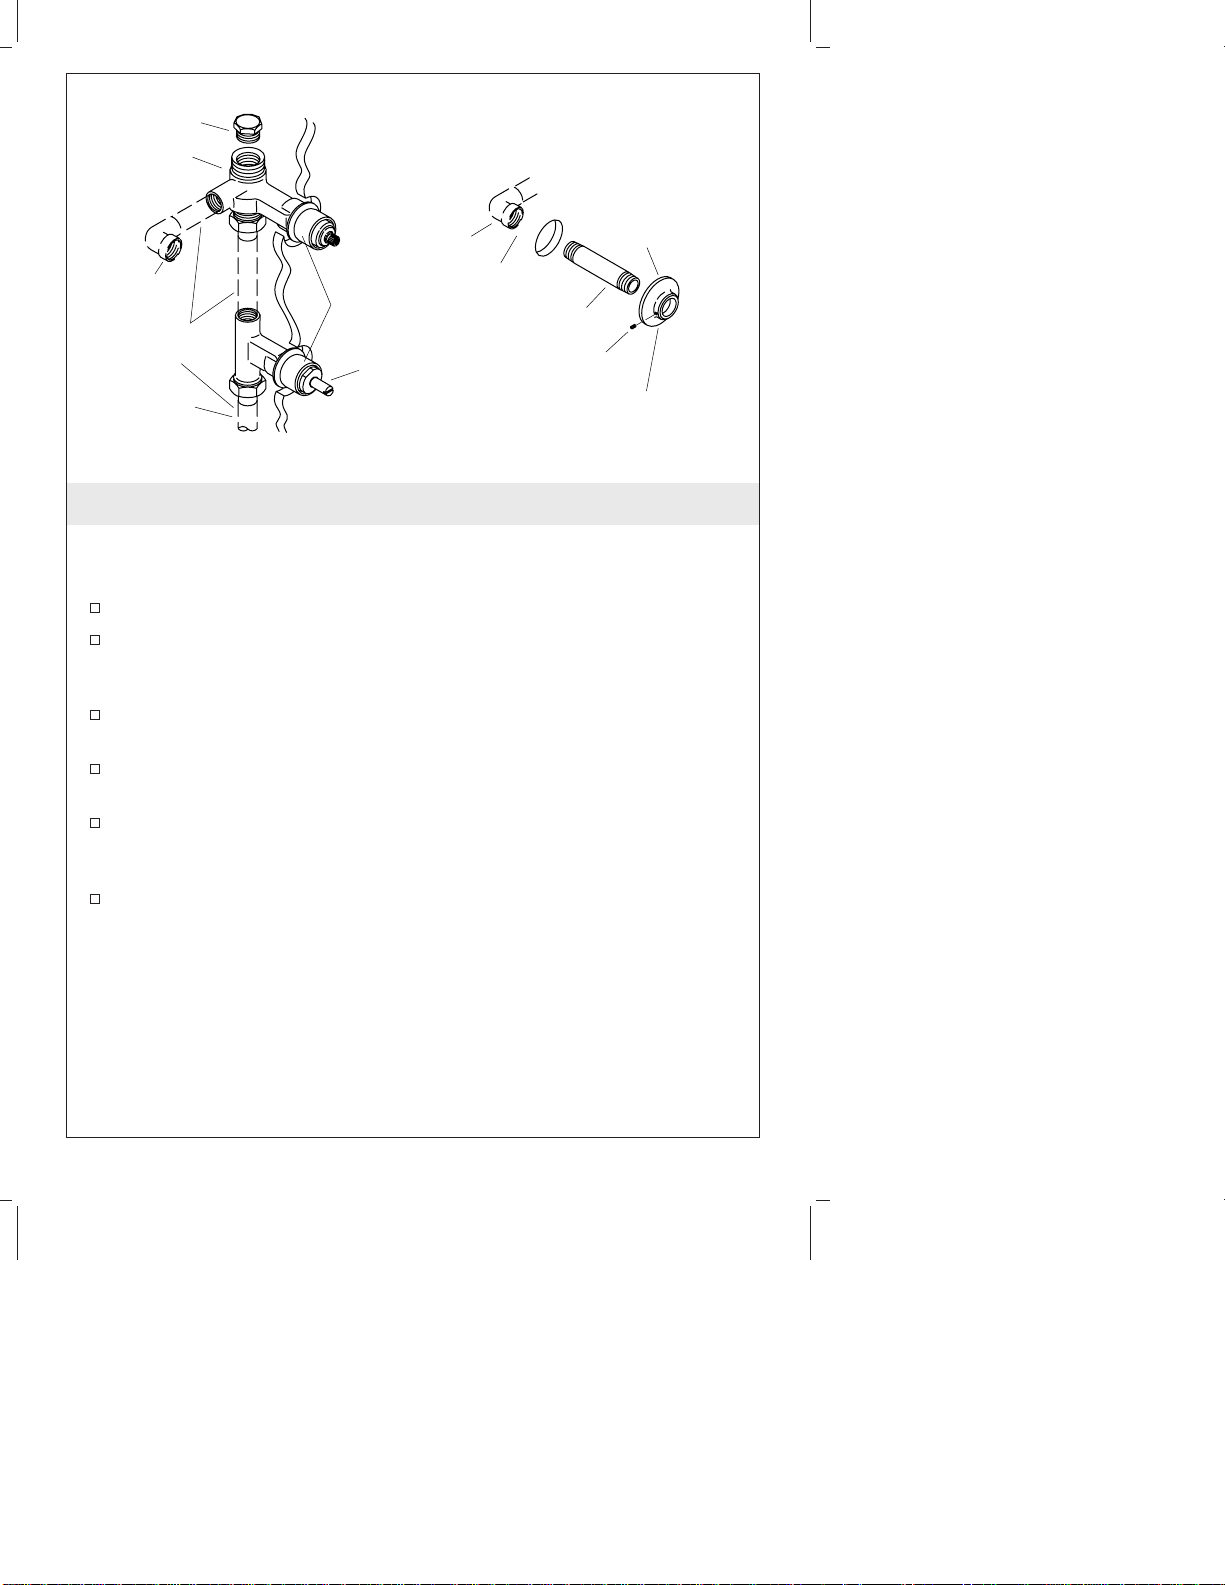
Plug
Supply
Valve
Apply Plumbers
Putty.
Screw
Flange
Elbow
1/2" Piping
or Tubing
Water
Supply
Thread
Protectors
Check
Valve
Elbow
Supply
Outlet
Supply
Nipple
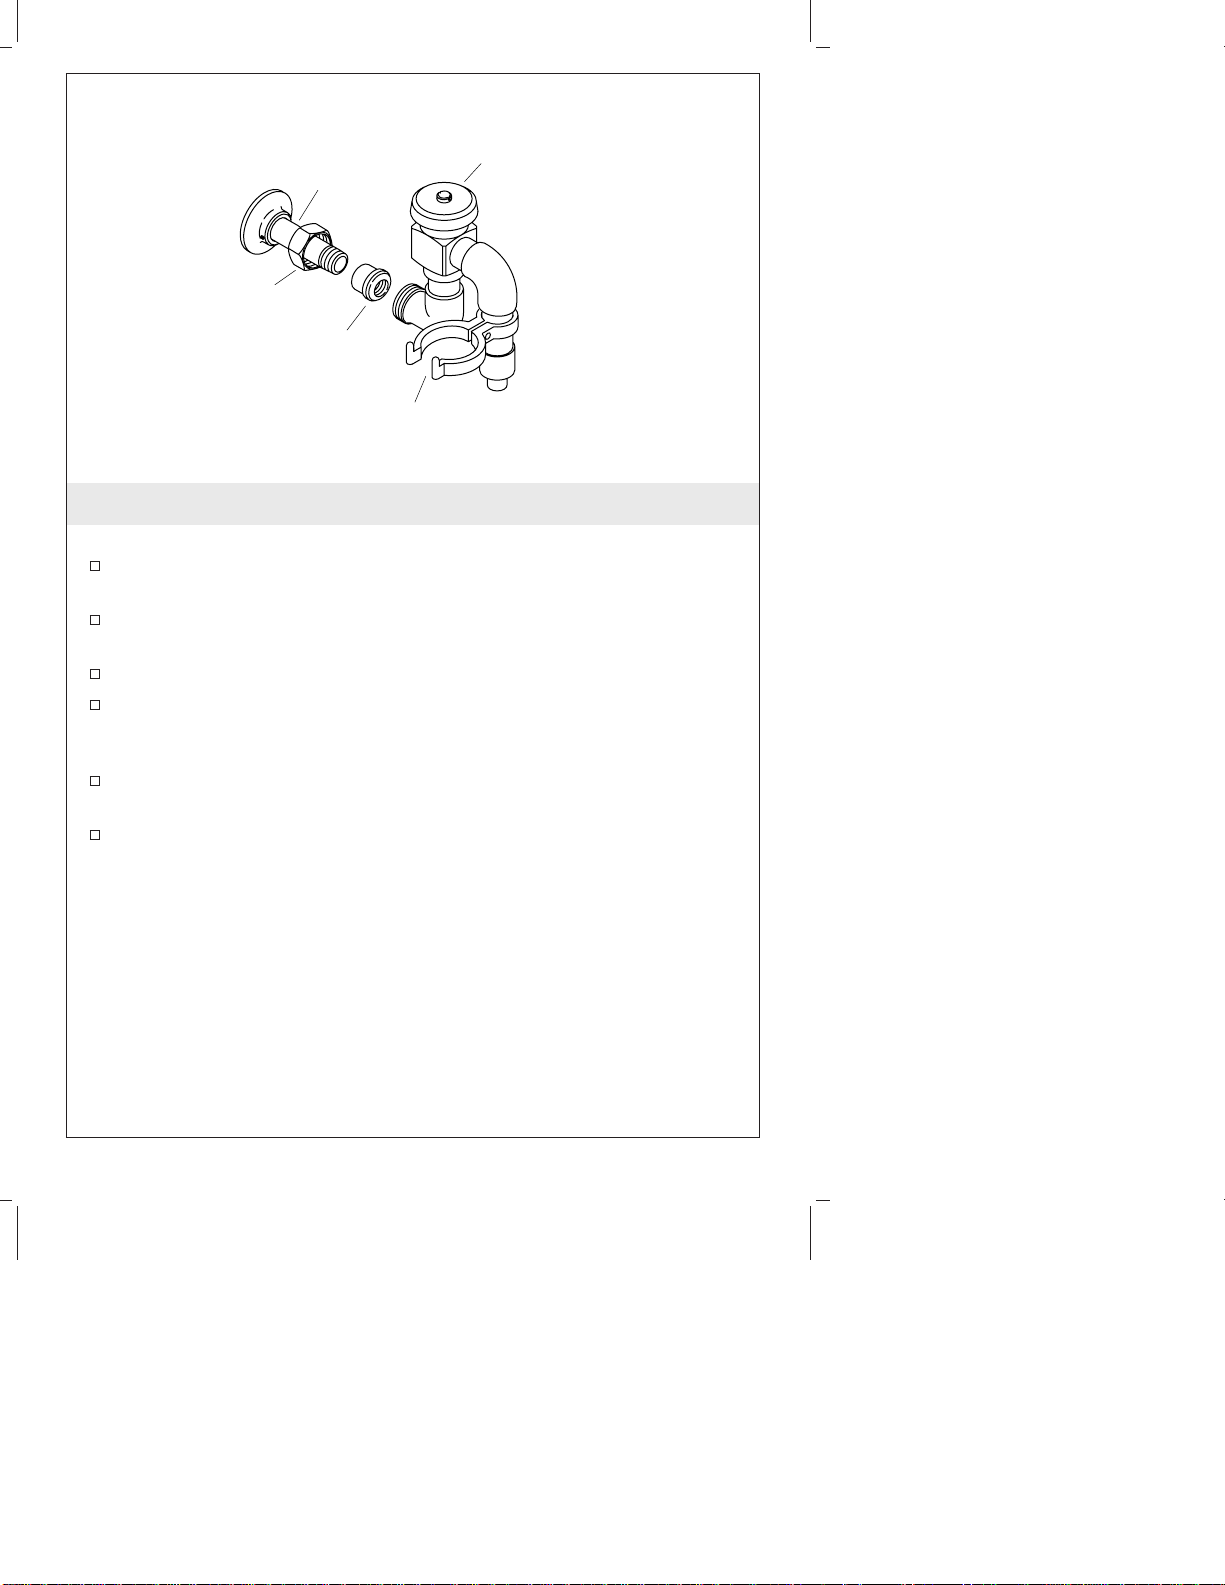
1. Install the Valve Body
NOTE: Apply a thread sealant where applicable.
NOTE: Do not remove thread protectors at this time.
Thread the plug button into the top of the supply valve.
Install both the supply valve and the check valve according to the
roughing-in diagram. Install two supply valves and two check
valves for a two handle bedpan washer.
Thread one supply nipple into the supply elbow outlet in the
wall. Repeat for a two handle bedpan washer.
Apply a bead of plumbers putty or other sealant to backside of
the flange according to the putty manufacturer’s instructions.
Slide one flange onto and over the supply nipple until it is snug
against the finished wall. Secure with the flange setscrew. Repeat
for a two handle bedpan washer.
Remove any excess putty or sealant.
1034409-2-A 4 Kohler Co.
Page 5
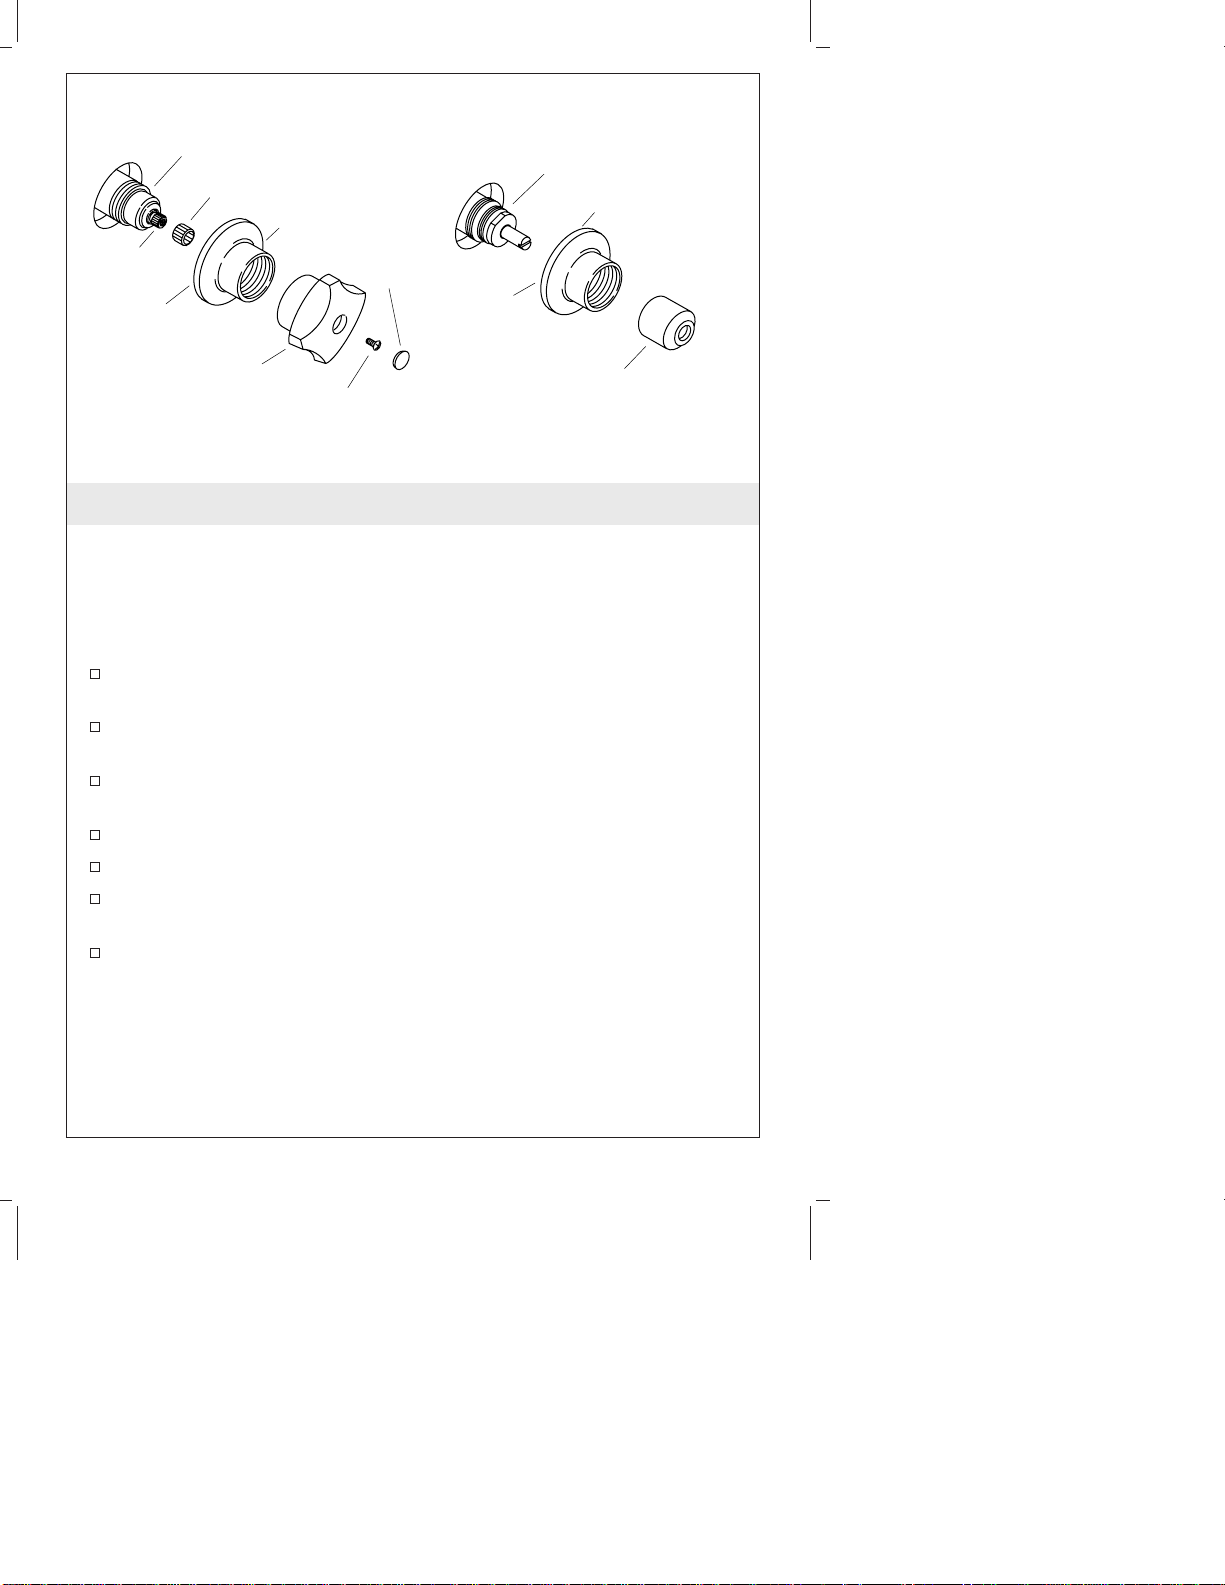
Supply
Valve
Spline
Adapter
Check Valve
Escutcheon
Escutcheon
Valve
Stem
Apply
Plumbers
Putty.
Handle
Round-Head
Screw
Button
Cap
Apply
Plumbers
Putty.
Shield
2. Install the Handles and Check Valves
NOTE: Handles that are marked ″Cold″ with a blue tape must
always be installed onto the right valve as viewed from the front of
the bedpan washer.
One Handle Installation
To install one handle, remove the thread protector from the valve.
Turn the valve to the closed position.
Apply a bead of plumbers putty or other sealant to backside of
the escutcheon according to the putty manufacturer’s instructions.
Thread the escutcheon onto the valve body until it is snug against
the finished wall.
Remove any excess putty or sealant.
Press the spline adapter into the valve stem.
Press the handle onto the escutcheon and spline adapter. Secure
with a screw.
Insert one button cap into the top and over the screw.
Kohler Co. 5 1034409-2-A
Page 6

Install the Handles and Check Valves (cont.)
Repeat for a two handle bedpan washer.
Check Valve Installation
To install one check valve, remove the thread protector.
Apply a bead of plumbers putty or other sealant to backside of
the escutcheon according to the putty manufacturer’s instructions.
Thread the escutcheon onto the check valve until it is snug
against the finished wall.
Remove any excess putty or sealant.
Thread the shield onto the check valve until tight.
Repeat for a two handle bedpan washer.
1034409-2-A 6 Kohler Co.
Page 7
Vacuum
Breaker
Supply
Nipple
Nut
Union
Joint
Clamp
Assembly
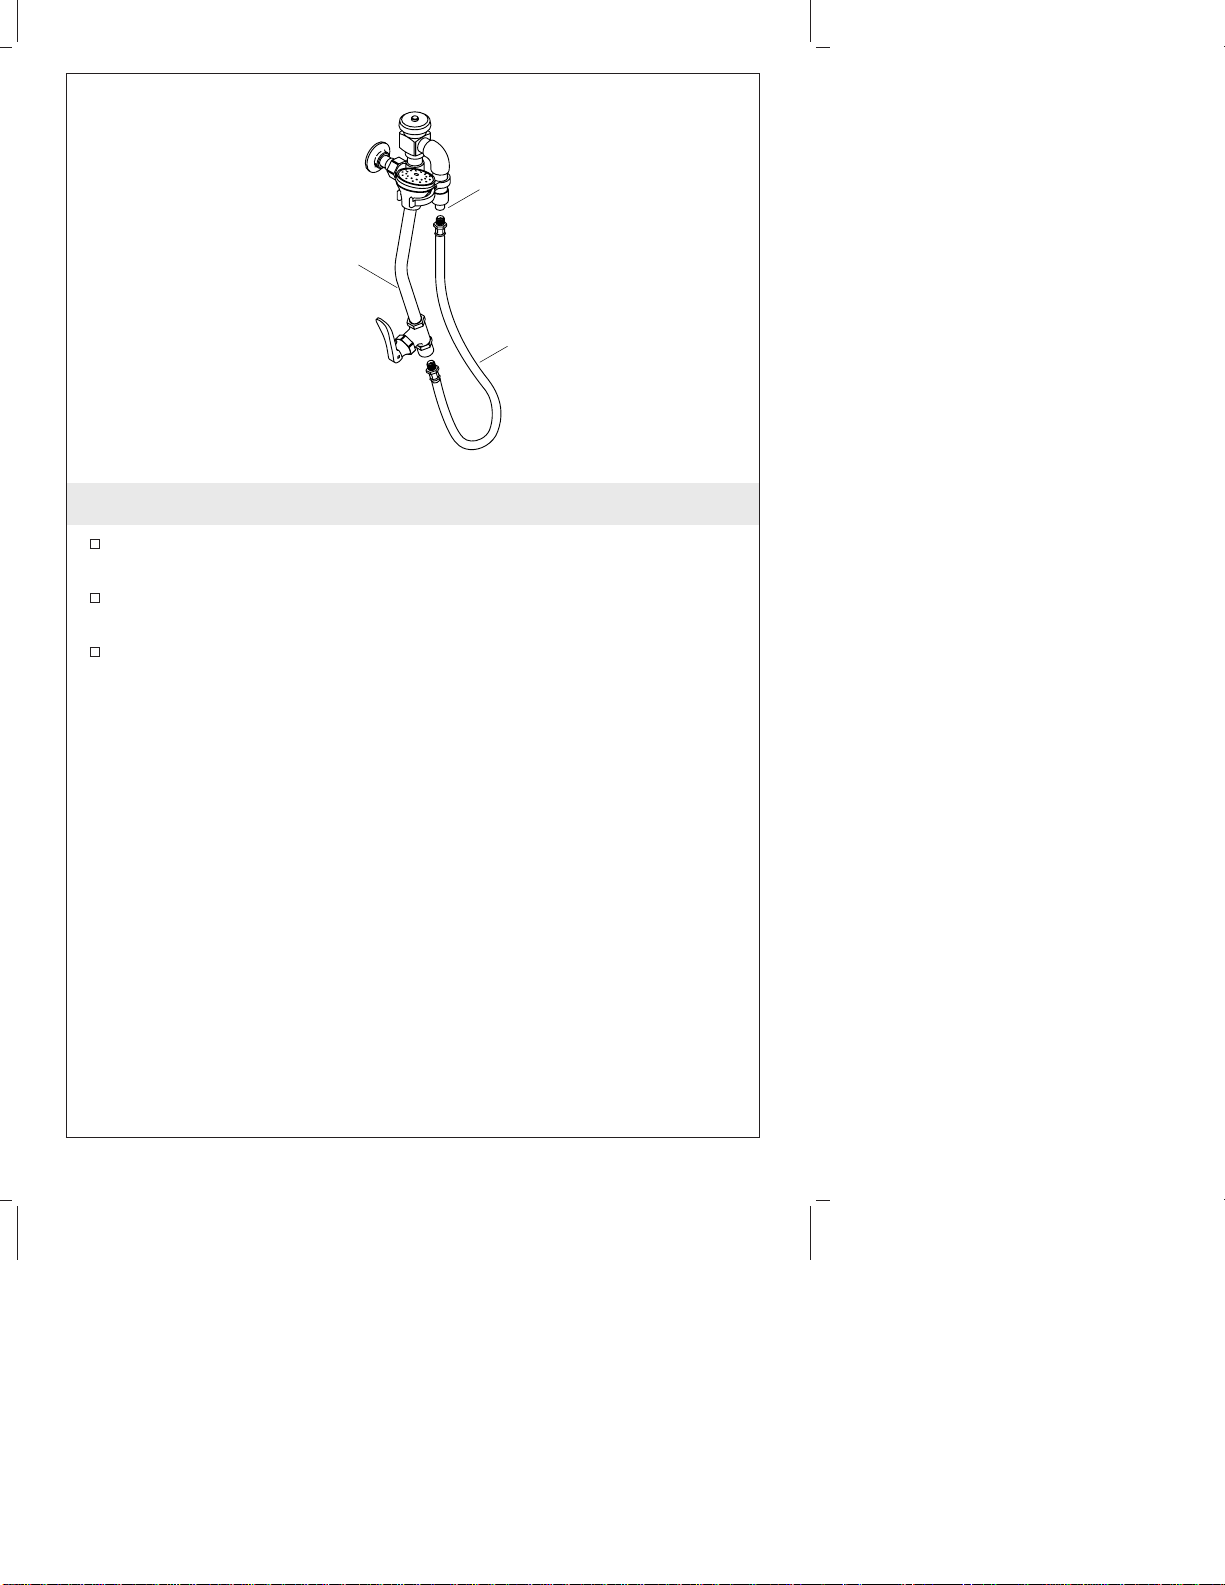
3. Install the Vacuum Breaker
NOTE: Apply a thread sealant where applicable.
Rotate the nut and union joint counterclockwise until they are
removed from the vacuum breaker assembly.
Slide the nut with threads facing out, half way down the supply
nipple.
Thread the union joint onto the supply nipple.
Thread the vacuum breaker assembly onto the union joint until
tight. Ensure that the vacuum breaker assembly is vertically
aligned.
Slide the nut onto the vacuum breaker assembly and thread until
tight.
Rotate the vacuum breaker clamp to point straight out from the
left side of the vacuum breaker assembly. Secure with a screw.
Kohler Co. 7 1034409-2-A
Page 8
Vacuum
Breaker
Assembly
Sprayer
Hose
4. Install the Hose Assembly
Thread one end of the flexible hose into the vacuum breaker
assembly outlet. Securely tighten.
Thread the other end of the flexible hose into the sprayer outlet.
Securely tighten.
Hang the spray nozzle from the rotated valve assembly clamp.
1034409-2-A 8 Kohler Co.
Page 9

Face
Sprayer
Screw
Washer
5. Installation Checkout
NOTE: The water flow from the sprayer can be limited by adjusting
the angle valve.
NOTE: The water temperature can be reset by adjusting the angle
valve.
One Handle Bedpan Washer
For a one handle bedpan washer, turn on the main water supply.
Open both the check valve and the supply valve.
Check for leaks. Repair as needed.
Remove the screw, face, and washer from the sprayer.
Run water through the hose for approximately one minute to
remove debris.
Test and verify that the sprayer operates normally.
Two Handle Bedpan Washer
For a two handle bedpan washer, repeat with the other check
valve and supply valve.
Turn the water off.
Remove any debris from the sprayer and reinstall.
Test and verify that the sprayer operates normally.
Kohler Co. 9 1034409-2-A
Page 10

Guide d’installation
Appareil de nettoyage à cuvettes
Outils et matériels
Clé à molette
Tournevis plat
Tournevis
cruciforme
Plus:
• Mêche à mur de
9/16" ou plus large
• Support de
tuyauterie
• Chiffons
Clé à
sangle
Joint d'étanchéité
pour filetage
Merci d’avoir choisi la compagnie Kohler
Nous apprécions votre engagement envers la qualité Kohler. Veuillez
prendre s’il vous plaît quelques minutes pour lire ce manuel avant de
commencer l’installation. Ne pas hésiter à nous contacter en cas de
problème d’installation ou de fonctionnement. Nos numéros de
téléphone et adresse Internet sont au verso. Merci encore d’avoir choisi
la compagnie Kohler.
Kohler Co. Français-1 1034409-2-A
Page 11

2-1/4" (5,7 cm)
Min.
3" (7,6 cm)
Max.
1-3/4"
(4,4 cm)
1-3/4"
(4,4 cm)
K-13938
N.P.T. 1/2"
4" (10,2 cm)
K-13931
Vaporisateur
2-5/16"
(5,9 cm) D.
2-1/2"
(6,4 cm) D.
Valve
d'alimentation 1/2"
2-1/2" (6,4 cm) D.
4" (10,2
cm)
Valve
d'alimentation 1/2"
2-1/2"
(6,4 cm) D.
8" (20,3 cm)
Valve
d'alimentation 1/2"
2-5/16"
(5,9 cm) D.
2-1/2" (6,4 cm) D.
8" (20,3 cm) Optionnel
Valve d'alimentation 1/2"
Avant de commencer
ATTENTION : Risque d’endommagement du matériel. Pour
supporter l’appareil de nettoyage à cuvettes et la tuyauterie,
prévoir un renfort suffisant ou des montants de fixation tel que
requis dans le mur.
REMARQUE : Se référer au plan de raccordement pour les
informations dimensionnelles.
Fermer la valve principale et couper l’alimentation d’eau
principale.
Respecter tous les codes de plomberie et de bâtiment locaux.
Mettre d’aplomb à l’aide d’un tube de 1/2″ N.P.T., ou un tube de
cuivre de 1/2″, de coudes et d’adaptateurs. Sécuriser la tuyauterie
aux renforts dans le mur.
Ne pas retirer les protecteurs en plastique du filetage avant d’en
être instruit de le faire.
Kohler Co. se réserve le droit d’apporter toutes modifications sur
le design des produits et ceci sans préavis, comme spécifié dans
le catalogue des prix.
Kohler Co. Français-2 1034409-2-A
Page 12

Bouchon
Vanne
d'alimentation
Appliquer du
mastic de
Coude
Tuyau ou
tube de 1/2"
Alimentation
d'eau
Coude
Protecteurs
de filetage
Valve clapet de
non-retour
Sortie
d'alimentation
Mamelon
d'alimentation
plomberie.
Vis
Bride
1. Installer le corps de la valve
REMARQUE : Appliquer un joint pour filetage où c’est applicable.
REMARQUE : Ne pas retirer les protection du filetage à ce moment.
Visser le bouchon au-dessus de la valve d’alimentation.
Installer la valve d’alimentation et la valve clapet selon le plan de
raccordement. Installer deux valves d’alimentation et deux
valves-clapet pour un appareil de nettoyage à cuvettes à deux
poignées.
Visser un mamelon d’alimentation dans la sortie d’alimentation
du coude dans le mur. Répéter pour un appareil de nettoyage à
cuvettes à deux poignées.
Appliquer du mastic d’étanchéité ou un produit semblable au dos
de la bride selon les instructions du fabricant du mastic.
Glisser une bride sur le mamelon d’alimentation jusqu’à ce qu’elle
soit serrée contre le mur fini. Sécuriser avec la vis de serrage de la
bride. Répéter pour un appareil de nettoyage à cuvettes à deux
poignées.
Retirer tout excédent de mastic de plombier ou joint d’étanchéité.
1034409-2-A Français-3 Kohler Co.
Page 13

Tige la
valve
Vanne
d'alimentation
Adaptateur à
cannelures
Rosace
Capuchon
du bouton
Valve clapet de
non-retour
Applique
Appliquer du
Appliquer du mastic
de plomberie.
Poignée
Vis à tête ronde
mastic de
plomberie.
Protection
2. Installer les poignées et les valves clapet.
REMARQUE : Les poignées marquées froid en bleu doivent toujours
être installées sur la valve droite tel qu’indiqué de l’avant de
l’appareil de nettoyage à cuvettes.
Installation une poignée
Pour installer une poignée, retirer le protecteur du filetage de la
valve. Tourner la valve en position fermée.
Appliquer du mastic de plombier ou autre au dos de l’applique
selon les instructions du fabricant du mastic.
Visser l’applique sur le corps de la valve jusqu’à ce qu’elle soit
serrée contre le mur fini.
Retirer tout excédent de mastic de plombier ou joint d’étanchéité.
Presser l’adaptateur à cannelures dans la tige de la valve.
Enfoncer la poignée sur l’adaptateur à cannelures. Fixer avec une
vis.
Insérer un bouchon par dessus la vis.
Kohler Co. Français-4 1034409-2-A
Page 14

Installer les poignées et les valves clapet. (cont.)
Répéter pour un appareil de nettoyage à cuvettes à deux
poignées.
Vérifier l’installation de la valve
Pour installer une poignée de valve, retirer le protecteur du
filetage.
Appliquer du mastic de plombier ou autre au dos de l’applique
selon les instructions du fabricant du mastic.
Visser l’applique sur la valve clapet jusqu’à ce qu’elle soit serrée
contre le mur fini.
Retirer tout excédent de mastic de plombier ou joint d’étanchéité.
Visser la protection sur la valve clapet jusqu’au serrage.
Répéter pour un appareil de nettoyage à cuvettes à deux
poignées.
1034409-2-A Français-5 Kohler Co.
Page 15

Mamelon
d'alimentation
Écrou
Joint
d'union
Collier
Ensemble
reniflard
3. Installer le reniflard
REMARQUE : Appliquer un joint pour filetage où il est applicable.
Pivoter l’écrou et le joint d’union vers la gauche jusqu’à ce qu’ils
soient retirés de l’ensemble du reniflard.
Glisser l’écrou avec le filetage dirigé vers l’extérieur, à mi-distance
du mamelon d’alimentation.
Visser un joint d’union sur chaque mamelon d’alimentation.
Visser l’ensemble du reniflard sur le joint d’union jusqu’au
serrage. S’assurer que l’ensemble du reniflard soit aligné
verticalement.
Glisser l’écrou sur l’ensemble du reniflard et bien serrer.
Pivoter la pince du reniflard de façon à ce qu’elle pointe vers
l’extérieur du côté gauche de l’ensemble du reniflard. Fixer avec
une vis.
Kohler Co. Français-6 1034409-2-A
Page 16

Ensemble
reniflard
Vaporisateur
Flexible
4. Installer l’ensemble du flexible
Visser une extrémité du flexible dans la sortie de l’ensemble du
reniflard. Bien serrer.
Visser l’autre extrémité du flexible dans la sortie du vaporisateur.
Bien serrer.
Suspendre le jet du vaporisateur du collier de l’ensemble de la
valve.
1034409-2-A Français-7 Kohler Co.
Page 17

Face
Vaporisateur
Vis
Rondelle
5. Vérification de l’installation
REMARQUE : Le débit d’eau du vaporisateur peut être limité en
ajustant l’angle de la valve.
REMARQUE : La température peut être ré-initialisée en ajustant
l’angle de la valve.
Appareil de nettoyage à cuvettes à une poignée.
Pour un appareil de nettoyage à cuvettes à une poignée, ouvrir
l’alimentation d’eau principale.
Ouvrir les valves clapet et d’alimentation.
Vérifier s’il y a des fuites. Réparer au besoin.
Retirer la vis, face, et rondelle du vaporisateur.
Faire couler l’eau à travers le flexible pendant environ une minute
pour chasser tous les débris.
Tester et vérifier que le vaporisateur fonctionne normalement.
Appareil de nettoyage à cuvettes à deux poignées.
Pour un appareil de nettoyage à cuvettes à deux poignées, répéter
avec les autres valves clapet et d’alimentation.
Fermer l’eau.
Retirer tous débris du vaporisateur et réinstaller.
Kohler Co. Français-8 1034409-2-A
Page 18

Vérification de l’installation (cont.)
Tester et vérifier que le vaporisateur fonctionne normalement.
1034409-2-A Français-9 Kohler Co.
Page 19

Guía de Instalación
Aparato limpiador de orinales
Herramientas y materiales
Llave ajustable
Destornillador
plano
Destornillador
de punta de
cruz (Phillips)
Más:
• Broca de 9/16" o
mayor para el
material de la pared
• Abrazaderas de
soporte para tubos
• Trapos
Llave de
correa
Cinta selladora
de roscas
Gracias por elegir los productos de Kohler
Apreciamos su elección por la calidad de Kohler. Dedique unos
minutos para leer este manual antes de comenzar la instalación. En
caso de problemas de instalación o de funcionamiento, no dude en
contactarnos. Nuestros números de teléfono y nuestra página web se
encuentran en la última página. Gracias nuevamente por escoger a
Kohler.
Kohler Co. Español-1 1034409-2-A
Page 20

2-1/4" (5,7 cm)
Mín.
3" (7,6 cm)
Máx.
1-3/4"
(4,4 cm)
1-3/4"
(4,4 cm)
K-13938
Rosca NPT
de 1/2"
4" (10,2 cm)
K-13931
Rociador
2-1/2"
(6,4 cm) D.
Válvula de
suministro de 1/2"
4" (10,2 cm)
2-5/16"
(5,9 cm) D.
2-1/2" (6,4 cm) D.
Válvula de
suministro de 1/2"
2-1/2"
(6,4 cm) D.
8" (20,3 cm)
Válvula de
suministro de 1/2"
2-5/16"
(5,9 cm) D.
2-1/2" (6,4 cm) D.
8" (20,3 cm) Optativo
Válvula de
suministro de 1/2"
Antes de comenzar
PRECAUCIÓN: Riesgo de daños a la propiedad. Para soportar
el aparato limpiador de orinales y los tubos, asegúrese de que el
interior de la pared tenga suficientes refuerzos o soportes de
montaje según sea necesario.
NOTA: Consulte el diagrama de instalación para ver la información
dimensional.
Cierre la válvula principal y el suministro de agua.
Cumpla con todos los códigos locales de plomería y de
construcción.
Conecte con tuberías de cobre de 1/2″ o tuberías con rosca NPT
de 1/2″, codos y adaptadores. Fije las tuberías a los refuerzos en
la pared.
No retire los protectores de plástico de las roscas hasta que se le
indique.
Kohler Co. se reserva el derecho de modificar el diseño de los
aparatos limpiadores de orinales sin previo aviso, tal como se
especifica en la lista de precios.
1034409-2-A Español-2 Kohler Co.
Page 21

Tapón
Válvula de
suministro
Aplique masilla
de plomería.
Tornillo
Brida
Codo
Tuberías o
tubos de 1/2"
Suministro
de agua
Codo
Protectores
de roscas
Válvula de
retención
Salida del
suministro
Niple de
suministro
1. Instale el cuerpo de la válvula
NOTA: Aplique cinta de roscas donde sea pertinente.
NOTA: No retire los protectores de roscas en este momento.
Enrosque el tapón en la parte superior de la válvula de
suministro.
Instale la válvula de suministro y la válvula de retención según el
diagrama de instalación. Instale dos válvulas de suministro y dos
válvulas de retención para un aparato limpiador de orinales de
dos manijas.
Enrosque un niple de suministro en la salida de suministro en
codo de la pared. Repita este procedimiento con un aparato
limpiador de orinales de dos manijas.
Aplique una tira de masilla de plomería u otro sellador en la
parte posterior de la brida, según las instrucciones del fabricante
del sellador.
Deslice una brida por el niple de suministro hasta que quede bien
ajustada contra la pared acabada. Fije con el tornillo de fijación de
la brida. Repita este procedimiento con un aparato limpiador de
orinales de dos manijas.
Elimine el exceso de masilla de plomería o sellador.
Kohler Co. Español-3 1034409-2-A
Page 22

Vávula de
suministro
Adaptador
de ranura
Válvula de
retención
Chapetón
Chapetón
Espiga de
vávula
Tapón
Aplique
Aplique masilla
de plomería.
Manija
Tornillo de
cabeza redonda
masilla de
plomería.
Cubierta
protectora
2. Instale las manijas y las válvulas de retención
NOTA: Las manijas que tienen inscrito ″Cold″ con cinta azul deben
instalarse siempre en la válvula derecha mirando desde el frente del
aparato limpiador de orinales.
Instalación de una manija
Para instalar una manija, retire el protector de roscas de la
válvula. Gire la válvula a la posición cerrada.
Aplique una tira de masilla de plomería u otro sellador en la
parte posterior del chapetón, según las instrucciones del
fabricante del sellador.
Enrosque el chapetón en el cuerpo de la válvula hasta que quede
ajustado contra la pared acabada.
Elimine el exceso de masilla de plomería o sellador.
Presione el adaptador de ranura en la espiga de la válvula.
Presione la manija sobre el chapetón y el adaptador de ranura.
Fije con un tornillo.
Inserte un tapón en la parte superior, sobre el tornillo.
1034409-2-A Español-4 Kohler Co.
Page 23

Instale las manijas y las válvulas de retención (cont.)
Repita este procedimiento con un aparato limpiador de orinales
de dos manijas.
Instalación de la válvula de retención
Para instalar una válvula de retención, retire la cubierta protectora
de roscas.
Aplique una tira de masilla de plomería u otro sellador en la
parte posterior del chapetón, según las instrucciones del
fabricante del sellador.
Enrosque el chapetón en la válvula de retención hasta que quede
ajustado contra la pared acabada.
Elimine el exceso de masilla de plomería o sellador.
Enrosque la cubierta protectora en la válvula de retención hasta
que quede apretada.
Repita este procedimiento con un aparato limpiador de orinales
de dos manijas.
Kohler Co. Español-5 1034409-2-A
Page 24

Montaje de la
Niple de
suministro
Tuerca
Junta de
unión
Abrazadera
válvula
rompevacío
3. Instale la válvula rompevacío
NOTA: Aplique cinta de roscas donde sea pertinente.
Gire la tuerca y la junta de unión a la izquierda hasta retirarlos
del montaje de la válvula rompevacío.
Deslice la tuerca con las roscas al exterior hasta llegar a la mitad
del niple de suministro.
Enrosque la junta de unión en el niple de suministro.
Enrosque el montaje de la válvula rompevacío en la junta de
unión hasta que esté apretado. Asegúrese de que el montaje de la
válvula rompevacío esté alineado verticalmente.
Deslice la tuerca por el montaje de la válvula rompevacío y
enrósquela hasta que esté apretada.
Gire la abrazadera de la válvula rompevacío de manera que
apunte hacia la izquierda desde el montaje de la válvula
rompevacío. Fije con un tornillo.
1034409-2-A Español-6 Kohler Co.
Page 25

Montaje de la
válvula
rompevacío
Rociador
Tubo flexible
4. Instale el montaje del tubo flexible
Enrosque un extremo del tubo flexible en la salida del montaje de
la válvula rompevacío. Apriete bien.
Enrosque el otro extremo del tubo flexible en la salida del
rociador. Apriete bien.
Cuelgue la boquilla del rociador en la abrazadera.
Kohler Co. Español-7 1034409-2-A
Page 26

Placa
Rociador
Tornillo
Arandela
5. Verificación de la instalación
NOTA: Se puede limitar el flujo de agua del rociador ajustando la
válvula en ángulo.
NOTA: La temperatura del agua se puede ajustar mediante la
válvula en ángulo.
Aparato limpiador de orinales de una manija
En caso de tener el aparato limpiador de orinales de una manija,
abra el suministro principal de agua.
Abra tanto la válvula de retención como la válvula de suministro.
Verifique que no haya fugas. Repare según sea necesario.
Retire el tornillo, la placa y la arandela del rociador.
Deje correr el agua a través del tubo flexible durante un minuto
aproximadamente para eliminar los residuos.
Pruebe el rociador y compruebe que funcione con normalidad.
Aparato limpiador de orinales de dos manijas
En caso de tener el aparato limpiador de orinales de dos manijas,
repita esta operación con la otra válvula de retención y la válvula
de suministro.
Cierre el agua.
1034409-2-A Español-8 Kohler Co.
Page 27

Verificación de la instalación (cont.)
Elimine las impurezas del rociador y vuelva a instalarlo.
Pruebe el rociador y compruebe que funcione con normalidad.
Kohler Co. Español-9 1034409-2-A
Page 28

USA: 1-800-4-KOHLER
Canada: 1-800-964-5590
México: 001-877-680-1310
kohler.com
©2004 Kohler Co.
1034409-2-A
 Loading...