

Kohler K6880SN Installation Manual

Installation and Care Guide
Guide d’installation et d’entretien
Guía de instalación y cuidado
Console Table Legs
Pieds de console
Patas de la mesa consola
K-6880
M product numbers are for Mexico (i.e. K-12345M)
Los números de productos seguidos de M
corresponden a México (Ej. K-12345M)
1007272-2-C
USA/Canada: 1-800-4KOHLER
México: 001-800-456-4537
kohler.com
©2009 Kohler Co.

Tools/Outils/Herramientas
Plus/Plus/Más:
2x6 Backing Material
Matériau de renfort 2x6
Listones de refuerzo 2x6
9/16"
1/4"
Before You Begin
WARNING: Risk of property damage. Select lag bolts with a length that can
safely clear any obstacles in the wall. Calculate the proper length of the lag bolts
by adding the following thicknesses: backing material + finished wall + hanger.
NOTICE: Do not allow the console table legs to fully support the weight of the
lavatory. The weight of the lavatory must be supported to 2x6 backing material
behind the finished wall using the hanger provided with the lavatory and lag bolts
(not provided).
Observe all local plumbing and building codes.
Two people should install this product.
Plumbing fittings will be exposed and visible once the vanity installation is
complete. Plated plumbing fittings are recommended.
This installation guide provides installation steps for attaching the lavatory to
wood frame construction. For other installations, supply suitable bracing and
fastening devices of sufficient size and strength.
Kohler Co. reserves the right to make revisions in the design of products without
notice, as specified in the Price Book.
• Lag Bolts
Tire-fond
Pernos de fijación
Avant de commencer
AVERTISSEMENT: Risque d’endommagement du matériel. Sélectionner des
tire-fonds ayant une longueur qui peut dégager tous les obstacles du mur en toute
sécurité. Calculer la longueur appropriée des tire-fonds en rajoutant les épaisseurs
suivantes : matériau arrière + mur fin + ancrage.
NOTICE: Ne pas laisser les pieds de la table de console supporter entièrement le
poids du lavabo. Le poids du lavabo doit être supporté sur le matériau arrière 2x6 à
l’arrière du mur fini en utilisant le dispositif d’ancrage fournir avec le lavabo et les
tire-fonds (non fournis).
Respecter tous les codes de plomberie et de bâtiment locaux.
Deux personnes doivent installer ce produit.
Les raccords de plomberie seront exposés et visibles une fois l’installation du
meuble complétée. Des raccords de plomberie plaqués sont recommandés.
1007272-2-C 2 Kohler Co.

Avant de commencer (cont.)
Ce guide d’installation fournit les étapes pour raccorder le lavabo au cadre en
bois. Pour d’autres installations, fournir un renforcement approprié et des
dispositifs de fixation de dimension et résistance suffisantes.
Kohler se réserve le droit d’apporter des modifications à la conception de ses
produits sans préavis comme cela est indiqué dans le catalogue des prix.
Antes de comenzar
ADVERTENCIA: Riesgo de daños a la propiedad. Seleccione pernos de fijación
de una longitud que pueda librar con seguridad todos los obstáculos de la pared.
Calcule la longitud correcta de los pernos de fijación sumando los espesores
siguientes: material de refuerzo + pared acabada + soporte de suspensión.
AVISO: No permita que las patas de la mesa consola soporten todo el peso del
lavabo. El peso del lavabo debe quedar soportado por el material de refuerzo de 2x6
detrás de la pared acabada utilizando el soporte de suspensión provisto con el lavabo
y los pernos de fijación (no provistos).
Cumpla con todos los códigos locales de plomería y construcción.
Dos personas deben instalar este producto.
Una vez que se termine la instalación del tocador, las conexiones de plomería
quedarán expuestas y visibles. Se recomienda utilizar conexiones de enchapadas.
Esta guía de instalación contiene los pasos de instalación para fijar el lavabo a una
estructura de madera. Para otras instalaciones, provea el refuerzo adecuado y los
herrajes de suficiente tamaño y resistencia.
Kohler Co. se reserva el derecho de modificar el diseño de los productos sin
previo aviso, tal como se especifica en la lista de precios.
Kohler Co. 3 1007272-2-C
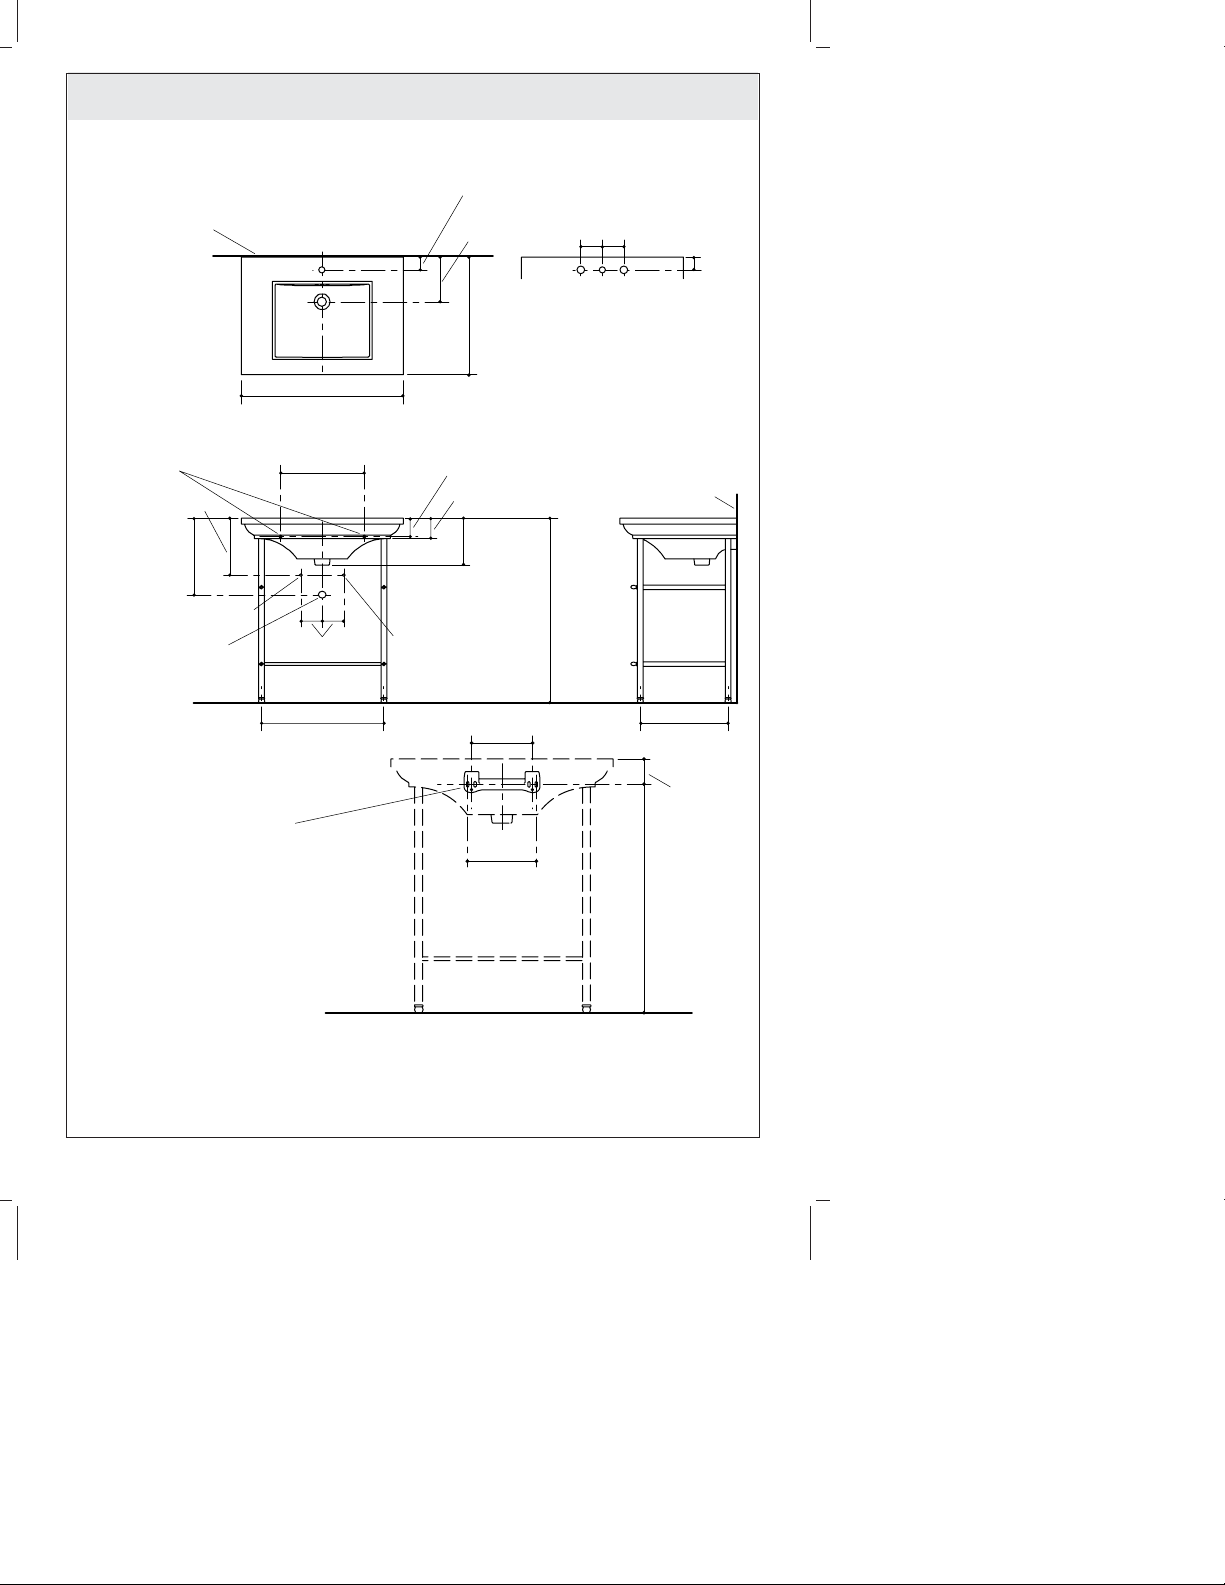
Roughing-In/Plan de raccordement/Diagrama de instalación
Finished Wall
Mur fini
Pared acabada
1/2" (1.3 cm) D.
Anchor Holes in the
Lavatory
Orifices d'ancrage
dans le lavabo de
Ø 1/2" (1,3 cm)
Orificios de anclaje
de 1/2" (1,3 cm) D.
en el lavabo
14" (35.6 cm)
14-1/4"
(36.2 cm)
3/8" Hot/Chaud/Caliente
1-1/4" Outlet
Sortie 1-1/4"
Salida de 1-1/4"
K-6880
K-2269-1
30" (76.2 cm)
15-1/2" (39.4 cm)
4" (10.2 cm)
23" (58.4 cm)
2-3/8"
(6 cm)
8-1/4"
(21 cm)
21-3/4"
(55.2 cm)
3-11/16" (9.4 cm)
3-3/4" (9.5 cm)
8-5/8"
(21.9 cm)
3/8" Cold/Froid/Fría
8-1/4" (21 cm)
K-2269-8
4" (10.2 cm)
2-3/8"
(6 cm)
Finished Wall
Mur fini
Pared acabada
34"
(86.4 cm)
15-1/2"
(39.4 cm)
2-13/16"
Hanger
Étrier de support
Soporte de suspensión
9-1/4" (23.5 cm)
Hanger Location
Emplacement d'accrochage
Ubicación del soporte de suspensión
(7.1 cm)
31-1/8"
(79.1 cm)
1007272-2-C 4 Kohler Co.
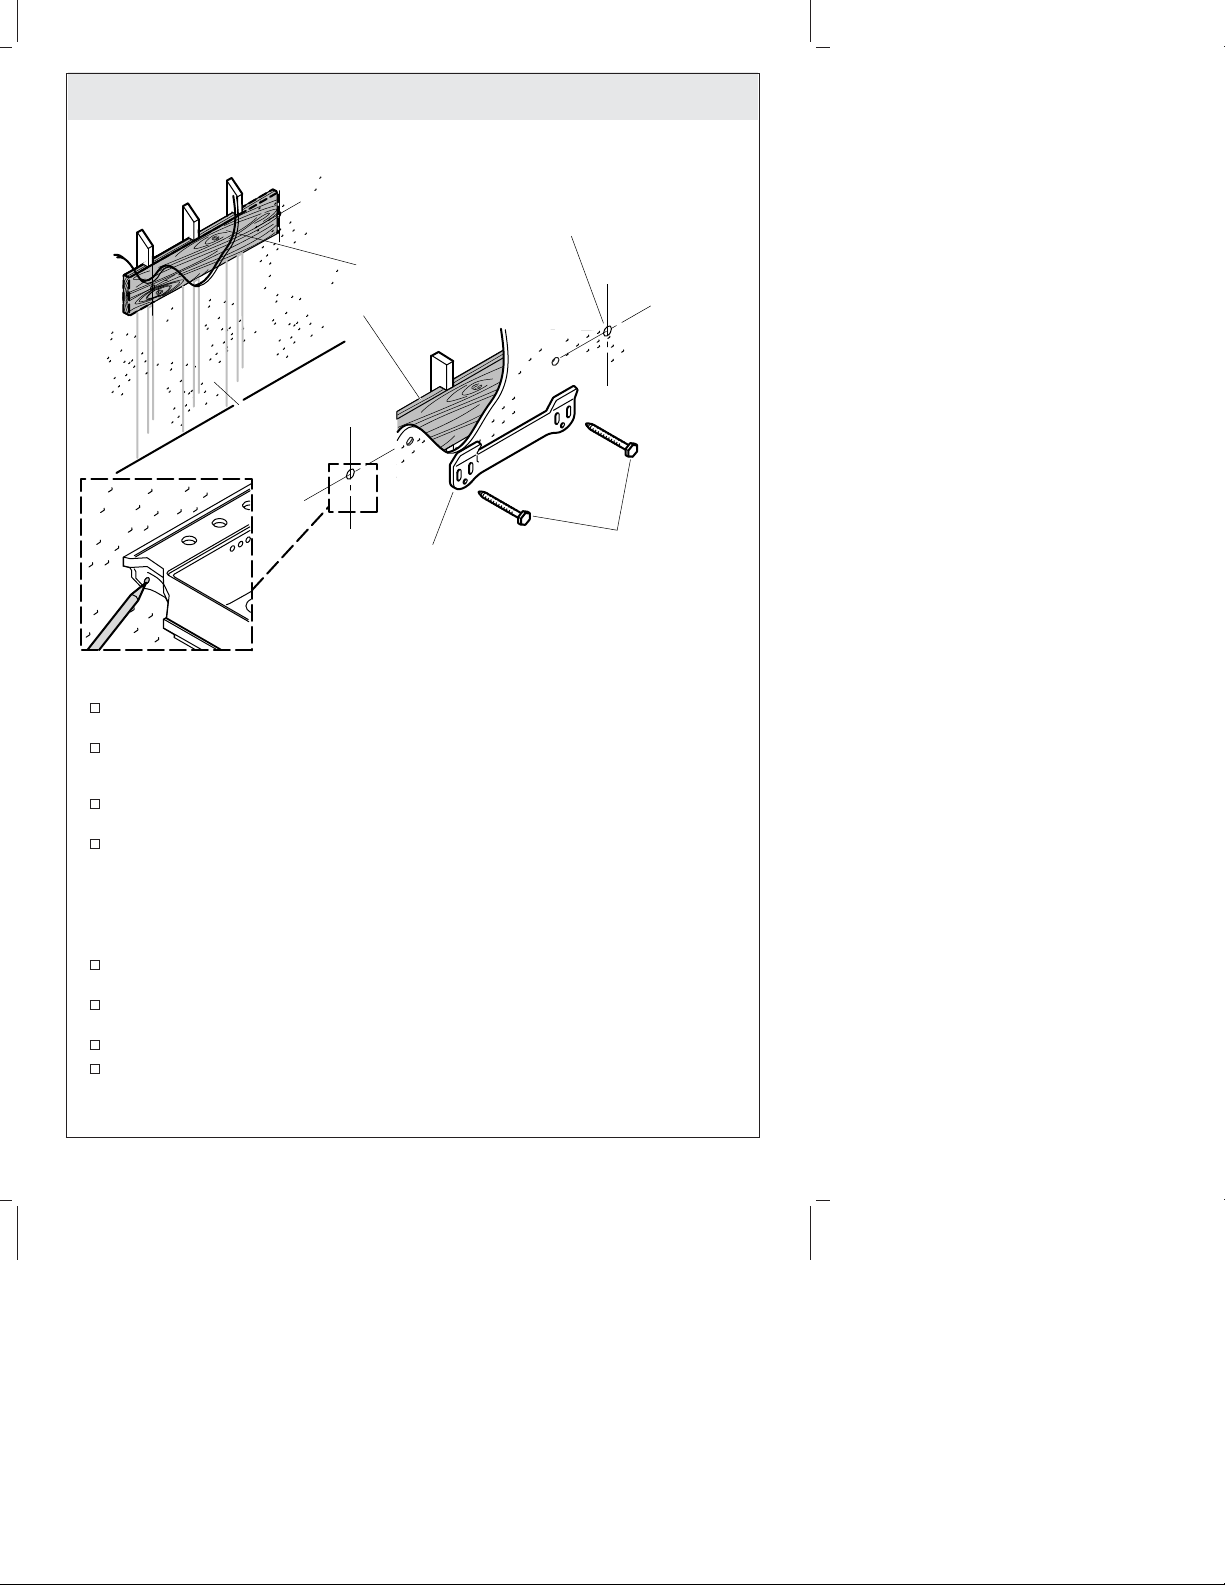
1. Prepare the Site
Finished Wall
Mur fini
Pared acabada
Mounting Holes
Orifices de fixation
Orificios de fijación
2x6 Backing Material
Matériau de renfort 2x6
Listones de refuerzo de 2x6
Hanger
Étrier de support
Soporte de suspensión
NOTICE: Refer to the ″Roughing-In″ section throughout this procedure to prepare the
site.
Front notch the studs, then secure 2x6 backing material to the studs with framing
nails.
Install the water supplies and drain piping. Install the supply stops at a location
where the handles will not make contact with the console table legs when the
handles are fully open.
Complete the finished wall. Ensure the finished wall is straight and the floor is
level and perpendicular to the finished wall.
Level and hold the hanger in position. Secure the hanger with lag bolts (not
provided).
NOTICE: The product can break, chip, or cause injury if handled carelessly. Do not
allow the hanger to support the weight of the lavatory. Get assistance lifting and
holding the lavatory in place while you mark the mounting holes on the underside of
the lavatory.
With assistance, lift and hold the lavatory on the lip of the installed hanger. Verify
the lavatory is properly positioned and is level. Adjust the lavatory, if needed.
Mark the two mounting holes on the underside of the lavatory. Lift the lavatory
off the hanger, then set the lavatory aside.
Verify the marks are level with one another.
Using a 1/4″ drill bit, drill pilot holes at the marks.
Lag Bolts
Tire-fonds
Pernos de fijación
Kohler Co. 5 1007272-2-C
 Loading...