

Page 1

Installation Guide
Apron-Front Sinks
K-6573, K-14570, K-14571,
K-14572, K-14573, K-14576,
K-14577
M product numbers are for Mexico (i.e. K-12345M)
Los números de productos seguidos de
M corresponden a México (Ej.
K-12345M)
Français, page “Français-1”
Español, página “Español-1”
1019949-2-C
Page 2
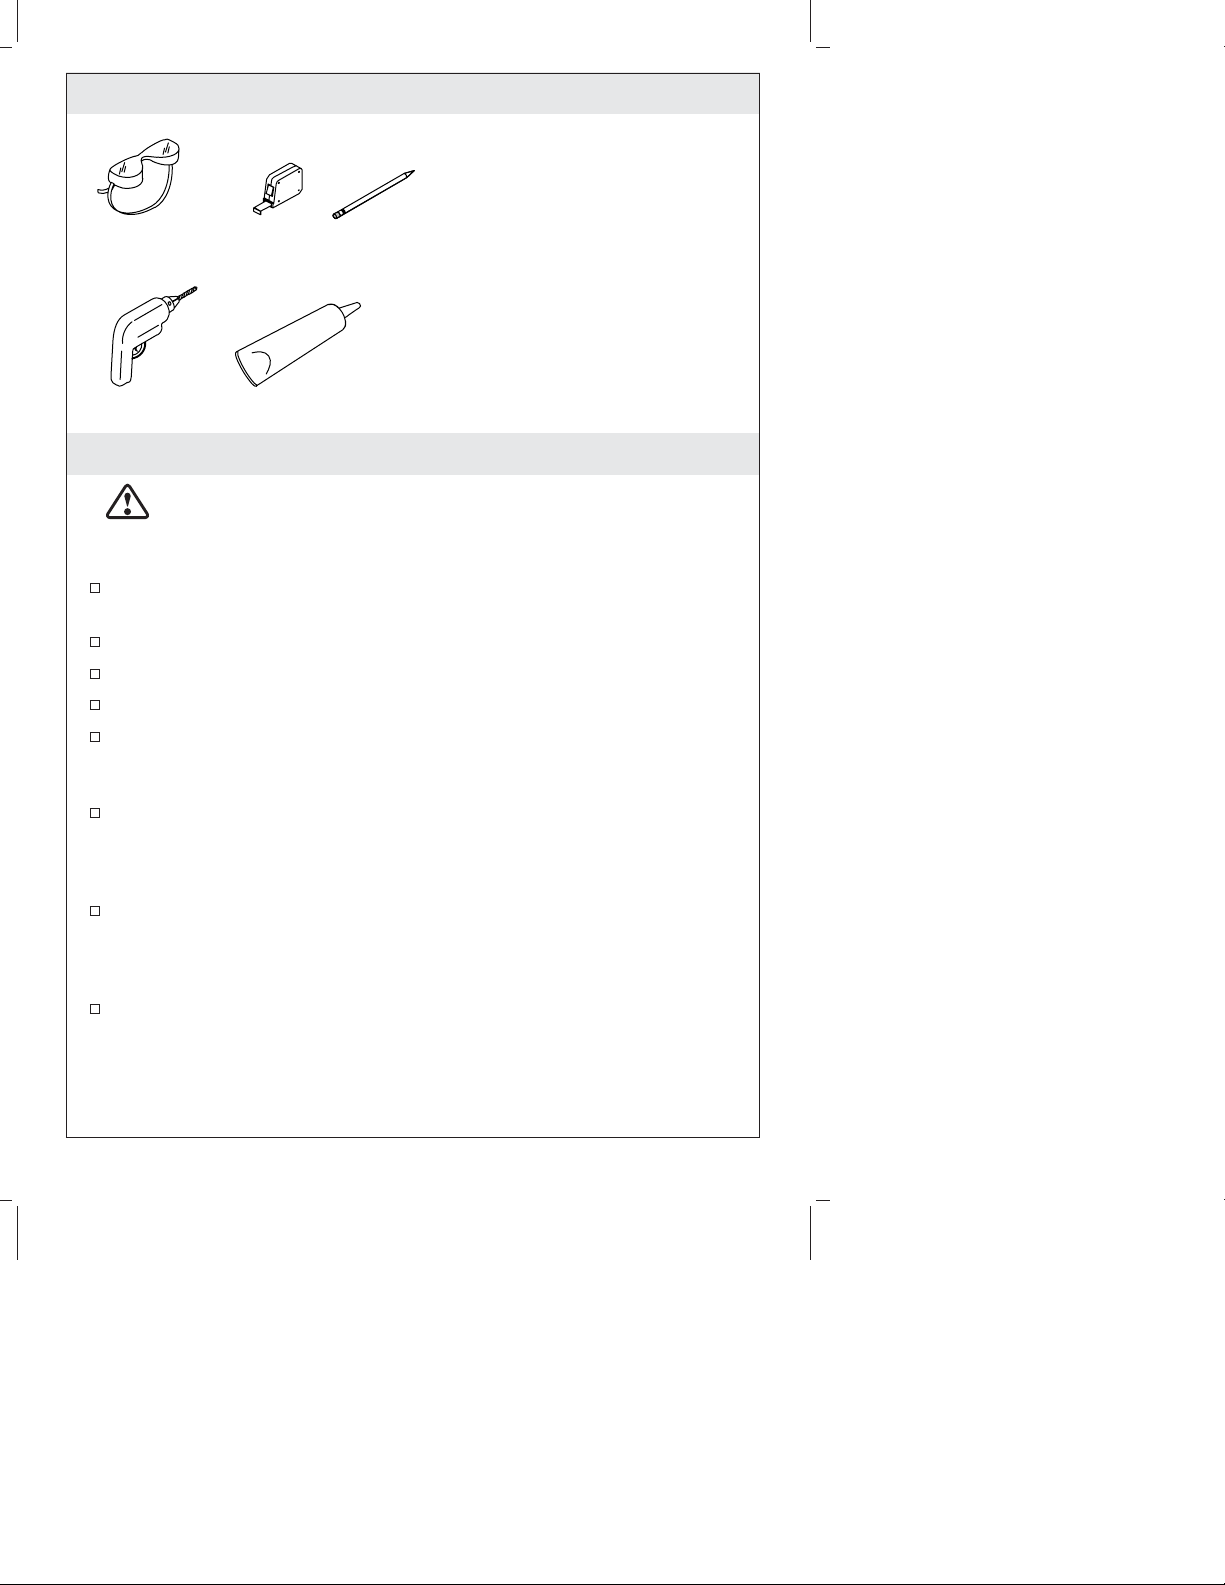
Tools and Materials
Safety
Glasses
Tape
Measure
Pencil
Plus:
• 1/2" or larger drill bit
• Hole saw 1-3/8"
• Support frame members
• Sanding block
• Assorted sandpaper
• Orbital sander (optional)
Drill
Sealant
Before You Begin
CAUTION: Risk of personal injury or product damage.
Handle with care. Product can break, chip, cause injury or
product damage if handled carelessly. Get help lifting the
sink.
Read these instructions carefully before you begin this
installation.
Observe all local plumbing and building codes.
Shut off the hot and cold water supplies.
Inspect the drain and supply tubing. Replace if necessary.
Prior to installation, unpack the new sink and inspect it for
damage. Return the sink to its protective carton until you are
ready to install it.
Due to the variety of installations possible with this sink, you
may need to use procedures other than those described. Because
of the variety of tiles available, you must take careful
measurements prior to installation.
It is very important that the proper materials are used with your
sink. Proper selection of tile is critical for a secure installation.
Because of the variance in tile thickness, your carpenter, tiler, and
plumber must be aware of the exact type of tile you choose.
After selecting the tile, provide a sample to each contractor
involved in the project. It is very important that the carpenter,
tiler, and plumber maintain communication and discuss the
requirements of the project.
1019949-2-C 2 Kohler Co.
Page 3

Before You Begin (cont.)
The cabinet and frame shown in these instructions are generic
and may not represent the actual design or structure.
Due to the nature of undercounter installations, Kohler Co.
recommends that undercounter sink installations be performed by
trained and experienced installers.
To ensure a safe and damage-free installation, two people should
install the sink.
All information in these instructions is based on the latest product
information available at the time of publication. Kohler Co.
reserves the right to make revisions in the design of products
without notice, as specified in the Price Book.
1. Preparation
Undercounter Installations
Check to see if the faucet can be completely assembled to the
countertop and the sink.
Determine this by taking the countertop thickness plus the sink
rim thickness, 5/8″ (1.6 cm) plus or minus 1/32″ (1 mm), and
comparing that measurement to the available shank length
between the base of the faucet assembly and the mounting nut. If
the available shank length is the same or longer than needed,
proceed. If not, select a thinner countertop or another faucet.
Tile-In Installations
Tile backer board installed over plywood is the recommended
underlayment for installing this sink. Tile should be bonded to
the backer board with dry set or latex Portland mortar.
Acceptable underlayments include:
•
Tile backer board over 3/4″ (1.9 cm) exterior grade plywood
•
3/4″ (1.9 cm) exterior grade plywood
IMPORTANT! Do not use:
•
Flakeboard
•
Interior grade plywood
•
Gypsum wallboard
Kohler Co. 3 1019949-2-C
Page 4

Preparation (cont.)
Consult with a tile contractor to determine the material to be
used.
1019949-2-C 4 Kohler Co.
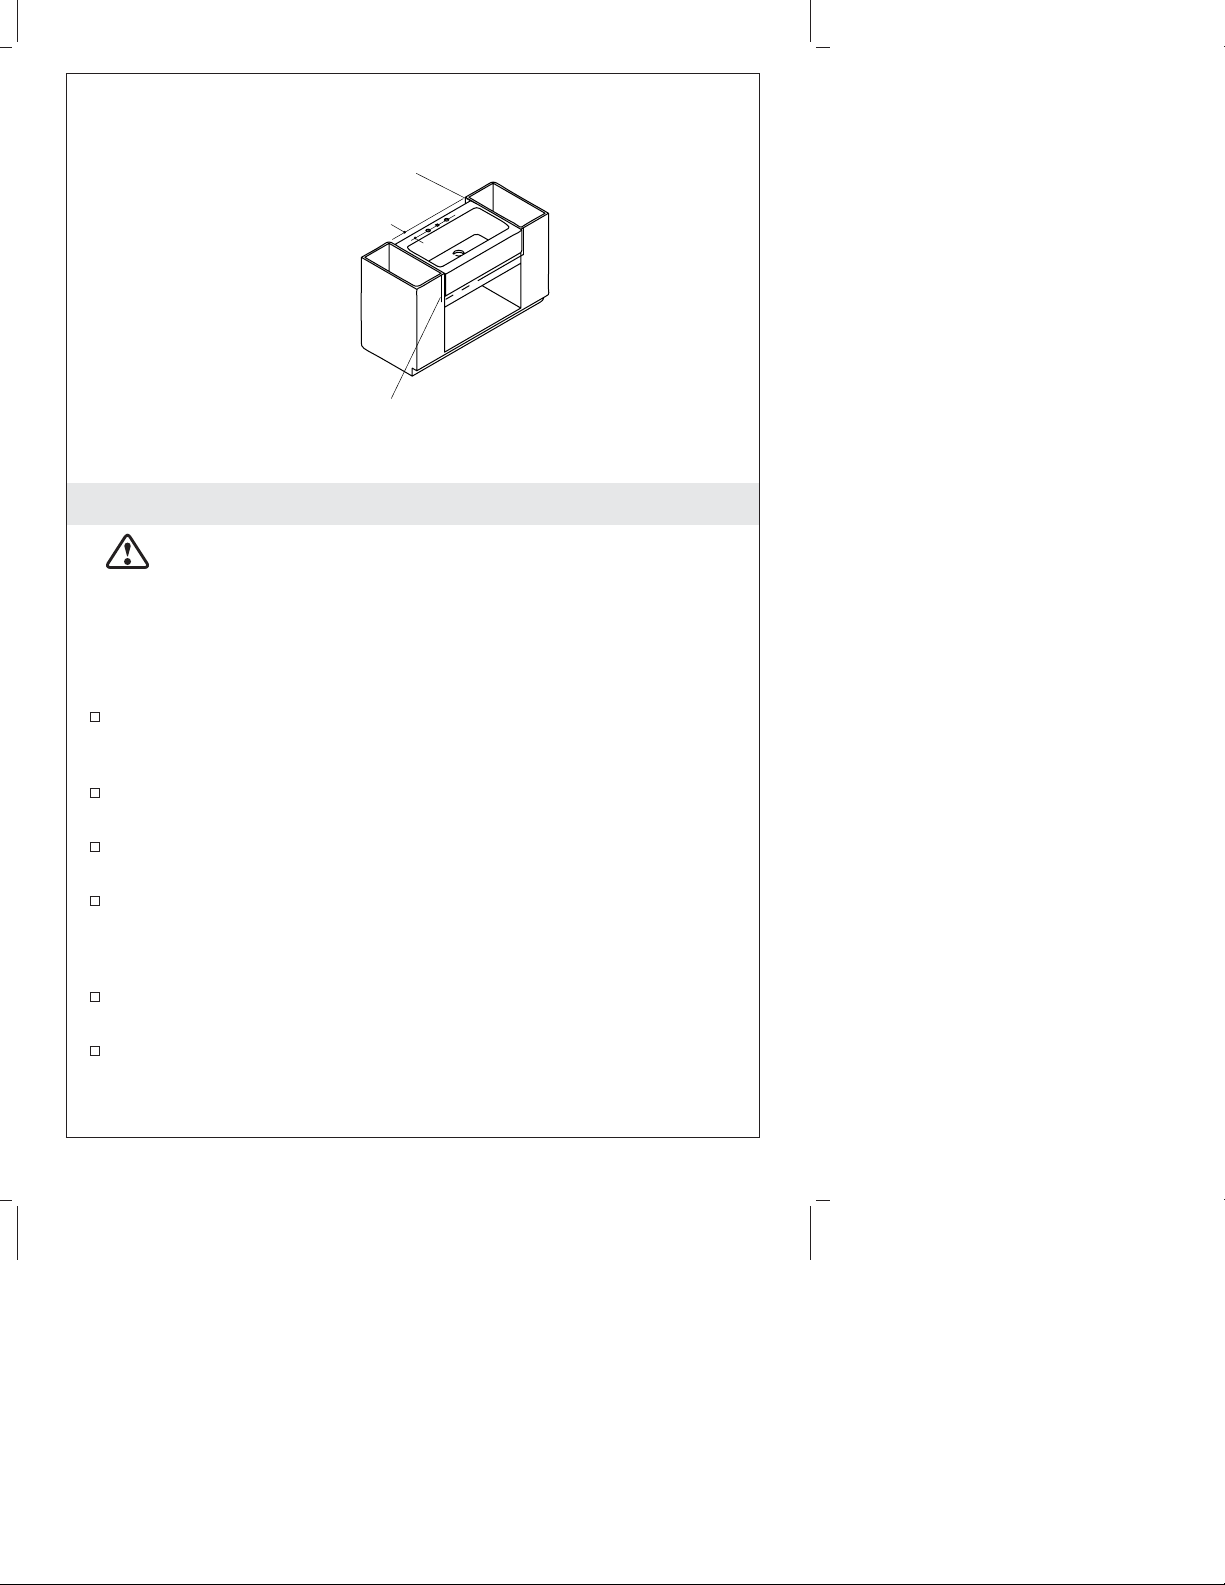
Page 5
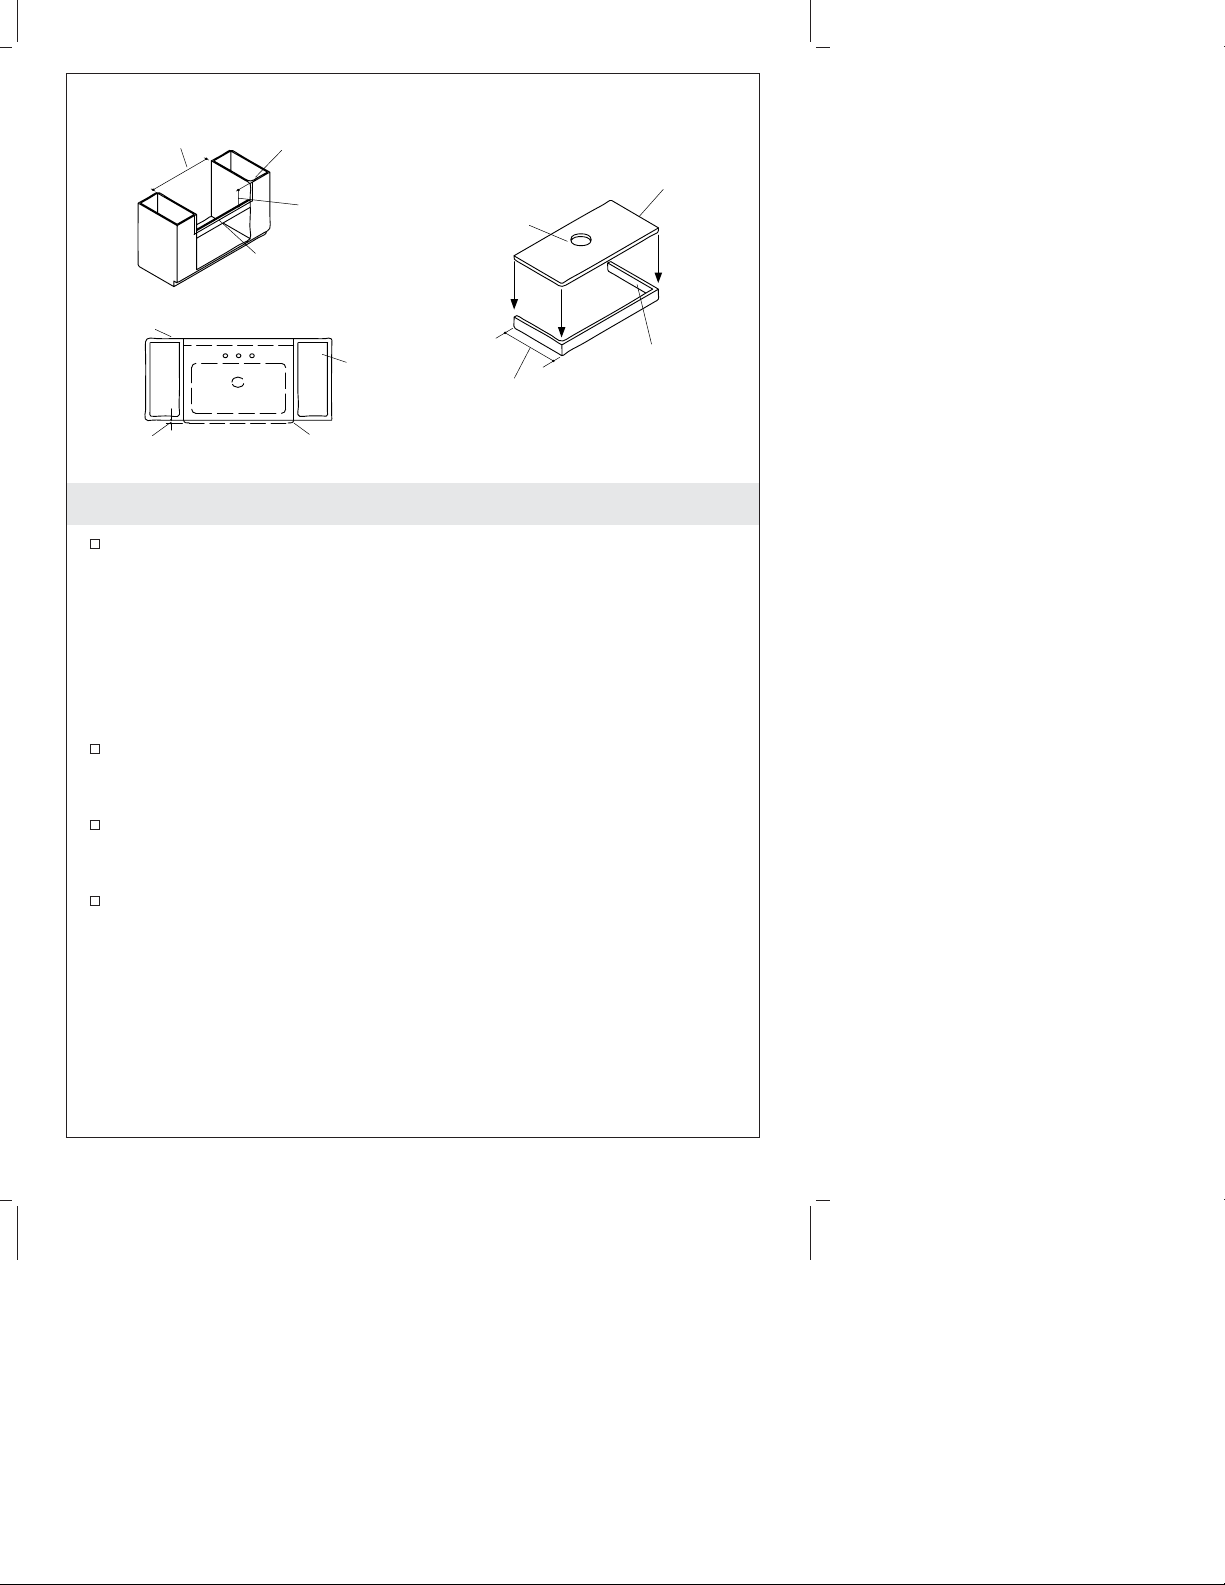
Max Sink/
Apron Width
Cabinet Perimeter
Support
Dimension "H"
Wood Filler
Strips/Spacers
Support 25" (63.5cm) x 17" (43.2cm)
(must clear water supply lines)
Drain Hole
Finished
Wall
1-1/4" (3.2cm) Max
TOP VIEW
Cabinet
Sink Outline
17" (43.2cm)
Support and Frame
Frame Members
Running
Front-to-Back
(Typical)
2. Cabinet/Support Frame Construction
Measure the size of the sink, including the apron (the bottom of
the apron is approximately 1/8″ (3 mm) wider than the top). The
cabinet opening should equal the maximum sink/apron
dimensions to ensure a minimum gap between the sink and the
cabinet.
NOTE: If the sink is not available at the time of installation, make
allowances to add wood filler strips or spacers to the cabinet
opening after the frame and before the sink is installed.
Determine if the sink will be flush with or extend slightly beyond
the front of the cabinet. The sink may extend no more than 1-1/4″
(3.2 cm) beyond the face of the cabinet.
Construct a wood support frame to fit inside the cabinet opening.
Allow adequate clearance for the water supply lines between the
support and the finished wall.
Locate and cut out the drain outlet clearance hole in the support.
The hole diameter must clear the garbage disposal mounting
system, if used.
Kohler Co. 5 1019949-2-C
Page 6
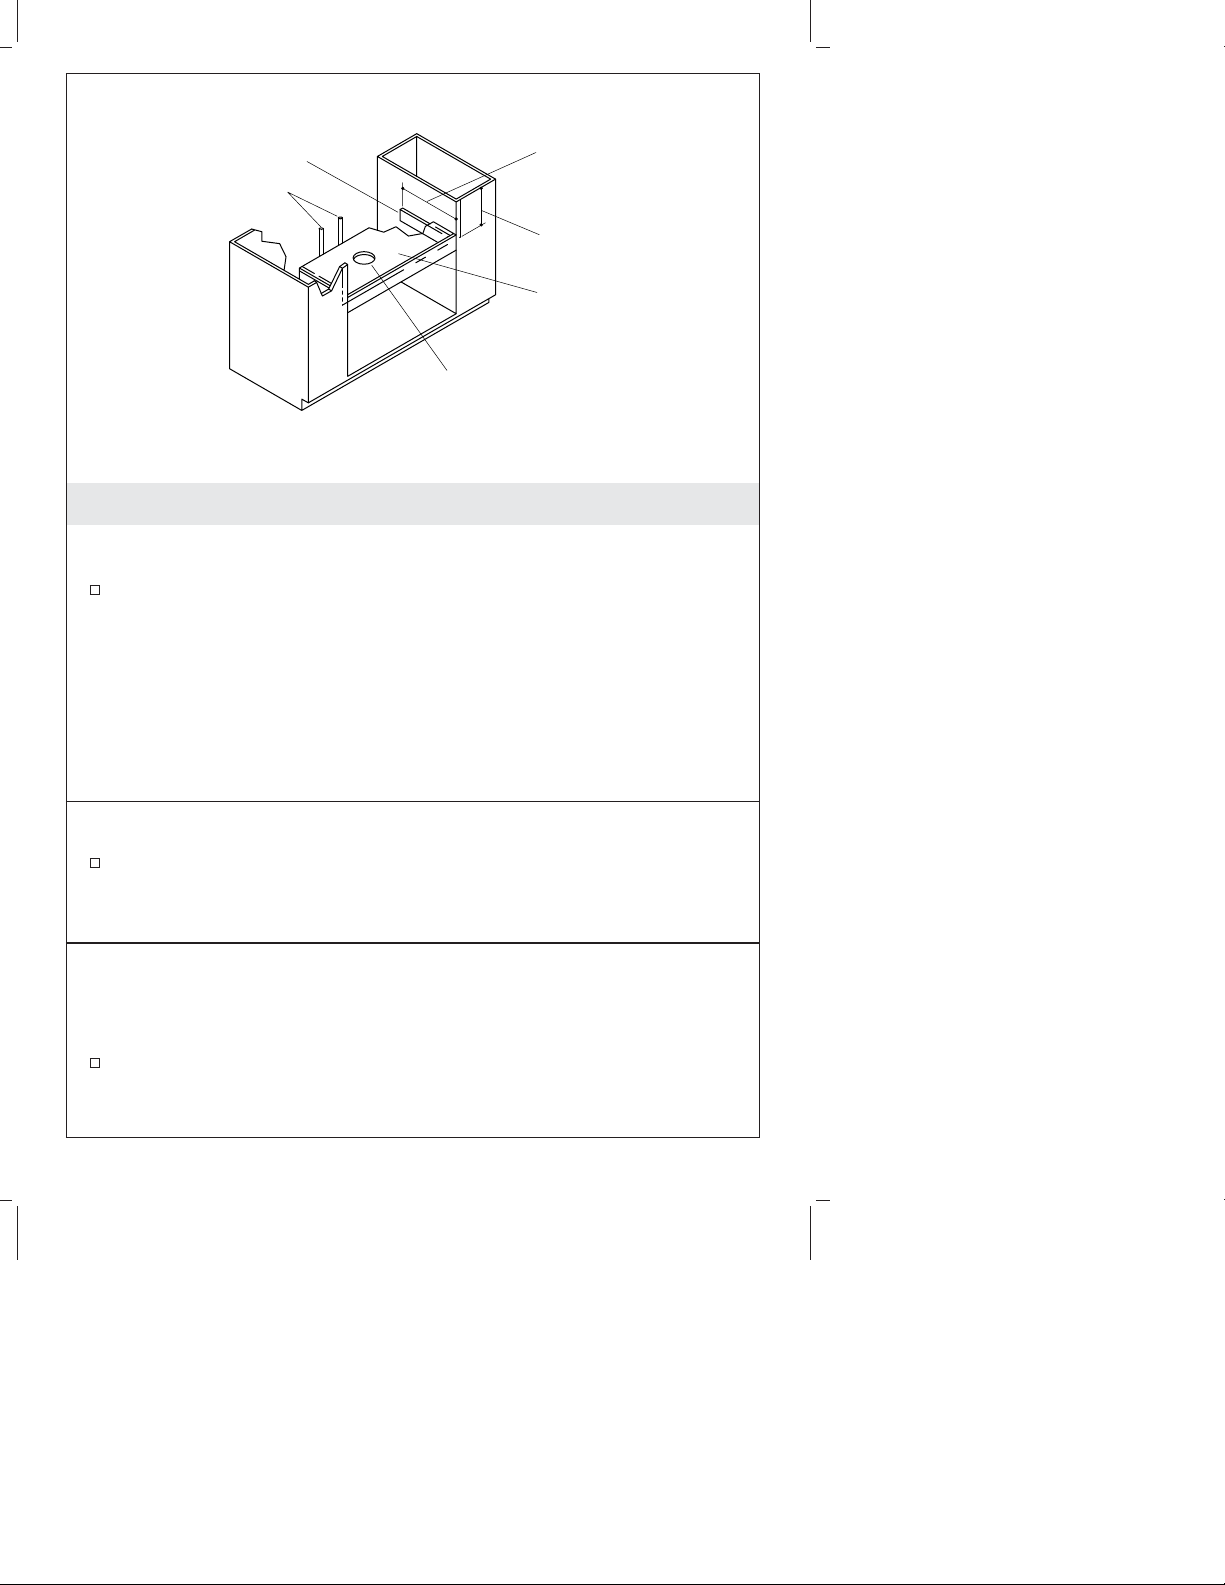
17" (43.2cm)
Frame Members
Water Supply Lines
Drain Hole Clearance
(must clear garbage disposal
mounting system)
Support and Frame
Dimension "H"
Support
3. Support Frame Installation
Tile-In Installations
This sink is designed to be installed flush with or slightly lower
than the surrounding tile. Measure and compare the thickness of
the sink rim and tile. The rim thickness on this sink is 5/8” (1.6
cm) plus or minus 1/32” (1 mm). Take these measurements into
consideration when determining support frame placement
(Dimension “H”). Because of the varying thickness of the tile and
sink, or if adhesive or mortar bed installation is used, you may
need to make allowances to shim the sink, or route the
underlayment as required.
Undercounter and Solid Surface Installations
Position the support frame in the cabinet opening so that when
installed, the top of the sink will be level and flush with the top
of the cabinet (Dimension H).
All Installations
NOTE: Ensure that the securing hardware will not penetrate
through the cabinet walls.
Secure the support frame to the cabinet. Position the securing
hardware to allow for easy removal should the sink need to be
removed or replaced.
1019949-2-C 6 Kohler Co.
Page 7
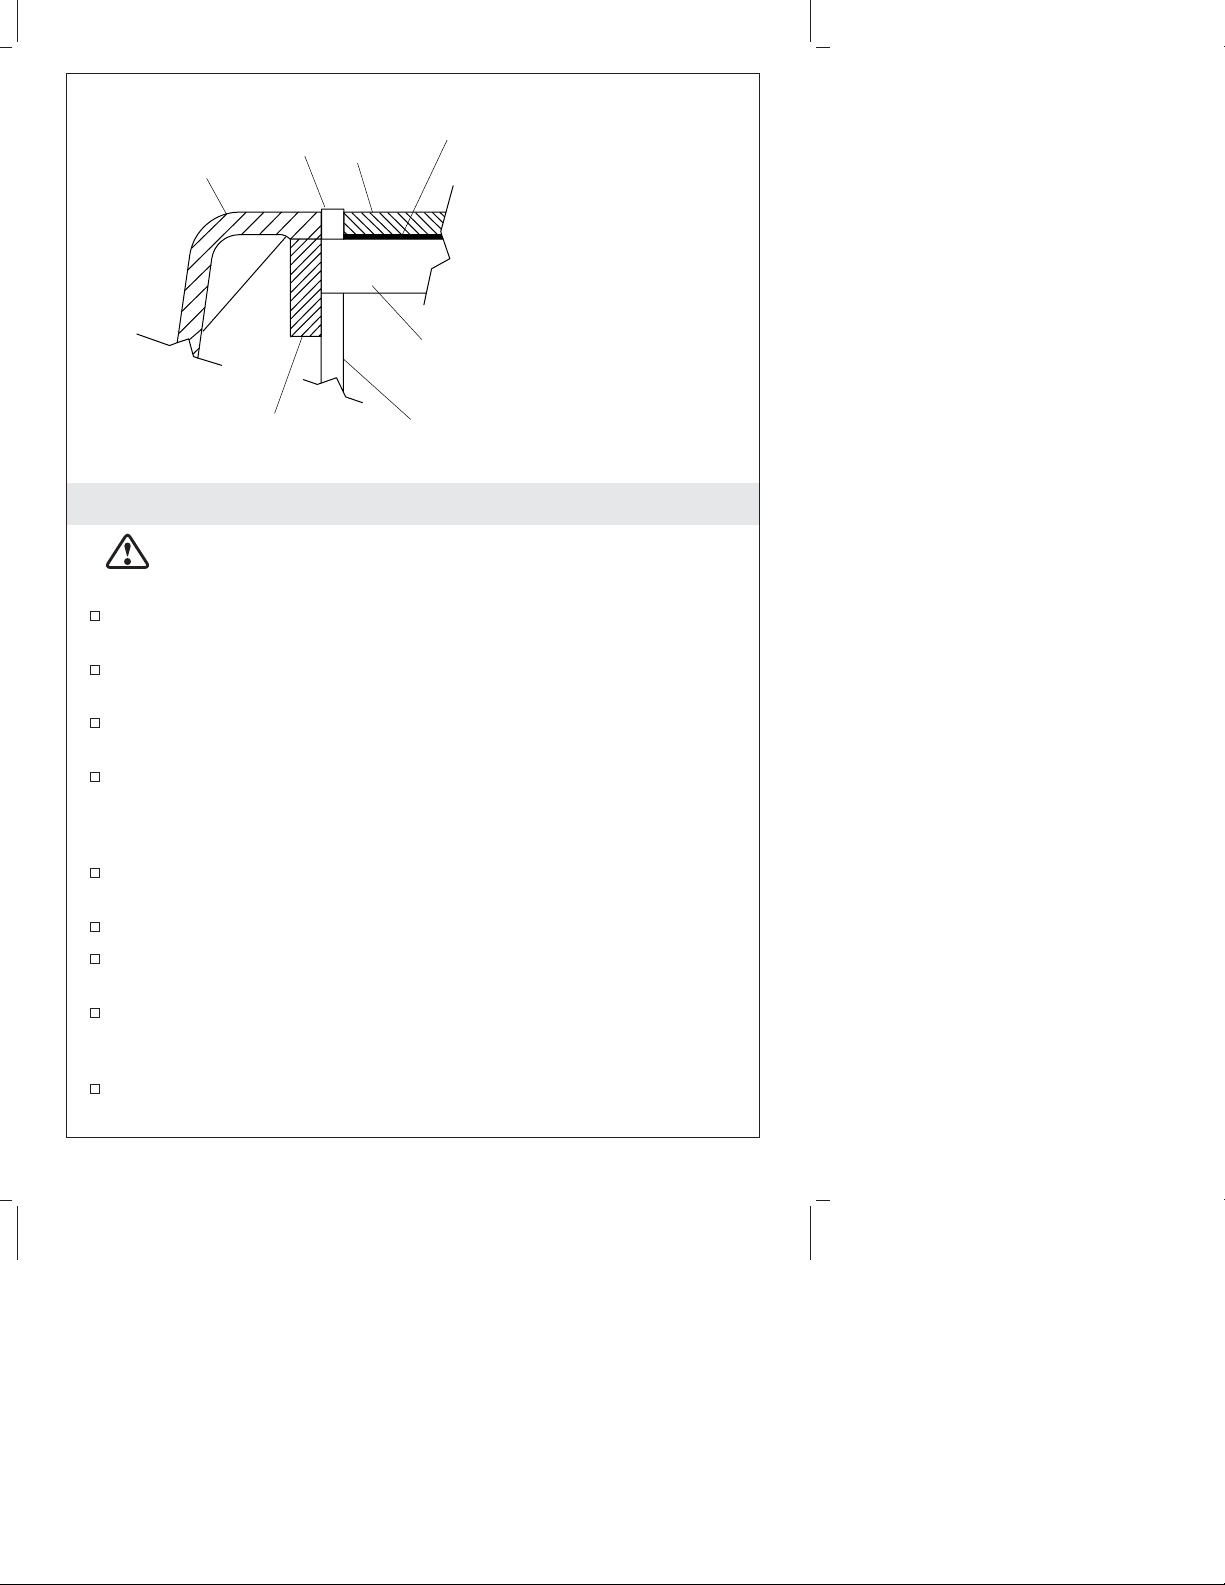
Sink
Sealant
Mortar or Adhesive
Tile
Water Resistant Underlayment
Support Frame
Cabinet
4. Tile-In Installation
CAUTION: Risk of personal injury or product damage.
Large sinks are very heavy. Get help lifting the sink into
place.
Verify that the sink will fit in the cabinet opening. If necessary,
sand the opening or add wood filler strips.
Install the strainer or garbage disposal to the sink according to
the manufacturer’s instruction.
Install the faucet to the sink according to the manufacturer’s
instructions.
Apply a 1” (2.5 cm) spot of sealant at each corner of the frame
where it will contact the sink.
NOTE: If using shims, additional sealant will be needed.
Carefully position the sink within the frame, making sure to
center the sink in the cabinet.
Optional: Apply sealant between the cabinet and the apron.
Verify that the sink is level. Adjust or shim between the sink and
support if needed.
Install the tile. To absorb vibration from a garbage disposal, apply
sealant between the sink and tile directly next to the sink rim.
This will prevent the grout around the sink from cracking.
Allow the sealant to cure for at least 30 minutes before
proceeding.
Kohler Co. 7 1019949-2-C
Page 8

Tile-In Installation (cont.)
Connect and tighten the trap to the strainer, and complete the
water supply connections to the faucet according to the
instructions packed with the faucet.
Run water into the sink and check for leaks.
Clean up with a non-abrasive cleaner.
1019949-2-C 8 Kohler Co.
Page 9
Sink Rim Flush With
Top of Cabinet
"Y"
Wood Filler Strip (Optional)
5. Undercounter/Solid Surface Preparation
CAUTION: Risk of personal injury or product damage.
Large sinks are very heavy. Get help lifting the sink into
place.
NOTE: Instructions in this section are for both undercounter and
solid surface installation. Any differences are noted in the text.
NOTE: Use shims to level the sink if needed.
Verify that the sink will fit in the cabinet opening. If necessary,
adjust the opening by sanding the opening or adding wood filler
strips.
For solid surface installation, install the faucet to the sink
according to the manufacturer’s instructions.
Install the strainer or garbage disposal to the sink according to
the manufacturer’s instructions.
Apply a 1″ (2.5 cm) spot of sealant at each corner of the frame
where it will contact the sink.
NOTE: If using shims additional sealant will be needed.
Carefully position the sink within the frame, making sure to
center the sink in the cabinet.
Optional: Apply sealant between the cabinet and the apron.
Kohler Co. 9 1019949-2-C
Page 10

Undercounter/Solid Surface Preparation (cont.)
Verify that the sink is level. The top of the sink should be flush
with the top of the cabinet to allow proper countertop
installation. Adjust or shim between the sink and support if
needed.
Due to the various cutout sizes possible, a template is not
supplied.
Carefully measure the countertop to determine the exact location
of the cutout.
Carefully mark the cutout location on the countertop.
1019949-2-C 10 Kohler Co.
Page 11

1-3/8" (3.5 cm) D.
Faucet Holes
1-1/2" (3.8 cm) Min
Solid Surface Installation
4" (10.2 cm)
Cut-out
Sink
2" (5.1 cm) R. Max.
(Sharp Corner Optional)
1-3/8" (3.5 cm) D.
Faucet Holes
Finished Wall
"Y"
Countertop
4" (10.2 cm)
1-1/2" (3.8 cm)
Min
Undercounter
Installation
6. Undercounter/Solid Surface Installation
CAUTION: Risk of personal injury or product damage.
Large sinks are very heavy. Get help lifting the sink into
place.
CAUTION: Risk of product damage. Do not cut, drill, or
sand the countertop while positioned over the fixture.
Both undercounter and solid surface installations are covered in
these instructions. Any differences are noted in the text.
Measure the distance ″Y″ (see illustration) from the finished wall
to the center of the sink faucet holes. This dimension will be used
to locate the faucet hole centerline and the back edge of the
cutout on the countertop. Verify that there is adequate clearance
between the faucet handles and the backsplash or finished wall to
ensure proper faucet operation.
From the back edge of the countertop, measure the same distance
as ″Y″ and draw the faucet centerline. For undercounter
installation, add 1-1/2″ (3.8 cm) to the faucet centerline to locate
the back edge of the cutout. For solid surface installation, subtract
1-1/2″ (3.8 cm) from the faucet centerline to locate the back edge
of the cutout.
Trace the cutout opening onto the countertop using a soft lead
pencil.
For undercounter installation, locate the faucet holes.
Cut out the opening by carefully following the pencil line.
"Y"
Kohler Co. 11 1019949-2-C
Page 12

Undercounter/Solid Surface Installation (cont.)
For undercounter installation, drill the faucet holes.
Sand the edge of the cutout to smooth the surface and remove all
saw marks. For laminate-type countertops, waterproof all
unprotected areas of wood.
Clean the top of the sink rim, making sure the surface is free
from debris. Clean the bottom of the countertop around the
cutout area, making sure the surface is smooth and free of
defects.
Apply a generous bead of sealant around the sink rim where the
sink rim will contact the countertop.
Position the countertop over the sink, making sure the sealant
provides a complete seal between the sink rim and the bottom of
the countertop.
Immediately wipe away any excess sealant with a damp cloth.
Fill any voids between the rim and the countertop if needed.
Allow the sealant to cure for at least 30 minutes before
proceeding.
For undercounter installation, install the faucet to the sink and
countertop according to the manufacturer’s instructions.
Connect and tighten the trap to the strainer, and complete the
water supply connections to the faucet according to the
instructions packed with the faucet.
Run water into the sink and check for leaks.
Clean up with a non-abrasive cleaner.
1019949-2-C 12 Kohler Co.
Page 13

Guide d’installation
Éviers avec bandeau frontal
Outils et matériels
Plus:
Lunettes de
protection
Mètre
ruban
Crayon
à papier
• Mêche de 1/2" ou plus large
• Trou de scie de 1-3/8"
• Cadre de support
• Bloc de ponçage
• Papiers de verre à poncer assortis
• Ponseuse orbitale (Optionnelle)
Perceuse
Mastic
Avant de commencer
ATTENTION: Risque de blessure corporelle ou
d’endommagement du produit. Manipuler avec précaution.
Ce produit peut se briser ou se fendre, il peut aussi causer
des blessures s’il est manipulé avec négligence. Demander de
l’aide pour soulever l’évier.
Veuillez lire attentivement ces instructions avant de commencer
l’installation.
Respecter tous les codes de plomberie et de bâtiment locaux.
Couper les alimentations d’eau chaude et froide.
Inspecter le drain et la tuyauterie d’alimentation. Remplacer si
nécessaire.
Avant l’installation, déballer le nouvel évier et l’examiner pour en
déceler tout dommage. Remettre l’évier dans son emballage
jusqu’à être prêt à l’installer.
Étant donné le nombre d’installations possibles pour ce type
d’évier, des procédures autres que celles décrites peuvent être
nécessaires. Étant donné la variété de carreaux disponibles, vous
devez être prudent et prendre des mesures préalables à
l’installation.
Kohler Co. Français-1 1019949-2-C
Page 14

Avant de commencer (cont.)
Il est très important d’utiliser les matériels adéquats avec votre
évier. La bonne sélection des carreaux est critique pour assurer
une installation sécurisée. A cause de la variété d’épaisseur des
carreaux, votre charpentier, carreleur, et plombier doivent
connaître le type exact de carreaux choisis.
Après avoir sélectionné le carreau, fournir un échantillon aux
différents entrepreneurs participant au projet. Il est très important
que votre charpentier, carreleur et plombier soient en
communication et qu’ils discutent des nécessités du projet.
Le meuble et le cadre illustrés dans ces instructions sont
génériques et peuvent ne pas représenter le modèle ou la
structure actuelle.
Vu la nature particulière des installations sous comptoir, Kohler
Co. recommande que les installations des éviers sous comptoir
soient effectuées par des installateurs formés et expérimentés.
Pour assurer une installation sécurisée et sans dommage, deux
personnes devraient installer l’évier.
Tous les renseignements contenus dans ces instructions sont basés
sur les données les plus récentes relatives au produit au moment
de la publication. Kohler Co. se réserve le droit d’apporter toutes
modifications sur le design des produits et ceci sans préavis, tel
que spécifié dans le catalogue des prix.
1. Préparation
Installations Sous le Comptoir
S’assurer que le robinet puisse être complètement assemblé sur le
comptoir et l’évier.
Déterminer ceci en additionnant l’épaisseur du comptoir et du
rebord de l’évier, 5/8 (1,6 cm) plus ou moins 1/32″ (1 mm), et en
comparant cette mesure à celle de la longueur du manche entre la
base du robinet et de l’écrou de fixation. Si la longueur du tuyau
est la même ou plus grande, procéder à l’installation. Si non,
choisir un comptoir plus fin ou un autre modèle de robinetterie.
1019949-2-C Français-2 Kohler Co.
Page 15

Préparation (cont.)
Installations des Carreaux
L’installation des carreaux sur du contreplaqué est conseillée pour
l’installation de cet évier. Les carreaux doivent être liés à la
plaque d’appui à l’aide de ciment à sec ou mortier en latex de
Portland. Les sous-couches acceptables incluent:
•
Plaque d’appui de carreaux de plus de 3/4″ (1,9 cm) en
contreplaqué extérieur
•
Contreplaqué extérieur de 3/4″ (1,9 cm)
IMPORTANT! Ne pas utiliser:
•
Aggloméré
•
Contreplaqué pour intérieur
•
Panneau de revêtement en plâtre
Consulter le fabriquant des carreaux afin de déterminer les
matériaux à utiliser.
Kohler Co. Français-3 1019949-2-C
Page 16

Largeur max évier/bord
Support du Périmètre
du Meuble
Dimension "H
Espaceurs en bois
Support 25"(63,5 cm) x 17" (43,2 cm)
(doit être hors des lignes d'alimentation)
Orifice du drain
Mur fini
1-1/4" (3,2 cm) Max.
VUE SUPÉRIEURE
Pourtour de l'évier
Meuble
17" (43,2 cm)
Support du Cadre
Composants du cadre
de l'avant à l'arrière
(Typique)
2. Construction du Meuble / Support
Mesurer la taille de l’évier, ainsi que son bandeau (la partie
inférieure du bandeau et approximativement 1/8″ (3 mm) plus
large que sa partie supérieure) L’ouverture du meuble doit être
égale à la dimension de l’évier, ceci pour assurer qu’il y ait un
espace entre le bandeau de l’évier et le meuble.
REMARQUE: Si l’évier n’est pas disponible au moment de
l’installation, prévoir l’utilisation des cales sur l’ouverture du
meuble, après avoir installé le meuble et avant l’installation de
l’évier.
Avant de continuer, déterminez si l’évier sera égale ou si il
dépassera légèrement de l’avant du meuble. L’évier ne doit pas
dépasser de plus de 1-1/4″ (3,2 cm) au-delà de la face avant du
meuble.
Construire un support en bois pour qu’il contienne dans du
meuble. Prévoir suffisamment d’espace pour les lignes d’arrivées
d’eau et le mur.
Localiser et coupez une ouverture pour le drain dans le support.
Le diamètre du trou doit être assez large pour le système du
broyeur de déchets.
1019949-2-C Français-4 Kohler Co.
Page 17

17" (43,2 cm) Support
Cadre
Lignes d'alimentation
d'eau
Le Dégagement Du Drain
(Doit libérer l' espace pour le
broyeur de déchets)
du Cadre
Dimension "H
Support
3. Installation de cadre de support
Installations des Carreaux
Ce bassin est conçu pour être installé de niveau avec les carreaux
ou plus bas. Mesurer et comparer l’épaisseur du rebord de l’évier
et des carreaux. L’épaisseur du rebord de l’évier est de 5/8″ (1,6
cm) plus ou moins 1/32″ (1 mm). Prendre ces mesures en
considération lors de la détermination de l’emplacement des
supports (Dimension ″H″). A cause de la différence d’épaisseur
entre les carreaux et le lavabo, ou si vous utilisez du mortier,
prévoir les dégagements nécessaires, afin d’utiliser des cales ou
faire d’autres réglages au besoin.
Installation Sous Comptoir et sur Surface Solide
Positionner le cadre de support dans l’ouverture du meuble, pour
que quand installé, le dessus de l’évier soit de niveaux avec le
dessus du meuble (Dimension H).
Toutes les installations
REMARQUE: S’assurer que les dispositifs d’ancrage ne dépassent
pas à travers le meuble.
Sécuriser le cadre d’appui au meuble. Installer les dispositifs
d’ancrage de façon à permettre un enlèvement facile de l’évier.
Kohler Co. Français-5 1019949-2-C
Page 18

Évier
Mastic
Mortier ou adhésif
Carreau
Sous-Couche
Résistante à l'Eau
Cadre de support
Meuble
4. Installation du carrelage
ATTENTION: Risque de blessure corporelle ou
d’endommagement du produit. Les éviers larges sont très
lourds. Demander de l’aide pour soulever et mettre en place
l’évier.
Vérifier que l’évier s’adaptera dans la découpe du meuble. Poncez
l’ouverture ou ajoutez des cales au besoin.
Assembler le robinet et le tuyau d’évacuation à l’évier
conformément à la notice du fabricant.
Installer le robinet au comptoir selon les instructions du fabricant
qui accompagnent le produit.
Appliquer un boudin de mastic de 1″ (2,5 cm) à chaque coin du
cadre en contact avec l’évier.
REMARQUE: Si vous utilisez des cales, des joints seront nécessaires.
Placer l’évier avec soin sur le cadre, de manière à aligner le centre
de l’évier sur le meuble.
Optionnel: Appliquer un joint d’étanchéité entre le meuble et le
bandeau.
Vérifier que l’évier soit nivelé. Ajuster ou placer des cales entre
l’évier et le support si besoin.
1019949-2-C Français-6 Kohler Co.
Page 19

Installation du carrelage (cont.)
Appliquer les Carreaux. Pour absorber la vibration du broyeur,
appliquer du mastic entre l’évier et les carreaux directement à
côté du rebord de l’évier. Ceci évitera que le coulis s’effrite autour
de l’évier.
Laisser le mastic d’étanchéité sécher pendant 30 minutes au
moins avant de continuer.
Connecter et bien fixer le siphon à la crépine, et terminer les
connexions d’alimentation d’eau au robinet selon les instructions
emballées avec ce dernier.
Laisser couler l’eau dans l’évier et vérifier s’il y a des fuites.
Nettoyer avec un nettoyant non abrasif.
Kohler Co. Français-7 1019949-2-C
Page 20

Nivelage du bord d'evier avec
dessus du meuble
"Y"
Bouche-Trous en bois (Optionnel)
5. Préparation sous-comptoir/surface solide
ATTENTION: Risque de blessure corporelle ou
d’endommagement du produit. Les éviers larges sont très
lourds. Demander de l’aide pour soulever et mettre en place
l’évier.
REMARQUE: Les instructions de cette section sont pour des
installations sous le comptoir et en surface solide. Toutes différences
son notées dans ce texte.
REMARQUE: Utiliser des cales au besoin pour mettre le sol à
niveau.
Vérifier que l’évier s’adaptera dans la découpe du meuble. Si
nécessaire, ajuster l’ouverture en polissant celle-ci ou ajoutant des
espaceurs en bois.
Pour une installation sur surface solide, installer le robinet sur
l’évier selon les instructions du fabricant qui accompagnent le
produit.
Assembler le siphon ou broyeur à ordures à l’évier conformément
aux instructions du fabricant.
Appliquer un boudin de mastic de 1″ (2,5 cm) à chaque coin du
cadre en contact avec l’évier.
REMARQUE: Si vous utilisez des cales, des joints supplémentaires
seront nécessaires.
1019949-2-C Français-8 Kohler Co.
Page 21

Préparation sous-comptoir/surface solide (cont.)
Placer l’évier avec soin sur le cadre, de manière à aligner le centre
de l’évier sur le meuble.
Optionnel: Appliquer un joint d’étanchéité entre le meuble et le
bandeau.
Vérifier que l’évier soit nivelé. Le dessus de l’évier doit être
nivelé au dessus du meuble pour permettre une installation
correcte du comptoir. Ajuster ou placer des cales entre l’évier et le
support si besoin.
Étant donné le nombre de dimensions d’ouvertures possibles,
aucun plan/gabarit n’est fourni.
Mesurer soigneusement le comptoir pour déterminer
l’emplacement précis de la découpe.
Tracer soigneusement l’emplacement de la découpe sur le
comptoir.
Kohler Co. Français-9 1019949-2-C
Page 22

Trous d’un Ø de 1-3/8"
(3,5 cm) pour le robinet
1-1/2" (3,8 cm) Min
Trous d’un Ø de 1-3/8"
(3,5 cm) pour le robinet
4" (10,2 cm)
Mur terminé
“Y”
4" (10,2 cm)
“Y”
Découpe
Évier
2" (5,1 cm) Rd. Max
(Coin pointu optionnel)
Installation sur surfaces solides
Comptoir
Installation sous le
1-1/2"
(3,8 cm) Min
comptoir
6. Installation sous-comptoir/surface solide
ATTENTION: Risque de blessure corporelle ou
d’endommagement du produit. Les éviers larges sont très
lourds. Demander de l’aide pour soulever et mettre en place
l’évier.
ATTENTION: Risque d’endommagement du produit. Ne
pas découper, ni percer ou poncer le comptoir lorsqu’il est
positionné sur l’installation.
Chaque installation sous comptoir et sur surface solide sont
expliquées dans ces instructions. Toutes différences son notées dans
ce texte.
Mesurer la distance ″Y″ (voir l’illustration) à partir du mur fini,
jusqu’au centre des orifices du robinet de l’évier. Cette dimension
servira à déterminer l’axe de l’orifice du robinet et le rebord
arrière de la découpe sur le comptoir. Prévoir suffisamment
d’espace entre les poignées des robinets et le dosseret ou le mur
fini pour assurer le bon fonctionnement des robinets
Depuis le rebord arrière du comptoir, mesurer la même distance
″Y″ et marquer le centre du robinet. Pour une installation sous
comptoir, rajouter 1-1/2″ (3,8 cm) à l’axe central de l’orifice du
robinet pour déterminer l’emplacement du bord arrière de la
découpe. Pour une installation sur surface solide, retirer 1-1/2″
(3,8 cm) à l’axe central de l’orifice du robinet pour déterminer
l’emplacement du bord arrière de la découpe.
1019949-2-C Français-10 Kohler Co.
Page 23

Installation sous-comptoir/surface solide (cont.)
Tracer l’ouverture de la découpe à l’aide d’un crayon à papier à
pointe douce.
Pour une installation sous comptoir, localiser les trous des
robinets.
Découper l’ouverture en suivant soigneusement le tracé au crayon
à papier.
Pour une installation sous comptoir, percer les trous des robinets.
Poncer les bords de la découpe pour lisser la surface et retirer
toutes marques de scie. Pour les revêtements en contreplaqué,
imperméabiliser les surfaces du bois non protégées.
Nettoyer le dessus du rebord de l’évier, en éliminant tout débris
de la surface. Nettoyer la partie inférieure du comptoir autour de
la découpe et vérifier que la surface soit lisse et sans défaut.
Appliquer un boudin de mastic autour du rebord de l’évier à
l’endroit où il sera en contact avec le comptoir.
Placer le comptoir sur l’évier, en s’assurant d’une étanchéité
complète entre le rebord de l’évier et de la base du comptoir.
Essuyer tout excédent de mastic à l’aide d’un chiffon humide.
Remplir tous les espaces entre les rebords et le comptoir si besoin.
Laisser le mastic d’étanchéité sécher pendant 30 minutes au
moins avant de continuer.
Pour une installation sous comptoir, installer le robinet à l’évier
selon les instructions du fabricant qui accompagnent le produit.
Connecter et bien fixer le siphon à la crépine, et terminer les
connexions d’alimentation d’eau au robinet selon les instructions
emballées avec ce dernier.
Laisser couler l’eau dans l’évier et vérifier s’il y a des fuites.
Nettoyer avec un nettoyant non abrasif.
Kohler Co. Français-11 1019949-2-C
Page 24

Guía de instalación
Fregaderos con faldón al frente
Herramientas y materiales
Más:
Lentes de
seguridad
Taladro
Cinta
para medir
Sellador
Lápiz
Antes de comenzar
PRECAUCIÓN: Riesgo de lesiones personales o daños al
producto. Maneje el producto con cuidado. El producto
puede romperse, despostillarse o causar lesiones y daños, si
no se maneja con cuidado. Obtenga ayuda para levantar el
fregadero.
Lea atentamente estas instrucciones antes de comenzar la
instalación.
Cumpla con todos los códigos locales de plomería y construcción.
Cierre el suministro del agua fría y caliente.
Examine las tuberías de suministro y de desagüe. Reemplace de
ser necesario.
Antes de la instalación, desembale el fregadero nuevo y verifique
que no esté dañado. Coloque el fregadero en la caja como
protección hasta el momento de la instalación.
Debido a la variedad de instalaciones posibles con este fregadero,
puede que necesite utilizar otros procedimientos de instalación
además de los descritos en estas instrucciones. A causa de la
variedad de azulejos disponibles, es necesario que tome las
medidas exactas antes de iniciar la instalación.
• Broca de 1/2" o mayor
• Corona perforadora de 1-3/8"
• Componentes para la
estructura de soporte
• Bloque de lijar
• Papel lija surtido
• Lijadora orbital (opcional)
Kohler Co. Español-1 1019949-2-C
Page 25

Antes de comenzar (cont.)
Es muy importante emplear los materiales apropiados para su
fregadero. La selección correcta del azulejo es crítica para una
instalación segura. Debido a la variación de grosor de los
azulejos, es importante que el carpintero, el instalador de azulejos
y el plomero sepan con precisión el tipo de azulejo seleccionado.
Después de seleccionar el azulejo, suministre una muestra a cada
contratista involucrado en el proyecto. Es muy importante que el
carpintero, el instalador de azulejos y el plomero estén en
contacto entre ellos para poder hablar sobre los requisitos del
proyecto.
El gabinete y la estructura ilustrados en estas instrucciones son
genéricos y quizá no representen el diseño o la estructura real.
Debido a la naturaleza de las instalaciones bajo cubierta, Kohler
Co. recomienda que estas instalaciones sean realizadas por un
personal calificado y con experiencia.
Para asegurar una instalación segura y sin daños, se recomienda
que dos personas instalen el fregadero.
Toda la información contenida en estas instrucciones está basada
en la información más reciente disponible al momento de su
publicación. Kohler Co. se reserva el derecho de modificar el
diseño de los productos sin previo aviso, tal como se especifica en
la lista de precios.
1. Preparación
Instalaciones bajo cubierta
Verifique que la grifería pueda montarse por completo en el
fregadero y cubierta.
Para determinarlo, mida el espesor de la cubierta más el del
borde del fregadero, 5/8″ (1,6 cm) más o menos 1/32″ (1 mm), y
compárelo con la longitud del vástago disponible entre la base del
montaje de la grifería y la tuerca de montaje. Si la longitud del
vástago disponible tiene la misma medida o es más larga que la
necesaria, continúe con la instalación. Si no es así, elija otra
grifería o una cubierta más delgada.
Kohler Co. Español-2 1019949-2-C
Page 26

Preparación (cont.)
Instalaciones con azulejos
La placa de soporte de azulejos instalada sobre la madera
contrachapada es el contrapiso ideal para instalar este fregadero.
El azulejo debe adherirse a la placa de soporte con mortero de
fijar en seco o mortero Portland de látex. Las bases de cubierta
aceptables incluyen:
•
Tabla de soporte de azulejos sobre madera contrachapada de
grado para exteriores de 3/4″ (1,9 cm)
•
Madera contrachapada para exteriores de 3/4″ (1,9 cm)
¡IMPORTANTE! No utilice:
•
Tablas de aglomerado
•
Madera contrachapada de grado para interiores
•
Panel de yeso
Consulte con el contratista de azulejos para determinar los
materiales que se deben utilizar.
1019949-2-C Español-3 Kohler Co.
Page 27

Ancho máx
de fregadero/
faldón
Pared
acabada
1-1/4” (3,2 cm) máx
VISTA SUPERIOR
Soporte del perímetro
del gabinete
Dimensión "H
Tiras de relleno
de madera/espaciadores
Gabinete
Contorno del fregadero
Soporte de 25" (63,5 cm) x 17" (43,2 cm)
(debe librar las líneas de suministro)
Soporte y estructura
de 17" (43,2 cm)
Orificio de
desagüe
Piezas de la
estructura desde
el frente hasta la
parte posterior
(típico)
2. Construcción del gabinete y la estructura de soporte
Mida el fregadero, incluyendo el faldón (la parte inferior del
faldón es aproximadamente 1/8″ (3 mm) más ancha que la parte
superior). La abertura del gabinete debe ser igual a las
dimensiones del fregadero/faldón para asegurarse de que haya
un espacio mínimo entre el fregadero y el gabinete.
NOTA: Si no se dispone de fregadero a la hora de la instalación,
coloque tiras de relleno de madera o espaciadores en la abertura del
gabinete una vez instalada la estructura y antes de instalar el
fregadero.
Determine si el fregadero estará alineado con el gabinete o si
sobresaldrá por la parte delantera del gabinete. El fregadero no
debe sobresalir más de 1-1/4″ (3,2 cm) más allá del frente del
gabinete.
Construya una estructura de soporte de madera que entre dentro
de la abertura del gabinete. Proporcione suficiente espacio para
las líneas de suministro de agua, entre el soporte y la pared
acabada.
Ubique y corte un orificio con suficiente espacio para la salida del
desagüe en el soporte. El diámetro del orificio debe permitir la
instalación de un triturador de desperdicios de comida, si se va
utilizar.
Kohler Co. Español-4 1019949-2-C
Page 28

Soporte y estructura
Miembros de la estructura
Líneas de suministro
del agua
Espacio para el orificio
del desagüe (debe librar el
sistema de montaje del triturador
de alimento)
de 17" (43,2 cm)
Dimensión "H
Soporte
3. Instale la estructura de soporte
Instalaciones con azulejos
El fregadero está diseñado para que, una vez instalado, esté al ras
con o un poco más bajo que los azulejos que la rodean. Mida y
compare el grosor del borde del fregadero y los azulejos. El
espesor del borde de este fregadero es de 5/8″ (1,6 cm) más o
menos 1/32″ (1 mm). Considere estas medidas cuando determine
la ubicación de la estructura de soporte (Dimensión ″H″). Debido
al espesor variable del azulejo y del fregadero, o si utiliza
adhesivo o mortero en la instalación, tal vez tenga que dejar
espacio para utilizar cuñas en el fregadero o rebaje la base de la
cubierta según sea necesario.
Instalaciones bajo cubierta y sobre superficies
sólidas
Coloque la estructura de soporte en la abertura del gabinete de
manera que cuando esté instalado, la parte superior del fregadero
esté nivelado y al ras con la parte superior del gabinete
(Dimensión H).
1019949-2-C Español-5 Kohler Co.
Page 29

Instale la estructura de soporte (cont.)
Todas las instalaciones
NOTA: Verifique que los herrajes de fijación no penetren a través de
las paredes del gabinete.
Fije la estructura de soporte en el gabinete. Coloque el herraje de
fijación de manera que permita la fácil desinstalación en caso de
que el fregadero se tenga que desmontar o reemplazar.
Kohler Co. Español-6 1019949-2-C
Page 30

Fregadero
Sellador
Mortero o adhesivo
Azulejo
Contrapiso resistente al agua
Estructura de soporte
Gabinete
4. Instalación con azulejos
PRECAUCIÓN: Riesgo de lesiones personales o daños al
producto. Los fregaderos grandes son muy pesados. Obtenga
ayuda para colocar el fregadero en su lugar.
Verifique que el fregadero entre bien en la abertura del gabinete.
De ser necesario, lije la abertura o añada tiras de relleno de
madera.
Instale la coladera o triturador de desperdicios de comida en el
fregadero conforme a las instrucciones del fabricante.
Instale la grifería en el fregadero siguiendo las instrucciones del
fabricante.
Coloque 1″ (2,5 cm) de sellador en cada esquina de la estructura
de soporte en contacto con el fregadero.
NOTA: Si utiliza cuñas, necesitará aplicar más sellador.
Coloque el fregadero con cuidado en la estructura, y asegúrese de
centrar el fregadero en el gabinete.
Opcional: Aplique sellador entre el gabinete y el faldón.
Verifique que el fregadero esté nivelado. Ajuste o utilice cuñas
entre el fregadero y el soporte según sea necesario.
Instale los azulejos. Para absorber la vibración del triturador de
desperdicios de comida, aplique sellador entre el fregadero y los
azulejos directamente junto al borde del fregadero. Esto evitará
que se agriete la boquilla alrededor del fregadero.
1019949-2-C Español-7 Kohler Co.
Page 31

Instalación con azulejos (cont.)
Antes de continuar, deje secar el sellador durante 30 minutos
como mínimo.
Conecte y apriete la trampa a la coladera y termine las conexiones
del suministro de agua a la grifería, conforme a las instrucciones
incluidas con la grifería.
Haga circular agua al fregadero y verifique que no haya fugas.
Limpie con un limpiador no abrasivo.
Kohler Co. Español-8 1019949-2-C
Page 32

El borde del fregadero debe
estar al ras de la parte
superior del gabinete.
"Y"
Tiras de relleno
de madera (opcional)
5. Preparación de la superficie sólida/bajo la cubierta
PRECAUCIÓN: Riesgo de lesiones personales o daños al
producto. Los fregaderos grandes son muy pesados. Obtenga
ayuda para colocar el fregadero en su lugar.
NOTA: Las instrucciones de esta sección son para la instalación
tanto bajo cubierta como sobre superficies sólidas. Las diferencias se
han anotado en el texto.
NOTA: De ser necesario, utilice cuñas para nivelar el fregadero.
Verifique que el fregadero entre bien en la abertura del gabinete.
Si es necesario, ajuste la abertura lijando o añadiendo tiras de
relleno de madera.
Para la instalación sobre superficies sólidas, instale la grifería en
el fregadero según las instrucciones del fabricante.
Instale la coladera o triturador de desperdicios de comida en el
fregadero conforme a las instrucciones del fabricante.
Coloque 1″ (2,5 cm) de sellador en cada esquina de la estructura
de soporte en contacto con el fregadero.
NOTA: Si utiliza cuñas, necesitará aplicar más sellador.
Coloque el fregadero con cuidado en la estructura, y asegúrese de
centrar el fregadero en el gabinete.
Opcional: Aplique sellador entre el gabinete y el faldón.
1019949-2-C Español-9 Kohler Co.
Page 33

Preparación de la superficie sólida/bajo la cubierta (cont.)
Verifique que el fregadero esté nivelado. La parte superior del
fregadero debe quedar al ras con la parte superior del gabinete,
para permitir la instalación correcta de la cubierta. Ajuste o utilice
cuñas entre el fregadero y el soporte según sea necesario.
Debido a los distintos tamaños de abertura posibles, no se ha
incluido plantilla.
Mida la cubierta con detenimiento para determinar la ubicación
exacta de la abertura.
Marque la ubicación de la abertura con cuidado en la cubierta.
Kohler Co. Español-10 1019949-2-C
Page 34

1-3/8" (3,5 cm) D.
Orificios para grifería
1-1/2" (3,8 cm) Mín
4" (10,2 cm)
1-3/8" (3,5 cm) D.
Orificios para grifería
Pared acabada
"Y"
4" (10,2 cm)
"Y"
Abertura
Fregadero
Cubierta
2" (5,1 cm) R. Máx (Esquina
pronunciada opcional)
Instalación en superficies sólidas
Instalación bajo
1-1/2"
(3,8 cm) Mín
cubierta
6. Instalación de la superficie sólida/bajo cubierta
PRECAUCIÓN: Riesgo de lesiones personales o daños al
producto. Los fregaderos grandes son muy pesados. Obtenga
ayuda para colocar el fregadero en su lugar.
PRECAUCIÓN: Riesgo de daños al producto. No corte,
taladre o lije la cubierta mientras esté sobre el fregadero.
Estas instrucciones cubren las instalaciones bajo cubierta y sobre
superficies sólidas. Las diferencias se han anotado en el texto.
Mida la distancia ″Y″ (vea la ilustración) desde la pared acabada
hasta el centro de los orificios de la grifería del fregadero. Utilice
estas medidas para ubicar la línea central de la grifería y el borde
posterior de la abertura de la cubierta. Verifique que haya
suficiente espacio entre las manijas de la grifería y el protector
contra salpicaduras o pared acabada para así asegurarse de que la
grifería funcione bien.
Desde el borde posterior de la cubierta, mida la distancia igual
que ″Y″ y trace la línea central de la grifería. Para la instalación
bajo la cubierta, añada 1-1/2″ (3,8 cm) a la línea central de la
grifería, para hallar el borde posterior de la abertura. Para la
instalación sobre superficies sólidas, reste 1-1/2″ (3,8 cm) desde la
línea central de la grifería, para hallar el borde posterior de la
abertura.
Trace la plantilla sobre la cubierta con un lápiz de mina suave.
Para la instalación bajo cubierta, ubique los orificios de la grifería.
1019949-2-C Español-11 Kohler Co.
Page 35

Instalación de la superficie sólida/bajo cubierta (cont.)
Corte la abertura siguiendo con cuidado la línea trazada en lápiz.
Para la instalación bajo cubierta, taladre los orificios para la
grifería.
Lije los bordes de la abertura para alisar la superficie y eliminar
todas las marcas de la segueta. Para las cubiertas laminadas,
impermeabilice todas las áreas sin protección de la madera.
Limpie la parte superior del borde del fregadero, asegurándose de
que la superficie no tenga residuos. Limpie la parte inferior de la
cubierta, a lo largo del área de la abertura, para asegurarse de
que la superficie esté lisa, limpia y sin irregularidades.
Aplique una cantidad abundante de sellador alrededor del borde
del fregadero por donde el borde entra en contacto con la
cubierta.
Coloque la cubierta sobre el fregadero, asegurándose de que el
sellador se adhiera bien entre el borde del fregadero y la parte
inferior de la cubierta.
Limpie de inmediato el exceso de sellador con un trapo húmedo.
Rellene los huecos vacíos entre el borde y la cubierta de ser
necesario.
Antes de continuar, deje secar el sellador durante 30 minutos
como mínimo.
Para la instalación bajo cubierta, instale la grifería en el fregadero
y la cubierta según las instrucciones del fabricante.
Conecte y apriete la trampa a la coladera y termine las conexiones
del suministro de agua a la grifería, conforme a las instrucciones
incluidas con la grifería.
Haga circular agua al fregadero y verifique que no haya fugas.
Limpie con un limpiador no abrasivo.
Kohler Co. Español-12 1019949-2-C
Page 36

USA/Canada: 1-800-4KOHLER
México: 001-800-456-4537
kohler.com
©2010 Kohler Co.
1019949-2-C
 Loading...