

Kohler K-6228 Installation And Care Manual

Installation and Care Guide
Wall-Mount Kitchen Sink Faucet
K-6228
M product numbers are for Mexico (i.e. K-12345M)
Los números de productos seguidos de
M corresponden a México (Ej.
K-12345M)
Français, page “Français-1”
Español, página “Español-1”
1095311-2-J
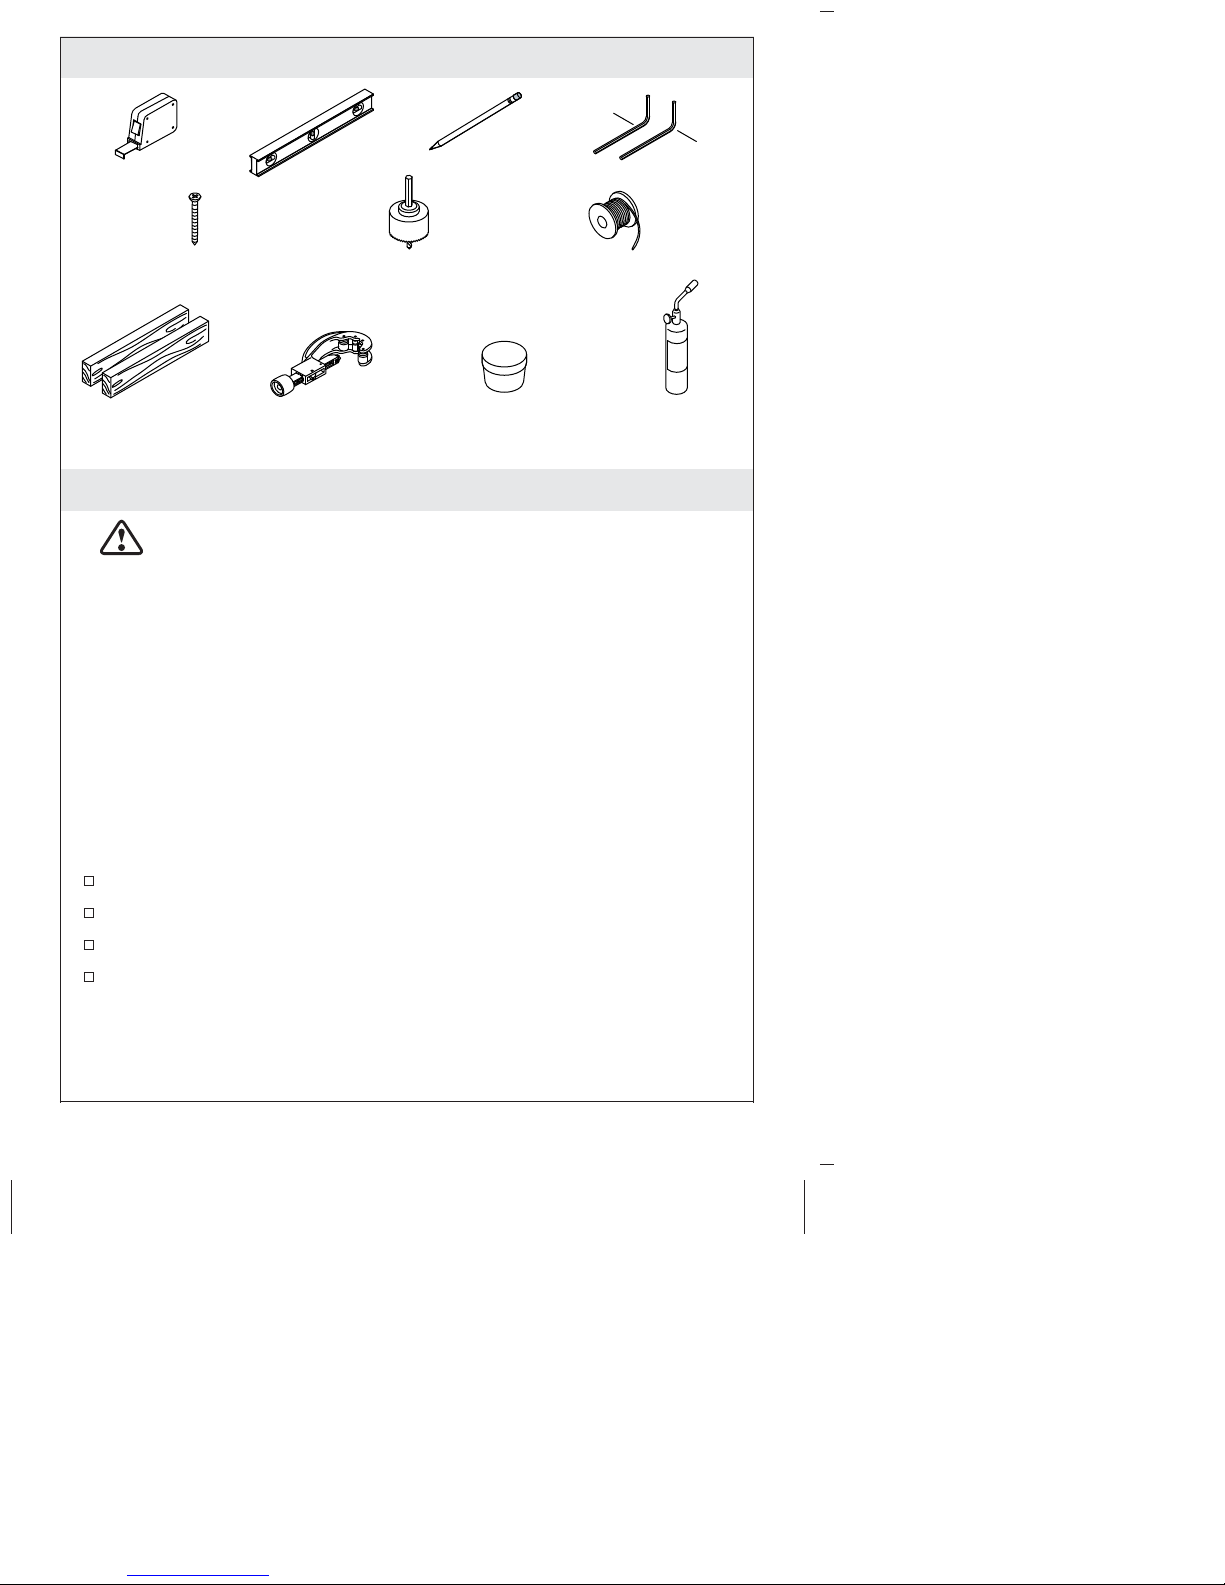
Tools and Materials
5/64"
3/32"
#10 Wood Screws
2x4 Lumber
1-3/16" and 2-3/16"
Hole Saw
Tube Cutter
Plumbers Putty
Solder
Propane Torch
Before You Begin
CAUTION: Risk of property damage. Before finishing the
wall, make sure the supply lines are connected to the mixer
valve with the cold line plumbed on the left and the hot line
plumbed on the right.
IMPORTANT! Unless otherwise indicated, the illustrations in this
document show installation for a handle located to the right of the
spout. The valve is designed for handle installation on the right.
Special steps will need to be performed to position the handle to the
left of the valve.
NOTICE: For exterior wall installations, be sure proper wall
insulation is installed to prevent frozen pipes.
NOTE: For service parts information, visit your product page at
www.kohler.com/serviceparts.
Observe all local plumbing and building codes.
Shut off the water supply.
Carefully inspect supply tubing for any sign of damage.
The supplied plaster guard will also be used to assemble the
valve. The supplied spout tool will also be used for alignment of
the spout escutcheon.
1095311-2-J 2 Kohler Co.
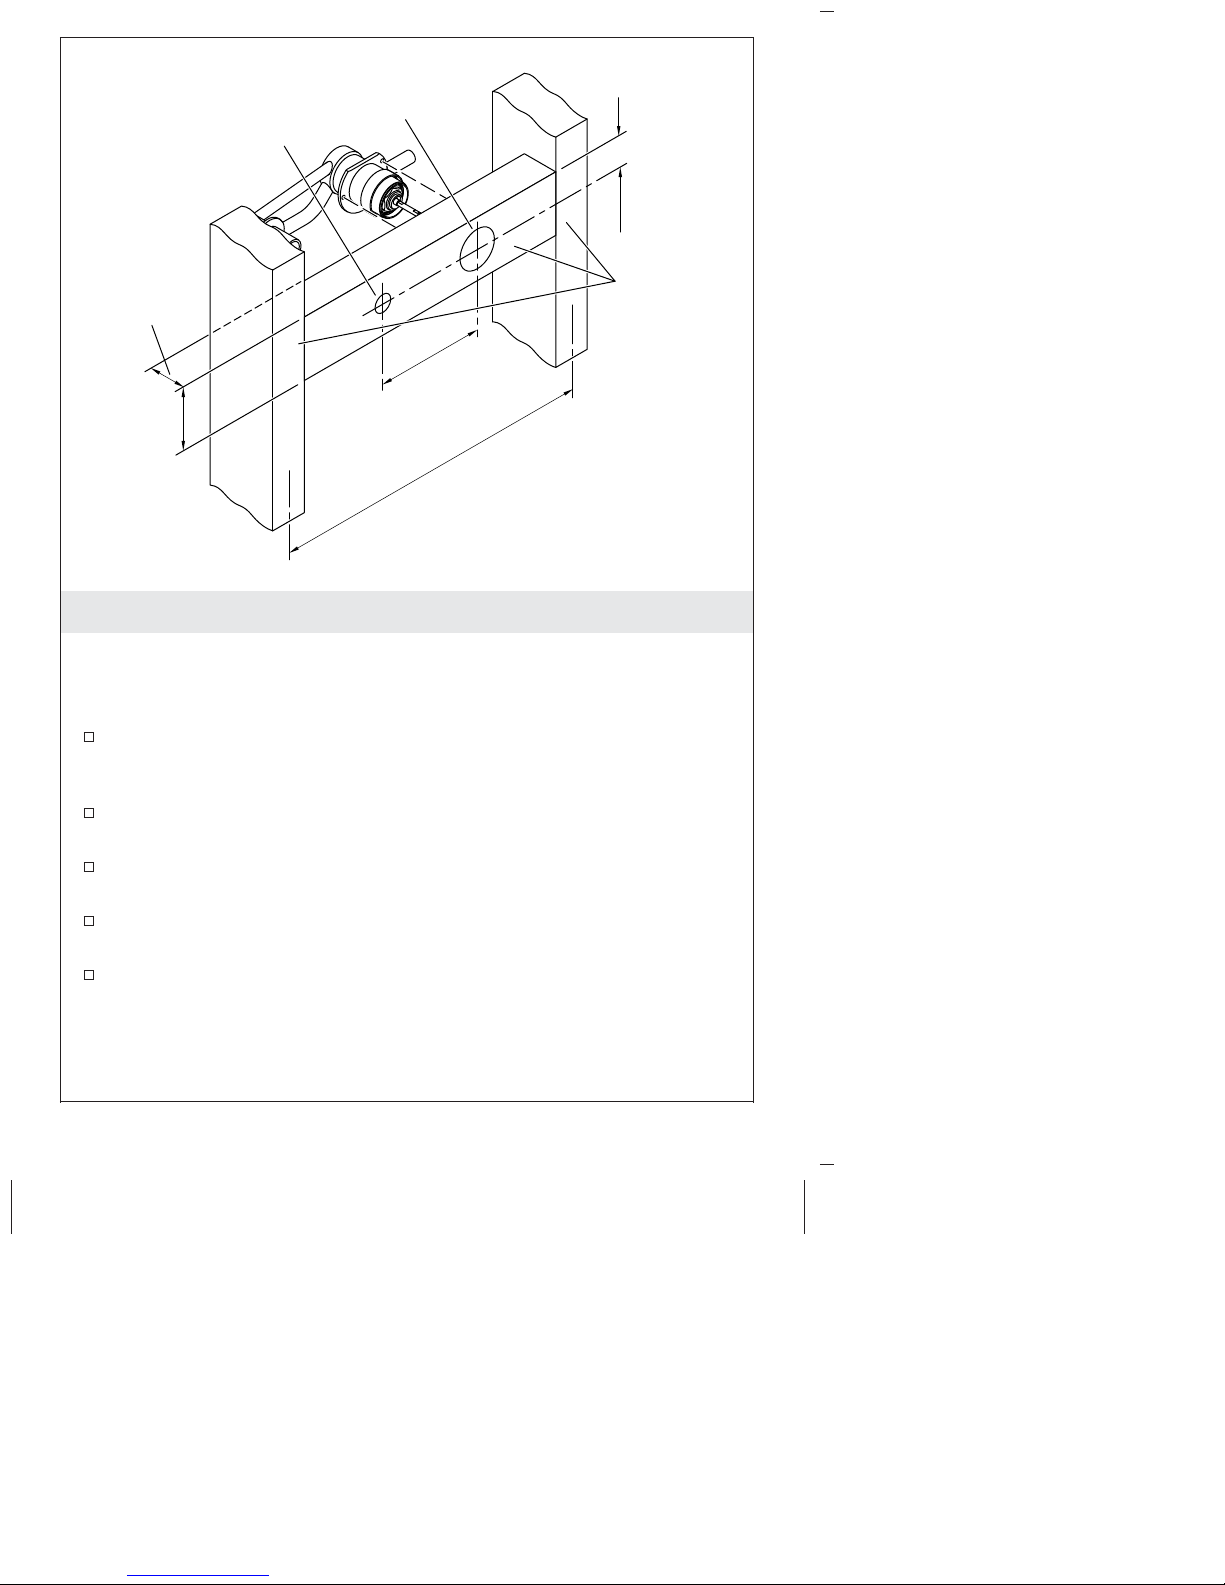
Ø 1-3/16"
(30 mm)
Ø 2-3/16"
(56 mm)
1-3/4"
(44 mm)
1-1/2"
(38 mm)
These
surfaces
to be flush.
6"
3-1/2"
(89 mm)
(152 mm)
16"
(406 mm)
1. Prepare the Site
IMPORTANT! The illustration shows hole locations for a right side
handle. Reverse the holes for left side handle installation.
NOTE: The mixer valve requires special framing and support.
Construct framing for right side handle installation according to
the dimensions shown. Reverse the holes for left side handle
installation.
Verify the framing is level and will be parallel to the finished
wall. Adjust as needed.
Loosely attach the mixer valve to the framing with one or two
wood screws (not provided).
Using the flat portion of the mixer valve as a guide, level the
mixer valve.
Fully tighten the wood screw(s).
Kohler Co. 3 1095311-2-J
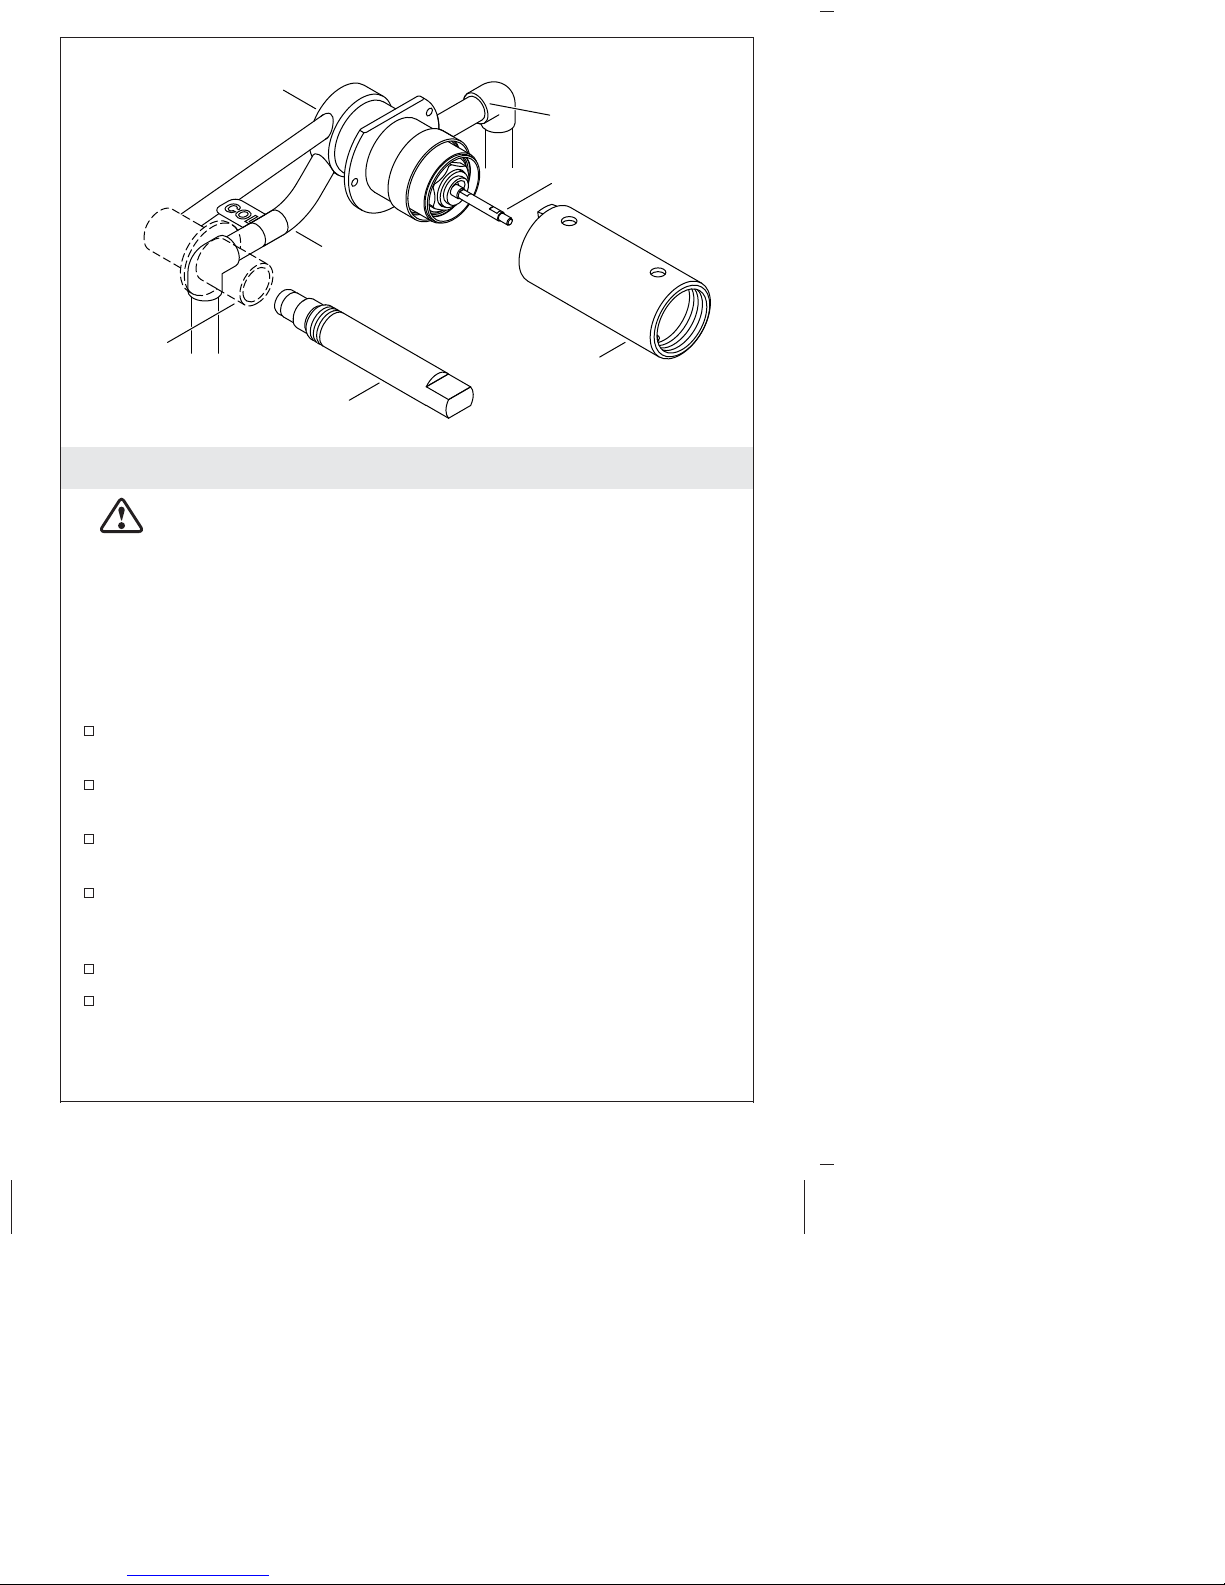
Mixer Valve
Hot Supply
Valve Stem
Cold Supply
Spout
Shank
Plaster
Guard/Tool
Spout Plug
2. Install the Supplies
CAUTION: Risk of property damage. When installing the
handle on either the right or the left side of the spout,
connect the supplies to the mixer valve with the cold supply
line plumbed on the left and the hot supply line plumbed on
the right. For left side handle installation, disregard the cold
label on the mixer valve.
IMPORTANT! The illustration shows a right side handle
installation. The supply can also be installed with the handle on the
left side.
Install 1/2″ supply lines to the mixer valve with the cold supply
on the left and the hot supply on the right.
Temporarily remove and retain the plaster guard/tool and spout
plug.
Position a bucket in front of the spout shank, then turn on the
water supplies to the mixer valve.
Slowly open the valve stem. Allow hot and cold water to flow
from the water supplies for approximately 1 minute to remove
any debris.
Close the valve stem. Check all connections for leaks.
Reattach the plaster guard/tool and spout plug.
1095311-2-J 4 Kohler Co.
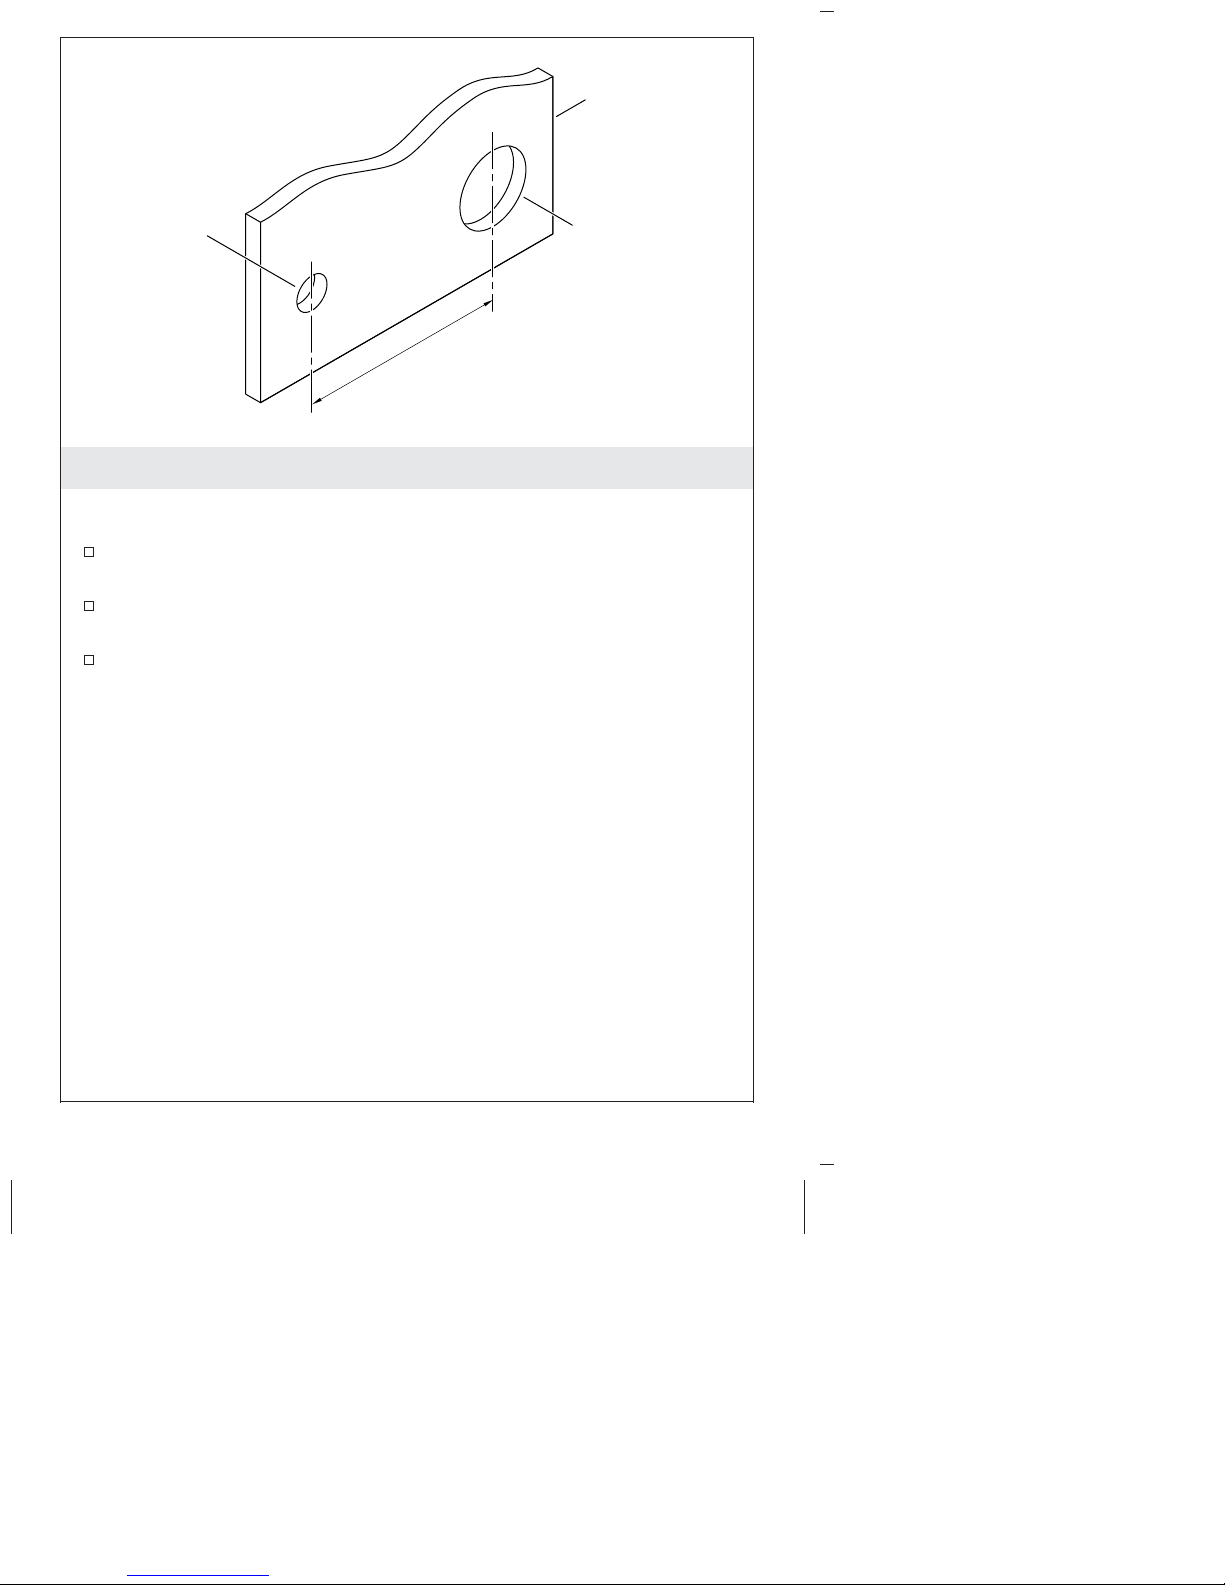
Finished Wall
Ø 1-3/16"
(30 mm)
Ø 2-3/16"
(56 mm)
6" (152 mm)
3. Complete the Finished Wall
IMPORTANT! The illustration shows hole locations for a right side
handle. Reverse the holes for left side handle installation.
Measure and mark the hole centers 6″ (152 mm) apart from each
other.
Using a hole saw, drill a 1-3/16″ (30 mm) hole for the spout and
a 2-3/16″ (58 mm) hole for the handle.
Complete the finished wall.
Kohler Co. 5 1095311-2-J
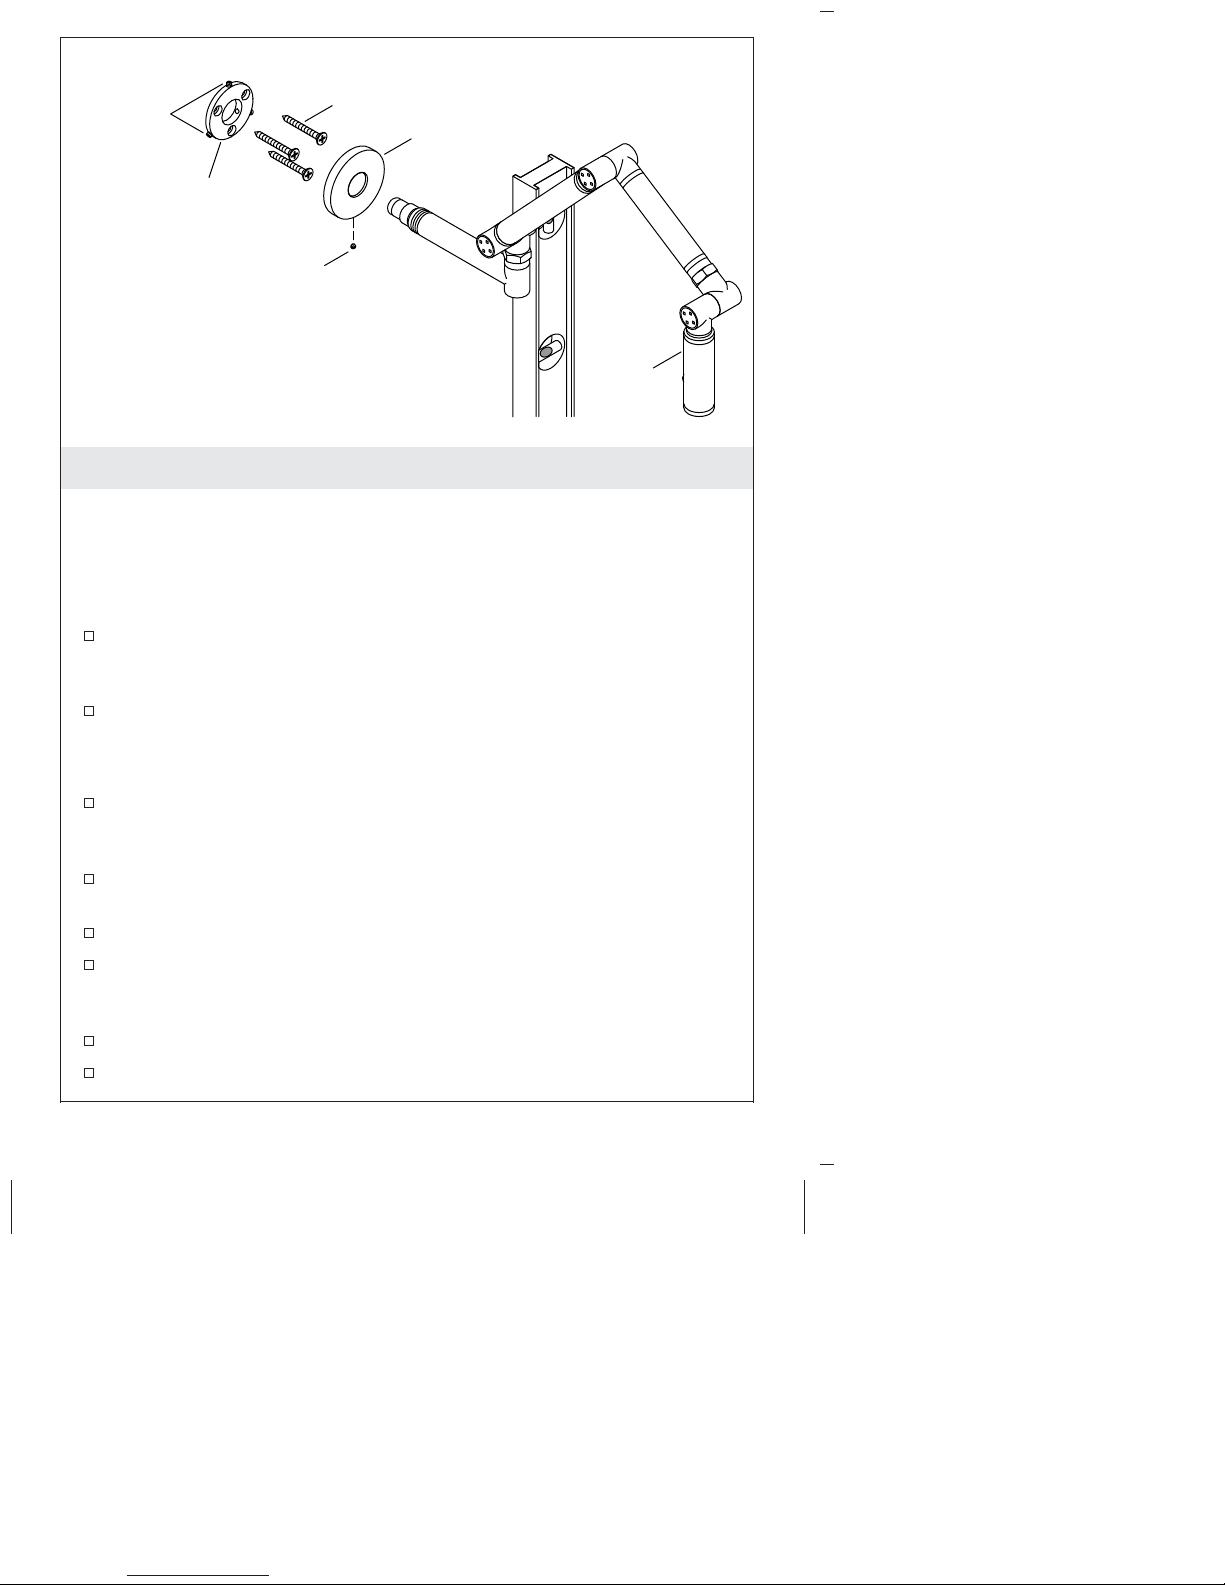
Setscrews
Wood Screws
Escutcheon
Apply sealant
to the back of
the flange.
Setscrew
Spout
4. Install the Spout
NOTE: Anchors are required when installing to materials such as
glass, mirror, and ceramic tile. The anchors and fasteners are not
supplied. Select appropriate fasteners and anchors for the finished
wall material.
If Anchors Are Required
Position the wall flange over the spout plug (not shown) with the
three holes at the 2, 6, and 10 o’clock positions. Mark the hole
locations on the wall.
Drill holes at each of the marks, using the drill bit size and type
appropriate for the finished wall material.
All Installations
Confirm there are three setscrews pre-installed in the wall flange.
Make sure they do not protrude into the inside diameter of the
wall flange. Adjust as necessary using a 3/32″ hex wrench.
Apply plumbers putty or other suitable sealant to the back of the
wall flange.
Slide the wall flange over the spout plug (not shown).
Position the three holes on the wall flange at the 2, 6, and 10
o’clock positions, then secure the flange with three wood screws
or other appropriate fasteners (not provided).
Remove the spout plug.
Temporarily place the escutcheon on the wall flange.
1095311-2-J 6 Kohler Co.

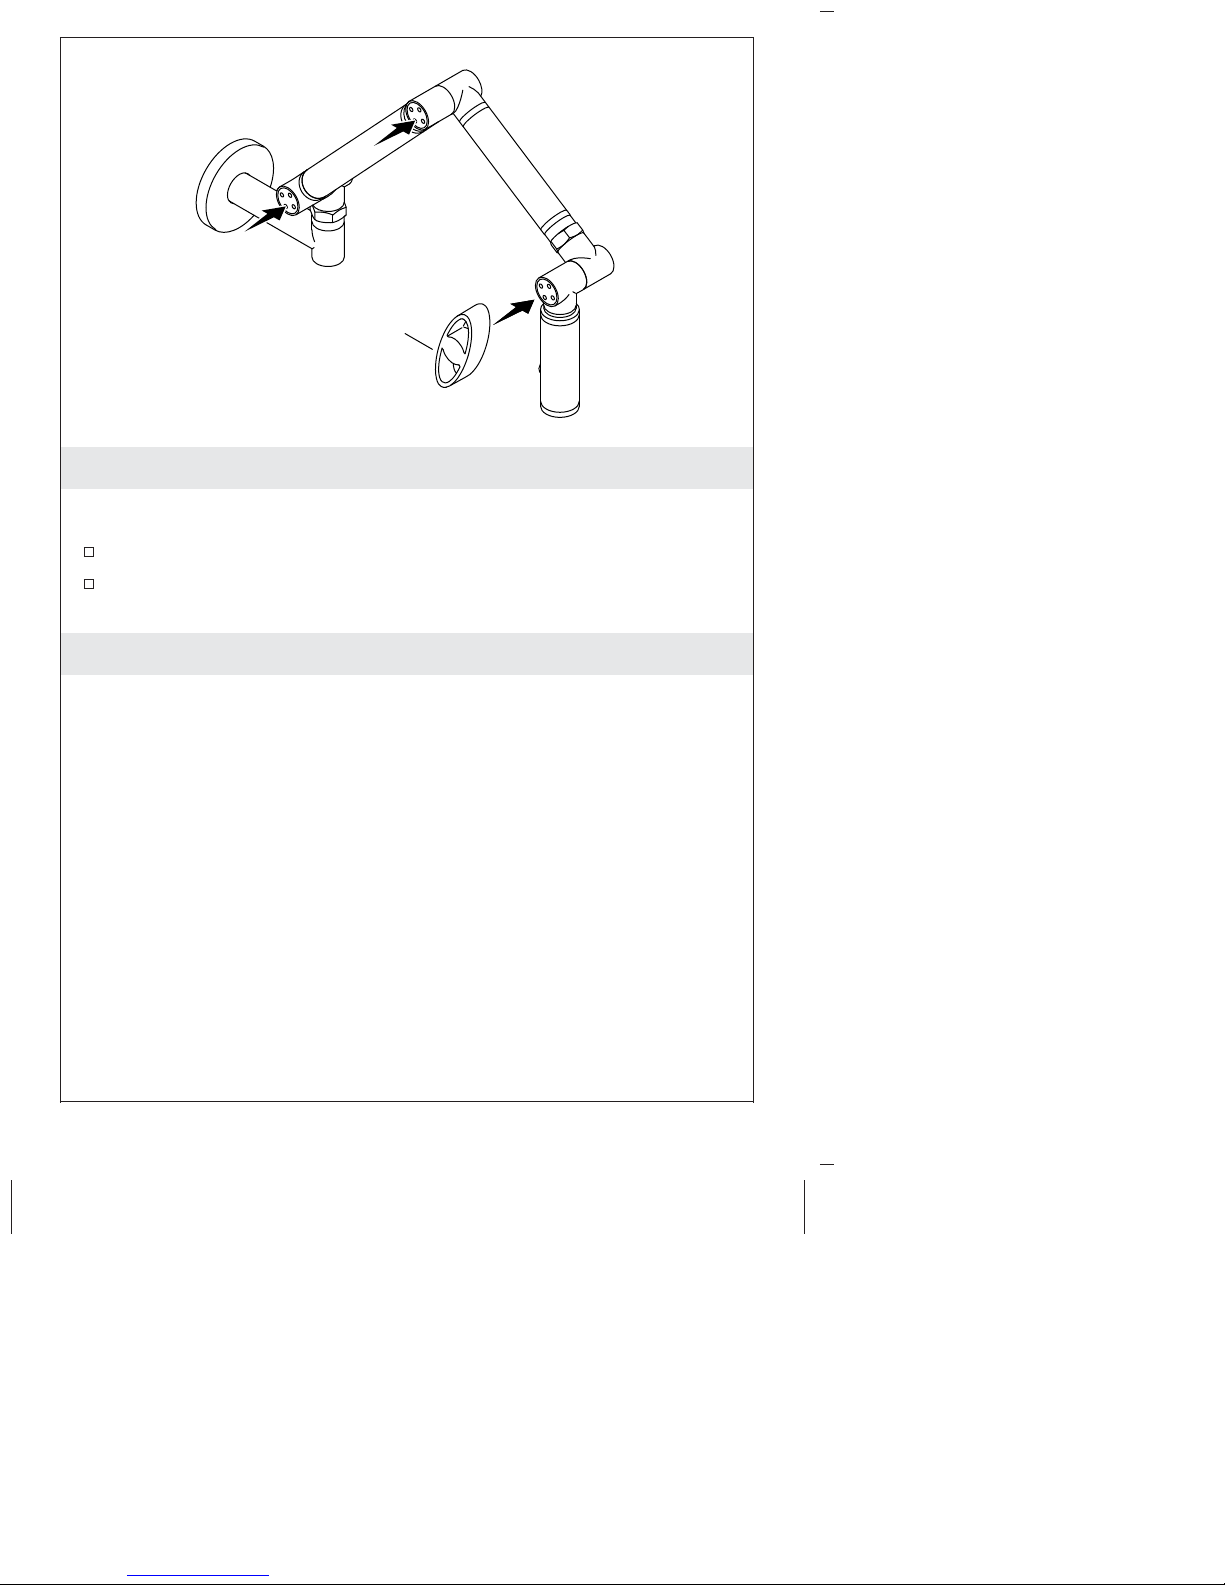
Install the Spout (cont.)
Thread the spout onto the mixer valve until the spout is fully
seated. If necessary, unthread the spout for alignment.
Slide the escutcheon away from the finished wall to access the
setscrew holes.
Using a 3/32″ hex wrench, tighten the three setscrews in the wall
flange until the setscrews contact the spout. Fully tighten the
setscrews.
Slide the escutcheon back against the finished wall and onto the
wall flange.
With the escutcheon setscrew hole at the 6 o’clock position, use a
5/64″ hex wrench to secure the escutcheon with a setscrew.
Kohler Co. 7 1095311-2-J
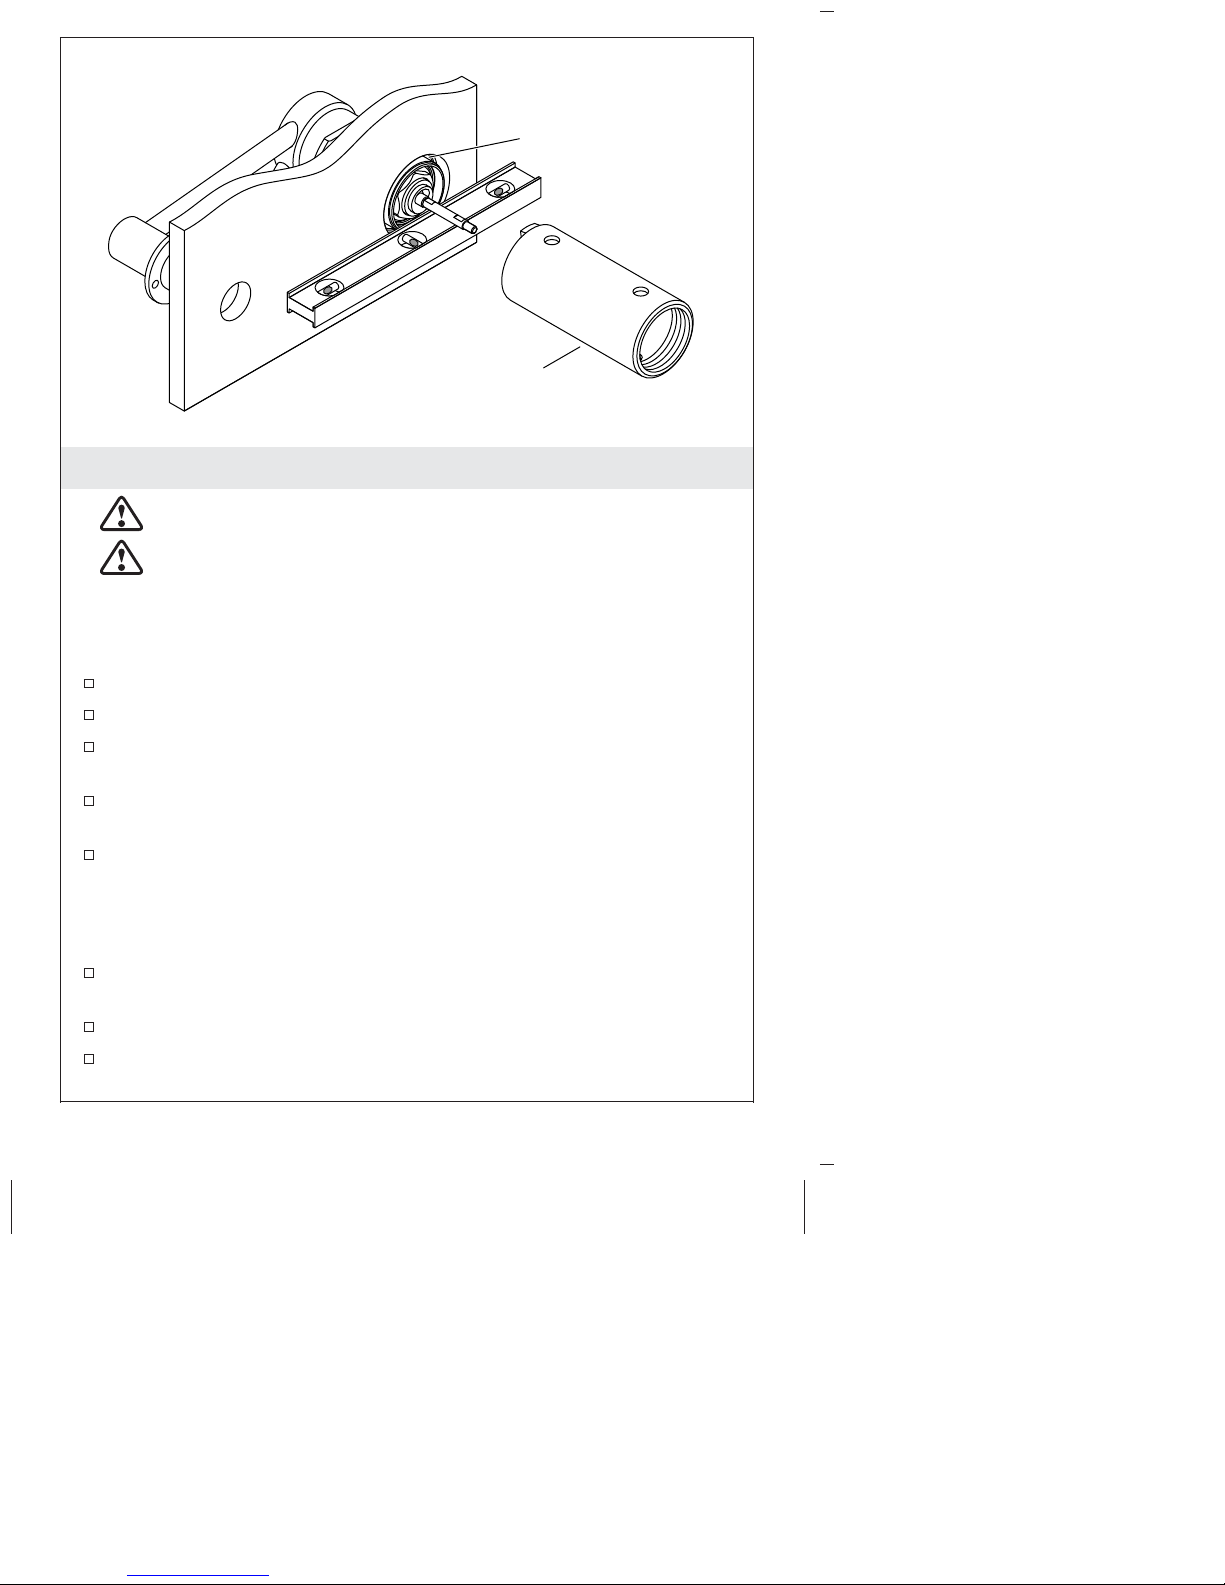
Retaining Ring
Plaster Guard/
Retaining Ring Tool
5. Adjust the Valve - Right Handle
CAUTION: Risk of property damage. The water supply
must be shut off before performing these steps.
CAUTION: Risk of property damage. At the maximum
valve body extension, a detent will be encountered. To avoid
leakage, do not extend the valve beyond this detent. If the
valve needs to be extended further, install deep rough-in kit
1107027. If the valve needs to be recessed further, install
shallow rough-in kit 1107026.
Shut off the water supply.
Remove the plaster guard/retaining ring tool.
Position a bucket at the spout outlet, then open the valve handle
to relieve water pressure. Leave the handle open.
Using the tool, loosen the threaded retaining ring until the valve
body disengages from the mixer valve.
Using a straight edge, adjust and hold the valve body flush with
the finished wall.
NOTE: A screwdriver inserted through the holes in the plaster
guard/retaining ring tool can serve as a handle.
With the valve body flush with the finished wall, retighten the
retaining ring with the tool.
Close the valve handle.
Turn on the water supply and check that the valve is functioning
properly.
1095311-2-J 8 Kohler Co.
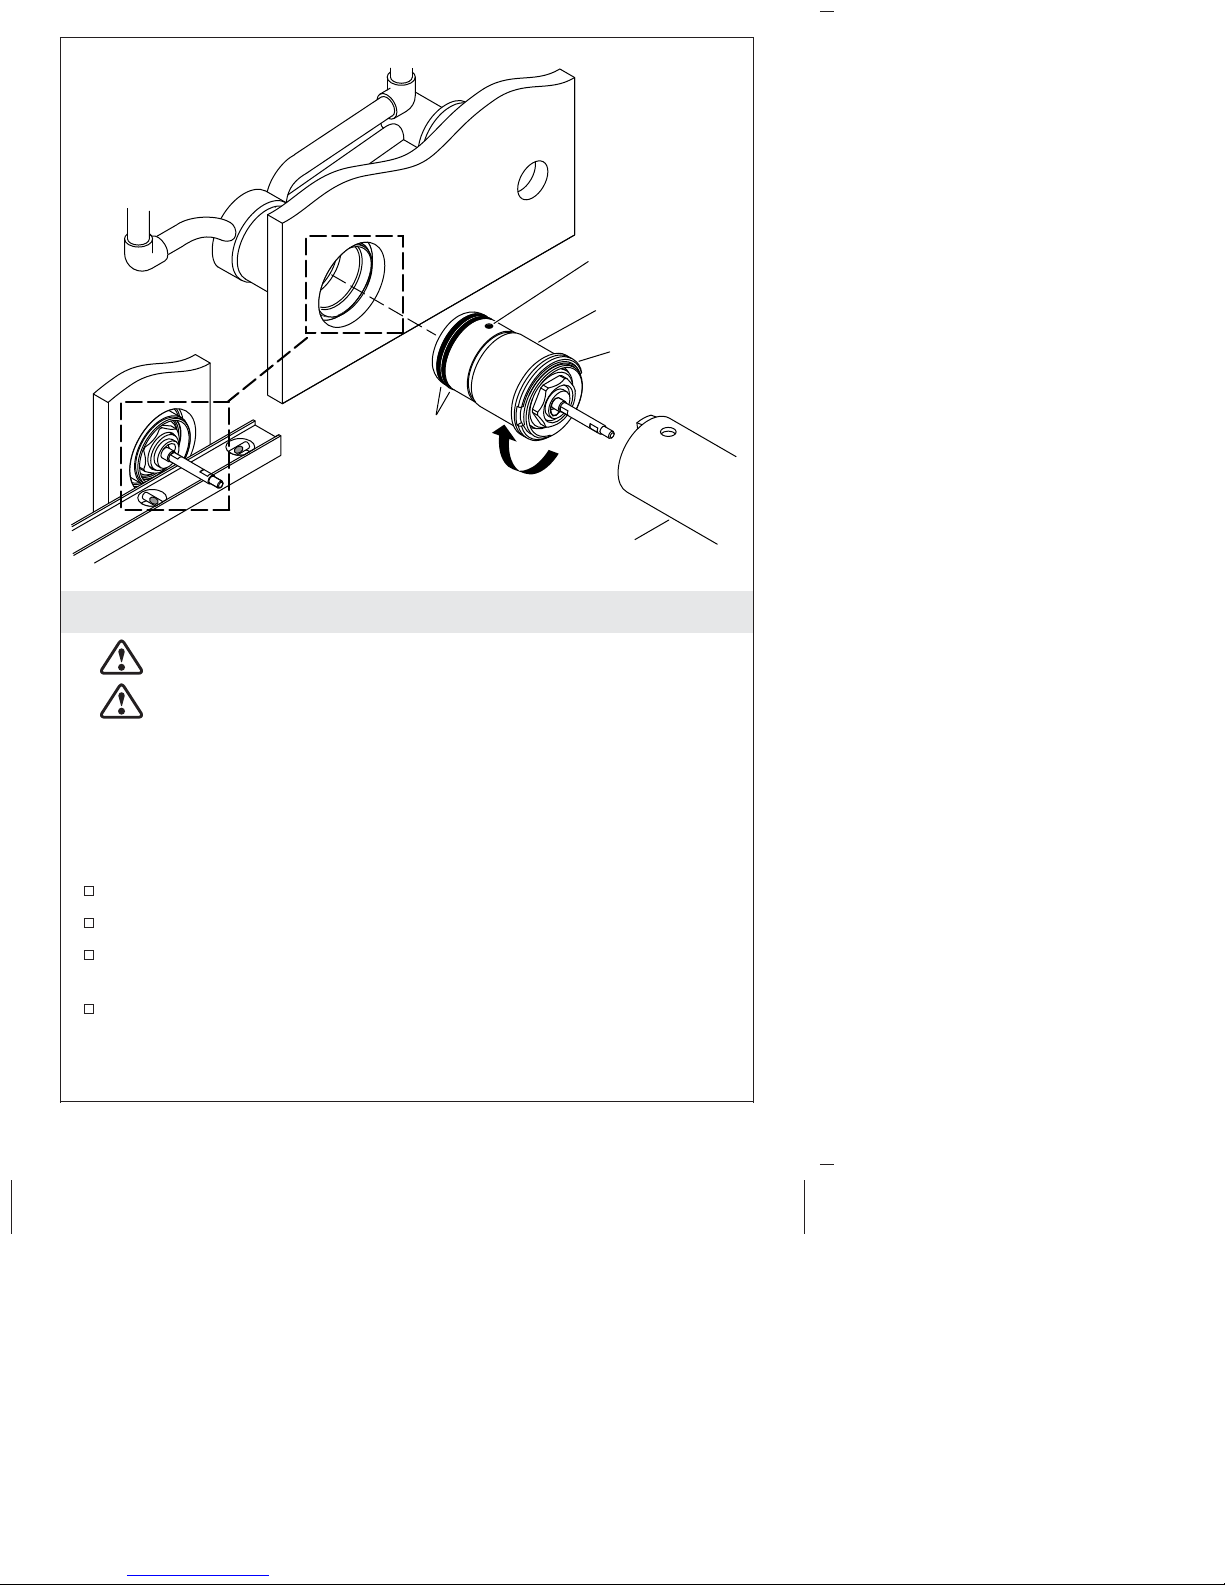
O-Rings
6. Adjust the Valve - Left Handle
CAUTION: Risk of property damage. The water supply
must be shut off before performing these steps.
CAUTION: Risk of property damage. At the maximum
valve body extension, a detent will be encountered. To avoid
leakage, do not extend the valve beyond this detent. If the
valve needs to be extended further, install deep rough-in kit
1107027. If the valve needs to be recessed further, install
shallow rough-in kit 1107026.
Spring Plunger
Valve Body
Retaining Ring
180˚
Plaster Guard/Tool
IMPORTANT! Perform these steps when the handle will be located
on the left side of the spout.
Shut off the water supply.
Remove the plaster guard/retaining ring tool.
Position a bucket at the spout outlet, then open the valve handle
to relieve water pressure. Leave the handle open.
Using the tool, loosen the threaded retaining ring until the valve
body disengages from the mixer valve.
Kohler Co. 9 1095311-2-J

Adjust the Valve - Left Handle (cont.)
Pull out the valve body. The plaster guard/retaining ring tool can
be threaded onto the valve body to get a better grip when pulling
it out.
Rotate the valve body 180 degrees from the original position. This
allows the handle to move up when turning the water on.
Verify the o-rings on both the valve body and the mixer valve are
undamaged.
Verify the spring plunger is installed and is flush with the surface
of the valve body.
Reinstall the valve body into the mixer valve until fully seated.
Using a straight edge, adjust and hold the valve body flush with
the finished wall.
NOTE: A screwdriver inserted through the holes in the plaster
guard/retaining ring tool can serve as a handle.
With the valve body flush with the finished wall, retighten the
retaining ring with the tool.
Close the valve handle.
Turn on the water supply and check that the valve is functioning
properly.
1095311-2-J 10 Kohler Co.
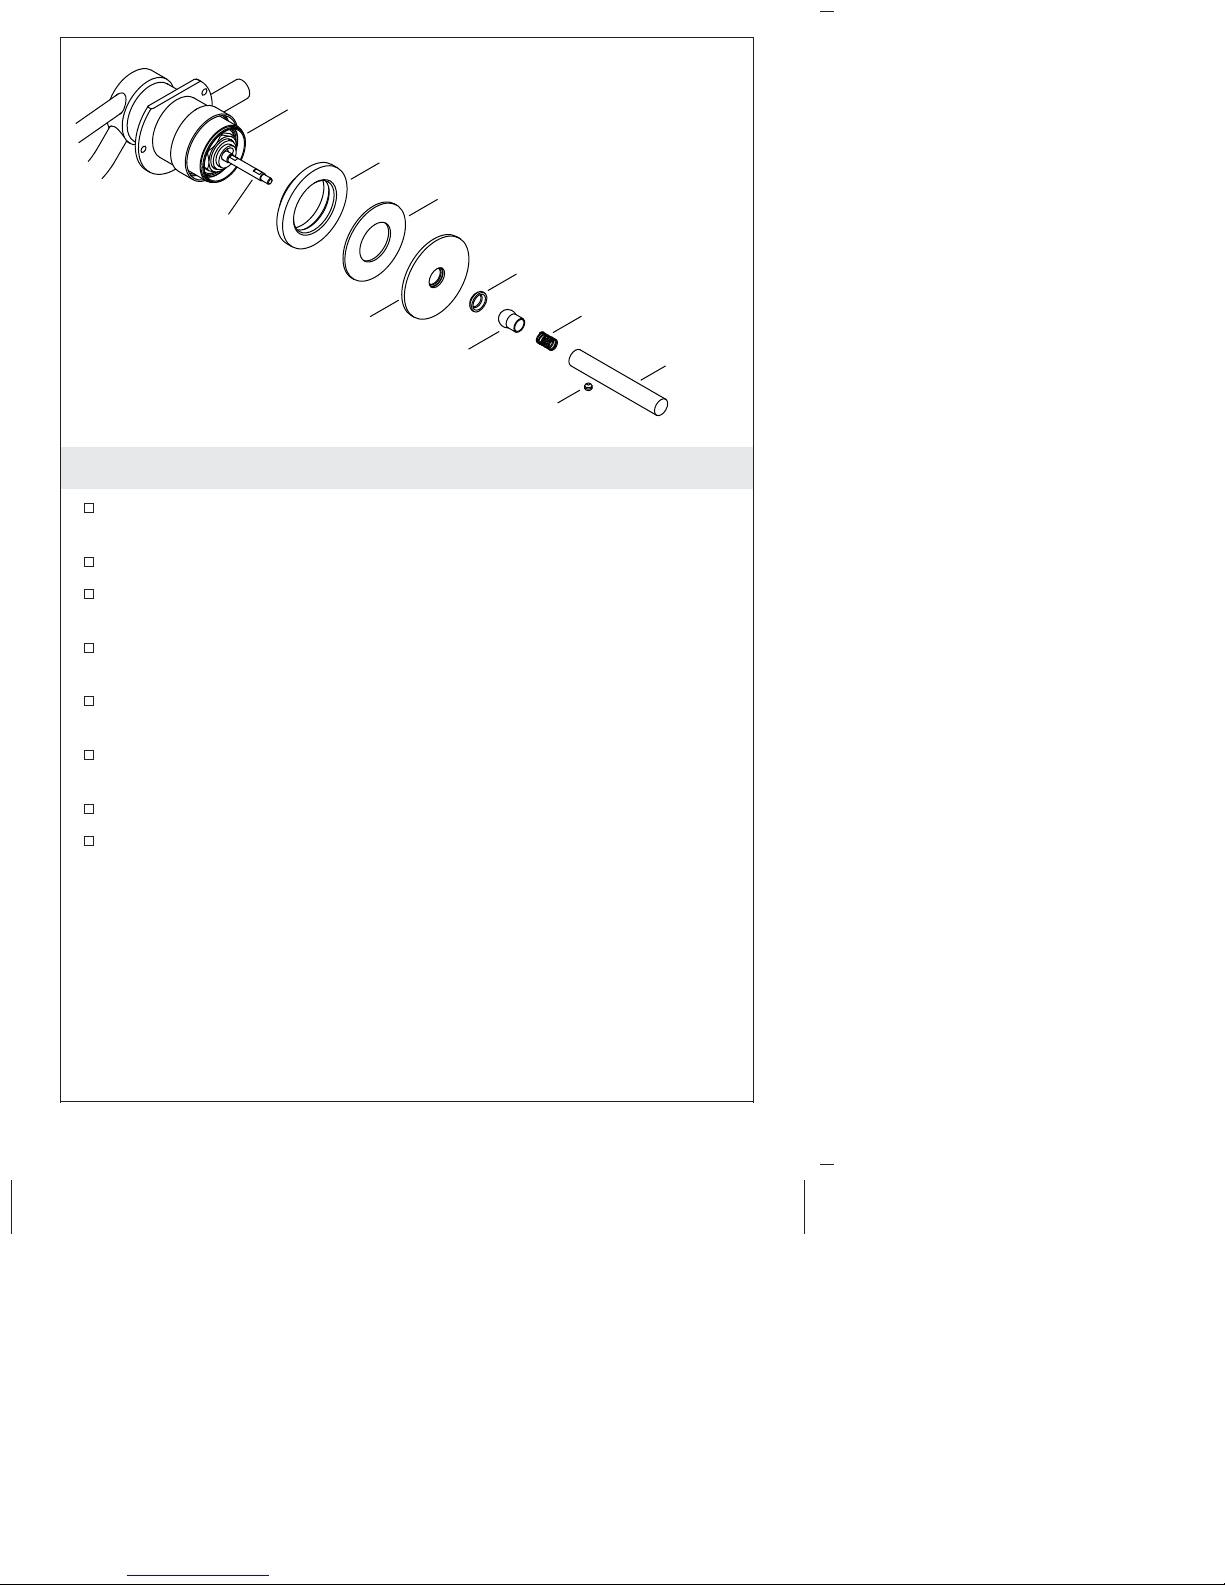
Valve Stem
Retaining Ring
Apply sealant to the
back of the escutcheon.
Bearing
Friction Cup
Sliding Disk
Ball Joint
Setscrew
Spring
7. Install the Handle
Apply plumbers putty or other suitable sealant to the back of the
escutcheon.
Thread the escutcheon tight against the finished wall.
Slide the following components onto the valve stem: bearing,
sliding disk, friction cup, ball joint, and spring.
Hold the components in place on the valve stem, then thread the
handle onto the valve stem until fully seated.
Unthread the handle until the setscrew hole is pointed at the 6
o’clock position.
Use a 5/64″ hex wrench to fully tighten the setscrew into the
handle.
Turn on the water supply.
Check for leaks.
Handle
Kohler Co. 11 1095311-2-J
Tool
8. Adjust the Faucet
NOTE: Adjustment may be needed if the faucet is difficult to move
or does not remain in place after use.
Insert the adjustment tool onto the joint that requires adjustment.
To tighten the joint, turn the tool clockwise. To loosen the joint
(faucet will move more freely), turn the tool counterclockwise.
Care and Cleaning
For best results, keep the following in mind when caring for your
KOHLER product:
•
Use a mild detergent such as liquid dishwashing soap and warm
water for cleaning. Do not use abrasive cleaners that may scratch
or dull the surface.
•
Carefully read the cleaner product label to ensure the cleaner is
safe for use on the material.
•
Always test your cleaning solution on an inconspicuous area
before applying to the entire surface.
•
Do not allow cleaners to sit or soak on the surface.
•
Wipe surfaces clean and rinse completely with water immediately
after cleaner application. Rinse and dry any overspray that lands
on nearby surfaces.
1095311-2-J 12 Kohler Co.

Care and Cleaning (cont.)
•
Use a soft, dampened sponge or cloth. Never use an abrasive
material such as a brush or scouring pad to clean surfaces.
For detailed cleaning information and products to consider, visit
www.kohler.com/clean. To order Care & Cleaning information, call
1-800-456-4537.
Warranty
KOHLER®Faucet Lifetime Limited Warranty
Kohler Co. warrants its Faucets* manufactured after January 1, 1997, to
be leak and drip free during normal residential use for as long as the
original consumer purchaser owns his or her home. If the Faucet
should leak or drip during normal use, Kohler Co. will, free of charge,
mail to the purchaser the cartridge necessary to put the Faucet in good
working condition. This warranty applies only to Kohler Faucets
installed in the United States of America, Canada or Mexico (″North
America″).
Kohler Co. also warrants all other aspects of the faucet or accessories
(″Faucet″)*, (except gold, non-Vibrant
of defects in material and workmanship during normal residential use
for as long as the original consumer purchaser owns his or her home.
This warranty applies only to Kohler Faucets installed in North
America. If a defect is found in normal residential use, Kohler Co. will,
at its election, repair, provide a replacement part or product, or make
appropriate adjustment. Damage to a product caused by accident,
misuse, or abuse is not covered by this warranty. Improper care and
cleaning will void the warranty**. Proof of purchase (original sales
receipt) must be provided to Kohler Co. with all warranty claims.
Kohler Co. is not responsible for labor charges, installation, or other
incidental or consequential costs. In no event shall the liability of
Kohler Co. exceed the purchase price of the Faucet.
If the Faucet is used commercially or is installed outside of North
America, or if the finish is gold, non-Vibrant or a painted or powder
coated color finish, Kohler Co. warrants the Faucet to be free from
defects in material and workmanship for one (1) year from the date the
product is installed, under Kohler Co.’s standard one-year limited
warranty.
If you believe that you have a warranty claim, contact Kohler Co.,
either through your Dealer, Plumbing Contractor, Home Center or
E-tailer, or by writing Kohler Co., Attn.: Customer Care Center, 444
Highland Drive, Kohler, WI 53044, USA. Please be sure to provide all
pertinent information regarding your claim, including a complete
description of the problem, the product, model number, color, finish,
, non-chrome finishes) to be free
®
Kohler Co. 13 1095311-2-J

Warranty (cont.)
the date the product was purchased and from whom the product was
purchased. Also include your original invoice. For other information,
or to obtain the name and address of the service and repair facility
nearest you, call 1-800-4-KOHLER (1-800-456-4537) from within the
USA and Canada, and 001-800-456-4537 from within Mexico, or visit
www.kohler.com within the USA, www.ca.kohler.com from within
Canada, or www.mx.kohler.com in Mexico.
KOHLER CO. AND/OR SELLER ARE PROVIDING THESE
WARRANTIES IN LIEU OF ALL OTHER WARRANTIES,
EXPRESSED OR IMPLIED, INCLUDING BUT NOT LIMITED TO
THE IMPLIED WARRANTIES OF MERCHANTABILITY AND
FITNESS FOR A PARTICULAR PURPOSE. KOHLER CO. AND/OR
SELLER DISCLAIM ALL LIABILITY FOR SPECIAL, INCIDENTAL
OR CONSEQUENTIAL DAMAGES. Some states/provinces do not
allow limitations of how long an implied warranty lasts or the
exclusion or limitation of such damages, so these limitations and
exclusions may not apply to you. This warranty gives the consumer
specific legal rights. You may also have other rights that vary from
state/province to state/province.
This is Kohler Co.’s exclusive written warranty.
*Trend
components; WaterHaven®tower, systems and components; Tripoint
faucets, MasterShower®tower, BodySpa systems and
®
®
faucets, Polished Gold, non-Vibrant and painted or powder coated
finishes, fittings; all items within the ″Fixture Related″ section of the
Kohler Faucets Price Book, drains, Duostrainer
sink strainers,
®
soap/lotion dispensers, Moxie®Wireless Speaker; and faucets used in
commercial settings, and outside North America, are covered by
Kohler Co.’s one-year limited warranty.
**Never use cleaners containing abrasive cleansers, ammonia, bleach,
acids, waxes, alcohol, solvents or other products not recommended for
chrome. This will void the warranty.
1095311-2-J 14 Kohler Co.

Guide d’installation et d’entretien
Robinet d’évier à montage mural
Outils et matériaux
5/64"
3/32"
Vis à bois #10
Lambourde
de 2x4
Scie circulaire de
1- 3/16" et 2-3/16"
Coupe-tubes
Mastic de
plombier
Fer à souder
Torche au
propane
Avant de commencer
ATTENTION: Risque de dommages matériels. Avant de
terminer le mur, s’assurer que les conduites d’alimentation
sont connectées au robinet mélangeur avec la conduite
d’alimentation en eau froide plombée sur la gauche et la
conduite d’alimentation en eau chaude plombée sur la droite.
IMPORTANT! Sauf sur indication spécifique, les illustrations dans
ce document indiquent une installation pour une poignée située sur
la droite du bec. Le robinet est conçu pour l’installation d’une
poignée sur la droite. Des étapes spéciales doivent être exécutées
pour positionner la poignée sur le côté gauche du robinet.
AVIS: Pour des installations sur mur extérieur, s’assurer qu’une
bonne isolation du mur est en place afin d’éviter le gel des tuyaux.
REMARQUE: Pour tout renseignement sur les pièces de rechange,
visiter la page du produit à www.kohler.com/serviceparts.
Respecter tous les codes de plomberie et de bâtiment locaux.
Fermer l’arrivée d’eau.
Kohler Co. Français-1 1095311-2-J
 Loading...