

Page 1

Installation
Guide
Tile-In Cast Iron Sinks
K-5814, K-5834, K-5848,
K-5852, K-5864, K-5877,
K-5879, K-5882, K-5893,
K-5898, K-5902, K-5910,
K-5950, K-5959, K-5961,
K-6540
M product numbers are for Mexico (i.e. K-12345M)
Los números de productos seguidos de
M corresponden a México (Ej.
K-12345M)
Français, page “Français-1”
Español, página “Español-1”
1019943-2-C
Page 2
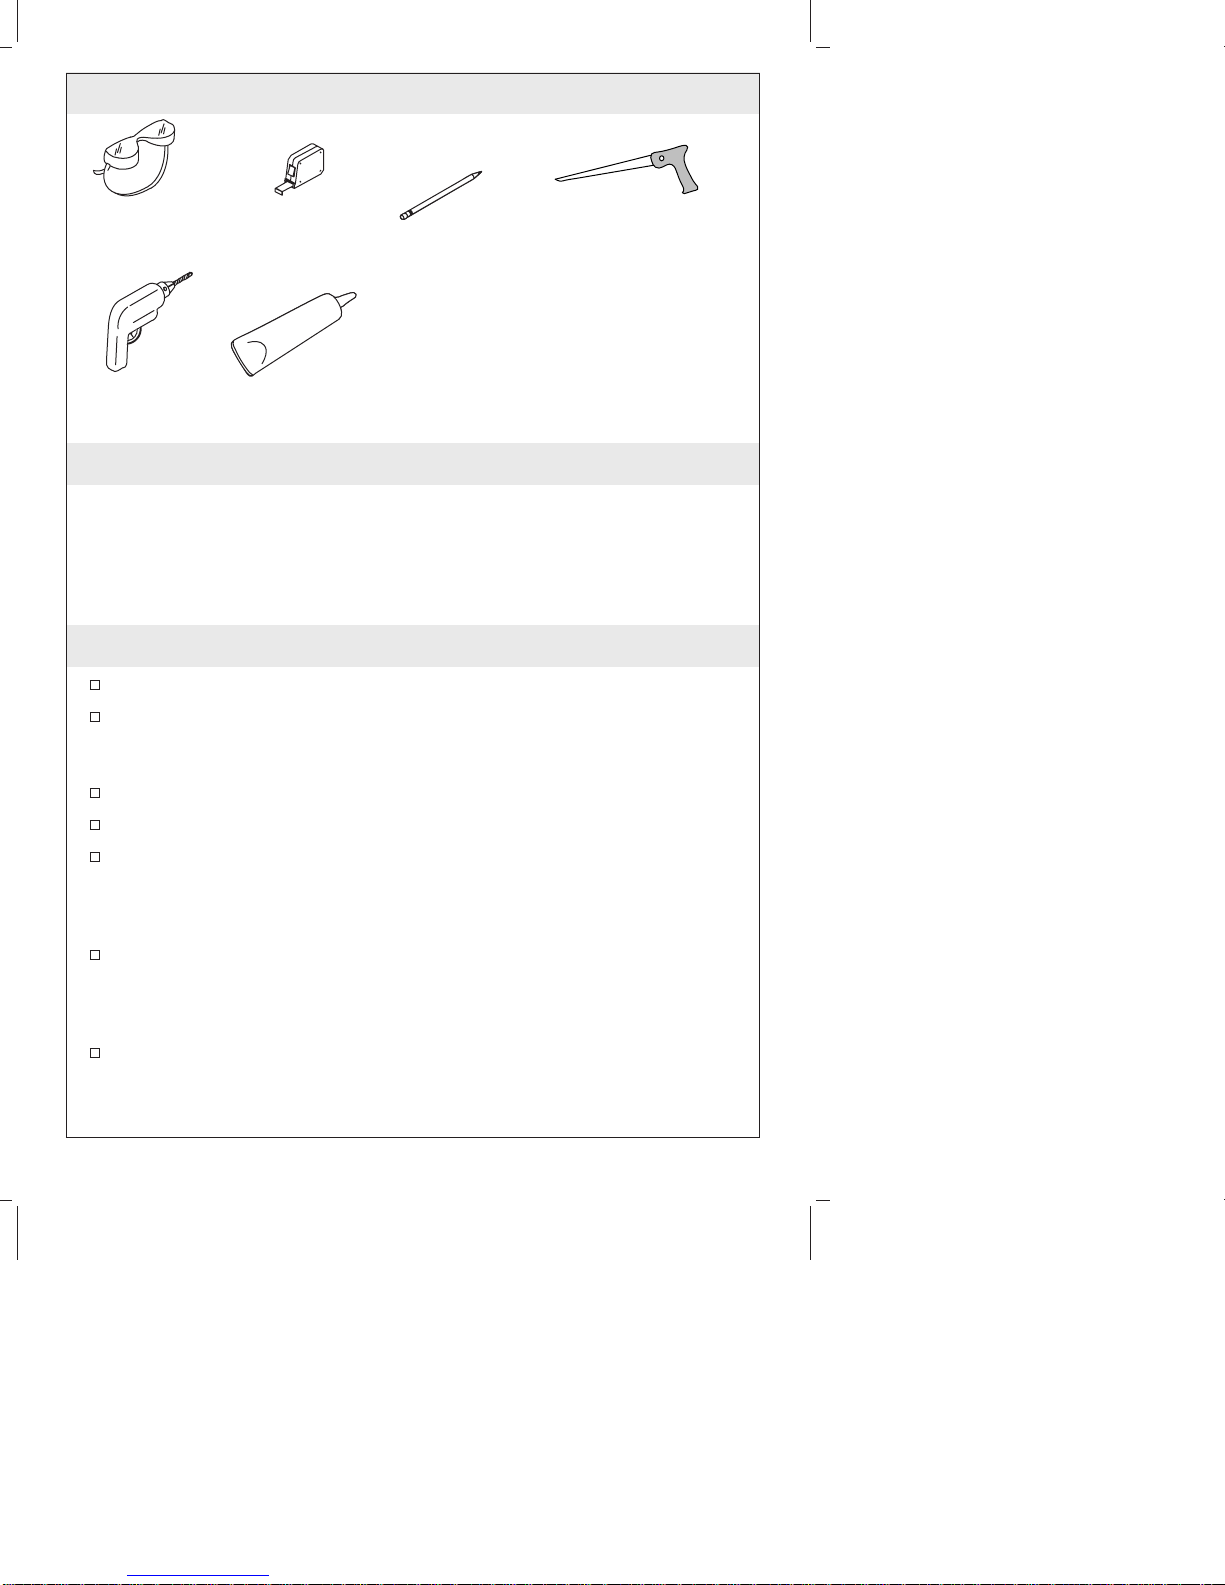
Tools and Materials
Safety
Glasses
Drill
Tape
Measure
Sealant
Pencil
Plus:
• 1/2" or larger drill bit
• Rags or paper toweling
Keyhole/Compass
Saw
Thank You For Choosing Kohler Company
We appreciate your commitment to Kohler quality. Please take a few
minutes to review this manual before you start installation. If you
encounter any installation or performance problems, please don’t
hesitate to contact us. Our phone numbers and website are listed on
the back cover. Thanks again for choosing Kohler Company.
Before You Begin
Observe all local plumbing and building codes.
Prior to installation, unpack the new sink and inspect it for
damage. Return the sink to its protective carton until you are
ready to install it.
This sink is not intended for undercounter installation.
Inspect the drain and supply tubing. Replace if necessary.
Due to the variety of installations possible with this sink, you
may need to use procedures other than those described. Because
of the variety of tiles available, you must take careful
measurements prior to installation.
It is very important that the proper materials are used with your
sink. Proper selection of tile is critical for a secure installation.
Because of the variance in tile thickness, your carpenter, tiler, and
plumber must be aware of the exact type of tile you choose.
To ensure a safe and damage-free installation, two people should
install the sink.
1019943-2-C 2 Kohler Co.
Page 3

Before You Begin (cont.)
For a replacement installation, make sure the existing cut-out is
the same size or smaller than the cut-out for the new sink.
Kohler Co. 3 1019943-2-C
Page 4
A
B
CUT-OUT DIMENSIONS
1. Preparation
Cut-Out
Information
Model
Number
Kitchen
Sinks
K-5834 30” (76.2 cm) x
K-5910 48” (121.9 cm)
K-5898 33” (83.8 cm) x
K-5852 43” (109.2 cm)
K-5882 33” (83.8 cm) x
K-5879 36” (91.4 cm) x
K-5814 33” (83.8 cm) x
K-5950 32” (81.3 cm) x
K-5986 33” (83.8 cm) x
K-5931 33” (83.8 cm) x
K-5877 33” (83.8 cm) x
Sink O.D. Cut Out (A x B) Radius (R)
21” (53.3 cm)
x 21” (53.3 cm)
22” (55.9 cm)
x 22” (55.9 cm)
22” (55.9 cm)
22” (55.9 cm)
22” (55.9 cm)
21” (53.3 cm)
22” (55.9 cm)
22” (55.9 cm)
22” (55. 9cm)
29-1/4” (74.3 cm) x
20-1/4” (51.4 cm)
46-3/4” (118.7 cm)
x 19-3/4” (50.2 cm)
31-7/8” (81 cm) x
20-3/4” (52.7 cm)
41-3/4” (106 cm) x
20-3/4” (52.7 cm)
31-7/8” (81 cm) x
20-3/4” (52.7 cm)
34-3/4” (88.3 cm) x
20-3/4” (52.7 cm)
31-7/8” (81 cm) x
20-3/4” (52.7 cm)
30-3/4” (78.1 cm) x
19-3/4” (50.2 cm)
31-7/8” (81 cm) x
20-3/4” (52.7 cm)
31-7/8” (81 cm) x
20-3/4” (52.7 cm)
31-7/8” (81 cm) x
20-3/4” (52.7 cm)
R
1” (2.5 cm)
1” (2.5 cm)
1-1/2” (3.8 cm)
1” (2.5 cm)
1-1/2” (3.8 cm)
1” (2.5 cm)
1-1/2” (3.8 cm)
1” (2.5 cm)
1-1/2” (3.8 cm)
1-1/2” (3.8 cm)
1-1/2” (3.8 cm)
1019943-2-C 4 Kohler Co.
Page 5

Preparation (cont.)
Cut-Out
Information
Model
Sink O.D. Cut Out (A x B) Radius (R)
Number
K-5864 33” (83.8 cm) x
22” (55.9 cm)
K-5921 33” (83.8 cm) x
22” (55.9 cm)
K-5959 24” (61 cm) x
21” (53.3 cm)
K-5961 16” (40.6 cm) x
21” (53.3 cm)
K-5893 43” (109.2 cm)
x 21” (53.3 cm)
Entertainment
Sinks
K-6540 16” (40.6 cm) x
19” (48.3 cm)
K-5848 18-3/4” (47.6
cm) x 20-7/8”
(53 cm)
K-5902 15” (38.1 cm) x
15” (38.1 cm)
31-1/4” (79.4 cm) x
20-1/8” (51.1cm)
31-7/8” (81 cm) x
20-3/4” (52.7 cm)
23” (58.4 cm) x 20”
(50.8 cm)
15” (38.1 cm) x 20”
(50.8 cm)
41-3/4” (106 cm) x
20-3/4” (52.7 cm)
14-3/4” (37.5 cm) x
17-3/4” (45.1 cm)
17-1/2” (44.3 cm) x
19-5/8” (49.8 cm)
13-3/4” (34.9 cm) x
13-3/4” (34.9 cm)
1-1/2” (3.8 cm)
1-1/2” (3.8 cm)
1” (2.5 cm)
1” (2.5 cm)
1” (2.5 cm)
2-5/16” (5.9 cm)
1” (2.5 cm)
2-1/8” (5.4 cm)
Install the water supplies and drain piping according to the
roughing-in information.
NOTE: Tile backer board installed over plywood is the
recommended underlayment for installing this lavatory. Tile should
be bonded to the backer board with dry set or latex Portland mortar.
Acceptable underlayments include:
•
Tile backer board over 3/4″ (1.9cm) exterior grade plywood
•
3/4″ (1.9cm) exterior grade plywood
IMPORTANT! Do not use:
•
Flakeboard
•
Interior grade plywood
•
Gypsum wallboard
NOTE: Consult with a tile contractor to determine the material to be
used.
Kohler Co. 5 1019943-2-C
Page 6

Preparation (cont.)
Determine the desired location for the sink. Draw the cut-out line
based on the measurements provided in the Cut-Out Information
table. Provide adequate clearance between the sink, cabinet, and
backsplash.
1019943-2-C 6 Kohler Co.
Page 7
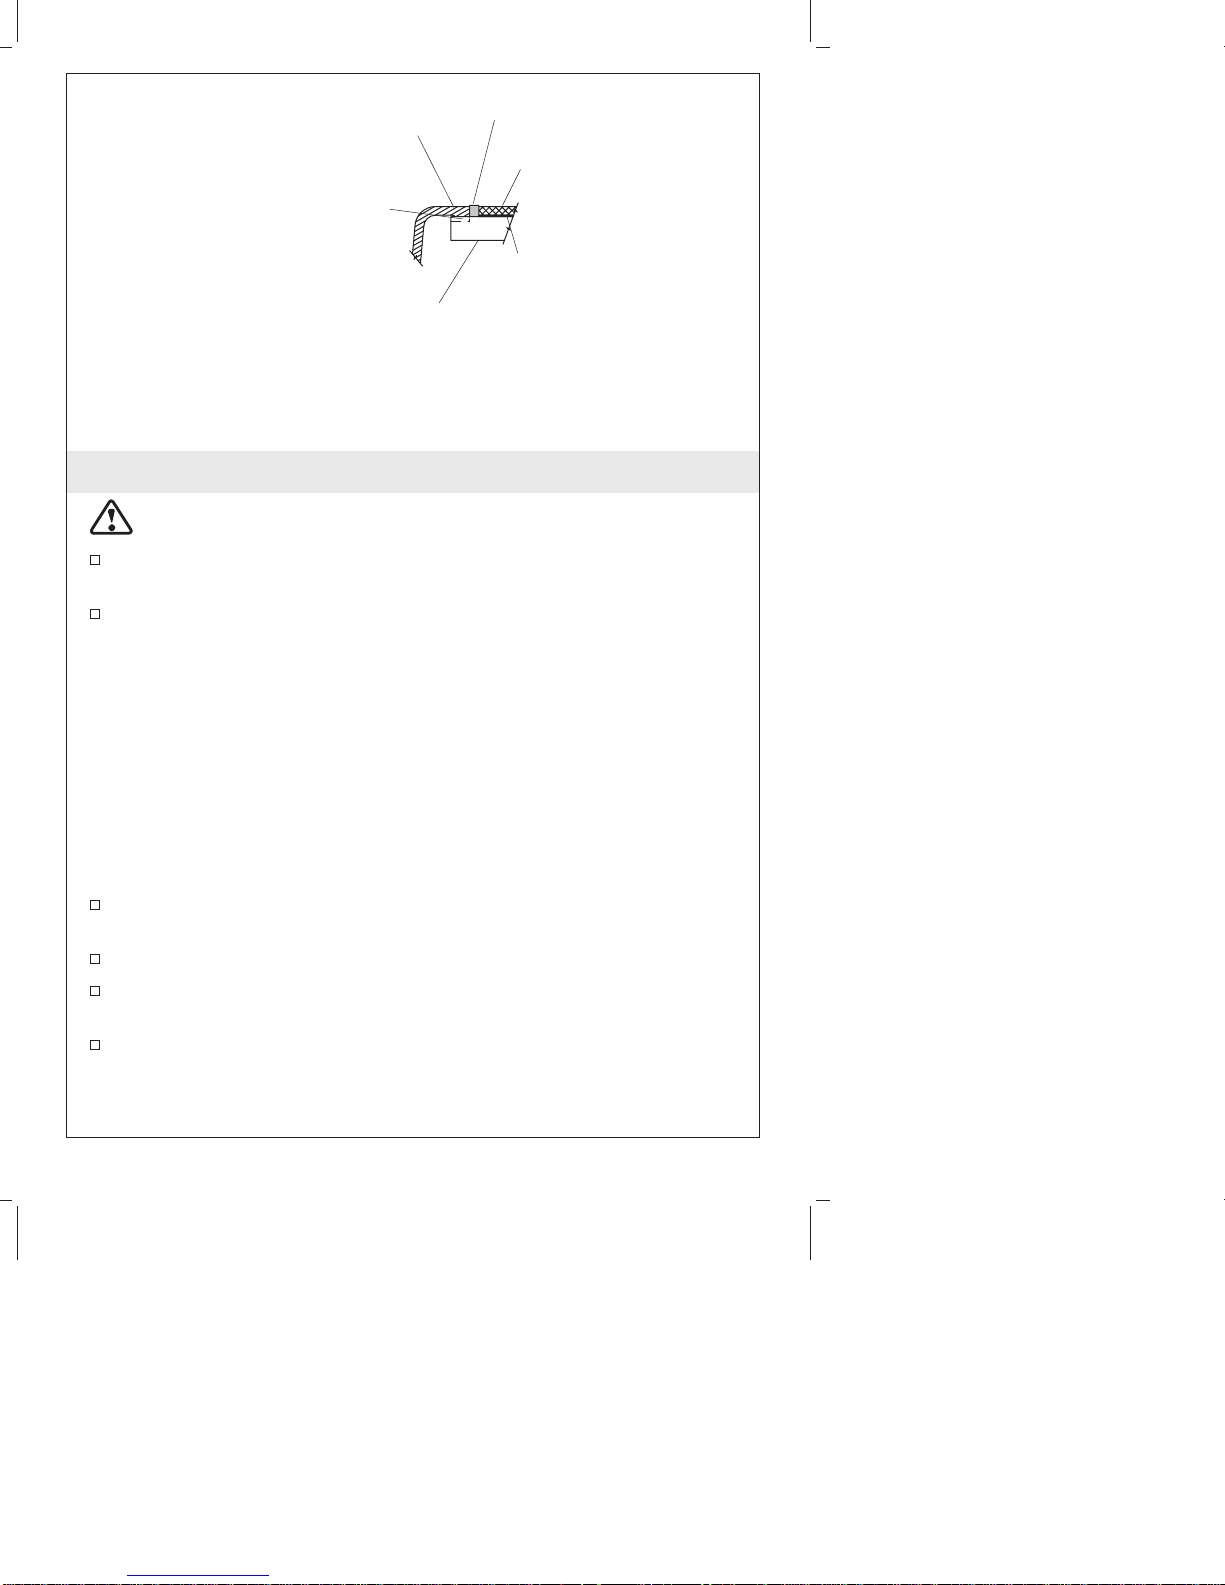
Sink
Sealant
Tile
Route or Shim
as Required To
Level Tile
Water Resistant
Underlayment
Tile-In Installation
Mortar or
Adhesive
2. Install the Sink
CAUTION: Risk of personal injury or product damage. Cast
iron sinks are very heavy. Get help lifting the sink.
Cut out the opening by carefully following the pencil line traced
from the template.
Measure and compare the thickness of the sink rim and the tile.
The rim thickness on this sink is 3/8″ (1cm) plus or minus 1/32″
(1mm). Because of the varying thickness of the tile and sink, or if
adhesive or mortar bed installation is used, make allowances to
shim the sink, or route the underlayment as required.
NOTE: This sink is designed to be installed flush with or slightly
lower than the surrounding tile.
NOTE: If the tiled countertop transitions into a laminated
countertop, the laminated countertop must be installed after the tile
has been installed to ensure a flush transition between the two
surfaces.
Position the sink in the countertop opening. Verify the fit and
position.
Carefully remove the sink.
Install the faucet and strainer(s) to the sink according to the
manufacturer’s instructions.
Place a 1″ (2.5cm) spot of sealant at each corner of the frame
where it will contact the sink.
NOTE: Apply additional sealant if using shims.
Kohler Co. 7 1019943-2-C
Page 8

Install the Sink (cont.)
Carefully re-position the sink in the countertop opening.
Tile and grout to allow an acceptable space between the tile and
sink.
To absorb the vibration from a garbage disposal, apply sealant
between the sink and tile directly adjacent to the sink rim. This
will prevent the grout from cracking around the sink.
Allow the sealant to cure for at least 30 minutes before
proceeding.
Install the garbage disposal, if desired. Follow the manufacturer’s
instructions.
Connect and tighten the trap to the drain, and complete the water
supply connections to the faucet according to the instructions
packed with the faucet.
Run water into the sink and check for leaks.
Clean up with a non-abrasive cleaner.
1019943-2-C 8 Kohler Co.
Page 9

Guide d’Installation
Cuisine et Évier de Récréations
Outils et Matériaux
Merci d’avoir choisi la Société KOHLER
Nous apprécions votre engagement envers la qualité KOHLER. S’il
vous plait, prenez quelques minutes et lisez attentivement ce guide
avant de commencer votre installation. N’hésitez pas à nous contacter
en cas de problème d’installation ou de fonctionnement. Nos numéros
de téléphone et notre adresse du site Internet sont au verso. Merci
encore d’avoir choisi un produit KOHLER.
Avant De Commencer
Respectez tous les codes locaux de plomberie et de bâtiment.
Avant l’installation, déballez le nouvel évier et examinez le
soigneusement pour en déceler tout dommage. Remettre l’évier
dans son emballage jusqu’à ce que vous soyez prêt à l’installer.
Cet évier n’est pas fait pour une installation sous comptoir.
Vérifiez l’état des tubes des évacuations et des alimentations.
Remplacez les si besoin.
Étant donné le nombre d’installations possibles pour ce type
d’évier, des procédures autres que celles décrites peuvent être
nécessaires. Étant donné la variété de carreaux disponibles, vous
devez être prudent est prendre des mesures avant l’installation.
Kohler Co. Français-1 1019943-2-C
Page 10

Avant De Commencer (cont.)
Il est très important d’utiliser les matériaux appropriés avec votre
évier. La bonne installation des carreaux est trés importante pour
assurer une installation correct. A cause des diverses épaisseurs
des carreaux, les différents Corps de Métiers doivent connaître le
type exact de carreaux utilisés.
Pour assurer une installation sécurisé et sans dommage, deux
personnes doivent effectuer les étapes d’installation suivantes.
Si vous remplacez une installation, assurez-vous que la dimension
de la coupe soit de la même taille ou plus petite que celle
nécessaire pour le nouvel évier.
1019943-2-C Français-2 Kohler Co.
Page 11

1. Préparation
Information
de la
Découpe
Numéro du
modèle :
Éviers de
Cuisine
K-5834 30″ (76,2 cm) x
K-5910 48″ (121,9 cm) x
K-5898 33″ (83,8 cm) x
K-5852 43″ (109,2 cm) x
K-5882 33″ (83,8 cm) x
K-5879 36″ (91,4 cm) x
K-5814 33″ (83.8 cm) x
K-5950 32″ (81,3 cm) x
Dimension
Extérieure de
l’Èvier
21″ (53,3 cm)
21″ (53,3 cm)
22″ (55,9 cm)
22″ (55.9 cm)
22″ (55,9 cm)
22″ (55,9 cm)
22″ (55.9 cm)
21″ (53,3 cm)
Découpe de (A xB)Rayon (R)
29-1/4″ (74,3 cm)
x 20-1/4″ (51,4
cm)
46-3/4″ (118,7 cm)
x 19-3/4″ (50,2
cm)
31-7/8″ (81 cm) x
20-3/4″ (52,7 cm)
41-3/4″ (106 cm) x
20-3/4″ (52,7 cm)
31-7/8″ (81 cm) x
20-3/4″ (52,7 cm)
34-3/4″ (88,3 cm)
x 20-3/4″ (52,7
cm)
31-7/8″ (81 cm) x
20-3/4″ (52,7 cm)
30-3/4″ (78,1cm) x
19-3/4″ (50,2cm)
1″ (2,5 cm)
1″ (2,5 cm)
1-1/2″ (3,8 cm)
1″ (2,5 cm)
1-1/2″ (3,8 cm)
1″ (2,5 cm)
1-1/2″ (3,8 cm)
1″ (2,5 cm)
Kohler Co. Français-3 1019943-2-C
Page 12

Préparation (cont.)
Information
de la
Découpe
Numéro du
modèle :
Dimension
Extérieure de
l’Èvier
K-5986 33″ (83,8 cm) x
22″ (55,9 cm)
K-5931 33″ (83,8 cm) x
22″ (55,9 cm)
K-5877 33″ (83,8 cm) x
22″ (55,9 cm)
K-5864 33″ (83,8 cm) x
22″ (55,9 cm)
K-5921 33″ (83,8 cm) x
22″ (55,9 cm)
K-5959 24″ (61 cm) x
21″ (53,3 cm)
K-5961 16″ (40.6 cm) x
21″ (53,3 cm)
K-5893 43″ (109.2 cm) x
21″ (53,3 cm)
ÉviersDe
Récréation
K-6540 16″ (40.6 cm) x
19″ (48,3 cm)
K-5848 18-3/4″ (47,6
cm) x 20-7/8″
(53 cm)
K-5902 15″ (38,1 cm) x
15″ (38,1 cm)
Découpe de (A xB)Rayon (R)
31-7/8″ (81 cm) x
1-1/2″ (3,8 cm)
20-3/4″ (52,7 cm)
31-7/8″ (81 cm) x
1-1/2″ (3,8 cm)
20-3/4″ (52,7 cm)
31-7/8″ (81 cm) x
1-1/2″ (3,8 cm)
20-3/4″ (52,7 cm)
31-1/4″ (79,4 cm)
1-1/2″ (3,8 cm)
x 20-1/8″ (51,1
cm)
31-7/8″ (81 cm) x
1-1/2″ (3,8 cm)
20-3/4″ (52,7 cm)
23″ (58.4cm) x 20″
1″ (2,5 cm)
(50,8cm)
15″ (38,1 cm) x 20″
1″ (2,5 cm)
(50,8cm)
41-3/4″ (106cm) x
1″ (2,5 cm)
20-3/4″ (52,7cm)
14-3/4″ (37.5cm) x
2-5/16″ (5,9 cm)
17-3/4″ (45,1cm)
17-1/2″ (44.3cm) x
1″ (2,5 cm)
19-5/8″ (49,8cm)
13-3/4″ (34,9 cm)
2-1/8″ (5,4 cm)
x 13-3/4″ (34,9
cm)
Installez les tuyaux des arrivées d’eau et de l’évacuation, selon
l’information du plan de raccordement.
REMARQUE : Pour l’installation de ce lavabo, nous vous
conseillons de poser le panneau d’appui pour carreaux sur du
contreplaqué. Les carreaux doivent être collés avec un ciment sec ou
du mortier de Portland en latex. Les sous-couches acceptables
incluent :
1019943-2-C Français-4 Kohler Co.
Page 13

Préparation (cont.)
•
Plaque d’appui de 3/4″ (1,9 cm) en contreplaqué extérieur
•
Bois contreplaqué de 3/4″ (1,9 cm) pour l’extérieur.
IMPORTANT ! Ne pas utiliser :
•
Aggloméré
•
Bois contreplaqué d’intérieur
•
Panneau de revêtement de plâtre
REMARQUE : Consultez le Fabriquant des carreaux afin de
déterminer les matériaux à utiliser.
Déterminez l’endroit désiré pour l’évier. Dessinez les lignes de
coupes en vous basant sur les mesures fournies par la notice
d’information de la découpe. Prévoir suffisamment de
dégagement entre l’évier et le dosseret.
Kohler Co. Français-5 1019943-2-C
Page 14

2. Installer l’Évier
ATTENTION : Risque de blessures ou d’endommagement du
produit. Les éviers en fonte sont très lourds. Demandez de l’aide
pour soulever l’évier.
Découpez l’ouverture du comptoir suivant la ligne tracée.
Mesurez et comparez l’épaisseur du rebord de l’évier et des
carreaux. L’épaisseur du rebord de l’évier est de 3/8″ (1 cm)
+/1/32″ (1 mm). A cause de la différence d’épaisseur entre les
carreaux et le lavabo, ou si vous utilisez du mortier, il vous faut
prévoir les dégagements nécessaires afin d’utiliser des cales ou,
de faire d’autres réglages.
REMARQUE : Ce bassin est conçu pour être installé de niveau avec
les carreaux ou plus bas.
REMARQUE : Si les carreaux du comptoir sont déplacés sur un
plateau en contreplaqué, le contreplaqué doit être installé après que
les carreaux soient installés pour assurer une bonne transition entre
les deux surfaces.
Placez l’évier dans l’ouverture du comptoir. Ajustez la position de
l’évier.
Retirez le lavabo.
Assemblez le robinet et le tuyau d’évacuation à l’évier
conformément à la notice du fabricant.
Appliquez un boudin de mastic de 1″ (2,5 cm) à chaque coin du
cadre qui touche l’évier.
1019943-2-C Français-6 Kohler Co.
Page 15

Installer l’Évier (cont.)
REMARQUE : Appliquez du matériau d’étanchéité si vous posez
des cales additionnelles.
Placez soigneusement l’évier dans l’ouverture du plan de travail.
Carrelez ou coulez de façon à avoir un dégagement acceptable
entre les carreaux et l’évier.
Pour absorber la vibration du broyeur, appliquez du mastic entre
l’évier et les carreaux, à côté du rebord de l’évier. Ceci évitera que
le coulis s’effrite autour de l’évier.
Avant de continuer, laisser prendre le mastic pour au moins 30
minutes.
Installez le broyeur, le cas échéant. Suivez les instructions du
fabricant.
Raccordez et fixez le siphon au drain, puis complétez les raccords
d’arrivées d’eau au robinet, selon la notice qui accompagne le
robinet.
Laissez couler l’eau dans le lavabo et vérifiez s’il y a des fuites.
Nettoyez avec des nettoyants non abrasifs.
Kohler Co. Français-7 1019943-2-C
Page 16

Guía de Instalación
Fregaderos de hierro fundido de empotrar
Herramientas y materiales
Gracias por elegir los productos de Kohler
Apreciamos su elección por la calidad de Kohler. Por favor, tome unos
minutos para leer este manual antes de comenzar la instalación. En
caso de problemas de instalación o de funcionamiento, no dude en
contactarnos. Nuestros números de teléfono y nuestra página web se
encuentran en la solapa posterior. Gracias nuevamente por escoger a
Kohler.
Antes de comenzar
Cumpla con todos los códigos locales de plomería y de
construcción.
Antes de la instalación, verifique que las piezas no estén dañadas.
Coloque el fregadero en la caja como protección hasta el
momento de la instalación.
Este fregadero no está diseñado para las instalaciones bajo el
mostrador.
Examine las tuberías de suministro y de desagüe. Reemplácelas
de ser necesario.
Kohler Co. Español-1 1019943-2-C
Page 17

Antes de comenzar (cont.)
Debido a la variedad de instalaciones posibles con este fregadero,
puede que necesite utilizar otros procedimientos de instalación no
descritos en estas instrucciones. A causa de la variedad de
azulejos disponibles, es necesario que tome las medidas exactas
antes de iniciar la instalación.
Es muy importante emplear los materiales apropiados para su
fregadero. La selección correcta del azulejo es crítica para una
instalación segura. A causa de la variación en el espesor del
azulejo, es importante que el carpintero, el instalador de azulejos
y el plomero sepan con precisión el tipo de azulejo seleccionado.
Para asegurarse de que la instalación sea segura y no cause
daños, se recomienda que dos personas instalen el fregadero.
Si va a reemplazar el fregadero, asegúrese de que la abertura
existente sea de igual o menor tamaño a la requerida para el
fregadero nuevo.
Kohler Co. Español-2 1019943-2-C
Page 18

1. Preparación
Información
sobre la
plantilla
Número de
modelo:
Fregaderos
de cocina
K-5834 30″ (76,2 cm)
K-5910 48″ (121,9 cm)
K-5898 33″ (83,8 cm)
K-5852 43″ (109,2 cm)
K-5882 33″ (83,8 cm)
K-5879 36″ (91,4 cm)
K-5814 33″ (83,8 cm)
D. E. del
fregadero
x21″(53,3
cm)
x21″(53,3
cm)
x22″(55,9
cm)
x22″(55,9
cm)
x22″(55,9
cm)
x22″(55,9
cm)
x22″(55,9
cm)
Plantilla (A x B) Radio (R)
29-1/4″ (74,3 cm) x
20-1/4″ (51,4 cm)
46-3/4″ (118,7 cm) x
19-3/4″ (50,2 cm)
31-7/8″ (81 cm) x
20-3/4″ (52,7 cm)
41-3/4″ (106 cm) x
20-3/4″ (52,7 cm)
31-7/8″ (81 cm) x
20-3/4″ (52,7 cm)
34-3/4″ (88,3 cm) x
20-3/4″ (52,7 cm)
31-7/8″ (81 cm) x
20-3/4″ (52,7 cm)
1″ (2,5 cm)
1″ (2,5 cm)
1-1/2″ (3,8 cm)
1″ (2,5 cm)
1-1/2″ (3,8 cm)
1″ (2,5 cm)
1-1/2″ (3,8 cm)
1019943-2-C Español-3 Kohler Co.
Page 19

Preparación (cont.)
Información
sobre la
plantilla
Número de
modelo:
D. E. del
fregadero
K-5950 32″ (81,3 cm)
x21″(53,3
cm)
K-5986 33″ (83,8 cm)
x22″(55,9
cm)
K-5931 33″ (83,8 cm)
x22″(55,9
cm)
K-5877 33″ (83,8 cm)
x22″(55,9
cm)
K-5864 33″ (83,8 cm)
x22″(55,9
cm)
K-5921 33″ (83,8 cm)
x22″(55,9
cm)
K-5959 24″ (61 cm) x
21″ (53,3 cm)
K-5961 16″ (40,6 cm)
x21″(53,3
cm)
K-5893 43″ (109,2 cm)
x21″(53,3
cm)
Fregaderos adicionales
K-6540 16″ (40,6 cm)
x19″(48,3
cm)
K-5848 18-3/4″ (47,6
cm) x 20-7/8″
(53 cm)
K-5902 15″ (38,1 cm)
x15″(38,1
cm)
Plantilla (A x B) Radio (R)
30-3/4″ (78,1 cm) x
1″ (2,5 cm)
19-3/4″ (50,2 cm)
31-7/8″ (81 cm) x
1-1/2″ (3,8 cm)
20-3/4″ (52,7 cm)
31-7/8″ (81 cm) x
1-1/2″ (3,8 cm)
20-3/4″ (52,7 cm)
31-7/8″ (81 cm) x
1-1/2″ (3,8 cm)
20-3/4″ (52,7 cm)
31-1/4″ (79,4 cm) x
1-1/2″ (3,8 cm)
20-1/8″ (51,1 cm)
31-7/8″ (81 cm) x
1-1/2″ (3,8 cm)
20-3/4″ (52,7 cm)
23″ (58,4 cm) x 20″
1″ (2,5 cm)
(50,8 cm)
15″ (38,1 cm) x 20″
1″ (2,5 cm)
(50,8 cm)
41-3/4″ (106 cm) x
1″ (2,5 cm)
20-3/4″ (52,7 cm)
14-3/4″ (37,5 cm) x
2-5/16″ (5,9 cm)
17-3/4″ (45,1 cm)
17-1/2″ (44,3 cm) x
1″ (2,5 cm)
19-5/8″ (49,8 cm)
13-3/4″ (34,9 cm) x
2-1/8″ (5,4 cm)
13-3/4″ (34,9 cm)
Kohler Co. Español-4 1019943-2-C
Page 20

Preparación (cont.)
Instale las tuberías de suministro de agua y desagüe conforme al
diagrama de instalación.
NOTA: El contrapiso recomendado para instalar este lavabo es la
placa de soporte de azulejos sobre la madera contrachapada. El
azulejo debe fijarse a la placa de soporte con un mortero de fijar en
seco o un mortero Portland de látex. Los contrapisos aceptables
incluyen:
•
La placa de soporte de azulejos sobre madera contrachapada de
grado exterior de 3/4″ (1,9 cm)
•
La madera contrachapada de grado exterior de 3/4″ (1,9 cm)
¡IMPORTANTE! No utilice:
•
Tableros de aglomerado
•
Madera contrachapada de grado interior
•
Paneles murales de yeso
NOTA: Consulte con el contratista de azulejos para determinar los
materiales que se deben utilizar con el azulejo.
Determine la ubicación deseada para el fregadero. Trace una línea
de corte utilizando las medidas en la tabla de Información de la
Plantilla. Proporcione suficiente espacio entre el fregadero, el
gabinete y la pared posterior.
1019943-2-C Español-5 Kohler Co.
Page 21

2. Instale el fregadero
PRECAUCIÓN: Riesgo de lesiones personales o daños al
producto. Los fregaderos de hierro fundido son muy pesados.
Obtenga ayuda para colocar el fregadero en su lugar.
Corte la abertura con cuidado siguiendo la línea trazada de la
plantilla.
NOTA: El fregadero está diseñado para que, una vez instalado, esté
al ras de o un poco más bajo de la superficie con azulejos que la
rodea.
Mida y compare el grosor del borde del fregadero y los azulejos.
El grosor del borde del fregadero es 3/8″ (1 cm), más o menos
1/32″ (1 mm). Debido al espesor variable del azulejo y lavabo, o
si se emplea adhesivo, deje espacio suficiente para poder utilizar
cuñas o rebajar el contrapiso según sea necesario.
NOTA: Si el mostrador de azulejos se junta con un mostrador
laminado, debe instalar el mostrador laminado después del azulejo
para asegurar una transición alineada entre las dos superficies.
Coloque el fregadero en la abertura del mostrador. Verifique el
ajuste y la posición.
Retire el fregadero con cuidado.
Instale la grifería y colador(es) en el fregadero según las
instrucciones del fabricante.
Coloque 1″ (2,5 cm) de sellador en cada esquina de la estructura
de soporte en contacto con el fregadero.
Kohler Co. Español-6 1019943-2-C
Page 22

Instale el fregadero (cont.)
NOTA: Aplique más sellador en caso de utilizar cuñas.
Vuelva a colocar el fregadero con cuidado en la abertura del
mostrador.
Instale los azulejos con cemento de manera que exista un espacio
aceptable entre el azulejo y el fregadero.
Para absorber la vibración del triturador de basura, aplique
sellador entre el fregadero y los azulejos junto al borde del
fregadero. Esto impedirá que el cemento alrededor del fregadero
se agriete.
Antes de continuar, permita que el sellador se seque durante 30
minutos como mínimo.
Si lo desea, instale el triturador de basura. Siga las instrucciones
del fabricante.
Conecte y fije el sifón en el colador y complete las conexiones del
suministro de agua a la grifería, conforme a las instrucciones
incluidas con la grifería.
Abra los suministros de agua y verifique que no haya fugas.
Utilice productos de limpieza que no sean abrasivos.
1019943-2-C Español-7 Kohler Co.
Page 23

1019943-2-C
Page 24

USA: 1-800-4-KOHLER
Canada: 1-800-964-5590
México: 001-877-680-1310
kohler.com
©2004 Kohler Co.
1019943-2-C
 Loading...