

Page 1

Installation Guide
Stainless Steel Kitchen Sinks
K-3361 K-3362
K-3363 K-3369
M product numbers are for Mexico (i.e. K-12345M)
Los números de productos seguidos de
M corresponden a México (Ej.
K-12345M)
Français, page “Français-1”
Español, página“ Español-1”
1013270-2-D
Page 2
Thank You For Choosing Kohler Company
We appreciate your commitment to Kohler quality. Please take a few
minutes to review this manual before you start installation. If you
encounter any installation or performance problems, please don’t
hesitate to contact us. Our phone numbers and website are listed on
the back cover. Thanks again for choosing Kohler Company.
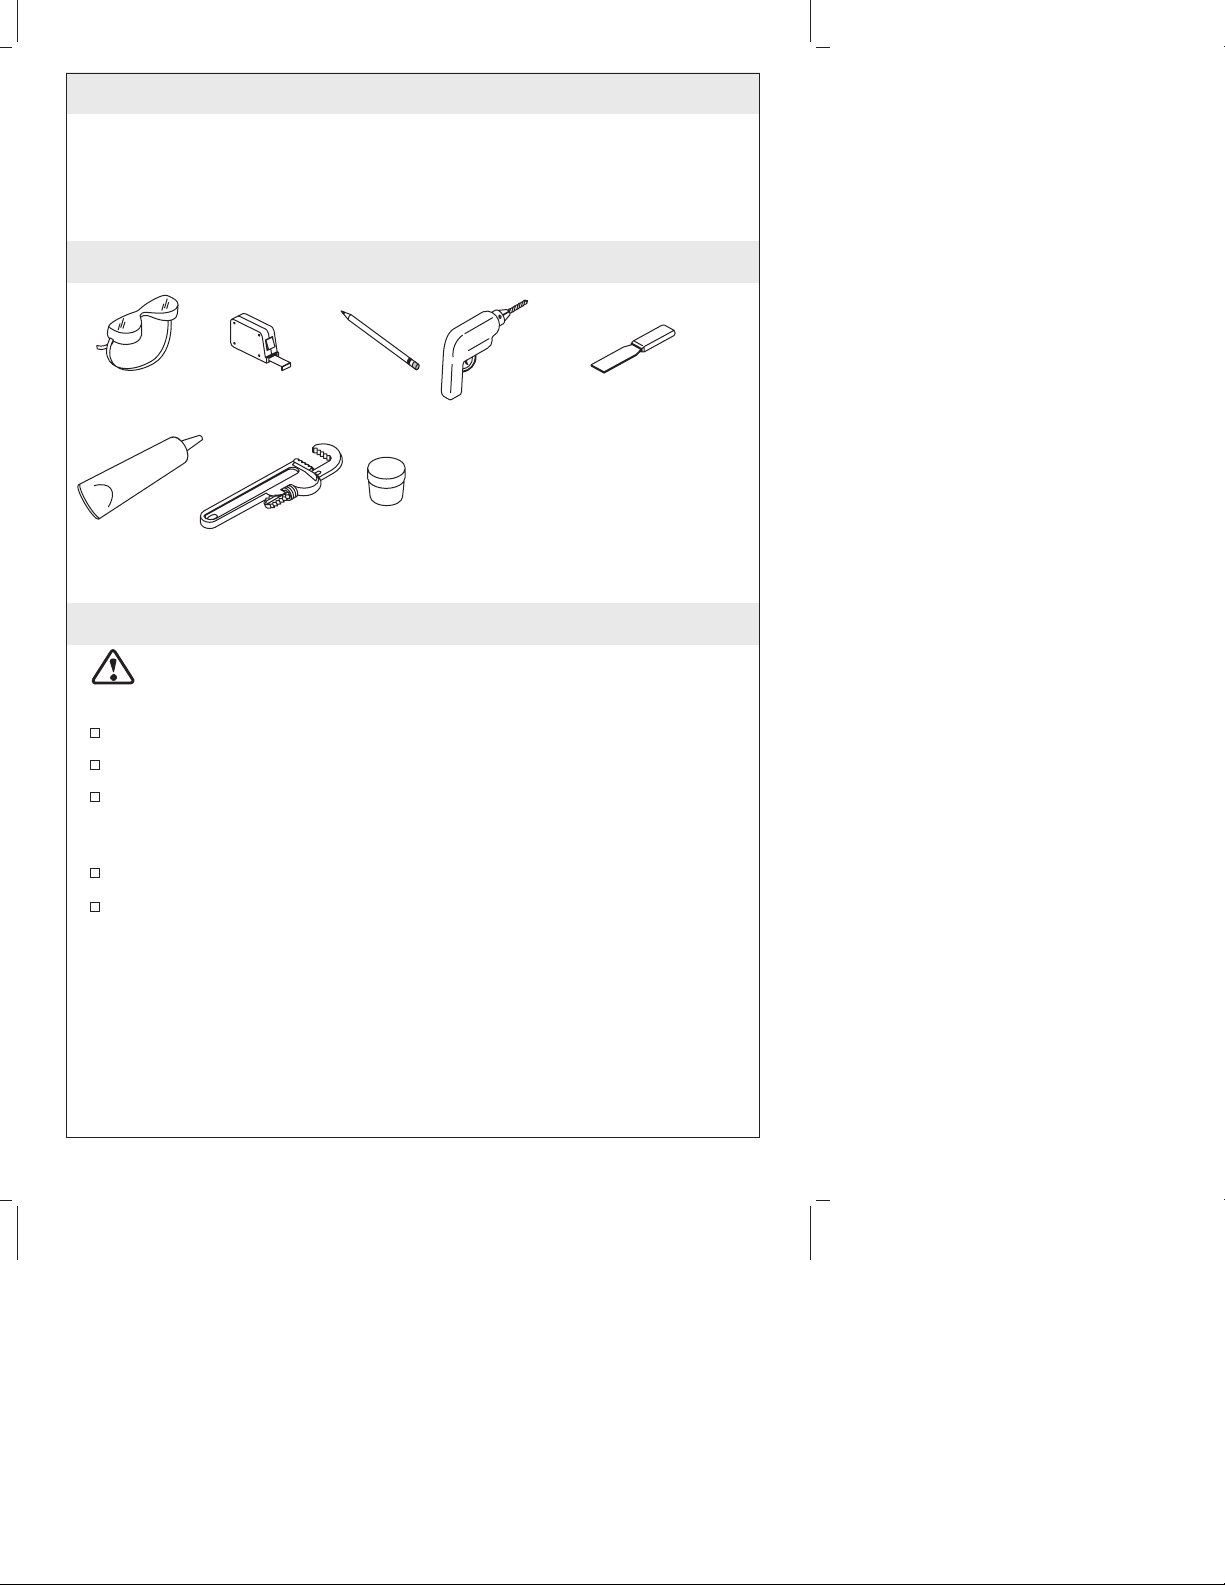
Tools and Materials
Safety
Glasses
Silicone
Sealant
Measuring
Tape
Pipe Wrench
Pencil
Plumbers
Putty
Drill
Plus:
• Level
• 5/16" Deepwall Socket or
5/16" Nut Driver
• Keyhole/Jigsaw
• Gloves
Putty Knife
Before You Begin
WARNING: Risk of personal injury. Metal surfaces are sharp
and can cause severe cuts. Use gloves and handle sink edges
carefully.
Observe all local plumbing and building codes.
Shut off the hot and cold water supplies.
Prior to installation, unpack the new sink and inspect it for
damage. Return the sink to its protective carton until you are
ready to install it.
Inspect the drain and supply tubing. Replace if necessary.
All information in these instructions is based on the latest product
information available at the time of publication. Kohler Co.
reserves the right to make changes at any time without notice.
1013270-2-D 2 Kohler Co.
Page 3
Sink
Sink Outline
Countertop
Pilot
Hole
1/4"
(6 mm)
Trace the outline of the sink on
the countertop with a pencil at the
Create a second line 1/4" (6 mm)
in from the original sink outline.
desired installation location.
1. Preparation
WARNING: Risk of personal injury. Metal surfaces are sharp
and can cause severe cuts. Use gloves and handle sink edges
carefully.
For new installations:
Carefully place the sink upside down on the countertop in the
desired position. Be careful not to damage the sink finish.
Make sure the sink will not interfere with the cabinet.
Trace the sink outline onto the countertop. Do not cut along the
outline.
For existing installations:
Carefully lift the old sink out of the countertop.
Compare the existing cut-out to the required cut-out size.
If needed, enlarge the cut-out hole according to the directions for
new installations.
For all installations:
Draw a line 1/4″ (6 mm) inside the sink outline.
Before cutting, measure the cut-out line you just drew and
compare it to the overall sink dimensions. The cut-out should be
1/2″ (1.3 cm) smaller than the overall sink dimensions.
Kohler Co. 3 1013270-2-D
Page 4

Preparation (cont.)
Drill a pilot hole inside the cutting line. Using a jig or keyhole
saw, cut along the inside line to cut out the opening in the
countertop.
1013270-2-D 4 Kohler Co.
Page 5
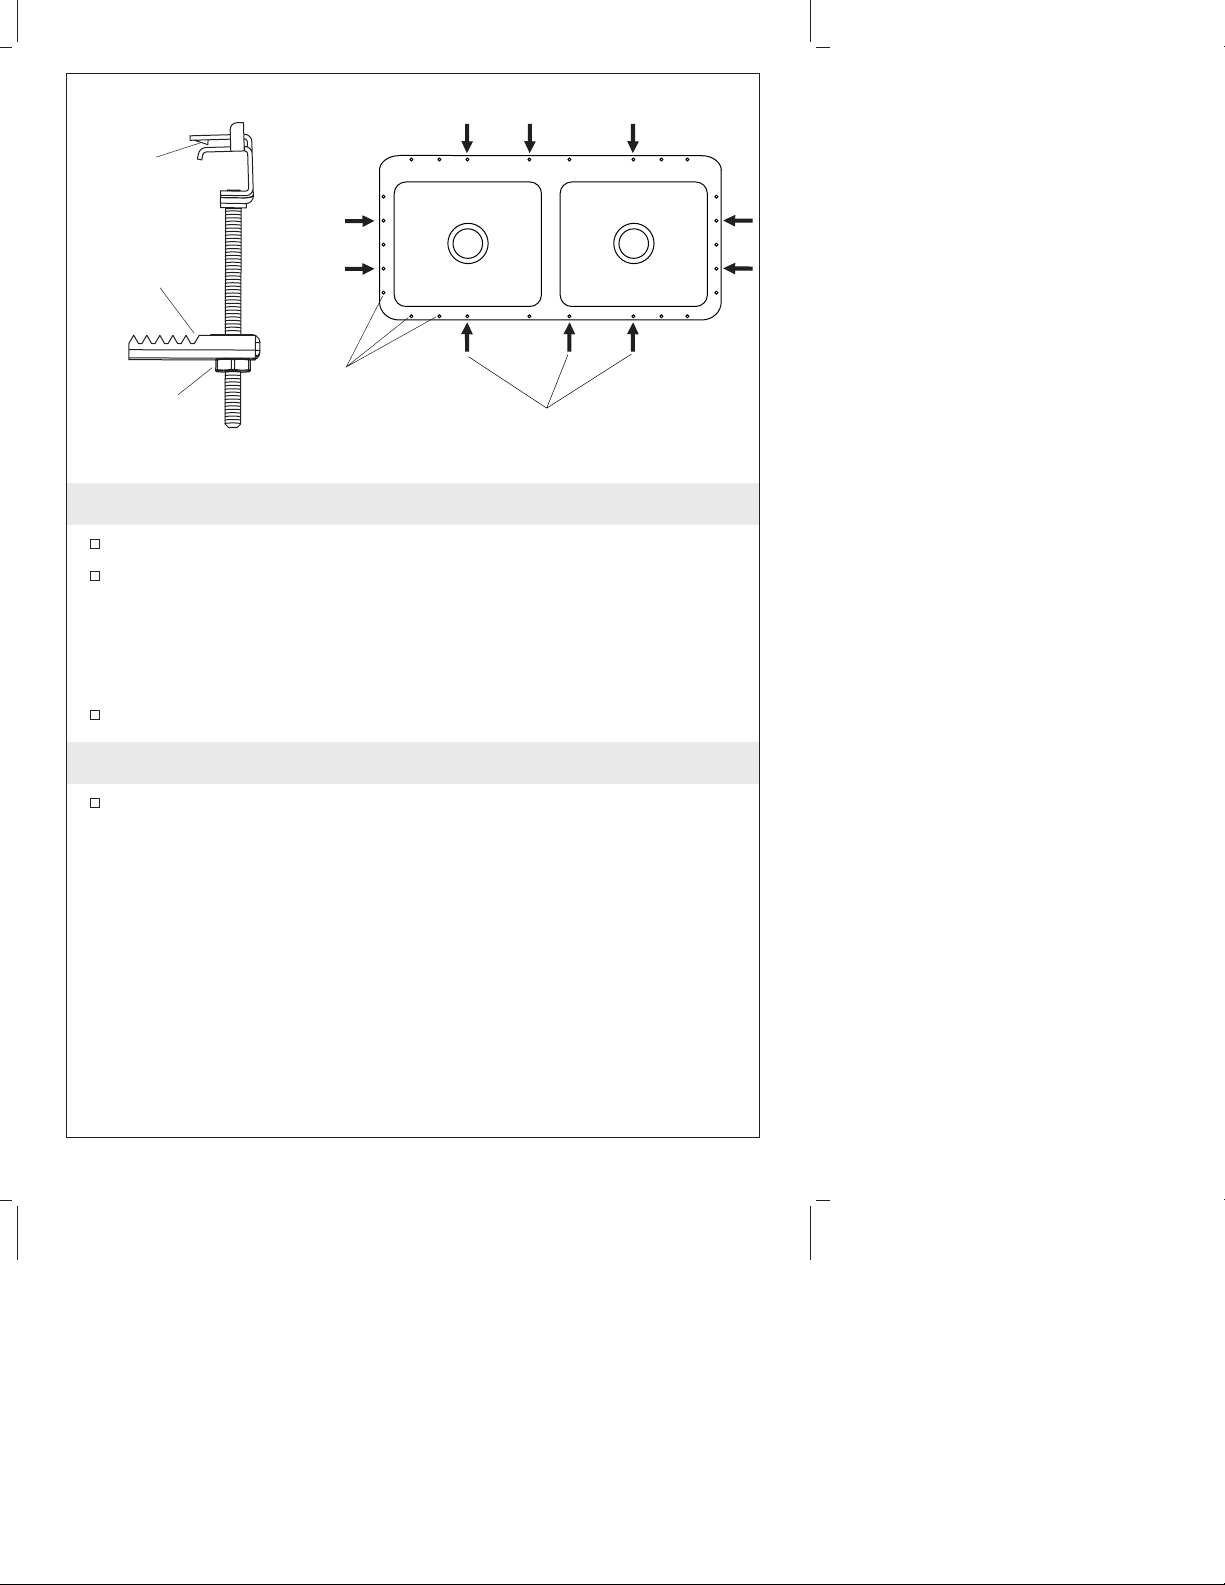
Clip
Tooth
Clip Jaw
Mounting Holes
Hex Nut
Clip Placement
2. Install the Clips
Turn the sink upside down onto a clean, soft surface.
Slide the clips over the predrilled mounting holes in the sink rim.
Refer to the illustration for correct clip positions (three clips on
the front and back; two on each side).
NOTE: Make sure the clip teeth are fully seated in the mounting
hole.
Turn all the clip jaws parallel to the sink rim.
3. Install the Faucet Fitting
Install the faucet and drain fitting according to the manufacturer’s
instructions.
NOTE: If you are reusing fittings from an old sink, use plumbers
putty under the faucet base and top flange of the strainer.
Kohler Co. 5 1013270-2-D
Page 6
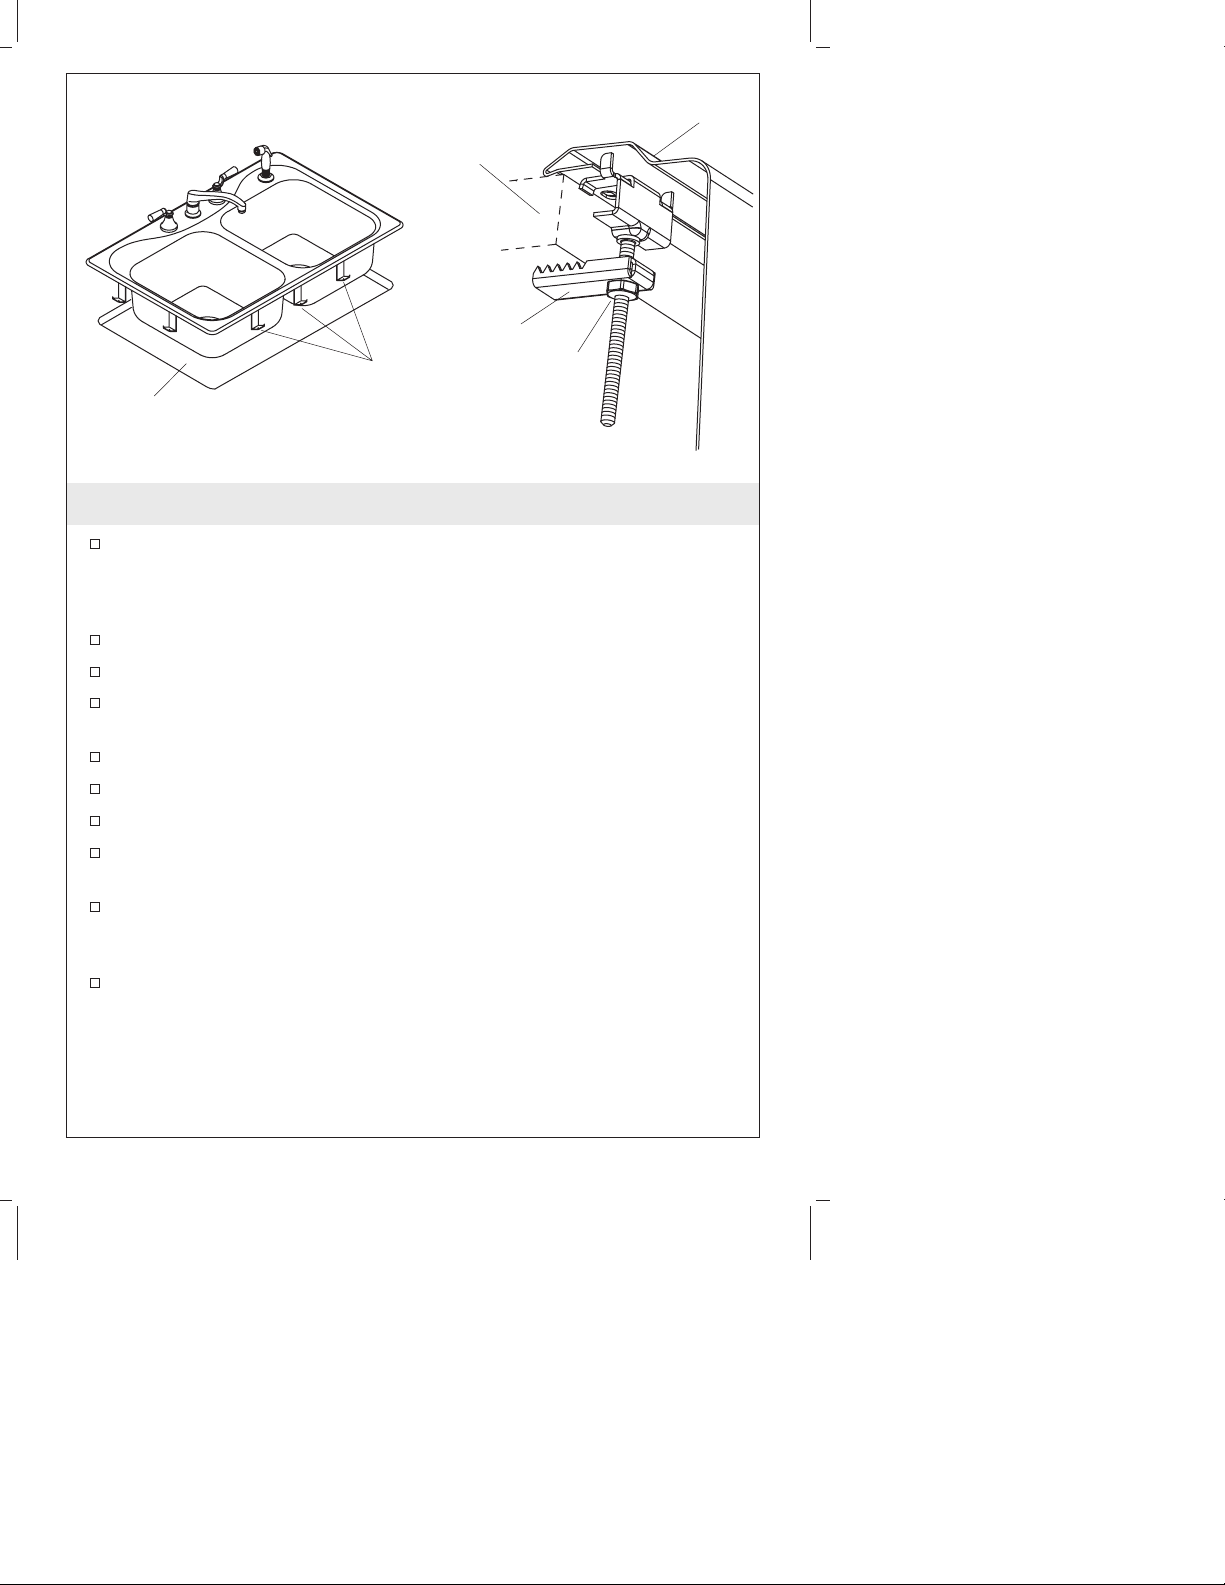
Countertop
Clip Jaw
Sink
Installation Clips
Cut-Out
Hex Nut
4. Install the Sink
Apply a bead of quality sealant to the underside of the sink rim.
NOTE: The fasteners may need to be repositioned to compensate for
an uneven countertop.
Squarely position the sink onto the cut-out area.
Rotate the clip jaws underneath the countertop, as illustrated.
Tighten the hex nuts to lower the sink rim down onto the
countertop. Do not overtighten.
Use a dry cloth to wipe away any excess sealant.
Verify that there are no gaps.
Allow the sealant to cure for at least 30 minutes.
Install the garbage disposal, if used, according to the
manufacturer’s instructions.
Connect and tighten the trap to the strainer, and complete the
water supply connections to the faucet according to the
instructions packed with the faucet.
Run water into the sink and check for leaks.
1013270-2-D 6 Kohler Co.
Page 7

Guide d’installation
Éviers de cuisine en acier inoxydable
Outils et Matériaux
Lunettes de
protection
Joint en
silicone
Mètre ruban
Clé à tuyau
Crayon
Mastic de
plombier
Perceuse
Plus:
• Niveau à bulle
• Douille profonde de 5/16" ou
tourne-écrou de 5/16"
• Trou de serrure/compas ou scie
sauteuse
• Gants
Couteau à mastic
Merci d’avoir choisi la compagnie Kohler
Nous apprécions votre engagement envers la qualité Kohler. Veuillez
prendre s’il vous plaît quelques minutes pour lire ce manuel avant de
commencer l’installation. Ne pas hésiter à nous contacter en cas de
problème d’installation ou de fonctionnement. Nos numéros de
téléphone et notre adresse du site internet sont au verso. Merci encore
d’avoir choisi la compagnie Kohler.
Avant de commencer
AVERTISSEMENT : Risque de blessure corporelle. Les surfaces
métalliques ont des bords tranchants et peuvent provoquer de
graves coupures. Porter des gants et manipuler les bords de
l’évier avec précaution.
Respecter tous les codes de plomberie et de bâtiment locaux.
Couper les alimentations d’eau chaude et d’eau froide.
Avant l’installation, déballer le nouvel évier et l’examiner pour en
déceler tout dommage. Remettre l’évier dans son emballage
jusqu’à être prêt à l’installer.
Inspecter le drain et la tuyauterie d’alimentation. Remplacer si
nécessaire.
Kohler Co. Français-1 1013270-2-D
Page 8

Avant de commencer (cont.)
Tous les renseignements contenus dans ces instructions sont basés
sur les données les plus récentes relatives au produit au moment
de la publication. Kohler Co. se réserve le droit d’apporter des
modifications à tout moment, sans préavis.
1013270-2-D Français-2 Kohler Co.
Page 9

Évier
Comptoir
Pourtour de
l'évier
1/4" (6 mm)
Orifice de
guide
Tracer le bord extérieur de l'évier
sur le comptoir avec un crayon,
au lieu d'installation désiré.
Tracer une deuxième ligne
1/4" (6 mm) à l'intérieur du
bord de l'evier.
1. Préparation
AVERTISSEMENT : Risque de blessure corporelle. Les surfaces
métalliques ont des bords tranchants et peuvent provoquer de
graves coupures. Porter des gants et manipuler les bords de
l’évier avec précaution.
Pour des nouvelles installations:
Placer soigneusement l’évier à l’envers sur le comptoir et à
l’endroit désiré. S’assurer de ne pas endommager la finition de
l’évier.
S’assurer que l’évier n’interférera pas avec le meuble.
Tracer le bord extérieur de l’évier sur le comptoir. Ne pas couper
le long du pourtour.
Pour des installations existantes:
Retirer délicatement l’ancien évier du comptoir.
Comparer la taille de découpe à celle requise.
Si nécessaire, agrandir la découpe selon les instructions pour des
nouvelles installations.
Pour toutes les installations:
Tracer une ligne de 1/4″ (6 mm) à l’intérieur du pourtour de
l’évier.
Kohler Co. Français-3 1013270-2-D
Page 10

Préparation (cont.)
Avant de découper, mesurer et comparer la ligne de découpe avec
les dimensions générales de l’évier. La découpe doit être de 1/2″
(1,3 cm) plus petite que la dimension général de l’évier.
Percer un trou-pilote à l’intérieur de la ligne de découpe. À l’aide
d’une scie à guichet ou scie sauteuse, découper soigneusement le
long de la ligne intérieure pour découper l’ouverture dans le
comptoir.
1013270-2-D Français-4 Kohler Co.
Page 11

Dent du
clip
Machoir
du clip
Trous de
Écrou
Hexagonal
fixation
Mise en place des clips
2. Installer les clips
Retourner l’évier sur une surface propre et douce.
Glisser les clips sur les trous de fixation préalablement percés
dans le rebord de l’évier. Se réferer à l’illustration pour les
positions correctes des clips (trois devant et derrière;deux de
chaque côté).
REMARQUE : S’assurer que les dents du clip soient complètement
reposées dans le trou de fixation.
Pivoter toutes les machoires desclips parallèlement au rebord de
l’évier.
3. Installer les raccords de robinet
Installer le robinet et le drain conformément aux instructions du
fabricant.
REMARQUE : Si les accessoires de tuyauterie de l’ancien évier sont
réutilisés, appliquer du mastic audessous de la base du robinet et à
l’applique supérieure de la bonde.
Kohler Co. Français-5 1013270-2-D
Page 12

Comptoir
Mâchoire
du clip
Écrou
hexagonal
Découpe
Clips
d'installation
4. Installer l’évier
Appliquer du mastic d’étanchéité sous le rebord de l’évier.
REMARQUE : Pour un alignement du comptoir, il peut être
nécessaire de replacer les fixations.
Positionner d’équerre l’évier dans la découpe.
Pivoter les machoires du clip sous le comptoir tel qu’illustré.
Serrer les écrous hexagonaux pour baisser le rebord de l’évier
dans le comptoir. Ne pas trop serrer.
Essuyer tout excédent de mastic à l’aide d’un chiffon sec.
Vérifier qu’il n’y ait pas d’espaces.
Laisser prendre le mastic pendant au moins 30 minutes.
Installer le broyeur de déchets, si utilisé, conformément aux
instructions du fabricant.
Connecter et bien fixer la crépine au drain, et terminer les
connexions d’alimentation d’eau au robinet selon les instructions
emballées avec le robinet.
Laisser couler l’eau dans l’évier et vérifier s’il y a des fuites.
Évier
1013270-2-D Français-6 Kohler Co.
Page 13

Guía de instalación
Fregaderos de cocina de acero inoxidable
Herramientas y materiales
Lentes de
seguridad
Sellador
de silicona
Cinta
métrica
Llave para
tubo
Lápiz
Masilla de
plomería
Taladro
Más:
• Nivel
• Casquillo profundo de 5/16" o
llave para tuercas de 5/16"
• Serrucho de calar o sierra
caladora eléctrica
• Guantes
Espátula
Gracias por elegir los productos de Kohler
Apreciamos su elección por la calidad de Kohler. Dedique unos
minutos para leer este manual antes de comenzar la instalación. En
caso de problemas de instalación o de funcionamiento, no dude en
contactarnos. Nuestros números de teléfono y nuestra página web se
encuentran en la última página. Gracias nuevamente por escoger a
Kohler.
Antes de comenzar
ADVERTENCIA: Riesgo de lesiones personales. Las superficies
metálicas tienen bordes cortantes y pueden producir graves
cortes. Utilice guantes y tenga cuidado con los bordes del
fregadero.
Cumpla con todos los códigos locales de plomería y de
construcción.
Cierre el suministro del agua fría y caliente.
Antes de la instalación, desembale el fregadero nuevo y verifique
que no esté dañado. Coloque el fregadero en la caja como
protección hasta el momento de la instalación.
Kohler Co. Español-1 1013270-2-D
Page 14

Antes de comenzar (cont.)
Examine las tuberías de suministro y de desagüe. Reemplácelas
de ser necesario.
Toda la información contenida en estas instrucciones está basada
en la información más reciente disponible al momento de su
publicación. La empresa Kohler se reserva el derecho de realizar
cambios en cualquier momento sin previo aviso.
1013270-2-D Español-2 Kohler Co.
Page 15

Fregadero
Contorno del
fregadero
Mostrador
1/4"
(6 mm)
Orificio
de guía
Trace el contorno del fregadero
sobre el mostrador con un lápiz,
en el lugar de instalación deseado.
Trace una segunda línea en el
interior a 1/4" (6 mm) del contorno
trazado del fregadero.
1. Preparación
ADVERTENCIA: Riesgo de lesiones personales. Las superficies
metálicas tienen bordes cortantes y pueden producir graves
cortes. Utilice guantes y tenga cuidado con los bordes del
fregadero.
Instalaciones nuevas:
Coloque el fregadero con cuidado en posición invertida sobre el
lugar deseado del mostrador. Tenga cuidado de no dañar el
acabado del fregadero.
Asegúrese de que el fregadero no interfiera con el gabinete.
Trace el contorno del fregadero en el mostrador. No corte a lo
largo del contorno.
Instalaciones existentes:
Levante con cuidado el fregadero viejo y sáquelo del mostrador.
Compare la abertura existente con el tamaño requerido por el
fregadero nuevo.
De ser necesario, agrande la abertura siguiendo las instrucciones
para las instalaciones nuevas.
Todas las instalaciones:
Trace una línea a 1/4″ (6 mm) del contorno del fregadero, dentro
del mismo.
Kohler Co. Español-3 1013270-2-D
Page 16

Preparación (cont.)
Antes de cortar, mida la línea de corte que acaba de trazar y
compárela con las dimensiones totales del fregadero. La abertura
debe de ser 1/2″ (1,3 cm) más pequeña que las dimensiones
totales del fregadero.
Taladre un orificio de guía dentro de la línea de corte. Utilice un
serrucho de calar o sierra caladora eléctrica, y corte a lo largo de
la línea interna para perforar la abertura en el mostrador.
1013270-2-D Español-4 Kohler Co.
Page 17

Dientes de
la grapa
Quijada de
la grapa
Tuerca
hexagonal
Orificios de
fijación
Emplazamiento de las
grapas de fijación
2. Instale las grapas
Coloque el fregadero en posición invertida, sobre una superficie
limpia y blanda.
Deslice las grapas por los orificios de fijación perforados
previamente en el borde del fregadero. Consulte la posición
correcta de las grapas en la ilustración (tres grapas en la parte
frontal y posterior; dos a cada lado).
NOTA: Asegúrese de que los dientes de las grapas queden bien
asentados en los orificios de fijación.
Gire todas las quijadas de las grapas para que estén paralelas al
borde del fregadero.
3. Instale las conexiones de la grifería
Instale la conexión de la grifería y del desagüe según las
instrucciones del fabricante.
NOTA: Si emplea las conexiones de un fregadero viejo, aplique
masilla de plomería por debajo de la base de la grifería y de la brida
superior del colador.
Kohler Co. Español-5 1013270-2-D
Page 18

Fregadero
Mostrador
Quijada de la
grapa
Tuerca
hexagonal
Abertura
Grapas de
fijación
4. Instale el fregadero
Aplique una tira de sellador de calidad en la parte inferior del
borde del fregadero.
NOTA: Si la superficie del mostrador resulta desigual, es posible que
tenga que cambiar las fijaciones de posición.
Coloque el fregadero en la abertura de manera que quede bien
alineado.
Gire las quijadas de las grapas debajo del mostrador, como se
ilustra.
Apriete las tuercas hexagonales para bajar el borde del fregadero
y acercarlo al mostrador. No apriete demasiado.
Utilice un paño seco para limpiar el exceso de sellador.
Compruebe que no queden huecos.
Permita que el sellador se seque durante 30 minutos como
mínimo.
Instale el triturador de basura, si se utiliza, siguiendo las
instrucciones del fabricante.
Conecte y fije el sifón en el colador y termine las conexiones del
suministro de agua a la grifería, conforme a las instrucciones
incluidas con la grifería.
Haga circular agua por el fregadero y verifique que no haya
fugas.
1013270-2-D Español-6 Kohler Co.
Page 19

1013270-2-D
Page 20

USA: 1-800-4-KOHLER
Canada: 1-800-964-5590
México: 001-877-680-1310
kohler.com
©2005 Kohler Co.
1013270-2-D
 Loading...