

Page 1

KALITGTSETA
Whipper Snipper
USER MANUAL
Page 2
2
9
8
2
13
7
11
1 3
4
5
6
10 14
12
B1
B2
Page 3

3
14
B3
B5 B6
B8B7
B4
Page 4

4
B9
B11
B13
B10
B12
B14
5
9
Page 5

5
B16
30 °
B18
B15
B17
Page 6

6
(including children) with reduced physical,
sensory or men
tal capabilities, or lack of
experience and knowledge, unless they have
been given supervision or instruction concerning
use of the appliance by a person responsible
for their safety.
Children should be supervised to ensure that
they do not play with the appliance.
.
Do not operate the cordless trimmer when
barefoot or wearing open sandals; always
wear substantial footwear and long trousers.
.
Never allow children or people unfamiliar with
these instructions to use the cordless trimmer.
Local regulations may restrict the age of the
operator. When not in use store the trimmer
well out of reach of children.
.
Never work with this trimmer while people,
especially children or pets are nearby.
.
The operator or user is responsible for accidents
or hazards occurring to other people or their
property.
.
Wait until the blade has completely stopped
before touching it. The blade continues to rotate
after the trimmer is switched o; a rotating
blade can cause injury.
.
Work only in daylight or in good articial light.
.
Avoid operating the cordless trimmer in wet
grass, where feasible.
.
Switch o when transporting the cordless
trimmer to and from the area to be worked on.
.
Switch on the cordless trimmer with hands
and feet well away from the rotating blade.
.
Do not put hands or feet near the rotating
blade.
.
Never use a metal blade in this trimmer.
Safety instructions and warnings
Caution!
Wear safety goggles!
Protect from the damp!
Read the directions for use before
putting into operation for the rst time!
Please read the operating instructions
through carefully before operating the
machine.
Improper use could result in damage to
persons or objects. Persons not familiar with the
operation may not operate the machine. Keep the
operating instructions in a secure place.
Children & youths under the age of 16 and those
persons who have not read the operating
instructions are not permitted to operate the
machine.
1. Safety Instructions
Before using the machine and after impact,
check for signs of wear or damage, and repair
if necessary.
.
This appliance is not intended for use by persons
Keep third parties away from
the danger zone!
The tool runs on after
being switched o!
Page 7

7
GB
.
Inspect and maintain the cordless tr
immer
regularly.
.
Have the cordless trimmer r
epaired only by an
Kogan customer service technician.
.
Always ensure tha
t the ventilation slots are
kept clear of debris.
.
Switch o and remove the ba
ttery:
- whenever you leave the machine unattended
for any period
- before replacing the blade
- before cleaning or working on the cordless
trimmer.
.
Store the machine in a secure dry plac
e out of
the reach of children. Do not place other objects
on top of the machine.
.
Replace worn or damaged parts f
or safety.
.
Ensure replacement parts tt
ed are Kogan
approved.
.
Ensure the switch is in the o position before
inserting ba
ttery pack. Inserting the battery pack
into machines that have the switch on invites
accidents.
.
Recharge only with the charger specied by
the manufactur
er. A charger that is suitable
for one type of battery pack may create a risk
of re when used with another battery pack.
.
Use only battery packs int
ended specically
for the machine. Use of any other battery packs
may create a risk of injury and re.
.
When battery pack is not in use
, keep it away
from other metal objects like paper clips, coins,
keys, nails, screws, or other small metal objects
that can make a connection from one terminal to
another. Shorting the battery terminals together
may cause burns or a re.
.
Under abusive conditions, liquid may be eject
ed
from the battery; avoid contact. If contact
accidentally occurs, ush with water. If liquid
contacts eyes, additionally seek medical help.
Liquid ejected from the battery may cause skin
irritation or burns.
2. Proper use
The equipment is designed for cutting the edges
of lawns and small ar
eas of grass in private and
hobby gardens.
Tools for private and hobby gardens are not
suitable for use in public facilities, parks and
sport centers, along roadways, on farms or in the
forestry sector.
For the tool to be used properly it is imperative
to follow the instructions set out in the
manufacturer's directions for use.
Important! It is prohibited to use the tool to
chop material for composting because of the
potential danger to persons and property.
The machine is to be used only for its prescribed
purpose. Any other use is deemed to be a case of
misuse. The user / operator and not the
manufacturer will be liable for any damage or
injuries of any kind caused as a result of this.
Please note that our equipment has not been
designed for use in commercial, trade or industrial
applications. Our warranty will be voided if the
machine is used in commercial, trade or industrial
businesses or for equivalent purposes.
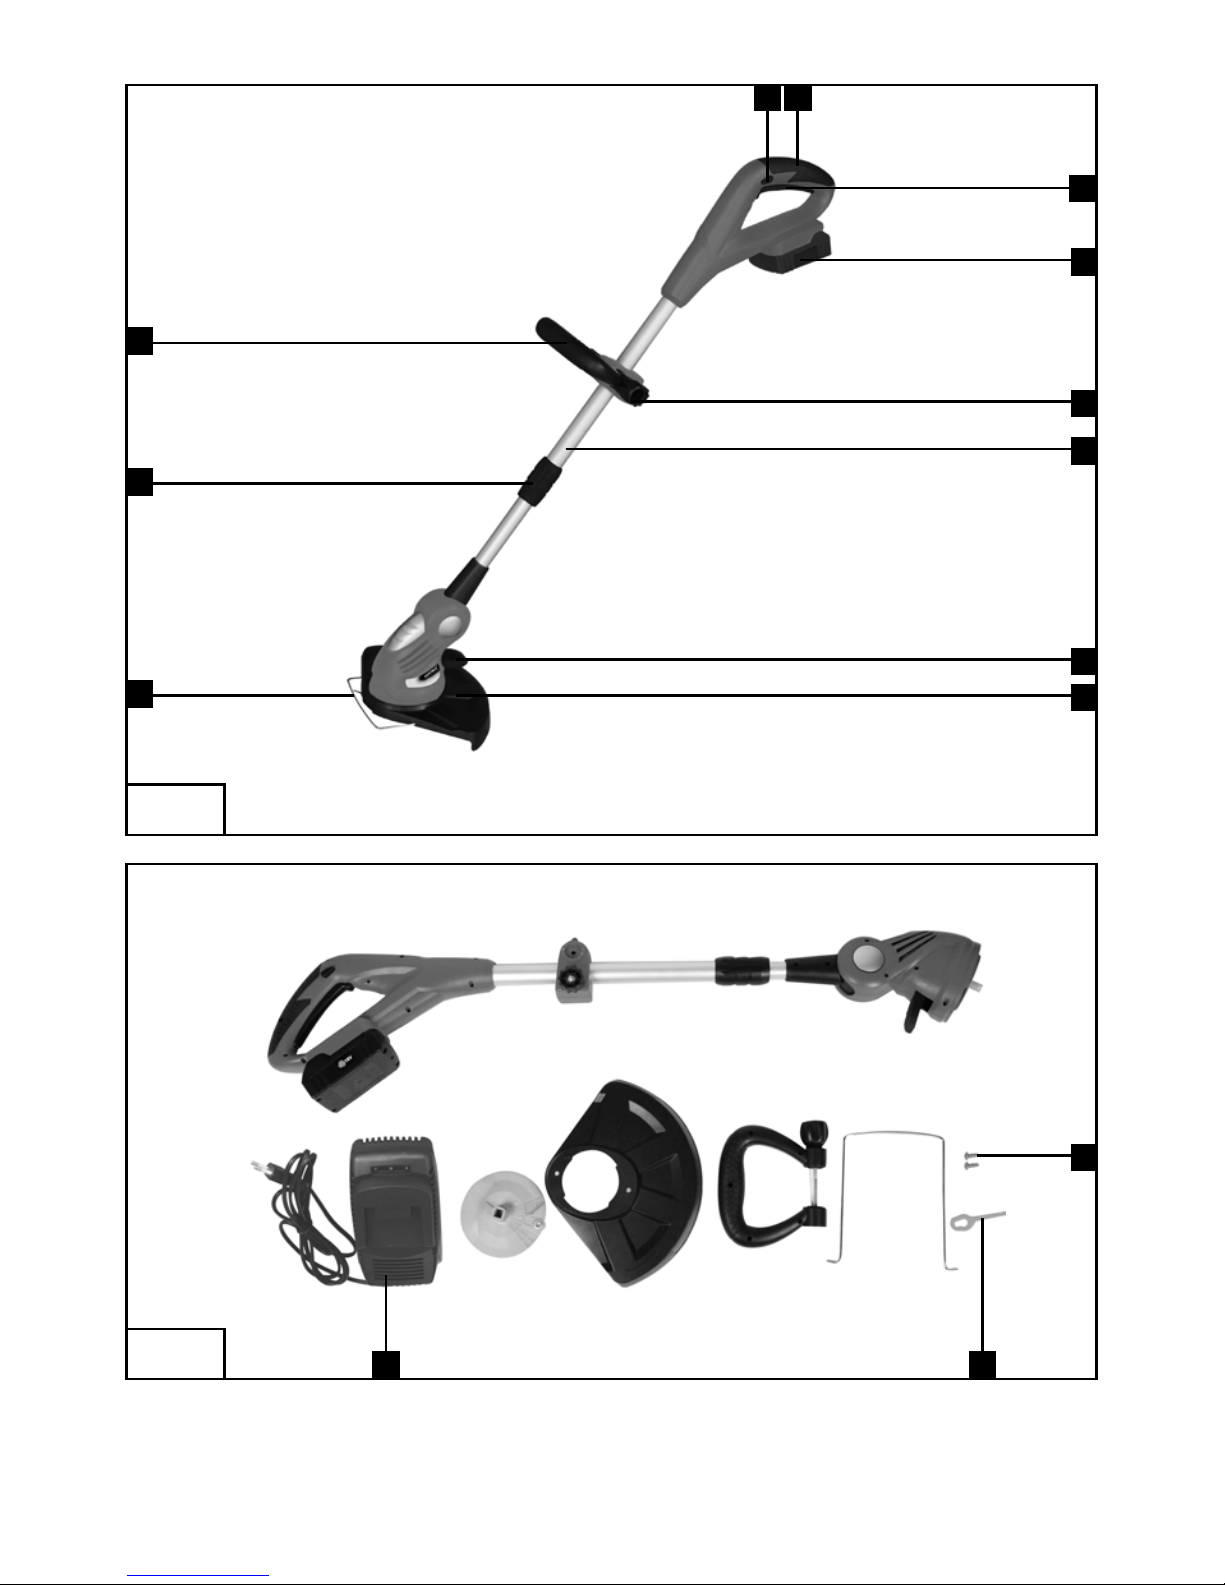
3. Layout (B1,B2)
1. Safety lock-o
2. ON/OFF swit
ch
3. Handle
4. Additional handle
5. Height adjustment bar
6. Edge guide
Page 8

8
7. Telescope tube
8. Saf
ety hood
9. Pedal for angle adjustment
10. Battery charger (One battery charger for all 3
machines in the scope of delivery)
11. Battery (One battery for all 3 machines in the
scope of delivery)
12. 2 Securing screws for safety hood
13. Locking knob
14. Blade
4. Before starting
4.1 Installing the safety hood (B3-B5)
.
Secure the edge guide to the safety hood (B3).
.
Place the safety hood on the trimmer (B4) and
secure to the trimmer (B5) it using the 2 securing
screws (B2 / Item 12).
4.2 Installing the additional handle (B7)
Undo the securing screw from the handle and
then place the handle on the main handle and
secure it with the screw (B7).
4.3 Fitting the blade (B8,B9)
Place the blade (B8/Item 14) with the larger
opening over the mount (B9) and then pull tight
in the direction of the arrow. Make sure the blade
locks into place correctly as shown in Figure B9.
4.4 Height adjustment (B10)
Undo the union nut (B10/Item 5) until the grass
trimmer handle can be moved in and out freely.
Now set the required working height and secure
the handle in this position by tightening the
union nut again.
4.5 Adjusting the additional handle (B7)
Undo the securing screw on the additional handle
until it can be moved forwards and backwards
without any great resistance. Set the required
position and tighten the securing screw again.
4.6 Adjusting the angle of the guide handle
(B11)
Place the grass trimmer on a rm surface. Press
the pedal for adjusting the angle from above
using your foot (B11/Item 9). You can now set the
handle to the required angle. Release the pedal
and allow the handle to lock into position to
x the angle. Three dierent locking angles are
possible.
4.7 Charging the battery (B13-B15)
• Press the snap fastening and remove the battery
(11).
• Place the plug of charger (10) in a 210- 240V~/
50-60 Hz socket.
The red LED will be permanently lit.
• Push the battery pack onto the battery charger.
The ashing yellow LED will come on to indicate
that the battery pack is being charged. When the
charging process is nished, the green, red and
yellow LED will be permanently lit. The time
it takes to fully recharge an empty battery is
approximately 1 hour.
• Push the battery into the machine with clean
contacts until it engages.
Recharging
• Regular recharging after lengthy use and after
lengthy periods of inaction will extend the service
life of the battery.
5. Operation
Your grass trimmer will work at its best if you
observe the following instructions:
.
Never use the grass trimmer without its safety
devices.
.
Do not cut grass when it is wet. The best results
are had on dry grass.
Page 9

9
Weight: 2,2 kg
Power supply unit:
Mains voltage: 210-240 V ~/ 50-60 Hz
Output:
Rated voltage: 18 V DC
Rated current: 1500 mA
The noise level of this machine may exceed 94
dB(A). In this case, noise protection is necessary
for the user. The machine's noise was measured in
accordance with prEN ISO 10518.
7. Cleaning, maintenance and ordering
of spare parts
Before putting away or cleaning the grass
trimmer, pull out the battery pack (B12 and B13).
7.1 Cleaning
.
Keep all safety devices, air vents and the motor
housing free of dirt and dust as far as possible.
Wipe the equipment with a clean cloth or blow it
with compressed air at low pressure.
.
We recommend that you clean the device
.
Clean the equipment regularly with a moist
cloth and some soft soap. Do not use cleaning
agents or solvents; these could attack the plastic
parts of the equipment. Ensure that no water can
seep into the device.
.
Remove deposits from the guard hood with a
brush.
7.2 Replacing the blade (B8,B9)
IMPORTANT! Make sure that you remove the
battery pack before replacing the blade.
.
To remove the blade, push the blade inwards
.
To switch on your grass trimmer, press the
.
ON/OFF switch (B1/Pos. 2).
.
Do not move the grass trimmer against the gr
ass
until the switch is pressed, i.e. wait until the
trimmer is running.
.
For the correct cutting action, swing the grass
trimmer to the side as you walk forward, holding
it at an angle of approx. 30° as you do so (see
B16-B17).
.
Make several passes to cut long gr
ass shorter
step by step from the top (see B18).
.
Use the guard hood to prevent unnecessary
wear.
.
To avoid unnecessary wear, keep the grass
trimmer away from hard objects.
Using the grass trimmer as an edge trimmer
The grass trimmer can be adjusted as follow
s to
trim the edge of lawns and beds.
.
The grass trimmer can thus be adjusted for use
as an edge trimmer for making vertical cuts on
the gr
ass (B15).
6. Technical data
Speed n0: 9000 min
-1
Battery type: Li-Ion
Cutting range: 26 cm diameter
Max. running period: 30 min
Sound power level LWA: 87.7 dB(A)
Sound pressure level LpA: 75.3 dB(A)
Replaceable NC battery: 18 V d.c./1300 mAh
Vibra
tion
a
hw
: 2,147 m/s
2
k =1,5 m/s
2
Page 10

10
and remove via the larger opening as shown in
Figure B8.
.
To t the new blade, proceed in reverse order.
Make sure the blade locks into place correctly as
shown in Figure B9.
7.3 Maintenance
There are no parts inside the equipment which
require additional maintenance.
7.4 Ordering replacement parts:
Please quote the following data when ordering
replacement parts:
.
Type of machine
.
Article number of the machine
8. Repairs
Only use accessories and spare parts
recommended by the manufacturer. If the
equipment should fail some day in spite of our
quality controls and your maintenance, only have
it repaired by an authorised electrician.
If the supply cord of the appliance is damaged,
this has to be done by the manufacturer or his
agent or electrician in order to avoid a safety
hazard.
9. Disposal and recycling
The unit is supplied in packaging to
prevent its being damaged in transit.
This packaging is raw material and can
therefore be reused or can be returned
to the raw material system.
The unit and its accessories are made of various
types of material, such as metal and plastic.
Defective components must be disposed of as
special waste.
 Loading...