

Kogan MAGPIES42LED Owner's Manual

LED TVLED TVLED TV
OWNER'S MANUALOWNER'S MANUALOWNER'S MANUAL
Please read this manual carefully before TV operation.
Retain it for future reference.
MAGPIES42LED
R
TM
THE AFL LOGO AND COMPETING TEAM LOGOS, EMBLEMS AND NAMES ON THIS PRODUCT ARE ALL
TRADE MARKS OF AND USED UNDER LICENCE FROM THE OWNER THE AUSTRALIAN FOOTBALL LEAGUE.

The screen and cabinet get warm when the TV
is in use. This is not a malfunction.In case of
smoke, strange noise or strange smell from the
unit:
· Turn off the power switch immediately;
· Disconnect the power plug from the power
outlet;
· Contact your dealer or service centre. Never attempt to make repairs
yourself because this could be dangerous.
High Voltage
Do not open
Risk of electronic shock, do not open.
Do not attempt to service this product yourself
as opening or removing covers may expose
you to dangerous voltage or other hazards.
Refer all servicing to qualified service personnel.
CAUTION
Important Safety Instructions
Important Safety Instructions and Maintenance
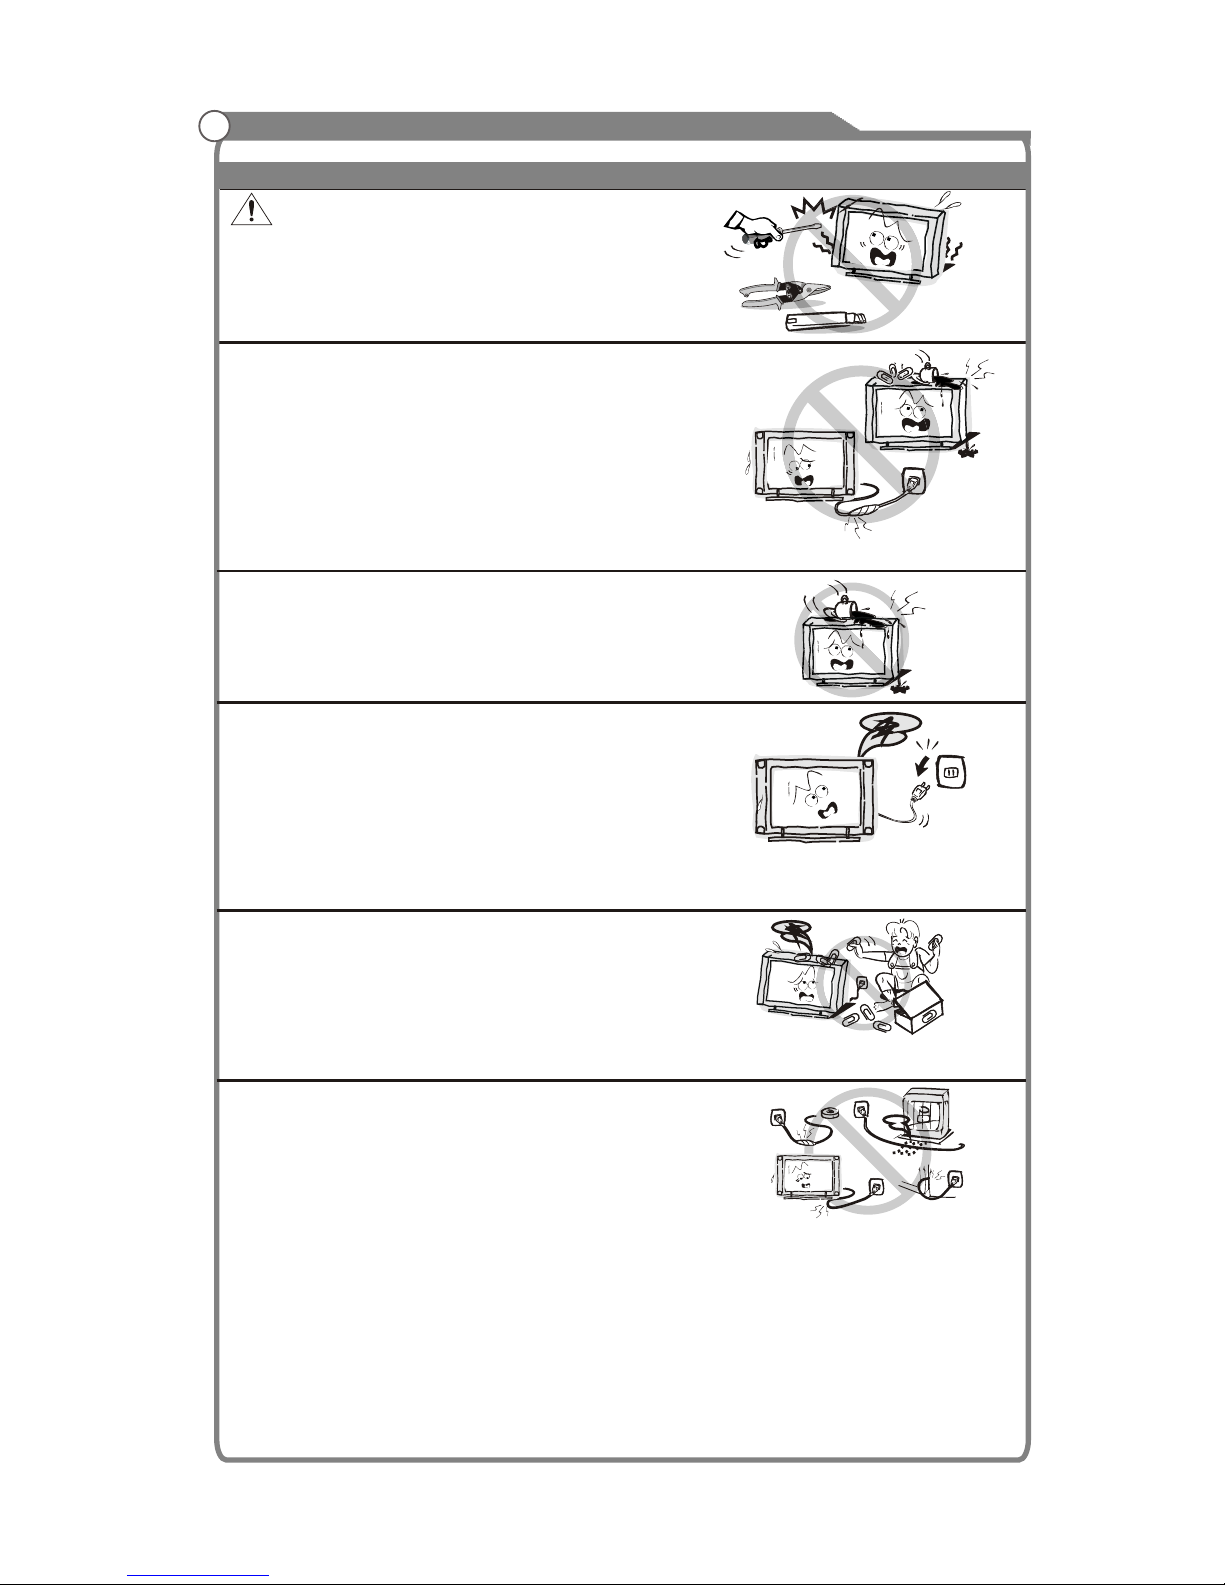
Never push objects of any kind into the set
through the cabinet slots as they may touch
dangerous voltage points or short-circuit parts that
could result in a fire or electric shock. Never spill
liquid of any kind on the set. Use special caution
in households where children are present. The apparatus is not suitable for children
under 3-year to operate.
To reduce the risk of fire or electric shock, do not
expose this product to rain or moisture.
The apparatus shall not be exposed to dripping
or splashing and no objects filled with liquids,
such as vases, shall be placed on the apparatus.
1
If the following problems occur:
Turn off the TV set and unplug the AC power cord
immediately if any of the following problems occur.
Ask your dealer or service centre to have it checked
by qualified service personnel
When:
- AC power cord is damaged.
- Poor fitting of AC power outlet.
- TV set is damaged by being dropped, hit or having something thrown at it.
- Any liquid or solid object falls through openings in the cabinet.
Do not overload wall outlets, extension cords or
adaptors beyond their capacity, this can result in
fire or electrical shock.
Power-supply cords should be routed so that they
are not likely to be walked on or pinched by items
placed upon or against them, paying particular attention to cords at plug end, adaptors
and the point where they exit from the appliance. The mains plug is used as the
disconnect device. It shall remain readily accessible and should not be obstructed
during intended use. Make sure to plug the power cord in until it is firmly inserted.
When removing the power cord, make sure to hold the power plug when pulling the
plug from the outlet, do not pull the plug out by the wire. NEVER touch the plug or
power cord with wet hands. To disconnect the apparatus from the mains power, the
plug must be pulled out from the mains socket, therefore make sure the mains plug
is always easily accessible.

Important Safety Instructions and Maintenance
Important Safety Instructions
When not in use
If you will not be using the TV set for several days, the
TV set should be disconnected from the AC mains for
environmental and safety reasons. As the TV set is not
disconnected from the AC power when the TV is turned
off at the standby switch, pull the plug from the AC power
outlet to disconnect the TV completely. However, some
TV sets may have features that require the TV set to be
left in standby to function correctly. In the case of lightning,
unplug the TV set from the outlet immediately. Never
touch the antenna wire during lightning.
An outside antenna system should not be located in
the vicinity of overhead power lines or other electric
light or power circuits, or where it can fall into such
power lines or circuits. When installing an outside
antenna system, extreme care should be taken to keep
from touching such power lines or circuits as contact
with them might be fatal.Ensuring the television is not
overhanging the edge of the supporting furniture.
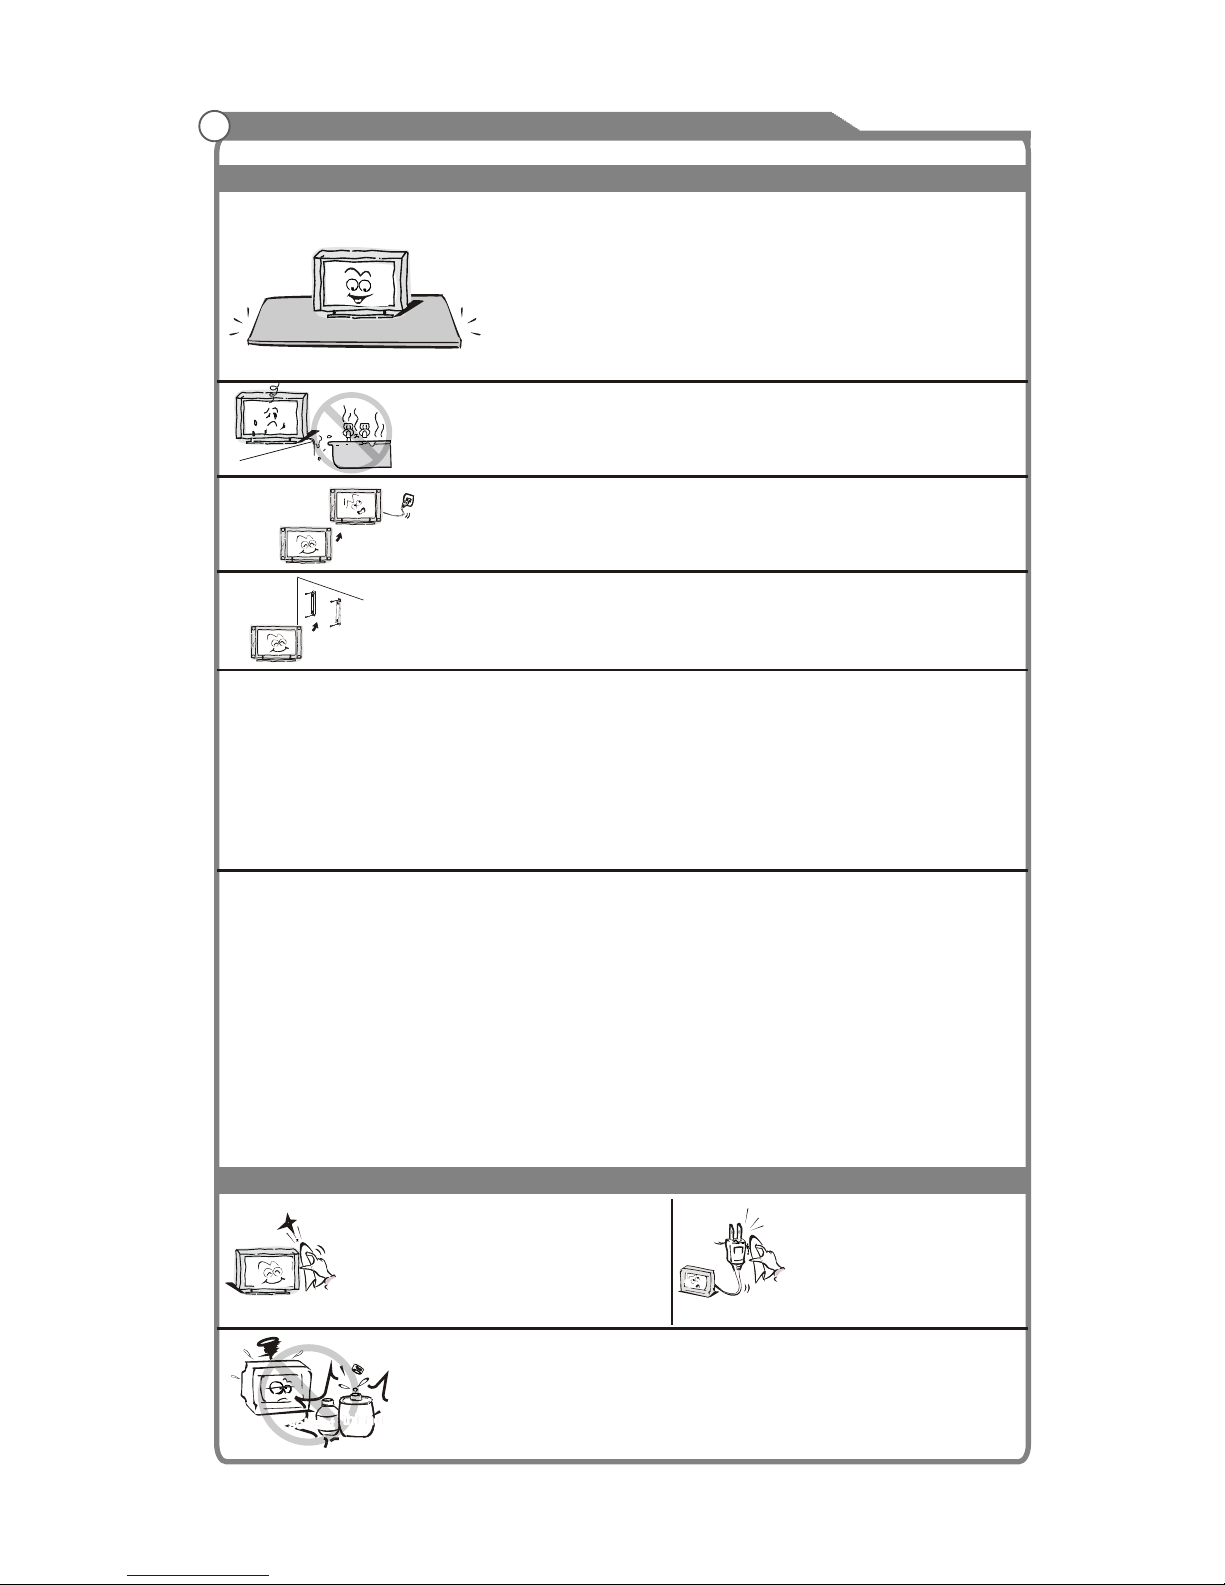
Installation
The ventilation should not be impeded by covering the
ventilation opening with items, such as newspapers,
tablecloths, curtains, etc.
At least 10 cm space should be left around the
apparatus for sufficient ventilation.
The product should be situated away from heat
sources such as radiators, heat registers, stoves, or
other products (including amplifiers) that produce heat.
Place the apparatus in such a position that the screen
is not exposed to direct sunlight. It is best to have soft
indirect lighting while watching and avoid
and reflection from the screen as
these may cause eye fatigue.
Keep the TV set away from any equipment emitting
electromagnetic radiation.
completely
dark environments
Do not pull the plug out by the wire;
Never touch the plug with wet hands.
Excessive from earphones and headphones
can cause hearing loss.
volume
2
To avoid the fire, no naked flame source,
such as lighted candles, should be placed on the
apparatus.
Do not push or scratch the front filter, or place any objects on top of the TV set. The
image may be uneven or the screen may be damaged.
Important Safety Instructions and Maintenance
Installation
Do not place this apparatus near water, for example,
near a bath tub, wash bowl, kitchen sink, or laundry
tub; in a wet basement; or a swimming pool; and
the like;
When the TV being moved in from cold place, it needs
some right time for dew inside unit evaporating fully
before turn on the unit;
Cleaning and handling the screen
surface and cabinet. Disconnect
the unit from the AC outlet before
cleaning. To remove dust, wipe
gently with a soft, lint free cloth. If
required use a slightly damp cloth.
Do not place the set on an unstable cart, stand, table
or shelf. The set may fall, causing serious personal
injury as well as damage to the product. Use only with
the cart, stand, tripod, bracket, or table specified by
the manufacturer, or sold with the apparatus. An
appliance and cart combination should be moved with
care. Quick stops, excessive force, and uneven
surfaces may cause the appliance and cart
combination to overturn.
To prevent injury, this apparatus must be securely
attached to the floor/wall in accordance with the
installation instructions.
3
Cleaning
Move
LED Screen
Although the LED screen is made with high precision technology and 99.99% or
more of the pixels are effective, black dots may appear or bright points of light (red,
blue or green) may appear constantly on the LED screen. This is a structural property
of the LED screen and is not a malfunction.
If the surface of the LED panel cracks, do not touch it until you have unplugged the
AC power cord. Otherwise electric shock may result.
Do not throw anything at the TV set. The LED panel may break from the impact and
cause serious injury.
Precautions When Displaying a Still Image
A still image may cause permanent damage to the TV screen.
Do not display still images and partially still images on the LED panel for more
than 2 hours as it can cause screen image retention. This image retention is
also known as "screen burn". To avoid such image retention, reduce the
degree of brightness and contrast of the screen when displaying a still image.
Watching the LED TV in 4:3 format for a long period of time may leave traces
of borders displayed on the left, right and centre of the screen caused by the
difference of light emission on the screen. Playing a DVD or a game console
may cause a similar effect to the screen. Damages caused by the above effect
are not covered by the Warranty.
Displaying still images from Video games and PC for longer than a certain
period of time may produce partial after-images. To prevent this effect, reduce
the 'brightness' and 'contrast' when displaying still images.
MAINS PLUG
Wipe the mains plug with
a dry cloth at regular
intervals. Moisture and
dust may lead to fire or
electrical shock.
Use care not to subject the TV's surfaces to detergent.
(A liquid inside the TV could lead to product failure, fire or
electrical shock.)
Use care not to subject surfaces to bug repellent, solvent,
thinner, or other volatile substances as this may deteriorate the
surface and finish of the cabinet.
solvent
thinner

Table of Contents
Important Information
4
Accessories------------------------------------------------------------------------------------------------5
Introduction------------------------------------------------------------------------------------------------6
Features-----------------------------------------------------------------------------------------------------6
Specifications-----------------------------------------------------------------------------------------------7
Stand and wall-mounting instructions (optional)--------------------------------------------------8
---------------------------------------------------------------------------------10
Overview of back panel--------------------------------------------------------------------------------10
Overview of front panel--------------------------------------------------------------------------------11
Overview of remote control---------------------------------------------------------------------------12
Teletext ----------------------------------------------------------------------------------------------------14
Installing Batteries in the Remote Control---------------------------------------------------------16
External Connection---------------------------------------------------------------------------------------16
Antenna connection-------------------------------------------------------------------------------------16
Connecting VCR -----------------------------------------------------------------------------------------17
Connecting a Camcorder------------------------------------------------------------------------------18
Connecting a DVD Player/Set-Top Box -----------------------------------------------------------19
Connecting a DVD Player/Set-Top Box via DVI -------------------------------------------------20
Connecting DVD Player/Set-Top Box via HDMI -------------------------------------------------21
Connecting Digital Audio System--------------------------------------------------------------------22
Connecting PC ------------------------------------------------------------------------------------------23
Supporting signals -----------------------------------------------------------------------------------------23
Basic operation-----------------------------------------------------------------------------------------24
Turning the TV on and off-----------------------------------------------------------------------------24
Menu operation ------------------------------------------------------------------------------------------25
Menu system instruction----------------------------------------------------------------------------------27
Picture-------------------------------------------------------------------------------------------------------27
Sound-------------------------------------------------------------------------------------------------------29
Channel-----------------------------------------------------------------------------------------------------31
Time---------------------------------------------------------------------------------------------------------33
Option-------------------------------------------------------------------------------------------------------34
Function----------------------------------------------------------------------------------------------------36
PVR---------------------------------------------------------------------------------------------------------37
Digital Media Player ---------------------------------------------------------------------------------------40
-------------------------------------------------------------------------------------------------40
-------------------------------------------------------------------------41
---------------------------------------------------------------------------------
---------------------------------------------------------------------------------------------------------41
--------------------------------------------------------------------------------------------------------43
--------------------------------------------------------------------------------------------------------44
-----------------------------------------------------------------------------------------------------------47
My Disk------------------------------------------------------------------------------------------------------48
Troubleshooting --------------------------------------------------------------------------------------------50
Picture defects and the reason-------------------------------------------------------------------------52
General Description
Introduction
Device and File Management
USB Support Character 41
Photo
Music
Movie
Text
Keep small accessories out of reach of children so they are not mistakenly swallowed.

Please make sure the following items are included with your LED TV. If any items are
missing, contact your dealer.
Accessories
5
Remote Control
Owner’s
Instructions
SOUND
AUDIO LANG
VOL PROG
MENU
1 2 3
4 5
6
789
0
INFO
RECALL
FREEZE SLEEP
EXIT
HOLD SIZE
REVEAL CANCEL
PICTURE
MUTE
INPUT
POWER
TEXT
SUBTITLE
TIME
SUBCODE
FAV
CH.LIST
GUIDE
DTV HDMI
USB
INDEX
PgUp PgDn
RED GREEN YELLOW
BLUE
OK/
REC LIST
ASPECT
MIX

Features
Introduction
Input terminals used for external equipment connection
1 x CVBS output
1 x SPDIF output
1 x ANTENNA jack 3 x HDMI inputs
1 x computer PC-RGB input 1 x USB inputs
1 x COMPONENT input
2 x AV inputs
1 x Headphone output
l TV adopts 42” TFT display screen
l Zero X radiation complies to green environment protection requirement
l Connect to computer directly to realize TV/monitor combo.
l 16:9 wide screen
l Auto tuning and fine tuning
l HDMI input
l Component Compatible (480i; 480P; 576i; 576P; 720P; 1080i; 1080P)
l PC-RGB
l Programmable sleep timer
l Wide range voltage input
l No-signal automatic power off
LED
6
Note:
- Design and specifications are subject to change without notice.
- Weight and Dimension shown are approximate.
Introduction
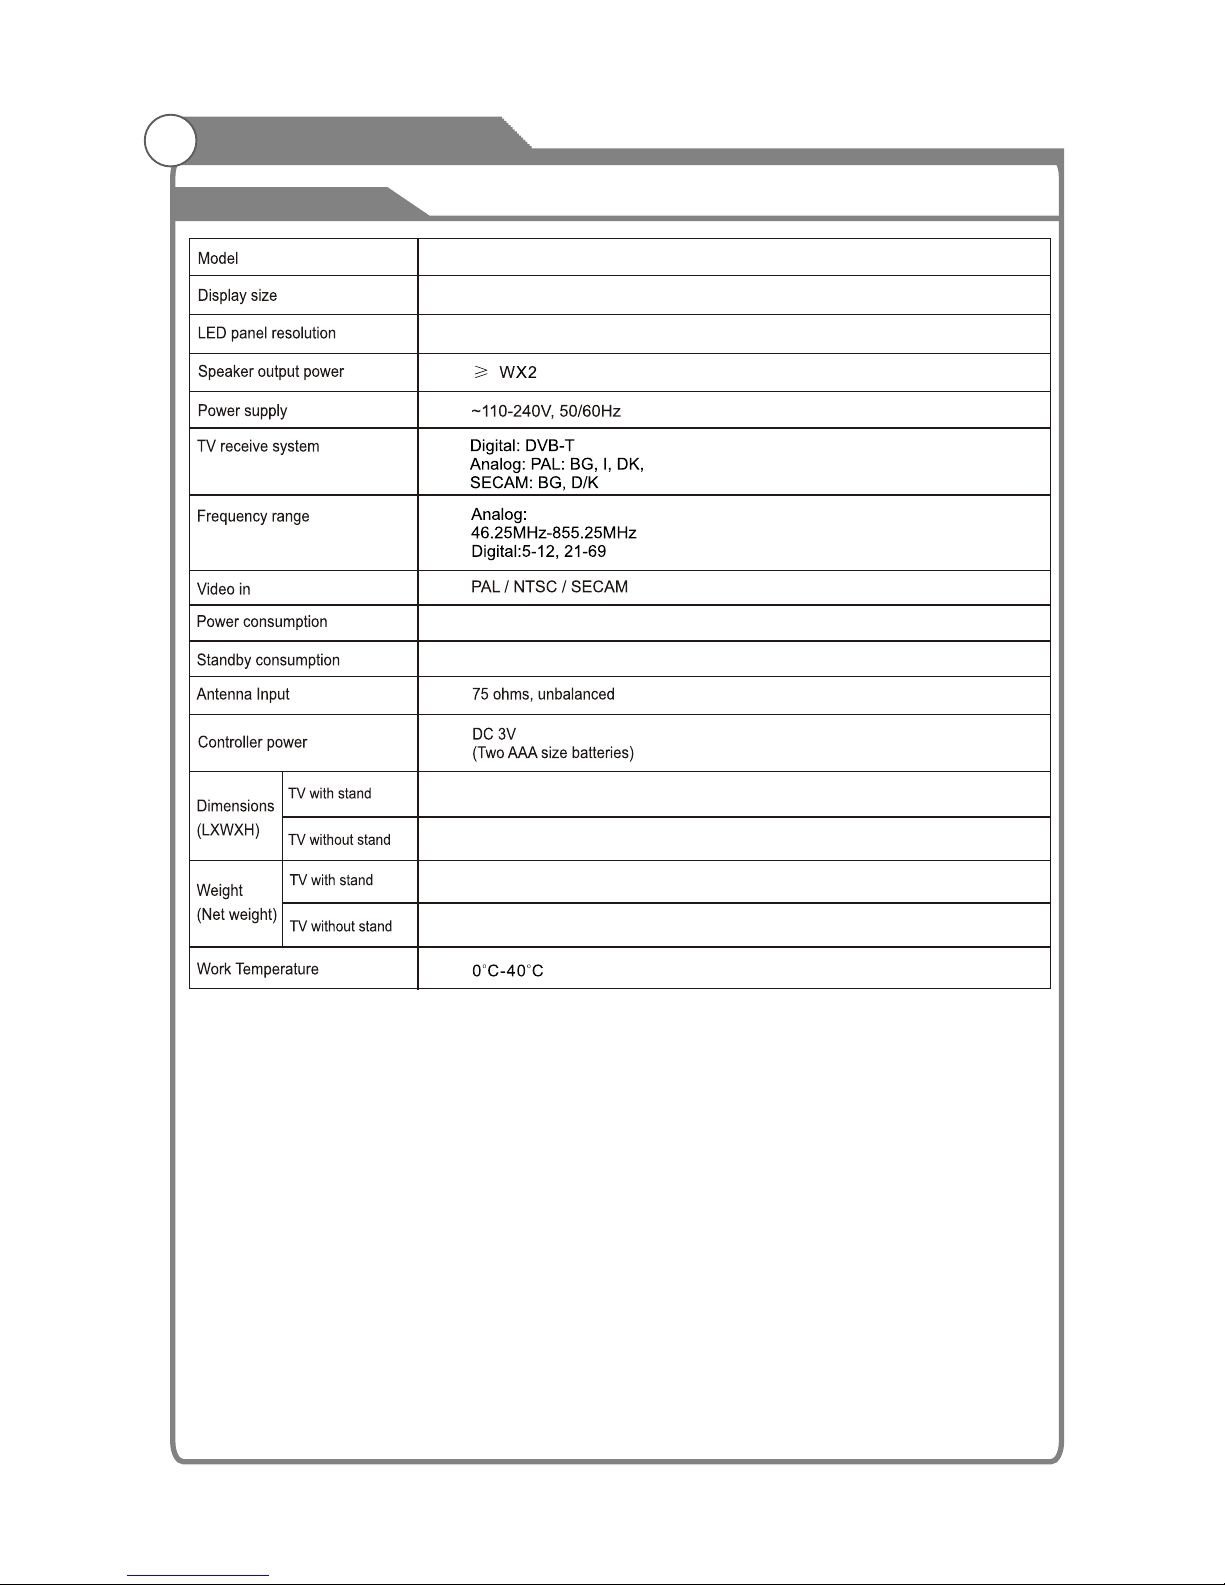
Specifications
7
MAGPIES42LED
85W
5
<0.5 W
979.5x74.5x588mm
9.68Kg
12Kg
979.5x240x641.5mm
42”Diagonal(max.)
1920X1080

8
Stand and wall-mounting instructions (optional)
How to assemble the stand
-Before attaching/detaching the stand, make sure to turn off the TV.
-Before performing work, spread cushioning over the base area to lay the LED TV on.
This will prevent it from being damaged.
If you need to remove or assemble the stand please read the following instructions.
Assembling instruction:
Put the television on the table, fix the stand and the unit with four screws given in the
carton.
Screws(4 x M4*12)

9
Stand and wall-mounting instructions (optional)
Figure1
How to mount the LED TV on the wall
1.Detach the TV stand from the bottom of the TV, then place the TV screen down onto
a soft blanket or surface to avoid scratching or damage. Fasten two mounting screws
(thread size M6X8-not supplied, please contact your local hardware store)into the 2 screw
holes on the rear cover ,see the figure 1.
2.fasten 2 bolts by using two M6X18 screws on the rear cover as figure 2 shown.
3.Fasten wall mounting bracket with screws on the wall.
4.Carefully check for the strength before releasing the LED TV.
NOTE: For more detailed instructions please refer to your "after market" wall
mounting instruction book.
M6 X 8
2 bolts
M6 X 18
Figure2
Figure3
Home theatre system
with digital input
General Description
You can connect the TV with video devices such as DVD/VCD player, VCR and video camera
to enjoy the high quality picture.
10
USB
Camcorder
DVD player
Blu-ray disc player
Audio system
PC (HDMI-output)
PC
Overview of back panel
PC (HDMI-output)
PC
HDMI2 HDMI1
VGA AUDIO
ANT IN
PC IN
Y/V 2
PB PR R L R L
VID EO
COMP ONENT /AV2 AV1
HDMI 3
CVBS /
SPDI F
OUT
USB
Headphone
DVD player
VCR
DVD player with
component output

General Description
11
Overview of front panel
The buttons on the lower-right panel control your TV’s basic features, including the
on-screen menu. To use the more advanced features, you must use the remote control.
Standby button
Press button to toggle between
normal and standby mode.
7
POWER INDICATOR
Red:In standby mode.
Green: In power on mode.
PROG
Press to change programs.
In the on-screen menu, use the
PROG buttons as up/down
arrow buttons.
6
1
3
245
7
INPUT

12
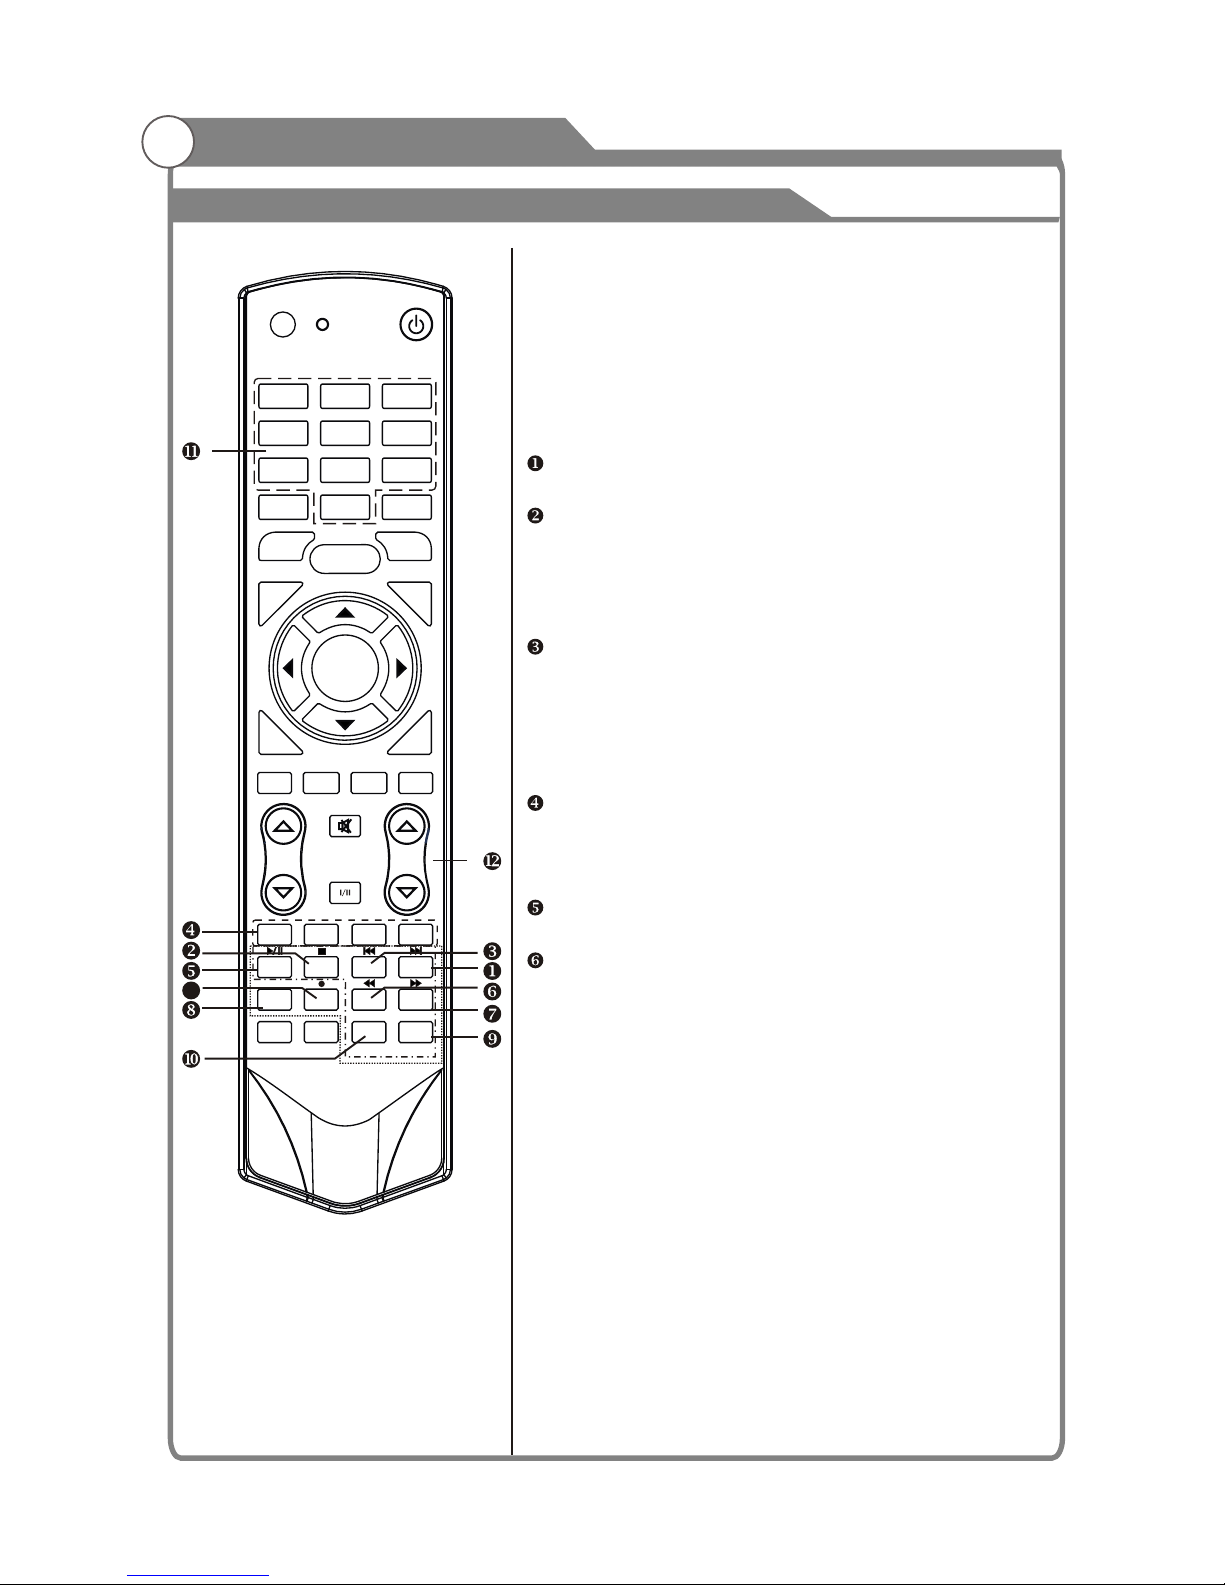
Overview of Remote Control
General Description
1. INPUT: This button is used to switch among
different sources: DTV,ATV, AV1, AV2, Component,
PC-RGB, HDMI1, HDMI2, HDMI3,USB.
Select a source and press OK button to confirm.
2. POWER: Press this button to switch to standby
mode, and press it again to turn TV on.
3. Digital buttons(0~9): To select channel with
digital buttons.
4. INFO: This button is used to start the "Current
Service Banner" application that provides
information about the current service.
5. RECALL: Switch to the previous program.
6. FREEZE: Press this button to freeze the image.
7.
8. SLEEP: TV will be switched off automatically at
preset sleep time if you have set sleep timer. Use
your remote control to set the sleep timer.
Press SLEEP button on the remote control, then
press this button again to set sleep time: off, 10,
20,30, 60,90,120,180, 240 min. Press MENU
button to exit when you have set the sleep timer.
After you have set sleep timer, press SLEEP button
again, you will see the Remaining time.
Notes: The sleep timer you have set will be
Cancelled when the TV turns off or if a power
failure occurs.
9. CH.LIST: Press it to show channel list on screen.
10. FAV: Press it to display favorite list.
11.
12.
GUIDE: In DTV source, this button is used to
start the EPG application.
14.
DTV: Switch to DTV mode.
16. HDMI: Switch to HDMI1 mode directly, press
twice to switch to HDMI2, press three times to
switch to HDMI3.
MENU: Press this button to display main menu or
exit the menu. When you are in the submenu, you
can press it to return the main menu.
Arrow buttons: Press these buttons to move
cursor up/down/left/right for menu.
OK/REC LIST: Press this button to display a list
of recorded programs. In main menu and submenu
it is a validation button.
13.
Exit: Exit the menu.
15.
SOUND
AUDIO LANG
VOL PROG
MENU
1 2 3
4 5
6
7
8
9
0
INFO
RECALL
FREEZE
SLEEP
EXIT
HOLD
SIZE
REVEAL CANCEL
PICTURE
MUTE
INPUT
POWER
TEXT
SUBTITLE
TIME
SUBCODE
FAV
CH.LIST
GUIDE
DTV HDMI
USB
INDEX
PgUp PgDn
RED GREEN
YELLOW
BLUE
OK/
REC LIST
ASPECT
MIX

13
Overview of Remote Control
General Description
SOUND
AUDIO LANG
VOL PROG
MENU
1 2 3
4 5
6
7
8
9
0
INFO
RECALL
FREEZE
SLEEP
EXIT
HOLD
SIZE
REVEAL CANCEL
PICTURE
MUTE
INPUT
POWER
TEXT
SUBTITLE
TIME
SUBCODE
FAV
CH.LIST
GUIDE
DTV HDMI
USB
INDEX
PgUp PgDn
RED GREEN
YELLOW
BLUE
OK/
REC LIST
ASPECT
MIX
17. USB: Switch to USB mode directly or call the
control menu in USB mode. Please see the
details in “Digital Media Player” on
: Press this button to switch the screen
mode.
19.
22. Button/Audio Lang: source
source
source,the button is used to make language
soundtrack switch(video).
Digital media player control button:
play/pause, stop, previous file, next file, page up,
page down, backward, forward, is used to control in
USB mode.
Please refer to instructions in the section
of multimedia player.
26. SOUND: This button is used to select the sound
mode.
27. PICTURE: This button is used to adjust user
picture mode, press this button repeatedly and
select one of four settings.
28. MIX ( ): Teletext buttons for mix function, please
refer to page 15. It is also used for recording function
when TV is on DTV mode, please refer to page 39.
Page40 to Page49.
18. ASPECT
VOL and VOL: Press these buttons to
adjust TV volume.
20. PROGand PROG: Press these buttons to
change channel upward or downward.
In the teletext, these buttons are used to
display the next page and previous page.
21. MUTE: Press this button to shut off sound of the
TV, press again to restore TV sound.
In ATV , the button
is used to set NICAM sound system.
In DTV , the button is used to set the audio
language.
In USB
23. Red/Green/Yellow/Blue Command: These four
buttons are used to request linked buttons with the
current menu/page.
24. Teletext buttons: Detail operation please refer to
"Teletext “ in the next page.
25. Including
relevant
Standard" Mi ld" Bright" User " Sports
Standard"News"Movie"Sports"“Dance"
Classic"Pop"Rock"Jazz"Soft"User
14
Teletext
General Description
OK/
REC LIST
ASPECT
SOUND
AUDIO LANG
VOL PROG
MENU
1 2 3
4 5
6
7
8
9
0
INFO
RECALL
FREEZE
SLEEP
EXIT
HOLD
SIZE
REVEAL CANCEL
PICTURE
MUTE
INPUT
POWER
TEXT
SUBTITLE
TIME
SUBCODE
FAV
CH.LIST
GUIDE
DTV HDMI
USB
INDEX
PgUp PgDn
RED GREEN
YELLOW
BLUE
MIX
13
Teletext is an information system broadcast by certain
channels which be consulted like a newspaper.
It also offers to subtitles for viewers with hearing
problems or who are not familiar with the transmission
language.
You can press these buttons to operate the teletext:
Text
Press TEXT button to enter or exit teletext mode.
Hold
Press HOLD button to toggle Hold function on or
off. When Hold is switched on, the page acquisition
is stopped. When Hold is switched off, the page
acquisition is started.
Size
Red/Green/Yellow/Blue Command
Index
Press INDEX button, then index page displays.
Reveal
Press SIZE button one time to display the upper
half of the screen in double height, press the SIZE
button two times to display the lower half of the
screen in double height, press three times to
display the full screen in normal size.
These four buttons are used for quick access to
different pages as numbered at the bottom of the
screen.
Pressing this button will reveal any hidden data
(answers to quizzes for example).Press the REVEAL
button again to return to normal screen.

15
Teletext
General Description
Cancel
Subtitle
Turning the Teletext subtitles on or off.
Subtitles is a separate mode with only a few
buttons available. There will be no OSD visible
other than the Teletext Subtitles.
Subcode
Subcode mode gives the possibility to select
certain subcode pages of a Teletext page.
Entry of digits within the range 0...9 for current
subcode entry. If the digit completes the entry,
a page request is started.
Press buttons to change the
subcode pages.
Time
This button is used to show the time of the
Teletext.
Digital buttons(0~9)
You can press them to enter the number of the
Page required.
You can press them to change page upward or
downward.
Mix
Press MIX botton, the teletext page changes
transparent, TV content and teletext page
content will display at the same time.
Press MIX button again to exit MIX mode.
The CANCEL button will exit from any Teletext on
the display. Press CANCEL button again to exit
Teletext and return to live TV broadcast.
PROG/ PROG
PROG/PROG
OK/
REC LIST
ASPECT
SOUND
AUDIO LANG
VOL PROG
MENU
1 2 3
4 5
6
7
8
9
0
INFO
RECALL
FREEZE
SLEEP
EXIT
HOLD
SIZE
REVEAL CANCEL
PICTURE
MUTE
INPUT
POWER
TEXT
SUBTITLE
TIME
SUBCODE
FAV
CH.LIST
GUIDE
DTV HDMI
USB
INDEX
PgUp PgDn
RED GREEN
YELLOW
BLUE
MIX
13
13
 Loading...