

Page 1

KGNFHDLED4ϲVAA
USER MANUAL
Page 2
ImportantSafetyInstructionsandMaintenance
ImportantSafetyInstructions
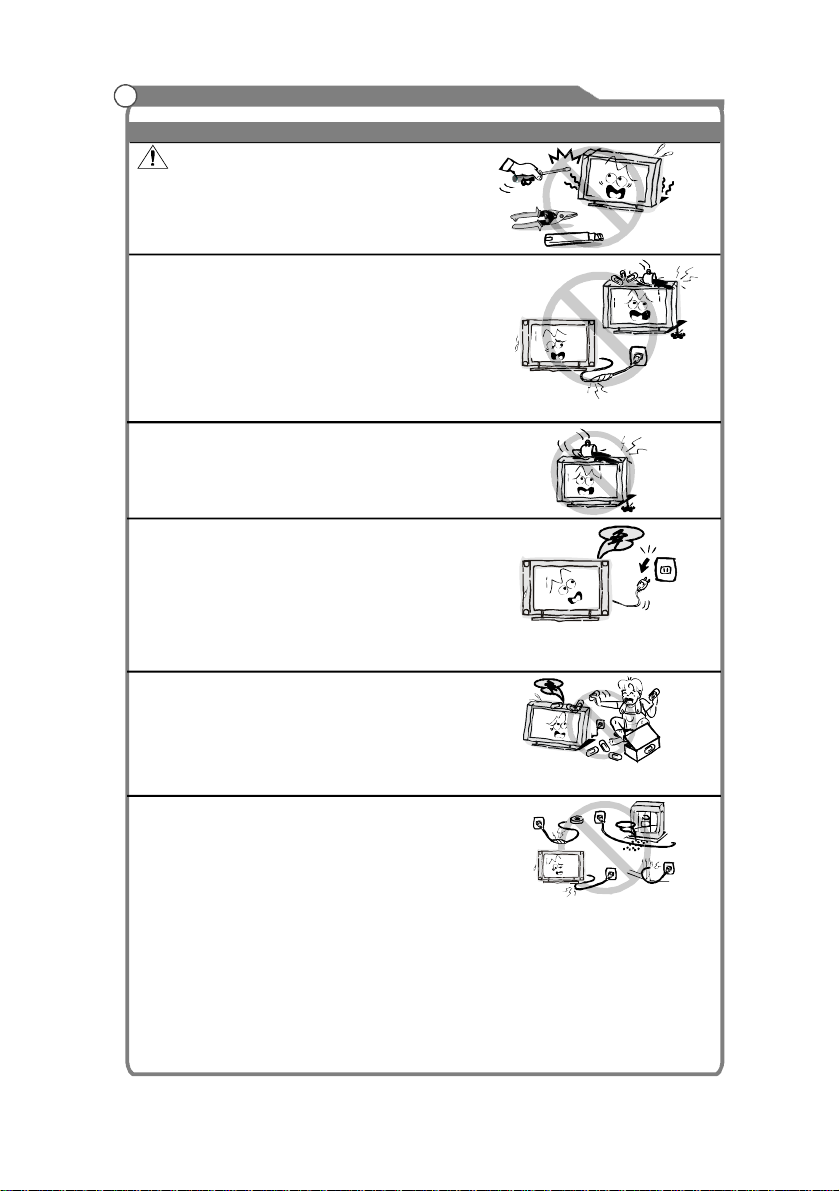
CAUTION
Riskofelectronicshock,donotopen.
Donotattempttoservicethisproductyourself
asopeningorremovingcoversmayexpose
youtodangerousvoltageorotherhazards.
Referallservicingtoqualifiedservicepersonnel.
Ifthefollowingproblemsoccur:
TurnofftheTVsetandunplugtheACpowercord
immediatelyifanyofthefollowingproblemsoccur.
Askyourdealerorservicecentretohaveitchecked
byqualifiedservicepersonnel
When:
-ACpowercordisdamaged.
-PoorfittingofACpoweroutlet.
-TVsetisdamagedbybeingdropped,hitorhavingsomethingthrownatit.
-Anyliquidorsolidobjectfallsthroughopeningsinthecabinet.
Toreducetheriskoffireorelectricshock,donot
exposethisproducttorainormoisture.
Theapparatusshallnotbeexposedtodripping
orsplashingandnoobjectsfilledwithliquids,
suchasvases,shallbeplacedontheapparatus.
ThescreenandcabinetgetwarmwhentheTV
isinuse.Thisisnotamalfunction.Incaseof
smoke,strangenoiseorstrangesmellfromthe
unit:
· Turnoffthepowerswitchimmediately;
· Disconnectthepowerplugfromthepower
outlet;
· Contactyourdealerorservicecentre.Neverattempttomakerepairs
yourselfbecausethiscouldbedangerous.
Neverpushobjectsofanykindintotheset
throughthecabinetslotsastheymaytouch
dangerousvoltagepointsorshort-circuitpartsthat
couldresultinafireorelectricshock.Neverspill
liquidofanykindontheset.Usespecialcaution
inhouseholdswherechildrenarepresent.Theapparatusisnotsuitableforchildren
under3-yeartooperate.
Donotoverloadwalloutlets,extensioncordsor
adaptorsbeyondtheircapacity,thiscanresultin
fireorelectricalshock.
Power-supplycordsshouldberoutedsothatthey
arenotlikelytobewalkedonorpinchedbyitems
placeduponoragainstthem,payingparticularattentiontocordsatplugend,adaptors
andthepointwheretheyexitfromtheappliance.Themainsplugisusedasthe
disconnectdevice.Itshallremainreadilyaccessibleandshouldnotbeobstructed
duringintendeduse.Makesuretoplugthepowercordinuntilitisfirmlyinserted.
Whenremovingthepowercord,makesuretoholdthepowerplugwhenpullingthe
plugfromtheoutlet,donotpulltheplugoutbythewire.NEVERtouchtheplugor
powercordwithwethands.Todisconnecttheapparatusfromthemainspower,the
plugmustbepulledoutfromthemainssocket,thereforemakesurethemainsplug
isalwayseasilyaccessible.
HighVoltage
Donotopen
1
Page 3
ImportantSafetyInstructionsandMaintenance
ImportantSafetyInstructions
Donotpushorscratchthefrontfilter,orplaceanyobjectsontopoftheTVset.The
imagemaybeunevenorthescreenmaybedamaged.
Toavoidthefire,nonakedflamesource,
suchaslightedcandles,shouldbeplacedonthe
apparatus.
Anoutsideantennasystemshouldnotbelocatedin
thevicinityofoverheadpowerlinesorotherelectric
lightorpowercircuits,orwhereitcanfallintosuch
powerlinesorcircuits.Wheninstallinganoutside
antennasystem,extremecareshouldbetakentokeep
fromtouchingsuchpowerlinesorcircuitsascontact
withthemmightbefatalEnsuringthetelevisionisnot
overhangingtheedgeofthesupportingfurniture.
Whennotinuse
IfyouwillnotbeusingtheTVsetforseveraldays,the
TVsetshouldbedisconnectedfromtheACmainsfor
environmentalandsafetyreasons.AstheTVsetisnot
disconnectedfromtheACpowerwhentheTVisturned
offatthestandbyswitch,pulltheplugfromtheACpower
outlettodisconnecttheTVcompletely.However,some
TVsetsmayhavefeaturesthatrequiretheTVsettobe
leftinstandbytofunctioncorrectly.Inthecaseoflightning,
unplugtheTVsetfromtheoutletimmediately.Never
touchtheantennawireduringlightning.
Donotpulltheplugoutbythewire;
Nevertouchtheplugwithwethands.
.
Installation
Excessivefromearphonesandheadphones
cancausehearingloss.
Theventilationshouldnotbeimpededbycoveringthe
ventilationopeningwithitems,suchasnewspapers,
tablecloths,curtains,etc.
Atleast10cmspaceshouldbeleftaroundthe
apparatusforsufficientventilation.
Theproductshouldbesituatedawayfromheat
sourcessuchasradiators,heatregisters,stoves,or
otherproducts(includingamplifiers)thatproduceheat.
Placetheapparatusinsuchapositionthatthescreen
isnotexposedtodirectsunlight.Itisbesttohavesoft
indirectlightingwhilewatchingandavoid
darkenvironments
thesemaycauseeyefatigue.
KeeptheTVsetawayfromanyequipmentemitting
electromagneticradiation.
volume
completely
andreflectionfromthescreenas
2
Page 4
ImportantSafetyInstructionsandMaintenance
Installation
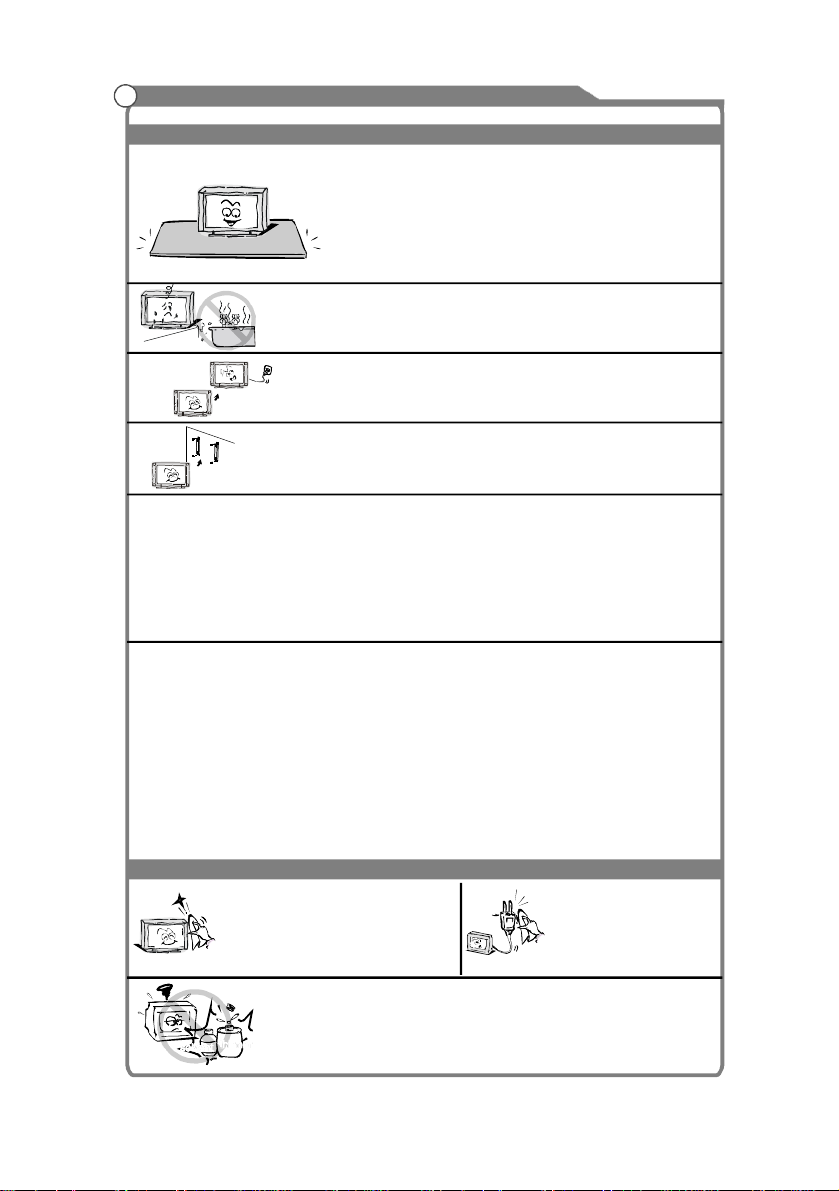
Donotplacethesetonanunstablecart,stand,table
orshelf.Thesetmayfall,causingseriouspersonal
injuryaswellasdamagetotheproduct.Useonlywith
thecart,stand,tripod,bracket,ortablespecifiedby
themanufacturer,orsoldwiththeapparatus.An
applianceandcartcombinationshouldbemovedwith
care.Quickstops,excessiveforce,anduneven
surfacesmaycausetheapplianceandcart
combinationtooverturn.
Donotplacethisapparatusnearwater,forexample,
nearabathtub,washbowl,kitchensink,orlaundry
tub;inawetbasement;oraswimmingpool;and
thelike;
WhentheTVbeingmovedinfromcoldplace,itneeds
Move
LCDScreen
AlthoughtheLEDscreenismadewithhighprecisiontechnologyand99.99%or
moreofthepixelsareeffective,blackdotsmayappearorbrightpointsoflight(red,
blueorgreen)mayappearconstantlyontheLEDscreen.Thisisastructuralproperty
oftheLEDscreenandisnotamalfunction.
IfthesurfaceoftheLCDpanelcracks,donottouchituntilyouhaveunpluggedthe
ACpowercord.Otherwiseelectricshockmayresult.
DonotthrowanythingattheTVset.TheLCDpanelmaybreakfromtheimpactand
causeseriousinjury.
PrecautionsWhenDisplayingaStillImage
AstillimagemaycausepermanentdamagetotheTVscreen.
DonotdisplaystillimagesandpartiallystillimagesontheLEDpanelformore
than2hoursasitcancausescreenimageretention.Thisimageretentionis
alsoknownas"screenburn".Toavoidsuchimageretention,reducethe
degreeofbrightnessandcontrastofthescreenwhendisplayingastillimage.
WatchingtheLEDTVin4:3formatforalongperiodoftimemayleavetraces
ofbordersdisplayedontheleft,rightandcentreofthescreencausedbythe
differenceoflightemissiononthescreen.PlayingaDVDoragameconsole
maycauseasimilareffecttothescreen.Damagescausedbytheaboveeffect
arenotcoveredbytheWarranty.
DisplayingstillimagesfromVideogamesandPCforlongerthanacertain
periodoftimemayproducepartialafter-images.Topreventthiseffect,reduce
the'brightness'and'contrast'whendisplayingstillimages.
Cleaning
Cleaningandhandlingthescreen
surfaceandcabinet.Disconnect
theunitfromtheACoutletbefore
cleaning.Toremovedust,wipe
gentlywithasoft,lintfreecloth.If
requireduseaslightlydampcloth.
thinner
solvent
somerighttimefordewinsideunitevaporatingfully
beforeturnontheunit;
Topreventinjury,thisapparatusmustbesecurely
attachedtothefloor/wallinaccordancewiththe
installationinstructions.
MAINSPLUG
Wipethemainsplugwith
adryclothatregular
intervals.Moistureand
dustmayleadtofireor
electricalshock.
UsecarenottosubjecttheTV'ssurfacestodetergent.
(AliquidinsidetheTVcouldleadtoproductfailure,fireor
electricalshock.)
Usecarenottosubjectsurfacestobugrepellent,solvent,
thinner,orothervolatilesubstancesasthismaydeterioratethe
surfaceandfinishofthecabinet.
3
Page 5
ImportantInformation
Keepsmallaccessoriesoutofreachofchildrensotheyarenotmistakenlyswallowed.
TableofContents
Accessories
Introduction
Accessories-----------------------------------------------------------------------------------------------5
Features---------------------------------------------------------------------------------------------------6
Specifications--------------------------------------------------------------------------------------------7
Standandwall-mountedinstructions(option)
Overviewofbackpanel-------------------------------------------------------------------------------10
Overviewoffrontpanel-------------------------------------------------------------------------------11
Overviewofremotecontrol--------------------------------------------------------------------------12
Teletext---------------------------------------------------------------------------------------------------14
InstallingBatteriesintheRemoteControl--------------------------------------------------------16
ExternalConnection
Antennaconnection------------------------------------------------------------------------------------16
ConnectingVCR---------------------------------------------------------------------------------------17
ConnectingaCamcorder-----------------------------------------------------------------------------18
ConnectingaDVDPlayer/Set-TopBox----------------------------------------------------------19
ConnectingaDVDPlayer/Set-TopBoxwithDVI----------------------------------------------20
ConnectingDVDPlayer/Set-TopBoxwithHDMI----------------------------------------------21
ConnectingDigitalAudioSystem-------------------------------------------------------------------22
ConnectingAmplifier/DVDHomeTheater-------------------------------------------------------22
ConnectingPC-----------------------------------------------------------------------------------------23
Supportingsignals
--------------------------------------------------------------------------------------16
----------------------------------------------------------------------------------------23
---------------------------------------------------8
Basicoperation
TurntheTVonandoff--------------------------------------------------------------------------------24
Menuoperation----------------------------------------------------------------------------------------25
Menusystemintroduction
Picture----------------------------------------------------------------------------------------------------27
Sound-----------------------------------------------------------------------------------------------------29
Channel--------------------------------------------------------------------------------------------------31
Time-------------------------------------------------------------------------------------------------------33
Option-----------------------------------------------------------------------------------------------------34
Function--------------------------------------------------------------------------------------------------36
PVR-------------------------------------------------------------------------------------------------------37
DigitalMediaPlayer
-----------------------------------------------------------------------------27
-------------------------------------------------------------------------------------40
Reference
Troubleshooting
Picturedefectsandthereason
-------------------------------------------------------------------------------------------44
-----------------------------------------------------------------------46
4
Page 6
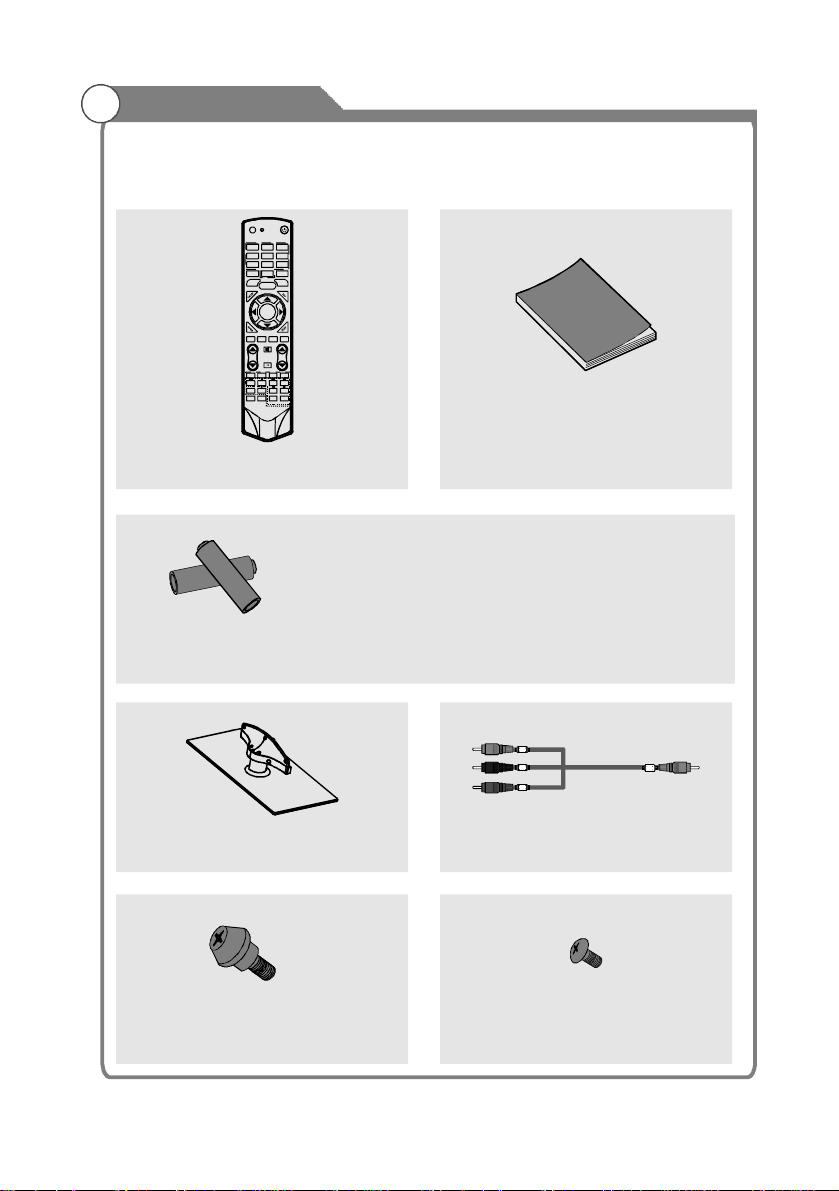
Accessories
PleasemakesurethefollowingitemsareincludedwithyourLED/LCDTV.Ifanyitemsare
missing,contactyourdealer.
POWER
INPUT
123
456
789
INFORECALL
0
FREEZESLEEP
MENU
OK/
RECLIST
DTVHDMIUSB
ASPECT
MUTE
VOLPROG
AUDIOLANG
REDGREENYELLOWBLUE
HOLDSIZE
TEXT
INDEX
REVEALCANCEL
SUBTITLE
MIX
PgUpPgDn
SOUND
PICTURE
TIMESUBCODE
RemoteControl
Batteryx2
CAUTION:
Donotdisposeofbatteriesinafire.Donotshort
circuit,disassembleoroverheatthebatteries.
Dangerofexplosionifbatteryisincorrectly
replaced,pleaseobservepolarity.Replaceonly
withthesameorequivalenttype.
Owners
’
Instructions
Stand(1Piece)AVcable(2Pieces)
M8X10,4Pieces-seerearpanelofTV.
Mountingscrews
M4X105Pieces
()
Standscrews
5
Page 7

Introduction
Features
l TVadopts32”/42”/46”TFTLCDdisplayscreen
l
ZeroXradiationcompliestogreenenvironmentprotectionrequirement
l
ConnecttocomputerdirectlytorealizeTV/monitorcombo.
l
16:9widescreen
l
Autotuningandfinetuning
l
HDMIinput
l
ComponentCompatible(480i;480P;576i;576P;720P;1080i;1080P)
l
PCVGA
l
Programmablesleeptimer
l
Widerangevoltageinput
l
No-signalautomaticpoweroff
Inputterminalsusedforexternalequipmentconnection
1xANTENNAjack4xHDMIinputs
1xcomputerVGA/PCinput2xUSBinputs
1xCOMPONENTinput1xAVoutput
3xAVinputs1xSPDIFoutput
1xHeadphoneoutput
LED/
6
Page 8
Introduction
Specifications
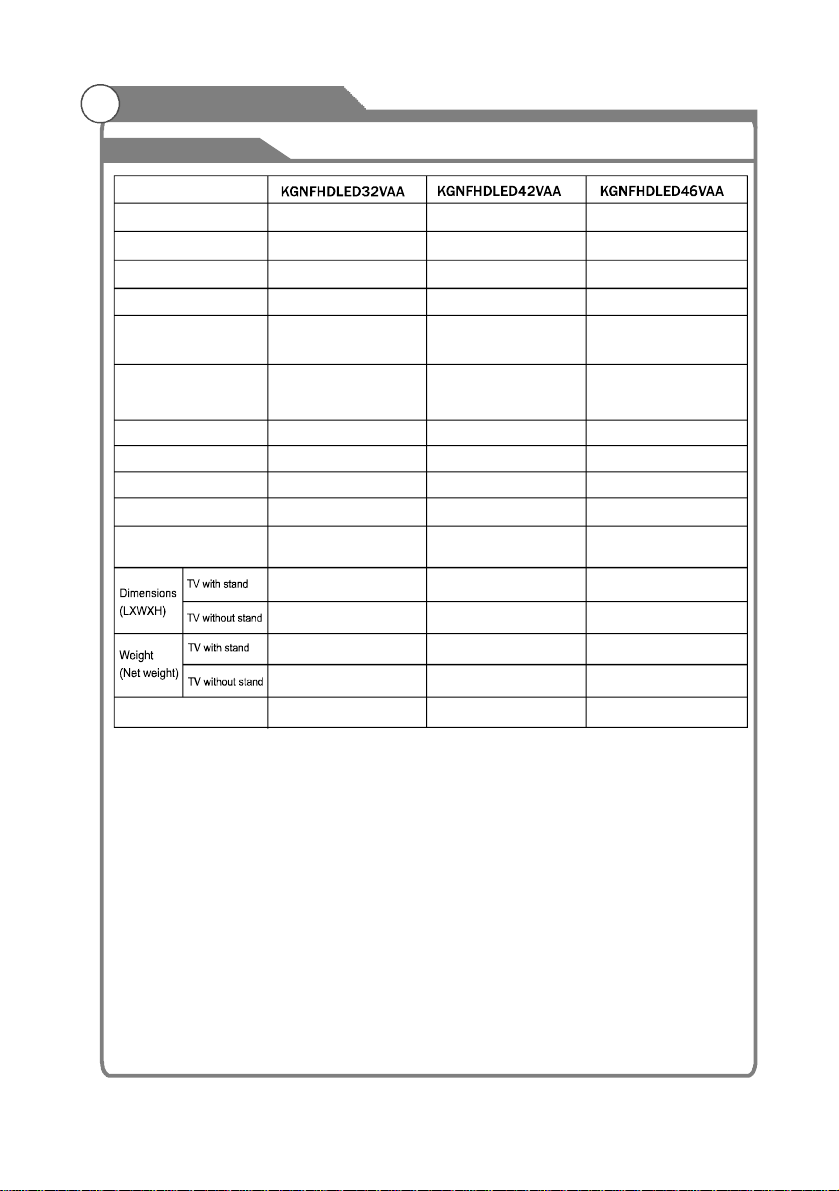
Model
Displaysize
LEDpanelresolution
Speakeroutputpower
Powersupply
TVreceivesystem
Frequencyrange
Videoin
Powerconsumption
Standbyconsumption
AntennaInput
Controllerpower
WorkTemperature
32” Diagonalmax.)
1920X1080
≥5X2W
~110-240V,50/60Hz
PAL/NTSC/SECAM
95W
<1W
75ohms,unbalanced
DC3V
(TwoAAAsizebatteries)
(
Digital:DVB-T
Analog:PAL:BG,DK,I,
SECAM:BG,D/K
Analog:
Antenna:
46.25MHz-855.25MHz
Digital:5-12,27-69
782240560XXmm
782X41X525mm
11Kg
8.1Kg
oo
0C-40C
42” Diagonalmax.)
1920X1080
≥5X2W
~110-240V,50/60Hz
Digital:DVB-T
Analog:PAL:BG,DK,I,
SECAM:BG,D/K
Analog:
46.25MHz-855.25MHz
Digital:5-12,27-69
PAL/NTSC/SECAM
135W
<1W
75ohms,unbalanced
DC3V
(TwoAAAsizebatteries)
(
Antenna:
1019X255X709mm
1019X43X669mm
17.6Kg
14.2Kg
oo
0C-40C
46” Diagonalmax.)
1920X1080
≥5X2W
~110-240V,50/60Hz
Digital:DVB-T
Analog:PAL:BG,DK,I,
SECAM:BG,D/K
Analog:
46.25MHz-855.25MHz
Digital:5-12,27-69
PAL/NTSC/SECAM
160W
<1W
75ohms,unbalanced
DC3V
(TwoAAAsizebatteries)
(
Antenna:
1112X275X756mm
1112X42X724mm
20.7Kg
16.6Kg
oo
0C-40C
Note:
-Designandspecificationsaresubjecttochangewithoutnotice.
-WeightandDimensionshownareapproximate.
7
Page 9
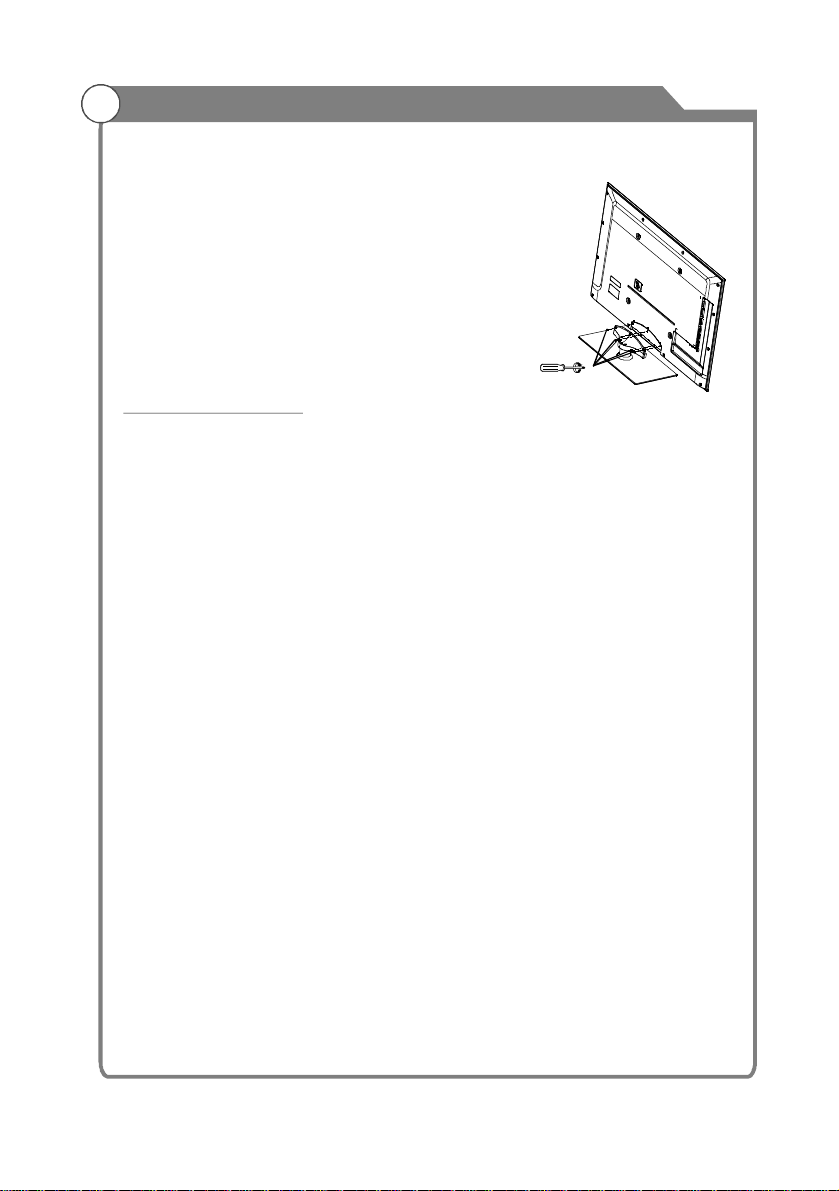
Standandwall-mountinginstructions(optional)
Howtoassemblethestand
Ifyouneedtoremoveorassemblethestandplease
readthefollowinginstructions.
-Beforeattaching/detachingthestand,makesureto
turnofftheTV.
-Beforeperformingwork,spreadcushioningoverthe
baseareatolaytheLEDTVon.
Thiswillpreventitfrombeingdamaged.
Assemblinginstruction:
1)Fixthestandandtheunittogetherwith5screws.
2)Toremovethestand,reverseinstructionsasabove.
SecuringtheTVStand
Caution:Pulling,pushing,orclimbingontheTVmaycausetheTVtofall.Inparticular,
ensureyourchildrendonothangoverordestabilizetheTV;doingsomaycausetheTV
totipover,causingseriousinjuriesordeath.Followallsafetyprecautions
thismanual.
asfollows.
Foraddedstability,installtheanti-falldeviceforsafetypurposes,
Screws(5-M4X10)
atthestartof
ALTERNATIVELY
TosecuretheTVtothewall:
1-Putthescrewsintotheclampsandfirmlyfastenthemontothewall.Confirmthatthe
screwshavebeenfirmlyinstalledontothewall.
-Youmayneedadditionalmaterialsuchasananchordependingonthetypeofwall.
-Sincethenecessaryclamps,screws,andstringarenotsupplied,pleasepurchasethem
separately.
2-RemovethescrewsfromthecentrebackoftheTV,putthescrewsintotheclamps,
andthenfastenthescrewsontotheTVagain.
-Screwsmaynotbesuppliedwiththeproduct.Inthiscase,pleasepurchasethescrews
ofthefollowingspecifications.
-ScrewSpecificationsfora46~55InchLEDTV:M8XL10
8
Page 10

Standandwall-mountinginstructions(optional)
3-ConnecttheclampsfixedontotheTVandtheclampsfixedontothewallwithastrong
cable.
-InstalltheTVneartothewallsothatitdoesnotfallbackwards.
-Itissafetoconnectthestringsothattheclampsfixedonthewallareequaltoor
lowerthantheclampsfixedontheTV.
-RemovethecablebeforemovingtheTV.
4-Verifyallconnectionsareproperlysecured.Periodicallycheckconnectionsforany
signoffatigueforfailure.Ifyouhaveanydoubtaboutthesecurityofyourconnections,
contactaprofessionalinstaller.
Wall
Wallmountinginstructions
YourLCDTVisabletoaccommodatewallmountingwiththeuseofawallmountbracket
(notsuppliedwithLCDTV,pleasecontactyourlocalhardwarestore)andthemounting
holesonthebackoftheunit.
WerecommendremovingtheTVstandpriortowallmountingtheTV.Please
pageforinstructionsonremovingthestand.
HowtomounttheLCDTVonthewall
1.Afterdetachingthestand,fasten4mountingscrews(threadsizeM8X10-notsupplied!
Pleasecontactyourlocalhardwarestore)intothe4screwholesontherearcover,see
thefigurebelow.
2.Fastenwallmountingbracket(NotsuppliedwithLCDTV,pleasecontactyourlocal
hardwarestore)withscrewsonthewall.
3.CarefullycheckforthestrengthbeforereleasingtheLCDTV.NOTE:Formoredetailed
instructionspleaserefertoyour “aftermarket” wallmountinginstructionbook.
(optional)
seeprevious
KDL46JS97A
Threadholesize – M8x10depth(TVmountingscrewsize)ontheTV.
9
Page 11
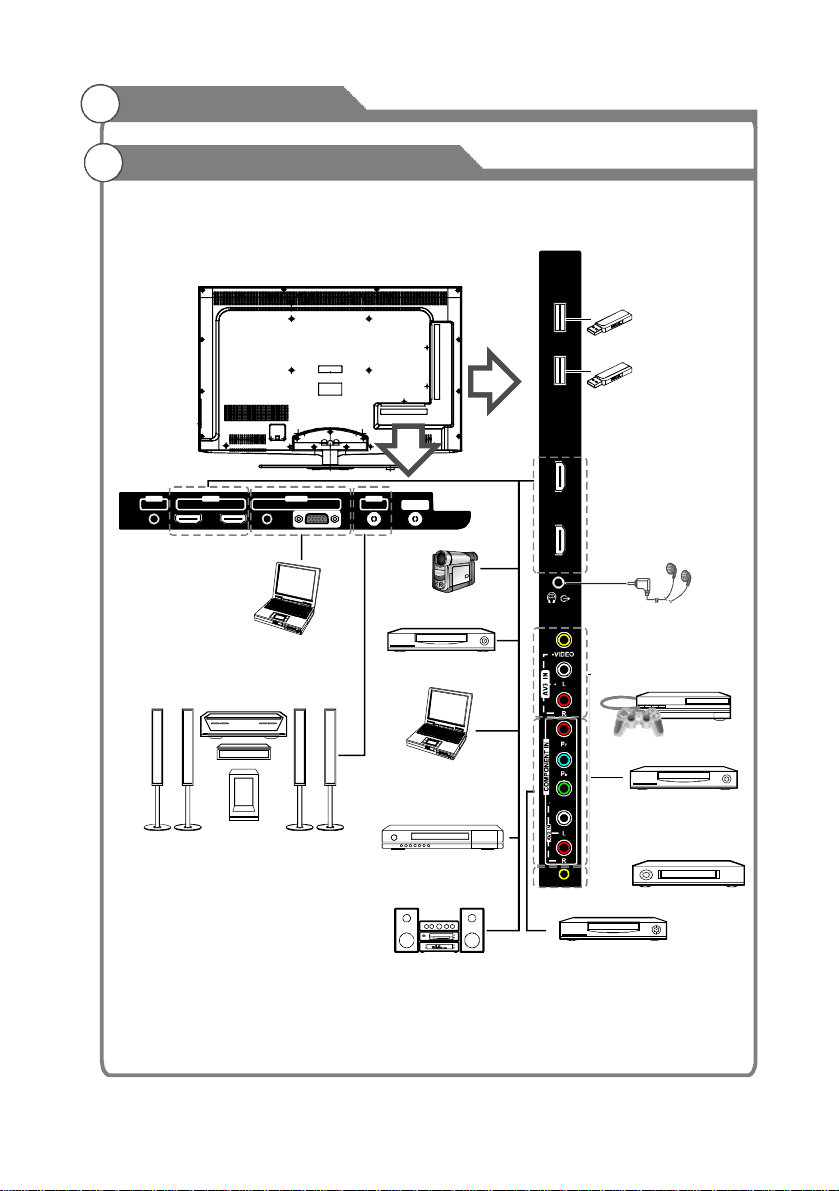
GeneralDescription
Overviewofbackpanel
YoucanconnecttheTVwithvideodevicessuchasDVD/VCDplayer,VCRandvideocamera
toenjoythehighqualitypicture.
OUTOUTIN
HDMI2HDMI1AV
Hometheatresystem
withdigitalinput
IN
AUDIOVGA
PC
ANT
SPDIF
Camcorder
DVDplayer
PC(HDMI-output)
Blu-raydiscplayer
USB2
USB1
HDMI4
HDMI3
USB2
USB1
Headphone
Videogameequipment
Y/VIDEO
AV1IN
DVDplayer
VCR
Audiosystem
10
DVDplayerwith
componentoutput
Page 12
GeneralDescription
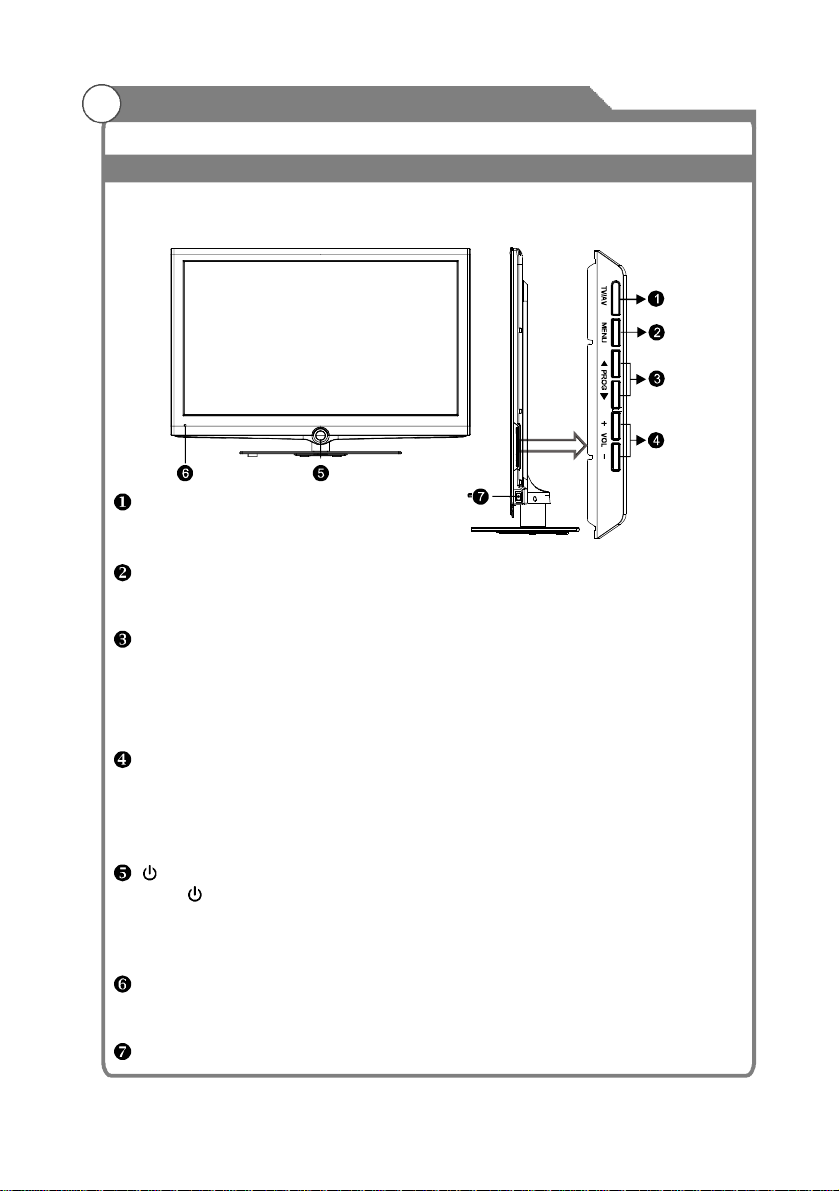
Overviewoffrontpanel
Thebuttonsonthelower-rightpanelcontrolyourTV’sbasicfeatures,includingthe
on-screenmenu.Tousethemoreadvancedfeatures,youmustusetheremotecontrol.
TV/AV
Togglesbetweenalltheavailable
inputsources.
MENU
Presstoseeanon-screenmenu
ofyourTV'sfeatures.
PROG/
rs
Presstochangeprograms.
Intheon-screenmenu,usethe
PROG/buttonsasup/down
rs
arrowbuttons.
VOL+/Presstoincreaseordecreasethe
volume.Intheon-screenmenu,
usetheVOL+/-buttonsasleft/
rightarrowbuttons.
Standbybutton
Pressbuttontotogglebetween
normalandstandbymode.
POWERINDICATOR
Red:Instandbymode.
REMOTECONTROLSENSOR
Aimtheremotecontroltowards
thisspotontheTV.
POWERSWITCH
Note:
1.
Sensorlightswillturnoffwithin6secondsof
thelastoperation.
2.Inordertovoiderrors,theTVwillgointo
standbymodeaftertouchingthestandby
buttonfor2seconds.Instandbymode,the
standbyindicatorwillremainilluminated,all
otherindicatorswillbeoff.
3.Whenthesensorindicatorlightsareoff,they
arestillactiveandwillrespondtothefirsttouch.
4.Pleasedonottouchthebuttonsinrapid
sucession.
5.WhentheTVinitialisesduringpowerup,all
sensorlightsonthefrontpanelwillflash
sequentially,cyclingfromlefttoright.Whenthe
TVhasfinishedtheinitialisingprocess,thecycle
willceaseandalllightindicatorswillremainoff
untiltouched.
6.Whenrecordinginnormal/standbymode,the
logowillcyclefrombrighttodullfortheduration
oftherecording--seelogoledpg.36fordetails.
a
c
11
Page 13
GeneralDescription
OverviewofRemoteControl
INPUT
POWER
123
456
789
INFORECALL
0
FREEZESLEEP
MENU
OK/
RECLIST
DTVHDMIUSB
VOLPROG
AUDIOLANG
REDGREENYELLOWBLUE
HOLDSIZE
INDEX
SUBTITLE
MIX
SOUND
PICTURE
MUTE
REVEALCANCEL
PgUpPgDn
TIMESUBCODE
ASPECT
TEXT
1.Thisbuttonisusedtoswitchamong
2.Pressthisbuttontoswitchtostandby
3.Toselectchannelwith
4.
5.Switchtothepreviousprogram.
6.
7.
8.TVwillbeswitchedoffautomaticallyat
9.Pressittoshowchannellistonscreen.
10.Pressittodisplayfavoritelist.
11.
12.
13.
14.
15.
16.:SwitchtoHDMI1modedirectly,press
INPUT:
differentsources:ATV,AV1,AV2,AV3,
DTV,
Component,PCRGB,HDMI1,HDMI2,HDMI3,
USB.
HDMI4,
SelectasourceandpressOKbuttontoconfirm.
POWER:
mode,andpressitagaintoturnTVon.
Digitalbuttons(0~9):
digitalbuttons.
Thisbuttonisusedtostartthe"Current
INFO:
ServiceBanner"applicationthatprovides
informationaboutthecurrentservice.
RECALL:
FREEZE
MENU:
:Pressthisbuttontofreezetheimage.
Pressthisbuttontodisplaymainmenuor
exitthemenu.Whenyouareinthesubmenu,you
canpressittoreturnthemainmenu.
SLEEP:
presetsleeptimeifyouhavesetsleeptimer.Use
yourremotecontroltosetthesleeptimer.
PressSLEEPbuttonontheremotecontrol,then
pressthisbuttonagaintosetsleeptime:off,10,
20,30,60,90,120,180,240min.PressMENU
buttontoexitwhenyouhavesetthesleeptimer.
Afteryouhavesetsleeptimer,pressSLEEPbutton
again,youwillseetheRemainingtime.
Notes:Thesleeptimeryouhavesetwillbe
CancelledwhentheTVturnsofforifapower
failureoccurs.
CH.LIST:
FAV:
Arrowbuttons:
Pressthesebuttonstomove
cursorup/down/left/rightformenu.
OK/RECLIST:
Pressthisbuttontodisplayalist
ofrecordedprograms.Inmainmenuandsubmenu
itisavalidationbutton.
InDTVsource,thisbuttonisusedto
GUIDE:
starttheEPGapplication.
Exit:
Exitthemenu.
:SwitchtoDTVmode.
DTV
HDMI
twicetoswitchtoHDMI2,pressthreetimesto
switchtoHDMI3,pressfourtimestoswitchto
HDMI4.
12
Page 14

GeneralDescription
OverviewofRemoteControl
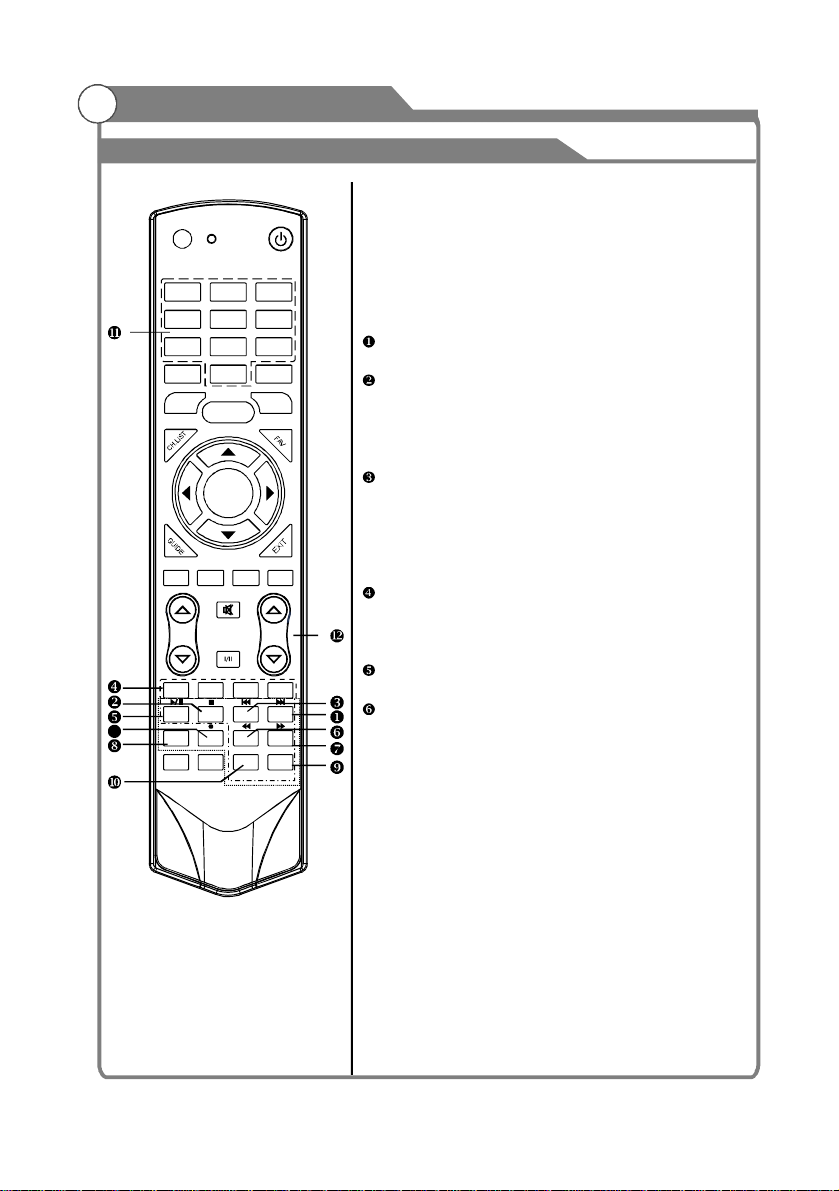
17.:SwitchtoUSBmodedirectlyorcallthe
INPUT
INFORECALL
FREEZESLEEP
DTVHDMIUSB
REDGREENYELLOWBLUE
INDEX
SUBTITLE
SOUND
POWER
123
456
789
0
MENU
OK/
RECLIST
ASPECT
MUTE
VOLPROG
AUDIOLANG
HOLDSIZE
MIX
PICTURE
TEXT
REVEALCANCEL
PgUpPgDn
TIMESUBCODE
18.
19.
20.Pressthesebuttonsto
21.Pressthisbuttontoshutoffsoundofthe
22. Button/AudioLang:
23.
24.Detailoperationpleasereferto
25.Including
26.Thisbuttonisusedtoselectthesound
USB
controlmenuinUSBmode.Pleaseseethe
detailsin “DigitalMediaPlayer” on
Page42/
Page43/Page44.
Pressthisbuttontoswitchthescreen
ASPECT
:
mode.
VOLandVOL:
rs
Pressthesebuttonsto
adjustTVvolume.
PROGandPROG:
rs
changechannelupwardordownward.
Intheteletext,thesebuttonsareusedto
displaythenextpageandpreviouspage.
MUTE:
TV,pressagaintorestoreTVsound.
source
InATV,thebutton
isusedtosetNICAMsoundsystem.
source
InDTV,thebuttonisusedtosettheaudio
language.
Red/Green/Yellow/BlueCommand:
Thesefour
buttonsareusedtorequestlinkedbuttonswiththe
currentmenu/page.
Teletextbuttons:
"Teletext “ inthenextpage.
Digitalmediaplayercontrolbutton:
play/pause,stop,previousfile,nextfile,pageup,
pagedown,back,forward,isusedtocontrolin
USBmode.
Pleaserefertoinstructionsinthesection
relevant
ofmultimediaplayer.
SOUND:
mode.
StandardMusicMovieSportsUser""""
27.Thisbuttonisusedtoadjustuser
PICTURE:
picturemode,pressthisbuttonrepeatedlyand
selectoneoffoursettings.
StandardMildUserSports"""
28.Teletextbuttonsformixfunction,please
MIX():
refertopage15.Itisalsousedforrecordingfunction
whenTVisonDTVmode,pleaserefertopage38.
13
Page 15
GeneralDescription
Teletext
13
INPUT
POWER
123
456
789
INFORECALL
0
FREEZESLEEP
MENU
OK/
RECLIST
MUTE
REVEALCANCEL
PgUpPgDn
TIMESUBCODE
ASPECT
DTVHDMIUSB
VOLPROG
AUDIOLANG
REDGREENYELLOWBLUE
INDEX
HOLDSIZE
SUBTITLE
MIX
SOUND
PICTURE
Teletextisaninformationsystembroadcastby
channelswhichbeconsultedlikea
Italsoofferstosubtitlesforviewers
problemsorwhoarenotfamiliar
newspaper.
withhearing
withthetransmission
certain
language.
Youcanpressthesebuttonstooperatethe
teletext:
Text
PressTEXTbuttontoenterorexitteletextmode.
Hold
PressHOLDbuttontotoggleHoldfunctiononor
off.WhenHoldisswitchedon,thepage
isstopped.WhenHoldisswitched
acquisition
off,thepage
acquisitionisstarted.
Size
PressSIZEbuttononetimetodisplaytheupper
halfofthescreenindoubleheight,presstheSIZE
buttontwotimestodisplaythelowerhalfofthe
screenindoubleheight,pressthreetimesto
displaythefullscreeninnormalsize.
Red/Green/Yellow/BlueCommand
Thesefourbuttonsareusedforquickaccessto
differentpagesasnumberedatthebottomofthe
screen.
Index
PressINDEXbutton,thenindexpagedisplays.
TEXT
Reveal
Pressingthisbuttonwillrevealanyhiddendata
(answerstoquizzesforexample).PresstheREVEAL
buttonagaintoreturntonormalscreen.
14
Page 16

GeneralDescription
Teletext
POWER
123
456
789
0
MENU
OK/
RECLIST
ASPECT
MUTE
AUDIOLANG
HOLDSIZE
MIX
PICTURE
TEXT
REVEALCANCEL
PgUpPgDn
TIMESUBCODE
13
INPUT
INFORECALL
FREEZESLEEP
DTVHDMIUSB
VOLPROG
REDGREENYELLOWBLUE
INDEX
SUBTITLE
SOUND
Cancel
TheCANCELbuttonwillexitfromanyTeletexton
thedisplay.PressCANCELbuttonagaintoexit
TeletextandreturntoliveTVbroadcast.
Subtitle
TurningtheTeletextsubtitlesonoroff.
Subtitlesisaseparatemodewithonlyafew
buttonsavailable.TherewillbenoOSDvisible
otherthantheTeletextSubtitles.
Subcode
Subcodemodegivesthepossibilitytoselect
certainsubcodepagesofaTeletextpage.
Entryofdigitswithintherange0...9forcurrent
subcodeentry.Ifthedigitcompletestheentry,
apagerequestisstarted.
PressPAGE+/PAGE-buttonstochangethe
subcodepages.
Time
Thisbuttonisusedtoshowthetimeofthe
Teletext.
Digitalbuttons(0~9)
Youcanpressthemtoenterthenumberofthe
Pagerequired.
Page+/Page-
Youcanpressthemtochangepageupwardor
downward.
13
Mix
PressMIXbotton,theteletextpagechanges
transparent,TVcontentandteletextpage
contentwilldisplayatthesametime.
PressMIXbuttonagaintoexitMIXmode.
15
Page 17

GeneralDescription
InstallingBatteriesintheRemoteControl
Openthebatterycompartment
1
coveronthebackside.
Inserttwo1.5VAAAsizebatteries
incorrectpolarity.Don´tmixoldor
2
usedbatterieswithnewones.
Closedthecover.
3
ATVDTVHDMISLEEP
INPUTSOUND PICTURE ZOOM
Pointtheremotetowardstheremote
controlsensoroftheTVanduseit
within8meters.
Puttheusedbatteriesintotherecyclingbinsincetheycannegatively
affecttheenvironment.
Thebatteries(batterypackorbatteriesinstalled)shallnotbeexposedto
excessiveheatsuchassunshine,fireorthelike.
ExternalConnection
Antennaconnection
Antennainputimpedanceofthisunitis75ohm.VHF/UHF75ohmcoaxialcablecanbe
connectedtotheantennajackdirectly,iftheantennacableis300ohmparallelflatfeeder
cable,youneedtousethe300ohm/75ohmconvertertoconnecttheantennacabletothe
antennajack.FordetailsPleaserefertothefollowingdrawing.
Antennaswith300flattwinsLeads
Usea75ohm-300ohmconverter
Ω
ANTIN
Antennaswith75RoundLeads
Ω
300ohmcoaxialcable
Antennafeeder
75ohmcoaxialcable
Antennacable
16
Page 18

ExternalConnection
ConnectingVCR
TheseinstructionsassumethatyouhavealreadyconnectedyourTVtoanantennaora
cableTVsystem.Skipstep1ifyouhavenotyetconnectedtoanantennaoracable
system.
VCRRearPanel
ANTANTOUTS-VIDEOVIDEOOUTAUDIOOUT
RFCable(Notsupplied)
3
OUTOUTIN
HDMI2HDMI1AV
IN
AUDIOVGA
5
AudioCable(Notsupplied)
VideoCable(Notsupplied)
4
ANT
SPDIF
TVRearPanel
USB2
USB1
HDMI4
HDMI3
FollowtheinstructionsinViewingaVCRorCamcorder
TapetoviewyourVCRtape.
EachVCRhasadifferentbackpanelconfiguration.
WhenconnectingaVCR,matchthecoloroftheconnection
terminaltothecable.
1.UnplugthecableorantennafromthebackoftheTV.
2.ConnectthecableorantennatotheANTINterminalon
thebackoftheVCR.
3.ConnectanRFCablebetweentheANTOUTterminalontheVCRand
theANTINterminalontheTV.
4.ConnectaVideoCablebetweentheVIDEOOUTjackontheVCRand
theVIDEOINjackontheTV.
5.ConnectAudioCablesbetweentheAUDIOOUTjacksontheVCRand
Y/VIDEO
theAUDIOLandAUDIORjacksontheTV.
Ifyouhaveamono(non-stereo)VCR,useaY-connector(notsupplied)
tohookuptotherightandleftaudioinputjacksoftheTV.IfyourVCR
isstereo,youmustconnecttwocables.
AV1IN
Note:1.WheneveryouconnectanexternaldevicetoyourTV,makesurethatpoweron
theunitisturnedoff.
2.Whenconnectinganexternaldevice,matchthecoloroftheconnectionterminal
tothecable.
17
Page 19

ExternalConnection
ConnectingCamcorder
TherearpaneljacksonyourTVmakeiteasytoconnectacamcordertoyourTV.They
allowyoutoviewthecamcordertapeswithoutusingaVCR.
TVRearPanel
USB2
USB1
Camcorder
White
Red
VideoCable(Notsupplied)1
AudioCable(Notsupplied)
2
HDMI4
HDMI3
EachCamcorderhasadifferentbackpanelconfiguration.
WhenconnectingaCamcorder,matchthecolorofthe
connectionterminaltothecable.
1.ConnectaVideoCablebetweentheVIDEOjackon
theTVandtheVIDEOOUTjackonthecamcorder.
2.ConnectAudioCablesbetweentheAUDIOLand
AUDIORjacksontheTVandtheAUDIOOUTjacks
onthecamcorder.
Note:
1.WheneveryouconnectanexternaldevicetoyourTV,make
surethatpowerontheunitisturnedoff.
2.Whenconnectinganexternaldevice,matchthecolorofthe
connectionterminaltothecable.
18
Y/VIDEO
AV1IN
Page 20

ExternalConnection
ConnectingDVDPlayer/Set-TopBox
TherearpaneljacksonyourTVmakeiteasytoconnectaDVDtoyourTV.
DVDPlayer/Set-TopBox
1
ComponentCable(Notsupplied)
AudioCable(Notsupplied)
2
ComponentvideoseparatesthevideointoY(Luminance
(brightness)),Pb(Blue)andPr(Red)forenhancedvideoquality.
Besuretomatchthecomponentvideoandaudioconnections.
Forexample,ifconnectingthevideocabletoCOMPONENTIN,
TVRearPanel
Red
Blue
Green
White
Red
USB2
USB1
HDMI4
HDMI3
Y/VIDEO
connecttheaudiocabletoCOMPONENTINalso.
EachDVDplayer/STBhasadifferentbackpanelconfiguration.
AV1IN
WhenconnectingaDVDplayer/STB,matchthecoloroftheconnectionterminaltothecable.
1.ConnectaComponentCablebetweentheCOMPONENTIN[Y,PB,PR]jacksontheTV
andtheCOMPONENT[Y,PB,PR]jacksontheDVDplayer.
2.ConnectAudioCablesbetweentheCOMPONENTIN[R-AUDIO-L]jacksontheTVand
theAUDIOOUTjacksontheDVDplayer.
Note:1.WheneveryouconnectanexternaldevicetoyourTV,makesurethatpoweronthe
unitisturnedoff.
2.Whenconnectinganexternaldevice,matchthecoloroftheconnectionterminalto
thecable.
19
Page 21

ExternalConnection
ConnectingDVDPlayer/Set-TopBoxviaDVI
ThisconnectioncanonlybemadeifthereisaDVIOutputconnectorontheexternaldevice.
DVDPlayer/
Set-TopBox
OUTOUTIN
HDMI2
AV
HDMI1
AUDIO
IN
VGA
SPDIF
ANT
TVRearPanel
White
Red
AudioCable
2
(Notsupplied)
1
DVItoHDMICable(Notsupplied)
EachDVDplayer/STBhasadifferentbackpanelconfiguration.
WhenconnectingaDVDplayer/STB,matchthecoloroftheconnectionterminaltothe
cable.
1.ConnectaDVItoHDMICableorDVI-HDMIAdapterbetweentheHDMI1,HDMI2,HDMI3
orHDMI4connectorontheTVandtheDVIconnectorontheDVDplayer/Set-TopBox.
2.ConnectAudioCablesbetweenthePCAUDIOINjackontheTVandtheAUDIOOUT
jacksontheDVDplayer/Set-TopBox.
Note:
1.WheneveryouconnectanexternaldevicetoyourTV,makesurethatpowerontheunitis
turnedoff.
2.Whenconnectinganexternaldevice,matchthecoloroftheconnectionterminaltothe
cable.
20
Page 22

ExternalConnection
ConnectingDVDPlayer/Set-TopBoxviaHDMI
ThisconnectioncanonlybemadeifthereisaHDMIOutputconnectorontheexternal
device.
DVDPlayer/
Set-TopBox
HDMICable(Notsupplied)
WhatisHDMI?
HDMI,orhigh-definitionmultimediainterface,isanext-generationinterfacethatenables
thetransmissionofdigitalaudioandvideosignalsusingasinglecablewithout
compression.
Multimediainterfaceisamoreaccuratenameforitespeciallybecauseitallowsmultiple
channelsofdigitalaudio(5.1channels).
ThedifferencebetweenHDMIandDVIisthattheHDMIdeviceissmallerinsize,hasthe
HDCP(HighBandwidthDigitalCopyProtection)codingfeatureinstalled,andsupports
multi-channeldigitalaudio.
EachDVDplayer/STBhasadifferentbackpanelconfiguration.
1.ConnectanHDMICablebetweentheHDMI1,HDMI2,HDMI3orHDMI4connectoron
theTVandtheHDMIconnectorontheDVDplayer/Set-TopBox.
OUTOUTIN
AV
HDMI2HDMI1
IN
AUDIOVGA
SPDIF
ANT
Note:
1.WheneveryouconnectanexternaldevicetoyourTV,makesurethatpowerontheunitis
turnedoff.
2.Whenconnectinganexternaldevice,matchthecoloroftheconnectionterminaltothe
cable.
21
Page 23

ExternalConnection
ConnectingDigitalAudioSystem
TherearpaneljacksonyourTVmakeiteasytoconnectaDigitalAudioSystemtoyourTV.
DigitalAudioSystem
OUTOUTIN
AV
HDMI2HDMI1
CoaxialCable(Notsupplied)
5.1CHaudioispossiblewhentheTVisconnectedtoanexternaldevicesupporting5.1CH.
1.ConnectanOpticalCablebetweentheSPDIFjacksontheTVandtheDigitalAudioInput
jacksontheDigitalAudioSystem.WhenaDigitalAudioSystemisconnectedtothe
SPDIFterminal:Decreasethegain(volume)oftheTV,andadjustthevolumelevelwith
thevolumecontrol.DigitalAudioSystem's
ConnectingAmplifier/DVDHomeTheater
IN
AUDIOVGA
SPDIF
TVRearPanel
ANT
Amplifier/
DVDHomeTheater
AudioCable
(Notsupplied)
OUTOUTIN
AV
HDMI2HDMI1
IN
AUDIOVGA
SPDIF
ANT
TVRearPanel
Eachexternalinputsourcedevicehasadifferent
backpanelconfiguration.Whenconnectingan
externaldevice,matchthecoloroftheconnection
terminaltothecable.
1.ConnectAudioCablesbetweentheAUDIOL
andROUTontheTVandAUDIOIN[RAUDIO-L]ontheAmplifier/DVDHomeTheater.
WhenanaudioamplifierisconnectedtotheAV
OUT[R-AUDIO-L]terminals:Decreasethegain
(volume)oftheTV,andadjustthevolumelevel
withtheAmplifier'svolumecontrol.
Note:1.Wheneveryouconnectanexternaldevice
toyourTV,makesurethatpoweronthe
unitisturnedoff.
2.Whenconnectinganexternaldevice,
matchthecoloroftheconnectionterminal
tothecable.
22
Page 24

ExternalConnection
ConnectingPC
OUTOUTIN
AV
HDMI2HDMI1
PC
2
PCAudioCable(Notsupplied)
1
D-SubCable(Notsupplied)
EachPChasadifferentbackpanelconfiguration.
TheHDMIjacksdonotsupportPCconnection.
1.ConnectaD-SubCablebetweenVGA/PCINconnectorontheTVandthePCoutput
connectoronyourcomputer.
2.ConnectaPCAudioCablebetweenPCAUDIOINjackontheTVandtheAudioOutjack
ofthesoundcardonyourcomputer.
YoushouldsetPCsoftwarebeforeyouconnectaPCtoyourTV(pleasereferto"PC
Display''settings)
Note:
1.WheneveryouconnectanexternaldevicetoyourTV,makesurethatpowerontheunitis
turnedoff.
2.Whenconnectinganexternaldevice,matchthecoloroftheconnectionterminaltothe
cable.
IN
AUDIOVGA
SPDIF
ANT
Supportingsignals
Input
DTV
ATV
CVBS PAL/NTSC/SECAM
Input
PC/VGA
Resolution
VGA
SVGA
XGA
SXGA
Mode
DVB-T
PALBGDKI
SECAMDKBG
640x480
800X600
1024X768
1280X1024
1360X768
Vertical
Frequency
60Hz
75Hz
60Hz
75Hz
60Hz
75Hz
60Hz
60Hz
23
Input
Component
HDMI
DVI-HDMI
Resolution
480i
480p
576i
576p
720p
480p
720p
1080i
640x480
800X600
1024X768
1280X1024
Vertical
Frequency
60Hz
60Hz
50Hz
50Hz
50Hz/60Hz
50Hz/60Hz1080i
50Hz/60Hz1080p
60Hz
50Hz/60Hz
50Hz/60Hz
50Hz/60Hz1080p
60Hz
60Hz
60Hz
60Hz
Page 25

BasicOperation
TurningtheTVOnandOff
HowtoturntheTVonoroff
1
1.InsertthepowercordplugintoapolarizedACoutlet.
2.IfTVisinstandbymodePressbuttonon
theremotecontrolorbuttononthepanel
ofLED/LCDTV.
3.Normalpicturewillbedisplayedonthescreenafter15seconds.Ifnosignalinput,
"NoSignal"willbedisplayedonthescreen.
4.IftemporaryPOWERoffisrequired,pressbuttonontheremotecontrolor
buttononthepanel.
5.Ifyouwantto
forthisunit.
6.Afterswitchingofftheunit,youshould
Statusindicationlamp
buttonislighted:
Autopoweroff
Ifthereisnosignal,theTVwill10minutes.
See'Autosleep'pg.34formoredetails.
MemorybeforeturningTVoff
Thepictureandsoundsettingsandpresetchannelswillbememorisedatthepointwhen
theTVisturnedoff.WhentheTVisstartedupagainitwillworkaccordinglywiththese
settings.
bottom
completelyswitchoffthepowerforthisunit,unplugthepowercordplug
Instandbymode.
-
POWER
bottom
POWER
waitatleast5secondsbeforeswitchingonagain.
automaticallyenterstandbymodeafter
24
Page 26

BasicOperation
Menuoperation
InputSetup
1
Presskeyontheremotecontroltoenter"INPUT
INPUT
SOURCE"menu.Therearetwelveoptionsforyoutoselect:ATV,
DTV,AV1,AV2,AV3,Component,PC-RGB,HDMI1,HDMI2,
HDMI3,HDMI4andUSBUse/keytomovethecursorto
theinputyoudesiredandpresskeytoconfirm.
ChannelsSelection
2
Therearefourwaystoselectchannel:
1)Usingnumberkeysandkeysontheremotecontrolto
selectchanneldirectly.
Whenyouusethenumberbuttons,youcandirectlyselectchannels
thatwereeithererasedornotmemorized.
2)Using/keyontheremotecontroloronyourTVtoselectchannel.
PROG
rs
Whenyoupressthekey,theTVchangeschannelsinsequence.Youwillseeallthe
channelsthattheTVhasmemorized.
Youwillnotseechannelsthatwereeithererasedornotmemorized.
3)Presskeytoreturntopreviouschannel,pressitagaintoreturntocurrent
RECALL
PROG
channel.
Toquicklyswitchbetweentwochannelsthatarefarapart,tunetoonechannel,thenusethe
numberkeystoselectthesecondchannel.Thenusethebuttontoquicklyalternate
betweenthem.
RECALL
4Selectchannelsfrom"ChannelList"or"FavoriteChannelsList".
)
isnotactivatedifnochannelhasbeenchangedafterTVturningon.
PressOKkeytoselectChannel.
▲ q
OK
,OK
Toselectchannel90,press.
/
rs
9
0
Select
RECALL
InputSource
DTV
ATV
AV1
AV2
AV3
Component
PC-RGB
HDMI1
HDMI2
HDMI3
HDMI4
USB
OK
OK
olumeAdjustmentandMuteSetup
V
3
Volumeadjustment
Press/keyontheremotecontrolorontheTVtodisplay"Volume"menu,
VOL
rs
adjustthevolumeofTVbetween0to100byusing/key:
Toincreasethevolume,presskey;
(
Todecreasethevolume,presskey;
(
VOL
VOL
r
s
VOL
rs
Mute
Pressandthesoundcutsoff.TheMUTEiconwillappearinthelower-leftcorner
MUTE
ofthescreen.
Toresumesound,pressthebuttonagain,orsimplypresstheVOL/key.
MUTE
rs
25
Page 27

BasicOperation
Menuoperation
CurrentChannelInformation
4
PressINFOkeyontheremotecontroltoviewcurrentchannelinformation,the
indicationsofchannelinformationarelistedinthefollowingtable.
9NineDigital
DTV576i
SDDOLBY
THESHAK
WedJun172009
Fears
Ahhhh,it’stimetofaceyourfears!!it’sascarydayatTheShakwiththethemeof
Fears-Eco.Curio.
Protugues
09:4112:00
Subtitle
PressEXITkeyontheremotecontroltoexitthisOSD.
GUIDEMenu
5
Presskeytoenter “ "menu,thefirstlinedisplayscurrentchannelnumber,
GUIDEGUIDE
channelname,eventtitleandcurrenttime.
Thefollowinglinedisplaysallprogramsthischannel,press/
keytoselecttheprogramyoudesired.
PROGRAMMEGUIDE
DTV
9NineDigital
MALCOLMINTHEMIDDLE
DTV
18Jan15:30-16:00
18Jan16:00-16:30
Pre.Day NextDay Schedule Reminder
MALCOLMINTHEMIDDLE
THESHAK
NoInformation
NoInformation
NoInformation
NoInformation
INFO
OK
INFORecord
10:47
18Jan201004:54
EXIT
Exit
OK
MPEG
▲ qthatwillbeplayedon
DTVEPG(ElectronicProgramGuide)
InDTVmode,press “EPG” buttontoentertheElectronicProgram.(Disabled
whenthereisnosignal)
1.ElectronicProgramGuide
informationisprovidedbythebroadcasteranddisplays
scheduledprogramsfortheweekahead(dependinguponthebroadcaster).
2.TVprogramofeachchannelislistedunderthetimeaxis.Press
thechannelandpress “”buttontohighlightthep
backgroundcolourwillchangeto.Press “INFO” buttontoviewthedetailed
information.Press “OK” to.
3“Reminder”(blue)buttontoreserveprograms.IftheTVisinDTVmode,
Usethe
.
/
pq
white
selectthedesiredchannel
rogram.Theselectedprogram’s
itwillautomaticallyturntothereservedprogramatthescheduledtime.Use “Schedule”
(yellow)buttontolookupthereminderlist.
26
Disabled
/
“”buttontoselect
tu
Page 28

Menusysteminstruction
Menuoperation
PrevDay:
NextDay:
Schedule:
Reminder:
Record:
InstallGuide
WhentheTVisturnedonforthefirsttime,theInstallationGuidewillappear,itconsistsof
3parts:
1.Press/keytoselectOSDLanguageoption,
andchangeLanguage.
2.Press/keytoselectCountryoption,and
changeCountry.
3.Press/keytoselectChannelTunningoption,
andpress “OK” or “”tostarttuning.
Ifyouwanttoexit,pressEXITbuttonandselect “Yes”,
thenpressOKbuttontoexit
NOTE:InstallguidewillalsoappearthefirsttimeyouturnontheTVafterperformingthe
1.Presskeytodisplaythemainmenuonthescreen.
2.Press/keytoselect"Picture"option.
3.Presskeytoenter"Picture"submenu.
4.Youcanalsopressthekeyonthe
remotecontroltoselectoneofthepicturesettings.
PictureMode
YourTVhasfourpicturesettings(Standard,
Mild,user,Sports)thatarepresetatthe
factory.Only"User"modecanbesettoyour
preferencebyadjustingparticularitemssuchas
Contrast,Brightness,Sharpness,Tint,Color.
1.Press/keytoselect"PictureMode"option.
2.Press/keytoselectonepicturemode.
Ifyoupresstheredkeyontheremotecontroller,ItwillshowDay’s
. Previous
programs.
Ifyoupressthegreenkeyontheremotecontroller,ItwillshowNextDay’s
programs.
Ifyoupresstheyellowkeyontheremotecontroller,Itwillshowthereminder
list.
Ifyoupressthebluekeyontheremotecontroller,Itwillshowacommand
window,andyoucansetthereserveprograms.
IfpresstherecordkeyontheremotecontrolleritwillshowtheRECORDERpage.
youcanpresstheINFOkeyontheremotecontrollertoshowinformationin
INFO:
regardstotheprogramyouhavechosen.
youcanpresstheOKkeyontheremotecontrollerto
OK:
selectthechannelyou
wanttoview.
Exit:
onceyouhaveselectedachannelusingtheOKkey,presstheExitkeytoview
thatparticularchannel.
OSDLanguage,Country,ChannelTunning.
▲
q
▲
q
▲
q
Resetfunction.
u
.
InstallationGuide
OSDLanguageEnglish
CountryAustralia
ChannelTuning
EXIT
Exit
OK
OK
Picture
MENU
▲ q
u
pq
tu
PICTURE
PictureModeStandard
Contrast70
Brightness50
Color50
Sharpness50
Tint50
Backlight100
ColorTemp
Select
Menu:Exit
27
Page 29

Menusysteminstruction
Picture
Standard:Selectsthepictureforoptimumdisplayinanormalenvironment.
Sports:Selectsthepictureforhigh-definitioninabrightroom.
MILD:Selectsthepictureforcomfortabledisplayinadarkroom.
User:Selecttoviewyourfavoritedisplaysettings(seeUsersettingsforPICTURE).
UsersettingsforPICTURE(Contrast,Brightness,Color,Sharpness,Tint)
Yoursethasseveralsettingswhichallowyoutocontrolpicturequality.
1.Press/keytoselectaparticularitem.
2.Press/keytodecreaseorincreasethevalueofaparticularitem.
Note:Theadjustedvaluesarestoredaccordingtotheselectedparticularitem.
AdjustingtheBacklight
Youcanthebrightnessoftheentire
screenaccordingtoyourpreference.
1.Press/keytoselect"Backlight"option.
2.Press/keytoselectonebacklightmode.
AdjustingtheColorTemp
Youcanchangethecoloroftheentirescreen
accordingtoyourpreference.
1.Press/keytoselect"ColorTemp"option.
2.Press/keytoselectonecolortemp.
Standard:Keepswhiteswhite.
Warm:Makeswhitesreddish.
User:Selecttoviewyourfavoritedisplaysettings.
Cool:Makeswhitesbluish.
▲▼
tu
Contrast:Adjuststhelightnessanddarknessbetweenobjectsandthebackground.
Brightness:Adjuststhebrightnessofthepicture.
Color:Adjuststhecolors,makingthemlighterordarker.
Sharpness:Adjuststheoutlineofobjectstoeithersharpenthemormakethemmoredull.
Tint:Adjuststhecolorofobjects,makingthemmoreredorgreenforamorenaturallook.
TintcanonlybeadjustedwhensignalisNTSC.
change
pq
tu
Backlight:Adjuststhebrightnessofthewholescreen.
pq
ColorTempStandard
Red50
Green50
Blue50
SelectMenu:Return
tu
28
Page 30

Menusysteminstruction
Sound
1.Presskeytodisplaythemainmenuonthescreen.
2.Press/keytoselect"Sound"option.
3.Presskeytoenter"Sound"submenu.
4.Youcanalsopressthekeyonthe
SoundMode
Youcanselectthetypeofspecialsound
tobeusedwhenwatchingagivenbroadcast.
YourTVhasfivesoundsettings(“Standard”,
“Music”,“Movie”,“Sports”,"User")thatare
presetatthefactory.
1.Press/keytoselect"SoundMode"option.
2.Press/keytoselectonesoundmode.
Balance
Ifthevolumesoftheleftspeakerandtherightspeaker
yourpersonalpreference.
1.Press/keytoselect"Balance"option.
2.Press/keytodecreaseorincreasethevalueof
theitem.
MENU
pq
u
SOUND
remotecontroltoselectoneofthesound
settings.
settings
pq
tu
l
Standard:Selectsthenormalsoundmode.
l
Music:Emphasizesmusicovervoices.
l
Movie:Providesliveandfullsoundformovies.
l
Sports:Emphasizesbassoverothersounds.
l
User:Selectsyourcustomsoundsettings(See"UsersettingsforSound”).
arenotthesame,youcanadjustthe"Balance"tosuit
pq
tu
SoundModeStandard
Balance0
Equalizer
SurroundSoundOff
HDMISoundHDMI
AutoVolumeOff
SPDIFModePCM
SelectMenu:Exit
UsersettingsforSOUND(Equalizer)
1.Press/keytoselectanequalizeritem.
2.PressOKorkeytoentertheequalizer
submenu
Thesoundsettingscanbeadjustedtosuityour
userpreferences.
1.Press/keytoselectaparticularitem.
2.Press/keytodecreaseorincreasethe
valueofaparticularitem.
Note:Theadjustedvaluesarestoredaccording
totheselectedparticularitem.
▲▼
u
.
▲▼
tu
29
Balance0
Equalizer
环绕声
EqualizerAdjust
HDMIHDMI声音
120Hz50
自动音量控制
500Hz50
1.5Hz50
超重低音
3.0KHz50
丽音
7.5KHz50
SelectMenu:Return
关
关
关
立体声
Page 31

Menusysteminstruction
Sound
SurroundSound
Thisisusedtoturnonsurroundsoundtogainbettersoundeffect.
1.Press/keytoselect"Surroundsound"option.
2.Press/keytoselect “Surround” or “Off”.
HDMISound
ThisoptionisonlyusedinHDMImode.
1.Press/keytoselect “HDMISound"option.
2.Press/keytoselectHDMISoundmode,External,Auto,Internal
AutoVolume
Eachbroadcastingstationhasitsownsignalconditions,anditisinconvenienttoadjust
thevolumeeverytimethechannelischanged. “AutoVolume” automaticallyadjuststhe
volumeofthedesiredchannelbyloweringthesoundoutputwhenthemodulationsignal
1.Press/keytoselect “AutoVolume"option.
2.Press/keytoselect “On” or “Off”.
.
SPDIFMode
Thisisusedtoselect"SPDIFMode".ThisoptionisonlyusedinHDMI\DTVmode.
1.Press/keytoselect"SPDIFMode"option.
2.Press/keytoselect"RAW"or"PCM".
pq
tu
pq
tu
ishighorbyraisingthesoundoutputwhenthemodulationsignalislow.
pq
tu
pq
tu
30
Page 32

Menusysteminstruction
Channel
1.Presskeytodisplaythemainmenuon
MENU
thescreen.
2.Press/keytoselect"Channel"option.
3.Presskeytoenter"Channel"submenu.
pq
u
ColorSystem
1.Press/keytoselect “ "option.
2.Press/keytoselectthecolorsystem
(PAL,SECAM).
Sound
1.Press/keytoselect “Sound"option.
2.Press/keytoselecttheSoundsystem
(BG,DK,I).
pq
tu
System
pq
tu
ColorSystem
System
AutoSearch
/keyelect
pq
P
resstos"AutoSearch"option.Then
keytostartanoticewindow.Inthis
pressOKor
noticewindow,youcanselectcountryinthe
“CountrySelection” optionandset “TuneType” option.
Pressbuttontoselect"Start",andpressOKbutton
tosearch,thenthesearchinginterfacewillbeonthe
screenasfollows:
(Ifyouwanttoexit,press/
“Cancel",
Thenumberofsearchedchannelswillbeshownon
thescreen.
Ifyouset “TuneType” to “DTV+ATV”,Whenthesearching
ofATVchannelsisover,TVwillstarttosearchDTVchannels.
Whenthewholesearchingisfinished,allthechannels
willbestoredinmemory,andamessagewillappearonthe
screenasperthediagramontheright:
u
q
tu
p
andpressOKbuttontoexit.)
/buttontoselect
ColorSystemPAL
SoundSystemBG
AutoSearch
DTVManualSearch
ATVManualSearch
ProgrammeEdit
SignalInformation
SelectMenu:Exit
SoundSystemBG
AutoSearch
DTVManualSearch
Pleaseselectcountryfirst,
ThenselectStarttoupdateinfo.
ATVManualSearch
ProgrammeEdit
CountryselectionAustralia
SignalInformation
TuneTypeDTV+ATV
ColorSystemPAL
SelectMenu:Return
ChannelTuning
4%...(ATV)
ATV
:4
DTV
:0
Radio:0
MENU
Skip
Program(s)
Program(s)
Program(s)
EXIT
CancelStart
Exit
NOTE:
1)IfyouwanttoexittheATVsearching,youcanpress
MENUbutton,thenaconfirmationmessagewillappear
onthescreen.
Saving
ATV:35
DTV:9
Radio:1
2)ToexitDTVsearching,presstheMENUbutton,a
confirmationmessagewillthenappearonthescreen.
3)Ifyouwanttoexitthewholesearching,youcanpressEXITbutton.
31
Programme(s)
Programme(s)
Programme(s)
Programme(s)
Page 33

Menusysteminstruction
Channel
DTVManualSearch
IntheDTVsource,youcanchoose “DTVManualSearch” to
enter “DTVManualSearch” menu.
Youcanuse/buttontochoosethechannelnumberand
pressOKbuttontoentersearching,andthentheTVwill
storetheDTVchannelifthereisaDTVsignalpresent.
ATVManualSearch
IntheATVsource,youcanchoose “ATVManual ” to
enter “ATVManual ” menu.
è
StorageTo:Youcanpress/buttontochangechannelswhichareusedtostore
è
CurrentCH:Youcanseethecurrentchannelnumberandyoucanpress/buttonto
è
Search:youcanusebuttontosearchchannelsfromlowfrequencytohigh
è
FineTune:IncaseofunfavorableimageorsoundofTVprogram,youcanuse “FineTune”.
È
Frequency:Youcanseethefrequencyofthesearchedchannels.
Note:RemebertostorethechannelbypressingREDbuttonaftersearching/Fine-tuning.
ProgramEdit
Youcanuse/buttontochoose “ProgramEdit” andenter
themenu,presstheRed/Green/Yellow/Bluecolorbuttononthe
remotecontroltodelete,rename,moveandskipprograms,also
youcanpressFAVbuttontoaddtoyourfavoritelist.
è
DEL:YoucanpressREDbuttontoenter"DEL"menu,thenchoosethechannel
è
RENAME:Youcanpress/buttontochoosethechannelyouwanttorename,
è
MOVE:Youcanpress
è
SKIP:/buttontochoosethechannelyouwanttoskipand
è
FAV:Ifyouliketheprogramofachannel,youcanchoose “FAV” buttoninthe
SignalInformation(
1.Press/keytoselect “ "option.
2.Press “Ok”orkey,youcanseethei
oftheDTVchannel.
NOTE:
Unlikeanaloguechannels,whichcanvaryinreception
quality,digitalchannelsmusthaveperfectreception
qualityoryouwillnotreceivethematall.So,unlike
analoguechannels,youarenotablefinetuneadigital
channel.Ifthesignalstrengthindicatesthatthesignal
isweak,apossiblesolutionistoadjustyourantenna
toincreasethesignalstrength.Continuetoadjustthe
antennauntilyoufindthebestpositionwiththe
strongestsignal.
tu
Search
thesearchedchannels.
choosethechannelyouwanttomodify.
frequencyandusebuttontosearchchannelsfromhighfrequencyto
lowfrequency.Whenyouhavesearchedachannel,thesearchingwillbe
pausedandyoucanpressitagainforotherchannelsafteryoustorethe
channel.
tu
u
t
Search
tu
pq
youwanttodeleteandpressREDbuttonagaintodelete.
andpressGREENbuttontoenter"RENAME"menu.Inthismenu,you
canpress/buttontoselectthecharacter,thenpress/buttonto
adjust.(Note:OnlyavailableinATVprogram.)
tomoveandpressYELLOWbuttontomoveit.
Youcanpress
pressBLUEbuttontoskipitwhenyouchangechannels.
menutoaddittoyourfavoritelistandlateryoucanpress “FAV” button
intheremotecontroltochooseyourfavoriteprogramsassoonaspossible.
pq
pq
tupq
/buttontochoosethechannelinATVmodeyouwant
pq
pq
UsedonlyinDTV
u
SignalInformation
)
nformation
SignalQuality/SignalStrength(DTVOnly):
DTVManualSearch
UHFCH37
Pleaseselectchannel
PressOKtosearch
DTV3
Radio0
BadNormalGood
MenuReturnOKOK
ATVManualSearch
58.50MHz
Save
1C-01
2C-04
3S-43
4S-45
5S-02
6S-04
7S-05
Rename
MOVE
37
NineMelbourne
64QAM
100%
100%
No
1
1
Adjust
FAV
EXIT
CurrentCH
StorageTo
Search
FineTune
Skip
Frequency
Exit
Exit
ProgramEdit
TV
TV
TV
TV
TV
TV
TV
Delete
Skip
ProgrammeEdit
SignalInformation
SignalInformation
ColorSystemPAL
SoundSystemBG
Channel
AutoSearch
Network
DTVManualSearch
Modulation
ATVManualSearch
Quality
Strength
SelectMenu:Return
FAV
Exit
32
Page 34

Menusysteminstruction
Time
1.Presskeytodisplaythemainmenuon
2.Press/keytoselect"Time"option.
3.Presskeytoenter"Time"submenu.
Off/OnTime
In"OffTime"item,press/buttonorOKbuttontoenterthesubmenu,settheday&
MENU
thescreen.
pq
u
tu
OffTimeOff
OnTimeOff
SleepTimerOff
AutoSleepOff
Clock01/Jan 10:02
TimeZoneVIC
SelectMenu:Exit
timetoturnofftheTVset.
In"OnTime” item,press/buttonorOKbuttontoenterthesubmenu,setthetimeto
tu
turnontheTVset,whentheTVsetisinthestandbymode.Youcanalsochoosewhich
daytocontrolyourTVsetinaweek.
SleepTimer
1.Press/keytoselect"SleepTimer"option.
2.Press/keyrepeatedlyuntilthedesiredtimeappears(Off,10min,20min,30min,
Notes:ThesleeptimeryouhavesetwillbecancelledwhentheTVturnsofforifapower
failureoccurs.
Notes:
pq
tu
60min,90min,120min,180min,240min).
Whenthetimeislessthan60seconds,remindinformationwillbedisplayedonthe
screen.Pressanykeybuttontocanceltimerfunction.
AutoSleep
1.Press/keytoselect"AutoSleep"option.
2.Press/keytosetit"On"or"Off".
pq
tu
When “AutoSleep” isturnedon,theTVsetwillbe
inthestandbymode10minuteslaterifthereisnosignal.
Clock
YoucanmodifythetimeofyourTVset,butwhen
youswitchtoDTVprogram,the"Clock"isdecided
bythesignalfromyourantenna.
TimeZone
YoucanchooseittomodifyyourtimezoneintheTVset.
1.Press/keytoselect"TimeZone"option.
2.Press/keytoselecttimezone.
pq
tu
33
Page 35

Menusysteminstruction
Option
1.Presskeytodisplaythemainmenuonthescreen.
2.Press/keytoselect"Option"option.
3.Presskeytoenter “Option” submenu.
OSDSetting
YoucanmodifytheOSDsettosuityouruser
preferences.
1.Press/keytoselect “ "option.
2.PressorkeytodisplaytheOSDsettingmenu.
Audiolanguages
1.Press/keytoselect “ "option.
2.Inthe “ "settingpage,youcan
3.Inthe"Audiolanguages"settingpage,press
NOTE:ThisoptionisonlyusedinDTV.
Window
ThisoptionisonlyusedwhenPCmodehassignal.
1.Press/keytoselect “Window"option.
2.Pressorkeytodisplaythe “Window"menu.
MENU
pq
u
pq
OK
u
OSDSetting
OSDLanguage:selecttheproperlanguage
OSDTime:Setthepreferredamountoftimefor
theOSDtobedisplayedonthescreen.
pq
Audiolanguages
Audiolanguages
selectprimaryandsecondinglanguages.
/keytoselecttheaudiolanguages.
pq
pq
OK
u
OSDSetting
AudioLanguages
Window
Lock
HearingImpairedOff
Reset
Softwareupdate(USB)
PVRFileSystem
Select
OSDSetting
NoiseReductionMIDDLE
AudioLanguages
OSDLanguage
Window
OSDTime
Lock
HearingImpairedOff
PVRFileSystem
Select
Menu:Exit
OSDSetting
English
Always
Menu:Return
AudioLanguages
MPEG
English
DOLBY
English
AutoAdjust:AllowsyoutosettheTVtoself-adjustto
w
theincomingPCvideosignal.Thefine,coarseand
positionvaluesareadjustedautomatically
H-Postion:Sethorizontalofpicture.
w
V-Postion:Setverticalofpicture.
w
Clock/Phase:Removeorreducepicturenoise.
w
position
position
34
AutoAdjust
H-Position
V-Position
Clock
Phase
Select
MENU
Menu:Return
ReturnSelect
50
50
50
25
Page 36

Menusysteminstruction
Option
Lock
ThelockfeaturerequiresaPasswordtobeenteredbeforeanysettingscanbechanged.
1.Pres
skeytodisplaythemainmenuonthescreen.
2.Press/key
3.Pressorkeytoenter""submenu,"EnterPassword"menuwillappear,enter
pq
OK
your4-digitpasswordtoenter""submenu
,thealmightypasswordis1980).
9999
LockSystem
MENU
1.Press/keytoselect""option.
2.Press
pq
tu
SetPassword
1.Press/keytoselect"Set"option.
2.Enteryour4-digitpasswordtoenter
pq
Password"submenu.Chooseany4-digitsforyour
newpasswordandenterthem.Assoonasthe4
digitsareentered,thecursorto “Confirm
Password” item,re-enterthesame4digits,andyour
newpasswordhasbeenmemorized.
BlockProgram
1.Press/keytoselect “BlockProgram” option.
pq
2.PressOKorkeytoenterBlockProgramlist.
Intheprogramlist,useGreenkeytolockorunlockthe
program.OncetheprogramislockedandLockSystem
ison,passwordisneededtoenterit.
ParentalGuidance
ThisoptiononlyusedinDTVmode.
1.Press/keytoselect “”option.
2.PresskeytoselectthelockleveloftheParentalGuidance:
pq
tu
off,3,4,5,6,7......18.
andselect"Lock"underthe"Option"menu.
u
Lock
Lock(thedefaultanduniversalpasswordis
LockSystem
/keytoselect"On"or"Off".
Password
enter"Change
willskip
u
ParentalGuidance
/
LockSystemOff
Pleaseenterpassword
SetPassword
New
--------
Confirm
--------
BlockProgram
ParentalGuidanceOff
Cancel
Menu:ReturnSelect
BlockProgram
DTV 9NineDigital
DTV
90NineDigital
DTV
99NineDigital
MENU
LockReturn
EXIT
Exit
HearingImpaired
SpecificHearingImpairedsubtitlescanbeactivatedsubjectto
Note:OnlyavailableinDTVmode.
availabilityfrombroadcaster.
RESET
Selectthe “Reset” optionandpressOKorkeytodisplayaconfirmbox,andselect”Yes”
or “No”.
Note:Pleaseusethe"Reset"optionwithcautionasitwillreturnallsettingsandchannel
memoriestofactorydefault.
u
SoftwareUpdate(USB)
1SoftwareUpdate(USB)
.Press/keytoselect “”option.
pq
PressOKor
2.
Note:Inthesoftwareupdateprocess,donotturnoffthepower.
keytosoftwareupdateprocess.
u
PVRFileSystem
1.Presskeytodisplaythemainmenuonthescreen.
2.Press/keytoselect “PVRFileSystem” option.
3.Pressorkeytoenter “PVRFileSystem"submenu,operationreferto
MENU
pq
OK
u
“PVRFileSystem” inpage37.
fordetailed
35
Page 37

Menusysteminstruction
Function
AspectRatio
Youcanselectthepicturesizewhichbestcorresponds
toyourviewing
1.Press/keytoselect “ "option.
2.Press/keytosetthescalemode.
Youcanalsopress “”keyontheremodecontrol
toselectoneofthescalemodes.
(Auto,16:9,4:3,Panorama,Moive,Subtitle.Auto,
Panoramaisdisabledwhenitisin
/USBmode.
ScreenSaver
ThisoptionisonlyusedinATVmode.
1.Press/keytoselect “ScreenSave” option.
2.Press/tochooseonoroff.
OPC
Press/buttontoselect “On”, “Off” and “Demo”.In “On” mode,accordingtobrightdark
tu
screenimagechanges,thesystemwillautomaticallyadjusttheallocationofpower,soas
toachievetheeffectofenergy-saving.
functionIn “Demo” mode,TVwillshowtheOPCeffectofreal-timeinthelowerright
cornerofthescreen,therewillbeDLC,DCCandPW.TheDemomodeisnotavailablein
PC,USBandDVI-HDMImodesoronsignal.
Note:1.TheDemomodecannotshowtogetherwithothermeanus.
2..
pq
tu
requirement.
AspectRatio
Aspect
AspectRatio
ScreenSaverOff
OPC
Motion
16:9
Off
Component/HDMI/PC
)
SelectMenu:Return
pq
tu
''Off''isthedefaultsettinganddisablestheOPC
.
If “OPC” isin“Demo” mode,itwillturnto “On” automaticallythenexttimeyou
turnontheTV.
Motion
Afterselectingthe “Motion” option,pressOKorkeytoenterthesubmenu.
1.E-Motion:PresskeytoselecttheE-Motionmode:On/Demo.Themovingpictures
tu
/
willbemoreliquidin “On” mode.Youreyescanalsobeprotected.In “Demo” mode,
thepanelwillbedividedintotwopartstoshowthisfunction.Therightpartopenthe
function,andtheleftpartdoesnot.ThisoptionisnotusedinDVI/VGA/USBmode.
2.Detailenhance:Presskeytoselectthedetailenhancemode:Off/On.Thedetail
tu
/
willbestrongerwhenitisin “On” mode.
3.NoiseReduction:PresskeytoselecttheNoiseReductionmode:LOW/MIDDLE/
tu
/
HIGH/DEFAULT/Off.Youcanselecttherightmodetomatchthepictures.
u
36
Page 38

Menusysteminstruction
PVR
PVRFileSystem
WARNING:
1.BeforeconnectingyourUSBdevicetotheTV,pleasebackupyourfilestopreventthem
fromdamageorlossofdata.
2.AUSBdiskmustbeformattedwhenfirstusedforPVR.Anyexistingdataonthediskwill
belostduringtheformattingprocess.Pleasebackupyourdiskifyoudonotwanttolose
thisdata.YouarerecommendedtouseadedicateddiskforPVRuseonly.Donot
disconnectdiskorpowerduringformatting.
3.DonotmodifyPVRfilesonaPC.
USB2supportsPlayback/Recording/Softwareupgrade.USB1onlysupportsplayback.
PleaseconnectyourUSBdevicetoUSB2portonthebackpanelbeforeusingPVR.
Note:MakesureyourUSBdeviceiscompatiblewiththeTVandabletosupport
PVRrecording.
SelectDisk:PressOK” buttontoentersubmenuandpresschoosethediskforPVR.
RecordMaxTime:Press
“
/
“”tosetthemaxtimeforPVRRecord.
tu
PVRFileSystem
SelectDiskC:
RecordMaxTime4Hr.
CheckPVRFileSystemtart
USBDisk
Format
TimeShiftSize
Speed
DiskRemainingSpaceMB
S
MenuReturnOKEXITOKExit
SelectDiskC:
RecordMaxTime4Hr.
CheckPVRFileSystemtart
USBDisk
Format
TimeShiftSize
Speed
DiskRemainingSpaceMB
RecordMaxTime:Setthemaximumdurationforanyrecording.
CheckPVRFileSystem:PressOK” buttontocheckifthediskisPVR.
USBDisk:
Format:PressOK” buttontoenterformatsubmenu.Thediskmustbewhenfirst
usedforPVR.
IndicatesPASSorFAILforthestatusofyourUSBDisk.
“
Donotdisconnectdiskorturnpoweroffduringformatting.
“
Whenformattingyourdisk,aprogressbarwillappearonthedisplay.
yourdevicethelongeritwilltaketoformat.Thedevicemaytakemanyminutesto
format,thisisnotamalfunction,pleasewaitfortheformattingtofinish.
PVRFileSystem
SelectDiskC:
RecordMaxTime4Hr.
CheckPVRFileSystemtart
USBDisk
Formatnat...
TimeShiftSize
Speed
DiskRemainingSpaceMB
FileSystemSize
PVRFileSystemSizeAll
SD55MinsHD15MIins
OKExit
MenuReturnOKEXITOKExit
S
PVRFileSystem
SelectDiskC:
RecordMaxTime4Hr.
CheckPVRFileSystemtart
USBDisk
Format
TimeShiftSize
Speed
DiskRemainingSpaceMB
TimeShiftSize
TimeShiftDiskSize512MB
SD14MinsHD4Miins
OKExit
S
MenuReturnOKEXITOKExit
TimeShiftSize:Thissettingisavailabletoadjustonly
afterthediskhasbeenformatted.ThemaximumTime
ShiftSizeis8G.
Speed:Displaythediskwriting/readingspeed.
Pleasenote:Itissuggestedthatyouuseadiskwith
speedthatisgreater
than4500KB/S.
DiskRemainSpace:DisplaytheremaningspaceforPVR.
NOTE:Thetimeslistedarenotprecise,onlyforreference.
/
“”to
tu
PVRFileSystem
SelectDisk
S
DiskC:
OKExit
MenuReturnOKEXITOKExit
suitablefor
formatted
NOTE:Thelarger
PVRFileSystem
SelectDiskC:
RecordMaxTime4Hr.
CheckPVRFileSystem
USBDiskPass
FormatPass
TimeShiftSize512MB
Speed
HDsupport
DiskRemainingSpace384MB
Exit
OKEXITOK
SUCCESS
3008KB/s
MenuReturn
37
Page 39

Menusysteminstruction
PVR
PVRGuide
IfthediskforPVRisready,theprogramscanbe
recordedinDTVmode.
Timeshift
InDTVmode,press “”buttontopausetheDTV
program,pressitagaintocontinueplay.
Thelengthof
timeaprogramcanbepauseddependsuponthe
settinginthePVRFileSystem.
Press “EXIT” toshowor
hidethecontrolmenu.
TimeShift
[-]00:00:38/00:04:00
04:55
1.CurrenttimebehindliveTV.
2.Totalallowabletimefortimeshifting,pleaseseepg.
37'PVRFileSystem'fordetailsinregardstosetting
theTimeShiftSize.
Theprogressbarwillfadeoutin10seconds.
PressthePLAYbuttontocontinueplayingtheprogram
fromthepointwhereitwaspaused.
NOTE:TimeShiftwillstopifyouchangechannels,
changeinputsorgointostandbymodewhileinTime
Shiftmode.Amessagewillappearonthedisplay
promptingyoutocontinueorcancel.
POWER
INPUT
123
456
789
INFORECALL
0
FREEZESLEEP
MENU
OK/
RECLIST
DTVHDMIUSB
MUTE
VOLPROG
AUDIOLANG
REDGREENYELLOWBLUE
INDEX
HOLDSIZE
SUBTITLE
REVEALCANCEL
MIX
PgUpPgDn
SOUND
PICTURE
TIMESUBCODE
ASPECT
STOP
TEXT
BACK
FORWARD
PLAY/
PAUSE
OK
RECORD
38
Page 40

Menusysteminstruction
PVR
Instantrecording
1.SelectthedesiredchannelthenpresstheRECORDbuttonontheremotecontroltostart
recordingthecurrentbroadcast,aprogressbarwillbedisplayedatthebottomofthescreen.
-Duringrecording,theprogressbarwillfadeoutafter10seconds.
2.RecordingstopswhenyoupresstheSTOPbuttonandtherecordedfileisstoredinthe
externalUSBdeviceautomatically.
NOTE:Youcanonlywatchchannelsonthesamefrequencyastheprogrambeingrecorded.
Ifyoutrytochangetoanotherchannelamessagewillappearpromptingyoutocontinueor
not'Recordinginprogress.Changechannelwillstoprecording.YesorNo.'
Recordinginstandbymode
Thisunitisabletodorecordingwhileinstandbymode.
1.Startarecordingthenpressthepowerbutton.Amessagewillbedisplayedpromptingyou
tocontinueorcancel.
Recording
9NineDigital
REC
[]00:00:13Remain
AtEPGmenu,press “”buttontoreserve-recordtheprogram.
Atreserverecordmenu,press “”buttontoadjustthescheduledtime,press “OK” to
/
tu
savethesettingandpresstheyellowbuttontochecktherecordschedule.
proceedwhentheTVisineitheractiveorstandbymodes.Whenrecordinginitialisesin
standbymode,thefrontpanelindicatorswillflashmomentarily,andtherewillbenopicture
output.Youcanintercepttherecordingbyturningonthepowerandviewingtheprogram
thatisbeingrecorded.schedules
minbetweentwoprograms.
Theshouldnotoverlap,andthereshouldbeatleast1
scheduled
RECORDER
DTV
9NineDigital
MALCOLMINTHEMIDDLE
Programme
Mode
StartDate
StartTime
EndDate
EndTime
InDTVmode,press “OK/RECLIST” toopentherecordedlist.Press “”buttontoselect
thepress “OK/RECLIST” toplaytheandpressthe “”buttonto
recordedfile,recordedfile,
showtheInformation.Whenplaying,the “”,“”,“”,“”
,“”,“”“” available.Press “EXIT” toshoworhidethecontrolmenu.
recordinginformation.
buttonsare
WhentheRecordedListisdisplayed
onthescreen,youcandeletefilesyou
nolongerrequire.Selectthedesiredfile
usingthearrowbuttons,thenpressthe
Redbuttontodelete.
NOTE:Filescannotbedeletedduring
PlaybackorRecording.
9MALCOLMINTHEMIDDLE
18Jan2010
18Jan2010
Schedule
MALCOLMINTHEMIDDLE
MALCOLMINTHEMIDDLE
OKOK
AUTO
04:30
05:00
Back
RecordedList
To.Page1
Cu.Page1
04:56
selected
18Jan201004:54
EXIT
OK
Exit
OK
/
pq
[DATE]2010/01/18
[Time]045640
::
[PROGRAMNAME]
MALCOLMINTHEMIDDLE
[CHANNELNAME]9NineDigital
[PROGRAMDESCRIPTION]IfBoysWereGilsEverytimetheboysare...
Recordingwill
u
39
Page 41

DigitalMediaPlayer
Introduction
ThisTVisembeddedwithoneUSBportdigitalmediaplayer.Itcanfinddevicesthat
supportUSB1.1/2.0,includingflashdisk,USBharddiskanddigitalcamera.Itsupports
functionsas:Displaypictures,Playmusicfiles,Playvideofiles,Displaytextfiles.
Note:pleasedonotremovethecableduringthedatatransfer.Itmaycauseproblemsfor
thesystem.
Data
Picture
Music
Video
Text
RemoteControlButton
POWER
INPUT
123
456
789
INFORECALL
0
FREEZESLEEP
MENU
NAVIGATION
BUTTONS
pqtu
MENU
OK/
RECLIST
DTVHDMIUSB
MUTE
VOLPROG
AUDIOLANG
REDGREENYELLOWBLUE
HOLDSIZE
INDEX
REVEALCANCEL
SUBTITLE
MIX
PgUpPgDn
SOUND
PICTURE
TIMESUBCODE
ASPECT
TEXT
Format
JPG,JPE,PNG,BMP
MP3,WMA,AAC
MPG,MPEG,,,,,RMRMVBMP4MOVMKV
TXT
DescriptionofPlaybackButtons:
ButtonsFunction
PgUp
PgDn
EXIT
INFO
OK
RED
BLUE
I/II
SUBTITLE
Pause/Play
Stop
Previousfile
Nextfile
Pageup/Zoomin
Pagedown/Zoomout
Backward
Forward
Displaytheinformation
Displaytheshortcutkey
ABPlayrepeatedly
Timeselected
Languagesoundtrack
switch(video)
Subtitileswitch(video)
40
Page 42

DigitalMediaPlayer
DeviceandFileManagement
1.Press “Input” buttontoselect “USB”.ThescreenwilldisplaytheUSBmenu
.Themenuisintofoursections,including:Filetypesection,Filelist
1divided
section,Filepreviewsection,Fileinformationsection.Thesystemwillsearch
wx
uv
thedeviceautomatically.IfnoUSBdeviceconnects,themenuwilldisplay
atthebottomofthescreen
.
asperFigure
'NODEVICE'
2.PlugtheUSBdeviceintotheUSBport,thesystemwillautomaticallyreadanddisplay
thedeviceas2.Thefilelistsectiondisplaythefoldersandpicturefilesofthe
perFigure
firstdrive.
3.USBmenu,press “ buttontoselectthefiletype:PHOTO/
Fromthe
MUSIC/MOVIE/TEXT.Press “ buttontoselectthedriveand
/
tu
”
“OK” and
/
pq
”
press “OK” buttontoshowthefilelist.
4.Inthefilelistsection,press “ buttontoselectfolder
/
pq
”
(ifyourfilesaresortedinto
folders,thefolderswillbedisplayed.Iftherearenofolders,onlythefileswillbe
displayed).and
return.
5.
Thefilethatishighlightedwillbeautomaticallydisplayedinthepreviewwindow.
Press “OK” buttontoenterthisfolder.Select “”press“OK” buttonto
tothefolderlist
PLEASENOTE:Largerfileswilltakelongertodisplayedinthepreviewwindow.
Press “OK” buttontoshowthesubmenu,youcanselect: “Play/Select/All/D
all”,itwillbesignedas “”,ifithasbeen
PHOTO MUSIC TEXTMOVIE
C:Page1/2
C:
RMStream
MOVIE
RMVBStream
H.264
RMHDMovie
.wd_tv
AVI
USB1 USB2
Select
Menu
BackEnterOK
selected.
PHOTO MUSIC TEXTMOVIE
C:Page1/2
C:
USB1 USB2
RMStream
Chattahoochee.MP3
Summertime.MP3
Wanted.MP3
Someday.MP3
Dallas.MP3
Figure1
Note:1.
Toplaymultiplefilesinsequence,thefilesmustbeselectedfirst.
Press
“”“”orselectallby
u
buttonandassigneachfileyouwishtoviewwith
pressingonthesubmenu
“OK” ,thenpress “”toplay.
Play
Select
SelectAll
DeselectAll
Figure2
Album:
Title:
BitRate:192K
Artist:
Sampling:44K
Year:
Selecteselect
Select
Menu
2.Whenyouselectmultifiles,itwillplayinsequence.
3.IftheUSBdevicehaveonlyonedrive,youcan’tchangethedriveandthesystem
willselectthisdriveasdefault.
4.Youcanselectupto200filesatonetime.
.
BackEnterOK
Picture
1.Select “PHOTO”inthefiletypesection,andpress “OK” buttontoshowthefilelist.
2.Selectonefileandpress “”buttontosignit.Pressbuttontodisplaythe
u
“”
picturefile.
3.Whenmorethanonefileisselected,theywillatthespeedof5seconds
cyclethrough
perfile.
4.Ifnofileissigned,press “”buttontodisplayallthefilesincurrentdirectory.
5.Whenthefileisplaying,pressbuttontoplay/pause,pressbuttonto
switchtothenext/previousfile,press “ buttontozoomin/outthepicture(You
“”“”
”PgUpPgDn
41
Page 43

DigitalMediaPlayer
canpressnavigationbuttontomovethepicturewhileitiszoomedin),andpressinfo
buttontoshowthecurrentfileinformation.
6.Press “OK” buttontoshowtheshortcutmenu.
aroundthismenu.
7.Press “EXIT” toexitplaying.
MUSIC
Youcanusethearrowkeystonavigate
1.Select “MUSIC”inthefiletypesection,andpress “OK ” buttontoshowthefilelist.
2.Selectonefileandpressbuttontosignit.Press “”buttontoplaythe
“”
u
musicfile.
3.Whenthefileisplaying,pressbuttonto,pressbutton
tochangethemusicfile,presschangetotheprevious/nextfile,
“”to,press “”toup/downthe
press
fastforward/fastrewindnavigate
“” play/pause “
“”buttonto
PgUpPgDn
/
pq
”
playlist.
4.Ifnofileissigned,pressbuttontoplayallthefilesincurrentdirectory.
“”
5.IfthematchingLRCfileisavailable,thelyricswillbedisplayedautomatically
6.Press “EXIT” toexitplaying.
MOVIE
1.Select “MOVIE” inthefiletypesection,andpress “OK” buttontoshowthefilelist.
2.Selectonefileandpressbuttontosignit.Pressbuttontodisplaythe
“”“”
u
videofile.
3.Whenthefileisplaying,pressbuttontoplay/pause,pressbuttonto
skiptothenextselected
“”“”
videofile,press “ buttontozoomin/outthepicture,
PgUpPgDn
”
thenyou
canusethenavigationtomovethepicture,andpressthe “INFO” buttontodisplaythe
currentfileinformation.Ifthevideofilecontainmulti-trackormulti-subtitle,press
I/II
“/SUBTITLE ”
4.Ifnofileissigned,pressbuttontoplayallthefilesincurrentdirectory.
5.playingfiles,youcanpressthe “RED” keytoselectAB
Whiletorepeatedlyplaya
Youcanpressthe “BLUE” keyto
section.skiptothetimeofyourchoice.
buttontoswitchtrack/subtitle.
“”
6.Press “EXIT” toexitplaying.
Note:1.Ifthereisnosoundwhenplaying,trytochangethetrackby “”.
I/II
2.WhenplayingMovieorPicture,press “pageup” and “pageDn” tozoominand
zoomoutthedisplaysize.Thezoomfunctioncan’tsupportHDMovies.
Inputsearchtime:
00
0000
:
:
OK
42
Page 44

DigitalMediaPlayer
TEXT
1.Select “TEXT”inthefiletypesection,andpress “OK” buttontoshowthefilelist.
2.Selectonefileandpress “”buttontosignit.Press “”buttontodisplaythetextfile.
3.Whenthefileisplaying,press “”buttontochangethepage,press “”
buttontochangethetextfile.
4.Ifnofileissigned,press “”buttontoplayallthefilesincurrentdirectory.
5.Press “EXIT” toexitplaying.
USB
WARNING
1.AstheUSBdeviceisproducedbydifferentmanufacturersandofdifferentstandards,
wedonottosupportallUSBdevice.
2..Itissuggestedtousethe
USB1.1maynotbecompatiblewithplaybackofvideofiles
USB2.0device.
3.Asvideofilesfromtheinternetcompressedatthesamestandard,
andconvertedtoanotherformat,wedonottosupport
allthevideofileswhichformat-converted.
guarantee
canbeguarantee
u
PgUpPgDn
maynotbe
havebeen
43
Page 45

Troubleshooting
Ifyouhaveanyproblem,checkthecoutermeasuresforeachsymptomlistedbeiow.
Thefollowingsymptomsmayhave.adjustmentrather
thanactualmalfunctionoftheunit.Ifthetroublepersists,contactthe
Centre,seebackpageforcontactdetails
Symptoms
Nopower
Nopicture
Goodpicturebutno
sound
Goodsoundbutabnormal
colorornopicture
Noresponsetoremote
control
Fullscreenflickering
underVGA
beencausedbyinappropriate
.
Possiblesolutions
Pleasecheckthepowercord
outletworks
Unplugthepowercordandplugitinafter60secondsand
restarttheTV.
Pleasecheckantennaconnection.
Stationmayproblems,pleasetuneto
anotherstation.
Pleaseadjustthesettingsofcontrastandbrightness.
Pleaseincreasethevolume.
PleasecheckTVisundermutemode,pressMUTEbutton
ontheremotecontrol.
Pleasechecksoundsettings
Ifexternaldevicesarebeingused,checktheirvolumesare
notsettooloworturnedoff.
IfusingAVIorComponentinputs,pleasemakesurecables
areconnectedprpoerlyandnotloose.
IfusingDVItoHDMIcable,aseparateaudiocableisrequired.
Makesureaheadphonejackisnotconnected.
Pleasecheckantennaconnectionandantennacondition.
IfusingComponentinput,pleasecheckComponent
connections,incorrectorlooseconnectionsmaycause
colourproblemsorcausethescreentobeblank.
Batteriesofremotecontrolmayhaveexhausted,if
necessary,pleasechangethebatteries.
Cleantheremotecontrollens.Thedistancebetween
LEDTVandremotecontrolshouldbewithin8m,within
recommendedoperatingangleandpathisfreeofobstructions.
V-HEIGHTvaluemaybesettoobig,restartcomputerand
entersafemode,thensetmonitorparameterstocorrect
valueaccordingtoadjustmentdescription.
.
beexperiencing
pluggedinandthatthepower
CustomerCare
.
Horizontalstripes
underVGA
Coloreddotsmaybe
presentonthescreen
Pictureisbreakingup
Samplephasemaybedeflected,adjustphaseaccordingto
pictureposition.
AlthoughtheLCDscreenismadewithhigh-precision
technologyand99.99%ormoreofthethepixelsare
effective,blackdotsmayappearorbrightpointsoflight
(red,blue,orgreen)mayappearconstantlyontheLCD
screen.ThisisastructuralpropertyoftheLCDscreen
andnotamalfunction.
KeeptheTVawayfromnoisyelectricalsourcessuchascars,
hairdryers,welders,andalloptionalequipment.
Electricalatmosphericinterferencesuchaslocalordistant
lightningstormsmaycausepicturetobreakup.
Wheninstallingoptionalequipment,leavesomespace
betweentheoptionalequipmentandtheTV.
Checktheantennaandconnection.
Keeptheantennaawayfromanypowerorinput/outputcables.
44
Page 46

Troubleshooting
AfterAutoTuningonly
somechannelsare
available
Channelcannotbe
selected
USBnotplaying
Pictureisdistorted,
macroblock,smallblock,
dots,pixelization,etc
Noisefromspeaker
TVturnsoffautomatically
TVturnson
automatically
Pictureisnotshownin
fullscreen
CheckyourareaiscoveredbyDigitalVideoBroadcasts.
Tryre-tuningormanuallytuningmissingchannels.
Checkthatyouareusingthecorrectantennatype-please
seepg.16'Antennaconnection'.
Checkifthechannelhasbeenblockedinthemainmenu
settings.
PleasecheckconnectingUSBcableandpowersupplyis
connected.Harddrivehasnotbeenformatted.Pleasemake
sureUSBdiskiscompatibleandthemultimediadataformats
aresupported.
Compressionofvideocontentsmaycausedistortion
especiallyonfastmovingpicturessuchassportsand
actionmovies.
Checkcableconnections,makesureavideocableisnot
connectedtoanaudioinput.
Lowsignallevelmaycausesounddistortion.
CheckiftheOffTimerissettoOnintheSetupmenu.
SleepTimermayhavebeenenabled.
Ifthereisnosignalforabout10minutesfromaninput,
theTVwillturnoff,seeAutoSleeppg.33.
IfconnectedtoyourPC,checkyourPCpowersettings.
MakesuretheACpowercordispluggedinsecurelyto
thewalloutletandtheTV.
CheckiftheOnTimerissettoOnintheSetupmenu.
BlackbarsoneachsidewillbeshownonHDchannels
whendisplayingSD(4:3)contents.
BlackbarsonTop&Bottomwillbeshownonmoviesthat
haveaspectratiosdifferentfromyourTV.
AdjustpicturesizeoptiononyourexternaldeviceorTVto
fullscreen.
45
Page 47

Troubleshooting
Picturedefectsandthereason
Ghostingmayalsooccurwhenstillpicturesare
displayedcontinuously.Itmaydisappearaftera
fewmoments.
46
 Loading...