

Page 1

TOWER FIREPLACE
HEATER
(2000W)
KATWFPHT2BA
Page 2

Page 3

SAFETY & WARNINGS
This appliance is not intended for use by persons (including children) with reduced physical,
sensory or mental capabilities or lack of experience and knowledge, unless they have been
given supervision or instruction concerning use of the appliance by a person responsible for
their safety.
• Children should be supervised to ensure that they do not play with the appliance.
• Read all instructions before using the heater.
• Never turn the unit off by unplugging the power cord. Always turn off the power switch.
• Do not use this fan heater in the immediate surroundings of a bath, a shower or a
swimming pool.
• Do not use this heater if it has been dropped.
• Do not use if there are visible signs of damage to the heater.
• Always use this heater on a horizontal and stable surface.
• If the power cord is damaged, cease use immediately and contact help.Kogan.com for
support.
• Do not use this heater on the same power outlet as another large appliance.
• Make sure to unplug the unit when it is not in use.
• If you encounter any issues with the product, turn it off, disconnect the power, cease
use immediately and contact help.Kogan.com for support.
• The heater must not be located immediately below a power outlet.
• The unit may make some minor sounds when turned on or off due to the material
expanding when heated and contracting when cooled. This is normal.
• Do not attempt to replace the heating element of the product.
• Keep combustible material such as furniture, cushions, bedding, paper, clothes,
curtains, etc. at least 100cm away from the heater.
• Only connect the fan heater to a single-phase outlet with a main voltage as specified
on the rating plate.
• Do not leave your home while the appliance is in use. Ensure that the switch is in OFF
(0) position and the thermostat is in the minimum position. Always unplug the
appliance when not in use.
• Do not allow children to replace batteries without adult supervision.
• Do not short-circuit or heat batteries.
• Remove batteries from equipment if it is not to be used for an extended period of time.
Page 4

• Always select the correct size and type of battery most suitable for the intended use.
Information provided with the equipment to assist with correct battery selection should
be retained for reference.
• Clean the battery and equipment contacts prior to battery installation.
• Ensure that the batteries are installed correctly with regard to polarity (+ and –).
• Remove exhausted batteries promptly. Do not dismantle batteries.
• Do not dispose of batteries in fire.
Batteries must be disposed in accordance with your local environmental authority.
• Read these instructions carefully before using your fan heater and retain them for future
reference.
• Do not use this appliance outdoors. This appliance is for household use only and not for
commercial or industrial use.
• Do not use if there are visible signs of damage to the heater.
• Do not use this heater with a programmer, timer, separate remote-control system or
any other device that switches the heater on automatically.
• The heater MUST only directly be plugged in to a fixed Domestic Power outlet, DO
NOT use in conjunction with Extension cords, Power Boards or Double Adaptors, as
these can overheat when overloaded.
• Keep the air inlet and outlet free from objects at least 100cm in front and 50cm behind
the heater. Do not hang anything on or in front of the fan heater.
• Never immerse the product in water or any other liquid for any reasons.
• If the appliance is tilted or the base is off the ground, the power will cut off
automatically.
• When you finish using the heater, physically switch the unit off before unplugging it
from the wall outlet.
• When moving the heater, ensure it has been physically switched off and unplugged
from the wall outlet. Lift the appliance using the handle at the rear of the convection
unit.
Page 5

CAUTION: Some parts of this product can become very hot and
cause burns. Particular attention must be given where children
and vulnerable people are present.
CAUTION: Never allow the heater to be covered during use.
Warning: Do Not Cover
WAR NING: This heater is not equipped with a device to control
the room temperature. Do not use this heater in small rooms
when they are occupied by persons not capable of leaving the
room on their own, unless constant supervision is provided.
WAR NING: To r e d u c e t h e r i s k o f f i r e , k e e p t e x t i l e s , c u r t a i n s o r a n y
other flammable material a minimum distance of 1m from the air
outlet
Page 6
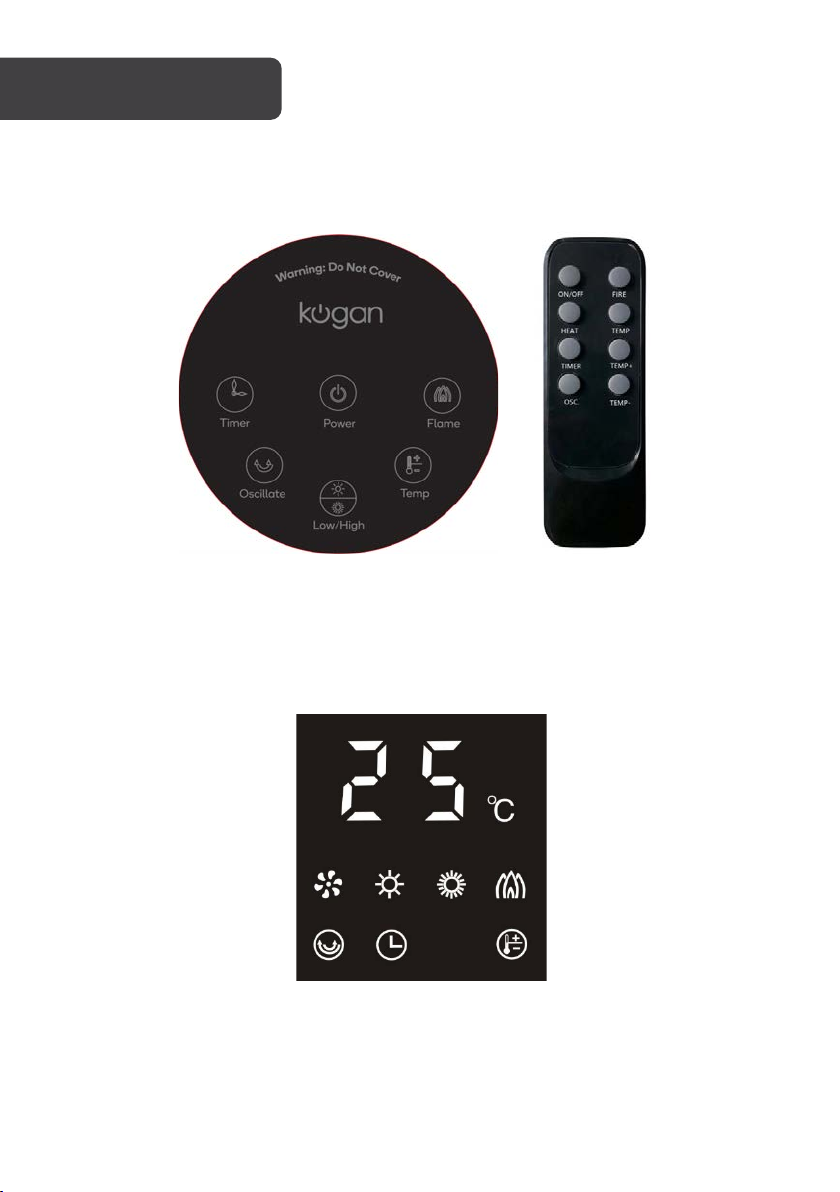
OVERVIEW
Control Panel & Remote Control
LED Display
Page 7
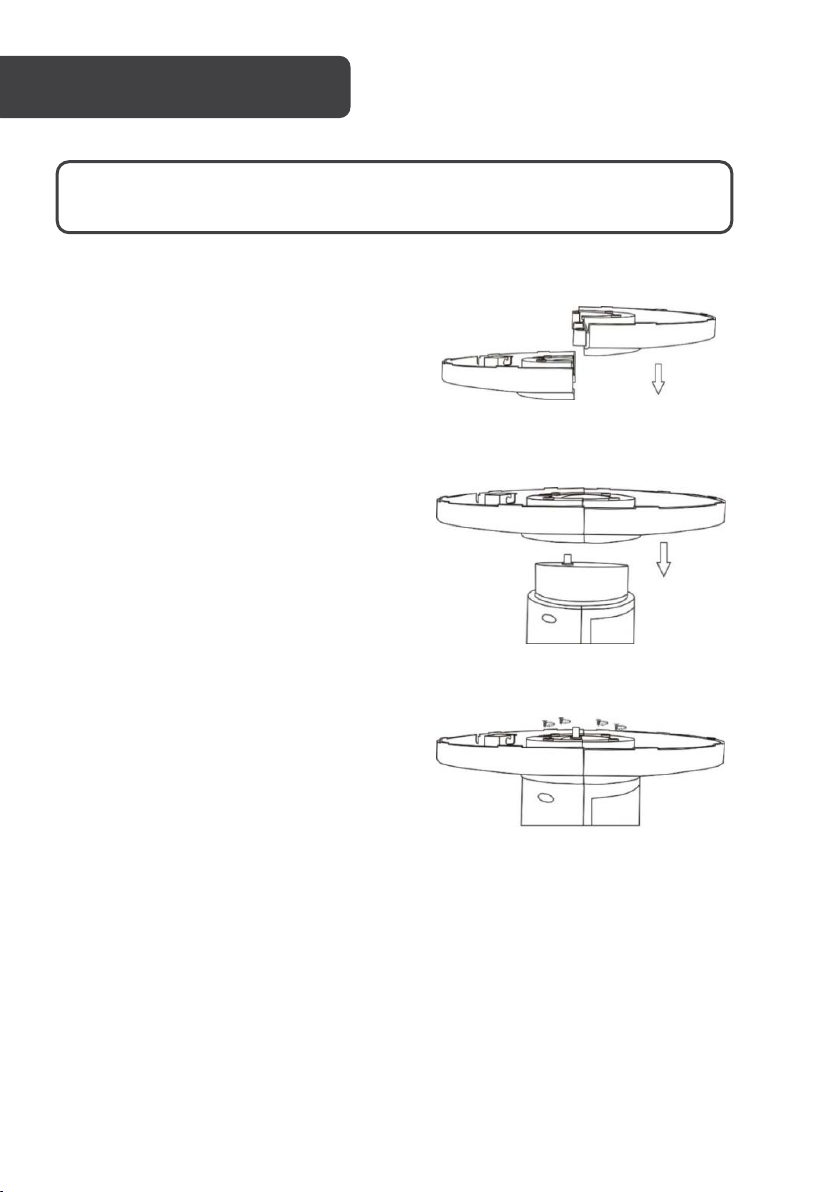
1. Remove all accessories from the
packaging.
2. Connect both halves of the base
together to form a singular piece.
3. Invert the appliance so that the bottom
is facing upwards.
4. Feed the power cord through the centre
hole of the base and place the base
onto the bottom of the appliance.
5. Secure the base and appliance
together using the 4 supplied screws.
6. Clip the power cord into the slot in the
base.
Note: Ensure the base is firmly secured
in place and that the appliance is
stable before use.
INSTALLATION
WARNING: Do not use the unit without the base plate installed.
Page 8

OPERATION
Low heat mode
High heat mode
Before first use, ensure that:
• The heating element and power cable are not damaged.
• The power outlet the appliance is connected to is rated at 10A or higher.
• The heater is placed on a flat, stable surface to avoid toppling.
Power
1. Place power switch “ ” in the ON
position. The device will now be in standby, and the
LED will display the ambient temperature.
2. Press the power button “ ” (ON/OFF on the
remote) to engage the fan, which will be shown on
the display.
Heat Mode
Press the heat button “ ” (HEAT on the remote) to toggled between low or high heat
mode.
Oscillate
Press the Oscillate button “ ” (OSC on the remote) to engage the swing function.
Page 9

Timer
1. Press the timer button “ ” (TIMER on the remote) to cycle through the pre-set
operating times “1, 2 - 8 hours”. The heater's display will show the timer indicator
when the timer function is activated.
2. After selecting the desired operating time, the heater will run for the selected time
before automatically switching back to standby mode.
3. If you wish to cancel the timer function, press the timer button until the time is set
to “0H” and the indicator disappears from the display.
Flame effect
Press the flame button “ ” (FIRE on the remote) to enable the flame effect, the flame
icon will appear on the display.
Setting the temperature
Press the temperature button “ ” (TEMP on the remote), then using either the “+” and
“-“ buttons on the heater or “TEMP+” and “TEMP-” on the remote to manually select the
desired temperature.
Note: The temperature range is: 18-45°C.
Page 10

Temperature sensor
The appliance is equipped with temperature-sensing features to adjust its output based on
the ambient temperature of the environment it is used in.
For example, if the set temperature on the appliance is equal to or lower than the
environment temperature, the appliance will stop heating.
When the set temperature is 1-2°C higher than the environment temperature, the appliance
will engage low heat mode as shown below:
If the set temperature is higher than the environment temperature by 3°C or more, the
appliance will engage high heat as shown:
Page 11
Remote Control Battery Replacement
WARNING:
• Remove the batteries if the unit will not be used for a long period of
time.
• Only use the size and type of battery as specified above.
WARNING: Keep batteries out of reach of children. Swallowing may
lead to serious injury or death in as little as 2 hours due to internal
burns. If swallowed, go straight to a hospital emergency room. Dispose
of used batteries immediately.
1. Open the battery compartment cover on the back of the remote.
2. Insert x2 AAA batteries into the compartment, making sure to align the polarity
symbols "+"/"-" correctly.
3. Close the battery compartment cover by sliding it back into place.
4. Test the remote to verify its functionality. If it doesn't work, confirm that the
batteries are properly inserted and the cover is firmly attached.
Page 12

Model
KATWFPHT2BA
Rated Power
2000W
Rated Voltage
220-240V~
Frequency
50Hz
Class
Class II
• Ensure the appliance is unplugged from the power outlet before cleaning.
• Do not use water or solvents to clean the heater. Use a soft, damp cloth with a small
portion of neutral detergent.
• Do not use the appliance until it has dried completely.
• If the appliance is not in use for an extended period, unplug the unit from the wall
socket and store it in a cool, dry place in a rust-proof polyethylene bag.
Page 13

Page 14

Page 15

Page 16

Need more information?
We hope that this user guide has given you
the assistance needed for a simple set-up.
For th e mo st u p-to-date guide for your product,
as well as any additional assistance you may require,
head online to help.kogan.com
 Loading...