

Page 1
KOGAN SMARTERHOME™
SMART WI-FI PET FEEDER 4.3L
WITH HD CAMERA
KASMPTFDCMA
Page 2

Page 3
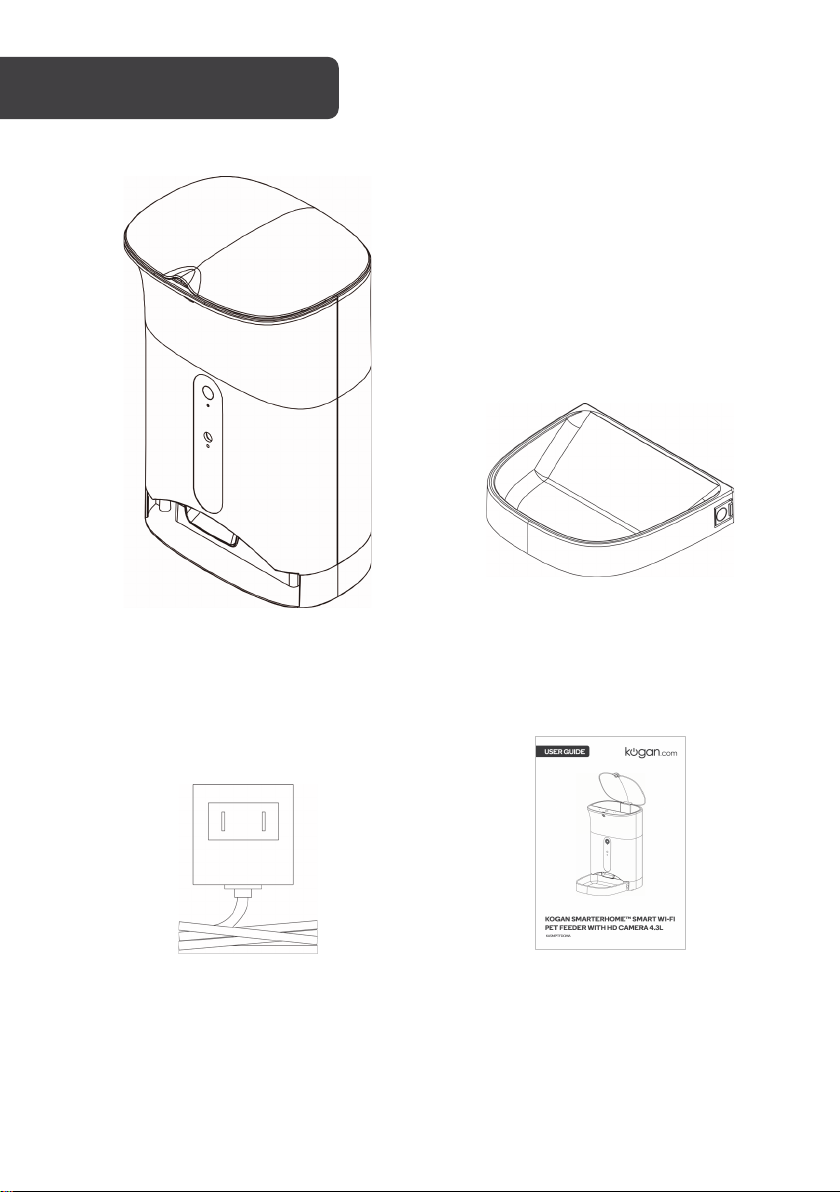
COMPONENTS
1 Main body 2 Food tray
3 Power adapter 4 User guide
Page 4
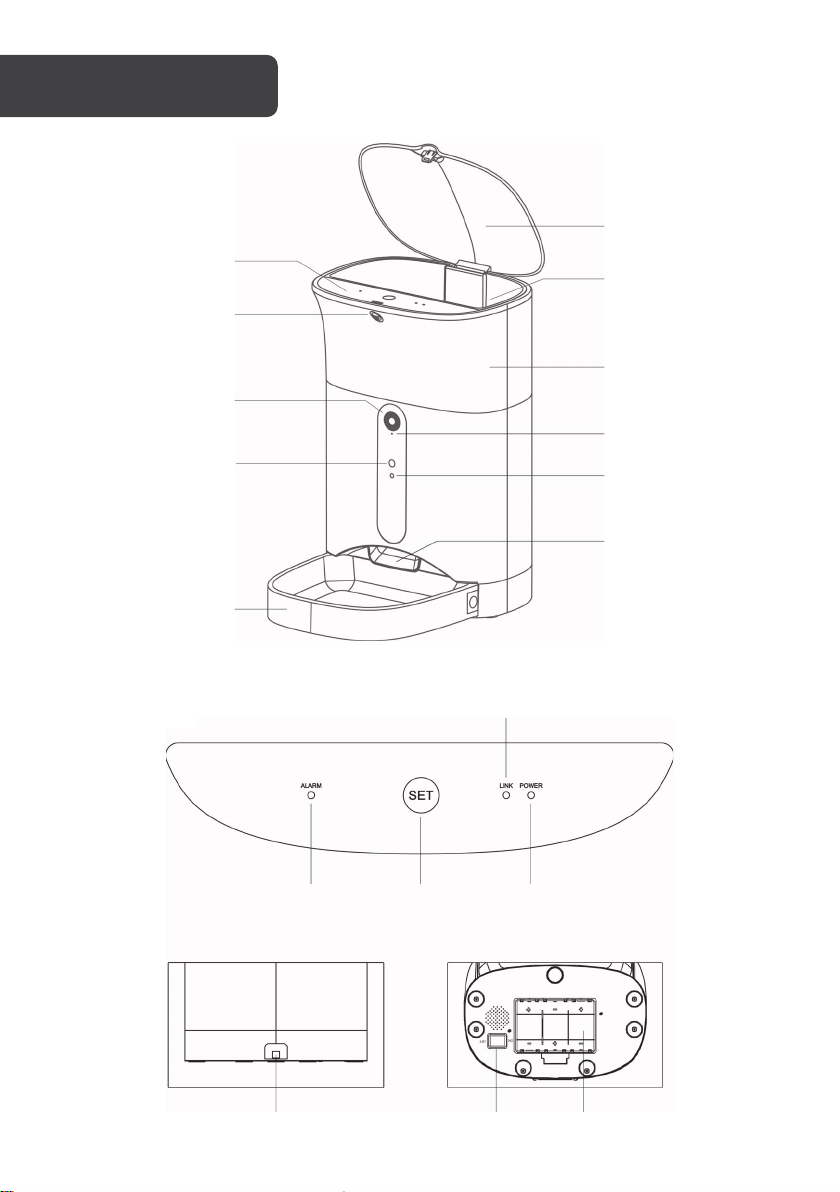
Power switch
Battery
compartment
DC power port
Alarm indicator
Reset
Power indicator
Connection indicator
Top cover
Camera
Lock
Control panel
Body
MIC
Photosensor
Feed hopper
Control panel
OVERVIEW
Night light
Food tray
Food outlet
Page 5
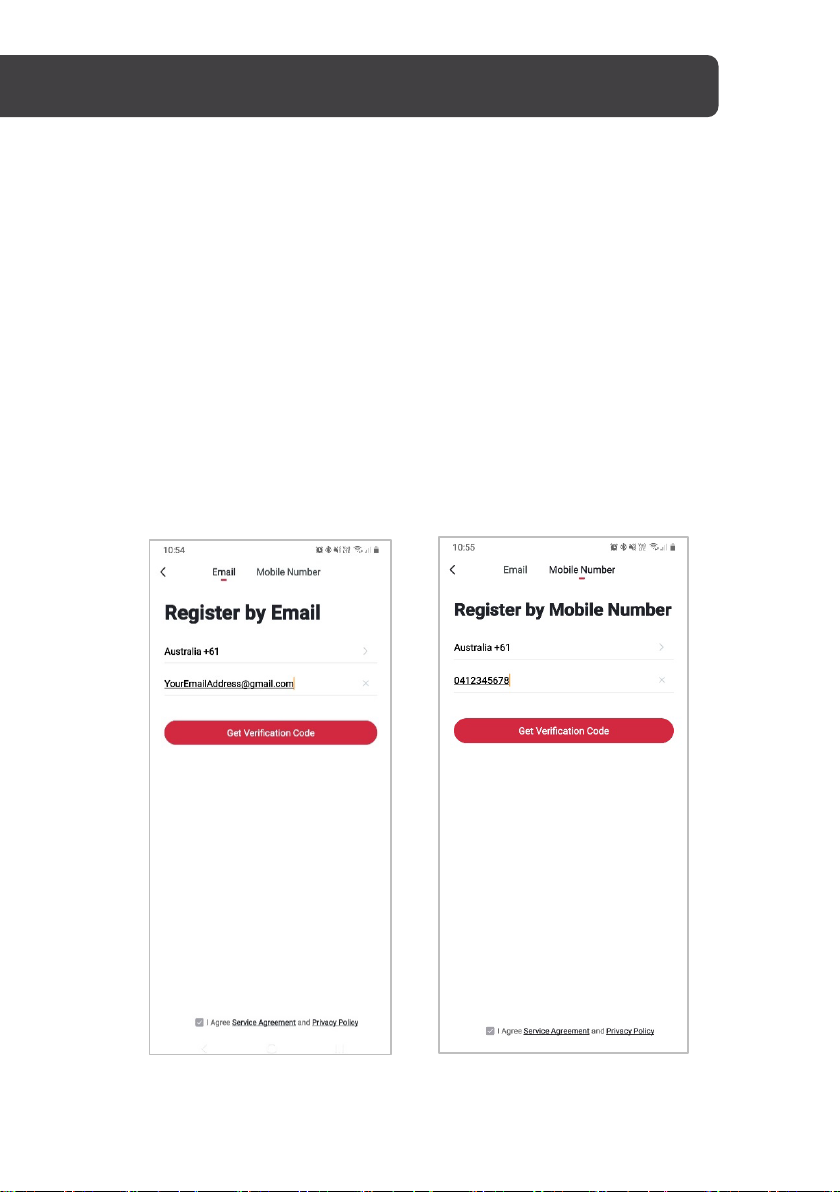
CONNECT TO SMARTERHOME™ APP
Install App
Download the “Kogan SmarterHome” app from the Play Store (Android) or App Store (iOS).
Register
If you do not have a Kogan SmarterHome™ account, register or sign in with a verification
code sent by SMS.
To register:
1. Ta p to enter registration page.
2. The system automatically recognises your country/area. You can also select your
country code manually. Enter your email address and tap ‘Next.’
3. Alternatively, you can select ‘Register by mobile number’ and enter the verification
code sent to you by SMS.
4. Create a profile on the next page to define your location and room.
Page 6
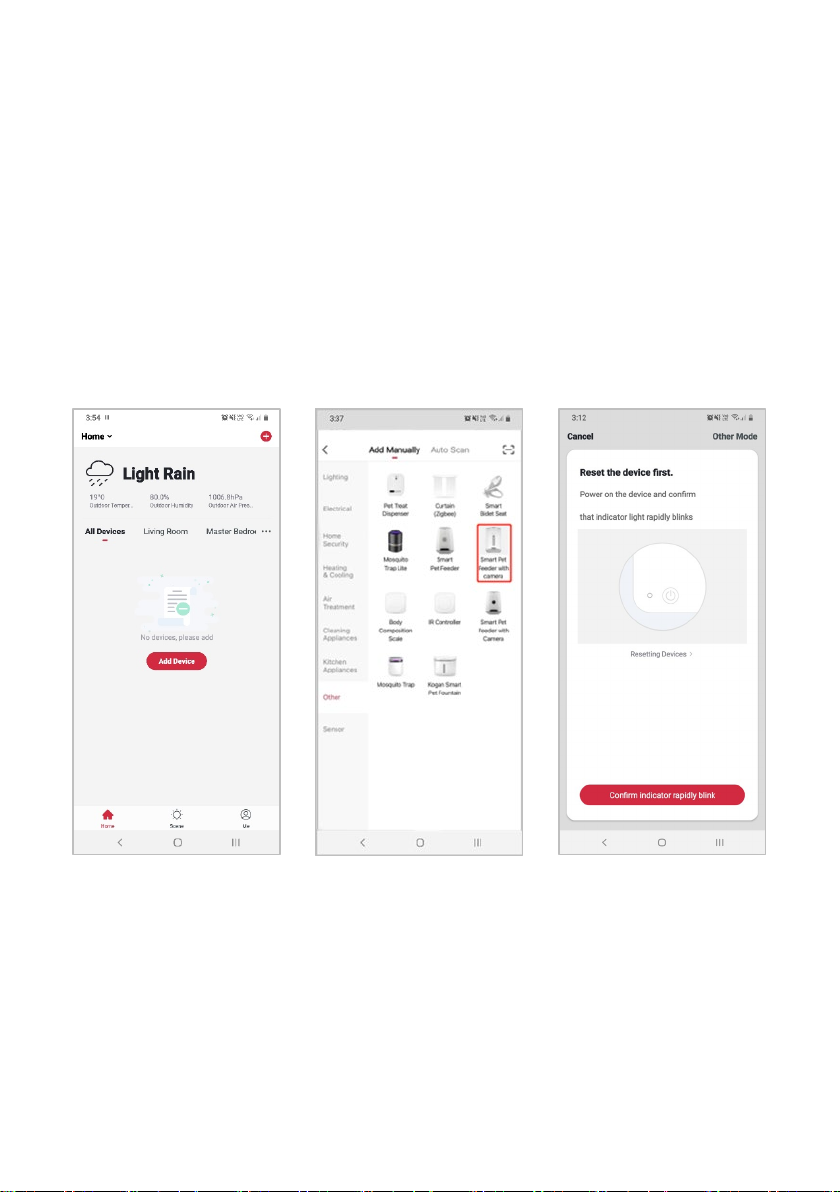
Set device in pairing mode
When the device is first turned on, it may automatically enter pairing mode (the connection
indicator will be rapidly flashing).
If not automatically in pairing mode when powered on, please wait until you hear an “EZ
mode” voice prompt.
Add device through network
5. Once registered, tap “+” in the upper right corner of the app’s home page to add a
new device through the network.
6. Select the product type from the list of options in the app (Other > Smart Pet
Feeder 4.3L).
7. Ensure that the device is in pairing mode, with the connection indicator flashing,
and tap “Confirm light is rapidly flashing”.
Page 7

8. Upon successfully confirming pairing mode, enter your Wi-Fi details. It is important
Notes:
• The device is only compatible with 2.4Ghz networks.
that your SmarterHome™ device and the app are connected to the same Wi-Fi
network during setup.
9. The device will commence the pairing process and connect to the app. Ensure your
Wi-Fi router, mobile phone, and the SmarterHome™ device are kept close until
connection is complete.
10. After successfully being added, you will have the option to rename the device and
assign it to a location. It will now be listed on the app’s home page. Tap the device
listing to enter its control page.
The device and the app have to use the same Wi-Fi network.
•
If you are unable to connect the pet feeder after repeated attempts, try following the AP
mode connection steps on the following page.
Page 8
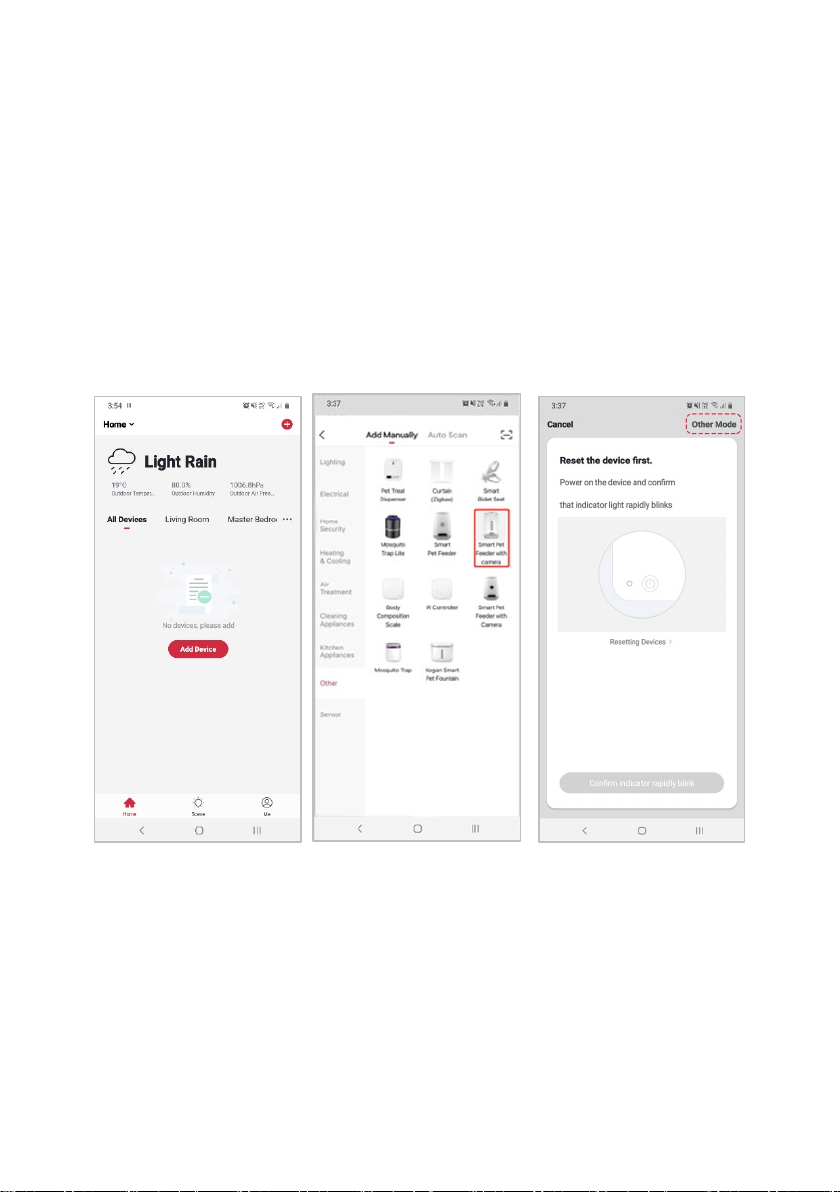
AP mode connection steps
Set device in pairing mode
To set the device to AP mode pairing, press and hold the Reset button for 5 seconds and
wait until you hear an “AP mode” voice prompt. The connection indicator will be slowly
flashing.
Using AP Mode to add device
1. Once registered, tap “+” in the upper right corner of the app’s home page to add a
new device through the network.
2. Select the product type from the list of options in the app (Other > Smart Pet
Feeder 4.3L), and then select “Other Mode” from the top-right corner when asked
to proceed.
Page 9
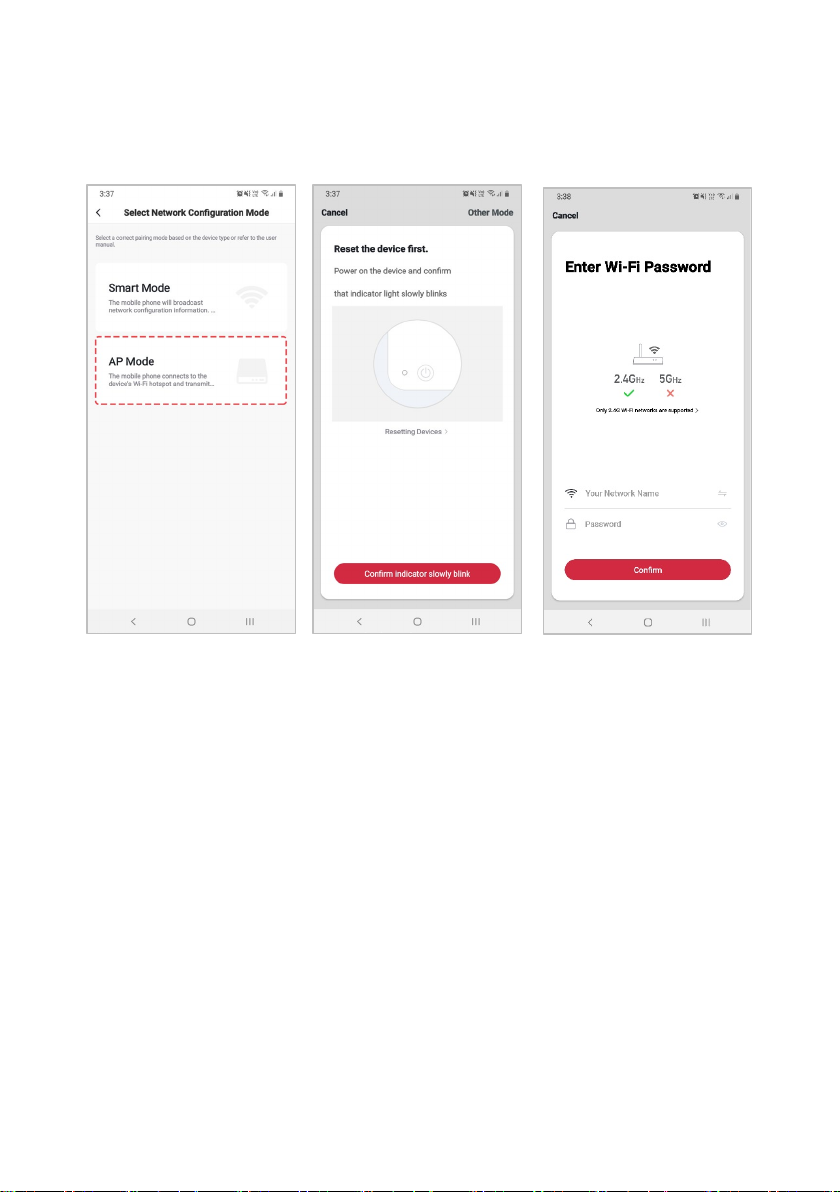
3. Select “AP Mode” for the set-up type.
4. Ensure that the device is in pairing mode, with the connection indicator slowly
flashing, and tap “Confirm light is slowly flashing”.
5. Enter your Wi-Fi details. It is important that your SmarterHome™ device and the
app are connected to the same Wi-Fi network during setup.
Page 10
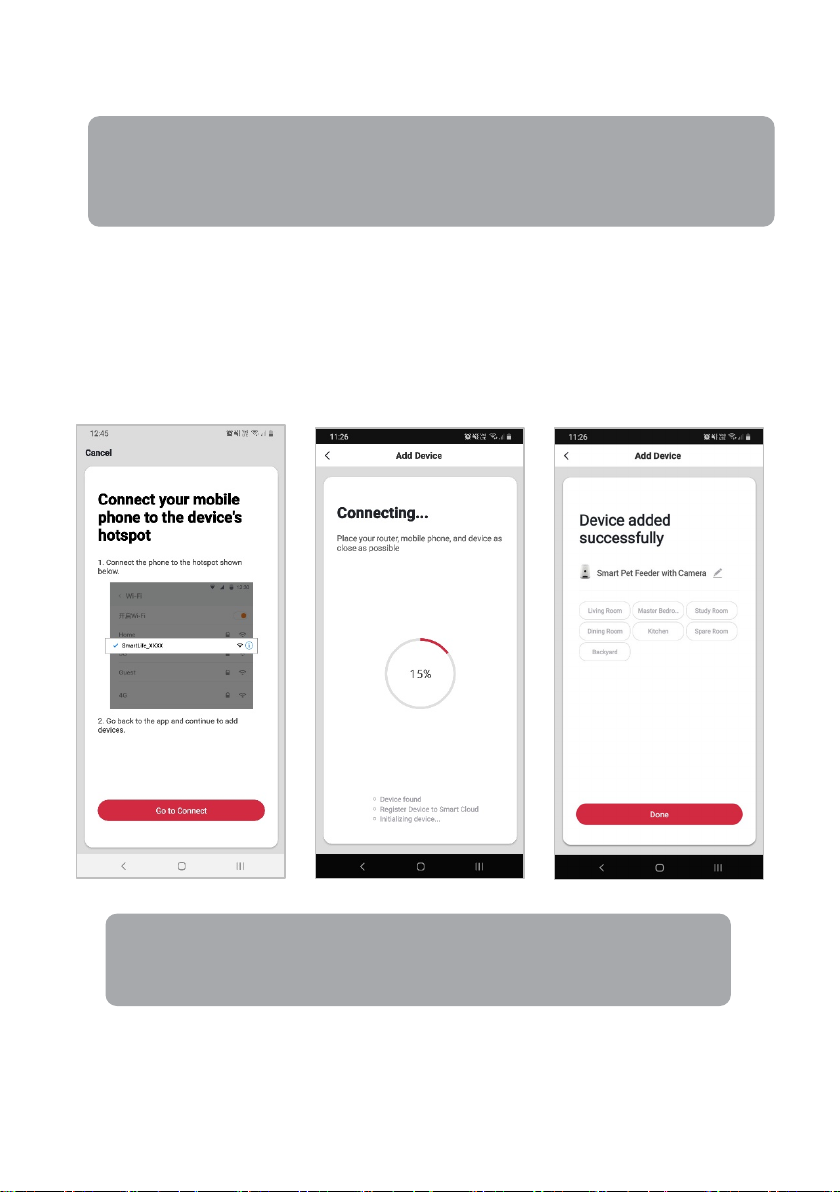
6. Follow the in-app prompts to continue AP Mode connection, which will pair your
Notes:
• The device is only compatible with 2.4Ghz networks.
Note:
mobile phone to the device’s Wi-Fi hotspot to ensure a connection.
If the Wi-Fi hotspot does not appear on your phone in the list of available
networks, your device may not be set in AP Pairing Mode correctly. Try repeating
the steps outlined above to ensure your device is ready for connection.
7. The device will commence the pairing process and connect to the app. Ensure your
Wi-Fi router, mobile phone, and the SmarterHome™ device are kept close until
connection is complete.
8. After successfully being added, you will have the option to rename the device and
assign it to a location. It will now be listed on the app’s home page. Tap the device
listing to enter its control page.
The device and the app have to use the same Wi-Fi network.
•
Page 11
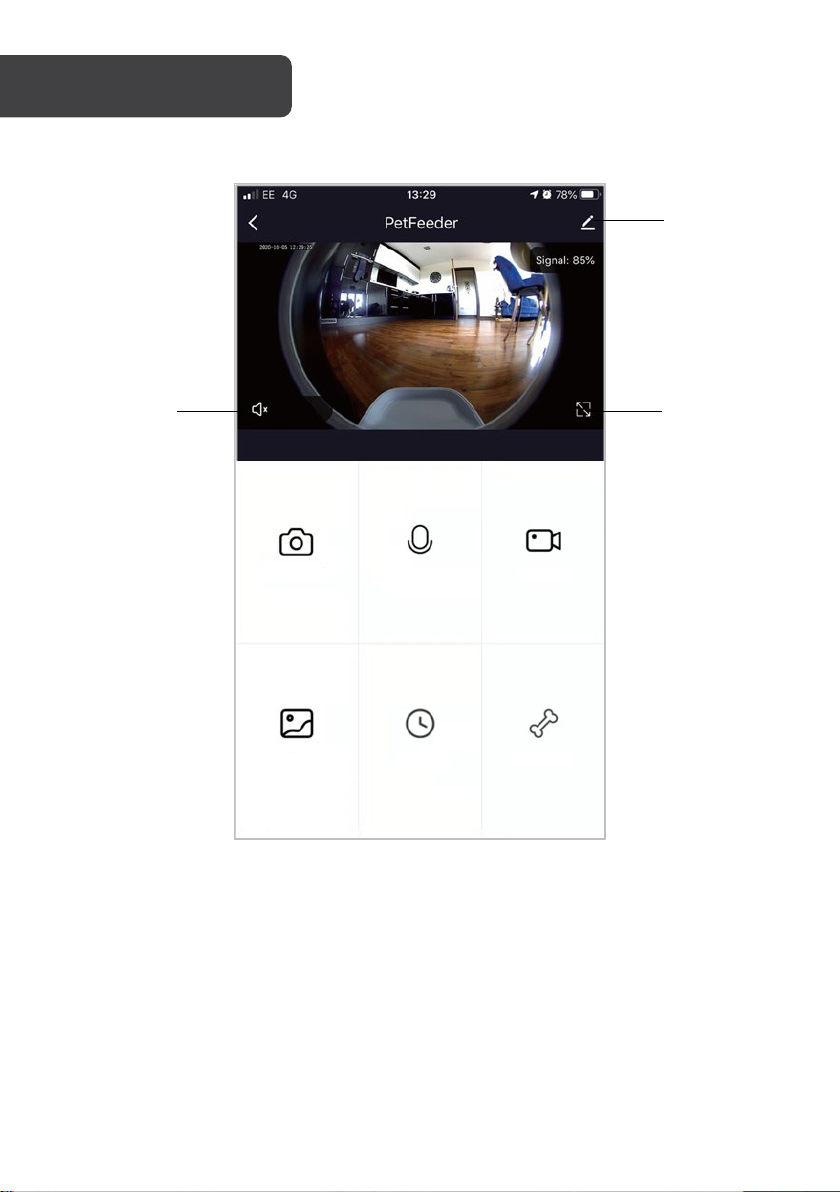
Functions
Snapshoot
Tapping will capture a photo of the camera’s current view.
Began to speak
Turns on the microphone to talk to whoever is near the pet feeder.
Video
Records video footage.
Album
View captured photos and videos.
Timing
Allows scheduling for feed times.
Feeding
Allows for manual feeding.
Mute/Unmute
Fullscreen
Settings
Snapshoot
Began to speak
Video
Album
Timing
Feeding
OPERATION
App interface
Powering the pet feeder
Page 12
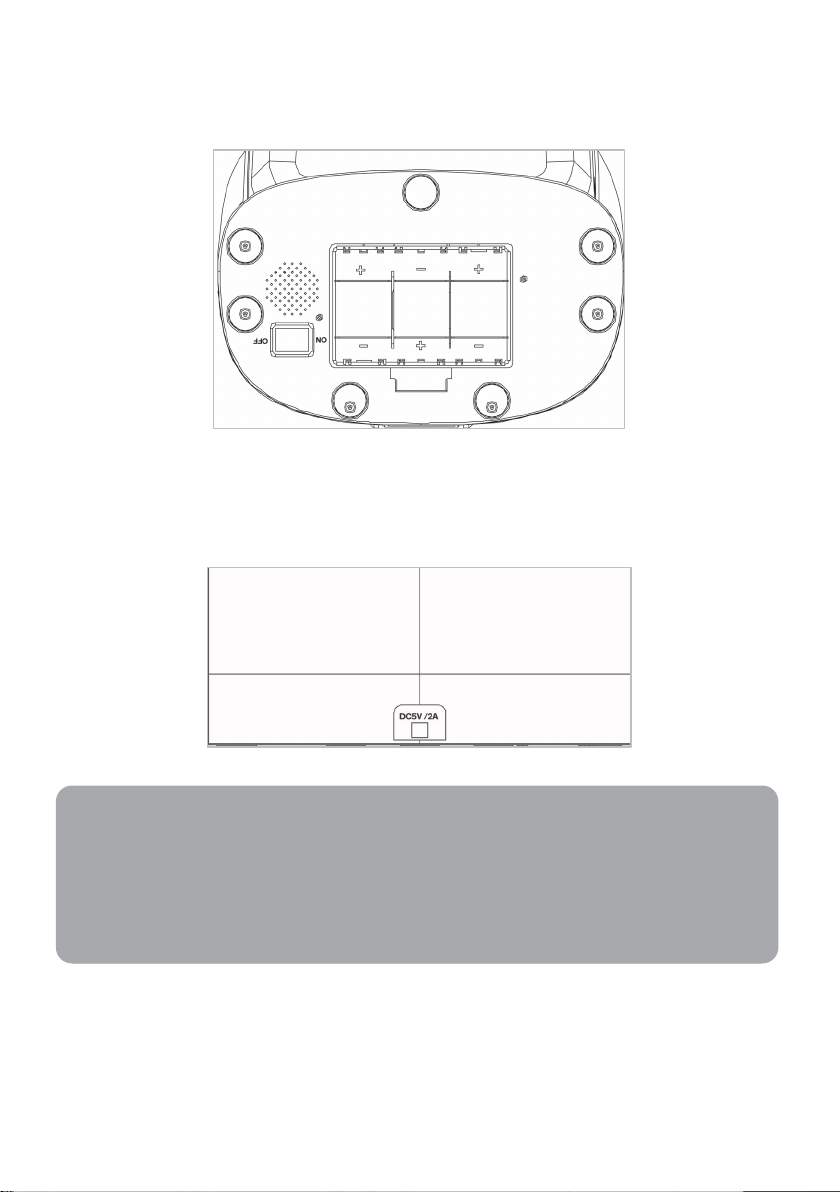
This pet feeder can be powered via batteries or the included power adapter.
Notes:
If powering by batteries, insert 3x D batteries (not included) into the bottom of the main
body. Turn the power switch on.
If using the power adapter, plug the cable end into the DC power port, and the other into a
pocket socket. Turn the power on.
• If powered by batteries, the pet feeder will only dispense food based on the
scheduled feeding times set by users on the SmarterHome™ app. The pet feeder
will appear as offline.
• If users wish to gain full functionality, or change any settings using the
SmarterHome™ app, use the power adapter to power the pet feeder.
Page 13
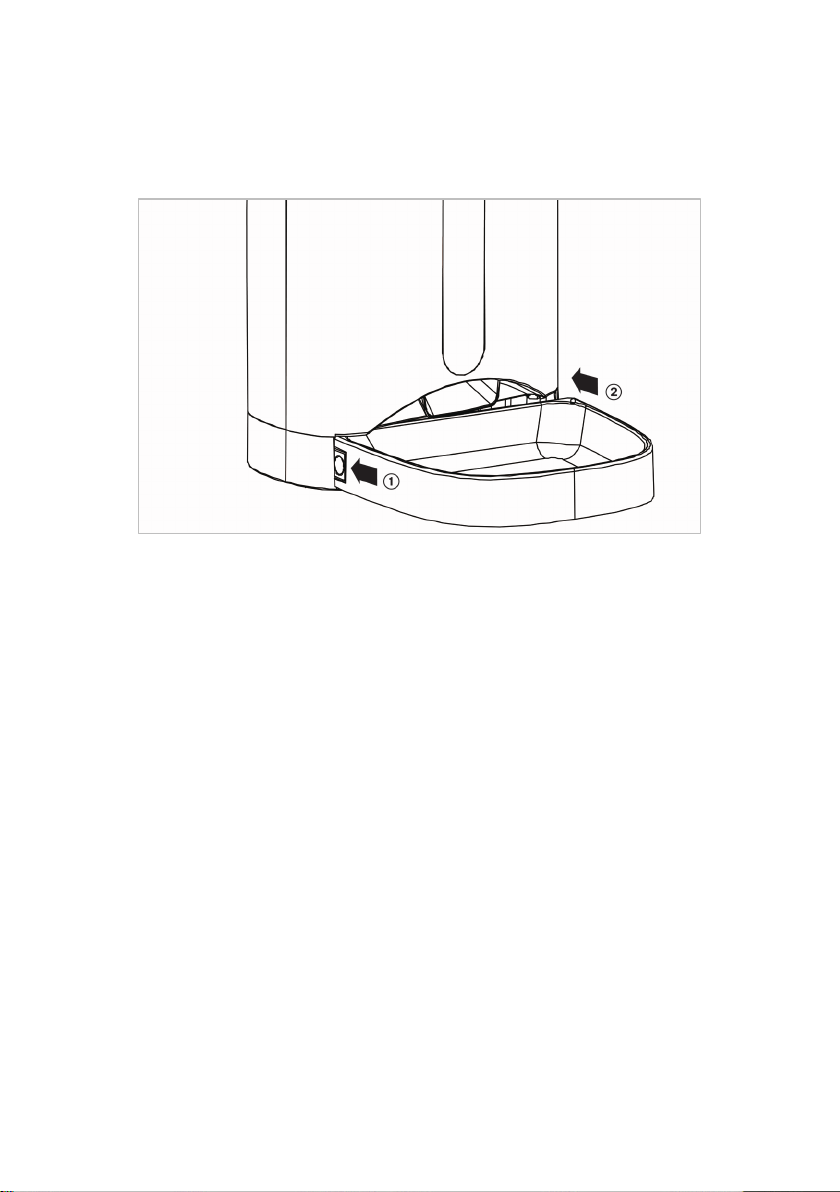
1. Connect the pet feeder with the SmarterHome™ app as above.
2. Press the lock button to lift the top cover and reveal the feed hopper.
3. Pour pet food into the feed hopper. Press down on the cover to lock.
4. Push the food tray under the pet feeder.
5. Open the SmarterHome™ app and press “Feed”. Choose the number of portions
you would like dispensed. Upon confirming, the pet food will be released into the
food tray.
Page 14
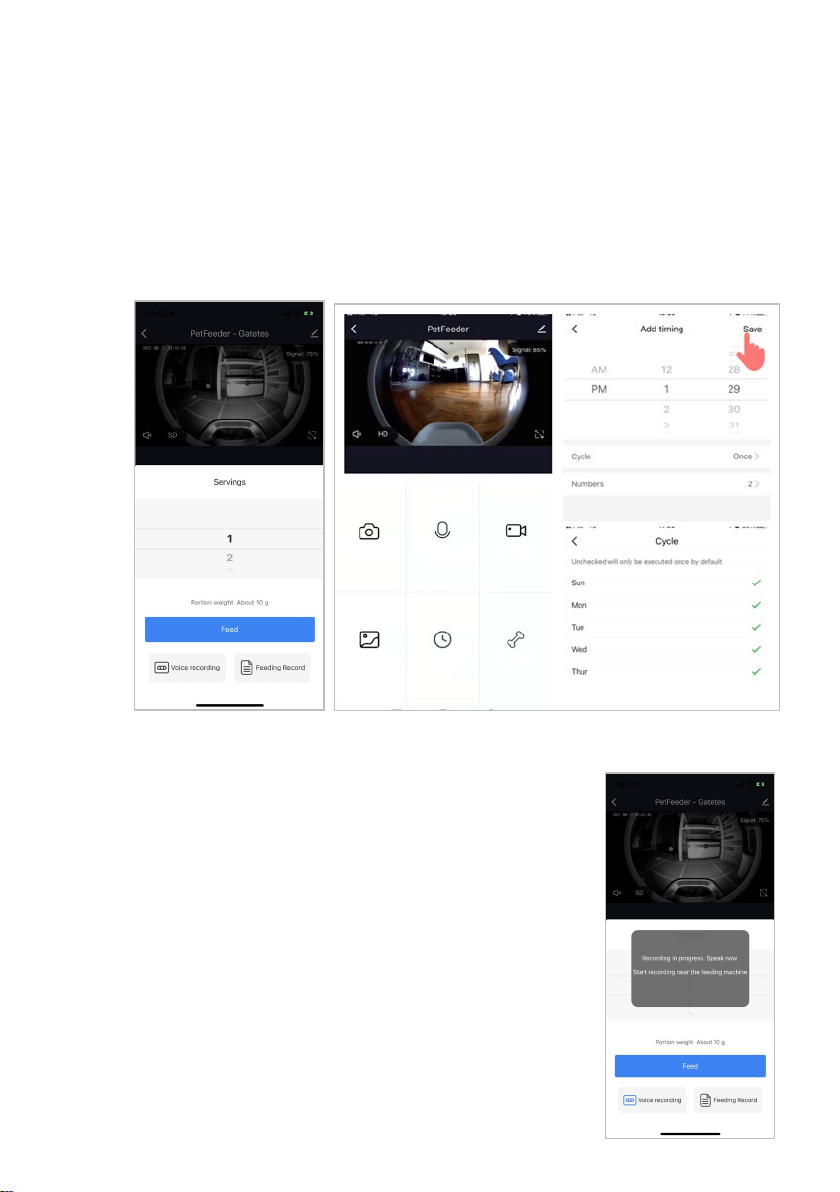
Scheduling multiple feeds
Snapshoot
Began to speak
Video
Album
Timing
Feeding
In the SmarterHome™ app, you can schedule times for the pet feeder to dispense food for
your pet.
Tap “Schedule” to add feeding times. Various feeding times and their respective portions
can be set. Tap “Save” after each scheduling each meal. You can set up to 4 meals and 10
portions per meal.
In the overview displaying all pre-scheduled times, you can also activate or deactivate
individual times.
Voice recording
You may also record a short 10 second recording that is activated
whenever your pet has their scheduled feeding time. Tap “voice
"recording” to record.
Page 15
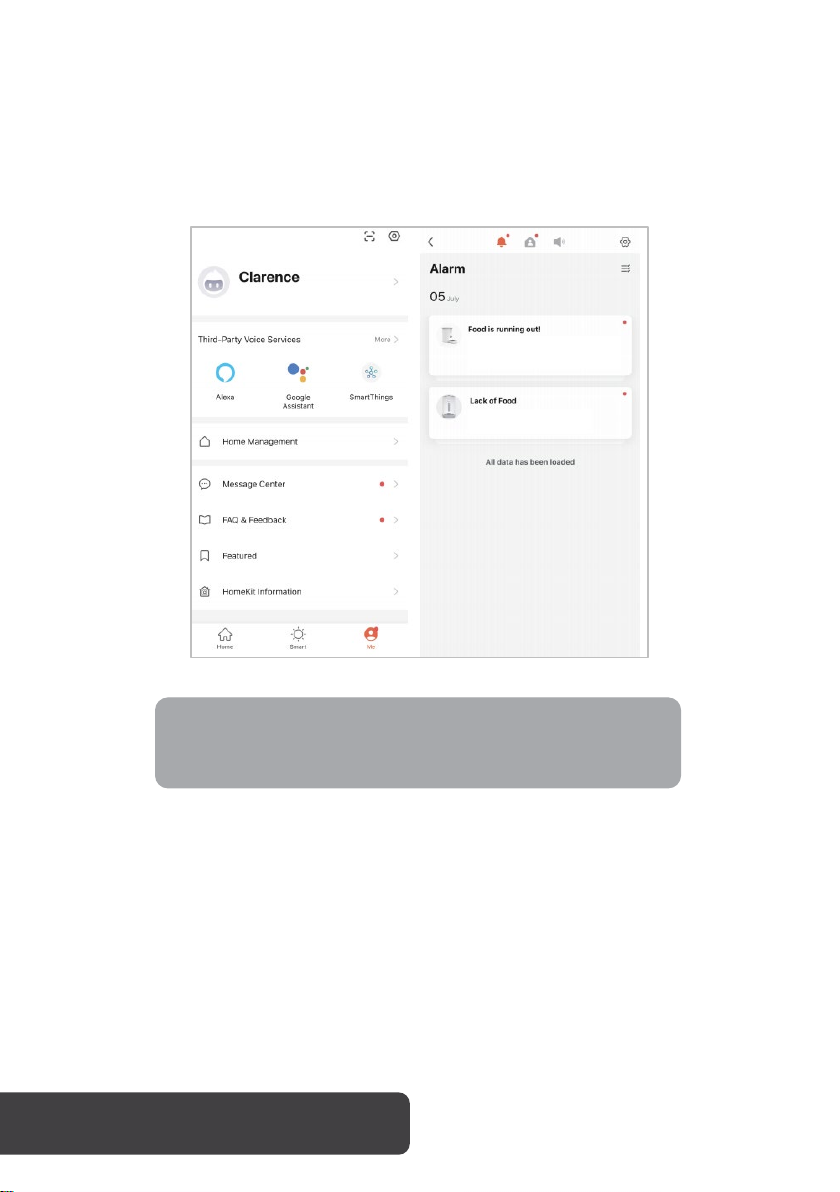
Notifications centre
Note:
In the “Message Center” under the “Me” tab in the SmarterHome™ app, you can manage,
activate or deactivate notifications.
Activating notifications will allow the pet feeder to send alerts at each feeding time, when
the feed hopper needs refilling, and when your pet approaches the pet feeder.
Other settings
You can access additional features by tapping “Settings” to go to the settings menu. These
include:
• Checking the feeder’s status.
• Activating IR (night) vision
• Activating and deactivating motion detection
• Flipping the display on the screen
• Sharing the pet feeder with other users (for example, others living in the household).
• Setting one or two-way audio.
CLEANING & CARE
The images shown in this user guide are for reference only.
Page 16
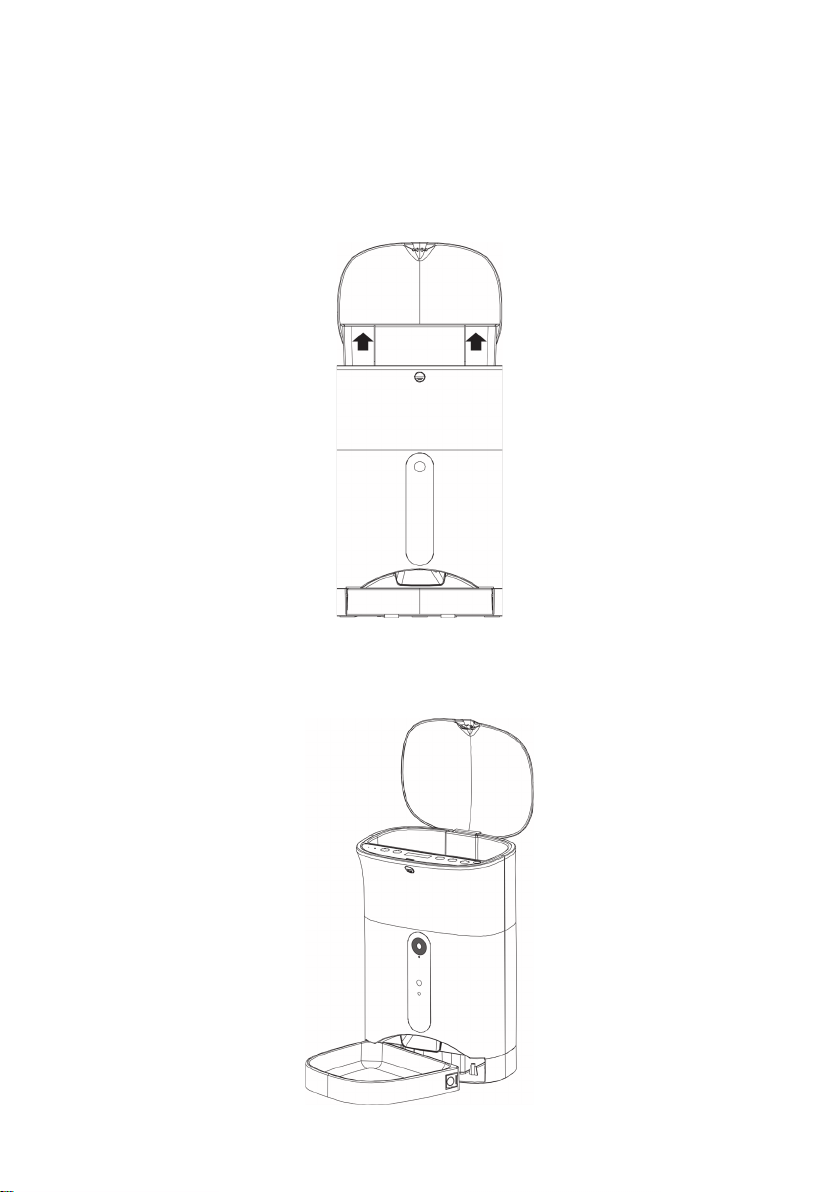
Ensure the pet feeder is turned off and the power is disconnected before attempting to
clean.
1. Open the top cover and use both hands to lift out the feed hopper.
2. The food tray can be removed for cleaning. Press the side buckles on the left and
right of the bowl to release. Pull the food tray out and slightly upwards.
Page 17
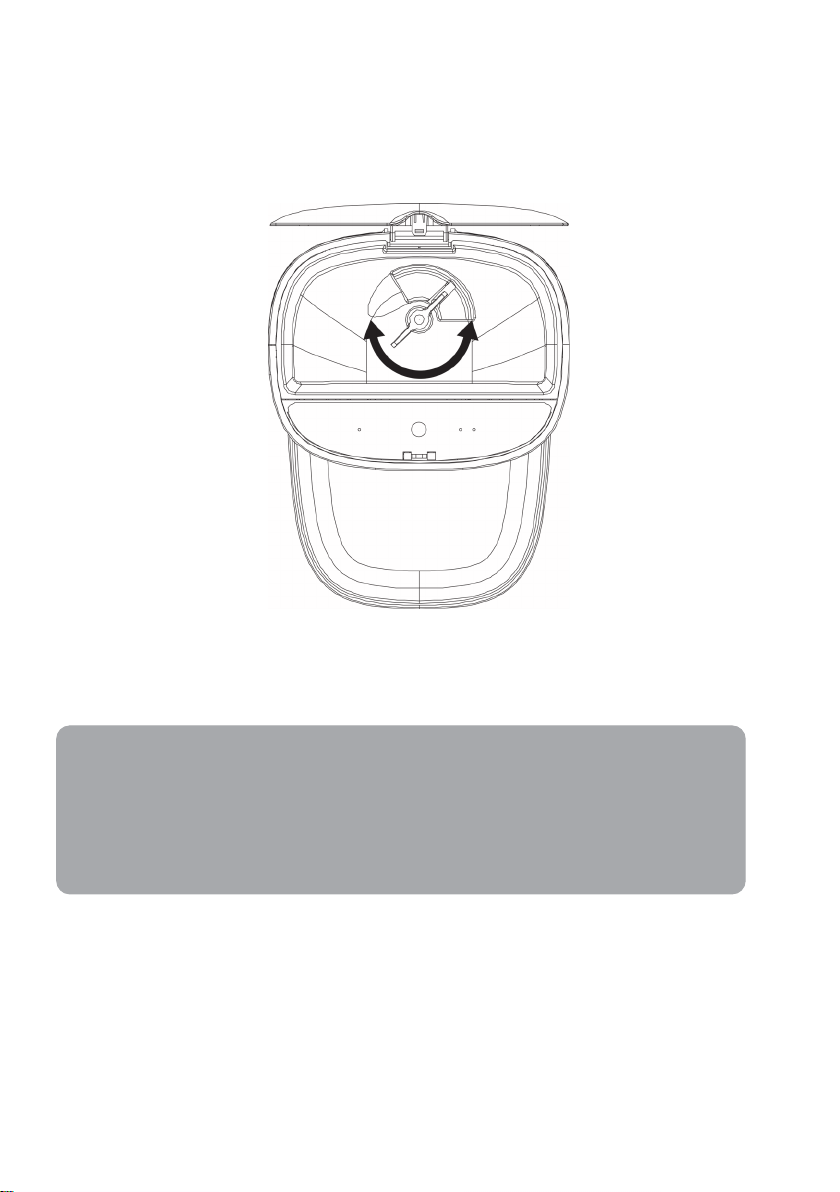
3. Wipe the feeder’s body with a damp soft cloth dipped in a small amount of soapy
Notes:
water. Do not use a fully soaked cloth. The feed hopper and food tray may be
washed with soap with water.
4. Once cleaned, open the top cover and rotate the impeller inside, placing the feed
hopper back in to secure the feed hopper to the bottom.
5. Push the food tray under the pet feeder. The pet feeder is now ready for use.
• Never submerge the main body in water as it may cause the pet feeder to
short circuit.
• Ensure that all parts are clean and fully dry before operating the pet feeder.
• The food tray and feed hopper are dishwasher safe.
Page 18

NOTES
Page 19

Need more information?
We hope that this user guide has given you
the assistance needed for a simple set-up.
For the most up-to-date guide for your product,
as well as any additional assistance you may require,
head online to help.kogan.com
 Loading...