

Page 1
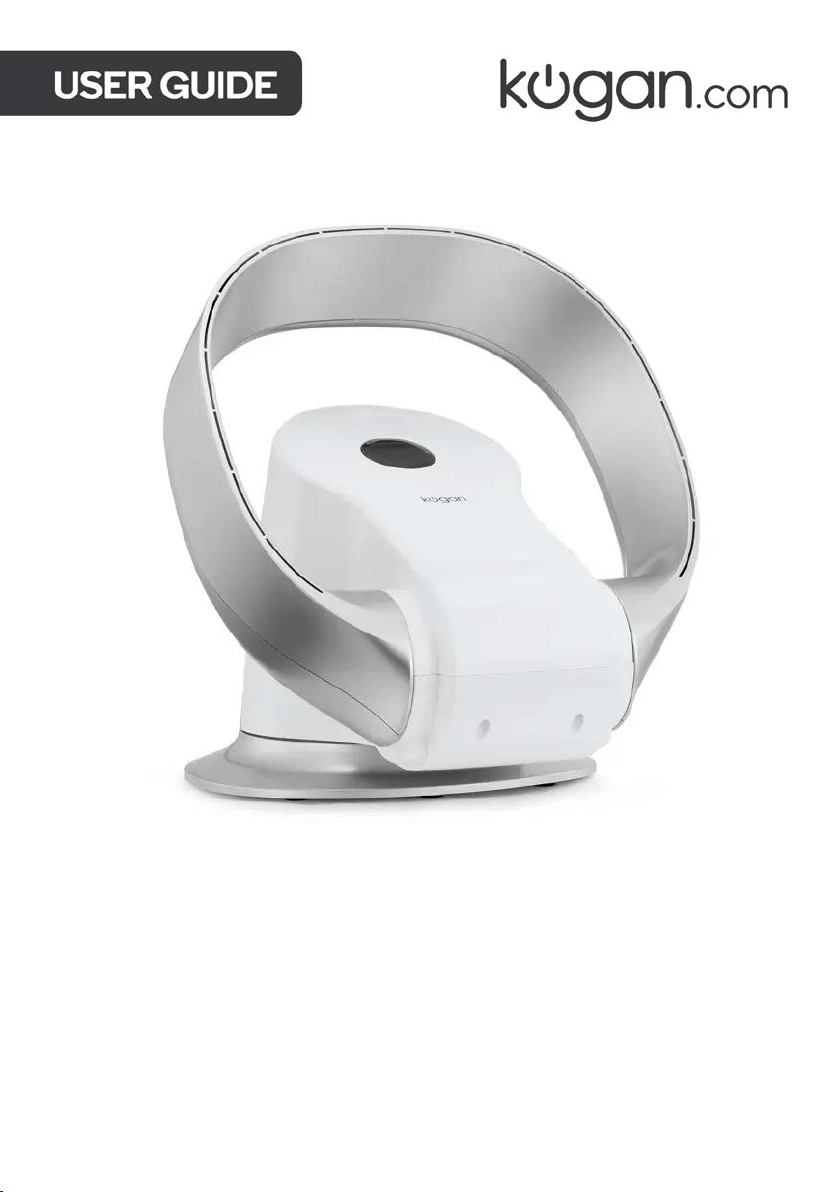
KOGAN SMARTERHOME™
BLADELESS TURBO FAN
(SILVER)
KASBLSTFANSA
Page 2

Page 3

SAFETY & WARNINGS
• To operate this device safely, the user must read and understand these instructions
before using the device for the first time.
• Observe all safety instructions. Failing to do, may cause harm to you and others.
• Retain all instructions for use and safety instructions for future reference.
• The device must only be used when it functions properly. If the product or part of the
product is defective, cease use immediately and contact help.Kogan.com for support.
• Never use the device in a room where there is a danger of explosion or in the vicinity of
flammable liquids or gases.
• Always ensure that the device which has been switched off should not be restarted
unintentionally.
• Do not use the device with an on/off switch that does not function correctly.
• Keep the device away from the way of children and other unauthorised persons.
• Do not overload the device. Do not use the device for the purposes for which it is not
intended.
• Exercise caution and only work when in good condition. If you are tired, ill or if you have
ingested alcohol, medication or illegal drugs then don't use the device as you are not in
a condition to use it safely.
• This product is not intended to be used by persons (including children) or who are
limited in their physical, sensory or mental capacities or who lack experience and/or
knowledge of the product unless they are supervised or have been instructed on how to
use the product by a person responsible for their safety.
• Ensure that children are not allowed to play with the device.
• Always comply with all applicable domestic and international safety, health and
working regulations.
• If the power supply cord is damaged, it must be replaced by the manufacturer or its
service agent or a similarly qualified person, in order to avoid a hazard.
Page 4
Play Store (Android)
App Store (iOS)
Install App
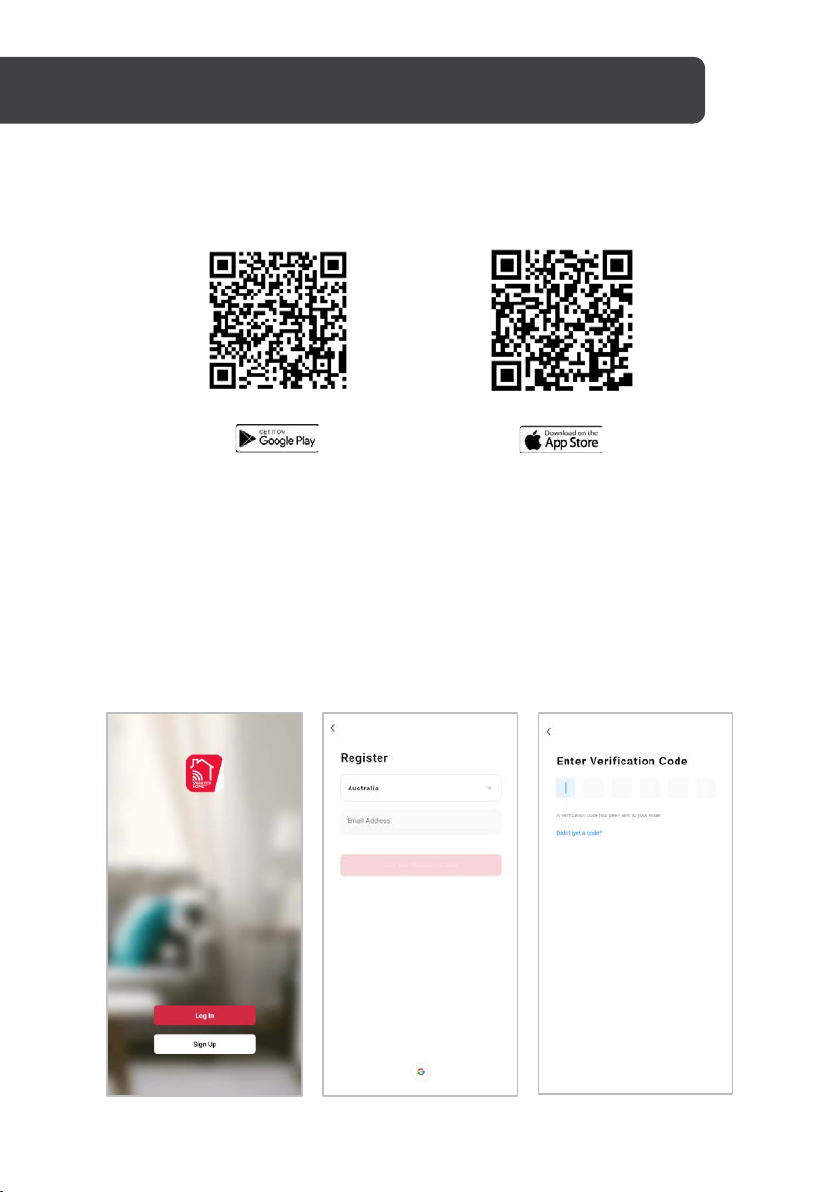
Download the “Kogan SmarterHome” app from the Play Store (Android) or App Store (iOS).
To register:
1. If you already have a SmarterHome account, select ‘Log In’. To register a new
account, select ‘Sign Up’.
2. The system will automatically recognise your country. If needed, you can manually
select your country from the drop-down box. Enter your email address and tap
‘Get Verification Code’ to continue.
3. A 6-digit code will be sent to the submitted email address. Enter this code before
the one-minute timer expires.
4. Continue to the next page and complete your SmarterHome profile.
Page 5
Set device in pairing mode
Notes:
• The device and the app have to use the same Wi-Fi network.
• The device is only compatible with 2.4Ghz networks.
• Depending on the product, Steps 3 and 4 may be in opposite order.
When the device is first turned on, it may automatically enter pairing mode (the Wi-Fi light
will be flashing rapidly).
If not automatically in pairing mode when powered on, you can manually set the air
conditioner in pairing mode by pressing and holding the fan button on the control panel for
5 seconds until the Wi-Fi indicator light begins flashing rapidly.
Add device through network
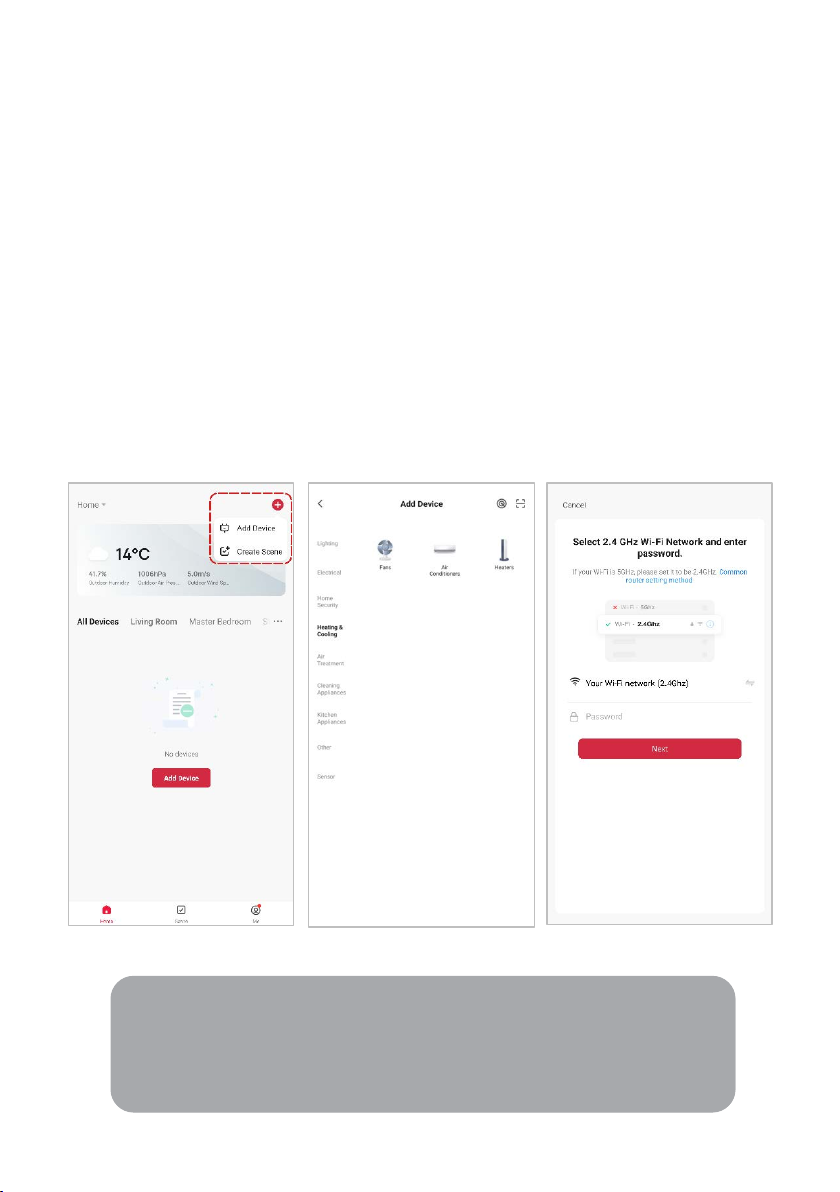
1. Once registered, tap “Add Device” on the app’s home page, or the “+” in the upper
right corner, to add a new device through the network.
2. Select the product type from the list of options in the app (Heating & Cooling > Air
Conditioners).
3. Enter your Wi-Fi details. It is important that your SmarterHome™ device and the
app are connected to the same Wi-Fi network during setup.
Page 6
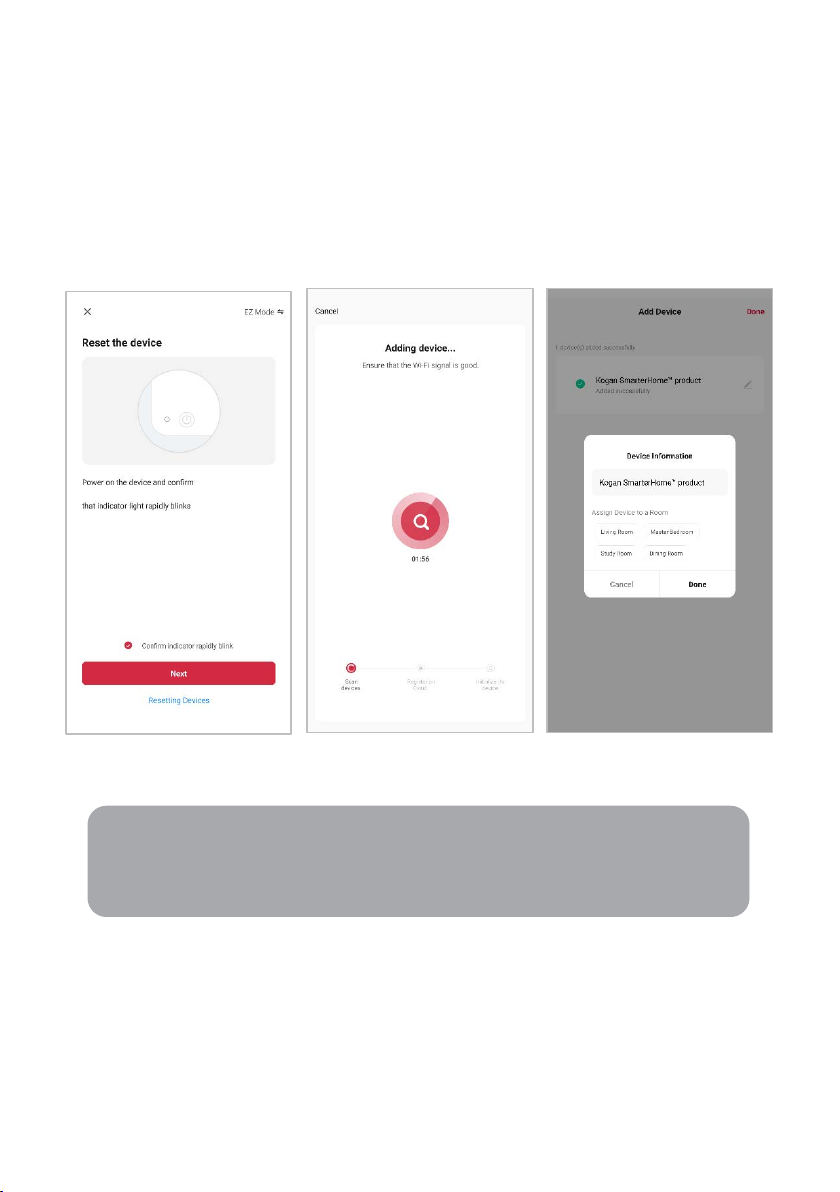
4. Ensure that the device is in pairing mode, with the the Wi-Fi light flashing rapidly,
Note:
Once connected, you can select Create Scene from the “+” in the upper right
corner (or from the Scene tab) to group connected SmarterHome™ products
and automate their functions.
and tap “Confirm light is rapidly flashing”.
5. The device will commence the pairing process and connect to the app. Ensure
your Wi-Fi router, mobile phone, and the SmarterHome™ device are kept close
until connection is complete.
6. After successfully being added, you will have the option to rename the device and
assign it to a location. It will now be listed on the app’s home page. Tap the device
listing to enter its control page.
Page 7
Note:
You will need to have set up a Google Home account prior to linking
your Kogan SmarterHome™ device.
Adding “SmarterHome” to the Google Home app
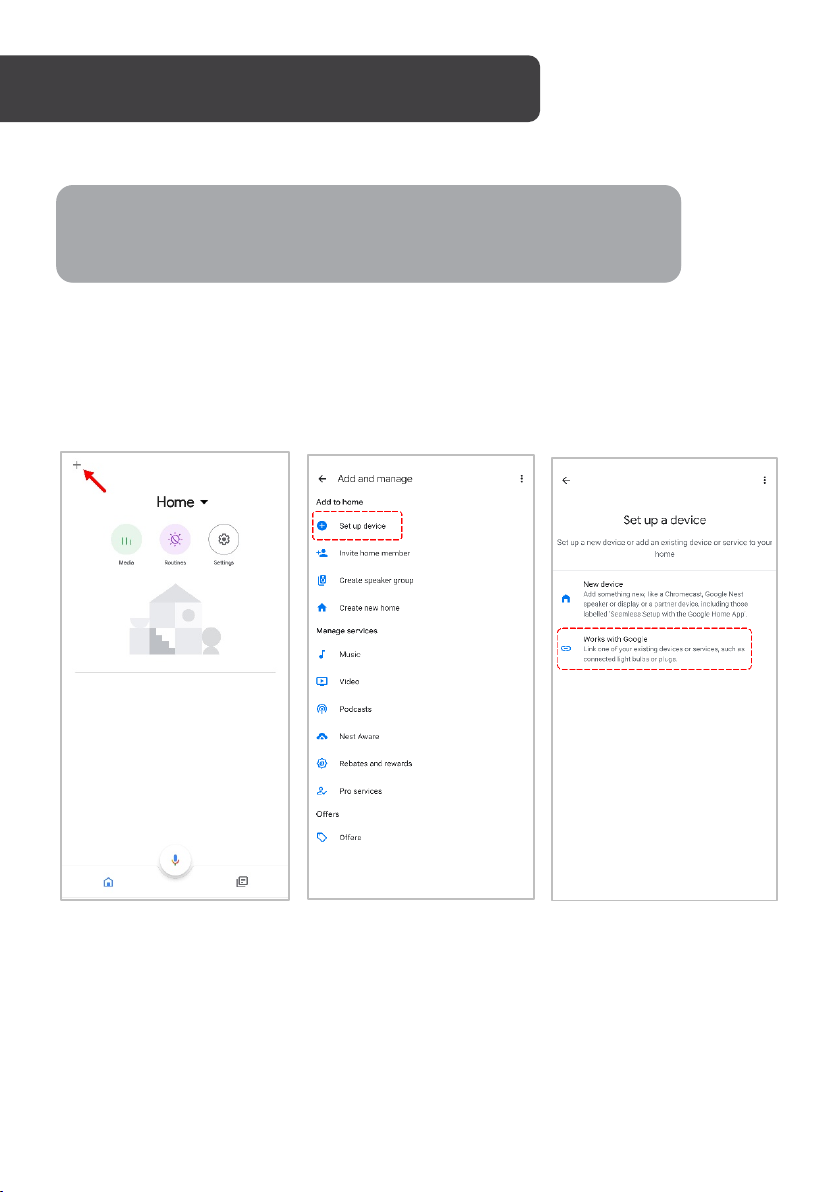
1. From the home page of the Google Home app, select the “+” icon (top left corner,
see arrow in the below screenshot) to access the ‘Add and manage’ page.
2. Select ‘Set up device’, then select the ‘Works with Google’ option.
Page 8
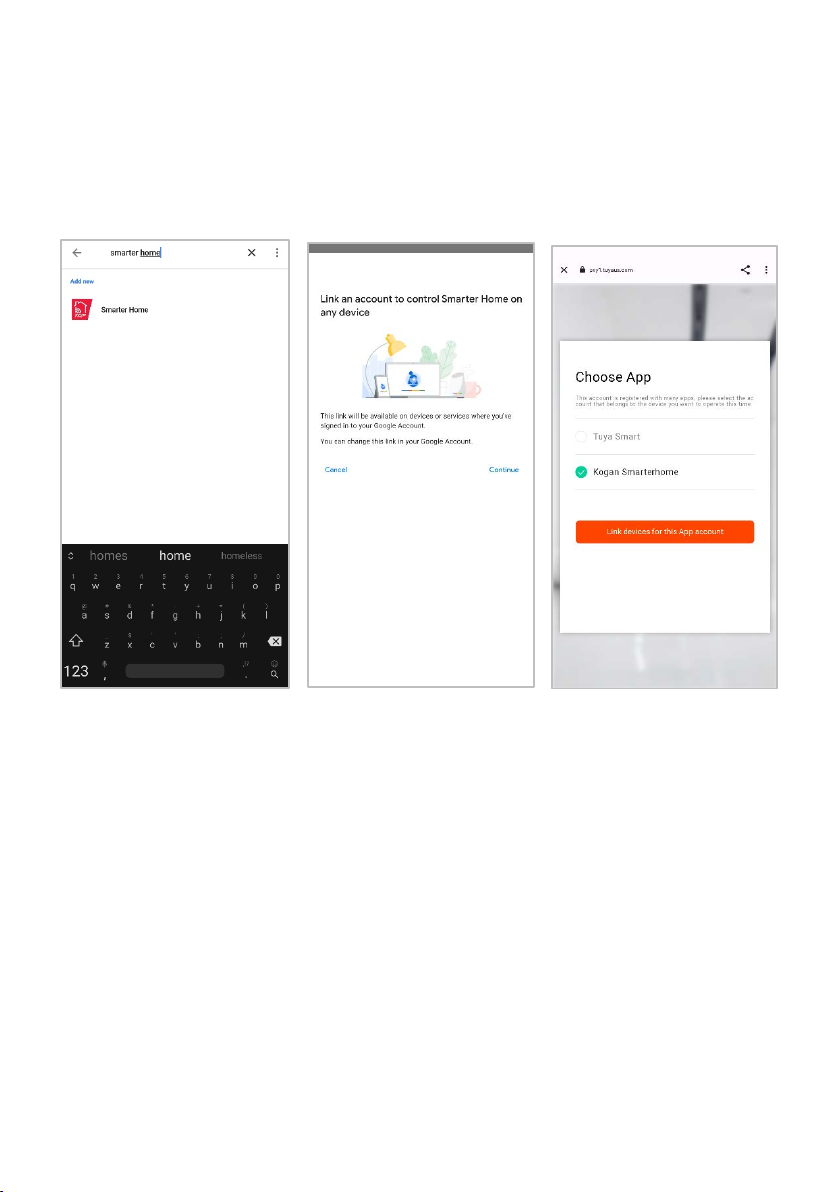
3. Select the search bar and type ‘Smarter Home’ to locate the Kogan
SmarterHome™ service.
4. From here, you will be prompted to sign into your SmarterHome™ account using
either your email or mobile phone number, depending on which method you used
to register your account.
5. Select “Kogan SmarterHome™” from the app options.
Page 9
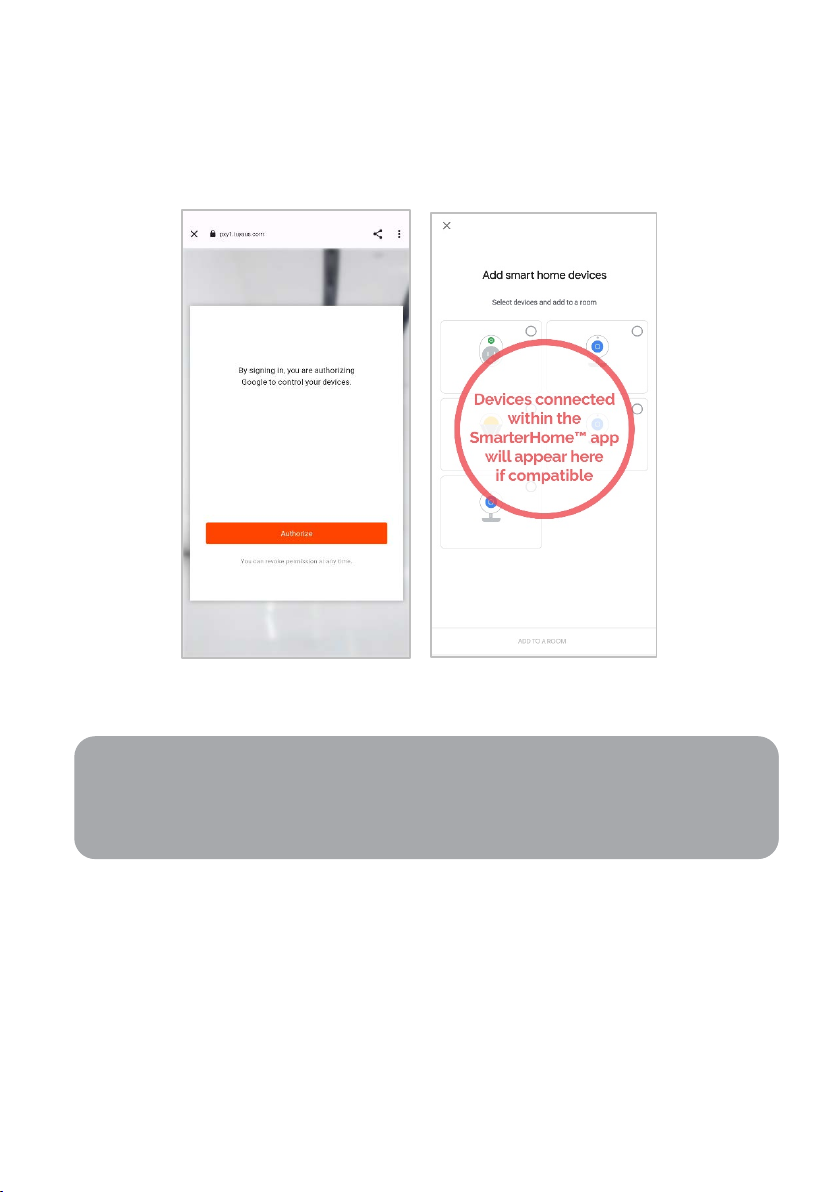
6. Tap ‘Authorise’ to grant Google permission to access the SmarterHome™ app and
Note:
Please note that Google Home can only control the base/core functions of any
compatible SmarterHome™ devices. To make full use of this product’s smart
functionality, please use the Kogan SmarterHome™ app.
your devices.
7. Once connected, the app will display any compatible devices linked to your
SmarterHome™ account. From here you can assign them to rooms and set up any
routines. Tap on any of the devices to view a list of available commands.
Page 10
Note:
Yo u w i l l n e ed t o h a ve s et u p a n Al e xa account prior to linking your Kogan
SmarterHome™ device.
Adding “SmarterHome” to the Alexa app
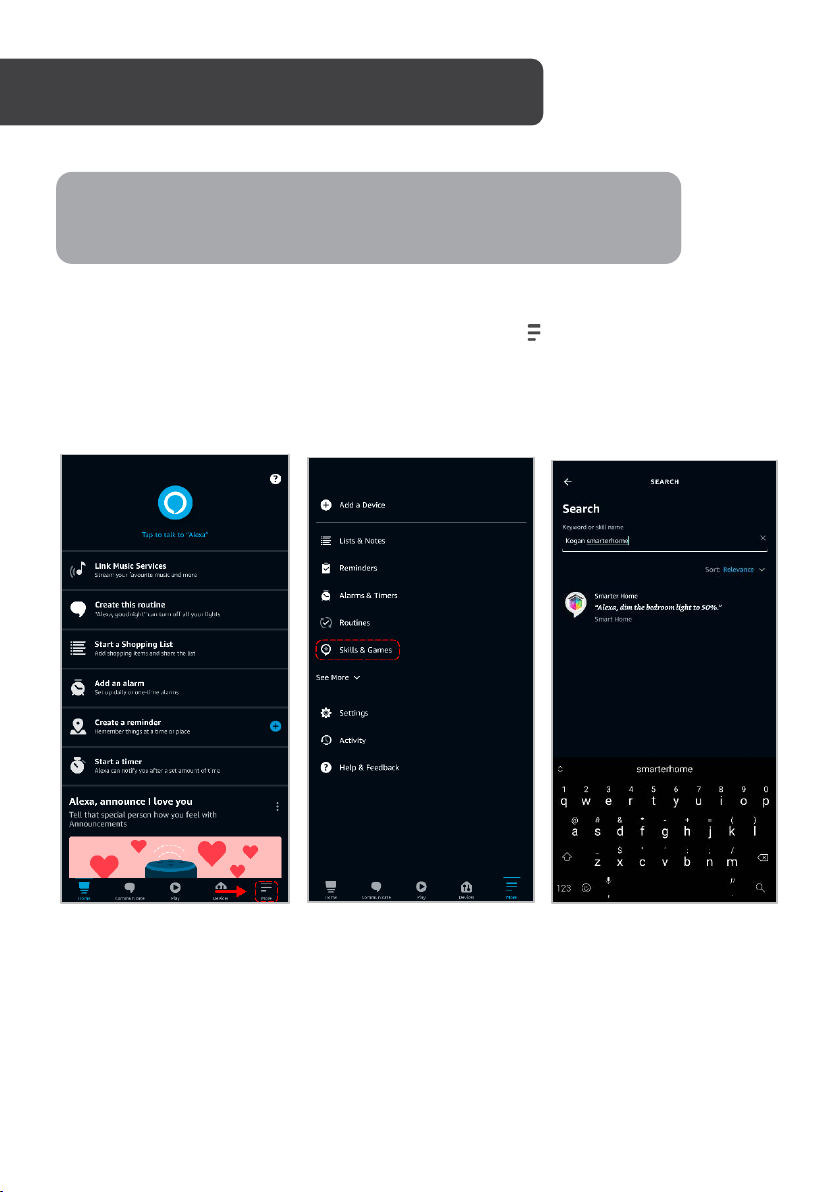
1. From the home page of the Alexa app, select the “ ” icon in the bottom-right and
select “Skills & Games” from the sidebar.
2. Select the search bar and type ‘Smarter Home’ to locate the Kogan
SmarterHome™ skill.
Page 11
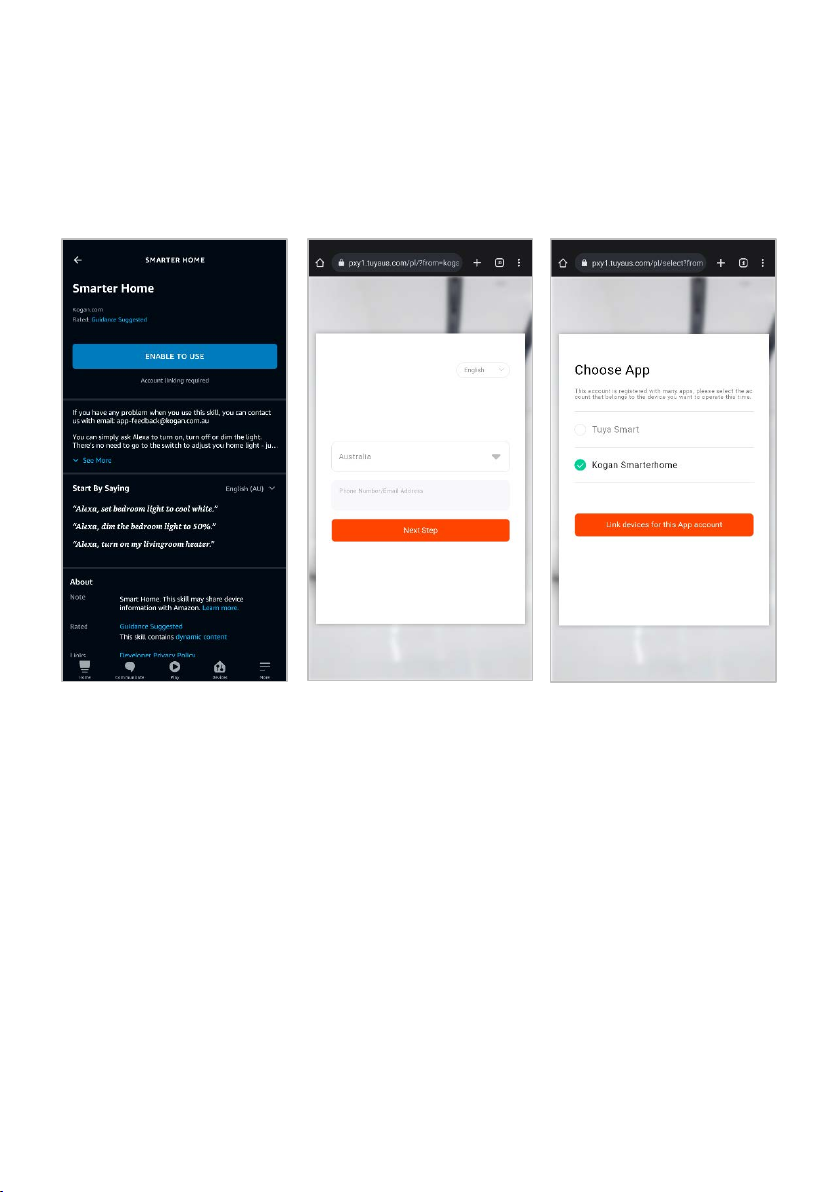
3. Tap ‘Enable to Use’ to add the Kogan SmarterHome™ skill to Alexa.
4. From here, you will be prompted to sign into your SmarterHome™ account using
either your email or mobile phone number, depending on which method you used
to register your account.
5. Select “Kogan SmarterHome™” from the app options.
Page 12
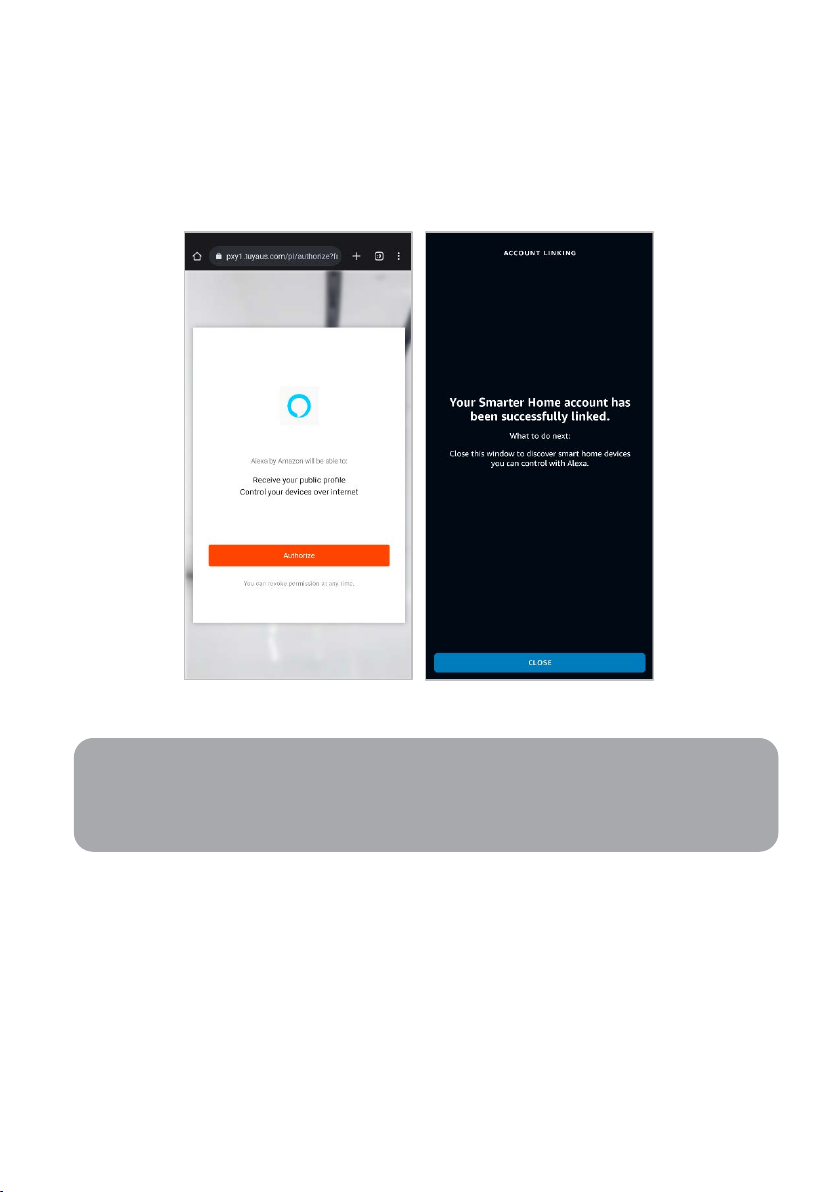
6. Tap ‘Authorise’ to grant Alexa permission to access the SmarterHome™ app and
Note:
Please note that Alexa can only control the base/core functions of any
compatible SmarterHome™ devices. To make full use of this product’s smart
functionality, please use the Kogan SmarterHome™ app.
your devices.
7. Once connected, the app will perform a search and display the devices linked to
your SmarterHome™ account. When your devices have successfully connected to
the Alexa app, you will be able to control your Kogan SmarterHome™ devices via
Alexa’s voice commands.
Page 13
OPERATION
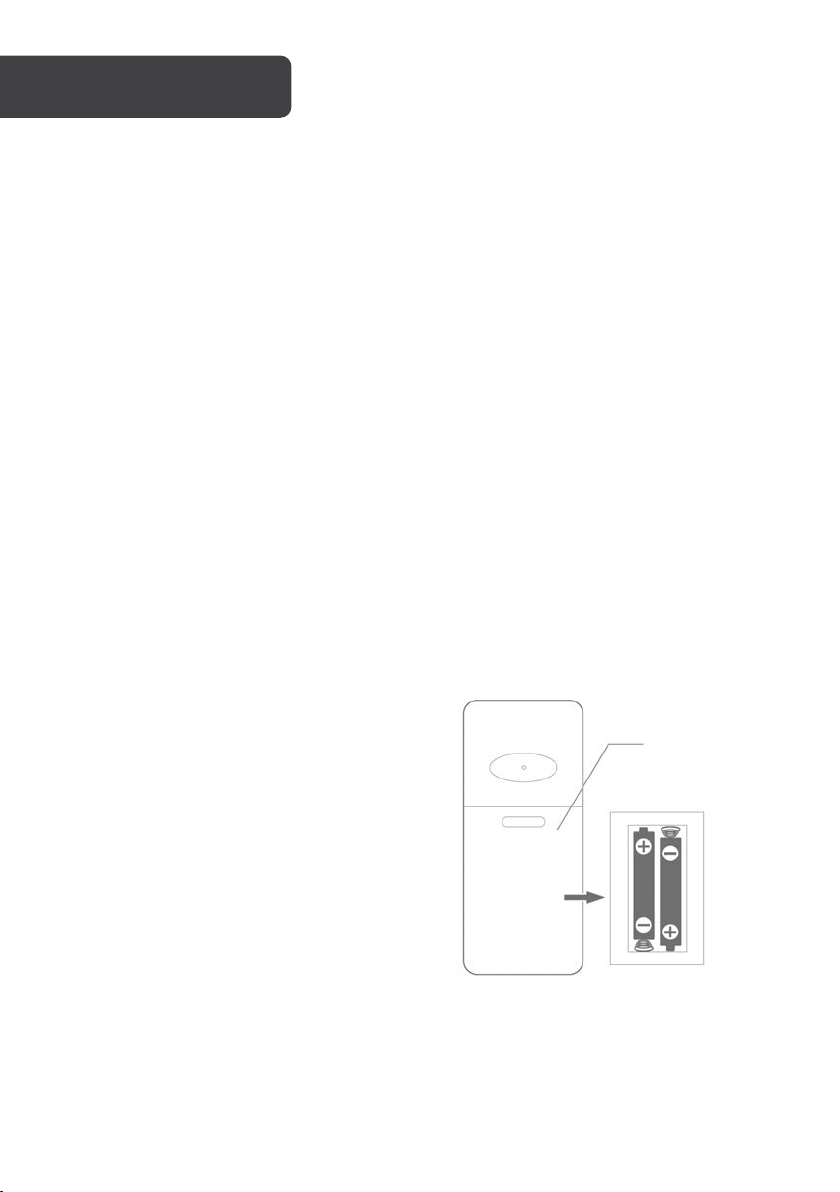
Battery
compartment cover
Read and observe the instructions before using the product for the first time.
• When wall mounting, ensure that the wall is suitable for drilling and strong enough for
hanging a fan. If necessary, employ a qualified technician to help with installation.
• When wall mounting, ensure that the position for drilling is not along the water piping
or electric wiring to avoid danger and damage.
• When wall mounting, ensure that the fan is hanged onto the bracket firmly, otherwise,
the fan may fall off during operation and lead to damage or injury.
• The reception for remote control signals may be interfered by strong lights.
• Avoid installing the fan at a place where there is direct sunlight or other strong lights.
• Make sure to leave adequate space for the fan to oscillate.
• The fan is not designed for mounting onto the ceiling.
Check Before Switching On
Check the safety condition of the product:
• Check for any visible defects
• Ensure all parts of the product are firmly attached
Remote Control Batteries
This remote requires x2 1.5V alkaline AA
batteries.
1. Remove the battery compartment
cover.
2. Install x2 AA batteries into the remote
paying attention to the orientation of
the polarity symbols (+/-).
3. Replace the battery compartment
cover.
Page 14
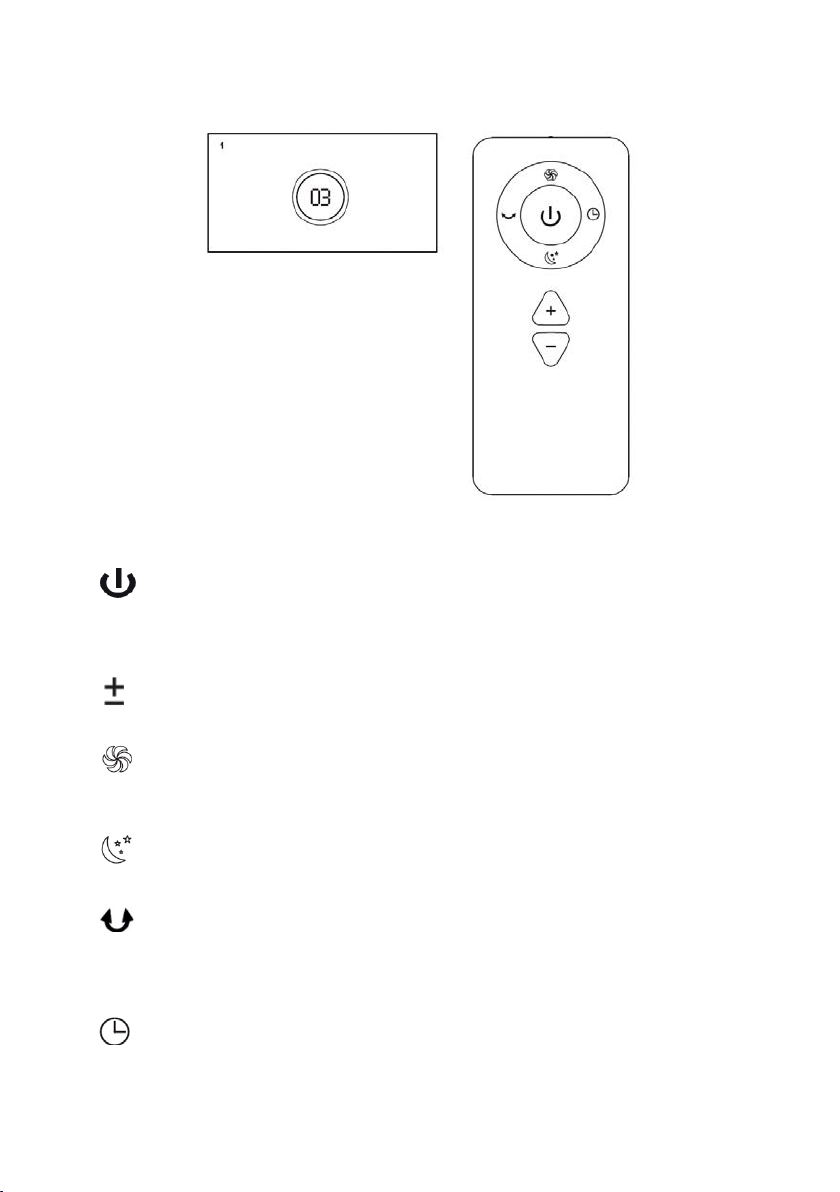
Controls
Place the fan on a dry, flat surface and plug the cord into a suitable 220-240V AC outlet.
• [ ]: By touching the display, switch on the fan and it starts its operation according
to the settings. Press the display again for 2 seconds and then you will hear two
confirmation beep and the fan will turn off. The fan can also be turned on and off with
the remote control.
• [ ]: By touching the display, increase/decrease the fan speed. Features a total of 9
speed levels. Press +/- button on the remote control to set the fan speed.
• [ ]: Maximum fan speed. Press this button on the remote control: the LED display
will shows H for the maximum fan speed. Press +/- button for the fan speed to exit this
mode.
• [ ]: Sleep mode. Press this button on the remote control, the LED display will show L
and fan speed will be reduced. Press +/- button for the fan speed to exit this mode.
• [ ]: Press the display for 1 second to enter oscillation mode. Press and hold the
button again for 1 second until you hear confirmation beep sound once and then the
oscillation mode is cancelled. The oscillation mode can also be controlled via remote
control.
• [ ]: Press this button to turn the timer on or off. The timer settings are 1-8-0. At 0 is
the timer deactivated. (2x confirmation tones).
Page 15
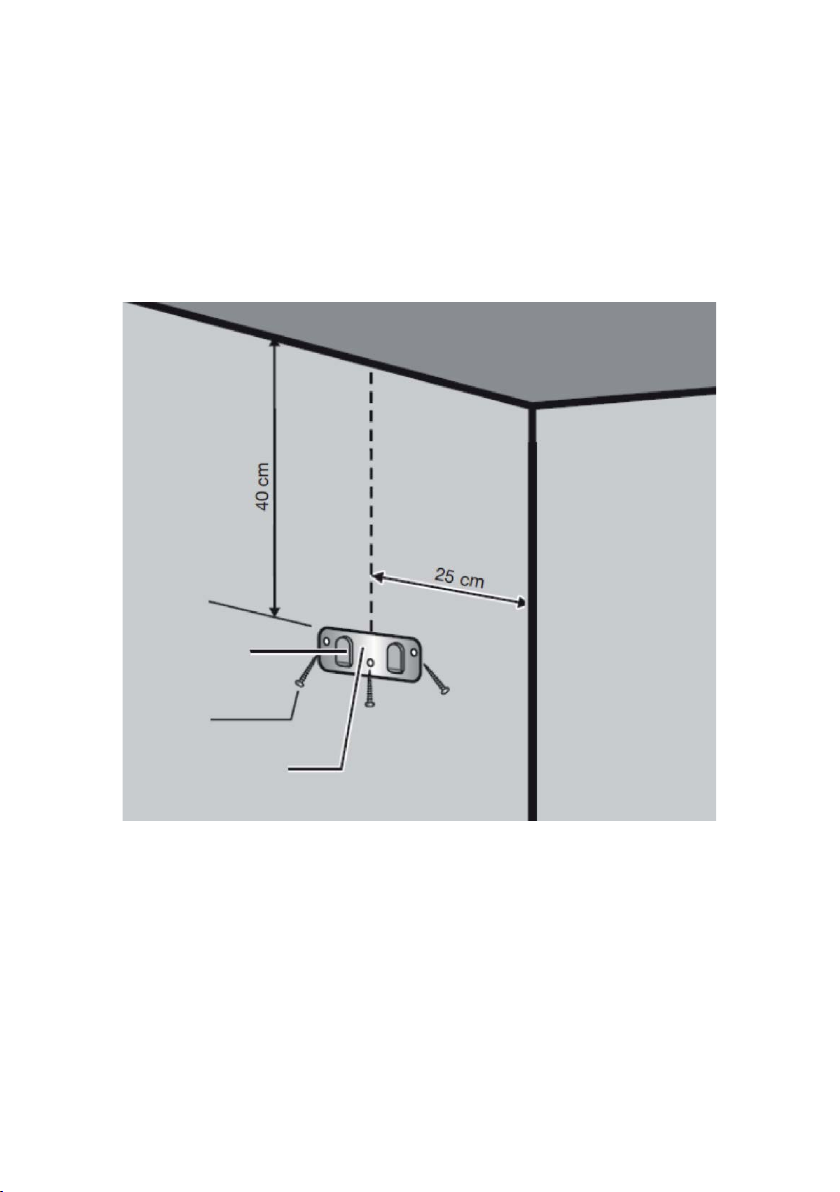
Wall Mounting
Hooks
Screws
Bracket
1. Using the bracket as a guide, mark the positions for the 3 screws on the wall.
2. Before securing the screws, be mindful of the type of wall you are mounting the
fan on. If your wall has wooden studs, you can directly screw the bracket into
them. However, if you're mounting the fan on a drywall or a hollow wall, it's
essential to use wall anchors to provide extra support and prevent damage.
3. Once the bracket is securely fastened, attach the bladeless smart fan to the
bracket.
Page 16
This marking indicates that this appliance should not be disposed with other
household wastes. To prevent possible harm to the environment or human
health from uncontrolled waste disposal, recycle it responsibly to promote the
sustainable reuse of material resources.
Operating voltage
220-240V~50/60Hz
Power consumption
26W
• Turn off the product, pull out the mains plug.
• Wipe the product with a slightly damp cloth.
Disposal
Page 17
Page 18
Page 19
Page 20

Need more information?
We hope that this user guide has given you
the assistance needed for a simple set-up.
For th e mo st up -to-date guide for your product,
as well as any additional assistance you may require,
head online to help.kogan.com
 Loading...