

Page 1
KOGAN SMARTERHOME™
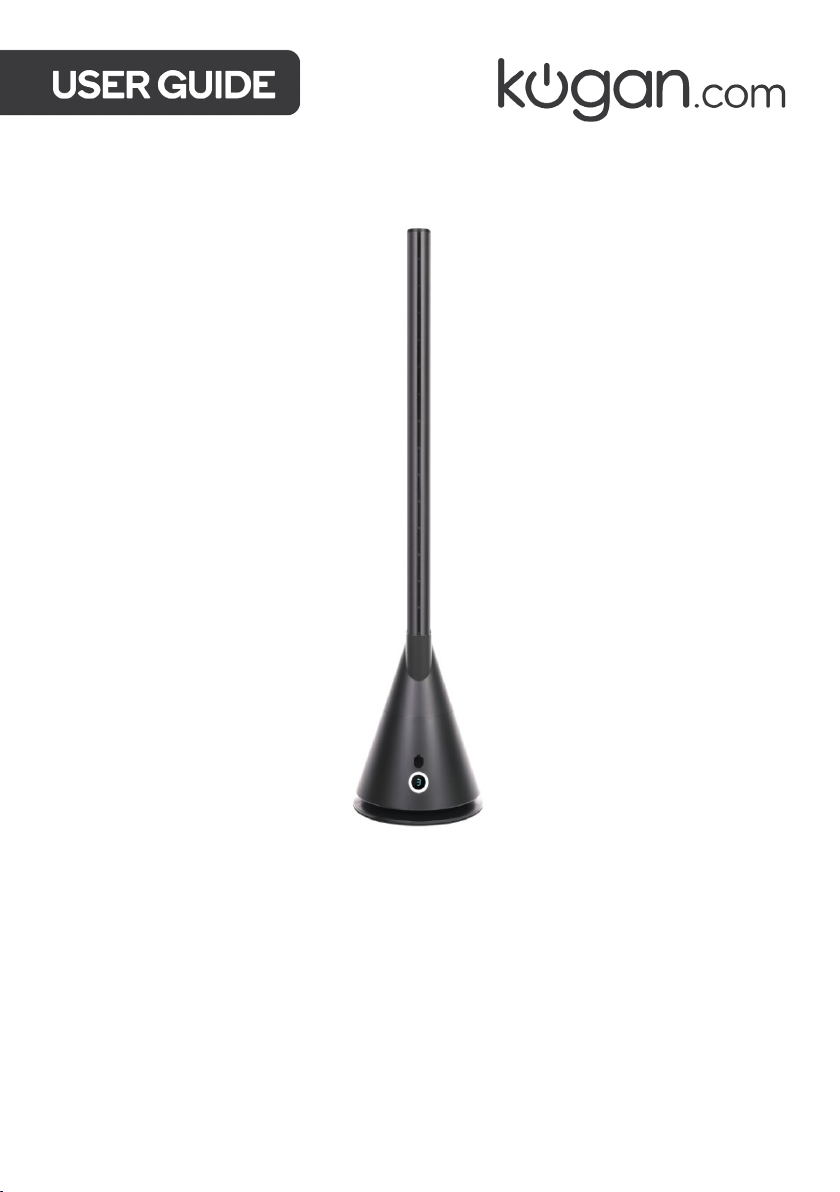
BLADELESS DC MOTOR SLIM
SMART FAN
BLACK
KASBLSSLFANA
Page 2

Safety & Warnings 3
Components List 6
Overview 6
Before First Use 8
Operation 9
Connect to SmarterHome™ App 12
Google Home Control 15
Amazon Alexa Control 18
Cleaning & Care 21
Troubleshooting 23
Specifications 23
2
Page 3
SAFETY & WARNINGS
Ensure to read all instructions and warnings in this user guide prior to first use. Retain this
user guide for future reference. Following these precautions will reduce the risk of fire, electric
shock, and injury.
WARNING — KEEP BATTERIES OUT OF REACH OF CHILDREN
• Swallowing may lead to serious injury or death in as
little as 2 hours, due to chemical burns and potential
perforation of the oesophagus.
• If you suspect your child has swallowed or inserted a
button battery immediately call the 24-hour Poisons
Information Centre on 13 11 26 (Australia) or 0800 764
766 (New Zealand) for fast, expert advice.
• Examine devices and make sure the battery compartment is correctly secured, e.g. that
the screw or other mechanical fastener is tightened. Do not use if compartment is not
secure.
• Dispose of used button batteries immediately and safely. Flat batteries can still be
dangerous.
• Tell others about the risk associated with button batteries and how to keep their
children safe.
Other warnings
• This fan is not intended for use by persons (including children) with reduced physical,
sensory or mental capabilities or lack of experience and knowledge unless they have
been given supervision or instruction concerning use of the appliance by a person
responsible for their safety.
• This appliance is intended for indoor household use only. It is not suited for
commercial, industrial, or outdoor use.
• Do not use it for any other purpose as this may result in fire, electric shock, or injury.
• This fan is not a toy. Adult supervision is required at all times when children are around
the fan.
• This fan supports voltages between 220–240V. Ensure the socket used is compatible
with this.
• Do not immerse the fan, power cord, plug, or any other connections into water or any
other liquid.
• Do not allow the fan, power cord, plug, or any other connections to come into contact
with water or any other liquid.
• Do not use the fan on unstable surfaces.
3
Page 4

• Do not use the fan on wet surfaces.
• WARNING: Do not leave this fan unattended when in use.
• WARNING: DO NOT use the fan in the following areas:
o Near an open flame, a hot burner, oven, or other sources of high heat.
o On a soft surface (for example, carpet) or where it may tip over during use.
o Outdoors or in areas of high humidity without suitable ventilation (for example,
in a bathroom, laundry area, near a sink, washer, pool, or any source of water).
o Near curtains or in tight corners. Placement in these areas may lead to
suboptimal airflow.
o In conjunction with or directly next to an air freshener or similar product.
o In areas where there is a risk of explosions or fire from flammable gases (for
example, paint, petrol) or in areas where these substances are sprayed.
• WARNING: Do not expose people, especially babies and elderly people, to a
continuous stream of cold air.
• CAUTION: Avoid contact with moving parts. Never insert fingers, pencils or any other
objects through the grilles/housing when the fan is running.
• Do not place any objects within 30cm of the air outlet.
• Keep hair and loose clothing away from the fan when it is in use.
• Do not place anything on top of the fan.
• Ensure nothing is blocking the air inlet or outlet.
• Do not insert foreign objects into any of the openings as this may cause electric shock
and/or a fire hazard.
• Ensure hands are dry before handling the plug or switching on the fan.
• WARNING: Do not pick up or operate the fan if the power cord, plug or housing is
damaged. If damaged, stop use immediately and contact help.Kogan.com for
assistance.
• If the fan malfunctions or has been dropped, stop use immediately and contact
help.Kogan.com for assistance. Do not attempt to repair the fan yourself.
• Unless your home is already fitted with a residual current device (safety switch, RCD),
it is recommended to install an RCD with a rated residual operating current not
exceeding 30mA to provide additional safety protection when using electrical
appliances. Consult an electrician for professional advice.
• WARNING: Do not use extension cords, timers, adapters, and other third-party
devices with this fan.
• Do not use more than one electrical appliance at the same time on the same socket.
• Always unplug the fan from the power socket when not in use and before cleaning,
servicing, moving, or storing.
• Check the power cord regularly for visible damage.
4
Page 5

• Do not operate the fan with the power cord coiled up. Ensure the cord is always fully
unwound.
• Do not twist or kink the power cord.
• Do not allow the power cord to touch heated surfaces.
• Do not put any stress on the power cord where it connects to the fan.
• Never carry the fan by the power cord.
• Do not pull on the power cord when disconnecting from the socket. Instead, pull it
from the plug.
• Arrange the power cord away from any traffic areas so no one will trip over it.
• Do not run the power cord under the carpet or cover it with rugs or runners.
• Do not use this fan to dry clothes or other items.
5
Page 6
OVERVIEW
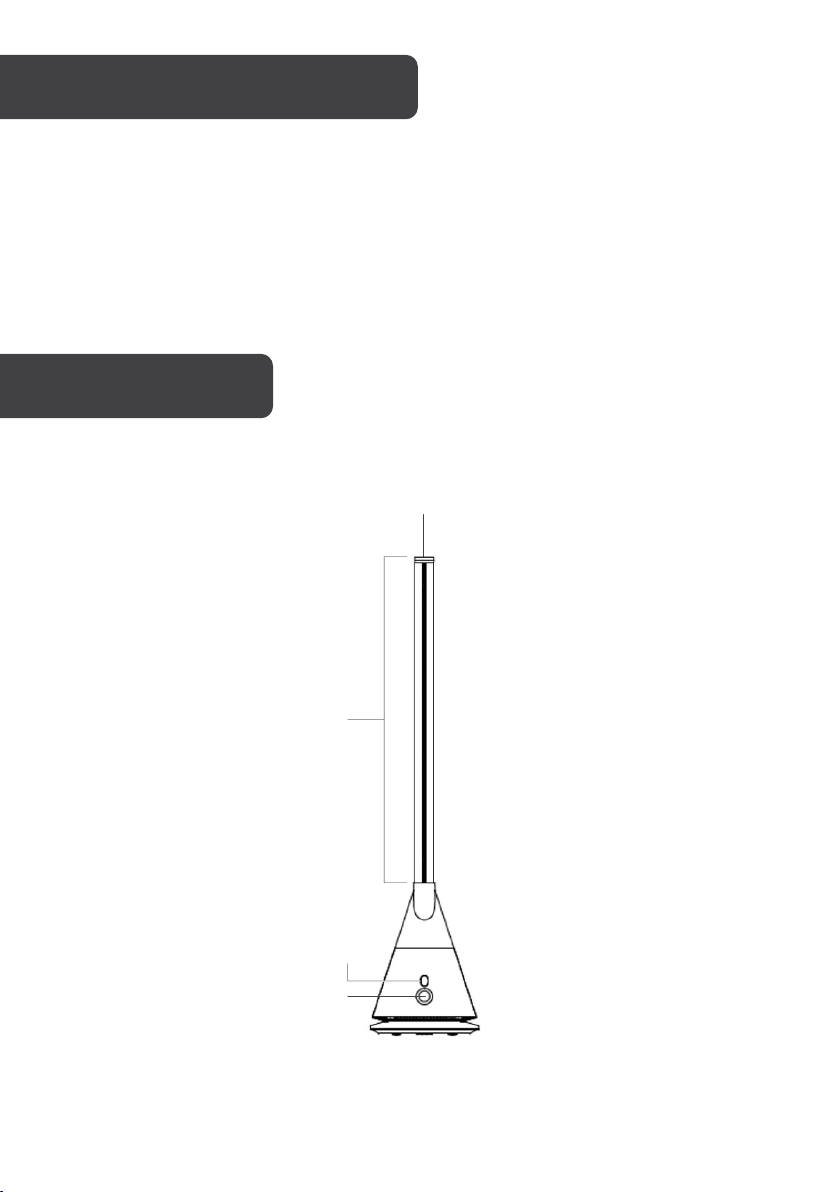
Magnetic remote control shelf
Air outlet
LED display
COMPONENTS LIST
Signal receiver
• Bladeless slim fan
• Remote control
• CR2025 battery
• User guide
Fan (front view)
6
Page 7
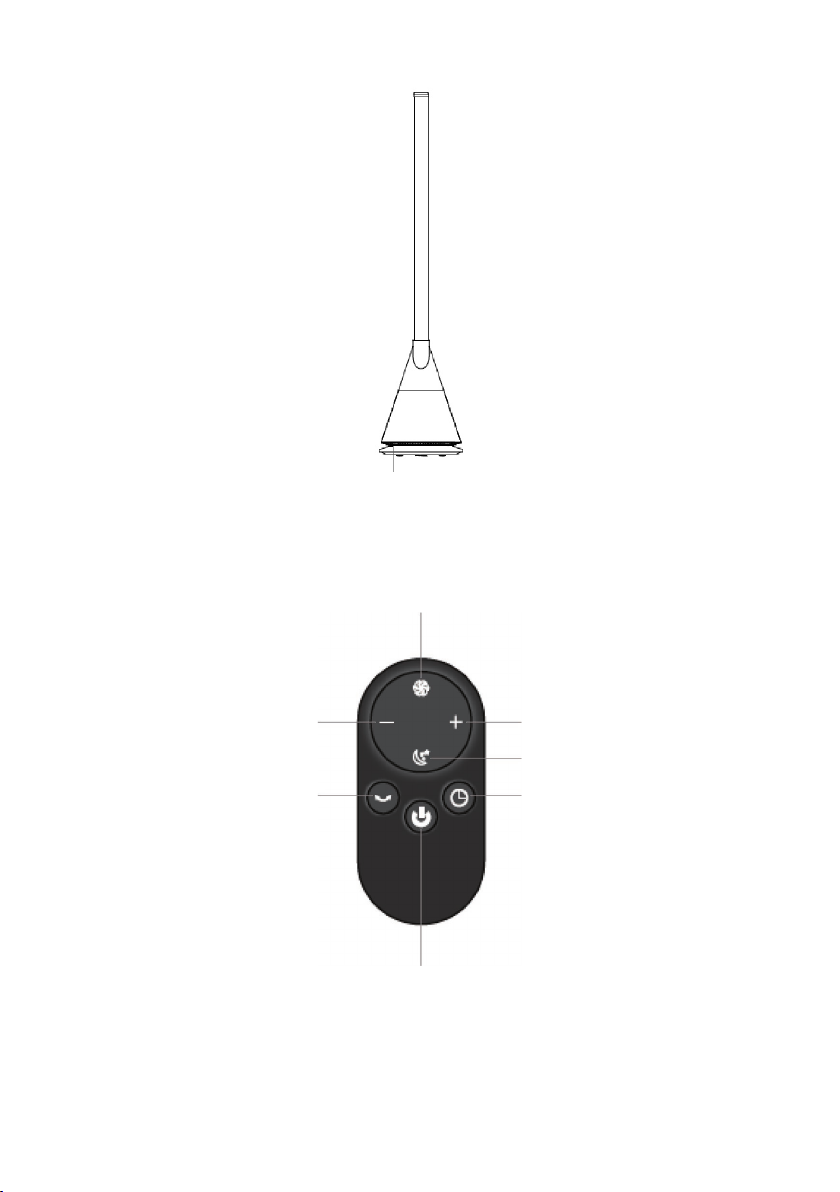
Fan (back view)
Air inlet
Tu r b o mode button
Power button
Speed increase button
Sleep mode button
Timer button
Speed decrease button
Oscillation button
Remote control
7
Page 8
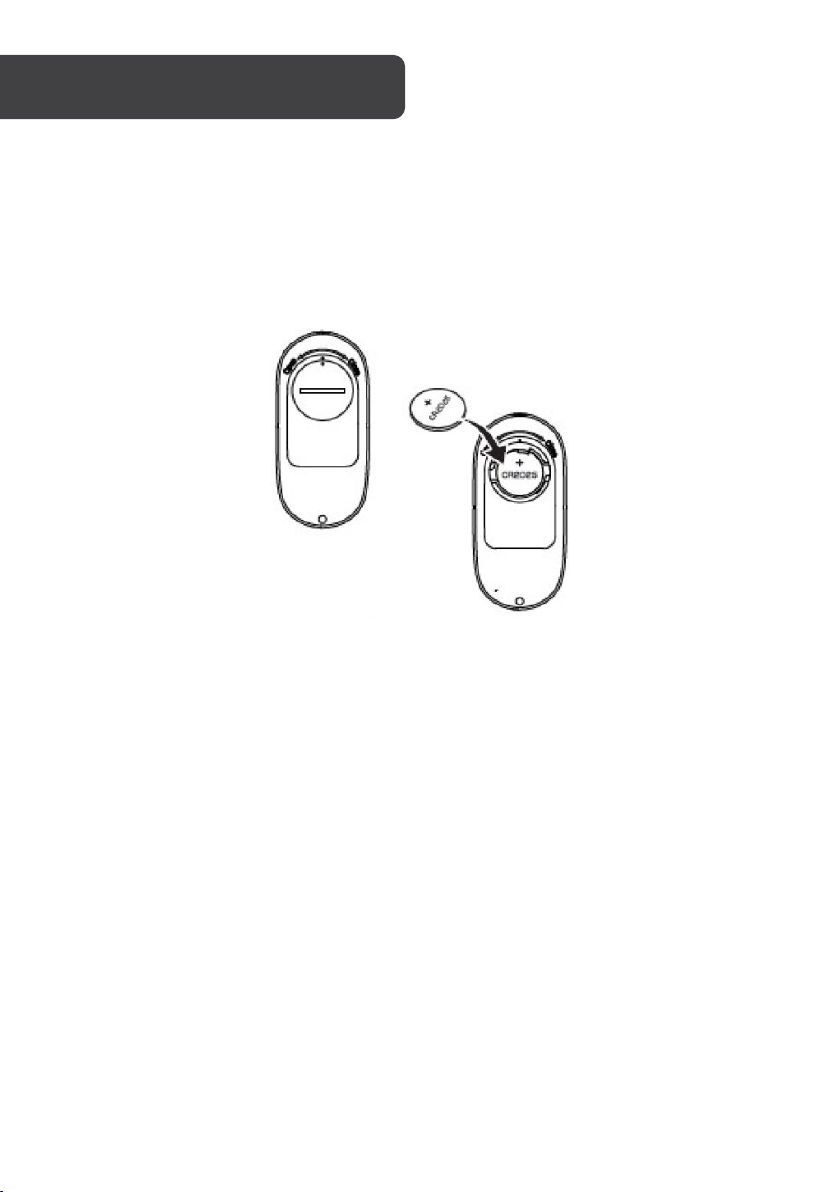
BEFORE FIRST USE
Remote control battery
1. Turn over the remote control. Hold down the battery cover and turn anti-clockwise to
open.
2. With the positive polarity ‘+’ facing up, insert the CR2025 battery into the battery slot
on the remote control.
3. Place the battery cover onto the remote control and turn clockwise to close.
8
Page 9
OPERATION
Notes:
Notes:
the other appliances.
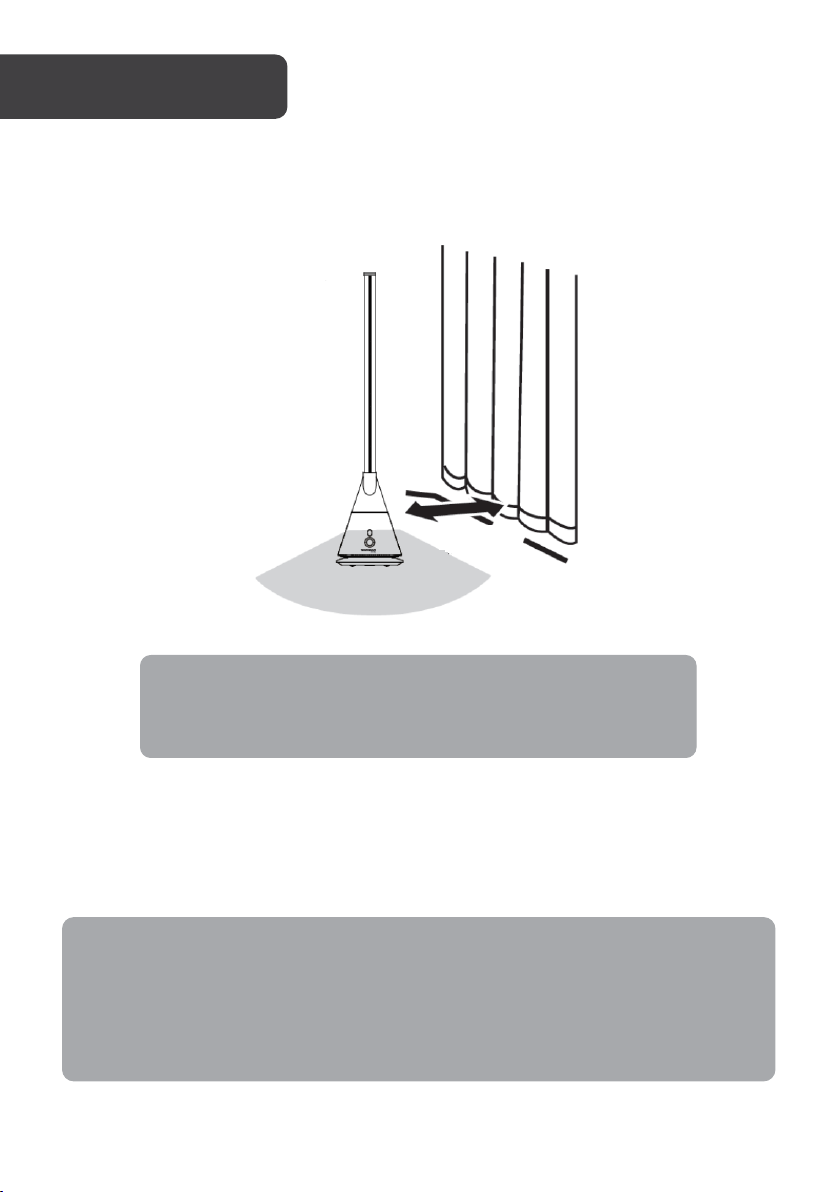
Placement
Place the fan on a dry, stable surface.
Ensure there is at least a 30cm clearance between the fan and any obstructions.
30cm
Powering on
Insert the power cord into a socket and turn the socket on. The fan will then enter standby
and the LED display will turn on.
To turn on the fan, press the LED display or press the power button on the remote control.
• When using the remote control, point it towards the signal receiver.
• This fan may turn on when using remote controls from other electrical
appliances and vice versa. This is due to the remote controls being the same
frequency and is normal. To prevent this, keep the remote controls away from
• Blocking the fan’s air inlet/outlet may cause malfunctions.
• Do not place anything on top of the fan.
9
Page 10

Adjusting the fan speed
Notes:
This fan features nine fan speeds. There are two methods to adjust the fan speed:
• Using the fan: Tap on the LED display to cycle between the fan speeds (1–9).
• Using the remote control: Use the fan increase and fan decrease buttons to adjust.
Timer
The timer can be used to turn off the fan after a period between 1–8 hours.
• Press the timer button for the specified number of hours. This will be reflected on the
LED display. The display will cycle through the number of hours (0–8).
• If the LED display shows ‘0’ followed by two beeps, this means that there is no timer
set.
• Once the timer has elapsed, the fan will turn off. To turn the fan back on, press the
power button on the remote control.
• The remaining functions of the fan can still be used when the timer is set.
• If the fan is turned off before the timer has elapsed, the timer will be cancelled.
Sleep mode
Activating this mode will run the fan quieter, ideal for when you need to sleep.
Press the sleep mode button on the remote control to activate. Press the fan increase or
fan decrease buttons on the remote control to exit this mode.
Turbo mode
Activating this mode will run the fan at the highest speed.
Press the turbo mode button on the remote control to activate. The LED display will then
show ‘H’. Press the fan increase or fan decrease buttons on the remote control to exit this
mode.
Oscillation
The oscillation function allows the fan to swing left and right. There are two methods to turn
the oscillation function on/off.
• Using the fan: Press and hold the LED display for one second and the fan will start
oscillating. To stop oscillating, press and hold the LED display for one second again,
then after hearing a beep sound, let go of the LED display.
• Using the remote control: Press the oscillation button to turn the function on/off.
10
Page 11
Powering off
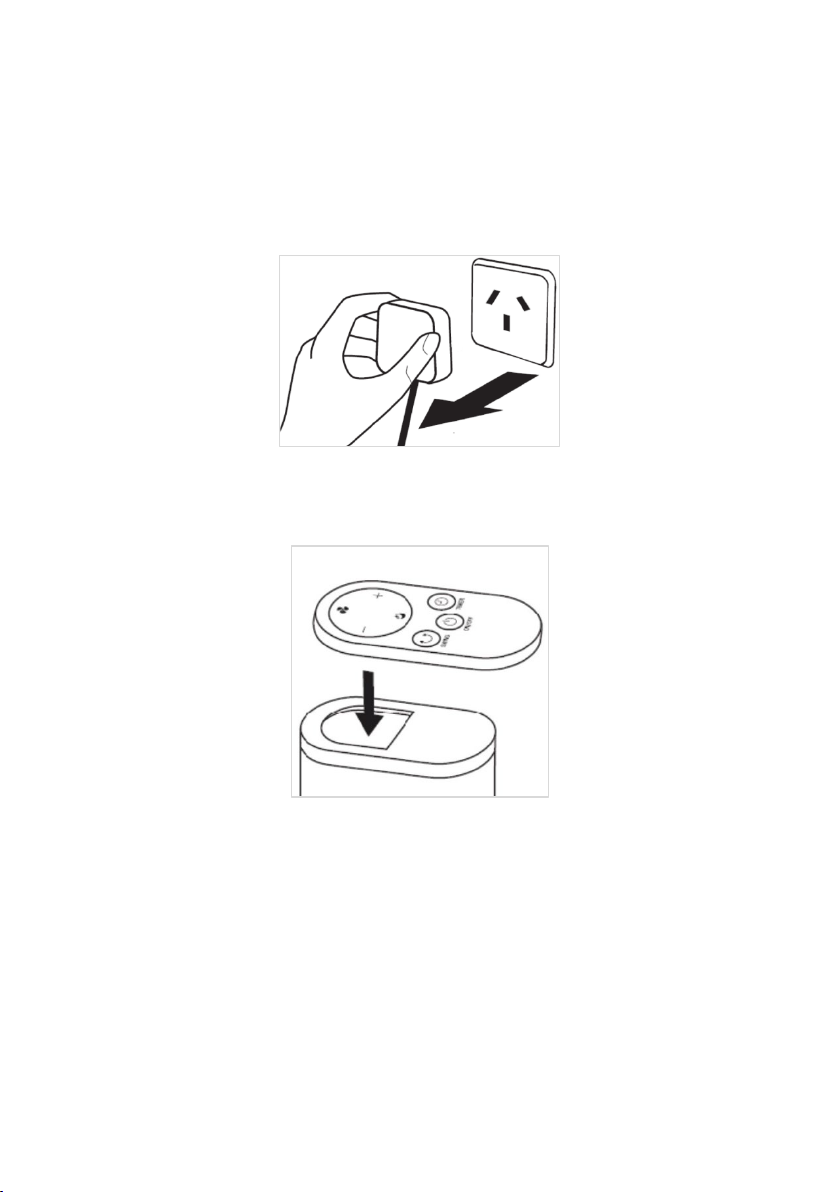
There are two methods to turn off the fan.
• Using the fan: Press and hold the LED display for two seconds then you will hear a
buzzing sound. Let go of the LED display and the fan will turn off. Turn off the socket
and unplug.
• Using the remote control: Press the power button on the remote control. Turn off the
socket and unplug.
Storing the remote control
When the remote control is not being used, place it onto the magnetic remote control shelf.
11
Page 12
CONNECT TO SMARTERHOME™ APP
Install App
Download the ‘Kogan SmarterHome’ app from the Play Store (Android) or App Store (iOS).
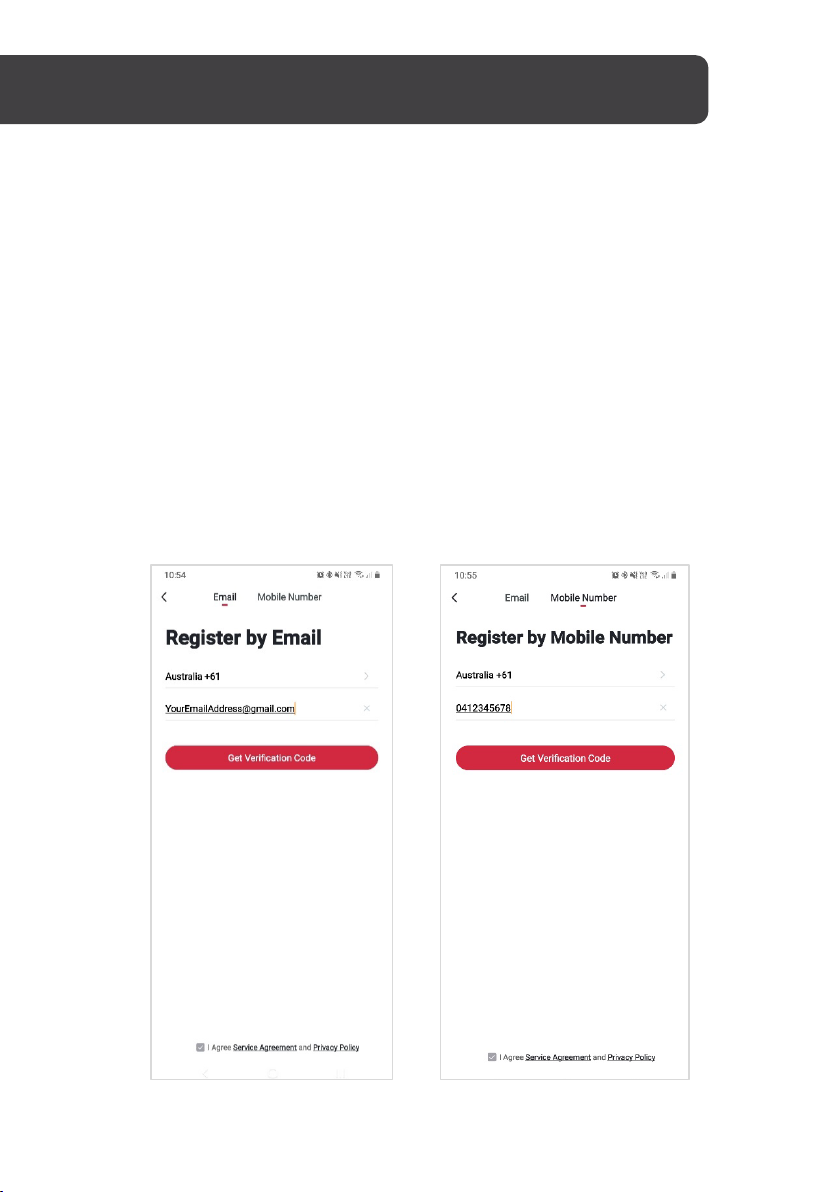
Register
If you do not have a Kogan SmarterHome™ account, register or sign in with a verification
code sent by SMS.
To register:
1. Tap to enter registration page.
2. The system automatically recognises your country/area. You can also select your
country code manually. Enter your email address and tap ‘Next.’
3. Alternatively, you can select ‘Register by mobile number’ and enter the verification
code sent to you by SMS.
4. Create a profile on the next page to define your location and room.
12
Page 13
Set device in pairing mode
When the device is first turned on, it may automatically enter pairing mode (‘F’ will be
flashing quickly on the LED display).
If not automatically in pairing mode when powered on, you can manually set the device in
pairing mode by pressing and holding the LED display for five seconds until ‘F’ is flashing
quickly on the LED display.
Add device through network
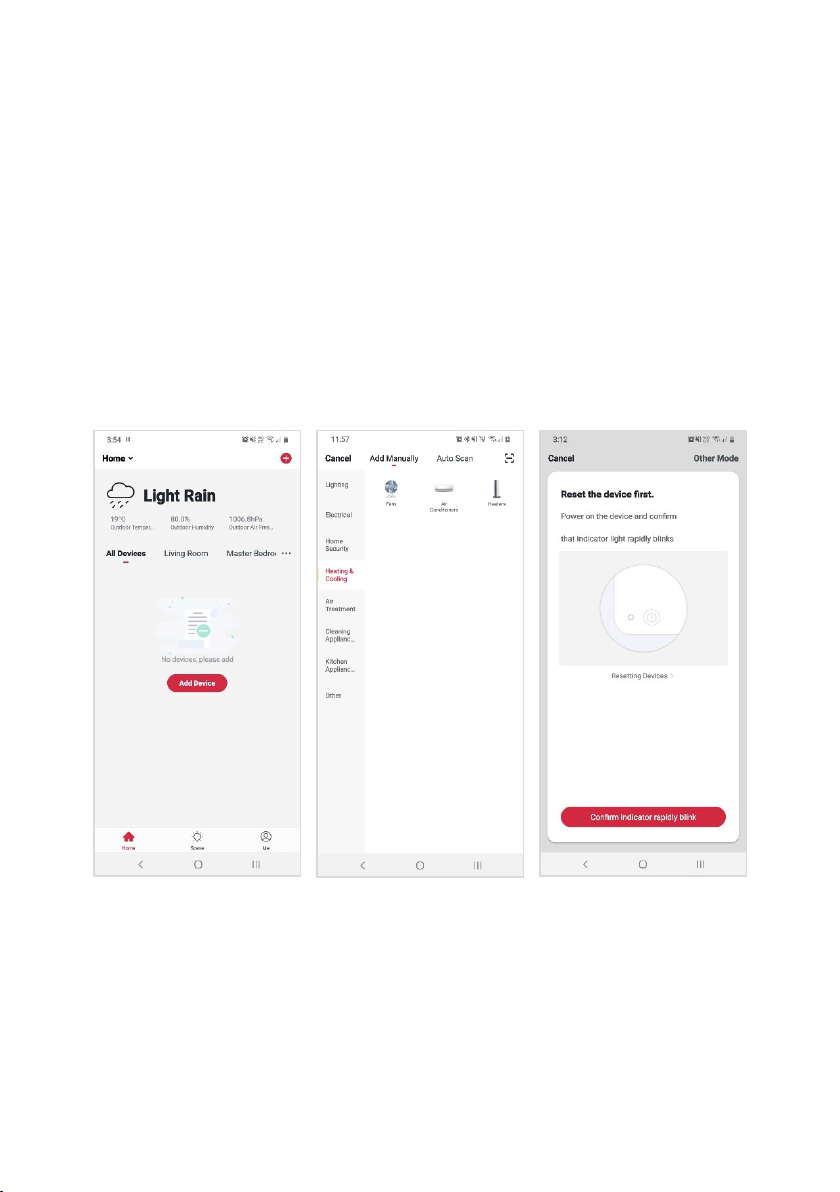
5. Once registered, tap ‘+’ in the upper right corner of the app’s home page to add a new
device through the network.
6. Select the product type from the list of options in the app (Heating & Cooling > Fans).
7. Ensure that the device is in pairing mode, with the ‘F’ on the LED display rapidly
flashing, and tap ‘Confirm light is rapidly flashing’.
13
Page 14
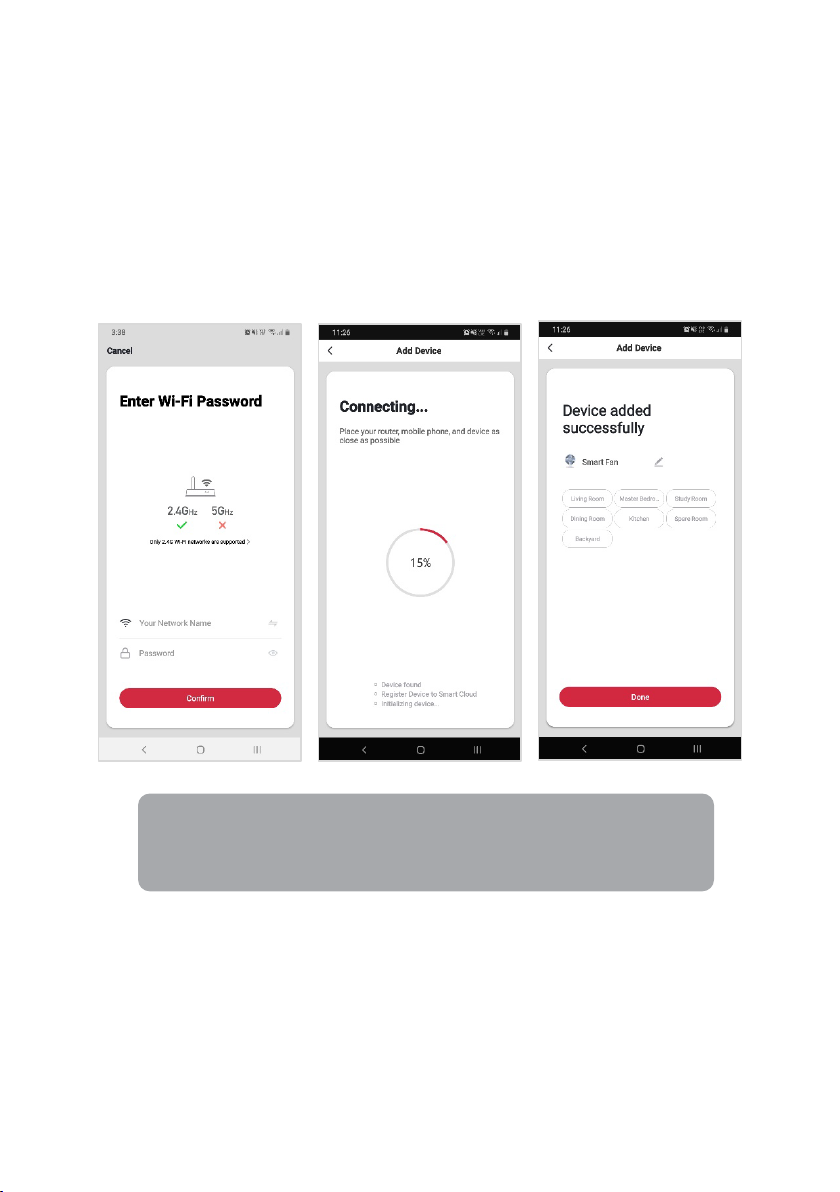
8. Upon successfully confirming pairing mode, enter your Wi-Fi details. It is important
Notes:
The device is only compatible with 2.4Ghz networks.
that your SmarterHome™ device and the app are connected to the same Wi-Fi
network during setup.
9. The device will commence the pairing process and connect to the app. Ensure your
Wi-Fi router, mobile phone, and the SmarterHome™ device are kept close until
connection is complete.
10. After successfully being added, you will have the option to rename the device and
assign it to a location. It will now be listed on the app’s home page. Tap the device
listing to enter its control page.
• The device and the app have to use the same Wi-Fi network.
•
14
Page 15
Note:
GOOGLE HOME CONTROL
You will need to have set up a Google Home account prior to linking your
Kogan SmarterHome™ device.
Adding ‘SmarterHome’ to the Google Home app
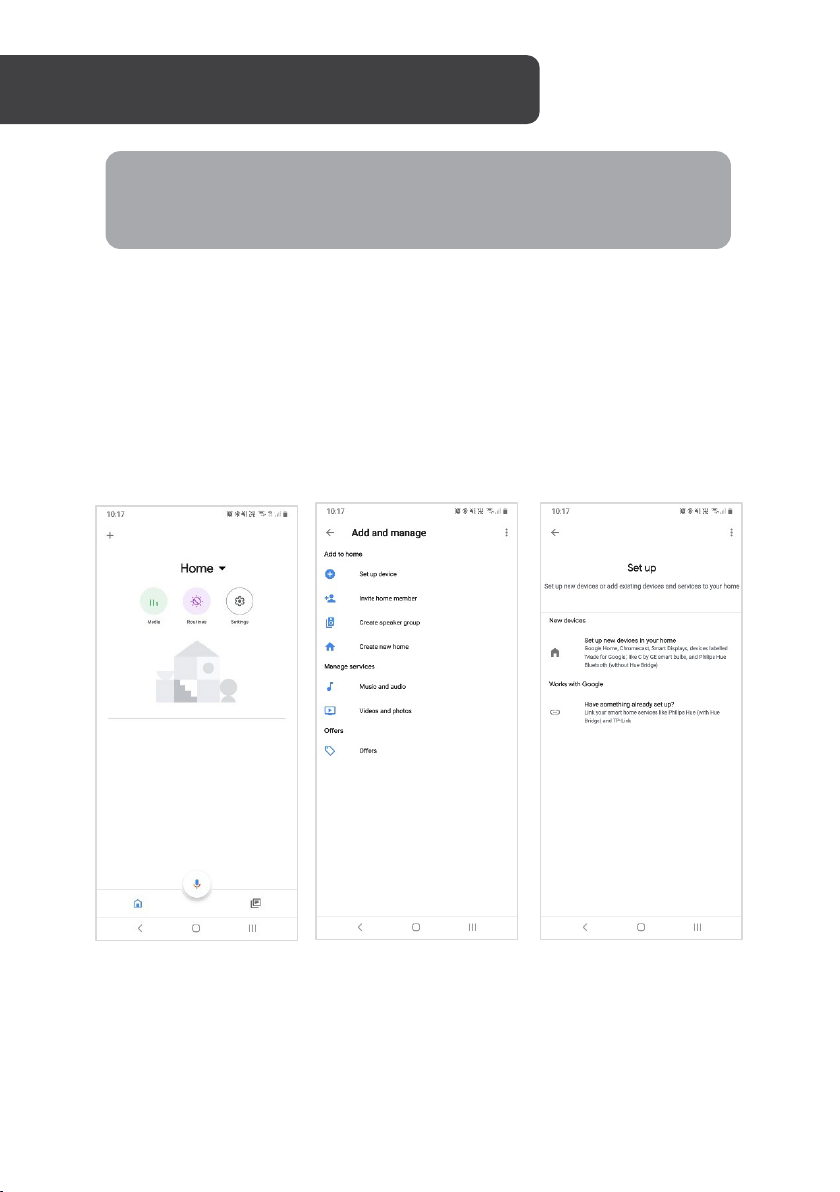
1. From the home page of the Google Home app, select the ‘+’ icon to access the ‘Add
and manage’ page.
2. Select ‘Set up device’, then under the Works with Google banner, select ‘Have
something already set up?’
3. Select the search bar and type ‘Smarter Home’ to locate the Kogan SmarterHome™
service.
15
Page 16
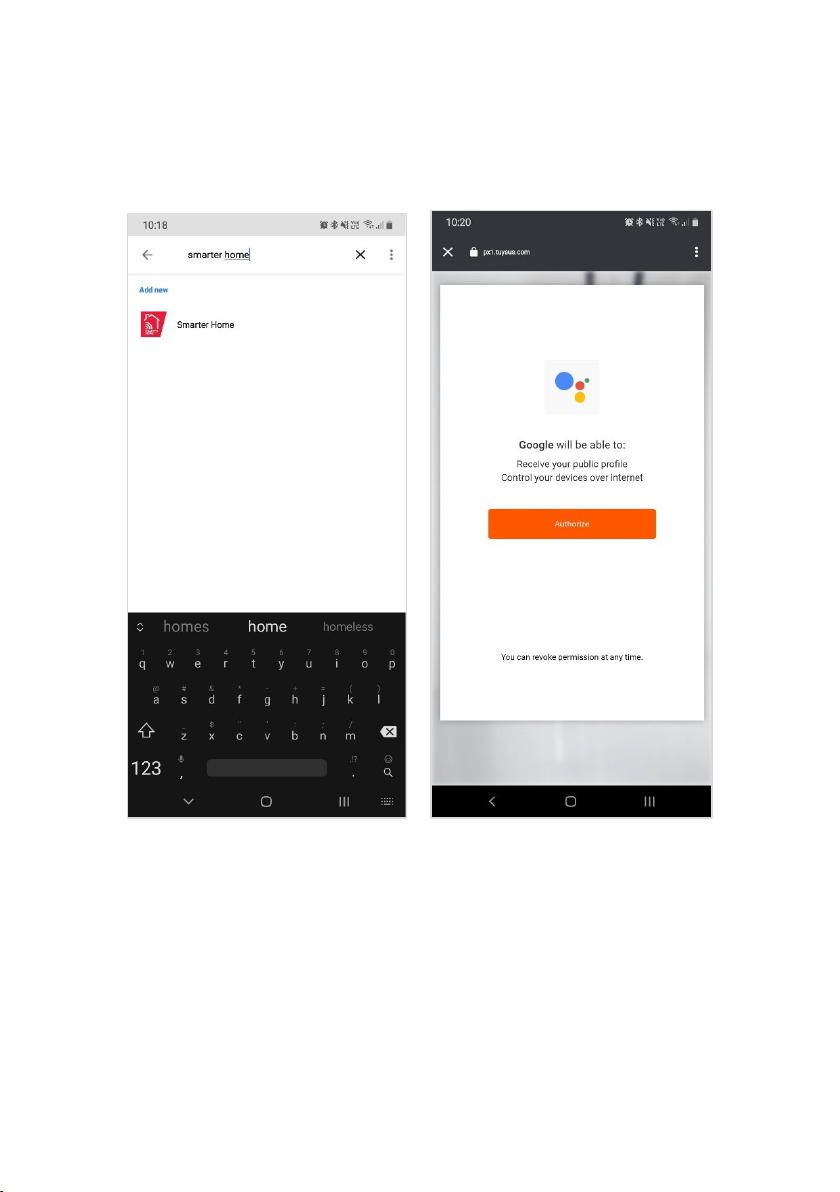
4. Tap ‘Authorise’ to grant Google permission to access the SmarterHome™ app and
your devices.
5. From here, you will be prompted to sign into your SmarterHome™ account using
either your email or mobile phone number, depending on which method you used to
register your account.
16
Page 17
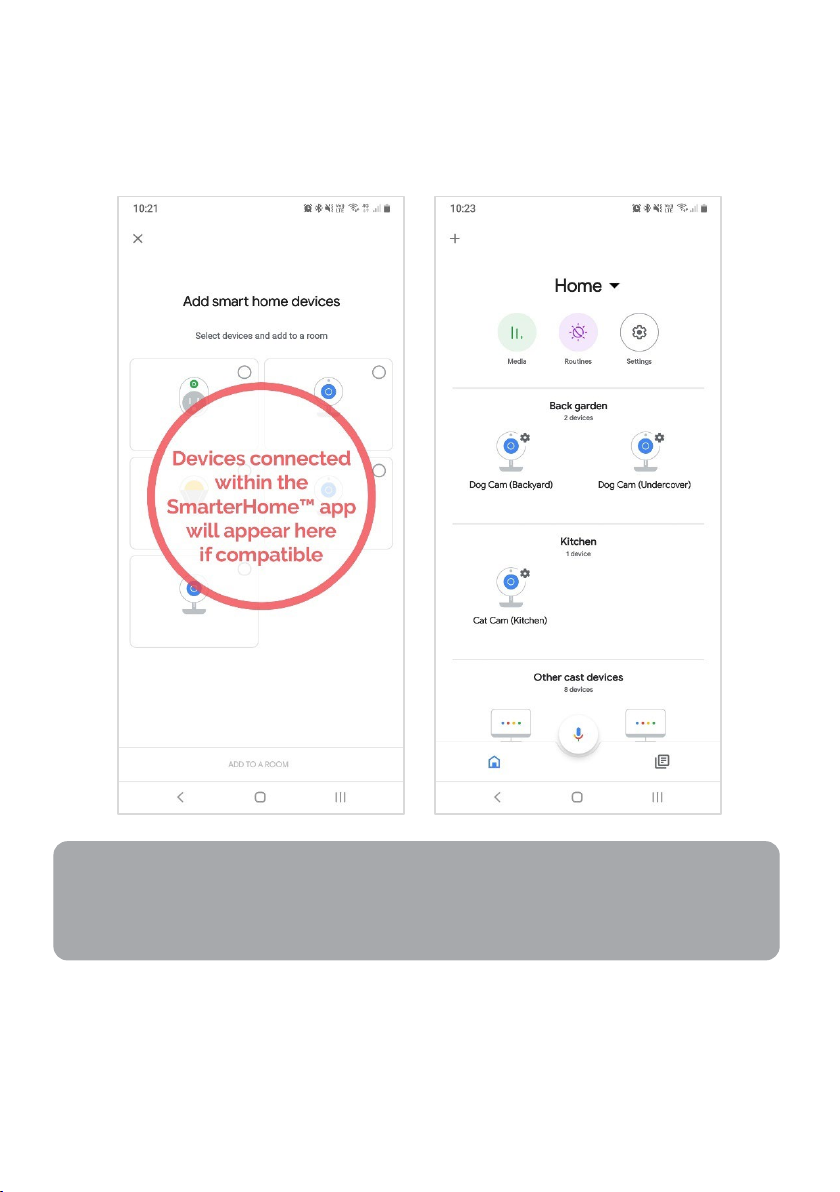
6. Once connected, the app will display any compatible devices linked to your
Note:
SmarterHome™ account. From here you can assign them to rooms and set up any
routines.
7. Tap on any of the devices to view a list of available commands.
Please note that Google Home can only control the base/core functions of any
compatible SmarterHome™ devices. To make full use of this product’s smart
functionality, please use the Kogan SmarterHome™ app.
17
Page 18
Note:
AMAZON ALEXA CONTROL
You will need to have set up an Alexa account prior to linking your Kogan
SmarterHome™ device.
Adding ‘SmarterHome’ to the Alexa app
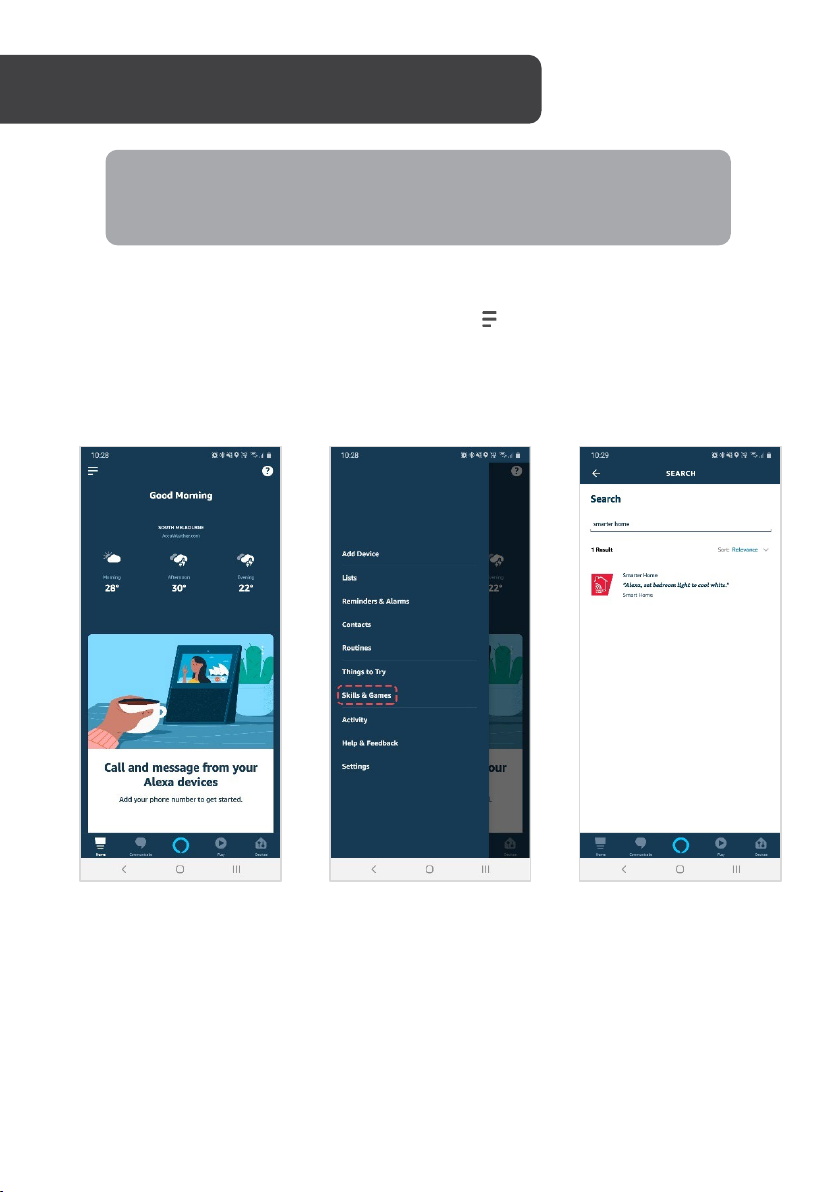
1. From the home page of the Alexa app, select the ‘ ’ icon in the top-right and select
Skills & Games from the sidebar.
2. Select the search bar and type ‘Smarter Home’ to locate the Kogan SmarterHome™
skill.
18
Page 19
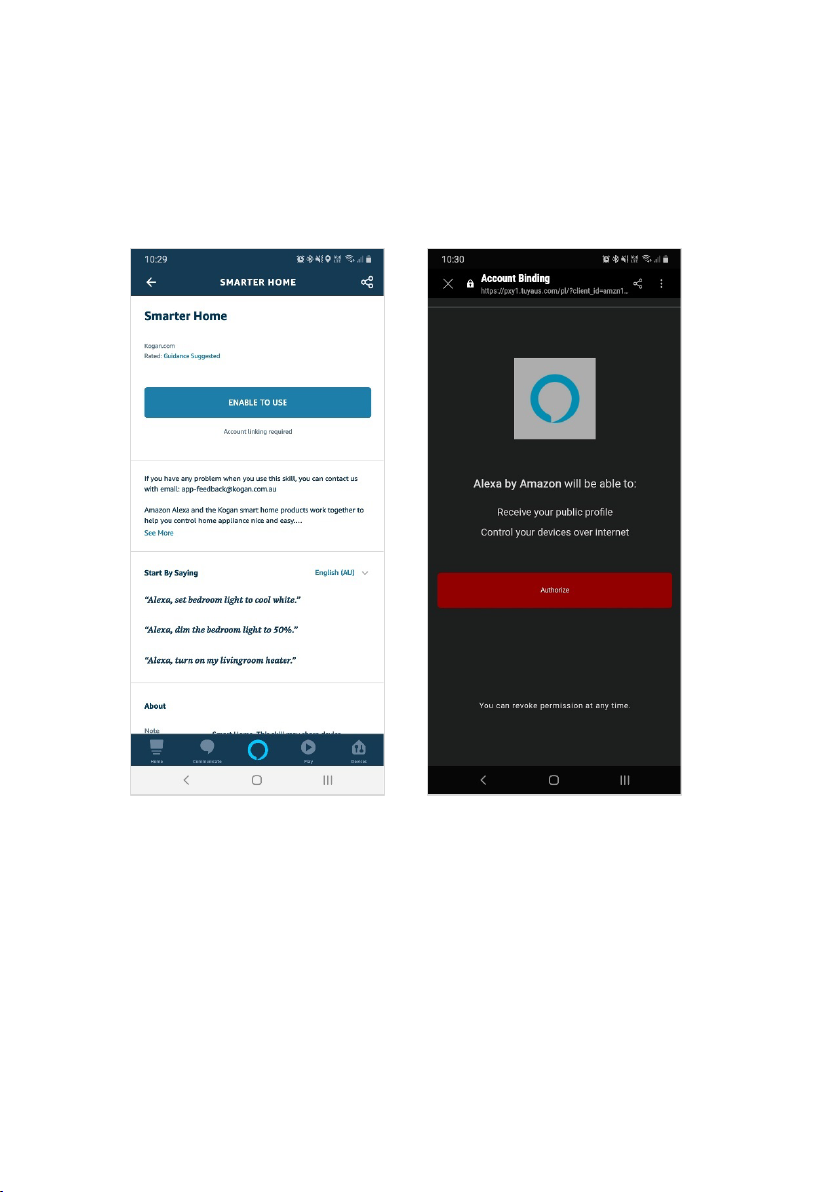
3. Tap ‘Enable to Use’ to add the Kogan SmarterHome™ skill to Alexa.
4. From here, you will be prompted to sign into your SmarterHome™ account using
either your email or mobile phone number, depending on which method you used to
register your account.
5. Tap ‘Authorise’ to grant Alexa permission to access the SmarterHome™ app and your
devices.
19
Page 20
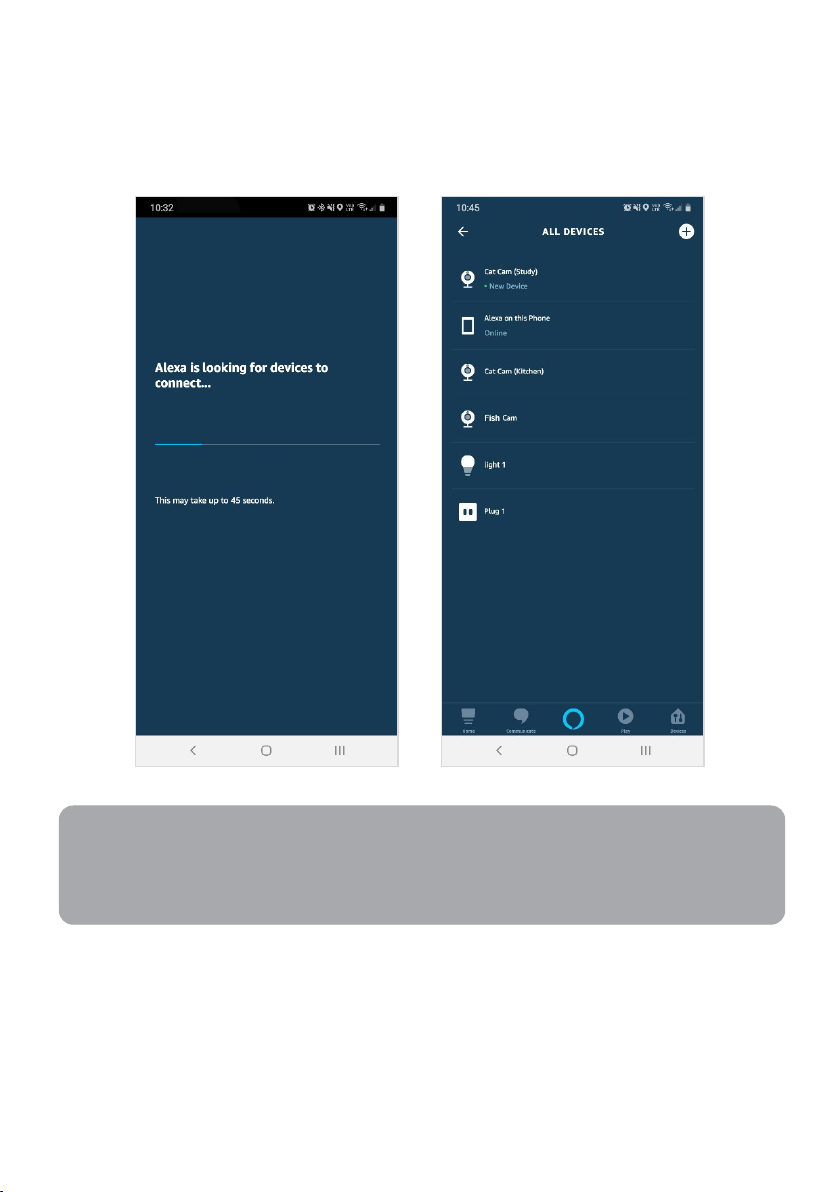
6. Once connected, the app will perform a search and display the devices linked to your
Note:
SmarterHome™ account.
7. When your devices have successfully connected to the Alexa app, you will be able to
control your Kogan SmarterHome™ devices via Alexa’s voice commands.
Please note that Alexa can only control the base/core functions of any compatible
SmarterHome™ devices. To make full use of this product’s smart functionality,
please use the Kogan SmarterHome™ app.
20
Page 21
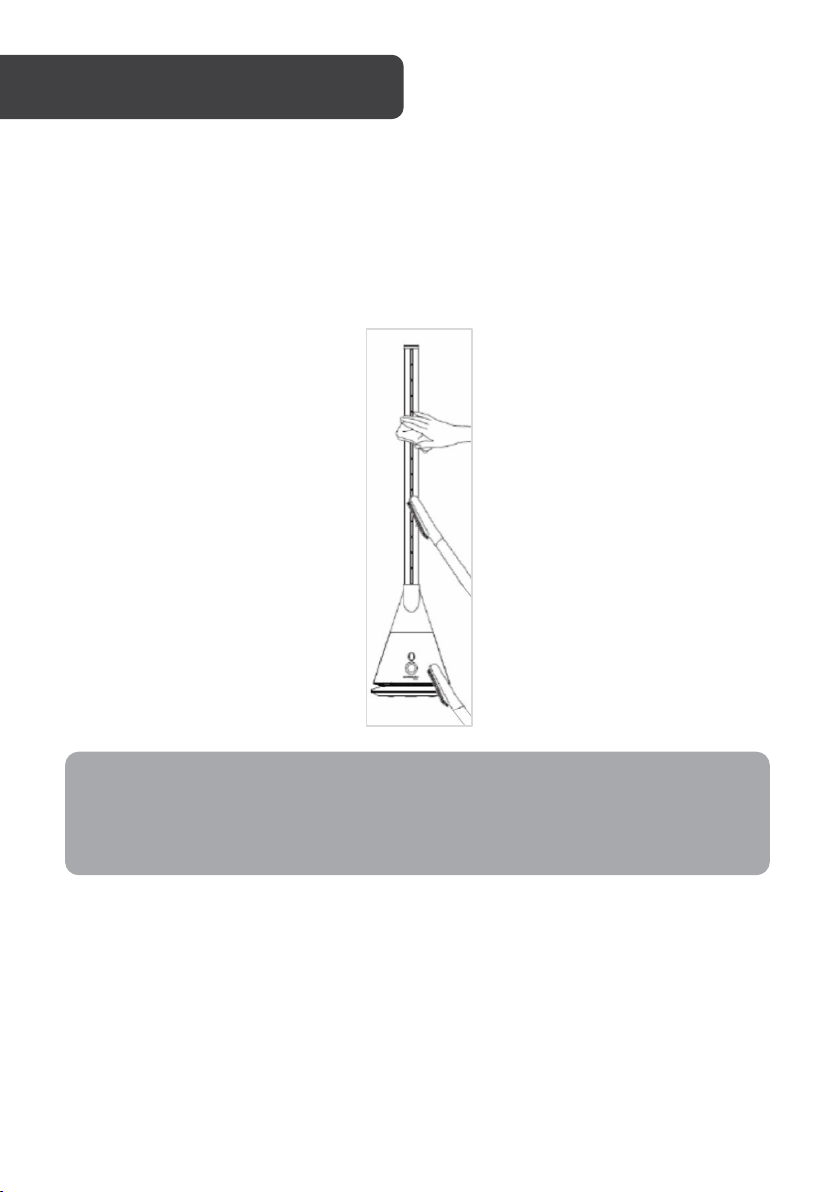
CLEANING & CARE
Notes:
Ensure the fan is turned off and unplugged before cleaning.
Exterior
Gently wipe the exterior with a clean soft cloth.
If the fan needs further cleaning, use a wet cloth with diluted detergent to clean the exterior.
Wipe with a soft cloth to dry.
• Do not splash water or any liquid onto the fan.
• Do not use paint thinner, gasoline, alcohol, bleach, or metal objects to clean
the fan. Doing so may cause discolouration and damage.
21
Page 22
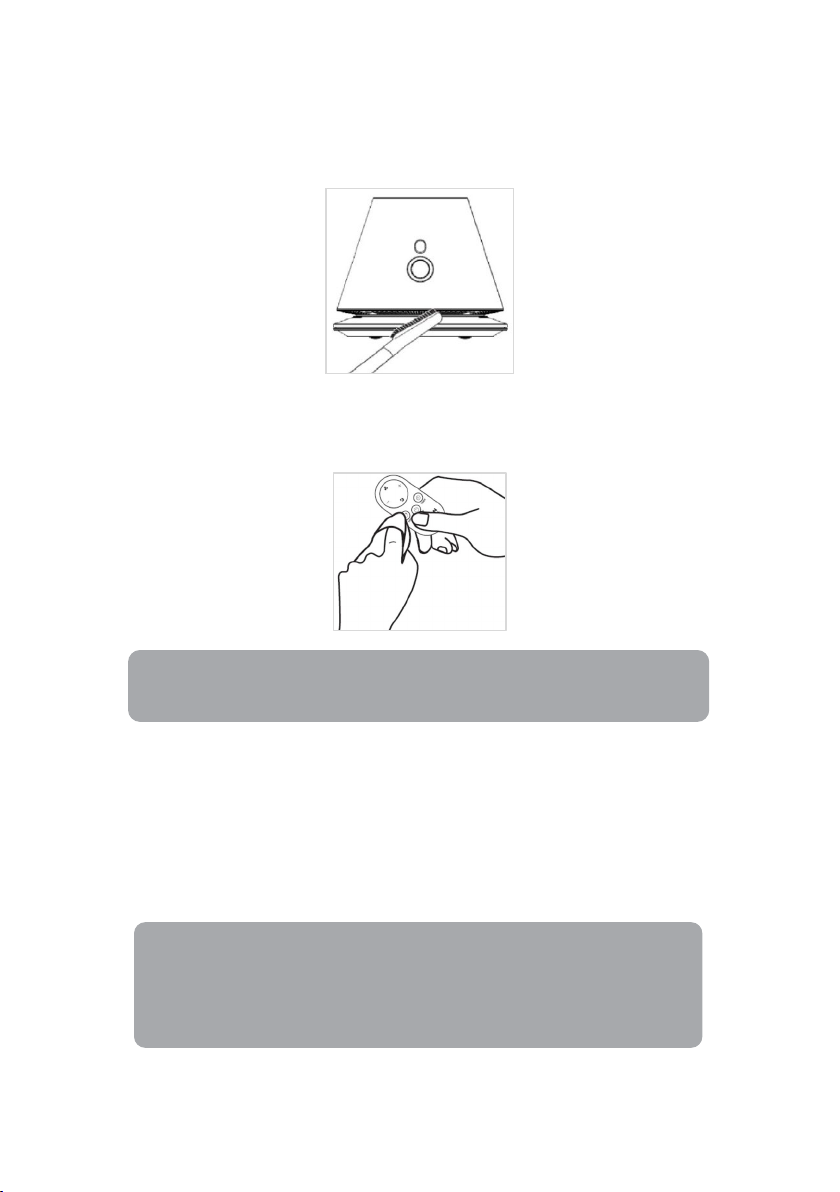
Air inlet and air outlet
Note:
Remove the battery if the fan will not be used for an extended period.
Notes:
Accumulation of dust may result in a weaker airflow, so the air inlet and air outlet must be
cleaned periodically.
Use a soft brush or vacuum cleaner to clean dust and other particles out of the air inlet and
air outlet.
Remote control
Wipe the remote control surface gently with a dry, soft cloth.
Power cord
Clean the power cord with a dry soft cloth.
Storage
Place the fan in a large plastic bag to protect it from dust.
Store the fan in a clean and dry place, out of reach from children.
• Do not place the fan on uneven surfaces or near other
appliances that heat/cool.
• Do not store in direct sunlight or in hot/wet places.
22
Page 23
TROUBLESHOOTING
Problem Solution
• Ensure the power cord is inserted fully into the socket and
The fan is plugged in
but not working.
The remote control is
not working.
If these solutions do not solve your issues, contact help.Kogan.com for further assistance.
the socket is turned on.
• Ensure the LED display is on and there is no power failure or
outage.
• Ensure the battery is not flat. Replace the battery if
necessary.
• Ensure the positive polarity marking ‘+’ on the battery is
facing up.
• Ensure the remote control is aimed towards the signal
receiver when in use.
Voltage supported 220–240V
Frequency 50Hz
Power 26W
Swing range 90°
Timer range 1–8 hours
Motor BLDC
Dimensions 1020 x 230 x 230mm
Net weight 2.6kg
23
Page 24

Need more information?
We hope that this user guide has given you
the assistance needed for a simple set-up.
For the most up-to-date guide for your product,
as well as any additional assistance you may require,
head online to help.kogan.com
24
 Loading...