

Page 1
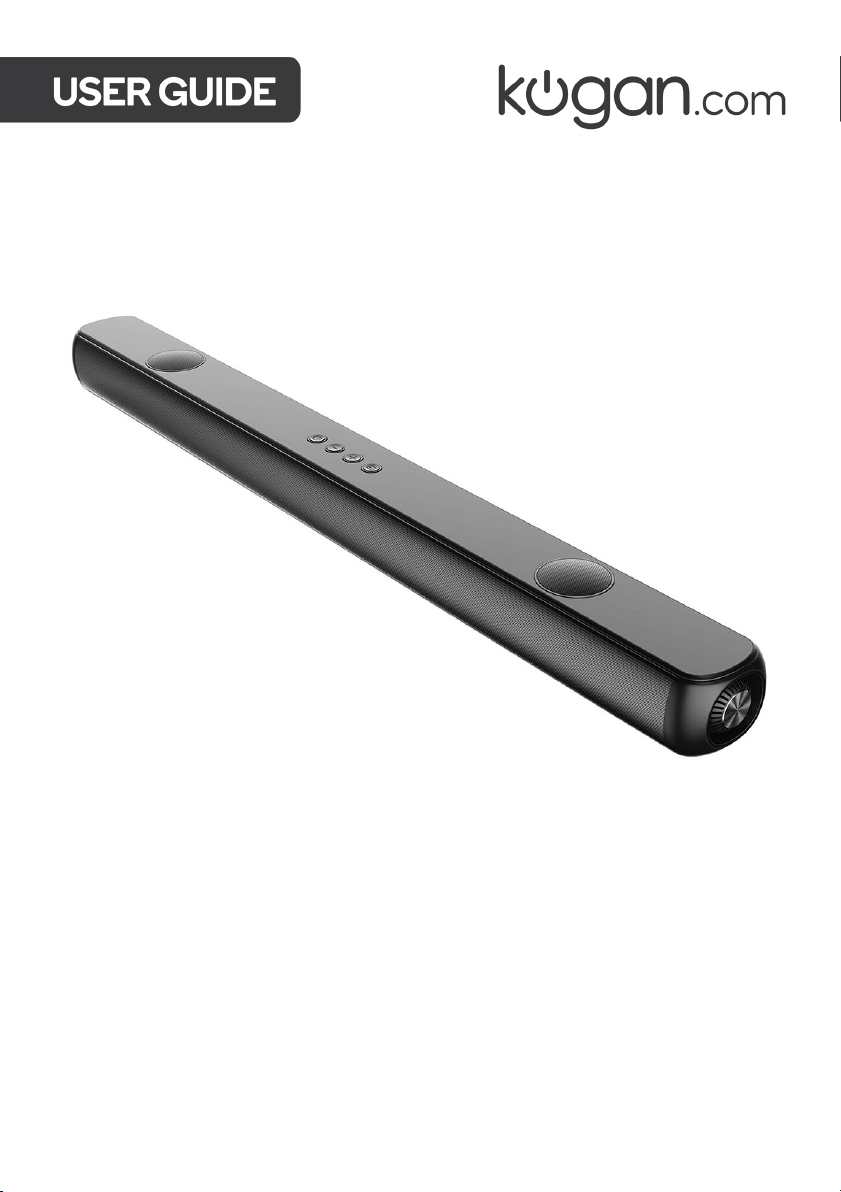
2.0.2 CH 120W DOLBY ATMOS
SOUNDBAR
KASBDA20CA
Page 2

Page 3
TO REDUCE THE RISK OF ELECTRIC SHOCK DO NOT REMOVE COVER
The lightning flash within an equilateral triangle is intended to alert you to
SAFETY & WARNINGS
WARNING: Do not attempt to remove any screws or open the casing of the
unit; there are no user-serviceable parts inside. Refer all servicing to qualified
service personal.
Servicing is required when the apparatus has been damaged in any way, for
example, when the power-supply cord or plug is damaged, liquid has been
spilt or objects have fallen into the apparatus, the apparatus has been
exposed to rain or moisture, does not operate normally or has been dropped.
the presence of uninsulated dangerous voltage within the product’s
enclosure that may be of sufficient magnitude to constitute an electric shock
to a person or persons.
Important! This symbol alerts you to read and observe important warnings
and instructions on the unit or in this manual.
Notice:
This appliance is not intended for use by persons (including children) with reduced
physical sensory or mental capabilities or lack of experience and knowledge unless
they have been given supervision or instruction concerning use of the appliance by a
person responsible for their safety. Children should be supervised to ensure that they
do not play with the appliance.
Read, keep, and follow all instructions. Heed all warnings and retain this guide for future
reference. Operate the product only as instructed within.
Page 4

• To prevent possible hearing damage, do not listen to high volume levels for long
periods or a sudden high-volume level.
• Never use the device unsupervised. Switch off the device whenever you are not
using it, even if not using it only for a short while.
• The appliance is not intended to be operated using an external timer or separate
remote-control system.
• If the supply cord is damaged, it must be replaced by Kogan.com to avoid a
hazard.
• Before operating this system, check the voltage of this system to see if it is identical
to the voltage of your local power supply.
• The unit should not be impeded by covering the ventilation opening with items
such as newspaper, table-cloths, curtains etc. Make sure that there are at least 20
cm of space above and at least 5 cm of space on each side of the unit.
• The apparatus must not be exposed to dripping or splashing liquid. No objects
filled with liquids (such as vases) should be placed on or near the apparatus.
• Avoid extreme temperatures. Do not install near any heat sources such as
radiators, heaters, stoves, or other apparatus (including amplifiers) that produce
heat.
• To prevent fire or shock hazard, do not expose this equipment to direct heat, rain,
moisture, or dust.
• Do not position this unit near any water sources e.g. taps, bathtubs, washing
machines or swimming pools. Ensure that you place the unit on a dry, stable
surface.
• Do not place this unit close to a strong magnetic field, or on an amplifier or receiver.
• Do not place this unit in a damp area as the moisture will affect the life of electric
components.
• Do not attempt to clean the unit with chemical solvents as this might damage the
finish. Wipe with a clean, dry, or slightly damp cloth.
• When removing the power plug from the wall outlet, always pull directly on the
plug, never pull on the cord.
• Protect the power cord from being walked on or pinched particularly at plugs,
convenience receptacles or at the point where they exit from the apparatus.
• Depending on the electromagnetic waves used by a television broadcast, if a TV is
turned on near this unit while it is also on, lines might appear on the LED TV.
Neither this unit nor the TV is malfunctioning. If you see such lines, keep this unit
well away from the TV set.
• The AC plug is used to disconnect the device; the disconnected device should
remain readily operable. To disconnect the apparatus from the AC power
completely, the AC plug must be removed from the AC outlet completely.
• Only use original or certified cables or attachments/accessories specified by
Kogan.com.
• Do not use the device outdoors during thunderstorms, Unplug this apparatus
during lightning storms or when unused for long periods.
Page 5
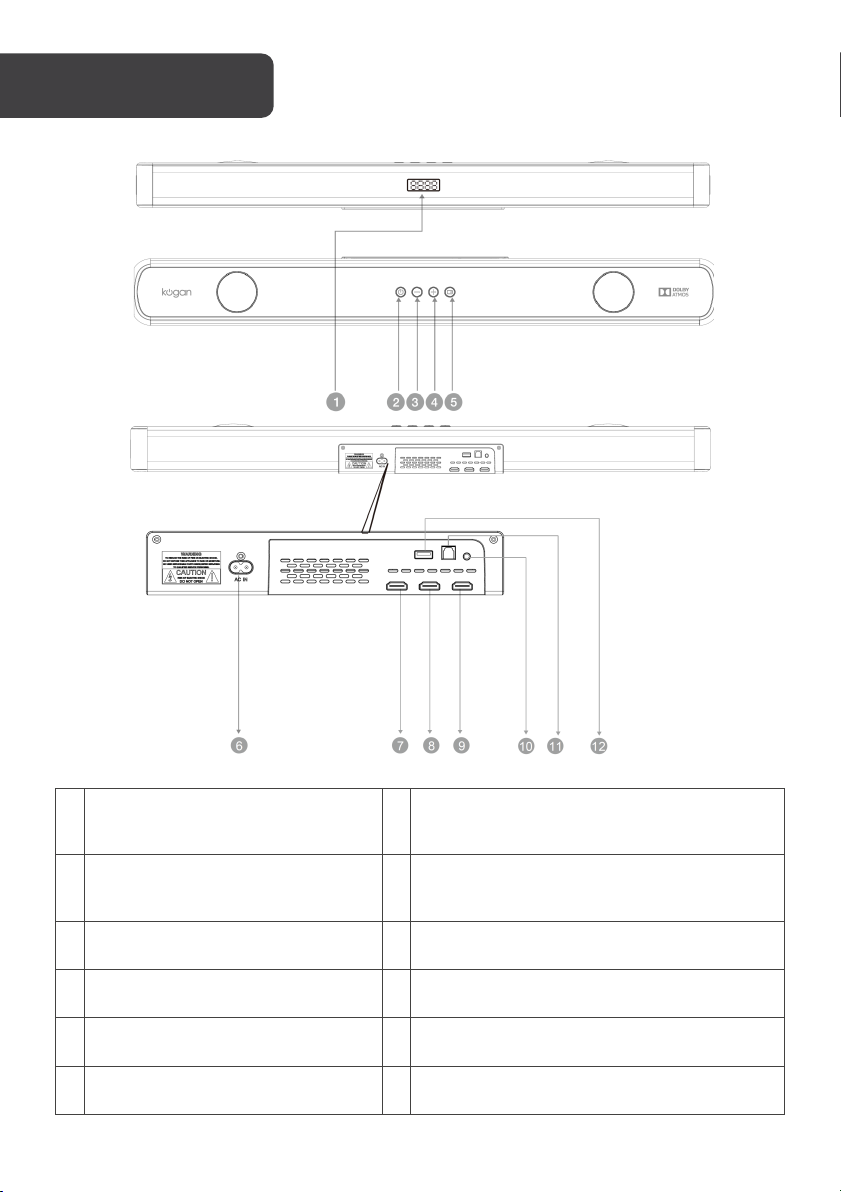
HDMI IN 2: Connect to HDMI OUT of TV or
Ray DVD player
HDMI IN 1: Connect to HDMI OUT of TV or
Ray DVD player
HDMI OUT (ARC): Connect to the HDMI
input on the TV.
AUX IN: Audio input from a 3.5mm source
(e.g. MP3 player)
TV IN OPTICAL: Connect to an optical audio
output on the TV or a digital device.
USB PORT: Audio input from a USB storage
device. Upgrade software of this product.
OVERVIEW
1 Display panel 7
Standby-on: Switch the Soundbar
2
On or to standby
3 Volume: Decrease the volume 9
4 Volume: Increase the volume. 10
5 INPUT: Select an input source. 11
6 AC IN: Connect to the power supply 12
satellite or network set-top box or BD/Blue
8
satellite or network set-top box or BD/Blue
Page 6
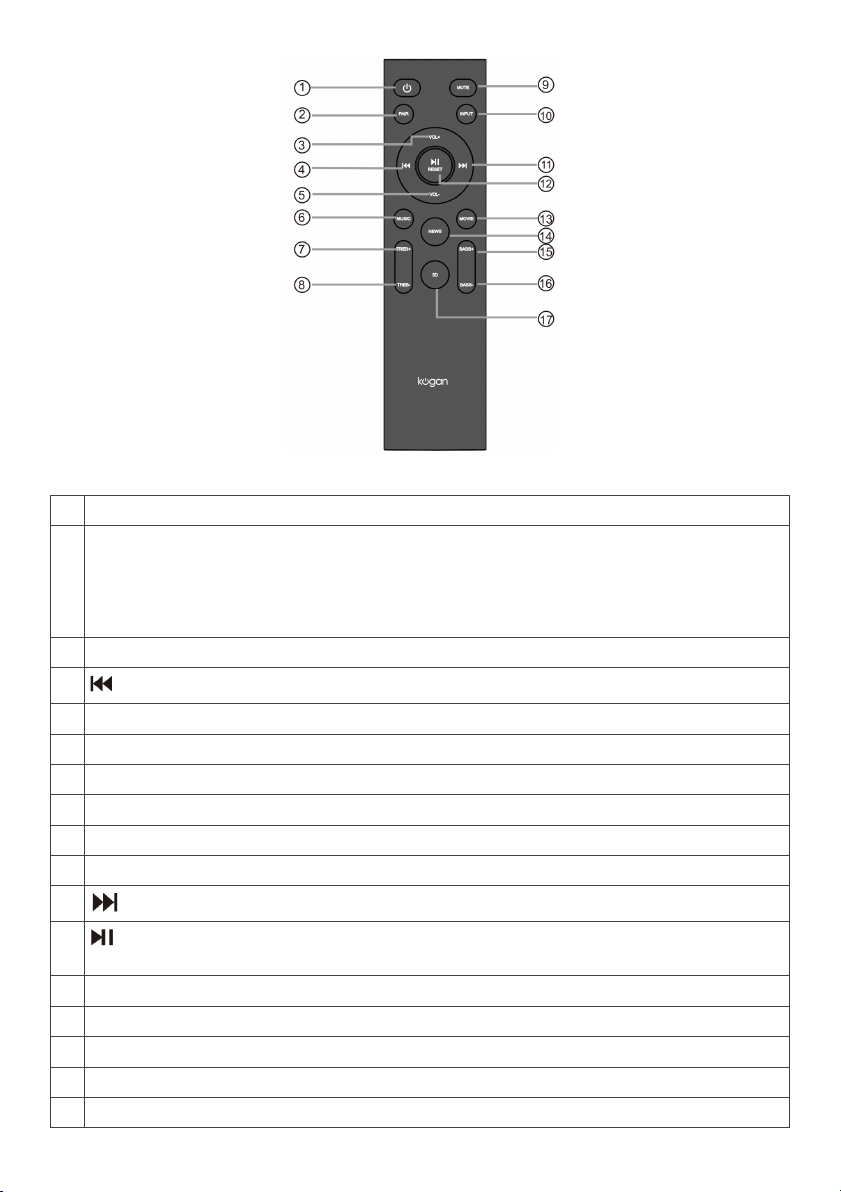
1
Power button: Press to switch the soundbar on/off or enter standby mode.
Pair button:
and the display will show “on or off”.
3
VOL+: to increase the volume.
4
Previous button: Skip to the previous track in USB & BT mode.
5
VOL-: to decrease the volume.
6
Music button: to select and activate the music EQ effect and mode.
7
Tre b le + button: to increase the treble volume.
8
Tre b le - button: to decrease the treble volume.
9
Mute button: Temporarily mutes the sound. Press again to turn the sound back on.
10
Source input button: Selects an input source; ARC, HDMI, Bluetooth, AUX, USB, Optical
11
Next button: Skip to the next track in USB & BT mode.
Reset button: Press and hold for more than 2 seconds to restore factory default settings.
13
Movie button: To select and activate the movie EQ effect and mode.
14
News button: To select and activate the news voice EQ effect and mode.
15
Bass+ button: To increase the bass.
16
Bass- button: To decrease the bass.
17
3D button: To select and activate the 3D EQ effect and mode.
• In Bluetooth mode, press and hold the pair button more than 2 seconds to
2
12
connect and disconnect the last device.
• In other modes, press the pair button to turn on or off surround function or effect
Play/Pause button: Start, pause, or resume play in USB & BT mode.
Page 7
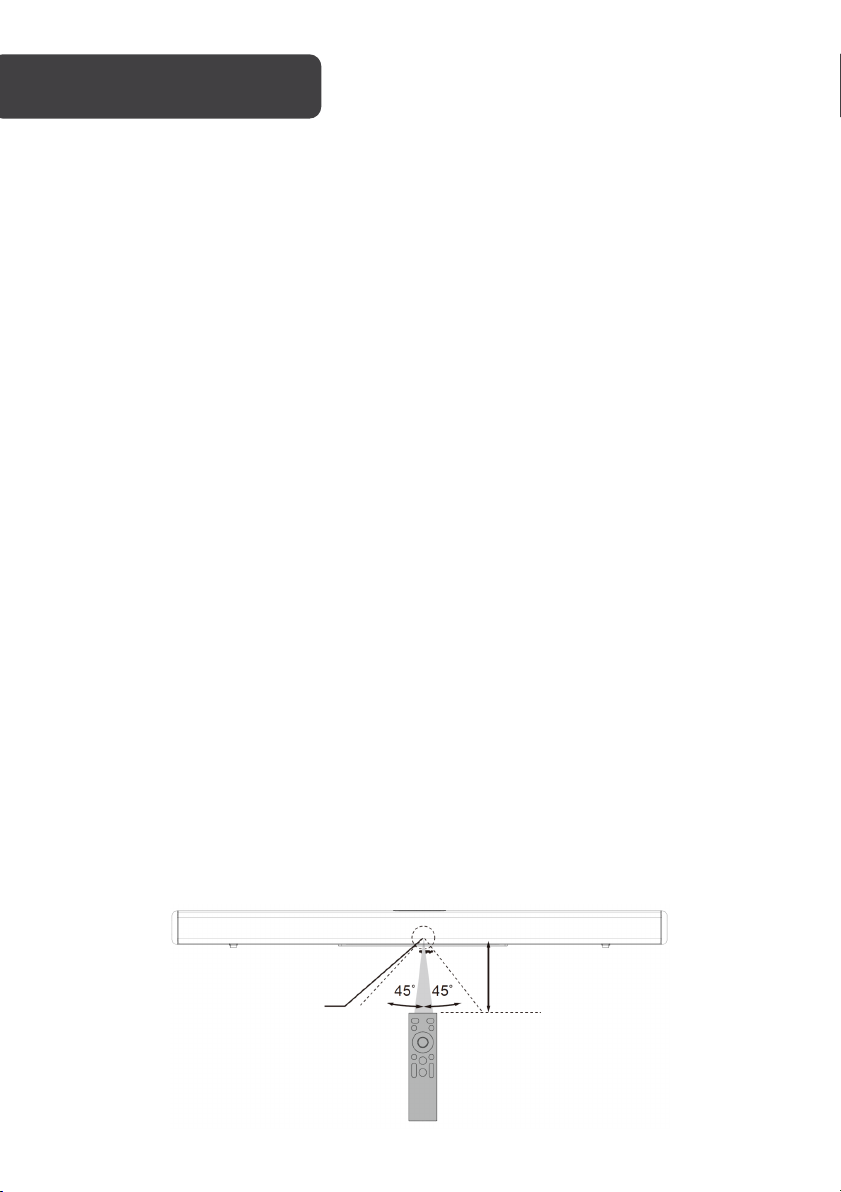
INSTRUCTION
Remote control sensor
Within 10m (32.8ft)
• Remove the soundbar from the carton and remove all packing material from the
soundbar. Save the packing material, if possible, in case the soundbar ever needs
to be serviced or transported. The original carton and packing material are the only
safe way to pack your soundbar to protect it from damage in transit.
• Remove any descriptive labels or stickers on the front or top of the cabinet. Do not
remove any labels or stickers from the back or bottom of the cabinet.
• Place your soundbar on a level surface such as a table, desk, or shelf, out of direct
sunlight and away from sources of excess heat, dirt, dust, moisture, humidity, or
vibration.
• Unwind the cord connecting the AC adapter and extend it to its full length.
This model is equipped with non-skid rubber 'feet' to prevent the product from moving when
you operate the controls. These 'feet' are made from non-migrating rubber material specially
formulated to avoid leaving any marks or stains on your furniture. However certain types of
oil-based furniture polishes, wood preservatives or cleaning sprays may cause the rubber
'feet' to soften and leave marks or rubber residue on the furniture. To prevent any damage to
your furniture, it is strongly recommended that you purchase small self-adhesive felt pads,
available at hardware stores and home improvement centre everywhere and apply these
pads to the bottom of the rubber 'feet' before you place the unit.
Operating range of the remote control
• When the unit is mounted on a wall, point the remote control at the remote-control
sensor on the bellowed panel.
• Even if the remote control is operated within the effective range of 32.8 feet (10m),
remote control operation may be impossible if there are any obstacles between the
unit and the remote control.
• If the remote control is operated near other products which generate infrared rays
or if other remote-control devices using infra-red rays are used near the unit, it may
operate incorrectly. Conversely, the other products may operate incorrectly.
Page 8
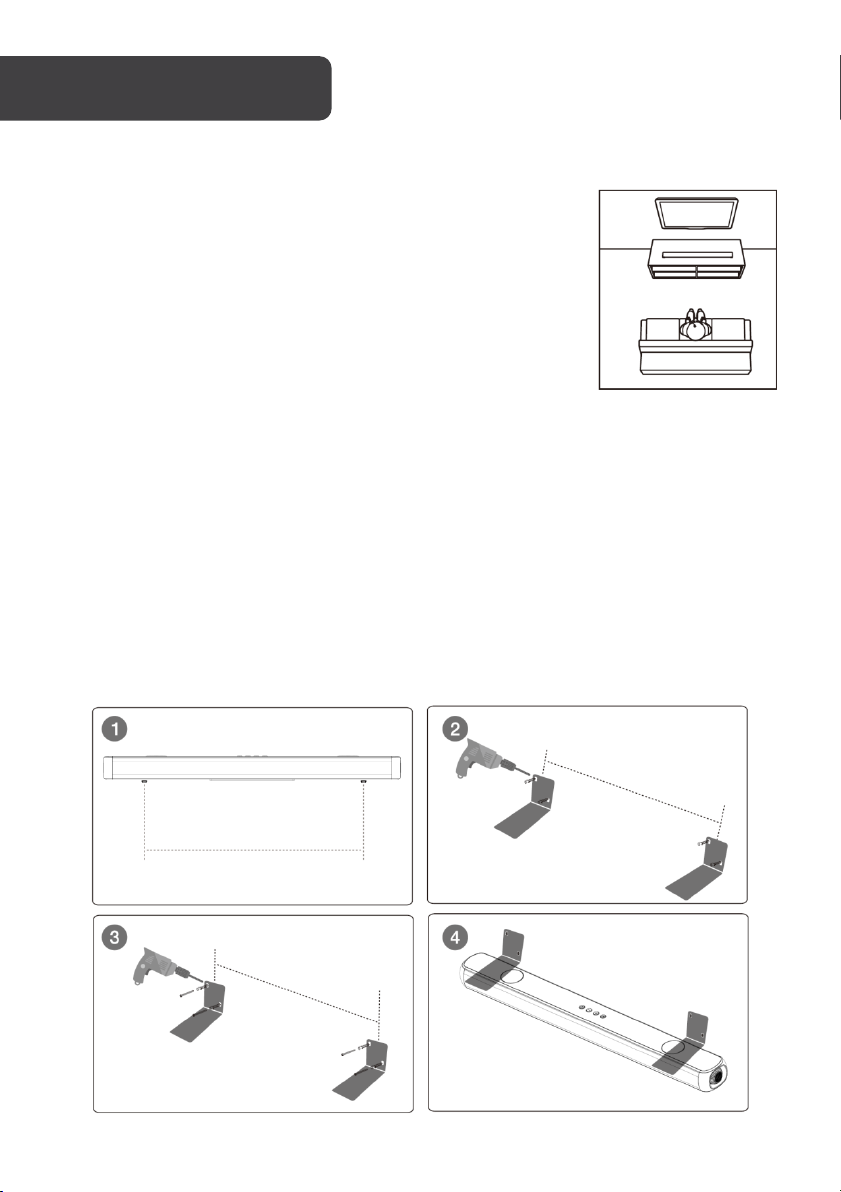
Table placement
Place the soundbar horizontally on a solid surface such as a TV
unit or shelves and align it centrally with the TV screen.
For best sound output and good airflow around the soundbar,
place your soundbar as shown in the image to the right.
Wall mount installation
• Drill 4 holes in the wall, referring to the metal bracket for spacing, ensuring the
holes correspond to the distance between soundbar pads.
• Fix the plastic anchors in the 4 holes of the wall mounting bracket.
• Fix the screws on the plastic anchor and tighten the screws to ensure that the wall
mounting bracket will not shake.
• After fastening the screws, put the soundbar pads into the extension of the wall
mounting bracket.
Page 9

HDMI 1 & HDMI 2
Sound from a connected device (via HDMI IN port)
ARC/Optical
Audio from TV (via HDMI ARC port or TV IN (OPT) jack)
AUX
Sound from a connected device (via AUX port)
BLUETOOTH
Sound from a Bluetooth connected device
USB
Sound from a USB storage device
Using the soundbar
• Before connecting the AC power cord, ensure you have completed all other
connections.
• Risk of product damage: Ensure that the power supply voltage corresponds to the
voltage printed on the back or the underside of the unit.
• Connect the mains cable to the AC IN of the unit and then into a mains socket.
Basic operation
1. Press the power button on either the remote control or the sound bar to turn on the
sound bar.
2. Switch on the connected device (such as TV, playback device, game console etc).
3. Press the input button on either the remote control or the sound bar to select your
desired input source.
Page 10
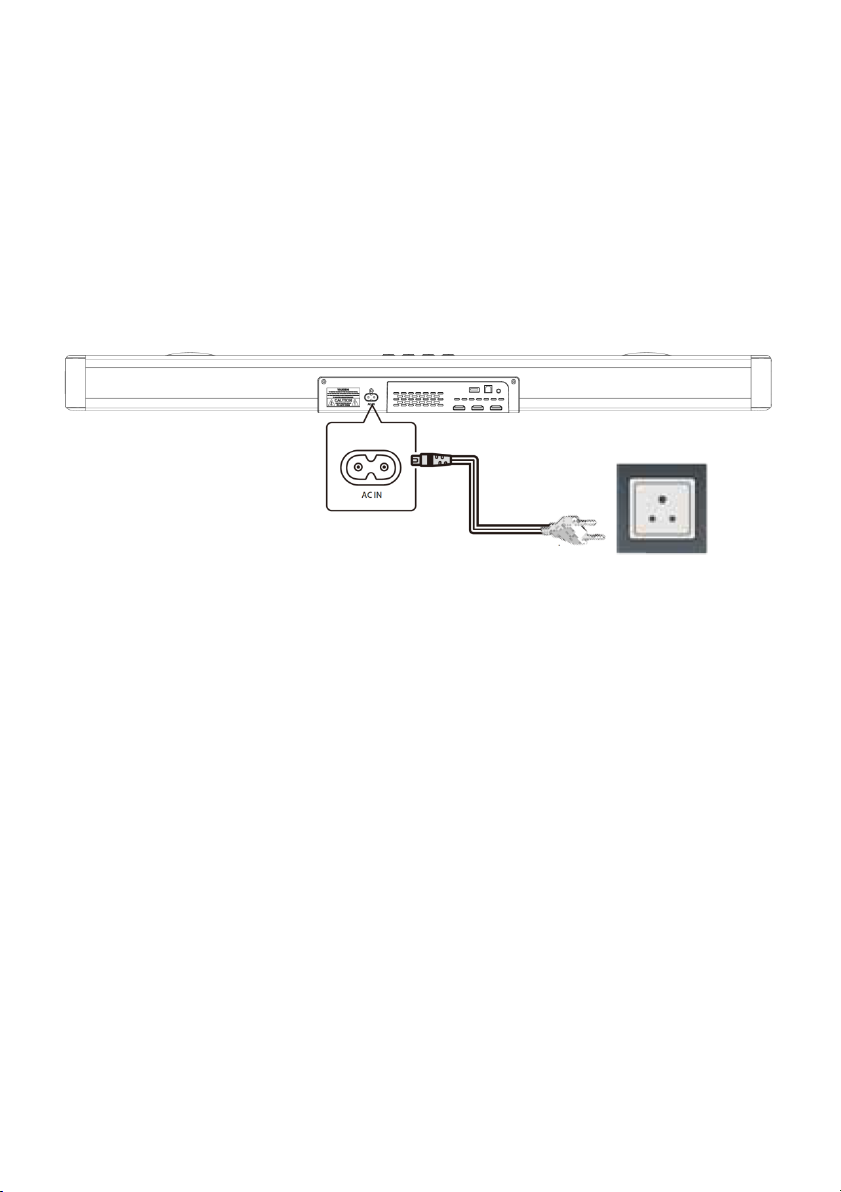
Power on and off
To A C wa l l outlet
1. Plug-in the power cord with one side to AC IN on the soundbar and the other side
to an AC wall outlet (see the following diagram). When you connect the soundbar
to the main socket, the unit will be in standby mode.
2. Switch on the soundbar by short-pressing the power button on the soundbar or
remote control, and a welcome message will scroll across the display. After 12
seconds, the default input mode will automatically appear on the display screen.
3. Press and hold the Power button on the soundbar or remote control for 2 seconds
to switch it off and then disconnect the main plug from the main socket if you want
to switch the unit off completely.
Page 11
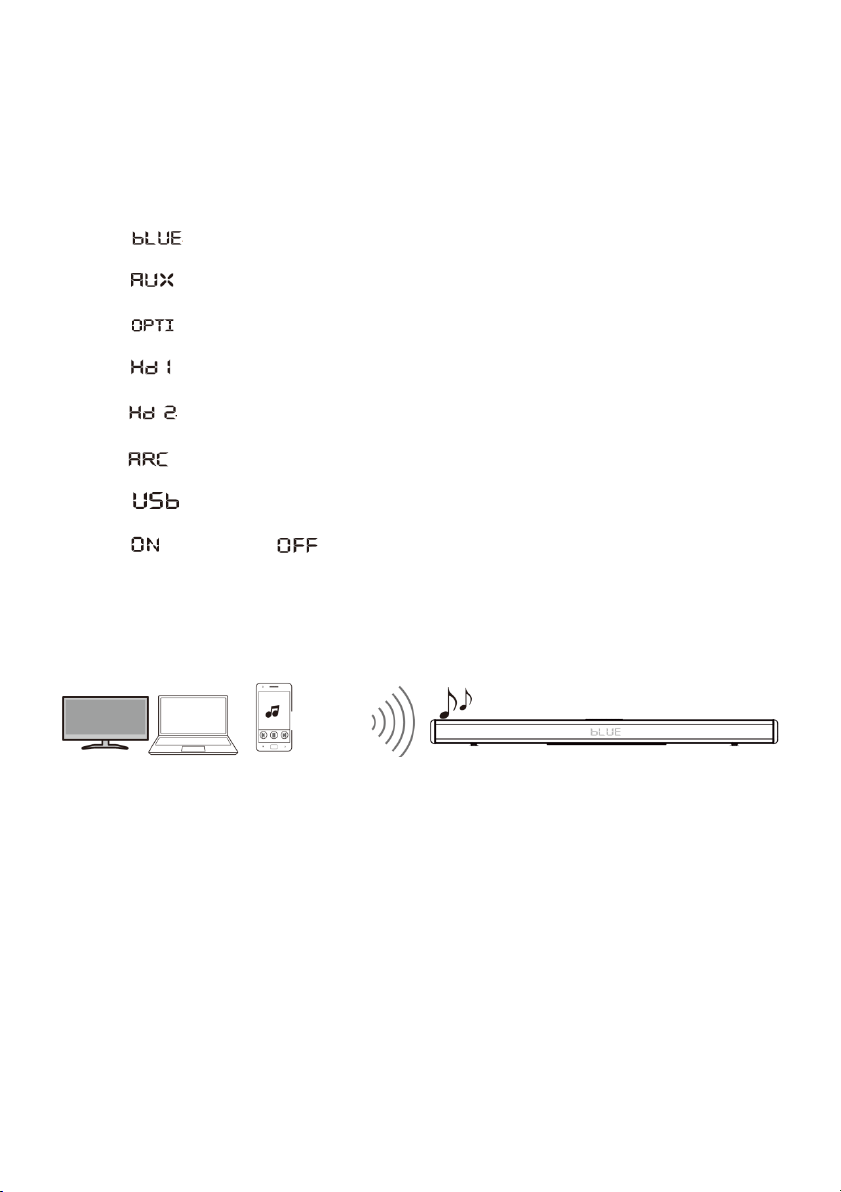
Select mode
Bluetooth
Press the INPUT button on the soundbar or remote control to select between BT, AUX,
OPTICAL, HDMI ARC, HDMI 1, HDMI 2, USB modes.
The selected mode will show on the display:
• : Bluetooth Pairing mode,
• : AUX mode
• : Optical mode
• : HDMI 1 mode,
•
• : HDMI OUT (ARC) mode,
• : USB mode
• : Surround on/ : Surround off
Playing audio via Bluetooth
Through Bluetooth, connect the soundbar with your Bluetooth device (such as an iPad,
iPhone, iPod touch android phone or laptop) and you can listen to audio files on the device
through your soundbar.
Requirements:
• A Bluetooth device which supports Bluetooth profile A2DP, AVRCP and with
: HDMI 2 mode,
device
Bluetooth version 5.0 or later.
• The maximum operational range between the soundbar and a Bluetooth device is
approximately 10 meters (30 feet).
Page 12

1. Turn on the soundbar and press the INPUT button on the soundbar or remote
control to switch the soundbar to Bluetooth mode. The display on the soundbar will
show “ ” and begin flickering to show Bluetooth pairing mode.
2. On the Bluetooth device, switch on Bluetooth, search for and select KASBDA20CA
on your Bluetooth list to start connection (see the user manual of the Bluetooth
device on how to enable Bluetooth). If prompted for a password, use “0000”.
3. Wait until you hear the voice prompt from the soundbar. If successfully connected,
“ ” will stop flickering and is displayed on the display panel.
4. Select and play audio files or music on your Bluetooth device.
• During play, if a call is coming, music play is paused. Play resumes when
the call ends.
• If your Bluetooth device supports AVRCP profile, on the remote control you
can press to skip to a track or short-press to pause/resume play. Hold the
PAIR button on the remote control for more than 2 seconds to disconnect
the paired Bluetooth device, or reconnect the most recent Bluetooth
device.
5. You can use the volume buttons on the soundbar or on the remote control to adjust
the volume to your requirements.
6. To exit Bluetooth, select another input source.
• When your switch back to Bluetooth mode, the Bluetooth connection will
remain active.
Note:
• If you experience connection problems, remove KASBDA20CA from your
device's Bluetooth history and ensure it is less than 10 meters from the
soundbar, then try pairing again. To get the best sound quality, make sure
there is a clear line of sight between the connected device and your sound
bar.
• If your pairing device or connected device is switched off or manually
disconnected, the soundbar will automatically enter pairing mode.
• The music streaming may be interrupted by obstacles between the device
and soundbar, such as a wall, metallic casing that obscures the device or
other devices nearby that operate in the same frequency.
• If you want to connect your soundbar with another Bluetooth device, press
and hold PAIR on the remote control to disconnect the currently connected
Bluetooth device.
Page 13
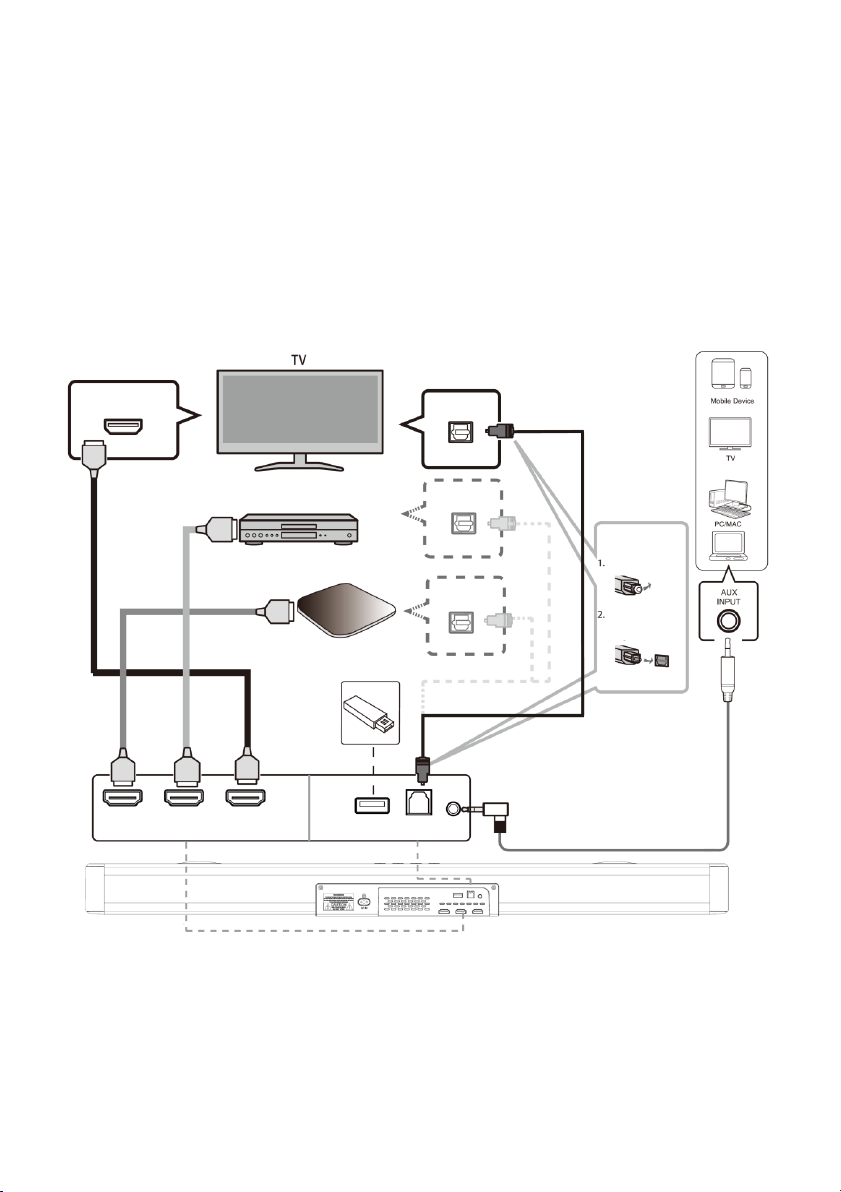
Connections
Satellite or Network Set-top Box, or
HDMI Out
STB (Set
HDMI Out
USB Flash
Driver
Optical
Output
Optical
Output
Remove the
Check the
HDMI 2 HDMI 1 HDMI Out
USB Port
TV IN AUX IN
Optical
HDMI ARC)
The HDMI in and HDMI (ARC) ports support both video & audio.
• Video: max. 1080p/4K/HDR/60fps
• Audio: Dolby Atmos, Dolby Digital, Dolby Digital Plus, Dolby TrueHD and Dolby
Surround
• HDMI: HDMI version 2.0
HDMI IN
BD/Blu-ray DVD Player
Top Box)
Output
cap
direction of
the plug
Page 14
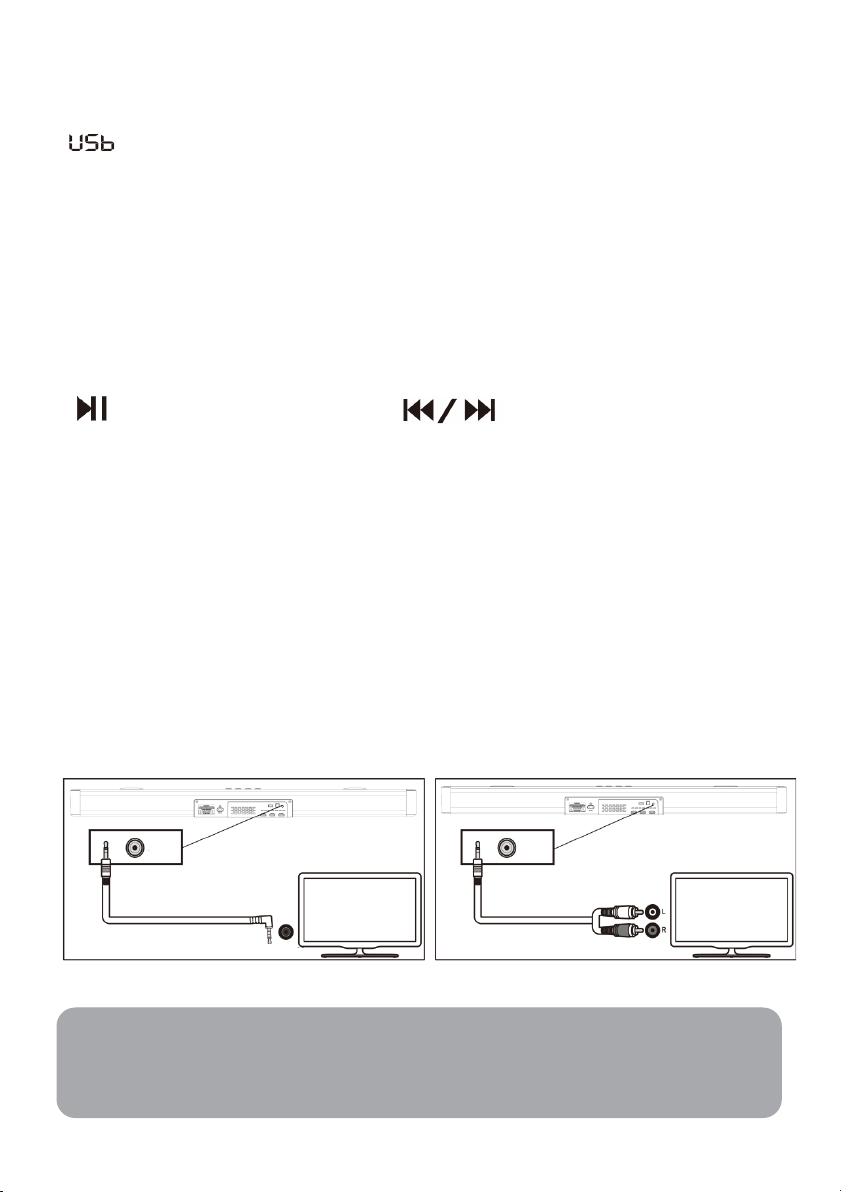
Playing audio via USB port
AUX
AUX
Headphone
Audio Out
The soundbar automatically switches to USB input mode (with the LED display showing
“ ”) when a USB flash drive is inserted. This mode is not selectable on the soundbar or
remote control unless a USB flash drive is connected.
1. Ensure that your USB flash drive contains MP3 or WMA audio files (other file types
not supported).
2. Connect the USB flash drive to the USB port on the soundbar (or your USB
extension cable connected to the USB port); music will automatically play with the
LED display showing “00:00”, and the playtime will be automatically displayed on
the screen.
3. Press the VOL +/– buttons to adjust the volume to your desired level.
4. During playback:
Start, pause, or resume play.
Playing audio via audio input (AUX) connection
• Use a 3.5mm to 3.5mm audio cable (included) to connect the PC, tablet,
smartphone, TV’s headphone socket etc. to the AUX IN socket on the soundbar.
• Use an RCA to 3.5mm audio cable (not included) to connect a Blu-ray player/TV’s
audio output sockets to the AUX IN socket on the soundbar.
• Short-press the button on the soundbar or the remote control to switch to AUX
input mode on the LED display.
• In this mode, playback can only be controlled on the connected device.
Skip to the previous or next track.
Note:
For some computers, you may need to access the audio control panel to manually
select the soundbar as the audio playback device.
Page 15
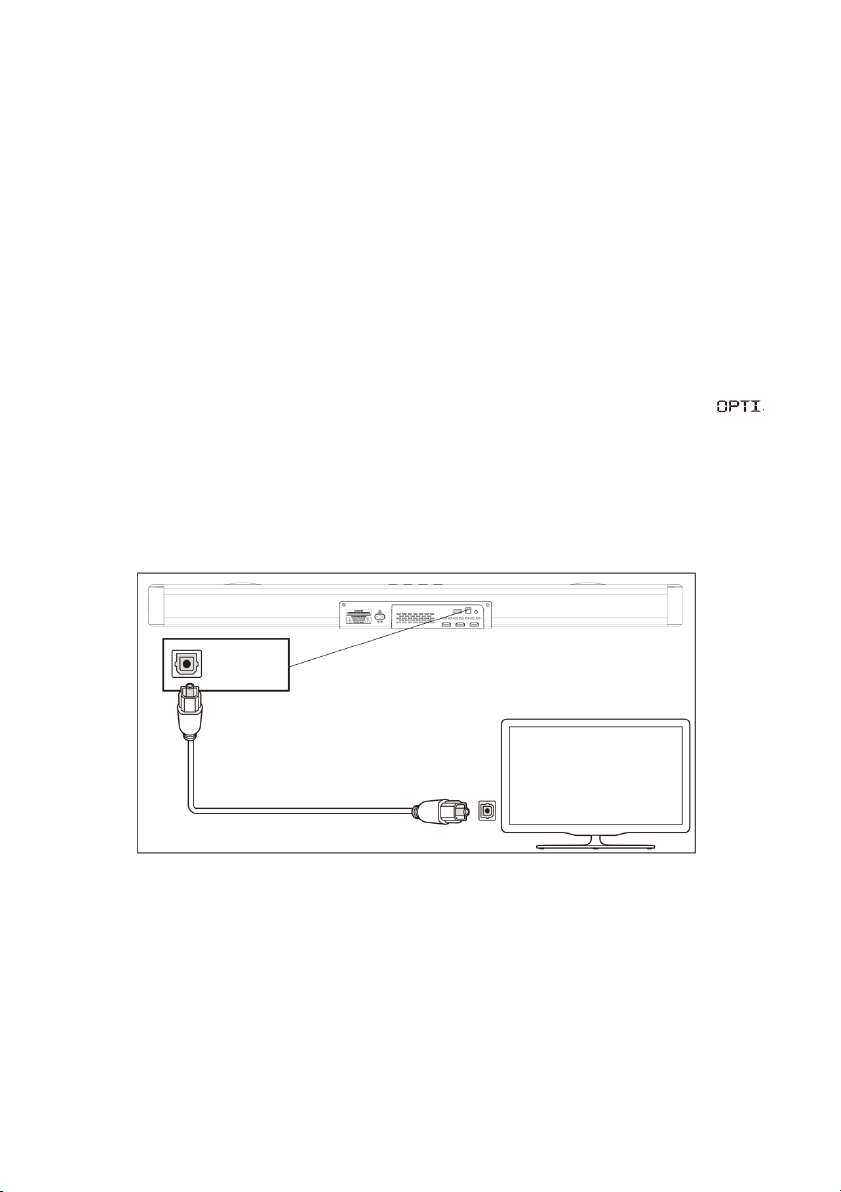
Optical mode
Optical
Optical Out
Using an optical cable (not included), connect the OPTICAL connector on your soundbar
(Optical digital input) to the OPTICAL OUT connector on the TV or other device. The TV or
other device must have an optical digital output.
• Connect the optical cable to the TV IN (OPT) jack on the rear of the soundbar.
• Connect the other end of the optical cable to the audio output jack on the TV.
• Switch the TV setting and sound bar on. Set the connected TV to “PCM Stereo” or
“Stereo 2.0”.
• Start playback on the TV.
• Press the source input button on the soundbar or remote control to activate
OPTICAL mode. After successfully connecting, the LED display will show “ ”.
Operate your audio device directly for playback features.
• Press the VOL +/– buttons to adjust the volume to your desired level.
Page 16

HDMI IN & HDMI (ARC) modes
Option 1: ARC (Audio Return Channel)
The soundbar supports HDMI with Audio Return Channel (ARC). If your TV is HDMI (ARC)
compliant, you can hear the TV audio through your soundbar by using a single HDMI cable.
1. Using a high-speed HDMI cable, connect the HDMI OUT (ARC) on the soundbar to
the HDMI (ARC) connector on your TV.
2. Press the INPUT button on the soundbar or remote control to switch to HDMI (ARC)
mode. After successfully connecting, the LED display will show “ ”.
3. Press the VOL +/– buttons to adjust the volume to your desired level.
4. If you wish, you can change the audio settings by using the relevant buttons on the
remote control.
Note:
• Your TV must support the HDMI-CEC and ARC function. HDMI-CEC and
ARC must be set to be on.
• The setting method of HDMI-CEC and ARC may differ depending on the TV.
For details about ARC function, refer to your TV owner’s manual.
• Only HDMI 1.4 (or later) compatible cables can support the ARC function.
• The Audio Return Channel (ARC) function enables an HDMI compatible TV to
send the audio stream to HDMI OUT of the unit.
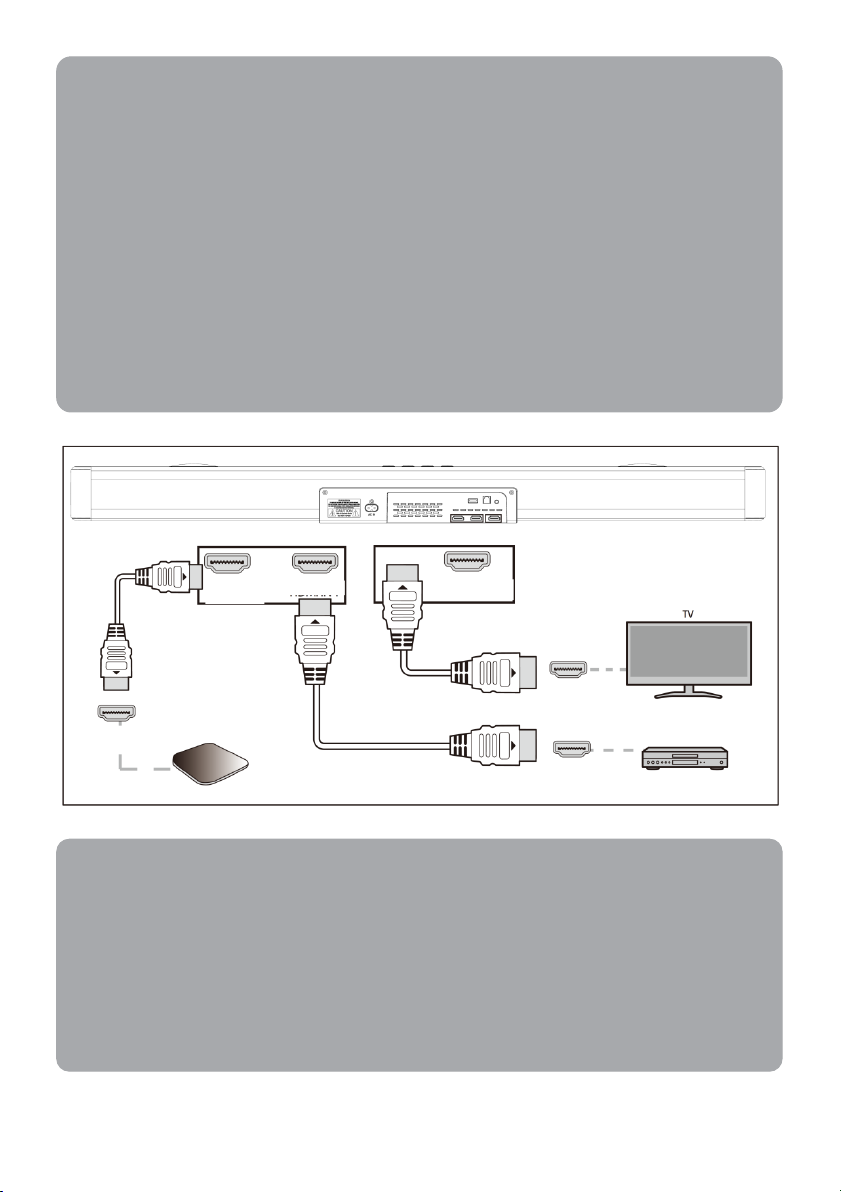
Option 2: Standard HDMI
• If your TV is not HDMI ARC-compliant, connect your soundbar to the TV through a
standard HDMI connection.
• Use an HDMI cable (not included) to connect the soundbar’s HDMI OUT socket to
the TV’s HDMI IN socket.
• Use an HDMI cable (not included) to connect the soundbar’s HDMI IN (1 or 2)
socket to your external devices (e.g. games consoles, DVD players and Blu-ray).
• Press the input button on the soundbar or remote control to switch to HDMI mode.
• After successfully connecting, the LED display will show or .
Page 17
HDMI IN 2 HDMI IN 1
HDMI IN
HDMI OUT
HDMI OUT (ARC)
HDMI OUT
STB (Set
Satellite or Network Set-top Box, or
Note:
To play Dolby ATMOS signals to the soundbar:
1. Set the ATMOS device’s audio output to be “auto” or original code.
2. Connect the device’s HDMI OUT to the soundbar’s HDMI 1 or 2 input.
3. Connect the soundbar HDMI OUT (ARC) to the TV’s HDMI IN.
4. If connecting the device’s HDMI OUT to a TV, connect the TV’s HDMI ARC to
the ATMOS HDMI ARC port to share control with the soundbar (only power
on/off, previous/next track, mute and volume of soundbar can be controlled
by your TV remote). The device’s Optical output can be sent to the soundbar
as a Dolby Digital Plus signal, as Dolby ATMOS signals require large
bandwidth and cannot transfer by Optical or HDMI ARC.
Top Box)
Note:
• While in OPTICAL/HDMI ARC mode, if there’s no sound output from the unit
and the status LED display flashes, you may need to activate PCM or Dolby
Digital Signal output on your source device (e.g. TV, DVD or Blu-ray player).
• The unit may not be able to decode all digital audio formats from the input
source. In this case, the unit will mute. This is NOT a defect. Ensure that the
audio setting of the input source is set to PCM or Dolby Digital with HDMI
1/HDMI 2/HDMI ARC/optical input.
BD/Blu-ray DVD Player
Page 18

Manufactured under license from Dolby Laboratories. Dolby, Dolby Audio, Dolby Vision,
Dolby Atmos and the double -D symbol are trademarks of Dolby Laboratories.
Using DOLBY ATMOS®:
DOLBY ATMOS is only available in HDMI IN and HDMI OUT (ARC) mode.
1. To use Dolby Atmos® in HDMI 1/HDMI 2/HDMI ARC mode, your TV must
support Dolby Atmos®.
2. Make sure that “No Encoding” is selected for bitstream in the digital audio output
of the connected external device (e.g. Blu-ray DVD player, TV etc.).
3. While entering Dolby Atmos/Dolby Digital Plus format, the soundbar will show
DOLBY ATMOS/DOLBY SURROUND.
4. Set the audio output sampling rate to 192 kHz if possible.
This sound bar supports 4K pass-through and DOLBY VISION. When you play a disc which
supports 4K video signal, the signal can be delivered to your TV.
Note:
The full Dolby Atmos experience is only available when the Soundbar is connected to
the source via a HDMI 2.0 cable.
The soundbar will still function when connected via other methods (such as a Digital
Optical cable) but these are unable to support all the Dolby features. Given this, our
recommendation is to connect via HDMI, to ensure full Dolby support.
Page 19
Select equalizer (EQ) effect
Music mode
Enhances the treble and adds greater depth to the music
Movie mode
Intensifies the bass and enhances the clarity of dialogue
Enhances the clarity of voices. Suitable for watching TV shows and
3D mode
Enhances background music and provides a full range of sound.
Press the EQ button on the remote control to select your desired preset equalizer effects:
Movie/Music/News/3D:
News mode
news.
Adjust the volume
Press VOL+/- buttons on the unit or remote control to increase or decrease the volume level.
• To mute sound, press Mute.
• To restore the sound, press Mute again or press VOL+/-.
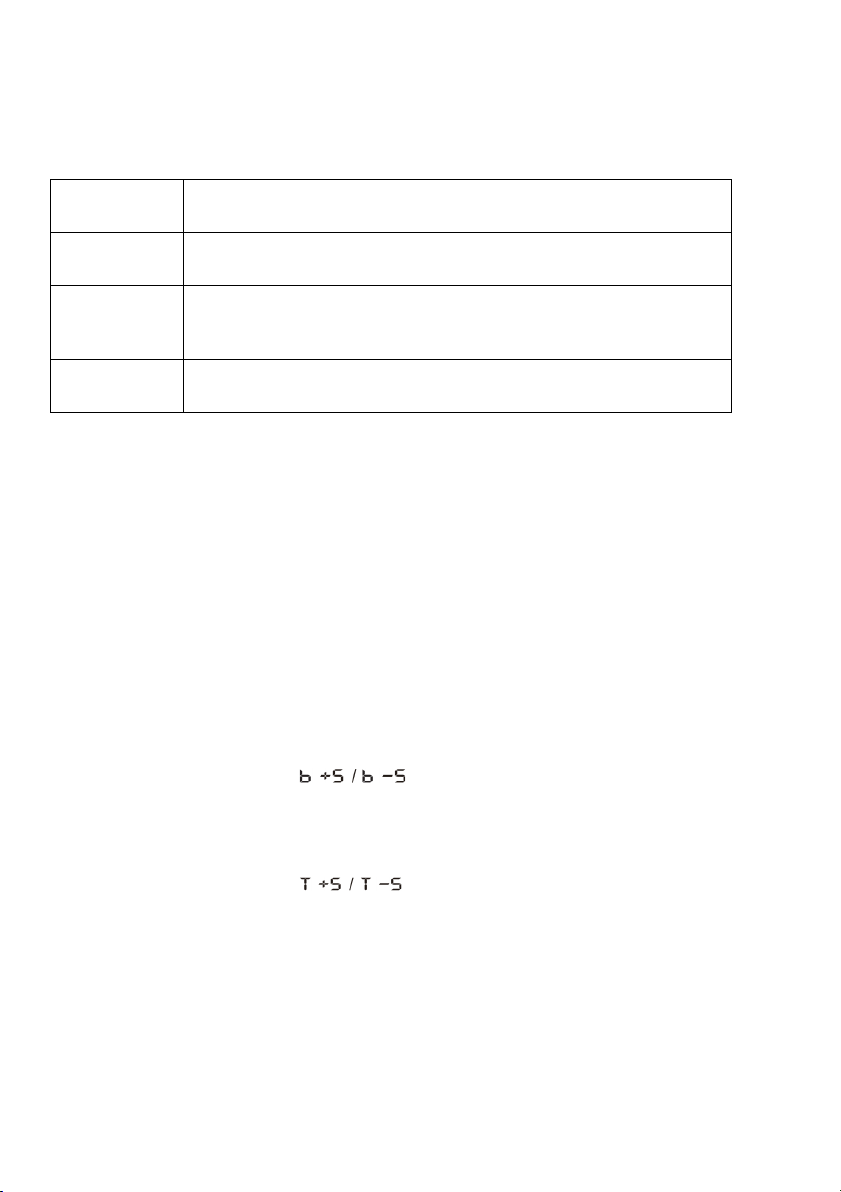
Adjust the bass/treble level
Press Bass+/- on the remote control to activate the bass level setting.
• The display will show accordingly.
Press Treble+/- on the remote control to activate the treble level setting.
• The display will show accordingly.
Page 20

Problem
Cause
Remedy
Use the remote control
within the operating range.
The batteries are drained.
Replace with new batteries.
The remote-control sensor of the unit
lighting.
The TV cannot be
TV’s remote control.
Position the unit so that it
remote-control sensor.
Bluetooth is not selected as the input
source.
Select Bluetooth as the
input source.
Unpair the Bluetooth device
Bluetooth device.
The unit is too far away from the
Bluetooth device.
Move the Bluetooth device
closer to this unit.
A device emitting electromagnetic
may be located nearby.
Do not use this unit near
electromagnetic waves.
The Bluetooth device you are using
may not support the correct protocol.
Use a supported Bluetooth
device.
Delete the connection
device to this unit.
The volume on the Bluetooth device
may be too low.
Raise the volume on the
Bluetooth device.
Bluetooth is not selected as the input
source.
Select Bluetooth as the
input source.
Playback on the device has not been
started.
Begin playback on the
device.
Select this unit as the
Bluetooth device.
The connection to the Bluetooth
device was cut off.
Connect with the Bluetooth
device again
The unit may be too far away from
the Bluetooth device.
Move the Bluetooth device
near this unit.
TROUBLESHOOTING
The unit is out of the operating range.
The unit cannot be
operated using the
remote control.
is exposed to direct sunlight or strong
Adjust the lighting angle or
reposition the unit.
operated using the
The unit cannot be
connected to a
Bluetooth device.
No sound can be
heard, or the sound
cuts off intermittently.
The unit is blocking the TV’s remotecontrol sensor.
The unit is connected to a different
Bluetooth device.
waves (such as a microwave oven)
The connection profile registered in
the Bluetooth device may not be
functioning correctly.
The sound output on the Bluetooth
device may not be set to this unit.
does not obstruct the TV’s
that is currently connected
and pair with the desired
devices that emit
profile in the Bluetooth
device then reconnect the
output destination on the
Page 21

A device emitting electromagnetic
waves (such as a microwave oven, a
located nearby.
Select an appropriate input
source.
The mute function is activated.
Cancel the mute function.
The volume is too low.
Turn up the volume.
Make sure that the power
outlet securely.
Connect the input jack on
on the playback device.
Change the digital audio
playback device to PCM.
The volume decreases
The automatic volume adjustment
turned on.
The volume is too low.
Turn up the volume.
The TV or playback device is set to
(such as PCM) only.
Sound is also heard from the TV builtin speakers.
Set the TV volume to a
minimum.
The listening position should
the unit.
The unit is too close to another digital
or high-frequency device.
Move those devices away
from the unit.
Your TV HDMI ARC is not compatible
with soundbar HDMI ARC.
Your TV can not support HDMI-CEC
and ARC function.
wireless device and so on) may be
Another input source is selected.
Do not use this unit near
devices that emit
electromagnetic waves.
No sound.
when the unit is
turned on.
No surround effects.
Noise is heard.
The power cable of the unit is not
connected properly.
Input jacks on playback device are
not connected.
Signals that the unit cannot playback
are being inputted.
function is activated. To prevent
excessive loudness, the unit
automatically controls its volume
within a certain level when the unit is
output 2 channel audios (such as
PCM) only. The TV or playback device
is set to output 2 channel audios
The listening position is too close to
the unit.
cable of the unit is
connected to an AC wall
the unit and the output jack
output setting on the
Turn up the volume as
required.
Change the digital audio
output setting on the TV or
playback device to
Bitstream.
be at some distance from
Volume drops in and
out when soundbar
connected to TV via
HDMI ARC.
You can select Optical as
the input source to
reproduce TV sound via
soundbar Optical input.
Page 22

Page 23

Page 24

Need more information?
We hope that this user guide has given you
the assistance needed for a simple set-up.
For the most up-to-date guide for your product,
as well as any additional assistance you may require,
head online to help.kogan.com
 Loading...