

Page 1
2.1CH 160W DOLBY SOUNDBAR
WITH WIRELESS SUBWOOFER
KASBD16CB
Page 2

Safety & Warnings 3
Components List 5
Overview 5
Before First Use 7
Installation 7
Operation 10
Cleaning & Care 17
Troubleshooting 17
Notes 21
2
Page 3

SAFETY & WARNINGS
Ensure to read all warnings and instructions in this user guide prior to first use. Retain this
user guide for future reference.
CAUTION: Do not open, dismantle or modify the soundbar. This may lead to an
electric shock and damage to the unit.
• This appliance is not intended for use by persons (including children) with reduced
physical sensory or mental capabilities or lack of experience and knowledge unless
they have been given supervision or instruction concerning use of the appliance by a
person responsible for their safety.
• Children should be supervised to ensure that they do not play with the soundbar.
• This soundbar uses a voltage of 50Hz. Ensure the power supply used is identical.
• Do not listen at high volume levels for extended periods, or suddenly increase the
volume of the soundbar. Doing so may cause permanent hearing damage.
• Ensure the soundbar is placed on a dry, stable surface.
• Ensure there is at least a 20cm clearance above, and a 5cm clearance on either side
of the soundbar.
• Do not place this soundbar near any heat sources (for example, radiators, heaters,
stoves, or any other devices that may emit heat).
• Do not place the soundbar in areas commonly near water (for example, bathrooms,
laundries, and kitchens).
• This soundbar is not waterproof. Keep water and other liquids away from the
soundbar.
• Do not place this soundbar in damp areas as this will affect the components inside
the unit.
• Do not block the vents or speakers on this soundbar with any obstructions (for
example, newspapers, walls, and curtains).
• The soundbar has no user-serviceable parts. If repairs are needed, contact
help.Kogan.com for assistance.
• Ensure the power cord is always visible and not walked on, or folded.
• If the power cord is damaged, stop use immediately and contact help.Kogan.com for
assistance.
• Do not forcibly pull on the power cord itself to remove it from the power socket.
• To prevent fires and electric shocks, do not expose this soundbar to direct
heat/sunlight, open flames, rain, moisture, or excess dust.
3
Page 4

• Do not place this soundbar near strong magnets.
• Do not place this soundbar on an amplifier or receiver.
• Do not clean the soundbar using chemical solvents as this might damage the
exterior finish.
• Depending on the electromagnetic waves used, if another TV is turned on near this
soundbar whilst powered, lines may appear on certain LED TVs. This is due to signal
interference. If such lines are seen, keep the soundbar away from the TV.
• This soundbar is compatible with LCD, LED, and Plasma TVs.
• Do not use this soundbar with CRT TVs as it may cause image interference.
• This soundbar is not intended to be used with third-party accessories (for example,
remote controls and timers).
• Switch off the soundbar whenever it is not in use.
4
Page 5
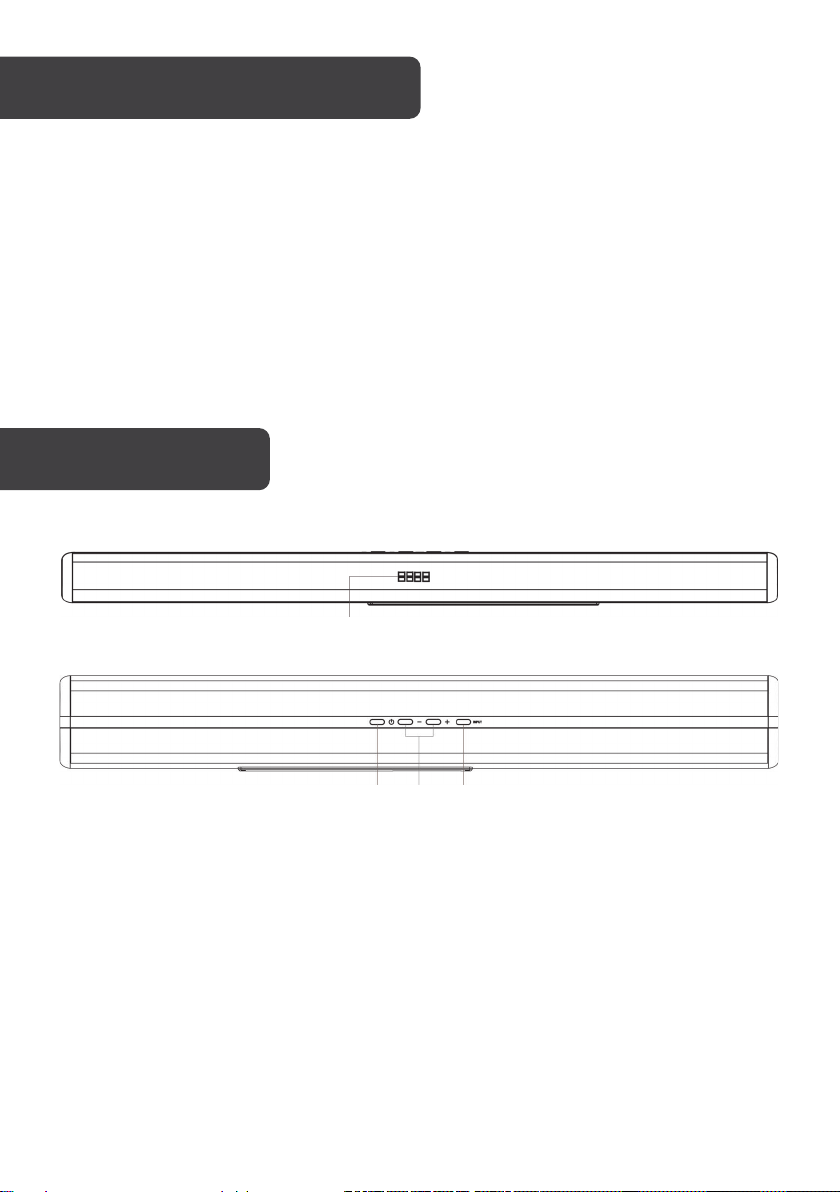
1
2 3 4
COMPONENTS LIST
OVERVIEW
Soundbar (x1)
•
Wireless subwoofer (x1)
•
RCA to 3.5mm cable (x1)
•
Bracket (x2)
•
Screw (x4)
•
Anchor (x4)
•
User guide (x1)
•
Front view (Soundbar)
Top view (Soundbar)
1 LED display
2 Power button
3 Volume controls
4 INPUT button
5
Page 6
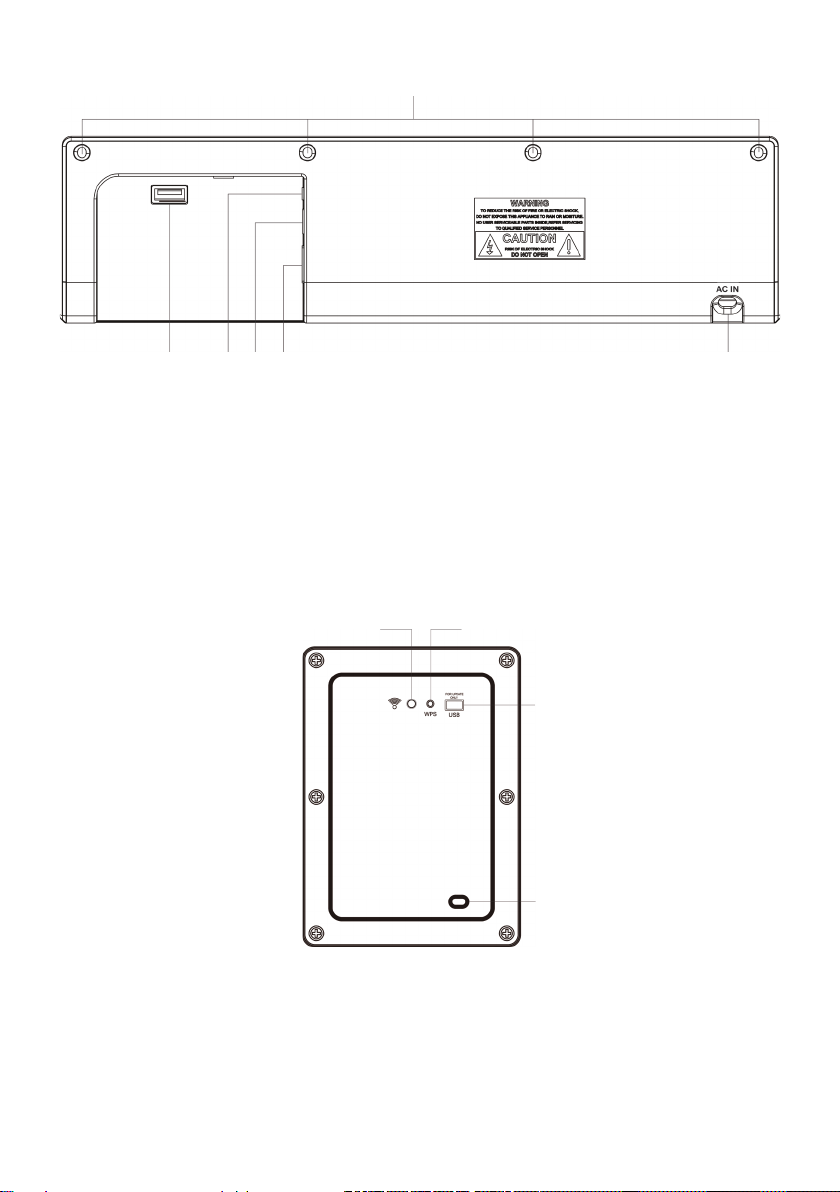
Bottom view (Soundbar)
12
13
14
15
5 6 7 8 9
10
Back view (Subwoofer)
5 Screw holes 8 Optical input
6 USB port 9 HDMI (ARC) input
7 AUX input 10 Power port
12 LED indicator 14 USB port (only used for data transfer if
firmware updates are necessary)
13 WPS button 15 Power port
6
Page 7
BEFORE FIRST USE
Unpacking
• Remove the soundbar from the carton and remove all packaging. If possible, save
the packaging in case the soundbar ever needs to be transported.
• Remove any descriptive labels or stickers on the front and top of the soundbar.
• Do not remove any labels or stickers from the back or bottom of the soundbar.
Rubber feet
This soundbar is equipped with non-skid rubber feet to prevent the unit from moving when
operating the physical controls. These feet are made from a non-migrating rubber material
specially formulated to avoid leaving any marks or stains on your furniture. However, certain
types of oil-based furniture polishes, wood preservatives, or cleaning sprays may cause the
rubber feet to soften and leave marks or a rubbery residue on furniture. To prevent any
damage to furniture, we strongly recommend that you purchase small self-adhesive felt
pads and apply them to the bottom of the rubber feet before placing the unit.
INSTALLATION
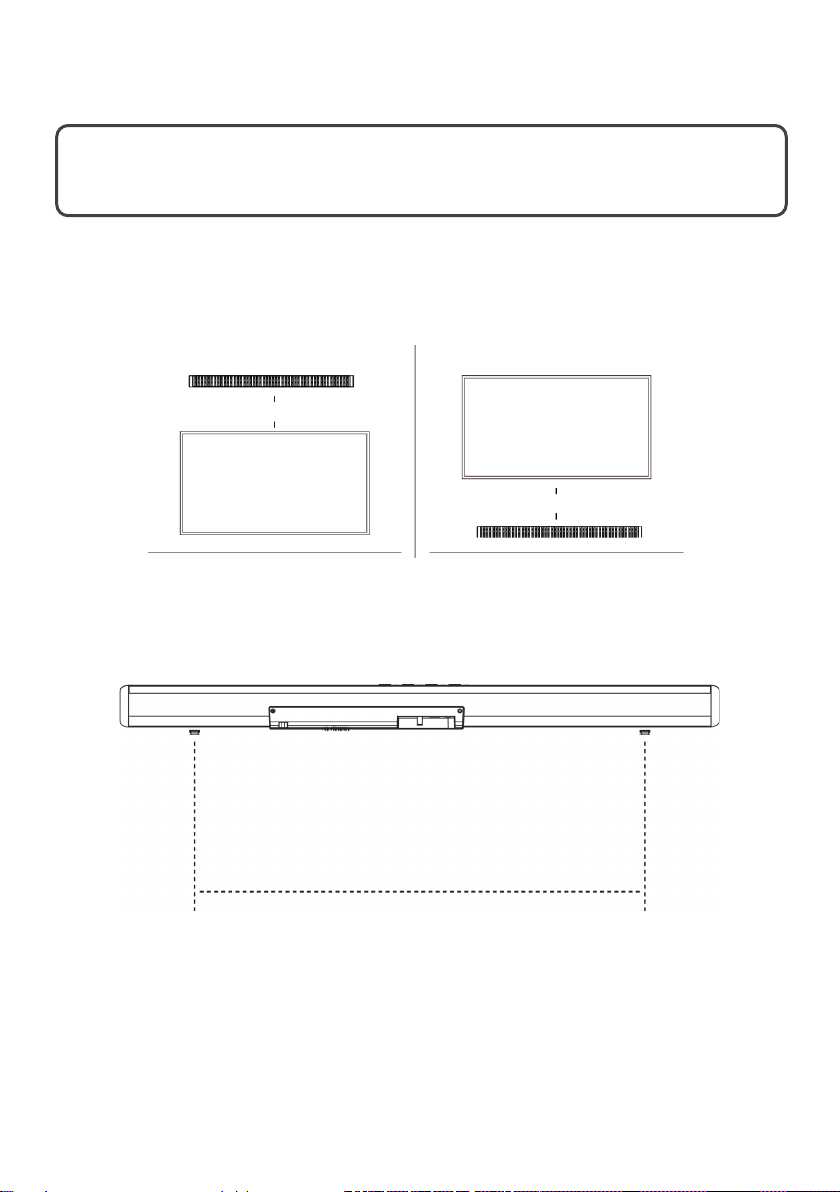
Placement
• Place the soundbar horizontally on a dry, stable surface (for example, TV unit,
shelves) and align it centrally with the TV screen.
• The soundbar should be away from direct sunlight, heat sources, liquids, and excess
dust.
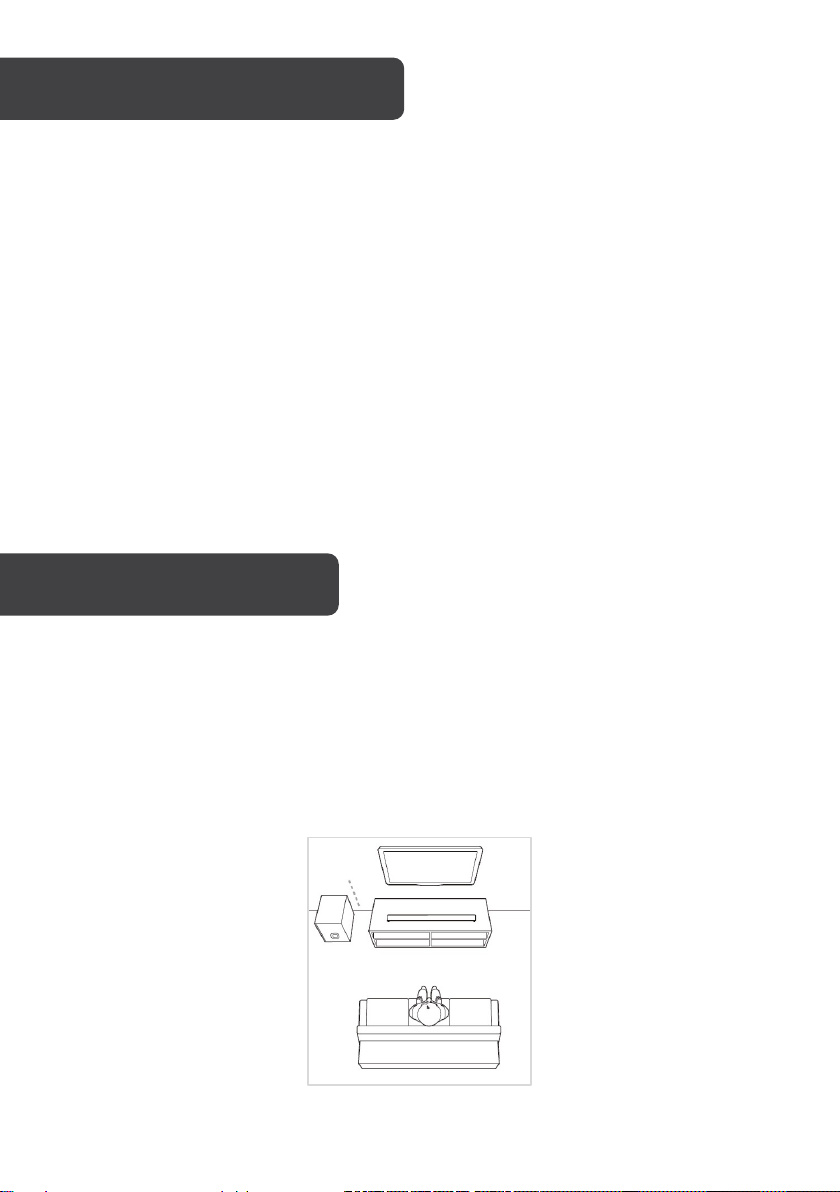
• For the best sound output and sufficient airflow around the soundbar, place your
soundbar as shown below.
7
Page 8
Wall mounting
20cm
20cm
This soundbar may also be mounted onto a wall.
WARNING: If you don't feel confident in correctly securing the wall
mount, Seek the assistance of an experienced person or professional.
For the speaker to be supported, it must be installed on a vertical, reinforced area of the
wall. For plasterboard walls, it is recommended to screw into wall studs for greater security.
For optimum performance, allow at least 20cm clearance between the soundbar and the
TV.
1. Hold the soundbar against the wall and mark the placement of the two outer rubber
feet. These will be used to mark the spacing for the brackets. Place the soundbar
back on a level surface.
2. Using the markings, place the brackets and align them so they are level. Mark the
four holes in the brackets then remove the brackets. Using a drill (not supplied),
create the four holes.
8
Page 9
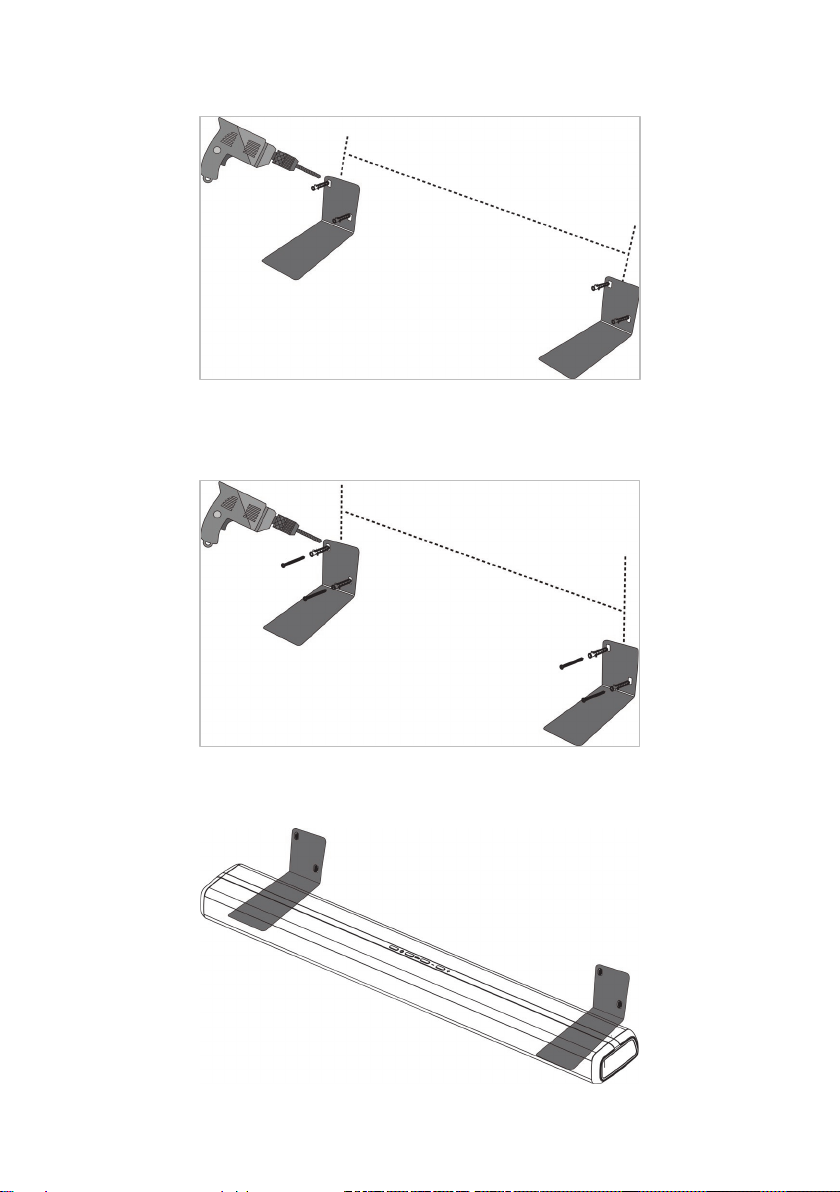
3. Align the drilled holes with those on the brackets and fix the anchors into the holes of
the brackets.
4. Secure and tighten the screws into the anchors to ensure that the brackets will
remain stable.
5. Aligning the outer rubber feet, place the soundbar onto the brackets.
9
Page 10
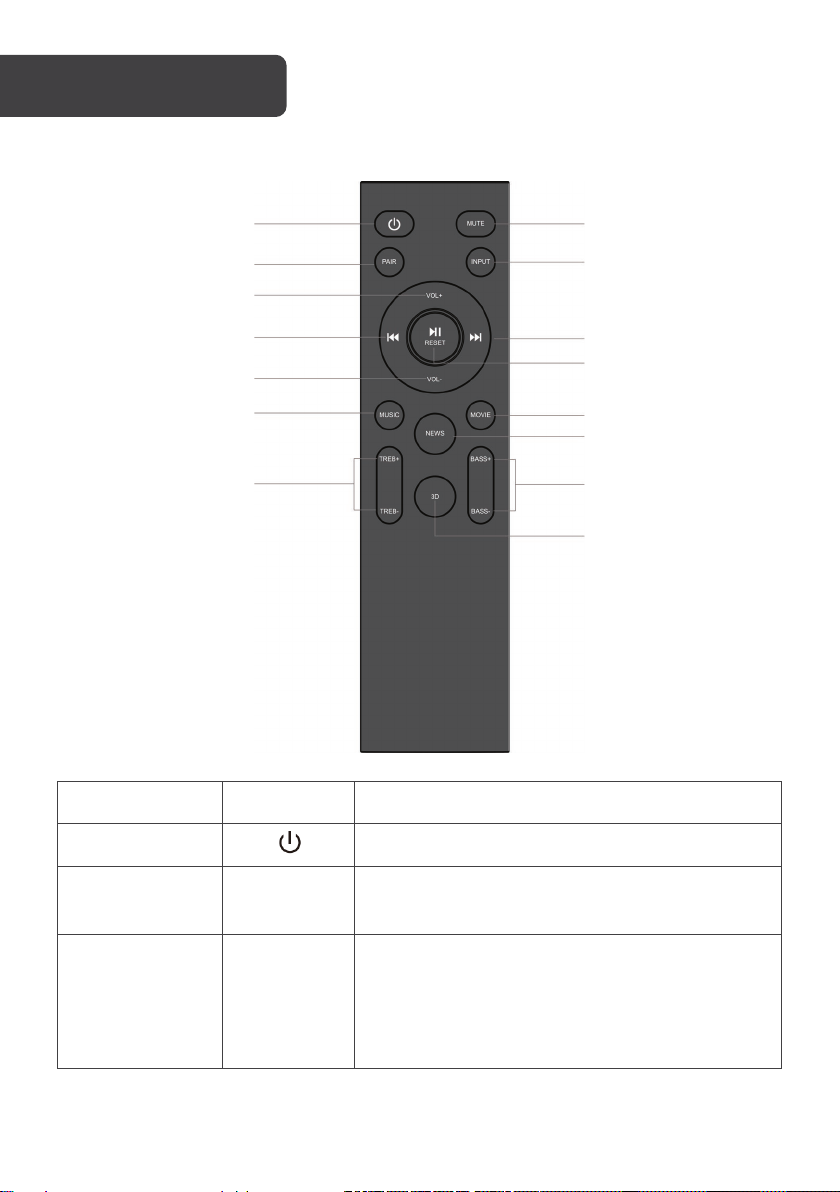
Power button
PAIR button
Volume increase button
Previous button
Volume decrease button
MUSIC EQ button
Treble adjustment buttons
MUTE button
INPUT button
Next button
RESET/play/pause button
MOVIE EQ button
NEWS EQ button
Bass adjustment buttons
3D EQ button
OPERATION
Remote control
Name Icon Description
Power button Powers the soundbar on/off.
MUTE button MUTE
PAIR button PAIR
10
• Pressing this button will mute the soundbar.
• Pressing again will unmute the soundbar.
• Pressing and holding this button for 2 seconds
will connect/disconnect a paired device.
• If multiple devices are paired, the soundbar
will disconnect from one and reconnect with
another previously paired device.
Page 11
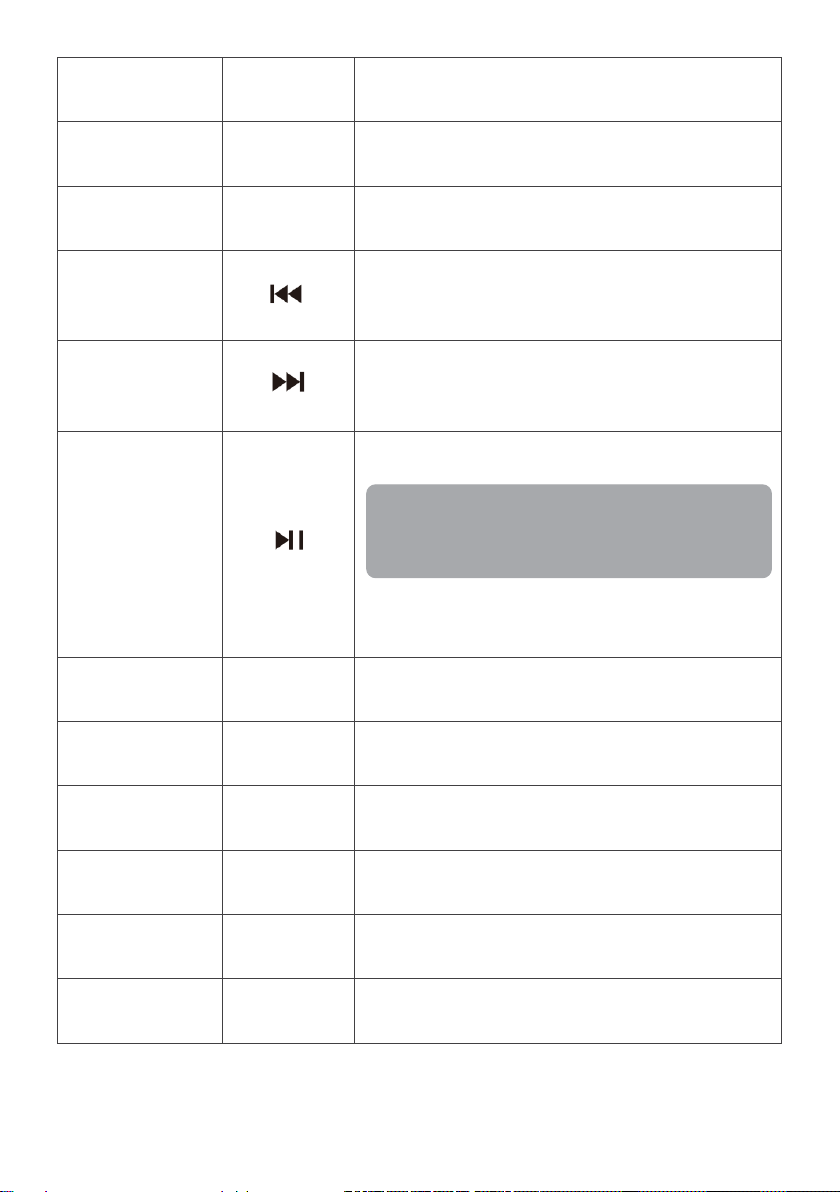
INPUT button INPUT
RESET/play/pause
Note:
Pressing this button changes the input mode (AUX,
USB, HDMI(ARC), Optical, Bluetooth).
Volume increase
button
Volume decrease
button
Previous button
Next button
button
MUSIC EQ button
VOL+
VOL–
MUSIC
Pressing this button increases the volume of the
soundbar.
Pressing this button decreases the volume of the
soundbar.
• Pressing this button plays the previous track.
• This button only applies in USB and Bluetooth
mode.
• Pressing this button plays the next track.
This button only applies in USB and Bluetooth
mode.
• Pressing this button can play/pause tracks.
This function only applies in USB and
Bluetooth mode.
• Pressing and holding the button for 2 seconds
resets all settings to default.
Pressing this button changes the EQ of the
soundbar to be optimised for music.
MOVIE EQ button
NEWS EQ button
Treble adjustment
buttons
Bass adjustment
buttons
3D EQ button
MOVIE
NEWS
TREB+/TREB–
BASS+/BASS–
3D
Pressing this button changes the EQ of the
soundbar to be optimised for movies.
Pressing this button changes the EQ of the
soundbar to be optimised for the news.
These buttons adjust the level of treble in the sound
output.
These buttons adjust the level of bass in the sound
output.
Pressing this button changes the EQ of the
soundbar for a 3D audio effect.
11
Page 12
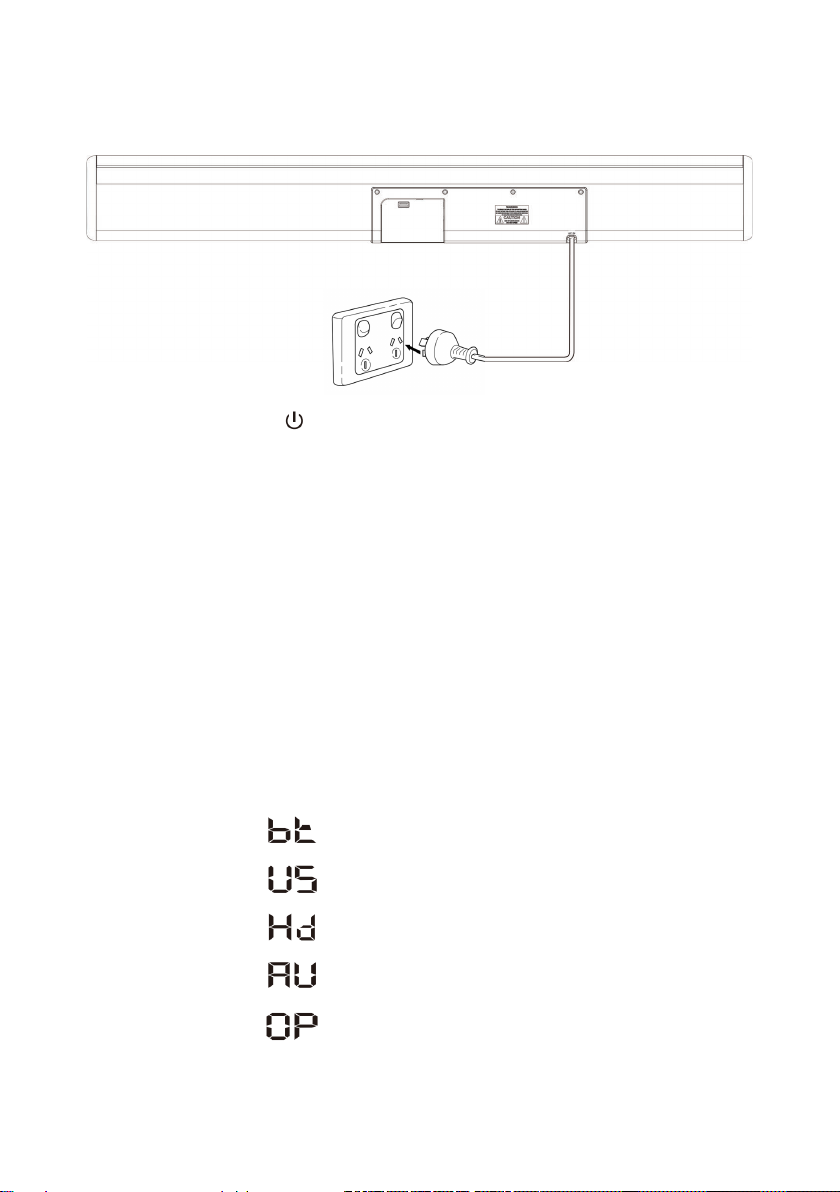
Powering on
• Plug the power cord into a power socket and switch on the power socket. The
soundbar will enter standby.
• Press the power button ( ) on the soundbar or remote control to turn on the
soundbar.
Setting the mode
This soundbar features five input modes. These include:
• Bluetooth mode
• Optical mode
• USB mode
• HDMI (ARC) mode
• AUX mode
When the soundbar is switched on, the current mode will appear on the display. You can
cycle through the modes by pressing the INPUT button on the soundbar. The code shown
on the display will reflect the mode that is currently active.
12
Bluetooth mode
USB Mode
HDMI (ARC) mode
AUX mode
Optical mode
Page 13
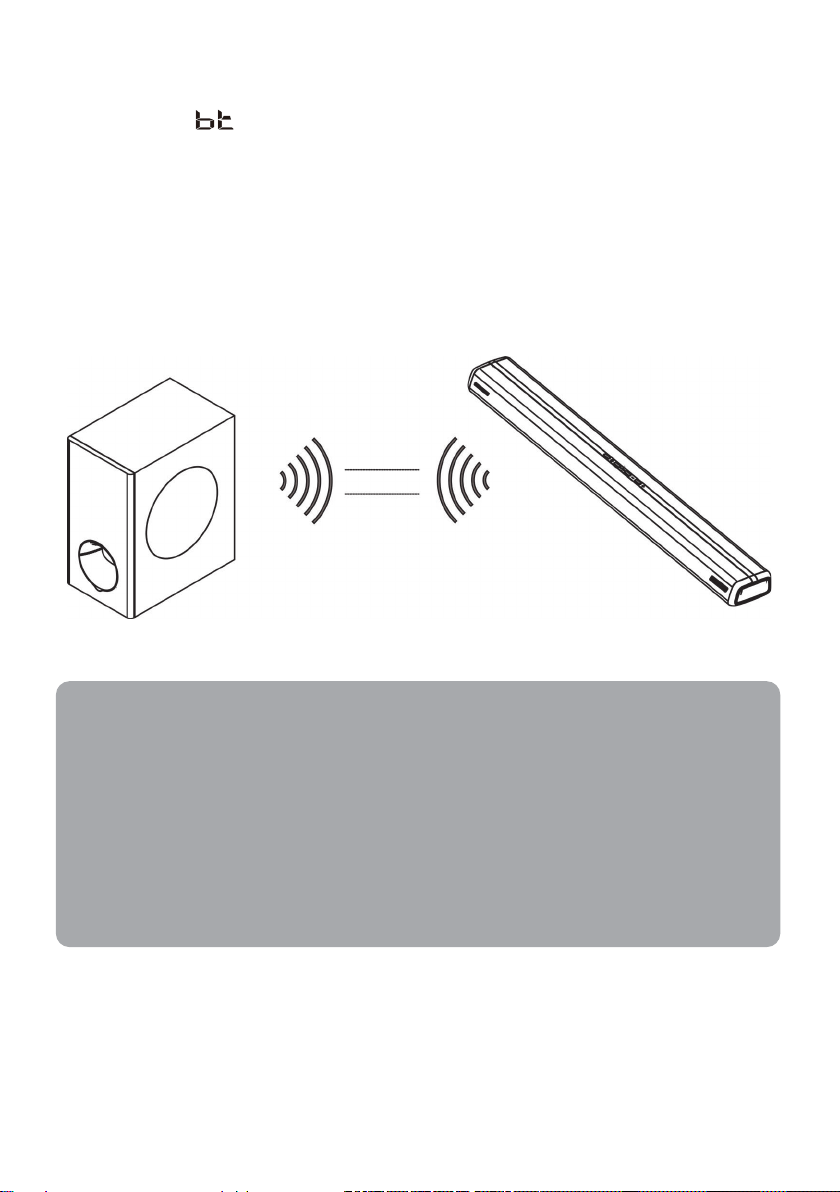
Pairing with the subwoofer
Notes:
1. With the soundbar turned on, press the INPUT button on the soundbar or remote
control until ‘ ’ appears on the LED display. This will cause the soundbar to enter
pairing mode.
2. Connect the power cord for the subwoofer into the power socket. Switch on the
power socket. The LED indicator will start flashing slowly, indicating it is ready to pair.
3. Press and hold the WPS button. The LED indicator will start flashing rapidly. This
indicates the subwoofer is pairing to the soundbar.
4. After 20–30 seconds, the LED indicator will stop flashing and turn a solid blue. The
subwoofer is now paired to the soundbar.
• After this initial pairing process, the subwoofer will automatically pair with the
soundbar in future uses.
• If you wish to pair the subwoofer with another soundbar, repeat the steps above.
• Keep the soundbar and subwoofer within 10m of each other. Keeping them
further apart may cause the Bluetooth connection to be lost.
• The LED indicator on the subwoofer will turn red if the soundbar is off or on
standby. The subwoofer will then enter standby.
• To avoid signal interference, keep the soundbar and subwoofer away from other
Wi-Fi connected devices.
13
Page 14
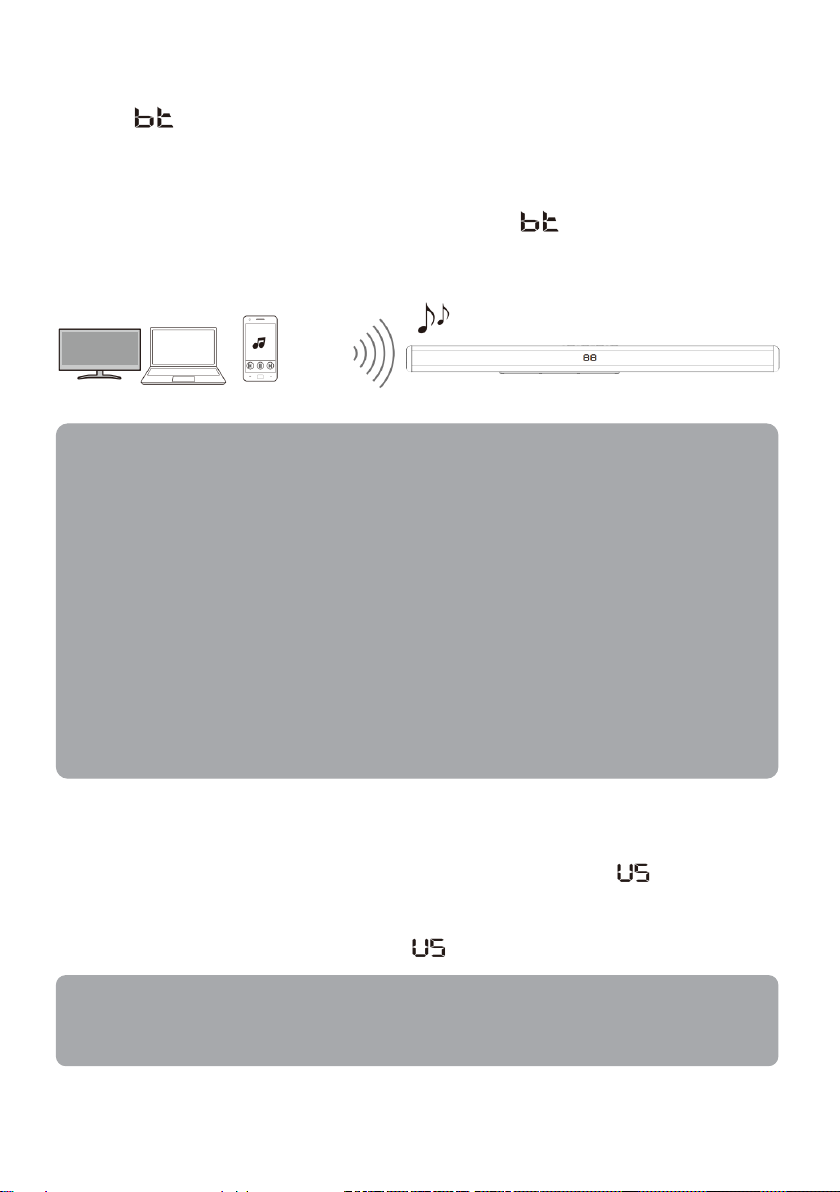
Bluetooth mode
Notes:
turn it off.
Note:
other file formats.
1. With the soundbar on, press the INPUT button on the soundbar or remote control
until ‘ ’ is shown on the display. You will then hear two beeps from the soundbar.
This indicates the soundbar is ready for pairing.
2. Turn the Bluetooth of your device on and search for ‘KASBD16CB’ on the list of
available devices. Tap on the name and connect.
3. When successfully paired, you will hear a tone before ‘ ’ stop flashing. Music can
now be played from your device with the sound outputting from the soundbar.
Bluetooth
device
• Ensure the Bluetooth device connected is running Bluetooth 4.0 or later.
• Once a device is paired, the pairing process does not need to be repeated for
future use.
• If a connected device is further than 10m from the soundbar, the connection will
be lost and become disconnected. Your device will automatically reconnect
once it is within 10m.
• If a connected device has its Bluetooth switched off or is turned off, the
soundbar will automatically re-renter into pairing.
• Once in pairing mode, the soundbar will connect to the last connected device. If
you would like an unpaired device to be connected, disconnect the existing
connection, and repeat the pairing steps with the unpaired device.
• If no device is intended to be connected, change the mode of the soundbar or
USB mode
• When turned on, insert a USB into the USB port of the soundbar. The soundbar will
automatically switch to USB mode and the LED display will show ‘ ’. Music will
then start playing from the soundbar.
• If the soundbar does not automatically switch to USB mode, press the INPUT button
on the soundbar or remote control until ‘ ’ is shown on the display.
Ensure the files on the USB are in an MP3 format. The soundbar does not support
14
Page 15

HDMI (ARC) mode
Notes:
Note:
The soundbar supports HDMI with an audio return channel (ARC). Many standard HDMI
ports provide support for ARC. This allows you to have audio output from the TV to emit
from the soundbar, as opposed to the TV’s inbuilt speakers.
1. Using a high-speed HDMI (ARC) cable (not supplied), connect the input end of the
HDMI (ARC) into the HDMI input on the soundbar. Connect the output end into the
TV’s HDMI (ARC) port.
2. Go into the TV’s sound settings and check the sound output. It should be set to
‘External Dolby’ or ‘Auto mode’. The digital audio output should also be set to ‘Dolby’
or ‘Auto’.
3. Press the INPUT button on the soundbar or remote control until ‘ ’ is shown on the
display.
4. Sound from the TV will now be emitted from the soundbar. Use the remote control to
make any audio adjustments.
AUX mode
1. Using the provided RCA to 3.5mm cable, connect the 3.5mm end into the soundbar.
Connect the RCA end to your chosen audio device. Ensure the audio settings on your
device have set the soundbar for audio output.
2. To switch to AUX mode, Press the INPUT button on the soundbar or remote control
until ‘ ’ is shown on the display. Music will then begin playing out of the soundbar.
3. Use your connected device for playback controls (previous, play, pause, next). All
other controls can be adjusted using the remote control.
• A TV’s HDMI (ARC) port may be labelled differently.
• Ensure the HDMI ports on your TV support ARC.
Different TVs may have different names for their settings.
15
Page 16

Optical mode
Note:
Note:
1. Uncap an optical cable (not supplied) and connect the input end to the optical input
on the soundbar. Connect the output end to the optical digital output of your device
(for example, TV, set top box, DVD player, gaming console).
Do not bend the optical cable as this may cause damage to the cable.
2. Turn on the soundbar and connected device, then go to the device’s sound settings.
Set the audio output to ‘Dolby’ or ‘Auto’ mode.
3. Press the INPUT button on the soundbar or remote control until ‘ ’ is shown on
the display.
4. You can now begin watching TV with the sound emitting from the soundbar. Use the
remote control to make any audio adjustments.
Powering off
Press the power button ( ) on the soundbar or remote control and the soundbar will return
to standby. Switch off the power at the socket and turn the soundbar off.
Replacing the batteries in the remote control
This remote control is powered by x2 AAA batteries (not supplied). To replace the batteries:
1. Slide the battery cover off the back of the remote control
2. Remove the flat batteries. Noting the polarity markers, place new batteries into the
remote control.
3. Slide on the battery cover.
Different TVs may have different names for their settings.
16
Page 17

CLEANING & CARE
Wipe the exterior with a clean, dry cloth.
TROUBLESHOOTING
Problem Cause Solution
Another input source is selected. Select an appropriate input source.
The soundbar is muted. Unmute the soundbar.
There is no sound
coming out of the
soundbar.
Sound is distorted
or echoing.
The volume
decreases when
the soundbar is
turned on.
Other noises are
emitting from the
soundbar.
The volume of the soundbar is
adjusted too low.
The power cord is not
connected properly.
The input and output of the
cable are connected the wrong
way round.
There is an issue with the digital
audio output settings
TV volume is not muted.
The soundbar automatically
controls its volume when turned
on to prevent possible sudden
loud volumes from previous use.
The soundbar is too close to
another digital or highfrequency device.
Increase the volume of the
soundbar.
Ensure the power cord is securely
connected to the power port and
the plug is connected to the socket.
Connect the cable’s input into the
soundbar, and the output to the
chosen device.
The format of the sound emitted
from the soundbar is in a raw PCM.
In your device’s sound settings, try
setting the digital audio output to
‘PCM’.
If playing audio from the TV, ensure
the volume from the TV is muted.
Turn up the volume as required.
Move those devices away from the
soundbar.
17
Page 18

Unable to pair the
subwoofer to the
soundbar.
There is an interference with the
connection.
• Turn off and unplug the
subwoofer and soundbar.
• Wait for 3 minutes then plug
the subwoofer and soundbar
back into power.
• Press the power button on
the soundbar, then press and
hold the WPS button on the
subwoofer to reset the
connection.
The TV cannot be
operated using
the TV’s remote
control.
The Bluetooth
device cannot
connect to the
soundbar/
soundbar cannot
connect to a
device.
The soundbar is blocking the
TV’s remote control sensor.
Bluetooth on the device is
turned off.
The device is not paired or is
incorrectly connected.
Bluetooth is not selected as the
input mode.
The soundbar is connected to a
different Bluetooth device.
The soundbar is too far away
from the Bluetooth device.
A device emitting
electromagnetic waves (for
example, microwave oven,
wireless device) is nearby and
interfering with the connection.
Reposition the soundbar so that it
does not obstruct the TV’s remote
control sensor.
Turn on Bluetooth on your device.
• Restart the soundbar and try
pairing again.
• The soundbar is already
connected with another
Bluetooth device. Disconnect
the connected device and
then try pairing again.
Select Bluetooth as the input mode.
Unpair the Bluetooth device that is
currently connected and pair with
the desired Bluetooth device.
Move the Bluetooth device closer to
the soundbar.
• Do not use this soundbar near
devices that emit
electromagnetic waves.
• Move the other devices away
from the soundbar.
18
The Bluetooth device that you
are using is not supported.
Ensure the Bluetooth on your device
is Bluetooth 4.0 or later.
Page 19

The soundbar
to
cannot be
controlled using
the remote
control.
Poor audio quality
when using
Bluetooth mode.
The soundbar is out of the
operating range (10m).
The batteries are flat in the
remote control.
The sensor for the remote
control on the soundbar is
exposed to direct sunlight.
Bluetooth reception is poor.
Use the remote control within the
operating range (10m).
Replace the batteries in the
remote control.
Reposition the soundbar to not
expose it to direct sunlight.
• Move the device closer to the
soundbar.
• Remove any obstructions
between the device and the
soundbar.
No sound/
unstable sound in
Bluetooth mode.
Volume on the Bluetooth device
may be too low.
Bluetooth is not selected as the
input mode.
Audio from the connected
device is paused.
The audio output of the
Bluetooth device may not be set
to the soundbar.
The Bluetooth device was
disconnected.
The soundbar is too far from the
Bluetooth device.
A device emitting
electromagnetic waves (for
example, microwave oven,
wireless device) is nearby and
interfering with the connection.
Raise the volume on the Bluetooth
device.
Select Bluetooth as the input mode.
Press the Play/pause button on the
remote control.
• Ensure the device is
connected to the soundbar.
• Ensure sound output is set to
the soundbar.
Reconnect the Bluetooth device to
the soundbar.
Move the Bluetooth device nearer
the soundbar.
• Do not use this soundbar near
devices that emit
electromagnetic waves.
• Move the other devices away
from the soundbar.
19
Page 20
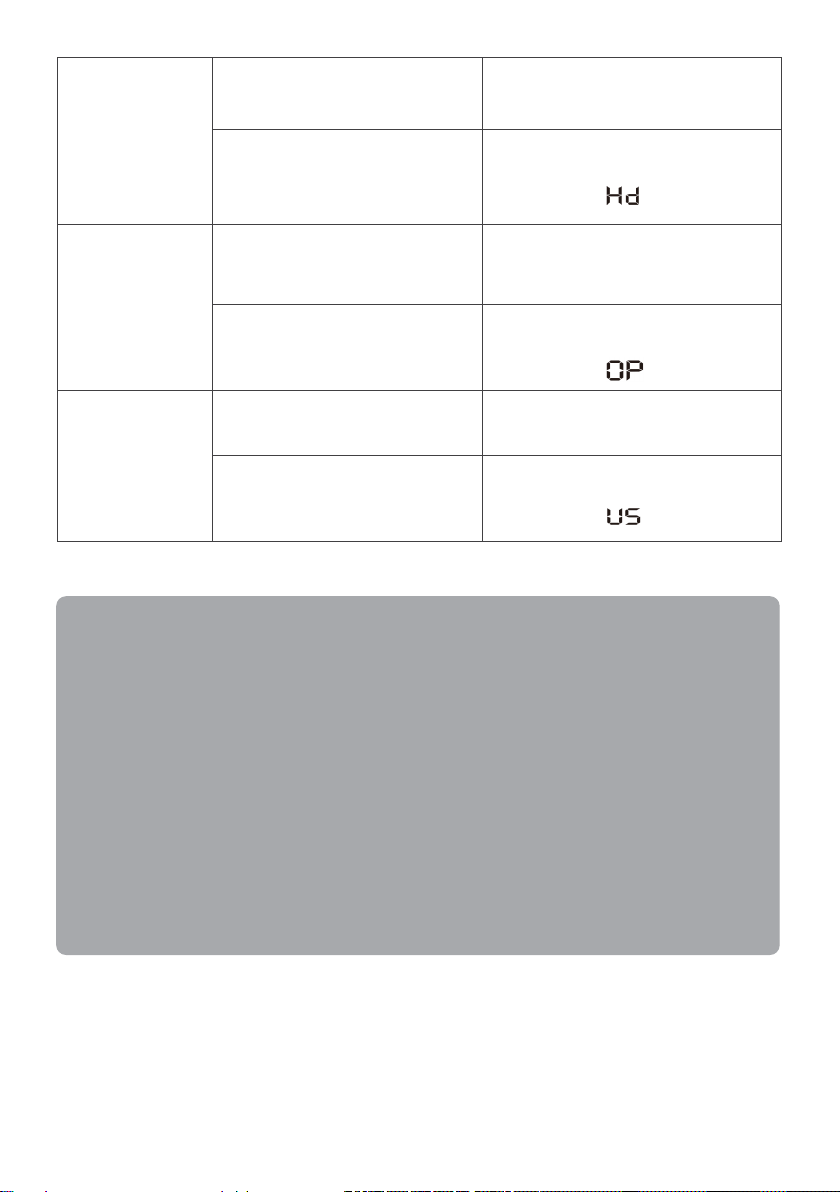
No sound in
Firmware update (if necessary)
HDMI (ARC)
mode.
An incorrect HDMI cable is used
Incorrect input mode is selected.
Ensure to use a high-speed HDMI
cable with ARC support.
Press the INPUT button on the
soundbar or remote control until the
display shows ‘ ’.
The optical cable is damaged.
No sound in
optical mode.
Incorrect input mode is selected.
The file type is not supported.
No sound in USB
mode.
Incorrect input mode is selected.
• If updates are necessary for the soundbar and subwoofer, these updates will be
made available at help.Kogan.com as a downloadable zip file. They would need
to be unzipped and placed on a USB.
• To install possible necessary updates on the soundbar, ensure the soundbar is
switched off, then plug in the USB.
• Switch the soundbar on and the display will show ‘UP’ to indicate the soundbar
is installing. When complete, the display will show ‘OL’.
• To install possible necessary updates on the subwoofer, ensure the subwoofer is
switched off, then plug in the USB.
• Switch the subwoofer on and the LED indicator will light up red to indicate the
subwoofer is installing. When complete, the red indicator will disappear. Unplug
the power cord and wait for at least 30 seconds before plugging it back in and
turning on the subwoofer.
Replace the optical cable.
Press the INPUT button on the
soundbar or remote control until the
display shows ‘ ’.
Ensure the files are in an MP3
format.
Press the INPUT button on the
soundbar or remote control until the
display shows ‘ ’.
20
Page 21

NOTES
21
Page 22

22
Page 23

23
Page 24

Need more information?
We hope that this user guide has given you
the assistance needed for a simple set-up.
For the most up-to-date guide for your product,
as well as any additional assistance you may require,
head online to help.kogan.com
24
 Loading...