

Page 1
2.1 DOLBY SOUNDBAR WITH
SUBWOOFER (120W RMS)
KASBD12CA
Page 2

Page 3
To Reduce The Risk Of Electric Shock Do Not Remove Cover (Or Back)
Caution:
To reduce the risk of electric shock, do not dismantle the product and do not expose the
apparatus to rain or moisture. No user-serviceable parts are inside. Refer servicing to
qualified personnel only.
The lightning flash within an equilateral triangle is intended to alert you to the
presence of un-insulated dangerous voltage within the product’s enclosure that may be of
sufficient magnitude to constitute an electric shock to a person or persons.
Important! This symbol alerts you to read and observe important warnings and
instructions on the unit or in this manual.
Notice:
This appliance is not intended for use by persons (including children) with reduced physical
sensory or mental capabilities or lack of experience and knowledge, unless they have been
given supervision or instruction concerning use of the appliance by a person responsible for
their safety. Children should be supervised to ensure that they do not play with the
appliance.
1. To prevent possible hearing damage, do not listen at high volume levels for long
time periods or raise the volume to a sudden high level.
2. Never use the device unsupervised! Switch off the device whenever you are not
using it, even if not using it only for a short while.
3. The appliance is not intended to be operated by means of an external timer or
separate remote-control system.
4. If the supply cord is damaged, it must be replaced by the manufacturer, its service
agent or similarly qualified persons in order to avoid a hazard.
5. Before operating this system, check the voltage of this system to see if it is identical
to the voltage of your local power supply.
Page 4

6. The unit should not be impeded by covering the ventilation opening with items
such as newspaper, tablecloths, curtains etc. Make sure that there is at least 20cm
of space above and at least 5cm of space on each side of the unit.
7. The apparatus must not be exposed to dripping or splashing. Objects filled with
liquids, such as vases, must not be placed on the apparatus.
8. To prevent fire or shock hazard, do not expose this equipment to direct heat, rain,
moisture or dust.
9. Do not locate this unit near any water sources e.g. taps, bathtubs, washing
machines or swimming pools. Ensure that you place the unit on a dry, stable
surface.
10. Do not place this unit close to a strong magnetic field.
11. Do not place this unit on an amplifier or receiver.
12. Do not place this unit in a damp area as the moisture will affect the life of
electronic components.
13. Do not attempt to clean the unit with chemical solvents as this might damage the
finish. Wipe with a clean, dry or slightly damp cloth.
14. When removing the power plug from the wall outlet, always pull directly on the
plug, never pull on the cord.
15. Depending on the electromagnetic waves used by a television broadcast, if a TV is
turned on near this unit while it is also ON, lines might appear on the LED TV.
Neither this unit nor the TV are malfunctioning. If you see such lines, keep this unit
well away from the TV set.
16. The mains plug is used to disconnect the device; the disconnected device should
remain readily operable.
Page 5
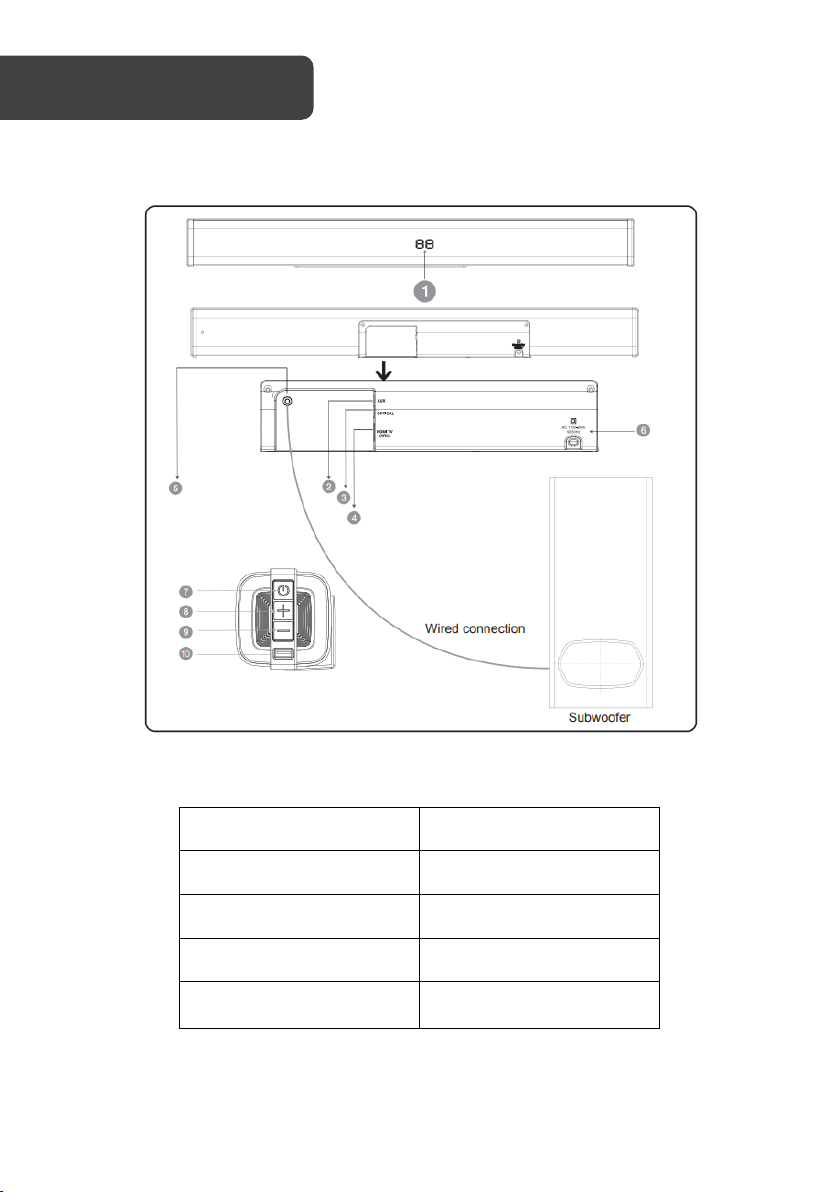
OVERVIEW
1. LED display
3. OPTICAL
5. SW OUT
7. Power/Standby
9. VOL-
2. AUX
4. HDMI(ARC)
6. AC IN
8. VOL+
10. USB
Page 6
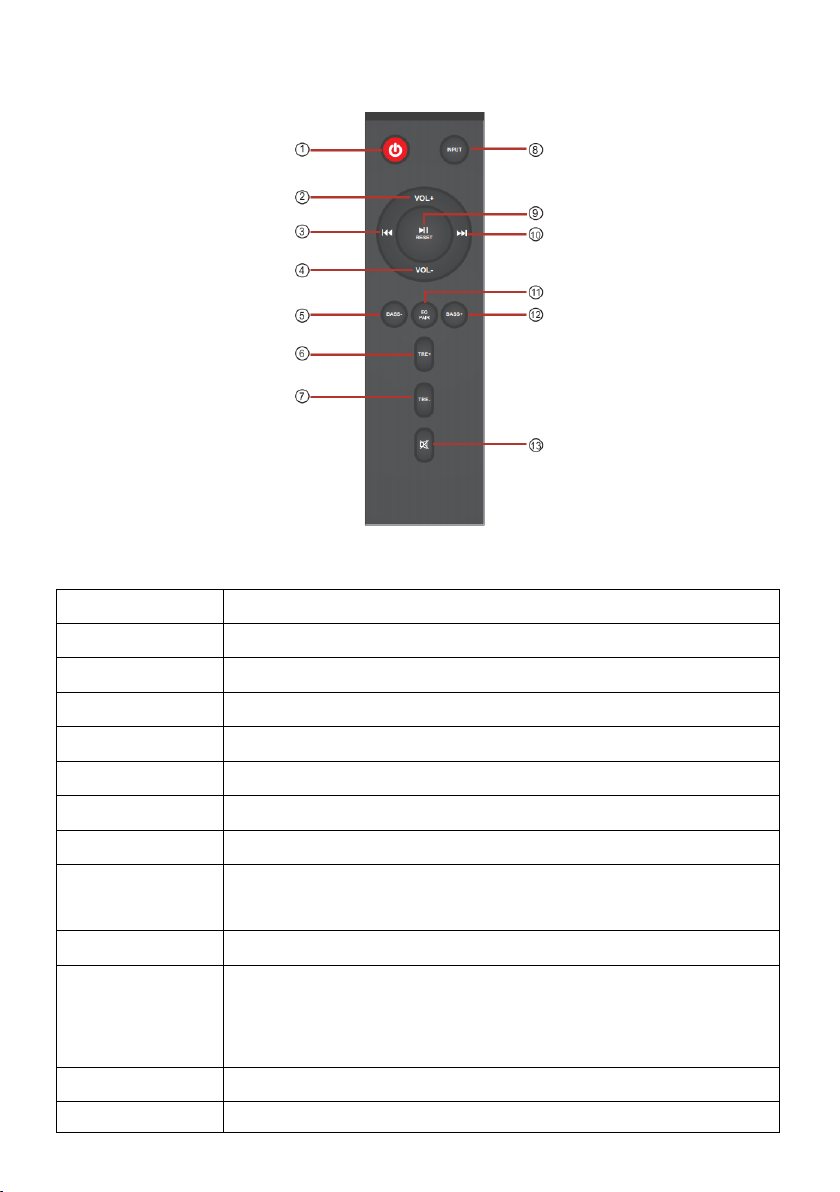
Remote Control
Standby
Standby mode for power on/off
VOL+
Volume increase
PREV
Previous song (USB and BT mode only)
VOL-
Volume decrease
BASS-
Bass decrease
TRE+
Treble increase
TRE-
Treble decrease
Input
Different input mode selection
Play/Pause: (USB and BT mode only)
defaults
Next
Next song (USB and BT mode only)
EQ: Press to cycle through EQ modes: Music/Movie/News/3D
Press and hold for 2 seconds again to reconnect
BASS+
Bass increase
Mute
Mute
Play/Pause/Reset
EQ/Pair
Reset: Press and hold for 2 seconds to restore all functions to
Pair: Press and hold for 2 seconds to disconnect paired Bluetooth
device
Page 7
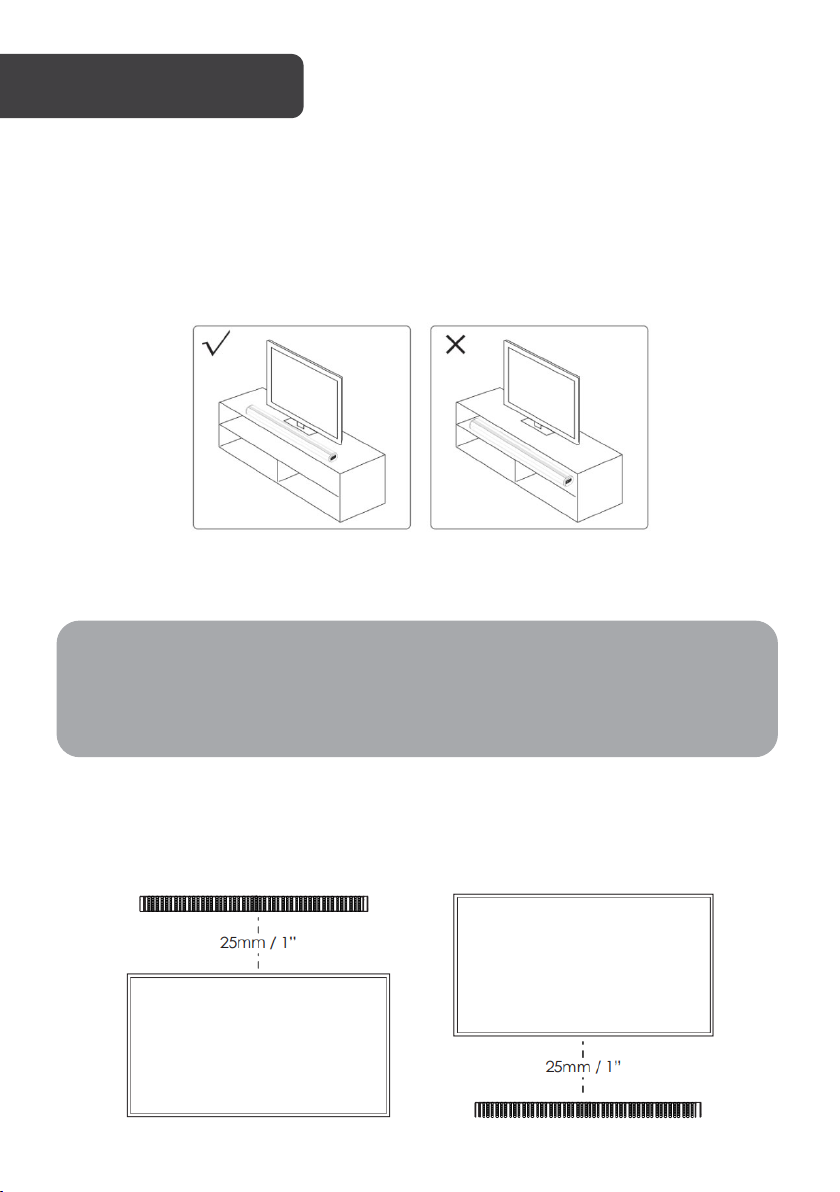
Place on a flat Surface
Place the soundbar horizontally on a flat surface, such as shelving, and align it centrally with
the TV screen. Allow some space between the speaker and the wall. Don’t place inside a
cabinet or on a walled shelf. Follow this guidance for best sound output and good airflow
around the soundbar.
Wall Mounting
Warning:
If you don’t feel confident to correctly and securely wall-mount the sound bar, seek the
assistance of an experienced professional.
Install the speaker on a vertical, fastened, reinforced area of wall. For plaster walls, it is
recommended to screw into wall studs for greater security. For optimum performance, allow
at least 25mm distance between the soundbar and the TV.
Page 8
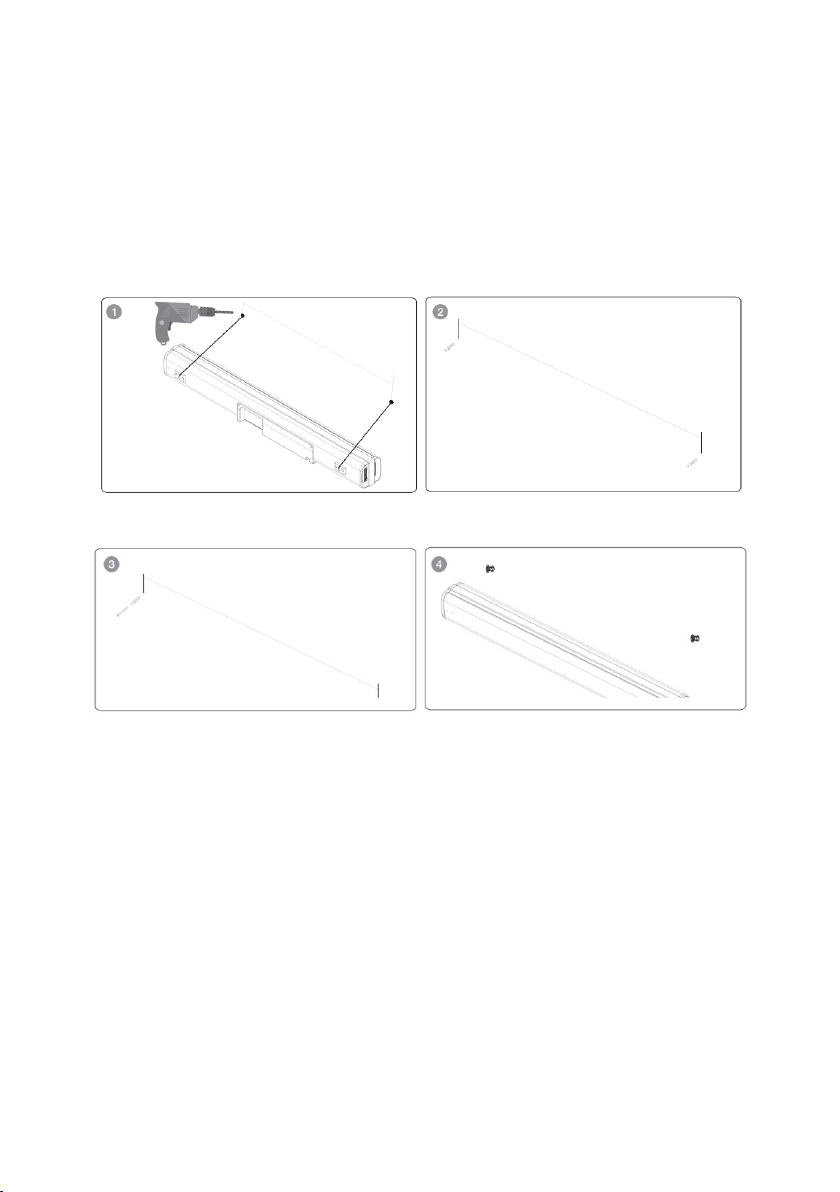
Follow below steps to mount the soundbar on the wall
1. Make 2 holes on the wall with distance same as the wall bracket on the soundbar.
2. Put the plastic anchors onto the wall and secure the screws to the plastic clip. Do
not tighten the screws all the way; make sure to leave some space.
3. Attach the 2 EVA pads onto the wall mount bracket. This will make sure that there
is enough room between the wall and the soundbar outlet, minimum 15mm.
4. Once the screws are securely fastened, hang the soundbar over by inserting the
screws onto the wall mount bracket.
Page 9

Before Use
Unpacking and Set Up
Remove the soundbar from the carton and remove all packing material from the soundbar.
Save the packing material, if possible, in case the soundbar ever needs to be serviced or
transported. The original carton and packing material is the only safe way to pack your
soundbar to protect it from damage in transit.
• Remove any descriptive labels or stickers on the front or top of the cabinet. Do not
remove any labels or stickers from the back or bottom of the cabinet.
• Place your soundbar on a levelled surface such as a table, desk or shelf, close to an
AC outlet, out of direct sunlight and away from sources of excess heat, dirt, dust,
moisture, humidity or vibration.
• Unwind the line cord connecting the AC adapter and extend it to its full length.
Protect Your Furniture
The unit is equipped with non-skid rubber ‘feet’ to prevent the product from moving when
you operate the controls. These ‘feet’ are made from non-migrating rubber material specially
formulated to avoid leaving any marks or stains on your furniture. However, certain types of
oil-based furniture polishes, wood preservatives or cleaning sprays may cause the rubber
‘feet’ to soften and leave marks or a rubber residue on the furniture. To prevent any damage
to your furniture, use small self-adhesive felt pads and apply these pads to the bottom of the
rubber ‘feet’ before you place the unit.
Power Source
This soundbar is designed to operate on normal AC power source. For Europe, it works only
under SMPS 110V-240V~50Hz/60Hz. Do not attempt to operate the soundbar on any other
power source. You could cause damage to the soundbar that is not covered by your
warranty.
Page 10
Important Notes
• This soundbar was especially developed for LED/LCD/Plasma TVs: It should not be
used in combination with CRTTVs (Cathode Ray Tube TVs) in order to avoid image
interference.
• Safety and operating instruction manual should be retained for future reference.
• The apparatus should not be exposed to dripping, splashing or placed in a humid
atmosphere such as a bathroom.
• Do not place on places exposed to direct sunlight or close to radiators.
• Do not place on top of other stereo equipment that radiate too much heat by
blocking ventilation or in a dusty area.
• Do not place in areas where there is constant vibration.
• Do not place in humid or moist places.
• Do not place near candles or other flames.
• Operate the product only as instructed in this manual.
• Before turning on the power for the first time, make sure the soundbar is plugged to
power outlet.
• For safety reasons, do not remove any covers or attempt to gain access to the
inside of the product. Refer any servicing to qualified personnel.
• Do not attempt to remove any screws or open the casing of the unit; there are no
user serviceable parts inside. Refer all servicing to qualified service personnel.
Setting the Soundbar
1. Plug in the power cord and the display will light up (Standby mode).
2. Switch on the soundbar by using power button on soundbar or by using STANDBY
button on remote. After switching on, the default input mode will appear on display.
3. Input mode can be changed by pressing the power button again or by using the
INPUT button on remote.
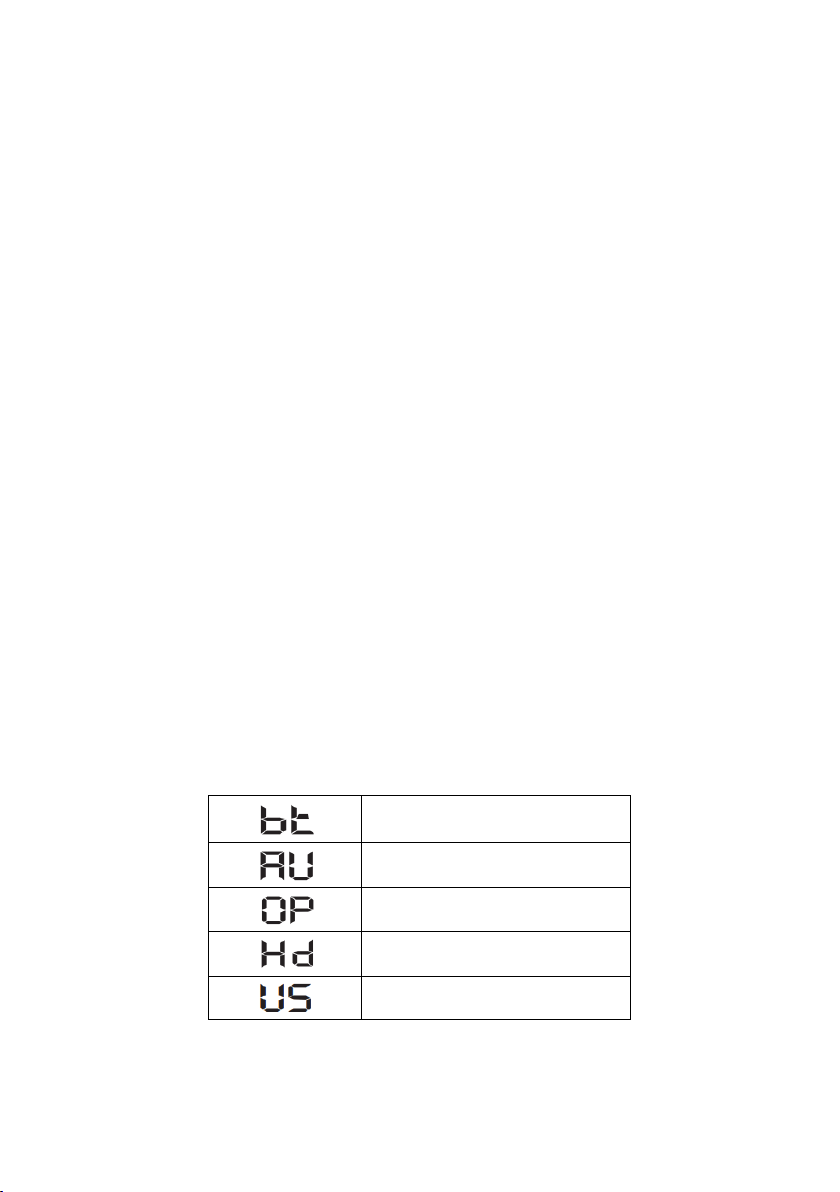
4. Below are input mode names appearing in the soundbar display:
Bluetooth pairing mode
AUX mode
Optical mode
HDMI mode
USB mode
Page 11
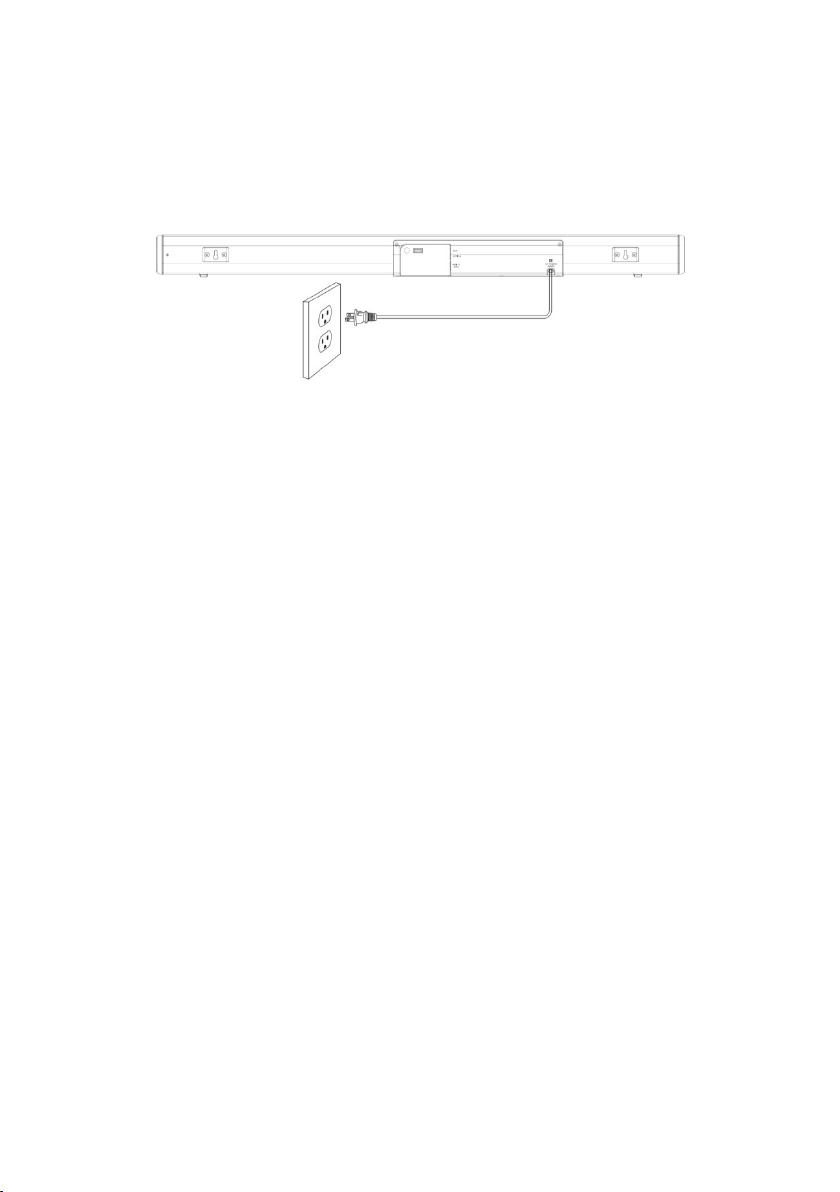
Powering On/Off
5. Plug the soundbar into a wall outlet, it will automatically enter standby mode.
6. Short-press the multi-function button to turn on the soundbar.
7. To turn off, press the STANDBY button on remote control or unplug from wall outlet.
Playing Audio via BT Connection
1. Turn on soundbar and then short-press the multi-function button to switch to BT
mode.
2. Activate the pairing function on your phone or other compatible device and select
“KASBD12CA”.
3. When successfully paired, you will hear a tone and the LED display will stay on.
4. The remote control includes BT mode playback controls.
Notes:
• If your pairing device switched off or manually disconnected, the soundbar will
automatically enter pairing mode.
• If the connected device is switched off or manually disconnected, the soundbar will
automatically enter pairing mode. The connection to the device will be reestablished once you re-enter wireless range (10 metres). To connect to other
devices, repeat the above pairing steps.
• There is no automatic shutdown in pairing mode. The soundbar will remain in
pairing mode even if no device is paired, so switch the unit off if not in use.
Page 12
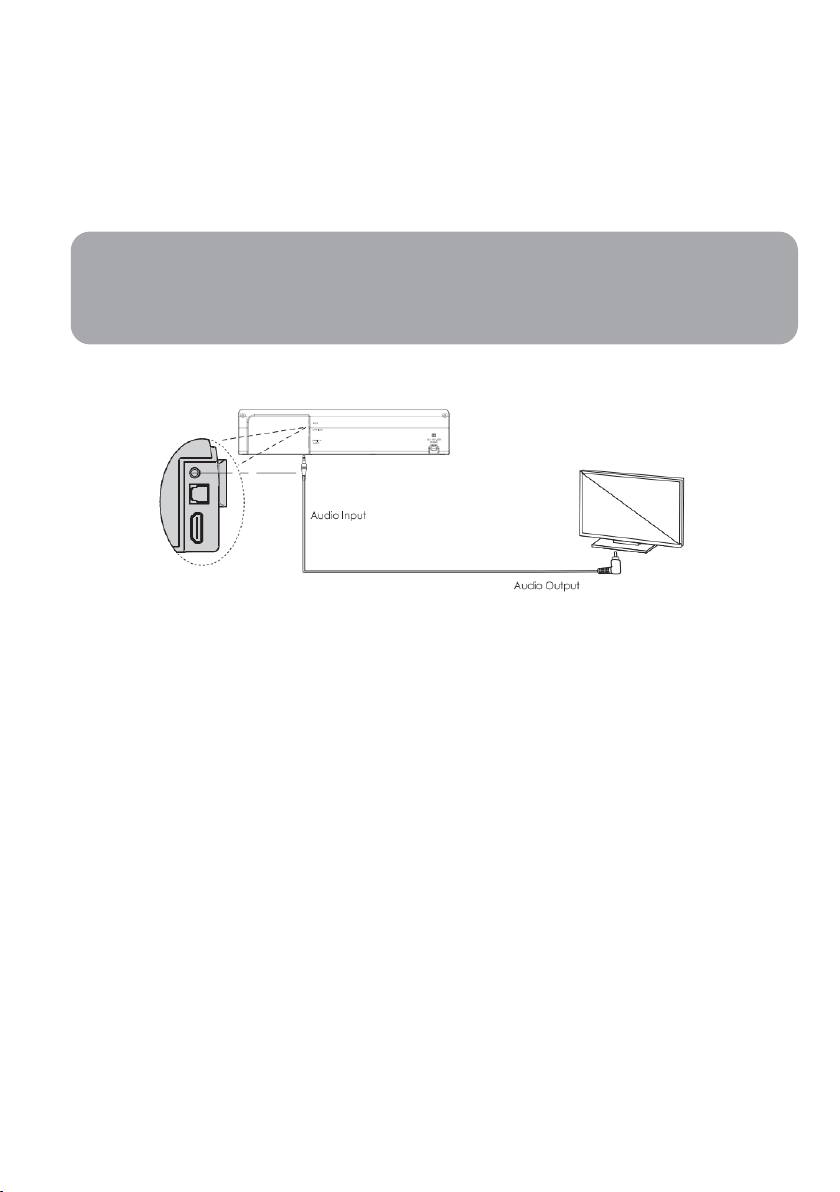
the sound bar as shown in the below picture.
AUX mode
• Connect the soundbar to your PC, tablet, smart phone, TV or other device using
3.5mm audio cable, and short-press the multi-function button to switch to AUX
input mode.
• In this mode, playback can only be controlled on your connected device.
Note:
For some computers, you may need to access the audio control panel to manually set
Playing Audio via USB Port
The soundbar automatically switches to USB input mode with the LED display (US) when a
USB flash drive is inserted (this mode isn't selectable on the soundbar or remote control
unless a USB flash drive is connected).
1. Ensure that your USB flash drive contains MP3 or WMA audio files (other file types
are not supported).
2. Connect the USB flash drive to the USB port on the soundbar (or your own USB
extension cable connected to the USB port); music will automatically play.
3. The remote control includes USB input mode playback controls.
Page 13
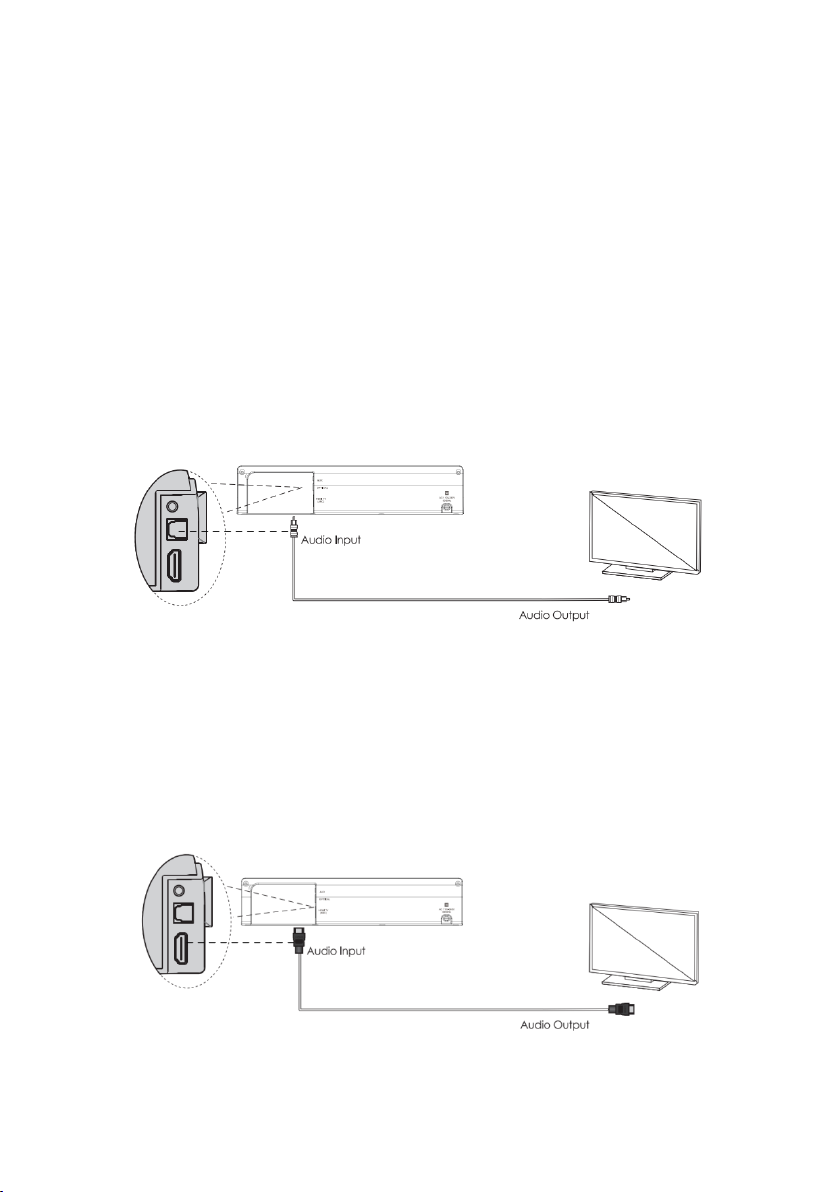
Optical Mode
Use this operating mode to play music from the optical digital input for example from a TV
on your soundbar (A).
The TV must have an optical digital output, and an optical cable must be used. An optical
cable is not included.
Proceed as follows:
• Connect the optical cable to the optical digital output of your TV.
• Connect the optical cable to the optical digital input of your soundbar.
• Switch the TV set and soundbar on. Set the connected TV to “PCM Stereo” or
“Stereo 2.0”.
• Begin media playback on the TV.
• Switch to OPTICAL input mode by using the remote control.
• You can use the volume buttons to adjust the volume to your requirements.
• If you wish, you can change the audio settings using the relevant buttons on the
remote control.
HDMI Mode
1. The soundbar supports HDMI with Audio Return Channel (ARC). If your TV is HDMI ARCcompliant, you can hear the TV audio through your Soundbar by using a single HDMI cable.
2. Use a High Speed HDMI cable and connect the HDMI TV (ARC) connector on the
soundbar to the HDMI ARC connector on the TV. The HDMI ARC connector on the TV
might be labelled differently. For details, see the TV user manual.
Page 14

Page 15

Page 16

Need more information?
We hope that this user guide has given you
the assistance needed for a simple set-up.
For the most up-to-date guide for your product,
as well as any additional assistance you may require,
head online to help.kogan.com
 Loading...