

Page 1

Full HD Projector
KAPROFHDXXA
Table of Contents
Safety Warnings................................................................................................................2
Basic Operation Tips........................................................................................................2
Start Up/Shutting Down the Projector........................................................................3
Product Layout.......................................................................................................................3
Installation...............................................................................................................................5
Standard Setup..................................................................................................................6
Installation Method...........................................................................................................7
Connections........................................................................................................................7
Operation.................................................................................................................................8
Startup.................................................................................................................................8
Shutdown Procedure........................................................................................................9
Control Panel Buttons......................................................................................................9
Remote Control.................................................................................................................9
How to Adjust the Trapezoidal Image........................................................................10
Menu Settings........................................................................................................................11
System Function Operation...........................................................................................11
Picture Menu......................................................................................................................11
Menu Options....................................................................................................................11
Audio Menu.......................................................................................................................12
Sound Mode Standard....................................................................................................12
USB Interface and Supporting Formats.....................................................................12
Troubleshooting...................................................................................................................14
Specifications........................................................................................................................15
1
Page 2

Safety Warnings
• Please check all contents while unpacking.
• Please read this manual carefully before using the projector.
• Do not look directly into the light from the projector lens.
• Direct bursts of intense light can harm your eyes.
• Do not allow children or infants to stay in areas where they can look at the projector
lens from any angle.
• Do not put the projector in a damp, humid environment.
Basic Operation Tips
Read the manual carefully before use
Operational mistakes may cause damage by electrocution or fire. Follow the instructions listed
below to use and maintain the projector.
Read the manual
Please read the manual carefully and use the projector according to the instructions in it. This
will preserve the life of the unit.
Cleaning Projector
Please make sure that the electric plug of the projector has been disconnected from the power
supply before cleaning; use a damp cloth to wipe the unit down. It is best to not use any
chemical cleaners at all on the projector.
Accessories
All of the accessories have been packed separately in the box to avoid any possible damage to
the projector. The unit comes with all accessories needed to be fully functional.
Working Environment
The projector works best in a non-humid or too dry environment.
Set Up and Functionality
The projector needs to be set up on a level, horizontal plane and position.
Ventilation
Good ventilation provides essential conditions for the projector's continuous running. Please
prevent dust from covering the filter, as the projector may go into high temperature protection
mode due to the temperatures inside. Extreme heat may shorten the service life and cause
potential issues. For ideal maintenance, the filter should be cleaned monthly.
Electricity Source
The power on the unit is rated at 90~240V AC.
Power Cable
Please inspect the power cable before use to make sure it is functional.
Abnormal Noises
If you hear abnormal noises coming from the projector, please unplug the power cable.
Maintenance
Do not open or attempt to repair the projector yourself due to high voltage that remains stored
inside the unit, even when it is unplugged.
Keep Unit Away From Heat Emitting Devices
Please ensure the projector is a safe distance from other heat emitting devices.
2
Page 3
Prevention
• To improve the service life of the projector, please do not use the projector in a dusty or
humid environment.
• Do not expose the projector to direct sunlight.
• The ideal working temperature for the projector is 0°C ~ 35°C
• The appropriate storage temperature for the projector is -20°C ~ 50°C
• Do not block the ventilation window – the projector will shut down automatically if the
internal temperature gets too high. Regular cleaning is important for the projector. Do
not let the filter build up dust.
Start Up/Shutting Down the Projector
Before starting the projector, please connect the power cable first, then press the POWER button
on the control panel. The indicator light will turn from red to green.
To shut the projector down, press the POWER button again. The LED bulb will go out.
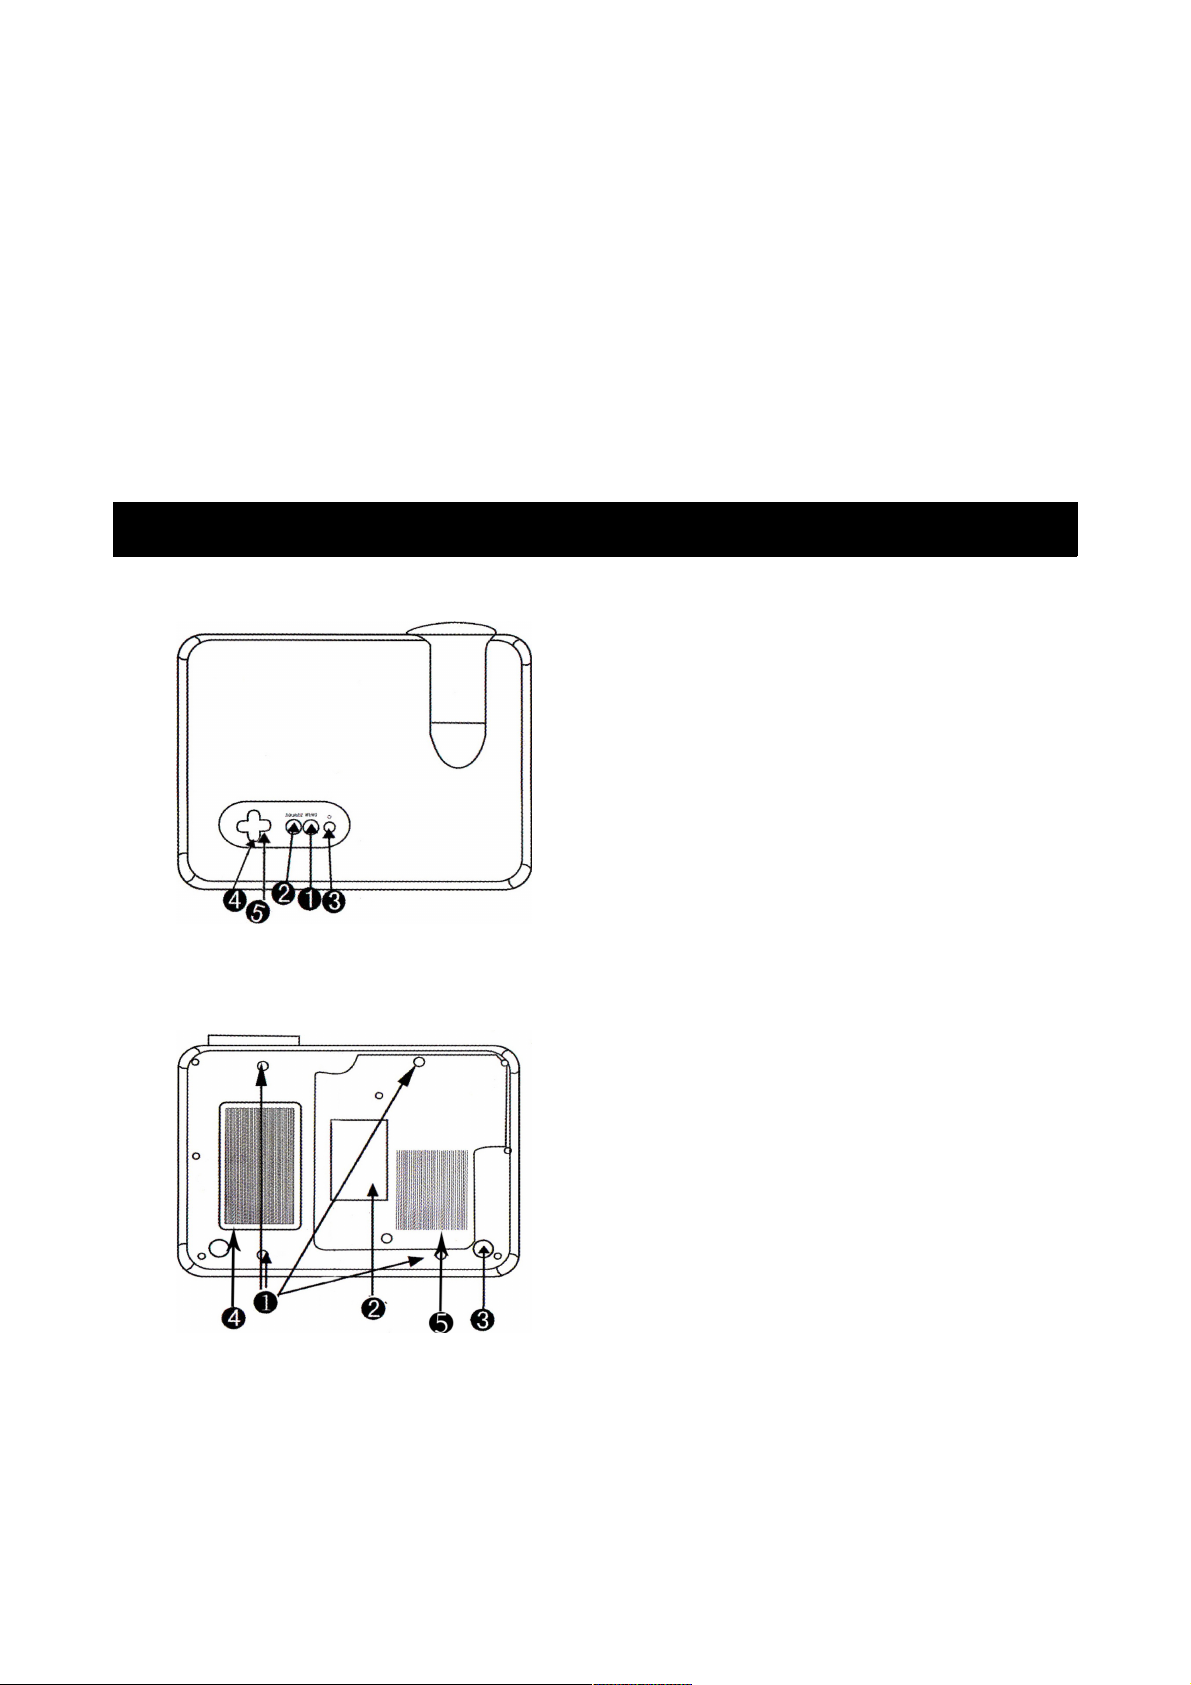
Product Layout
Top View
1. Menu button
2. Source button
3. Power button
4. Channel button
5. Volume button
Bottom View
1. Ceiling mounting holes
2. Product code region
3. Support base
4. Ventilation window
5. Ventilation window
If mounting the projector to the ceiling, please shift the high regulator and ensure that all screws
that are going into the ceiling mounting holes are going less than 1cm into the unit. This is to
avoid electrocution due to longer screws penetrating the plastic shell and touching high voltage
components inside the projector.
3
Page 4
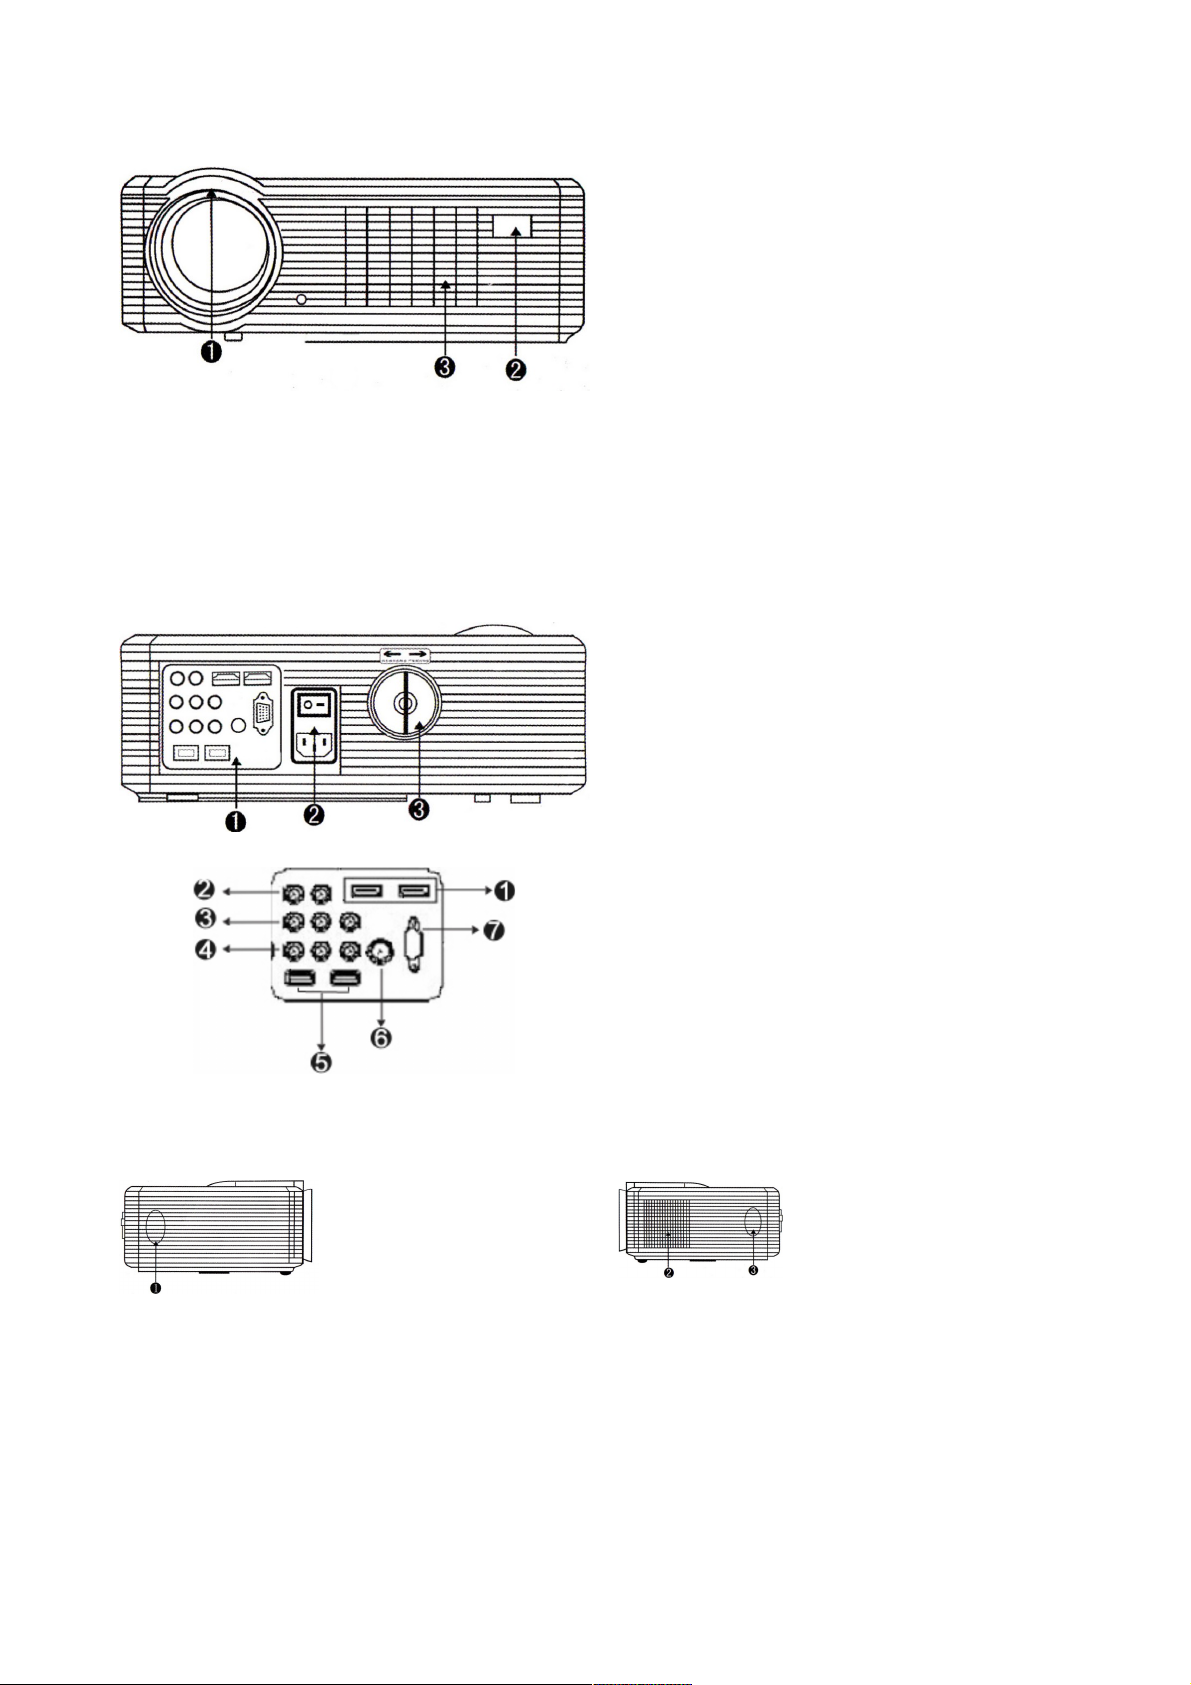
Front View
1. Lens
2. Remote Sensor
3. Ventilation Window
• When using the remote, point it towards the remote sensor.
• You can adjust the definition of the image by adjusting the lens focus
• The adjustable support base can move the projection angle by a maximum of 15°. The
best display effect will be obtained by angle ranges of 0° ~ 8°.
Rear View
1. Interface Area
2. Power Switch
3. Trapezoid Correction
1. HDMI High-Density Interface
2. Audio Out (L/R)
3. Composite AV
4. Y/PB/PR
5. USB Ports
6. TV Input (for digital TV signals)
7. VGA Input
Side Views
1. Right Speaker
2. Ventilation Window
3. Left Speaker
4
Page 5
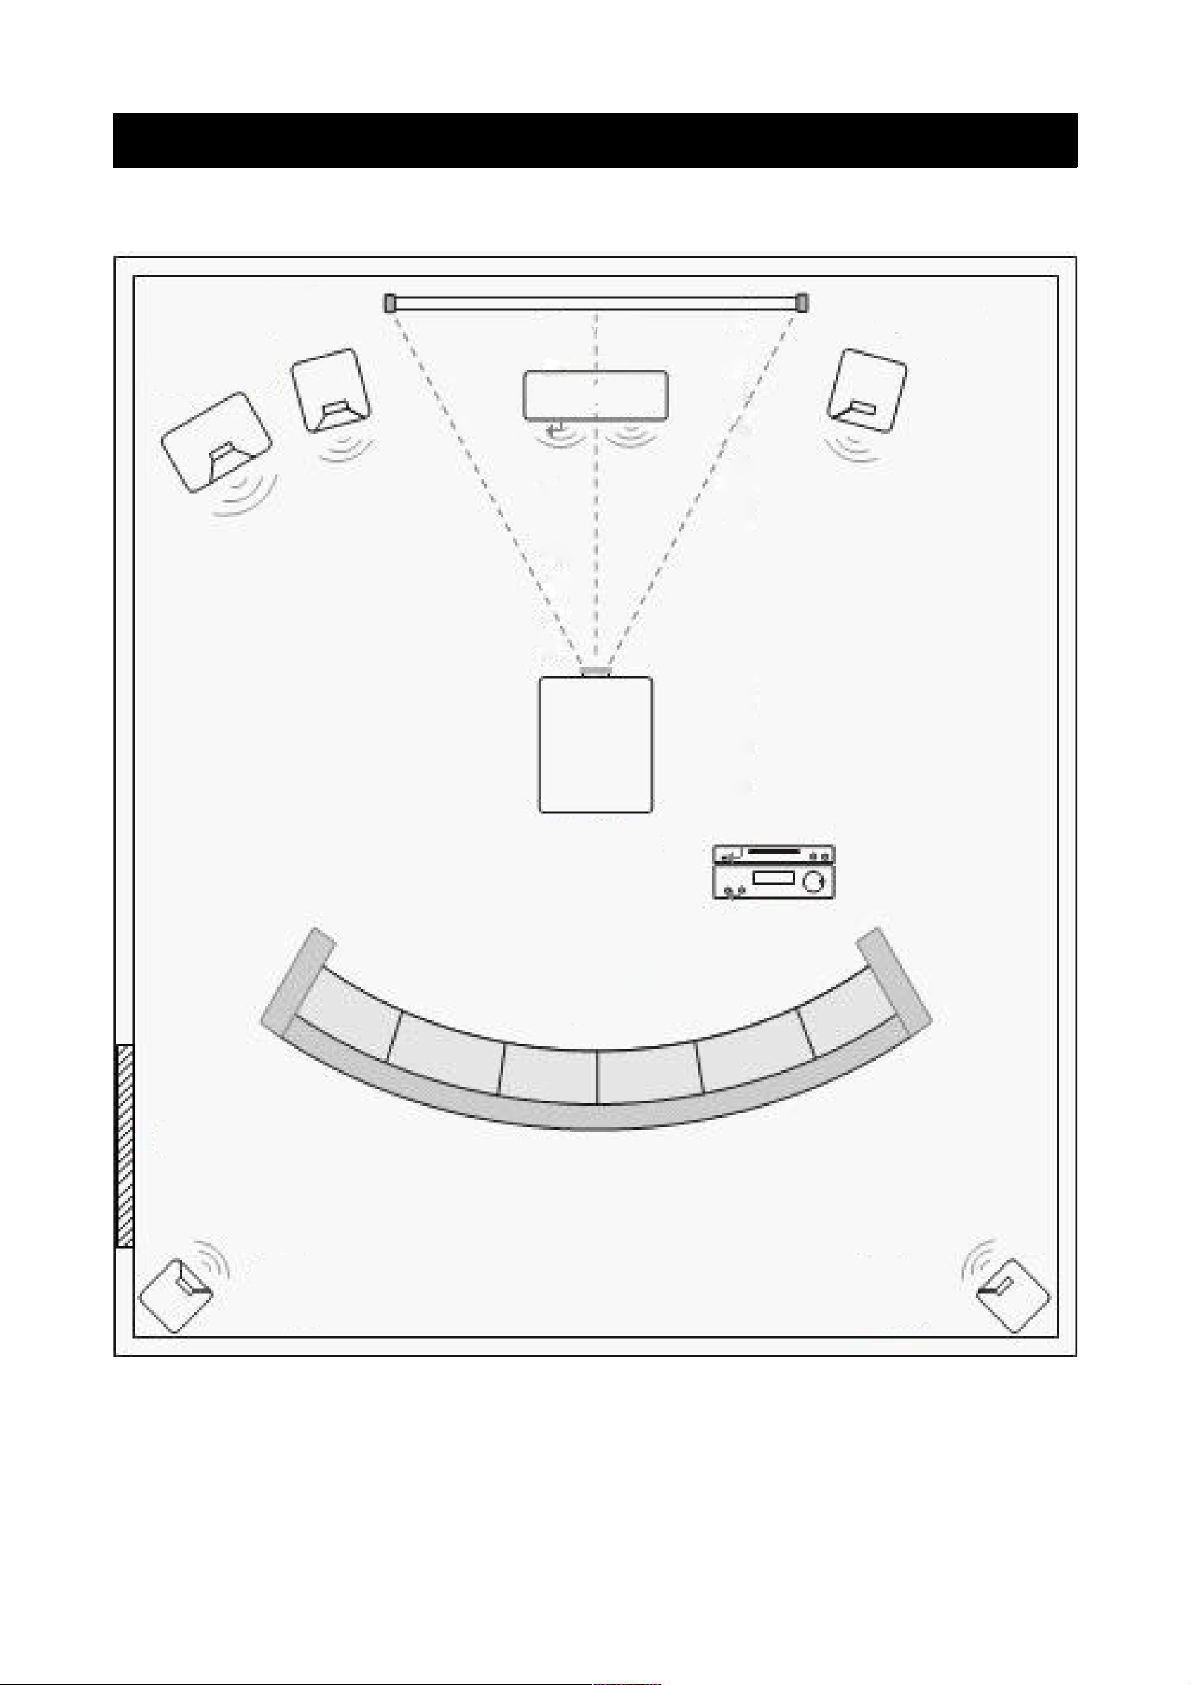
Installation
Please refer to the below image for setting up.
To achieve a better effect, do not allow sunlight to shine directly onto the projection screen.
5
Door
Left Rear
Speaker
Right Rear
Speaker
Seating
Blu-Ray / DVD
Player
Projector
Screen
Subwoofer
Left Front
Speaker
Right Front
Speaker
Center Speaker
Page 6

Standard Setup
Please follow the data in the chart below to adjust the image size and the distance between the
lens and screen.
Screen Size
Aspect Ratio
50” 72” 100” 120”
4:3 1.9m 2.65m 3.65m 4.35m
16:9 1.65m 2.3m 3.15m 3.75m
The image size depends on the distance between the projector and screen. There may be a 3%
deviation from the data. Different settings may require different settings from the above. The
projected image will become blurred if the distance is shorter than 2m or longer than 5m.
Please follow the figure below to adjust the trapezoid correction.
Incorrect installation
The image shrinks to the right
Correct installation
The image is rectangular
Incorrect installation
The image shrinks to the left
6
Page 7

Installation Method
If installing the projector on the ceiling, please consult with a professional installer, and refer to
the diagram below for projector positioning.
• To avoid damage to the projector, please ensure the projector is mounted properly to the
ceiling or on a suitable, stable surface.
• Keep the working environment of the project within the temperature range of 0°C – 35°C.
• If the project is used in a humid environment, it may affect the shape of the screen and
cause functionality issues with the unit.
• Please there is enough ventilation around the projector, as overheating will significantly
shorten the service life of the projector.
Connections
7
Page 8

Operation
Startup
Note: if this is the first time using the projector, please read the “installation” section in this
manual before use. To connect the signal cable and power cable to the projector, following this
operating process. Before starting the projector, please connect the external device (such as the
PC, Blu-ray player etc...)
1. Please place 2 x AAA batteries into the remote control before use.
2. Connect the power cable to the power jack. The indicator light should turn red. Remove
the lens cap.
3. Press the POWER button on the remote control until the panel indicator lights up.
4. After 2 seconds, the projector should start up.
5. The projected image may be blurry or in the shape of a trapezoid. Please read the “How
to adjust the trapezoidal image” chapter to adjust.
6. Once the image becomes clear, the user can watch their desired selections. The system
parameters of the project can also be set by reading the “Guides for Menu Setting”
chapter.
8
Page 9

Shutdown Procedure
While using the projector, press the POWER button to shut it down. Even though the projection
light may go out, the projector is still running until the fan stops turning.
Control Panel Buttons
1. The UP and DOWN buttons on the remote control have the same functionality as the CH+
and CH- buttons on the control panel. Use these buttons to move the cursor upwards or
downwards in the MENU FUNCTION window or sub-menu.
The LEFT and RIGHT buttons on the remote control are the same as the V+ and Vbuttons on the control panel. They can be used to move the cursor left and right, and to
increase or decrease the volume.
2. Indicator
3. MENU – Use this to show the main menu or to go back to the previous menu. Use CH+/to move forward or back, and use V+/- to select or enter options.
4. SOURCE – Use this to choose the input source, such as AV, YPBPR, HDMI2, USB1, USB2,
PC, TV etc...
5. POWER – Use this to startup/shutdown the projector.
Remote Control
9
1 2 3 4 5
Power
Vertical Flip – adjust image
for ceiling mounted units
Input Source
Open Menu
Mute Audio
Change Picture Modes
Change channels
directly in TV mode
Change the aspect ratio
of the display
Page 10

How to Adjust the Trapezoidal Image
During the first use of the projector, the image may be blurry or difficult to see. This will be due
to the lack of focus with the lens and the trapezoid correction. Please follow these steps to
adjust the focus:
Adjusting Focus
Rotate the lens clockwise or anti-clockwise, observing the image on the screen. Keep rotating
the lens until the image becomes clear.
NOTE: if bringing the projector from a cold environment into a warm environment, there may be
moisture on the lens. Please ensure the moisture is removed completely before starting the
projector up again.
Trapezoidal Correction
If the projected image is in a trapezoidal shape, it can be resolved by trapezoid correction. If the
screen or projector is not level horizontally, the image may be in a trapezoidal shape. Please try
to adjust the angle of the projector as it points at the screen to resolve this issue.
If the trapezoid correction fails to resolve the image shape, please reduce the vertical difference
in height between the projector and the center of the screen.
10
Page 11

Menu Settings
System Function Operation
Select the signal source
While selecting channels, if there is no signal input, “NO SIGNAL” will be displayed.
The SOURCE button can be used to indicate your preferred signal source.
Picture Menu
Different display modes can be set: Standard, Lively, Movie based on personal preference.
Colour Temperature
You can select different colour temperatures.
Aspect Ratio
Includes options for screen zoom and 16:9
aspect ratios.
Noise Reduction
Image background noise reduction.
Picture Setting
In VGA mode, the picture mode is relative and
bright can also be adjusted.
Menu Options
Use to adjust the display, language menu,
display time in menu, memory playback; and
reset the projector to the original settings.
11
Page 12

Audio Menu
While in projection mode, press “V+/-” buttons to increase or decrease the volume.
Sound Mode Standard
Adjust the sound settings as suitable to your theatre setup.
USB Interface and Supporting Formats
12
Page 13

13
Page 14

Troubleshooting
Please check these suggestion solutions if you encounter any problems with the projector. If they
do not solve the issue, please contact the Kogan.com customer support team.
Problem Possible Solutions
Cannot start unit up
1. Is the power cable plugged in?
2. Check the fuse to see if it has blown.
Bulb does not light up when
plugged into power
1. The bulb may be damaged or blown. Replace the bulb
and check again.
2. If the power has been switched off recently, wait for 15
minutes before turning the unit on again.
No image is displaying
1. Check the lens cap has been removed
2. Check that the connections are all secure and that the
right source signal has been selected.
Remote control doesn't work
1. Check the batteries aren't flat and are inserted correctly.
2. Make sure you are pointing the remote at the IR sensor.
3. Turn the projector off, wait for 15 minutes then turn it on
again.
The projector has autoshutdown
1. Check the dust filter to make sure it isn't clogged.
2. Internal fans may be damaged and may need to be
replaced.
14
Page 15

Specifications
15
 Loading...