

Page 1
Page 2

Thank you for purchasing this Halogen Oven. This oven can be used to grill,
broil, bake, steam or roast – all while saving energy and cooking up to 2550% faster than a conventional oven. It is also up to 75% more energy
efficient. A powerful 1200W halogen heating element assists in cooking entire
meals in a fraction of the time spent using a conventional oven. The oven
heats up instantly, reducing pre-heating times while a convection fan
circulates hot air internally to cook food uniformly and seal in natural juices
for full flavor and aroma.
As the bowl is made of glass, you can clearly see what you are cooking from
all sides and easily determine the optimum cooking level for your meals. This
oven also lends itself to healthy cooking. When meat, poultry or fish are
cooked, fats and oils drip away through the rack. In addition, this appliance is
so compact, it can be used as an extra warming vessel or as a primary
cooking vessel in situations where space is limited (eg. recreational vehicles,
dorm rooms, the office.)
This user’s manual contains information on the use and care of this product.
Please read this manual carefully before operating the Halogen Oven to
ensure proper usage and maintenance. Following the directions in this booklet
will enable you to optimize the performance and lifespan of the unit.
IMPORTANT SAFEGUARDS
The product you have purchased is a state -of-the-art appliance. It adheres to
all of the latest safety and technology standards; however, as with all electric
appliances, there are some potential risks. Only operate this oven in
accordance with the instructions provided and only for its intended household
use.
PLEASE READ THE INSTRUCTIONS BELOW BEFORE USING THE
APPLIANCE FOR THE FIRST TIME.
• Do not use outdoors or operate where aerosol spray products are being
used or where oxygen is being administered.
• The Halogen Oven is for domestic use only; it is designed to handle normal
household quantities. It is not suitable for continuous or commercial
operation.
• Do not operate in the presence of explosive and/or flammable fumes.
• This appliance is not intended to for use by persons (including children) with
reduced physical, sensory or mental capabilities, or lack of experience and
knowledge, unless they are carefully supervised or instructed by a person
responsible for their safety.
• Due to the high surface temperature this product reaches when in use, keep
children and pets away from this product.
• Always make sure that children cannot reach the product or any loose
cables.
• Use on a secure and stable worktop. Do not place near the edge of the
worktop.
• Do not place the product where it can either fall or be submerged in water
or any other liquid.
2
Page 3

• Use the product for its intended household use only.
• Always place the glass pot onto the base before plugging the power cord
and switching on. NEVER operate the oven without first placing it on the
supplied base.
• Do not let the cord hang over the edge of the table or worktop, or make
contact with hot surfaces.
• Do not place on or near a hot gas or electric cooktop or in a heated oven.
• Do not move the oven while in use.
• Surfaces become very hot during operation, and remain hot for some time
after the unit is switched off. Do not touch the lid or the sides of the oven
without protective oven gloves.
• All metal items in the oven, such as the cooking racks, can get very hot
during cooking. Please be careful when removing these items from the oven.
Always wear oven gloves or use the tongs supplied.
• Never place unprotected hands inside the oven when in use.
• Never leave the product unattended while in use.
• Please note: the handle on the lid works as a safety mechanism, if the lid is
not on properly or the lid is off the oven, it will automatically turn off.
• If baking cakes, for best results use a cake pan (Not included with the
oven).
• Use the handle and wear oven gloves when lifting the lid from the glass
oven.
• The lid should be placed on the lid holder, not directly on the countertop,
when taken off during operation. Placing the lid with the heating element
facing down on the countertop might damage your countertop or even cause
a fire hazard.
• Always remove the lid away from you so that escaping steam is channeled
away from your face.
• Take care when removing the lid to avoid contact with hot liquid
condensation that may have collected on the inner surface of the lid.
• Be sure to allow the oven body to cool off before cleaning it with a damp
cloth.
• Be sure to unplug the oven when it is not in use, when cleaning the oven or
whenever there is a known power failure. Remove the plug from the
socket by pulling on the actual plug. Do not pull the plug out by the cable.
• Use extreme caution when removing pans or cooking racks from the
Halogen Oven.
• Be careful when disposing of hot liquids, particularly fat or oil.
• Never immerse the cord, plug, or lid/control panel of the product in water or
other liquids.
• Re-tighten screws if the base becomes loose.
• Regularly check the cable and plug for any signs of damage.
• Do not clean with metal scouring pads: Pieces may break off the pads and
make contact with electrical parts, increasing the risk of electrical shock.
• Never operate the Halogen Oven if it has a damaged cord or plug. If the
Halogen Oven has been dropped or damaged, please contact the Kogan
Customer Service Department.
• Do not use any other accessories or attachments not recommended by the
manufacturer. They may result in fire, electrical shock, or personal injury.
• For safety reasons, a broken or damaged cable may only be replaced with a
cable supplied by the manufacturer.
• Never use the cord to carry the product.
• Do not disassemble the product or attempt to modify the plug in any way.
This item is not equipped with any user-serviceable parts.
3
Page 4
Technical Specifications
MODEL NUMBER: KAOVNHALOGA
RATE: 120 V / 1200 ~ 1200 W
TEMPERATURE RANGE: 250 F ~ 480 F
TIMER: 5 ~ 60 minutes
BOWL DIMENSIONS: 13” width x 6.25” depth
CAPACITY: 12 quarts
CORD LENGTH: 4 FT
WEIGHT: 15 lb.
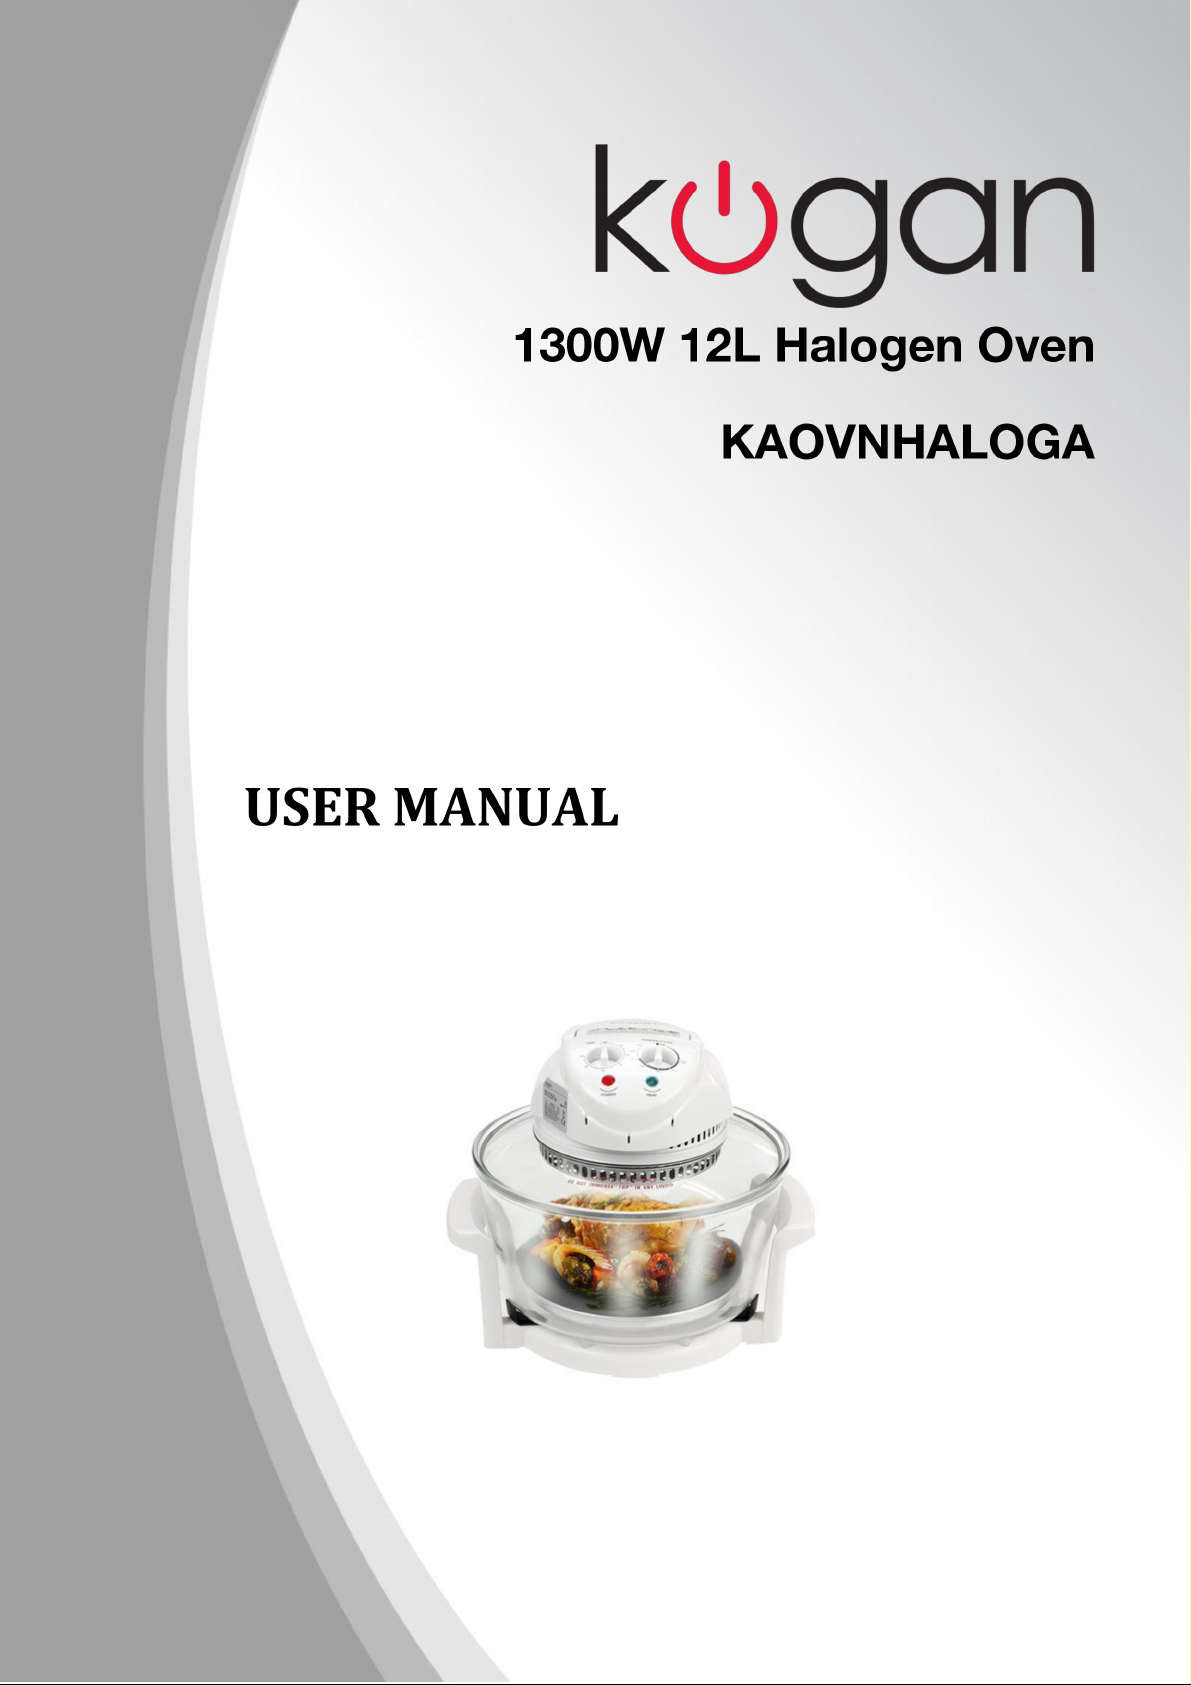
Oven Components
- Safety ON/OFF and Handle
- Temperature Knob
- Base
- LED Lights
- Timer
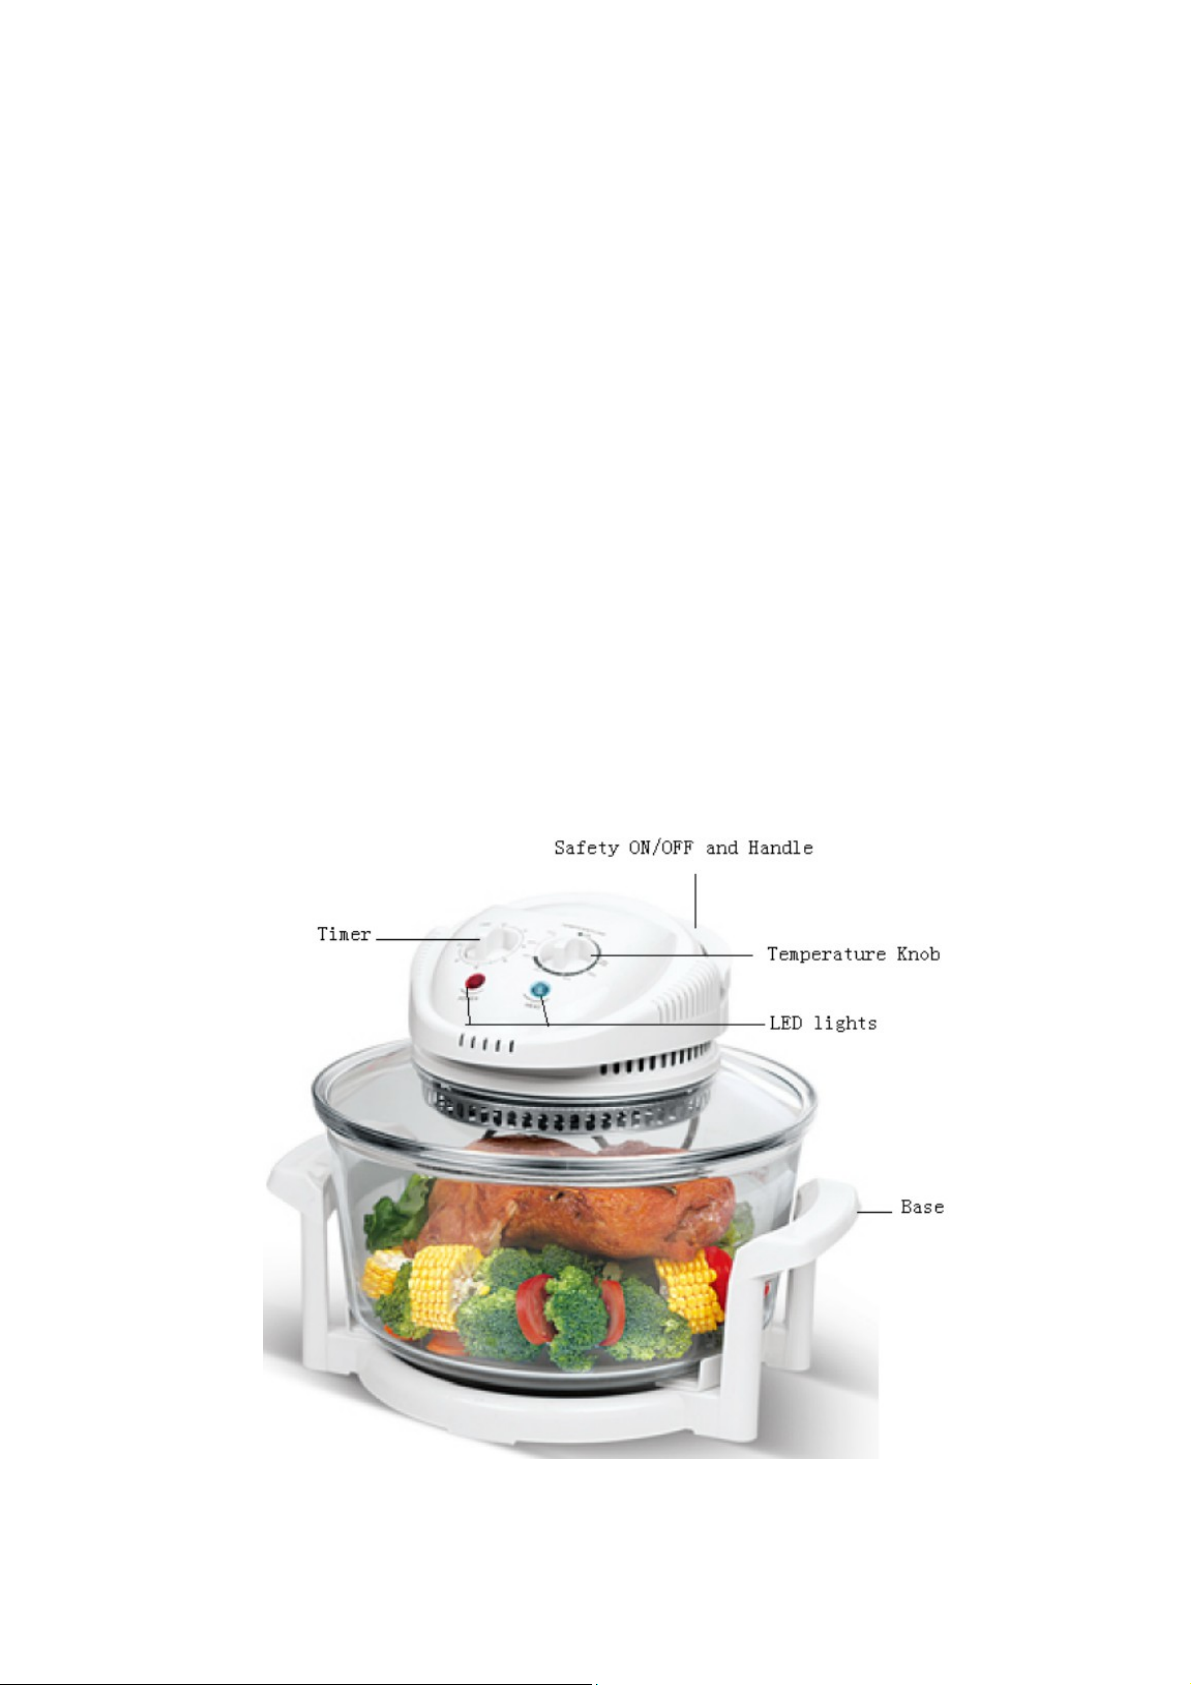
- Extender Ring
- High Rack Low Rack
- Tongs
- Lid Holder
- Non-stick Frying Pan
- Steamer
- Forks(4pcs)
4
Page 5
• LID: Safety ON/OFF Handle: For safety reasons, the oven will only work if
the handle is completely folded down. If it’s not completely folded down, the
oven will not turn on. Always use this handle to move the lid. To remove the
lid, lift it by the handle. Place it on the lid holder.
• Timer Knob: You can program the cooking time up to 60 minutes. The
timer will switch the oven off after the preset time period has passed and an
alarm will ring momentarily to alert that the cooking time is up.
• Temperature Knob: Easy manual selection of the cooking temperature.
May be adjusted while the unit is in use.
• LED Lights: Luminous indicators of the oven’s activity. When you select
your cooking and temperature time, the green and red lights will turn on.
Once the oven reaches the desired temperature the green light will turn off.
When the cooking time has concluded, the red light will turn off.
• LID HOLDER: A metal holder for placing the lid during and after cooking.
Take care not to place the hot lid directly on the table or countertop: this may
create a potential fire hazard or damage the furniture.
• GLASS POT: Made of heat-resistant glass. Dishwasher safe. 12 quart
capacity.
• BASE: Placed under the glass bowl to keep it off the countertop and
stabilize it. NEVER operate the oven without the base.
• EXTENDER RING: Allows expansion of the oven’s capacity by 5 quarts.
Allows for cooking larger food items such as a whole chicken or turkey.
• LOW RACK: Recommended for larger sized foods. May be used by itself or
in combination with the high rack.
5
Page 6

• HIGH RACK: Recommended for smaller sized foods to be placed closer to
the heat source. Also recommended for achieving crispness or browning food.
NOTE: It is not strictly necessary to use either of the racks to cook in this
oven, However, it is recommended since it allows for better circulation of air
which results in more even cooking.
• TONGS: Designed to easily remove hot racks from the oven.
• FRYING PAN: Non-stick metal pan specially used for air-frying. It should
be placed on the low rack. Requires little or no oil to cook.
• STEAMER: Sits in the middle of the bowl to allow space beneath it for the
provision of water to enable food to be steamed.
CAUTION: Ensure the water is added to the bowl before the oven is switched
on. Under no circumstance try to add additional water once the oven has
been switched on.
• FORKS: Can be used as barbecue utensils.
____________________________
Getting Started
Read the safety instructions found in this manual before operating. Before
using this appliance for the first time, follow these steps:
1. Remove all packing materials and literature from inside the oven. Make
sure the oven is in good condition and there are no missing parts or damage
to the glass bowl.
2. Select a flat, heat-resistant, non-flammable surface to operate the halogen
oven on.
3. Remove any dust or soil that may have accumulated on the surface of the
product. Wipe thoroughly with a clean damp cloth. Wash the glass pot in
warm soapy water or in the dishwasher. Dry thoroughly before use. NEVER
submerge the lid in water or any other liquid. Only the glass cooking pot and
racks are dishwasher safe.
4. Before first use, heat up the empty oven at maximum temperature for five
minutes. This will eliminate any odors from within the oven. This also will
burn off any excess lubricants, which were used during the manufacturing
process. A slight amount of smoke may be produced during the first few uses.
This is not considered a defect.
NOTE: the handle must be pushed down into a horizontal position to turn the
oven ON. When the handle is in the vertical position, the oven will turn itself
OFF. See illustration overleaf:
6
Page 7

5. Allow the appliance cool to room temperature.
6. Wipe the inside of the glass pot a final time. Do not use abrasive cleaners
or scouring pads.
____________________________
Operating Instructions
• Place the high and/or low racks in the glass bowl container before placing
food inside. You may also cook directly in the glass bowl but it is
recommended to use at least one of the racks to obtain better circulation and
distribution of hot air within the unit. For best results, keep food
approximately 1” to 1.25” from the glass wall to allow maximum hot air
circulation. Foods may be cooked directly on the racks, on foil or in an ovensafe container.
• Place top lid securely on the glass bowl. Make sure that the food does not
touch the lid.
• Plug the power cord firmly into the outlet.
• Before turning the oven on, push the handle all the way down until it snaps
securely in place. If it is not completely down, the oven will not turn on.
• Set the timer to the desired time. The red LED light will illuminate.
• Select the optimum temperature. The green LED light will turn on, as well
as the oven interior light. Both lights will turn off when the selected
temperature is reached. If the inner temperature drops below the selected
level, both lights will turn back on for short periods of time, indicating that
the oven is heating up.
• The timer and the red light will switch off after the preset time period is up
and an alarm will sound to alert you that the cooking time is over.
7
Page 8

• When the cooking time is over, unplug the device from the outlet. Lift the lid
and place it in the lid holder. NEVER put the hot oven lid directly on the
countertop or table as this might cause damage to the furniture or cause a
fire hazard.
• Always use wooden, heat-proof plastic or nylon utensils while cooking. Metal
utensils may scratch the glass bowl.
____________________________
Cooking tips
Roasting
• Place food directly on the low rack. Using an oven safe pan on the rack is
also optional. Using the high rack allows food to be positioned closer to heat
source for additional crispness, browning or for foods to be cooked “well
done”.
• Is not necessary to use oil for roasting, but you may do so for foods that
tend to become dry in an oven.
• For a glazing effect, set the food 4 inches away from top heating unit. Apply
the desired glaze and broil at 400 to 480 F until the desired shade of brown is
reached. Fruit jams, preserves and jellies work well as a glaze for broiled
foods.
• Roasting time may vary depending on the type of meat or other food, type
of cut, amount of fat, thickness or weight of the item.
• When half the cooking time is up, flipping the food is recommended for even
cooking.
Grilling
• Place food directly on the low rack, don’t use the frying pan.
• Brushing the rack with oil will help to avoid sticking.
• You may cover the bottom of the glass bowl with foil to catch fat and oil
drippings. This will make the oven easier to clean.
Baking
• Use any oven-proof baking dish, preferably nonstick, that will fit
comfortably inside the oven. Place it on the low rack. Take special care in
following baking recipes, as desserts are especially delicate and easy to
overcook. Lower the temperature slightly and turn the baking dish around if
too much browning occurs.
8
Page 9

Broiling
• Place food directly on the high rack. You may use the frying pan to broil as
well; it should be placed on the high rack.
• Brushing the rack with oil will help to avoid foods from sticking to its
surface.
• You may cover the bottom of the glass bowl with foil to catch fat and oil
drippings. This will make the oven easier to clean.
Air Frying
• Use the nonstick frying pan placed on the low rack.
• Little or no oil is used in this process, yet the effect is like pan-frying or
deep frying. If oil is used, only a thin layer is necessary.
• Once cooking is finished, promptly remove the lid from the glass cooking
bowl, otherwise steam may cause the food to become soggy instead of crispy.
WARNING: NEVER fill the glass bowl with oil. This appliance is not to be used
as a deep fryer! Also, stop cooking immediately if food begins to burn.
Steaming
• To steam, place food in an oven safe bowl or pan on the low rack making
sure that the container does not touch the sides of the oven and cover with
foil. Pour water or broth into the bottom of the glass cooking bowl using half a
cup of liquid for every pound of food. Cook at 180°F with correct suggested
cooking times listed below.
____________________________
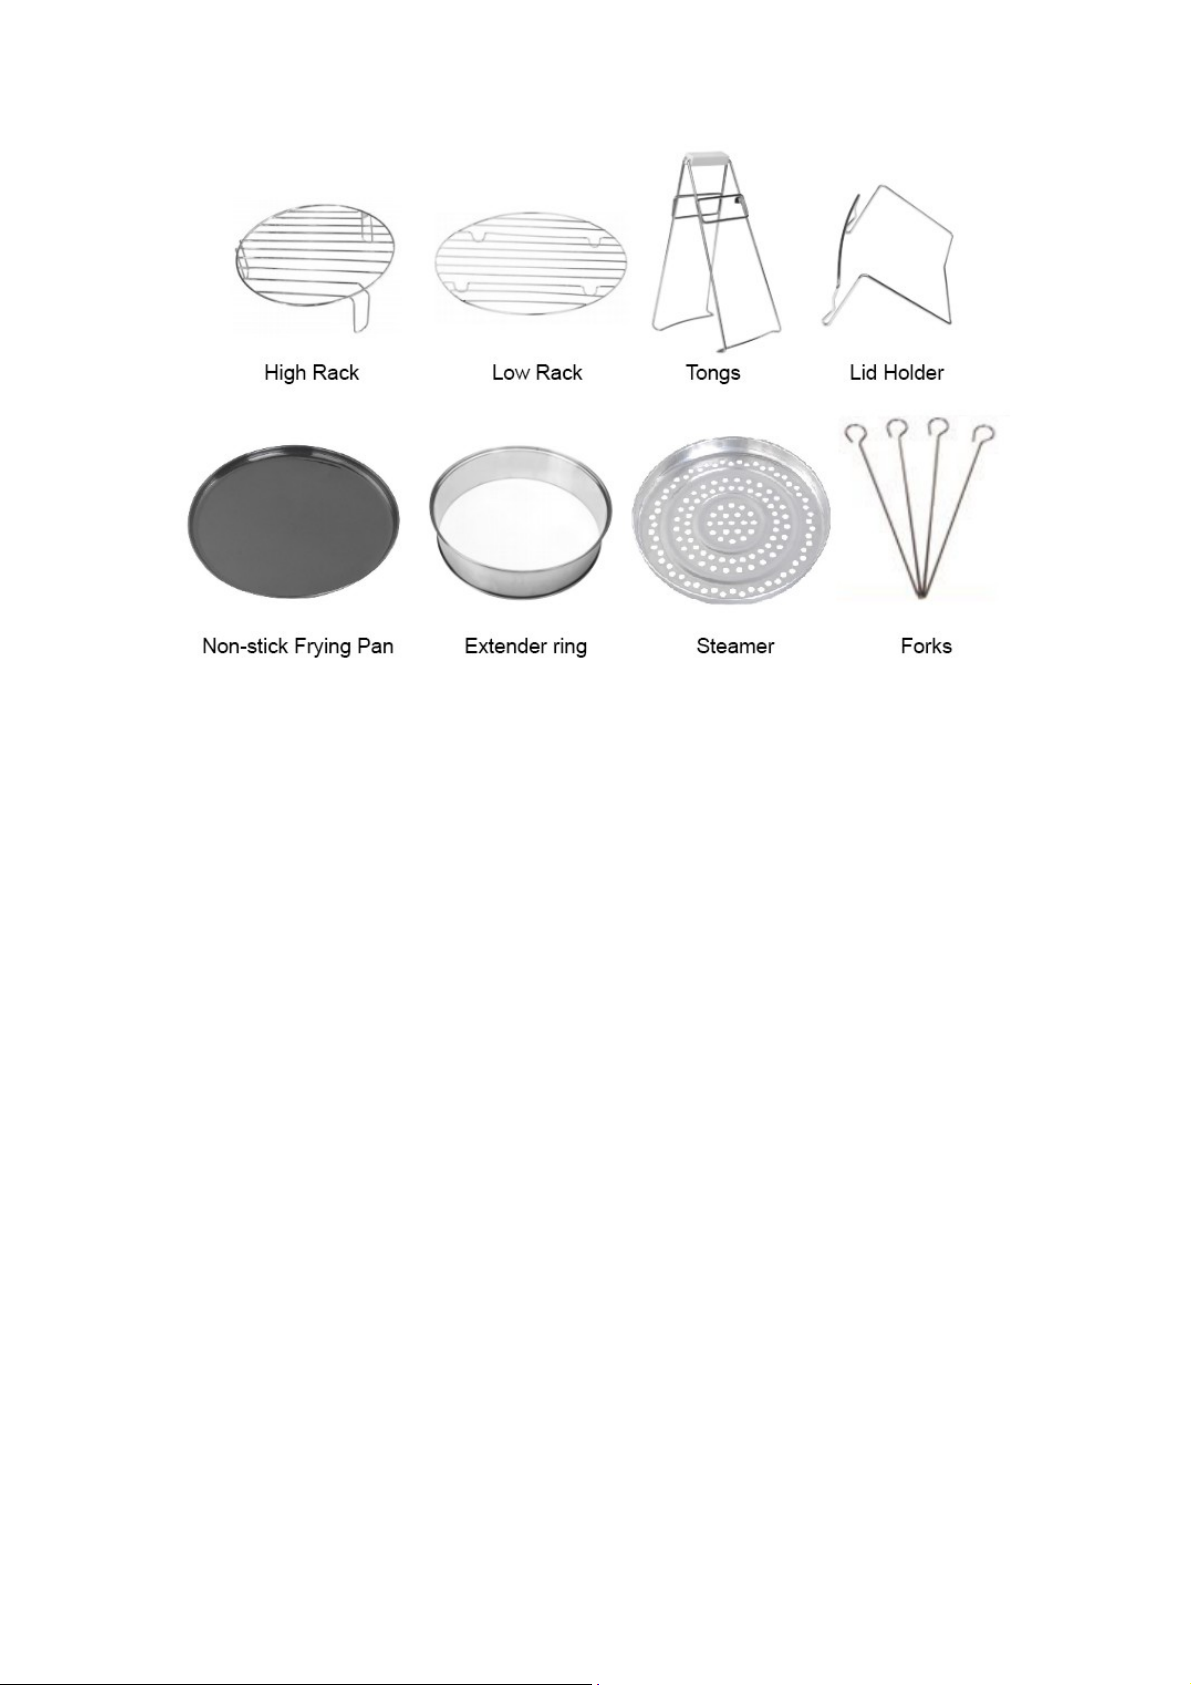
Suggested Cooking Times
NOTE REGARDING COOKING TIMES:
Please note that the following cooking times are approximate. Actual cooking
times will vary depending on several factors, such as the size of the pieces,
thickness of cut, quality & freshness of produce, and temperature of oven at
start (if the oven has been used immediately before starting a new recipe, the
cooking time will be slightly shorter than indicated).
Please make sure you test the food to see if it's done before removing from
oven. Use a food thermometer if possible. If food is under cooked when the
cooking time is up, turn the oven back on for a few additional minutes. Check
on the food periodically while the oven is functioning; if you see excessive
browning of scorching on the surface, flip the food over, lower the
temperature slightly, or shorten the cooking time.
9
Page 10
Page 11

Conventional oven recipes may also be used by slightly adjusting cooking
times. A 25% time reduction is suggested on average.
____________________________
Cleaning and maintenance
1. Unplug the oven and allow it to cool completely before performing any
cleaning or maintenance.
2. Once glass bowl has cooled completely, clean all parts thoroughly with
warm soapy water and a damp cloth. The glass bowl and racks are
dishwasher safe.
3. To clean the fan cover, remove the screw and take the cover off to be
washed in warm water with gentle detergent. Allow to dry completely before
re-assembling.
NOTE: spraying the bowl and racks with cooking oil prior to cooking may
facilitate easier cleaning
Self-cleaning - ‘Wash’ setting
This oven has a special self-cleaning setting labeled ‘Wash’ on the
temperature control knob, which may be used to clean the glass bowl.
1. Remove excess food and drain away fat from the glass bowl.
2. Add approximately 1/2 inch of warm water into the glass bowl with a squirt
of dishwashing liquid. Replace the glass lid and turn the temperature control
to ‘Wash’.
3. Set the time control to 10 - 15 minutes, depending on how soiled the glass
bowl is. The combination of heat, the swirling motion caused by the fan and
the dish liquid will clean the glass bowl quickly and efficiently. The cooking
racks may also be left in the glass bowl when using the wash setting to soften
any stuck-on residue.
4. Allow the oven to cool.
5. You may still need to use a sponge or scrub brush to remove stubborn
deposits before rinsing and wiping dry.
11
Page 12

CAUTION:
• Never immerse the lid, cord, or plug in water or any other liquid.
• If scrubbing is necessary, use a nylon or polyester mesh pad.
• Do not use a steel wool pad or abrasive material.
• Never use solvents or cleaning powder.
• Do not allow liquids to seep inside of the operating mechanism located on
the underside of the lid.
Storing
Allow the appliance to cool completely before storing. Store the appliance in a
cool, dry location and cover to protect from dust. Do not place any heavy
items on top of this appliance during storage as this may result in possible
damage to the unit. You may want to place the lid upside down on the bowl
for a more compact storage and to protect the lid from damage.
____________________________
Troubleshooting
Problem THE OVEN WILL NOT TURN ON
Solution • Make sure that the power cord is plugged in.
• By connecting another electric device, check that the outlet is
working properly.
• Check that the thermostat is set to the desired temperature.
Make sure the timer has been set. If you select a temperature
but do not set the timer, the oven will not turn on.
• Make sure the handle has been pushed all the way down until
it clicks into place.
Problem THE OVEN WILL NOT HEAT UP
Solution • Check the thermostat to see if it is set to high temperature.
• Make sure the timer has been set. If you select a temperature
but do not set the timer, the oven will not turn on.
Problem ANY PART OR COMPONENT OF THE OVEN IS BROKEN
Solution • Contact the Kogan customer service team.
Problem I AM NOT SURE WHAT TYPE OF COOKING VESSEL CAN BE
USED INSIDE OF THE HALOGEN OVEN!
Solution • Any cooking vessel that is safe to use in a regular oven is also
safe to use in this halogen oven as well. If unsure, check the
cookware’s manual or contact the cookware manufacturer.
Cookware with plastic parts should not be used in any oven.
12
Page 13

Problem THE MAIN LIGHT INSIDE THE OVEN TURNED OFF
Solution • When the oven reaches the desired temperature, the interior
light will turn off. This is normal operation. The light will only
turn on when the temperature is lower than the one selected on
the temperature knob.
• Turn the knob to the maximum temperature level. If the light
still does not turn on, contact the Kogan customer service team.
Problem THE OVEN PRODUCES SMOKE
Solution • The appearance of a small amount of smoke is normal during
the first few uses. If after a few uses it is still smoking, unplug
the unit and clean any excess grease from the underside of the
lid and operating mechanism. If the problem persists, please
discontinue use and contact the Kogan customer service team.
13
Page 14

Recipes
Over the next few pages, you will find delicious recipes you can prepare in
your Halogen Oven, including appetizers, entrées, sides, breads and desserts.
TIME SAVING TIP:
If you are using the frying pan for the recipe, cover it with aluminum foil and
spray it with cooking spray. Once the cooking is done you can simply remove
the tray with little or no cleanup needed.
If you are roasting, you can cover the bottom of the glass bowl with some foil
to catch the drippings, also making cleanup even faster!
NOTE REGARDING COOKING TIMES:
Please note that the cooking times in these recipes might need to be adjusted
due to several factors, such as size of the pieces, thickness of cut, quality &
freshness of produce, and temperature of oven at start (if the oven has been
used immediately before starting a new recipe, the cooking time will be 2-3
minutes shorter than indicated). Please make sure you test the food to
confirm it's done/ready before removing from oven. Use a food thermometer
if possible. If food is under cooked when the cooking time is up, turn the oven
back on for a few additional minutes. Check on the food periodically while the
oven is functioning; if you see excessive browning of scorching on the
surface, flip the food over, lower the temperature slightly, or shorten the
cooking time.
CRISPY BACON-WRAPPED STUFFED DATES
These stuffed dates are enjoyed by everyone! They have the sweet, salty,
smoothness and crunch that satisfies every taste bud!
Ingredients (Serves: 12)
8 bacon slices, cut in thirds
24 smoked almonds (roasted, salted is fine)
24 dates, pitted
3 ounces soft goat cheese
- Cut open dates; stuff with ½ - 1 teaspoon goat cheese and one almond.
- Wrap date with bacon piece and lay seam down on frying pan.
- Place on low rack of oven. Set oven for 205ºC and set timer for 15 minutes
- Turn dates over once at half time.
14
Page 15

CRANBERRY CRAB MEAT APPETIZERS
Crispy little filo tart shells with a creamy crab filling and topped with sweet
cranberry.
Ingredients (Serves: 15)
¼ cup cranberry sauce, whole berry, canned
¹⁄3cup cream cheese, softened
½ cup lump crab meat
Seasoning, to taste
2 tablespoons green onion, chopped
15 filo mini shells, frozen
- Place cranberry sauce in a small bowl; beat with whisk until smooth.
- Combine cream cheese, crab meat, green onion and seasoning in a bowl.
- Fill each shell with about 1 tsp. of the cream cheese mixture; top with ½
tsp. cranberry sauce.
- Arrange on frying pan. Place the pan on the low rack. Set oven for 190ºC
and the timer for 10 minutes. These can be made up ahead of time and
taken right out of the freezer and into the oven.
HOT BEEF DIP IN BREAD BOWL
Beautiful and delicious party food – spicy and warm. A beefy, cheesy filling
served in a bread bowl.
Ingredients
- Leaving a 1-inch border, cut top from bread, reserving top for lid. Hollow out
loaf to make a bowl, leaving a ½-inch thick shell; set aside.
- Crumble beef into an 8” round pan (like a cake pan). On high rack in oven,
cook beef at 205ºC, stirring occasionally, for 5 minutes, or until beef
appears cooked with no pink. Drain.
- Add seasoning and ½ cup water to beef and return to high rack for another
5 minutes.
- In a bowl, add remaining ingredients and pour into bread bowl. On low rack,
heat for 30 minutes at 150ºC.
- Serve with chips.
15
1 sourdough round bread loaf
450g ground beef mince
½ cup water
1 1-oz. pkg. taco seasoning mix
1 8-oz. reduced-fat cream cheese, softened
1 cup light sour cream
2 cups reduced-fat cheddar cheese, sharp, shredded
1 teaspoon Tabasco pepper sauce
Page 16

SANTA FE VEGGIE QUESADILLAS
Your family and friends will love these quesadillas for a party or for a meal…
quick, easy and delicious!
Ingredients (Serves: 4)
4 large flour tortillas
½ cup cheddar cheese, low fat, and/or Monterey jack, shredded
½ cup whole kernel corn, drained
½ cup red capsicum, diced
½ cup black beans, drained
2 green onions, chopped
½ teaspoon cumin
½ teaspoon garlic salt
¼ teaspoon black pepper
- Mix all the ingredients, except for tortillas, together. On one half of tortilla,
spoon generous amount of corn-bean mixture; fold over the other half
covering mixture.
- Place on one half of the frying pan. Repeat with another tortilla.
- On high rack of oven, place frying pan and bake for 3 minutes on each side
at 205ºC. Repeat with remaining ingredients.
SOUTHWEST CHEESECAKE
As beautiful as a dessert cheesecake, your friends will be delightfully
surprised when they eat this wonderful savory cheesecake with chips!
Ingredients (Serves: 25)
1 cup cornflake crumbs or corn chip crumbs
1 teaspoon garlic salt
2 tablespoons butter
2 8-oz. cream cheese, softened
1 cup Monterey Jack cheese, shredded
¼ teaspoon garlic salt
2 8-oz. sour cream, divided
2 large eggs
½ cup salsa
1 4-oz. green chili, chopped, drained
1 cup guacamole, fresh or frozen, thawed
1 medium tomato, seeded and diced
Tortilla chips or crackers
- Prepare 8” springform pan (not included with oven) with cooking spray and
wrap outside of pan with foil. In food processor, blend cornflake crumbs,
butter and garlic salt. Press into prepared springform pan.
- Place pan on the low rack in the oven and bake for 5 minutes at 205ºC.
- In a food processor, add the cream cheese, cheese, salt, 8 oz. sour cream,
16
Page 17

eggs, salsa, and chilies and blend well, stopping to scrape sides and blend
again. Pour into cornflake crust.
- In oven, pour two cups of hot water into the bottom, and place the
cheesecake on the low rack; return for 30 minutes at 175ºF.
- Remove from oven and let cool. Cover and refrigerate. When ready to serve,
run knife around cheesecake and release from sides. Spread a layer of sour
cream over top, followed by a layer of guacamole and then, chopped
tomatoes. Place on nice serving dish and garnish with corn chips at the
base.
STUFFED PIZZA ROLLS
These will become a favorite with kids and adults alike! Yummy pastry
covering seasoned cheese and pepperoni!
Ingredients (Serves: 8)
1 8-oz. crescent rolls, refrigerated
1 6-oz. pepperoni pizza slices
4 1-oz. Mozzarella cheese sticks, cut in half
1 teaspoon Italian seasoning
½ teaspoon garlic salt
- Separate each can of rolls into 8 triangles. Put 2 pepperoni slices and one
piece of cheese on each triangle. Sprinkle with Italian seasoning.
- Roll up, starting with wide end, folding over ends to seal in cheese. Place
pizza rolls on frying pan.
- Place frying pan on low rack and bake at 190ºC for 10 minutes, turning over
rolls halfway through. Serve with marinara sauce.
WHITE BUFFALO WINGS
No one will believe you made these, but they are so easy and really delicious!
Ingredients (Serves: 8)
500g chicken tenders
250g pound bacon
250g pound pepperjack cheese, cubed
- Roll up a chunk of Jack cheese.
- Wrap with bacon; secure with toothpick.
- Place chicken on frying pan and bake for 20 minutes at 190ºC, on low rack,
turning the last five minutes.
17
Page 18

BARBEQUE ROAST BEEF
Tender strips of beef, with a spicy seasoning and your favorite barbecue
sauce.
Ingredients (Serves: 4-6)
500g – 1kg flat-iron, flank, or sirloin steak
2 tablespoons Worcestershire sauce
1 tablespoon liquid smoke
1 teaspoon celery salt
1 teaspoon garlic salt
1 teaspoon onion powder
1 16-oz. barbecue sauce
- Sprinkle meat with seasonings.
- On high rack of oven, place steak on frying pan and roast at 230ºC for 10
minutes; turn over for another 2 minutes. This will be medium rare, so if a
rarer result is desired, cut this time.
- Let rest for 10 minutes. Slice across the grain at a diagonal in thin slices.
Cover with barbecue sauce and place back in oven for another 5 minutes or
until thoroughly heated.
BARBEQUED ROASTED SALMON
Marinated in a sweet and spicy marinade and roasted to perfection, you won’t
believe how easy this is!
Ingredients (Serves: 4)
¼ cup pineapple juice
2 tablespoons lemon juice, fresh
4 6-oz. Salmon fillet
2 tablespoons brown sugar
4 teaspoons chili powder
2 teaspoons lemon zest
¾ teaspoons cumin, ground
½ teaspoon salt
¼ teaspoon cinnamon
4 – 8 slices pineapple rings
- Combine first three ingredients in a zip-lock bag; seal and marinate in
refrigerator 1 hour, turning occasionally.
- Remove fish from bag; discard marinade. Combine sugar, chili powder,
lemon zest, cumin, salt and cinnamon in a bowl. Rub over fish on both sides
and both sides of pineapple.
- Lay a sheet of aluminum foil in bottom of oven. Spray low rack with cooking
spray.
- Place salmon and pineapple directly on low rack and turn on oven to 230ºC
and grill for 5 minutes. Turn over for another 3 minutes.
18
Page 19

BREAKFAST PIZZA
This pizza will become a favorite for breakfast, snack or dinner and you can
feel good about its nutritious ingredients.
Ingredients (Serves: 8)
1 8-oz. crescent roll, reduced fat, refrigerated
1 12-oz. turkey sausage, breakfast type
1 cup hash brown potatoes, shredded, refrigerated
1 cup cheddar cheese, low fat, shredded
¼ cup skim milk
½ teaspoon salt
¼ teaspoon black pepper
1 8-oz. egg substitute, liquid
2 tablespoon Parmesan cheese, grated fresh
- In a 9” cake pan, sprayed with cooking spray, crumble turkey sausage. Place
on high rack of oven and cook at 230ºC for 5 minutes, stirring occasionally.
When done, remove and drain.
- Unroll crescent rolls and press together, bringing up on sides. Bake on low
rack at 205ºC for 5 minutes. Cover pastry with sausage, potatoes, cheese.
Combine milk, salt, pepper and egg substitute, whisking till blended.
- Carefully pour mixture over pizza. Sprinkle with Parmesan.
- Bake on low rack at 190ºC for 30 minutes, cover with foil after 15 minutes
to prevent an excess of top browning.
CLASSIC BEEF FAJITAS
Delicious strips of tender beef, seasoned perfectly, together with roasted and
seasoned peppers and onions will have your family requesting this over and
over!
Ingredients (Serves: 8)
¼ cup fajita seasoning, divided
½ teaspoon oregano, divided
¼ cup vegetable oil, divided
¼ cup red wine vinegar, divided
700g pound sirloin, flat-iron or flank steak
1 medium onion, or more, cut into thin strips
1 medium green capsicum, or more, cut into thin strips
8 flour tortillas, large
Optional toppings: guacamole, salsa, cheese, sour cream
- Sprinkle meat with oil, vinegar and seasonings on both sides.
- Place steak on frying pan and put on high rack in oven. Roast at 230ºC for 5
minutes on each side, or until desired results. Remove steak and let rest.
- Add onions and capsicums, oil, vinegar and seasoning. On high rack, at
230ºC, roast for 5 minutes; toss, turn, and roast 5 more minutes.
19
Page 20

HONEY BOURBON PORK TENDERLOIN
So simple, yet delicious enough for a dinner party!
Ingredients (Serves: 4)
900g pounds pork tenderloin, trimmed
¼ cup honey
¼ cup soy sauce
2 tablespoons bourbon whiskey
- Blend honey, soy sauce and whiskey in small saucepan.
- Heat over medium heat to blend flavors.
- Trim pork and sprinkle with olive oil, salt and pepper. Place pork on frying
pan and place on high rack in oven.
- Roast at 230ºC for 10 minutes on each side. Let rest 10 minutes and slice
into ½ inch slices. Spoon sauce over pork.
HONEY-PECAN CRUSTED CHICKEN
Better than fried and so much better for you!
Ingredients
½ teaspoon salt
¼ teaspoon black pepper
500g chicken tenderloins
¼ cup honey
2 tablespoons Dijon mustard
¾ teaspoon paprika
¼ teaspoon garlic powder
1 ¼ cup cornflake crumbs
½ cup pecan pieces, finely chopped
Cooking spray
- Sprinkle salt and pepper evenly over chicken. Combine honey, mustard,
paprika, and garlic powder in a zip-lock bag and add chicken tenders,
making
sure all are covered in sauce.
- Combine cornflakes and pecans in a shallow dish. Coat each tender in crumb
mixture and put on frying pan (8 to a frying pan).
- On low rack, at 205ºC, bake chicken 7 minutes, turn and bake 5 minutes
more.
20
Page 21

GRILLED MAHI MAHI WITH BLACK BEAN SALSA
Mahi Mahi fillets marinated in a spicy citrus sauce, grilled to perfection and
topped with a colorful, delicious black bean salsa!
Ingredients (Serves: 4)
½ cup soy sauce
½ cup orange juice
¼ cup ketchup
1 tablespoon honey
Juice and zest of one lime
1 large garlic clove, finely minced
1 teaspoon basil, dried
1 teaspoon oregano, dried
Black pepper, fresh ground
4 8-oz. Mahi Mahi steaks or fillets, about 1 inch
1 tablespoon canola oil, for greasing the grill grates
Salsa:
2 cups cherry tomatoes, halved
2 large scallions, white and light green parts, thinly sliced
1 14-oz. can black beans, drained and rinsed
¼ cup cilantro, fresh chopped
1 large jalapeño, finely chopped
2 tablespoons lime juice, about 1 lime
Salt and pepper to taste
- Place the soy sauce, orange juice, ketchup, honey, lime juice and zest, basil,
oregano, and pepper in a Ziploc bag and mix well. Add the fish fillets and
marinate in the refrigerator for 30 – 45 minutes.
- Toss the tomatoes, scallions, black beans, cilantro, jalapeño, and lime juice
in a medium bowl. Add some salt to taste and set aside to let the flavors
develop.
- Oil or spray the grill grate. Lay a sheet of foil in the bottom of the oven and
place the low rack on top of the foil. Lay the fish directly on the rack and
grill at 230ºC for 3 minutes. Turn over and grill for 1 – 2 more minutes or
until desired results are achieved.
- Serve with the black bean salsa and lime wedges.
21
Page 22

ITALIAN MEATLOAF W/FRESH BASIL AND SUN-DRIED TOMATOES
This is such a favorite meatloaf, tender, juicy, filled with fresh ingredients and
topped with marinara and cheese.
Ingredients (Serves: 6)
1 cup water, boiling
½ cup sun-dried tomatoes, pack without oil
½ cup ketchup
1 cup bread crumbs, seasoned
¾ cup onion, finely chopped
¾ cup basil, fresh, chopped
½ cup provolone cheese, diced or shredded
2 large egg whites
2 garlic cloves, minced
400g - 700g ground turkey
1 cup marinara sauce
4 slices provolone cheese, cut into strips
- Combine boiling water and tomatoes in a bowl. Let stand 30 minutes or until
soft. Drain and finely chop.
- Combine ketchup, breadcrumbs, and the next 6 ingredients (breadcrumbs
through turkey) in a large bowl. Add tomatoes to meat mixture and shape
into two oval loaves.
- Place on frying pan. Bake on low rack at 190ºC for 35 minutes. You may
need to cover with foil toward the end of baking to prevent tops from
browning too much. Remove to serving dish.
- Top with marinara and strips of provolone.
HERBED TURKEY BREAST WITH VEGETABLES
Ingredients (Serves 6-8)
1 turkey breast (3kg), bone in, skin on, excess fat trimmed
3 garlic cloves, minced
4 tablespoons butter, softened
3 tablespoons chopped fresh flat-leaf parsley
1 tablespoon minced fresh sage
1 tablespoon minced fresh oregano
1 tablespoon minced fresh rosemary
1 tablespoon olive oil
1 large onion, cut into eighths
4 medium carrots, halved lengthwise and cut into 1 inch pieces
700g assorted small potatoes, scrubbed, halved or quartered
2 tablespoons extra-virgin olive oil
Coarse salt and freshly ground pepper
- Rinse turkey and pat dry with paper towels.
- Mash garlic and ½ teaspoon salt with the side of a large knife until a paste
22
Page 23

forms.
- Transfer to a small bowl, and add softened butter and herbs. Season with
salt and pepper.
- Gently separate turkey skin from breast meat, being careful not to tear the
skin.
- Spread herb butter mixture evenly under skin, then smooth down to remove
trapped air. Brush turkey with olive oil, and season with salt and pepper.
- Place all of the vegetables in the bottom of the oven. Drizzle with extra
virgin olive oil, season with salt and pepper, and toss to combine.
- Place low rack on top of vegetables. Place breast on rack and add extension
ring to top of oven. Bake for 11 minutes per pound at 205°C.
- Halfway through cooking time, use the tongs to turn the bird so that the
other end of the breast is uppermost. Continue to bake until the juices run
clear when you insert a skewer into the base of the breast or the
temperature of an instant read thermometer registers 75°C when inserted
into the thickest part of the breast.
- Cover the turkey with foil and allow to rest for 10 to 15 minutes.
- Remove vegetables and cover with foil to keep warm. If desired, place
cooking juices in a saucepan and bring to a boil. Add 2 teaspoons of
cornstarch that have been mixed with 1 tablespoon of water. Stir until
thickened. Season with salt and pepper if desired and serve with turkey.
SAVORY ROASTED CHICKEN
Ingredients (serves 4)
1 whole chicken (about 1.8kg)
2 tablespoons oil
2 tablespoons melted butter
1 ½ tablespoons lemon juice
2 teaspoons seasoned salt
1 teaspoon garlic powder
1 teaspoon onion powder
½ teaspoon fresh ground black pepper
¼ teaspoon cayenne pepper (optional)
2 whole lemons that have been poked all over with a fork
- Rinse the chicken inside and out well under cold water, then pat dry using a
paper towel.
- In a small bowl, mix the lemon juice with oil and melted butter until
blended, then rub all over the chicken and under the skin of the chicken
breast.
- Rub the inside and outside of the chicken with seasoned salt, garlic powder,
onion powder, black pepper and cayenne (you can season the chicken under
the skin also if desired). Place the lemons inside the cavity. Using cotton
string, tie the legs together tightly.
- Place chicken on low rack in oven, breast side down. Bake for 35 minutes at
205°C. Turn chicken over so breast side is up. Top oven with extender ring
and bake an additional 30 minutes or until the temperature of an instant
read thermometer registers 75°C when inserted into the thickest part of a
thigh.
- Cover with foil and let sit for 15 minutes before slicing.
23
Page 24

FROZEN FOODS
Frozen Drumsticks
- Approximately 700g package (4-5 drumsticks).
- Bake at 180°C on the low rack for 15 minutes.
- Separate and turn over the drumsticks, bake for an additional 15 minutes.
- Cooking results should be juicy, crispy and lightly browned.
Frozen Chicken Thighs
- Approximately 1.2kg package (4-5 thighs).
- Bake at 180°C on the low rack for 25 minutes.
- Separate and turn over the drumsticks, bake for an additional 25 minutes.
- Cooking results should be juicy, crispy and lightly browned.
French Fries
- Cook on low rack in frying pan accessory for 16 minutes at 230°C.
- Cooking results should be perfectly crisp and delicious.
Frozen Hamburgers
- Use 230g frozen 85% lean hamburgers.
- Bake at 205°C on the low rack for 14 minutes. Turn the burgers over and
cooked an additional 14 minutes. For moist burgers, spray before cooking
lightly with oil.
Frozen Pork Chops
- Use frozen 230g bone-in pork chops. Spray the chops with spray oil,
seasoned with salt, pepper, onion and garlic powder and baked at 180°C on
the low rack for 15 minutes.
- Turned the chops over, sprayed with spray oil and cooked an additional 15
minutes.
Frozen Sirloin Steak
- Use a frozen 1 inch thick boneless sirloin steak.
- Spray the steak with spray oil, seasoned with steak seasoning and baked at
180°C on the low rack for 14 minutes per side for rare and 16 minutes per
side for medium.
24
Page 25

ROASTED VEGETABLES
A delicious and slightly sweet vegetable medley that goes well with white
meat or can be even served on it’s own as a light dinner
Ingredients (Serves: 4)
½ small butternut squash
1 red capsicum
1 sweet potato, peeled
1-2 Yukon Gold potatoes, peeled
½ red onion
1 tablespoon fresh thyme
2 tablespoons fresh rosemary
4 tablespoons olive oil
2 tablespoons balsamic vinegar
Salt and freshly ground black pepper to taste
- Cube the squash, sweet potato and Yukon Gold potatoes into 1 inch cubes.
- Coarsely chop the capsicum (seeded) and the onion. Chop the thyme and
the rosemary.
- Use a large bowl to combine oil, vinegar, thyme, rosemary, salt and pepper.
Add vegetables to the bowl and toss gently.
- Place the vegetables in a shallow baking dish, or directly on the frying pan
and place on the low rack. Roast for 25 minutes at 205ºC, stirring the
vegetables gently every 8-10 minutes.
BAKED PINEAPPLE
This deliciously sweet dish can be a side to meats, the breakfast pizza or even
a dessert. The sugar can also be replaced by Splenda® (i.e. sweeteners) if
desired.
Ingredients (Serves: 6)
2 20-oz. pineapple, canned, crushed, in juice, drained
1 cup sugar or Splenda®
2 tablespoons cornstarch
¼ cup water
2 eggs
1 tablespoon vanilla
1 tablespoon butter
1 teaspoon cinnamon, ground
- Spray a 1 ½ qt. casserole dish with cooking spray.
- In bowl, whisk together the sugar, cornstarch, water, eggs, and vanilla till
blended. Add pineapple.
- Pour into dish. Top with divided butter and sprinkle top with cinnamon.
- Bake on low rack at 190ºC for 38 minutes.
25
Page 26

CORN FRITTER CASSEROLE
Creamy cheesy corn dish.
Ingredients (Serves: 8)
2 tablespoons butter, softened
4 Eggbeaters
1 8-oz. cream cheese, fat free, softened
½ cup onion, finely chopped
½ cup red capsicum, finely chopped
1 16-oz. whole kernel corn, drained
1 14-oz. can corn, cream-style
1 8-oz. cornbread mix, Jiffy
¼ teaspoon black pepper
Cooking spray
- Combine the first 3 ingredients in a large bowl, stirring with a whisk until
smooth. Stir in onion, capsicum, whole-kernel corn, and cream-style corn;
mix well.
- Add muffin mix and black pepper, stirring until well combined. Pour into
casserole dish sprayed with cooking spray.
- On low rack, bake at 190ºC for 40 minutes, covering with foil during the last
minutes to prevent excessive browning.
ROASTED BRUSSEL SPROUTS
Even people that don’t think they like brussel sprouts will love these
caramelized juicy treats!
Ingredients (Serves: 4)
1 14-oz. bag frozen baby brussel sprouts
3 tablespoons olive oil
¾ teaspoons kosher salt
½ teaspoon black pepper
½ teaspoon garlic powder
- Put sprouts on frying pan and toss with remaining ingredients.
- Roast on high rack at 230ºC for 15 – 20 minutes, or until done,
turning occasionally.
26
Page 27

ROASTED GREEN BEANS
These green beans take on a completely different taste and texture when
roasted!
Ingredients (Serves: 4)
1 16-oz. baby green beans, frozen
1 large onion, sliced into thin rings
3 tablespoons olive oil
1 teaspoon kosher salt
½ teaspoon black pepper
½ teaspoon garlic powder
2 tablespoons balsamic vinegar
- Add package of frozen green beans to the frying pan and toss with all
remaining ingredients, except balsamic vinegar.
- Roast on high rack at 230ºC for 15 minutes or until tender, stirring
occasionally.
- Sprinkle vinegar over beans.
TWICE-BAKED POTATOES
These are the perfect side dish and can be made up ahead of time and baked
at the last minute.
Ingredients (Serves: 6)
3 large baking potatoes
2 tablespoons butter
2 tablespoons cream cheese, fat-free
¼ cup light sour cream
1 cup cheddar cheese, low fat, shredded, divided
1 4-oz. pkg. real bacon bits
½ - 1 cup evaporated skim milk
- Prick potatoes with knife and place on frying pan on low rack. Set oven for 1
hour at 205ºC, stopping to turn after 30 minutes.
- Remove potatoes to kitchen towel and wrap to let cool enough to handle.
- Cut in half and scoop out potato into bowl. Add remaining ingredients
leaving some of the cheese and bacon for garnishing tops. With electric
mixer, beat potato mixture till smooth.
- Scoop into potato shells and garnish with cheese and bacon.
- When ready to heat again, place on frying pan and heat on low rack of oven
at 190ºC for 10 minutes or until heated through.
27
Page 28

ROASTED ONION SALAD
Ingredients (Serves: 4)
2 medium onions, peeled and cut into thin slices
2 tablespoons olive oil
4 cups salad greens
½ cup walnuts, chopped
2 ounces Feta, crumbled
Garlic Vinaigrette:
3 garlic cloves
2 shallots
¼ cup parsley, fresh, chopped
2 tablespoons white wine vinegar
½ teaspoon crushed red pepper
½ teaspoon salt
½ teaspoon black pepper
½ cup olive oil
- Arrange onion slices on a frying pan and sprinkle with olive oil, salt and
pepper. Place upon the high rack of oven and roasted at 230ºC for 15
minutes, stirring occasionally.
- Toast walnuts in 205ºC oven for 3 minutes, being careful not to burn.
- Place all vinaigrette ingredients in small food processor and blend until
smooth.
- Combine salad greens, Feta, and walnuts. Top with roasted onions and
vinaigrette.
ROASTED SWEET POTATOES WITH A KICK!
Sweet, caramelized cubes of roasted sweet potatoes with a spicy twist!
Ingredients (Serves: 2)
1 large or 2 small sweet potatoes
2 tablespoons olive oil
¼ cup brown sugar or brown sugar Splenda® (i.e. sweetener)
1 teaspoon cinnamon
½ teaspoon salt
½ teaspoon cayenne
1 pinch cloves, ground
- Peel and cube sweet potatoes into ½ inch cubes.
- Toss potatoes on frying pan with all the ingredients.
- Place on high rack in oven and set oven for 230ºC for 15 minutes, stirring
occasionally to avoid over-browning the tops. When tender, remove.
28
Page 29

MEXICAN CORNBREAD
This could easily be the entrée with a side of pinto beans and/or a nice salad.
Layers of cornbread, ground beef and cheese….delicious!
Ingredients (Serves: 16)
1 cup corn meal
2 large eggs
1 cup milk
1 teaspoon baking soda
¾ teaspoon salt
¼ cup butter, melted
1 16-oz. corn, cream-style
½ cup cooked and chopped bacon, or pkg. of real bacon bits
500g ground beef, lean
1 large onion, chopped
2 large jalapeños, or more, chopped
½ pound cheddar cheese, shredded
- Mix cornmeal and bacon together. Set aside.
- In 9-inch cake pan, crumble ground beef, chopped onions and peppers. On
high rack, 205ºC, cook beef for 5 minutes, stirring occasionally. Drain.
- In 2 8-inch cake pans, lined with foil and sprayed with cooking spray, divide
and layer cornmeal mixture, beef, cheese; repeat.
- On low rack, bake at 175ºC for 20 minutes, covering with foil the last five
minutes to prevent browning.
ROASTED ASPARAGUS
A classic and easy side dish. Use thicker asparagus stems for this recipe, they
are juicier and better for roasting.
Ingredients
500g fresh green asparagus
2 tablespoons olive oil
1 tablespoon balsamic vinegar or lemon juice
Parmesan cheese for topping
- Break the tough ends off the asparagus spears and peel the bottom third if
necessary.
- Pour olive oil and asparagus in a zip lock bag and shake until spears are
covered in a thin layer of oil.
- Place spears side by side on the low rack.
- Roast for 10 minutes at 205ºC.
- If your asparagus is very thick, you might need an additional 2-4 minutes.
- Remove from oven onto a serving tray, and sprinkle with balsamic vinegar
or lemon juice. Top with some parmesan cheese.
29
Page 30

BASIL PESTO ROLLS
These are the perfect accompaniment to any Italian food!
Ingredients (Serves: 10)
2 cups biscuit mix, dry
2 tablespoons basil pesto, from jar
¼ cup Parmesan cheese, grated
²⁄3cup milk, nonfat
¼ cup butter, softened or melted
1 teaspoon garlic powder
1 teaspoon parsley, dried
- Mix all ingredients, except for butter, garlic powder and parsley, together
and scoop out with ice cream scoop onto frying pan.
- Place on low rack of oven and bake at 205ºC for 10 minutes.
- Mix together remaining ingredients and brush onto tops of rolls.
- Return to oven and bake a few more minutes. If you want the bottoms to
brown more, you may want to turn them over the last five minutes of
baking.
CHEESY GARLIC BISCUITS
These biscuits are so wonderful, easy and addictive!
Ingredients (Serves: 10)
2 cups biscuit mix
½ cup, or more, cheddar cheese, shredded
²⁄3cup skim milk
¼ cup butter, softened or melted
1 teaspoon garlic salt
1 teaspoon parsley, dried
- Mix baking mix, cheese, milk together.
- Drop by small scoops onto frying pan.
- Place on low rack of oven and bake at 190ºC for 10 minutes.
- In the last 3 minutes, brush butter mixture over tops and continue to bake.
30
Page 31

CHERRY BERRY PIE
Delicious served warm with ice cream or frozen yogurt!
Ingredients (Serves: 8)
1 frozen or refrigerated pie crust
1 12-oz blueberries, unsweetened, frozen, thawed
1 12-oz dark sweet cherries, frozen, thawed
½ cup sugar
²⁄3cup flour, divided
3 tablespoons butter
¹⁄3cup brown sugar, or Splenda® brown sugar
¹⁄8teaspoon salt
1 teaspoon vanilla
- Bake pie crust in 205ºC oven on low rack for 5 minutes.
- In a large bowl, combine the berries, sugar, ¹⁄3cup flour and 1 tsp. Vanilla.
- Mix well, then spoon berry mixture into the pie crust. Mix together the
remaining flour, brown sugar, salt and butter. Top with berry mixture.
- Bake on low rack at 190ºC for 28 minutes. May need to cover edges with
strip of foil if crust is browning too much.
PIÑA COLADA CHEESECAKE BARS
These luscious bars are delicious but also a nice, light and healthy dessert
that you will make over and over.
Ingredients (Serves: 16)
Crust:
1 cup graham cracker crumbs
2 tablespoons flour
2 tablespoons brown sugar, or Splenda® brown sugar
½ teaspoon ground ginger
2 tablespoons butter, melted
1 tablespoon canola oil
1 tablespoon water
Cooking spray
Filling:
1 cup cottage cheese, low fat
½ cup sugar
¼ cup fat-free cream cheese
1 ½ tablespoons lemon zest
1 tablespoon lemon juice
1 tablespoon pineapple juice
1 dash salt
¾ cup egg substitute, liquid
1 cup pineapple tidbits, canned, in juice drained, for topping
¼ cup flaked coconut
31
Page 32

- To prepare crust, process every ingredient in food processor. Pour crust into
an 8-inch square baking pan (not included with oven), foil-lined and sprayed
with cooking spray. Bake crust for 5 minutes on low rack at 205ºC. Remove.
- In food processor, add remaining filling ingredients, except for pineapple
and coconut, and blend well, scraping sides. Pour filling into pie crust and
bake bars at 175ºC for 25 minutes. Let cool and top with drained pineapple
and coconut.
- When cool, lift foil out of pan and cut into 16 squares. Refrigerate.
LEMON CHEESECAKE
A light cheesecake, the perfect ending to a big meal.
Ingredients (Serves: 6)
1 teaspoon butter
½ cup graham cracker crumbs
16 ounces low fat cream cheese, room temperature
½ cup sugar
2 large eggs
1 tablespoon lemon juice, fresh
2 teaspoons lemon zest
½ teaspoon vanilla
½ cup lemon curd, for garnish
- Process crumbs and butter till blended.
- Pour into 7-inch springform pan (not included with oven) that has been
sprayed with cooking spray and foil-wrapped on the outside.
- Pour two cups hot water into the bottom of the oven.
- Place springform pan on low rack and bake for 5 minutes at 205ºC. Remove.
- In food processor, place remaining ingredients, except for lemon curd. Bake
at 160°C for 35 minutes.
- Heat jar of lemon curd in microwave for maybe a minute, or until softened.
Spoon out onto cheesecake and smooth. Refrigerate and when cooled, it can
be removed from the pan.
32
Page 33

CARAMEL TURTLE CHEESECAKE
You are absolutely going to love this dessert and your friends and family are
going to think you are a culinary genius!
Ingredients (Serves: 8)
1 low-fat graham cracker crust
¼ cup butter
1 cup coconut
½ cup chopped pecans
2 low fat cream cheese, 8 oz. each, room temperature
2 eggs, room temperature
½ cup Splenda® brown sugar (or similar sweetener)
1 teaspoon vanilla
Caramel ice cream topping, sugar-free
- In an 8 inch cake pan (not included with oven) combine butter, coconut and
pecans and add to high rack in oven.
- Bake for 4 minutes on 205ºC, stirring often and watching closely not to burn
coconut. Remove and cool.
- In food processor, add cream cheese, eggs, brown sugar, vanilla and process
till smooth, scraping sides.
- Pour half of mixture into graham cracker shell and top with half coconut-
pecan mixture and drizzle with caramel topping; top with remaining cream
cheese mixture.
- Bake on low rack at 160ºC for 20 minutes. Take out and top with remaining
coconut-pecan mixture and drizzle with caramel topping.
- You may add halved chocolate covered caramel confections for garnish.
Refrigerate.
33
 Loading...