

Page 1
24" FULL HD 165HZ
FREESYNC MONITOR
(1920 X 1080)
KAMN24FG6QA
Page 2

Safety & warnings
3
Components
4
Overview
5
Assembly
7
VESA mount
9
Connectivity
10
Operation
12
Specifications
20
2
Page 3
The terms HDMI, HDMI High-Definition Multimedia
Interface, HDMI trade dress and HDMI Logo are trademarks
or registered trademarks of HDMI Licensing Administrator,
Inc.
• Read all instructions before using the appliance and retain for reference.
• Only use the power adapter provided with this product.
• Do not use the power adapter with any other products
• Unplug the monitor before cleaning it.
• Use a clean, slightly dampened cloth to wipe the monitor casing.
• To clean the screen, turn the monitor off, unplug it and wait for it to cool
completely. Then, wipe it with a dry micro-fibre cloth.
• Do not use cleaning alcohol, ammonia-based liquids or other harsh cleaners.
• Do not cover or block the ventilation holes in the monitor casing.
• Do not insert any object or spray any liquid into the vents.
• Do not place the monitor near heaters, stoves, fireplaces or other sources of heat,
as well as in rooms lacking adequate ventilation.
• Do not position the monitor in unsafe locations. If the monitor falls, it may be
damaged and may injure nearby people.
• Unplug the monitor if it is not going to be used for an extended period.
• Do not place heavy objects on the monitor, its power cord or any connected cable.
• Do not open the back panel of the monitor, as it contains a high-voltage current
even when not plugged in.
• Only use the power adapter provided with this monitor. Do not use third-party
power adapters.
• Do not use the power adapter with other products.
3
Page 4
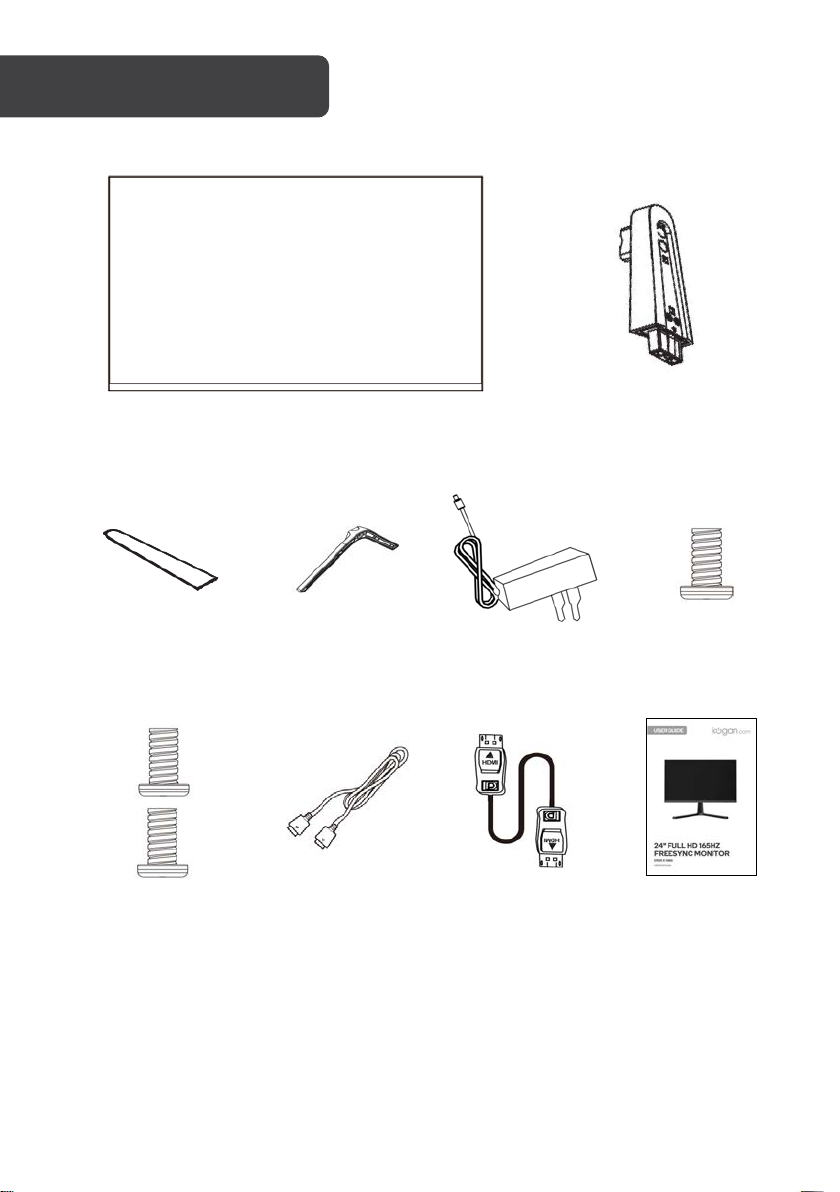
Monitor
Stand arm
Arm cover
Stand base
Power adapter
M6x14mm Screw
M4x14mm Screw (x2)
DP cable
HDMI cable
User guide
COMPONENTS
4
Page 5
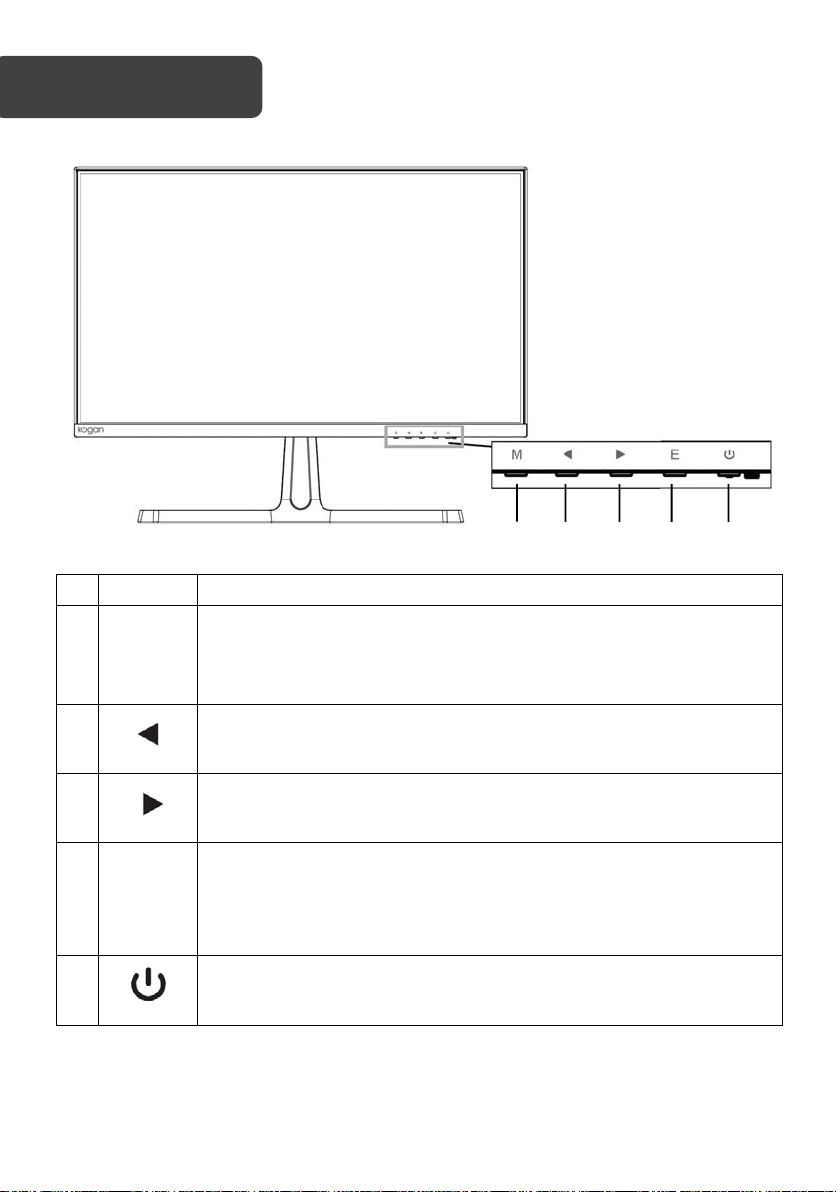
Button
Description
1
M
Menu
• Opens the menu.
• Returns to the previous menus.
• Exits main menu.
2
Left
• When the menu is open, decreases the value of the progress bar
• Used as the specified shortcut mode hot key.
3
Right
• When the menu is open, increases the value of the progress bar
• Used as the specified shortcut mode hot key.
4
E
Enter
• If the menu is opened, select the highlighted function.
• When the menu is inactive, press this button to enter the automatic
adjustment function. The automatically set the focus and the
horizontal and vertical positions (VGA signal only).
5
Power
Turns the monitor On/Off.
OVERVIEW
1 2 3
4
5
5
Page 6
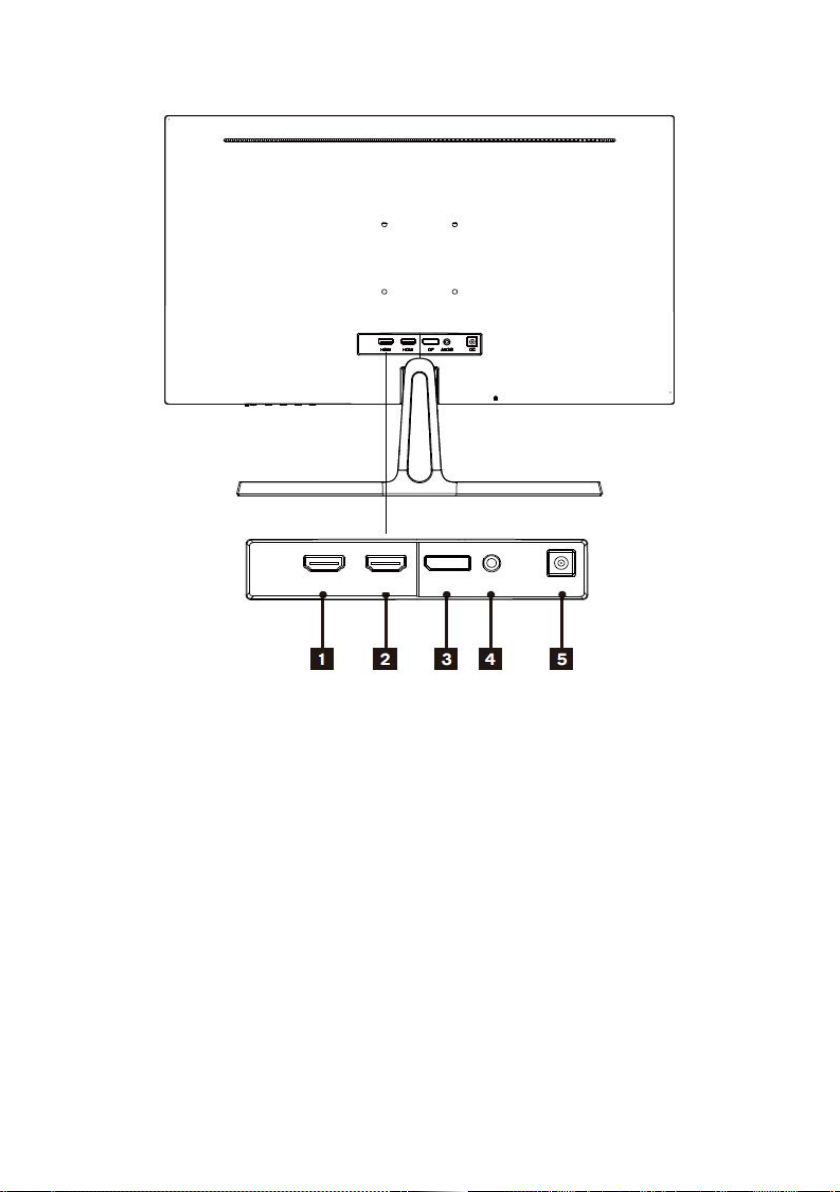
Monitor Ports
1
HDMI1 port
2
HDMI2 port
3
DisplayPort port
4
3.5mm headphone jack
5
Power input port
6
Page 7
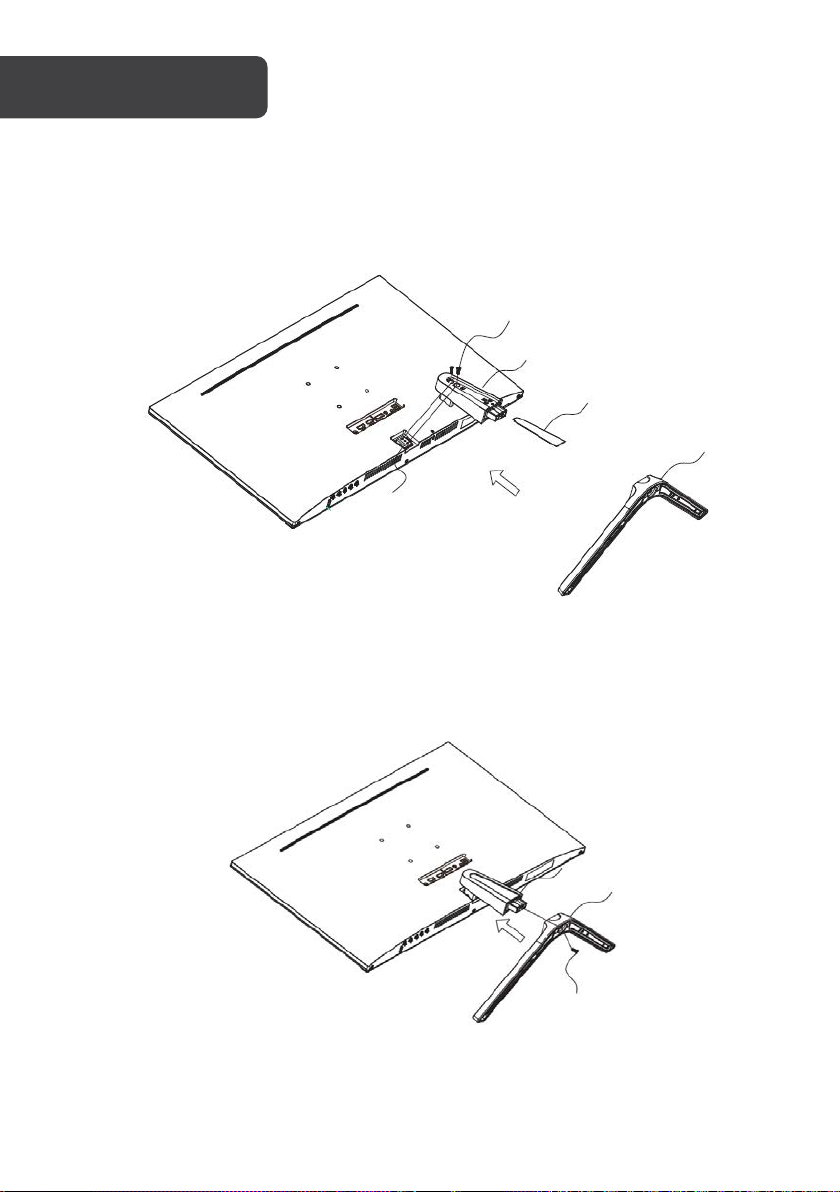
Neck cover
Neck
Base
Neck mount
Screws
Screw
Neck
Stand base
ASSEMBLY
Step 1:
• Attach the neck to the rear of the monitor using the 2 (M4x14mm) screws.
• Slide the neck cover into the groove on the neck.
Step 2:
Attach the stand base to the neck and secure it in place using the M6x14mm screw.
7
Page 8
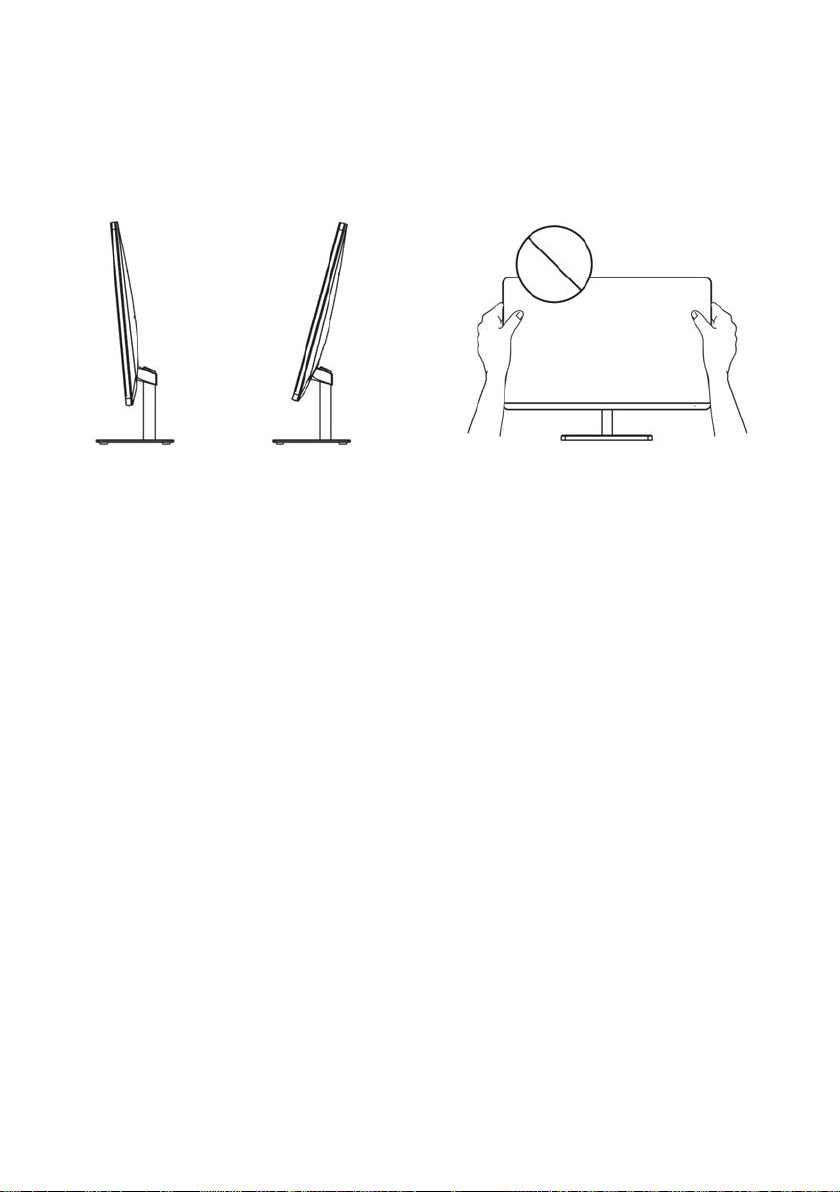
Adjusting the Monitor
The angle of the screen can be adjusted forward 5° or backward 15° for a comfortable
viewing experience.
Note: Be careful not to touch or press the screen when adjusting the angle of the monitor.
8
Page 9
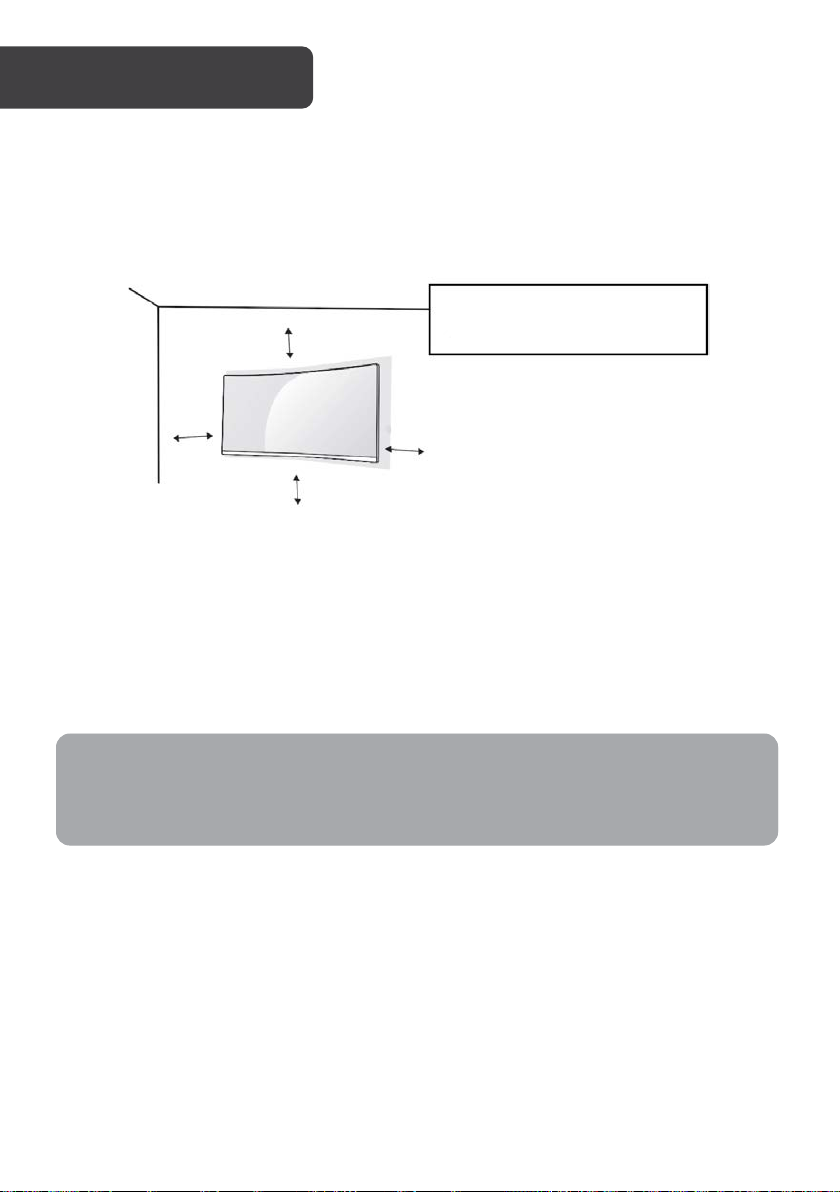
Note:
• The mounting hole distance for this monitor is 75 x 75mm.
• VESA mount and mounting accessories are not included.
10 cm
10 cm
Drawing is for illustrative
purpose only.
10 cm
10 cm
VESA MOUNT
Before installing the monitor on the wall, detach the stand from the monitor.
• To ensure sufficient ventilation, install the monitor at least 10 cm away from the wall
and leave about 10 cm of space at each side of the monitor.
1. Place a clean, dry and lint-free cloth on a flat, stable surface.
2. Gently lay the monitor on the cloth with the LCD screen facing down.
3. Identify the four wall mounting screw holes on the back of the monitor.
4. Install the wall mounting bracket (not supplied) on the back of the monitor
and attach the monitor to the wall according to the mounting bracket's
instructions.
5. Ensure that all screws (not supplied) are tightened and secured properly.
9
Page 10
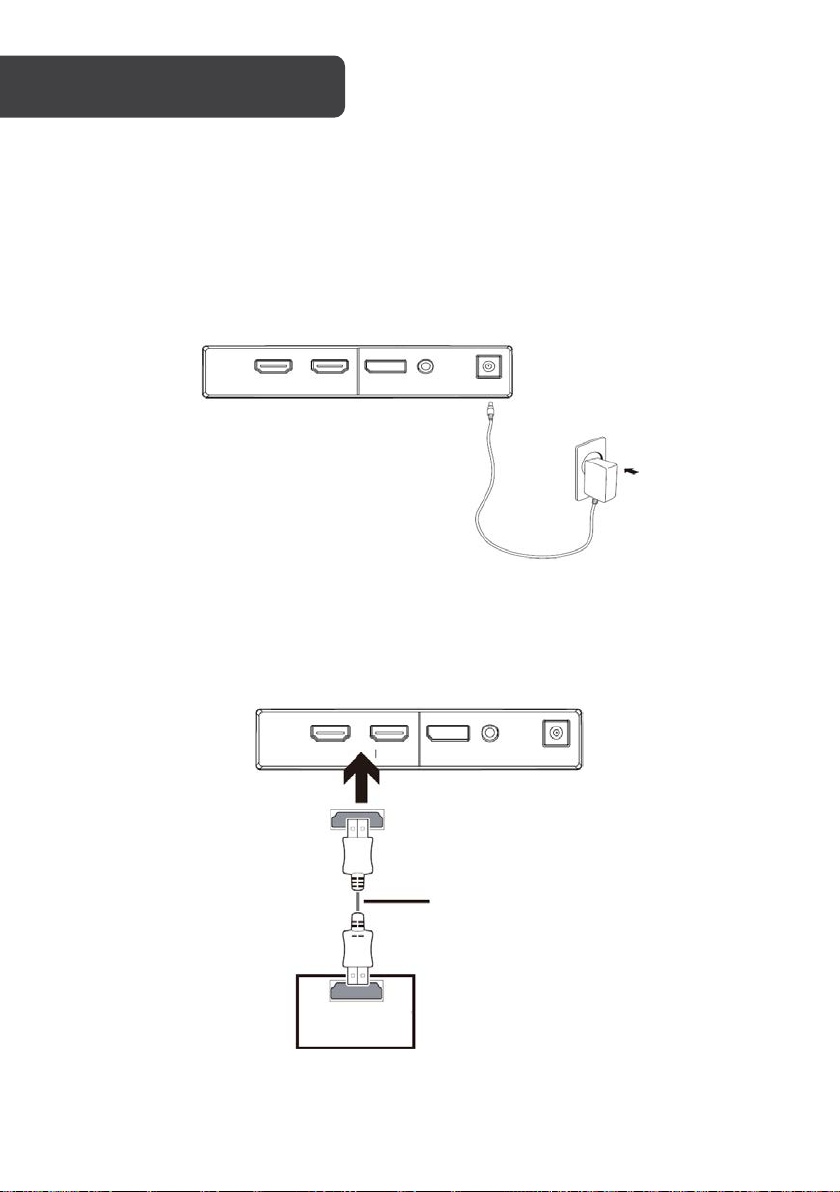
HDMI
DC
DP
AUDIO
HDMI Cable (included)
PC
HDMI
DC
AUDIO
DP
HDMI
CONNECTIVITY
HDMI
Before connecting the monitor to your PC, please shut down the PC and ensure the monitor
is switched off.
Power Cable
Connect the included power adapter to the monitor power port, then connect the other end
to a power outlet.
HDMI
Connect the supplied HDMI cable from the computer’s HDMI port to one of the monitor’s
HDMI ports.
10
Page 11
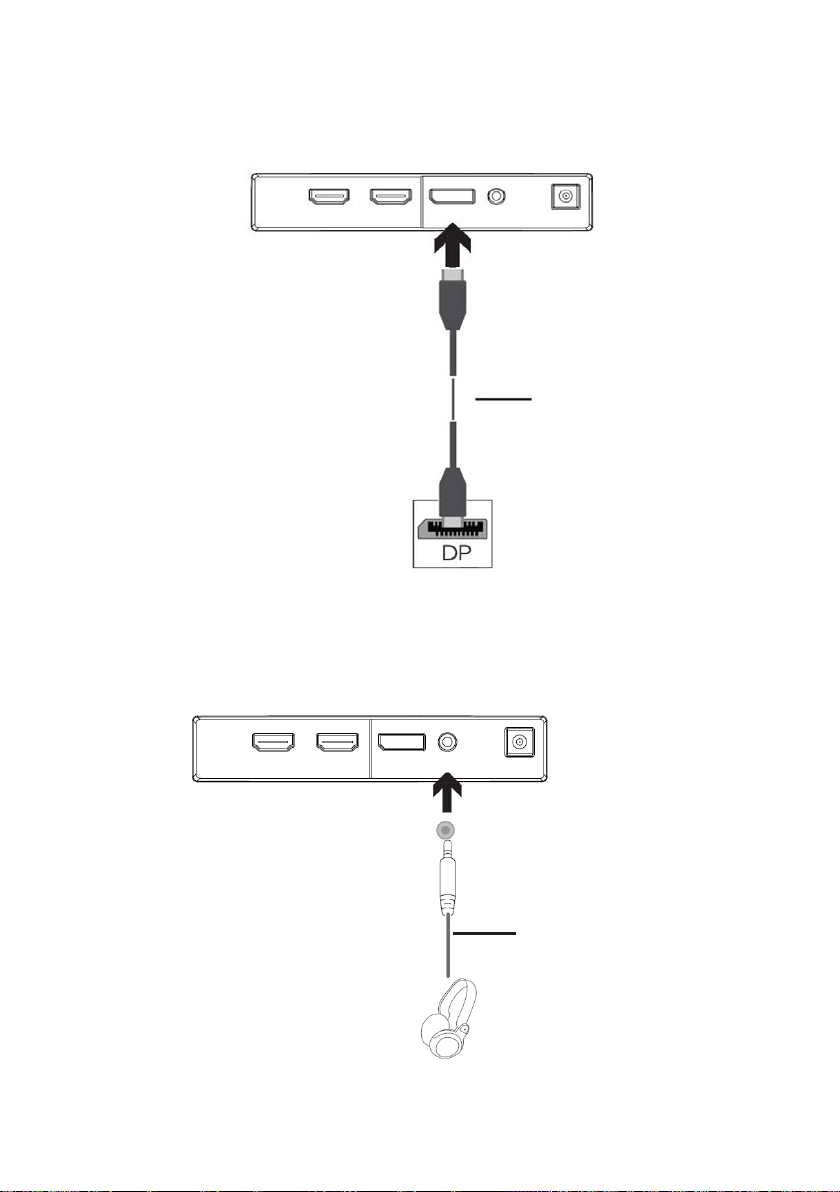
DisplayPort
HDMI
DP
HDMI
DC
AUDIO
DP Cable (included)
Earphones (not included)
HDMI
HDMI
AUDIO
DP
DC
PC
Connect a DisplayPort cable (included) from the computer’s DisplayPort to the monitor’s
DisplayPort.
Earphones
Plug in earphones (not supplied) into the 3.5mm headphone jack on the monitor.
Note: If audio devices are plugged into the monitor and computer, there will be no sound.
11
Page 12
OPERATION
1. Connect the monitor to the input device via HDMI/ DisplayPort.
2. Connect the power adapter to the monitor and then connect the other end directly
to a power socket.
3. Use the power button to turn the monitor on.
FreeSync
• Ensure your computer has FreeSync capability and the graphics drivers are fully up
to date.
• After connecting, you will receive a prompt to enable FreeSync on your computer.
If you do not receive the prompt, you may need to enable FreeSync in your
graphics card menu.
• See your graphics card manufacturer's documentation for instructions on how to
enable FreeSync.
12
Page 13
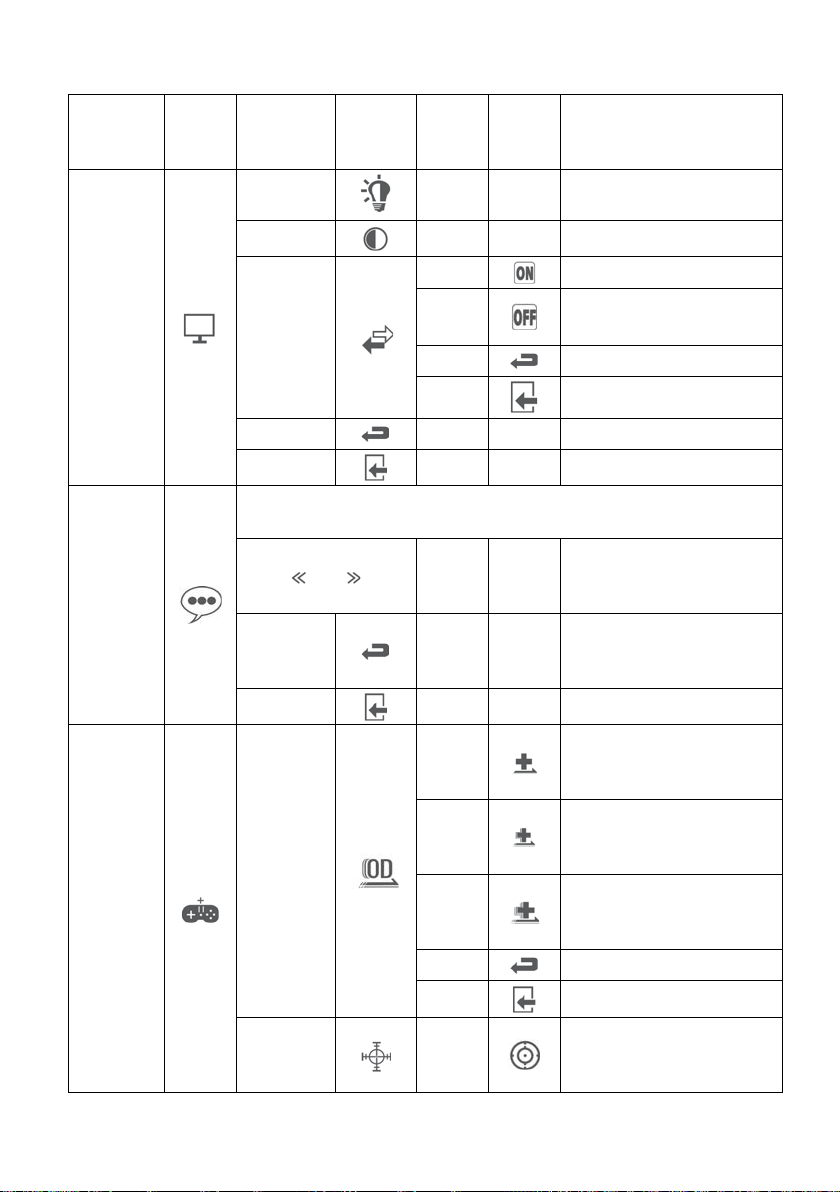
On Screen Menu( OSD)
1st level
menu
icon
2nd level
menu
icon
3rd
level
menu
icon
Description
Display
Brightness
NONE
NONE
Adjust display brightness
Contrast
NONE
NONE
Adjust display contrast
DCR
On Activate dynamic contrast
Off
Inactivate dynamic contrast
Return
Return to the previous menu
Exit
Exit from the whole menu
Return
NONE
NONE
Return to the previous menu
Exit
NONE
NONE
Exit from the whole menu
Language
中文, English, Française, Deutsch, Italiano, Español, 日本語, Русский, 繁,
Tiếng Việt, Português, Türkçe. (This needs the support of the monitor)
NONE
NONE
language selection (this
needs the support of the
monitor)
Return
NONE
NONE
Return to the previous menu
(this needs the support of
the monitor)
Exit
NONE
NONE
Exit from the whole menu
Game
OD
Off
Turn off the OD function
(this needs the support of
the monitor)
Norma
l
General OD functionality
(this needs the support of
the monitor)
Extre
me
Extreme OD functionality
(this needs the support of
the monitor)
Return
Return to the previous menu
Exit
Exit from the whole menu
Crosshair
Cross-
hair1
Switch the game front sight
(this needs the support of
the monitor)
13
Page 14
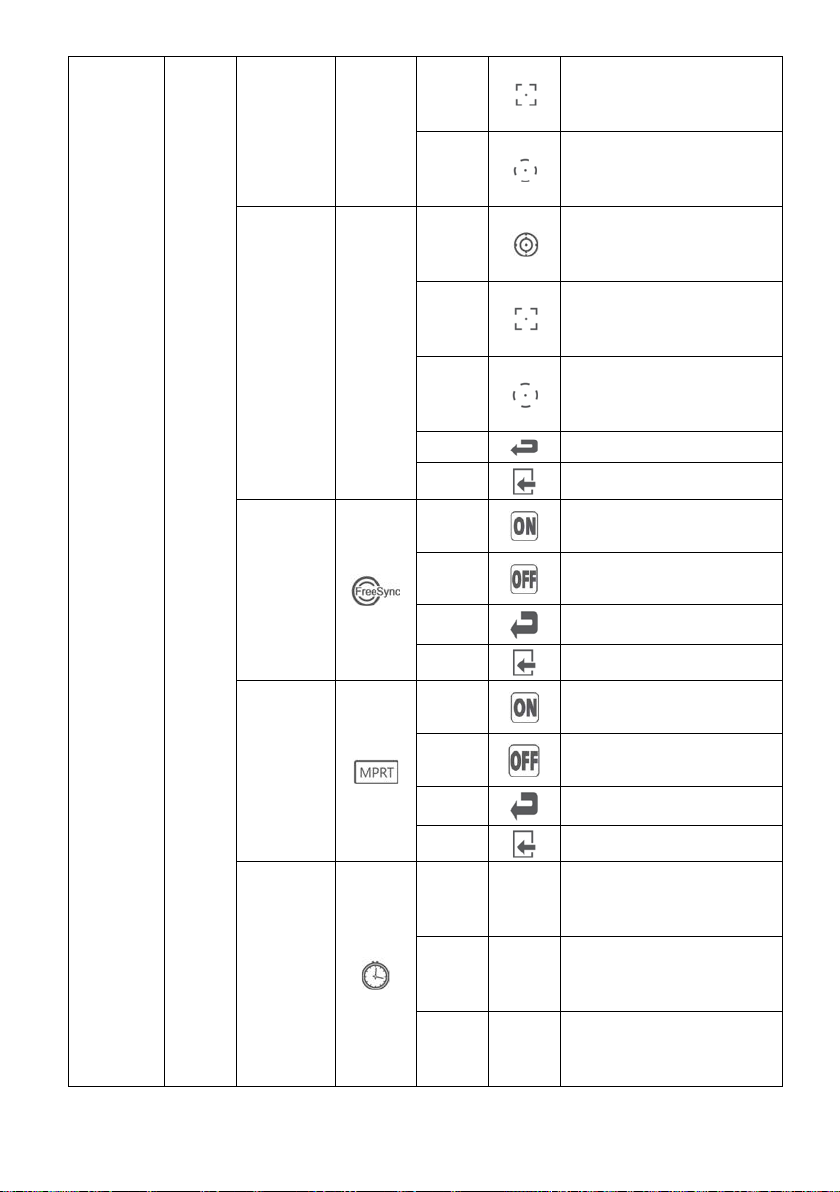
Cross-
hair2
Switch the game front sight
(this needs the support of
the monitor)
Cross-
hair3
Switch the game front sight
(this needs the support of
the monitor)
Cross-
hair4
Switch the game front sight
(this needs the support of
the monitor)
Cross-
hair5
Switch the game front sight
(this needs the support of
the monitor)
Cross-
hair6
Switch the game front sight
(this needs the support of
the monitor)
Return
Return to the previous menu
Exit
Exit from the whole menu
Adaptive
sync/
Free sync/
Free sync
Premium/
Free sync
Premium
Pro
On
Open Free Sync (this needs
the support of the monitor)
Off
Close Free Sync (this needs
the support of the monitor)
Return
Return to the previous menu
Exit
Exit from the whole menu
MPRT
On
Open MPRT (this needs the
support of the monitor)
Off
Close MPRT (this needs the
support of the monitor)
Return
Return to the previous menu
Exit
Exit from the whole menu
Timer
NONE
30
Open game timing (this
needs the support of the
monitor)
NONE
40
Open game timing (this
needs the support of the
monitor)
NONE
50
Open game timing (this
needs the support of the
monitor)
14
Page 15
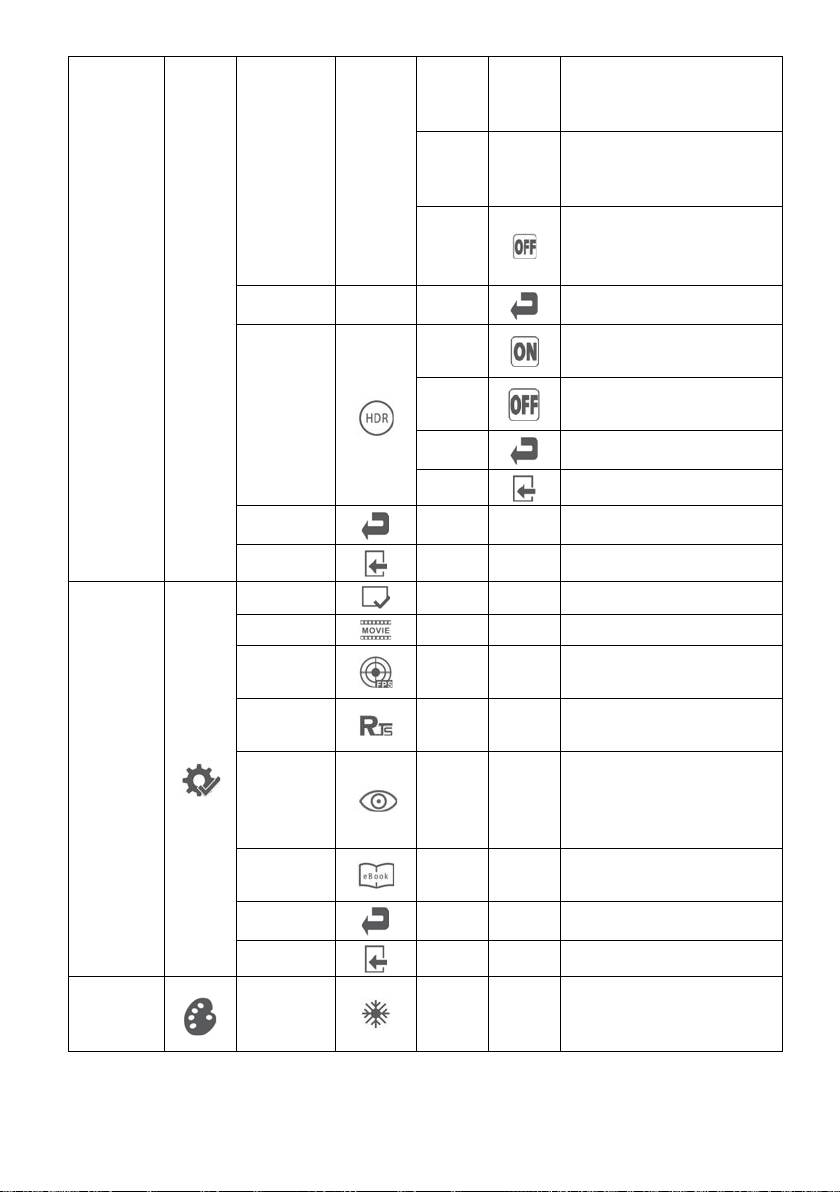
NONE
60
Open game timing (this
needs the support of the
monitor)
NONE
90
Open game timing (this
needs the support of the
monitor)
Close
Close game timing this
needs the
support of the monitor)
Return
Return to the previous menu
HDR
On
Open HDR (this needs the
support of the monitor)
Off
Close HDR (this needs the
support of the monitor)
Return
Return to the previous menu
Exit
Exit from the whole menu
Return
NONE
NONE
Return to the previous menu
Exit
NONE
NONE
Exit from the whole menu
Mode
Standard
NONE
NONE
Normal work mode
Cinema
NONE
NONE
Cinema mode
FPS
NONE
NONE
FPS game mode (this needs
the support of the monitor)
RTS
NONE
NONE
RTS game mode (this needs
the support of the monitor)
Eye Saver
NONE
NONE
Eye protection ray filter
application mode (this
needs the support of the
monitor)
eBook
NONE
NONE
eBook mode (this needs the
support of the monitor)
Return
NONE
NONE
Return to the previous menu
Exit
NONE
NONE
Exit from the whole menu
Colour
Cool
NONE
NONE
Set to standard colour
temperature (this needs the
support of the monitor)
15
Page 16
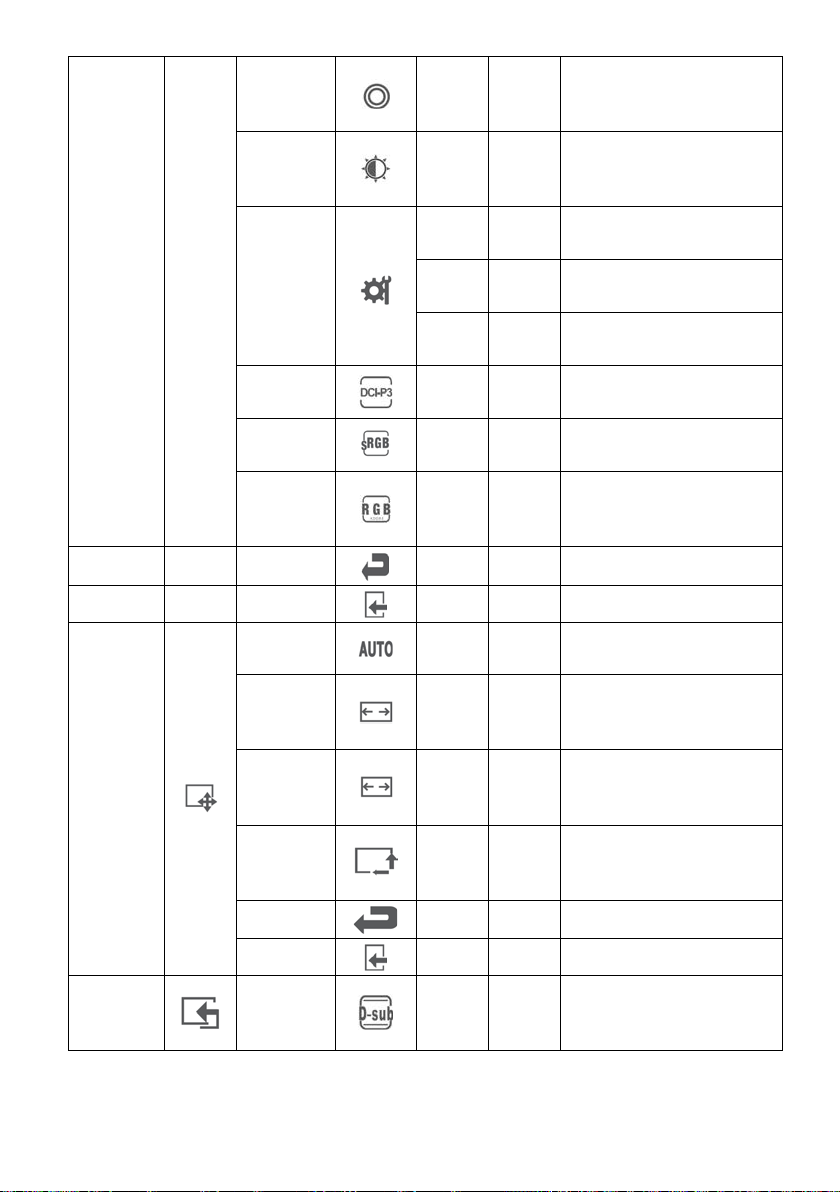
Standard
NONE
NONE
Set to standard colour
temperature (this needs the
support of the monitor)
Warm
NONE
NONE
Set to warm colour
temperature (this needs the
support of the monitor)
User
Red
R
Fine tuning of red colour
temperature
Green
G
Fine tuning of green colour
temperature
Blue
B
Fine tuning of blue colour
temperature
DCPI-P3
NONE
NONE
DCI-P3 mode (this needs
the support of the monitor)
sRGB
NONE
NONE
sRGB mode (this needs the
support of the monitor)
Adobe
RGB
NONE
NONE
Adobe RGB mode (this
needs the support of the
monitor)
Return
NONE
NONE
Return to the previous menu
Exit
NONE
NONE
Exit from the whole menu
Aspect
Auto
NONE
NONE
Automatically Adjust picture
aspect ratio
21:9
NONE
NONE
Picture in 21:9 mode (this
needs the support of the
monitor)
16:9
NONE
NONE
Picture in 16:9 mode (this
needs the support of the
monitor)
4:3
NONE
NONE
Picture in 4:3 mode (this
needs the support of the
monitor)
Return
NONE
NONE
Return to the previous menu
Exit
NONE
NONE
Exit from the whole menu
Input
VGA
NONE
NONE
VGA (Analog)Signal input
(this needs the support of
the monitor)
16
Page 17
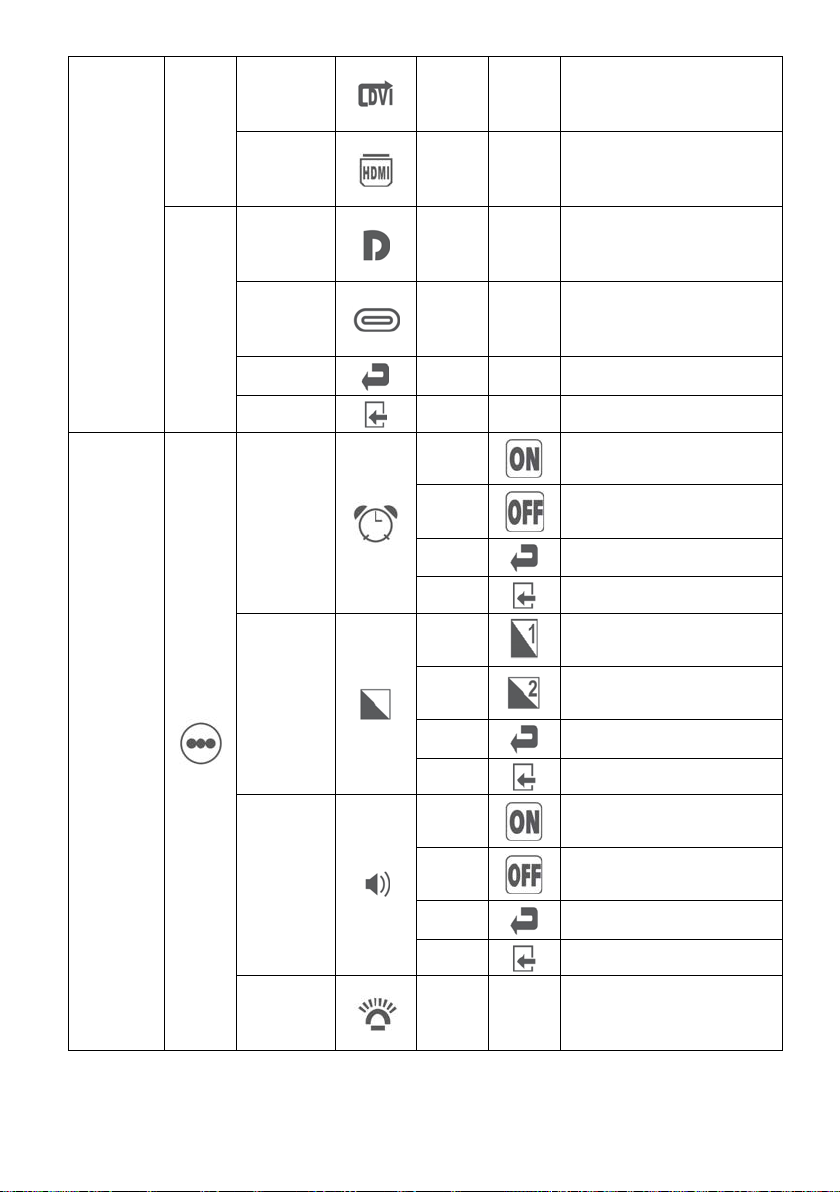
DVI
NONE
NONE
DVI (digital) Signal input
(this needs the support of
the monitor)
HDMI
NONE
NONE
HDMI (digital) Signal input
(this needs the support of
the monitor)
DP
NONE
NONE
Display port (digital) Signal
input (this needs the support
of the monitor)
TYPE-C
NONE
NONE
TYPE-C (digital) Signal
input (this needs the support
of the monitor)
Return
NONE
NONE
Return to the previous menu
Exit
NONE
NONE
Exit from the whole menu
Other
Power Off
On
Activate the function of time
switch-off
Off
Inactivate the function of
time switch-off
Return
Return to the previous menu
Exit
Exit from the whole menu
Gamma
Gamm
a1
Adjust colour tone
brightness grey 1
Gamm
a 2
Adjust colour tone
brightness grey 2
Return
Return to the previous menu
Exit
Exit from the whole menu
Volume
On
Resize sound (only the
model with audio out)
Off
Turn off the sound (only the
model with audio out)
Return
Return to the previous menu
Exit
Exit from the whole menu
Ambient
Light
Red
R
Switch the atmosphere light
to static red (this needs the
support of the monitor)
17
Page 18
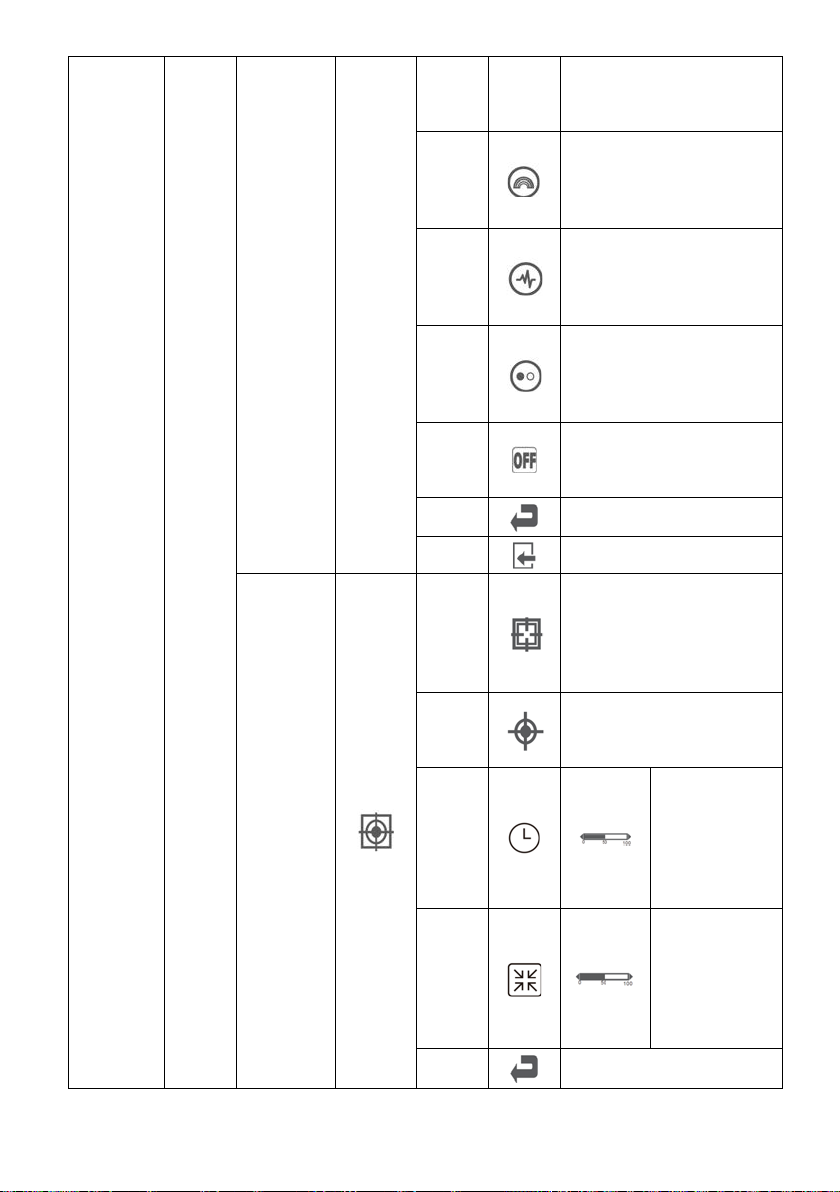
Blue
B
Switch the atmosphere light
to static blue (this needs the
support of the monitor)
Colour
ful
Switch the atmosphere light
to dynamic mode (this
needs the support of the
monitor)
Breath
e
Switch the atmosphere light
to dynamic mode (this
needs the support of the
monitor)
Marqu
ee
Switch the atmosphere light
to dynamic mode (this
needs the support of the
monitor)
Close
Turn off the atmosphere
light (this needs the support
of the monitor)
Return
Return to the previous menu
Exit
Exit from the whole menu
Adjust
Auto
Adjust
Automatically adjust the
horizontal vertical location,
focusing and dock of
pictures (this needs the
support of the monitor)
Auto
Colour
Adjust the white balance of
pictures (this needs the
support of the monitor)
Clock
Adjust the
Picture clock to
reduce vertical
line noise (only
for VGA
signals)
Phase
Adjust the
Picture Phase
to reduce
horizontal noise
(only for VGA
signals)
Return
Return to the previous menu
18
Page 19
Exit
Exit from the whole menu
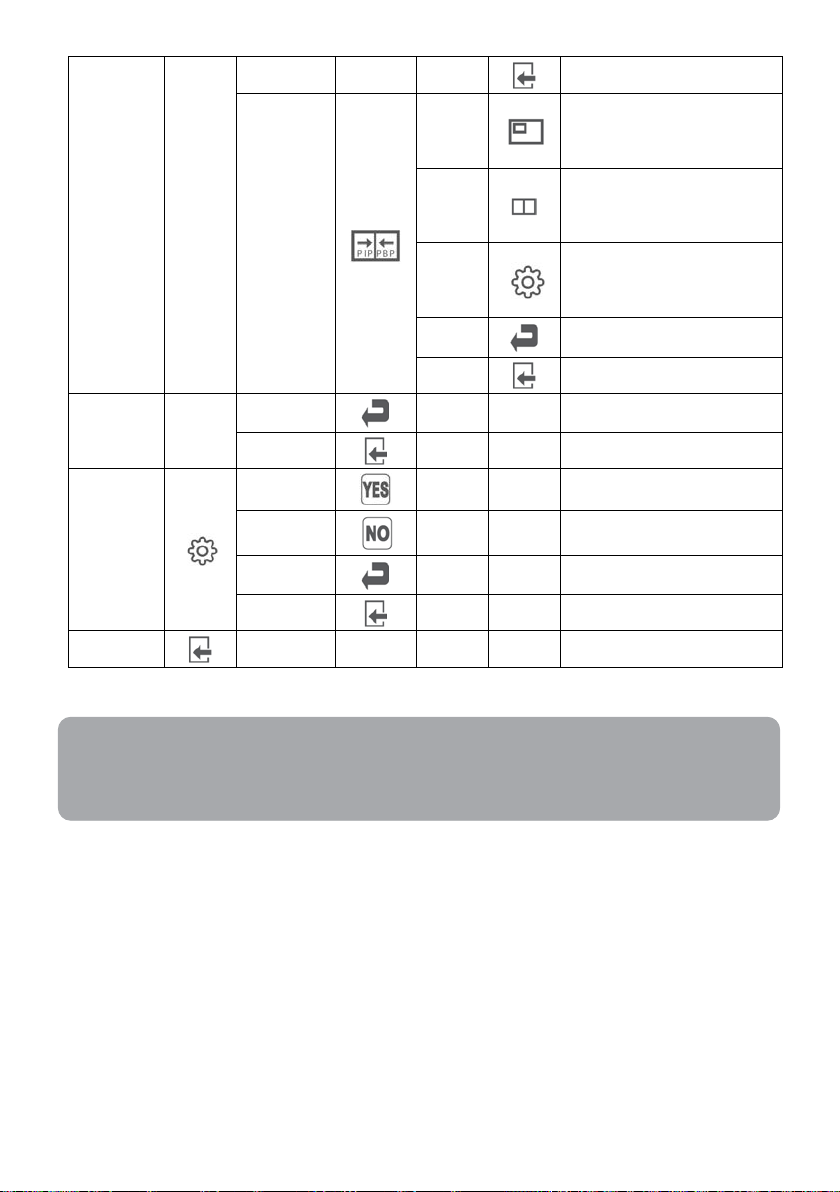
PIP
PIP
Switch the source of picturein-picture (this needs the
support of the monitor)
PBP
Switch the source of dual
split screen (this needs the
support of the monitor)
Reset
Reset to single window
display (this needs the
support of the monitor)
Return
Return to the previous menu
Exit
Exit from the whole menu
Return
NONE
NONE
Return to the previous menu
Exit NONE
NONE
Exit from the whole menu
Reset
YES NONE
NONE
Reset to factory setup
NO NONE
NONE
Exit from this function
Return
NONE
NONE
Return to the previous menu
Exit NONE
NONE
Exit from the whole menu
Exit
NONE
NONE
NONE
NONE
Exit from the whole menu
Note:
The functions may be adjusted due to specific model or the upgrade of so ware
version.
19
Page 20
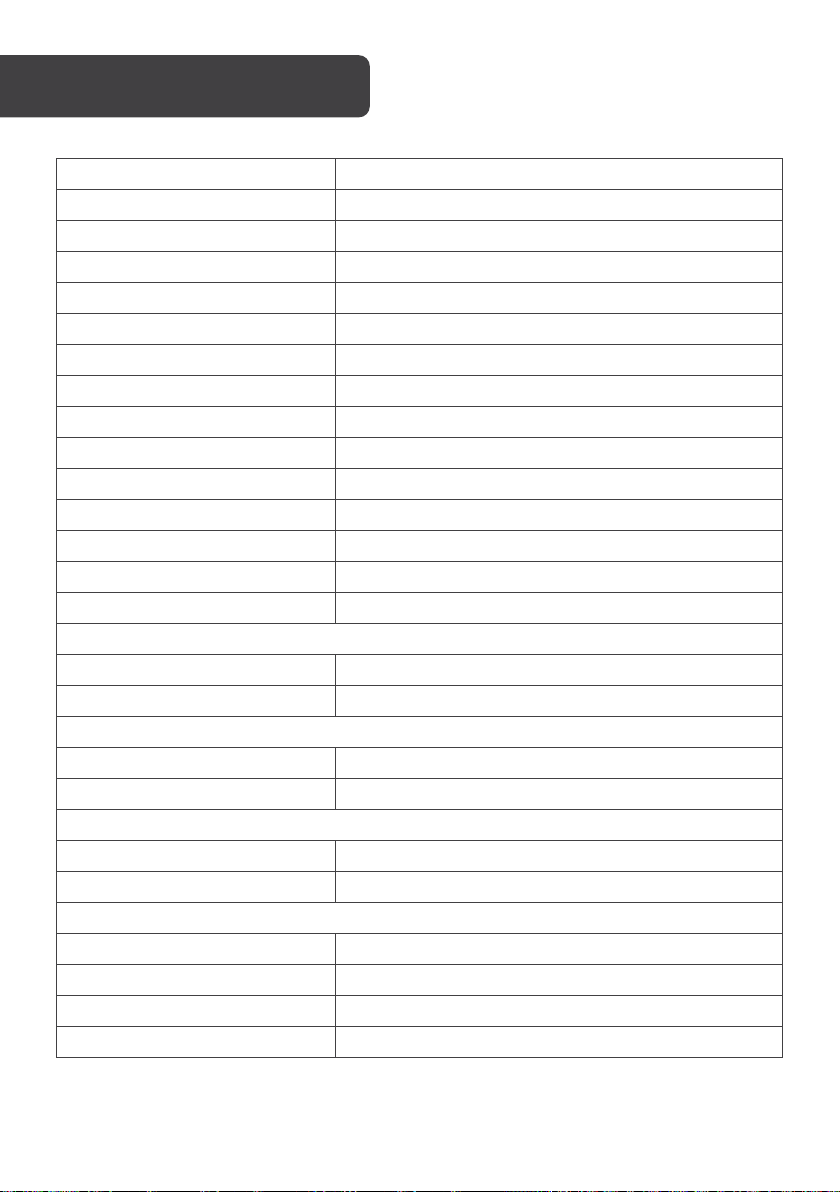
Screen Size
23.8”
Aspect Ratio
16:9
Backlight
LED
Brightness
250cd/m
2
Panel
VA
Resolution
1920 x 1080
Refresh rate
165Hz
Response time
MPRT 1ms
Viewing Angle
³ 178° (H) / ³ 178° (V)
Contrast Ratio
3000:1
VESA Mounting
75 x 75
Colours
16.78M
Free Sync
Yes
Signal Input
HDMI x 2, DP x 1
Power
12V = 2.5A
Audio
Speakers
No
Audio Out
Yes
Accessories
Adapter
Yes
HDMI Cable
Yes
Additional Functions
Low Blue Light
Yes
Flicker Free
Yes
Physical Dimensions
Dimensions (W/ Stand)
541.93 x 176.34 x 424.24mm
Dimensions (W/ o Stand)
541.93 x 42.85 x 322.26mm
Net weight
3.1kg
Gross weight
4.35kg
SPECIFICATIONS
20
Page 21
21
Page 22
22
Page 23
23
Page 24
Need more information?
We hope that this user guide has given you
the assistance needed for a simple set-up.
For th e mo st u p-to-date guide for your product,
as well as any additional assistance you may require,
head online to help.kogan.com
24
 Loading...