

Page 1
FULL HD CURVED 75HZ
FREESYNC GAMING MONITOR
1920 X 1080
KAMN24F7CSB
Page 2

Safety & warnings 3
Components list 4
Overview 5
Assembly 7
Connectivity 10
Operation 12
Specifications 16
Cleaning & care 18
Notes 19
2
Page 3
SAFETY & WARNINGS
• Read all instructions before using the appliance and retain for reference.
• This monitor is designed with ventilation holes on the back of the casing. Do not cover
or block them.
• Do not insert any object or spray any liquid into the vents.
• Avoid placing the monitor near heaters, stoves, fireplaces or other sources of heat, as
well as in rooms lacking adequate ventilation.
• Do not position the monitor in unsafe locations. If the monitor falls, it may be damaged
and may injure nearby people.
• Unplug the monitor if it is not going to be used for an extended period.
• Do not place heavy objects on the monitor, its power cord or any connected cable.
• Do not open the back panel of the monitor, as it contains a high-voltage current even
when not plugged in.
The terms HDMI and HDMI High-Definition Multimedia
Interface and the HDMI Logos are trademarks or registered
trademarks of HDMI Licensing Administrator, Inc. in the United
States and other countries.
3
Page 4
COMPONENTS
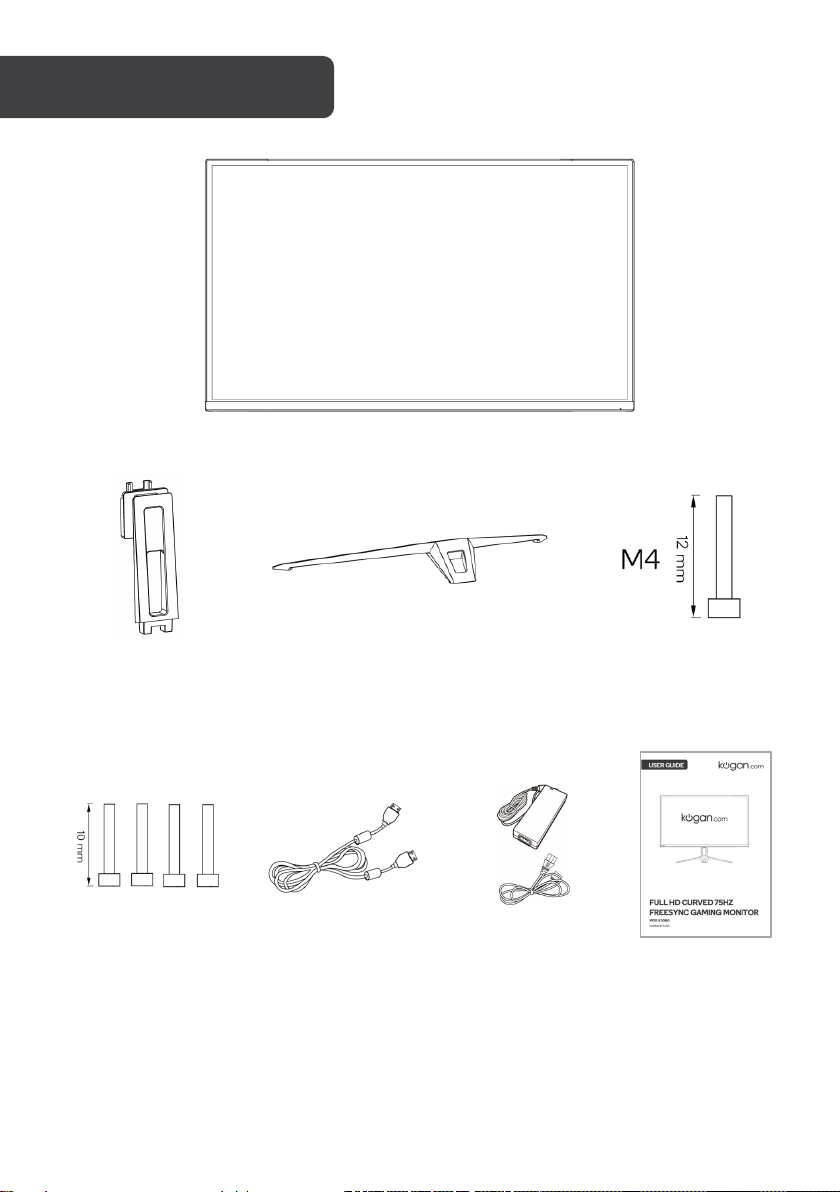
Monitor
Stand connector Stand base Stand base screw
(M4 x 12mm) (x1)
VESA screws (x4) HDMI cable Power adapter/
Power cable
4
User guide
Page 5
OVERVIEW
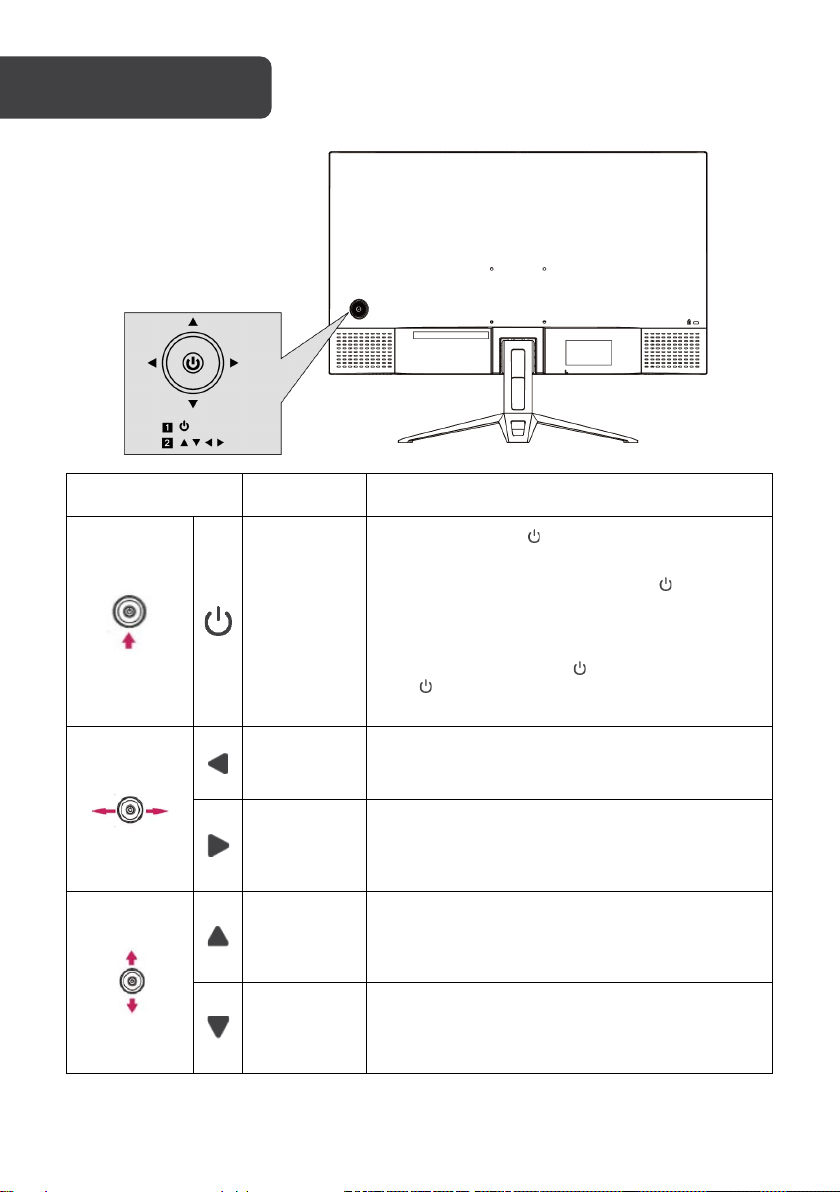
Button Action Description
Press in
Press and hold the button for 6 seconds to
turn on and off.
When the display is turned on, click button to
wake up the main menu for one second.
Use the arrow buttons to select the items to be
adjusted up and down in the main menu. After
selecting the items, click button to adjust.
Click button again to save and return to the
upper menu.
Push left
Push right
Push up
Push down
Display mode shortcut.
Enable the main menu or select the menu item.
Source selection.
Exit from the main menu or return to the upper
menu.
Game plus timer shortcut.
Select menu items or increase the setting values
of the selected menu item.
Game plus sight shortcut.
Select menu items or decrease the setting
values of the selected menu item.
5
Page 6
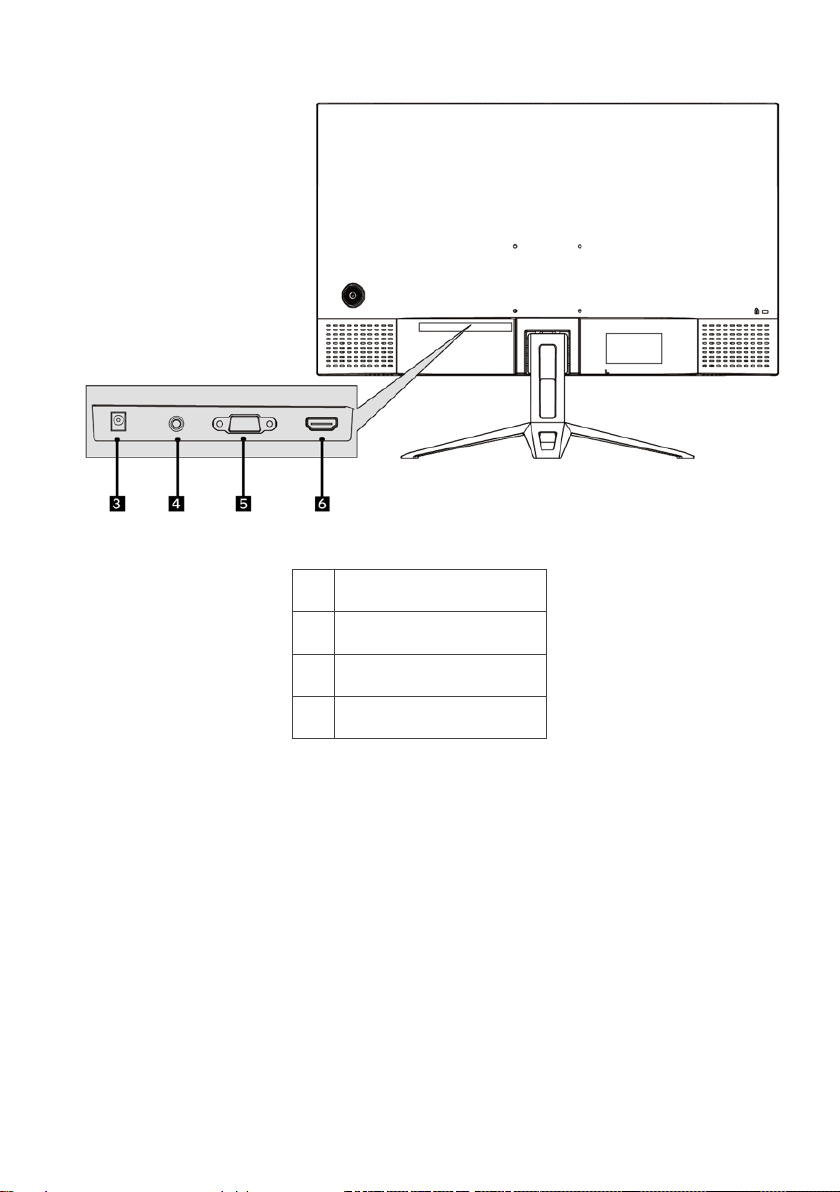
Monitor Ports
3 Power input (DC 12V)
4 Audio In
5 VGA connector
6 HDMI connector
6
Page 7
ASSEMBLY
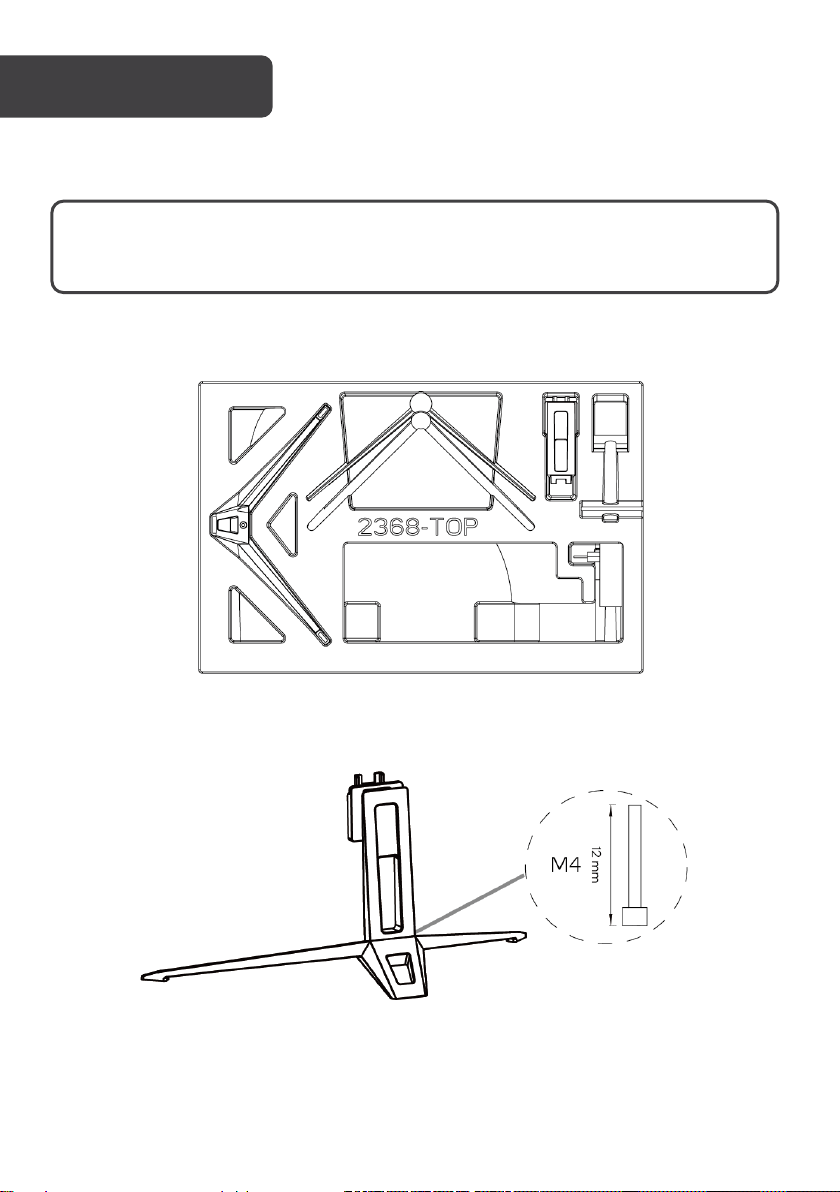
Assembling with stand
WARNING: Panel is fragile. Keep the foam underneath the monitor
while assembling the stand.
1. Carefully remove the monitor from the packaging with foam attached and place it
face down on a soft cloth spread across a stable surface such as a table.
2. Attach the stand base to the stand connector using the M4 screw provided.
7
Page 8
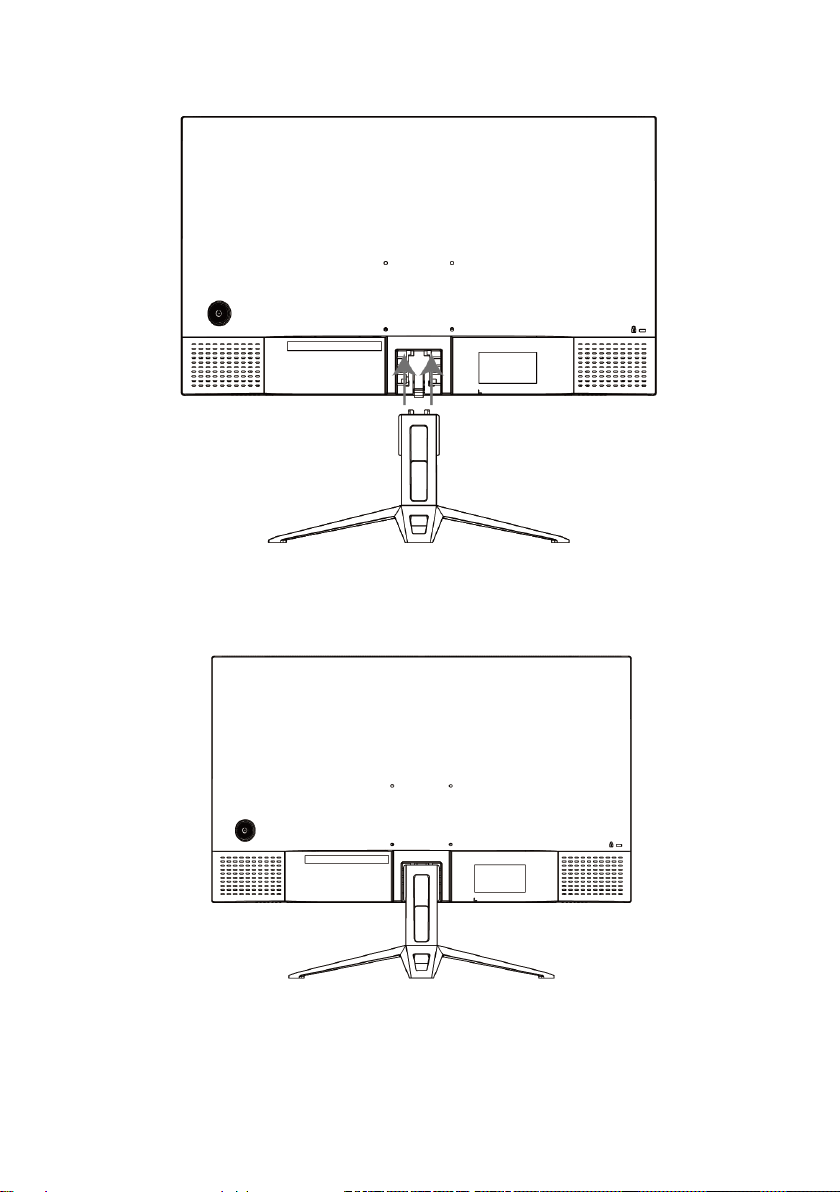
3. Insert the top of the stand connector into the rear of the monitor and push down
until firmly connected.
4. Lift monitor up straight and remove the bottom foam. Stand the monitor up on the
installed base.
8
Page 9
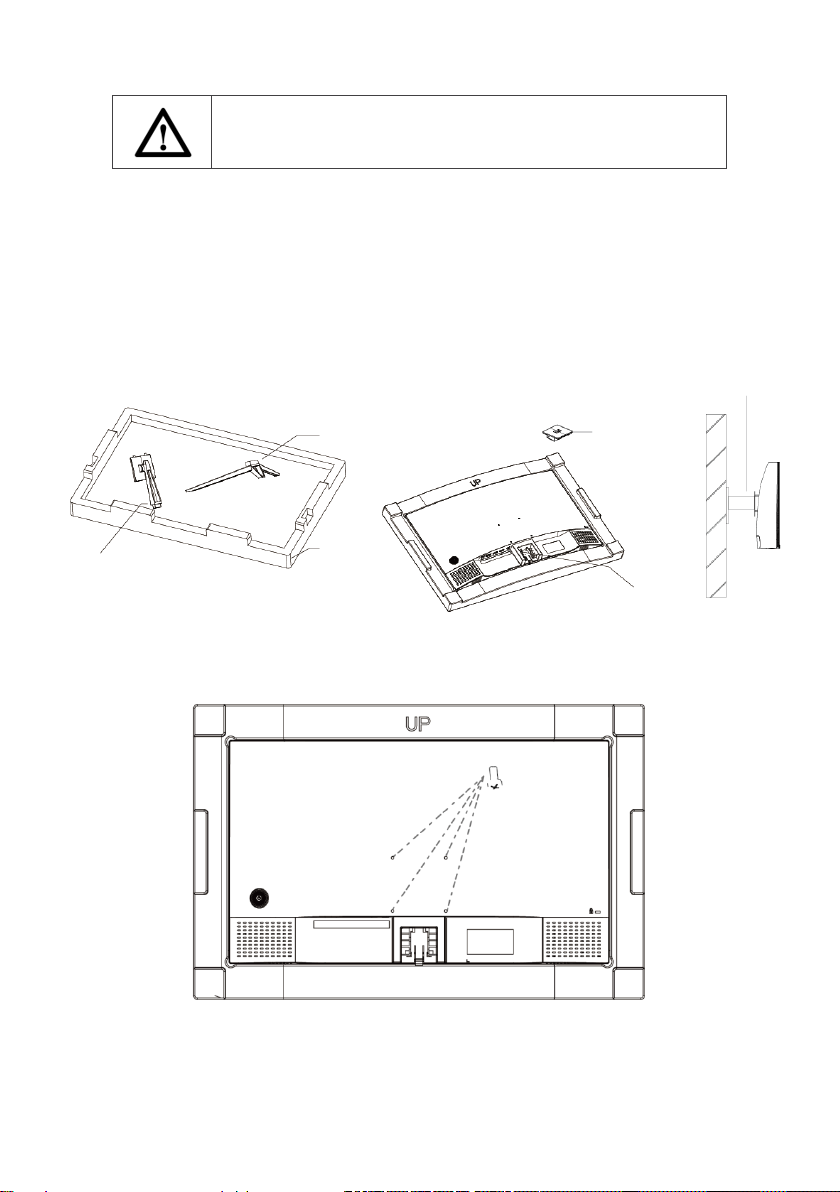
Assembling with VESA Mount
Stand stem
VESA mounting pattern 75 x 75mm, screw size M4.
Note: VESA mount or mounting accessories are not included.
Open the box, take out the monitor with protection form attached and gently place it on a
desktop or table. Ensure all components are removed from the foam covering. Press the
release button to remove the stand plate.
If the monitor is already attached to the stand, remove the stand before proceeding with
VESA mount assembly.
Wall mount
(Sold separately)
Stand base
Foam
Instructions for attaching to the specific wall mount will be included with the mount.
Stand plate
Monitor
9
Page 10
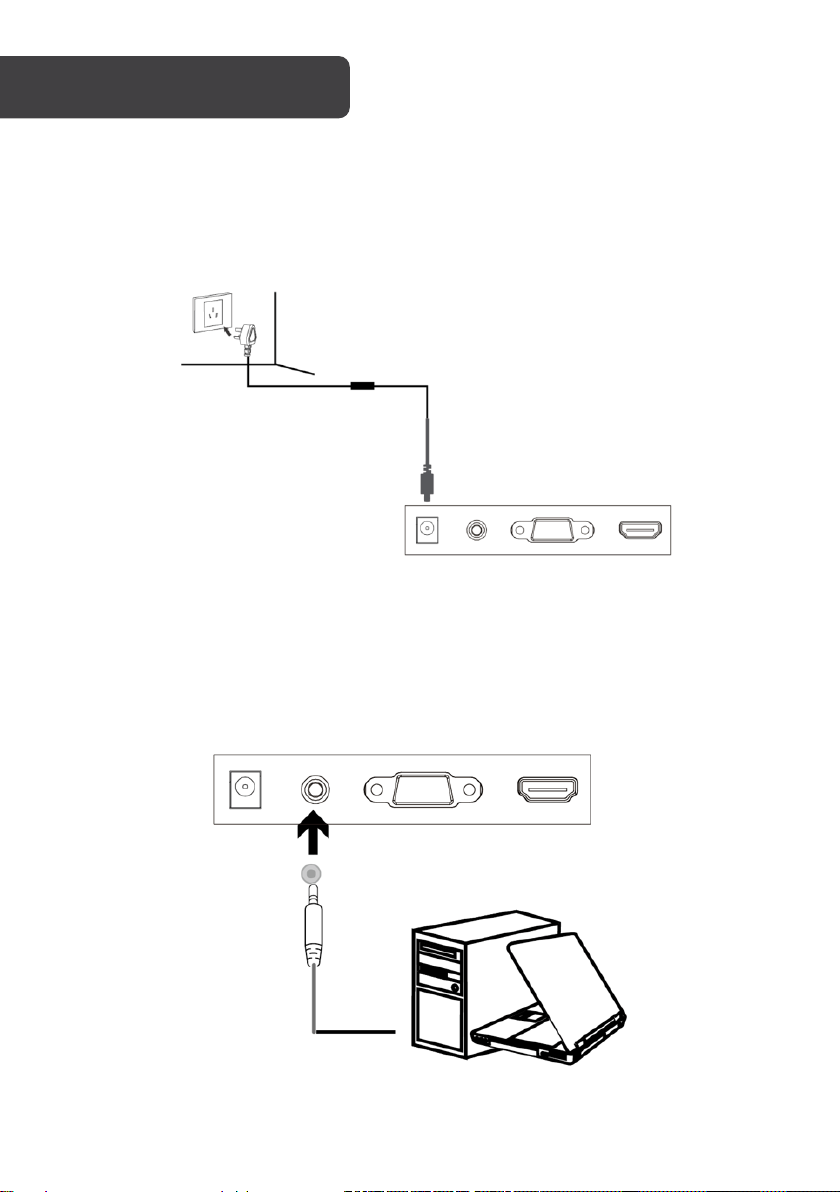
CONNECTIVITY
Power Cable
Connect the included power cable to the monitor power port and then connect the other
end to a power outlet.
Power adapter
Power Cable
Audio In
Connect an audio cable to the 3.5mm audio port on the monitor (Audio In) and the 3.5mm
audio port on your computer.
10
Page 11
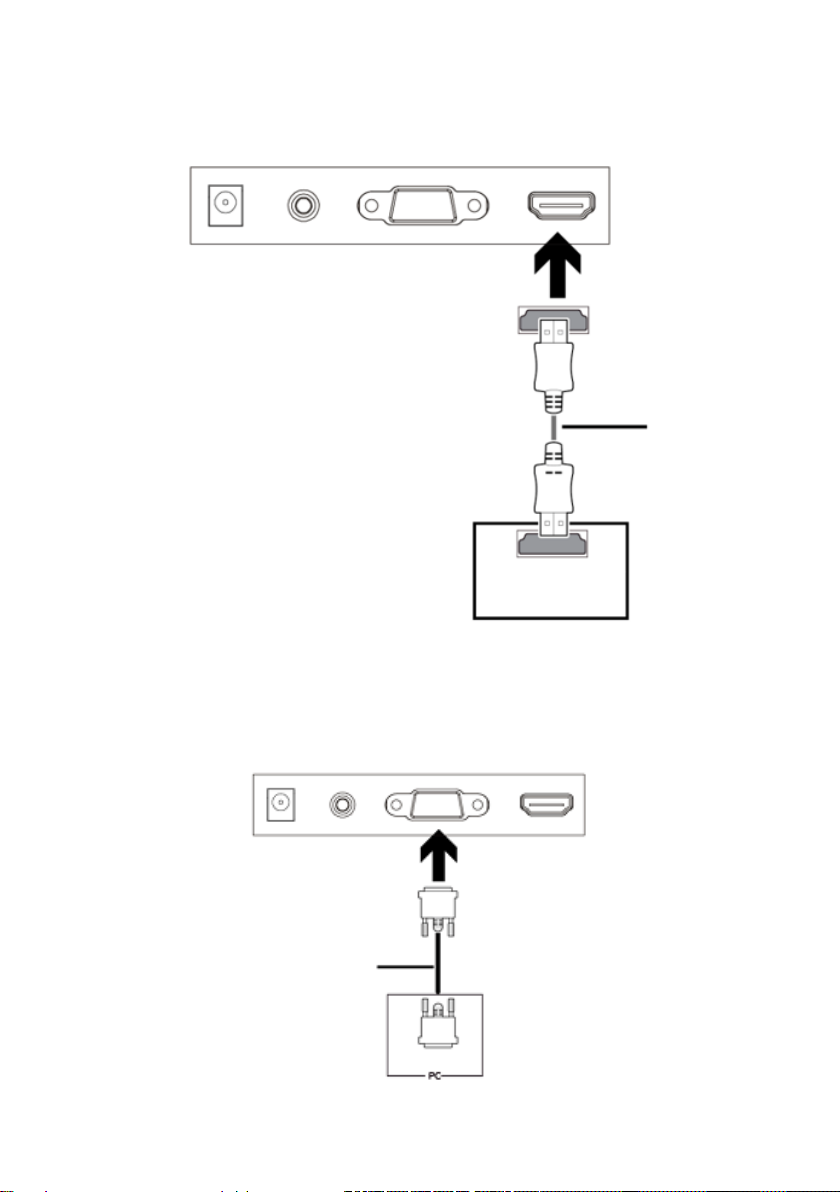
HDMI
Connect an HDMI cable from the computer’s display output to the monitor’s display input.
HDMI cable
HDMI OUTPUT
PC
VGA
Connect a VGA cable from the computer’s display output to the monitor’s display input.
VGA cable
(not included)
VGA OUTPUT
11
Page 12
OPERATION
1. Connect the monitor to your input device via HDMI or VGA.
2. Connect the power cable to your monitor and then connect the other end directly
to a power socket.
3. Use the power button to turn the monitor on.
FreeSync
• The feature is disabled by default when setting a 75Hz refresh rate.
• In order to use this feature, ensure your hardware has FreeSync capability and the
graphics drivers are fully up to.
• After connecting, you may receive a prompt to enable the feature on your computer. If
you do not receive the prompt, you may need to enable the function in your graphics
card menu.
• See your graphics card manufacturer’s documentation for instructions on how to turn
on and/or enable FreeSync.
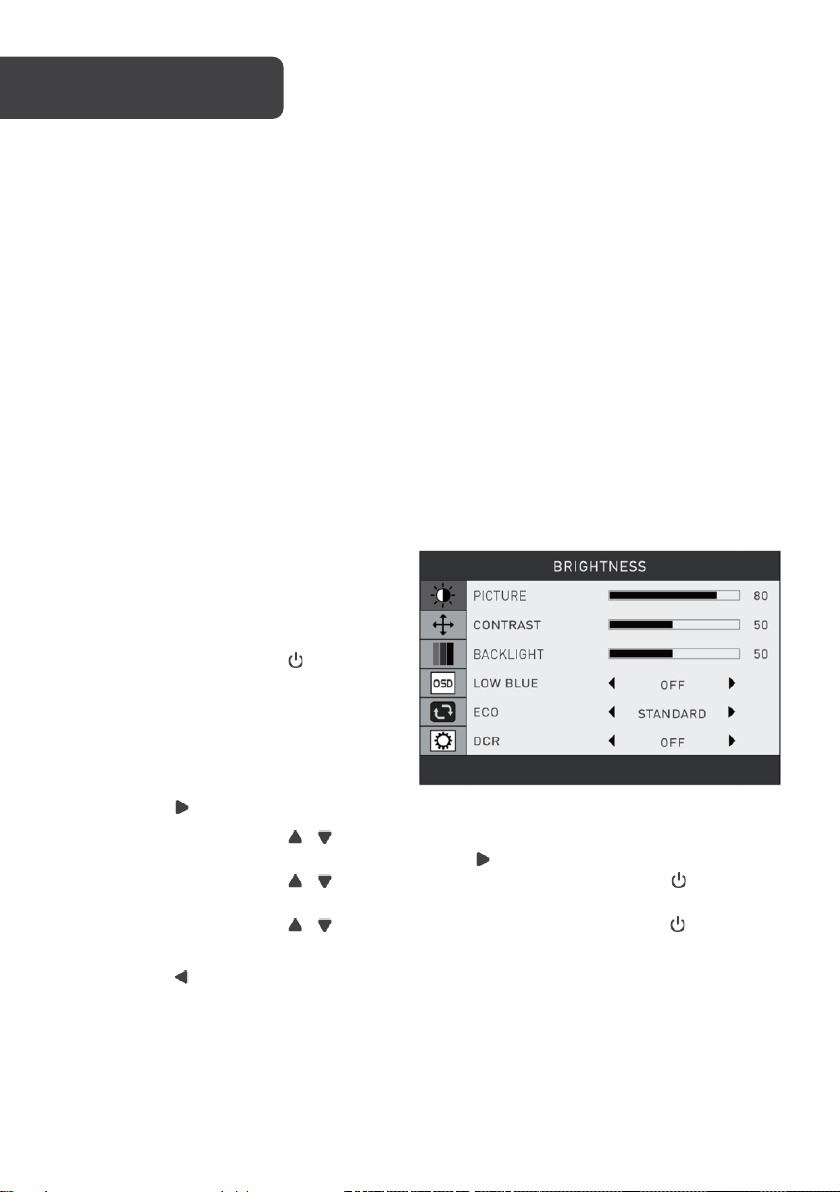
The On-Screen Display (OSD) Menu may
be used to adjust your monitor’s settings
and appears on the screen after turning on
the monitor and pressing the button.
When using the monitor for the first time, it
will configure optimal settings
automatically.
1. Press right button to open the navigation window.
2. Press up and down ( / ) buttons to browse functions.
With the desired function highlighted, press right button to enter the sub-menu.
Press up and down ( / ) buttons to browse sub-menus, then press button to
highlight the desired function.
Press up and down ( / ) buttons to highlight an option, then press button to
confirm the settings and exit the current screen.
3. Press left button to exit the current screen.
12
Page 13
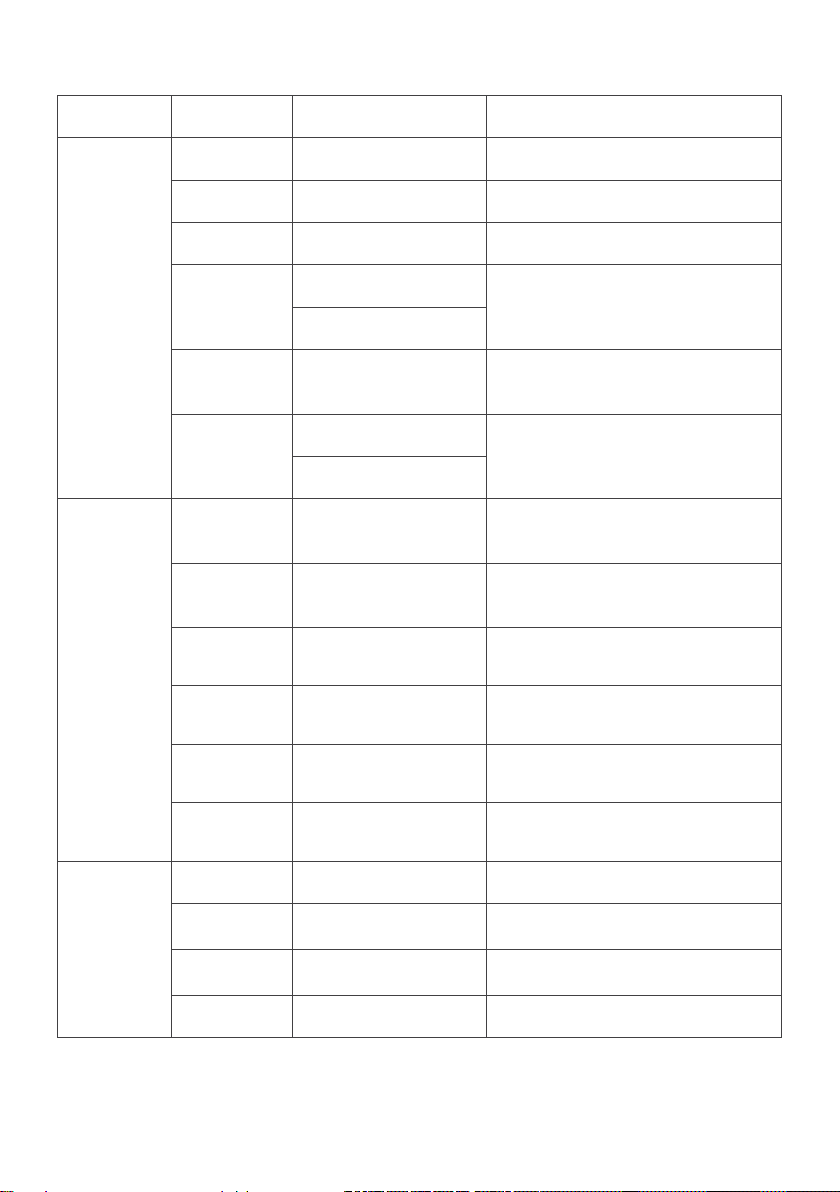
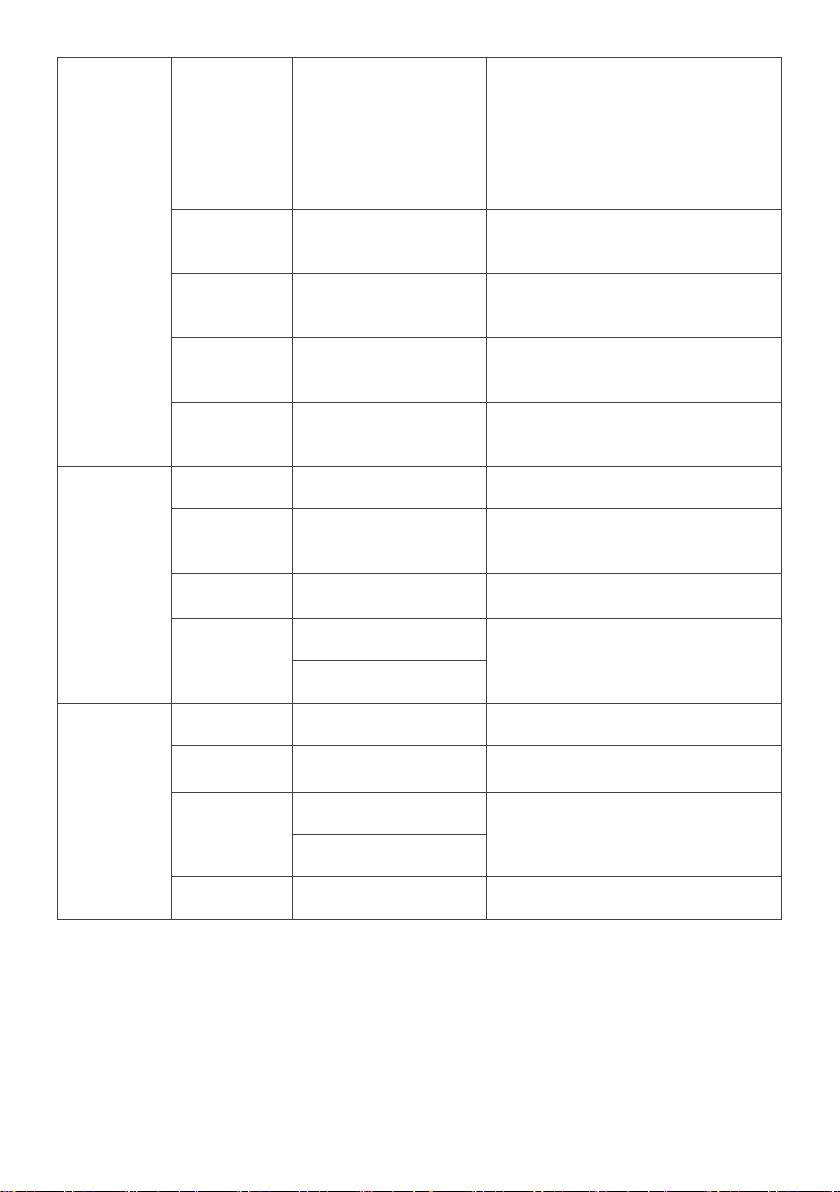
List of Functions
Main Menu Sub Menu Option Description
Picture ~0-100 Adjust display brightness
Contrast ~0-100 Adjust display contrast
Blacklight ~0-100 Adjust display Blacklight
On
Brightness
Low blue
Off
Enable/disable blue light reduction
Image
Colours
ECO
DCR
Horizontal
position
Vertical
position
Clock ~0-100 Adjust display Clock
Phase ~0-100 Adjust display Phase
Aspect Wide (16:9), 4:3 Adjust display Phase Aspect
FreeSync On/Off Adjust display FreeSync On/Off
Warm mode Red/green/blue Adjust red/green/blue levels
Cool mode Red/green/blue Adjust red/green/blue levels
User mode Red/green/blue Adjust red/green/blue levels
STANDARD/TEXT/
GAME/MOVIE/ FPS/RTS
On
Off
~0-100
~0-100
Preset colour modes
Enable/disable dynamic contrast ratio
Adjust video display area left to right
(VGA only)
Adjust video display area up and down
(VGA only)
HDR mode On/Off Enable or disable HDR mode
13
Page 14
Language
English, 简体中文, 한국어,
Русский, Español,
Deutsch, Italiano,
Français, Portugues,
Turkce, Polski,
Nederlands
Set OSD language
OSD Setting
Reset
Reset
Misc
OSDH-Position ~0-100 Adjust OSD horizontal position
OSD VPosition
OSD
Transparency
OSD Time Out 5~60
Image None Restore VGA image defaults
Colour None
Reset None Restore factory defaults
Power down
Time count 10-90min Adjust Time count
Signal source VGA/HDMI Adjust input source
Mute
~0-100 Adjust OSD vertical position
~0-100 Set OSD overall transparency
Set how long the OSD remains open
after last input
Automatically configure VGA colour
settings
On
Enable/disable Power down function
Off
On
Off
Enable or disable monitor speaker
output
Volume ~0-100 Adjust monitor speaker volume
14
Page 15
Eco Modes & Game plus Switching
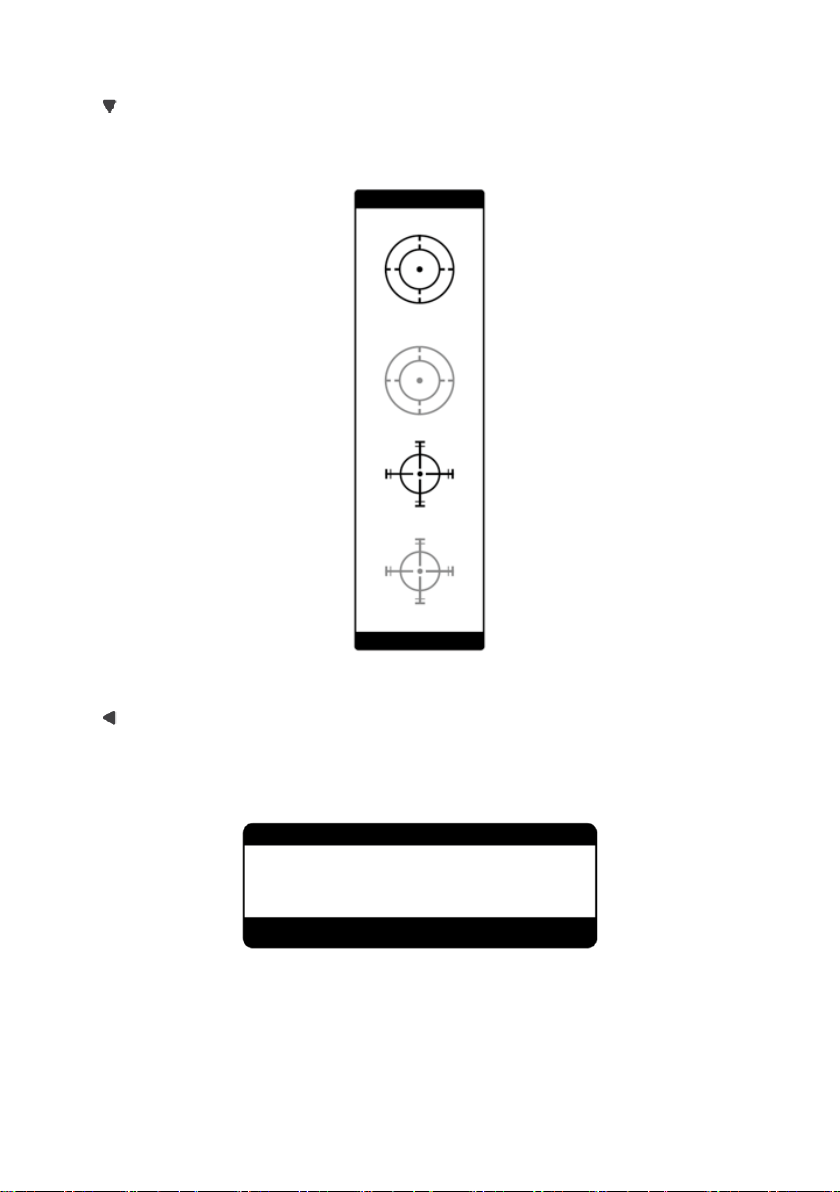
Press down button to switch Game plus modes. These overlay icons are primarily
designed to assist aim during FPS games, though they can be used for other scenarios.
CROSSHAIR
Press left button to switch ECO modes. These modes include Standard, Text, Game,
Movie, FPS and RTS and can be used to optimise settings according to your activity.
Standard mode is suitable for most activities.
STANDARD
15
Page 16
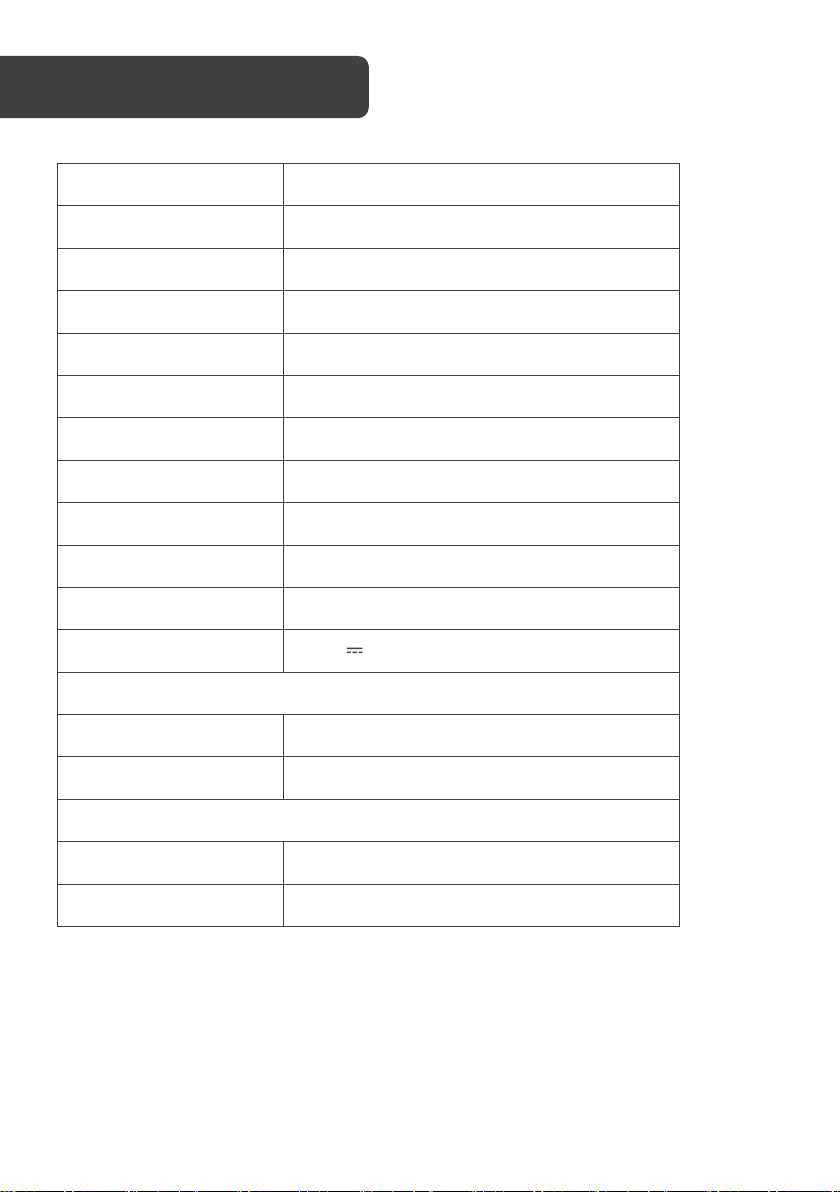
SPECIFICATIONS
Aspect ratio 16:9
Brightness 250cd/ m² (Typ.)
Panel VA
Resolution 1920x1080
Refresh rate 75Hz
Response time 20ms
Viewing angle ≥178°(H) / 178°(V)
Contrast ratio 3000:1
VESA mounting 75x75mm
Colours 16.7M
Signal input HDMI1. 4 x 1, VGA x 1
Power
Audio
Speakers Yes
Audio In Yes
Accessories
Power cable Yes
HDMI Cable Yes
DC12V 3A
16
Page 17
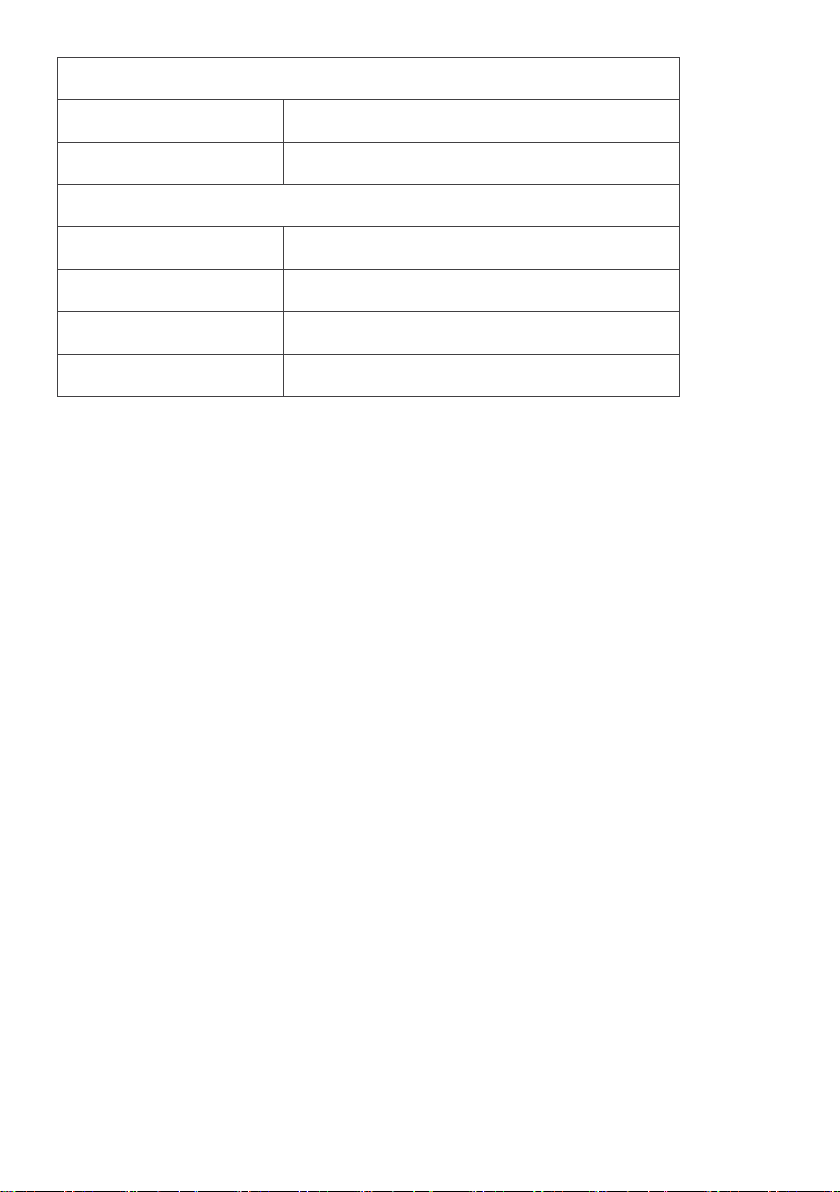
Additional functions
Low Blue Light Yes
Flicker Free Yes
Physical dimensions
Dimensions (w. Stand) 537.15 x 412.6 x 169.5mm
Dimensions (w/o Stand) 537.15 x 315.97 x 67.6mm
Net weight 3.0kg
Gross weight 4.3kg
17
Page 18

CLEANING & CARE
• Unplug the monitor before cleaning it.
• Use a clean, slightly dampened cloth to wipe the main monitor body.
• To clean the screen: Turn the monitor off, unplug it and wait for it to cool completely,
then wipe it with a dry micro-fibre cloth.
• Do not use cleaning alcohol, ammonia-based liquids or other harsh cleaners.
18
Page 19
19
Page 20

Need more information?
We hope that this user guide has given you
the assistance needed for a simple set-up.
For the most up-to-date guide for your product,
as well as any additional assistance you may require,
head online to help.kogan.com
20
 Loading...