

Page 1

21.5" Full HD IPS FreeSync Monitor
KAMN22FNSA
Page 2
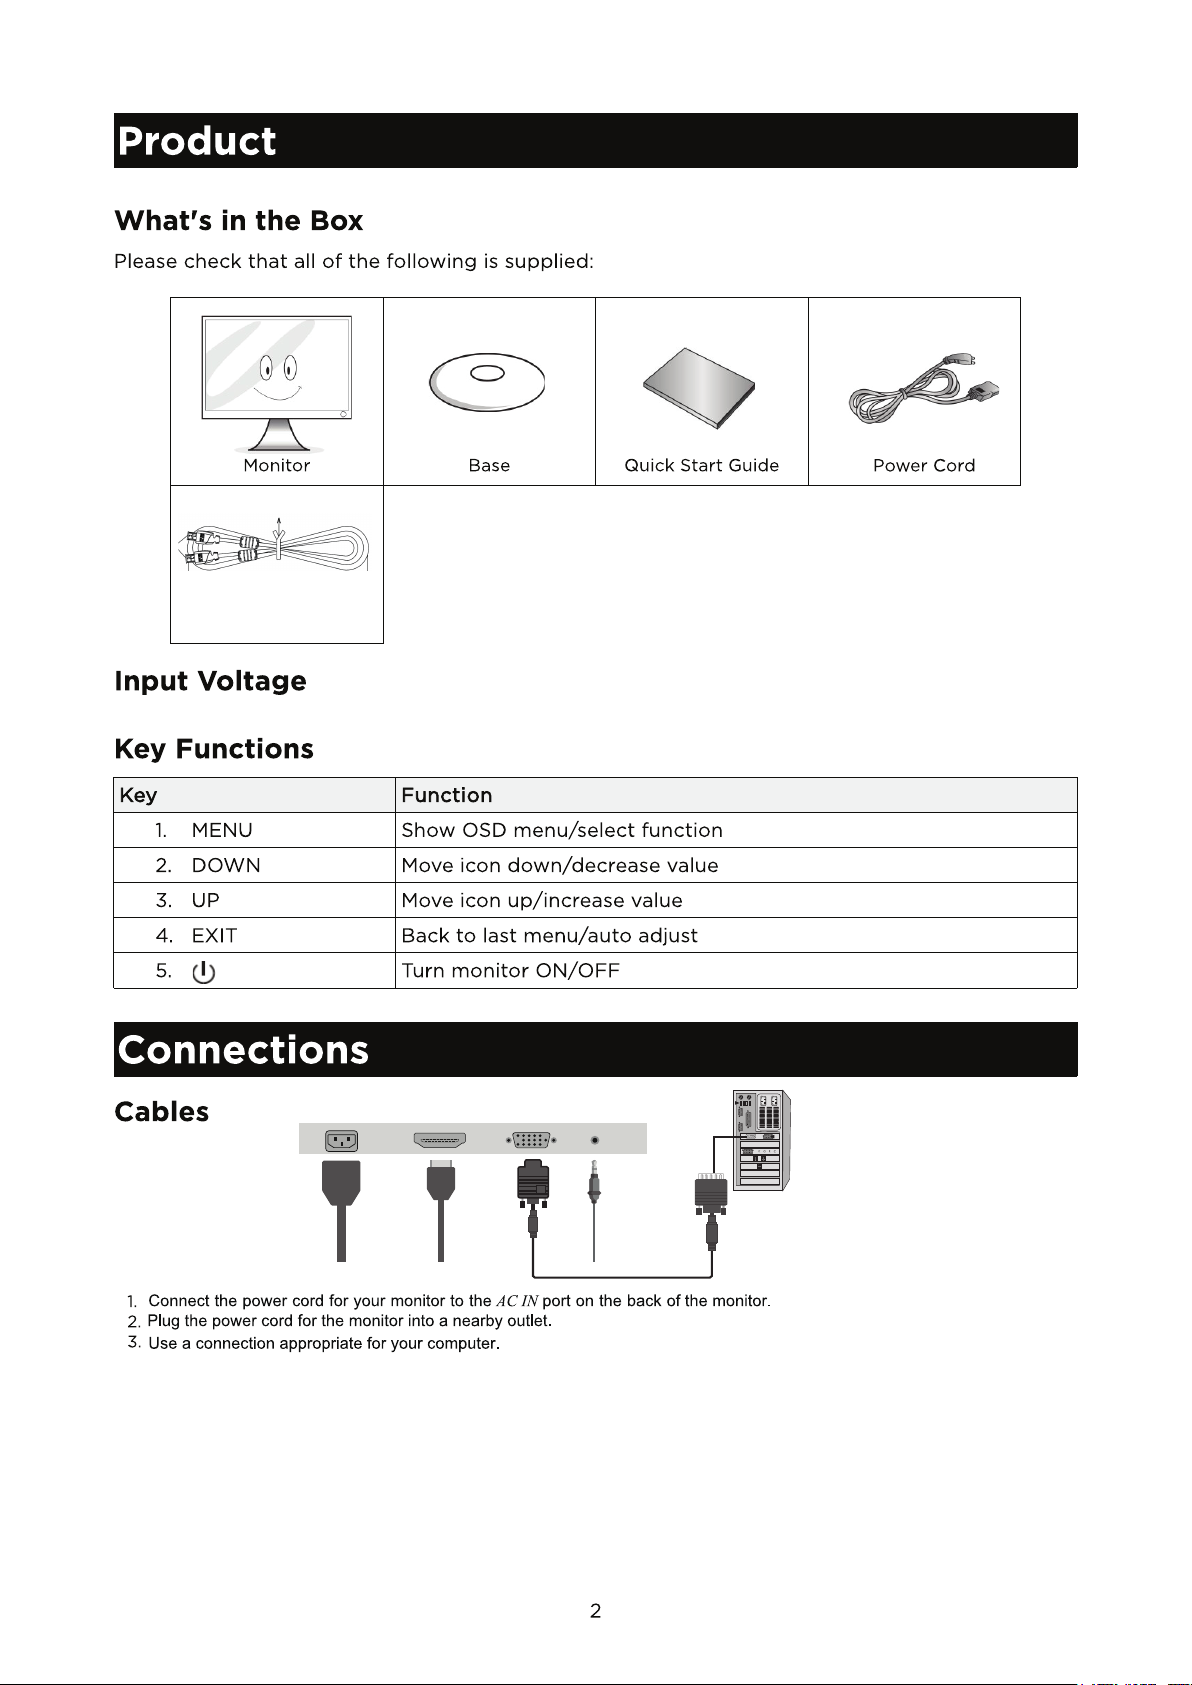
HDMI cable
AC 100-240V 50/60Hz 1.1A
HDMI VGA AudioPower
Page 3

Standbase Installation Guide
1. Pick out the monitor from Carton Box carefully. 2. Take out the Leg & Suppot column,
connect the two parts.
Connection Block
3. Take out the connection block by pressing the
detach button.
(keep the monitor in its protective foam).
5. Lift monitor up straightly, and remove the
bottom foam.
CLOSE
OPNE
4. Insert the Connection Block into the back cabinet
then push down the stand until firmly connected.
6. Stand Leg installation done.
,
3
Page 4

Wall Mount Install
ation Guide
OSD
1. Brightness
1. 1 Brightness adjustment
This option will adjust your displays brightness.
Use the up and down buttons to increase or decrease
brightness setting.
1. 2 Contrast adjustment
This option will adjust the amount of difference between
white values and black values. Use the up and down
buttons to increase or decrease contrast setting.
1. 3 Black equalizer adjustment
Use the up and down buttons to increase or decrease
black equalizer setting.
1. 4 Low blue adjustment
Use the ON/OFF option to adjust the low blue function.
1.5 ECO adjustment
This option will allow to choice STANDARD/GAME/MOVIE/TEXT/FPS/RTS mode.
1. 6 DCR function (Dynamic Contrast Ratio)
Press MENU to shows the main choice menus, press MENU into DCR choice item, press up or down to
select ON or OFF, press MENU to open or close DCR function.
4
Page 5

2. Image
2. 1 Horizontal position adjustment
This selection will adjust the horizontal position of the
video on your display. This mode is only available in
VGA mode. Use the up and down buttons to move your
video display area left to right.
2. 2 Vertical position adjustment
This selection will adjust the vertical position of the video
on your display. This mode is only available in VGA mode.
Use the up and down buttons to move your video display
area up and down.
2. 3 Clock adjustment
To press menu into main choice menus, press menu into
Clock adjustment, and then press up or down to adjust.
2. 4 Phase adjustment
To press menu into main choice menus,press menu into
Phase adjustment,and then press up or down to adjust.
2. 5 Aspect adjustment
Choose screen size, like Wide(16:9), 4:3.
3. Color Temp
This selection will change the amounts of red, green, and
blue present in the image. Warm mode will give more red,
Cool mode will give more blue and User mode will allow
you to make your own adjustments to the red, green and
blue values.
4. OSD Setting
4. 1 Language adjustment
This selection will allow you to select the language you
want the menu to appear in.
4. 2 OSD H-position adjustment
This selection will change the horizontal position of the
On Screen Display Menu. Use the up and down buttons
to change the position left to right.
4. 3 OSD V-position adjustment
This selection will change the vertical position of the On
Screen Display Menu. Use the up and down buttons to
move the display up and down.
4. 4 OSD Timer
This selection will adjust OSD menu display time on the screen, from 5s to 60s.
4. 5 Transparency
This selection will adjust OSD menu transparency on the screen. (0/25/50/75/100)
5. Reset
5. 1 Image Auto adjustment
This selection will automatically adjust your image setting
to the best viewing. This mode is only available in VGA
mode.
5. 2 Color Auto adjustment
This selection will automatically adjust your color setting
to the best viewing. This mode is only available in VGA
mode.
5.3 Reset
This selection will reset the monitor to factory statement.
5.4 Auto Power down adjustment
Open this function, display will set power off automatically after standby 60S.
5.5 Timecount adjustment
This selection will adjust timecount setting, 10min, 20min, 30min, 40min, 50min, 60min, 90min.
5
Page 6

6. Misc
6.1 Signal source adjustment
Press UP or DOWN to select VGA, HDMI source.
User manual is subject to change without notice. For the latest version of your user manual,
please visit https://www.kogan.com/usermanuals/. For further assistance, you can visit the
Kogan.com Help Centre at https://help.kogan.com/.
6
 Loading...