

Page 1
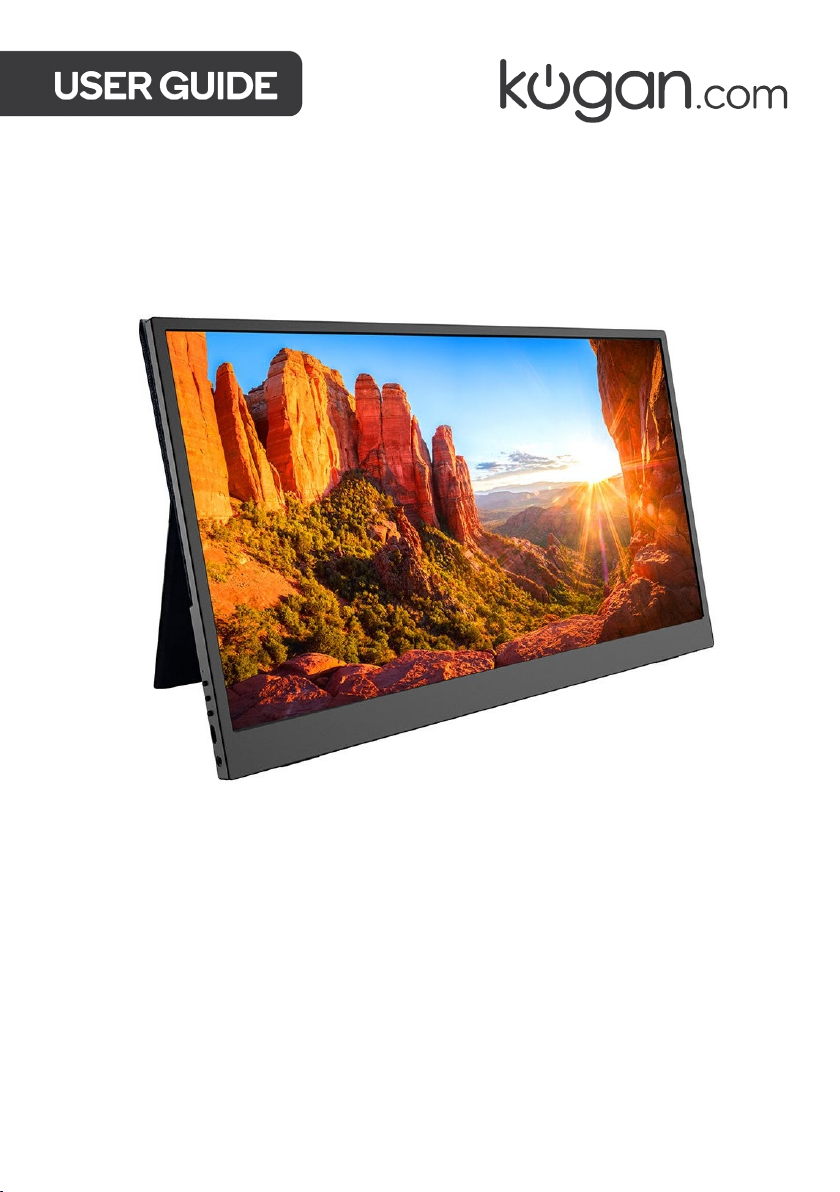
15.8" FULL HD IPS LED
PORTABLE USB-C MONITOR
1920 X 1080
KAMN15CSA
Page 2

Safety & Warnings 3
Overview 4
Using Cover Case 5
Connectivity 6
Operation 10
Cleaning & Care 13
Specifications 14
Troubleshooting 16
Notes 18
2
Page 3
SAFETY & WARNINGS
• Read these instructions. All safety and operating instructions must be read before this
product is operated.
• Keep these instructions – Retain this manual for future reference.
• All warnings on the device and in the operating instructions must be adhered to.
• Do not use this equipment near water. The appliance must not be used near water or
moisture (for example, in a wet basement or near a swimming pool).
• Clean only with a dry cloth. Do not use solvents or petroleum-based fluids.
• Only use attachments and accessories specified by the manufacturer. To connect with
USB-C solely, it’s important to use the USB-C cable supplied with the device.
• Unplug the device during lightning storms or when unused for long periods of time.
• Refer all servicing to qualified personnel. Servicing is required when the product has
been damaged in any way, such as when liquid has been spilled, when objects have
fallen into the product, when it has been exposed to rain or moisture, when it does not
operate normally or has been dropped.
• Do not remove the safety covers. There are no user serviceable parts inside. Trying to
service the unit yourself is dangerous and may invalidate the product’s warranty.
• Only qualified personnel should service this device.
• Contact help.Kogan.com for assistance if required.
WARNING: To reduce the risk of fire or electric shock, do not expose
this product to rain or moisture. The product must not be exposed to
dripping or splashing and objects filled with liquids, such as vases,
must not be placed on the product.
3
Page 4
OVERVIEW
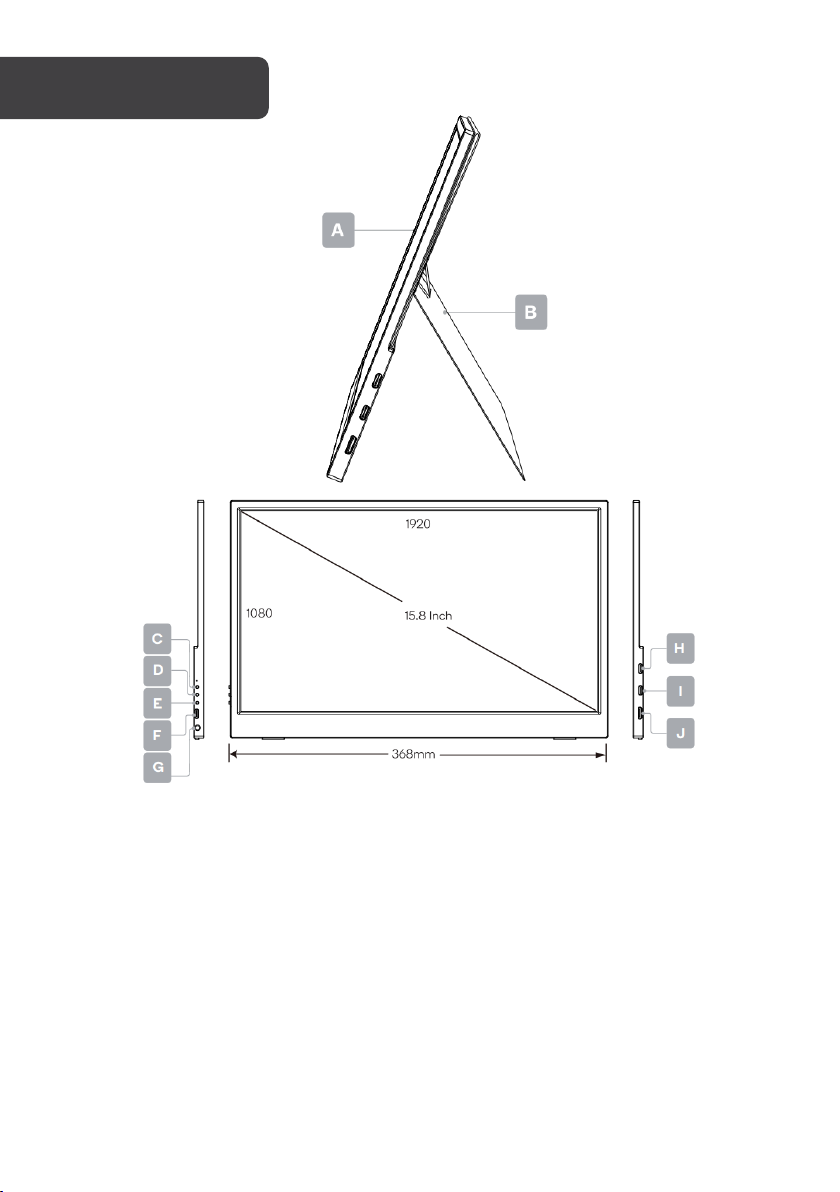
G
15.8" LED Portable Monitor
A
Case Cover
B
Up / Brightness Button
C
Down / Volume Button
D
Start / Back / Menu Button
E
Secondary USB-C Port
F
(Suitable for peripheral devices
such as keyboard, mouse, etc.)
4
3.5mm Earphone Port
H
Primary USB-C Port
(Suitable for Power Delivery [PD])
Primary USB-C Port
I
Mini HDMI Port
J
Page 5
USING COVER CASE
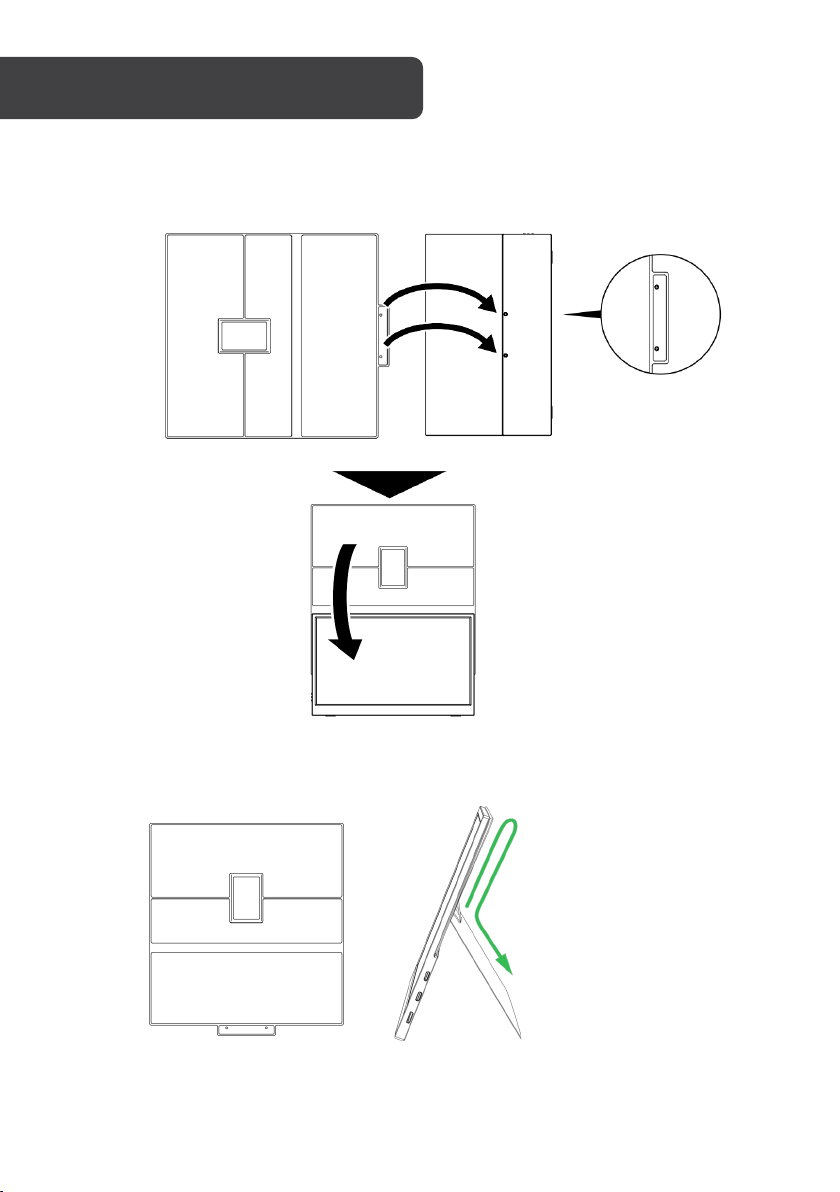
The cover case is attached to the monitor via two small screws. It has a built-in magnet and
sits in place over the screen when used as a cover, and can also be folded back to use as an
upright stand.
Back side
(with one line)
The monitor comes with the
cover case already attached,
but can be removed or
reattached with the screws.
Fold the LED side of
the cover case over
the LED display
By using the cover case as a stand, the main unit can be used at an angle as shown below:
Fold the cover case
outward
Follow the path of the
arrow shown here to
position the cover case
as an upright stand.
Attached to rear
of monitor
5
Page 6
Note:
CONNECTIVITY
Plugging in
If the device you’re connecting to has a USB-C port, connect one end of the USB-C to
USB-C cable to the device and the other end to the portable monitor. Only use the USB-C
cable supplied with this device, as lower-quality USB-C cables may not be compatible.
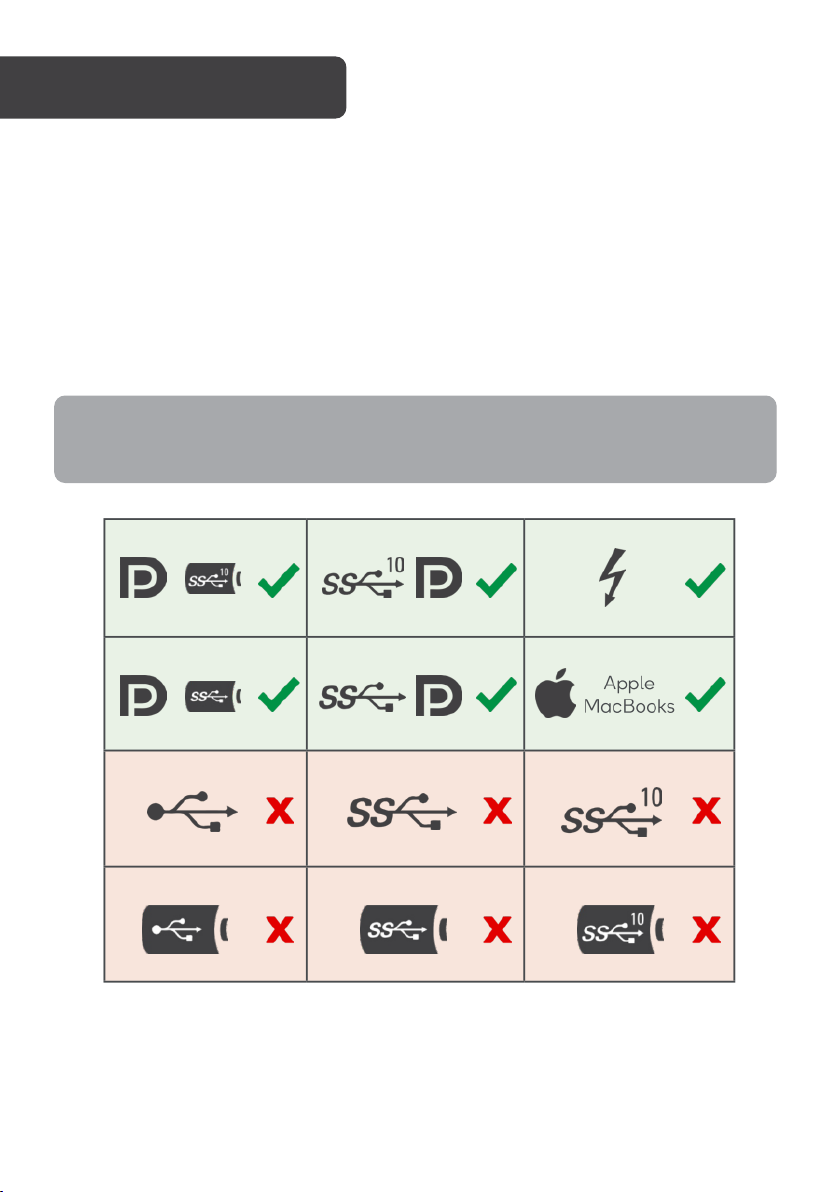
Some devices may not provide enough power to the monitor. Check the USB-C port on your
device for the symbols shown in the table below.
If you have one of the green checked symbols, then your USB-C port should provide both
data and enough power to the monitor.
MacBook ports should be compatible even if there are no symbols next to the port.
If the monitor won’t turn on, connect a USB-A to USB-C cable along with an HDMI cable.
6
Page 7
Computer (via USB-C)
Note:
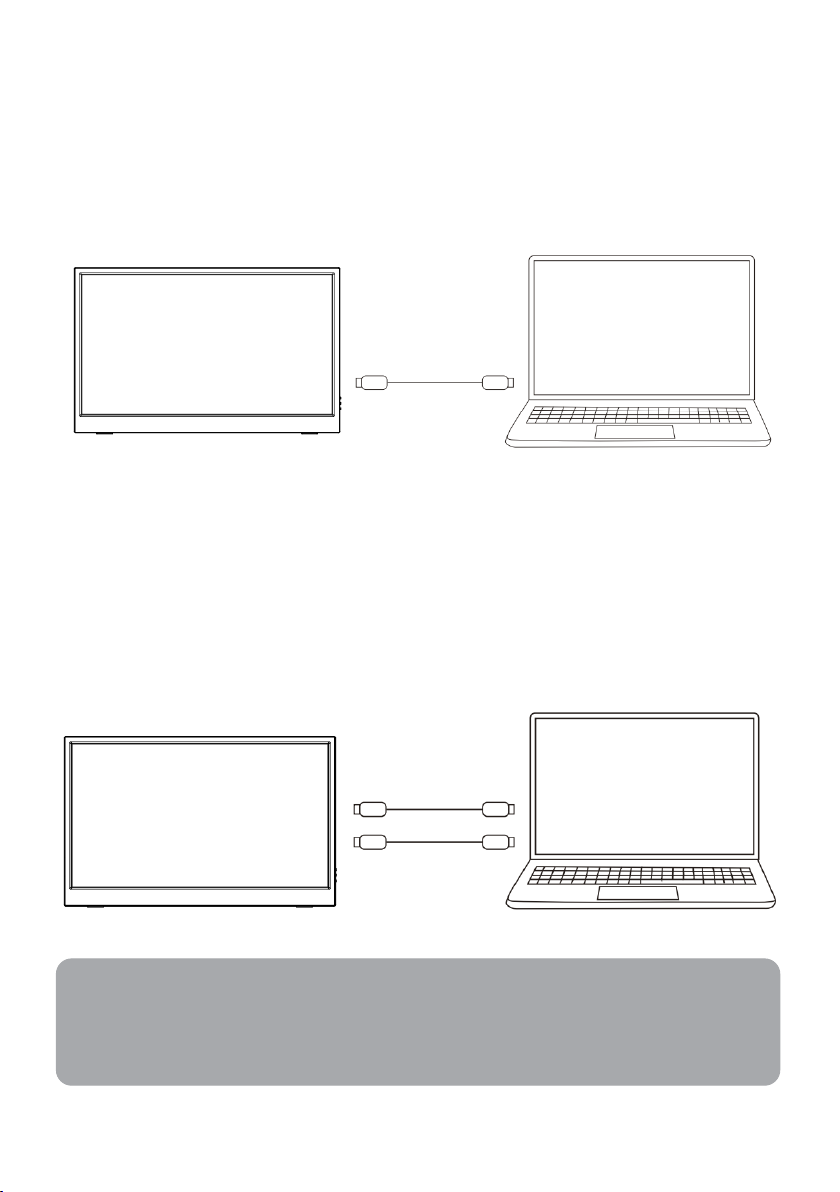
The portable monitor can be connected to a compatible computer using the supplied USBC cable. This must be connected to the primary USB-C port on the monitor’s right side. The
computer will provide power and signal to the monitor and can be used for extended display
or duplicated display use.
Only use the USB-C cable supplied with this device, as lower-quality USB-C cables may not
be compatible.
Computer with full-
Display
Computer (via HDMI & USB-A)
If connecting to a computer without a USB-C port, you can utilise HDMI as long as you also
provide a power supply. There are two options for this. The first is to connect the supplied
HDMI-to-Mini HDMI cable between the computer and the portable monitor, while also
connecting to the computer via USB to provide power. Connect the USB-A from the
computer to the primary USB-C port on the monitor’s right side.
USB-C to USB-C
function USB-C port
Mini HDMI to HDMI
Display
USB-C to USB-A
Depending on the power supplied by the USB port on the computer (display requires
5V/2A), additional power may need to be supplied to the monitor through the
secondary USB-C port on the left of the monitor.
Computer without
USB-C port
7
Page 8
Computer (via HDMI & power adapter)
Note:
or more
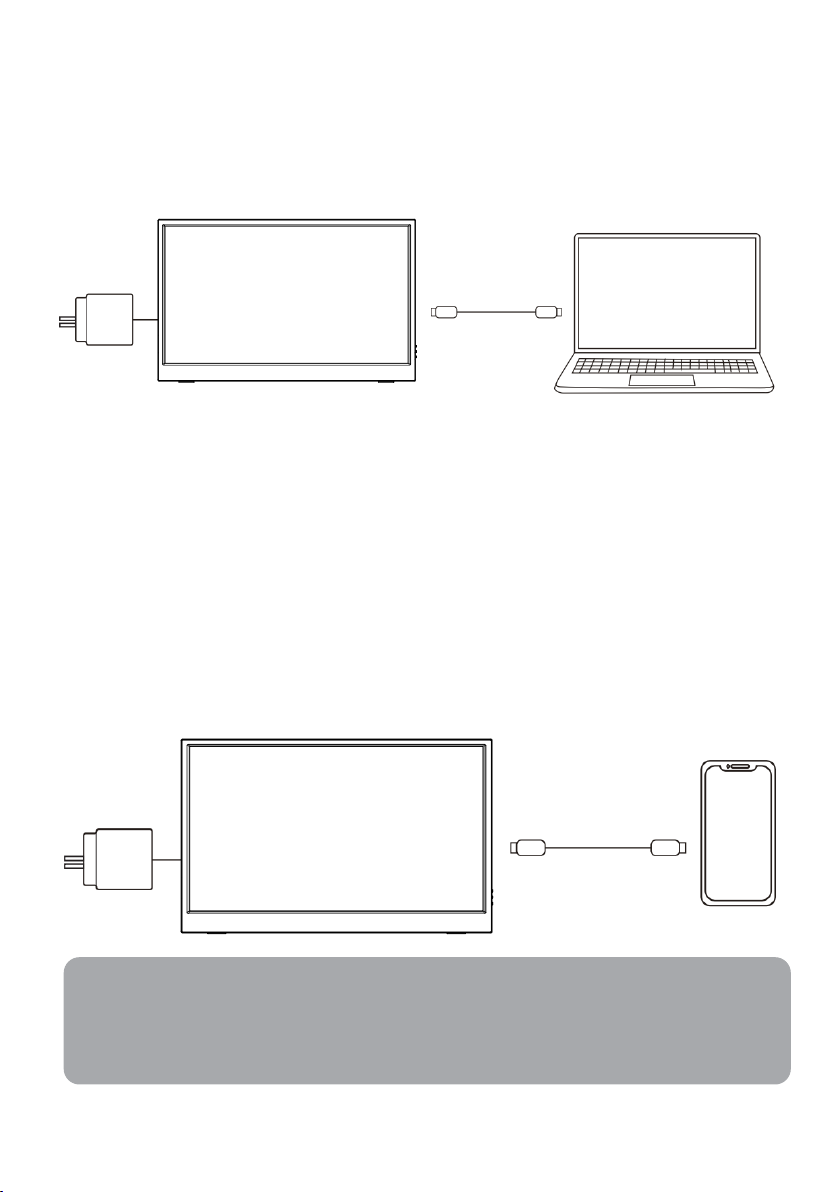
The second option for HDMI connection is to connect the supplied HDMI-to-Mini HDMI
cable between the computer and the portable monitor, while also connecting the monitor
directly to an external power adapter (supplied) via USB. For this, you can use either the
primary USB-C port on the monitor’s right side or the secondary USB-C port on the
monitor’s left side.
Mini HDMI
Display
to HDMI
Computer without
USB-C port
USB-C to power adapter
Mobile phone (via USB-C)
If there is no external power supply connected to the secondary USB-C socket on the left of
the monitor, the mobile phone battery will supply power to the display. To reduce power
usage, the energy-saving mode will be activated and the display brightness will be reduced
to 30%. You can adjust the brightness and volume of the monitor according to the output
power of the mobile phone.
When connected to an external power supply through the secondary USB-C port, the
display will provide power to the mobile phone through the external power supply. The
brightness of the monitor will automatically be adjusted to 85% when connecting with
external power.
External
power supply
of 5V/2A
Display
USB C to USB C
Mobile
Phone
If using a power bank (not supplied) as an external power source, it must be larger than
16W. Power banks can be used as external power for every connection shown here, not
just mobile phones.
8
Page 9
Other devices (via HDMI & USB or power adapter)
Note:
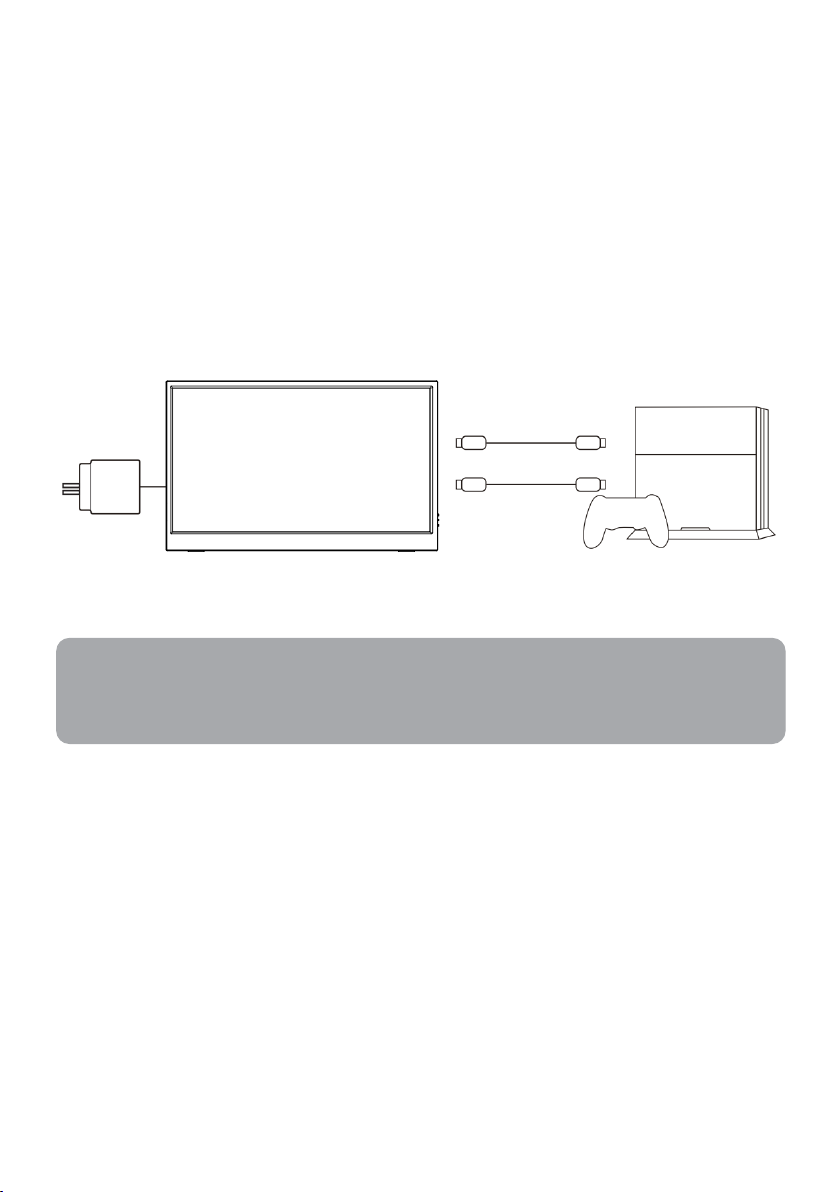
If connecting to a device without a USB-C port, you can utilise HDMI as long as you also
provide a power supply. There are two options for this. The first is to connect the supplied
HDMI-to-Mini HDMI cable between the device and the portable monitor, while also
connecting to the device via USB to provide power. Connect the USB-A from the device to
the primary USB-C port on the monitor’s right side.
The second option for HDMI connection is to connect the supplied HDMI-to-Mini HDMI
cable between the device and the portable monitor, while also connecting the monitor
directly to an external power adapter (supplied) via USB. For this, you can use either the
primary USB-C port on the monitor’s right side or the secondary USB-C port on the
monitor’s left side.
Mini HDMI to HDMI
Display
USB-C to USB-A
External power
supply if USB
power insufficient
When connecting a device using HDMI, to ensure the smooth transmission of the
signal be sure to connect the power cable first, then connect the HDMI.
9
Page 10
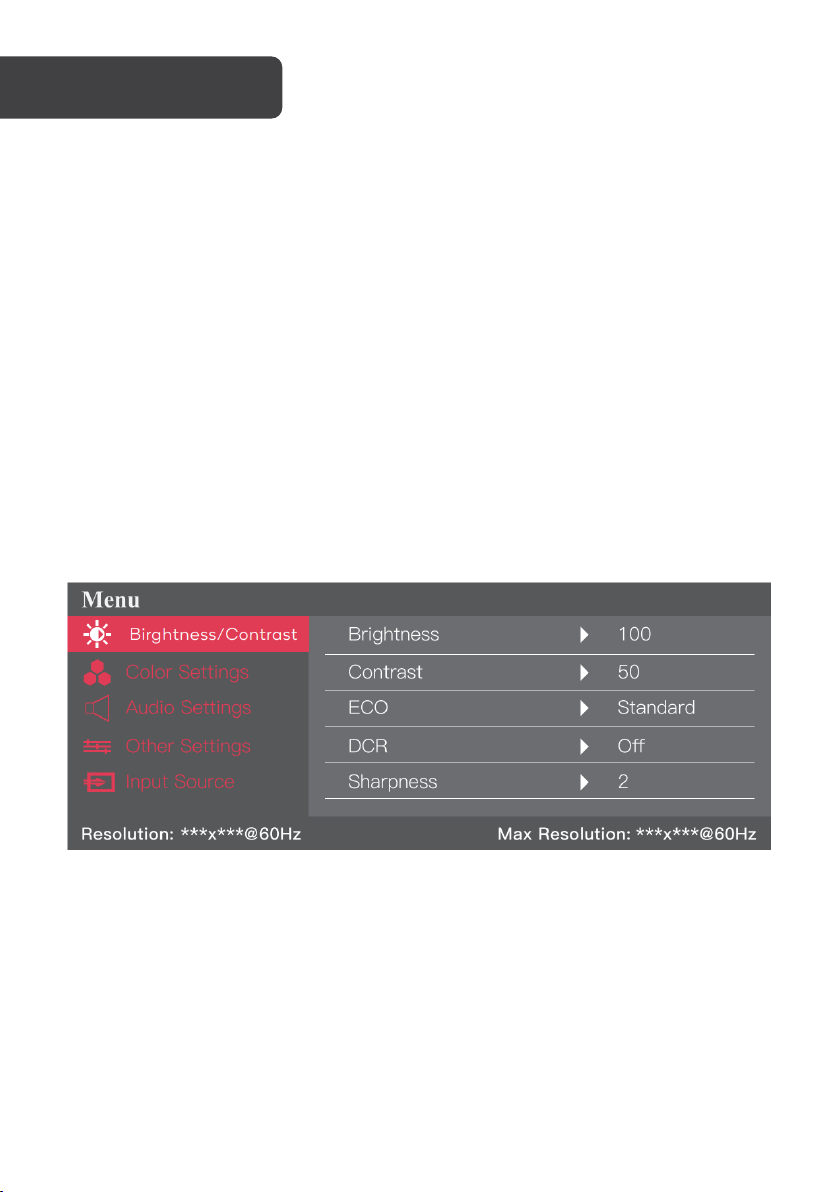
OPERATION
On-screen Display Control (Non-Touchscreen)
• Up / Brightness button
• Down / Volume button
• Start / Back / Menu button
Operation Method
Step 1: Click the Start button to enter Menu and enter submenu layers.
Step 2: Press up and down buttons to select features.
Step 3: Long-press the Start button to return to the previous menu layer, or to turn on/off if
no menu is open.
Brightness / Contrast Menus
• Brightness: Adjust the brightness of the screen. Adjustment range (0-100)
• Contrast: Adjust the contrast level of the image. Adjustment range (0-100)
• ECO Mode: Adjust display mode. Standard / Games / Movies / Reading / FPS / RTS
• Dynamic Contrast: Toggle dynamic contrast function On/Off
• Sharpness: Adjust sharpness. Adjustment range 0-4
10
Page 11
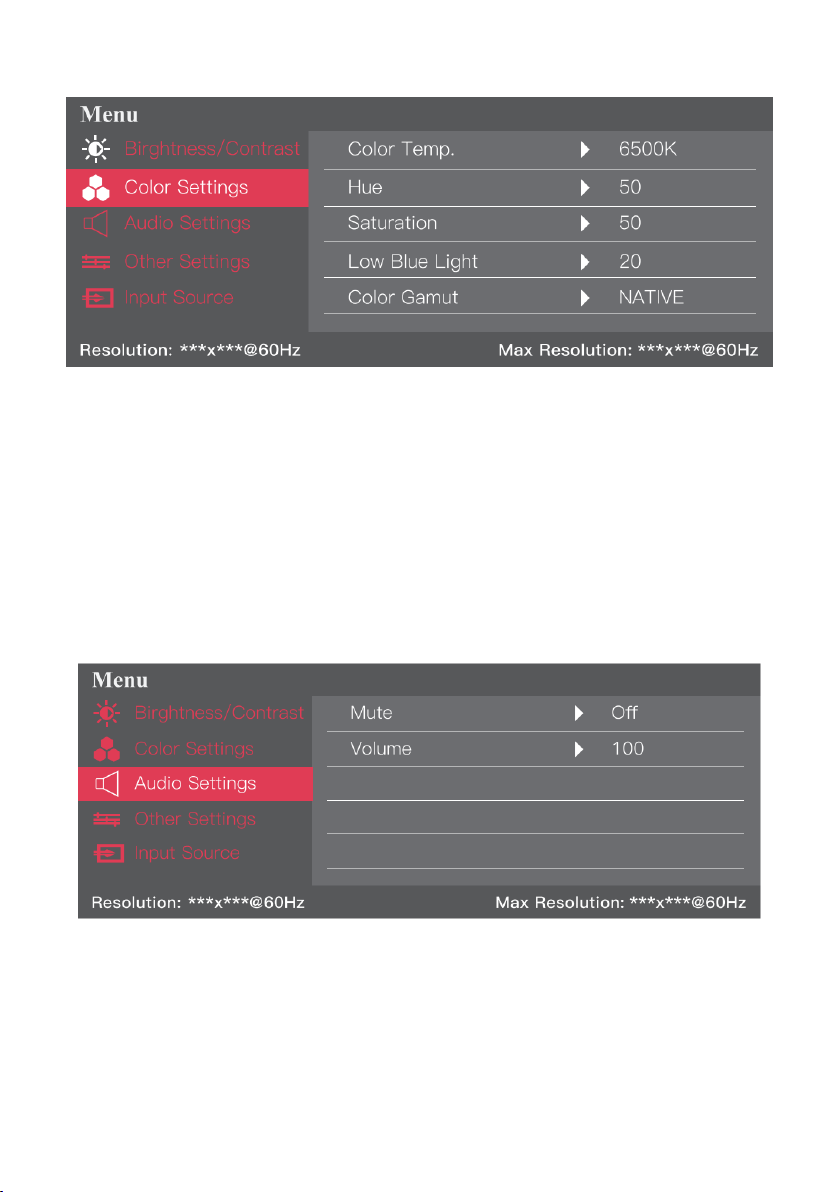
Colour Settings Menu
• Colour temperature: Adjust screen colour temperature mode. 6500k, 9300k user (Red
/ Green / Blue (0-100)
• Hue: Adjust the hue of the image. Adjustment range (0-100)
• Saturation: Adjust the saturation of the image. Adjustment range (0-100)
• Low blue light: Adjust the low blue light mode on the display screen. Adjustment range
0 / 25 / 50 / 75 / 100
• Gamut: Toggle colour gamut. sRGB / Adobe RGB / DCI-P3 / Native
Audio Settings Menu
• Mute: Switch mute mode On / Off
• Volume: Adjust volume. Adjustment range (0-100)
11
Page 12
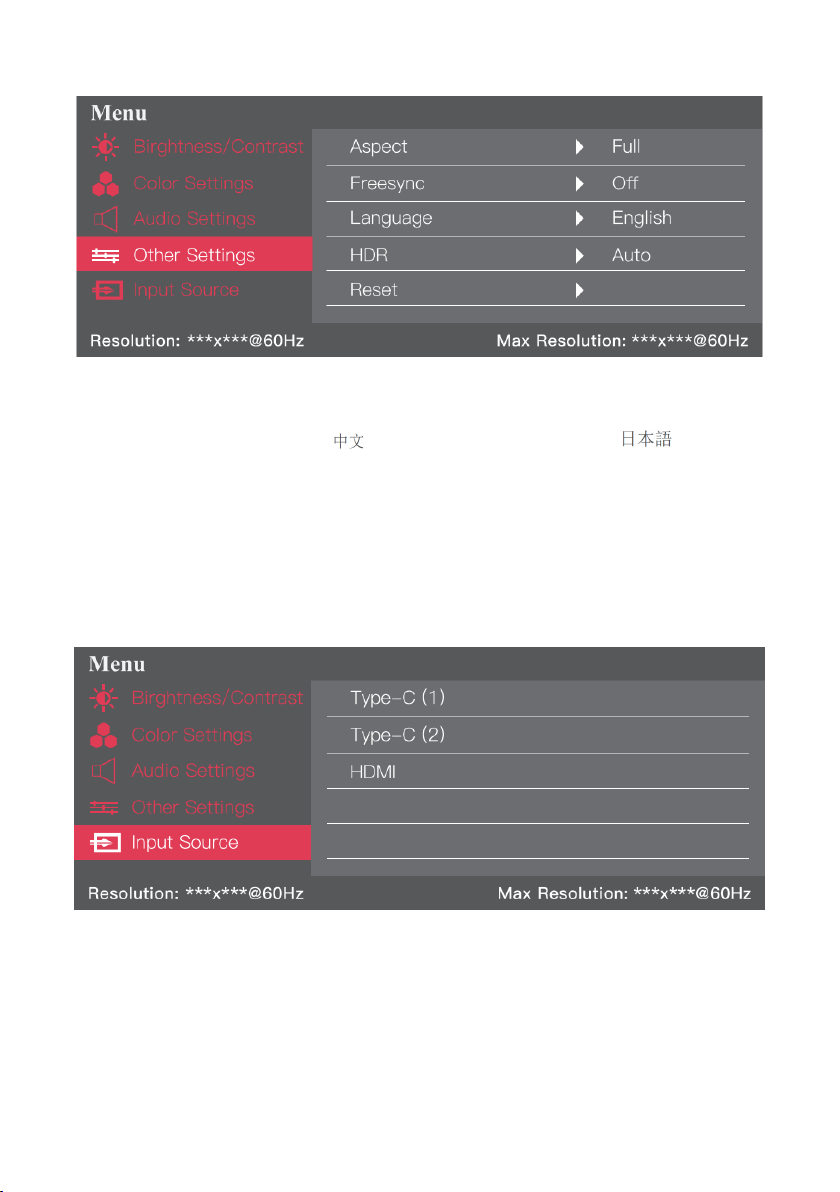
Other Settings Menu
• Aspect Control: Switch the image ratio. Full screen (16:9) / 4:3
• Free-Sync: Toggles free-sync mode On / Off
• Language: Choose language: / English / Français / Deutsch /
• HDR: Switch HDR mode. Automatic / Off
• Reset: Returns to factory set
Signal Source Menu
• Type-C (1)
• Type-C (2)
• HDMI
12
Page 13

CLEANING & CARE
Before cleaning the monitor, unplug the monitor power cord from the electrical outlet.
• When cleaning the antistatic screen, slightly dampen a clean, soft cloth with water. If
possible, use a dedicated screen-cleaning tissue or solvent for electrostatic coating. Do
not use benzene, thinner, ammonia, abrasives or compressed air.
• If you find white powder when you unpack your monitor, wipe it off with a cloth.
• Be careful when operating the monitor, as dark monitors are easier to scratch and leave
visible scratches than light monitors.
13
Page 14
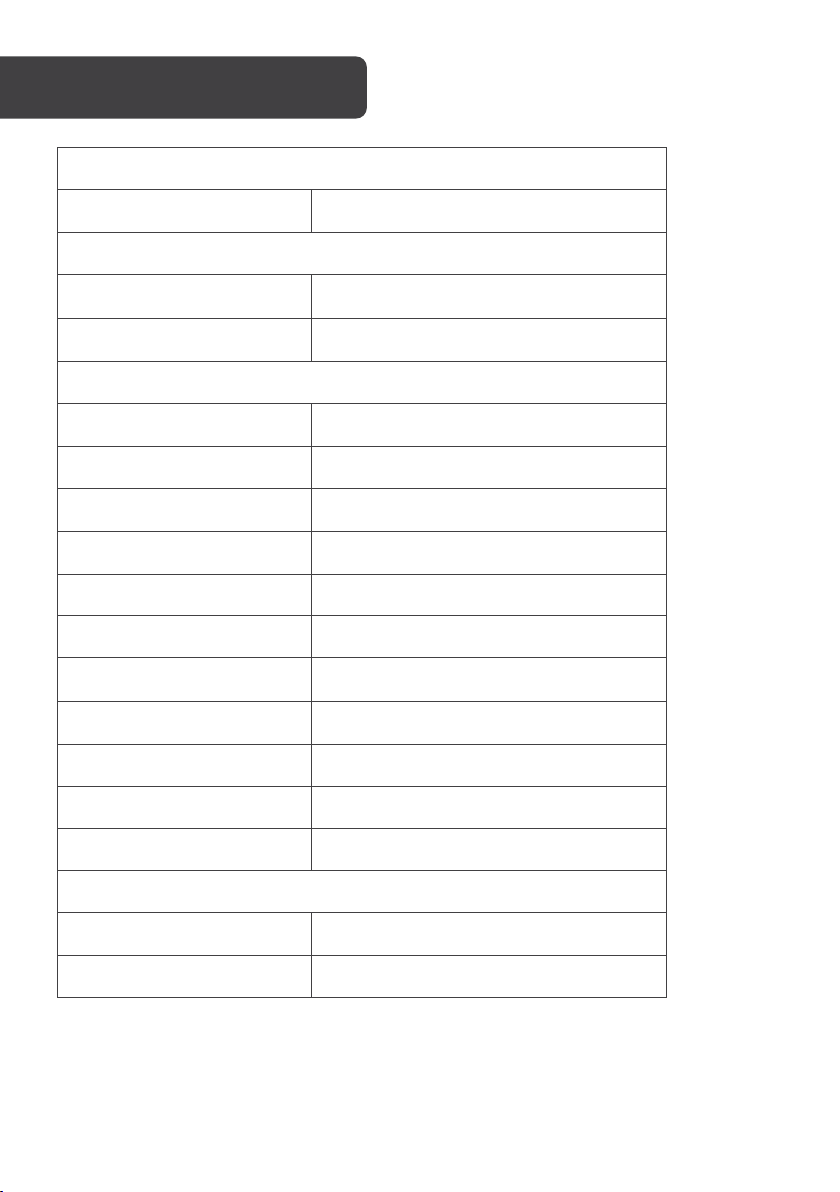
Audio
Speaker
1Wx2
Dimensions
Dimensions
415 x 280 x 61mm
Net Weight (with adapter)
710g
Display
Brightness
220cd/m2
Colours
16.7M
Contrast Ratio
800:1
HDR
Yes
Native Aspect Ratio
16:9
Panel Manufacturer
BOE
Panel Type
IPS
Refresh Rate
60Hz
Resolution
1920 x 1080
Size
15.8"
Viewing Angle
170°(H) x 170° (V)
Features
Flicker-free
Yes
Low Blue Light
Yes
SPECIFICATIONS
14
Page 15
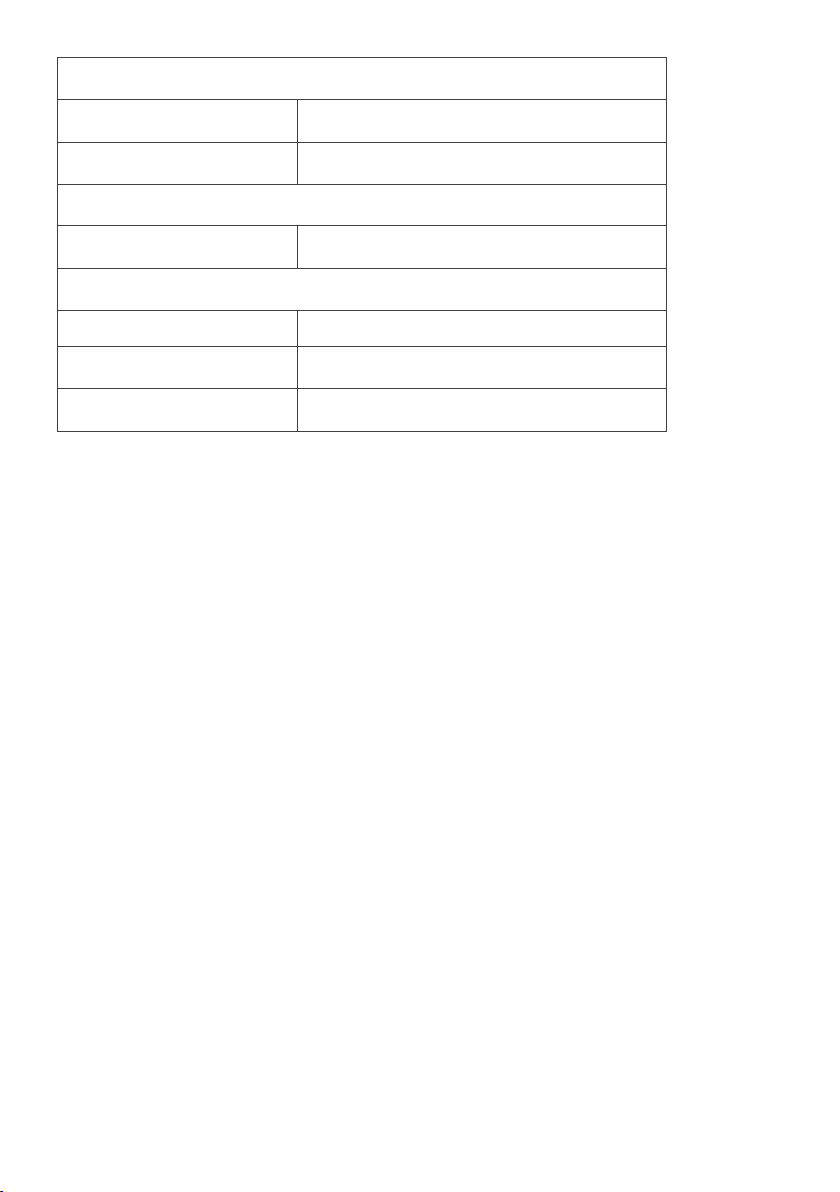
Inputs
HDMI
1
USB Type-C
2
Outputs
Headphone Jack
Yes
Power Consumption
Power On:
Less than or equal to 10W
Standby:
Less than or equal to 0.5W
Power Off:
Less than or equal to 0.5W
15
Page 16
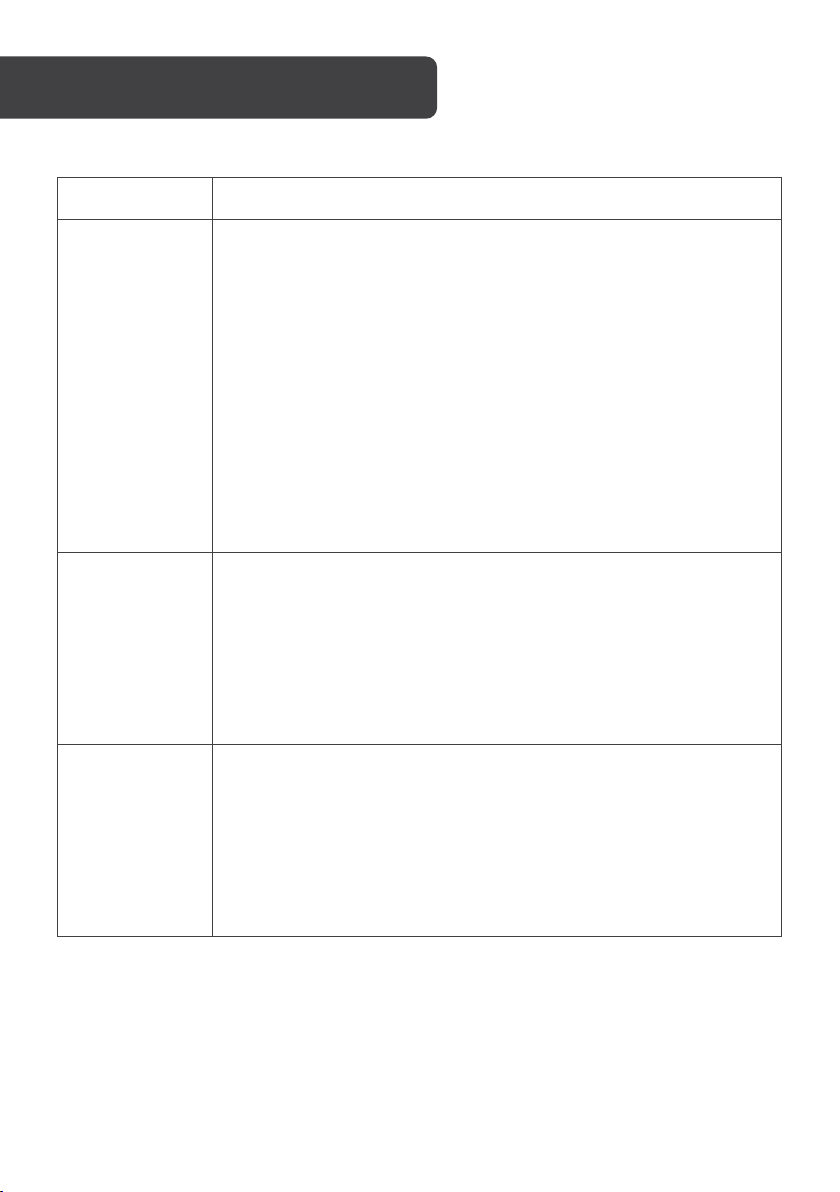
TROUBLESHOOTING
Problem Solution
• Make sure that the video cable between the monitor and computer
is connected properly and securely.
• Check the Connectivity steps in this guide and ensure the correct
USB-C ports are being used. If using HDMI, ensure a power source
(USB-A or power adaptor) is being used.
No video / picture
(LED not lit)
No video / Power
/ picture (LED lit)
• If connecting via USB-C, use the cable supplied with this device.
Lower-quality USB-C cables may not be compatible.
• Use other electrical equipment to confirm that the power outlet is
working properly.
• Make sure that the power button is pressed correctly.
• Make sure that the correct input source is selected through the
input source menu.
• Improve brightness and contrast with OSD.
• Check whether the indicators on the side are normal.
• Check if the video cable connector pins are bent or broken.
• Check whether the power adapter is properly connected.
• Make sure that the correct input source is selected through the
input source menu.
• Turn off and on again.
Missing pixels/
spots and light
leaks on the
screen
• Restore the monitor to factory settings.
• Use OSD to adjust brightness and contrast.
• Pixels that are permanently off are an inherent defect in LED
technology.
• Contact us about monitor quality and pixel issues.
16
Page 17
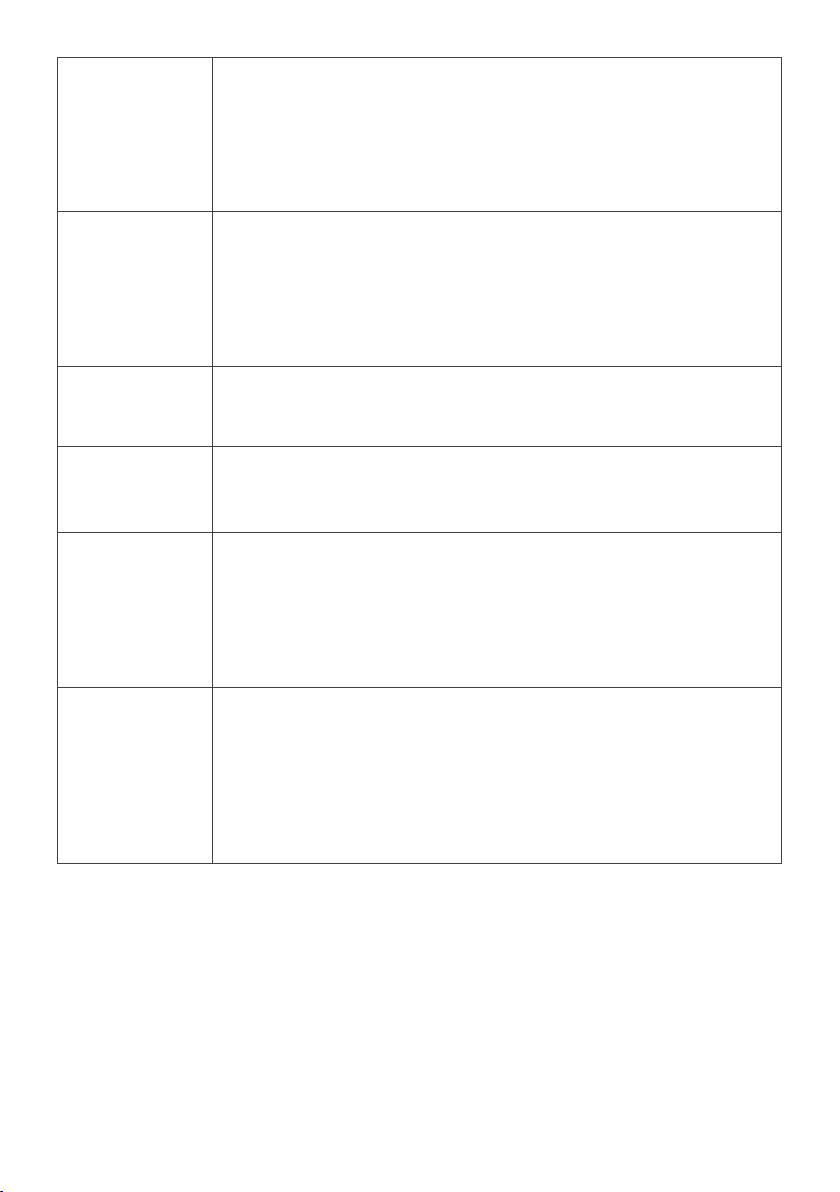
Display fails when
switching
Picture is missing
colours
• Make sure that the video cables of the monitor and HDMI output
device are properly connected.
• Ensure power is being supplied to the monitor (check Connectivity
settings)
• Reset the monitor to factory settings.
• Make sure that the video cable connecting the monitor and the
computer is properly connected.
• Adjust custom R/G/B values. Colour in the colour menu of OSD.
• In the advanced settings OSD, change the input colour format to
PCRGB or YPbPr.
Screen image is
too small
OSD does not
appear on the
screen
No picture,
indicator light is
blue
The picture does
not fill the entire
screen.
• Check the aspect ratio setting in the monitor settings OSD
• Restore the monitor to factory settings.
• Turn off the monitor, disconnect and reconnect the power cord and
turn on the monitor.
• Check the signal source. Make sure that the computer or phone is
not in sleep mode.
• Check that the signal cable is properly inserted. Reconnect the
signal cable if necessary.
• Restart your computer or phone.
• Since the resolution of the same screen of the mobile phone can be
re-scaled (aspect ratio), the display can be displayed in full screen.
• Computer equipment can be set to 16:9 resolution, the display can
be full screen display
• Play a video source with a 16:9 video sources and the monitor can
display full screen.
17
Page 18
NOTES
18
Page 19

19
Page 20

Need more information?
We hope that this user guide has given you
the assistance needed for a simple set-up.
For the most up-to-date guide for your product,
as well as any additional assistance you may require,
head online to help.kogan.com
20
 Loading...