

Page 1

LED COLOUR CHANGING
DRONE
KALEDDRNYWA & KALEDDRNBLA
Page 2

Contents 2
Components list 3
Overview 4
Setup 5
Operation 9
Specifications 21
Troubleshooting 22
Notes 23
2
Page 3

No.
Part Name
Quantity
1
Drone
x1
2
2.4 GHz Transmitter
x4
3
Additional Propellers
x1
4
USB Charging Cable
x1
5
Screwdriver
x1
6
Battery
x1
7
User Guide
x1
This marking indicates that this appliance should not be disposed with
Disposal
other house-hold wastes. To prevent possible harm to the environment or
human health from uncontrolled waste disposal, recycle it responsibly to
promote the sustainable reuse of material resources.
3
Page 4
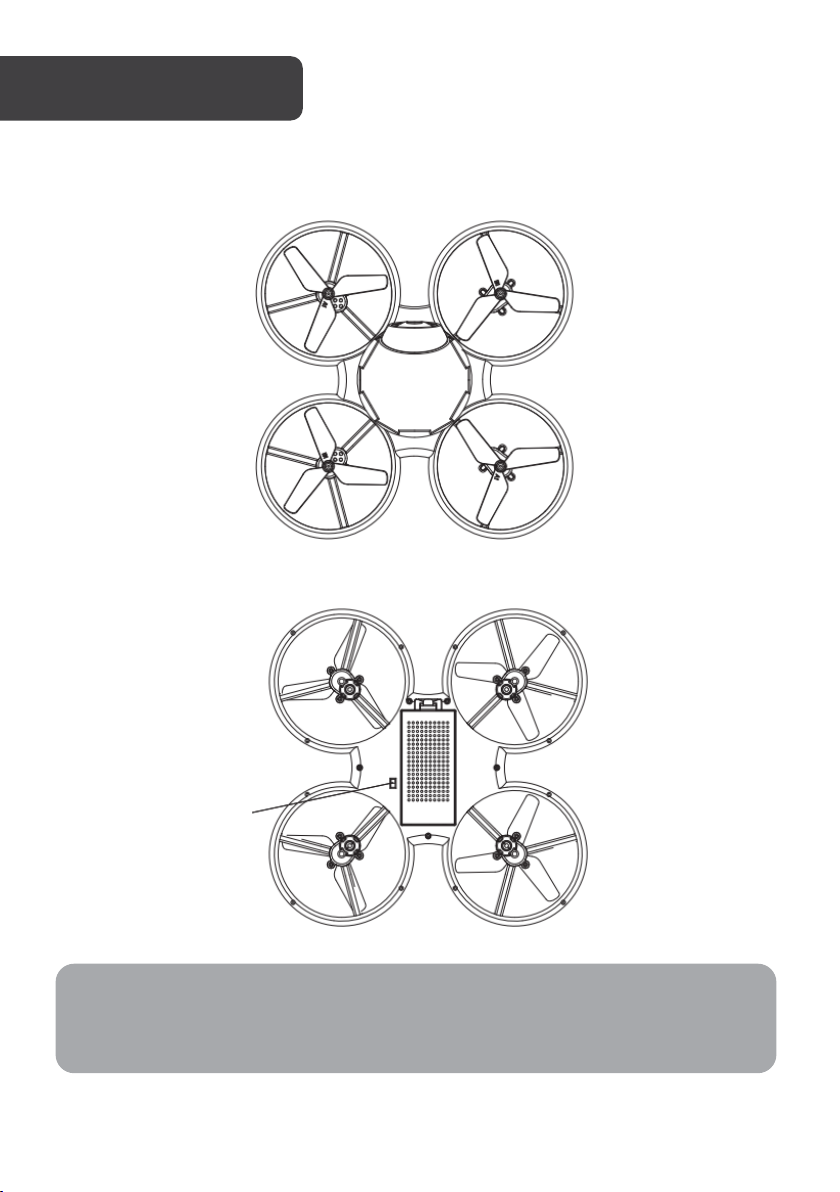
B1/B2
Head
A1/A2
A1/A2
Tai l
B1/B2
Power
ON/OFF
Note:
Every propeller is marked A1/A2 or B1/B2. Ensure each propeller is installed in the
correct position as shown above. Otherwise, the drone will fail to take off.
4
Page 5
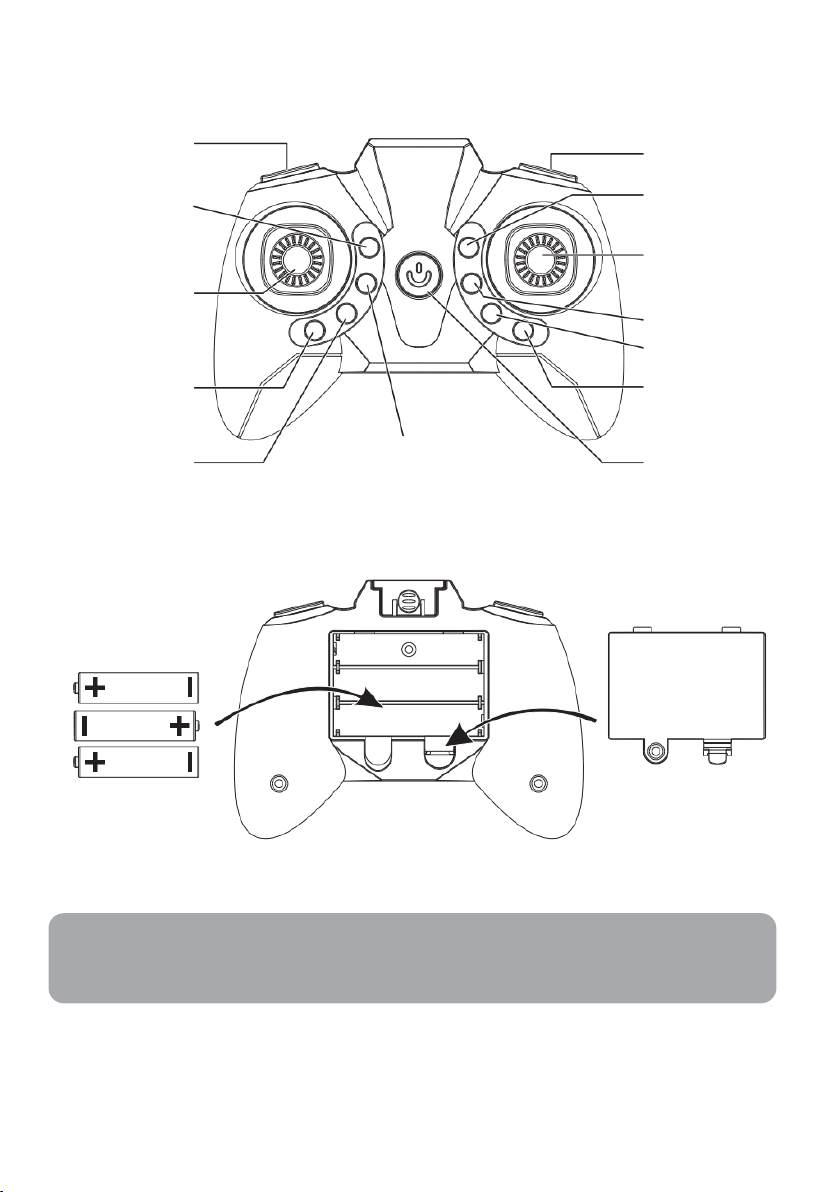
Transmitter
Speed Setting
One key take off/
Up/ Down/
One key Rotation
Light switch
Headless mode (short Press)/
3D Flip
Forward Trim
Forward/
Backward trim
Left trim
Right Trim
Power ON/ OFF
Battery Cover
3 x AA alkaline batteries
Landing/ Emergency
stop (Long Press)
Turn Left/
Turn Right
(Short Press)/ one key
spin (Long Press)
Backwards/
Fly to Left/
Fly to Right
one key return (Long Press)
(Not included)
Note:
Always pay close attention to battery polarity to ensure they are inserted correctly.
5
Page 6
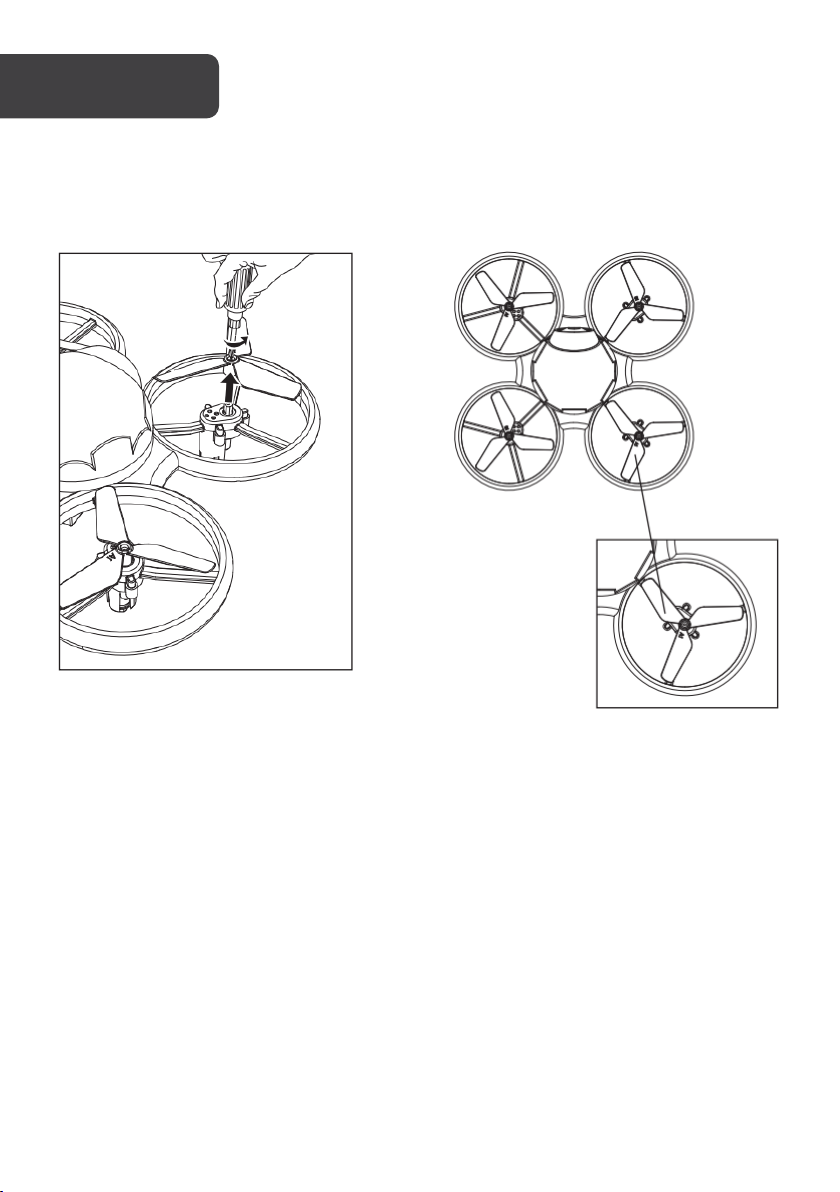
A1/A2
B1/B2
A1/A2
B1/B2
Charging propellers
1. Use the supplied screwdriver to loosen the screw by turning it counter clockwise
and then remove the propeller.
2. Install the propellers in the correct position as shown above: each propeller is
marked either A1/A2 or B1/B2.
3. Tighten the screw.
6
Page 7
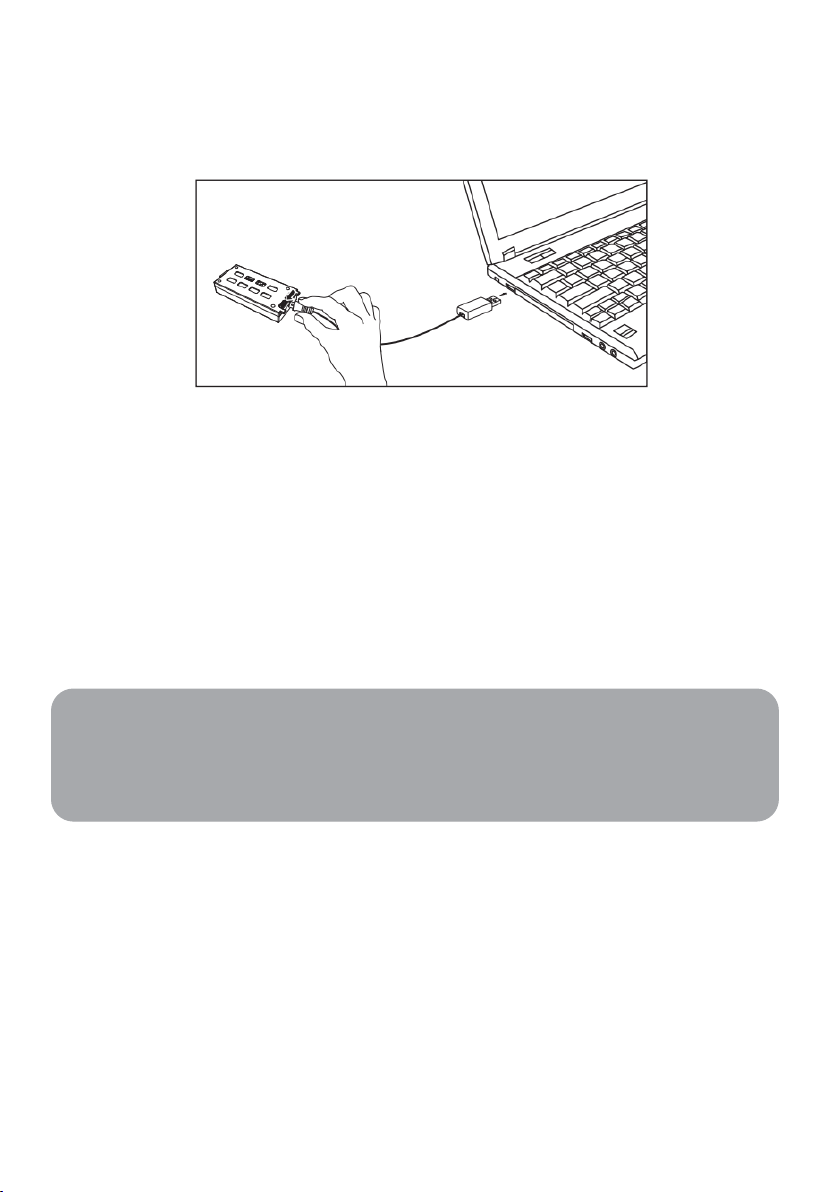
Charging the drone battery
The drone’s battery must be charged before it can be flown. To avoid the risk of injury or
damage, ensure the drone and remote control are both powered OFF and remove the
battery from the drone when charging. Charging time is approximately 80-100 minutes.
Charge fully before you use for best performance.
Connect the USB charging cable (included) to the USB port of a powered-ON computer or
USB power adapter (not included), then connect the charging plug to the battery plug.
While charging, the light will display a red light.
When charging is complete, the charger light will turn OFF.
Note:
• Be sure to correctly match the plug to the charging port or damage may occur.
• Do not charge overnight. Do not leave unattended while charging.
When the drone’s battery is low, the LED lights on the drone will begin blinking rapidly,
indicating that the remaining flight time is 40 seconds: you need to fly it to a safe area and
use the one key landing button to land it, otherwise it will drop out of the sky.
7
Page 8
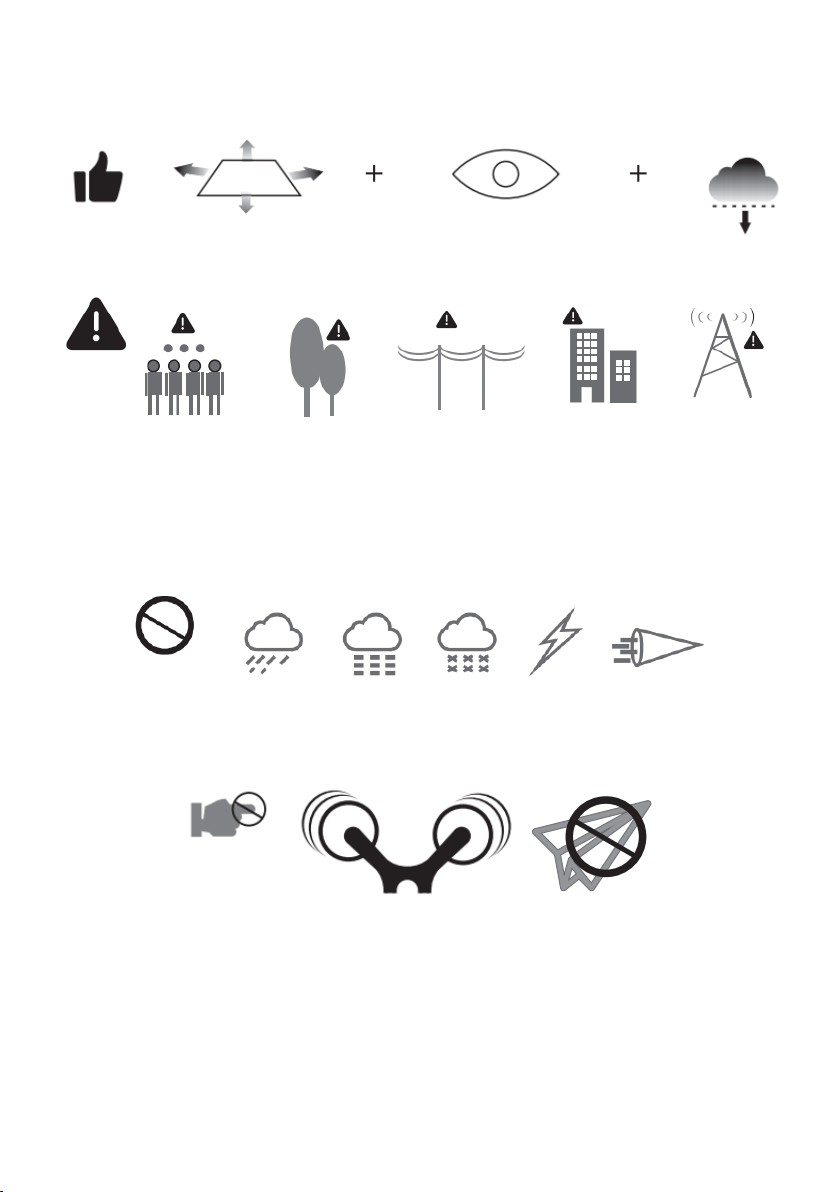
Flight Safety Information
Fly open areas
Maintain line of sight
Fly below 50m
No-fly zone
Stay away from rotating
Avoid flying over or near obstacles, crowds, high voltage power lines, trees, airports or bodies
of water.
Do not fly near strong electromagnetic sources such as power lines and those base stations
as it may affect the onboard compass.
Do not use the drone in adverse weather conditions such as rain, snow, fog and wind.
Do not use the drone in adverse weather conditions such as rainy, snowy, foggy and windy
conditions.
The basic flight guidelines are imported for pilots’ safety and the surroundings. Ensure you
read these safety guidelines carefully and always observe them.
8
propellers and motors.
Page 9
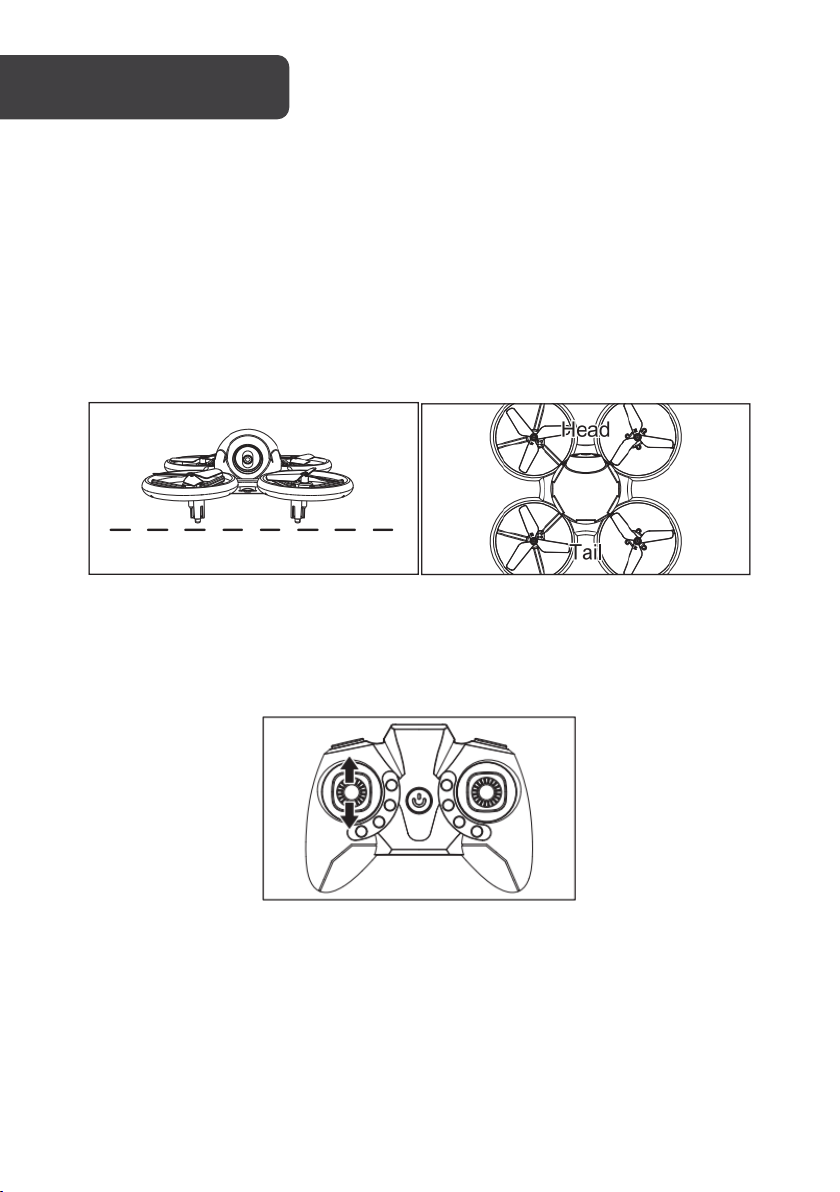
Horizontal position
Get Your Drone Ready
• Rotating propellers can be dangerous. Do not start the motor when there are
people nearby.
• If the motor is still engaged, always keep your hands on the transmitter.
Drone Pairing
1. Power on the drone and place it on a flat surface with the tail facing towards the
pilot. The lights on the drone will blink as it searches for a signal from the
transmitter.
2. Turn on the transmitter, push the left control stick fully forward, wait for a beep to
sound, then pull the stick fully back and wait for a second beep. When the indicator
pattern changes, this indicates the transmitter and the drone have paired
successfully.
9
Page 10
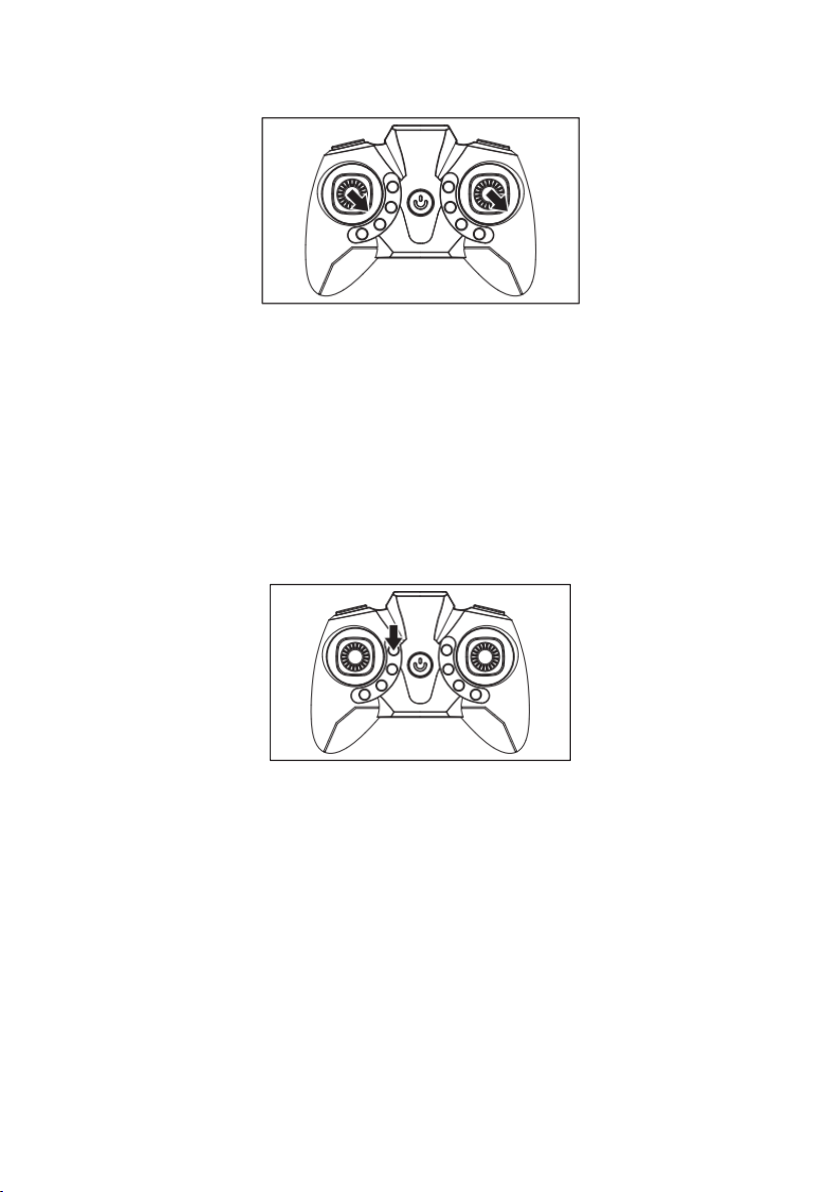
Gyro Calibration
3. After pairing, pull both control sticks down and to the right for 2-3 seconds. When
you hear a beep and the lights on the drone blink rapidly for 2-3 seconds,
calibration is completed.
(Gyro calibration is recommended after pairing and if a crash occurs. Do not
attempt to do this while flying).
Drone Ta ke off
4. After pairing and calibration, press the one key take off/landing button and the
drone will fly to the height of 80cm automatically. Press the take-off/landing
button again and the drone will land automatically. After landing, wait for the
propellers to stop spinning. Tur n the transmitter off before powering off the drone.
This will ensure that no signals are accidentally sent by the remote, reducing the
chance of injury. After this is done, it is safe to pick up and power off the drone.
10
Page 11
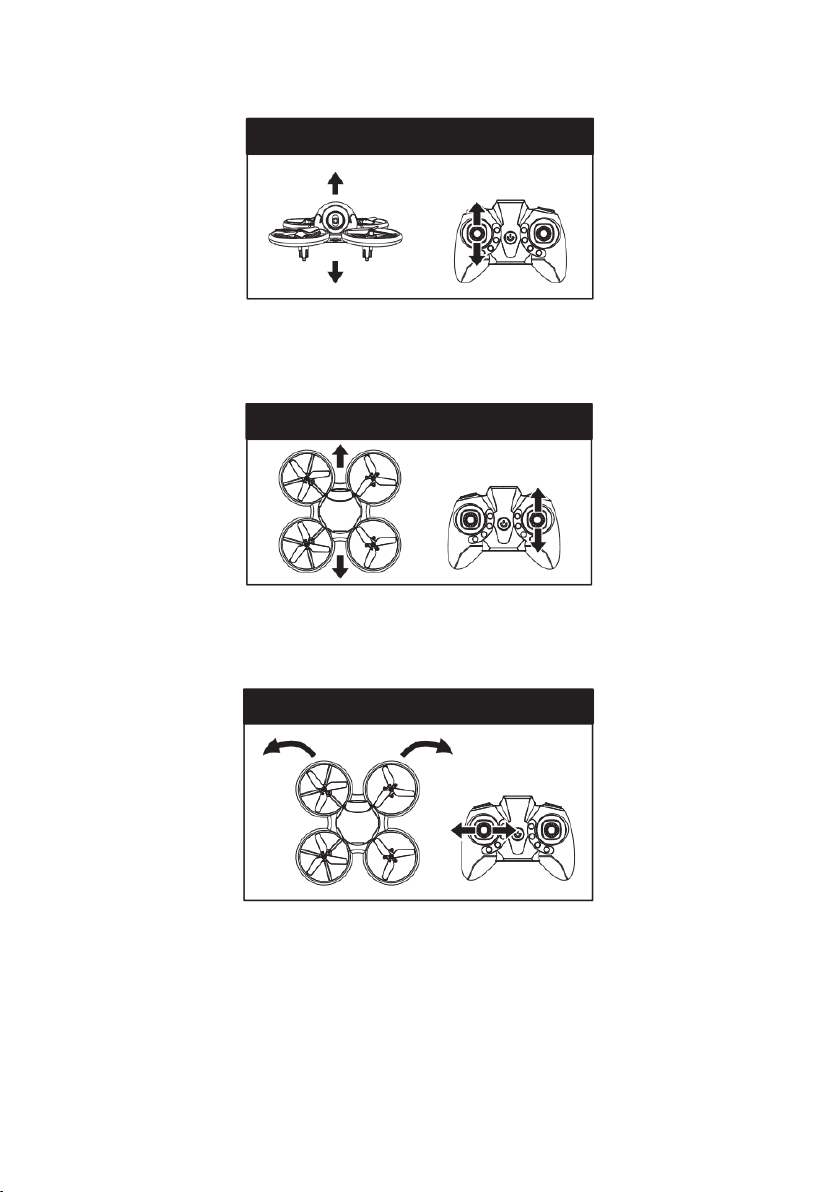
Flight Control
Rise and Fall Control
For ward and Backward Control
Turn Left and Right
Push the left control stick - up or down and the drone will ascend or descend
Push up or down on the right control stick and the drone will fly forward or backwards.
Push the left control stick left or right and the drone will turn to the left or the right.
11
Page 12
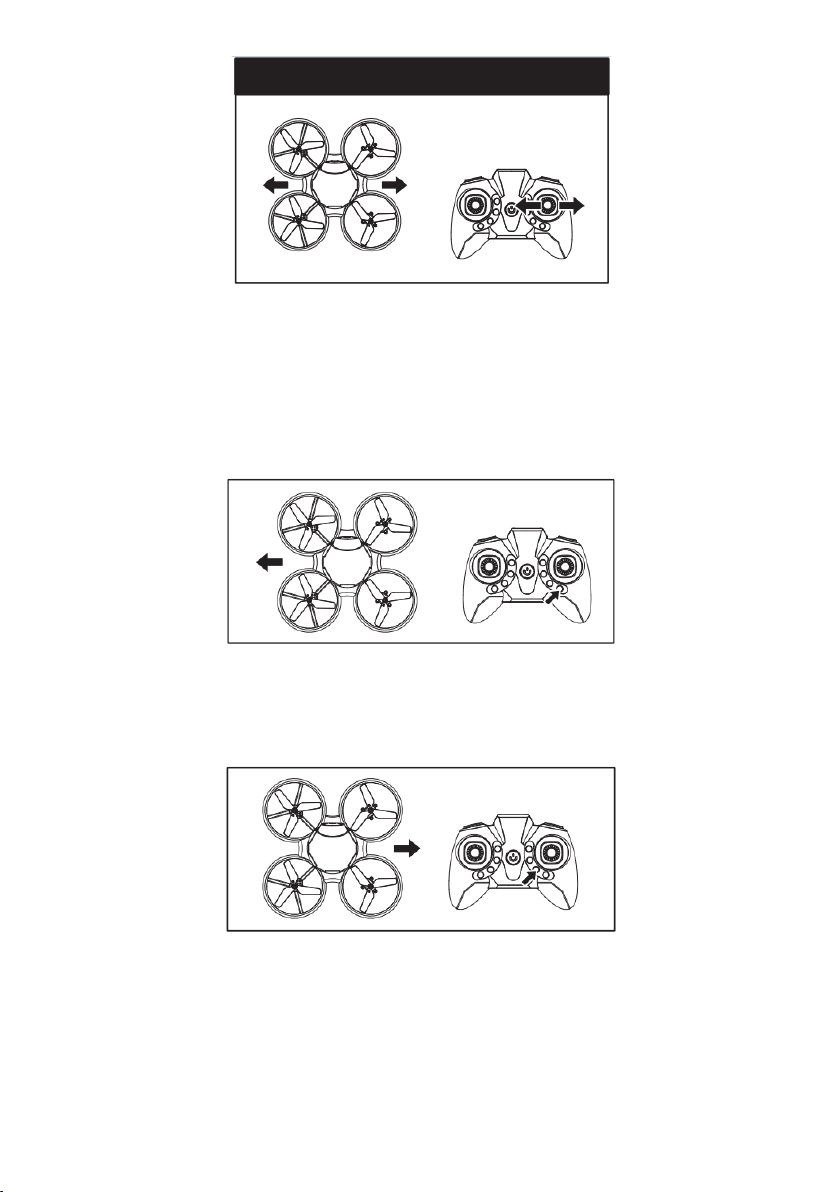
Left-Wing and Right-Wing Control
Push the right control stick left or right and the drone will fly to the left or the right.
Setting trim and Countering drift
If the drone keeps drifting leftwards when hovering, press the right side-fly trimmer to adjust
until it gets balanced.
If the drone keeps drifting rightwards when hovering, press the left side-fly trimmer to adjust
until it gets balanced.
12
Page 13
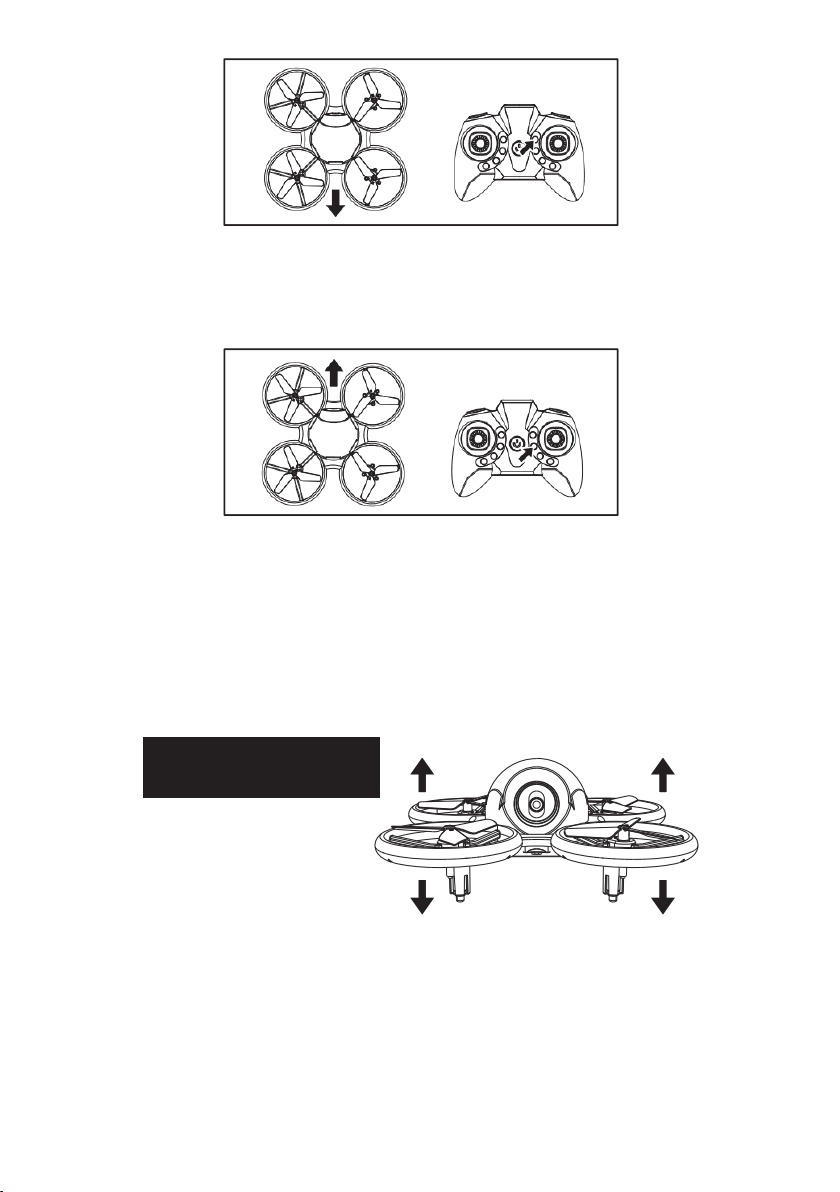
Altitude Hold
If the drone keeps flying backwards when hovering, press the forward trimmer to adjust until
it gets balanced.
If the drone keeps flying forward when hovering, press the backwards trimmer to adjust until
it gets balanced.
Even after the drone is calibrated, it may show a tendency to drift while airborne. Adjusting
the trim will help counter this effect and allow better control of the drone; however, it will not
eliminate it entirely as air currents and other factors may still cause slight drift while airborne.
This drone is equipped with an Altitude Hold function to hover steadily in the air.
During the flight, the altitude hold function allows you to release the throttle joystick and
maintain its height without descending to the ground.
13
Page 14
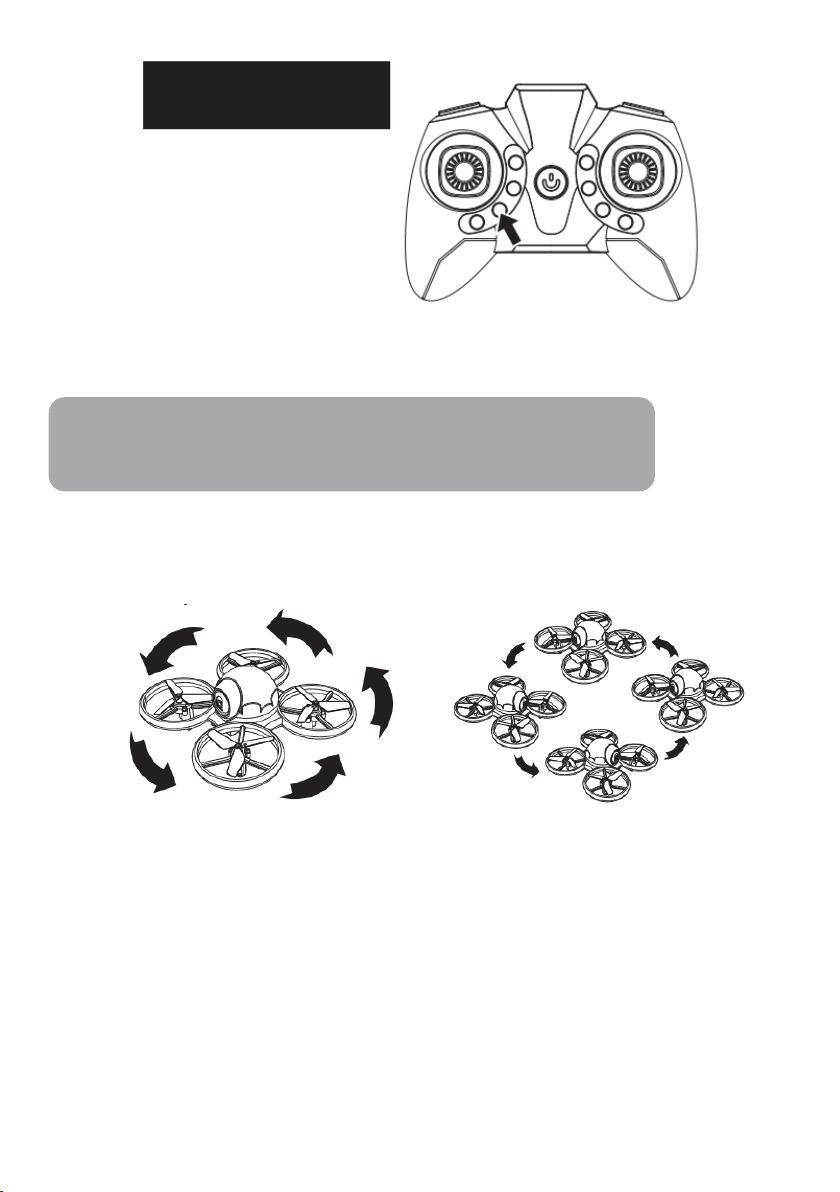
Light Switch
Press the light switch button to turn the lights of the drone on or off.
Note:
Pair the drone before pressing the light switch.
One key rotation / One key spin
A. One key rotation B. One key spin
14
Page 15
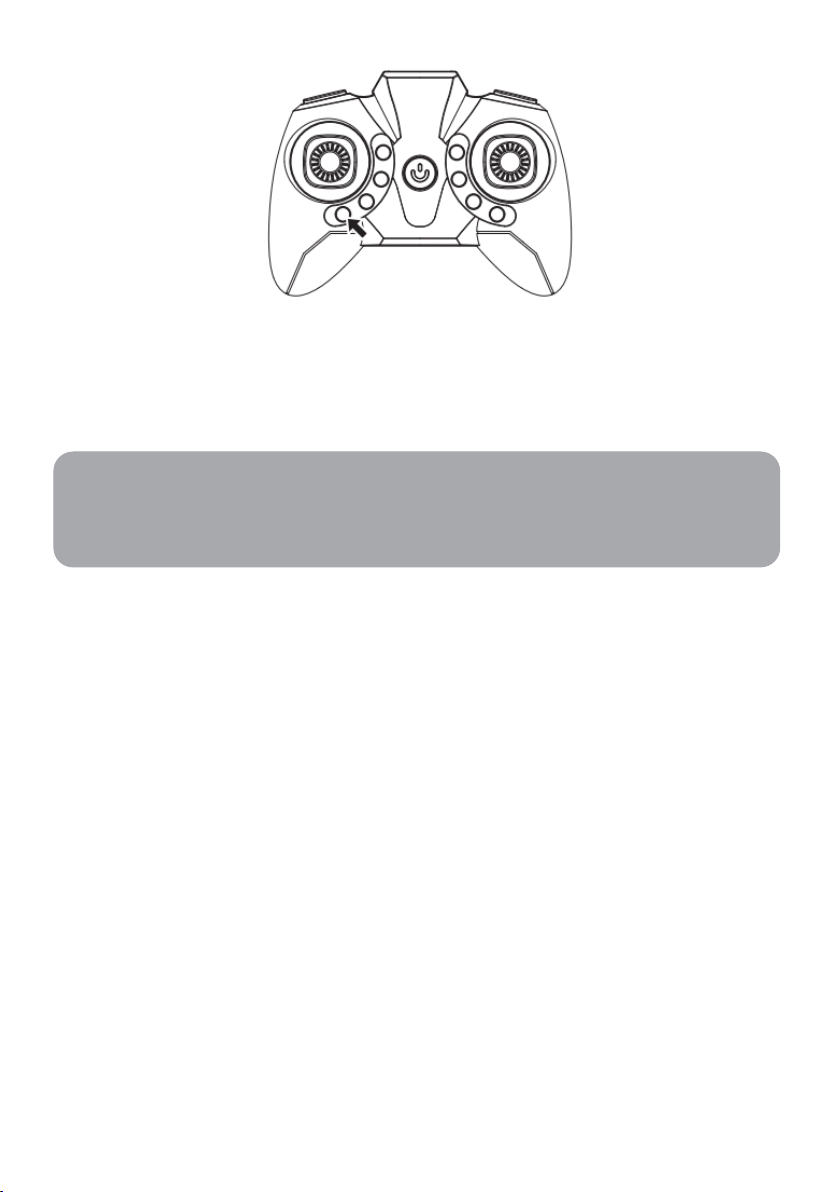
Short press the spin button and the drone will spin in an anticlockwise direction; short press
again to exit (A).
Long press the spin button and the drone will spin in circles; long press to exit (B). You can
use the left control stick to adjust the height of the drone while in a spin.
Note:
Before you press the spin button, please make sure you fly the drone at least 8 feet
away from any objects.
15
Page 16
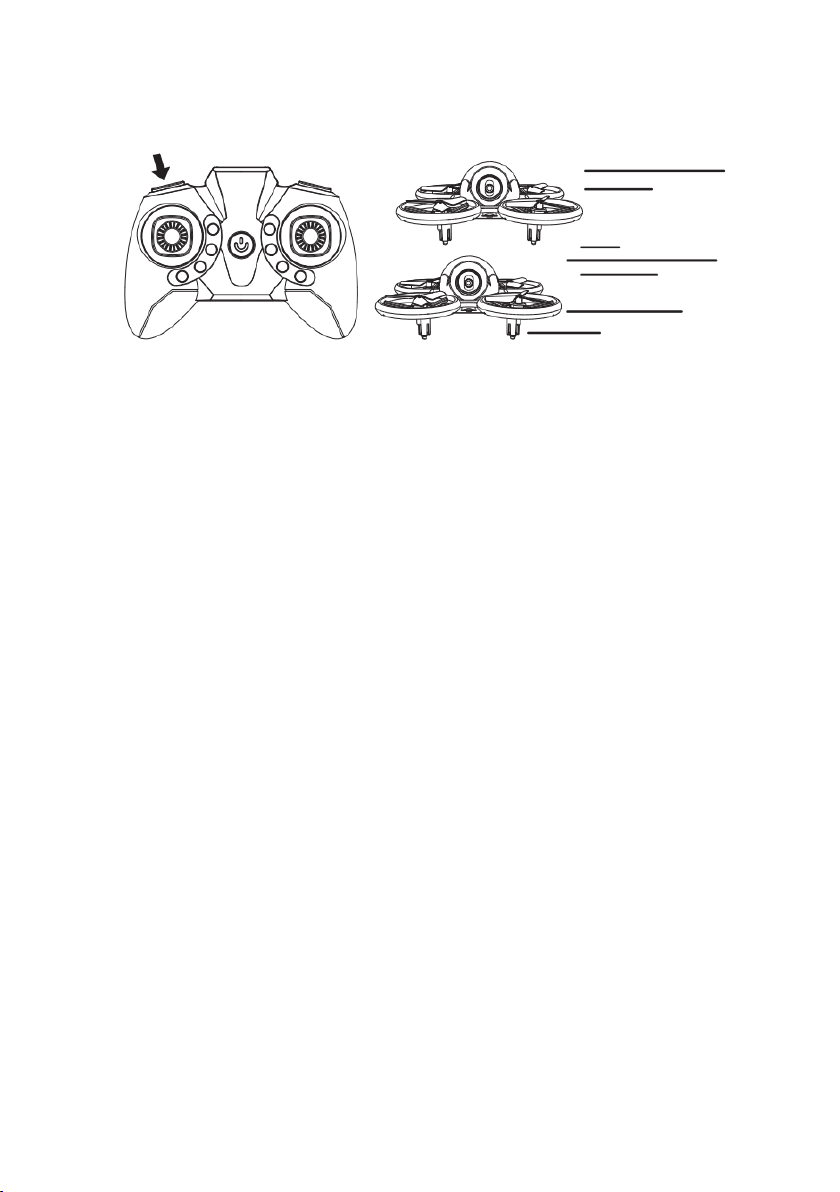
Speed Setting
Press the Speed button on the remote to cycle through speed settings.
• Low: Provides smooth and predictable control of the drone. The remote will chime
once to indicate the low-speed setting.
• Medium: The drone will move and respond faster to all control inputs. The remote
will chime twice to indicate the medium speed setting.
• High: Highest setting for maximum performance. The remote will chime three
times to indicate the high-speed setting.
16
Page 17
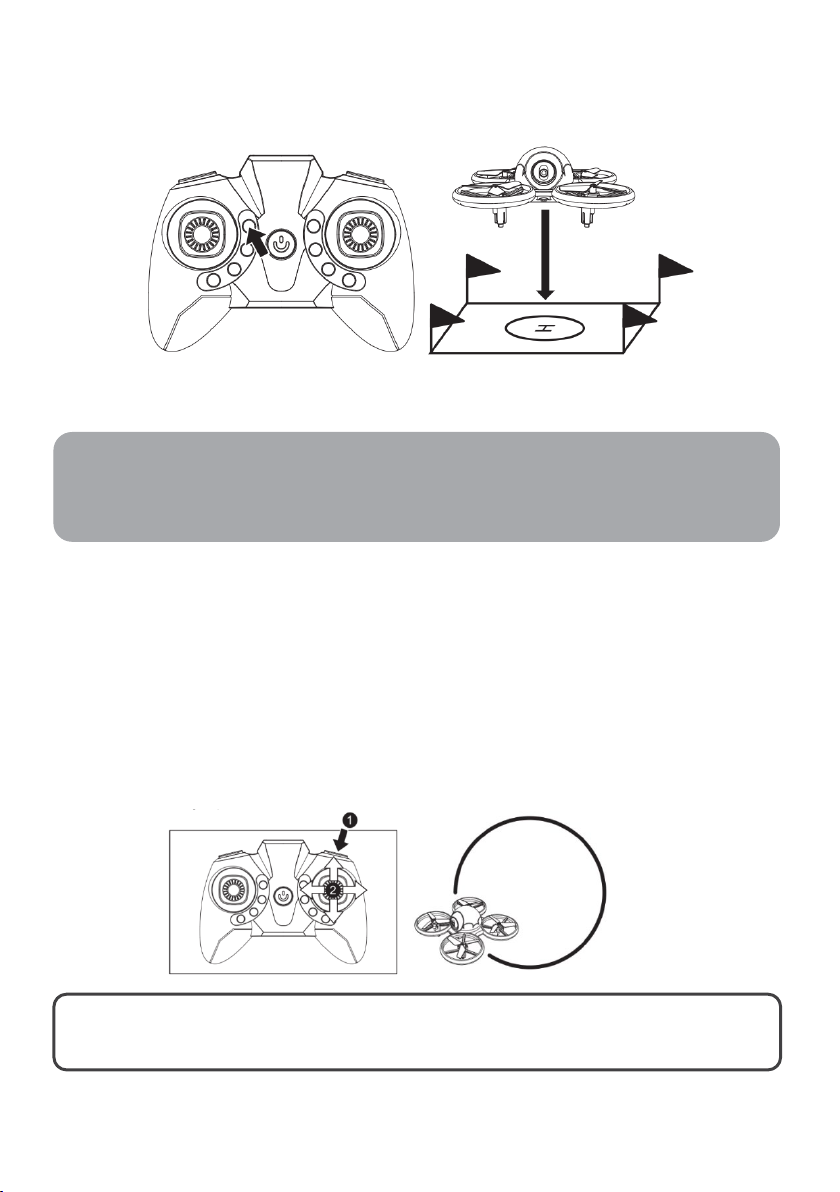
Emergency Stop
(Long Press)
WARNING: the drone will perform these manoeuvres best with a fully
Note:
The emergency stop function should be only used in case of emergency during the
flight to avoid any of damage or injury.
If for any reason you need to stop the drone, press the “Emergency Stop” button or pull the
left joystick down as far as it will go: the propellers will stop spinning immediately. Ensure the
ground is clear of any objects as this will command the rotor to shut down and crash land.
3D Flip Mode
Before attempting a flip, ensure that there is enough clear space around the drone, ideally 3
metres in all directions. It is not recommended to attempt to flip around or through any
obstacles, as this may result in unintended damage.
Press the Flip button to activate Flip Mode and then move the Right Control Stick in any
direction and the drone will perform a flip in the same direction. Press the Flip button again
to deactivate without performing a flip.
charged battery.
17
Page 18
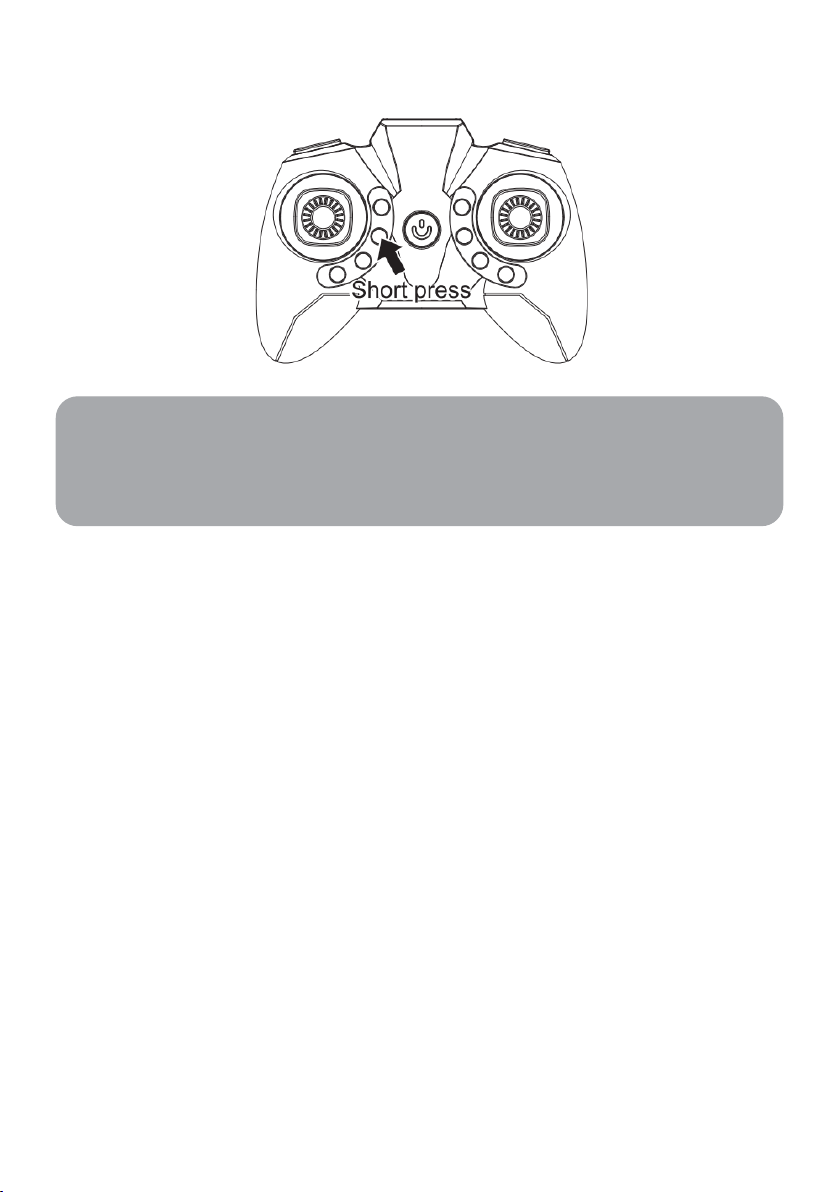
Headless Mode
Note:
Flying in Headless Mode without sufficient experience might result in loss or damage
to the device. Do not use the Headless Mode until you totally comprehend the
instructions For Use.
1. Place the drone in front of the pilot before pairing the drone to the transmitter.
Make sure the head of the drone faces forward and the tail faces towards the pilot.
2. After pairing and calibration, press the Headless Mode button to enter Headless
Mode function. A beep will be heard from the transmitter and the red lights will
slowly flash, indicates that drone is in headless mode.
3. Press the headless mode button again; you will hear a beep which indicates the
drone exits the headless mode.
4. Under Headless Mode, the forward direction is the direction the pilot faces when
the pilot pairs the drone with the transmitter.
18
Page 19
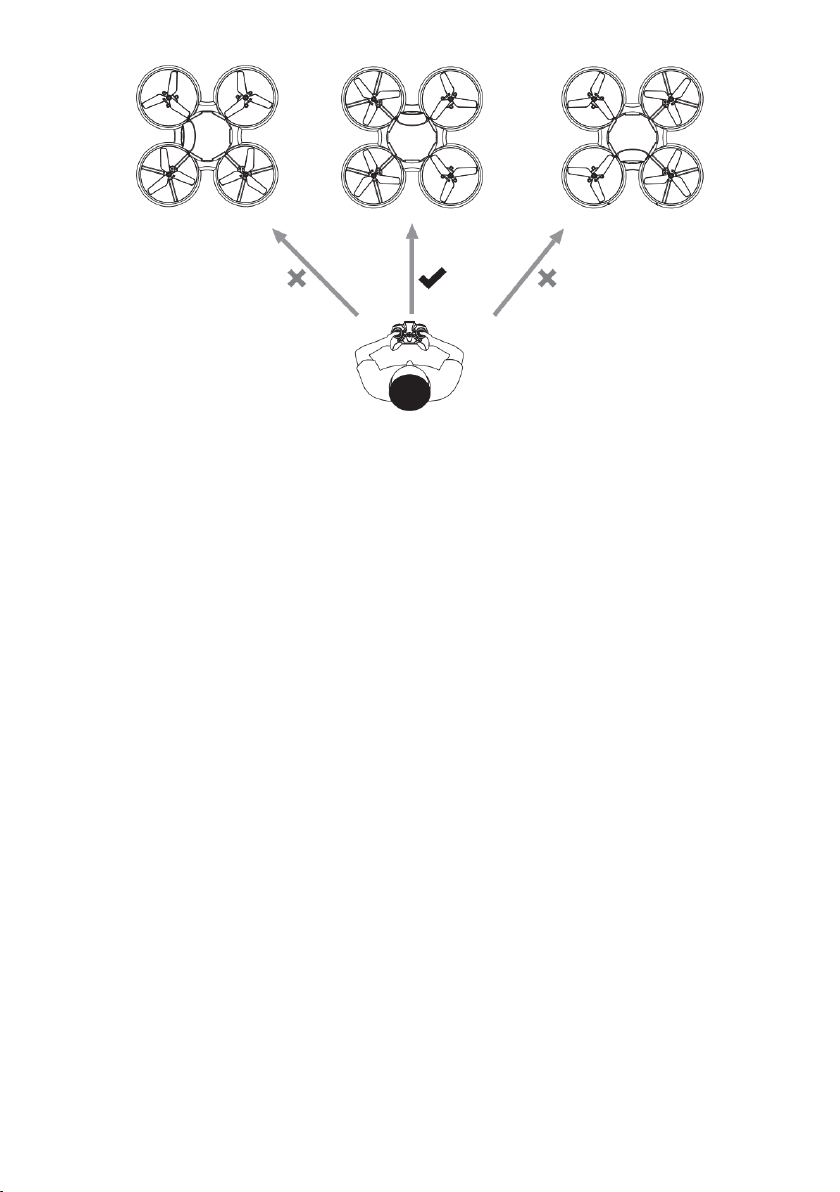
Ensure the pilot is in the same orientation as the drone head faces when the drone takes off.
The pilot must not change the direction or orientation they face; otherwise, the drone and
transmitter will lose connection, causing controls to not perform as desired.
19
Page 20
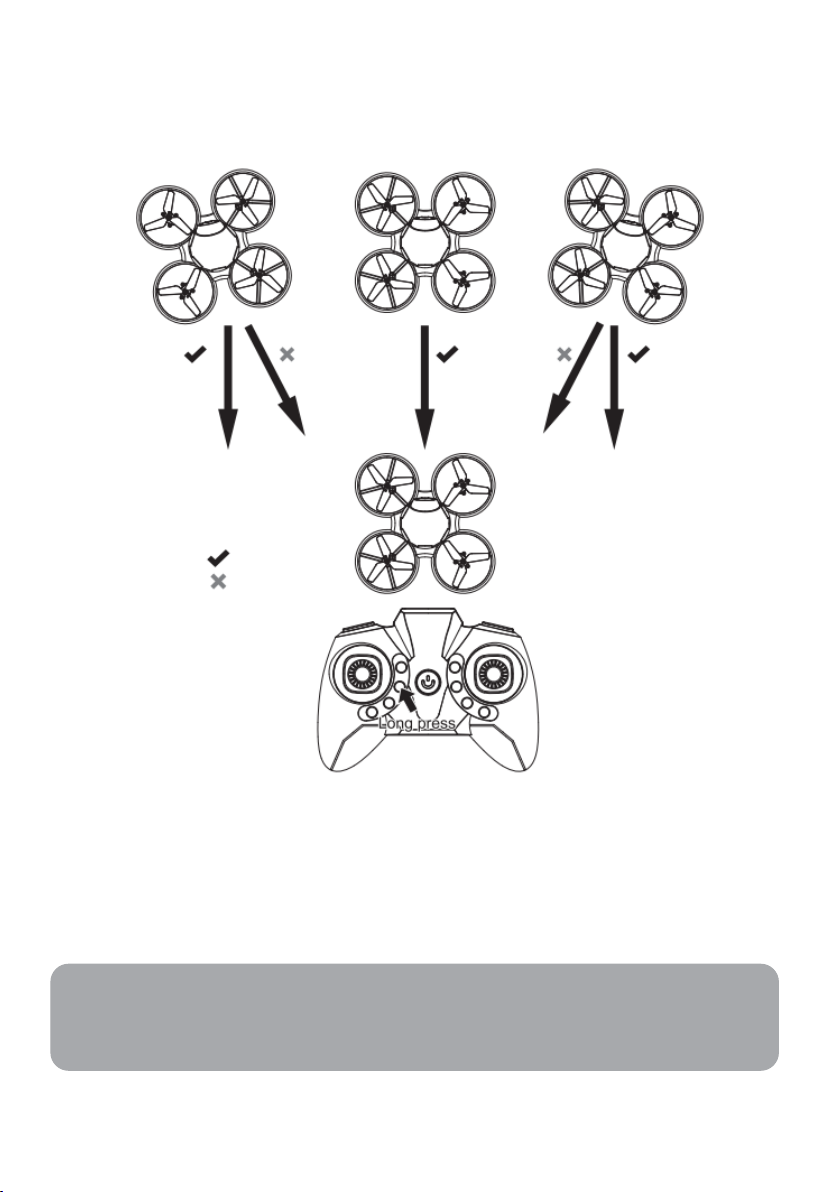
One key return
Wrong Track
Right Track
Avoid using this feature when the drone is near to the pilot, to avoid injury.
With a press of the One Key Return button, the drone will return towards the original
direction of take-off.
You can rotate the right joystick in any direction to retake control of the drone and cancel the
One Key Return Function.
It is recommended to use the return function when the headless mode is activated.
Note:
Please use one key return function after you comprehends these functions; otherwise, it
may result in the loss and/or damage of the drone.
20
Page 21

Drone
Flight time
8-9 minutes
Operating temperature range
32° to 140°F (0° TO 40°C)
Dimensions
6.3” x 6.3” x 2.95”
Operating frequency
2.4GHz
Max transmission distance
200-260 feet (outdoor and unobstructed)
Operating temperature
32° to 140°F (0° TO 40°C)
Capacity
800mAh
Voltage
3.7V
Battery type
LiPo
Energy
2.96Wh
Charging temperature range
41° to 104°F (5° TO 40°C)
Charging time
80-100mins (depending on charging power)
Transmitter
Flight battery
21
Page 22
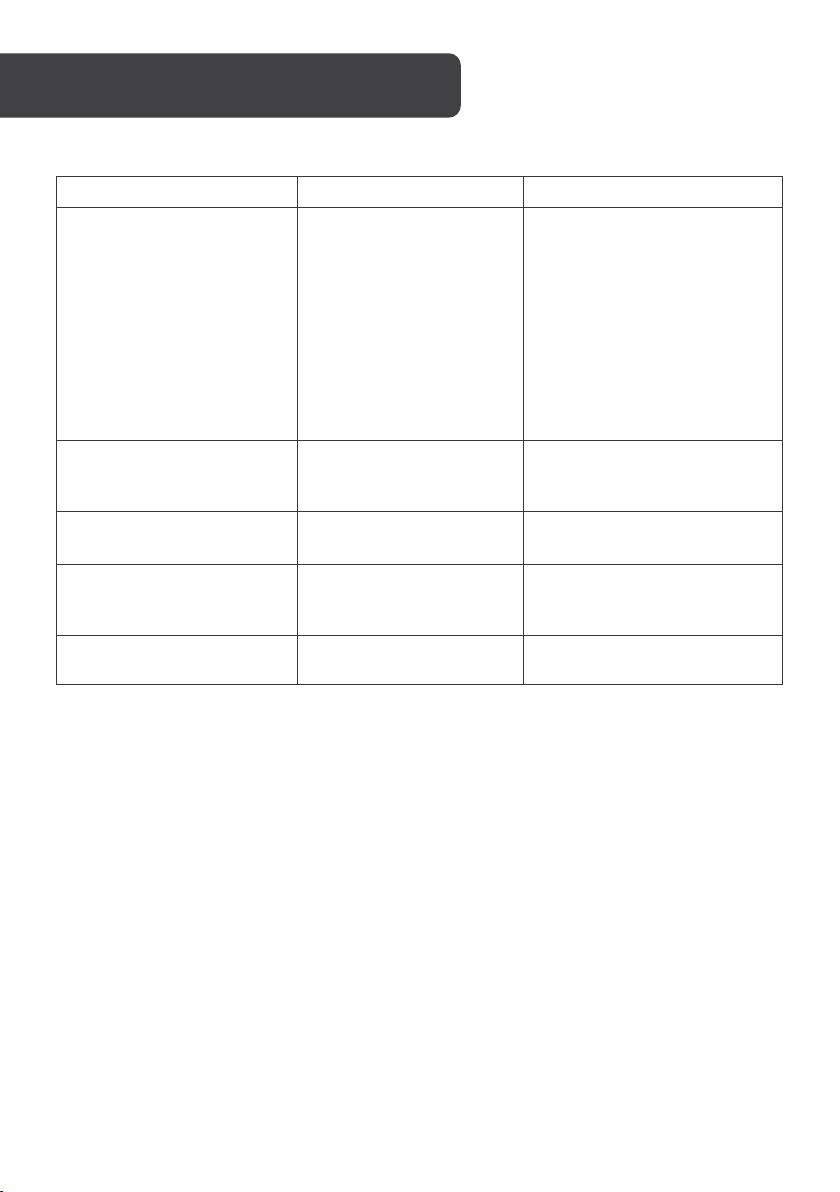
Problem
Possible causes
Solution
• Check remote batteries,
remote’s 328ft. range.
• Power OFF remote and
(see pg. 8).
• Trim not set or needs
adjustment.
• Adjust trim settings (see
pg. 10).
• Damage to body,
major components.
LED lights ON but drone
does not respond to controls.
The drone does not respond
to controls.
• No power to remote
or drone.
• Poor contact
between power
plugs.
• The drone is out of
range.
replace if needed.
• Check drone battery; be
sure it is fully charged.
• Be sure the power plugs
are firmly connected.
• Be sure the remote has
an unobstructed line of
sight to the drone.
• Remain within the
The drone is difficult to
control or flies erratically.
Drone drifts while in flight.
Drone suffers from
mechanical trouble.
Precautions
1. The remote-control distance will be shortened when the power of the
drone/transmitter is insufficient.
2. When the power of the drone is insufficient, the drone would have trouble taking off
or unable to fly high.
3. Please repair the drone in time when it is damaged. Don’t fly the drone when it is
seriously damaged (rotor-wing breakage) or it might lead to injury.
4. Please remove the batteries or avoid the damage to the product caused by
batteries leakage if you do not use the drone/transmitter for a long time.
5. Don’t crash the drone from high altitude or crash it seriously or might shorten its
lifetime.
• Gyroscopes may be
misaligned.
propellers or other
• Low battery power. • Recharge the battery.
drone and reconnect
• Repair or replace parts
as needed.
22
Page 23
23
Page 24

Need more information?
We hope that this user guide has given you
the assistance needed for a simple set-up.
For the most up-to-date guide for your product,
as well as any additional assistance you may require,
head online to help.kogan.com
24
 Loading...