

Page 1

Page 2

Table of Contents
Safety Instructions......................................................................................................................................................... 2
General Safety Instructions................................................................................................................................... 2
Installation................................................................................................................................................................... 3
Cleaning....................................................................................................................................................................... 4
General Description....................................................................................................................................................... 5
Specifications & Accessories..................................................................................................................................... 5
Specifications............................................................................................................................................................ 5
Accessories................................................................................................................................................................. 5
Input terminals.......................................................................................................................................................... 5
Assembling the Stand/Wall Mounting.................................................................................................................... 6
Stand Assembly Instructions............................................................................................................................... 6
Overview........................................................................................................................................................................... 7
Remote Control.............................................................................................................................................................. 8
External Connections.................................................................................................................................................. 10
Antenna Connection ............................................................................................................................................ 10
Basic Operation............................................................................................................................................................ 10
Changing the input source.................................................................................................................................. 10
First Time Installation............................................................................................................................................ 10
Channel Menu................................................................................................................................................................. 11
Auto Tuning............................................................................................................................................................... 11
Program Edit............................................................................................................................................................. 11
Schedule List............................................................................................................................................................ 12
Signal Information.................................................................................................................................................. 12
Picture Menu.................................................................................................................................................................. 12
Picture Mode............................................................................................................................................................ 12
Contrast/Brightness/Colour/Tint/Sharpness................................................................................................ 13
Colour Temp............................................................................................................................................................. 13
Noise Reduction...................................................................................................................................................... 13
HDMI Mode................................................................................................................................................................ 13
Sound Menu................................................................................................................................................................... 14
Sound Mode............................................................................................................................................................. 14
Balance....................................................................................................................................................................... 14
Auto Volume Level................................................................................................................................................. 14
SPDIF Mode.............................................................................................................................................................. 14
AD Switch.................................................................................................................................................................. 14
Time Menu....................................................................................................................................................................... 15
Time Zone.................................................................................................................................................................. 15
Sleep Timer............................................................................................................................................................... 15
Auto Standby........................................................................................................................................................... 15
OSD Timer................................................................................................................................................................. 15
Lock Menu....................................................................................................................................................................... 16
Lock System............................................................................................................................................................. 16
Set Password............................................................................................................................................................ 16
Channel Lock............................................................................................................................................................ 16
Parental Guidance................................................................................................................................................... 17
Key Lock..................................................................................................................................................................... 17
Setup Menu..................................................................................................................................................................... 17
Language................................................................................................................................................................... 17
TT Language............................................................................................................................................................. 18
Audio Language...................................................................................................................................................... 18
Subtitle Language.................................................................................................................................................. 18
Hearing Impaired.................................................................................................................................................... 18
PVR File System...................................................................................................................................................... 19
Aspect Ratio............................................................................................................................................................. 19
Blue Screen............................................................................................................................................................... 19
1
Page 3
First Time Installation............................................................................................................................................ 19
Reset........................................................................................................................................................................... 19
Software Update (USB)........................................................................................................................................ 19
E-POP........................................................................................................................................................................ 20
HDMI CEC................................................................................................................................................................. 20
PVR Settings........................................................................................................................................................... 20
EPG Menu.................................................................................................................................................................. 21
Timeshift.................................................................................................................................................................... 21
Media Operation.......................................................................................................................................................... 22
Photo Menu.............................................................................................................................................................. 22
Music Menu............................................................................................................................................................... 22
Movie Menu.............................................................................................................................................................. 23
Text Menu.................................................................................................................................................................. 23
Troubleshooting........................................................................................................................................................... 24
Safety Instructions
General Safety Instructions
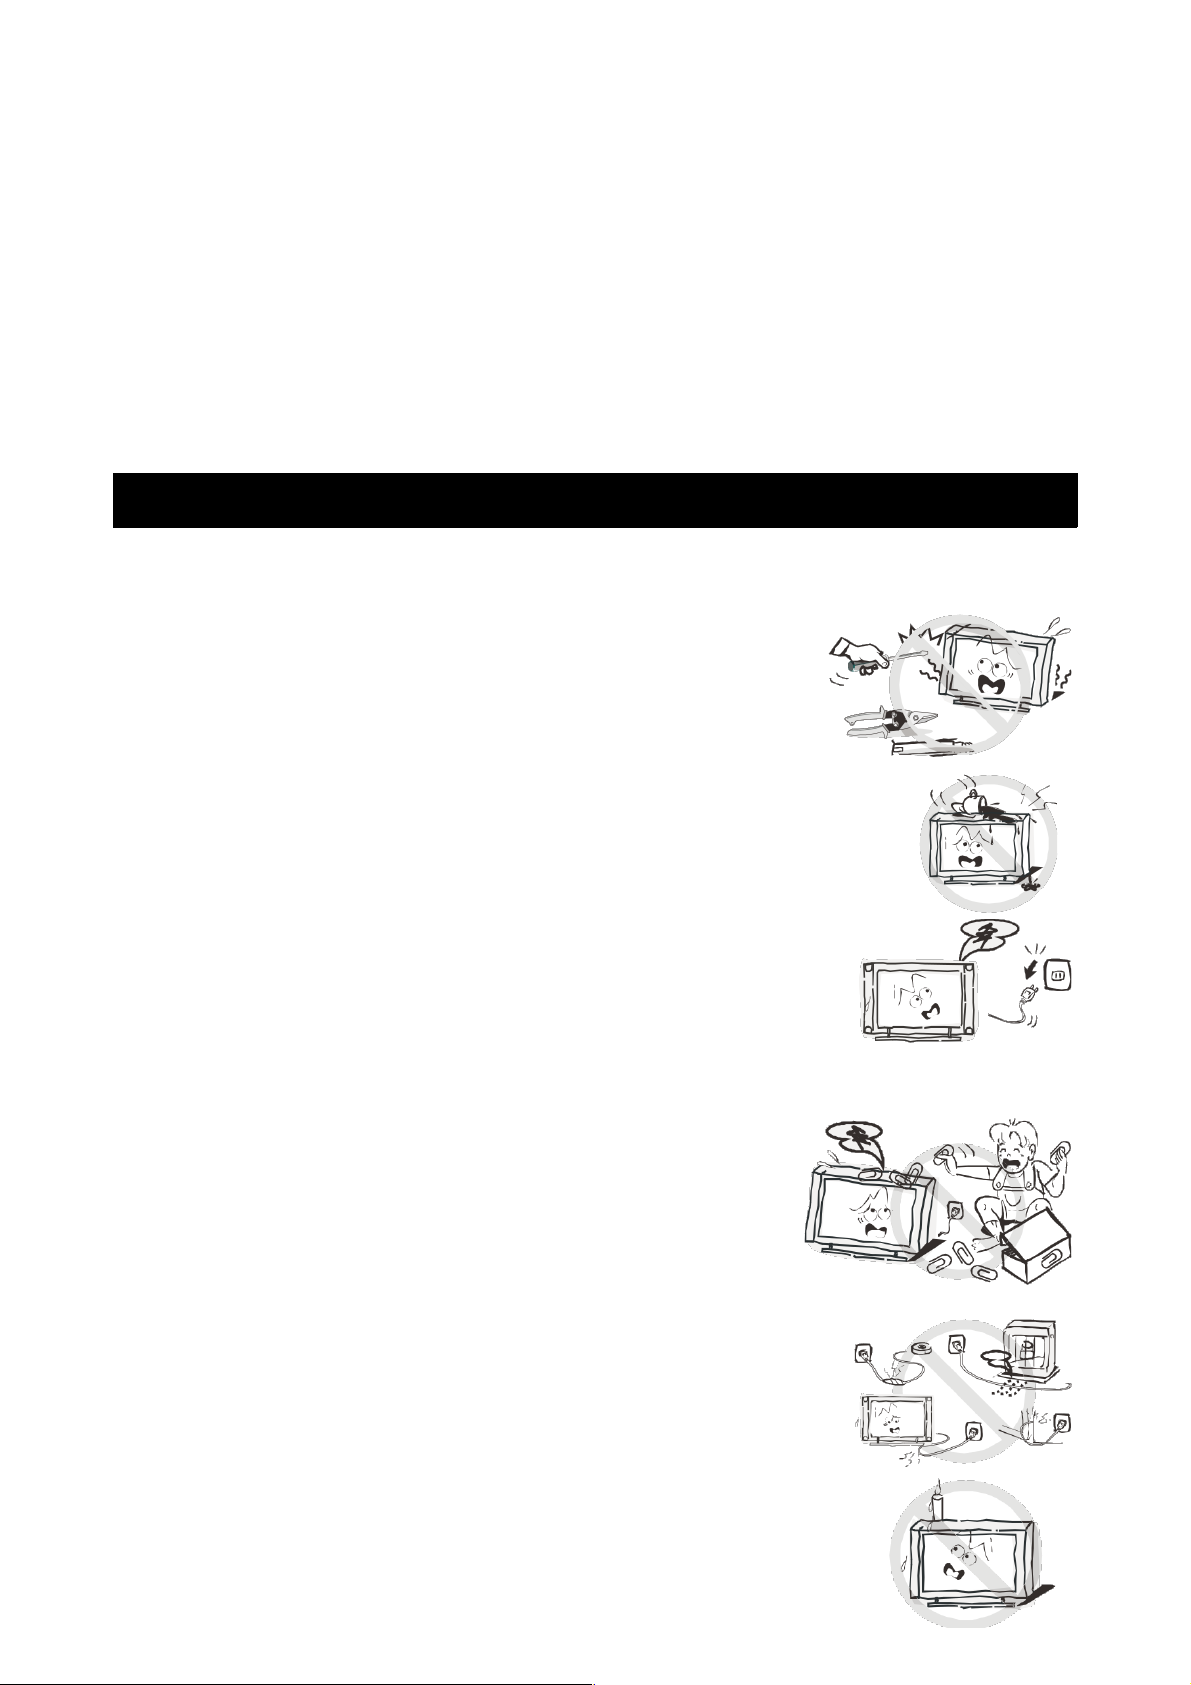
Risk of electric shock. DO NOT OPEN!
Do not attempt to service the television yourself, as opening or
removing the covers may expose you to dangerous voltage or other
hazards. Refer all servicing to the Kogan customer support team.
To reduce the risk of fire or electric shock, do not expose this product to rain
or moisture. The television should not be exposed to dripping or or splashing,
and no liquid filled objects such as vases should be placed on the case.
In the event of smoke, strange noises or a strange smell from the unit,
you should follow these steps:
• Turn off the unit immediately.
• Disconnect the power plug from the power outlet.
• Contact the Kogan customer support team. Never attempt to
make repairs yourself.
Never push objects of any kind into the set through the cabinet
slots as they may touch dangerous voltage points or short-circuit
parts that could result in a fire or electric shock. Never spill any
liquids onto the set. Use special caution in households where
children are present. The television is not suitable for children under
4 years old to operate.
Power supply cords should be routed safely to prevent dangers due to
damaged cords.
The mains plug is the main disconnect method, so it should be easily
accessible and not be obstructed during use.
2
Page 4
To avoid fires, no naked flame sources such as lit candles or burning
incense should be placed onto the casing of the television.
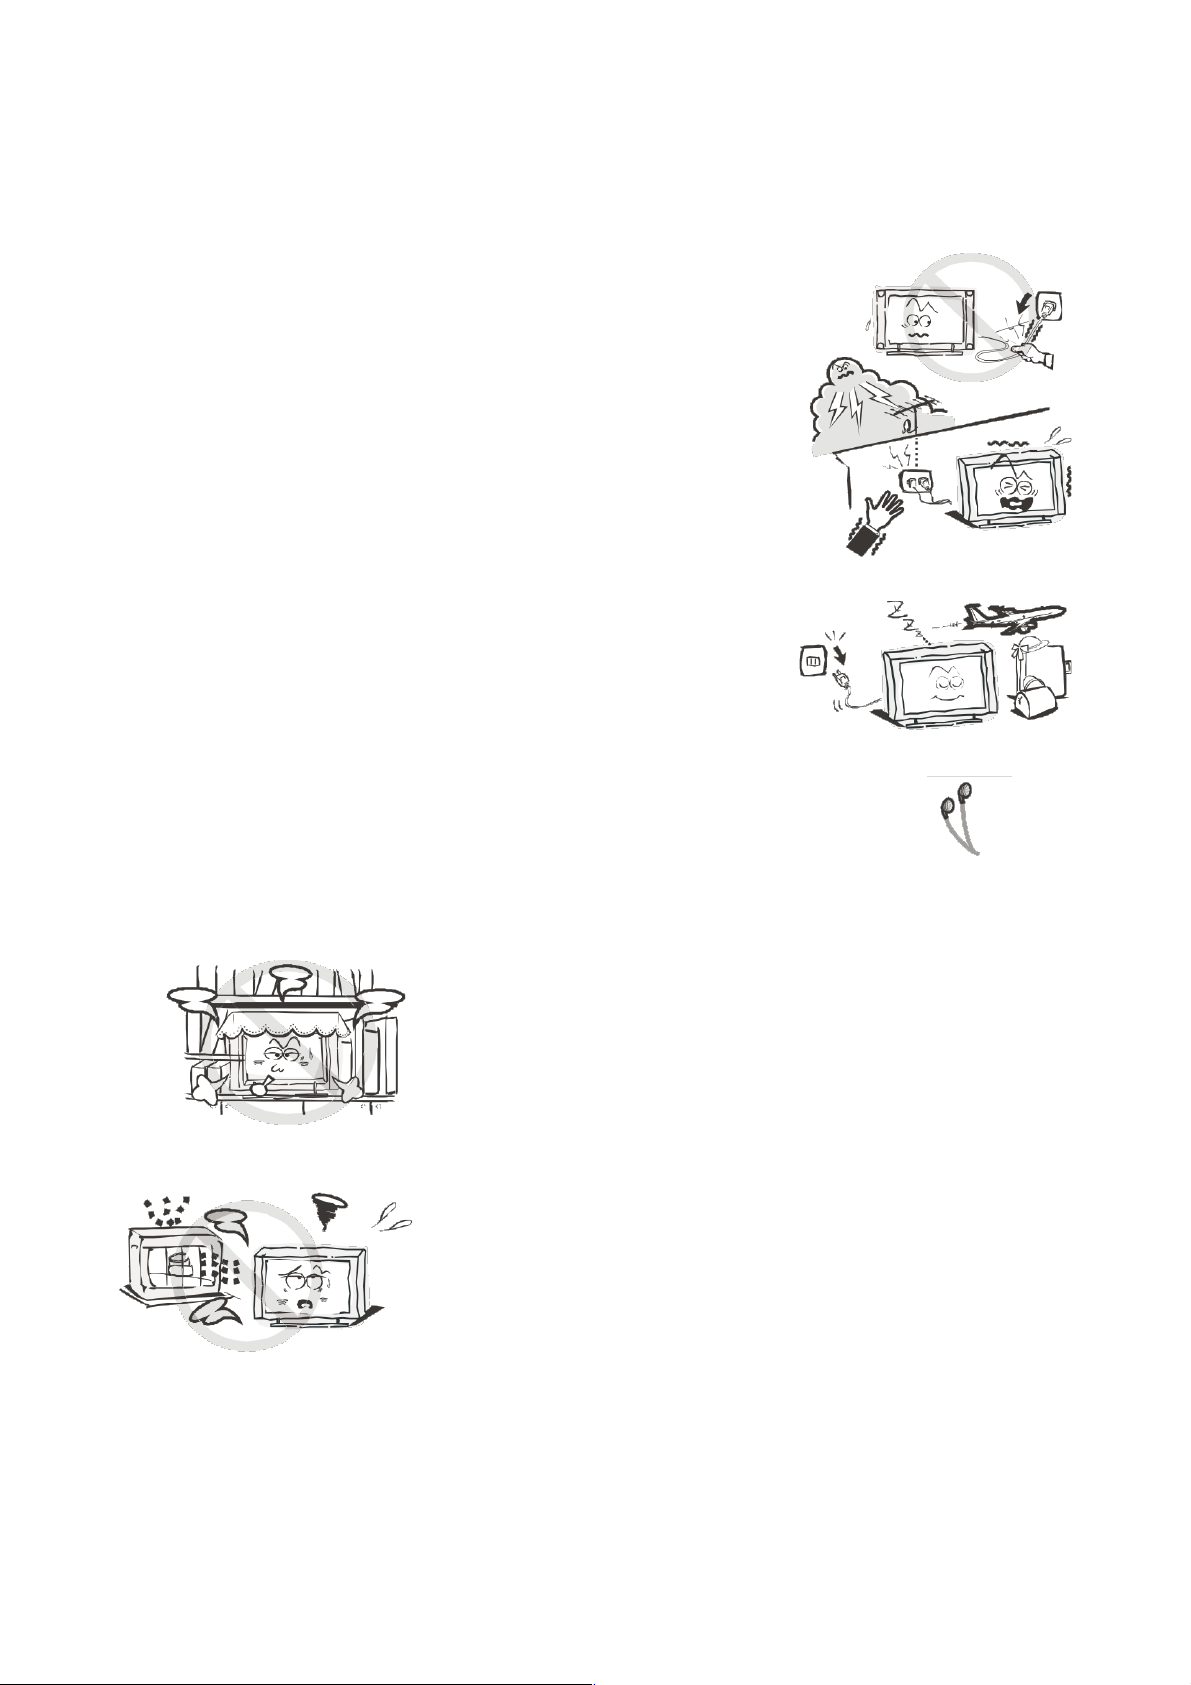
Do not pull the plug out of a power outlet by pulling on the power cable.
Always grasp the plug and pull.
Never touch the plug with wet hands.
An outside antenna system should not be located in the vicinity of
overhead power lines or other electric light or power circuits.
When installing an outside antenna system, extreme care should be
taken to keep from touching such power lines or circuits, as contact
with them may be fatal.
Always turn the set off when it is not being used. Unplug the
television from the power outlet when it will not be used for a long
time or when there is an electrical storm.
Never touch the antenna cable during a lightning storm.
Excessive volume from earphones and headphones can cause permanent
hearing loss. Always monitor the volume of noise from these devices,
especially when children are using them.
Installation
Ventilation should not be impeded or limited by covering the
ventilation slots with items such as newspapers, tablecloths,
curtains etc..
At least 10cm of space should be left around the apparatus
for sufficient ventilation.
The television should be situated away from heat sources such as
radiators, heaters, stoves or other products that product heat.
Place the television in a position where the screen is not exposed
to direct sunlight. It is best to have soft indirect lighting while
watching, and you should avoid a completely dark viewing
environment and reflections to avoid eye fatigue.
Keep the product away from high magnetic fields (such as near
an amplifier speaker) to avoid affecting the tint.
3
Page 5
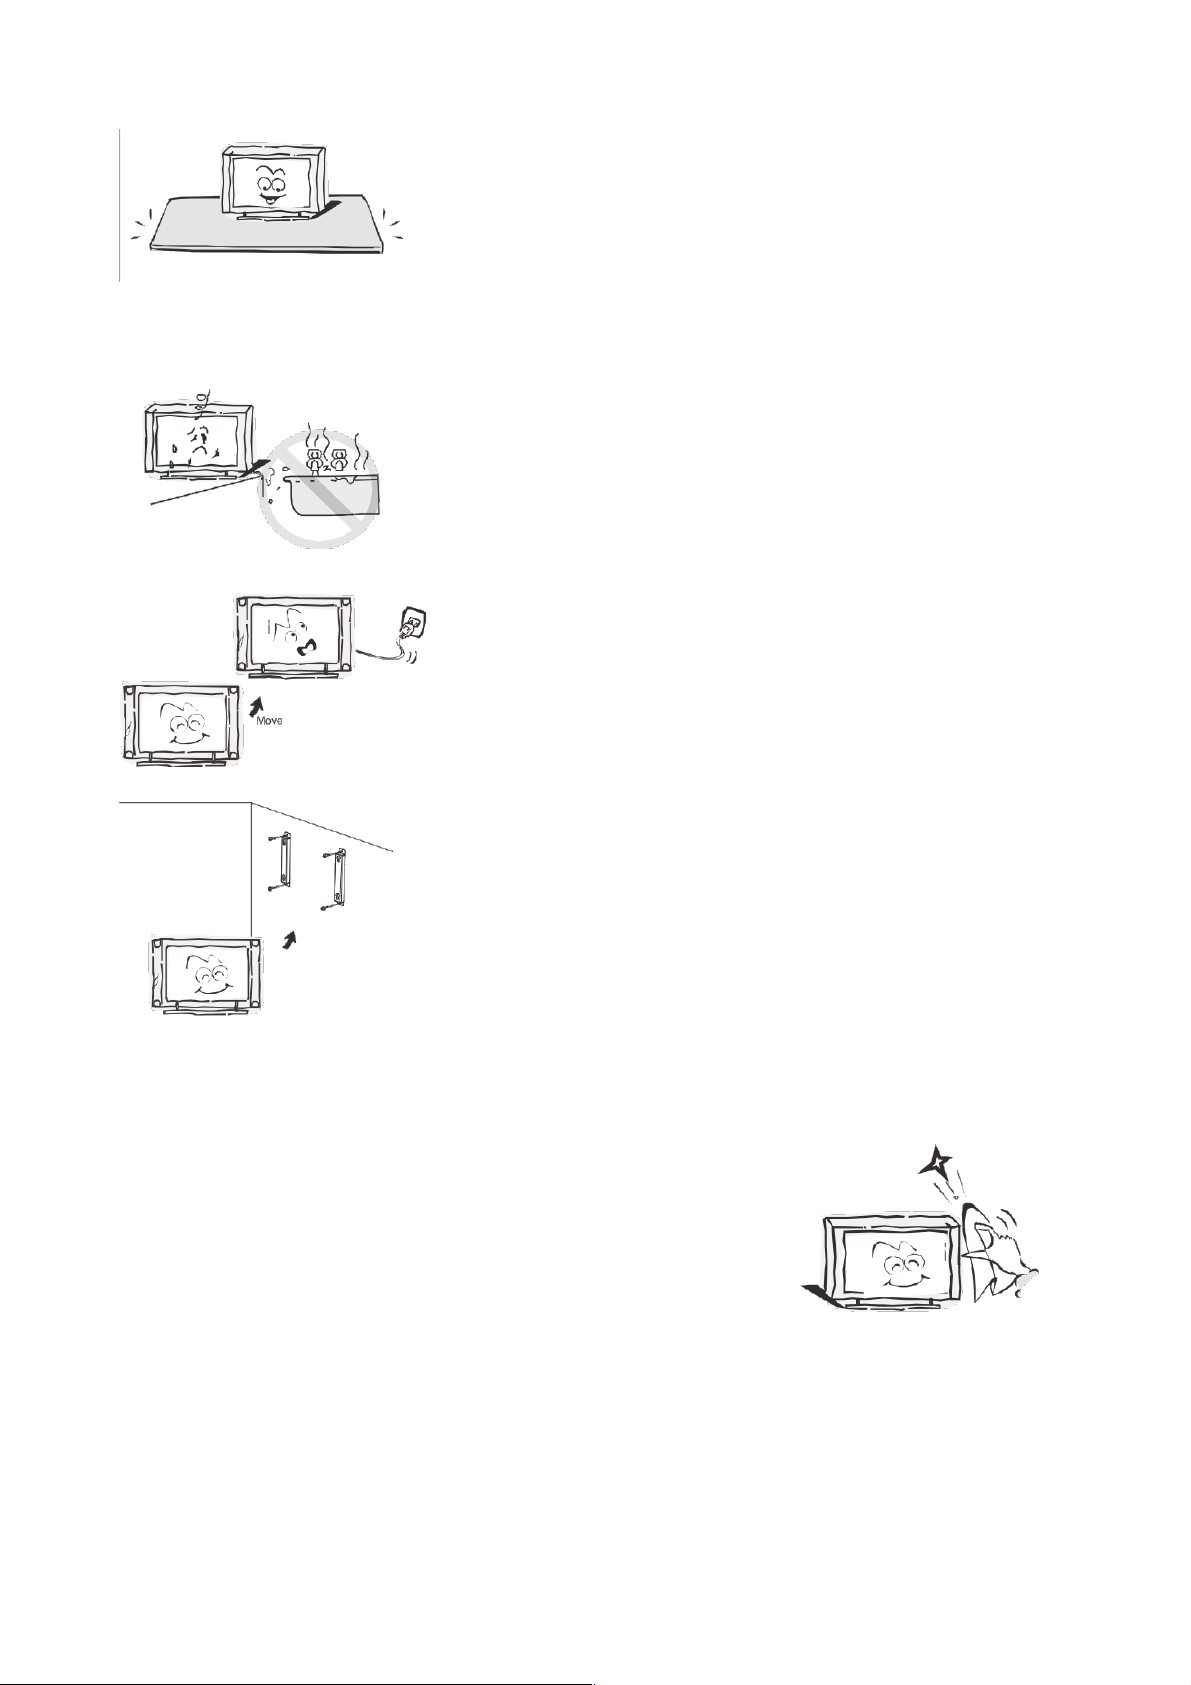
Do not place the television on an unstable table, stand or shelf.
The set may fall, causing serious injury as well as damage to the
television itself.
If moving the television on a cart, move the unit with care as
sudden stops and starts may cause the television to overturn.
Do not place this television near water, for example near a
bathtub, wash bowl, kitchen sink, laundry tub, swimming pool or
in a damp basement etc..
When moving the television to a warm location from a cold
location, allow some time for any dew or condensation inside
the television to evaporate fully before you turn the unit on.
To prevent injury, the television must be securely attached to the
floor/wall in accordance to the supplied installation instructions.
Cleaning
Unplug the television from the power supply before cleaning.
Do not use any liquid cleaners or harsh chemicals. Use a soft,
damp cloth.
4
Page 6

General Description
• Zero X radiation complies to green environment protection requirements
• Connect to computer directly to create a TV/Monitor combo
• MHL3.0
• Android5.1
• USB 2.0
• 16:9 widescreen
• Auto tuning and fine tuning.
• PC VGA input
• Component compatible (480i, 480P, 576i, 576P, 720P, 1080i, 1080P)
• HDMI input (HDMI3 supports MHL)
• Programmable sleep timer
• No signal automatic power off
• PC VGA
Specifications & Accessories
Specifications
Model KALED55UHDBZA
Display Screen Size 55” Diagonal
Maximum Resolution 3840 x 2160
Power Supply ~110-240V, 50/60Hz
TV Receive System PAL/SECAM: BG, DK, I DVB-T
Frequency Range DTV: 5-12, 21-69
Video In PAL/NTSC/SECAM
Antenna Input Impedance 75ohm unbalanced
Speaker Output Power 2 x 8W
Remote Power Input DC 3V (Two AAA batteries)
Power Consumption 110W
Standby Consumption <0.5W
Operating Temperatures 0°C ~ 40°C
Accessories
Remote Control
Input terminals
1 x Antenna jack 3 x HDMI inputs
1 x PC-RGB input 2 x USB inputs
1 x COMPONENT input 1 x Headphone output
1 x AV input 1 x SPDIF output
1 x CVBS output 1 x RJ-45 NET input
1 x TF input
5
Page 7
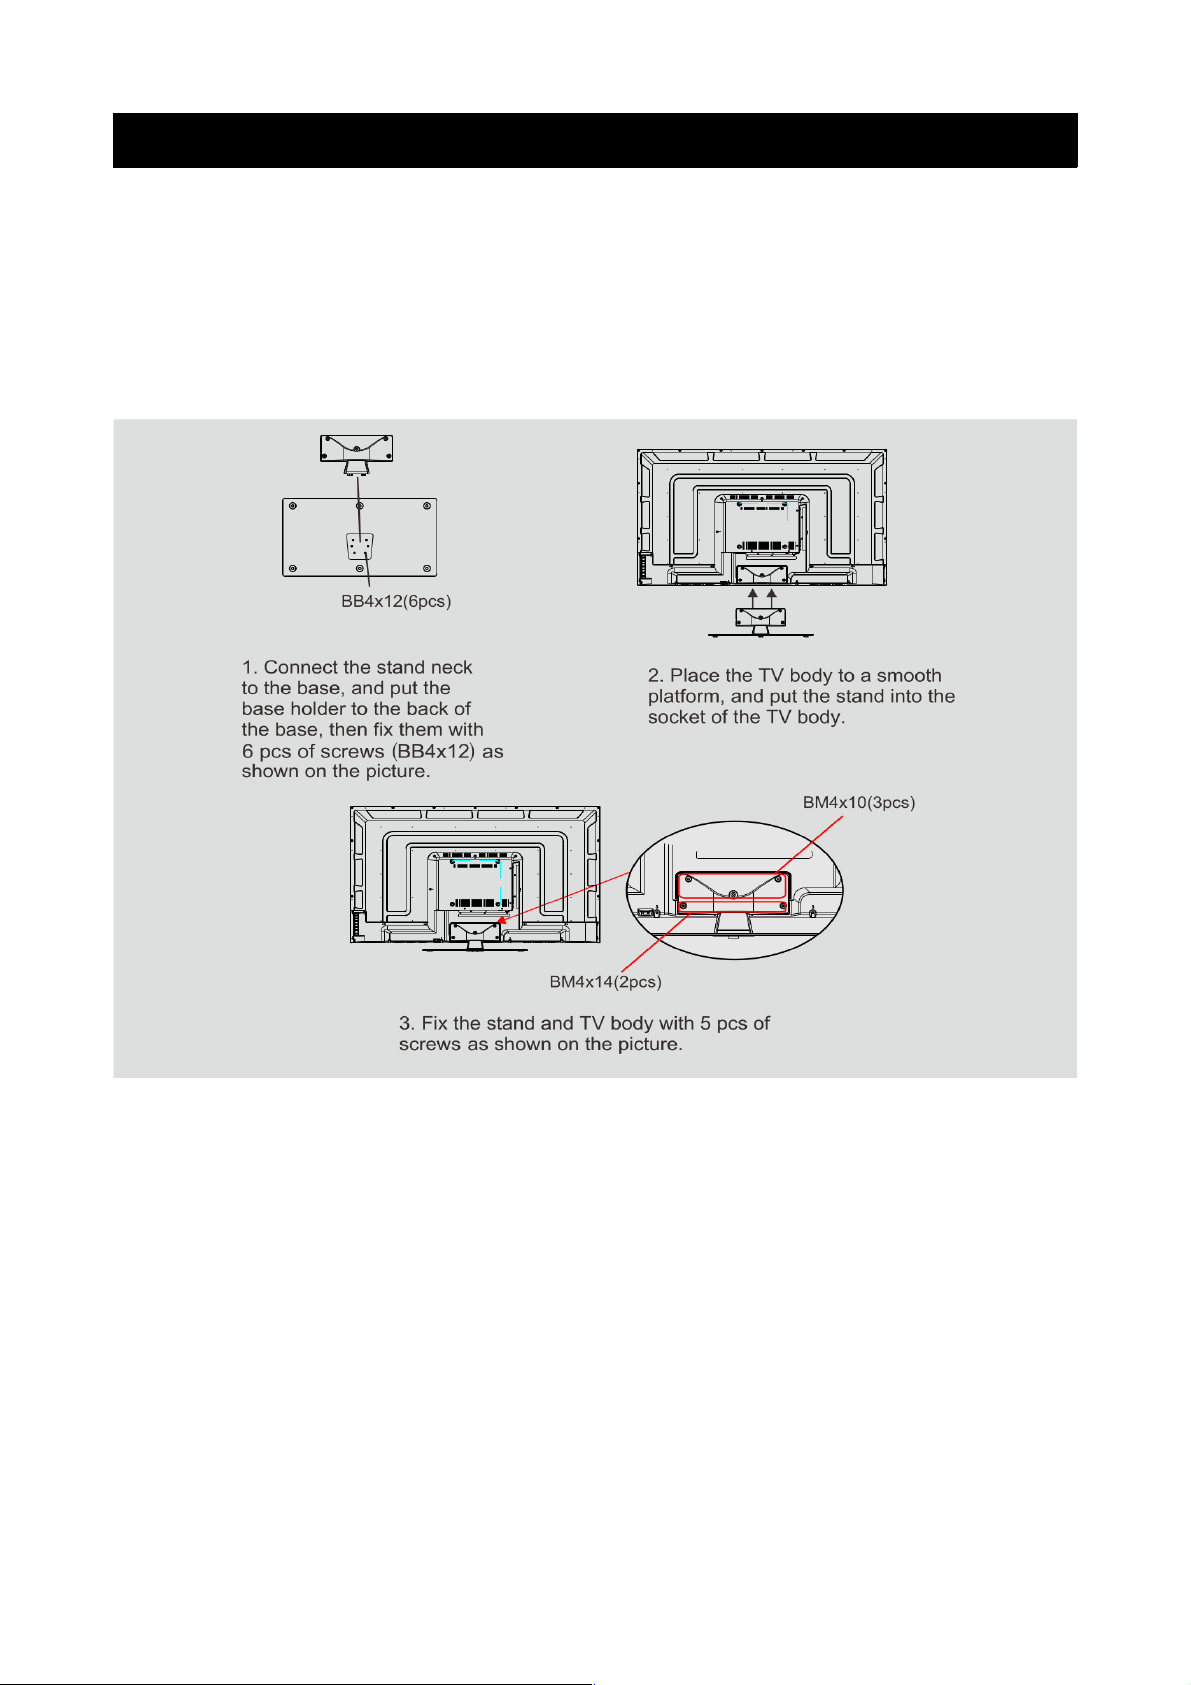
Assembling the Stand/Wall Mounting
If you need to remove or assemble the stand, please read the following:
• Before attaching/detaching the stand, be sure to turn the TV off.
• Before performing any work, spread cushioning out over the base area to lay the TV on.
This will prevent it from being damaged.
Stand Assembly Instructions
6
Page 8

Overview
The buttons on the lower left panel control your TVs basic functions, including the on-screen menu. To use
the more advanced features, you must use the remote control.
7
Page 9

Remote Control
8
Page 10

9
Page 11

External Connections
Antenna Connection
Antenna input impedance of this unit is 75ohm. VHF/UHF 75ohm coaxial cable can be connected
to the antenna jack directly. If the antenna cable is 300ohm parallel flat feeder cable, you will
need to use the 300ohm/75ohm converter to connect the antenna cable to the antenna jack. For
details, see below.
Antenna with 300ohm flat twin leads Antenna with 75ohm round leads
Basic Operation
Changing the input source
Press INPUT button to display the input source list.
Press / or ▲ ▼ OK buttons to select the input source you want.
Press OK button to enter the input source, or press EXIT to quit.
(Options: DTV, ATV, AV, Component, HDMI1, HDMI2, HDMI3, SMART TV, Media)
First Time Installation
Connect an RF cable from the Tvs input called "ANT. IN" to your TV aerial socket.
Select Language
Press / buttons to select the language to be used for menus and messages.◀ ▶
Select Country
Press / buttons to highlight country menu.▲ ▼
Press / buttons to select the country you are in.◀ ▶
10
Page 12

Channel Menu
Press the MENU button to display the main menu.
Press / buttons to select ◀ ▶ CHANNEL in the main menu.
1. Press / buttons to select the option that you want to adjust in the ▲ ▼ CHANNEL menu.
2. Press ENTER to adjust.
3. After making changes, press ENTER to save and return to the previous menu.
Auto Tuning
During tuning, the TV will first search through the analogue (ATV) range. Press MENU and the
left arrow button to skip ATV tuning. The TV will then search through the digital (DTV) range.
Program Edit
Press / buttons to select Program Edit, then press ▲ ▼ ENTER to enter the sub-menu.
The three coloured key is the shortcut key for
programming the channel. First press / to ▲ ▼
highlight the channel you want to select, then:
• Press the Red button to delete the selected program in the list
• Press the Green button to rename the channel (only for ATV
channels)
• Press the Yellow button to move the channel in the list
• Press the Blue button to skip the selected channel
• Press the Fav button to add or remove the channel from your
favourites list.
(Your TV will skip the channel automatically when using
CH+/- buttons to view the channels)
11
Page 13

Schedule List
Press the / buttons to select the Schedule List, then press ENTER to enter the sub-menu. ▲ ▼
This will display the list of programs for which you have set reminders.
Signal Information
Press / to select ▲ ▼ Signal Information, then press ENTER to see detailed information regarding
your signal. This method is only available when there is DTV signal.
Picture Menu
Press the MENU button to display the main menu.
Press / buttons to select ◀ ▶ PICTURE in the main menu.
1. Press / buttons to select the options that you want to adjust in the ▲ ▼ PICTURE menu.
2. Press the OK button to adjust.
3. Once adjustments have been completed, press MENU to save and return to the previous
menu.
Picture Mode
Press / buttons to select Picture Mode, then press ▲ ▼ OK to enter the sub-menu.
You can change the values of contast, brightness, colour, sharpness and tint only when the
picture is in Personal mode.
TIP: you can press PMODE to change the picture mode directly.
12
Page 14

Contrast/Brightness/Colour/Tint/Sharpness
Press / buttons to select the option, then press / buttons to adjust.▲ ▼ ◀ ▶
Contrast: Adjust the highlight intensity of the image. Shadowy regions will not be affected.
Brightness: Adjust the brightness of the entire image. Dark regions will be mostly affected.
Colour: Adjust the colour saturation of the image.
Tint: For use to compensate for colour changes when in NTSC mode.
Sharpness: Adjust the peaking for image details.
Colour Temp
Change the overall colour cast of the image.
Press / buttons to select Colour Temperature, then press ▲ ▼ OK to enter the submenu.
Press / buttons to select. (Available modes: Cold / Normal / Warm)◀ ▶
You can change the values of the red, green and blue when in User mode.
Noise Reduction
Filters out/reduces image noise, improving picture quality.
Press / buttons to select Noise Reduction, then press OK to enter the sub-menu.▲ ▼
HDMI Mode
Press / buttons to select HDMI mode, then press OK to select the mode.▲ ▼
13
Cool: increase the blue tones in white.
Normal: standard colour temperatures.
Warm: increases the red tones in white.
Off: select to turn noise reduction off.
Low: detect and reduce low video noise.
Middle: detect and reduce moderate video noise.
High: detect and reduce high video noise.
Default: set as default.
Page 15

Sound Menu
Press the MENU button to display the main menu.
Press / buttons to select ◀ ▶ SOUND in the main menu.
1. Press / buttons to select the options that you want to adjust in the ▲ ▼ SOUND menu.
2. Press the OK button to adjust.
3. Once adjustments have been completed, press MENU to save and return to the previous
menu.
Sound Mode
Press / buttons to select Sound Mode, then press OK to enter the submenu.▲ ▼
Press / buttons to select:▲ ▼
Note: you can change the value of treble and bass when sound is in Personal mode.
TIP: you can press SMODE on the remote control to change the sound mode directly.
Balance
Adjust individual speaker output, enabling optimal listening from any position.
Press / buttons to select balance, then press / to adjust.▲ ▼ ◀ ▶
Auto Volume Level
Reduces the difference between channel and program volumes automatically.
Press / buttons to select Auto Volume Level, then press / to select ON or OFF.▲ ▼ ◀ ▶
SPDIF Mode
Press / buttons to select SPDIF mode, then press / to select OFF / PCM / Auto.▲ ▼ ◀ ▶
AD Switch
Press / buttons to select AD Switch, then press / to select ON or OFF.▲ ▼ ◀ ▶
(Audio Description is not currently available in Australia.)
14
Standard: balanced sounds for most viewing.
Music: preserves original sounds for music viewing.
Movie: enhances treble and bass for rich sounds.
Sports: enhances vocals for sport broadcasts.
Personal: select to customize settings.
Page 16

Time Menu
Press the MENU button to display the main menu.
Press / buttons to select ◀ ▶ TIME in the main menu.
1. Press / buttons to select the options that you want to adjust in the ▲ ▼ TIME menu.
2. Press the OK button to adjust.
3. Once adjustments have been completed, press MENU to save and return to the previous
menu.
Time Zone
Press / to select Time Zone, then press ▲ ▼ OK to enter the sub-menu.
Sleep Timer
Press / buttons to select Sleep Timer, then press ▲ ▼ OK to enter the sub-menu.
Press / to select. (Off, 10min, 20min, 30min, 60min, 90min, 120min, 180min or 240min)▲ ▼
Auto Standby
Press / buttons to select Auto Standby, then press ▲ ▼ OK to enter the sub-menu.
Press / to select.▲ ▼
Note: if no operations on the remote control are performed for the specified time, the TV will
close down automatically. If operations are performed, then the timer will restart.
OSD Timer
Press / buttons to select OSD (On Screen Display), then press ▲ ▼ OK to enter the sub-menu.
Press / to select.▲ ▼
15
Page 17

Lock Menu
Press the MENU button to display the main menu.
Press / buttons to select ◀ ▶ LOCK in the main menu.
1. Press / buttons to select the options that you want to adjust in the ▲ ▼ LOCK menu.
2. Press the OK button to adjust.
3. Once adjustments have been completed, press MENU to save and return to the previous
menu.
Lock System
Set Password
Channel Lock
16
Press / buttons to select Lock System, then press OK to make ▲ ▼
the following options valid.
The default password is 0000.
If you forget your password, please contact the Kogan.com
customer support team.
Press / buttons to select Set Password.▲ ▼
Press OK to enter the sub-menu to set the new password.
Press / buttons to select Channel Lock.▲ ▼
Press OK to enter the sub-menu to block programs that may not
be suitable for children.
Page 18

Parental Guidance
Key Lock
Press / ▲ ▼ buttons to select Key Lock, then press / buttons to select ON or OFF.◀ ▶
When Key Lock is on, you cannot use the key panel buttons.
Setup Menu
Press the MENU button to display the main menu.
Press / buttons to select ◀ ▶ SETUP in the main menu.
1. Press / buttons to select the options that you want to adjust in the ▲ ▼ SETUP menu.
2. Press the OK button to adjust.
3. Once adjustments have been completed, press MENU to save and return to the previous
menu.
Language
17
Press / buttons to select Parental Guidance.▲ ▼
Press OK to enter the sub-menu to select the age groud that is
suitable for your children.
Page 19

TT Language
Press / ▲ ▼ buttons to select TT Language, then press OK to enter the sub-menu.
Press / /▲ ▼ / buttons to select TT language.◀ ▶
Audio Language
Press / ▲ ▼ buttons to select Audio Languages, then press OK to enter the sub-menu.
Press / /▲ ▼ / buttons to select the primary audio language.◀ ▶
Subtitle Language
Press / ▲ ▼ buttons to select Subtitle Language, then press OK to enter the sub-menu.
Press / /▲ ▼ / buttons to select the subtitle language.◀ ▶
Hearing Impaired
Press / ▲ ▼ buttons to select Hearing Impaired, then press OK to select ON or OFF.
18
Page 20

PVR File System
Press / ▲ ▼ buttons to select PVR File System, then press OK to enter the sub-menu.
Press / ▲ ▼ buttons to select Check PVR File System, then press OK to enter. The TV will then
check the USB speed.
Aspect Ratio
Press / ▲ ▼ buttons to select Aspect Ratio, then press OK to enter the sub-menu.
Press / ▲ ▼ buttons to select the Aspect Ratio. (Auto, 4:3, 16:9, Zoom1, Zoom2)
Blue Screen
Press / ▲ ▼ buttons to select Blue Screen, then press OK to select ON or OFF.
First Time Installation
Press / ▲ ▼ buttons to select First Time Installation, then press OK to enter.
Reset
Press / ▲ ▼ buttons to select Reset, then press OK to enter the sub-menu.
Software Update (USB)
Press / ▲ ▼ buttons to select Software Update (USB), insert your USB device into the USB slot,
then press OK to start updating your TV with the latest software version.
Note: you must ONLY ever update your TV with a software update as supplied by the customer
support team from Kogan.com. The use of other software drivers being installed on the TV will
void your warranty.
19
Page 21

E-POP
Press / ▲ ▼ buttons to select E-POP.
Press / buttons to select ON or OFF.◀ ▶
(Choosing ON will display information graphics highlighting features of the TV. Choose OFF for
regular TV viewing)
HDMI CEC
Press / ▲ ▼ buttons to select HDMI CEC, then press OK to enter the sub-menu.
HDMI CEC control allows you to control multiple CEC-enabled devices connected to your TV via
HDMI, using your single remote control.
PVR Settings
Note: in order to record, a USB memory device must be inserted into the USB port.
Press / to select PVR settings, then press ▲ ▼ OK to enter the sub-menu.
The TV will check the USB.
Press / to select File Manager, then press ◀ ▶ OK to enter the sub-menu. This will show you a list
of recorded programs.
Press / to select Device List, then press ◀ ▶ OK to enter the sub-menu. This will show the devices
available for recording.
Press / to select Scheduled Record, then press ◀ ▶ OK to enter the sub-menu.
Press / to select group No. Then press ▲ ▼ OK to enter settings.
Press / to select record Frequency, Channel, Start Time, End Time.▲ ▼
Complete these settings, then press / to select SAVE. Press ▲ ▼ OK to save the settings.
20
HDMI CEC: Press / to turn HDMI CEC on or off.◀ ▶
HDMI ARC: Press / to turn HDMI ARC on or off. Audio return ◀ ▶
channel (ARC) returns audio through the same HDMI channel
that is used to send video to the TV. If using this feature, you
won't need a separate audio cable to return sound from the TV.
(ARC feature only available on HDMI 1).
Auto Standby: Press / to turn Auto Standby on or off.◀ ▶
Device List: Press OK to open the main menu for the device.
Page 22

EPG Menu
Press the EPG button on the remote to enter the EPG menu.
Press the RED button to start the recording.
Press the BLUE button to display the next day.
Press the YELLOW button to display the previous day.
Press the GREEN button to set a reminder for a program you want to see.
Record: you can schedule programs to be recorded by selecting the program from the EPG list
and pressing Record on the remote control. This will take you to Scheduled Record from where
you can enter different options.
Timeshift
Press the PAUSE key when the program is playing under DTV to start timeshift. A USB memory
device is required for this operation. Insert the device into the USB port labelled USB.
The white bar indicates the recording progress.
The blue bar indicates the playback progress.
21
Page 23

Media Operation
USB devices support FAT32, FAT16, NTFS (NTFS Compressed Files are not supported)
USB media types support: .mpg, .avi, .mov, .mkv, .dat, .mp4, .vob, .rm, .rmvb, mp3, .wma, .jpg,
.jpeg, .bmp, .png)
Note: Before operating the MEDIA menu, plug the USB device into the port marked USB. (USB 1
and USB 2 are only available in Smart TV mode), then press the INPUT button and set the input
source to Media.
Press / buttons to select ▲ ▼ MEDIA in the source menu, then press OK to enter.
Photo Menu
Press / buttons to select PHOTO in the main menu, then press ◀ ▶ OK to enter.
Press EXIT to return to the previous menu and exit the menu to quit.
Press / ◀ ▶ buttons to select the file you want to look at in the file selection menu, then press the
media button to display the picture. While highlighting the files, the file information will appear
on the right, and the picture itself will be viewed in the center.
Music Menu
Press / buttons to select MUSIC in the main menu, then press ◀ ▶ OK to enter.
Press EXIT to return to the previous menu and exit the menu to quit.
Press / ◀ ▶ buttons to select the disk drive containing the music you want to listen to, then press
OK to enter. Press / ◀ ▶ buttons to select the return option to go back to the previous menu.
22
Press / buttons to select the option you want to adjust in the ◀ ▶
main MEDIA menu, then press OK to enter.
Page 24

Movie Menu
Press / buttons to select MOVIE in the main menu, then press ◀ ▶ OK to enter.
Press EXIT to return to the previous menu and exit the menu to quit.
Press / ◀ ▶ buttons to select the disk drive containing the video you want to watch to, then press
OK to enter. Press the MEDIA button to play the selected movie. Press the display button to
select the menu in the bottom that you want to run, then press OK operate.
Press EXIT to go back to the previous menu, and to quit the entire menu.
Text Menu
Press / buttons to select TEXT in the main menu, then press ◀ ▶ OK to enter.
Press EXIT to return to the previous menu and exit the menu to quit.
Press / buttons to select the drive that has the files you want to read, then press ◀ ▶ OK.
Press / to select the return option to go back to the previous menu.◀ ▶
23
Page 25

Troubleshooting
If you have any problems with your television, please check the suggested solutions below, as
these issues may be caused by improper adjustment/setup rather than a malfunction with the
unit. If the problem persists, please contact the Kogan customer support team.
Problem Possible Solution
Poor picture and sound quality
• Try a different channel
• Adjust the antenna
• Check all connections
No picture or sound in TV status
• Try another channel
• Press the TV/AV button
• Make sure TV is plugged in
• Check the antenna connection
No sound, or sound is too low at maximum
volume
• Check the volume settings on any
external speakers connected to your
television
• Adjust the TV volume accordingly
• Check that MUTE hasn't been turned on
No colour, wrong colour or tints
• Make sure the program itself is
broadcast in colour
• Select the picture menu, then adjust the
colour and tint submenus
Picture rolls vertically
• Check all connections
Blurred or snowy picture, distorted sound
• Check direction, location and
connections to your antenna
• Issues may be caused by use of an
indoor antenna
Remote control malfunctions
• Replace remote control batteries
• Check battery terminals
• Remote is out of range, move closer to
TV
• Confirm there is no obstructions
between remote and TV
• Make sure power cord is plugged in
Image is not centered on the screen
• Adjust the horizontal and vertical
position
If you have any further questions or concerns, please contact the Kogan.com customer support
team.
24
 Loading...