

Page 1
.$/(''=$
USER MANUAL
Page 2
Important Safety Instructions and Maintenance
Important Safety Instructions
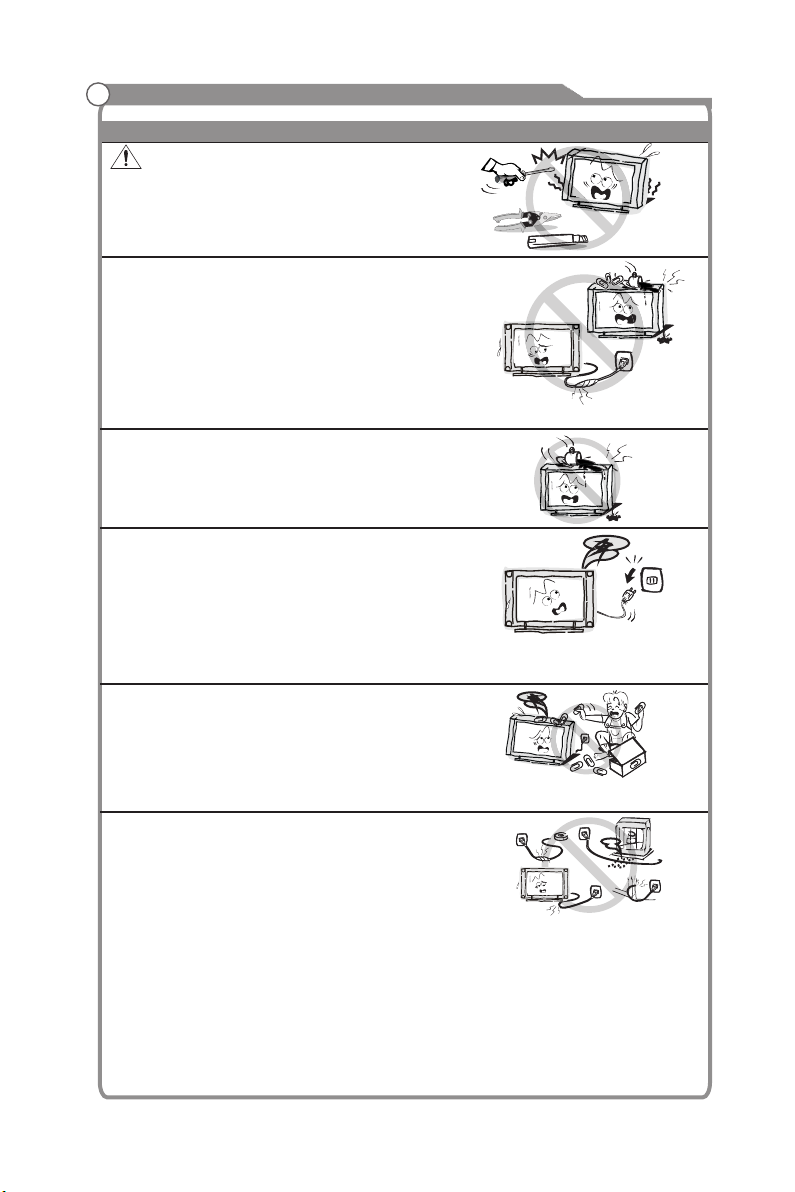
CAUTION
Risk of electronic shock, do not open.
Do not attempt to service this product yourself
as opening or removing covers may expose
you to dangerous voltage or other hazards.
Refer all servicing to Kogan customer support.
If the following problems occur:
Turn off the TV set and unplug the power cord
immediately if any of the following problems occur.
Ask Kogan customer support to have it checked
by qualified service personnel
When:
- AC power cord is damaged.
- Poor fitting of AC power outlet.
- TV set is damaged by being dropped, hit or having something thrown at it.
- Any liquid or solid object falls through openings in the cabinet.
To reduce the risk of fire or electric shock, do not
expose this product to rain or moisture.
The apparatus shall not be exposed to dripping
or splashing and no objects filled with liquids,
such as vases, shall be placed on the apparatus.
The screen and cabinet get warm when the TV
is in use. This is not a malfunction.In case of
smoke, strange noise or strange smell from the
unit:
· Turn off the power switch immediately;
· Disconnect the power plug from the power
outlet;
· Contact the Kogan Support centre. Never attempt to make repairs
yourself because this could be dangerous.
Never push objects of any kind into the set
through the cabinet slots as they may touch
dangerous voltage points or short-circuit parts that
could result in a fire or electric shock. Never spill
liquid of any kind on the set. Use special caution
in households where children are present. The television is not suitable for children
under 3-year to operate.
Do not overload wall outlets, extension cords or
adaptors beyond their capacity, this can result in
fire or electrical shock.
Power-supply cords should be routed so that they
are not likely to be walked on or pinched by items
placed upon or against them, paying particular attention to cords at plug end, adaptors
and the point where they exit from the appliance. The mains plug is used as the
disconnect device. It shall remain readily accessible and should not be obstructed
during intended use. Make sure to plug the power cord in until it is firmly inserted.
When removing the power cord, make sure to hold the power plug when pulling the
plug from the outlet, do not pull the plug out by the wire. NEVER touch the plug or
power cord with wet hands. To disconnect the apparatus from the mains power, the
plug must be pulled out from the mains socket, therefore make sure the mains plug
is always easily accessible.
High Voltage
Do not open
1
Page 3
Important Safety Instructions and Maintenance
Important Safety Instructions
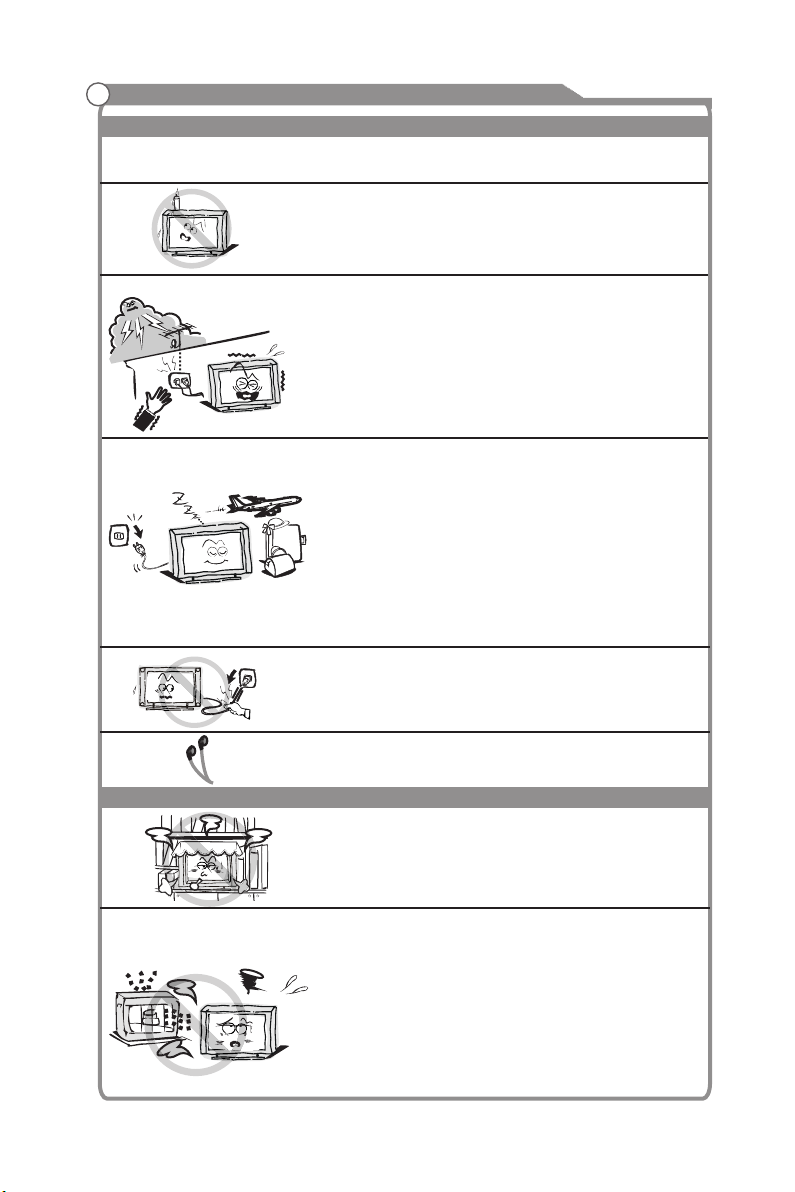
Do not push or scratch the front filter, or place any objects on top of the TV set. The
image may be uneven or the screen may be damaged.
To avoid fire, no naked flame sources,
such as lighted candles, should be placed on the
television.
An outside antenna system should not be located in
the vicinity of overhead power lines or other electric
light or power circuits, or where it can fall into such
power lines or circuits. When installing an outside
antenna system, extreme care should be taken to keep
from touching such power lines or circuits as contact
with them might be fatal. Ensure the television is not
overhanging the edge of the supporting furniture.
When not in use
If you will not be using the TV set for several days, the
TV set should be disconnected from the AC mains for
environmental and safety reasons. As the TV set is not
disconnected from the AC power when the TV is turned
off at the standby switch, pull the plug from the AC power
outlet to disconnect the TV completely. However, some
TV sets may have features that require the TV set to be
left in standby to function correctly. In the case of lightning,
unplug the TV set from the outlet immediately. Never
touch the antenna wire during lightning.
Installation
Do not pull the plug out by the wire;
Never touch the plug with wet hands.
Excessive from earphones and headphones volume
can cause hearing loss.
The ventilation should not be impeded by covering the
ventilation opening with items, such as newspapers,
tablecloths, curtains, etc.
At least 10 cm space should be left around the
apparatus for sufficient ventilation.
The product should be situated away from heat
sources such as radiators, heat registers, stoves, or
other products (including amplifiers) that produce heat.
Place the apparatus in such a position that the screen
is not exposed to direct sunlight. It is best to have soft
indirect lighting while watching and avoid completely
dark environments and reflection from the screen as
these may cause eye fatigue.
Keep the TV set away from any equipment emitting
electromagnetic radiation.
2
Page 4
Important Safety Instructions and Maintenance
Installation
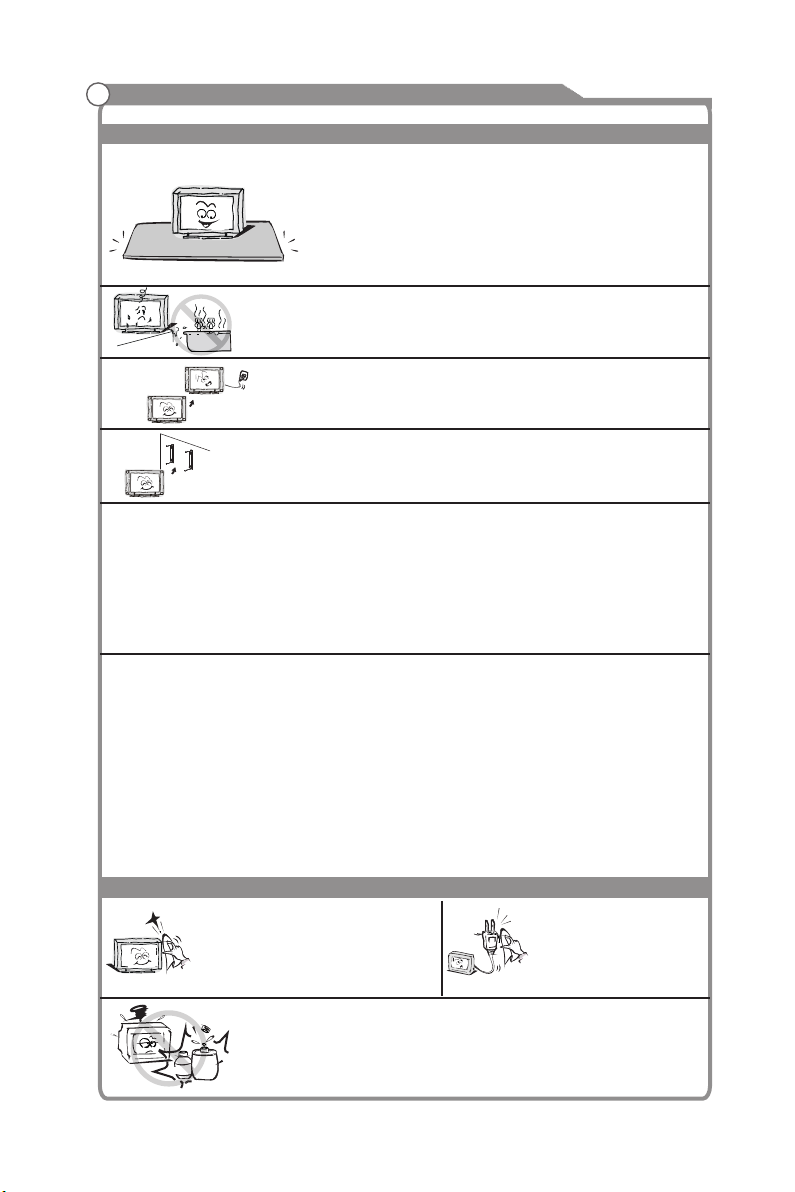
Do not place the set on an unstable cart, stand, table
or shelf. The set may fall, causing serious personal
injury as well as damage to the product. Use only with
the cart, stand, tripod, bracket, or table specified by
the manufacturer, or sold with the apparatus. An
appliance and cart combination should be moved with
care. Quick stops, excessive force, and uneven
surfaces may cause the appliance and cart
combination to overturn.
Do not place this apparatus near water, for example,
near a bath tub, wash bowl, kitchen sink, or laundry
tub; in a wet basement; or a swimming pool; and
the like;
When the TV being moved in from cold place, it needs
Move
LED Screen
Although the LED screen is made with high precision technology and 99.99% or
more of the pixels are effective, black dots may appear or bright points of light (red,
blue or green) may appear constantly on the LED screen. This is a structural property
of the LED screen and is not a malfunction.
If the surface of the LED panel cracks, do not touch it until you have unplugged the
AC power cord. Otherwise electric shock may result.
Do not throw anything at the TV set. The LED panel may break from the impact and
cause serious injury.
Precautions When Displaying a Still Image
A still image may cause permanent damage to the TV screen.
Do not display still images and partially still images on the LED panel for more
than 2 hours as it can cause screen image retention. This image retention is
also known as "screen burn". To avoid such image retention, reduce the
degree of brightness and contrast of the screen when displaying a still image.
Watching the LED TV in 4:3 format for a long period of time may leave traces
of borders displayed on the left, right and centre of the screen caused by the
difference of light emission on the screen. Playing a DVD or a game console
may cause a similar effect to the screen. Damage caused by the above effect
are not covered by the Warranty.
Displaying still images from Video games and PC for longer than a certain
period of time may produce partial after-images. To prevent this effect, reduce
the 'brightness' and 'contrast' when displaying still images.
Cleaning
Cleaning and handling the screen
surface and cabinet. Disconnect
the unit from the AC outlet before
cleaning. To remove dust, wipe
gently with a soft, lint free cloth. If
required use a slightly damp cloth.
thinner
thinner
solvent
solvent
some right time for moisture inside unit to evaporate
fully before turning on the unit;
To prevent injury, this apparatus must be securely
attached to the floor/wall in accordance with the
installation instructions.
MAINS PLUG
Wipe the mains plug with
a dry cloth at regular
intervals. Moisture and
dust may lead to fire or
electrical shock.
Use care not to subject the TV's surfaces to detergent.
(A liquid inside the TV could lead to product failure, fire or
electrical shock.)
Use care not to subject surfaces to bug repellent, solvent,
thinner, or other volatile substances as this may deteriorate the
surface and finish of the cabinet.
3
Page 5
Important Information
Keep small accessories out of reach of child ren so they are not mistakenly swallowed.
Table of Contents
Accessories-----------------------------------------------------------------------------------------------5
Introduction-----------------------------------------------------------------------------------------------6
Features---------------------------------------------------------------------------------------------------------6
Specifications--------------------------------------------------------------------------------------------------7
Stand and wall-mounting instructions (optional)-------------------------------------------------8
Overview of back panel------------------------------------------------------------------------------------10
Overview of front panel-------------------------------------------------------------------------------------11
Overview of remote control-------------------------------------------------------------------------------12
Teletext --------------------------------------------------------------------------------------------------------14
Installing Batteries in the Remote Control------------------------------------------------------------16
External Connection--------------------------------------------------------------------------------------16
Antenna connection----------------------------------------------------------------------------------------16
Connecting VCR -------------------------------------------------------------------------------------------17
Connecting a Camcorder---------------------------------------------------------------------------------18
Connecting a DVD Player/Set-Top Box --------------------------------------------------------------19
Connecting a DVD Player/Set-Top Box via DVI ----------------------------------------------------20
Connecting DVD Player/Set-Top Box via HDMI ----------------------------------------------------21
Connecting Digital Audio System-----------------------------------------------------------------------22
Connecting PC ---------------------------------------------------------------------------------------------23
Supporting signals ---------------------------------------------------------------------------------------23
Basic operation---------------------------------------------------------------------------------------24
Turning the TV on and off---------------------------------------------------------------------------------24
Menu operation ---------------------------------------------------------------------------------------------25
Menu system instruction--------------------------------------------------------------------------------27
Picture----------------------------------------------------------------------------------------------------------27
Sound----------------------------------------------------------------------------------------------------------29
Channel--------------------------------------------------------------------------------------------------------31
Time------------------------------------------------------------------------------------------------------------33
Option----------------------------------------------------------------------------------------------------------34
Function-------------------------------------------------------------------------------------------------------35
PVR-------------------------------------------------------------------------------------------------------------37
Digital Media Player --------------------------------------------------------------------------------------40
---------------------------------------------------------------------------------------------------40Introduction
Device and File Management----------------------------------------------------------------------------41
USB Support Character 41 -----------------------------------------------------------------------------------
Photo-----------------------------------------------------------------------------------------------------------41
-----------------------------------------------------------------------------------------------------------43Music
Movie-----------------------------------------------------------------------------------------------------------44
Text-------------------------------------------------------------------------------------------------------------47
My Disk--------------------------------------------------------------------------------------------------------48
Troubleshooting -------------------------------------------------------------------------------------------50
Picture defects and the reason------------------------------------------------------------------------52
--------------------------------------------------------------------------------10 General Description
4
Page 6
Accessories
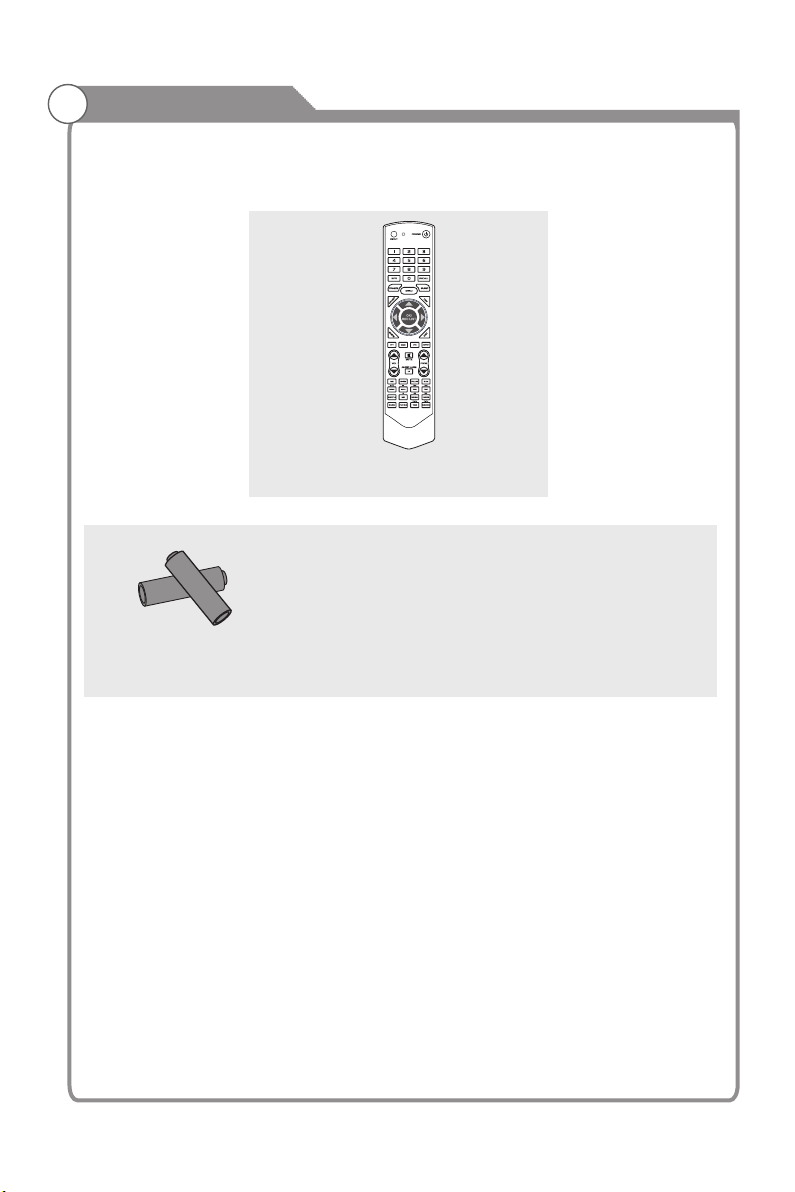
Please make sure the following items are included with your LED TV. If any items are
missing, contact the Kogan support team.
Remote Control
CAUTION:
Do not di spos e of batter ies in a fire . Do not s hort
circu it, di sassemb le or ov erheat th e batteries.
Dange r of exp losion if b attery is incor rectly
repla ced, p lease obs erve p olarity. Repl ace only
Batte ryx2
with th e same o r equival ent type.
5
Page 7

Introduction
Features
TV adopts 50” TFT display screenLED
Zero X radiation complies to green environment protection requirement
Connect to computer directly to realize TV/monitor combo.
16:9 wide screen
Auto tuning and fine tuning
HDMI input
Component Compatible (480i; 480P; 576i; 576P; 720P; 1080i; 1080P)
PC VGA
Programmable sleep timer
Wide range voltage input
No-signal automatic power off
Input terminals used for external equipment connection
1 x ANTENNA jack 4 x HDMI inputs
1 x computer PC-RGB input 2 x USB inputs
1 x COMPONENT input 1 x CVBS output
2 x AV inputs 1 x SPDIF output
1 x Headphone output
6
Page 8
Introduction
Specifications
Model
Display size
LED panel resolution
Speaker output power
Power supply
TV receive system
Frequency range
Video in
Power consumption
Standby consumption
Antenna Input
Controller power
Work Temperature
KALED 50 3D ZA
50” Diagonal (max.)
1920X1080
≥5 X2W
~110-240V, 50/60Hz
Digital: DVB-T
Analog: PAL: BG, I, DK,
SECAM: BG, D/K
Analog: Antenna:
46.25MHz-855.25MHz
Digital:5-12, 21-69
PAL / NTSC / SECAM
145W
<1W
75 ohms, unbalanced
DC 3V
(Two AAA size batteries)
1138 X2 75X73 5m m
1138X60X678mm
22.5Kg
19Kg
o o
0 C-40 C
Note:
- Design and specifications are subject to change without notice.
- Weight and Dimension shown are approximate.
- It is suggested to watch 3D program under the operation temperature above 10 C to
obtain the best 3D effect.
o
7
Page 9
Stand and wall-mounting instructions (optional)
How to assemble the stand
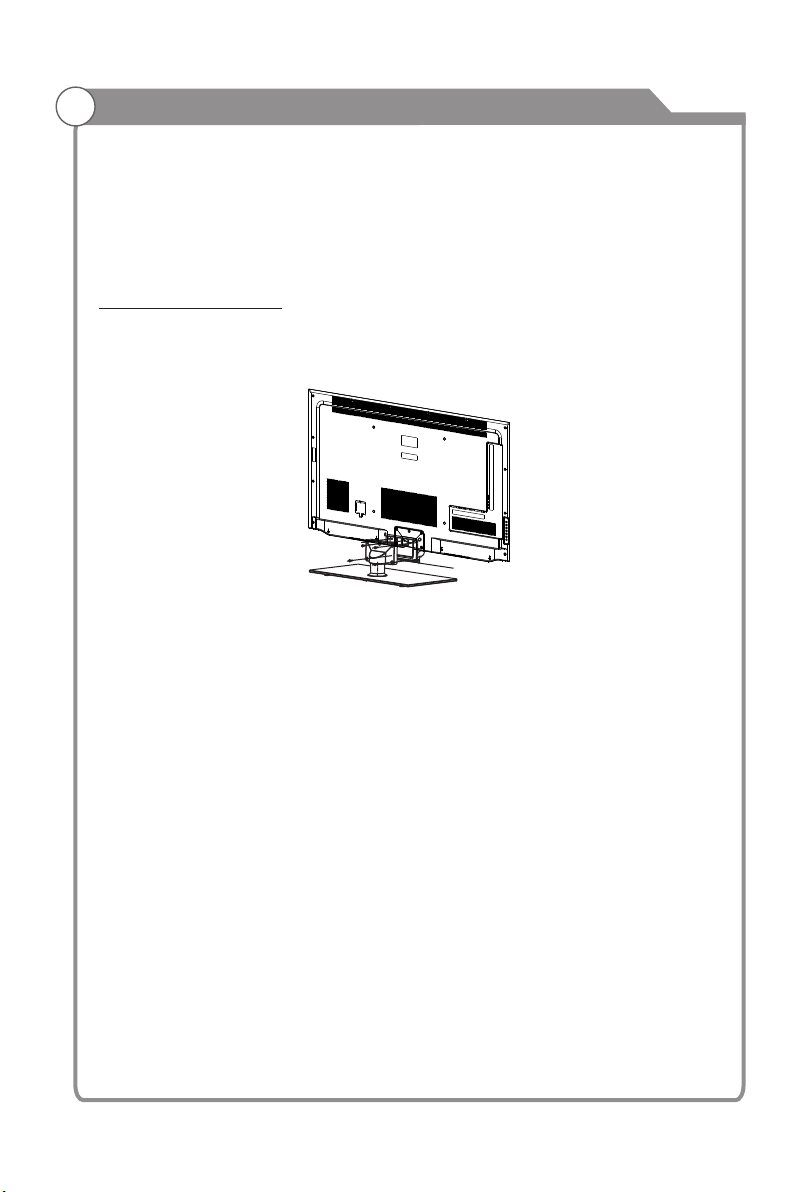
If you need to remove or assemble the stand please read the following instructions.
- Before attaching/detaching the stand, make sure to turn off the TV.
- Before performing work, spread cushioning over the base area to lay the LED TV on.
This will prevent it from being damaged.
Assembling instruction:
1) Assemble the stand and the unit together with five M4*12 screws. (Figure 1)
- To disconnect the stand from the TV, perform the above steps in reverse order.
Screws(5-M4X10)
Figure 1
Securing the TV Stand
Caution: Pulling, pushing or climbing on the TV may cause the TV to fall. In particular,
ensure your children do not hang over or destabilize the TV; doing so may cause the TV
to tip over, causing serious injuries or death. Follow all safety precautions at the start of
this manual. For added stability, install the anti-fall device for safety purposes,
as follows.
8
Page 10
Stand and wall-mounting instructions (optional)
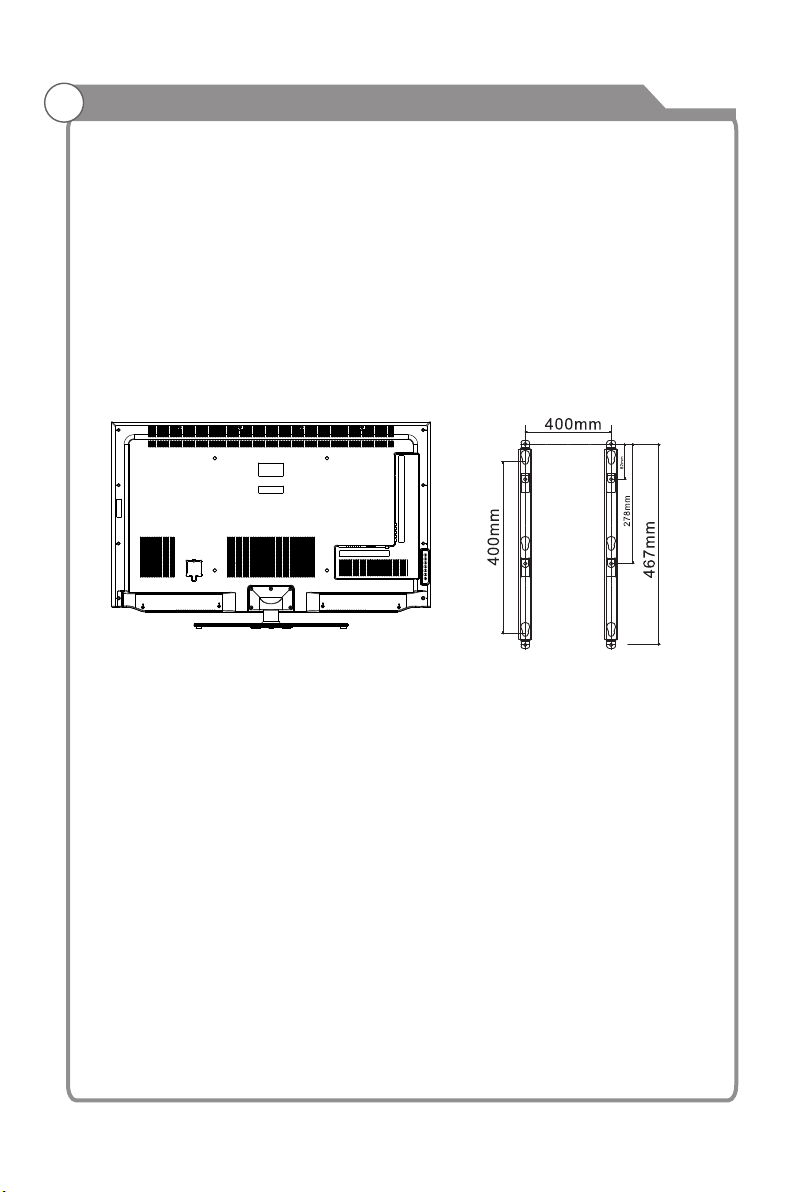
Your LED TV is able to accommodate wall mounting with the use of a wall mount bracket
(optional)Wall mounting instructions
(not supplied with LED TV, please contact your local hardware store) and the mounting
holes on the back of the unit.
We recommend removing the TV stand prior to wall mounting the TV. Please see previous
page for instructions on removing the stand.
How to mount the LED TV on the wall
1. After detaching the stand, fasten 4 mounting screws (Not supplied! Please contact your
local hardware store) into the 4 screw holes on the rear cover, see the figure below.
2. Fasten wall mounting bracket (Not supplied with LED TV, please contact your local
hardware store) with screws on the wall.
3.Carefully check for the strength before releasing the LED TV.
NOTE: For more detailed instructions please refer to your “after market” wall mounting
instruction book.
Thread hole size – M6 x 10 depth (TV mounting screw size) on the TV.
9
Page 11
General Description
Overview of back panel
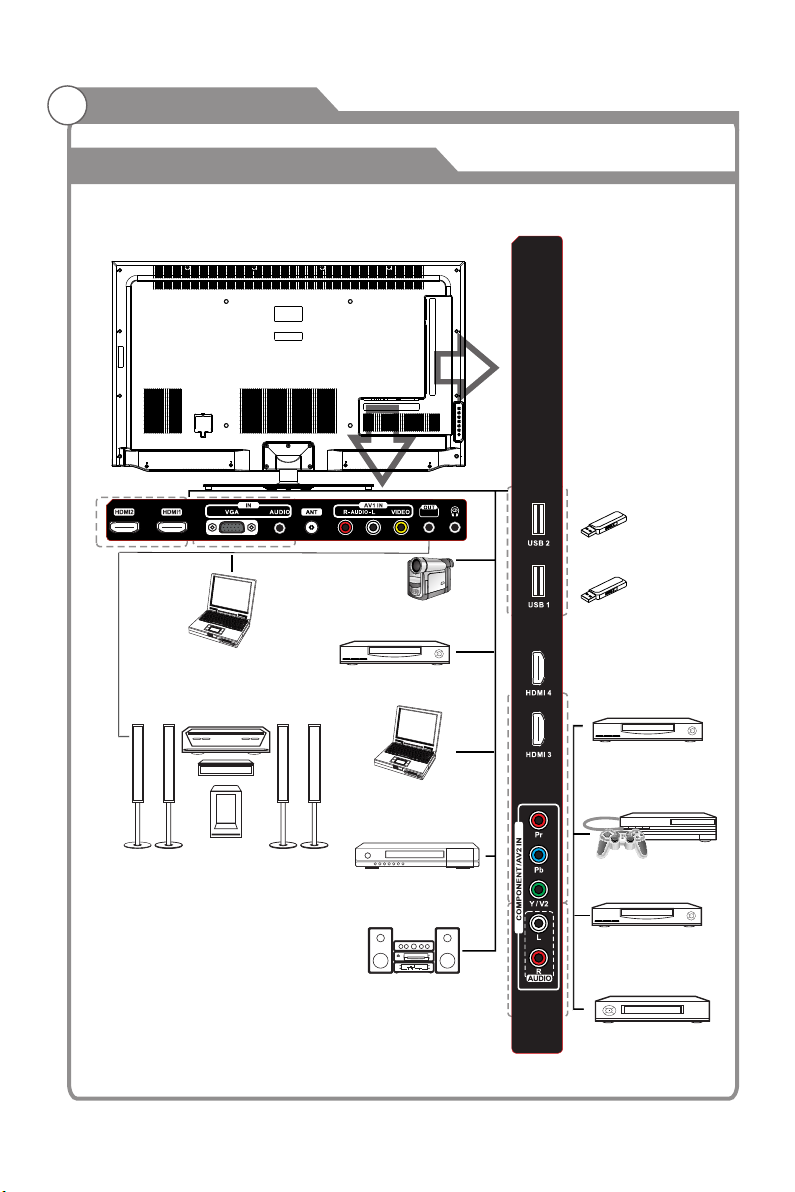
You can connect the TV with video devices such as DVD/VCD player, VCR and video camera
to enjoy the high quality picture.
CVBS/
SPDIF
USB2
PC
PC (HDMI-output)
Home theatre system
with digital input
Camcorder
DVD player
PC
PC (HDMI-output)
Blu-ray disc player
Audio system
10
USB1
DVD player with
component output
Video game equipment
DVD player
VCR
Page 12
General Description
Overview of front panel
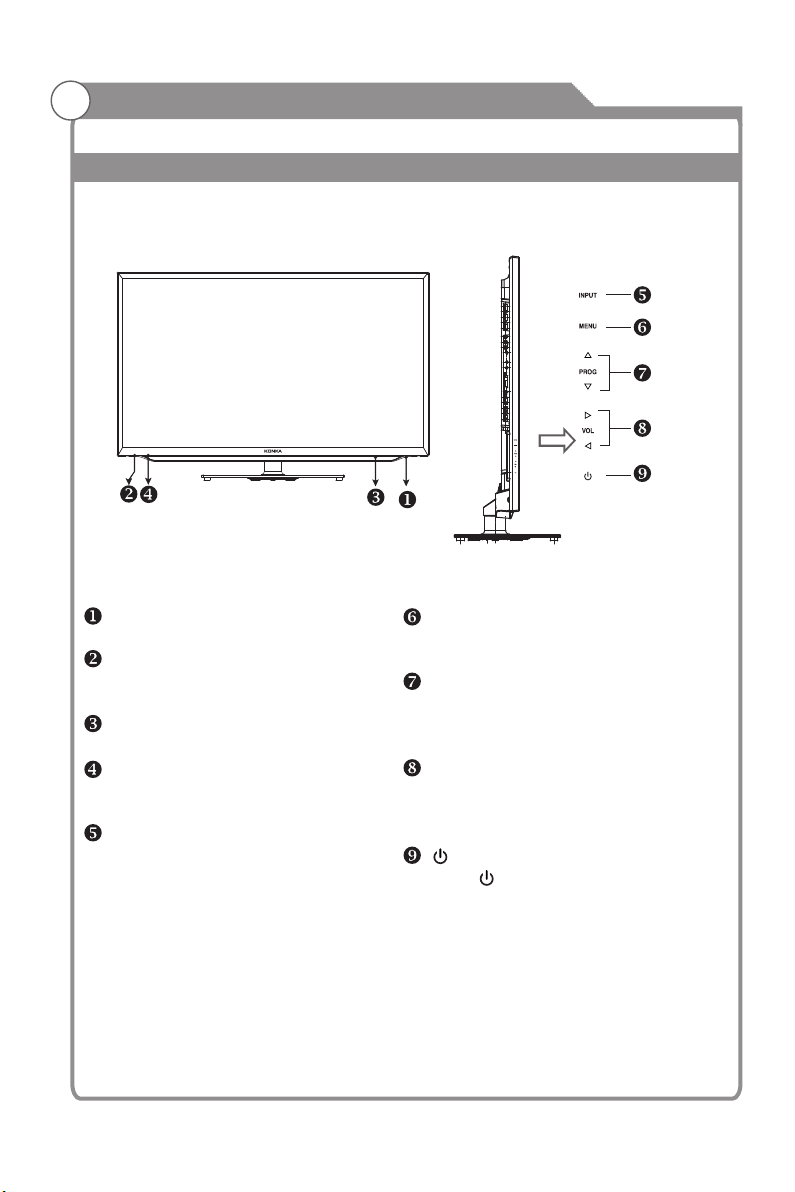
The buttons on the lower-left panel control your TV’s basic features, including the on-screen
menu. To use the more advanced features, you must use the remote control.
Power Switch
Press this button to turn TV on or off.
REMOTE CONTROL SENSOR
Aim the remote control towards this
spot on the TV.
3D Sync Signal emitter
3D sync signal for shutter glasses.
POWER INDICATOR
Green: In power on mode.
Red: In standby mode.
INPUT
Toggles between all the available
input sources.
MENU
Press to display an on-screen menu of
your TV's features.
PROG/
Press to change programs.
In the on-screen menu, use the PROG
/buttons as up/down arrow buttons.
VOL/
Press to increase or decrease the volume.
In the on-screen menu, use the VOL/
buttons as left/right arrow buttons.
Standby button
Press button to toggle between normal
and standby mode.
11
Page 13
General Description
Overview of Remote Control
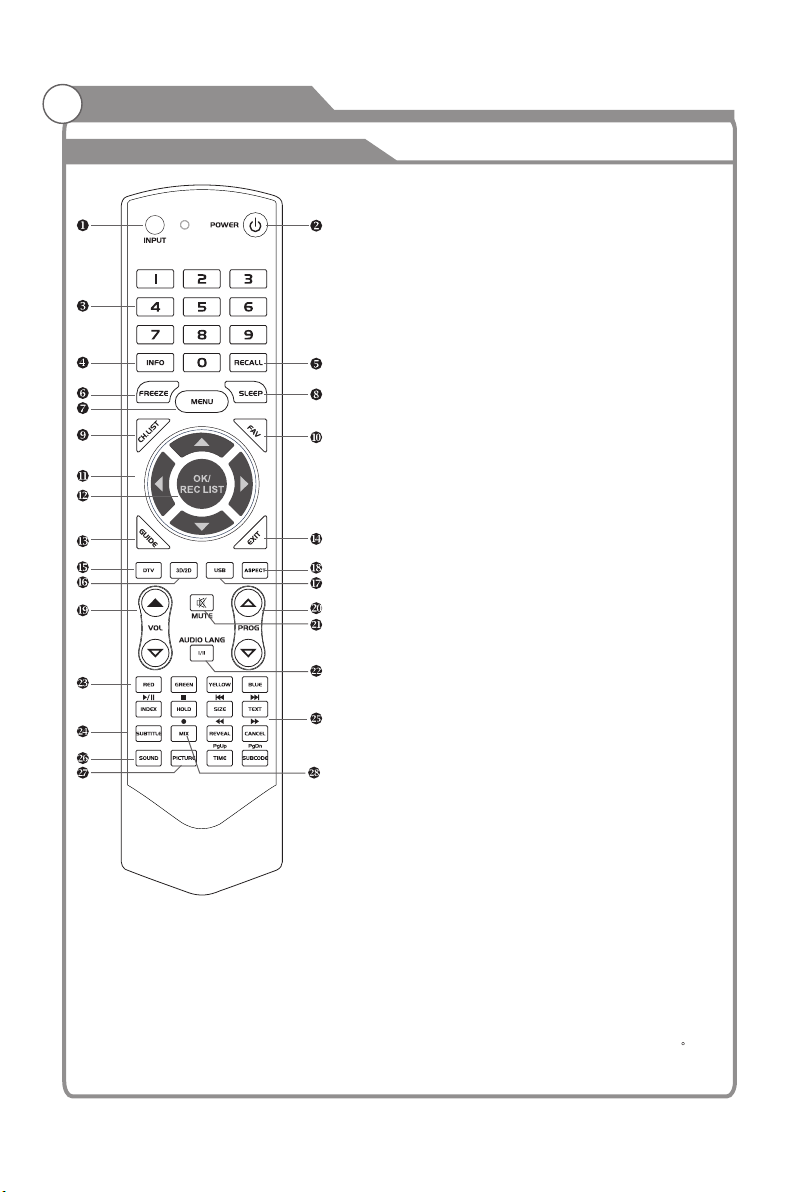
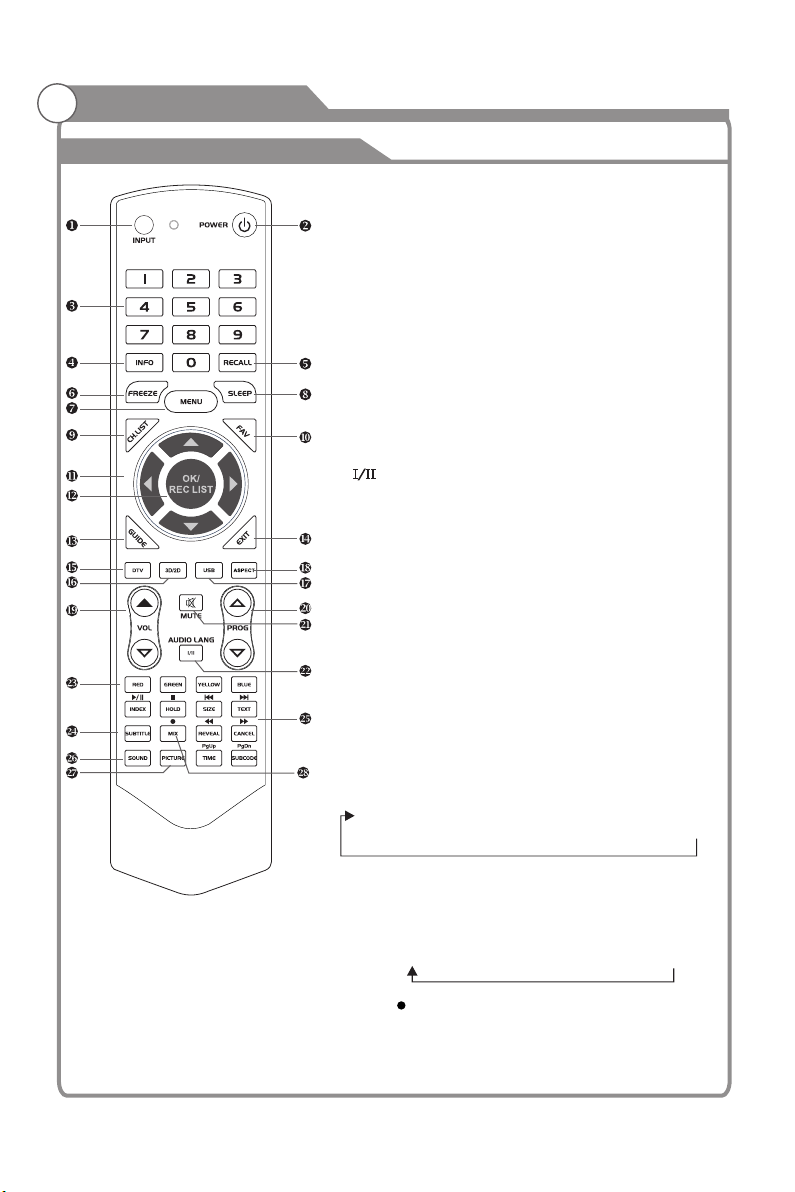
1. INPUT: This button is used to switch among
different sources: DTV,ATV, AV1, AV2,
Component,PC-RGB, HDMI1, HDMI2, HDMI3,
HDMI4, USB.
Select a source and press OK button to confirm.
2. POWER: Press this button to switch to standby
mode, and press it again to turn TV on.
3. Digital buttons(0~9): To select channel with
digital buttons.
4. INFO: This button is used to start the "Current
Service Banner" application that provides
information about the current service.
5. RECALL: Switch to the previous program.
6. FREEZE: Press this button to freeze the image.
7. MENU: Press this button to display main menu or
exit the menu. When you are in the submenu, you
can press it to return the main menu.
8. SLEEP: TV will be switched off automatically at
preset sleep time if you have set sleep timer. Use
your remote control to set the sleep timer.
Press SLEEP button on the remote control, then
press this button again to set sleep time: off, 10,
20,30, 60,90,120,180, 240 min. Press MENU
button to exit when you have set the sleep timer.
After you have set sleep timer, press SLEEP button
again, you will see the Remaining time.
Notes: The sleep timer you have set will be
Cancelled when the TV turns off or if a =power
failure occurs.
9. CH.LIST: Press it to show channel list on screen.
10. FAV: Press it to display favorite list.
11. Arrow buttons: Press these buttons to move
cursor up/down/left/right for menu.
12. OK/REC LIST: Press this button to display a list
of recorded programs. In main menu and submenu
it is a validation button.
13. GUIDE: In DTV source, this button is used to
start the EPG application.
14. Exit: Exit the menu.
15. DTV: Switch to DTV mode.
16. 3D/2D: SwiWch to 3D(2D)mode directly.
Press twice to swich to 2D(3D)mode.
Note :It i s sug ges ted t o watch 3D progra m und er
the op era tio n tem per atu re above 10 C to
obta in th e bes t 3D effe ct.
12
Page 14
General Description
Overview of Remote Control
17. USB: Switch to USB mode directly or call the
control menu in USB mode. Please see the
details in “Digital Media Player” on Page 40
-Page49.
18. ASPECT: Press this button to switch the screen
mode.
19. VOL and VOL: Press these buttons to
adjust TV volume.
20. PROGand PROG: Press these buttons to
change channel upward or downward.
In the teletext, these buttons are used to
display the next page and previous page.
21. MUTE: Press this button to shut off sound of the
TV, press again to restore TV sound.
22. Button/Audio Lang: sourceIn ATV , the button
is used to set NICAM sound system.
In DTV , the button is used to set the audiosource
language.
23. Red/Green/Yellow/Blue Command: These four
buttons are used to request linked buttons with the
current menu/page.
24. Teletext buttons: Detail operation please refer to
"Teletext “ in the next page.
25. IncludingDigital media player control button:
play/pause, stop, previous file, next file, page up,
page down, back, forward, is used to control in
USB mode.
Please refer to instructions in the section relevant
of multimedia player.
26. SOUND: This button is used to select the sound
mode.
User Standard New s Movie S por ts
Da nce Cla ssi c Po p Roc k Jazz Sof t
27. PICTURE: This button is used to adjust user
picture mode, press this button repeatedly and
select one of four settings.
Stan dar d Mil d Br igh t Use r Sports
28. MIX ( ): Teletext buttons for mix function, please
refer to page 15. It is also used for recording function
when TV is on DTV mode, please refer to page 39.
13
Page 15
General Description
General Description
Teletext
Teletext
13
13
Teletext is an information system broadcast by certain
Teletext is an information system broadcast by certain
channels which be consulted like a newspaper.
channels which be consulted like a newspaper.
It also offers to subtitles for viewers with hearing
It also offers to subtitles for viewers with hearing
problems or who are not familiar with the transmission
problems or who are not familiar with the transmission
language.
language.
You can press these buttons to operate the teletext:
You can press these buttons to operate the teletext:
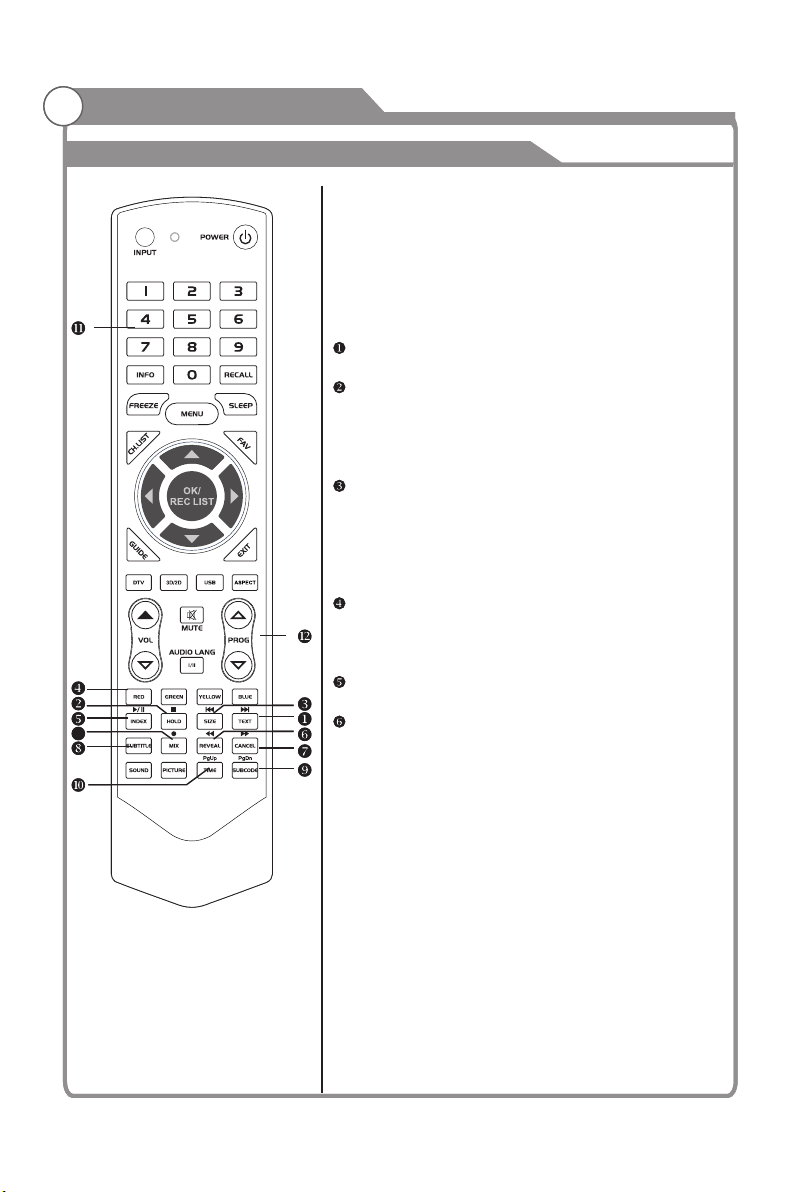
Text
Text
Press TEXT button to enter or exit teletext mode.
Press TEXT button to enter or exit teletext mode.
Hold
Hold
Press HOLD button to toggle Hold function on or
Press HOLD button to toggle Hold function on or
off. When Hold is switched on, the page acquisition
off. When Hold is switched on, the page acquisition
is stopped. When Hold is switched off, the page
is stopped. When Hold is switched off, the page
acquisition is started.
acquisition is started.
Size
Size
Press SIZE button one time to display the upper
Press SIZE button one time to display the upper
half of the screen in double height, press the SIZE
half of the screen in double height, press the SIZE
button two times to display the lower half of the
button two times to display the lower half of the
screen in double height, press three times to
screen in double height, press three times to
display the full screen in normal size.
display the full screen in normal size.
Red/Green/Yellow/Blue Command
Red/Green/Yellow/Blue Command
These four buttons are used for quick access to
These four buttons are used for quick access to
different pages as numbered at the bottom of the
different pages as numbered at the bottom of the
screen.
screen.
Index
Index
Press INDEX button, then index page displays.
Press INDEX button, then index page displays.
Reveal
Reveal
Pressing this button will reveal any hidden data
Pressing this button will reveal any hidden data
(answers to quizzes for example).Press the REVEAL
(answers to quizzes for example).Press the REVEAL
button again to return to normal screen.
button again to return to normal screen.
14
14
Page 16
General Description
Teletext
13
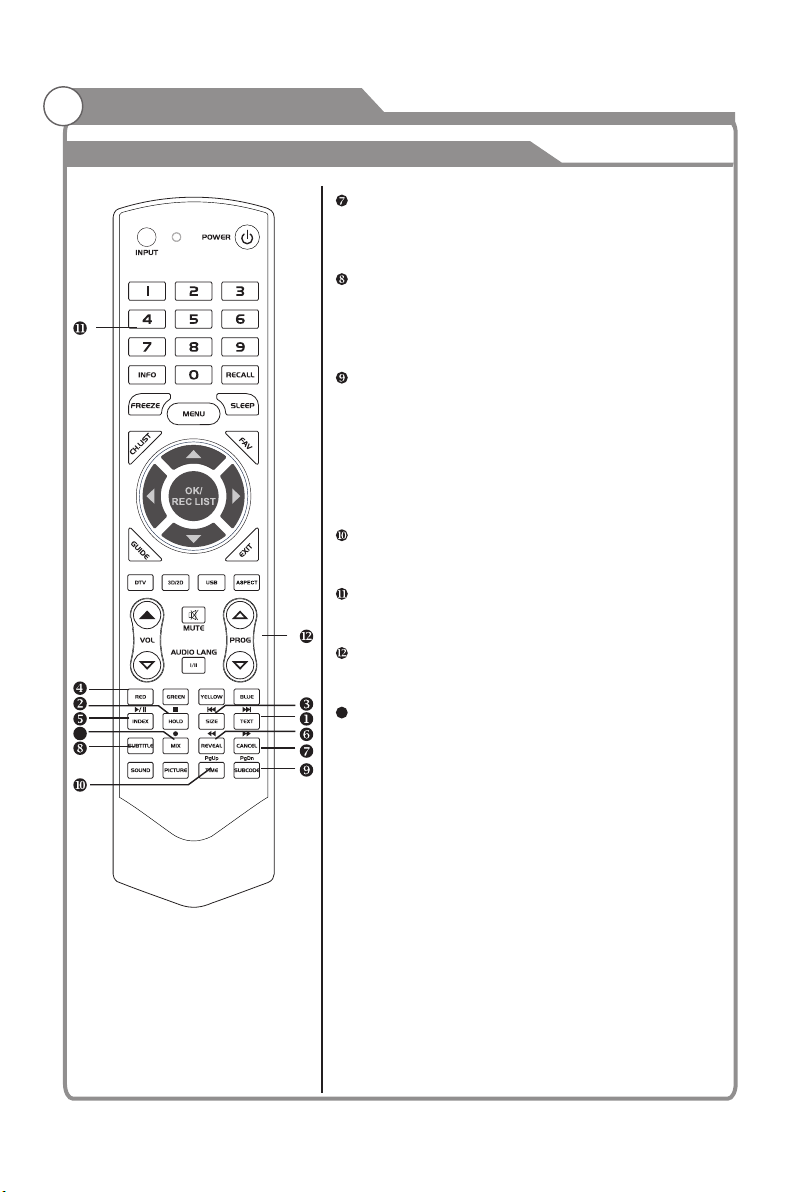
Cancel
The CANCEL button will exit from any Teletext on
the display. Press CANCEL button again to exit
Teletext and return to live TV broadcast.
Subtitle
Turning the Teletext subtitles on or off.
Subtitles is a separate mode with only a few
buttons available. There will be no OSD visible
other than the Teletext Subtitles.
Subcode
Subcode mode gives the possibility to select
certain subcode pages of a Teletext page.
Entry of digits within the range 0...9 for current
subcode entry. If the digit completes the entry,
a page request is started.
Press PROG+/PROG- buttons to change the
subcode pages.
Time
This button is used to show the time of the
Teletext.
Digital buttons(0~9)
You can press them to enter the number of the
Page required.
PROG+/PROG You can press them to change page upward or
downward.
13
Mix
Press MIX button, the teletext page changes
transparent, TV content and teletext page
content will display at the same time.
Press MIX button again to exit MIX mode.
15
Page 17
General Description
Installing Batteries in the Remote Control
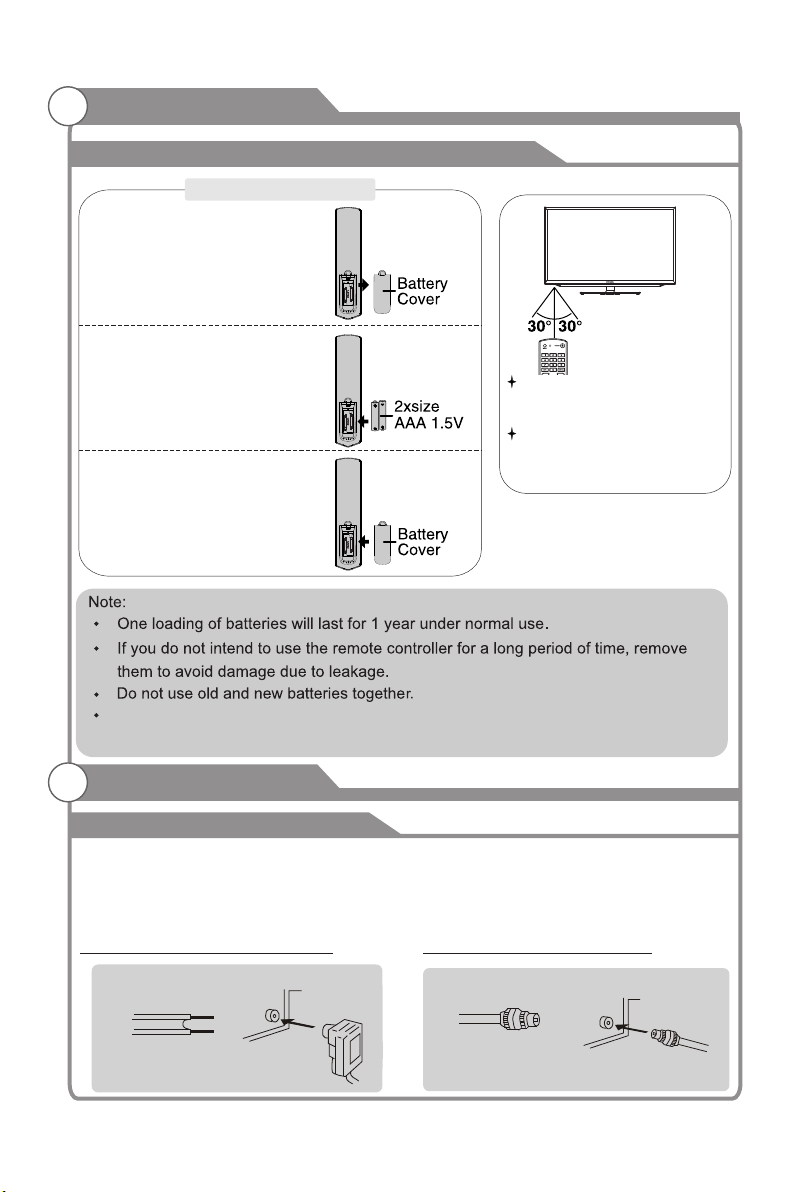
Inst al ling Ba tt er ies
Open the bat te ry c om pa rt me nt
1
cover on t he b ac k si de .
Insert two 1 .5 V AAA si ze b at te ri es
in corre ct p ol ar it y. Don´t mi x ol d or
2
used bat te ri es w it h ne w on es .
Closed t he c ov er.
3
Poi nt the re mote to wards t he remo te
con trol se nsor of t he TV and u se i t
wit hin 8 met ers.
Put t he used b atter ies int o the rec yclin g bin sin ce they c an nega tivel y
aff ec t th e env ironm ent.
The ba tte rie s (ba tte ry pa ck or batter ies i nst all ed) s hal l not b e exposed to
exce ssi ve he at su ch as s uns hin e, fire or the l ike .
External Connection
Antenna connection
Antenna input impedance of this unit is 75ohm. VHF/UHF 75ohm coaxial cable can be
connected to the antenna jack directly, if the antenna cable is 300ohm parallel flat feeder
cable, you need to use the 300ohm/75ohm converter to connect the antenna cable to the
antenna jack. For details Please refer to the following drawing.
Antennas with 300 flat twins Leads
Use a 75ohm - 300ohm converter
ANT IN
300ohm coaxial cable
Antenna feeder
Antennas with 75 Round Leads
75oh m co ax ia l cable
Ante nn a ca bl e
16
Page 18
External Connection
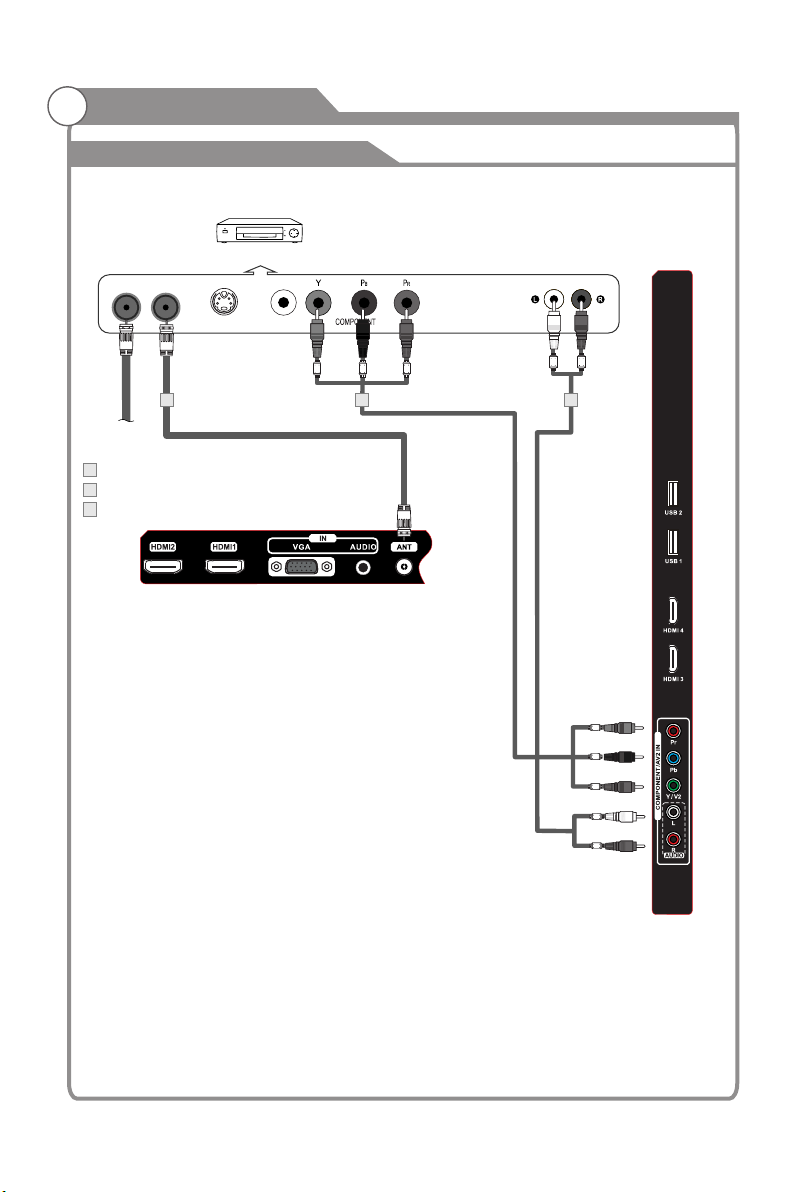
Connecting VCR
These instructions assume that you have already connected your TV to an antenna or a
cable TV system. Skip step 1 if you have not yet connected to an antenna or a cable
system.
VCR Rear Panel
ANT
ANT OUT S-VIDEO
1 2 3
RF Cable (Not supplied)
1
YPbPr cable(supplied)
2
Audio Cable (Not supplied)
3
VIDEO OUT
Green
Blue
Red
Follow the instructions in Viewing a VCR or Camcorder
Tape to view your VCR tape.
Each VCR has a different back panel configuration.
When connecting a VCR, match the color of the connection
terminal to the cable.
1. Unplug the cable or antenna from the back of the TV.
2. Connect the cable or antenna to the ANT IN terminal on
the back of the VCR.
3. Connect an RF Cable between the ANT OUT terminal
on the VCR and the ANT IN terminal on the TV.
4. Connect a Component Cable between the COMPONENT
[Y, Pb, Pr] jacks on the DVD player and YPbPr jack
on the TV.
5. Connect Audio Cables between the AUDIO OUT jacks
on the VCR and the AUDIO L and AUDIO R jacks on
the TV.
TV Rear Panel
AUDIO OUT
White
Red
Blue
Green
White
Red
Red
Note: 1. Whenever you connect an external device to your TV, make sure that power on
the unit is turned off.
2. When connecting an external device, match the color of the connection terminal
to the cable.
17
Page 19
External Connection
Connecting a Camcorder
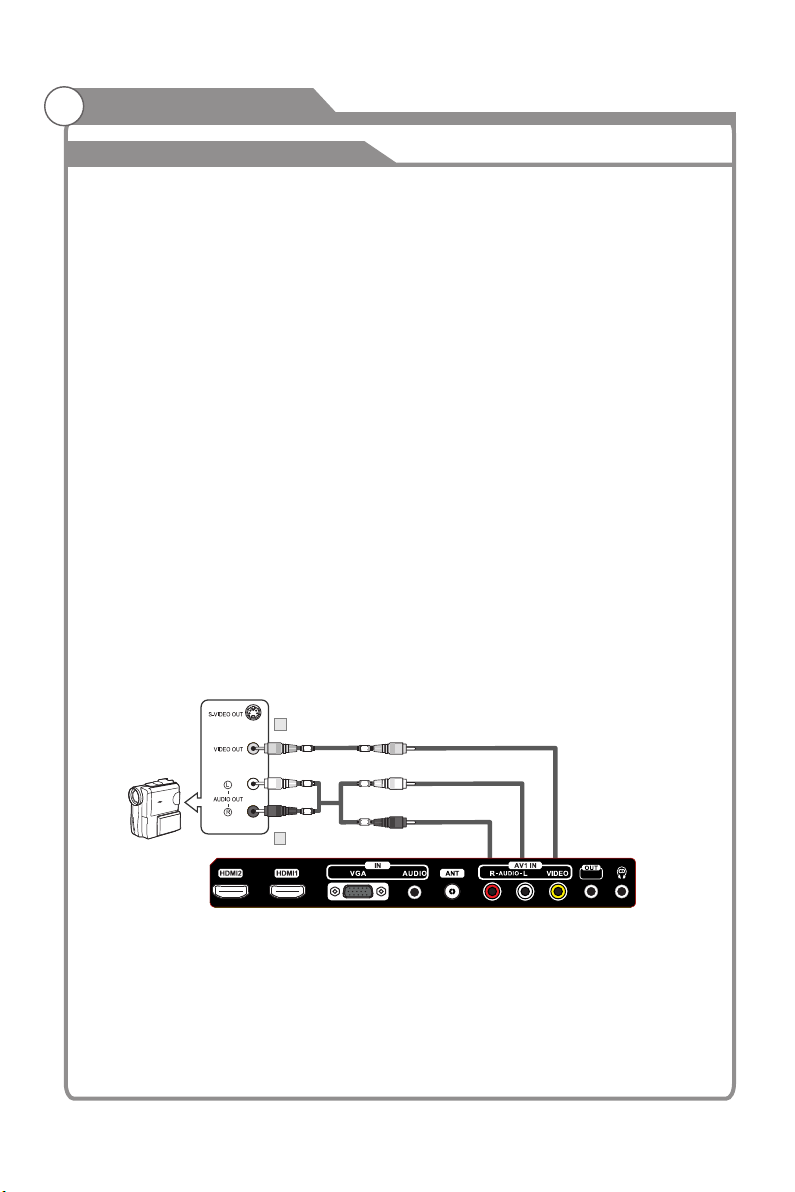
The rear panel jacks on your TV make it easy to connect a camcorder to your TV. They
allow you to view the camcorder tapes without using a VCR.
Each Camcorder has a different back panel configuration.
When connecting a Camcorder or DVD, match the color of the connection terminal to
the cable.
1. Connect a Video Cable between the AV1 VIDEO jacks on the TV
and the VIDEO OUT jack on the camcorder.
2. Connect Audio Cables between the AUDIO L and AUDIO R jacks on
the TV and the AUDIO OUT jacks on the camcorder.
3. Connect a Video Cable between the component IN Y on the TV
and the VIDEO OUT jack on the DVD.
4. Connect Audio Cables between the component IN AUDIO L and
R jacks on the TV and the AUDIO OUT jack on the DVD.
Note:
1. Whenever you connect an external device to your TV, make sure that
power on the unit is turned off.
2. When connecting an external device, match the color of the connection
terminal to the cable.
Camcorder
Video Cable (Not supplied)
1
Yellow
White
Red
Audio Cable (Not supplied)
2
Yellow
White
Red
18
CVBS/
SPDIF
Page 20
External Connection
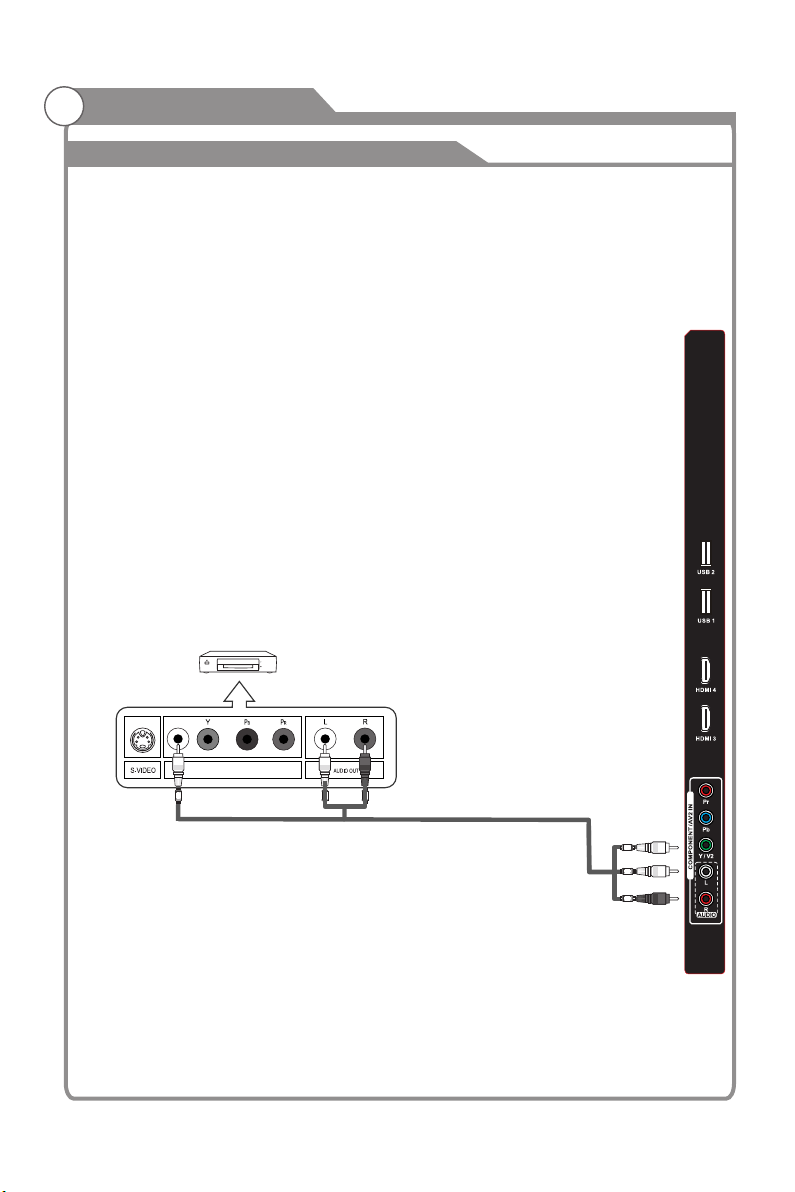
Connecting a DVD Player/Set-Top Box
Note:
1. Whenever you connect an external device to your TV, make sure that
power on the unit is turned off.
2. When connecting an external device, match the color of the connection
terminal to the cable.
DVD Player/Set-Top Box
TV Rear Panel
VIDEO OUT
Green
White
White
Red
Red
Audio Cable (Not supplied)
YPbPr cable(not supplied)
Yellow
White
Red
Red
Blue
19
Page 21
External Connection
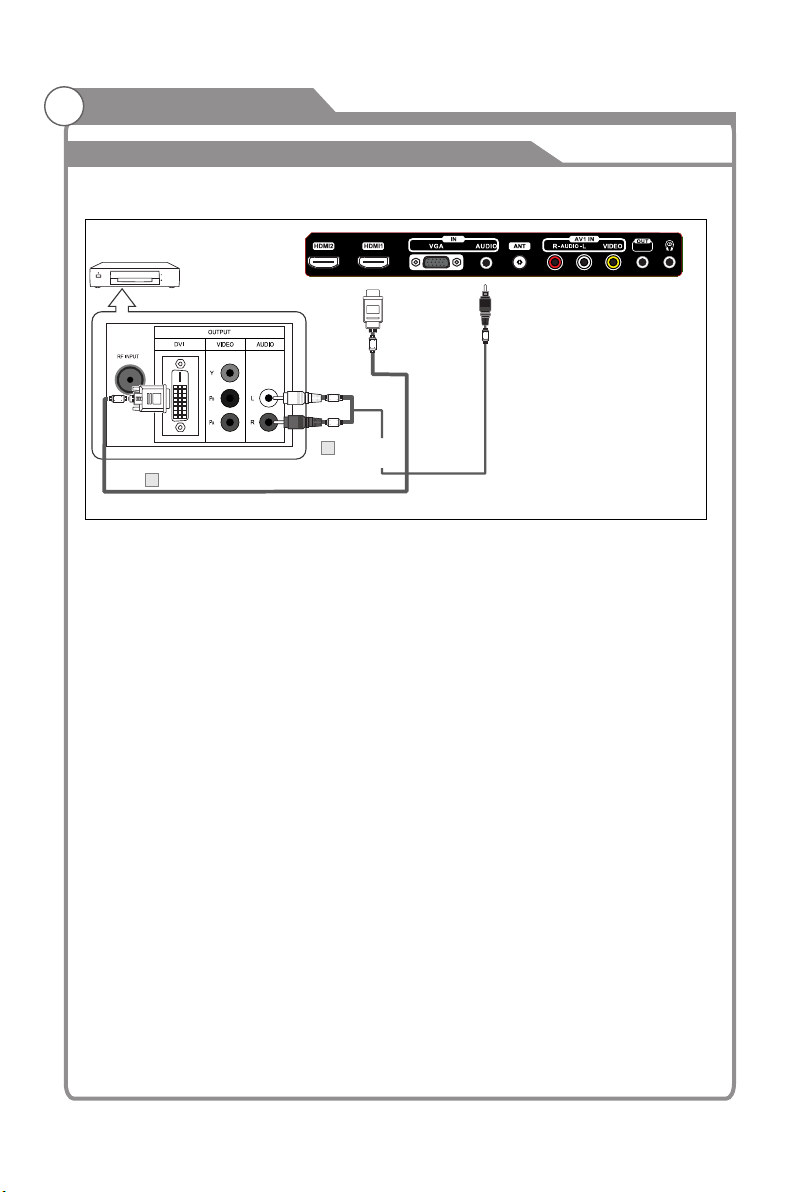
Connecting a DVD Player/Set-Top Box via DVI
This connection can only be made if there is a DVI Output connector on the external device.
DVD Player/
Set-Top Box
CVBS/
SPDIF
TV Rear Panel
White
Red
Audio Cable
2
(Not supplied)
1
DVI to HDMI Cable (Not supplied)
Each DVD player/STB has a different back panel configuration.
When connecting a DVD player/STB, match the color of the connection terminal to the
cable.
1. Connect a DVI to HDMI Cable or DVI-HDMI Adapter between the HDMI 1, HDMI 2, HDMI 3
or HDMI 4 connector on the TV and the DVI connector on the DVD player/Set-Top Box.
2. Connect Audio Cables between the PC AUDIO IN jack on the TV and the AUDIO OUT
jacks on the DVD player/Set-Top Box.
Note:
1.Whenever you connect an external device to your TV, make sure that power on the unit is
turned off.
2.When connecting an external device, match the color of the connection terminal to the
cable.
20
Page 22
External Connection
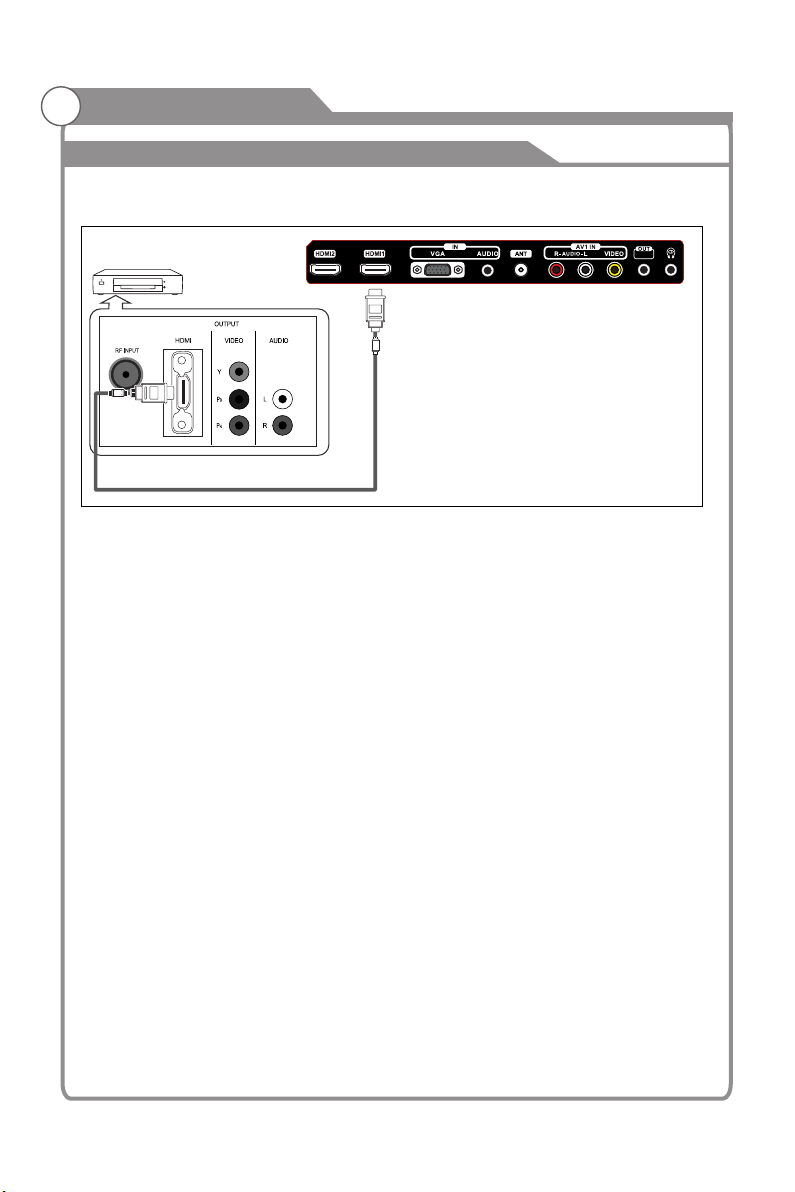
Connecting DVD Player/Set-Top Box via HDMI
This connection can only be made if there is a HDMI Output connector on the external
device.
DVD Player/
Set-Top Box
HDMI Cable (Not supplied)
What is HDMI?
HDMI, or high-definition multimedia interface, is a next-generation interface that enables
the transmission of digital audio and video signals using a single cable without
compression.
Multimedia interface is a more accurate name for it especially because it allows multiple
channels of digital audio (5.1 channels).
The difference between HDMI and DVI is that the HDMI device is smaller in size, has the
HDCP(High Bandwidth Digital Copy Protection) coding feature installed, and supports
multi-channel digital audio.
Each DVD player/STB has a different back panel configuration.
1. Connect an HDMI Cable between the HDMI1, HDMI2, HDMI3 or HDMI4 connector on
the TV and the HDMI connector on the DVD player/Set-Top Box.
CVBS/
SPDIF
Note:
1.Whenever you connect an external device to your TV, make sure that power on the unit is
turned off.
2.When connecting an external device, match the color of the connection terminal to the
cable.
21
Page 23
External Connection
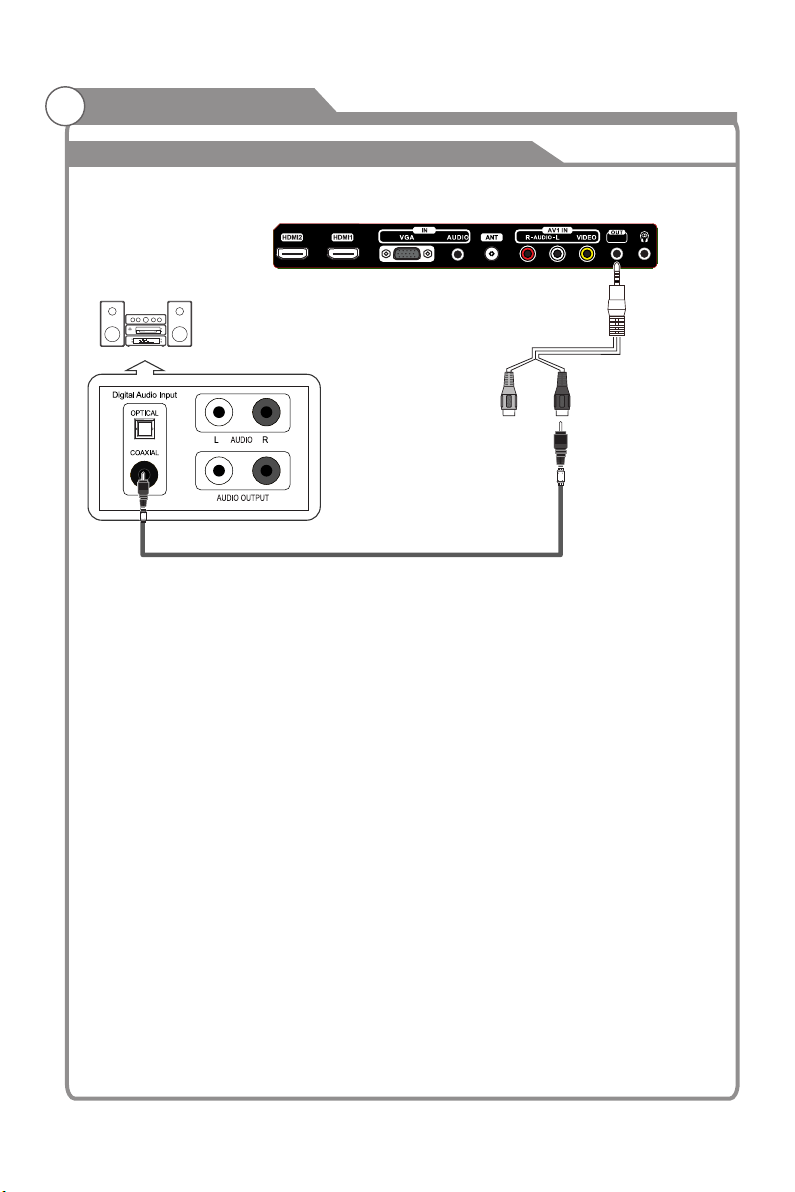
Connecting Digital Audio System
The rear panel jacks on your TV make it easy to connect a Digital Audio System to your TV.
CVBS/
SPDIF
Digital Audio System
TV Rear Panel
(Bla ck)
Coaxial Cable (Not supplied)
5.1 CH audio is possible when the TV is connected to an external device supporting 5.1 CH.
1. Connect an Coaxial Cable between the SPDIF jacks on the TV and the Digital Audio Input
jacks on the Digital Audio System. When a Digital Audio System is connected to the
SPDIF terminal: Decrease the gain (volume) of the TV, and adjust the volume level with
the volume control.Digital Audio System's
22
Page 24
External Connection
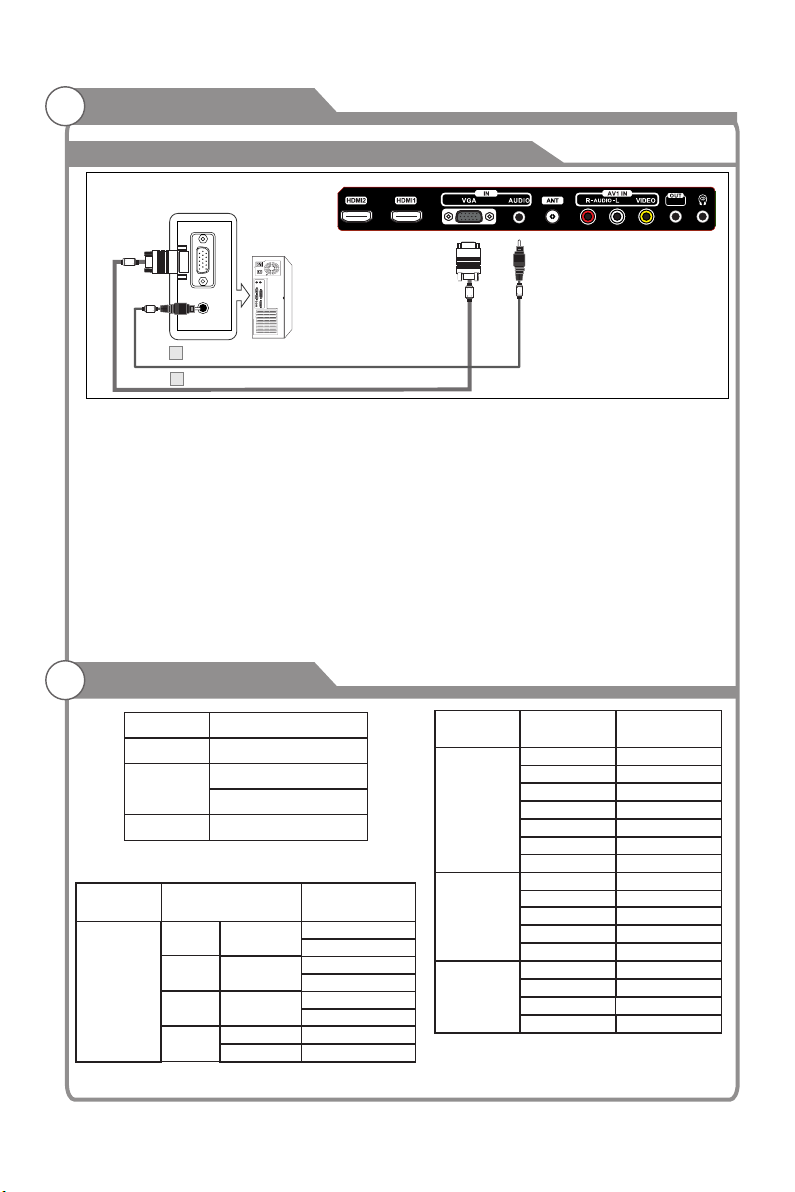
Connecting PC
CVBS/
SPDIF
PC
2
PC Audio Cable (Not supplied)
1
D-Sub Cable (Not supplied)
Each PC has a different back panel configuration.
The HDMI jacks do not support PC connection.
1. Connect a D-Sub Cable between VGA/PC IN connector on the TV and the PC output
connector on your computer.
2. Connect a PC Audio Cable between PC AUDIO IN jack on the TV and the Audio Out jack
of the soundcard on your computer.
You should set PC software before you connect a PC to your TV (please refer to "PC
Display'' settings)
Note:
1. Whenever you connect an external device to your TV, make sure that power on the unit is
turned off.
2. When connecting an external device, match the color of the connection terminal to the
cable.
Supporting signals
Input
DTV
ATV
CVBS PAL/NTSC/SECAM
Input
PC/VGA
Resolution
VGA
SVGA
XGA
SXGA
Mode
DVB-T
PAL BG I DK
SECAM BG DK
640x480
800X600
1024X768
1280X1024
1360X768
Vertical
Frequency
60Hz
75Hz
60Hz
75Hz
60Hz
75Hz
60Hz
60Hz
23
Input
Component
HDMI
DVI-HDMI
Resolution
480i
480p
576i
576p
720p
1080i
1080p
480p
576p
720p
1080i
1080p
640x480
800X600
1024X768
1280X1024
Vertical
Frequency
60Hz
60Hz
50Hz
50Hz
50Hz/60Hz
50Hz/60Hz
50Hz/60Hz
60Hz
50Hz
50Hz/60Hz
50Hz/60Hz
50Hz/60Hz
60Hz
60Hz
60Hz
60Hz
Page 25
Basic Operation
Turning the TV On and Off
How to turn the TV on or off
1
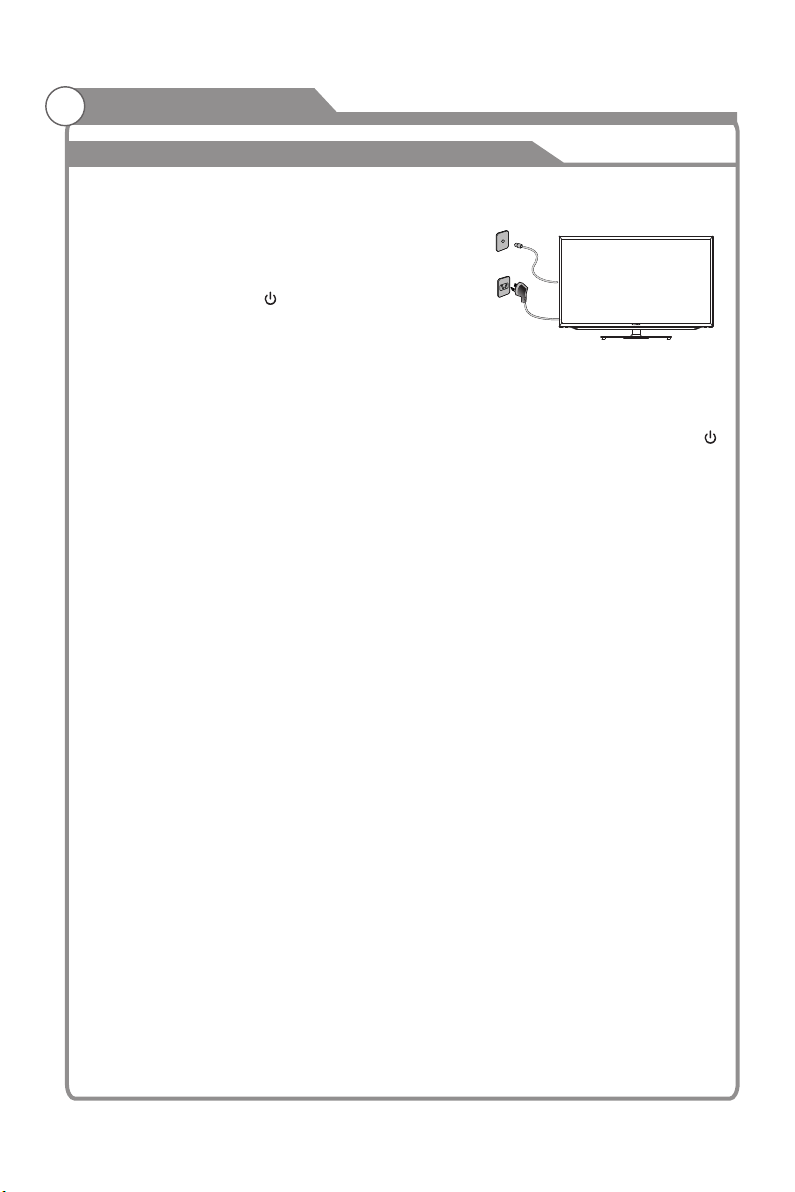
1. Insert the power cord plug into a polarized AC outlet.
2. If TV is in standby mode, press POWER button on
the remote control or button on the bottom panel
of LED TV.
3. Normal picture will be displayed on the screen after 15 seconds. If no signal input
is present, "No Signal" will be displayed on the screen.
4. If temporary POWER off is required, press POWER button on the remote control or
button on the bottom panel.
5. If you want to completely switch off the power for this unit, unplug the power cord plug
for this unit.
6. After switching off the unit, you should wait at least 5 seconds before switching on again.
Status indication lamp
Red: In standby mode.
Green: In power on mode.
Auto power-off
If there is no signal, the TV will 10 minutes.automatically enter standby mode after
See 'Auto sleep' pg. 36 for more details.
Memory before turning TV off
The picture and sound settings and preset channels will be memorised at the point when
the TV is turned off. When the TV is started up again it will work according to these
settings.
24
Page 26
Basic Operation
Menu operation
Input Setup
1
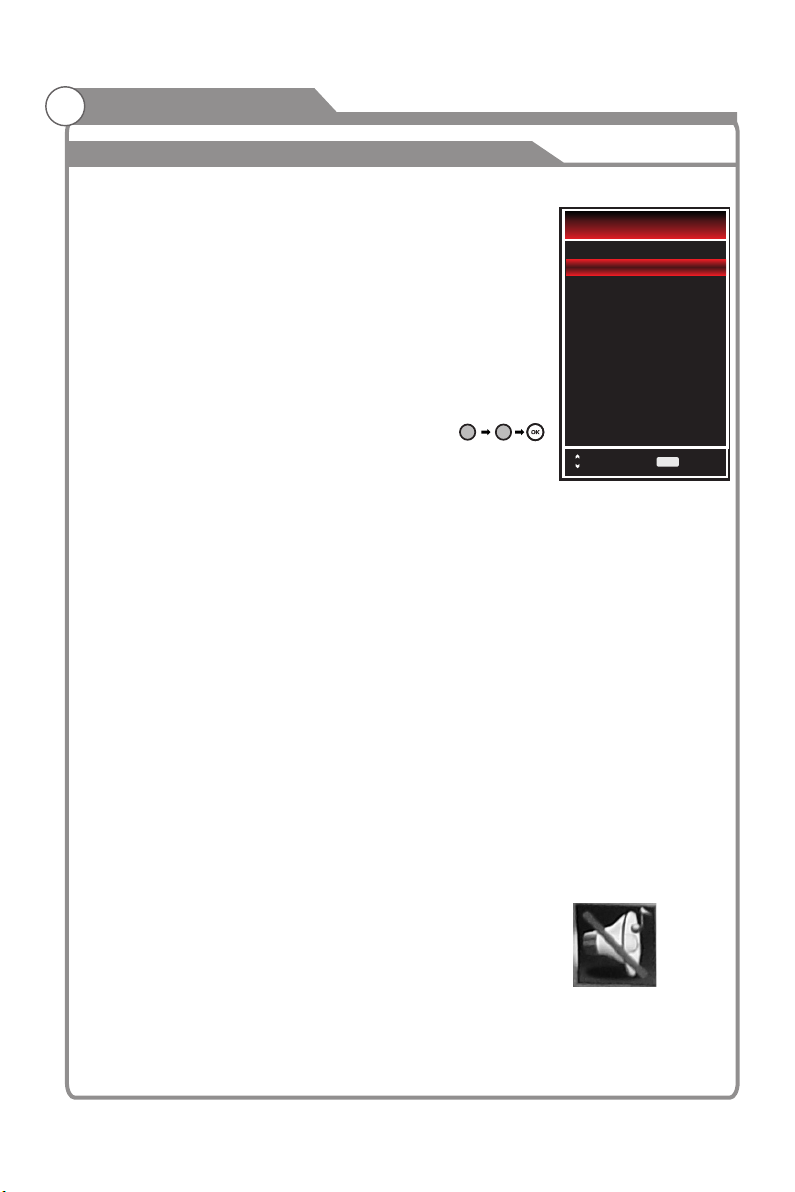
Press INPUT key on the remote control to enter "INPUT
SOURCE" menu. There are eleven options for you to select: DTV,
ATV, AV1, AV2, Component, PC-RGB, HDMI1, HDMI2, HDMI3,
HDMI4 and USB, Use ▲/key to move the cursor to the input
you desired and press OK key to confirm.
Channels Selection
2
There are four ways to select channel:
1) Using number keys, and OK keys on the remote control to
9
select channel directly. To select channel 90, press .
0
When you use the number buttons, you can directly select
channels that were either erased or not memorized.
2) Using PROG/ key on the remote control or on your TV to select channel.
When you press the PROG/ key, the TV changes channels in sequence. You will see
all the channels that the TV has memorized.
You will not see channels that were either erased or not memorized.
3) Press RECALL key to return to previous channel, press it again to return to current
channel.
To quickly switch between two channels that are far apart, tune to one channel, then use the
number keys to select the second channel. Then use the RECALL button to quickly
alternate between them.
RECALL is not activated if no channel has been changed after TV turning on.
4) Select channels from "All Channels List" or "Favorite Channels List".
Press OK key to choose from "Channel List" menu.
Input Source
Component
PC-RGB
HDMI1
HDMI2
HDMI3
HDMI4
Select
DTV
ATV
AV 1
AV 2
USB
OK
OK
Volume Adjustment and Mute Setup
3
Volume adjustment
Press VOL/ key on the remote control or on the TV to display "Volume" menu,
adjust the volume of TV between 0 to 100 by using VOL/key:
-To increase the volume, press VOL key;
-To decrease the volume, press VOL key;
Mute
Press MUTE and the sound cuts off. The MUTE icon will appear in the lower-left corner
of the screen.
To resume sound, press the MUTE button again, or simply press the VOL key.
25
Page 27
Basic Operation
Menu operation
Current Channel Information
4
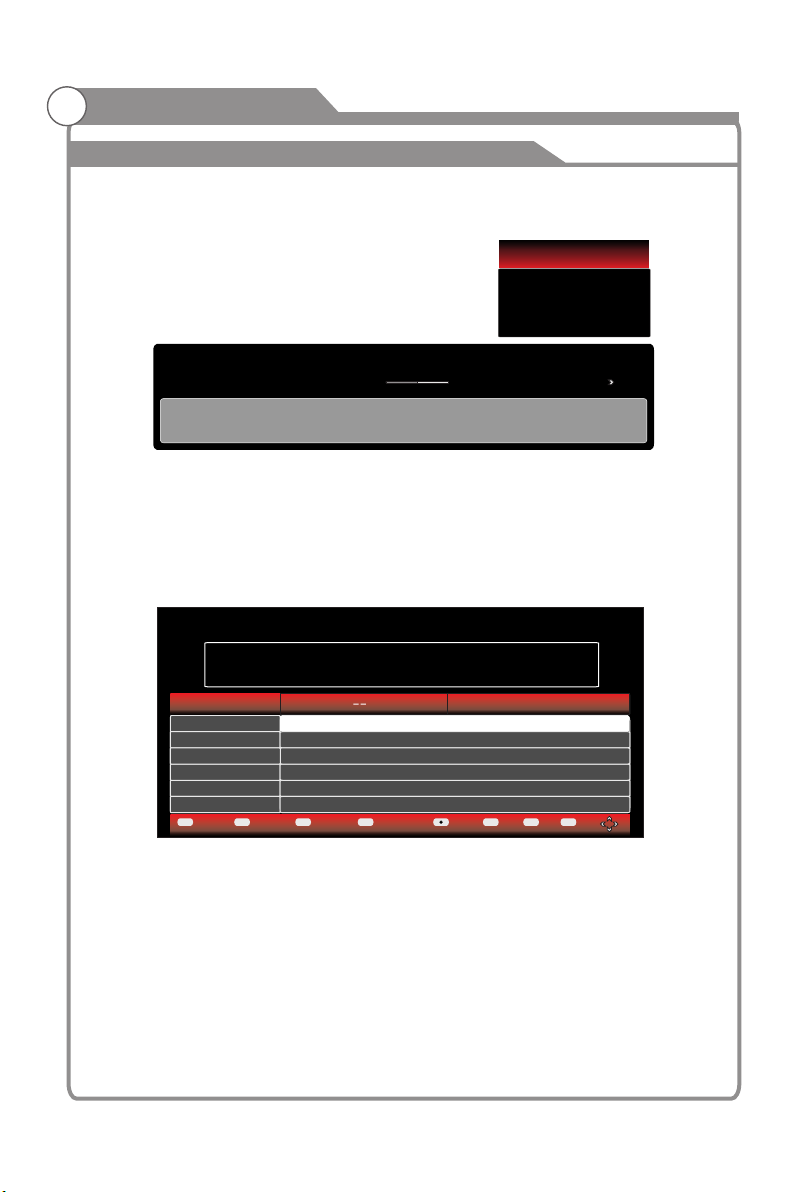
Press INFO key on the remote control to view current channel information, the
indications of channel information are listed in the following table.
9
DTV 576i
SD DOLBY
THE SHAK
Wednesday 17 Jun 2009
Fears
Ahhhh, it’s time to face your fears!! it’s a scary day at The Shak with the theme of
Fears-Eco. Curio.
Nine Di gi ta l
09:41 12:00
Subtitle
Age 11
Press EXIT key on the remote control to exit this OSD.
GUIDE Menu
5
Press GUIDE key to enter “GUIDE " menu, the first line displays current channel number,
channel name, event title and current time.
The following line displays all programs this channel, press ▲/ that will be played on
key to select the program you desired.
PROGRAMME GUIDE
DTV 9 Nine Digital
MALCOLM IN THE MIDDLE
18Jan 15:30-16:00
18 Jun 13:00-13:30
18Jan 16:00-16:30
18 Jun 13:30-14:30
DTV
MALCOLM IN THE MIDDLE
THE SHAK
No Information
No Information
No Information
No Information
Pre. Day Nex tDay Sche dule R emind er
INFO
OK
INFORecord
10:47
NEXT
18 Ja n 2010 04 :54
EXIT
Exit
OK
MPEG
DTV EPG (Electronic Program Guide)
In DTV mode, press “GUIDE” button to enter the Electronic Program . (Disabled Disabled
when there is no signal)
1. Electronic Program Guide information is provided by the broadcaster and displays
scheduled programs for the week ahead (depending upon the broadcaster).
2. TV program of each channel is listed under the time axis. Press /“ ” button to select
the channel and press “ ” button to highlight the p/ rogram. The selected program’s
background colour will change to . Press “INFO” button to view the detailed white
information. Press “OK” to .select the desired channel
3 “Reminder”(blue) button to reserve programs. If the TV is in DTV mode,.Use the
it will automatically turn to the reserved program at the scheduled time. Use “Schedule”
(yellow) button to look up the reminder list.
26
Page 28
Basic Operation
Menu operation
Prev.Day: If you press the red key on the remote controller, It will show Day’s Previous
programs.
Next Day: If you press the green key on the remote controller, It will show Next Day’s
programs.
Schedule: If you press the yellow key on the remote controller, It will show the reminder
list.
Reminder: If you press the blue key on the remote controller, It will show a command
window, and you can set the reserve programs.
Record: If press the record key on the remote controller it will show the RECORDER page.
INFO: you can press the INFO key on the remote controller to show information in
regards to the program you have chosen.
OK: you can press the OK key on the remote controller to select the channel you
want to view.
Exit: once you have selected a channel using the OK key, press the Exit key to view
that particular channel.
Install Guide
6
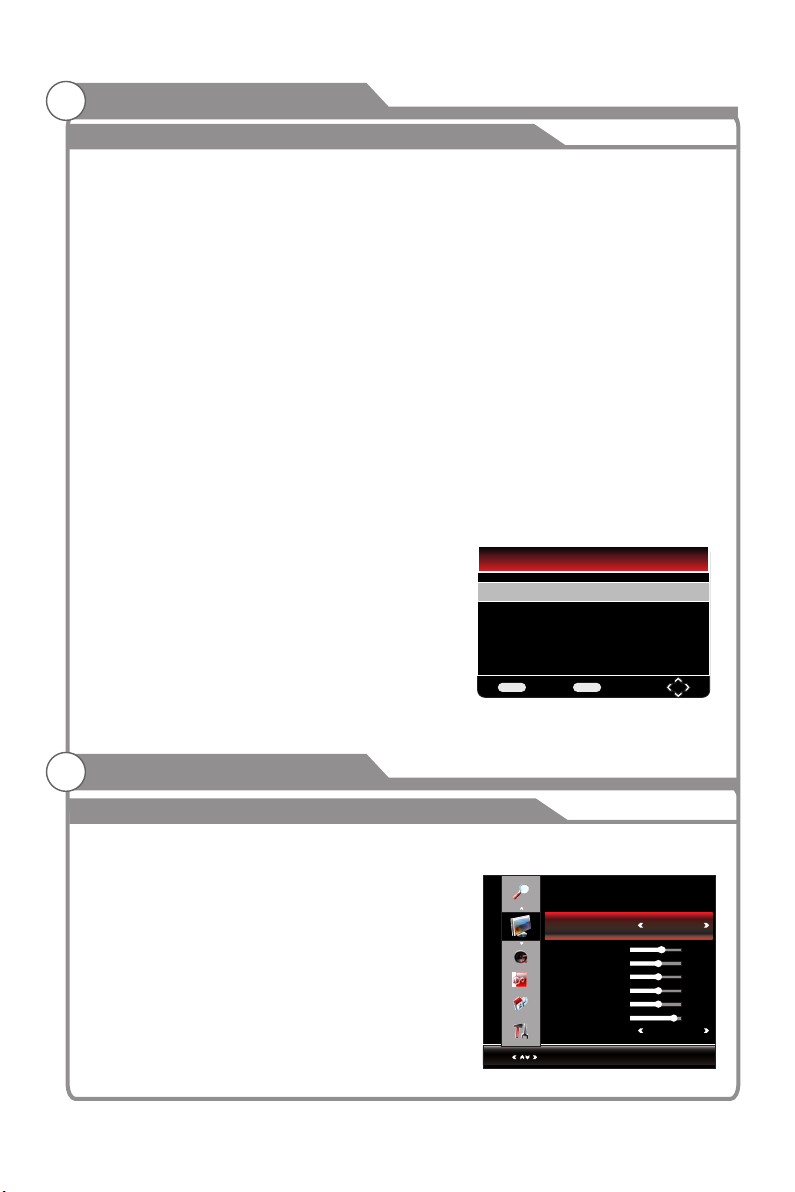
When the TV is turned on for the first time, the Installation Guide will appear, it consists of
3 parts: OSD Language, Country, Channel Tunning.
1. Press ▲/ key to select OSD Language option,
Press and ◄/►key to change Language.
2. Press ▲/ key to select Country option, and Press
◄/►key to change Country.
3. Press ▲/ key to select Channel Tunning option,
and press “OK” or “” to start tuning.
If you want to exit, press EXIT button and select “Yes”,
then press OK button to exit
NOTE: Install guide will also appear the first time you turn on the TV after performing the
Reset function.
Installation Gu id e
OSD Language English
Country Australia
Channel Tuning
EXI T
Exit
OK
OK
Menu system instruction
Picture
1. Press MENU key to display the main menu on the screen.
2. Press ▲/ key to select "Picture" option.
3. Press key to enter "Picture" submenu.
4. You can also press the PICTURE key on the
remote control to select one of the picture settings.
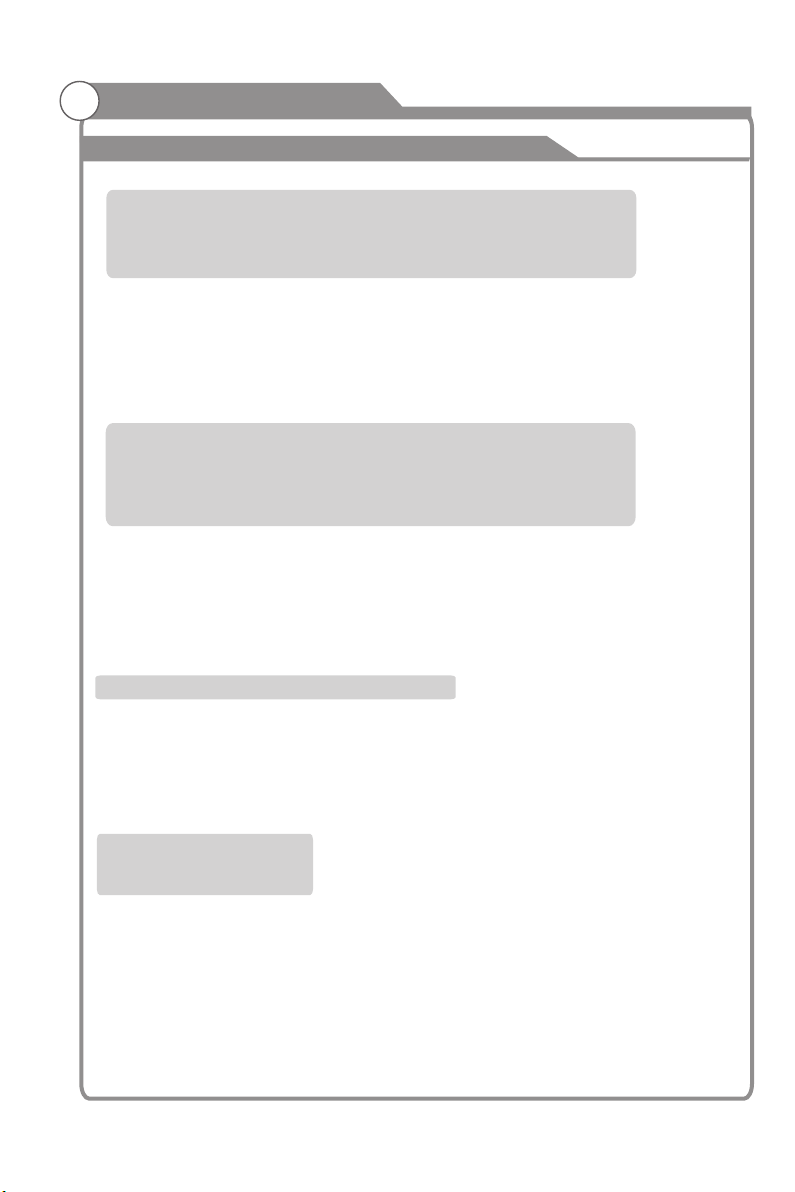
Picture Mode
Your TV has four picture settings (Standard,
Mild, Bright, user, Sports) that are preset at the
factory. Only "User" mode can be set to your
preference by adjusting particular items such as
Contrast, Brightness, Color, Sharpness,Tint.
1. Press / key to select "Picture Mode" option.
2. Press / key to select one picture mode.
Picture Mode Standard
PICTURE
Contrast 50
Brightness 50
Color 50
Sharpness 50
Tint 0
Backlight 80
Color Temp Cool
Select
Menu:Exit
27
Page 29
Menu system instruction
Picture
Standard: Selects the picture for optimum display in a normal environment.
Mild: Selects the picture for comfortable display in a dark room.
Bright: Selects the picture for high-definition in a bright room.
User: Select to view your favorite display settings (see User settings for PICTURE).
Sports: Selects the picture for high-definition in a bright room.
User settings for PICTURE (Contrast, Brightness, Color, Sharpness, Tint)
Your set has several settings which allow you to control picture quality.
1. Press ▲/▼ key to select a particular item.
2. Press / key to decrease or increase the value of a particular item.
Note: The adjusted values are stored according to the selected particular item.
Contrast: Adjusts the lightness and darkness between objects and the background.
Brightness: Adjusts the brightness of the picture.
Color: Adjusts the colors, making them lighter or darker.
Sharpness: Adjusts the outline of objects to either sharpen them or make them more dull.
Tint: Adjusts the color of objects, making them more red or green for a more natural look.
Tint can only be adjusted when signal is NTSC.
Adjusting the Backlight
You can the brightness of the entire change
screen according to your preference.
1. Press / key to select "Backlight" option.
2. Press/ key to select one backlight mode.
Backlight: Adjusts the brightness of the whole screen.
Adjusting the Color Temp
You can change the color of the entire screen
according to your preference.
1. Press / key to select "Color Temp" option.
2. Press / key to select one color temp.
Standard: Keeps whites white.
Warm: Makes whites reddish.
Cool: Makes whites bluish.
28
Page 30
Menu system instruction
Sound
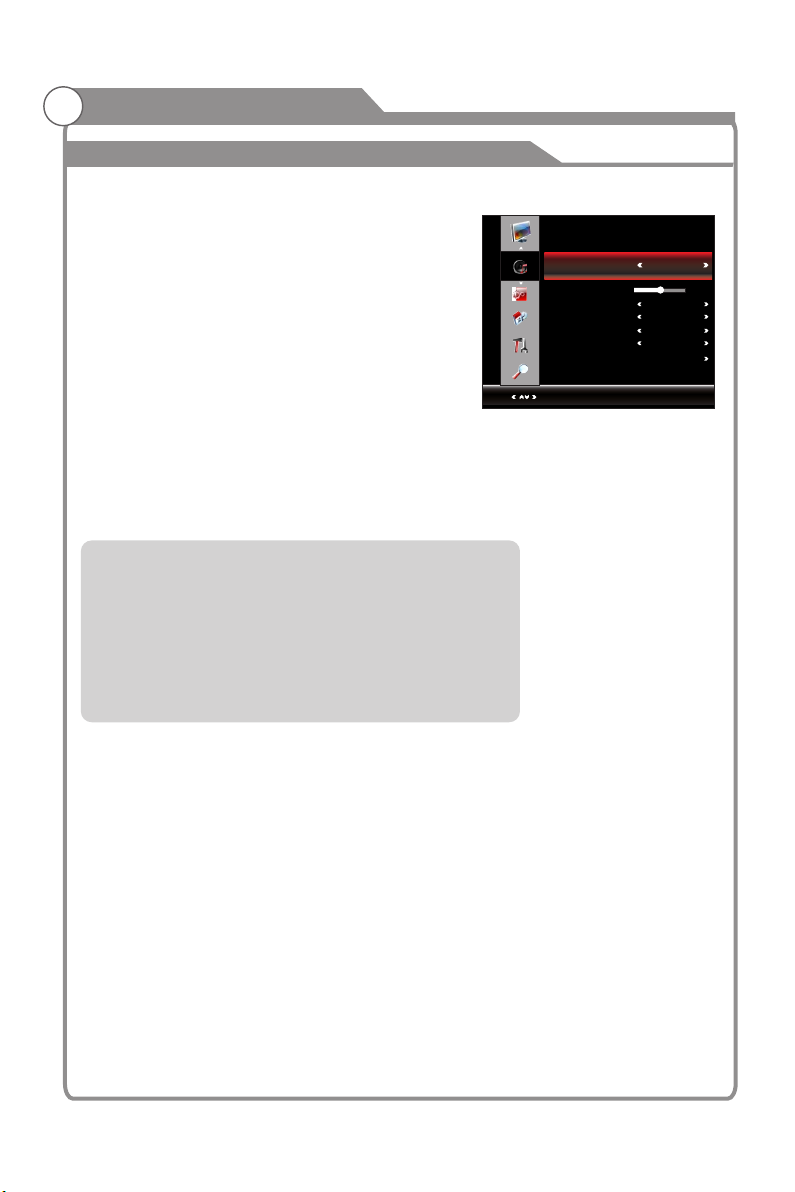
1. Press MENU key to display the main menu on the screen.
2. Press / key to select "Sound" option.
3. Press key to enter "Sound" submenu.
4. You can also press the SOUND key on the
remote control to select one of the sound
settings.
Sound Mode
You can select the type of special sound settings
to be used when watching a given broadcast.
Your TV has eleven sound settings (“Standard”,“News”,
“Movie”,“Sports”, “Dance”, “Classic”, “Pop”, “Rock”, “Jazz”, “Soft”, “User”) that are preset at
the factory.
1. Press / key to select "Sound Mode" option.
2. Press / key to select one sound mode.
Standard: Selects the normal sound mode.
News: Provides clear and live sound for news.
Movie: Provides live and full sound for movies.
Sports: Emphasizes bass over other sounds.
Dance: Select the sound mode for dances.
Classic: Provides the classical sound for classic music.
Pop: Select the sound mode for Pop.
Rock: Provides powerful sound for Rock music.
Jazz: Select the sound mode for Jazz.
Soft: Select the soft sound mode.
User: Selects your custom sound settings (See "User settings for Sound”).
Sound Mode Standard
SOUND
Balance
Surround Sound Off
HDMI Sound HDMI
Auto Volume Off
SPDIF Mode PCM
Equalizer
Select
0
Menu:Exit
Balance
If the volumes of the left speaker and the right speaker
are not the same, you can adjust the "Balance" to suit
your personal preference.
1. Press / key to select "Balance" option.
2. Press / key to decrease or increase the value of the item.
29
Page 31
Menu system instruction
Sound
Surround Sound
This is used to turn on surround sound to gain better sound effect.
1. Press / key to select "Surround sound" option.
2. Press / key to select “Surround” or “Off”.
HDMI Sound
This option is only used in HDMI mode.
1. Press / key to select “HDMI Sound" option.
2. Press / key to select HDMI Sound mode, HDMI or PC-RGB.
Auto Volume
Each broadcasting station has its own signal conditions, and it is inconvenient to adjust
the volume every time the channel is changed. “Auto Volume” automatically adjusts the
volume of the desired channel by lowering the sound output when the modulation signal
is high or by raising the sound output when the modulation signal is low.
1. Press / key to select “Auto Volume" option.
2. Press / key to select “On” or “Off”.
.
SPDIF Mode
This is used to select "SPDIF Mode" .This option is only used in HDMI\DTV mode.
1. Press / key to select "SPDIF Mode" option.
2. Press / key to select "RAW" or "PCM".
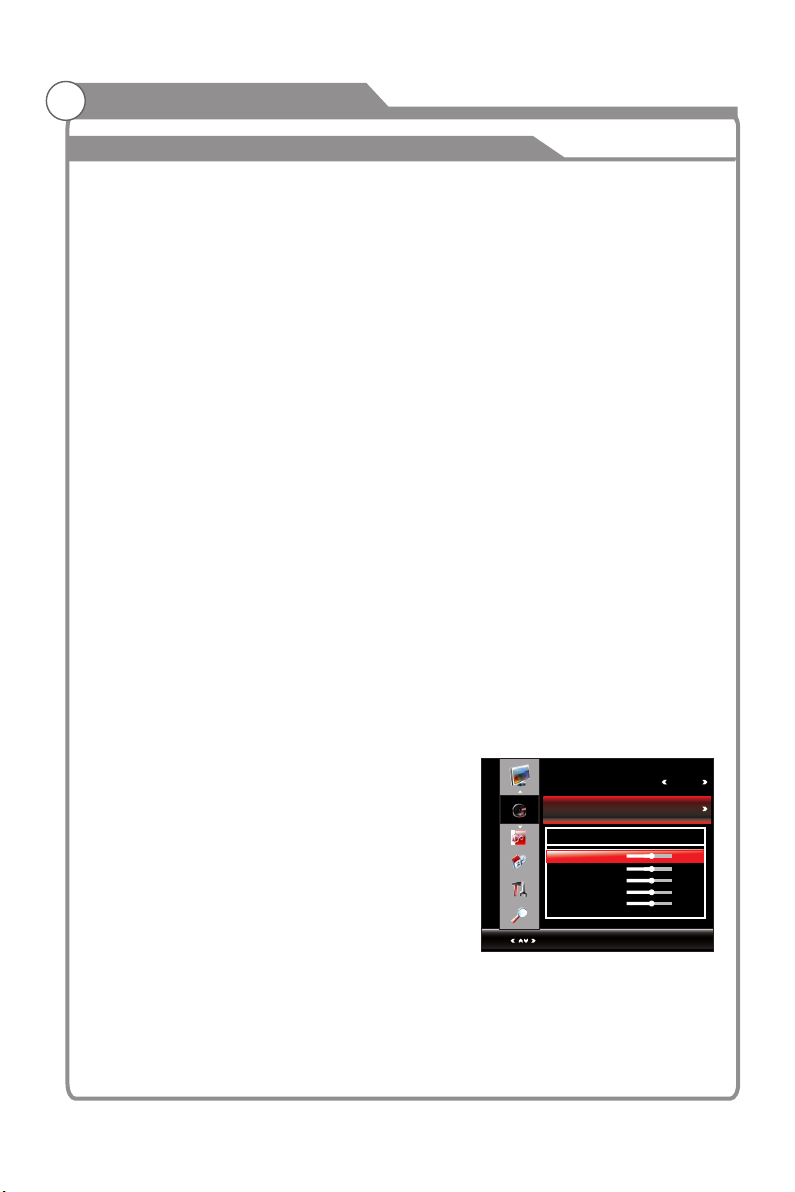
User settings for SOUND (Equalizer)
1. Press ▲/▼ key to select an equalizer item.
2. Press OK or key to enter the equalizer
. submenu
The sound settings can be adjusted to suit your
user preferences.
1. Press ▲/▼ key to select a particular item.
2. Press / key to decrease or increase the
value of a particular item.
Note: The adjusted values are stored according
to the selected particular item.
30
SPDIF Mode PCM
Equalizer
SOUND
环绕声
HDMI声音 HDMI
120Hz 50
自动音量控制
500Hz 50
1.5Hz 50
超重低音
3KHz 50
丽音
7.5KHz 50
Select
Equalizer Adjust
立体声
Menu:Return
关
关
关
Page 32
Menu system instruction
Channel
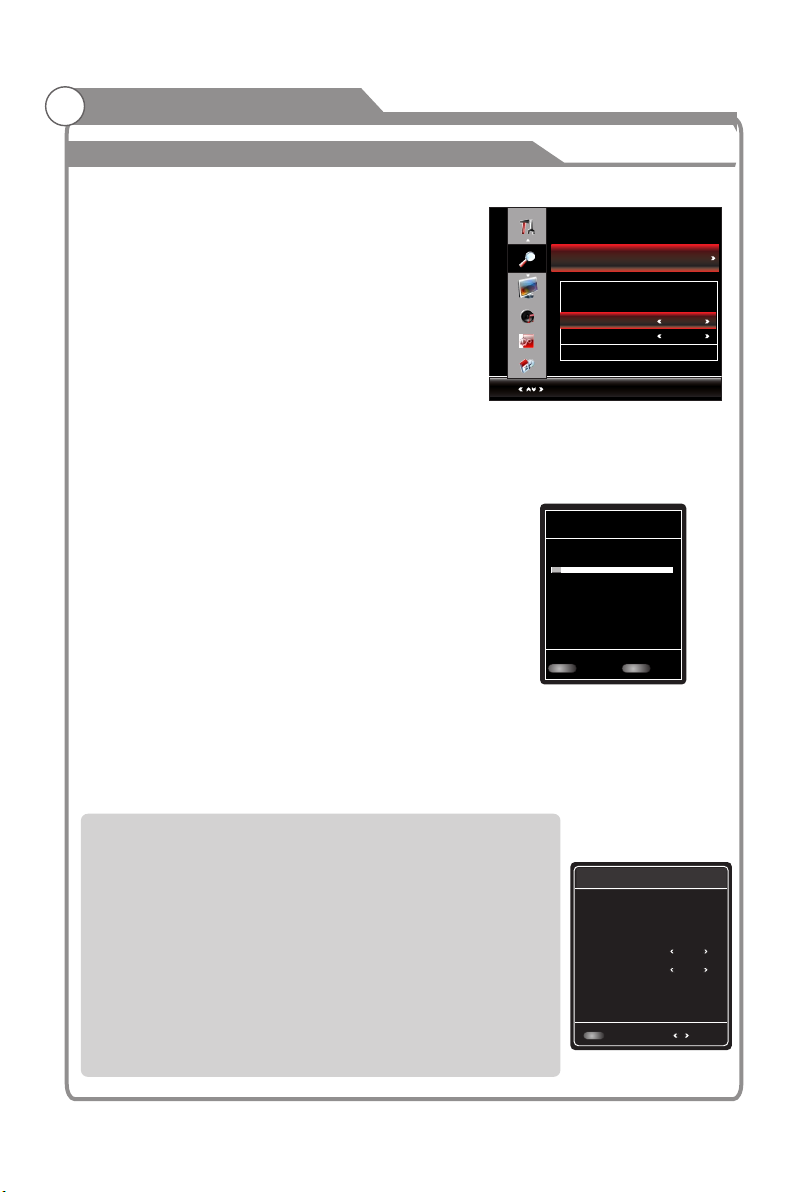
1. Press MENU key to display the main menu on
the screen.
2. Press / key to select "Channel" option.
3. Press key to enter "Channel" submenu.
Auto Search
Press / key to select "Auto Search" option. Then
press OK or key to start a notice window. In this
notice window, you can select country in the
“Country Selection” option and set “Tune Type” option.
Press button to select "Start" , and press OK button
to search, then the searching interface will be on the
screen as follows:
(If you want to exit, press / button to select
“Cancel", and press OK button to exit.)
The number of searched channels will be shown on the screen.
If you set “Tune Type” to “DTV+ATV”, When the searching
of ATV channels is over , TV will start to search DTV channels.
When the whole searching is finished, all the channels
will be stored in memory, and a message will appear on the
screen as per the diagram on the right:
NOTE:
1) If you want to exit the ATV searching, you can press
MENU button, then a confirmation message will appear
on the screen.
2) To exit DTV searching, press the MENU button, a
confirmation message will then appear on the screen.
3) If you want to exit the whole searching, you can press EXIT button.
CHANNEL
Select
4 % 76. 5MHz ( CH3)
ATV
DTV
Rad io
Dat a
EXIT
Auto Search
DTV Manual Search
Plea se sele ct coun try fir st,
Then s elect S tart to u pdate i nfo.
ATV Manual Search
Programme Edit
Country selection Australia
Signal Information
Tune Type DTV+ATV
Color System PAL
Aut o Se ac h
: 4
: 0
: 0
: 0
EXI T
Menu:Return
Pro gram( s)
Pro gram( s)
Pro gram( s)
Pro gram( s)
MENU
CancelSta rt
Ski p
In the ATV source, you can choose “ATV Manual ” to Search
SearchATV Manual
enter “ATV Manual ” menu.Search
Current CH: You can see the current channel number and you can press/button to
choose the channel you want to modify.
The color system will be changed repeatedly in the below order.
PAL SECAM
Sound System Sound: Select the “ System” option, press / on the remote control or TV.
The s system will be changed repeatedly in the below order.ound
BG I DK
Search: you can use button to search channels from low frequency to high
frequency and use button to search channels from high frequency tolow frequency.
When you have searched a channel, the searching will be paused and you can press it again
for other channels after you store the channel.
Fine Tune: In case of unfavorable image or sound of TV program, you can use “Fine Tune”.
Skip: Select “Skip” option, “be changed” on the remote control or TV to swich, select “ON” to
skip current program, select “OFF” to add the program into the program list.
Frequency: You can see the frequency of the searched channels.
: Select the “Color System” option, press / on the remote control or TV. Color System
31
ATV Ma nu al S ear ch
Cur rent CH 5
Col or Syst em
Sou nd Syst em
Sea rch
Fin e Tune
Ski p
Fre quenc y
Exit
112. 25 MHz
Exi t
PAL
DK
Off
Adj ust
Page 33
DTV Manual Search
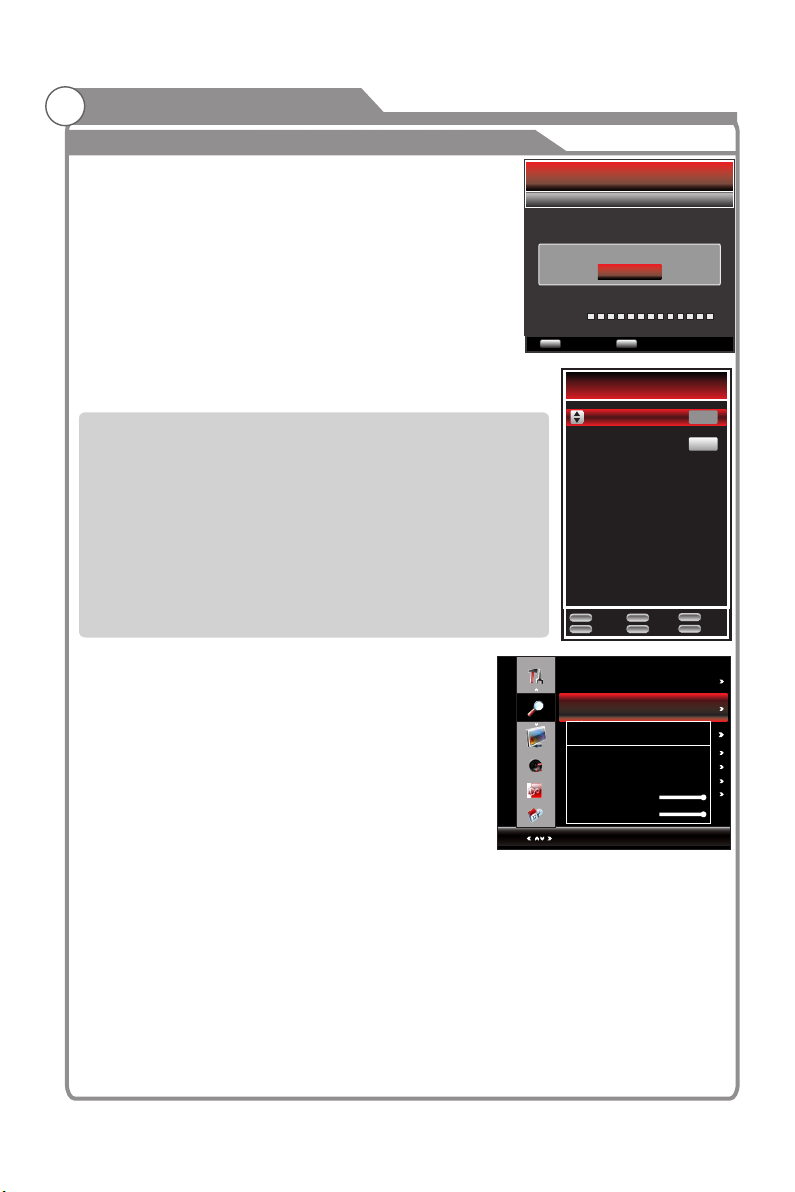
In the DTV source, you can choose “DTV Manual Search” to
enter “DTV Manual Search” menu.
You can use /button to choose the channel number and
press OK button to enter searching, and then the TV will
store the DTV channel if there is a DTV signal present.
Program Edit
You can use / button to choose “Program Edit” and enter
the menu, press the Red/Green/Yellow/Blue color button on the
remote control to delete, rename, move and skip programs, also
you can press FAV button to add to your favorite list.
Delete:You can press RED button to enter "DEL" menu, then choose the channel you
want to delete and press RED button again to delete.
move and press YELLOW button to move it.
Skip: / button to choose the channel you want to skip and press You can press
BLUE button to skip it when you change channels.
FAV:If you like the program of a channel, you can choose “FAV” button in the menu to
add it to your favorite list and later you can press “FAV” button in the remote control to
choose your favorite programs as soon as possible.
Rename(green):Rename some program from program list in ATV mode you want to
Rename. Press / button to selectthe program that need to be renamed, then press
green button into rename state, and press / button to select the letter that need to be
edited, and press / button to select a new letter, repeat to rename the program.
/ button to choose the channel in ATV mode you want to Move:You can press
DTV Manual Search
VHF CH 7
Plea se sele ct chan nel
Pres s OK to sea rch
No Sig nal
Stre ngth
Bad Nor mal Good
Qual ity
Bad Nor mal Good
OK
Menu ReturnOK
Pro gramm e Edit
5.1 Globo HD
5.2 Globo SD
Delete
Remane
Skip
Move
MENU
FAV
TV
DTV
FAV
Return
Signal Information(Used only in DTV)
1. Press / key to select “Signal Information" option.
2. Press “Ok”or key ,you can see the information
of the DTV channel.
NOTE: Signal Quality/Signal Strength (DTV Only):
Unlike analogue channels, which can vary in reception
quality, digital channels must have perfect reception
quality or you will not receive them at all. So, unlike
analogue channels, you are not able fine tune a digital
channel. If the signal strength indicates that the signal
is weak, a possible solution is to adjust your antenna
to increase the signal strength. Continue to adjust the
antenna until you find the best position with the
strongest signal.
32
Programme Edit
Signal Information
CHANNEL
Color System PAL
Sound System BG
Auto Search
DTV Manual Search
ATV Manual Search
Select
Signal Information
Channel
Network
Modulation
Quality
Strength
37
Nine Melbourne
64QAM
100%
100%
Menu:Return
Page 34
Menu system instruction
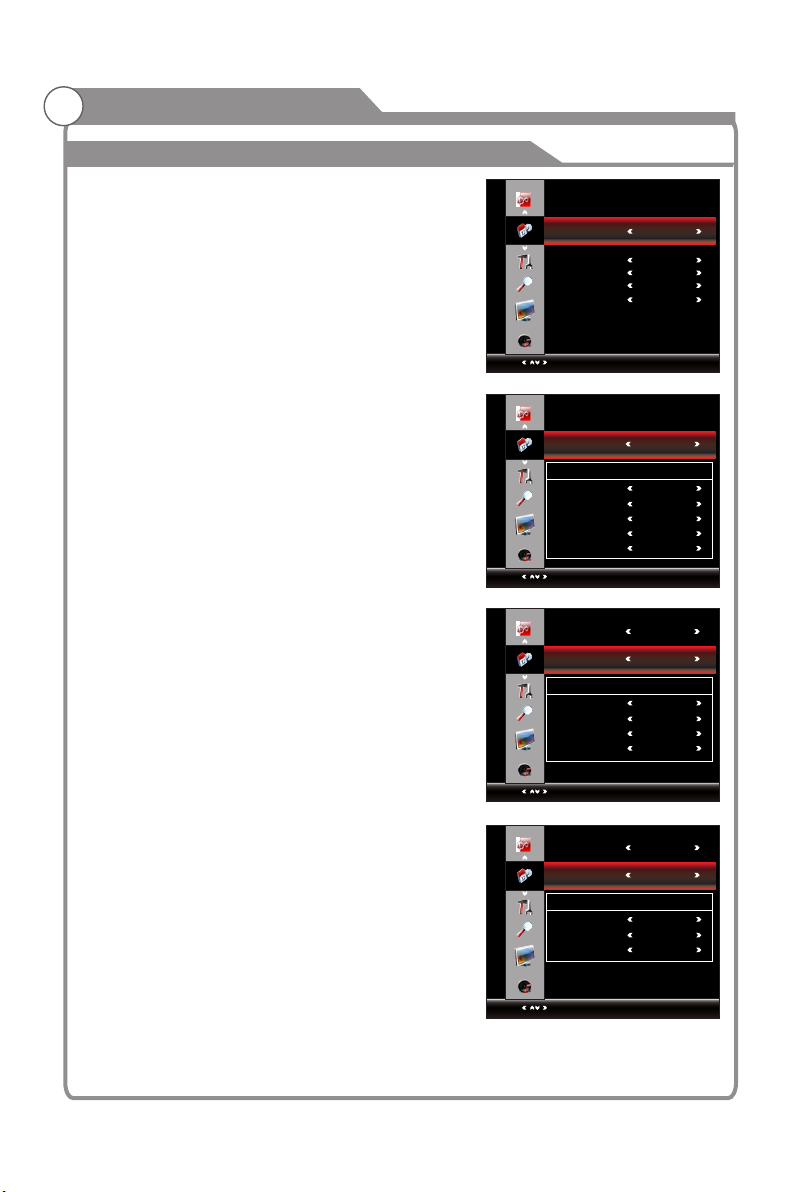
Time
1. Press MENU key to display the main menu on
the screen.
2. Press / key to select "Time" option.
3. Press key to enter "Time" submenu.
Clock 10:02
TIME
On Time Off
Off Time Off
Sleep Timer Off
Time Zone WA
Clock
You can modify the time of your TV set, but when
you switch to DTV program, the "Clock" is decided
by the from your antenna. signal
Off/On Time
In "Off Time" item, press /button or OK button to
enter the submenu, set the day & time to turn off the
TV set.
In "On Time” item, press /button or OK button to
enter the submenu, set the time to turn on the TV set,
when the TV set is in the standby mode. You can also
choose which day to control your TV set in a week.
Sleep Timer
1. Press / key to select "Sleep Timer" option.
2. Press / key repeatedly until the desired time
appears (Off, 10min, 20min, 30min, 60min, 90min,
120min, 180min, 240min).
Notes: The sleep timer you have set will be cancelled
when the TV turns off or if a power
failure occurs.
Notes: When the time is less than 60 seconds,
remind information will be displayed on the screen.
Press any key button to cancel timer function.
Time Zone
You can choose it to modify your time zone in the
TV set.
1. Press / key to select "Time Zone" option.
2. Press / key to select time zone.
Select
Clock
TIME
Select
Clock
On Time
TIME
Select
On Time
Off Time
TIME
Select
Menu:Return
Clock
Day
Month
Year
Hour
Minute
On Time
Hour
Minute
Source
Off Time
Hour
Minute
Jan uary
Menu:Return
On Time
Menu:Return
Off Time
Menu:Return
10: 02
01
2011
10
20
10: 02
Off
Off
12
00
DTV
Off
Off
Off
12
00
33
Page 35
Menu system instruction
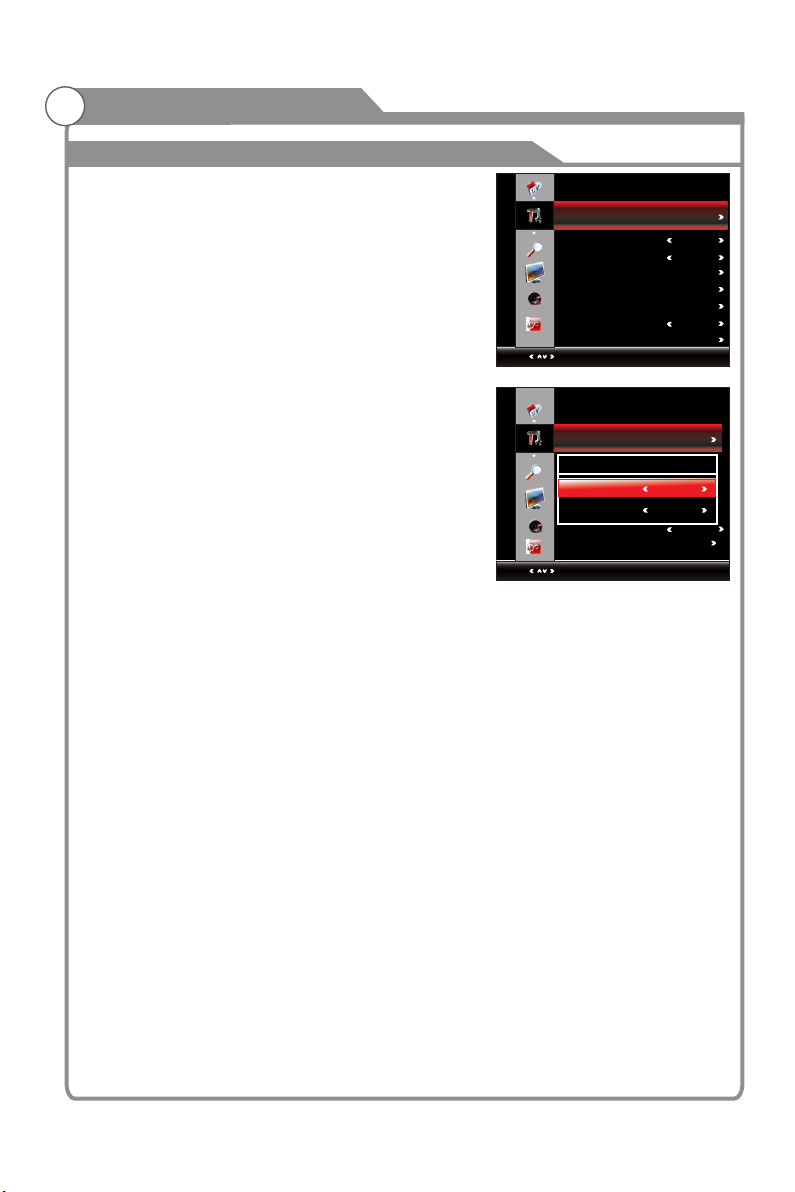
Option
1. Press MENU key to display the main menu on the screen.
2. Press / key to select "Option" option.
3. Press key to enter “Option” submenu.
OSD Setting
You can modify the OSD set to suit your user
preferences.
OSD Setting
OPTIONOPTION
Screen Saver
Aspect Ratio
Reset
Lock
Software updata(USB)
Hearing Impaired
PVR File System
Select
Menu:Exit
OSD Setting1. Press / key to select “ " option.
2. Press OK or key to display the OSD setting menu.
OSD Language: select the proper language
OSD Time : Set the preferred amount of time for
the OSD to be displayed on the screen.
Screen Saver
This option is only used in ATV mode.
1.Press / key to select “Screen Save” option.
2.Press / to choose on or off.
Aspect Ratio
You can select the picture size which best corresponds
to your viewing requirement.
OSD Setting
Noise Reduction MIDDLE
OSD Setting
Audio Languages
OSD Language
Window
OSD Time
Lock
Hearing Impaired
PVR File System
Select
English
Always
Menu:Return
1. Press / key to select “ " option. Aspect Ratio
2. Press / key to set the scale mode.
You can also press “ ” key on the remote control Aspect
to select one of the scale modes. Each source has different scale modes.
(16:9,4:3,Panorama,Movie,Subtitle,Full view,Auto )
RESET
Select the “Reset” option and press OK or key to display a confirm box,and select”Yes”
or “No”.
Note: Please use the "Reset" option with caution as it will return all settings and channel
memories to factory default.
On
16:9
Off
Off
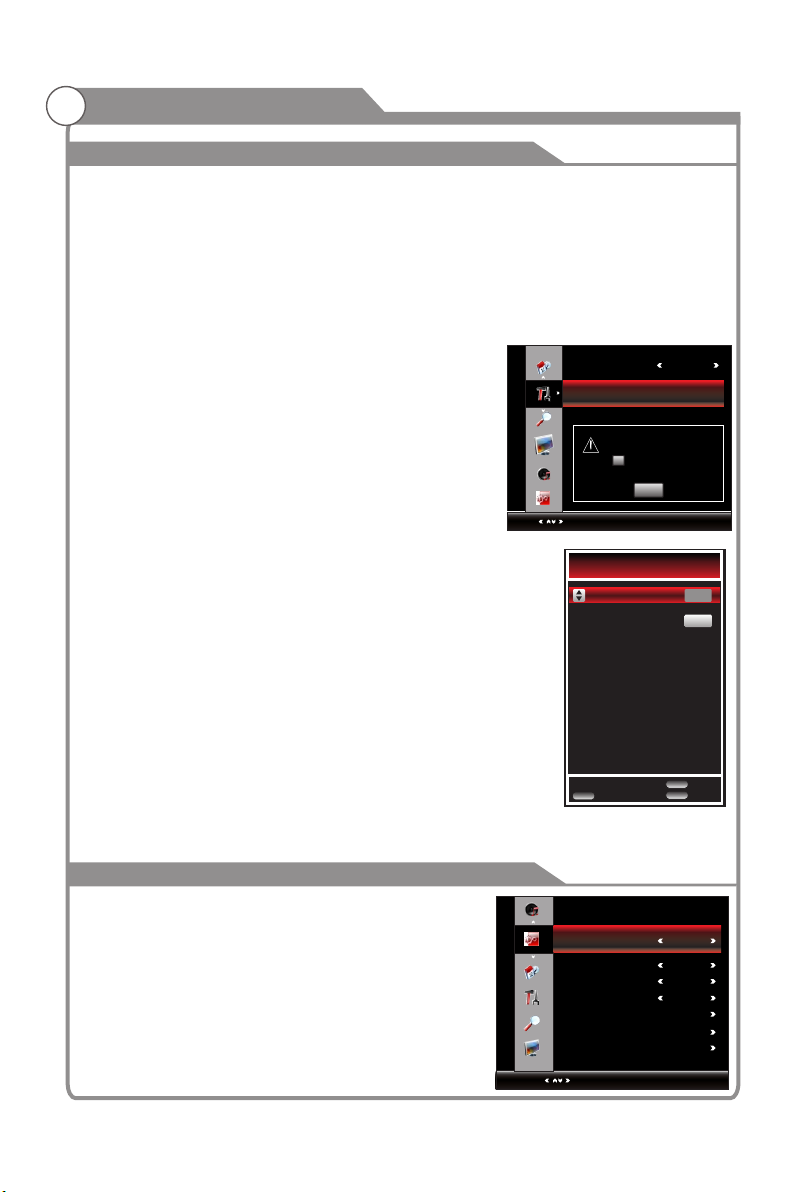
Lock
The lock feature requires a Password to be entered before any settings can be changed.
1. Press MENU key to display the main menu on the screen.
2. Press / key and select "Lock" under the "Option" menu.
3. Press OK or key to enter " " submenu, "Enter Password" menu will appear, enterLock
your 4-digit password to enter " " submenu Lock (the default and universal password is
0000, the almighty password is 1980).
Lock System
Lock System1. Press / key to select " " option.
2. Press / key to select "On" or "Off".
34
Page 36
Menu system instruction
Option
Set Password
Password1. Press / key to select "Set " option.
2. Enter your 4-digit password to enter "Change
Password" submenu. Choose any 4-digits for your
new password and enter them. As soon as the 4
digits are entered, the cursor to “Confirm will skip
Password” item, re-enter the same 4 digits, and your
new password has been memorized.
Block Program
1. Press / key to select “Block Program” option.
2. Press OK or key to enter Block Program list.
In the program list, use Green key to lock or
unlock the program. Once the program is locked
and Lock System is on, password is needed to
enter it.
Parental Guidance
This option only used in DTV mode.
1. Press / key to select “ ” option. Parental Guidance
2. Press key to select the lock level of the Parental /
Guidance: NO BLOCK, BLOCK ALL, G, PG, M, MA, AV, R.
Software Update(USB)
1. Press / key to select “Software Update(USB)” option.
Press OK or 2. key to software update process.
Note: In the software update process, do not turn off the power.
Hearing Impaired
Specific Hearing Impaired subtitles can be activated subject to
availability from broadcaster.
Note: Only available in DTV mode.
PVR File System
1. Press MENU key to display the main menu on the screen.
2. Press / key to select “PVR File System” option.
3. Press OK or key to enter “PVR File System" submenu, for
detailed operation refer to
“PVR File System” in page 37.
Function
1. Press MENU key to display the main menu on the screen.
2. Press / key to select "Function" option.
3. Press key to enter “Function” submenu.
Noise Reduction
1. Press/key to select "Noise Reduction" option.
2. Press / key to select "Off", "Low", "Middle", "High"
and "DEFAULT” to improve the picture sharpness.
Note: Noise Reduction doesn't work in PC-RGB Mode.
OPTION
FUNCTION
Lock System Off
Set Password
Block Program
Parental Guidance Off
Plea se ente r passwo rd
New -- - - -- -Conf irm -- - - -- - -
Cancel
Select
Noise Redution
RGB Range
NoSignal PowerOff
NoAct PowerOff
Window Adjust
Advanced Setting
3D Setting
Select
Menu:Return
Blo ck Prog ram
5.1 Globo HD
5.2 Globo SD
LOCK
EXIT
MENU
Off
16-235
Off
Off
Menu:Exit
DTV
DTV
Exit
Return
35
Page 37
Menu system instruction
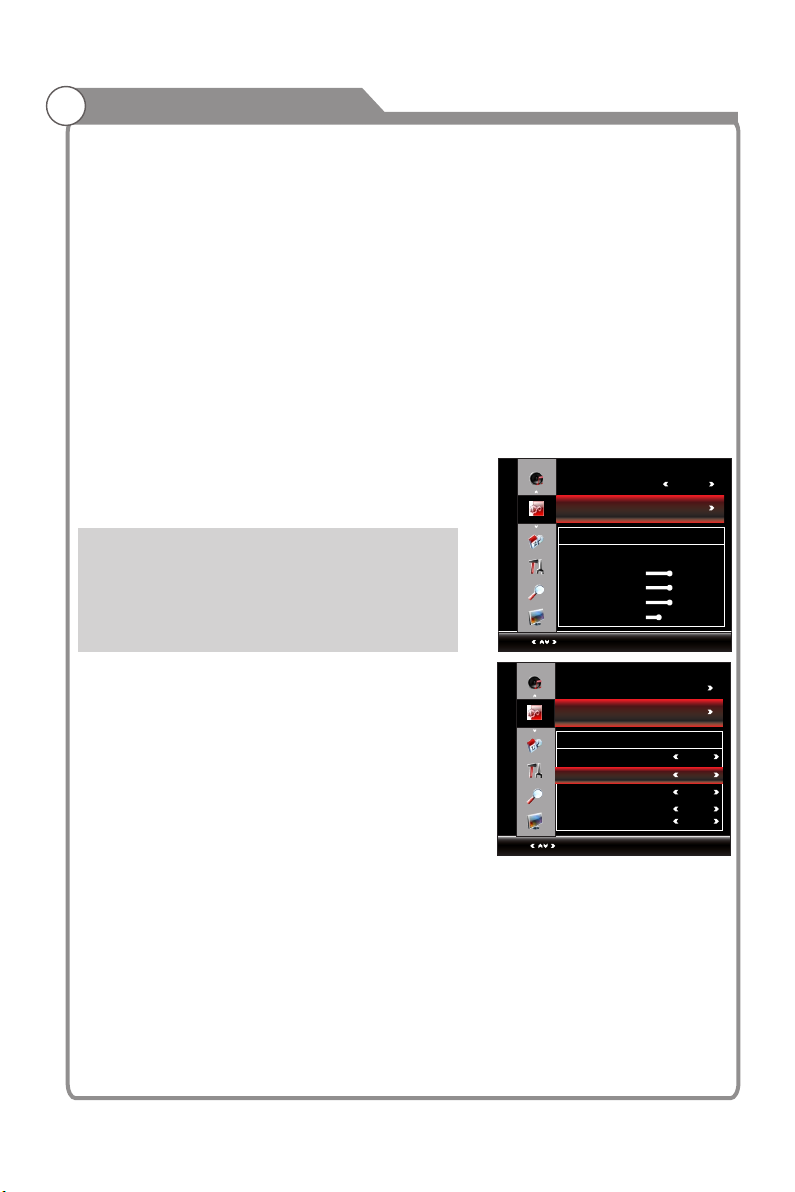
RGB Range
Change the brightness and saturation for a better picture.
1.Press/key to select "RGB Range" option.
2.Press / key to select "16~235" or "0~255".
Note: only available in HDMI mode, please select the appropriate setting according to the
DVD Player/STB.
NoSignal PowerOff
1. Press / key to select "NoSignal PowerOff" option.
2. Press / key to set it "On" or "Off". When “NoSignal PowerOff” is turned on, the TV set
will be Power Off 10 minutes later if there is no signal.
Note: The TV will be Power Off 15 minutes later if there is no singal.
The function is not available in USB mode.
NoACT PowerOff
1. Press/key to select "NoACT PowerOff" option.
2. Press / key to set it "Off" or "1 Hour","2 Hour","4 Hour". When “NoACT PowerOff” is
turned on, the TV set will be Power Off after the set-time if there is no action.
Window Adjust
This option is only used when PC mode has signal.
1. Press / key to select “Window" option.
2. Press OK or key to display the “Window Adjust” menu.
Auto Adjust: Allows you to set the TV to self-adjust to
the incoming PC video signal. The fine, coarse and
position values are adjusted automatically
H-Position: Set horizontal of picture. position
V-Position: Set vertical of picture. position
Clock/Phase: Remove or reduce picture noise.
Advanced Setting
Press/key to select "Advanced Setting" ,then press
OK or key to display the "Advanced Setting"menu.
TTX Language
1.Press/key to select "TTX Language" option.
2.Press / key to set TTX Language.
Primary Audio Language
1.Press/key to select "Primary Audio Language"
option.
2.Press / key to set Primary Audio Language.
Secondary Audio Language
1.Press/ key to select "Secondary Audio Language" option.
2.Press / key to set Secondary Audio Language.
Primary Subtitle Language
1.Press/ key to select "Primary Subtitle Language" option.
2.Press / key to set Primary Subtitle Language.
Secondary Subtitle Language
1.Press/ key to select "Secondary Subtitle Language" option.
2.Press / key to set Secondary Subtitle Language.
NoAct PowerOff Off
Window Adjust
FUNCTION
Auto Adjust
H-Position
V-Position
Clock
Phase
Select
Window Adjust
Advanced Setting
FUNCTION
TTX Language
Primary Audio Language
Secondary Audio Language
Primary Subtitle Language
Secondary Subtitle Language
Select
Window Adjust
Menu:Return
Advanced Setting
Menu:Return
West
English
English
English
English
50
50
50
25
36
Page 38
Menu system instruction
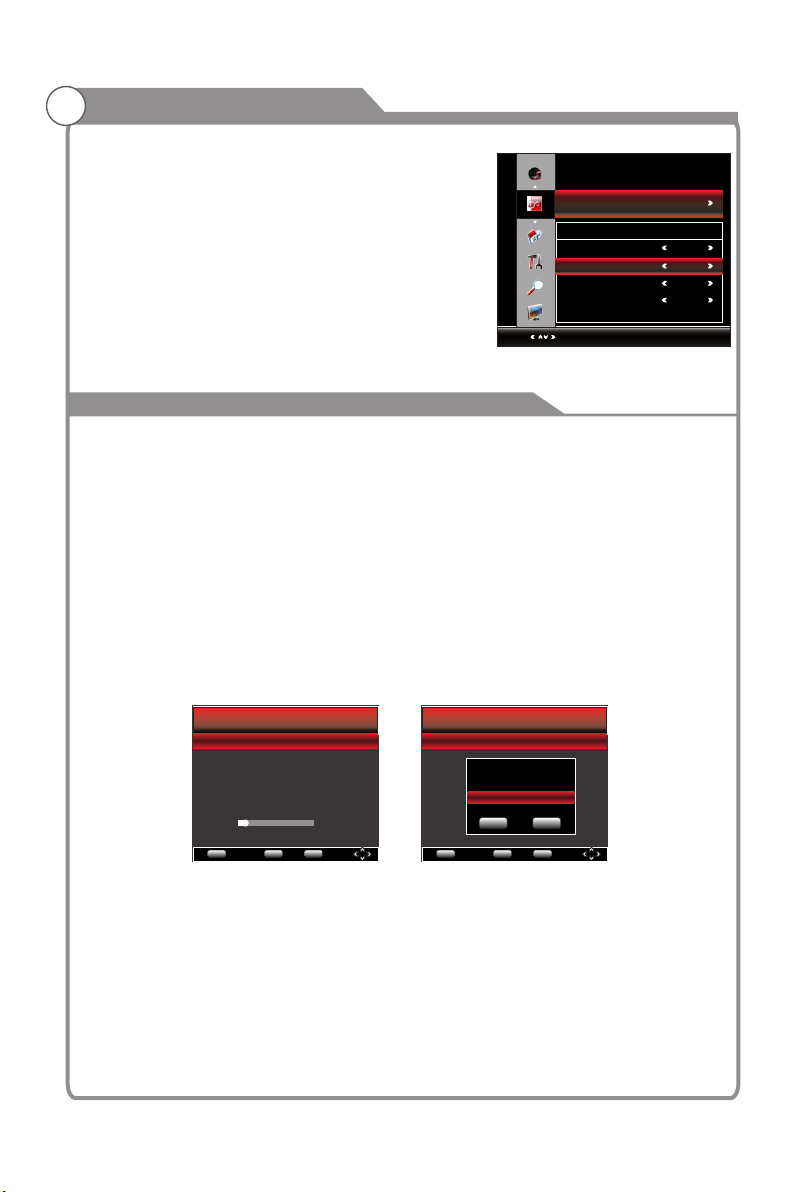
3D Setting
1. Press/key to select “3D Setting”option,
press OK/key to display the “3D Setting” submenu.
2. Press/key to select 3D format, 2D to 3D, 3D to 2D
or 3D order .
Note:When you in 3D mode, “2D to 3D” can’t be selected,
When you in 2D mode, “3D to 2D” can’t be selected.
3. Press / to select mode in submenu, then press “Exit”
to confirm.
PVR
PVR File System
WARNING:
1. Before connecting your USB device to the TV, please back up your files to prevent them
from damage or loss of data.
2. A USB disk must be formatted when first used for PVR. Any existing data on the disk will
be lost during the formatting process. Please back up your disk if you do not want to lose
this data. You are recommended to use a dedicated disk for PVR use only. Do not
disconnect disk or power during formatting.
3. Do not modify PVR files on a PC.
4. Only USB2 supports PVR function.
Note: Make sure your USB device is compatible with the TV and able to support
PVR recording.
Select Disk: Press OK” button to enter submenu and press / choose the disk for PVR.“ “ ” to
Record Max Time: Press /“ ” to set the max time for PVR Record.
PVR File System
Select Disk C:
Record Max Time 4Hr.
Check PVR File System Start
USB Disk
Format
Time Shift Size
Speed
Disk Remaining Space MB
Exit
EXIT
Menu Return
OK
OK
Record Max Time: Set the maximum duration for any recording.
Check PVR File System: Press OK” button to check if the disk is PVR.“ suitable for
USB Disk: Indicates PASS or FAIL for the status of your USB Disk.
Format: Press OK” button to enter format submenu. The disk must be when first “ formatted
used for PVR. Do not disconnect disk or turn power off during formatting.
When formatting your disk, a progress bar will appear on the display. NOTE: The larger
your device the longer it will take to format. The device may take many minutes to
format, this is not a malfunction, please wait for the formatting to finish.
PVR File System
Select Disk C:
Record Max Time 4Hr.
Check PVR File System Start
USB Disk
Format
Time Shift Size
Speed
Disk Remaining Space MB
EXIT
Exit
Select Disk
Dis k C:
OK Exi t
OK
FUNCTION
Menu Return
OK
3D Setting
3D Format
2D to 3D
3D to 2D
3D Order
Select
3D Setting
Off
Off
Off
Antitone
Menu:Return
37
Page 39
Menu system instruction
PVR File System
Select Disk C:
Record Max Time 4Hr.
File System Size
Check PVR File System Start
PVR File System Size All
USB Disk
Format nat...
SD 55 Mins HD 15 MIins
Time Shift Size
Speed
Disk Remaining Space MB
EXIT
Exit
OK E xit
Menu Return
OK
OK
PVR File System
Select Disk C:
Record Max Time 4Hr.
Check PVR File System Start
USB Disk
Format
Time Shift Size
Speed
Disk Remaining Space MB
Time Shift Size
Time Shift Disk Size 512MB
SD 14 Mins HD 4 Miins
OK E xit
Exit
EXIT
Menu Return
OK
OK
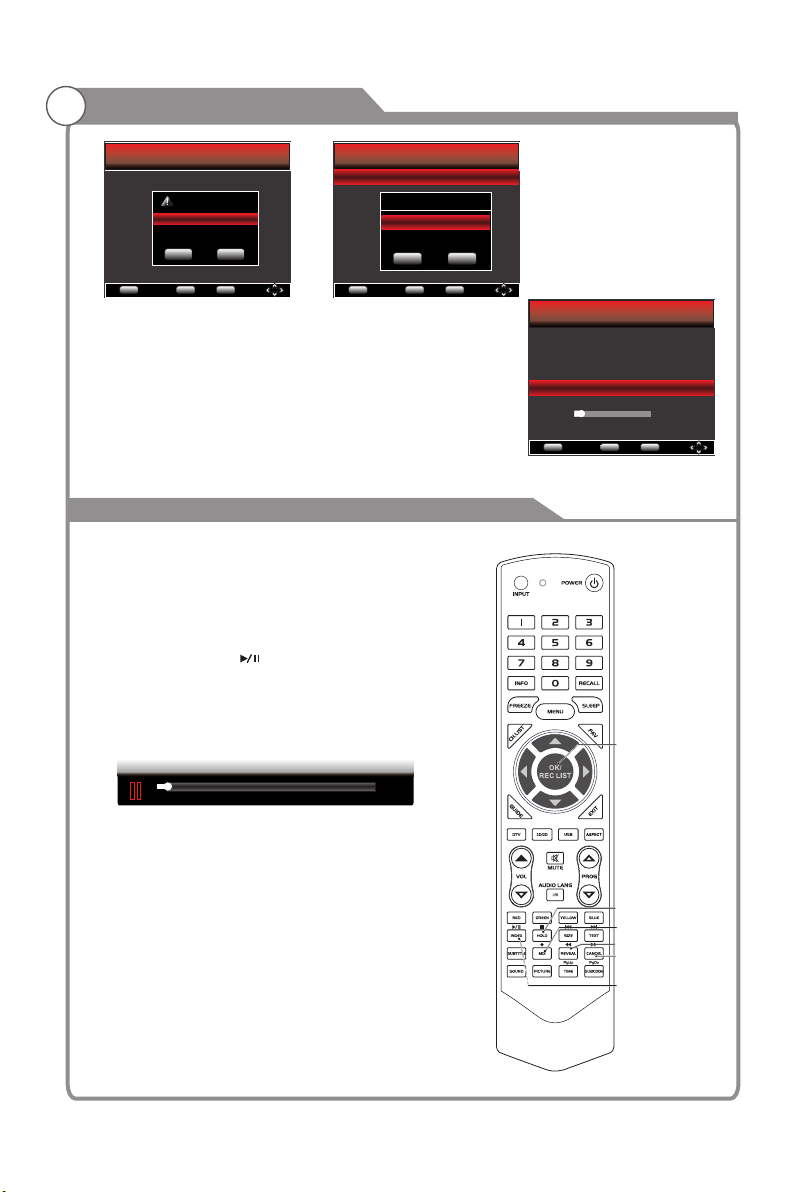
Time Shift Size: This setting is available to adjust only
after the disk has been formatted. The maximum Time
Shift Size is 8G.
Speed: Display the disk writing/reading speed.
Please note: It is suggested that you use a disk with
speed that is greater than 4500KB/S.
Disk Remain Space: Display the remaining space for PVR.
NOTE: The times listed are not precise, only for reference.
PVR
PVR Guide
If the disk for PVR is ready, the programs can be
recorded in DTV mode.
Time shift
In DTV mode, press “ ” button to pause the DTV
program, press it again to continue play. The length of
time a program can be paused depends upon the
setting in the PVR File System.Press “EXIT” to show or
hide the control menu.
Tim e Sh ift
[-0 0:00: 38/00 :04:0 0]
04: 55
PVR File System
Select Disk C:
Record Max Time 4Hr.
Check PVR File System SUCCESS
USB Disk Pass
Format Pass
Time Shift Size 512MB
Speed 4500KB/s
FULL HD support
Disk Remaining Space 384 MB
Exit
EXIT
Menu Return
OK
OK
OK
1. Current time behind live TV.
2. Total allowable time for time shifting, please see pg.
37 'PVR File System' for details in regards to setting
the Time Shift Size.
The progress bar will not fade out unless press EXIT
button.
Press the PLAY button to continue playing the program
from the point where it was paused.
NOTE: Time Shift will stop if you change channels,
change inputs or go into standby mode while in Time
Shift mode.
38
STOP
REC ORD
BACKWARD
FORWARD
PLAY/
PAUSE
Page 40
Menu system instruction
PVR
Instant recording
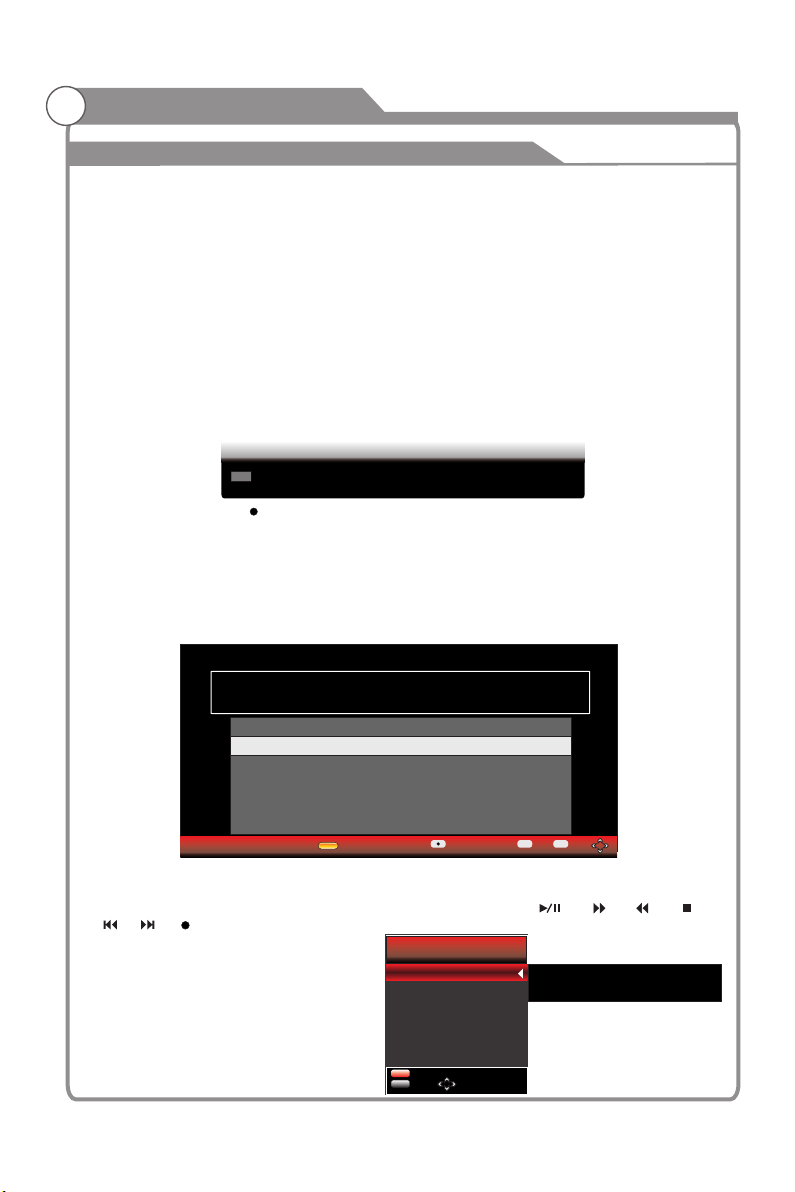
1. Select the desired channel then press the RECORD button on the remote control to start
recording the current broadcast, a progress bar will be displayed at the bottom of the screen.
- During recording, the progress bar will fade out after 10 seconds.
2. Recording stops when you press the STOP button and the recorded file is stored in the
external USB device automatically.
NOTE: You can only watch channels on the same frequency as the program being recorded.
If you try to change to another channel a message will appear prompting you to continue or
not 'Recording in progress. Change channel will stop recording. Yes or No.'
Recording in standby mode
This unit is able to do recording while in standby mode.
1. Start a recording then press the power button. A message will be displayed prompting you
to continue or cancel.
Rec ordin g
9 Nin e Digit al
RE C
[00 :00:1 3] Rema in [00: 05:13 ]
At Guide menu, press “ ” button to reserve -record the program. selected
At reserve record menu, press “ / ” button to adjust the scheduled time, press “OK” to
save the setting and press the yellow button to check the record schedule. Recording will
proceed when the TV is in either active or standby modes. When recording initialises in
standby mode, the front panel indicators will flash momentarily, and there will be no picture
output. You can intercept the recording by turning on the power and viewing the program
that is being recorded. schedulesThe should not overlap, and there should be at least 1
min between two programs.scheduled
DTV 9 Nine Digital
MALCOLM IN THE MIDDLE
Pro gramm e
Mod e
Sta rt Date
Sta rt Time
End D ate
End Ti me
9 MAL COLM IN T HE MIDD LE
18 Ja n 2010
18 Ja n 2010
Schedule
AUT O
04: 30
05: 00
Back
In DTV mode, press “OK/RECLIST” to open the recorded list. Press “ / ” button to select
the press “OK/RECLIST” to play the and press the “” button to recorded file, recorded file,
show the Information. When playing, the “ ”, “ ”, “ ”, “ ” recording information.
, “ ”,“ ” “ ” available. Press “EXIT” to show or hide the control menu.buttons are
When the Recorded List is displayed
on the screen, you can delete files you
no longer require. Select the desired file
Rec orded L ist
MALCOLM IN THE MIDDLE
MALCOLM IN THE MIDDLE
using the arrow buttons, then press the
Red button to delete.
NOTE: Files cannot be deleted during
Playback or Recording.
Delete Delete
OK OK
To. Page 1
Cu. Page 1
04:5 6
EXIT
OK
Exit
OK
[DATE] 2 010/0 1/18
[Time] 0 4 56 40 [DUR ATION] 00 00:0 0:13
[PROG RAM NAM E] MALC OLM IN TH E MIDDL E
[CHAN NEL NAME ] 9 Nine Di gital
[PROG RAM DES CRIPT ION] If B oys Wer e GilsE very ti me the bo ys are. ..
39
Page 41
Digital Media Player
Introduction
This TV is embedded with one USB port digital media player. It can find devices that
support USB1.1/2.0,including flash disks, USB hard disks and digital cameras. It supports
functions as: Display pictures, Play music files, Play video files, Display text files.
Note: please do not remove the cable during the data transfer. It may cause problems for
the system.
Data
Picture
Music
Video
Text
Remote Control Button
MENU
NAVIGATION
BUTTONS
Format
JPG,JPE,PNG,BMP
MP3,WMA,AAC
MPG,MPEG, , ,MP4 MOV MKV
TXT
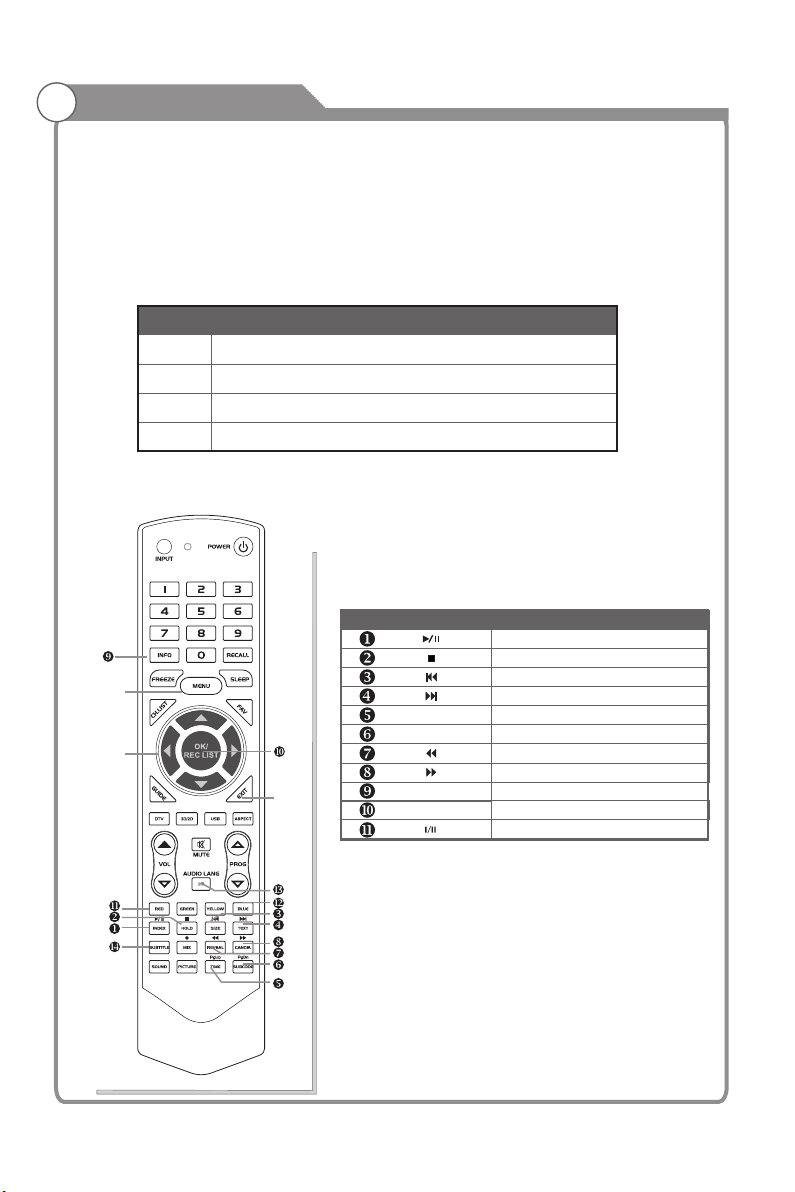
Description of Playback Buttons:
Buttons Func tion
PgUp
PgDn
EXIT
OK
SUBTITLE
Pause/Play
Stop
Previous file
Next file
Page up/Zoom in
Page down/Zoom out
Back wa rd
Forw ar d
Disp la y th e sh or t cu t ke y
Subt it il e sw it ch (v ideo)
Lang ua ge S ou nd tr ack Switc h( vi de o)
40
Page 42
Digital Media Player
Device and File Management
Initialization Interface
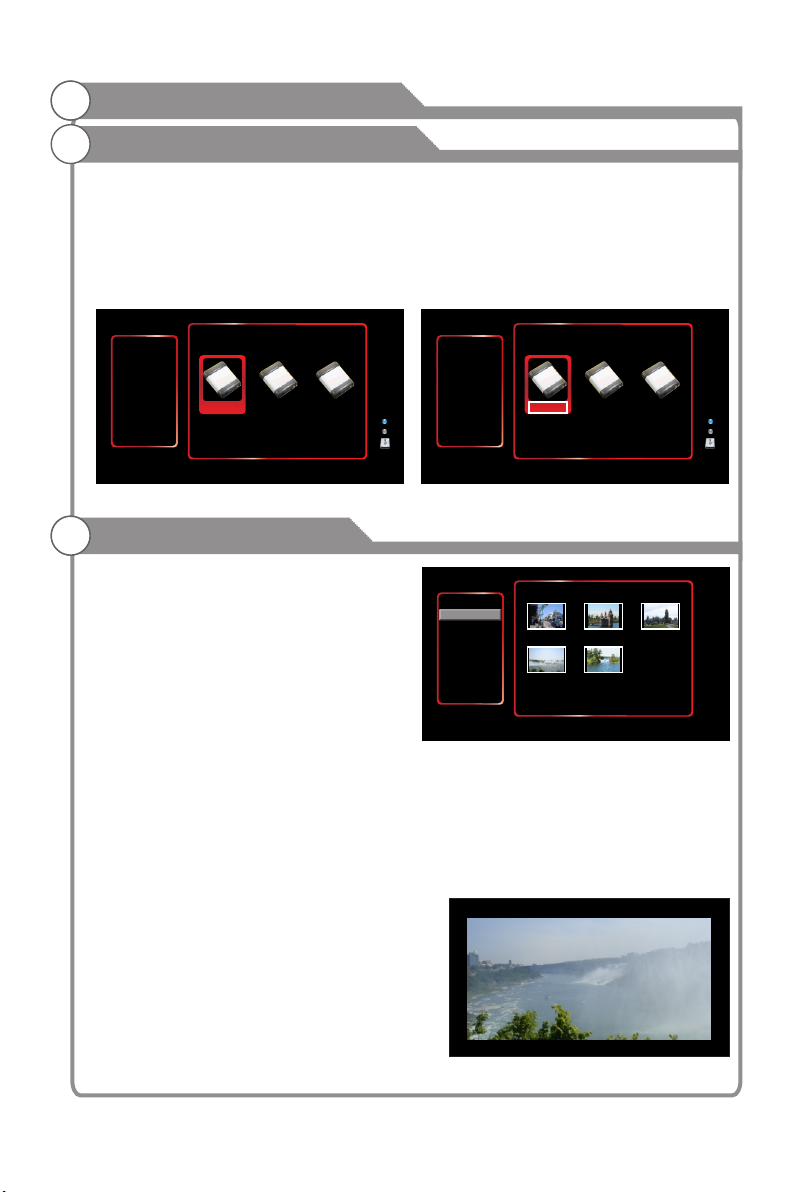
In the USB channel, the interface shown in Figure 1. If no USB disk is inserted, the system
will be prompt you to insert the USB device, while the lower right corner screen displays
"No Device" message. When you insert a USB disk, select the first letter located in the C
drive, shown in Figure 2. The corresponding buttons as follows:
Left and right keys: Select the drive letter.
OK key: to enter the selected letter.
C
0/ 0
0/0
Please insert USB device
USB 2. 0
Left/Right key: select OK Key: Enter
<Fig ure 1 > <Fig ure 2 >
USB support character
1. Photo
Features:Browse and play under the
specified path (the default path is specified
in the current disk, set the photo interface
methods please refer to the specified path:
path - Set) picture.
Content: Browse and play all the images
PHOTO
MUSIC
MOVIE
TEXT
My Disk
under the specified path.
Photos View Shown in Figure 3
Features: Displays thumbnails of all images
path, bmp and png format does not support thumbnails.
Key operation:Up, Down, Left, Right: Option key to switch up and down.
Enter Key: Selected in the entry photo option on the left, the switch to the image preview
area, was selected in the image preview area in the right section, then play image files
Exit Key: Selected in the entry in the right image preview area, select the entries to switch
back to the left side of photo options, the selected option in the entry on the left picture, the
switch back to the USB interface initialization.
Photo Play interface (Shown in Figure 4)
Key operation:
The following key: Play on a picture / next picture
Left, Right: Reverse / Rotate the image clockwise
Confirmation: play / pause image
Exit: Exit the pictures to return to photo browsing
interface
Menu key: enter the playback control menu.
Shown as Figure 5
41
Def ault pa th C:\
Stree t.jpg C astle .jpg C astle 2.jpg
Land scape .jpg
UP / Down key: select OK / Right Key: Enter
<Fig ure 3 >
0/ 0
1/1
Land scape 2.jpg
0/ 0
1/1
1.J PE G
<Fig ure 4 >
USB 2. 0
Page 43
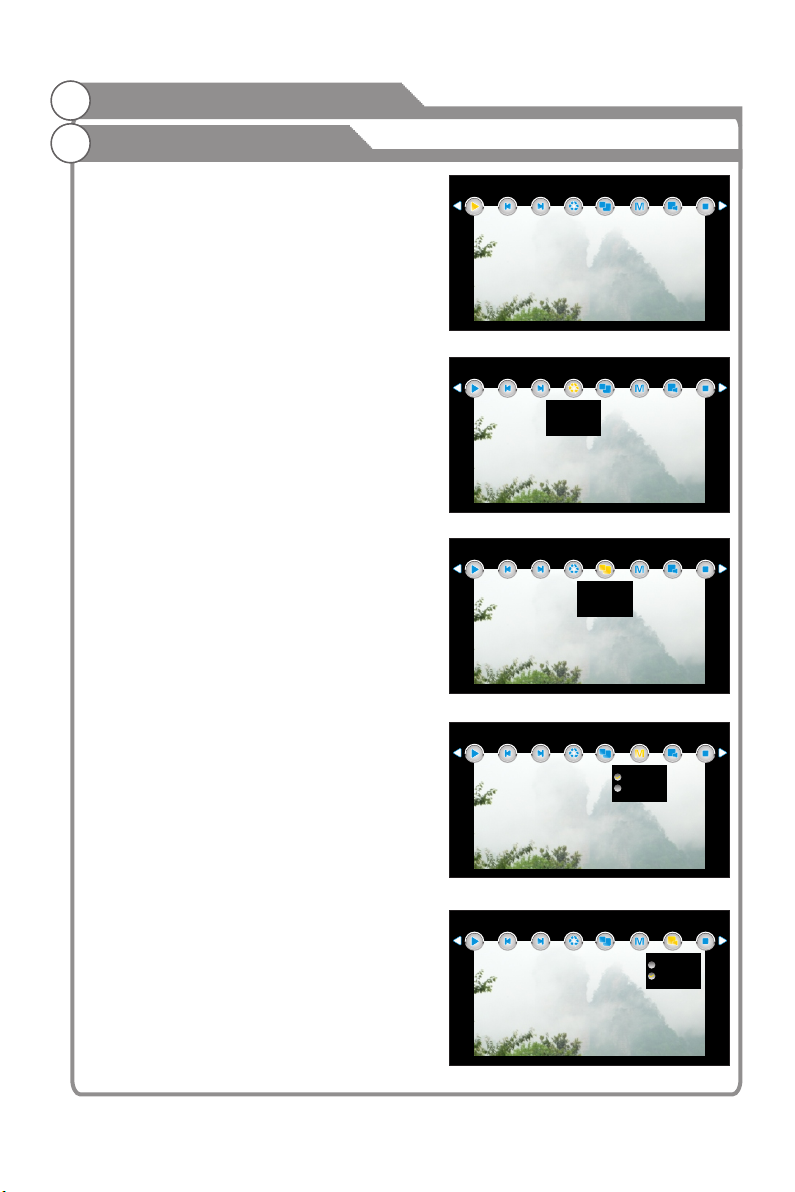
Digital Media Player
USB support character
Play Control menu
Key operation
Left, Right: Select Options
OK button: the selected function key to enter
the selected icon in the secondary function
key menu.
Play
Prev Next Rotate
1.JPE G
Proportion
PlayMode
Music
Stop
Play
Play / Pause: Play / Pause Picture.
Prev: Play on a picture.
Next: Play the next picture.
Rotate: Rotate the image counter-clockwise
along. (Shown as Figure 6)
Proportion
1. Zoom In: enlarge image 1X,2X,4X,8X
2. Zoom Out: shrink images 1/2,1/4
3. Move View: Mobile pictures. When the picture
have been magnified over the role of screen size,
Press OK to display the arrow guide OSD, press
the arrow keys to move a picture, press the
Escape key to return to the previous menu, as
shown in Figure 7.
PlayMode: Shown as Figure 8
1. Filmstrip: loop all the pictures.
2. Single: Repeat the current picture.
Music: Shown as Figure 9
Is set to open when the user is playing the
most recently played songs. If the user is
set to open when not playing a song recently,
the default entry to play music all the music.
Stop: Exit Slideshow
Play
Prev Next Rotate
Play
Prev Next Rotate
Play
Prev Next Rotate
Play
Prev Next Rotate
<Fig ure 5 >
1.JPE G
Proportion
Pos-Spin
Neg-Spin
<Fig ure 6 >
1.JPE G
Proportion
Zoom In
Zoom Out
Move View
<Fig ure 7 >
1.JPE G
Proportion
<Fig ure 8 >
1.JPE G
Proportion
PlayMode
PlayMode
PlayMode
Filmstrip
Single
PlayMode
Music
Music
Music
Music
On
Off
Stop
Stop
Stop
Stop
42
<Fig ure 9 >
Page 44
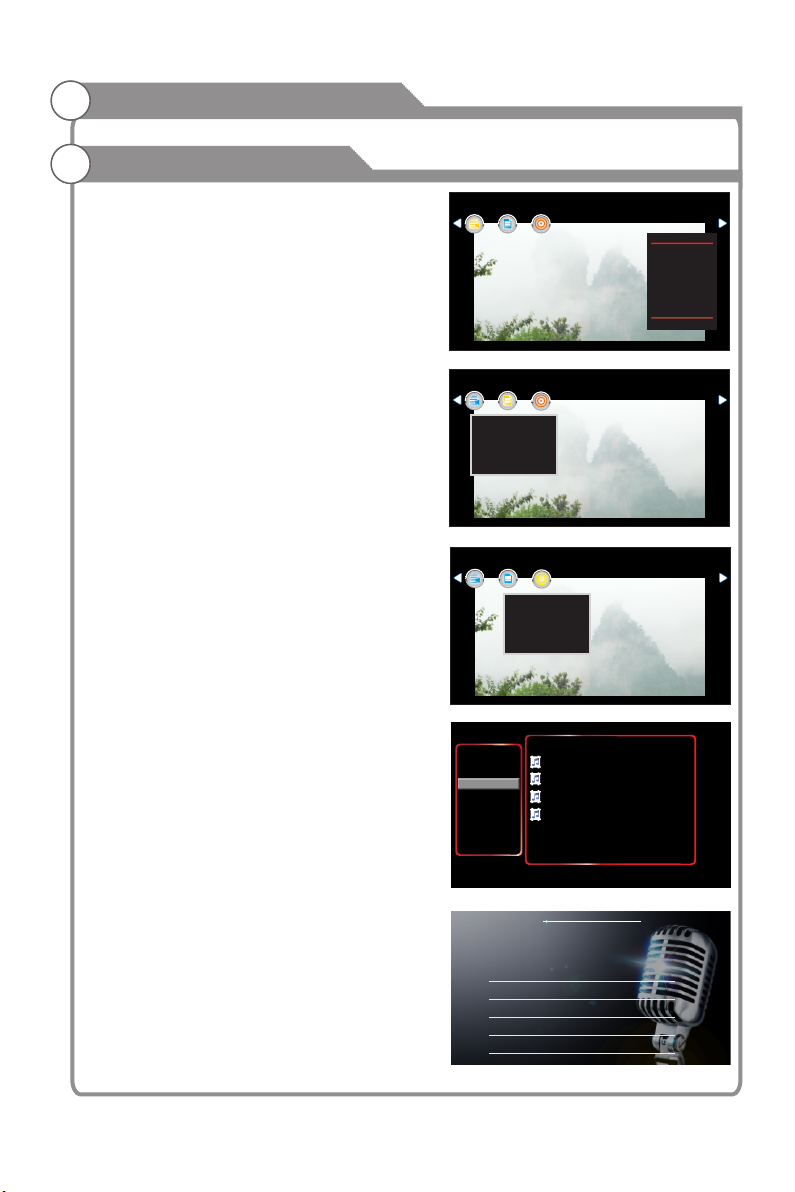
Digital Media Player
USB support character
Playlist: Show is playing and will play the
image file. Shown as Figure 10 Up,Down
keys: select the image file OK button: Play
the selected picture file Left, Right keys:
Exit playlist, and select other options.
Exit button: Exit Playlists
Info: Display the name of the picture
playback, resolution, size and date.
(Shown as Figure 11)
3D
Press Left or Right to Select 3D Option and
display submenu.
Press OK button to confirm.
(Show as Figure 12)
2. Music
Features: browse and play development path
is to develop the current disk, set the
method's interface, please refer to the
specified path: Path - setting) music files.
Content: Displays the playback of music
files under the specified path.
Browse Music
Content: Displays the music files.
(Show as Figure 13)
Key operation:
Arrow keys: Up and down between the
different options about the switch.
Enter key: Selected in the last entry in the left
side of music options, the switch to music
preview area; selected entries in the preview
area on the right music, then play music files.
Exit: election preview in the music entry in
the right area, select the entries to switch
back to the left side of music options; selected
entries in the music option on the left, the
switch back to the USB interface initialization
Play Music
Music player interface Shown as Figure 14
Action:
Left, Right: rewind / fast forward
Upper and lower key: on a / the next one
OK button: Play / Pause music
Exit: exit the music player interface, return
to music browsing interface
Menu key: enter the playback control menu.
(Shown as Figure 15)
Playlist
Playlist
Water lilies.jpg
Rsolution: 800X600
Size: 82 KBytes
Date: ----/--/--
Playlist
Info
Info
Info
3D Format
2D to 3D
3D to 2D
3D Order
1.JPE G
3D
<Fig ure 1 0>
1.JPE G
3D
<Fig ure 11>
1.JPE G
3D
Off
Off
Off
Desitive Order
<Fig ure 1 2>
Def ault pa th C:\
PHOTO
MUSIC
MOVIE
TEXT
My Disk
Burning. Mp3
Jesus To A Child George Michael. Mp3
Bonnie Windsl. mp3
music_ac3_448kbps.aac
UP / Down key: select OK / Right Key: Enter
<Fig ure 1 3>
Bonnie Winds.mp3
Hold m e now
Don’ t ever le t me go aga in
It’s b eatin g heart b ack in an d answe rs me
(ari se) my lo ve oh low er me to hi s grave
And dr y these t ears my b eatin g heart w ould br ing
<Fig ure 1 4>
1/1
Play List
Water lilies.jpg
Blue hills.jpg
1 / 1
Up/down select OK:Play
00:00:03/ 00:04:07
43
Page 45
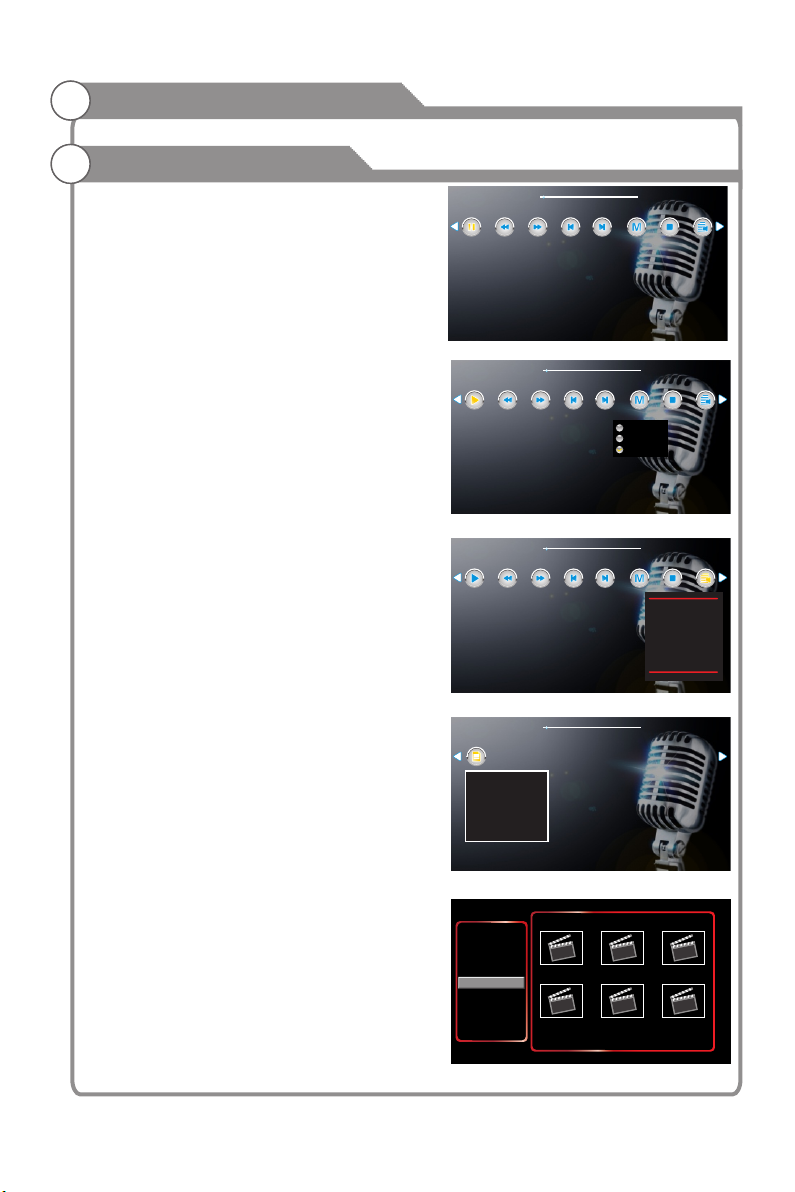
Digital Media Player
USB support character
Play Control
Key operation:
Left, Right: Select Options
Confirm the key: the selected function key
to enter the selected features live secondary
menu items.
Exit: exit the playback control menu
Bonnie Winds.mp3
Play
FB FF
00:00:03/ 00:04:07
PlayMode
Next
Prev
Playlist
Stop
Action:
Up,Down keys: Select the music file
OK button: Play the selected music files
Left, Right keys: Exit playlist, and select
other options
Exit button: Exit Playlists
Function:
Play / Pause: Play / pause the music
FB: Fast back playing (2x,4x,8x,16x)
FF: Fast forward playing (2x,4x,8x,16x)
Prev: Play previous music
Next: play next music
Play mode: Shown as Figure 16
1.ByOrder: Play music as order
2.Single: Repeat single music
3.PlayLoop:Play all the music in order loop.
Stop:Exit the music play
Playlist:
Show is playing and will play music files.
Shown as Figure 17
Info: Display the name of music, album name,
title, stream, author, sampling year.
Shown as Figure 18.
3. Movie
Features: browse and play video files under
the specified path (default path is the current
disk, set the video interface, the method
please refer to the specified path: Path setting)
Content: Displays the playback video files
under the specified path. Shown in Figure 19
Bonnie Winds.mp3
Play
FB FF
<Fig ure 1 6>
<Fig ure 1 5>
Bonnie Winds.mp3
Play
FB FF
<Fig ure 1 7>
Bonnie Winds.mp3
Info
Bonnie Winds.mp3
Album: The Best Songs Of The World
Title: Bonnie Winds
Bit Rate: 16 Bits
Artist: Bohinta
Sampling:
Year:
<Fig ure 1 8>
Def ault pa th C:\
PHOTO
MUSIC
MOVIE
TEXT
My Disk
Ad.mpeg V50.mp4
V1.RM
UP / Down key: select OK / Right Key: Enter
<Fig ure 1 9>
Prev
Prev
PlayMode
Next
ByOrder
Single
PlayLoop
PlayMode
Next
Divx 4....r mvb
1/1
00:00:03/ 00:04:07
Playlist
Stop
00:00:03/ 00:04:07
Playlist
Stop
Burning. mp3
Jesus To A Child . Mp3
Bonnie Windsl. mp3
music_ac3_448kbps.aac
1 / 1
UP / Down: select OK:play
00:00:03/ 00:04:07
Canoe_vp6.mpg
ASF_vp6.mov
44
Page 46
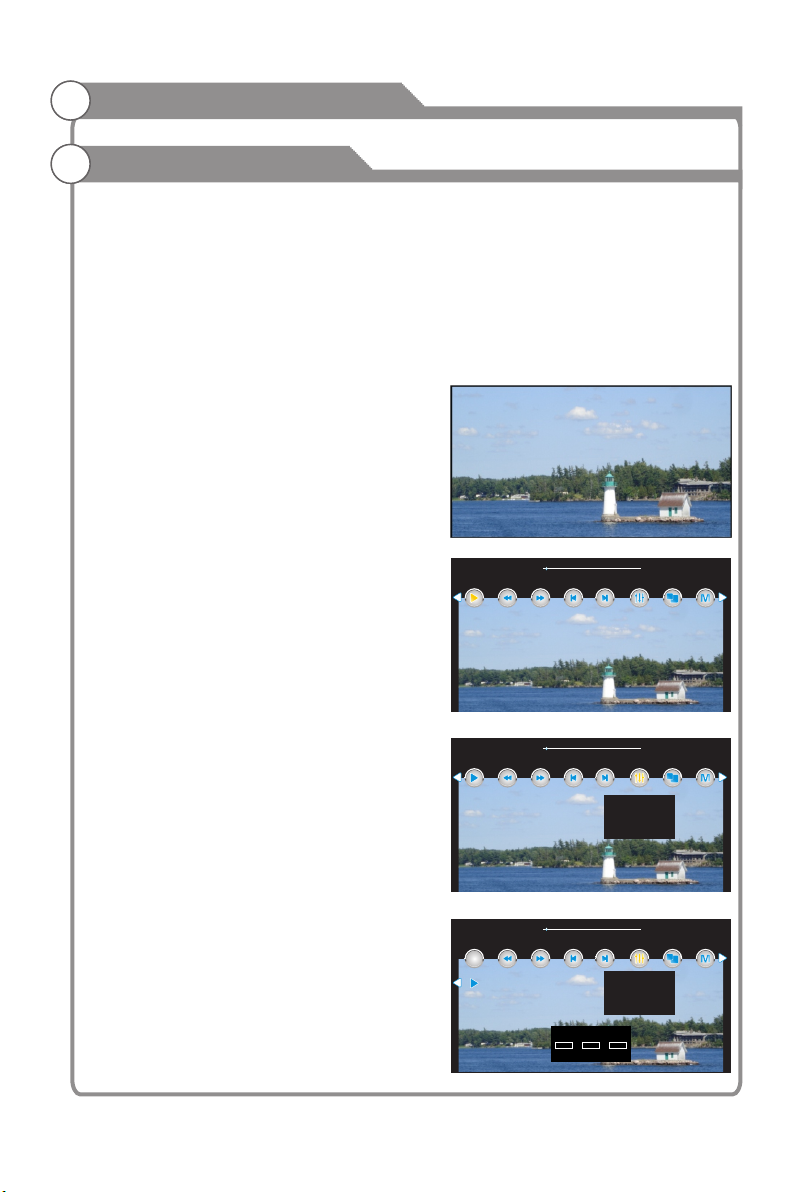
Digital Media Player
USB support character
Video view
Content: The specified path to all the video
files displayed as thumbnails
Key operation:
Arrow keys: Up and down in the switch between different options.
area; selected to the entry in the right side of the video preview area, then play the video file.
Exit: In the video preview on the right in the entry area, select the entries to switch
back to the left of the video options. Selected to the entry in the video options on the
left, the switch back to the USB interface initialization.
PLAY Video
Video player interface Shown as Figure 20
Action:
Left, Right: rewind / fast forward
Upper and lower key: on a / the next one
Exit: exit the video player interface, return to
video browsing interface.
Menu key: enter the playback control menu.
Shown as Figure 21
Play Control
Key operation:
Left, Right: Select Options
Confirm the key: the selected function key to
enter the selected. Features live secondary
menu items
Exit: exit the playback control menu.
Action:
Up,Down keys: Select the video file
OK button: Play the selected video files
Left, Right keys: Exit playlist, and select
other options.
Exit button: Exit Playlists
Function:
Play / Pause: Play / pause the video
FB: Fast back playing (2x,4x,8x,16x)
FF: Fast forward playing (2x,4x,8x,16x)
Prev: Play previous video
Next: play next video.
elected in the entry in the video options on the left, the switch to the video preview OK key: S
<Fig ure 2 0>
Ad.mpeg
Play
FB FF
Prev
Next
00:00:03/ 00:04:07
Proportion
Switch
PlayMode
<Fig ure 2 1>
Ad.mpeg
Play
FB FF
Prev
Next
Subtitle Sw.. --/0
Track Swit.. 1/1
Goto Time
00:00:03/ 00:04:07
Proportion
Switch
PlayMode
<Fig ure 2 2>
Ad.mpeg
Play
FB FF
Prev
Input search time
0 0 : 0 0 : 0 0
Enter
Next
Subtitle Sw.. --/0
Track Swit.. 1/1
Goto Time
00:00:03/ 00:04:07
Proportion
Switch
PlayMode
<Fig ure 2 3>
45
Page 47
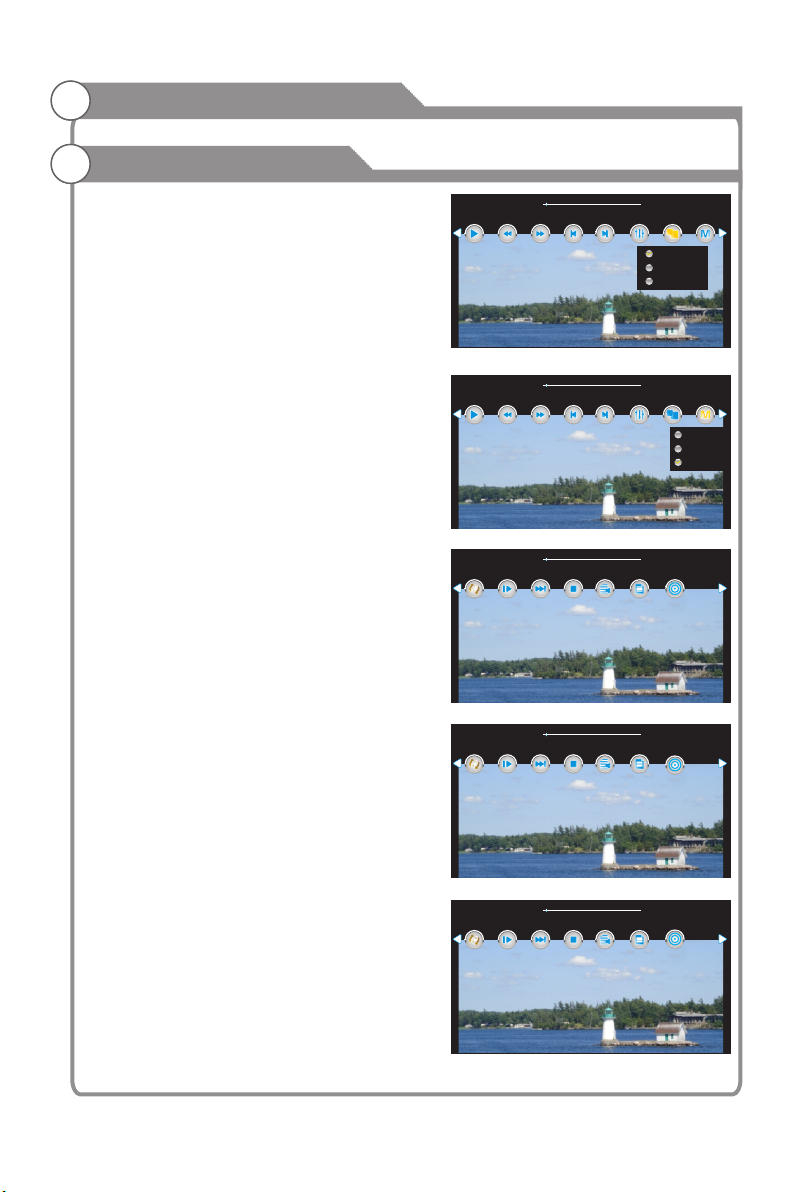
Digital Media Player
USB support character
Switch: Shown as Figure 22
1. Track switch: switch the currently playing
video tracks.
2. Subtitles switch: switch the currently
playing video titles, this option the user
can switch the video comes with different
titles, select the OFF option, the subtitles will
not be displayed.
3. Goto Choose a specific time period Time:
the video play the video.
Shown in Figure 23.
Proportion:
Select the display ratio video playback.
Shown in Figure 24.
1. Auto
2. 16 : 9
3. 4 : 3
Source of the film will switch to automatic
mode by default.
Play Mode: Shown as Figure 25
1.ByOrder: Play video as order.
2. Repeat single video.Single:
3.PlayLoop: Play all the video in order loop.
Set A
Ad.mpeg
Play
FB FF
Prev
Next
00:00:03/ 00:04:07
Proportion
Switch
Auto
16:9
4:3
PlayMode
<Fig ure 2 4>
Ad.mpeg
Play
FB FF
Prev
Next
00:00:03/ 00:04:07
Proportion
Switch
PlayMode
ByOrder
Single
PlayLoop
<Fig ure 2 5>
Ad.mpeg
Slow
Stepping
Stop
Playlist
00:00:03/ 00:04:07
3D
Info
A->B: A to B repeat playback of video
between points
Set A: select the starting point.
Shown as Figure 26.
Set B: select the destination point .
Shown as Figure 27.
None: Cancel A-> B play and resume normal
playback. As shown in Figure 28.
Slow:Play Slowly.(2X,4X,8X,16X)
Stepping: One frame video will be played each
time the stepping button is pushed.
Stop:Exit the video play
46
Set B
None
Ad.mpeg
Slow
Ad.mpeg
Slow
<Fig ure 2 6>
Stop
Stepping
<Fig ure 2 7>
Stop
Stepping
<Fig ure 2 8>
Playlist
Playlist
00:00:03/ 00:04:07
Info
3D
00:00:03/ 00:04:07
3D
Info
Page 48
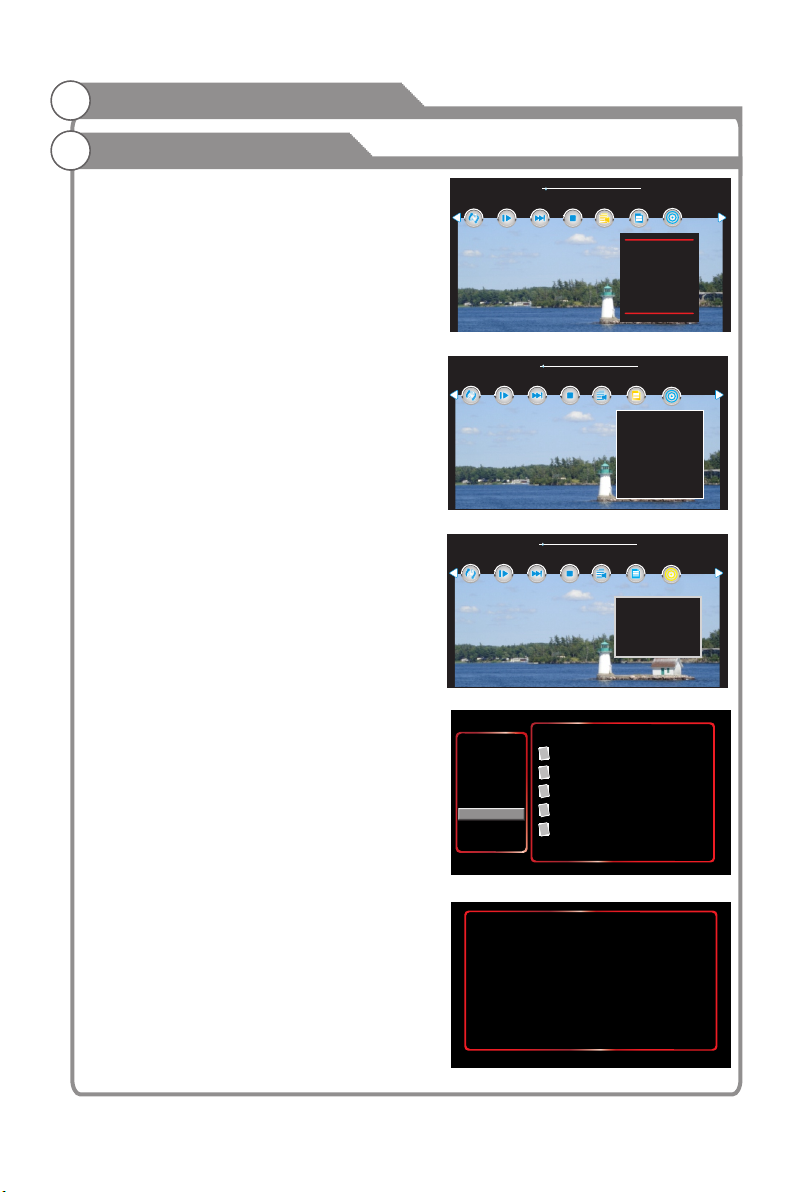
Digital Media Player
USB support character
None
Ad.mpeg
Slow
Stepping
Stop
3D
Info
00:00:03/ 00:04:07
Playlist
Playlist: Show the videos files being playing
and will be played.
Shown as Figure 29
Info: Shows the name of the video is playing,
resolution, audio track, subtitles, program,
title, version, chapters.
Shown as Figure 30.
3D
Press Left or Right to Select 3D Option and
display submenu.
Press OK button to confirm.
Shown as Figure 31.
4.Text
Features: browse and play text files under the
specified path (default path is the current disk,
set the video interface, the method please refer
to the specified path: Path - setting)
Content: Displays the playback text files under
the specified path.
Shown in Figure 32
Document view
Content: The specified path to all the document
files displayed as thumbnails.
Key operation:
Arrow keys: Up and down in the switch between
different options.
elected in the entry in the document OK key: S
options on the left, the switch to the video preview
area; selected to the entry in the right side of the
document preview area, then play the document
file.
Exit: In the video preview on the right in the entry
area, select the entries to switch back to the left
of the document options. Navigate to the entry in
the document options on the left, then switch back
to the USB interface initialization
Ad.mpeg
V50.mp4
V1.RM
Divx4....rmvb
Divx5....rmvb
1 / 1
<Fig ure 2 9>
None
Ad.mpeg
Slow
Stepping
Stop
Playlist
00:00:03/ 00:04:07
Info
3D
Ad.mpeg
Resolution: 352x288
Audio Track: 1 /1
Subtitle: - - / 0
Program: - - / 0
Title: - -
Edition: - -
Chapter: - -
<Fig ure 3 0>
None
Ad.mpeg
Slow
Stepping
Stop
Playlist
00:00:03/ 00:04:07
Info
3D Format
3D Format
2D to 3D
2D to 3D
3D to 2D
3D to 2D
3D Order
Desitive Order
3D Order
3D
Desitive Order
<Fig ure 3 1>
Def ault pa th C:\
PHOTO
MUSIC
MOVIE
TEXT
My Disk
The Wo nderf ul Wiza rd of Oz. t xt
Aro und the Wo rld in 80 D ays. tx t
How To Be H appy At Wo rk. txt
Ern est Hem ingwa y's cor pus. tx t
Jan e Eyre. T xt
UP / Down key: select OK / Right Key: Enter
1/1
<Fig ure 3 2>
How To Be Hap py At Work
it’s no t easy to t ell oth ers how t o be happ y at work ,
espe ciall y peopl e who fee l as if the y’re li ving in a c areer c ombat z one.
i know th e battl egro und wel l. for th e past 20 y ears,
i’ve b een a car eer cou nselo r, psych other apist ,
and co rpora te outp lacem ent con sulta nt. in th at time ,
i’ve s een mor e casua lties o f the car eer war s than mo st peop le expe rienc e in a
life time. i k now wha t it take s to be hap py with y our wor k. but i al so know t here’s
no sim ple for mula to a chiev e caree r succe ss and sa tisfa ction .
the wo rkpla ce is cha otic. if y ou’r e like mo st peop le, you p robab ly feel t hat you ’re
livi ng a care er nigh tmare : worki ng hard er to mak e a livin g with fe wer ava ilabl e
reso urces , more de mands o n your ti me, and l ots of di since ntive s to achi eveme nt.
perh aps you f antas ize abo ut chuc king th e whole s cene. r ight ab out now, l ife on
the go lf cour se, ski s lopes , or a sand y beach c an look m ighty a ppeal ing.
mayb e you jus t need a go od, lon g vacat ion. yo u don’t w ant to dr op out of t he
work force a ltoge ther, bu t you’r e hunge ring fo r a new adv entur e. you wa nt more
contr ol ove r your ti me and yo ur dest iny. your r allyi ng cry is m ore fre edom, l ess1/ 51
offic e polit ics!
UP: Pre Page DOWN: Next Page LEFT: Pre File RIGHT: Next File
<Fig ure 3 3>
Off
Off
Off
Off
Off
Off
1/1
47
Page 49
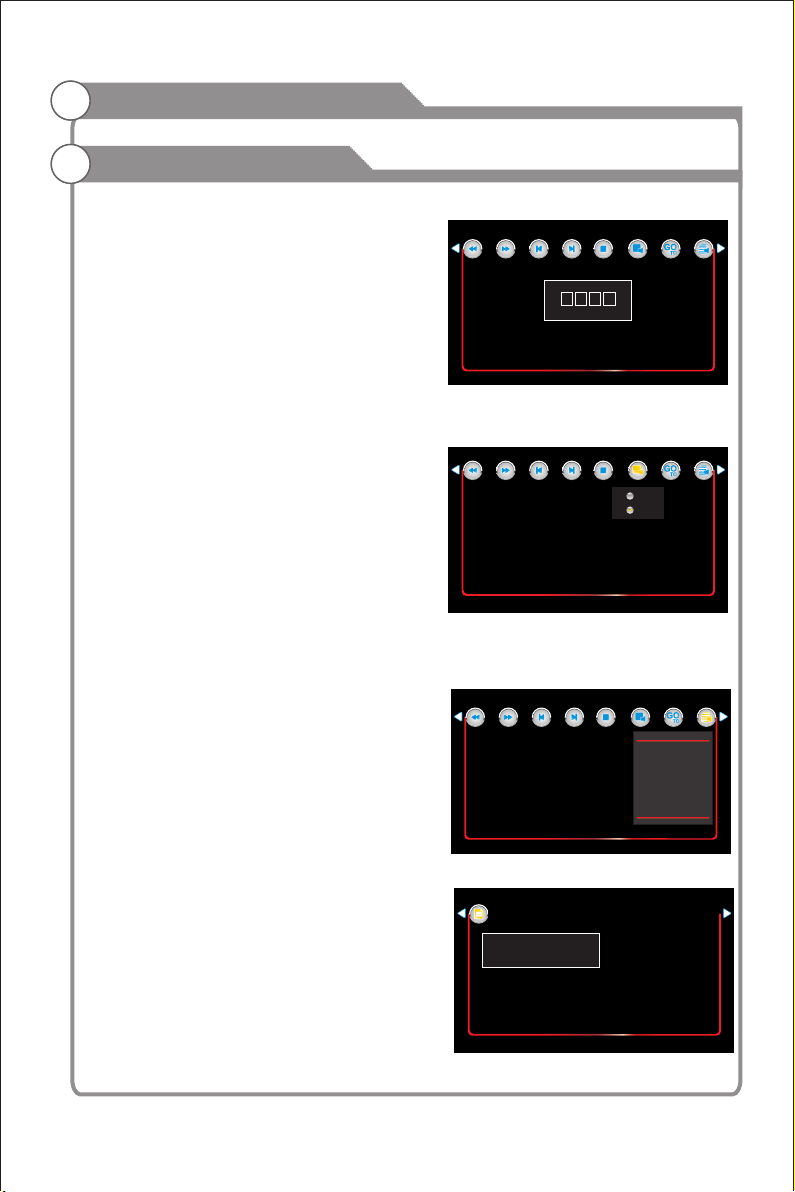
Digital Media Player
USB support character
Documents Reading
The Documents Reading interface: Shown as
Figure 33.
Key operation
Up,Down keys: Previous Page, Next Page
Left, right keys: Previous document, Next
document.
Exit key: Return to the document interface
Menu key: Enter the playback control menu.
As shown in Figure 34.
Play Control menu
Key operation
Left, Right: Select Options
OK button: the selected function key to enter the
selected Living the secondary function key menu.
Exit button: Exit Play control menu.
Function
Prev Page: Show previous page.
Next Page: Show next page.
Prev: Show previous document.
Next: Show next document.
Stop: Exit document reading
Music: Shown as Figure 35
When set to open, play music at the same time.
Goto Page: Select this feature, the pop-up
dialog box jump page, the user can enter the
page number to view the page, select OK
option, and enter the designated page, click
Exit to return to playback control menu.
Playlist: displays document files can be
played. Shown as Figure 36;
Show the name, size of the document playing.
As shown in Figure 37.
5. My Disk
Function: Displays the current disk under the
folder, movies, music, pictures, text files;
set "Photo", "music", "video", "document" the
specified path. Shown as Figure 38.
Prev Page
Next Page Prev Next Stop Music Goto Page Playlist
Rk
it’s no t easy to t ell oth ers how t o be happ y at work ,
espe ciall y peopl e who fee l as if the y’re li ving in a c areer c ombat z one.
i know t he batt legro und wel l. for th e past 20 y ears,
i’ve b een a car eer cou nselo r, psych other apist ,
and co rpora te outp lacem ent con sulta nt. in th at time ,
i’ve s een mor e casua lties o f the car eer war s than mo st peop le expe rienc e in a
life time. i kn ow wha t it take s to be hap py with y our wor k. but i al so know t here’s
no simp le for mula to a chiev e caree r succe ss and sa tisfa ction .
the wo rkpla ce is cha otic. i f you’r e like mo st peop le, you p robab ly feel t hat you ’re
livi ng a care er nigh tmare : worki ng hard er to mak e a livin g with fe wer ava ilabl e
reso urces , more de mands o n your ti me, and l ots of di since ntive s to achi eveme nt.
perh aps you f antas ize abo ut chuc king th e whole s cene. r ight ab out now, l ife on
the go lf cour se, ski s lopes , or a sand y beach c an look m ighty a ppeal ing.
mayb e you jus t need a go od, lon g vacat ion. yo u don’t w ant to dr op out of t he
work force a ltoge ther, bu t you’r e hunge ring fo r a new adv entur e. you wa nt more
cont rol ove r your ti me and yo ur dest iny. your r allyi ng cry is m ore fre edom, l ess
offic e polit ics!
0 0 0 0
OK
GO
GO
<Fig ure 3 4>
Prev Page
Next Page Prev Next Stop Music Goto Page Playlist
K
it’s no t easy to t ell oth ers how t o be happ y at work ,
espe ciall y peopl e who fee l as if the y’re li ving in a c areer c ombat z one.
i know t he batt legro und wel l. for th e past 20 y ears,
i’ve b een a car eer cou nselo r, psych other apist ,
and co rpora te outp lacem ent con sulta nt. in th at time ,
i’ve s een mor e casua lties o f the car eer war s than mo st peop le expe rienc e in a
life time. i kn ow wha t it take s to be hap py with y our wor k. but i al so know t here’s
no simp le for mula to a chiev e caree r succe ss and sa tisfa ction .
the wo rkpla ce is cha otic. i f you’r e like mo st peop le, you p robab ly feel t hat you ’re
livi ng a care er nigh tmare : worki ng hard er to mak e a livin g with fe wer ava ilabl e
reso urces , more de mands o n your ti me, and l ots of di since ntive s to achi eveme nt.
perh aps you f antas ize abo ut chuc king th e whole s cene. r ight ab out now, l ife on
the go lf cour se, ski s lopes , or a sand y beach c an look m ighty a ppeal ing.
mayb e you jus t need a go od, lon g vacat ion. yo u don’t w ant to dr op out of t he
work force a ltoge ther, bu t you’r e hunge ring fo r a new adv entur e. you wa nt more
cont rol ove r your ti me and yo ur dest iny. your r allyi ng cry is m ore fre edom, l ess
offic e polit ics!
GO
GO
On
Off
<Fig ure 3 5>
Next
Prev Page
Prev
Page
Stop
Next
Goto
Music
Play Li st
The Wond erful Wi zard of O z. txt
Around t he Worl d in 80 Days . txt
How To Be Hap py At Work. t xt
Ernest H eming way's c orpus . txt
Jane Eyr e. Txt
1 / 1
UP / Down: select OK:play
<Fig ure 3 6>
Info
How To Be Hap py At Work . Txt
espe ciall y peopl e who fee l as if the y’re li ving in a c areer c ombat z one.
i know t he batt legro und wel l. for th e past 20 y ears,
i’ve b een a car eer cou nselo r, psych other apist ,
and co rpora te outp lacem ent con sulta nt. in th at time ,
i’ve s een mor e casua lties o f the car eer war s than mo st peop le expe rienc e in a
How To Be Happy At Work. Txt
life time. i kn ow wha t it take s to be hap py with y our wor k. but i al so know t here’s
no simp le for mula to a chiev e caree r succe ss and sa tisfa ction .
Size: 115.92Kbytes
the wo rkpla ce is cha otic. i f you’r e like mo st peop le, you p robab ly feel t hat you ’re
livi ng a care er nigh tmare : worki ng hard er to mak e a livin g with fe wer ava ilabl e
reso urces , more de mands o n your ti me, and l ots of di since ntive s to achi eveme nt.
perh aps you f antas ize abo ut chuc king th e whole s cene. r ight ab out now, l ife on
the go lf cour se, ski s lopes , or a sand y beach c an look m ighty a ppeal ing.
mayb e you jus t need a go od, lon g vacat ion. yo u don’t w ant to dr op out of t he
workf orce a ltoge ther, bu t you’r e hunge ring fo r a new adv entur e. you wa nt more
cont rol ove r your ti me and yo ur dest iny. your r allyi ng cry is m ore fre edom, l ess
offic e polit ics!
TO
TO
TO
TO
1/1
Playlist
Page
GO
GO
TO
O
T
1/1
48
<Fig ure 3 7>
Page 50
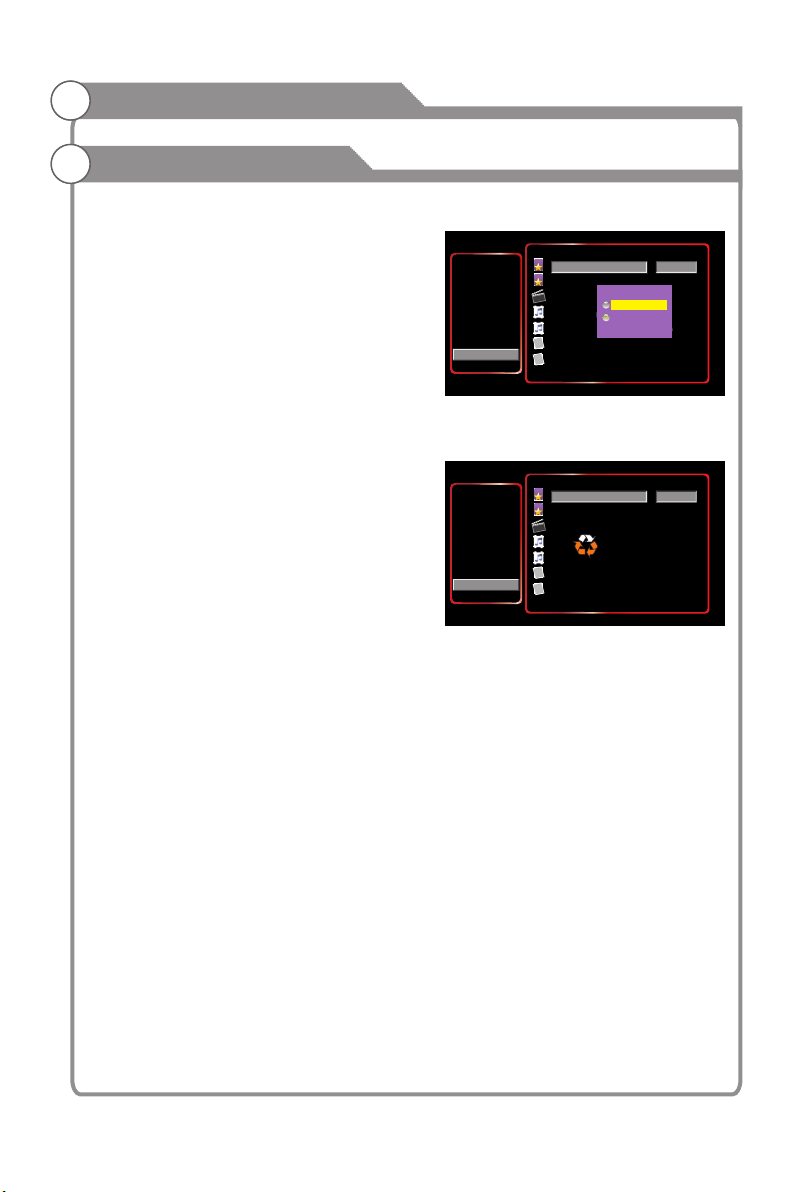
Digital Media Player
USB support character
Key operation:
Arrow keys: Up and down between the different
options about the switch.
OK key: If the focus is on the left side when
Regional Options, switch to the right area;
when the focus is on the right side file display
area, if the focus on the folder, then into the
folder. If movies, music, pictures, text, and
then play the file.
Exit: If the focus is on the left, the switch back
to the USB initialization interface; if the focus
is on the right side of the menu and when in the
root directory, then switch to the left region, if
the focus is on the right side when the non-root
directory, then return to the previous level
directory. Set path Description: display area is
selected in the file folder, the folder will appear
to set the right function. Right-click the arrow
keys to select the settings option and then
press the OK button will pop up settings dialog,
set the box includes two options: the current
disk and the current path.
Up and down keys to switch between these two
options, select the OK button is selected the
path way out to save the current settings and
launch path settings menu.
As shown in Figure 39
Current Path C:\
PHOTO
MUSIC
MOVIE
TEXT
My Disk
UP / Down key: Entry Type Select OK key: Select Entry Type Exit key:save Entry setting And Return
Landscape2.jpg
Street.jpg
Ad.mpeg
Burning. Mp3
Jesus To A Child George Michael. Mp3
Ernest Hemingway's corpus. txt
Jane Eyre. txt
Setup
Current Drive
Current Path
Index Path
1/1
Setup
<Fig ure 3 8>
Current Path C:\
PHOTO
MUSIC
MOVIE
TEXT
My Disk
UP / Down key: Entry Type Select OK key: Select Entry Type Exit key:save Entry setting And Return
Landscape2.jpg
Street.jpg
Ad.mpeg
Burning. Mp3
Jesus To A Child George Michael. Mp3
Savi ng sett ings .. ....
Ernest Hemingway's corpus. txt
Jane Eyre. txt
Setup
1/1
<Fig ure 3 9>
Current Drive: Set "Photo", "music", "video", "document" for the entire query path
specified disk. This option is selected, each time a user visit the "Photo", "music",
"video", "Documents" for the current disk contains all the photos / music / video /
document file. Entry: If you enter the C drive, when setting the current disk is
selected, the view, "photo", "music", "video", "document" is displayed when the
C drive, all photos / music / video / document file. As to the current disk to find the
entire disk media files, so speed will be very slow, do not recommend this path set up.
Current Path: Set "Photo", "music", "video", "document" of the specified query path
for the currently selected folder path. when choosen, each time a user browsing
photos, music, video, document files is the current folder contains all the photos /
music / video / document files.For example,the currently selected folder is
"KKDOWNLOAD", when elected in the current path, browsing the "photo", "music",
"video", "document" to display all photos / music / video / document files in the
"KKDOWNLOAD" folder.This will be faster when searching.Therefore, it is strongly
recommended that users put all kinds of media files in a fixed folder and set folder
to specify the path, so you can save search time.
49
Page 51
Troubleshooting
If you have any problem, check the couter measures for each symptom listed beOow.
The following symptoms may have adjustment rather been caused by inappropriate
than actual malfunction of the unit. If the trouble persists, contact the Customer Care
Centre at http://www.kogan.com/au/contact-us/
Symp tom s
No pow er
No pic tur e
Good p ict ure b ut no
soun d
Good sound but abnormal
color or no picture
No res pon se to r emo te
cont rol
Full s cre en fl ick eri ng
unde r VGA
Please check the power cord plugged in and that the power
outlet works.
Unplug the power cord and plug it in after 60 seconds and
restart the TV.
Please check antenna connection.
Station may problems, please tune to be experiencing
another station.
Please adjust the settings of contrast and brightness.
Please increase the volume.
Please check TV is under mute mode, press MUTE button
on the remote control.
Please check sound settings
If external devices are being used, check their volumes are
not set too low or turned off.
If using AVI or Component inputs, please make sure cables
are connected prpoerly and not loose.
If using DVI to HDMI cable, a separate audio cable is required.
Make sure a headphone jack is not connected..
Please check antenna connection and antenna condition.
If using Component input, please check Component
connections, incorrect or loose connections may cause
colour problems or cause the screen to be blank.
Batteries of remote control may have exhausted, if
necessary, please change the batteries.
Clean the remote control lens. The distance between
LED TV and remote control should be within 8m, within
recommended operating angle and path is free of obstructions.
V-HEIGHT value may be set too big, restart computer and
enter safe mode, then set monitor parameters to correct
value according to adjustment description.
Poss ibl e sol uti ons
Hori zon tal s tri pes
unde r VGA
Colo red d ots m ay be
pres ent o n the s cre en
Pic tu re is bre ak ing up
Sample phase may be deflected, adjust phase according to
picture position.
Although the LED screen is made with high-precision
technology and 99.99% or more of the the pixels are
effective, black dots may appear or bright points of light
(red, blue, or green) may appear constantly on the LED
screen. This is a structural property of the LED screen
and not a malfunction.
Keep the TV away from noisy electrical sources such as cars,
hair dryers, welders, and all optional equipment.
Electrical atmospheric interference such as local or distant
lightning storms may cause picture to break up.
When installing optional equipment, leave some space
between the optional equipment and the TV.
Check the antenna and connection.
Keep the antenna away from any power or input/output cables.
50
Page 52
Troubleshooting
Afte r Aut o Tuning o nly
some cha nne ls are
avai lable
Chan nel can not be
sele cted
USB not pl aying
Picture is distorted,
macroblock, small block,
dots, pixelization, etc
Nois e fro m spe ake r
TV turns off automatically
TV tur ns on
auto mat ica lly
Pict ure i s not s how n in
full s cre en
Check your area is covered by Digital Video Broadcasts.
Try re-tuning or ma nu ally tuning mis si ng channels.
Check that you are using th e correct antenna type - ple as e
see pg.16 'Antenna connection'.
Chec k if t he chan nel has b een blo cked in the m ain men u
sett ings.
Please check connecting USB cable and power supply is
connected.Hard drive has not been formatted. Please make
sure USB disk is compatible and the multimedia data formats
are supported.
Comp ressi on of video c onten ts may ca use dis torti on
espe ciall y on fast mov ing pic tures s uch as sp orts and
acti on movi es.
Chec k cab le co nne cti ons , mak e sure a video cabl e is no t
conn ect ed to a n aud io in put .
Low si gna l lev el ma y cau se so und d ist ortion.
Chec k if th e Off Time r is se t to On i n the S etu p men u.
Slee p Time r may h ave b een e nab led .
If the re is n o sig nal f or ab out 1 0 min utes from an i npu t,
the TV w ill turn off , see Auto Slee p pg. 3 3.
If con nec ted t o you r PC, c hec k your PC powe r set tin gs.
Make s ure t he AC po wer c ord i s plu gge d in se curely to
the wa ll ou tle t and t he TV.
Chec k if th e On Tim er is s et to O n in th e Setup menu .
Blac k bar s on ea ch si de wi ll be s how n on HD c hannels
when d isp lay ing S D (4: 3) co nte nts.
Blac k bar s on Top & Bottom wi ll be s how n on mo vie s tha t
have a spe ct ra tio s diffe ren t fro m you r TV.
Adju st pi ctu re si ze op tio n on yo ur externa l dev ice o r TV to
full s cre en.
51
Page 53
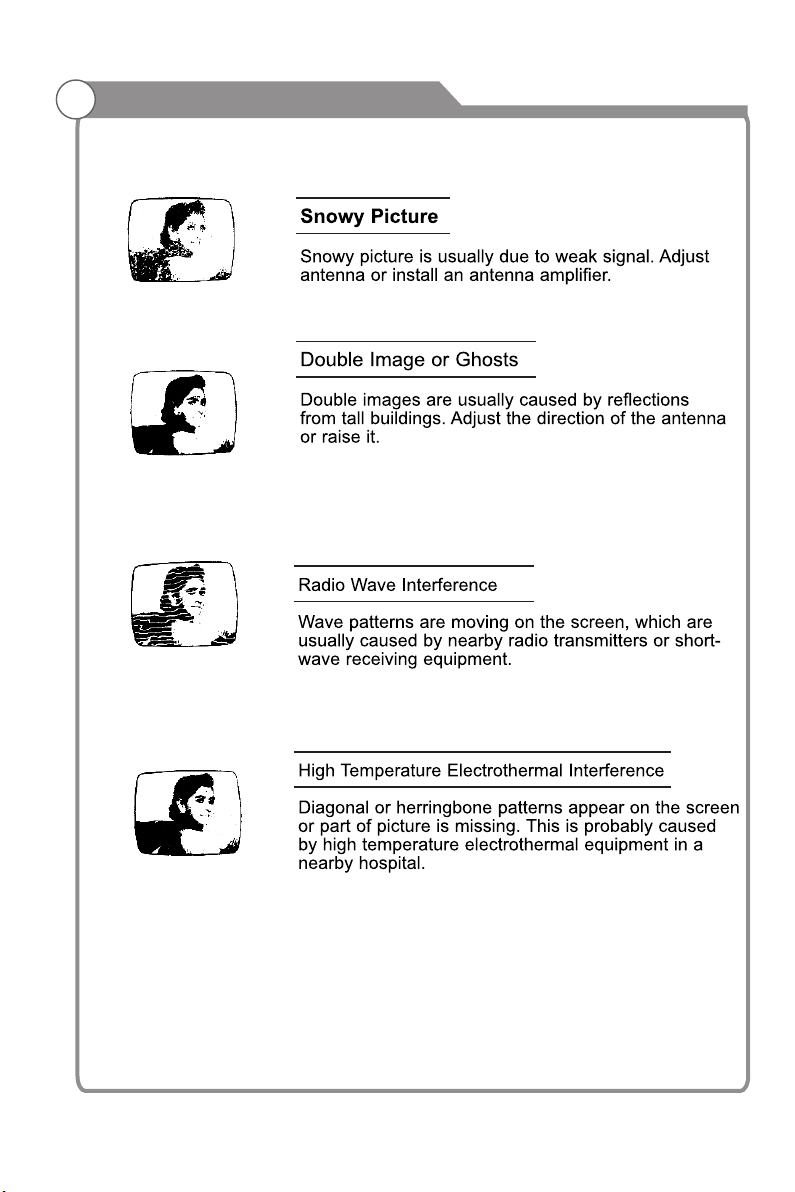
Troubleshooting
Picture defects and the reason
Ghost ing ma y also o ccur when still p ictu res ar e
displ ayed c onti nuously. It may d isap pear a fter a
few mom ents .
52
 Loading...