

Page 1

Page 2

Table Of Contents
1
This user manual for reference only
Safety Information.................................................................................................................2
Preparations Guide
Important Safety Precautions.................................................................................................3
Installed And Connected TV
TV Bracket assemble.............................................................................................................4
TV Buttons And Terminal Interface........................................................................................ 5
External device connection diagram................................................................... 6
Install And Connect TV...........................................................................................................7
Setup Menu....................................................................................................
USB Operation................................................................................................
Input Source...........................................................................................................................8
TV Menu
Picture Menu..........................................................................................................................8
Sound Menu.......................................................................................................................... 9
Channel Menu.......................................................................................................................9
Lock System Menu .........................................................................................................
Other Information
Help......................................................................................................................................15
Specifications.......................................................................................................................16
TV Stand installation Instructions.......................................................................7
11
12
........
11
DVD ......................................................................................... 13-14............... ..
Remote Controller
.................................................................................... 17-19..
Page 3
Page 4

3
Important Safety Precautions
1. Read these instructions.
2. Keep these instructions.
3. Heed all warnings.
4. Follow all instructions.
5. Do not use this apparatus near water.
6. Clean only with dry cloth.
7. Do not block any ventilation openings. Install in accordance with the
manufacturer’s instructions.
8. Do not install near any heat sources such as radiators, heat registers, stoves, or
other apparatus (including amplifiers) that produce heat.
9. Do not defeat the safety purpose of the polarized or grounding-type plug. A
polarized plug has two blades with one wider than the other. A grounding type plug
has two blades and third grounding prong. The wide blade or third prong are
provided for your safety. When the provided plug does not fit into your outlet,
consult an electrician for replacement of the obsolete outlet.
10. Protect the power cord from being walked on or pinched, particularly at plugs,
convenience receptacles, and the point where they exit from the apparatus.
11. Only use attachments/accessories specified by the manufacturer.
12. Use only with the cart, stand, tripod, bracket, or table specified by the
manufacturer, or sold with the apparatus. When a cart is used caution when
moving the cart/apparatus combination to avoid injury tip-over.
13. Unplug this apparatus during lightning storms or when unused for long periods
of time.
14. Refer all servicing to qualified service personnel. Servicing is required when the
apparatus has been damaged in any way, such as power-supply cord or plug is
damaged, liquid has been spilled or objects have fallen into the apparatus, the
apparatus has been exposed to rain or moisture, does not operate normally, or has
been dropped. Warning to reduce the risk of fire or electric shock, do not expose
this apparatus to rain or moisture.
15. The apparatus shall be disconnected from the mains by placing the power/standby
switch in the standby position and unplugging the power cord of the apparatus from
the AC mains receptacle.
16. The socket-out shall be installed near the equipment and shall be easily accessible.
17. This product should never be placed in a built-in installation such as a bookcase
or rack unless proper ventilation is provided or the manufacturer's instructions have
been adhered to.
18. Apparatus shall not be exposed to dripping or splashing.
19. Do not place any sources of danger on the apparatus (e.g. liquid filled objects,
lighted candles).
20. Wall or Ceiling Mounting - The appliance should be mounted to a wall or ceiling
only as recommended by the manufacturer.
21. Never place the TV, remote control or batteries near naked flames or other
heat sources, including direct sunlight. To prevent the spread of fire, keep
candles or other flames away from the TV, remote control and batteries at
all times.
22. The USB terminal should be loaded with 0.5 A under normal operation.
Page 5
4
TV Bracket assemble
SOURCEMENUCH+
-
CH
-
VOLVOL+
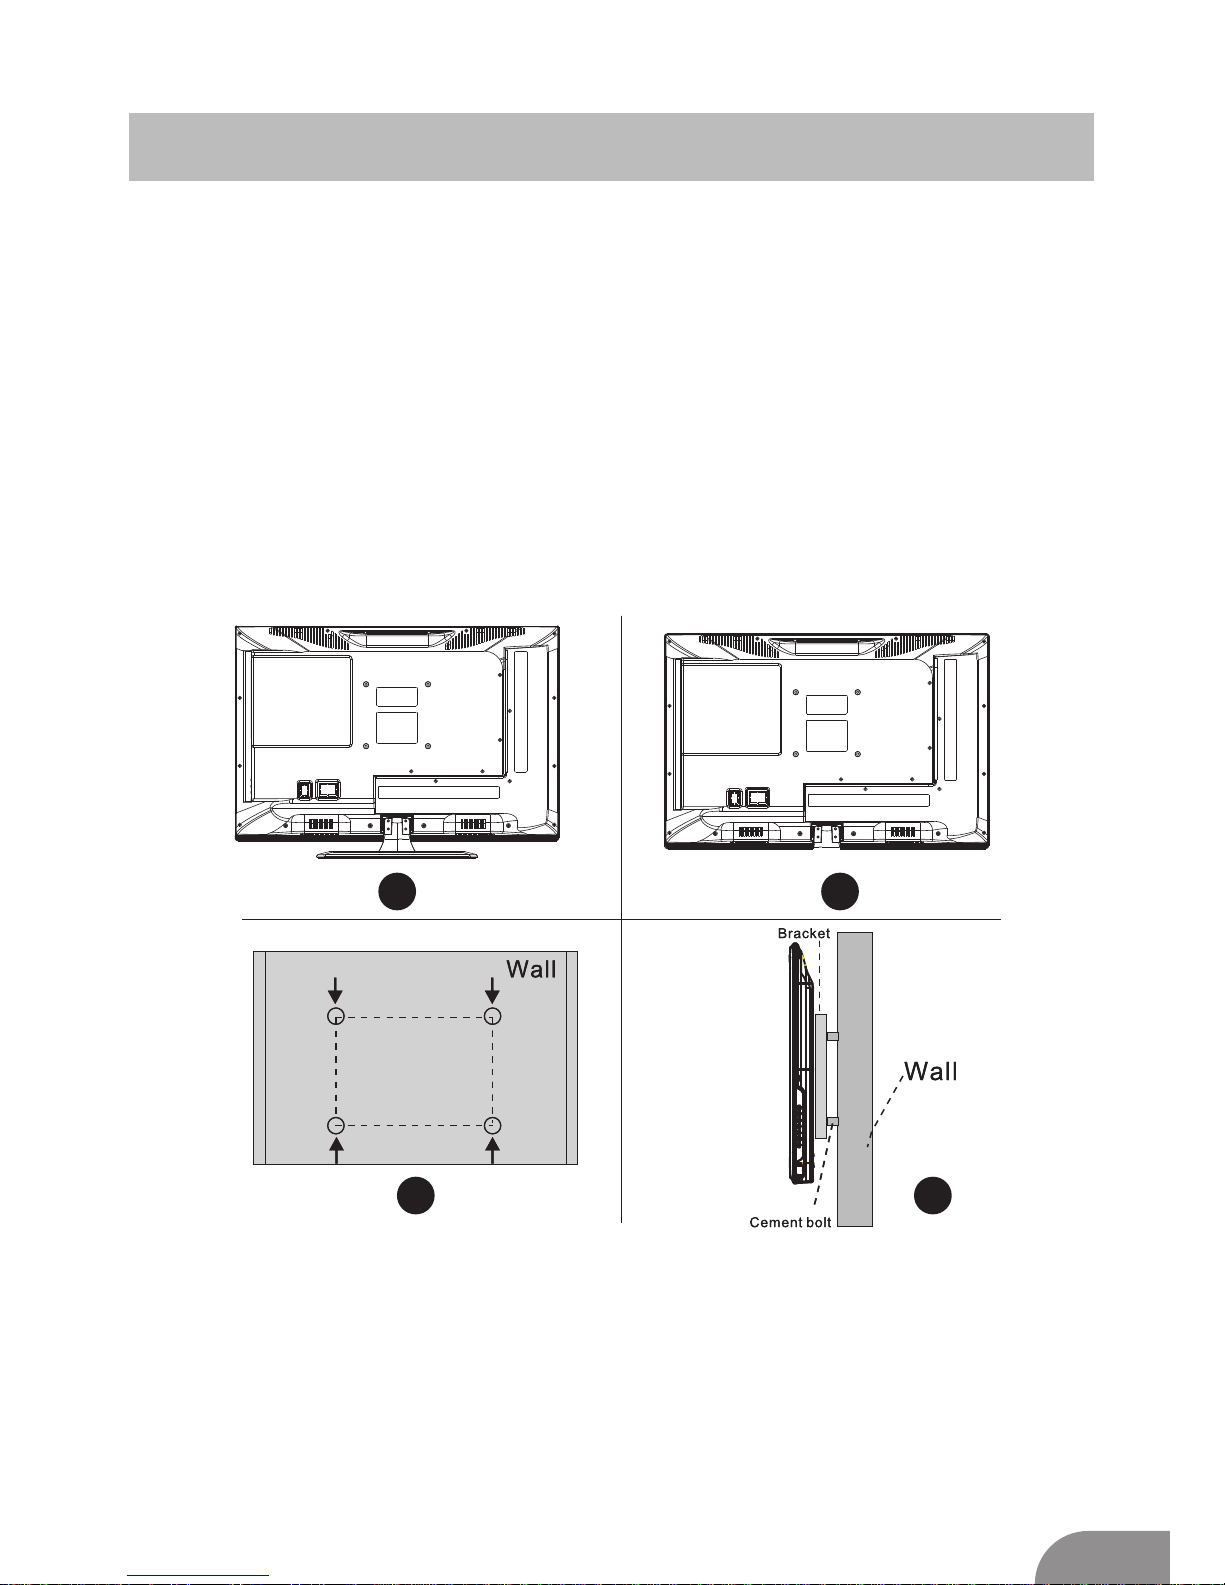
Fix the TV on the wall
1.First, put the TV on the table smoothly and put some soft cloth on the table to avoid
scratching the screen.
2.Use the screw driver to take off the screws which are fixed on the bottom stand
(the direction of the arrow, refer to the pic 1). Then take off the bottom stand (please
take off the screws and bottom stand carefully).
3.Make one bracket which can fix on the wall according to the size of arrow direction
of pic 2 and pic 3.
4.Drill four holes properly on the wall (the size only for reference) and put in four
screws.
5.According to step 4,use the screwdriver to lock the screws on the back of the TV,
then hang the TV on the wall.
1 2
3
4
Note:
1.The bracket fixed on the wall is optional part.
2.When you assemble the TV, there should be no other articles on the sides and front,
and please keep the TV at a short distance from other articles.
3.When mounting the TV, please ask a professional installer for advice if required.
4.The pictures above are only for reference.
5.Please follow the use manual about bracket assemble to fix the TV.
6.Attach the mounting bracket from the VESA compatible wall mounting kit.
Page 6
TV Buttons And Terminal Interface
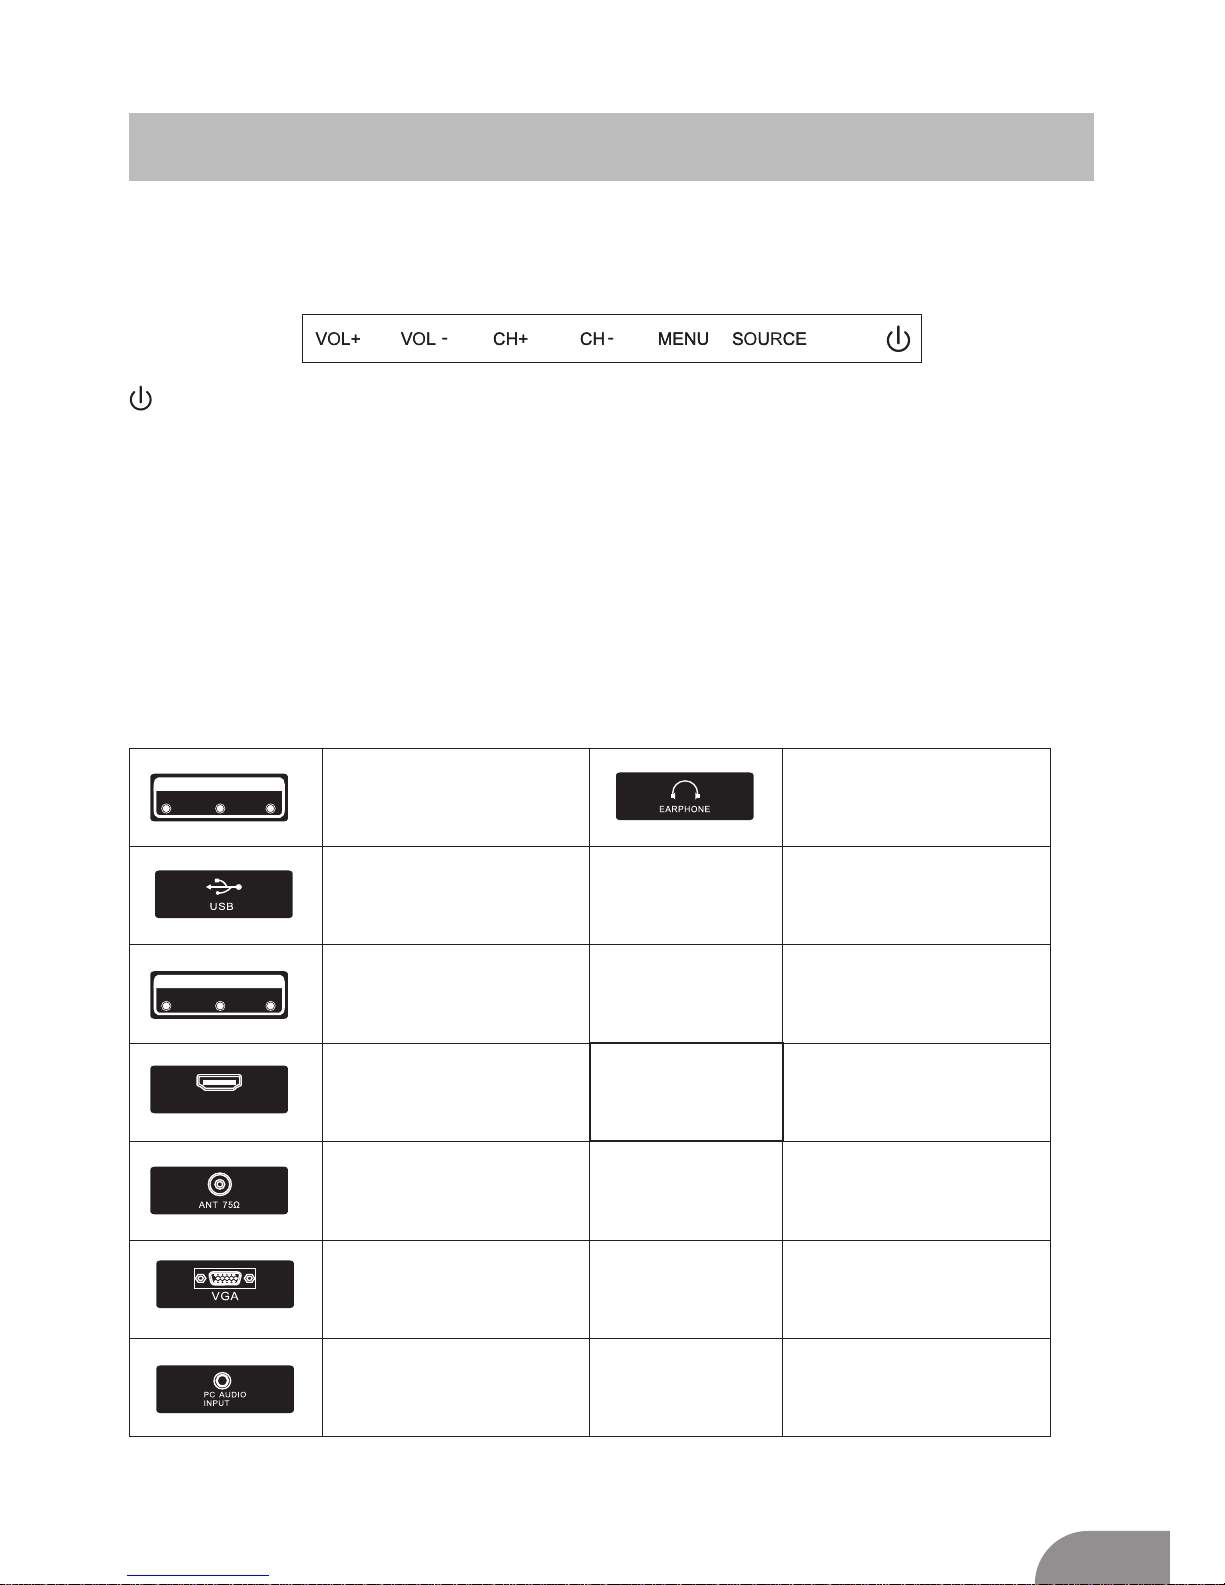
TV Buttons
:Turn ON/OFF Power.
SOURCE:External Signal Input Selection.
MENU:Display Main MENU And Confirm MENU Item Selection.
CH+/-:Select Channel.
VOL+/-:Adjust Volume.
Note: The following is only functional schematic. The actual position and
arrangement of different models may be different.
Terminal Interface
Note: The following are the various terminal interfaces. The actual position and
arrangement between the number of different models may be different.
VID EO R L
INP UT
Y Pb Pr
INP UT
HDMI
AV input
Extern al AV Signal Inp ut a nd
Releva nt R ight /L ef t So un d Channel
Y Pb Pr input
Connec t to t he c om po si te t erminal of
your DVD /V CR
(Some mo de ls w it ho ut t hi s interface)
HDMI inp ut
Digita l si gn al i np ut f ro m HDMI video
connec to r.
ANT 75
Connec t th e an te nn a/ cab le tv input
(75/VH F/ UH F)
VGA inp ut
PC analo g si gn al i np ut
PC AU DI O IN PU T
VGA input a nd a ud io i np ut w he n VGA
input
EARPHO NE o ut pu t
When ear ph on es a re p lu gg ed in,
speake rs a re d is ab le d
USB input
Connec t a US B de vi ce h er e to p lay
media fi le s or t o re co rd pr ograms
via the PV R fu nc ti on .
5
Page 7
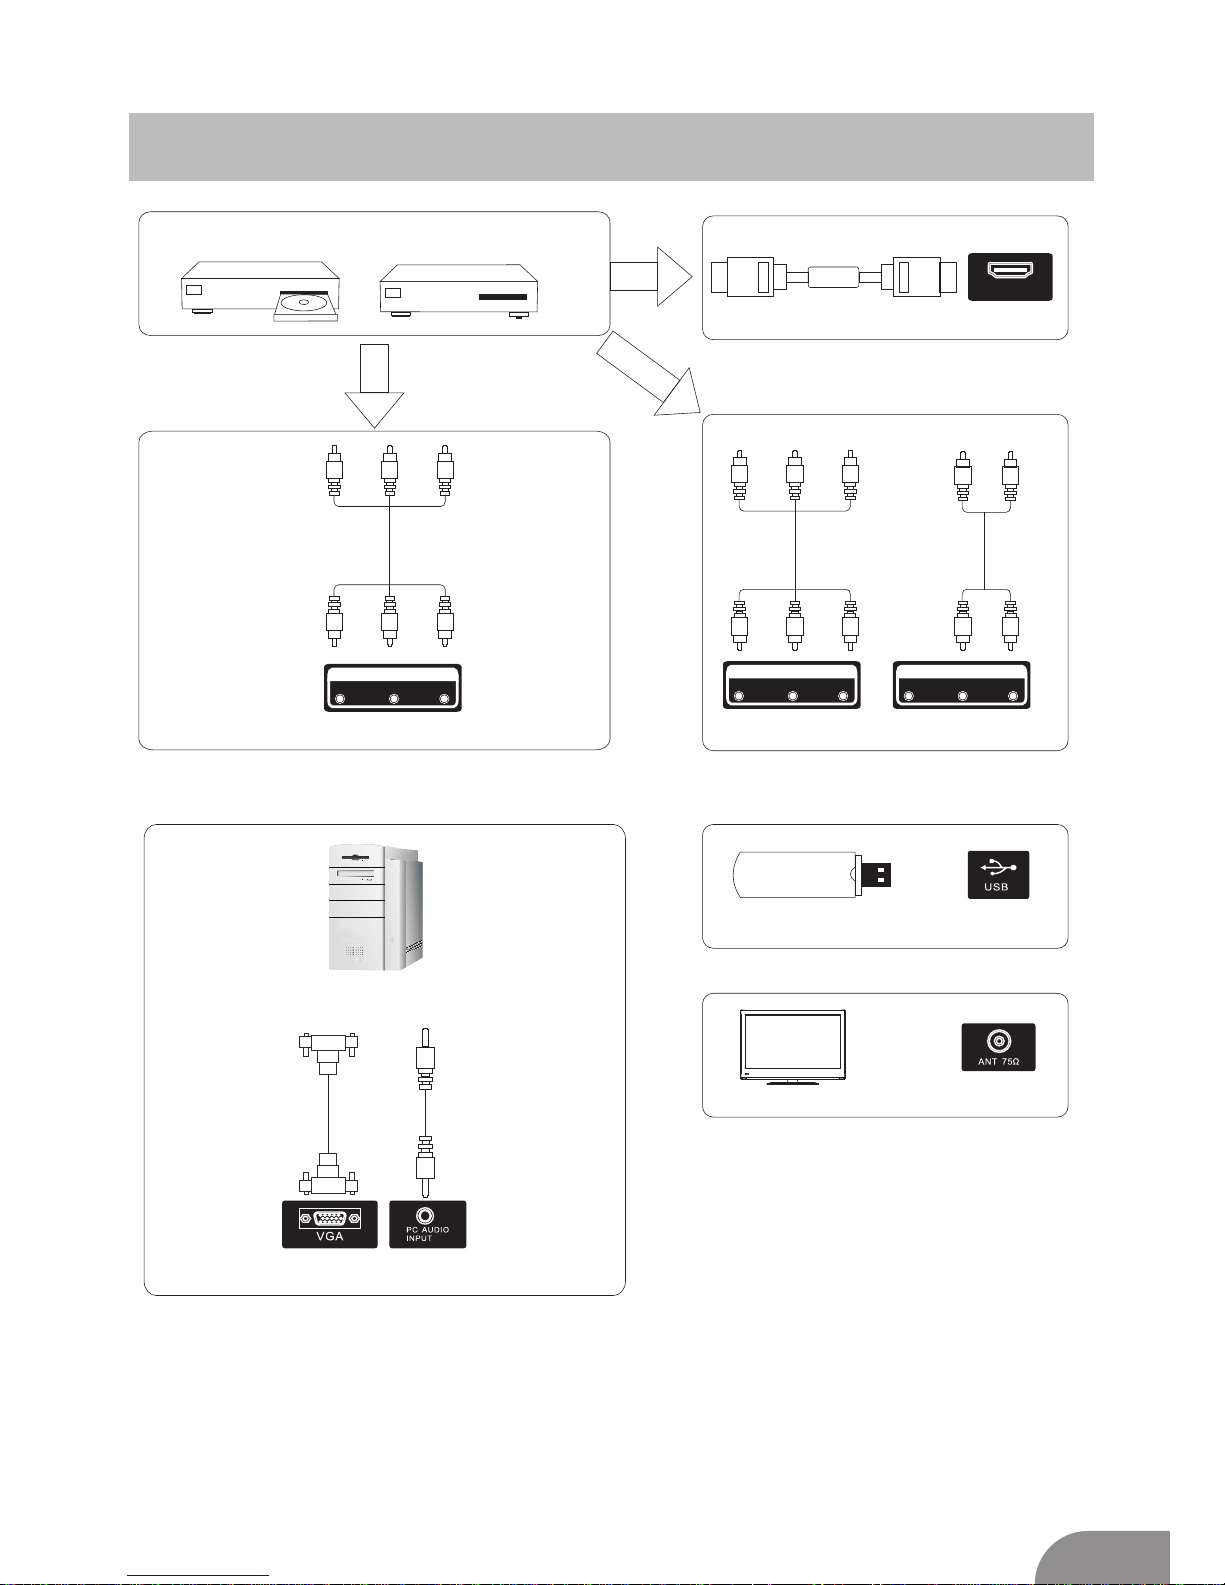
External device connection diagram
DV D
Set- to p boxes
HDMI
HD MI
HDMI i np ut conn ec tion
VID EO R L
INP UT
AV input co nn ection
VID EO R L
INP UT
Y Pb Pr
INP UT
AV input co nn ection
USB co nn ectio n
TV con ne ction
6
Page 8
1
3
2
4
Install And Connect TV
7
TV ANT
FM ANT
TV sig na l ou tput
Set your TV
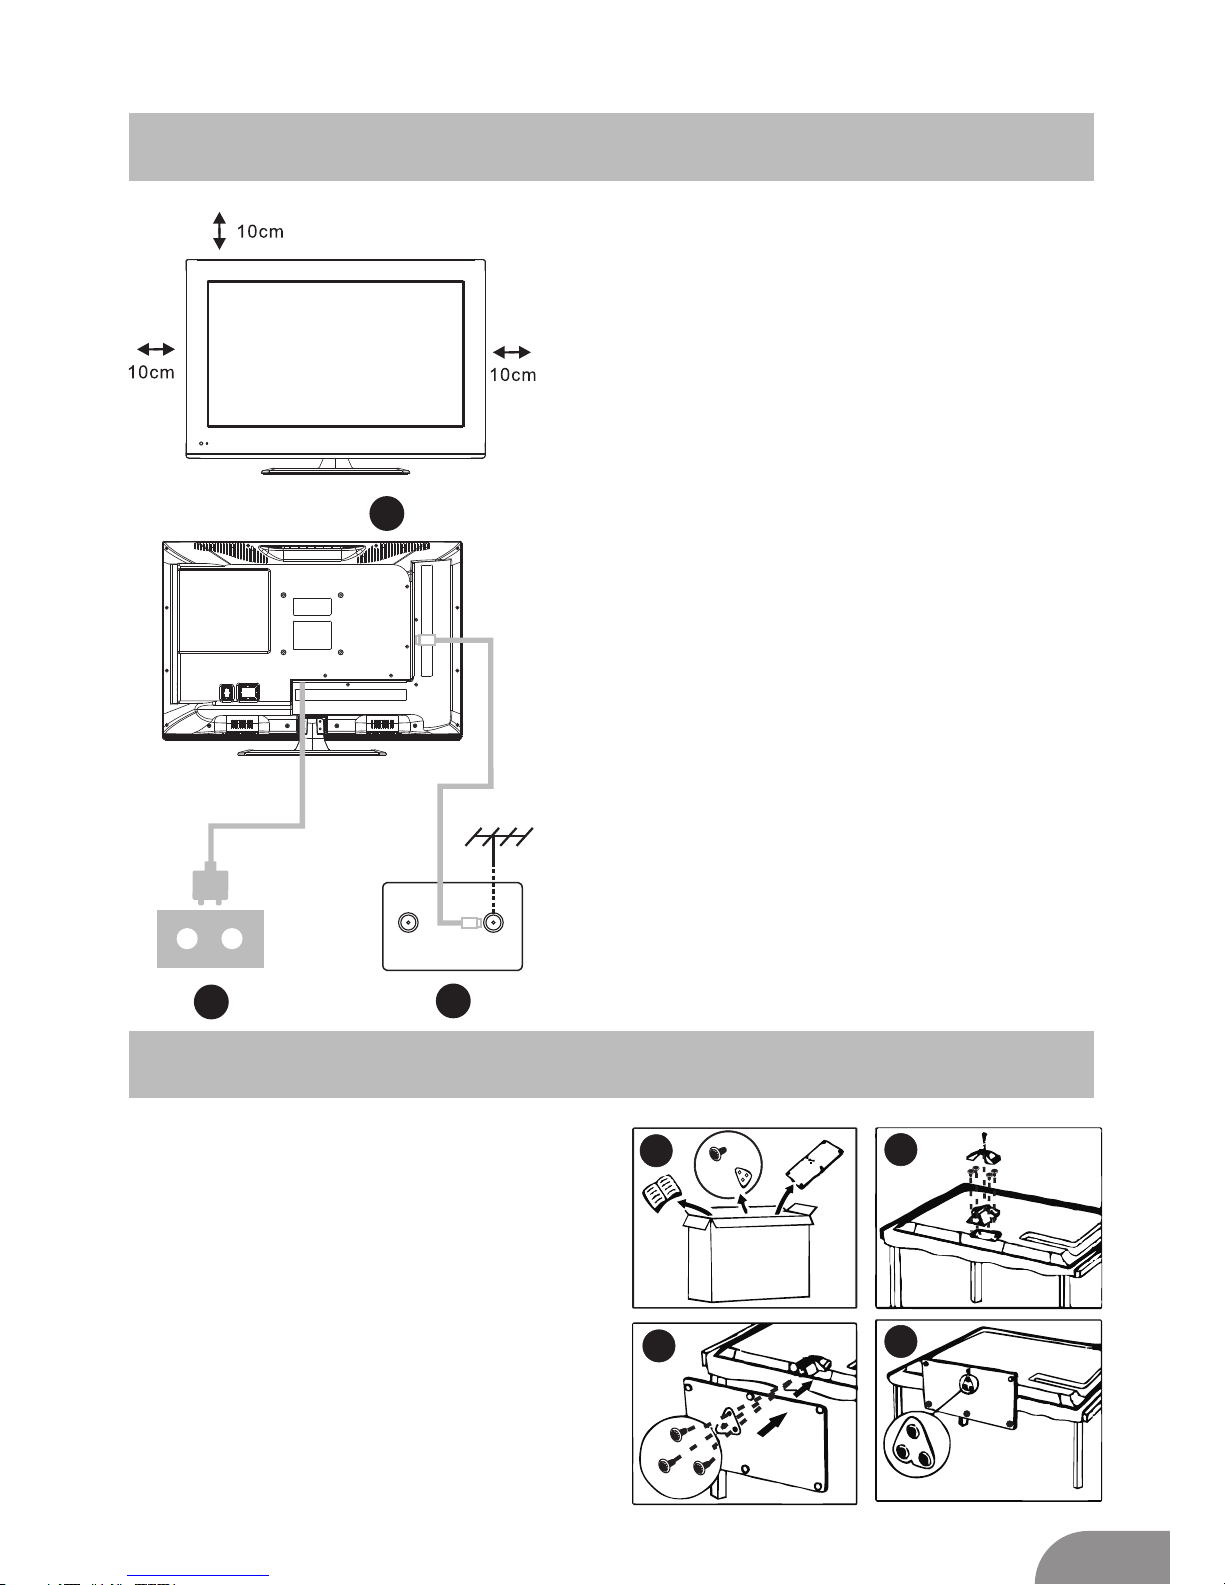
Put your TV in a steady location which can
bear the weight of the TV.
To avoid danger, please don’t expose the
TV near water or heating sources
(such as
l
ights, candles, heaters)
, and do not block
the ventilation at the back of TV.
Connect antenna and power
1.Connect the antenna cable to the antenna
socket on the back of the TV.
2.Plug the power cord of TV (AC 100 240V~ 50/60Hz) into a wall socket.
1
3
Turn on TV
3.Press the power button of the TV. The
indication light will turn to green. If TV
is
in s
tandby mode (the light is red), press
the power button on the remote control
to turn on the TV.
Note:
Picture for reference purposes only.
2
TV Stand Installation Instructions
1.Open the carton and remove the TV
and scattered accessories and base
(some models without base).
2.To avoid damage to the TV, cover screen
w
ith a soft towel,
or put TV on the table, face
down on a soft mattress. Fix the base of the
neck to the TV with screws.
3.Screw the base to the TV.
4. Stand
installation is complete.
Page 9
TV Menu
8
Input Source
Note: The above image is for reference
only!
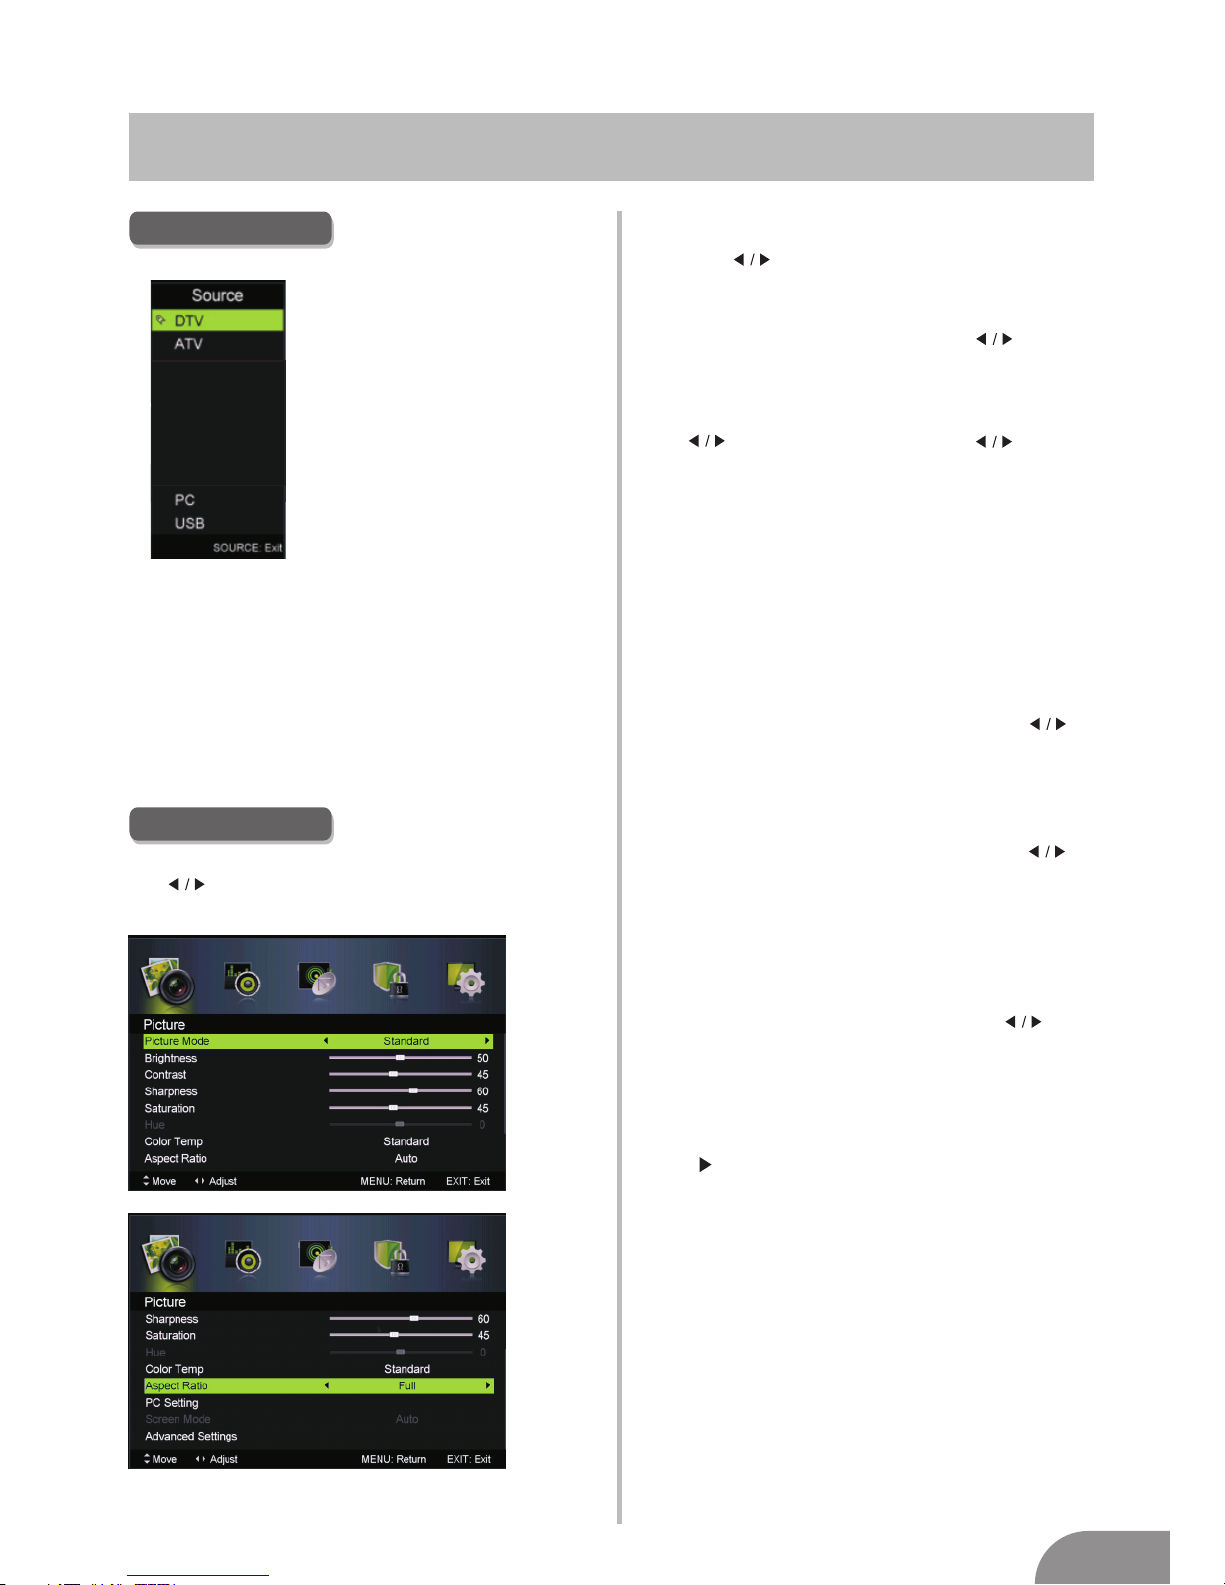
Press INPUT
button to display the input source list.
Press ▼ / ▲ or button to select the input source you want.
Press ENTER button to confirm the input source.
Press EXIT button to quit.
INPUT
Picture Menu
Press MENU button to display the main menu.
ress
to enter.
Press button select PICTURE in the main menu, then p ENTER / ▼
1. Press ▼ / ▲ button to select the option that you want to adjust in the
PICTURE menu.
2. Press Enter/ button to adjust.
3. After finishing your adjustment, Press MENU button to save and return
back to the previous menu.
Picture MODE
Press ▼ / ▲ button to select Picture Mode, then press button
to select.
TIPS: You can press PMODE button to change the Picture Mode directly.
Brightness/Contrast/ Sharpness/Saturation/Hue
Press button to select option, then press button
to adjust.
Brightness Adjust the optical output of the entire picture,
it will affect the darker regions of the picture.
Contrast Adjust the highlight intensity of the picture, but the
shadow of the picture is invariable.
Sharpness Adjust the peaking in the detail of the picture.
Saturation Adjust the saturation of the colour based on your
own preferences.
Hue Used in compensating colour changes with the
transmission in the NTSC format.
Color Temp
Change the overall coloXr cast of the picture.
button to select Standard/Cool/Warm.
Standard Produces a vivid image.
Cool Produces a gentle blue-hued image.
Warm Produces a red-hued image.
Aspect Ratio
Press ▼ / ▲ button to select Aspect Ratio, then press
button to select.
Auto Automatically adjust Aspect Ratio based on TV size
and TV program.
Full/4:3 /Zoom1/Zoom2 To select the available display format.
PC Setting
INPUT
M
ENTER / ▼ ▼
Press
Press
to select PC source.
ENU to enter the main menu,then press button
to select PICTURE menu.
Press to enter and press to select PC Setting.
Color TempPress ▼ / ▲ button to select , then press
Advanced Settings
Adjust advanced video features to fine tune the picture.
Advanced SettingsPress ▼ / ▲ button to select , then press
Enter / button to enter sub-menu.
YPBPR
DVD
HDMI1
AV
HDMI2
HDMI3
Page 10
TV Menu
9
Channel Menu
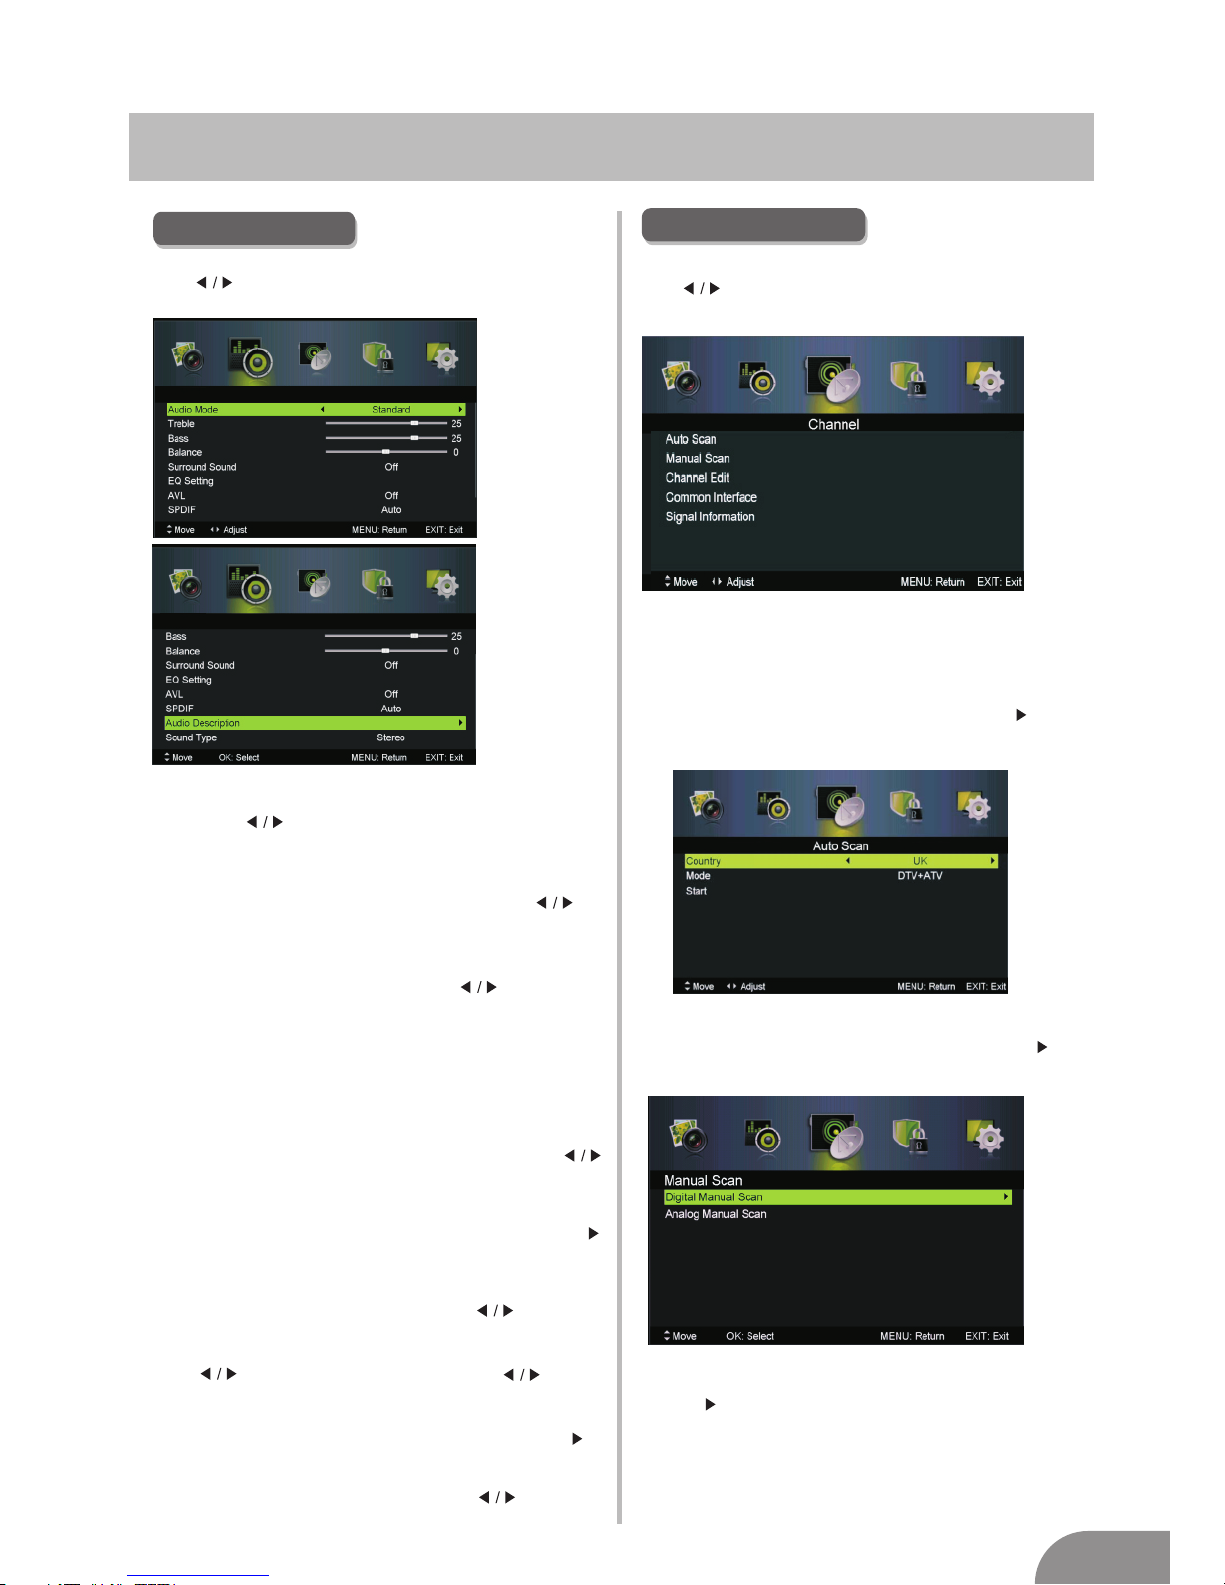
1. Press ▼ / ▲ button to select the option that you want to adjust in the
SOUND menu.
2. Press Enter/ button to adjust.
3. After finishing your adjustment, Press MENU button to save and return
back to the previous menu.
Sound Mode
Sound
Sound ModePress ▼ / ▲ button to select , then press
button to select.
Treble/Bass/Balance
Press ▼ / ▲ button to select option, then press button to adjust.
Treble Adjust the treble effect.Increases or decreases
high-pitched sounds.
Bass Adjust the bass effect.Increases or decreases
lower-pitched sounds.
Balance Adjust the balance between left and right speakers
to adapt to your listening position.
Surround Sound
Press ▼ / ▲ button to select Surround Sound, then press
button to select On or Off.
Press ▼ / ▲ button to select , then press Enter /
button to enter sub-menu.
EQ Setting
EQ Setting
Adjust the curve of 7 bands equalizer.
AVL
Set the auto volume control.
Press ▼ / ▲ button to select AVL, then press button to
select On or Off.
SPDIF
Press button to select SPDIF, then press button
to select Off / Auto / PCM.
Audio Description
Audio DescriptionPress ▼ / ▲ button to select , then press Enter /
button to enter sub-menu.
Sound Type
Press ▼ / ▲ button to select Sound Type, then press button to select.
(Available Sound Type: Stereo,Dual I,Dual II,Mixed).
Press MENU button to display the main menu.
Press button to select CHANNEL in the main menu,then p
ENTER / ▼
ress
to enter.
1. Press ▼ / ▲ button to select the option that you want to select in the
CHANNEL menu.
2. Press Enter button to enter sub-menu.
3. Press MENU button to return back to the previous menu.
Auto Scan
Auto Scan
Press ▼ / ▲ button to select
, then press Enter / button to
enter sub-menu.
SOUND MENU
Press MENU button to display the main menu.
ress
to enter.
Press button select SOUND in the main menu,then p ENTER / ▼
Sound
Manual Scan
Manual ScanPress ▼ / ▲ button to select , then press Enter / button
to enter sub-menu.
Digital Manual Scan
Press ▼ / ▲ button to select Digital Manual Scan, then press
Enter / button to enter sub-menu.
Page 11
TV Menu
10
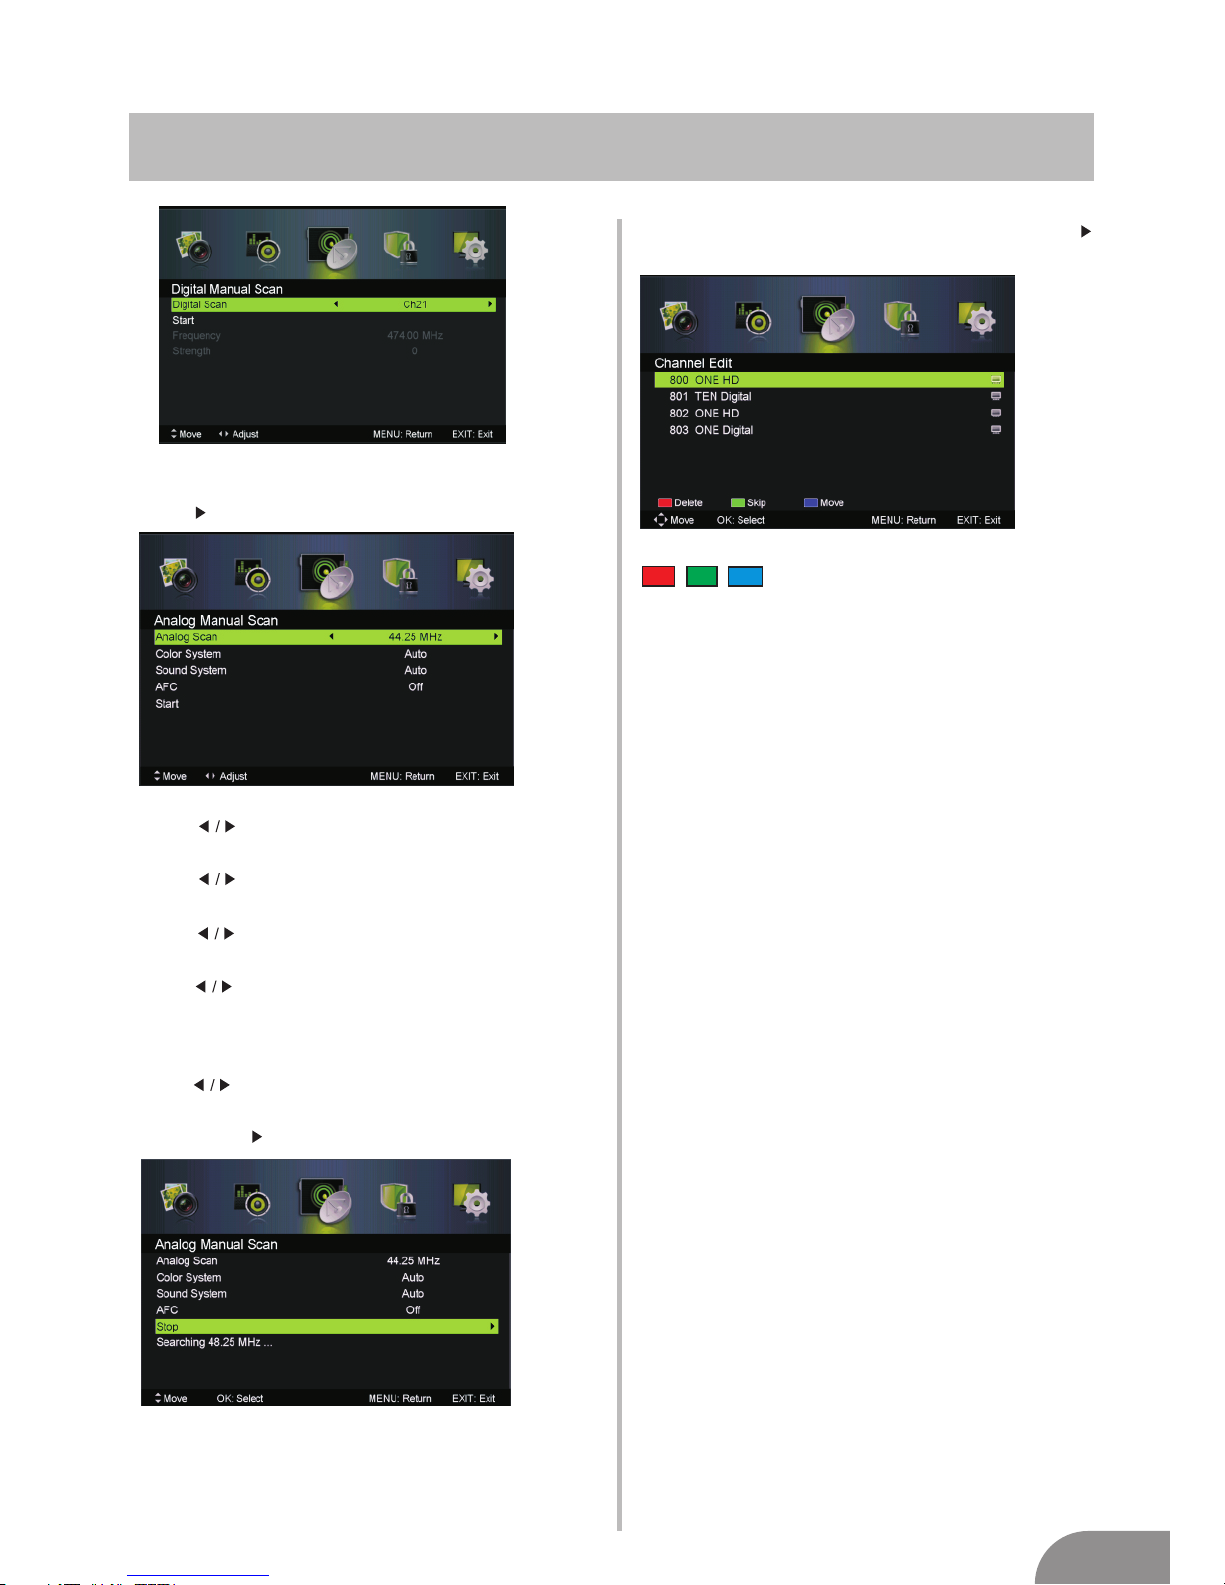
Analog Manual Scan
Press ▼ / ▲ button to select Analog Manual Scan, then press
Enter / button to enter sub-menu.
Analog Scan
Press button to select Analog Scan.
Color System
Press button to select Color System:Auto,PAL or SECAM.
Sound System
Press button to select Sound System :Auto,DK,BG,I or L.
Modulation
Press button to select Modulation:Auto,16QAM,32QAM,
64QAM,128QAM,256QAM.
AFC
press button to select On or Off.
Start
Press Enter / button to start the channel searching.
Automatic Fine tuning.
Channel Edit
Press ▼ / ▲ button to select Channel Edit, then press Enter /
button to enter sub-menu.
The three coloured keys are the shortcut keys for
programming the channels.
First press ▼ /
▲ to highlight the channel you want to delete or
move or skip, then:
Press the button to delete the channel.
Press the button to skip the select channel.
(Your TV set will skip the channel automatically when using
CH+/- to view the channels.)
Press the button to to set the channel to moving state,
then press ▼ / ▲ to move
it to the position you want it to go.
Red
Green
Blue
Signal Information
about the signal. Only
available under DTV mode.
Press ▼ / ▲ button to select Signal Information, then press the
Enter button to see the detail information
Page 12
TV Menu
11
Press MENU button to display the main menu.
ress
to enter.
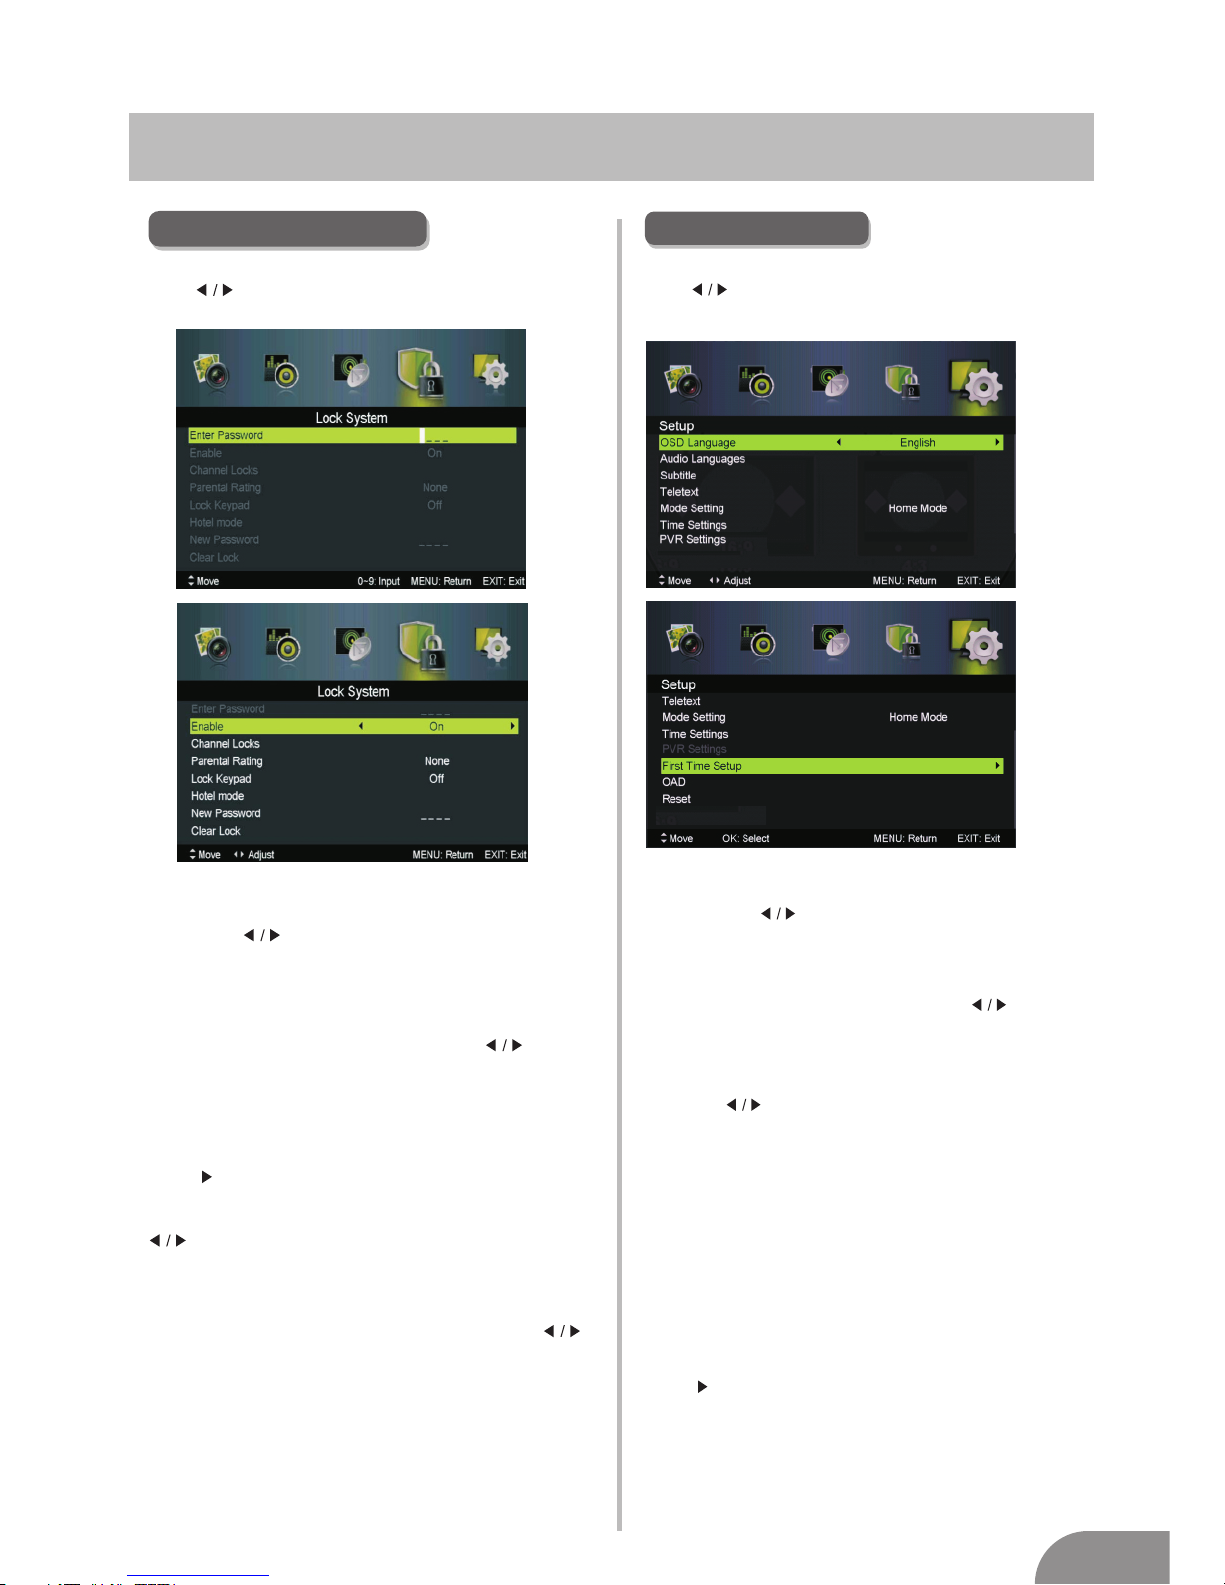
Press button select Lock System
Lock System
in the main menu,then
p
ENTER / ▼
1. Press ▼ / ▲ button to select the option that you want to adjust in the
menu.
2. Press Enter/ button to adjust.
3. After finishing your adjustment, Press MENU button to save and return
back to the previous menu.
Default password is 0000. If you forget what custom password
you set, please contact the Kogan customer support team.
P ,ress ▼ / ▲ button to select Enable then press button
to select On or Off.
Channel Locks,Parental Rating and Lock Keypad are
available when Enable is On.
Channal Locks
Channal LocksPress ▼ / ▲ button to select , then press
Enter / button to enter sub-menu.
Lock Keypad
Set to prevent it from being used by young children,or other
unexpected usage.
Lock Keypad ,Press ▼ / ▲ button to select then press
button to select On or Off.
Parental Rating
Parental RatingPress ▼ / ▲ button to select , then press
button to select.
New Password
Press ▼ / ▲ button to select New Password nter a
4-digital number you want to set twice.
,then e
Lock System Menu
Clea r Lo ck
Pr es s ▼ / ▲ bu tt on to se le ct C l ea r Lo ck .
Hote l mode
Pr es s ▼ / ▲ bu tt on t o sel ec t Ho te l mode.
SETUP MENU
Press MENU button to display the main menu.
ress
to enter.
Press button select SETUP in the main menu,then p ENTER / ▼
1. Press ▼ / ▲ button to select the option that you want to adjust in
the SETUP menu.
2. Press Enter/ button to adjust.
3. After finishing your adjustment, Press MENU button to save and
return back to the previous menu.
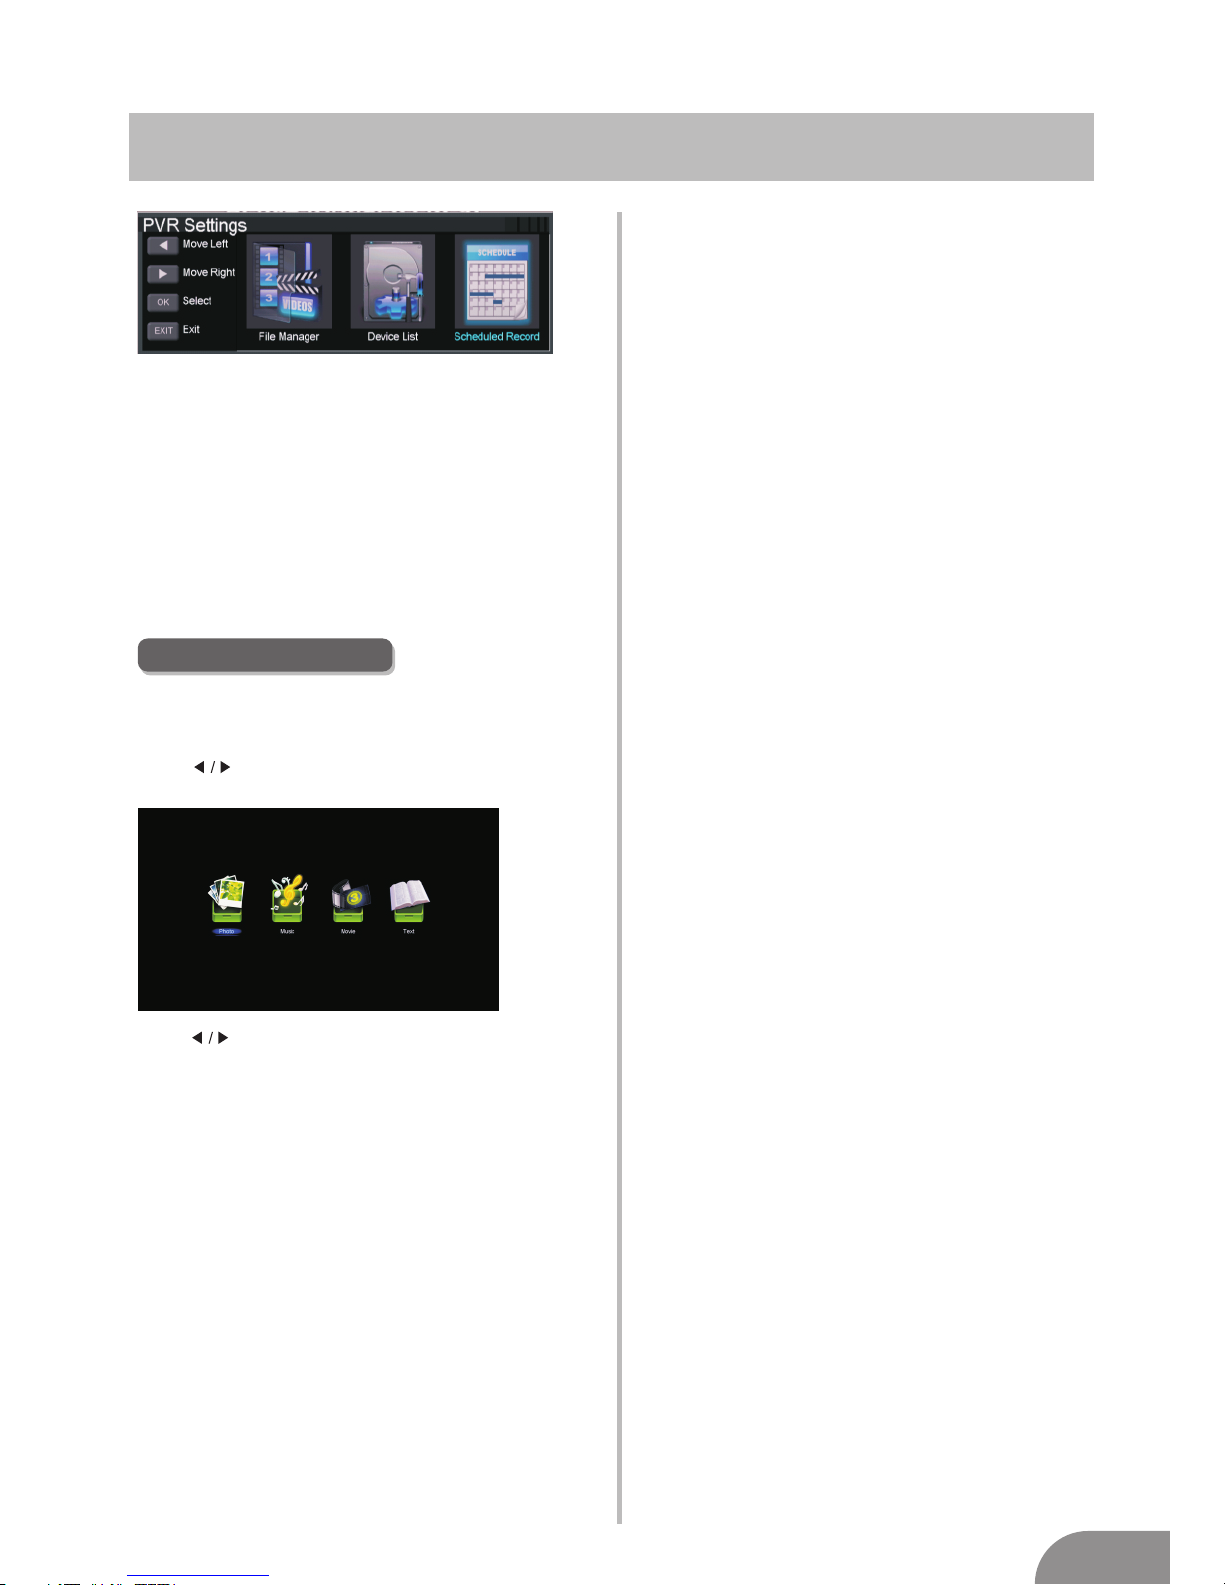
Press ▼ / ▲ button to select OSD Language, then press button to select.
Audio Languages
Press ▼ / ▲ button to select Audio Languages, then press Enter button to enter
sub-menu.
Press ▼ / ▲ / button to select the Audio Primary Language and Audio
Secondary Language.
OSD Language
Subtitle
Press ▼ / ▲ button to select Subtitle, then press Enter button to enter sub-menu.
Teletext
Adjust Teletext settings. Only available under DTV and ATV source.
TeletextPress ▼ / ▲
▲
button to select , then press Enter / button
to enter sub-menu.
Mode Setting
Mode Setting.Press ▼ / ▲ button to select
Time Settings
Time SettingsPress ▼ / ▲ button to select , then press
Enter / button to enter sub-menu.
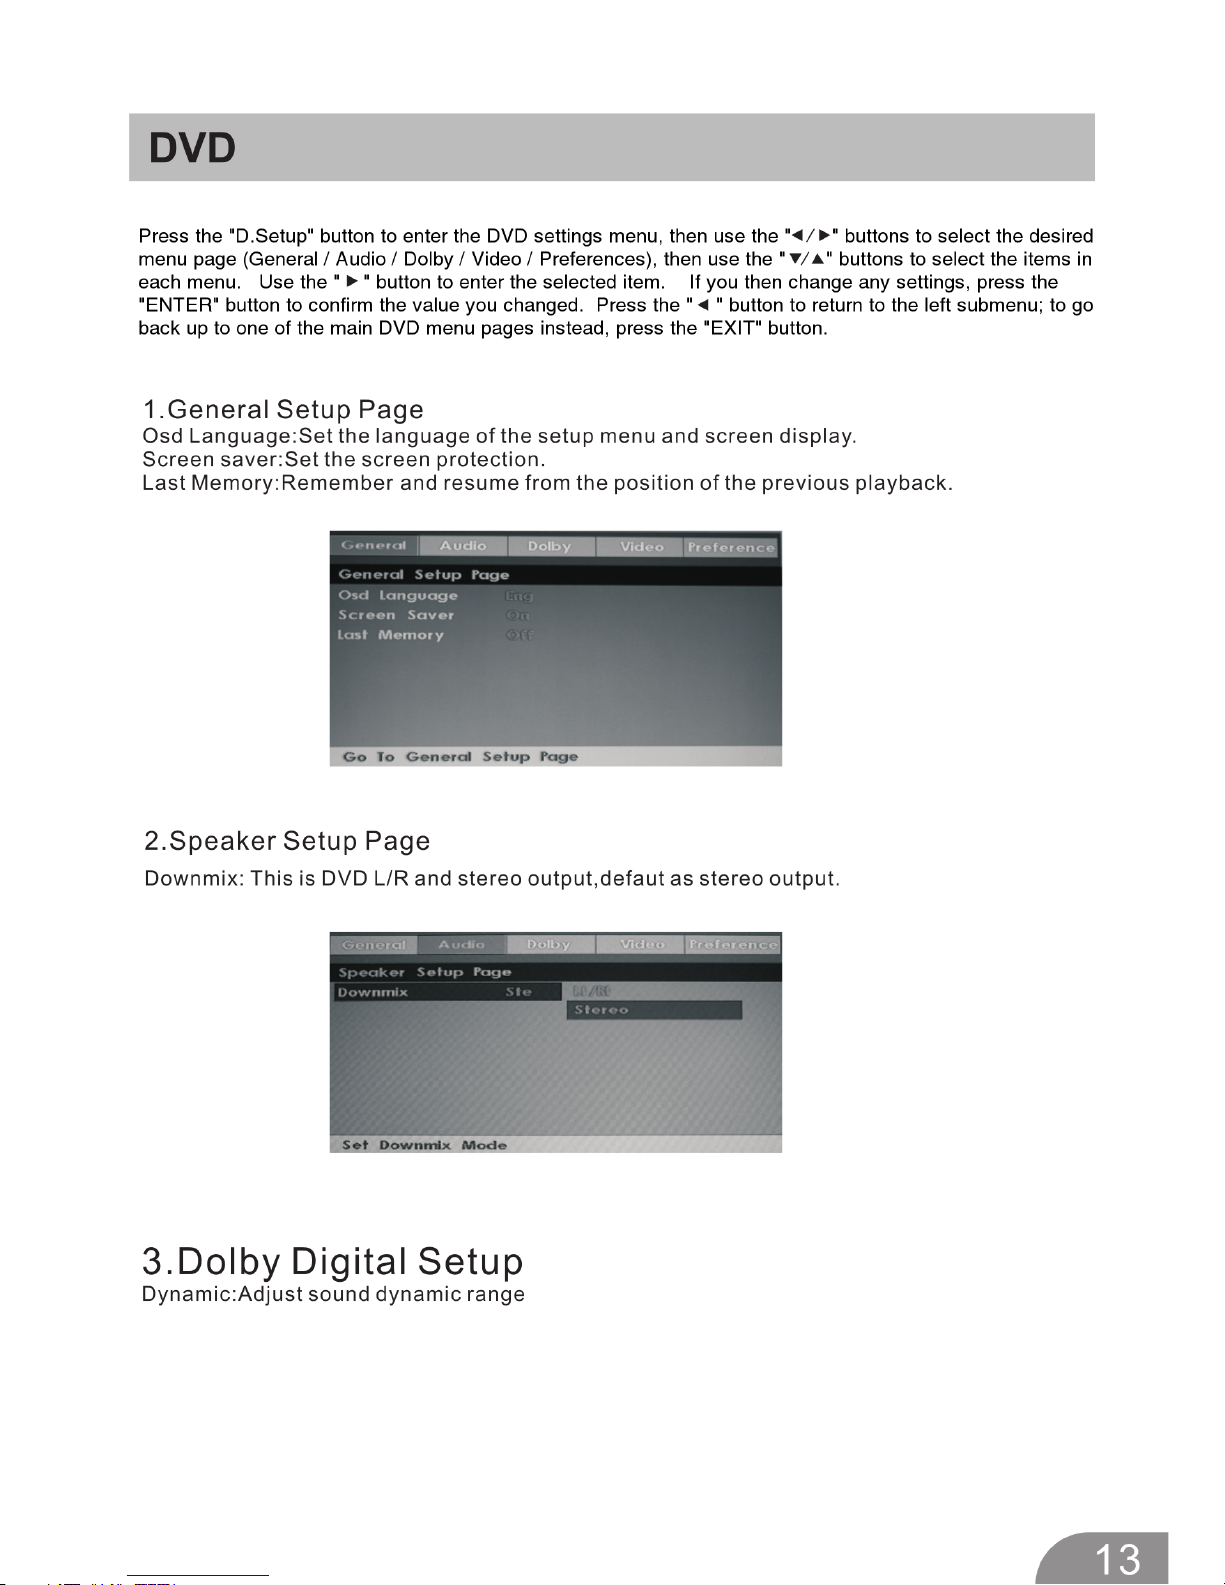
PVR Settings
Press ▼ / ▲ button to select PVR Settings, then press Enter
button to enter sub-menu.
It will check the USB .
Page 13
TV Menu
12
First Time Setup
Press ▼ / ▲ button to select First time Setup, then press Enter
button to enter.
OAD
Press ▼ / ▲ button to select OAD, then press Enter button to
enter sub-menu.
Reset
Press ▼ / ▲ button to select Reset, then press Enter button to
enter sub-menu.
USB OPERATION
Note: Before operating USB menu, plug in the USB device, then press
INPUT button to set the Input Source to
Press button to select USB in the Source menu, then
press Enter button to enter.
Press button to select the mediatype you wish to view in
the main USB menu,
then press Enter button to enter.
USB .
Page 14
Page 15
Page 16
Page 17
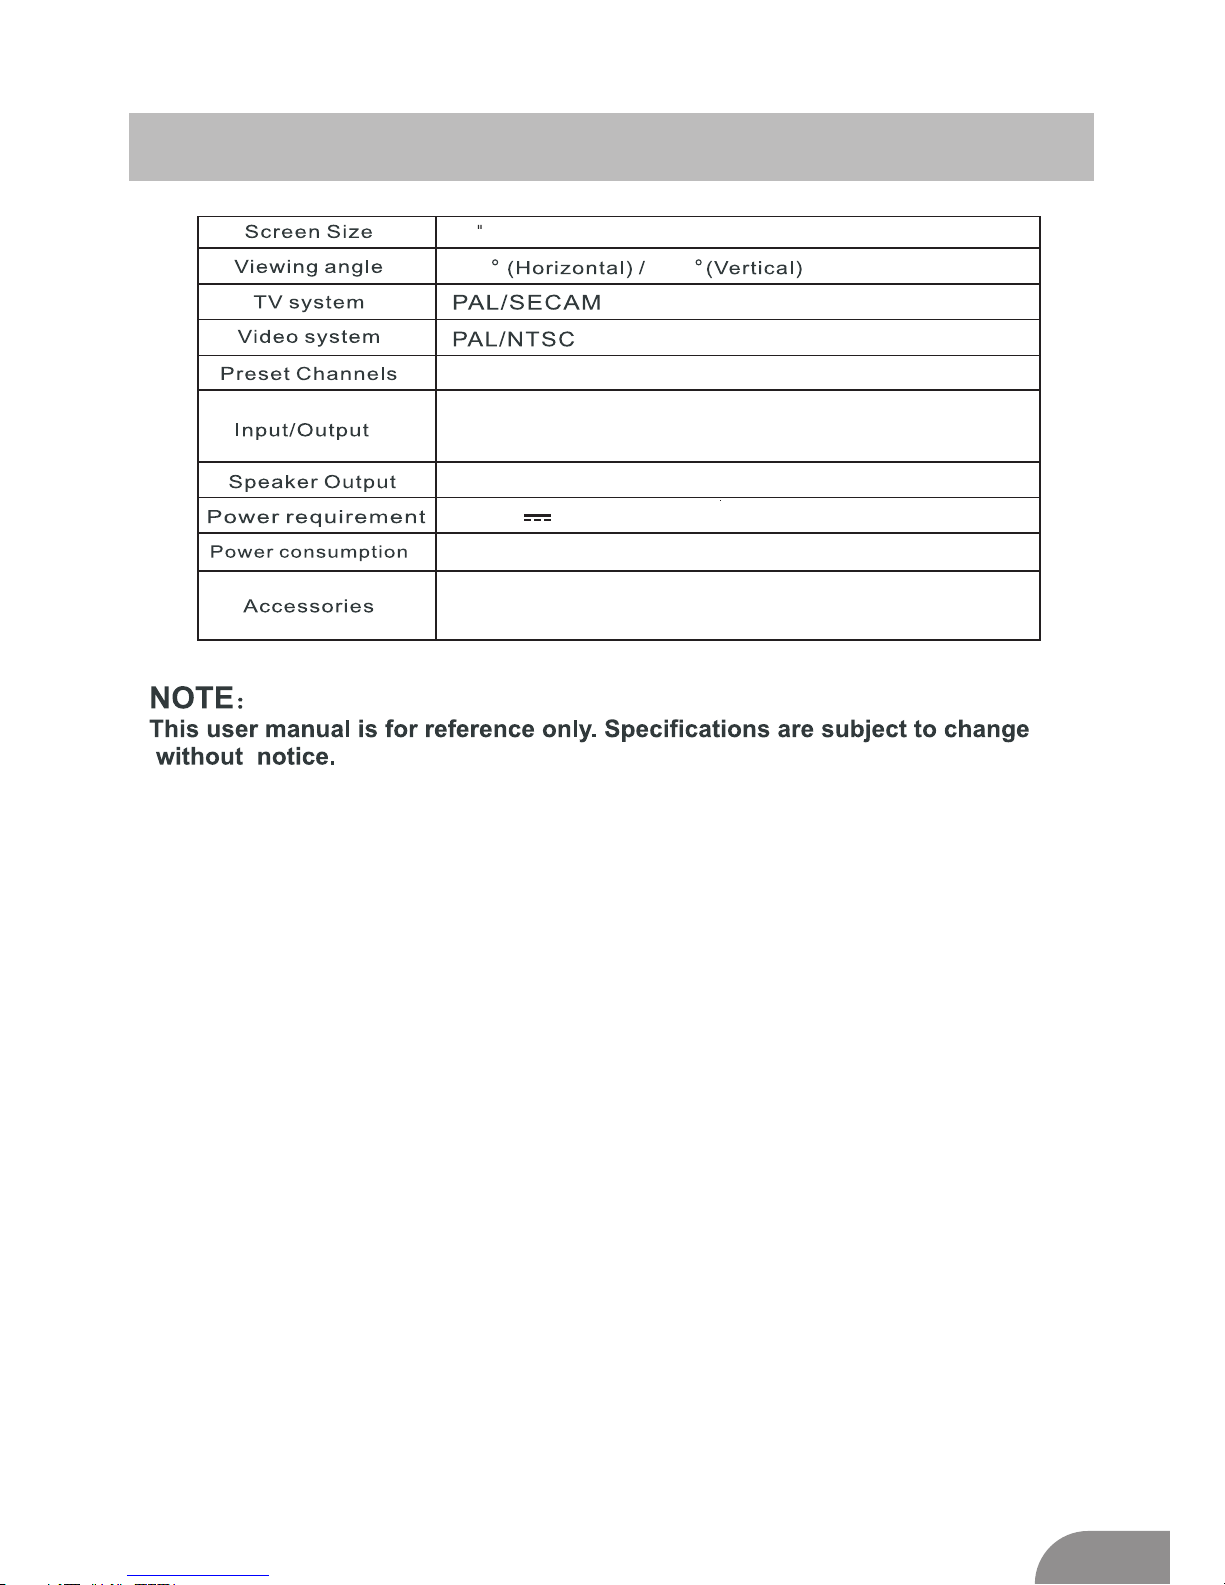
Machine Technical Specifications
16
19
170 170
5W+5W
DC 12V 3A
IN TV,AV,Y Pb Pr,PC,HDMI,DVD,USB
OUT EARPHONE, COAXIAL
36W
ATV:99 DTV:12 00
AC adapter, Remote controller,
Quick Setup Guide, 2xAAA Batteries
warranty card
Page 18
17
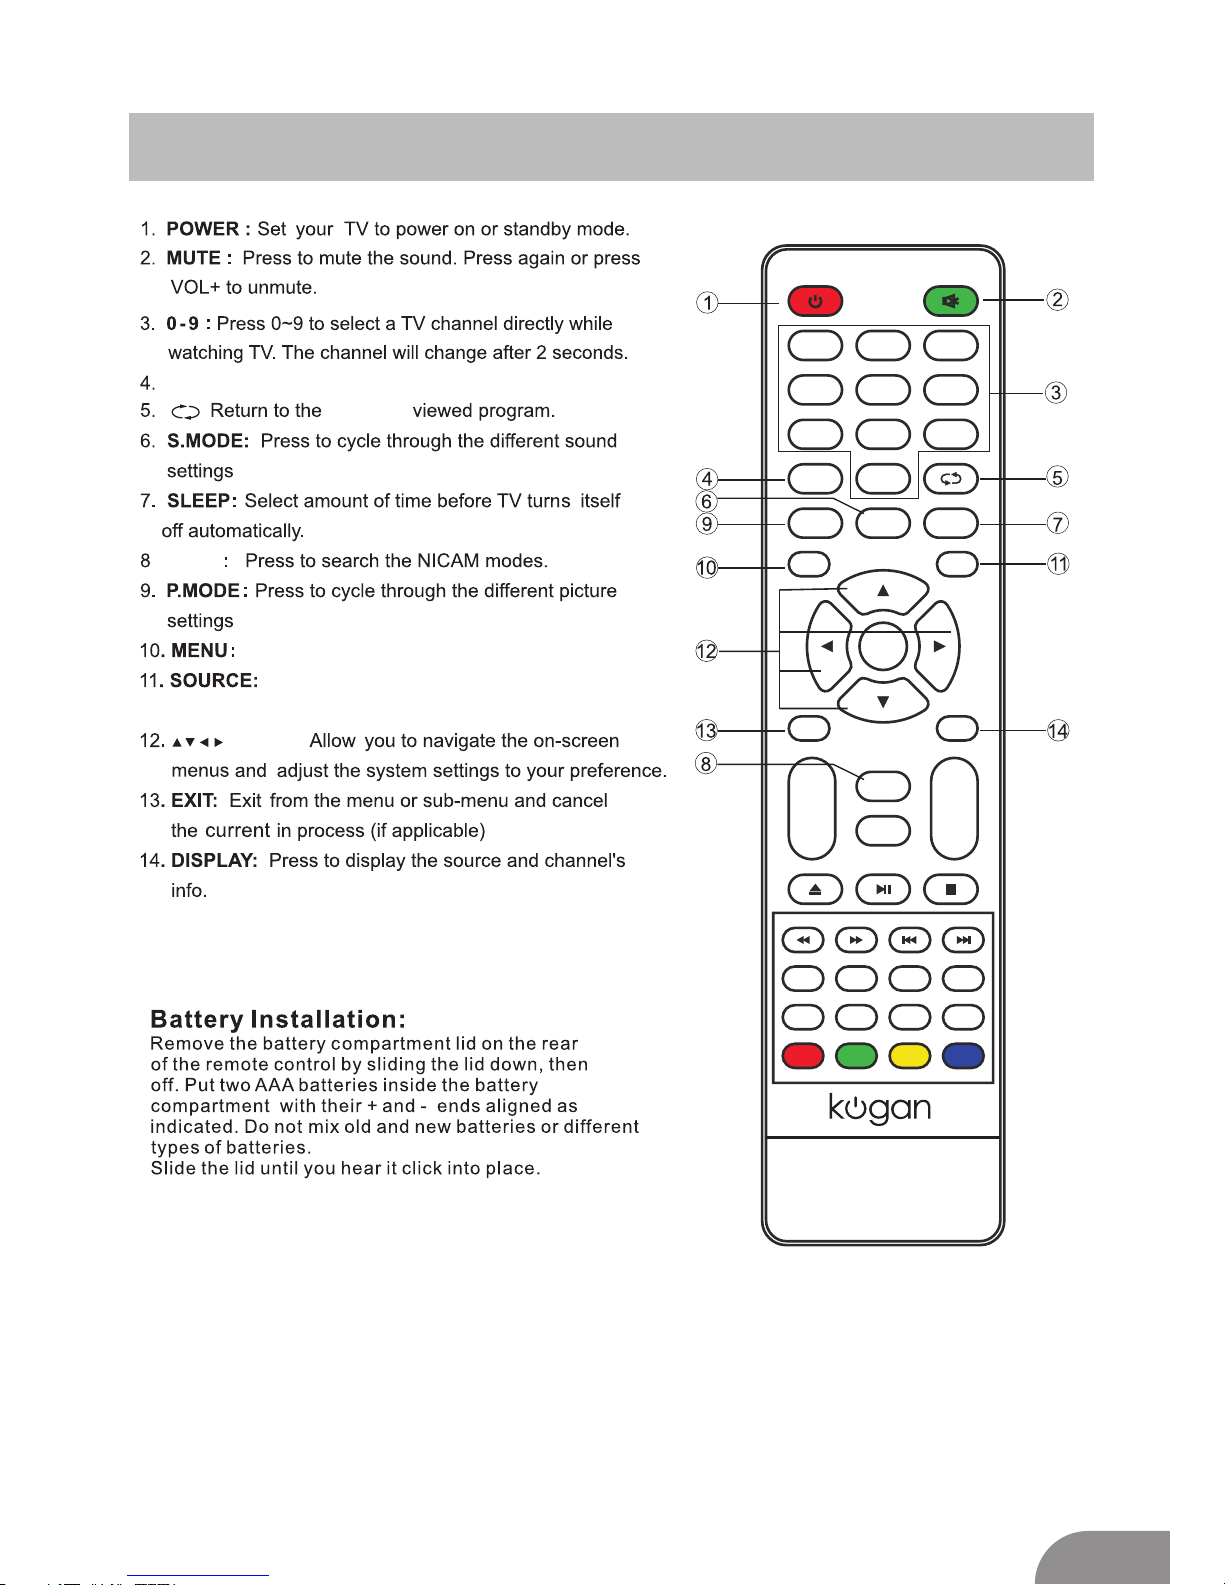
Remote Controller
previous
DTV/ATV: Switch between Analog and Digital TV
MTS
ENTER:
Open the main menu.
Press to view and select available
input sources
5
9
6
0
7
4
8
D.Menu D.Title
Goto
D.Disp
PROG
STEP REPEAT A-B
1 2
3
MENUMENU
SOURCE
ENTERENTER
VOL
+
-
CH
+
-
Zoom
Angle
Subtitle
Audio
EXIT DISPLAY
SLEEPSLEEP
P.MODE S.MODE
MTS
INDEX
RED GREEN YELLOW CYAN
REVEAL SIZE
CANCEL
HOLD TEXT
GUIDE ASPECT
FAV/LIST
FREEZE
DTV/ATVDTV/ATV
D.setup
TV/RADIO
REC
TIMESHIFT
SUB.PG
SUBTITLE
RECLIST
Page 19
18
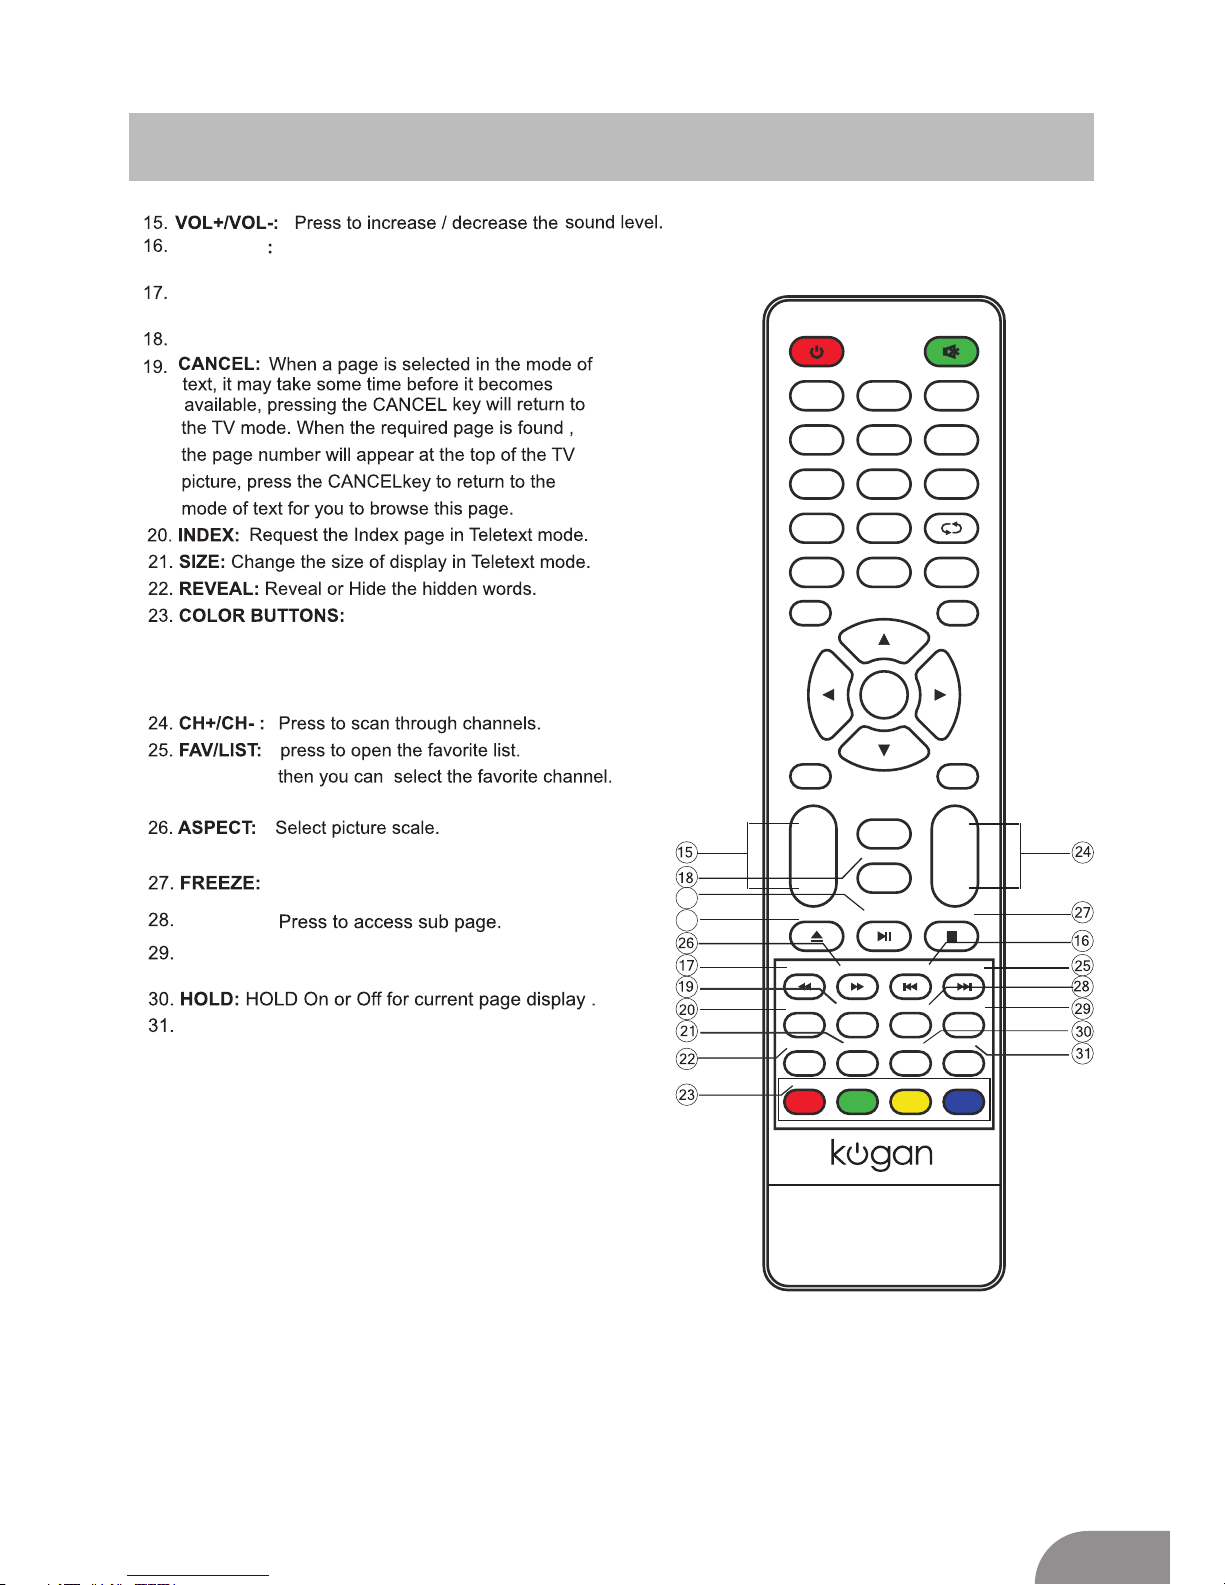
Remote Controller
Note: Teletext is not currently broadcast in Australia.
TV/RADIO
1.When watching channel,allows you to switch between TV and Radio modes.
GUIDE:1. Launches the EPG (Electronic Program Guide)
2. Fast reverse in PVR or Media Player mode.
2.Previous chapter in PVR or Media Player mode
1.
2.fast forward in PVR or Media Player mode.
2.Next chapter in PVR or Media Player mode.
REC LIST: .list of PVR recordings
In the on-screen menus, these
buttons have different functions as specified by the
colours shown on-screen. See next page for their
DVD-playback functionality.
1.
:
SUB.PG
SUBTITLE:To show subtitles when watching
DTV (broadcast-dependent)
Switch the teletext on and off.
TEXT:
32.
REC: Begin recording current program to connected
USB memory device, in PVR mode
33.
Press to ‘
cast continues in background)
pause' the picture (actual broad
TIMESHIFT:
1.DTV channel time shift Function.
2.Play / Pause during PVR or media playback.
5
9
6
0
7
4
8
D.Menu D.Title
Goto
D.Disp
PROG
STEP REPEAT A-B
1 2
3
MENUMENU
SOURCE
ENTERENTER
VOL
+
-
CH
+
-
Zoom
Angle
Subtitle
Audio
EXIT DISPLAY
SLEEPSLEEP
P.MODE S.MODE
MTS
INDEX
RED GREEN YELLOW CYAN
REVEAL SIZE
CANCEL
HOLD TEXT
GUIDE ASPECT
FAV/LIST
FREEZE
DTV/ATVDTV/ATV
D.setup
TV/RADIO
REC
TIMESHIFT
SUB.PG
SUBTITLE
RECLIST
33
32
Page 20
19
Remote Controller
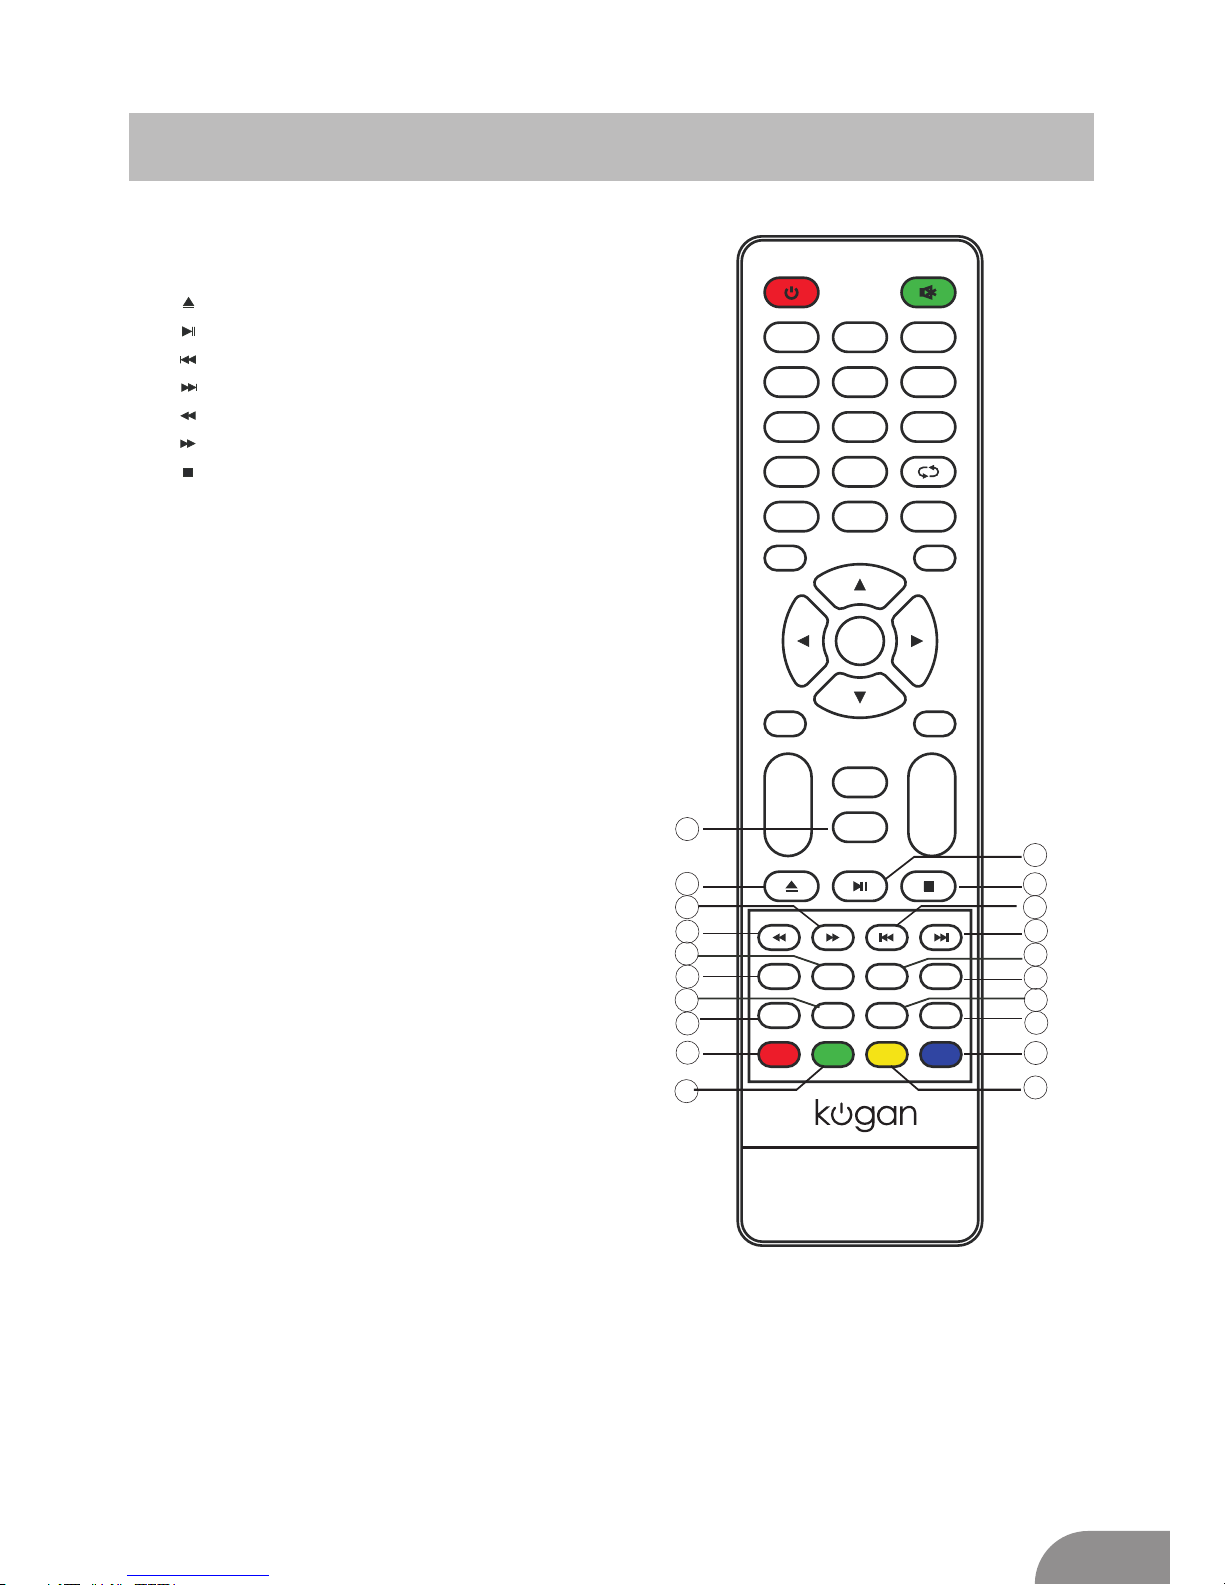
34. :DVD EJECT。
35. :Play /pause DVD program.
36. :DVD previous chapter.
37
. :DVD next chapter.
38. :DVD fast reverse.
39. :DVD fast forward.
40. :Stop DVD program.
41. D.setup: DVD system setup.
42. ZOOM: In DVD source adjust
DVD picture size.
43.Angle: Select DVD picture angle.
44.Audio: Select DVD disc language.
45.Subtitle: Select DVD disc subtitle.
46.D.MENU: DVD disc menu.Press this to access
the menu.
47.D.Title: Press to select the DVD title.
48.GOTO: Play your favorite title/chapter/track.
49.D.DISP: Press to display the source and channel's info.
50.PROG: Press this button to change the playback
order. It varies according to the different discs.
51.STEP: Entrance of DVD OSD features.
52.REPEAT:Repeat playing the title or chapter.
53.A-B:Whilst watching a DVD, press this button to mark
Button functionality when watching DVD
(Note that some features are disc-dependent):
the start and again at the end of a desired section
to watch repeatedly.
47
5
9
6
0
7
4
8
D.Menu D.Title
Goto
D.Disp
PROG
STEP REPEAT A-B
1 2
3
MENUMENU
SOURCE
ENTERENTER
VOL
+
-
CH
+
-
Zoom
Angle
Subtitle
Audio
EXIT DISPLAY
SLEEPSLEEP
P.MODE S.MODE
MTS
INDEX
RED GREEN YELLOW CYAN
REVEAL SIZE
CANCEL
HOLD TEXT
GUIDE ASPECT
FAV/LIST
FREEZE
DTV/ATVDTV/ATV
D.setup
TV/RADIO
REC
TIMESHIFT
SUB.PG
SUBTITLE
RECLIST
37
35
40
34
39
38
42
46
50
43
53
49
48
44
45
36
52
51
41
 Loading...