

Page 1

<&^,yy'Zz
USER MANUAL
Page 2

Table of Contents
Overview………………………………..………………
How Sonar Works……………………..……..………..…
Product specification………………………..………..…
Display View…………………………………..………..…
Installing the Batteries………………….…………
Connecting the Transducer Cable……………………..
Power On/Off……………………..……..………..…
Simulator……………………..………..……………..………..
Accessing Menu Features……………………..
Sensitivity……………………..…………………..
Fish Alarm……………………..………………………..………
Fish and Depth Readout……………………..
Reading Depth……………………..…………..………
Reading Temperature……………………..
Fish Indicators……………………..………………..………
Weed Indicators……………………..…………..………
Rock Indicators……………………..…………..………
Backlight ……………………..………………………..………
Unit……………………..…………..……… 8
1
1
2
3
4
4
5
5
6
7
7
7
8
9
9
9
10
11
Page 3

Floating Transducer……………………..…………..………
Fixing the Transducer……………………..
Fishing from a Boat……………………….. 14
Fishing on Ice……………………..…………………..…
Side-Scan……………………..…………………..……
Fishing on Ice…………………………….…………..……
Handheld Transducer(Optional)……..
Through a Boat Hull………………….……………
12
14
15
18
18
19
21
Page 4
Overview
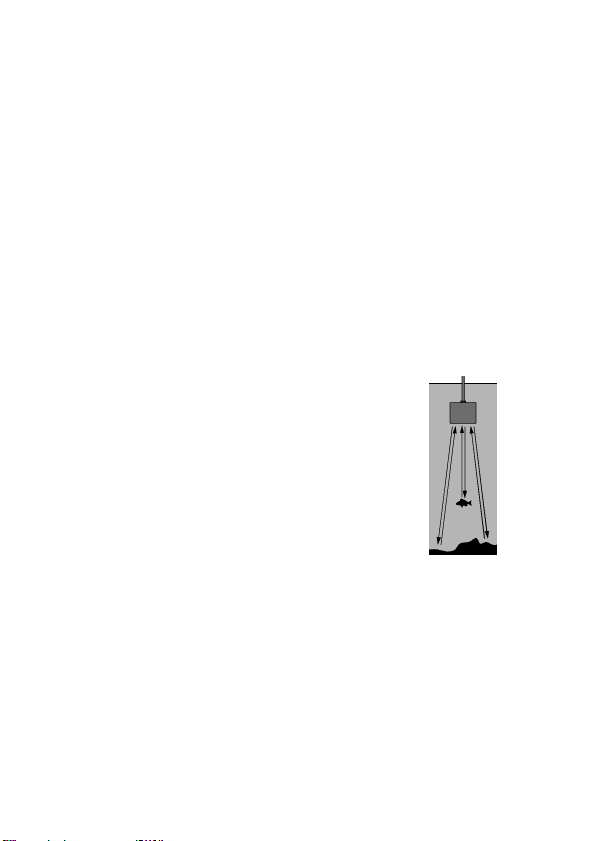
How Sonar Works
This product is especially designed for amateur
The unit can be used in oceans, rivers or lakes
and is fantastic for detecting schools of fish in
any particular area.
and professional fishermen alike, to find out
the location of fish, plus the depth and bottom
contours of bodies of water.
Using amazing and innovative technology, this
fish finder is the ideal tool to bring the fish to
you!
Sonar technology is based on sound
waves.
The system uses sonar to locate and
define structure, bottom contour and
composition, as well depth directly
below the transducer.
The transducer sends a sound wave signal and
determines distance by measuring the time
between the transmission of the sound wave and
when the sound wave is reflected off an object;
then it uses the reflected signal to interpret
location, size, and composition of an object.
1
Page 5

Product Specification
Display Type: 2.4" TN/anti-UV LCD
Backlighting :
Depth Range Max:
Depth Range Min:
Sonar Frequency:
Power Input: 4-AAA Alkaline Batteries
Audible Alarms: Fish/Low Battery
Operational Temp.:
Weed and Rock Indicator: Yes
Water Temperature Indicator: Yes
White LED
328ft (100M)
2ft (0.6M)
200 KHz
-20 — 70°C
2
Page 6
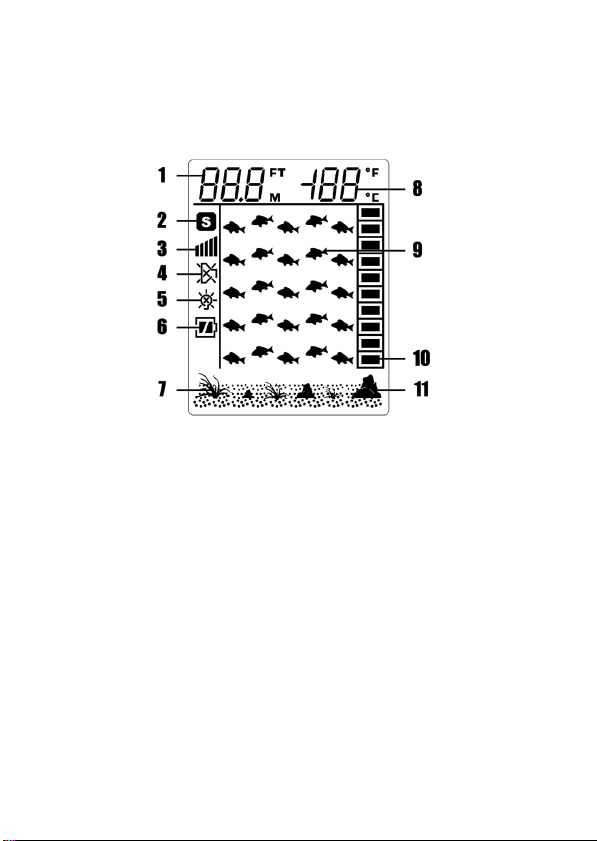
Display View
1 Water Depth
2 Simulator Indicator
3 Sensitivity Indicator
4 Fish Alarm On/Off
5
Backlight On/Off
6 Battery Strength Indicator
7 Weed Indicator
8 Water Temperature
9 Fish Location Indicator
10 Fish Depth Indicator
11 Rock Indicator
3
Page 7
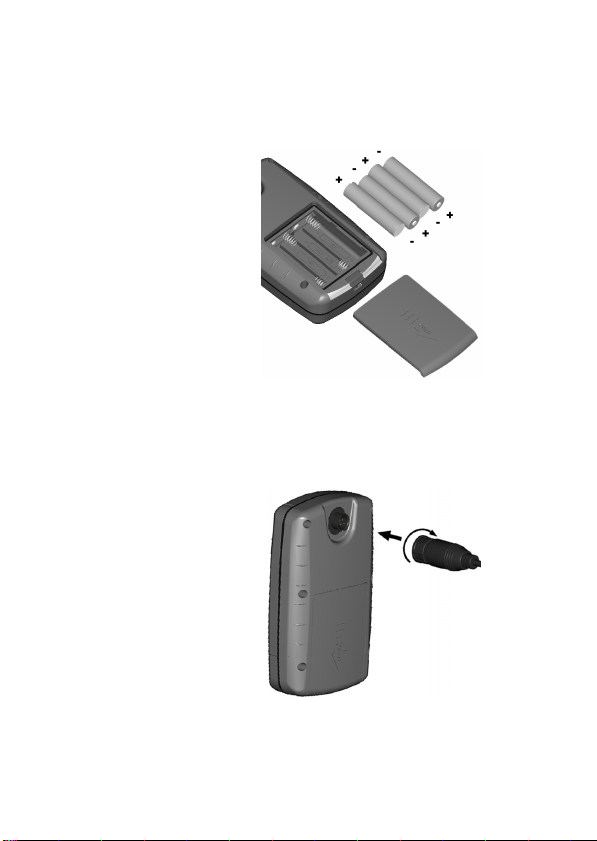
Installing the Batteries
When you first
use the Fish
Finder you will
need to install the
batteries. Slide
the Battery door
and insert 4 "AAA"
batteries to the
battery
compartment.
Be certain to align the batteries as per the
diagram within the battery compartment.
Connecting the Transducer Cable
Align the plug of
the transducer
cable with the
socket on the
back of the unit,
right twist the cap
to lock the plug.
4
Page 8
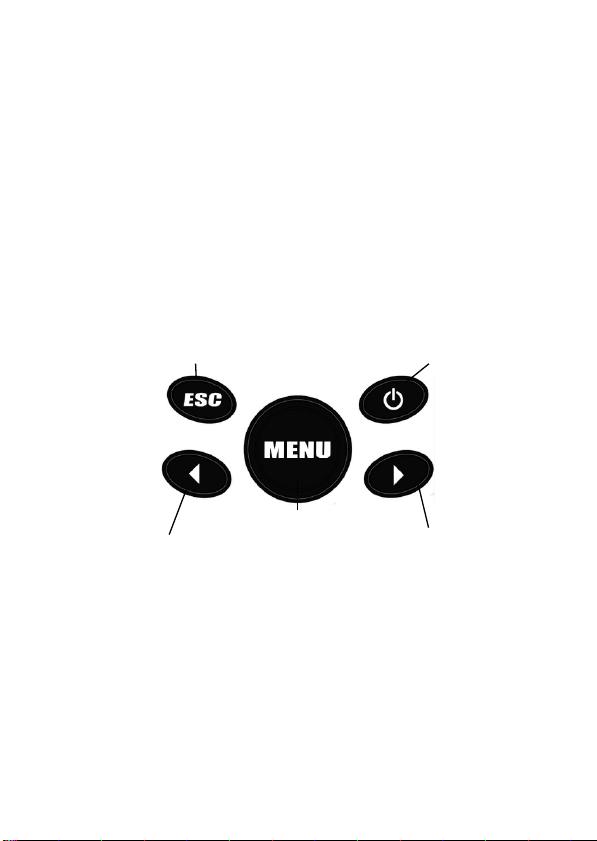
Power On/Off
Esc Key
Power Key
Menu Key
Left Arrow Key
Right Arrow Key
Press and release Power key to power the unit
On.
Press and hold Power key until the unit shuts
down to power Off.
Automatic power off feature: The display will
shut off automatically when the depth display
reads "---" continuously for 5 minutes.
To enter the simulation mode hold the Power
key down for 5 seconds while the power is off.
Release the Power key once the display turns
on.
Simulator
5
Page 9

The unit is now in Simulation mode and must
be turned off to enter normal operation.
Accessing Menu Features
A simple menu system accesses unit's
adjustable features.
Sensitivity Indicator
Fish Alarm Indicator
Backlight Indicator
Depth Unit Indicator
Temperature Unit Indicator
Press Menu Key and release, the "Sensitivity
Indicator" will blink, press the right or left
arrow keys to adjust the menu settings; then
pressing the Menu key again and again, the
"Alarms Indicator" "Backlight Indicator"
"Depth Unit Indicator" "Temperature Unit
Indicator" will blink from the current feature to
be set.
Press ESC key to exit the menu settings.
6
Page 10

Sensitivity
Sensitvity 5 (highest)
Sensitvity 4
Sensitvity 3
Sensitvity 2
Sensitvity 1 (lowest)
There are 5-user Selectable sensitivity settings
to choose from.
The sensitivity can be enhanced in dirty or
deep water. The sensitivity can be lowered in
shallow water.
The function allows the detection methods to
be more accurate.
Fish Alarm
Fish Alarm Off
Fish Alarm On
Select Fish Alarm Off for no fish alarm.
Select Fish Alarm On to set the alarm.
An alarm will sound when the fish finder
detects fish that correspond to the alarm
setting.
Backlight (Fishing at Night)
Backlight is illuminated all the time when
backlight feature is ON.
7
Page 11

This feature will greatly reduce the battery life
of the unit.
The backlight should only be used during low light
conditions. The backlight will illuminate for 3
seconds whenever a key is pressed when the
backlight feature is set to off.
Unit
Press Menu Key until the "Depth Unit and
Temperature Unit Indicator" blinks, press the
right or left arrow keys to select the depth unit
and Temperature Unit. (FT/°F or M/°C)
Fish and Depth Readout
Reading Depth
The depth readout on the top left, will appear
after the power is turned On and the
transducer is placed in water.
The depth meter will indicate ”---“ if the depth
exceeds the unit sonar range.
8
Page 12

NOTE:
The "---" reading may also occur if the water is
extremely dirty, or where there is heavy silt
or extremely soft muddy seabed.
Sonar is a sound signal that travels through
water. Sonar will not travel through air.
Keep this in mind when using the fish finder,
as the smallest bubble between the sonar
sensor and the water, will cause the unit not
to operate correctly.
Reading Temperature
The temperature readout on the top
right, will appear after the power is
turned On and correctly connect to
the plug of the transducer.
Fish Indicators
If the fish finder determines
that sonar has detected a
fish, the display will show a
fish shaped icon.
The first column of fish
indicators on the right of
the display shows the most
current information.
9
Page 13

This column is then moved to the left as a new
reading is displayed.
NOTE:
The fish indicators move away from the right
to the left at a constant speed.
This motion in no way reflects the actual
movement of the fish.
Use the fish Depth Indicator
to measure the fish's depth
from the sonar sensor. This
can be done by dividing the
depth reading by 10. This
number represents the
value of each box.
(For example, the depth is
20m, the fish symbol
appears in the 5th box from
the top. This means the fish
is 10m from the surface.)
Weed Indicators
10
Page 14

• The display indicates the presence of short
• One Medium Rocks Indicators identifies a
considerable amount of bottom structure, but
scattered (2). A considerable amount of time
needs to be spent fishing in this area as each
piece of structure could be hiding a prize
catch.
• One Big Rocks Indicators indicates a large
amount of bottom structure in a confined area
(3). This bottom may consist of a large
rock(s), stump(s), tree(s), or a ledge(s).
weeds by turning on the smallest Weed
indicator (1).
• Moderately tall weeds are depicted by
turning on the medium Weed indicators (2).
• Tall weeds are depicted by turning on the
largest Weed indicator (3).
Rock Indicators
• One Small Rock Indicators identifies limited
structure. (1). You would most likely find a small
rock, a small pile of rocks, or uneven bottom
contour. This is not a bad place for hiding fish,
but due to the limited amount of structure, there
may not be a lot.
11
Page 15

Floating Transducer
2 Toss the sonar sensor and float assembly into
water at your desired fishing location.
Fixing the Transducer
1 Pull out the rubber stopper, adjust
float so that it is 18 to 25 cm from the
sensor, or at your desired depth.
Replace the rubber stopper by pressing it
firmly into the float.
The Sensor float must be adjusted so that
it is a minimum of 7 inches away from the
sensor.
To toss, place the sonar sensor
and float in your hand, and
pitch underhand. Do not throw
the sensor by the cable as this
will cause unrepairable
damage.
Before tossing, be certain that
the cable is free from tangles
and is not wrapped around
anything.
12
Page 16

3 Your Fish Finder includes a combination
adapter, mounting bracket for the sonar sensor.
The Adapter includes mounting taps so that you can
attach it to any flat surface or boat hull and
appropriate rod, The Adapter is removable and
adjustable up to 180 Degrees.
4 Use a pole to guide the sonar sensor to a
desirable position or add floats on the cable to float
on the water.
NOTE: *** Incorrect use: Do not allow the cable to sink
to the bottom as it may become entangled in debris.
13
Page 17

CORRECT INCORRECT
NOTE:
*** The float can be removed as follows, if you do
not need it, cutting off the rubber stopper from the
cable and sliding the safety strap and the float
towards the plug and gently take it out from the
plug.
Fishing from a Boat
1 Toss the sensor and float into the water as per
the previous instructions.
2 Attach the adapter to the boat hull using the
mounting tabs.
3 “shoot –Through” the hull of a boat.
Place the sonar sensor in 1 inche of water against
the hull bottom. Or coat the face of the sonar sensor
with petroleum jelly and press it against the hull
bottom with a twisting motion.
14
Page 18

NOTE:
If depth readings appear as " ---" while using one
of these methods, place the sonar sensor directly in
the water to verify that the fish finder is operating
properly.
If it operates properly while directly in the water,
reposition the sensor in a new location in the hull, if
it still doesn't work on all hulls and you may have to
place the sensor directly in the water for proper
operation.
Fishing on Ice
To achieve the best performance for ice fishing, it is
highly recommended that you cut a hole through the
ice and place the sonar sensor directly in the water.
If you would like to check the area for depth or fish
before cutting the hole.
Clear away snow to expose the ice surface, making
sure the surface is smooth.
Place a small amount of liquid water on the ice and
set the sonar sensor on the water allowing the unit
to freeze to the ice.
15
Page 19

If there are any air pockets between the sonar senor
and ice, or air on the water below ice, the unit will
not work properly and will require you to try another
spot, or cut a hole in the ice to use.
NOTE:
*** To remove the sonar sensor from the frozen
ice, gently tap sonar sensor at the base with your
hand. If it will not come loose, spray a small amount
of water on the ice surface around the base and
repeat above step until the sonar sensor is easily
removed.
Never use a blunt instrument to strike the sonar sensor
as this may cause damage to the sensitive internal
electronics.
16
Page 20

NOTE:
*** Cold weather is extremely hard on the
electrical components within the display housing. It
is suggested that you keep the unit in temperatures
above 0 degrees Fahrenheit (-17 degrees Celsius)
during operation.
*** Remove the batteries from the fish finder to
prevent battery leakage and corrosion.
Clean the sonar sensor and cable with fresh water
and dry-off before storing. Do not submerge and/or
spray the fish finder screen/housing with water or
use chemicals to clean.
17
Page 21

Handheld Transducer(Optional)
Side-Scan
The Side-Scan Transducer has the ability to be used
as a sideways scanning sonar fish finder to detect
the bottom contour and fish locations.
1. Connect the transducer cable to the main unit
and turn power ON, select START UP mode for use.
2. Place the transducer perpendicular to the water
to obtain a correct depth reading.
3. Move the transducer in a scanning motion (similar
to use as a flashlight), and the bottom contour and
fish locations will be showed on the screen.
This Side-Scan
Transducer can be
used on a bridge, a
boat, or at the shore.
ON THE SEASHORE
18
Page 22

ON A BOAT ON A BRIDGE
NOTE:
There may be a wrong
display if you use this SideScan Transducer in the place
like the picture below.
So you must judge the result
by yourself at there position.
So you shall judge the information by yourself
according to your experience in the situation
of the pictures below.
19
Page 23

Through a Boat Hull
The Unit advanced sonar capabilities allows it to
“shoot through” the bottom of a boat or canoe.
The hull must be made out of solid fiberglass, or a
maximum of 1/8” (3.1 mm) aluminum, and be in
direct contact with the water, with no air pockets.
The unit will not work thru wood, plastic, or any
composite material.
a) place the transducer in 5 inches (13 mm) of
water against the hull bottom.
b) coat the face of the transducer with petroleum
jelly and press it against the hull bottom with a
twisting motion.
c) place the transducer in a plastic bag that is full of
water and place against the hull bottom.
NOTE:
If depth readings appear as " ---" while using one of
these methods, place the sonar sensor directly in
the water to verify that the fish finder is operating
properly.
If it operates properly while directly in the water,
reposition the sensor in a new location in the
20
Page 24

hull, if it still doesn't work on all hulls and you may
have to place the sensor directly in the water for
proper operation.
Fishing on Ice
To achieve the best performance for ice fishing, it is
highly recommended that you cut a hole through the
ice and place the sonar sensor directly in the water.
If you would like to check the area for depth or fish
before cutting the hole then follow these instructions.
Clear away snow to expose the ice surface, making
sure the surface is smooth.
Place a small amount of liquid water on the ice and
set the sonar sensor on the water allowing the unit
to freeze to the ice.
If there are any air pockets
between the sonar senor and
ice, or air on the water below
the ice, the unit will not work
properly and will require you to
try another spot, or cut a hole
in the ice to use.
21
Page 25

NOTE:
*** To remove the sonar sensor from the frozen
ice, gently tap sonar sensor at the base with your
hand. If it will not come loose, spray a small amount
of water on the ice surface around the base and
repeat above step until the sonar sensor is easily
removed.
Never use a blunt object to strike the sonar sensor
as this may cause damage to the sensitive internal
electronics.
*** Cold weather is extremely hard on the electrical
components within the display housing.
It is suggested that you keep the unit in
temperatures above 0 degrees Fahrenheit (-17
degrees Celsius) during operation.
*** Remove the batteries from the fish finder to
prevent battery leakage and corrosion.
Clean the sonar sensor and cable with fresh water
and dry-off before storing.
Do not submerge and/or spray the fish finder screen
/ housing with water or use chemicals to clean.
22
 Loading...