

Page 1
Page 2

Table of Contents
Product Features................................................................................................................................2
Product Layout...................................................................................................................................2
Usage......................................................................................................................................................3
Starting use......................................................................................................................................3
Language setup.............................................................................................................................3
Battery charging............................................................................................................................3
Inserting memory card...............................................................................................................3
Removing memory card.............................................................................................................3
Operation..............................................................................................................................................4
Switch between video/photo/playback.............................................................................4
Taking videos and setting video options............................................................................4
File Management................................................................................................................................6
Video and Photo File Playback....................................................................................................6
Video Playback..............................................................................................................................6
Photo Playback..............................................................................................................................7
Delete, Protect and Volume.....................................................................................................7
System Setup Options.....................................................................................................................7
Connecting to Computer................................................................................................................8
Video and photo download......................................................................................................8
Technical Specifications..................................................................................................................8
1
Page 3
Thank you for purchasing the Kogan Full HD Car Dash Camera with GPS. To
ensure that you get the most out of the unit, please read the user manual before
use.
Please charge the unit for 8 hours prior to the first use to ensure that the
180mAh battery operates at its full capacity.
Product Features
• Ultra small, 120 degree, high resolution and ultra wide-angle lens.
• Built in microphone/speaker.
• Cyclic recording function automatically deletes old files and makes room
to record new files.
• When left plugged into charger, will automatically turn on and start
recording when the engine starts up.
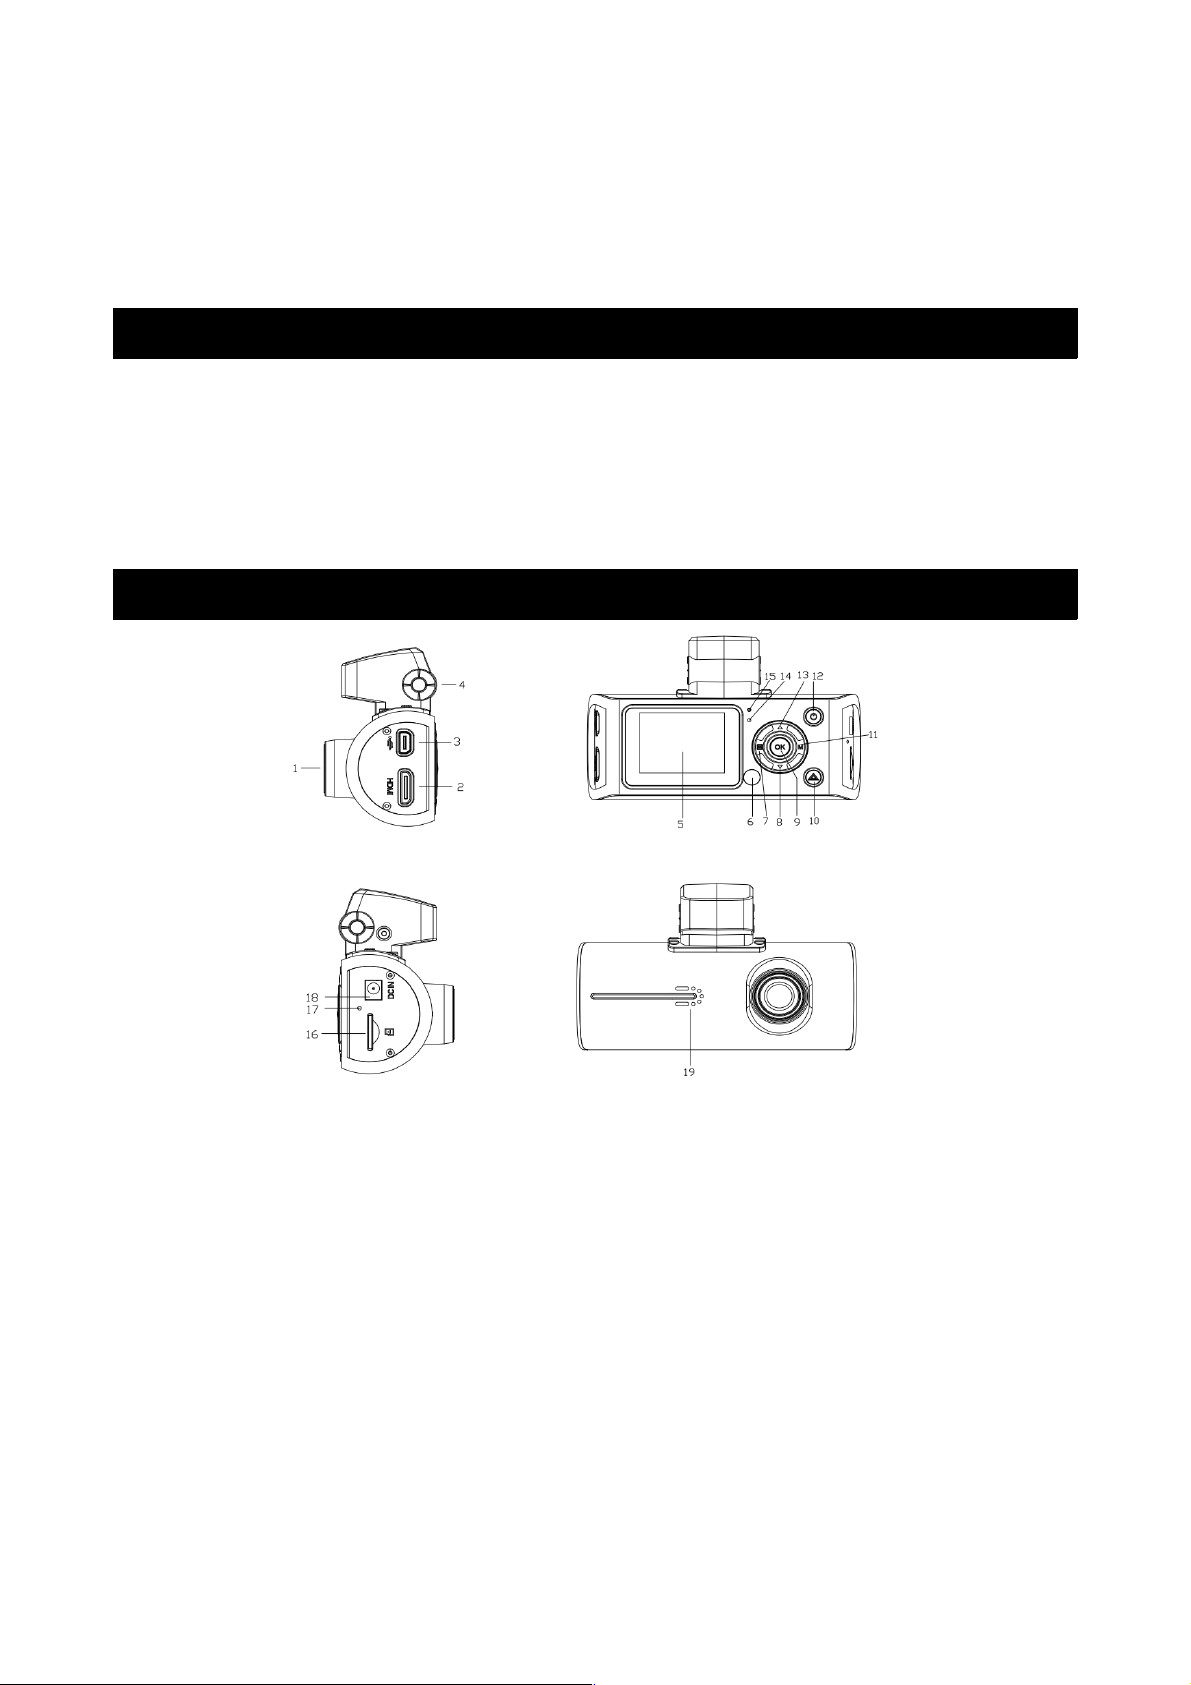
Product Layout
1. Camera lens 2. HDMI interface
3. USB/AV OUT interface 4. GPS
5. Display screen 6. Signal receiving window
7. Menu key 8. Down key
9. OK key 10. Emergency recording key
11. Mode key 12. Power key
13. Up key 14. Video recorder hole
15. Light indicator 16. Micro SD card slot
17. Reset key hole 18. DC slot
19. Horn hole
2
Page 4

Usage
Starting use
• Start up: press the power button for 3 seconds. The green indicator light
will light up.
• Power off: press the power button for 3 seconds again. Press the OK
button, then select “YES” to the confirmation question and the green
indicator light will go out.
Note: the recorder will power off automatically after the low-power alarm while
no external power source is connected.
Language setup
After starting up, press the MENU key, enter the main menu and press
UP/DOWN to select “ ” language setup. Press the OK key to enter into the
language setup. Press UP/DOWN until you have highlighted your preferred
language, then press OK.
Battery charging
There are three ways to charge the battery.
1. Charge via USB cable
2. Charge via vehicle power
3. Charge via USB cable plugged into a USB wall adaptor (not included)
During charging, the red indicator light will be on and charging should take
approximately 180 minutes. Once charging is complete, the red charging
indicator will go out if you are using your car power or a USB cable with an
adaptor.
Inserting memory card
Push the micro SD card into the card slot in the direction indicated by the
markings on the camera body. When the card is fully inserted and clicks into
place, stop pushing.
Note: this unit requires a high speed Micro SD card of Class 4 or higher, up to
32GB in size.
Removing memory card
Push the micro SD card slightly in further to the unit, at which point it will
partially pop back out of the camera.
3
Page 5

Operation
Switch between video/photo/playback
Press the mode key to switch between video/photo/video file playback/picture
file playback.
Taking videos and setting video options
Taking videos
Once the recorder is turned on, press the OK key to start recording. Press the
OK key again to stop recording.
Video setup options
Press the MENU key to enter into the main menu, then select “ ” image
parameters and press OK to enter. The options are as follows.
Movie mode FHD/30fps
HD/30fps
HD/60fps
VGA/30fps
Movie quality Super high quality
High quality
Movie clip time 1 minute
3 minutes
5 minutes
10 minutes
close
Movie off time 0 minute
5 seconds
30 seconds
1 minute
2 minutes
3 minutes
Sound record on
off
MIC sensitivity Standard
Low
Scene Automatic
Sport
Portrait
Landscape
Snow
Beach
Fireworks
4
Page 6

Exposure 0 EV
+0.33EV
+0.66EV
+1EV
+1.33EV
+1.66EV
+2EV
-0.33EV
-0.66EV
-1EV
-1.33EV
-1.66EV
-2EV
White balance Automatic
Daylight
Cloudy
Fluorescent lamp
Fluorescent lamp 2
Fluorescent lamp 3
Tungsten lamp
Taking Photos
Press the mode button to capture mode. Press OK to take photos.
Image Setup Options
Press the MENU key to enter the main menu, then select image shooting and
press OK to enter the settings.
Still image size 14M
12M
8M
5M
3M
2M
1.2M
VGA
Still image quality Super high quality
High quality
Scene Automatic
Sport
Portrait
Landscape
Snow
Beach
Fireworks
Exposure 0 EV
+0.33EV
+0.66EV
+1EV
+1.33EV
+1.66EV
5
Page 7

+2EV
-0.33EV
-0.66EV
-1EV
-1.33EV
-1.66EV
-2EV
White balance Automatic
Daylight
Cloudy
Fluorescent lamp
Fluorescent lamp 2
Fluorescent lamp 3
Tungsten lamp
ISO sensitivity ISO automatic
ISO100
ISO200
ISO400
Colour Natural
Bright
Gray
Effect Normal
Negative
Black and white
Retro
Emboss
Pencil sketch
Oil painting
Crayon
File Management
Press the mode key to enter video playback mode or picture playback mode to
manage your files.
Video and Photo File Playback
Video Playback
Press Mode Key to select playback mode. The first playback mode is video
mode, with the format showing AVI on top. Press UP/DOWN to select the video
or audio files to be played back.
Press OK to start or stop playing the video and audio files, and press UP/DOWN
to fast-forward or rewind, then press OK to resume normal speed.
Press the Mode Key to return to the square up image.
6
Page 8

Photo Playback
Press the mode key to enter into the photo playback mode, with the format
showing JPG on top. Press OK to enter into single photo playback mode. In
single photo playback mode, press UP/DOWN to select the photos to be played
back.
Press the Mode Key to return to square up mode.
Delete, Protect and Volume
In playback mode, press the Menu Key to show “ ” up volume, “ ” delete and
“ ” protection options. Select volume and press the OK key to set volume.
Press UP/DOWN to choose a volume level from 0 to 10, then press OK to
confirm.
Press the DOWN key to move to deletion options, then press OK to move into
either “ remove a single file” or “ delete all” options. Press the OK key to
choose which file you wish to delete.
To protect files, press the DOWN key to the protection options, then press OK
to enter into either “ Protect single file”, “ Unlock single file protection”,
“ Protect all files” or “ Unlock all files” options, then press OK to confirm.
System Setup Options
Press the MENU key under VIDEO or PHOTO SHOOTING mode, then press the
DOWN key, entering into “General Settings”, then “system setup” icon. Press the
OK key to enter into setup options.
Beep : toggle key tones
Power off: power off time setting
Clock: set the current system clock
Date Format: setup/set date and time format
TV Setup: set NTSC/PAL
HDMI setup: set 1080i/720p
Flicker: set 50Hz/60Hz frequency
USB function: set MSDC/PCCAM. (To set up
PCCAM, under video or capture mode, press
the menu button and select “General Settings”
and select PCAM, then press OK. You should
now be able to use the unit as a webcam.)
LCD rotate: rotate the screen display
LCD power save: Off / 1 minute / 3 minutes
Protection Level: set the protection sensitivity
of the G-SENSOR (Off/1/2/3/4) with 4 being
the strongest. When the machine is knocked by
your hand or the shock of a crash it will
automatically lock the current file.
7
Page 9

GPS Status: check GPS receiving status
Time Zone: select the time zone you are in
Reset setup: restore factory settings
Format SD-card: confirm to format SD card /
cancel SD card format
SD-Card info: indicate the time left to take
videos or number of pictures left
FW Version: software firmware version
Connecting to Computer
Video and photo download
1. When the camera is connected to your computer via USB, the red power
indicator should come on. Then computer will automatically identify the
camera as a removable disk (assuming the micro SD card is inserted).
Note: Computer operating systems must be Windows 2000 or newer, or
MAC OS x 10.3.6 or higher.
2. Use computer to browse and manage files.
3. Remove the USB cable to close the data recorder.
Note: if the unit crashes while using it and is not resuming use, press the reset
button. The equipment will then return to normal operations.
Technical Specifications
LCD screen dimensions 2.0LTPS (4:3)
Lens 120 degree, A+ level, high resolution, ultra-wide angle lens.
Language options English/Portuguese/Traditional Chinese/Simple Chinese/Russian/Spanish
Video FHD 30fps/HD 60fps/HD 30fps/VGA 30fps
Video format AVI
Picture resolution 14M/12M/8M/5M/3M/2M/1.2M/VGA
Memory card slot Micro SD (up to 32GB)
Microphone/speaker Built in
Power supply frequency 50/60Hz
Television output PAL/NTSC
USB interface USB2.0
Power interface 5V 1000MA
Battery Built-in lithium battery, 310mAH
System requirements Windows 2000/XP/Vista/7/8/8.1
MAC OS x 10.3.6 or higher
If you have any further questions regarding use of this product, please contact
the Kogan customer support team.
8
 Loading...