

Page 1
KOGAN SMARTERHOME™ PAN
& TILT SMART BABY MONITOR
(COMPATIBLE WITH DISPLAY)
KABBCMADDCA
Page 2

Components
3
Overview
4
Installation
5
Connect to SmarterHomeTM App
7
Google Home Control
10
Amazon Alexa Control
13
Operation
16
FAQ
18
Notes
19
2
Page 3
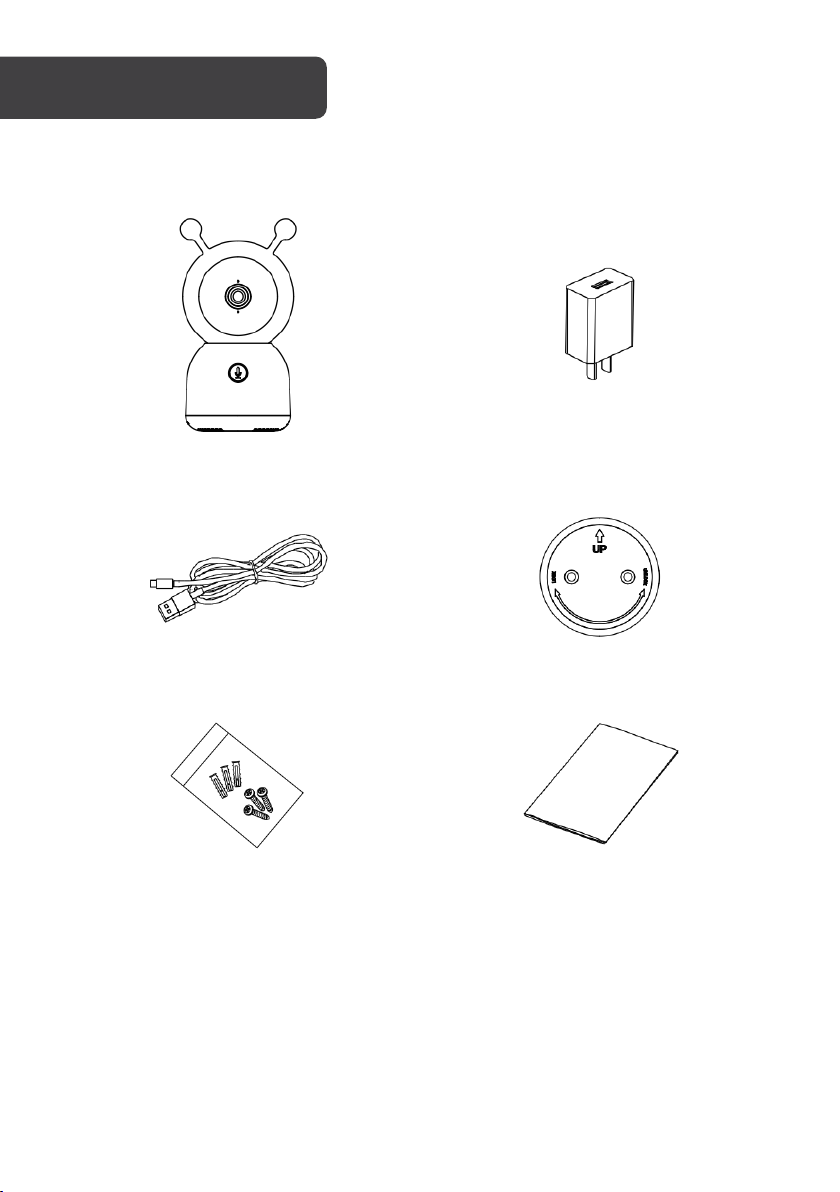
Camera
Power adapter
USB cable
Bracket
Mounting hardware
User guide
COMPONENTS
3
Page 4
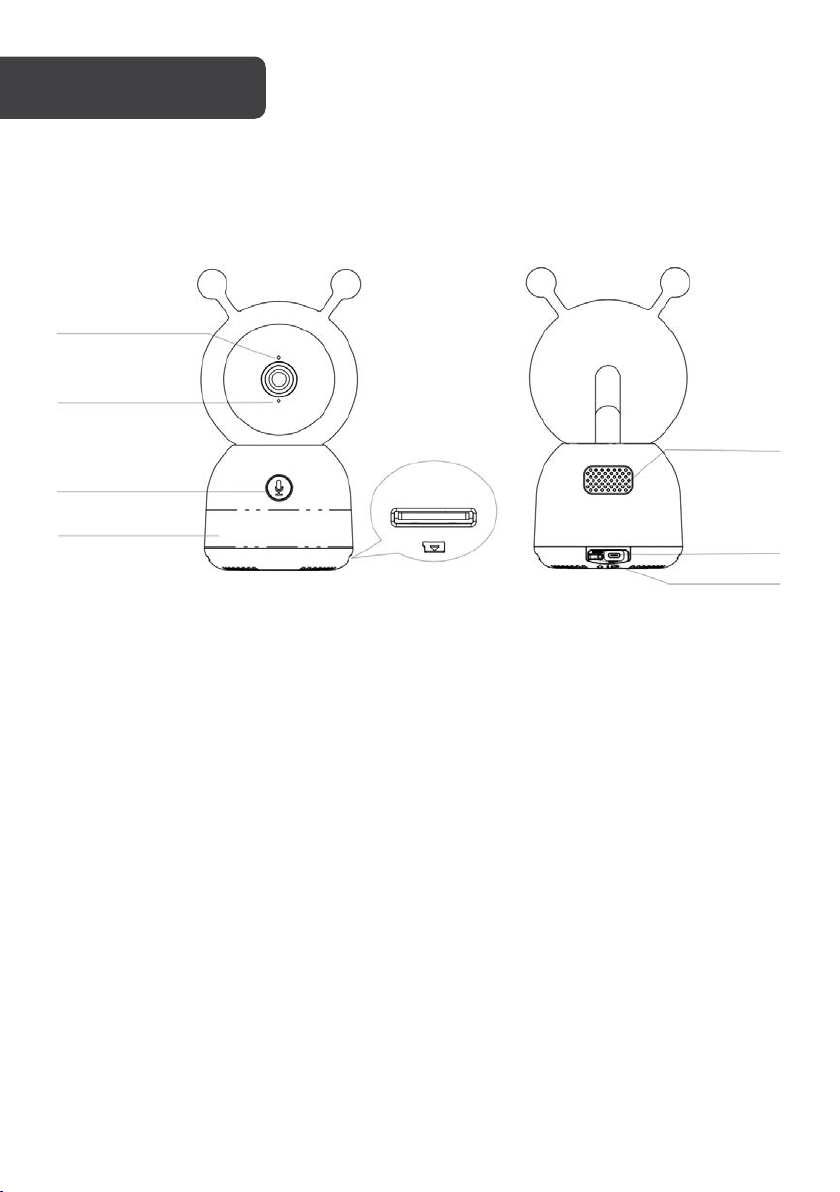
Power
DC 5V/1A
Microphone
Captures sound for your video
SD card slot
Support local SD Card storage (Max.128G)
Status indicator
Solid RED: network is malfunctional
Flashing RED: ready for network connection (fast blinking)
Solid BLUE: camera is working correctly
Notification/Pair
Pressing this button will send a pop-up notification to your
linked smartphone. Long press to pair with the monitor (not
supplied).
Reset
Press and hold for 5 seconds to reset the camera (if you have
modified settings, they will return to factory defaults) and
place it in Wi-Fi pairing mode
OVERVIEW
Status Indicator
Reset
Power
input
Microphone
Night light
Speaker
SD card slot
Notification/pair
Camera
4
Page 5
INSTALLATION
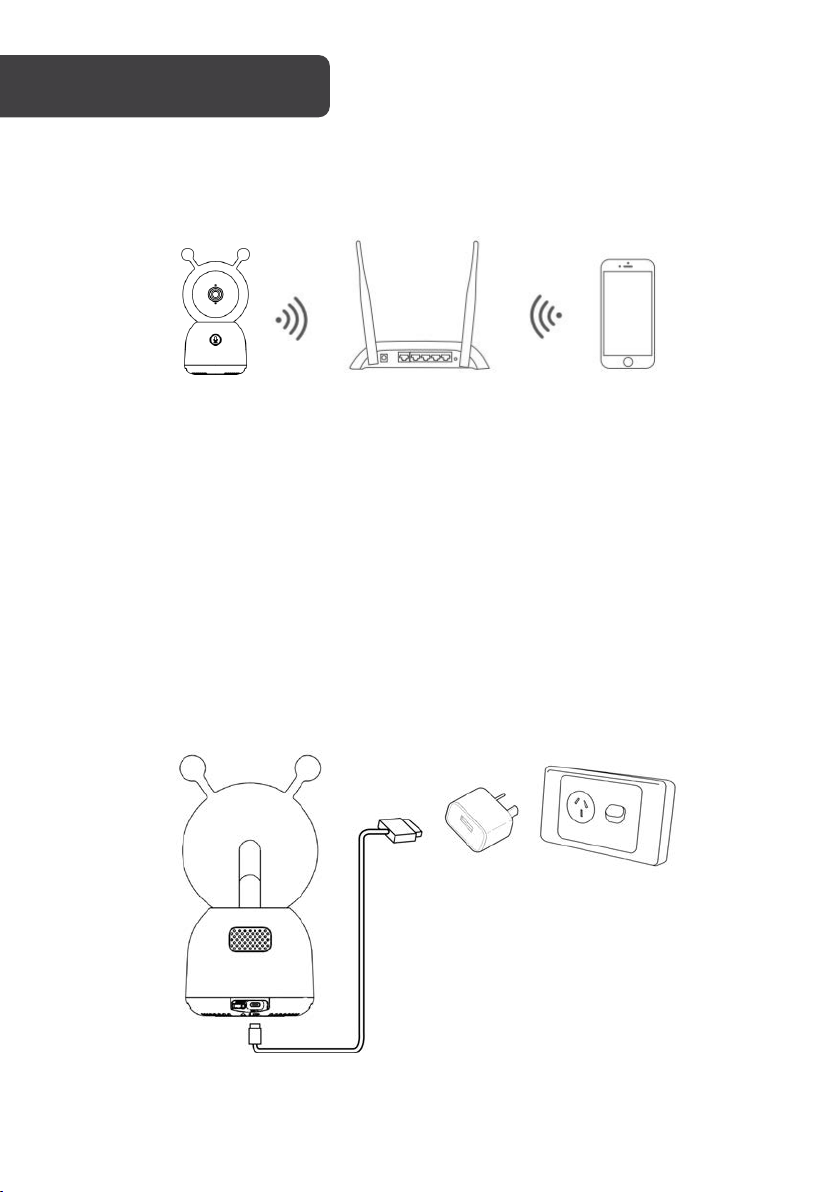
Camera
Smartphone
Router
Connection preparation
Bring the camera and your phone within 30 – 100cm of the router.
Insert the microSD card
Insert a microSD card (not supplied) into the SD card slot on the camera.
Camera Power Connection
1. Connect the USB cable to the power input port on the camera and connect the other
end into the power adapter.
2. Plug the power adapter into an electrical outlet and turn it on, the status indicator will
turn blue.
5
Page 6
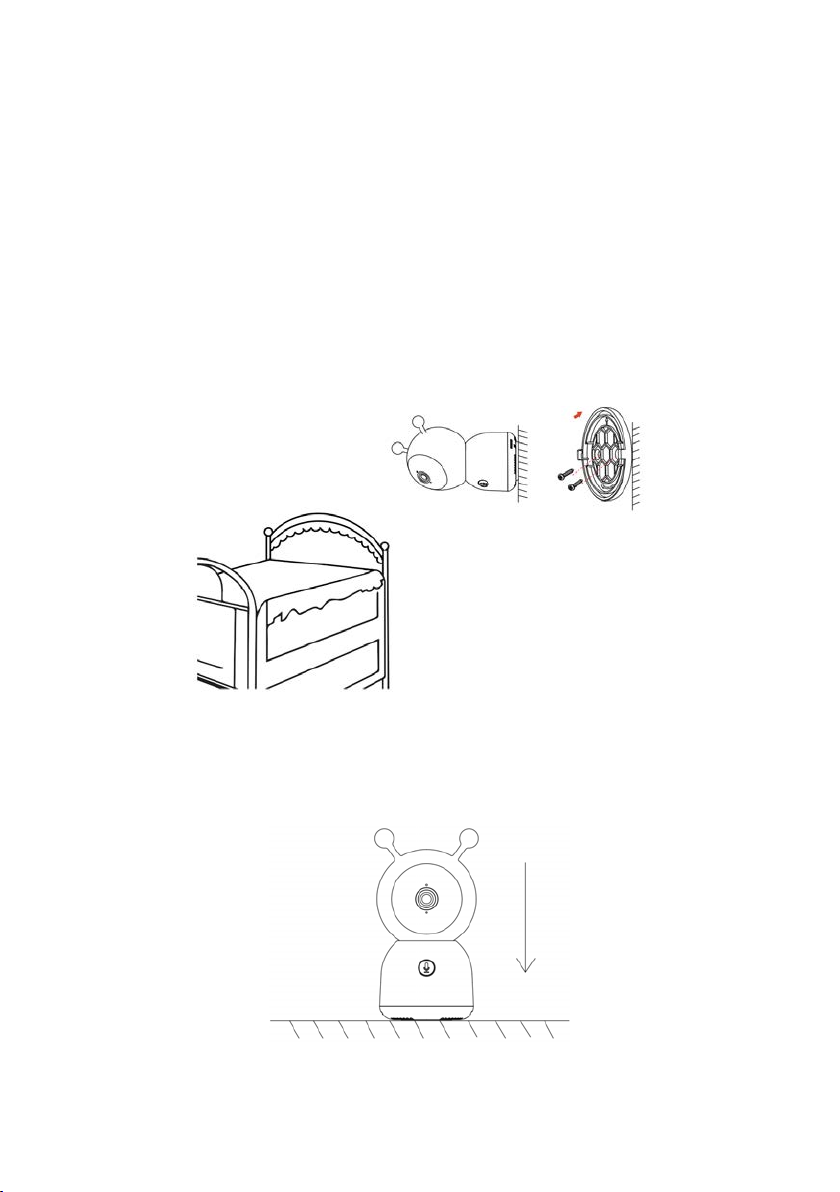
Mounting to wall/ceiling (masonry):
1. Drill pilot holes and insert the supplied wall anchors first.
2. Place the bracket against the surface, in line with the wall anchors, and secure it in
place with the supplied screws.
3. Attach the camera to the bracket.
Mounting to wall/ceiling (timber / dry wall):
1. If not drilling into timber studs, drill pilot holes and insert the supplied wall anchors first
2. Place the bracket against the surface, in line with the wall anchors (if used) and secure
it in place with the supplied screws.
3. Attach the camera to the bracket.
Alternatively, the camera can be placed on a clean, horizontal, flat surface.
6
Page 7
Play Store (Android)
App Store (iOS)
Install App
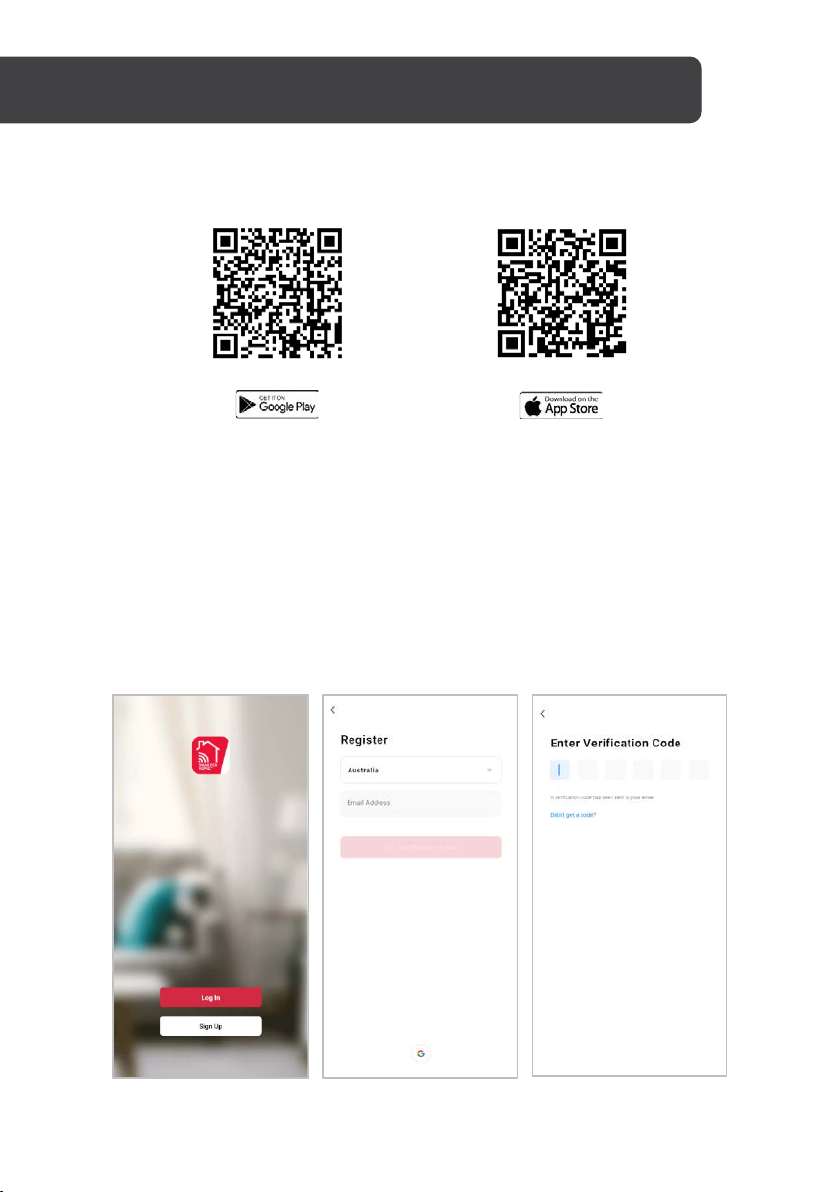
Download the “Kogan SmarterHome” app from the Play Store (Android) or App Store (iOS).
To register:
1. If you already have a SmarterHome account, select ‘Log In’. To register a new
account, select ‘Sign Up’.
2. The system will automatically recognise your country. If needed, you can manually
select your country from the drop-down box. Enter your email address and tap ‘Get
Verification Code’ to continue.
3. A 6-digit code will be sent to the submitted email address. Enter this code before the
one-minute timer expires.
4. Continue to the next page and complete your SmarterHome profile.
7
Page 8
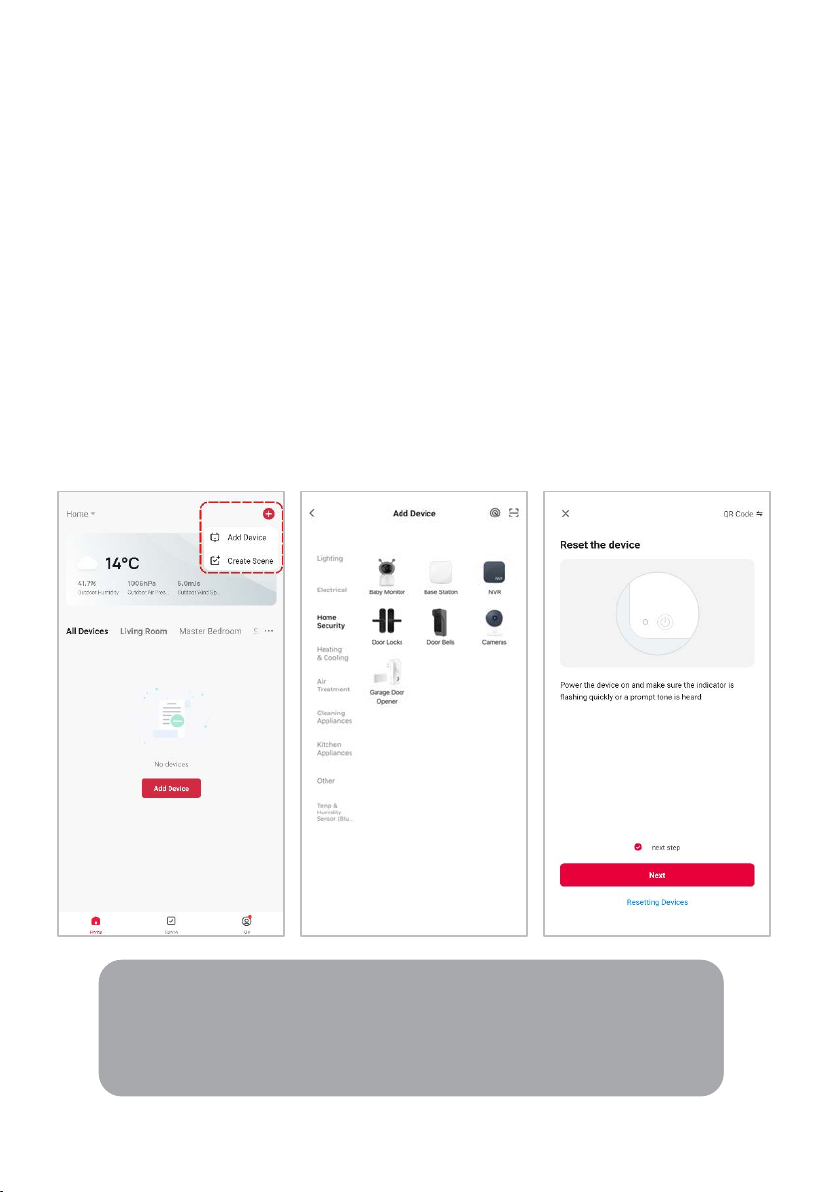
Set device in pairing mode
Notes:
• The device and the app have to use the same Wi-Fi network.
• The device is only compatible with 2.4Ghz networks.
• Depending on the product, Steps 3 and 4 may be in opposite order.
When the device is first turned on, it may automatically enter pairing mode (prompt tone
will be heard and the indicator will be rapidly flashing red).
If not automatically in pairing mode when powered on, you can manually set the device in
pairing mode by pressing and holding the reset button for 5 seconds until a prompt tone is
heard and the indicator begins rapidly flashing red.
Add device through network
1. Once registered, tap “Add Device” on the app’s home page, or the “+” in the upper
right corner, to add a new device through the network.
2. Select the product type from the list of options in the app (Home Security > Baby
Monitor).
3. Ensure that the device is in pairing mode, with the prompt heard and light flashing,
and tap “Next”.
4. Enter your Wi-Fi details. It is important that your SmarterHome™ device and the app
are connected to the same Wi-Fi network during setup.
8
Page 9
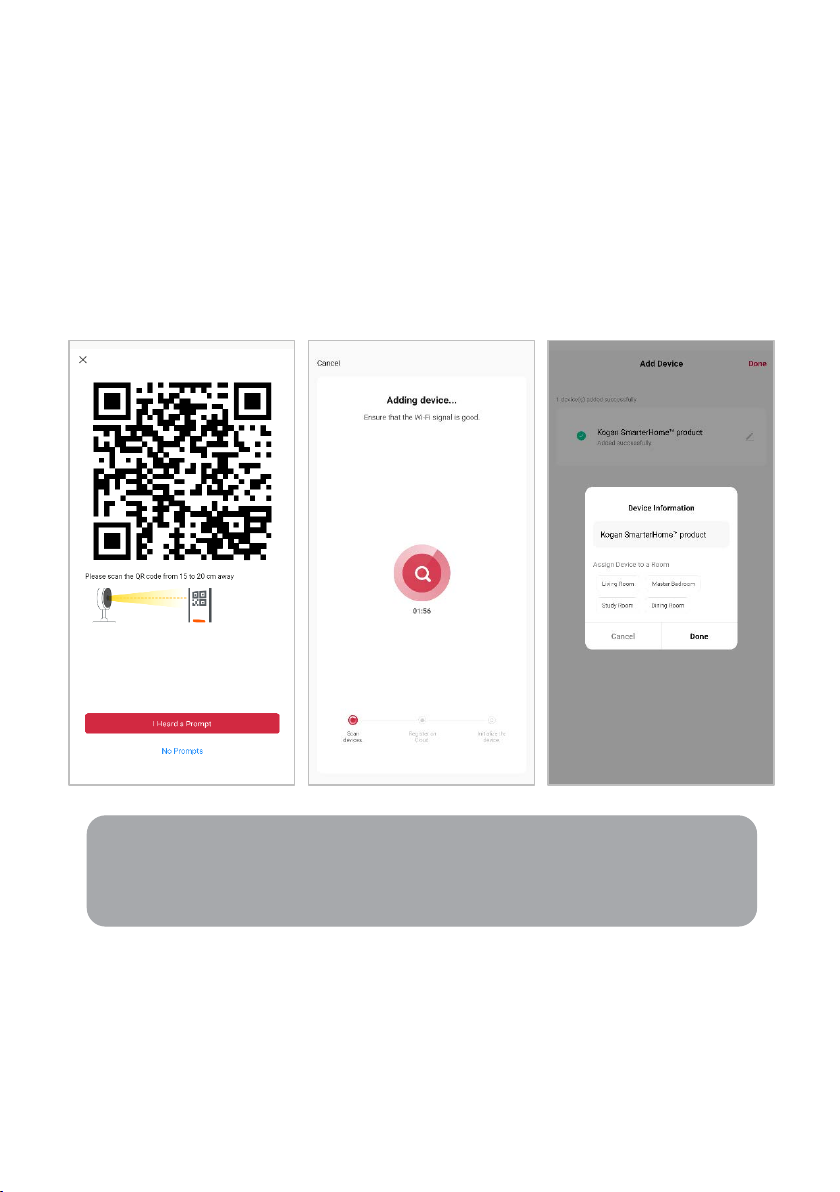
5. Calibrate the smart camera by holding your smartphone 15-20cm away from the
Note:
Once connected, you can select Create Scene from the “+” in the upper right
corner (or from the Scene tab) to group connected SmarterHome™ products
and automate their functions.
camera lens until it successfully scans the QR code shown on the following screen of
the setup. The device will make a prompt sound to confirm, click “I heard a prompt” to
proceed to the next screen.
6. The device will commence the pairing process and connect to the app. Ensure your
Wi-Fi router, mobile phone, and the SmarterHome™ device are kept close until
connection is complete.
7. After successfully being added, you will have the option to rename the device and
assign it to a location. It will now be listed on the app’s home page. Tap the device
listing to enter its control page.
9
Page 10
Note:
You will need to have set up a Google Home account prior to linking
your Kogan SmarterHome™ device.
Adding “SmarterHome” to the Google Home app
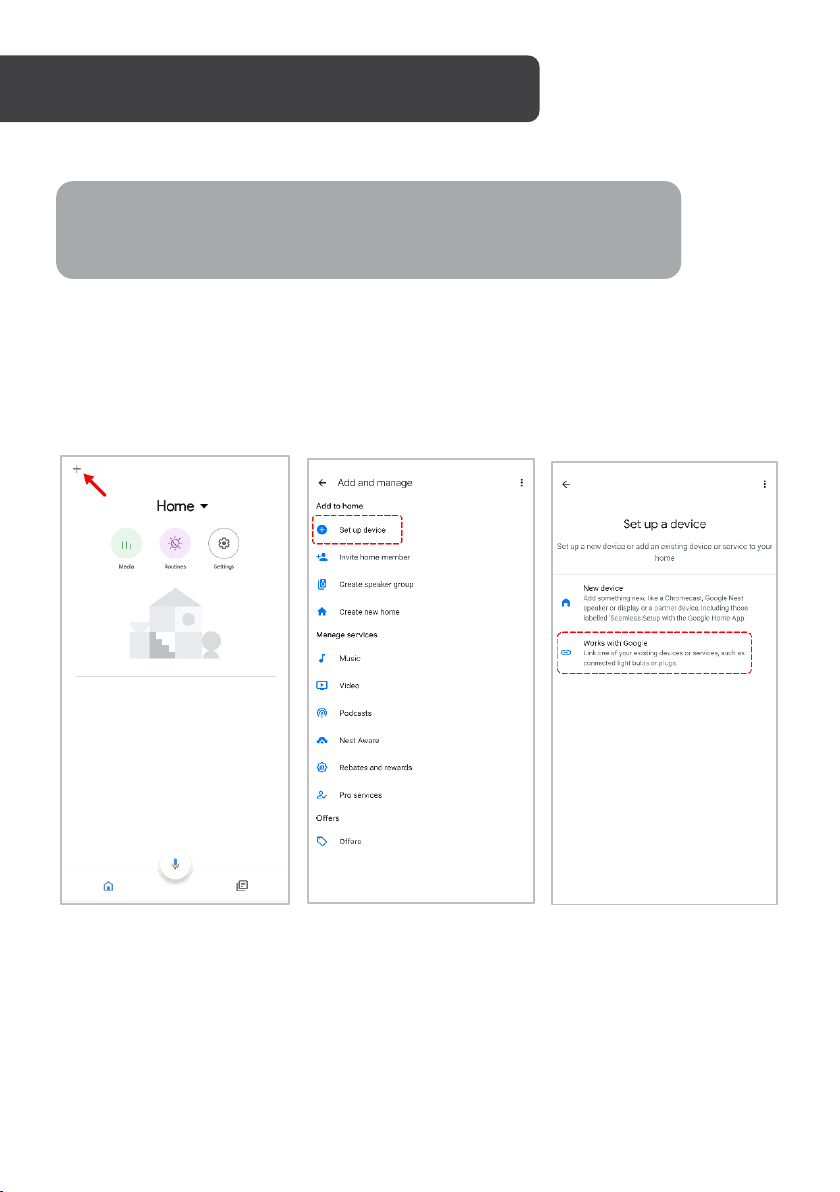
1. From the home page of the Google Home app, select the “+” icon (top left corner, see
arrow in the below screenshot) to access the ‘Add and manage’ page.
2. Select ‘Set up device’, then select the ‘Works with Google’ option.
10
Page 11
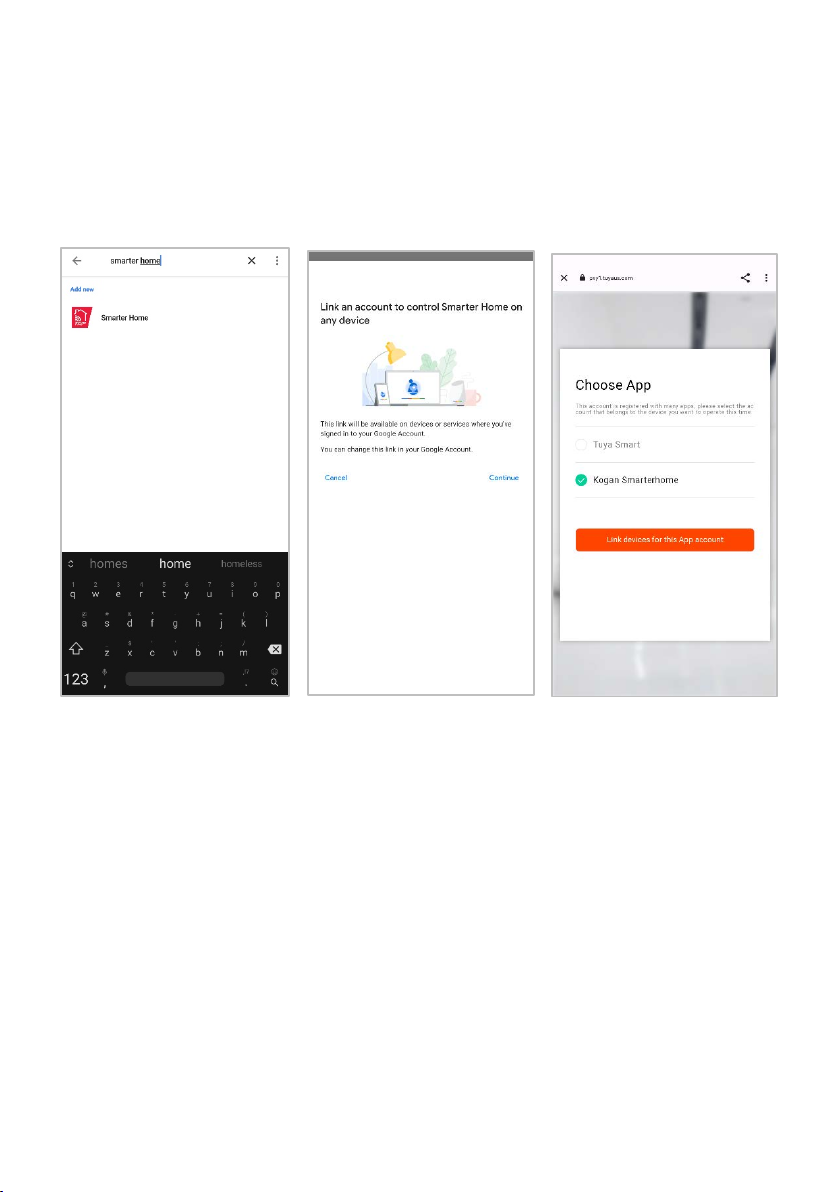
3. Select the search bar and type ‘Smarter Home’ to locate the Kogan SmarterHome™
service.
4. From here, you will be prompted to sign into your SmarterHome™ account using
either your email or mobile phone number, depending on which method you used to
register your account.
5. Select “Kogan SmarterHome™” from the app options.
11
Page 12
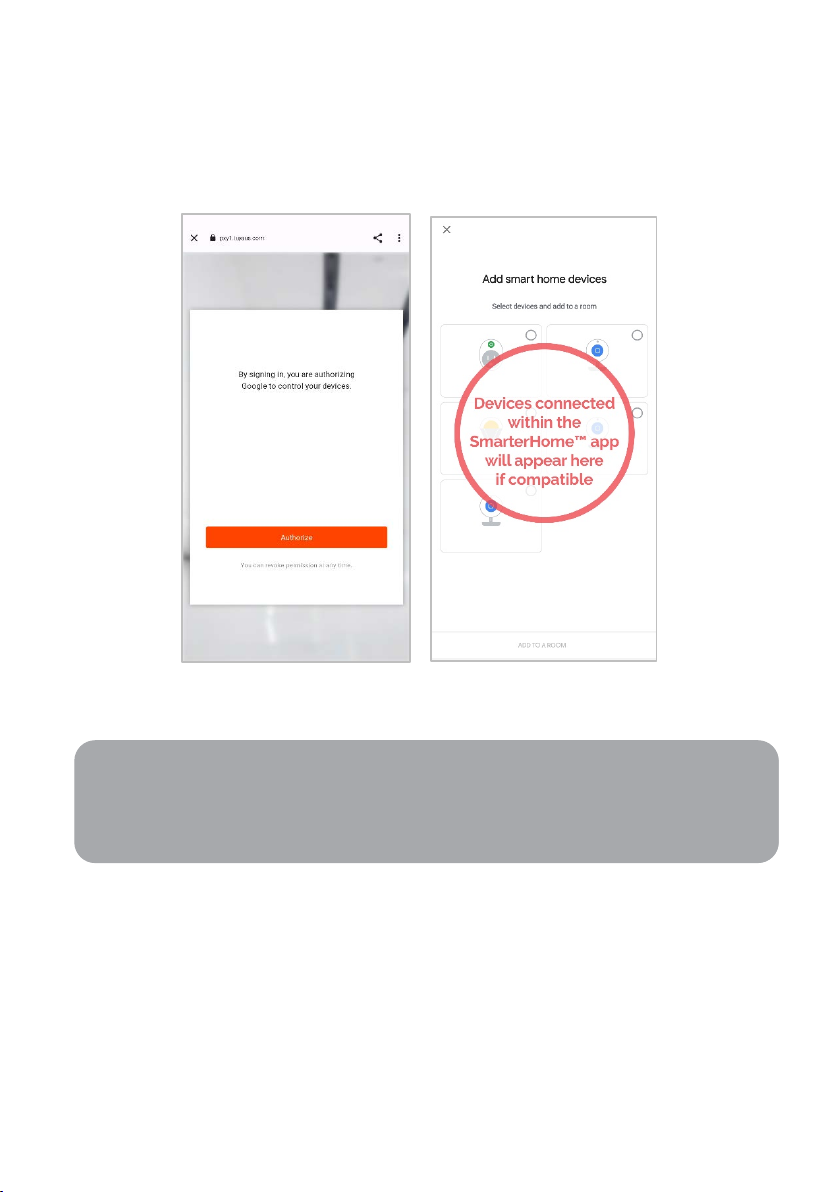
6. Tap ‘Authorise’ to grant Google permission to access the SmarterHome™ app and
Note:
Please note that Google Home can only control the base/core functions of any
compatible SmarterHome™ devices. To make full use of this product’s smart
functionality, please use the Kogan SmarterHome™ app.
your devices.
7. Once connected, the app will display any compatible devices linked to your
SmarterHome™ account. From here you can assign them to rooms and set up any
routines. Tap on any of the devices to view a list of available commands.
12
Page 13
Note:
Yo u w i l l n e ed t o h a ve s et u p a n Al e xa account prior to linking your Kogan
SmarterHome™ device.
Adding “SmarterHome” to the Alexa app
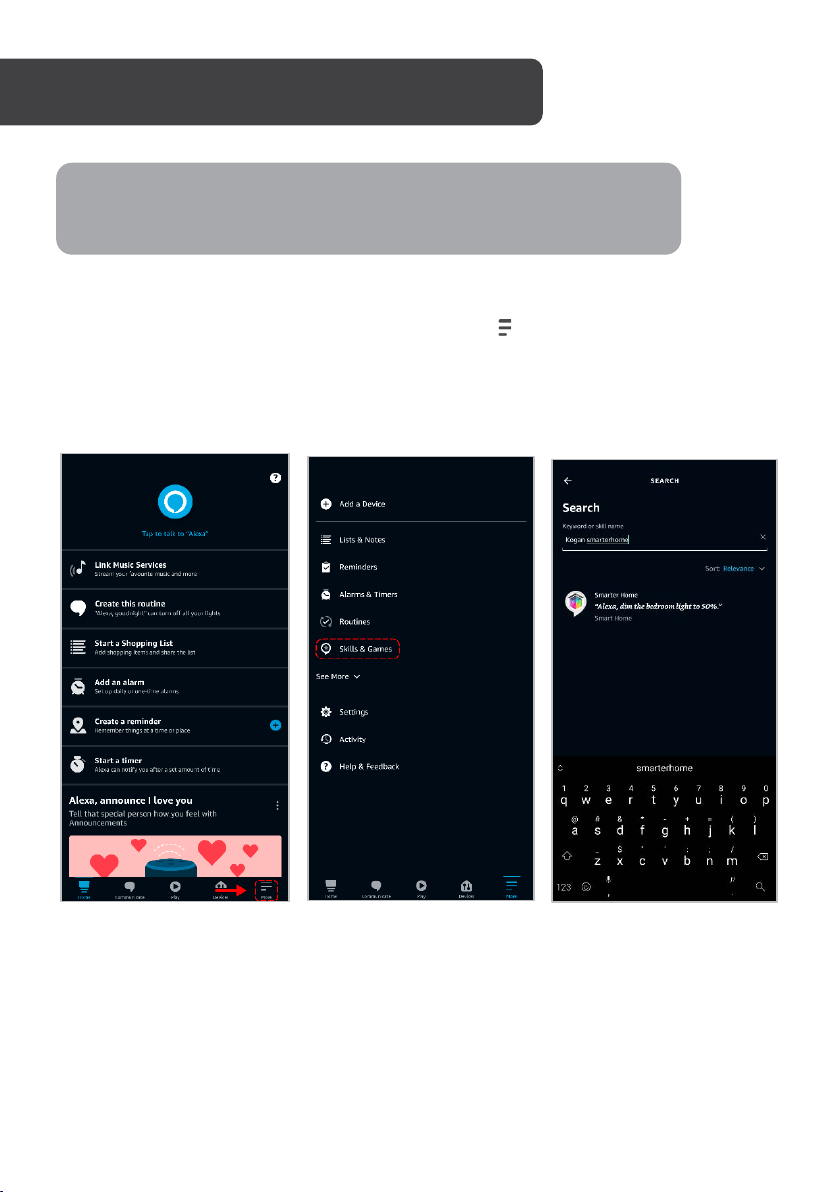
1. From the home page of the Alexa app, select the “ ” icon in the bottom-right and
select “Skills & Games” from the sidebar.
2. Select the search bar and type ‘Smarter Home’ to locate the Kogan SmarterHome™
skill.
13
Page 14
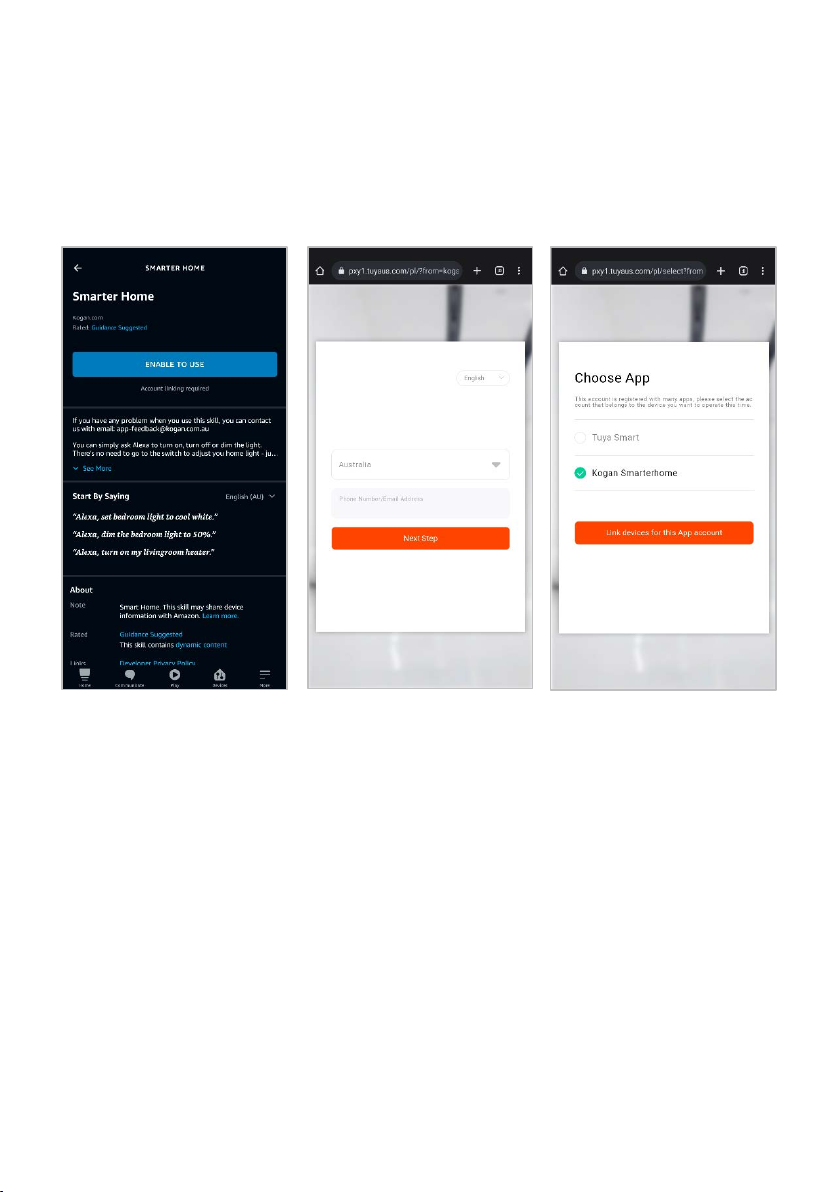
3. Tap ‘Enable to Use’ to add the Kogan SmarterHome™ skill to Alexa.
4. From here, you will be prompted to sign into your SmarterHome™ account using
either your email or mobile phone number, depending on which method you used to
register your account.
5. Select “Kogan SmarterHome™” from the app options.
14
Page 15
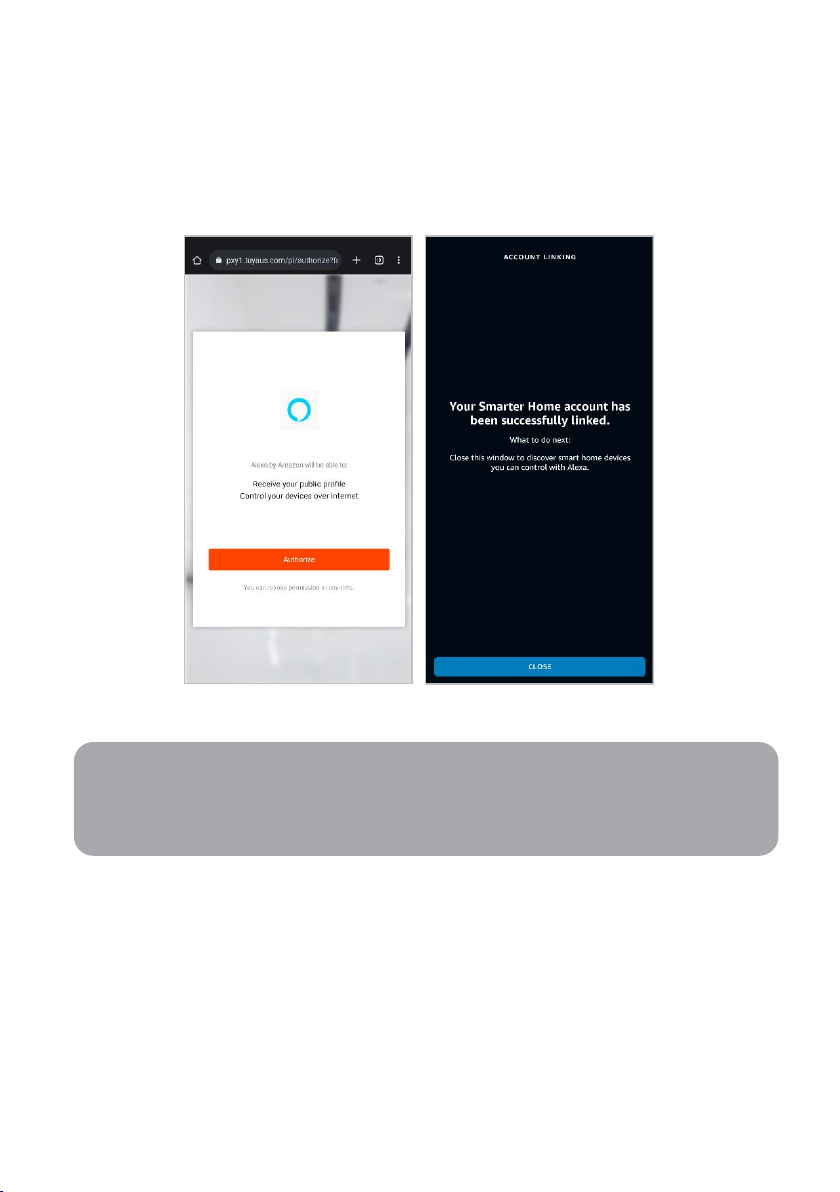
6. Tap ‘Authorise’ to grant Alexa permission to access the SmarterHome™ app and your
Note:
Please note that Alexa can only control the base/core functions of any
compatible SmarterHome™ devices. To make full use of this product’s smart
functionality, please use the Kogan SmarterHome™ app.
devices.
7. Once connected, the app will perform a search and display the devices linked to your
SmarterHome™ account. When your devices have successfully connected to the
Alexa app, you will be able to control your Kogan SmarterHome™ devices via Alexa’s
voice commands.
15
Page 16
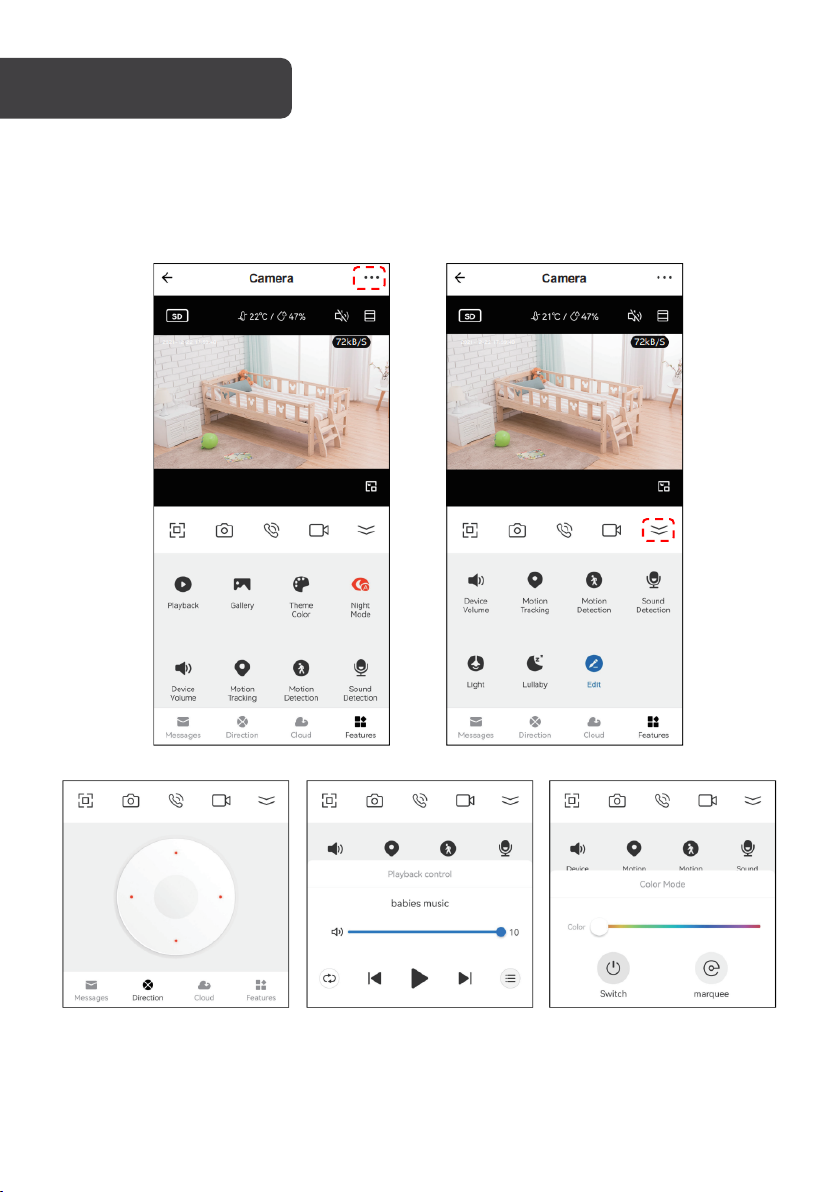
Lullaby: Select music
to sooth your baby
Direction: Move
the camera
Light: Toggle night light
on/off and adjust the light
settings
In the SmarterHome
TM
App Camera’s interface, click "…" in the upper right corner to access
the camera’s settings
Press the down arrow to view all the camera functions.
16
Page 17
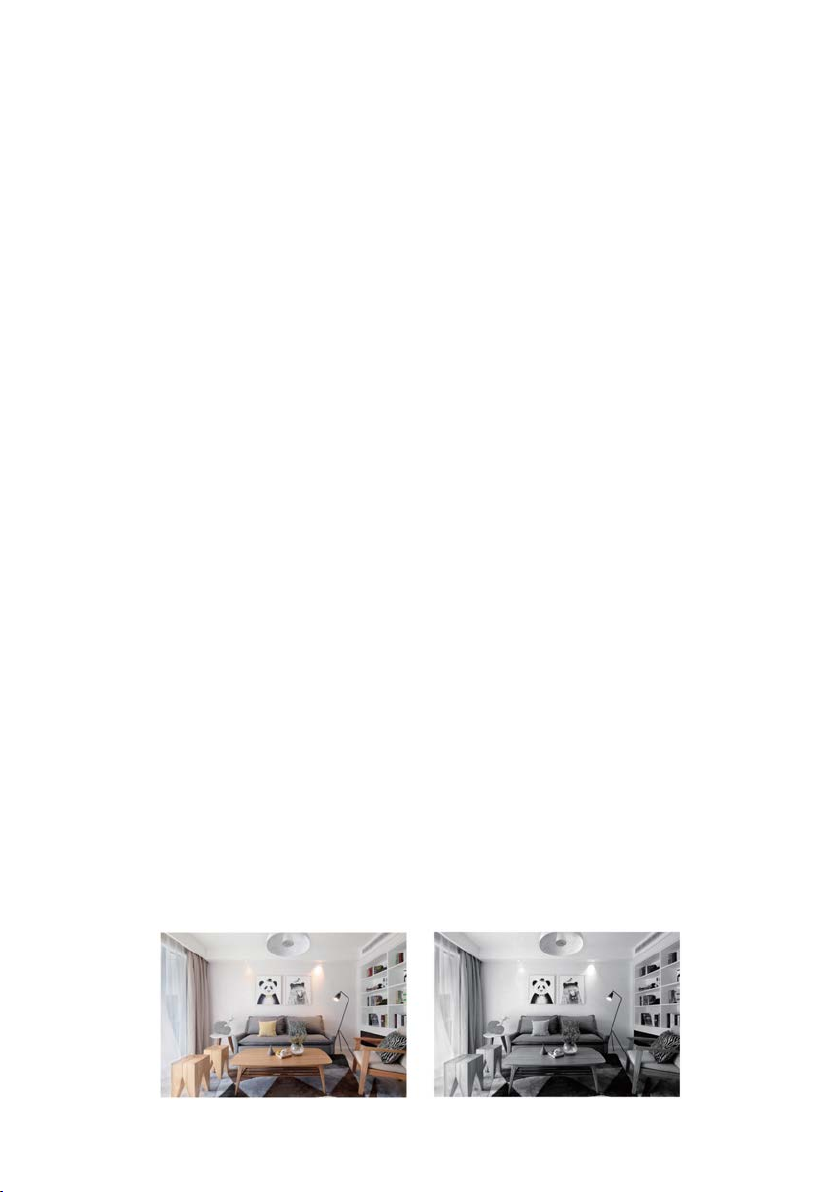
Pan/Tilt
Daytime
Night
Rotate the camera by sliding your finger on your smartphone’s screen allowing you to have
a greater field of vision. Alternatively, tapping “Direction” will bring up the directional pad.
Video Flip
If you’ve mounted the camera upside down, open the camera settings and select “Basic
Function Settings à Flip Screen” to flip the camera’s feed 180°.
Motion Detection
Smart motion detection will send push notifications to your smartphone when movement is
detected.
Sound Detection
The camera can detect sounds such a crying baby and will send push notifications to your
smartphone. The sensitivity of the audio detection can be adjusted in the setting menu.
Temperature & Humidity Detection
The camera can detect the temperature and humidity of the environment. These values
can be monitored using the app.
Record
This function allows 24-hour continuous recording using high-capacity microSD card
storage (max. 128GB).
Screenshot
Saves a screenshot of the current video feed to the microSD card.
Day & Night
Never miss a moment, even in complete darkness, with powerful night-vision technology.
17
Page 18

FAQ
Q: Why is the monitor not displaying properly?
A: Check whether the network is operating correctly. Ensure the camera is positioned
closely to the router. Ensure you are connecting to a 2.4Ghz network, and that this is the
network you are currently connected to on your smartphone.
Q: The device is still appearing in SmarterHome™ app after resetting?
A: Resetting device only initializes network configuration of the camera, but cannot change
the configuration in the app. To stop it appearing in the app, you must also remove the
device from the app.
Q: How do I change the camera network to another router?
A: First remove the device from the app, then reset the device manually. It is now ready to
pair using a new network or device.
Q: Why isn’t the camera identifying the microSD card?
A: It is recommended to insert the microSD card while power is off. Confirm whether the
microSD card is normally available and ensure the format is FAT32. Sometimes the
microSD card may not be identified when the internet connection is not stable.
Q: Why aren’t push notifications appearing on my phone?
A: Confirm that the app has been running on the phone and the relevant reminder function
has been enabled from the settings list. Ensure message notification and app permissions
have been enabled on the smart phone.
18
Page 19
19
Page 20

Need more information?
We hope that this user guide has given you
the assistance needed for a simple set-up.
For th e mo st u p-to-date guide for your product,
as well as any additional assistance you may require,
head online to help.kogan.com
20
 Loading...