

Page 1
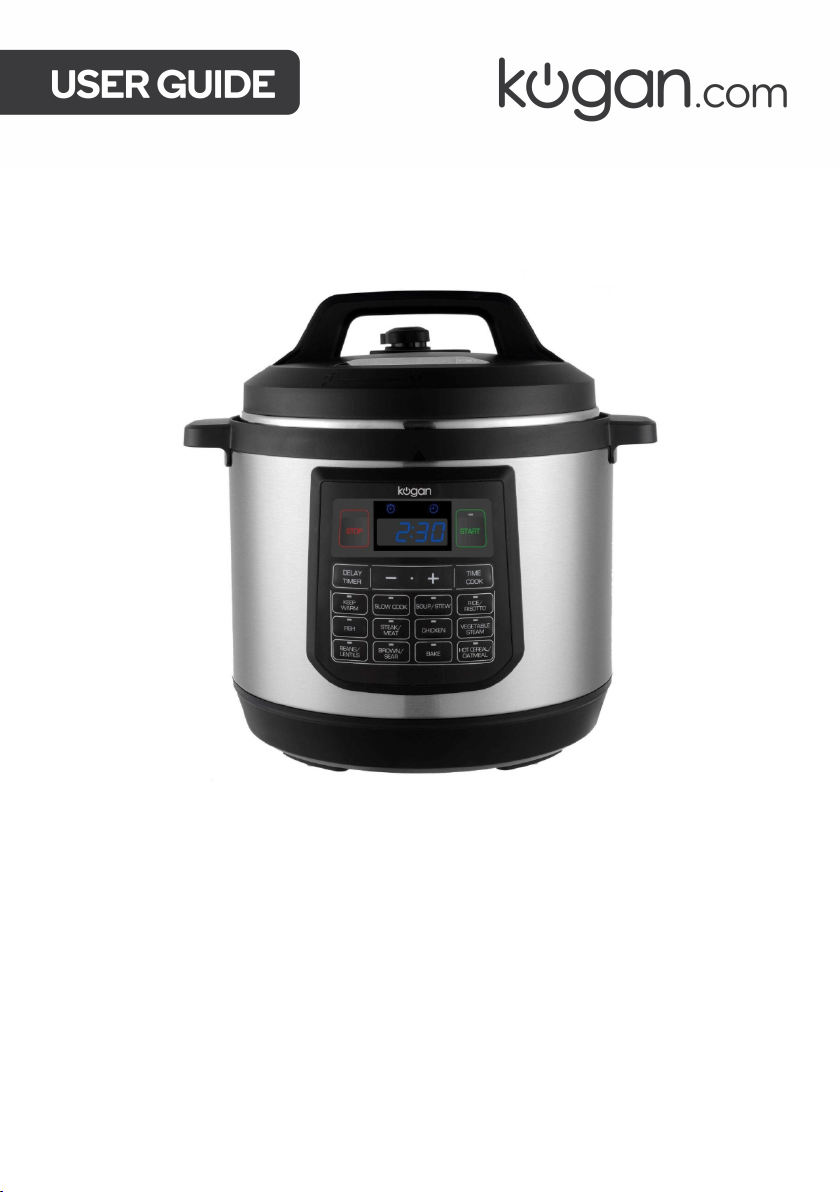
8L 12-IN-1 MULTIFUNCTION
PRESSURE COOKER
KA8PRSCOOKA
Page 2

Page 3

SAFETY & WARNINGS
• Do not operate any appliance with a damaged cord or plug, or after the appliance
malfunctions or has been damaged in any manner. Contact Kogan.com for
assistance.
• This appliance is for household use only. Do not use outdoors.
• Keep the electrical appliance out of reach from children. Do not allow children to
use the appliance without supervision.
• This appliance is not intended for use by person (including children) with reduced
physical, sensory or mental capabilities or lack of experience and knowledge unless
they have been given supervision or instruction concerning use of the appliance by
a person responsible for their safety.
• Children should be supervised to ensure that they do not play with the appliance.
• Never use the pressure cooker in its pressurised mode for deep or shallow frying of
food.
• Do not immerse any part of the appliance in water or other liquid.
• Always turn off and unplug the appliance before cleaning, maintenance relocation
and whenever it is not in use.
• This appliance is intended to be used in household and similar applications such
as:
o Staff kitchen areas in shops, offices, and other working environments.
o Farmhouses.
o By clients in hotels motels and other residential type environments.
o Bed and breakfast type environments.
• The pressure regulators allowing the escape of steam should be checked regularly
to ensure that they are not blocked or obstructed.
• The container must not be opened until the pressure has decreased sufficiently.
• The appliance is not intended to be operated using an external timer or a separate
remote-control system.
• The cooking appliance should be positioned on a stable surface with the handles
positioned to avoid spillage of the hot liquids.
• The heating element surface is subject to residual heat after use; do not touch.
• The cooker cannot gain pressure when the lid is not closed securely, and the lid
cannot be opened when the inner pressure is too high.
• Never place the pressure cooker into a heated oven.
Page 4

• Move the pressure cooker under pressure with the greatest care. Do not touch hot
WARNING:
surfaces. Use the handles and knobs. If necessary, use hand protection.
• Do not use the pressure cooker for any purpose other than those for which it is
intended.
• This appliance cooks under pressure. Scalds may result from inappropriate use of
the pressure cooker. Make sure that the cooker is properly closed before applying
heat; see “Operation” below.
• Never force the pressure cooker open. Do not open before making sure that its
internal pressure has completely dropped. See “Operation” below.
• Never use the pressure cooker without adding water or food (except when using
the Sauté function), as this will seriously damage it.
• Do not fill the cooker beyond 2/3 of its capacity. When cooking foodstuffs which
expand during cooking, such as rice or dehydrated vegetables, do not fill the
cooker to more than half of its capacity.
• Use the appropriate heat source(s) according to the instructions for use.
• After cooking meat with skin (e.g. ox tongue) which may swell under the effect of
pressure, do not prick the meat while the skin is swollen to avoid scalding.
• When cooking doughy food, gently shake the cooker before opening the lid to
avoid food ejection.
• Before each use, check that the valves are not obstructed. See “Operation” below.
• Do not tamper with any of the safety systems beyond the maintenance
instructions specified in the instructions for use.
• Only use spare parts from Kogan.com for the relevant model.
• Ensure to read and understand these instructions before use and retain them for
future reference.
• Keep extremities away from the exhaust valve and lid during operation to
avoid scalding.
• Unplug the appliance from the mains electricity supply before removing
food.
• Do not touch the lid during the cooking procedure or in heating status.
• Never block the periphery of the clamping position to ensure safety.
• Never attempt to uncover the cooker when the floating valve is flopping
or there is pressure inside.
• Be mindful of hot water flowing from the pressure discharging valve when
open the cover.
•
The silicone ring is not a safety device.
Page 5

WARNING: Disregarding the instructions below may result in property
damage, serious personal injury, or death.
• Failure to use AC 220-240W- 50-60Hz electricity can cause fire or electric shock.
• Ensure the power socket used is in good working order to avoid the danger of fire.
• Connect the appliance to a grounded socket with >10A rated current.
• Do not connect other appliances to the same outlet, as the socket may produce
excessive heat and result in fire.
• It is strictly prohibited to use other lids with the product for any form of operation,
as this may cause electric shock or safety hazards
• If the power cord becomes deteriorated or damaged, contact Kogan.com for
further assistance. Do not attempt to replace the power cord.
• It is prohibited to insert foreign matter into any gaps in the housing, as this may
cause electric shock or operational issues.
• Modification or repair by non-professionals is prohibited, as this may cause a fire or
electric shock. Repair or replacement of parts should only be made by Kogan.com.
• Products may not be immersed or sprinkled in water, as doing so could cause
electric shock or electrical short circuiting.
• When the electric pressure cooker is working, the pressure in the cooker rises and
the float valve ascends; do not forcefully open the lid before the pressure has been
completely released.
• If it is difficult to open the lid, do not open it forcefully to avoid causing scalding or
physical Injury.
• Be sure to check the block proof cover and exhaust valve core periodically to
ensure that they are not obstructed.
• Do not cover the exhaust valve with a heavy object or replace it with other objects.
• Never pull the plug with wet hands to avoid electric shock.
• When pulling the plug, you must pinch the plug.
• Do not pull the power cord; otherwise, it will damage the cord, causing electric
shock and short circuit.
• Unplugging when not in use Otherwise, it may produce leakage, fire, or failure.
• In the cooking process, never move your hands to close to the exhaust port to
avoid burns.
• During cooking, do not cover the vent with a cloth and other items.
• When the cooker is working, the lid has a high temperature, do not touch it.
• The total amount of food and water cannot exceed Max scale, otherwise, food
may be cooked unfamiliar or cause malfunction.
Page 6
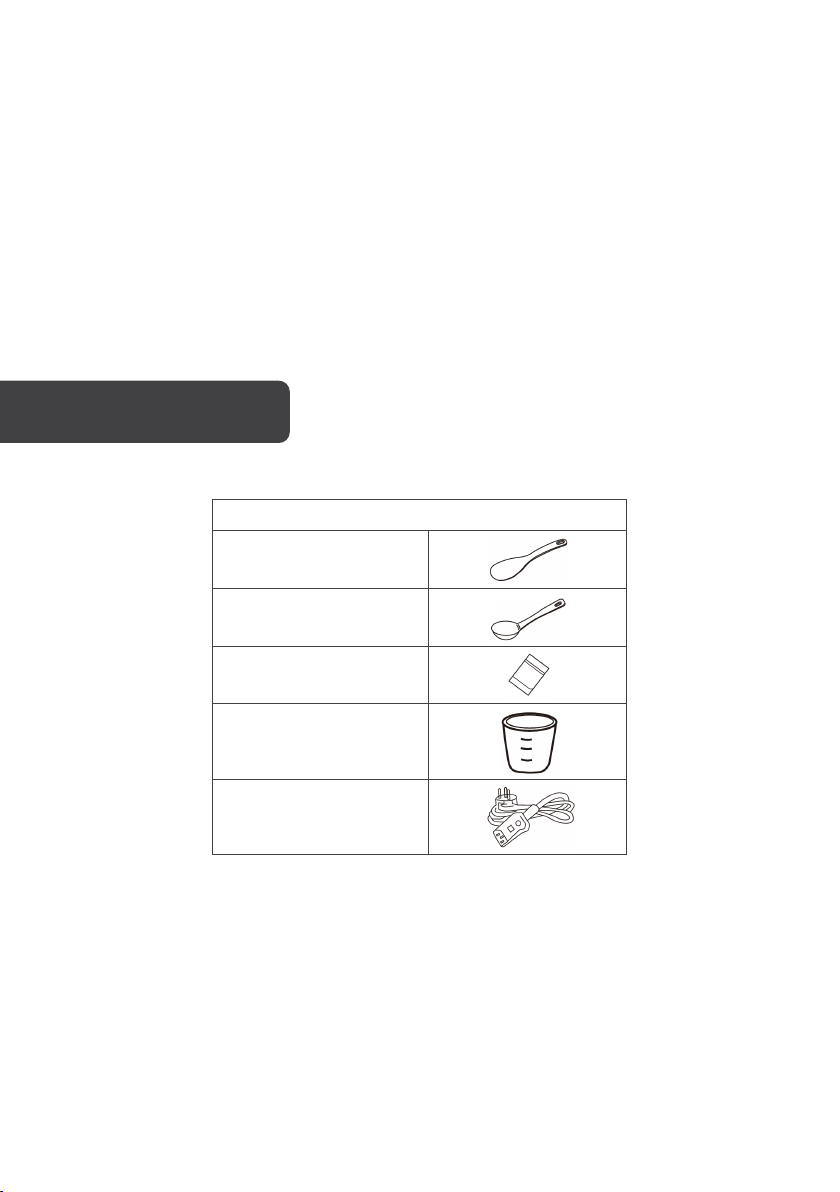
• Do not use a pot other than the dedicated pot
Accessories
• When there is a foreign object on the bottom of the pot and heating plate surface,
remove the foreign object before use. Otherwise, it may cause overheating and
work abnormalities etc.
• Do not put the inner pot on other appliance for heating to avoid deformation or
fault. Please use the special inner pot.
• When moving the product, please hold the handle of cooker body. Do not directly
hold the handle of the lid for avoiding lid dropping.
• Do not use in unstable locations, near water and fire, near walls and furniture, or in
locations exposed to direct sunlight.
IN THE BOX
Spoon
Soup spoon
User Guide
Measuring cup
Power cord components
Page 7
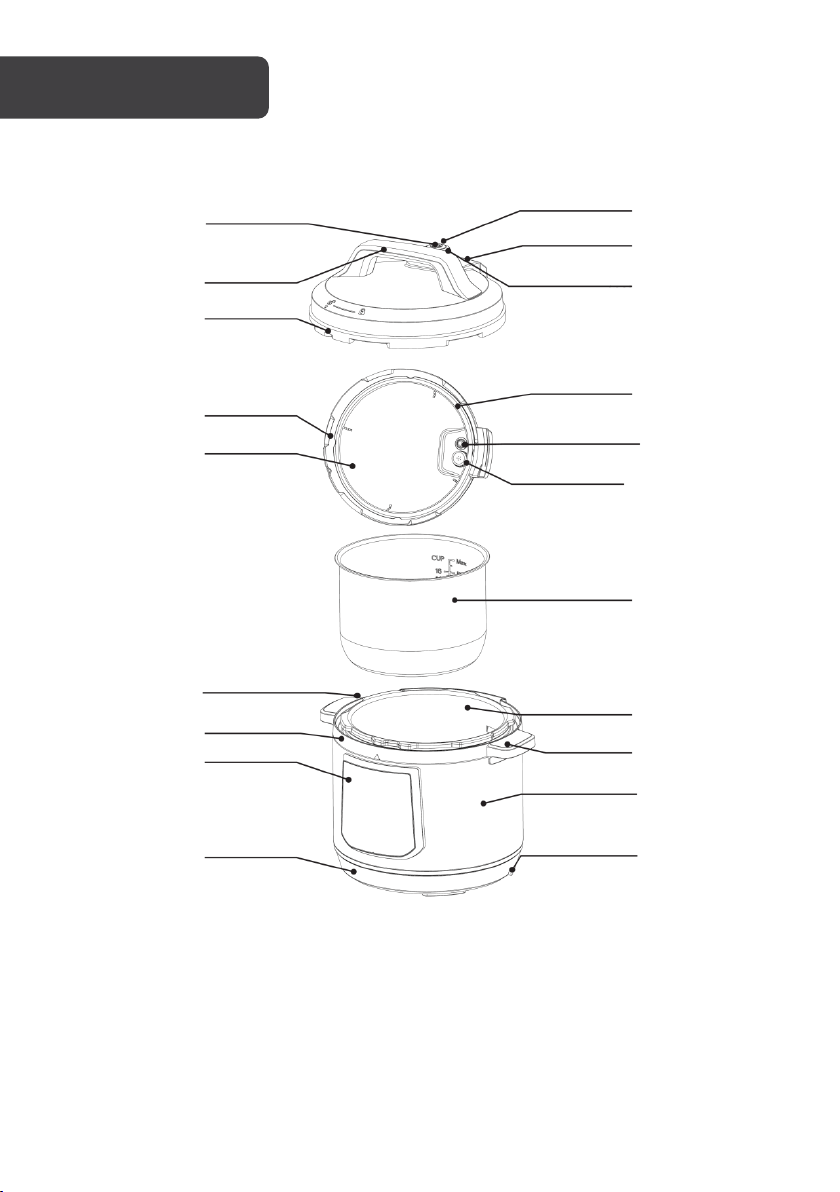
Exhaust valve
handle
Exhaust opening
Upper cover
handle
Lid
Float valve
Exhaust valve (note 1)
Seal ring
Internal
Housing cover
Control Box
Base
Seal ring bracket
Sealing gate (note 2)
Block proof cover
Inner pot
Outer pot
Handles
Cooker body
Power cord socket
OVERVIEW
side of lid
Water box (note 3)
Page 8
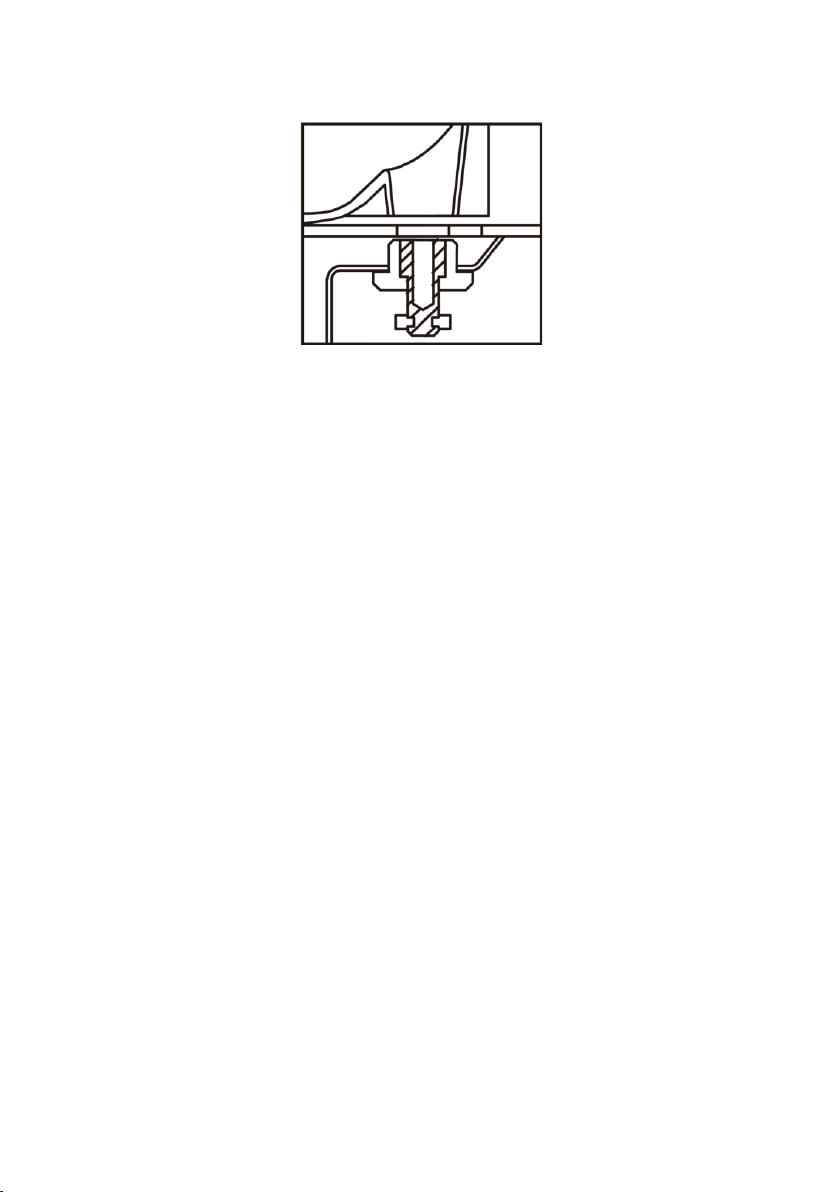
Structural diagram of float valve
• Confirm that the float valve, block proof cover and seal ring are correctly installed
before each use.
• Before placing the inner pot into the cooker each time, ensure to remove any dirt
and water from the external side of the inner pot, and the internal side of the
external pot.
• Always move the product using the handles on the cooker body. Remove any
water from the housing cover with a cloth.
Note:
1. Exhaust valve: Pull out the exhaust valve from the lid. Clean the exhaust valve and
float valve with a brush and cloth at least once a month.
2. Sealing gate: Remove oil and dirt from the sealing gate with mild detergent and a
brush. Oil and dirt in the sealing gate may cause a yellowed appearance; after
washing, it should return to the original stainless-steel colouring. It is suggested to
clean the sealing gate once every 2 months.
3. Water box: After cooking, the steam may condense in the water box of the
external pot. Water in the box should be removed to avoid unpleasant odours, and
the box wiped with a clean cloth.
Page 9
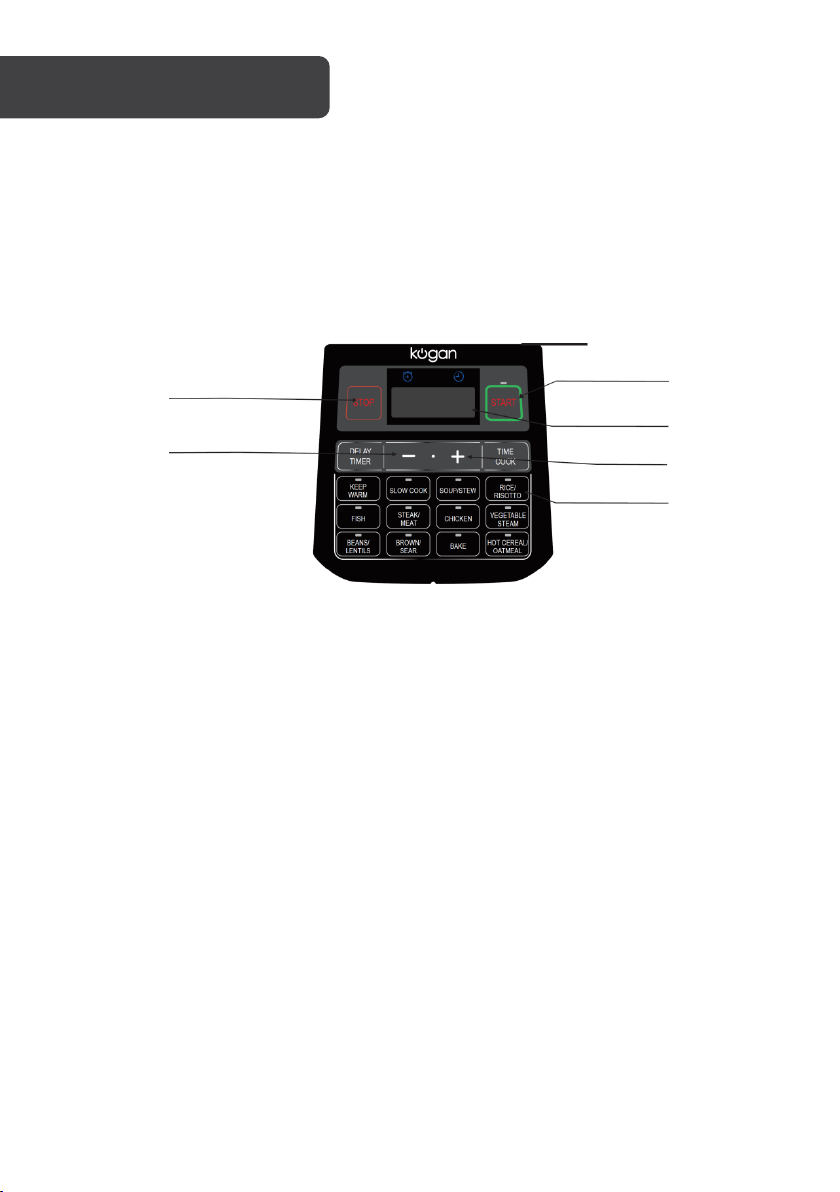
Function panel
“+” Button
Display screen
START button
STOP button
“-” button
INSTRUCTION
When using the appliance for the first time, ensure to remove all accessories from the
cooker body and read the User Manual carefully, particularly these instructions for usage
and the cautions above for avoiding property damage or physical injury.
Controls
Cooking timer function
If the pressure maintaining time is adjusted by pressing “+”/”-” button, it requires entering
into the “Manual Setting” state DELAY TIMER Function Set the time of finishing cooking by
pressing the button.
Page 10
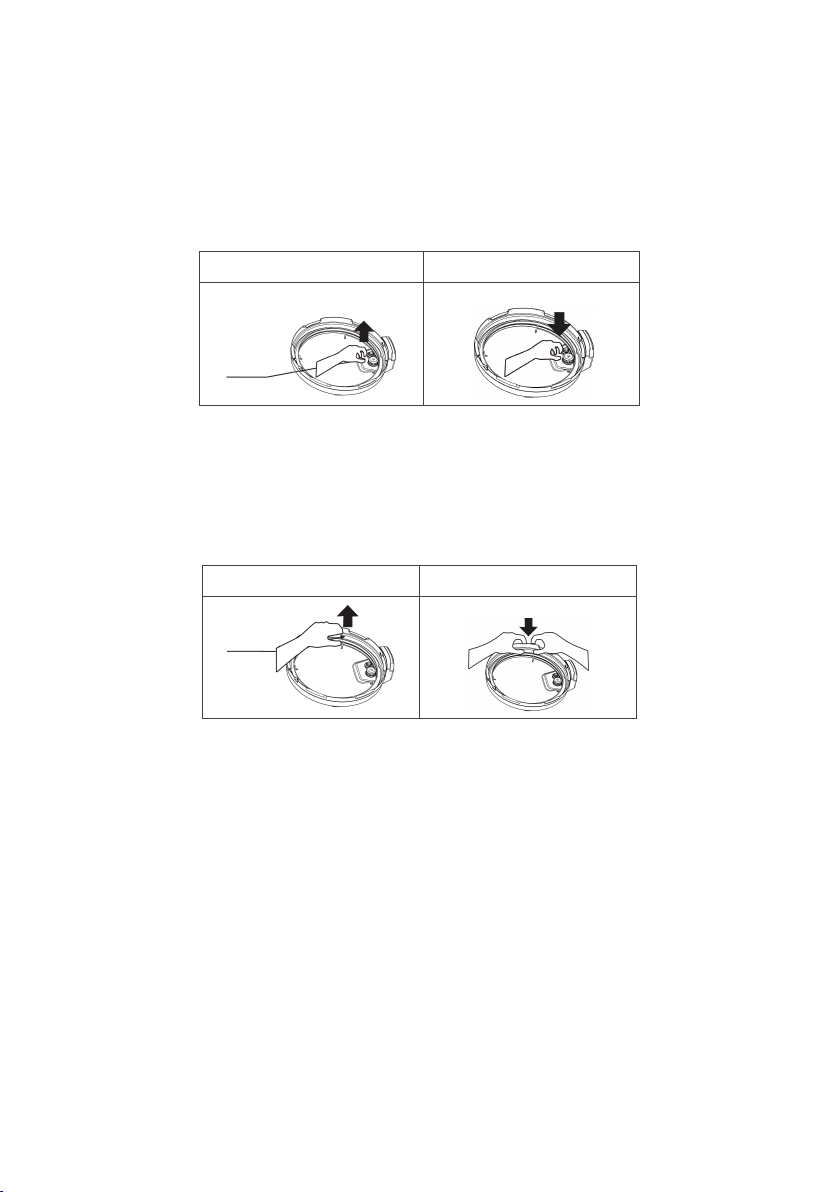
Disassembly/installation of the block proof cover and seal ring
Disassembly
Installation
Press down to install
Disassemble
Install
Press down to install
• Check to ensure seal ring and block proof cover are correctly installed in the upper
cover before use each time.
• After use, clean the seal ring and around of block proof cover to avoid jamming the
cover and the generation of unpleasant odours.
Block
Proof
• Do not pull on the seal ring, as a distorted seal ring may affect the pressure of the
unit.
• Do not use the damaged seal ring, please replace it at the authorised repair office.
Seal ring
Using and maintaining the inner pot
• Do not use the unit whilst the inner pot is empty, as yellowing/spotting, or physical
distortion of the pot’s surfaces may occur.
• Do not use the pot to store acidic, alkaline, or preserved foods for a long period;
although the inner pot has excellent anti-corrosion resistance, slight surface
damage may occur. It is recommended not to use the Keep Warm function with
these foods for more than 2 hours.
• Keep the inner pot clean to prolong the life of the product. Do not immerse it in
water for an extended period. Clean the inner pot with soap, weak detergent, or
warm water to remove dust, oil, and dirt.
• Do not use metal tools, as they will cause damage the inner surface of the pot.
Page 11
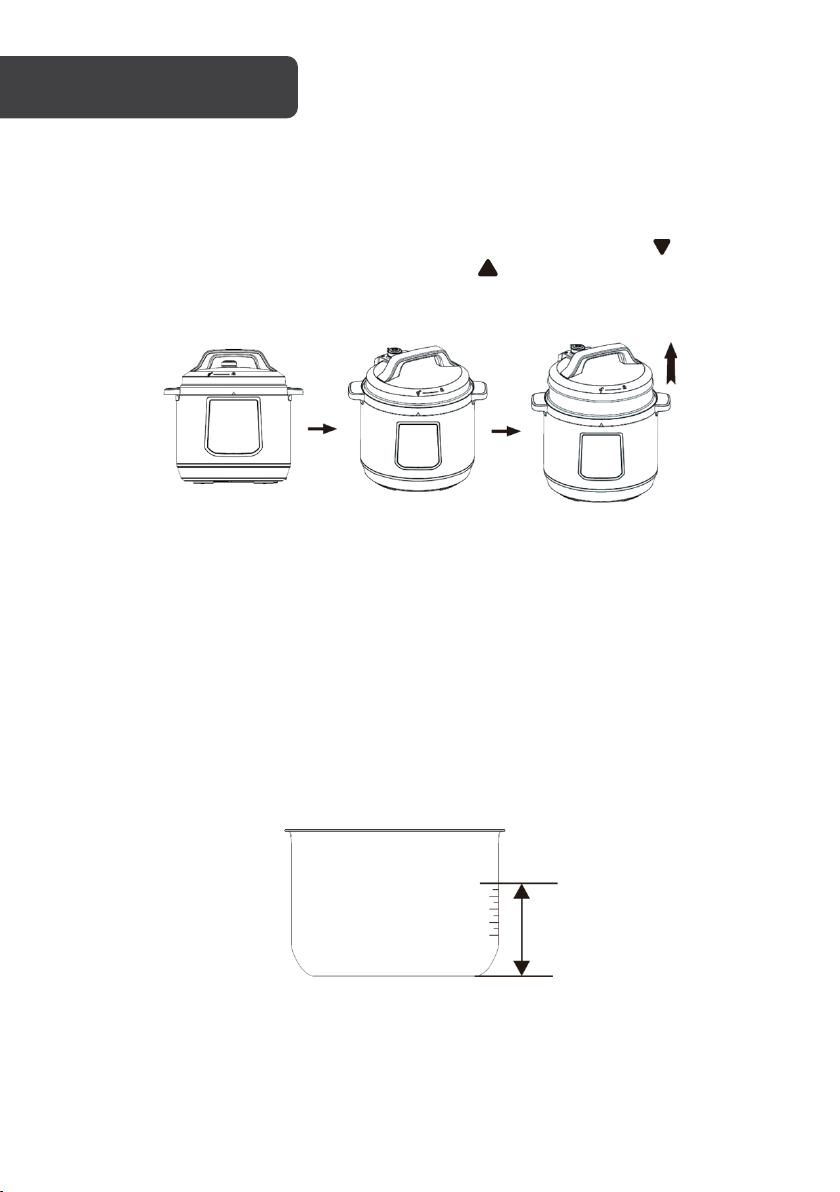
Max
OPERATION
1. Open the lid correctly
• Hold the handle of upper cover and turn it anticlockwise until the “ ” mark on the
edge of the upper cover is aligned with the “ ” mark on the edge of the housing
cover. Lift off the upper cover.
2. Double-check the lid components
• Check if the floater valve and exhaust valve are jammed; confirm if the sealing ring
and block proof cover are correctly installed.
3. Remove the inner pot to add food and water
• The total amount of foods and water shall not exceed the maximum marked on
the inner pot.
Page 12

4. Place the inner pot into the cooker
• Wipe to clean the external surface of the inner pot. Do not allow foreign objects or
water into the inner surface of the electric pressure cooker.
• Rotate the inner pot to the left and right to ensure good contact with the heating
plate.
5. Safely close the lid
• Before closing the lid, ensure the sealing ring is correctly installed.
• Hold the handle of upper cover and align the “ ’’ mark on the edge of the upper
cover with the “ ” mark on the edge of the housing cover. Place the top cover
horizontally on the cooker body and turn the upper cover clockwise until the “ ”
mark on the edge of the housing cover is aligned with the “ ” mark on the lid.
Page 13
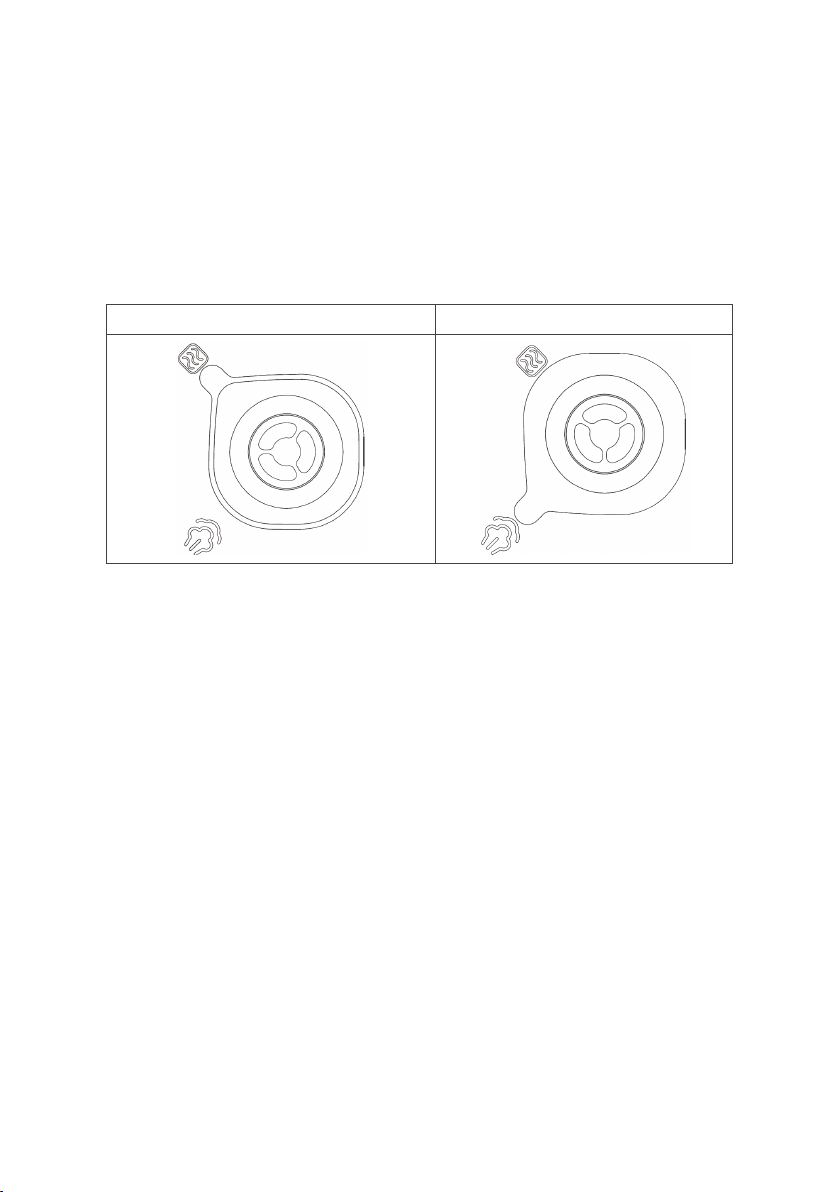
6. Position the exhaust valve
Sealed exhaust valve
Open exhaust valve
• During operation, turn the exhaust valve to the sealed position as shown below.
This will allow the appliance to retain pressure within the chamber.
• For manual exhaust, turn the exhaust valve handle to the open position as shown
below. Always keep hands and face clear of the open exhaust valve.
• Check if the floater valve drops down before using the appliance. Before heating,
the floater valve should always be down.
Function selection
1. Switch the appliance on. If the buttons are inactive when switched on, confirm that
the lid is closed correctly, as they will be disabled until it is properly sealed.
2. Press the “MENU” button to select functions, then press the “+”/”-” buttons to
switch between the available cooking modes. Different functions require different
cooking periods, the more the food, the longer the cooking time.
3. After pressing the desired function button, the electric pressure cooker will
automatically drop the inner pot into the cooker body and begins operation after 10
seconds. During operation, press the “STOP” button to cancel the current cooking
mode and return to the standby state.
4. After cooking or after pressing the “STOP” button, the appliance will sound an alert
and automatically enter the keep warm state. The function indicator will dim, and
the “Keep Warm” indicator will illuminate.
The keep warm time should never exceed 2 hours.
It is normal for the appliance to make a “clicking” sound during operation.
To cook a small amount of food, the inner pot may be lifted when opening the lid; shake the
lid to drop the inner pot back into the cooker body before removing the lid.
Page 14
Safely open the lid
1. Turn off the power supply or remove the power plug
2. Exhaust method:
A. Quickly open the lid
Turn the exhaust valve to the open position until the float valve drops down
(for non-fluid foods only).
B. Open the lid as normal
Allow the electric pressure cooker to cool naturally till the float valve drops
down.
3. Open the lid:
• Turn the upper cover anticlockwise with the left hand, turn it to the cover
open limit place and lift the upper cover with the right hand to open the lid.
• Do not open the lid before the pressure in the pot has been completely
released; do not open the lid forcefully if it is difficult to open.
• Do not pull out the exhaust valve when turning it to the open or sealed
positions.
• After cooking fluid foods (porridge and soup), do not turn the exhaust valve.
Turn off the power supply to allow the unit cool naturally until the float drops
before opening the lid.
• After cooking a large amount of food, do not immediately open the exhaust.
It is suggested to keep the food warm for a time before opening the lid.
Keep Warm function
• After cooking, the electric pressure cooker automatically enters the keep warm
state with the “Keep Warm” indicator illuminated.
• In the standby state, pressing the “Keep Warm” button will also engage this
function.
• The keep warm temperature range is 60°C~80°C (140°F~176°F).
Page 15

Function
Operation
KEEP WARM
SLOW COOK
SOUP/
STEW
• From the standby state, press the “KEEP WARM” button to enter
the keep warm state. The “KEEP WARM” indicator illuminates,
and the digital screen shows the default working time.
• If no button is pressed within 10 seconds, or the “START” button is
pressed, the appliance automatically starts cooking and the
digital screen starts the countdown. The appliance returns to the
standby state when it finishes working.
• From the standby state, press the “SLOW COOK” button; the
indicator light will illuminate, and the digital screen will show the
default working time. Press the “TIME COOK” button and then
the “+”/“-” buttons to adjust the working time.
• If no button is pressed within 10 seconds, or the “START” button is
pressed, the appliance automatically starts cooking and the
digital screen starts the countdown. The unit enters the keep
warm state when it finishes working.
1. From the standby state, press “SOUP/STEW” button; the
indicator light will illuminate, and the digital screen will show the
default working time. Press the “TIME COOK” button and then
the “+”/“-” buttons to adjust the working time.
If no button is pressed within 10 seconds, or the “START” button is
pressed, the appliance automatically starts cooking and the
digital screen starts the countdown once the unit has met the
required pressure. The unit returns to the keep warm state when it
finishes working.
2. Pre-set cooking: before the program starts, press the “DELAY
TIMER” button, and then the “+”/“-” buttons adjust the delay
time. Press “DELAY TIMER” button to change the hour and
minute.
If no button is pressed within 10 seconds, or the “START” button is
pressed, the unit starts the delay time countdown. When the
countdown time elapses, the program will begin.
RICE/
RISOTTO
1. From the standby state, press the “RICE/RISOTTO” button; the
indicator light will illuminate, and the digital screen will display.
If no button is pressed within 10 seconds, or the “START” button is
pressed, the appliance automatically starts cooking and the
digital screen starts the countdown once the unit has met the
required pressure. The unit returns to the keep warm state when it
finishes working.
2. Pre-set cooking: before the program starts, press the “DELAY
TIMER” button, and then the “+”/“-” buttons adjust the delay
time. Press “DELAY TIMER” button to change the hour and
minute.
If no button is pressed within 10 seconds, or the “START” button is
pressed, the unit starts the delay time countdown. When the
countdown time elapses, the program will begin.
Page 16

FISH
STEAK/
MEAT
1. From the standby state, press the ‘FISH’ button; the indicator
light will illuminate, and the digital screen will show the default
working time. Press the “TIME COOK” button and then the “+”/“-”
buttons to adjust the working time.
If no button is pressed within 10 seconds, or the “START” button is
pressed, the appliance automatically starts cooking and the
digital screen starts the countdown once the unit has met the
required pressure. The unit returns to the keep warm state when it
finishes working.
2. Pre-set cooking: before the program starts, press the “DELAY
TIMER” button, and then the “+”/“-” buttons adjust the delay
time. Press “DELAY TIMER” button to change the hour and
minute.
If no button is pressed within 10 seconds, or the “START” button is
pressed, the unit starts the delay time countdown. When the
countdown time elapses, the program will begin.
1. From the standby state, press the “STEAK/MEAT” button; the
indicator light will illuminate, and the digital screen will show the
default working time. Press the “TIME COOK” button and then
the “+”/“-” buttons to adjust the working time.
If no button is pressed within 10 seconds, or the “START” button is
pressed, the appliance automatically starts cooking and the
digital screen starts the countdown once the unit has met the
required pressure. The unit returns to the keep warm state when it
finishes working.
2. Pre-set cooking: before the program starts, press the “DELAY
TIMER” button, and then the “+”/“-” buttons adjust the delay
time. Press “DELAY TIMER” button to change the hour and
minute.
If no button is pressed within 10 seconds, or the “START” button is
pressed, the unit starts the delay time countdown. When the
countdown time elapses, the program will begin.
1. From the standby state, press the “CHICKEN” button; the
indicator light will illuminate, and the digital screen will show the
default working time. Press the “TIME COOK” button and then
the “+”/“-” buttons to adjust the working time.
If no button is pressed within 10 seconds, or the “START” button is
pressed, the appliance automatically starts cooking and the
digital screen starts the countdown once the unit has met the
CHICKEN
required pressure. The unit returns to the keep warm state when it
finishes working.
2. Pre-set cooking: before the program starts, press the “DELAY
TIMER” button, and then the “+”/“-” buttons adjust the delay
time. Press “DELAY TIMER” button to change the hour and
minute.
If no button is pressed within 10 seconds, or the “START” button is
pressed, the unit starts the delay time countdown. When the
countdown time elapses, the program will begin.
Page 17

VEGETABLE/
STEAM
BEANS/
LENTILS
1. From the standby state, press the “VEGETABLE/STEAM” button;
the indicator light will illuminate, and the digital screen will show
the default working time. Press the “TIME COOK” button and
then the “+”/“-” buttons to adjust the working time.
If no button is pressed within 10 seconds, or the “START” button is
pressed, the appliance automatically starts cooking and the
digital screen starts the countdown once the unit has met the
required pressure. The unit returns to the keep warm state when it
finishes working.
2. Pre-set cooking: before the program starts, press the “DELAY
TIMER” button, and then the “+”/“-” buttons adjust the delay
time. Press “DELAY TIMER” button to change the hour and
minute.
If no button is pressed within 10 seconds, or the “START” button is
pressed, the unit starts the delay time countdown. When the
countdown time elapses, the program will begin.
1. From the standby state, press the “BEANS/ LENTILS” button; the
indicator light will illuminate, and the digital screen will show the
default working time. Press the “TIME COOK” button and then
the “+”/“-” buttons to adjust the working time.
If no button is pressed within 10 seconds, or the “START” button is
pressed, the appliance automatically starts cooking and the
digital screen starts the countdown once the unit has met the
required pressure. The unit returns to the keep warm state when it
finishes working.
2. Pre-set cooking: before the program starts, press the “DELAY
TIMER” button, and then the “+”/“-” buttons adjust the delay
time. Press “DELAY TIMER” button to change the hour and
minute.
If no button is pressed within 10 seconds, or the “START” button is
pressed, the unit starts the delay time countdown. When the
countdown time elapses, the program will begin.
• From the standby state, press “BROWN/SEAR” button; the
indicator light will illuminate, and the digital screen will show the
default working time.
BROWN/
SEAR
• If no button is pressed within 10 seconds, or the “START” button is
pressed, the appliance automatically starts cooking and the
digital screen starts the countdown. The unit enters the keep
warm state when it finishes working.
• The lid should not be in place when using this program.
Page 18

BAKE
HOT
CEREAL/
OATMEAL
1. From the standby state, press the “BAKE’ button; the indicator
light will illuminate, and the digital screen will show the default
working time. Press the “TIME COOK” button and then the “+”/“-”
buttons to adjust the working time.
If no button is pressed within 10 seconds, or the “START” button is
pressed, the appliance automatically starts cooking and the
digital screen starts the countdown once the unit has met the
required pressure. The unit returns to the keep warm state when it
finishes working.
2. Pre-set cooking: before the program starts, press the “DELAY
TIMER” button, and then the “+”/“-” buttons adjust the delay
time. Press “DELAY TIMER” button to change the hour and
minute.
If no button is pressed within 10 seconds, or the “START” button is
pressed, the unit starts the delay time countdown. When the
countdown time elapses, the program will begin.
1. From the standby state, press the “HOT CEREAL/OATMEAL”
button; the indicator light will illuminate, and the digital screen
will show the default working time. Press the “TIME COOK”
button and then the “+”/“-” buttons to adjust the working time.
If no button is pressed within 10 seconds, or the “START” button is
pressed, the appliance automatically starts cooking and the
digital screen starts the countdown. The unit enters the keep
warm state when it finishes working.
2. Pre-set cooking: before the program starts, press the “DELAY
TIMER” button, and then the “+”/“-” buttons adjust the delay
time. Press “DELAY TIMER” button to change the hour and
minute.
If no button is pressed within 10 seconds, or the “START” button is
pressed, the unit starts the delay time countdown. When the
countdown time elapses, the program will begin.
Page 19

Problem
Solution
•
supplied.
• Dust or dirt on the plug or socket.
Remove the dust or dirt.
CLEANING & CARE
Storage
• Periodically clean the cooker and remove any oil and dirt if it is stored on a table.
• Position the electric pressure cooker 30cm away from other kitchen appliances.
Cleaning
Daily
To ensure safe use and the longevity of the product, carefully check and maintain it.
after use
1. Clean after each use.
2. Before cleaning and maintenance, always unplug the power cord and wait until
the product cools.
3. Remove the lid and inner pot, clean with detergent first, then rinse well with water
and wipe dry with a soft cloth.
4. Clean the internal side of the lid with water. The seal ring, block proof cover,
exhaust valve core and float valve can be removed for washing; ensure to correctly
install them after washing and then dry the internal side of the lid with a cloth.
5. Wipe clean the cooker body with a rag or cloth; never soak the cooker body in
water or spray water directly onto it.
check and maintenance
Power cord or plug are expanded, deformed, or
damaged.
• Part of the power cord or plug is heating up
excessively.
• Power cord is flexible with an intermittent power
supply.
• The pressure cooker has abnormal heating and
generates an unpleasant odour.
• Abnormal noise or vibration when power is
Discontinue use and
contact Kogan.com.
Page 20
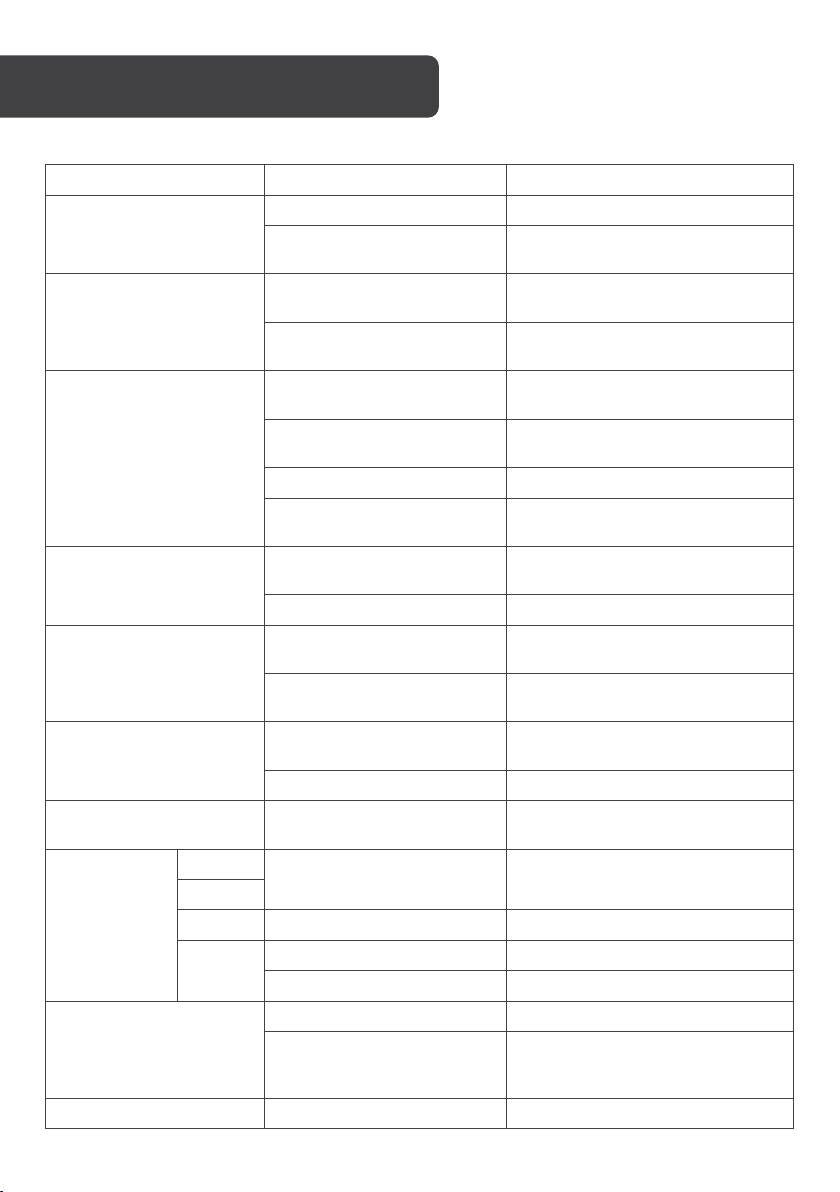
Problem
Cause
Solution
Sealing ring not installed
Position the sealing ring correctly
The floater valve clamps
the pushrod
Float valve is in the
popped-up position
Press the float valve lightly with a
chopstick.
Pressure exists inside the
cooker
Open the lid after the pressure is
completely released.
Sealing ring installed
improperly
Food debris attached to the
sealing ring
Sealing ring damaged
Replace the sealing ring
The lid is not closed
correctly
Food debris on the float
valve gasket
Float valve gasket worn-out
Contact Kogan.com
Too little food and water in
the inner pot
Add water and food according to
the recipe
Steam leaks from the lid or
exhaust valve
Exhaust valve not in sealed
position
Turn the exhaust valve to the
sealed position
Pressure control fault
Contact Kogan.com
Power indicator does not
illuminate
Poor contact with power
socket
E1 error
E2 error
C1 error
Excessive temperature
Add water as required
Excessive temperature
Add water as required
Pressure switch fault
Contact Kogan.com
Too little water
Add water accordingly
Leave the lid on for 5 minutes
completes
Rice too soft
Too much water
Reduce water accordingly
TROUBLESHOOTING
Difficulty closing the lid
Difficulty opening the lid
Steam leaks from the lid
Steam leaks from the
float valve
Float valve unable to rise
Steam emits from
exhaust valve
continuously
Lightly push the pushrod
Install the sealing ring correctly
Clean the sealing ring
Close the lid correctly
Clean the float valve gasket
Contact Kogan.com
All indicators
flash
E8 error
Rice half cooked or too
hard
Please check the power socket
Bottom sensor fault Contact Kogan.com
Lid opened prematurely
once the cooking cycle
Page 21
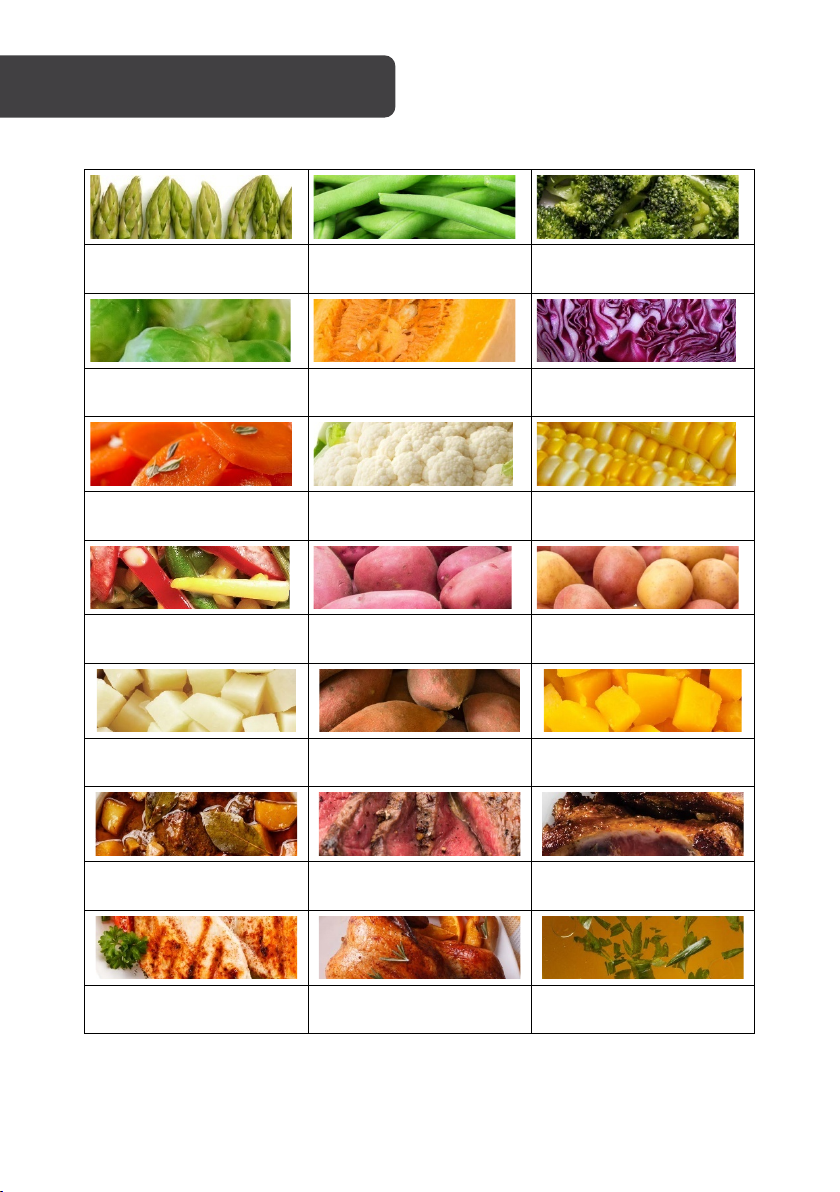
Asparagus
1~2mins
Beans (yellow & green)
1~2mins
Broccoli (florets)
1~2mins
Brussel Sprouts
2~3mins
Butternut Squash
4~6mins
Cabbage (whole/chunks)
2~3mins
Carrots (whole/chunks)
6~8mins
Cauliflower (florets)
2~3mins
Corn (on the cob)
1~2mins
Mixed Vegetables
3~4mins
Potatoes (large, whole)
12~15mins
Potatoes (small, whole)
8~10mins
Potatoes (cubed)
3~4mins
Sweet Potatoes (whole)
12~15mins
Sweet Potatoes (cubed)
1~2mins
Beef (stew)
20mins (per 450g)
Beef (large pieces)
20~25mins (per 450g)
Beef (ribs)
20~25mins (per 450g)
Chicken (breast)
6~8mins (per 450g)
Chicken (whole)
8mins (per 450g)
Chicken (bone stock)
40~50mins
COOKING TIMES
Page 22

Lamb (leg)
15mins (per 450g)
Pork (butt roast)
15mins (per 450g)
Pork (baby back ribs)
15~20mins (per 450g)
Eggs (large)
Hard: 5mins
Barley (pearl)
20~22mins (1: 2.5)
Congee
15-20mins (1:4 ~ 1:5)
Millet
10~12mins (1:1.75)
Oatmeal
2~3mins (1:2)
Oats (steel-cut)
3~5mins (2:3)
Porridge
5~7mins (1:6~1:7)
Quinoa
1min (1:1.25)
Rice (Basmati)
4mins (1:1)
Rice (brown)
20~22mins (1:1)
Rice (wild)
20~25mins (1:2)
Black Beans
D 20~25mins/S 6~8 mins
Black Eyed Peas
D 14~18 mins/S 4~5 mins
Chickpeas
D 35~40mins/S 10~15mins
Kidney Beans (red)
D 20~25mins/S 7~8mins
Kidney Beans (white)
D 25~30mins/S 6~9mins
Lentils (green)
D 8~10mins
Lentils (yellow)
D 1~2mins
Lima Beans
D 12~14mins/S 6~10mins
Navy Beans
D 20~25 mins/S 7~8mins
Pigeon Peas (grandules)
D 25~30mins/S 6~9mins
Page 23
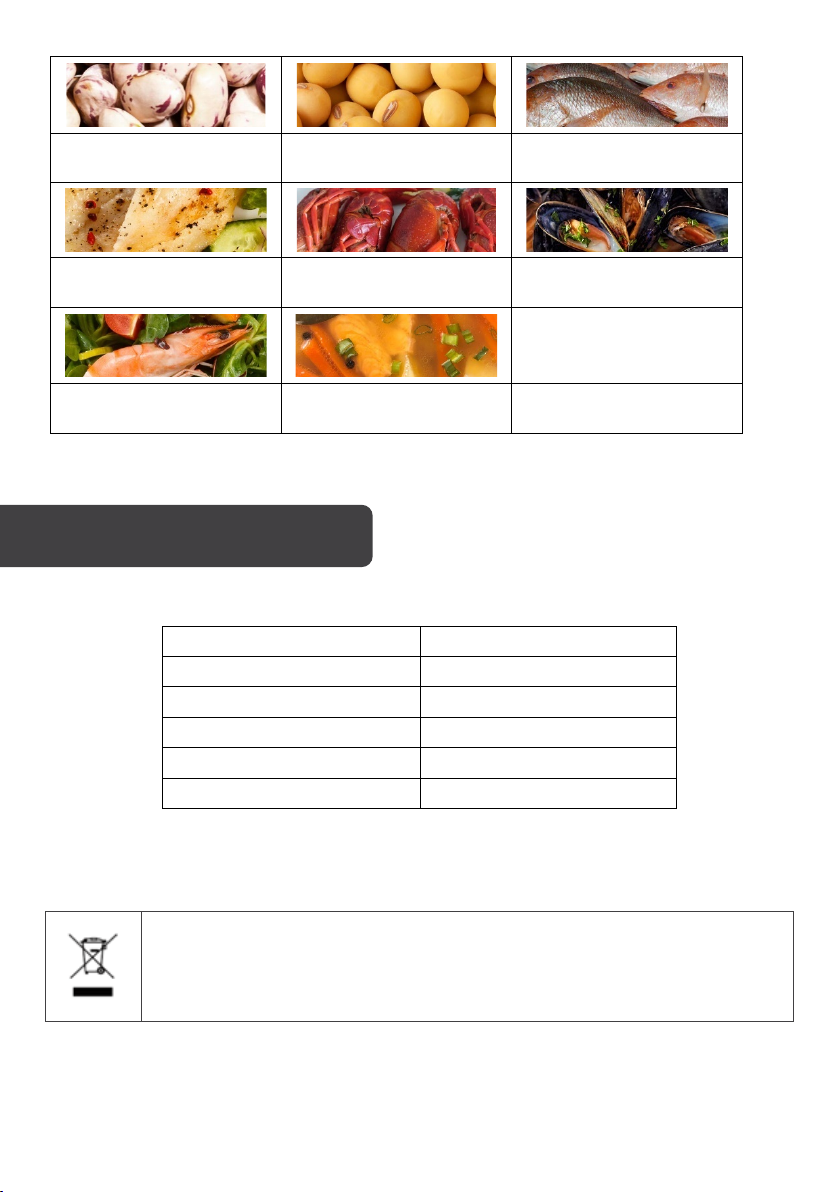
Pinto Beans
D 25~30mins/S 6~9mins
Soybeans
D 35~45mins/S 18~20mins
Fish (whole)
4~5mins
Fish (fillet)
2~3mins
Lobster
Mussels
Shrimp/Prawn
Seafood Stock
Beans & Lentils:
Capacity
8.0L
Power supply
220-240V~50/60Hz
Rated power
1200W
Inner pot size
10.16”
Operational pressure
80kPa
Keep Warm temperature
60°C~80°C (140°F~176°F)
2~3mins
1~2mins
Rice & Grains:
Grain : Water ratio
1~3mins
SPECIFICATIONS
Disposal
This marking indicates that this appliance should not be disposed with other
household wastes. To prevent possible harm to the environment or human
health from uncontrolled waste disposal, recycle it responsibly to promote the
sustainable reuse of material resources.
7~8mins
D = Dry/S = Soaked
Page 24

Need more information?
We hope that this user guide has given you
the assistance needed for a simple set-up.
For the most up-to-date guide for your product,
as well as any additional assistance you may require,
head online to help.kogan.com
 Loading...