

Page 1
4K CAMERA DRONE WITH
OBSTACLE AVOIDANCE
INCLUDING 2 BATTERIES
KA4KOADRONA
Page 2

Safety & Warnings
3
Components
5
Overview
6
Before First Use
8
Operation
11
Wi-Fi UAV App
15
Cleaning & Care
19
Troubleshooting
19
2
Page 3
SAFETY & WARNINGS
WARNING: This drone may need to be registered. Check with your
local authority on the rules for registration.
Ensure to read all instructions and warnings in this user guide prior to first use. Retain this
user guide for future reference.
• Do not attempt to touch the drone whilst it is operating under any circumstances.
• This drone is not a toy and can be dangerous when used incorrectly. Follow all
instructions while operating. Disassembling or modifying the drone arbitrarily, operating
improperly, or being unfamiliar with this product may lead to an accident and possible
injuries.
• This drone is intended for use by persons aged 14 years or older. It is recommended that
people between 14-18 years operate the drone under adult supervision.
• Ensure the drone is operated in a safe environment.
• It is recommended that you seek the assistance of an experienced drone pilot before
attempting to fly the drone for the first time. Asking a local expert is the best way to
properly assemble, setup, and fly your drone for the first time. It requires a certain
degree of skill to operate and is subject to normal wear and tear.
• Do not fly this drone higher than 120 metres above ground level.
• Do not fly multiple drones simultaneously. Only one drone can be flown at any given
time.
• Do not allow drone to fly out of visible range.
• Ensure the drone is flown at least 30 metres away from any people.
• Do not fly the drone over populated areas (for example, beaches, parks, and event
venues).
• Do not fly drones within 5.5km of airports. Many locations are considered
no-fly zones and you must ensure that you fly in areas that align with local laws and
ordinances.
• Do not record or photograph people without consent.
• Drones are prone to accidents and failures when piloted incorrectly. Operators are
responsible for their actions as well as any damage or injury caused by pilot error and
radio interference.
• This drone is suitable for indoor and outdoor use. Always fly in a place clear of obstacles
and do not fly the drone in a way that would cause hazards to nearby people and
property.
• Do not operate the drone in unsafe conditions and keep clear of heat sources, wires, or
electric power sources.
3
Page 4

• Do not fly the drone over areas affecting public safety or where there are emergency
operations taking place.
• This drone contains electrical components. Always keep this drone away from water
and other liquids. Exposure to water or moisture in any form can cause this drone to
malfunction resulting in a crash.
• To avoid a potential fire hazard, do not short, reverse the polarity, or puncture batteries.
Battery charging must be done under supervision and in a location out of reach of
children.
• Remove the batteries if they will not be used on the drone for an extended period.
Always dispose of old batteries according to the laws of local environmental authorities.
• Li-Polymer batteries pose higher operational risks compared to other battery types; thus
it is imperative to follow its usage instructions.
• Avoid contact between the battery and metallic objects.
• If there is an increase in battery temperature after operation, cease use immediately
and allow it to cool down. Continuous use of this battery may cause it to expand,
deform, explode, or result in potential fire hazards.
• Do not place heavy objects directly onto the drone or any of its components.
• Images used in this user guide are for reference only.
Battery warnings
• There is a certain risk when using a lithium battery. It may cause fire, bodily injuries, or
property loss. Users must be aware of the risks and take full of responsibility if using the
battery improperly.
• If battery leakage occurs, avoid contact with your eyes or skin. If there is contact, wash
your eyes with water and seek medical care immediately.
• Remove the plug immediately if there is any peculiar smell, noise, or smog.
• Do not use third-party chargers.
• Do not charge a diluted or outworn battery.
• Do not overcharge the battery. Unplug the charger once fully charged.
• Do not charge the battery next to inflammables (for example, carpet, timber floors,
wood furniture, or on the surface of electro-conductive objects).
• Always keep an eye on the battery when charging.
• Do not charge the battery if it has not had sufficient time to cool after use.
• The ambient temperature when charging is between 0–40°C.
• Do not dispose of the battery as rubbish. Familiarise yourself with the local disposal
laws and follow them accordingly.
4
Page 5
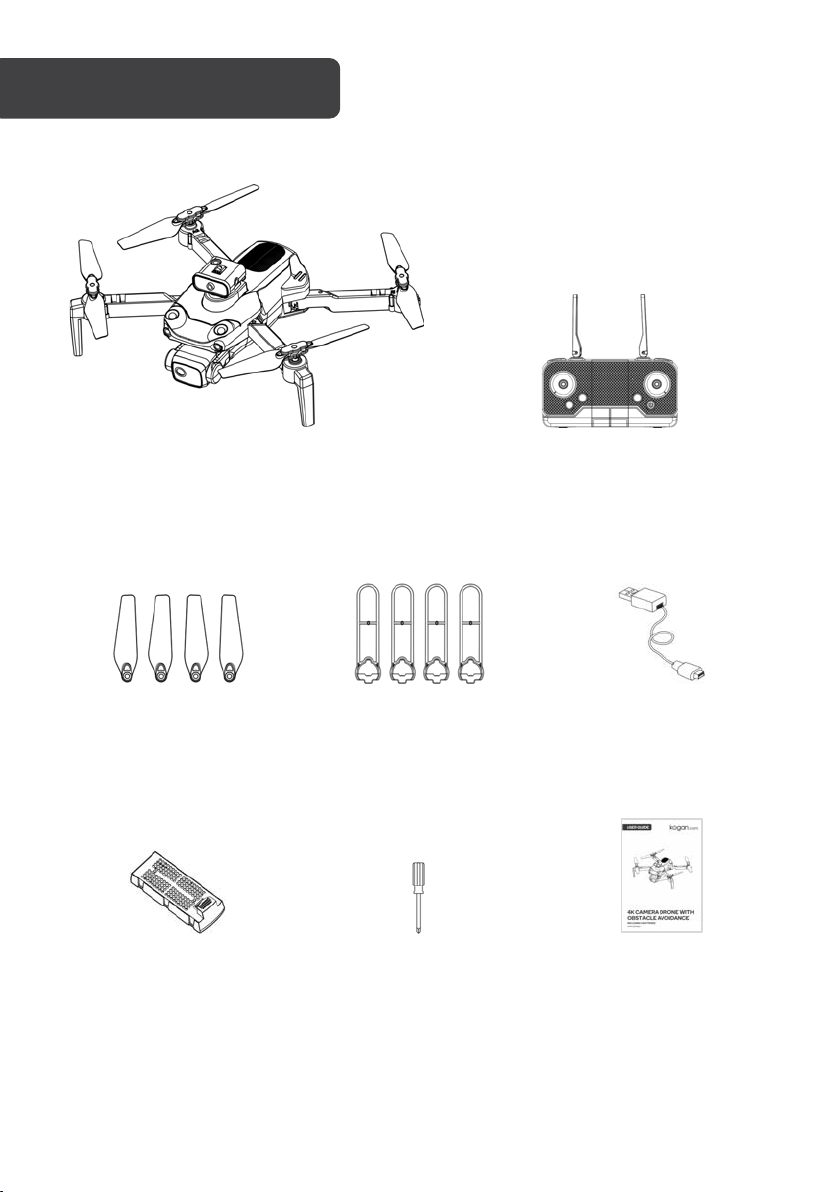
A Drone (x1)
B Remote control (x1)
C Spare propellers (x4)
D Protective guards (x4)
E USB charging cable (x1)
F Batteries (x2)
G Screwdriver (x1)
H User guide (x1)
COMPONENTS
5
Page 6
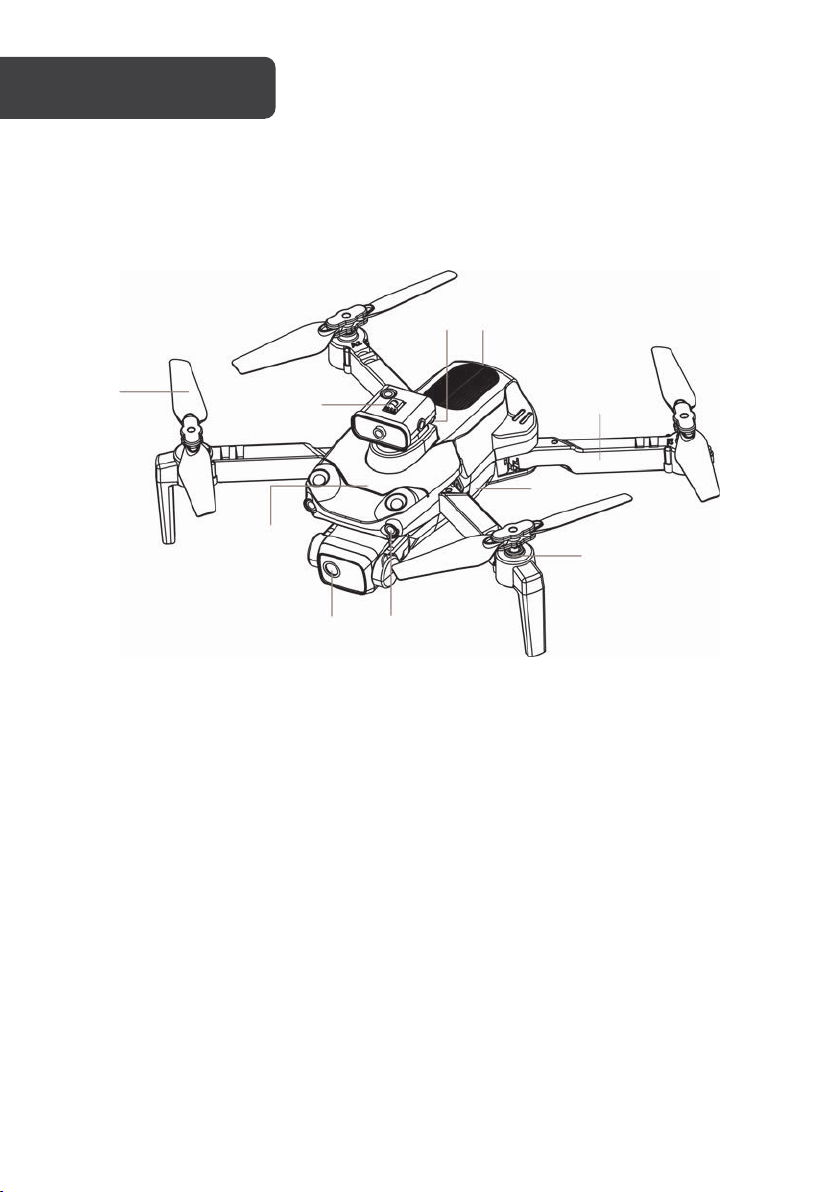
1
Propeller
6 Power button
2
Obstacle avoidance sensor
7 Battery
3
Upper casing
8 Arm
4
Camera
9 Lower casing
5
Indicator light
10
Motor
OVERVIEW
1
2
3
4
5
6
7
8
9
10
Drone
6
Page 7
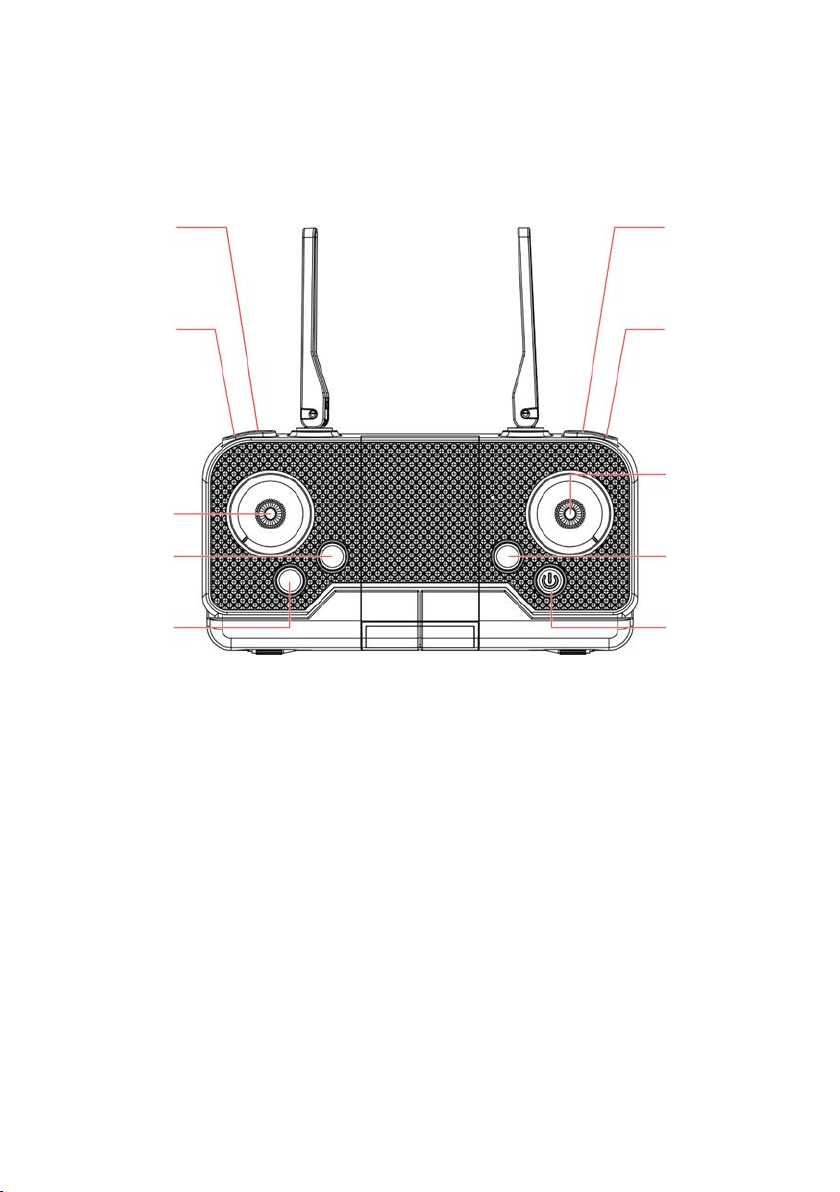
Remote control
11
Trim button
16
Capture/record button
12
Speed/headless mode button
17
Flip and roll/return button
13
Left joystick
18
Right joystick
14
Camera angle up button
19
Take-off/land/emergency stop button
15
Camera angle down button
20
Power/obstacle avoidance button
11
12
13
14
15
16
17
18
19
20
7
Page 8
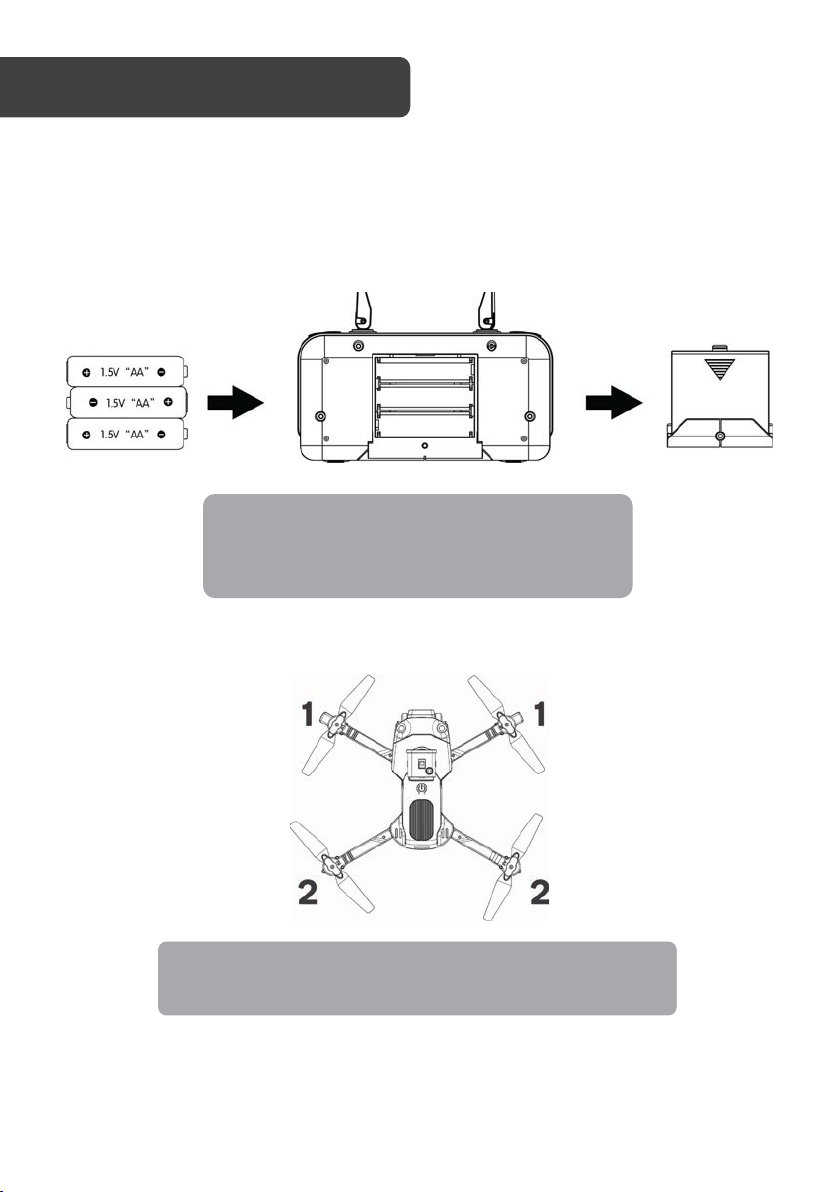
Notes:
• Do not mix old and new batteries together.
• Do not mix different types of batteries.
BEFORE FIRST USE
Note:
After use, fold the back arms in before folding the front arms.
Remote control
The remote control needs x3 AA batteries (not supplied) to operate.
1. Open the battery cover.
2. Noting the polarity markings (+/–), insert x3 AA batteries into the remote control.
Reattach the battery cover.
Drone
Arms
Open the front arms closest to the camera, then open the back arms.
8
Page 9
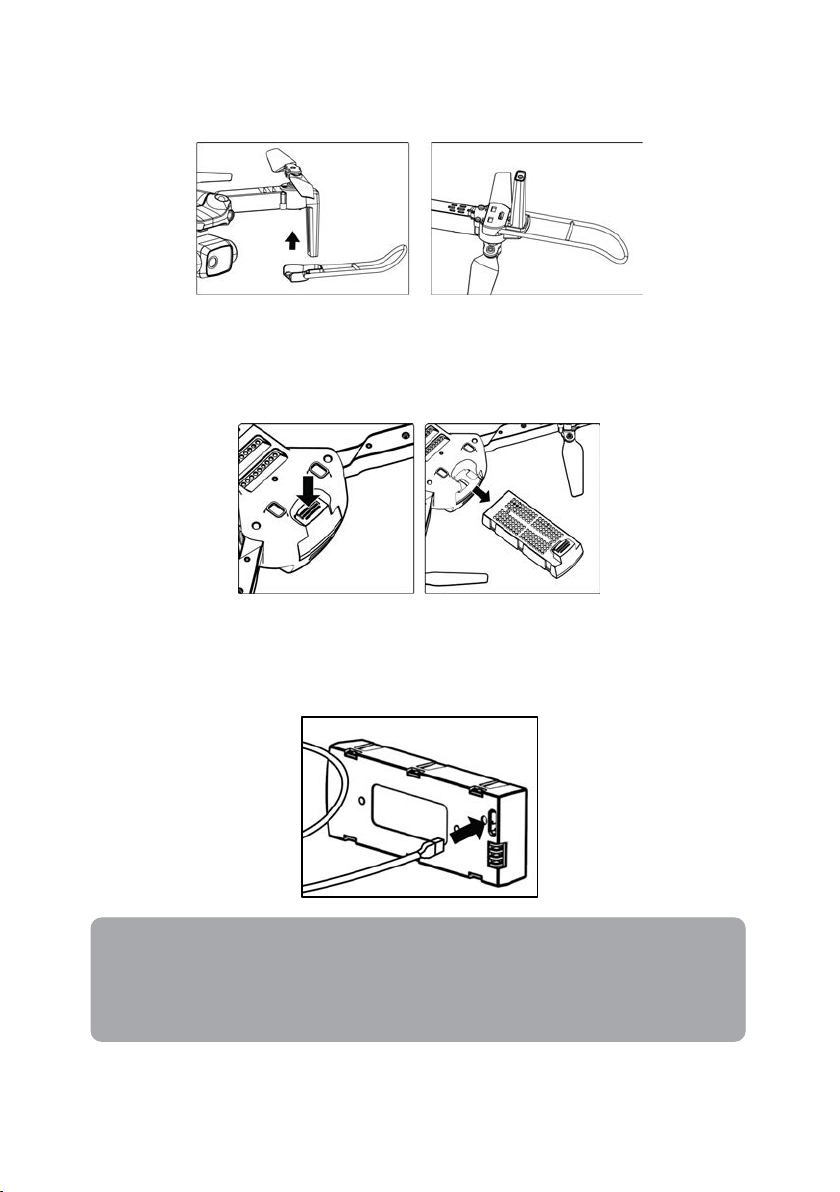
Protective guards
Notes:
• The lights on the battery will illuminate red when charging. The battery
lights will turn off when fully charged.
• A full charge takes around 60–90 minutes.
Align the protective guards with the motors on the arms, then attach them by pressing
them into place.
Battery for the drone
The battery must be charged before first use.
1. Remove the lithium battery from the bottom of the drone.
2. Connect the USB charging cable to the charging port on the battery and a power
adapter (not supplied). Plug the power adapter into a socket and switch it on to
charge.
3. After charging, reattach the battery to the drone.
9
Page 10
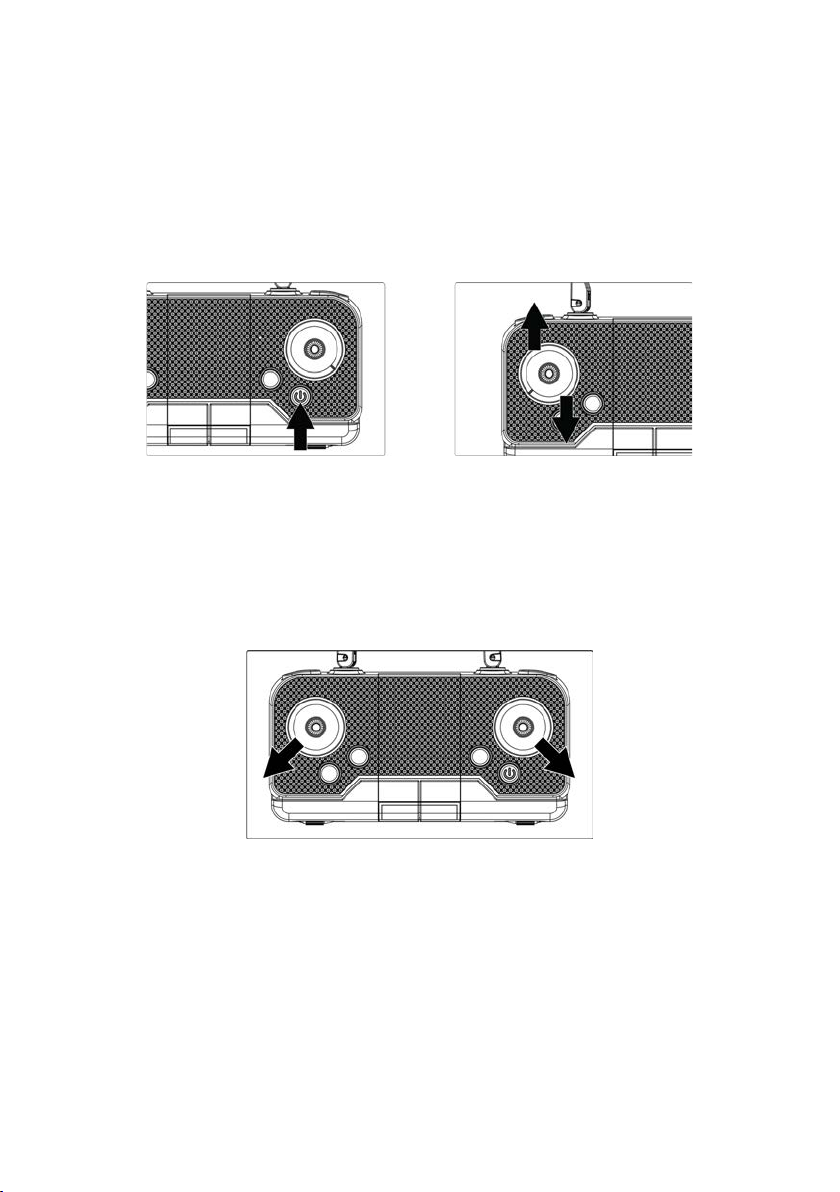
Connecting the signals of the transmitter and receiver
1. Long press the power button on the drone and remote control to turn on the drone
and place it on a level surface. The indicator lights of the transmitter and drone will
be flashing.
2. Push the left joystick to the highest position upwards then push it down to the lowest
position.
3. When you hear two beeps, the indicator lights on the transmitter and drone will
become solidly illuminated. The signal connection is now complete.
Calibrating the transmitter with the drone
This calibration can also be used when the drone is drifting or rotating by itself.
1. Long press the power button to turn on the drone and place it on a level surface.
2. Move and hold the left and right joysticks on the remote control for three seconds in
the positions indicated. The remote control will make a beep and the indicator lights
will flicker.
3. Wait for about three seconds and then the indicator lights will become solidly
illuminated. Calibration is now complete.
10
Page 11
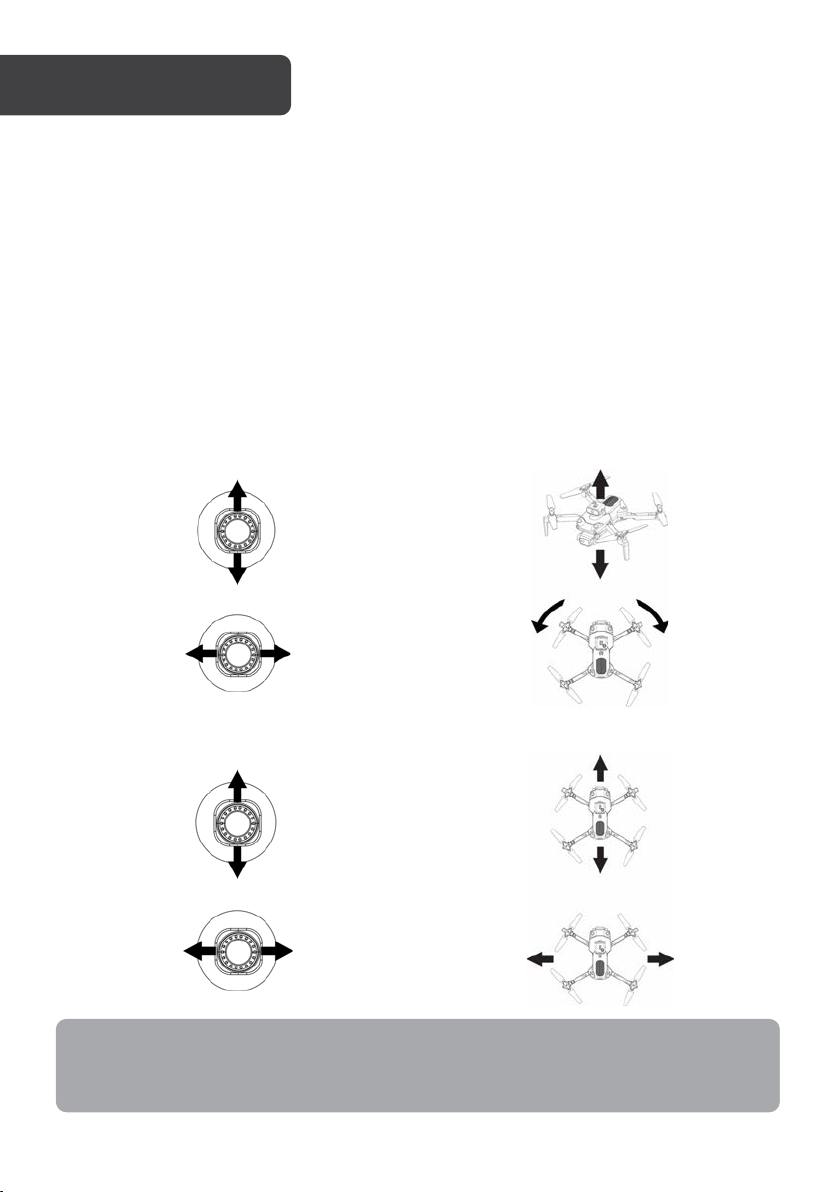
Left joystick
Right joystick
Decrease altitude
(descent)
Increase altitude
(ascent)
Left pan
Right pan
Backward
Forward
OPERATION
Turn orientation
left
Turn orientation
right
Note:
The drone must only be flown during the day in suitable weather conditions. Do not fly
the drone through cloud or fog.
Take-off
1. Long press the power button on the drone and remote control to turn on the drone.
2. Press the take-off button and the drone propellers will start rotating. The drone will
automatically fly at a height of 1.5 metres.
Flight controls
• Use the left joystick to control the flight altitude and to turn the drone’s orientation
left and right
• Use the right joystick to control the forward, backward, left, and right-pan
movements
• If the left joystick is released, the drone will hover at the given height
11
Page 12
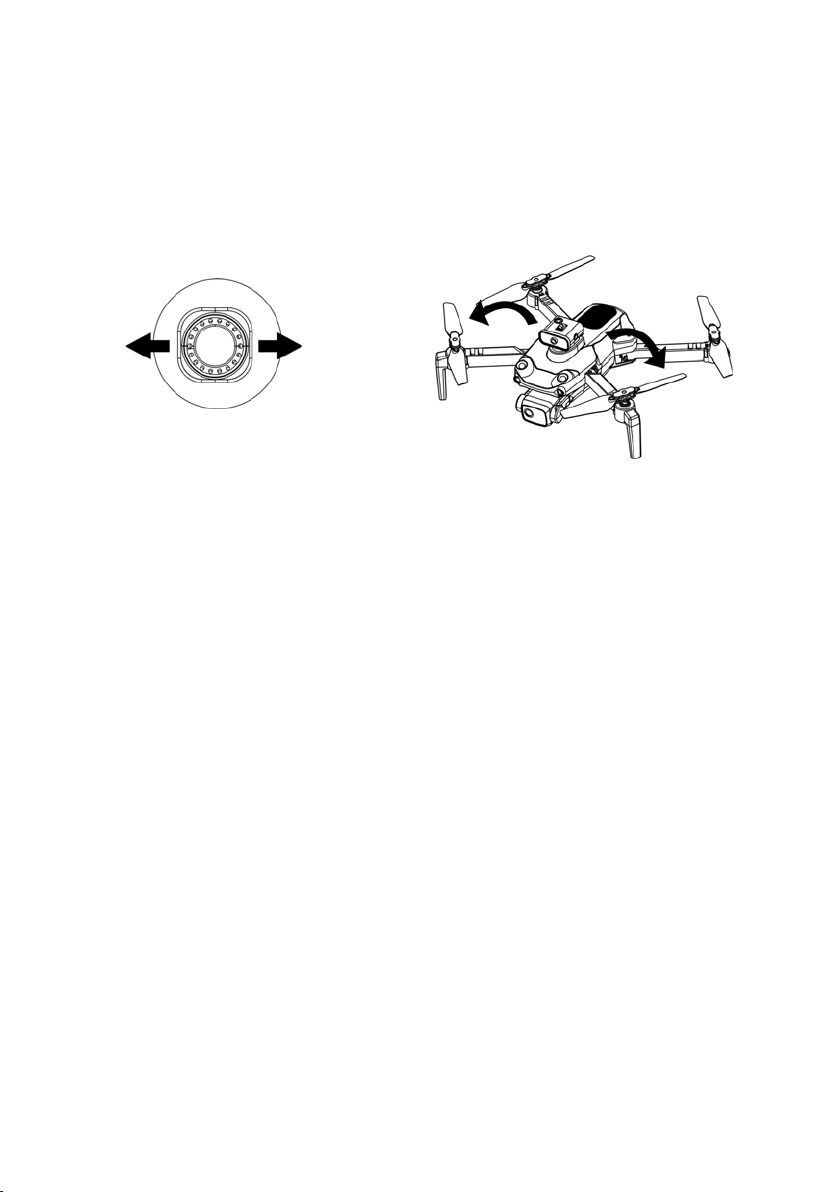
Speed
Flip to left
Flip to right
This drone features three speed settings. Press the speed button to switch between the
three speeds.
Flips and rolls
When the drone is more than three metres off the ground, press the flip and roll button and
move the right joystick either left or right. The drone will then flip in that direction.
Return
If you wish the drone to come back to its take-off point, long press the return button. The
drone will then return to the location where it took off.
Taking photos and recording videos
• Press the capture button and the drone will take a photo
• Press the record button and the drone will start/stop recording video footage
Landing
There are two methods to land the drone:
• Use the left joystick and decrease altitude manually in a desired location and land
• Press the land button. The drone will then automatically slow down and land at its
current location.
Emergency stop
The emergency stop should only be used in emergencies. This will result in the motors
stopping immediately and cause the drone to free fall and crash onto the ground, which
may cause damage. To perform an emergency stop, long press the emergency stop button.
12
Page 13
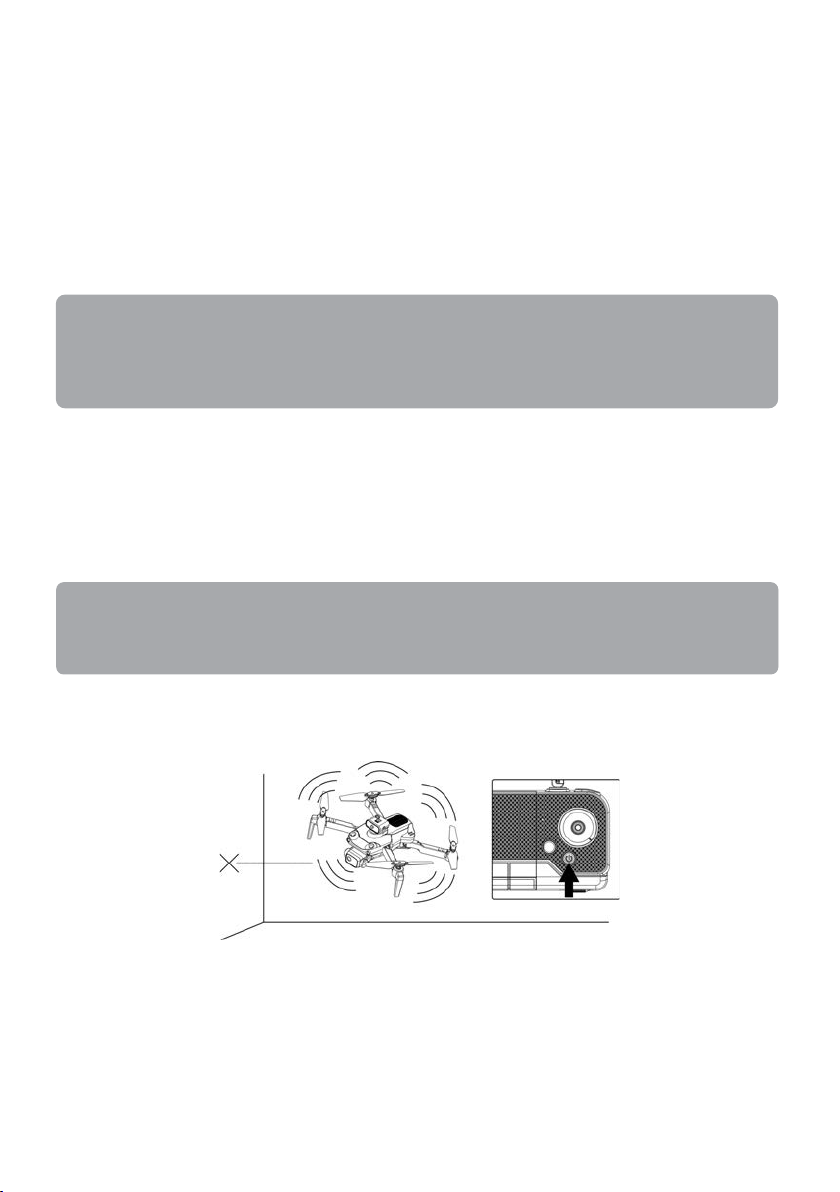
Headless mode
Note:
When the drone is flying within 30cm from the ground, it will have reduced drag which
may lead to the drone being unstable. The lower the drone flies, the more unstable it
will become.
Note:
The speed of the drone will also slow down, and the faster speed setting will not
function when using this mode.
By default, the flight controls of the drone are based on the position of the nose of the drone
at any given time. For beginners, this may make the drone difficult to control if the drone
changes its orientation.
Activating headless mode allows easier control of the drone as it will move according to the
joystick controls regardless of where the nose is facing. To activate headless mode, long
press the headless mode button. The remote control will beep once to confirm.
To exit headless mode, long press the headless mode button again. The remote control will
beep once to confirm.
Obstacle avoidance mode
It is recommended to turn on the obstacle avoidance mode when flying indoors in an
environment at least 6 x 6m in area.
When turned on, if the drone approaches obstacles on three sides (for example, walls), it will
retreat and move in the opposite direction to avoid contact with the obstacles.
To turn on obstacle avoidance mode, press the obstacle avoidance button. To turn off
obstacle avoidance mode, press the same button again.
13
Page 14
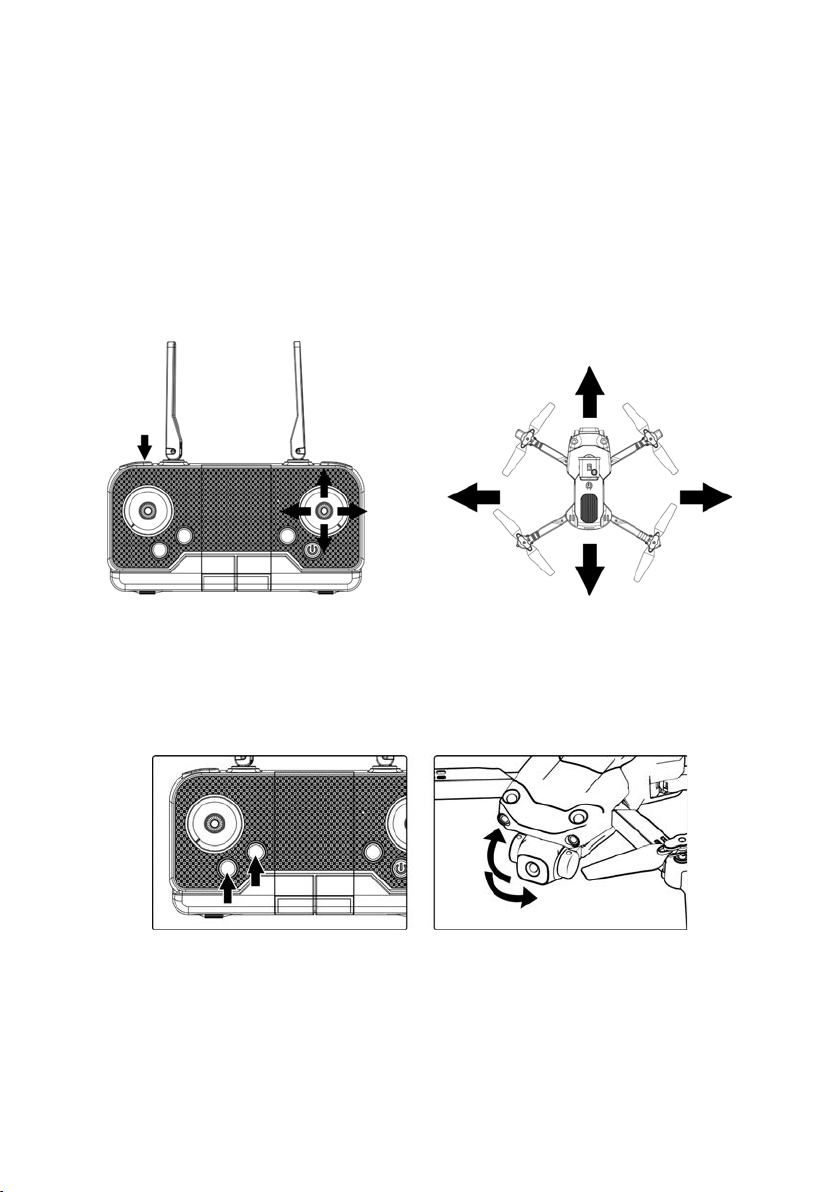
Trim adjustment
Forward
Backward
Left
Right
If the drone is deviating off-course or has lost its balance when stationary, trim adjustments
will need to be made.
1. Press the trim button and you will hear a beep.
2. Move the right joystick in the appropriate direction to regain balance on the drone.
For example, if the drone is tilting towards the right, move the joystick left. Make
these adjustments with the joystick until balance is achieved.
3. After adjusting, once there is no input on the remote control for 5–6 seconds, the
remote control will deactivate the trim function and the right joystick can be used
normally.
Camera angle adjustment
• Press the camera up button to adjust the camera angle upwards
• Press the camera down button to adjust the camera angle downwards
Powering off
Long press the power button on the drone and remote control to switch the drone off.
14
Page 15
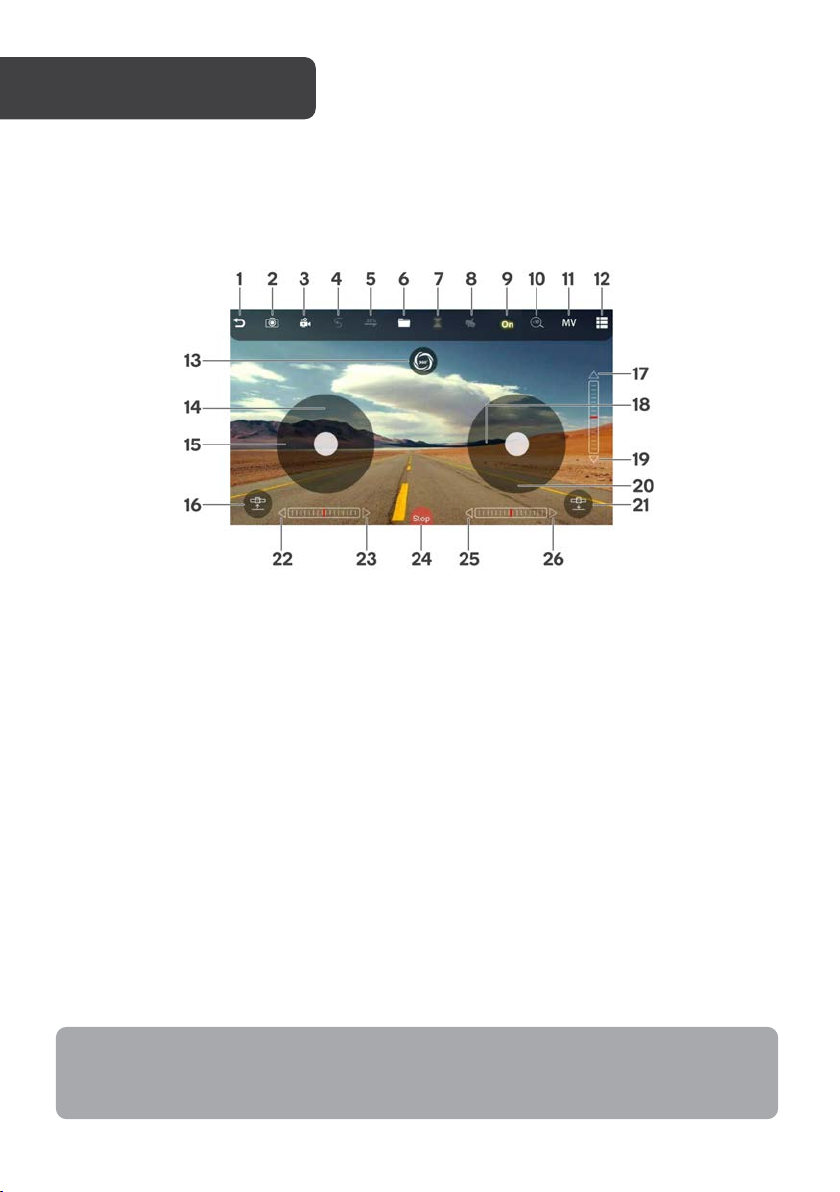
1
Back
14
Accelerate
2
Photo
15
Pitch
3
Video
16
Take-off
4
Flight trajectory
17
Trim adjustment: Forward
5
Speed control (30%, 60%, 100%)
18
Flying sideways
6
Gallery
19
Trim adjustment: Backward
7
Altitude hold
20
Altitude
8
Gravity control
21
Land
9
Show/hide movement controls
22
Trim adjustment: Left
10
Zoom
23
Trim adjustment: Left
11
Video options
24
Emergency stop
12
More functions
25
Trim adjustment: Right
13
360° flips and rolls
26
Trim adjustment: Right
WIFI UAV APP
Note:
The flight trajectory function allows users to pinpoint certain areas they wish the drone
to fly.
Apart from the remote control, the drone can also be controlled by using the ‘WiFi UAV’
app.
Interface (before connection)
Press the ‘Off’ icon to reveal more functions and movement controls.
15
Page 16
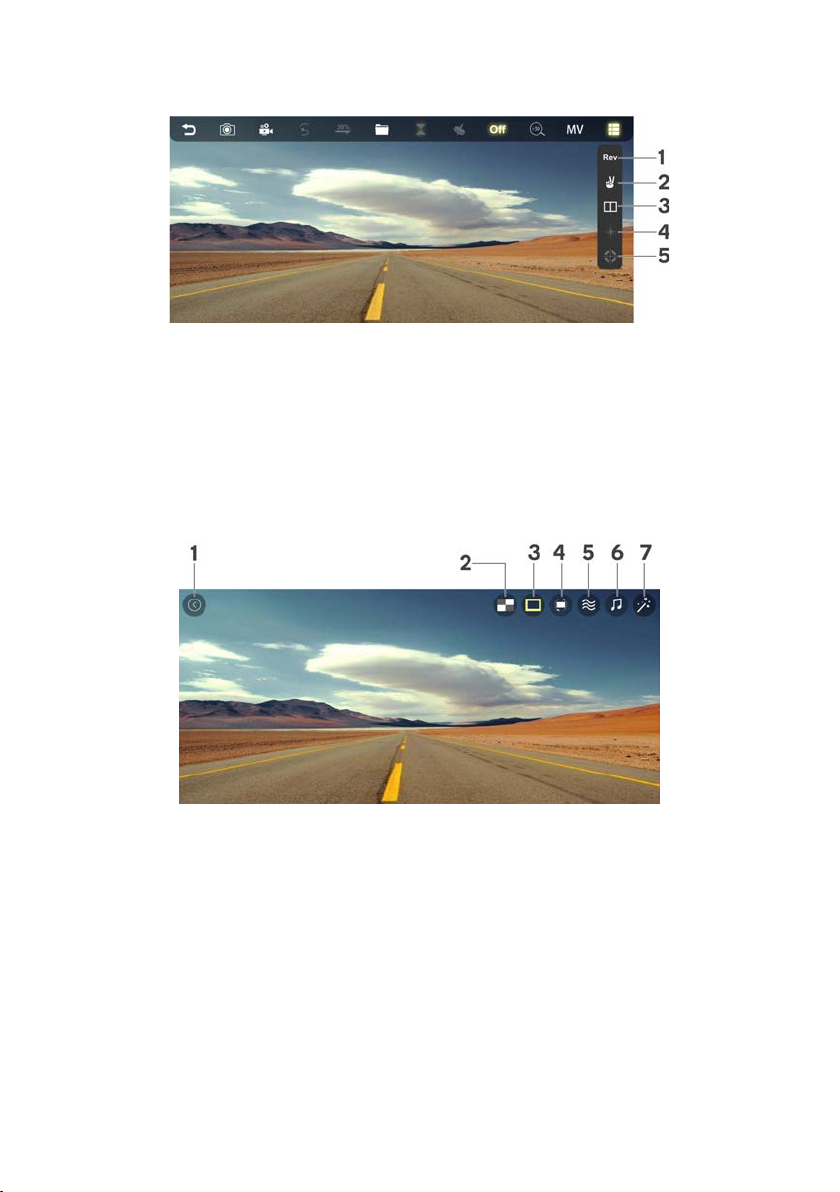
Menu icon (before connection)
1
Reverse camera
4
Headless flight mode
2
Gesture control
5
Calibration
3
3D view
1
Back
5
Wavy effect
2
Split screen
6
Music
3
Aspect ratio
7
Filters
4
Rotate screen
Press the ‘Menu’ icon to view more options.
Video options icon (before connection)
Press the ‘Video options’ icon to view video settings that can be changed.
16
Page 17
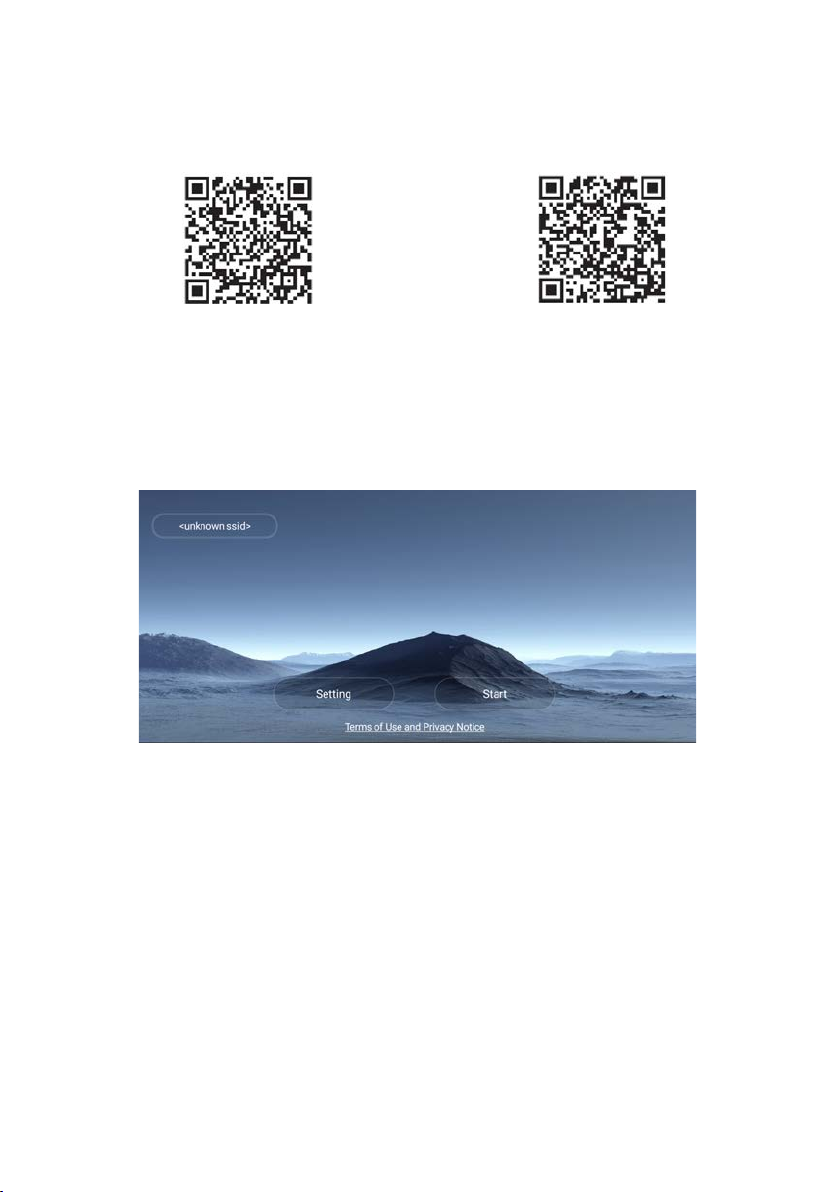
App installation
iOS
Android
1. Scan the below QR code to download the ‘WiFi UAV’ app according to your phone’s
operating system.
2. Turn on the drone. Enter the Wi-Fi settings of your phone and search for the Wi-Fi
network, ‘FLOW__4K***’. Tap to connect.
3. Open the ‘WiFi UAV’ app and tap ‘Start’ to begin use.
17
Page 18
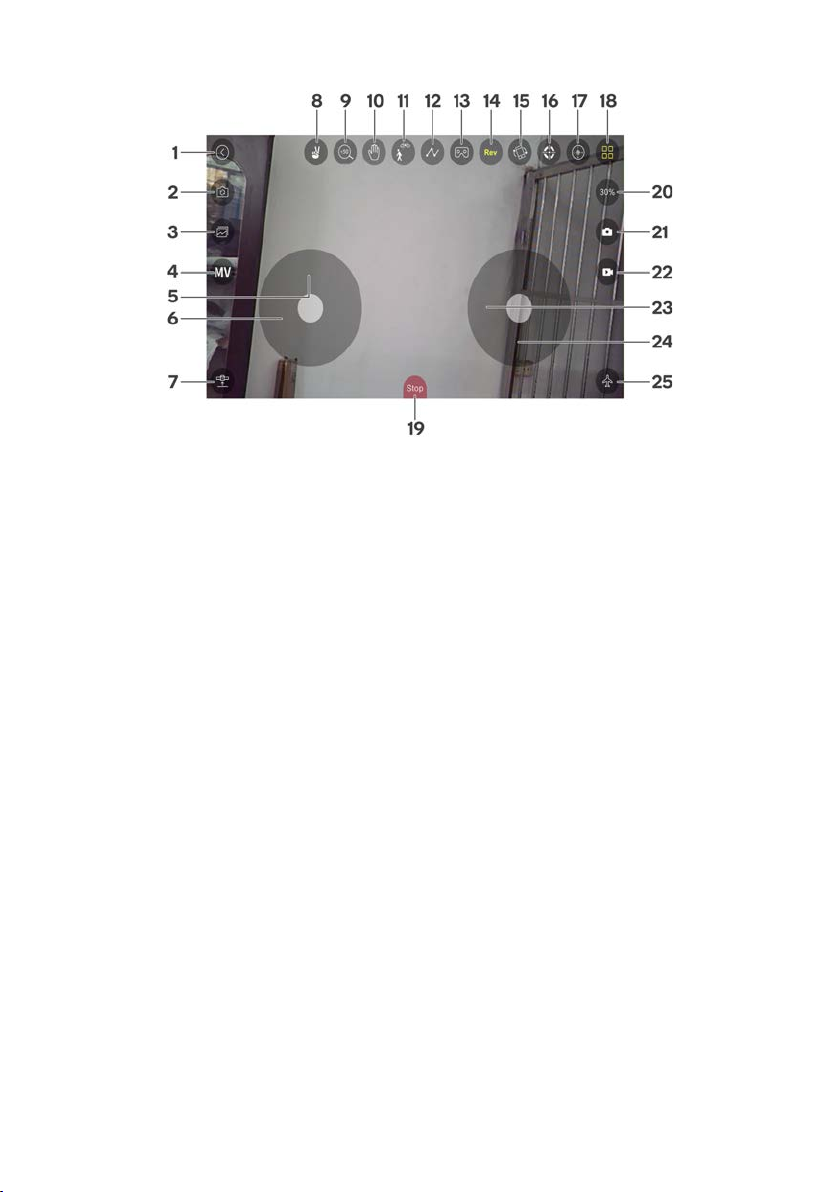
Interface (after connection)
1
Back
14
Mirror camera
2
Shot switching
15
Gravity control
3
Gallery
16
Calibration
4
Video options
17
Headless mode
5
Ascend/descend
18
More functions
6
Turn left/right
19
Emergency stop
7
Take-off
20
Speed control (30%, 60%, 100%)
8
Gesture control (photo)
21
Photo
9
Zoom
22
Video
10
Gesture control (video)
23
Flying sideways
11
Follow
24
Forward/backward
12
Path
25
Land
13
VR split screen mode
Gesture control
When activated, make a “V” sign with your right hand towards the camera and the drone
will take a photo after three seconds.
Face your palm towards the camera and the drone will start a video recording after three
seconds. Face your palm towards the camera again to stop recording.
18
Page 19
Problem
Cause
Solution
The drone is not
responding to the
remote control.
The battery on the
drone is not attached
correctly.
Ensure the battery is securely attached
to the drone.
The wind is too
strong.
Do not fly the drone in strong wind
conditions.
The drone cannot
ascend.
The rotational speed
of the propellers is too
slow.
Push the left joystick up higher.
The battery of the
drone is not fully
charged.
Fully charge the battery of the drone.
The drone is landing
too quickly/not
landing properly.
The left joystick is
pushed down too fast.
Push the left joystick down slowly to
perform a smooth landing.
The drone cannot
be controlled.
The drone is beyond
the effective
controlling distance.
• If using the remote control, ensure the
drone stays within 100 metres
• If using the ‘WiFi UAV’ app, ensure the
drone stays within 40–50 metres
TROUBLESHOOTING
CLEANING & CARE
Once powered off, wipe the drone with a dry cloth.
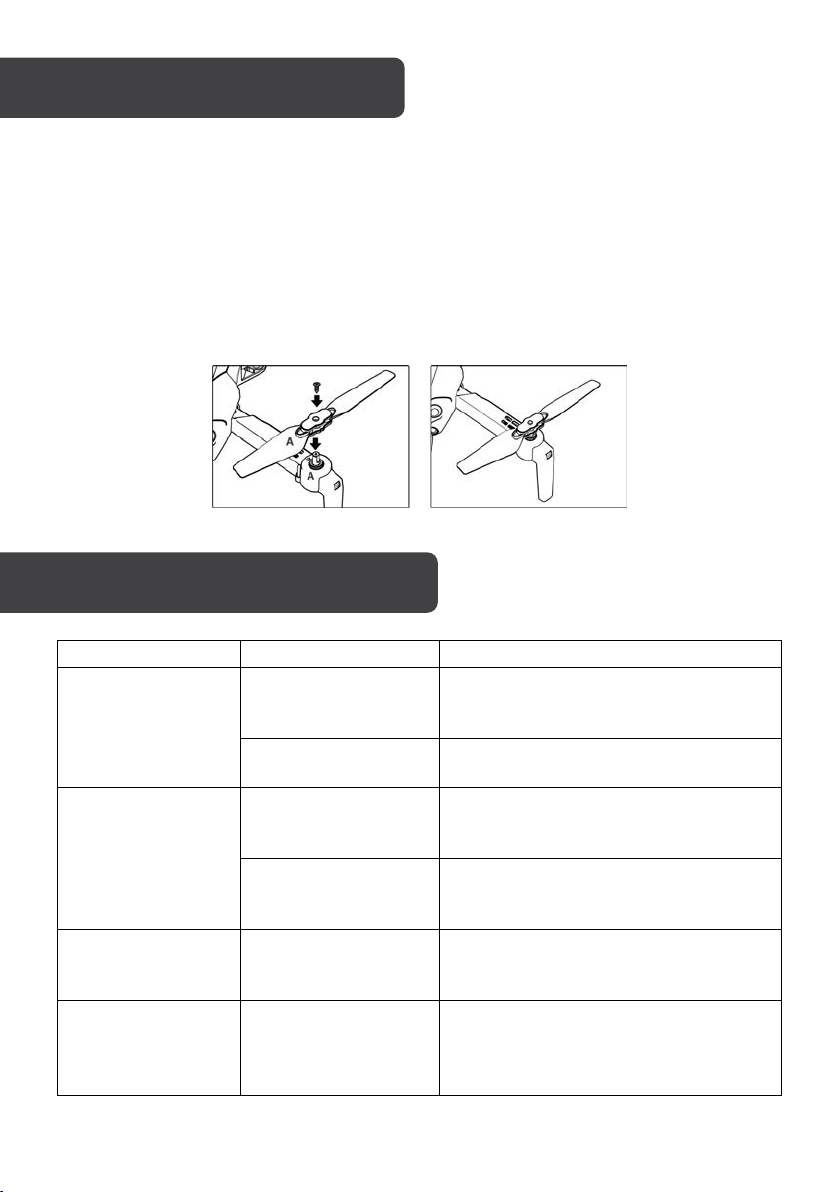
Propeller replacement
1. Use the screwdriver to remove the screws that are attached to the current propellers.
Remove the propellers.
2. Noting the ‘A’ and ‘B’ lettering on the spare propellers, insert the spare propellers
onto the matching motors.
3. Use the screwdriver to tighten the screws onto the propellers to secure them into
place.
19
Page 20
Need more information?
We hope that this user guide has given you
the assistance needed for a simple set-up.
For th e mo st up -to-date guide for your product,
as well as any additional assistance you may require,
head online to help.kogan.com
20
 Loading...