

Page 1
KOGAN SMARTERHOME™ 4.5L
PET FEEDER WITH CAMERA
KA45LSMPFCA
Page 2

Safety & warnings
3
Components
5
Overview
6
Before first use
8
Connect to SmaterHomeTM App
10
Google Home Control
15
Amazon Alexa Control
18
Operation
21
Cleaning & Care
24
Specifications
26
Troubleshooting
27
2
Page 3

SAFETY & WARNINGS
Read all instructions carefully before using this product for the first time. Retain this user
guide for future reference.
• Before leaving, always ensure the power supply is connected and working properly.
• Please use a 5V 2A plug for a reliable power supply.
• Camera function will be disabled when the feeder is switched to battery mode. The
feeder will still dispense food according to your programmed settings in the app.
• When the device is offline, the app will not have access to real-time dispense
information.
• This product should be placed horizontally and securely. Do not tilt, rock, or place it
upside down.
• Keep the feeder in a dry area away from direct sunlight. Avoid placing it in high areas to
prevent damage from accidental falls.
• Do not remove any parts from the feeder except for the food tray and food hopper.
• Do not place any objects on top of the feeder.
• Ensure there are no obstructions near the food outlet to allow for normal feeding of
pets.
Caution
• This product is designed for indoor use only.
• This product is not dishwasher safe. Clean it by hand only.
• Use this feeder only with dry food. It works best with food diameter of 5-15 mm or
smaller.
• This product is not recommended for puppies or kittens younger than 7 months or those
unable to reach the feeding dish.
• Do not use this feeder with puppies, kittens, dogs, or cats with any physical disabilities.
• This feeder is intended for use with dogs or cats ONLY.
• Do not allow small children to play with or be near the feeder.
• Frequently check to ensure proper dispensing.
• Before leaving for an extended period, replace the Battery Backup with 3 new "D" size
batteries.
3
Page 4

• Do not place any foreign objects in the feeder.
• Do not operate the feeder without securely placing the bowl, food hopper, and lid.
• To prevent tripping hazards, keep the power cord away from foot traffic.
• The feeder must be placed on a level surface.
• DO NOT disassemble the feeder except for the bowl, lid, and battery cover.
• Dispose of all packaging material properly. Some items may be packed in poly bags,
which could cause suffocation. Keep them away from children and pets.
• Do not attempt any repairs or modifications to the feeder. If this product shows any sign
of damage, cease use and contact help.Kogan.com for support.
• If you are unsure about the proper meal size for your pet, consult your veterinarian.
• Avoid touching the camera to prevent scratches and oil stains.
4
Page 5
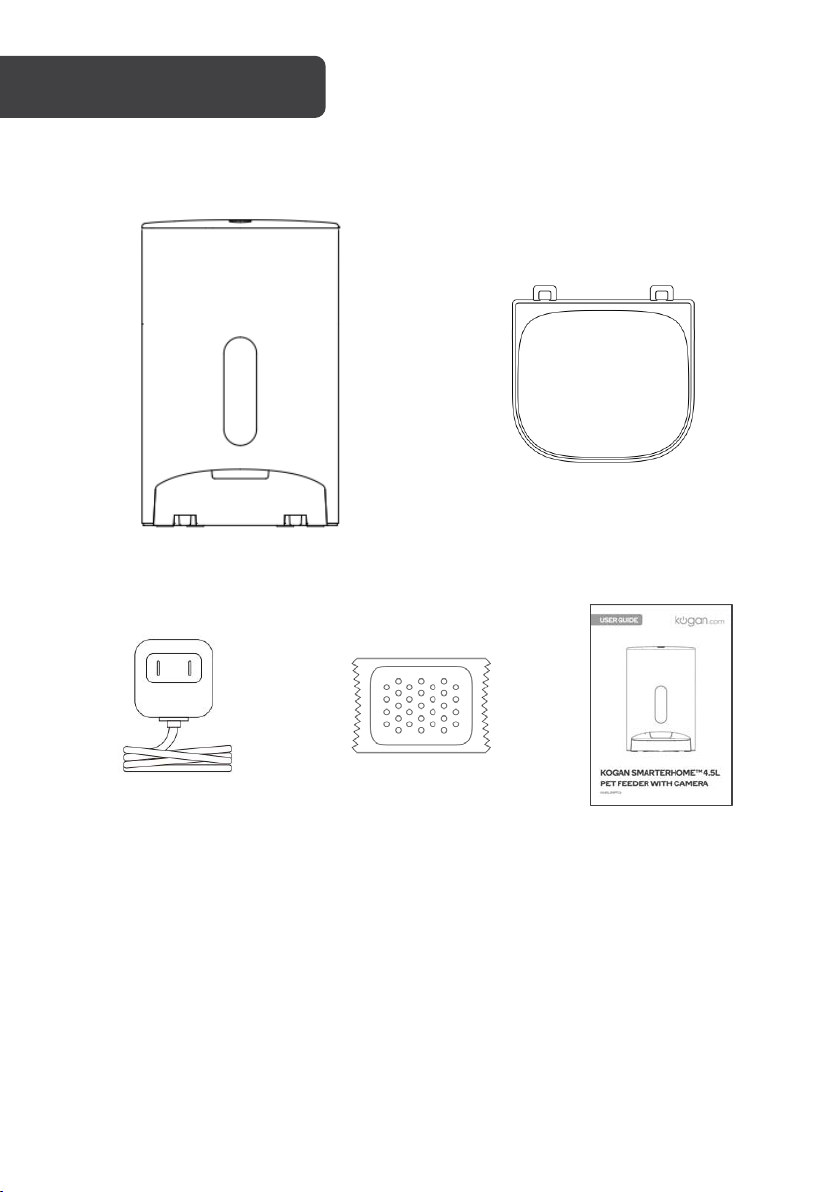
Main Body
Food Bowl
Power Adapter
Desiccant
User Guide
5
Page 6
OVERVIEW
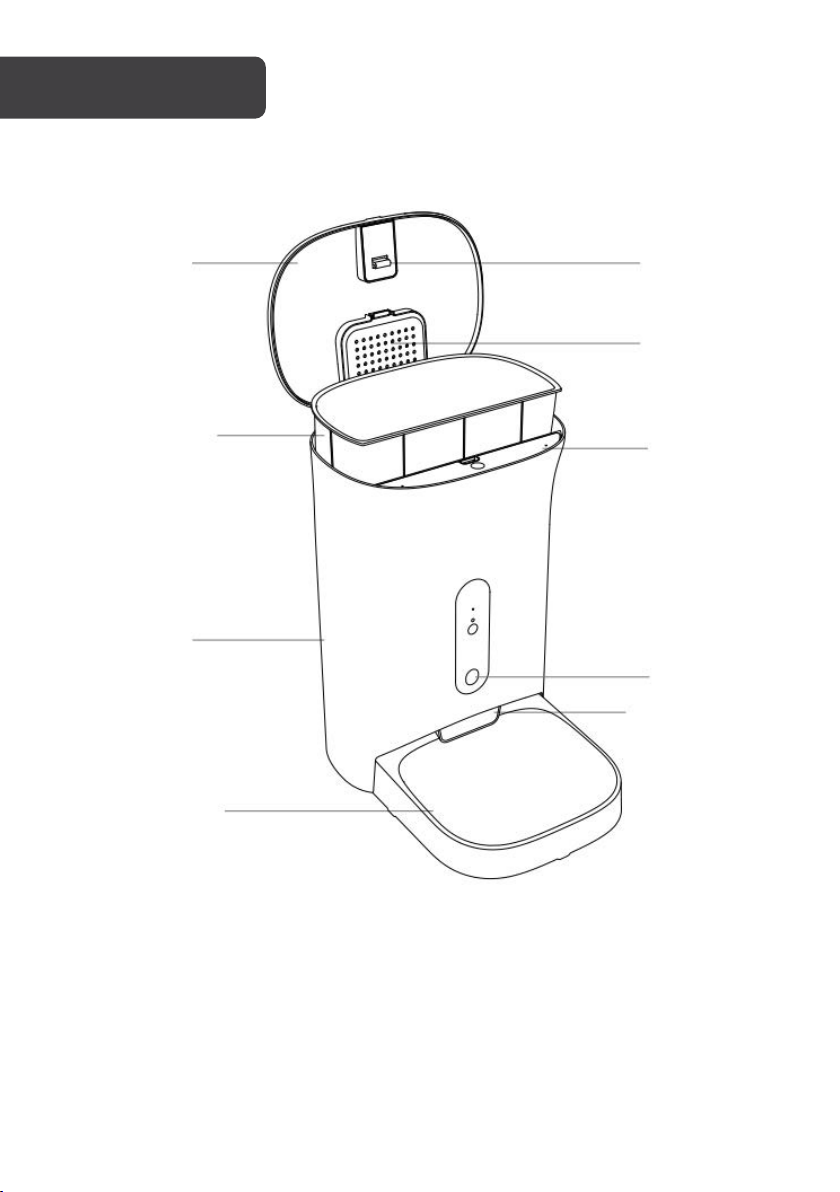
Lid
Body
Lid Latch
Desiccant
Box
Food
Hopper
Control
Panel
Camera
Food Outlet
Food Bowl
6
Page 7
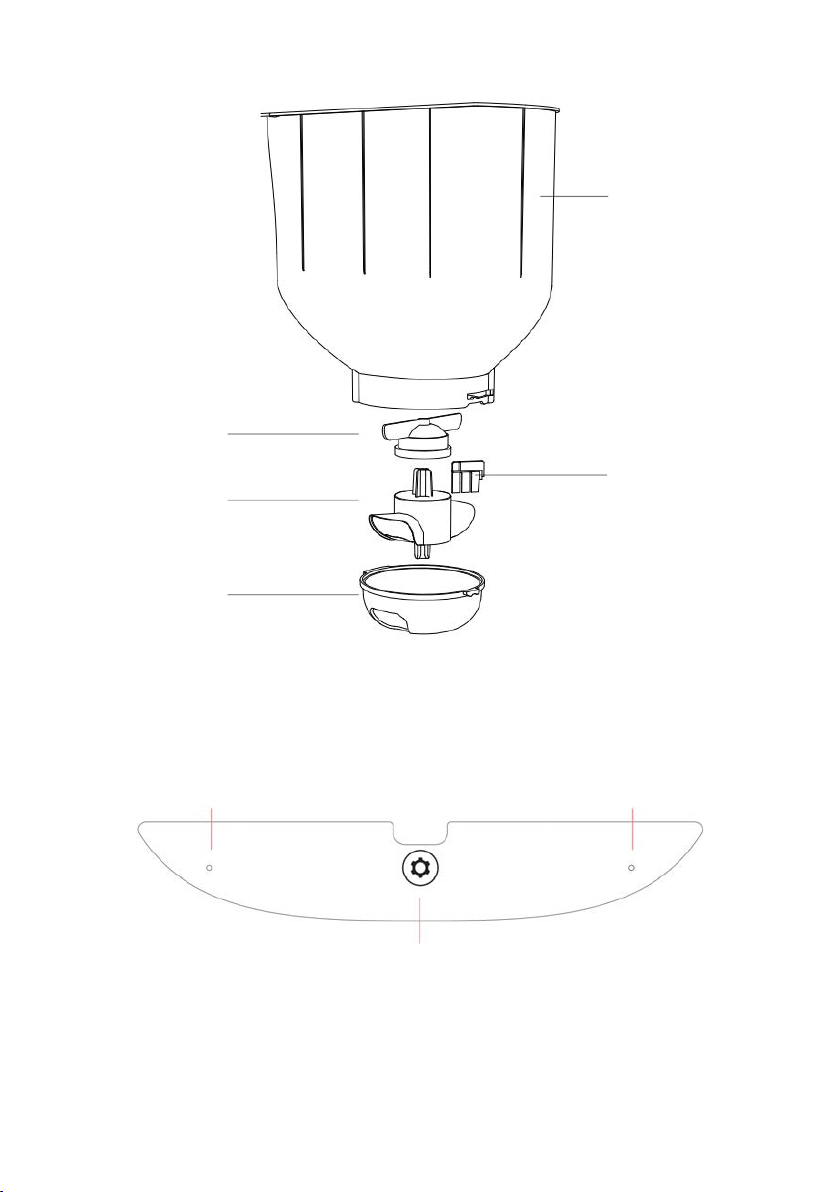
Rotation Box
Impeller
Feeding Mechanism
Feeding Slice
Food Hopper
State
Link
Status Indicator
Wi-Fi Indicator
Set Button
Contorl Panel
7
Page 8

Notes:
• If powered by batteries, the pet feeder will only dispense food based on the
scheduled feeding times set by users on the SmarterHome™ app. The pet feeder
will appear as offline.
• Do not mix batteries of different specifications and models.
• If users wish to gain full functionality, or change any settings using the
SmarterHome™ app, use the power adapter to power the pet feeder.
Lift the Latch
Press the lid latch with your index finger and lift upwards to open the lid.
Place Desiccant
1. Open the desiccant box on the lid.
2. Remove the transparent wrapping paper of the desiccant bag and place it into the
desiccant box and close it.
Powering the Pet Feeder
This pet feeder can be powered via batteries or using included power adapter.
• If powering by batteries, insert 3 alkaline ‘D’ batteries (not included) into the bottom of
the main body.
• If using the power adapter, plug the cable end into the DC power port, and the other
into a pocket socket.
8
Page 9

Install Food Bowl
Note:
The product only supports dry food sized between 5 – 15mm
2
1. Tilt the base unit back slightly, align the buckle of the food bowl with the base unit
to install.
2. To remove the food bowl for cleaning, tilt the base unit back slightly and pull the
food bowl away from the main body.
Fill with Pet Food
Open the lid, fill the hopper with dry food. To maintain maximum food freshness, it is
recommended that a maximum of 10 days food is loaded into the hopper.
9
Page 10
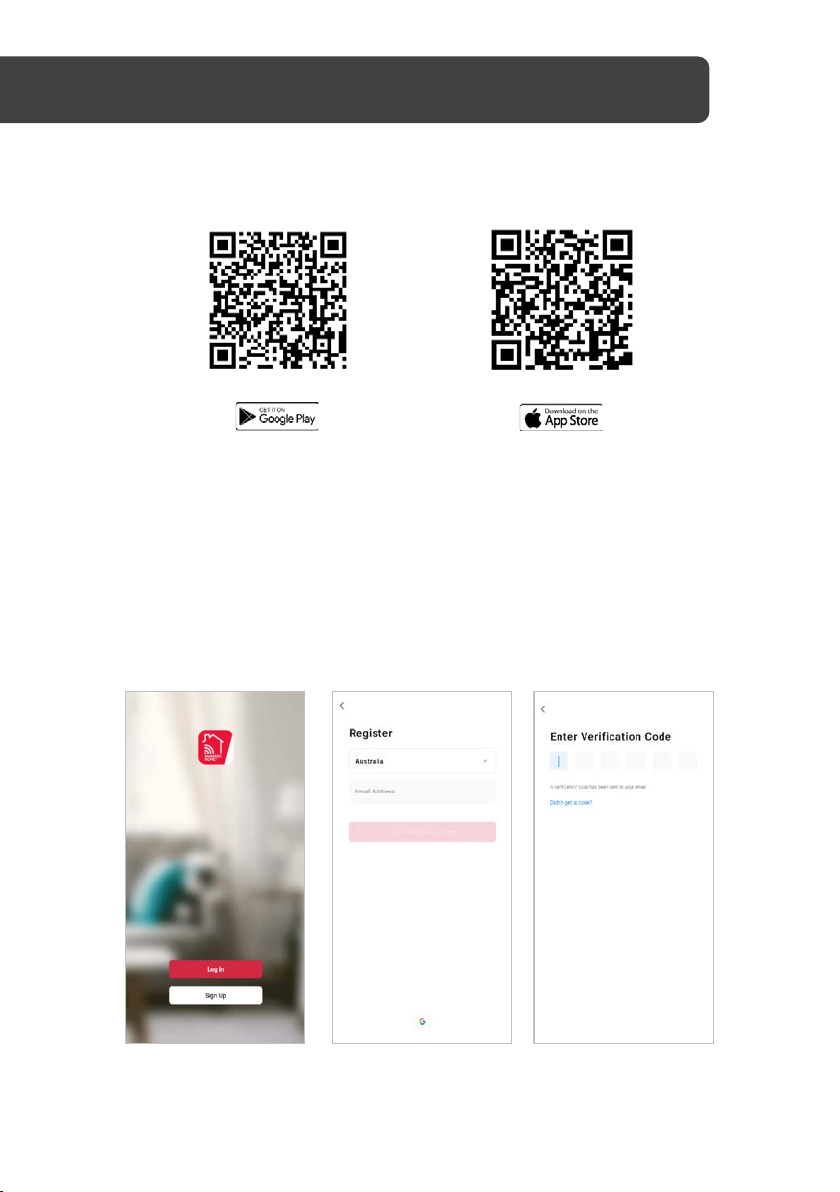
Play Store (Android)
App Store (iOS)
Install App
Download the “Kogan SmarterHome” app from the Play Store (Android) or App Store (iOS).
To register:
1. If you already have a SmarterHome account, select ‘Log In’. To register a new
account, select ‘Sign Up’.
2. The system will automatically recognise your country. If needed, you can manually
select your country from the drop-down box. Enter your email address and tap
‘Get Verification Code’ to continue.
3. A 6-digit code will be sent to the submitted email address. Enter this code before
the one-minute timer expires.
4. Continue to the next page and complete your SmarterHome profile.
10
Page 11
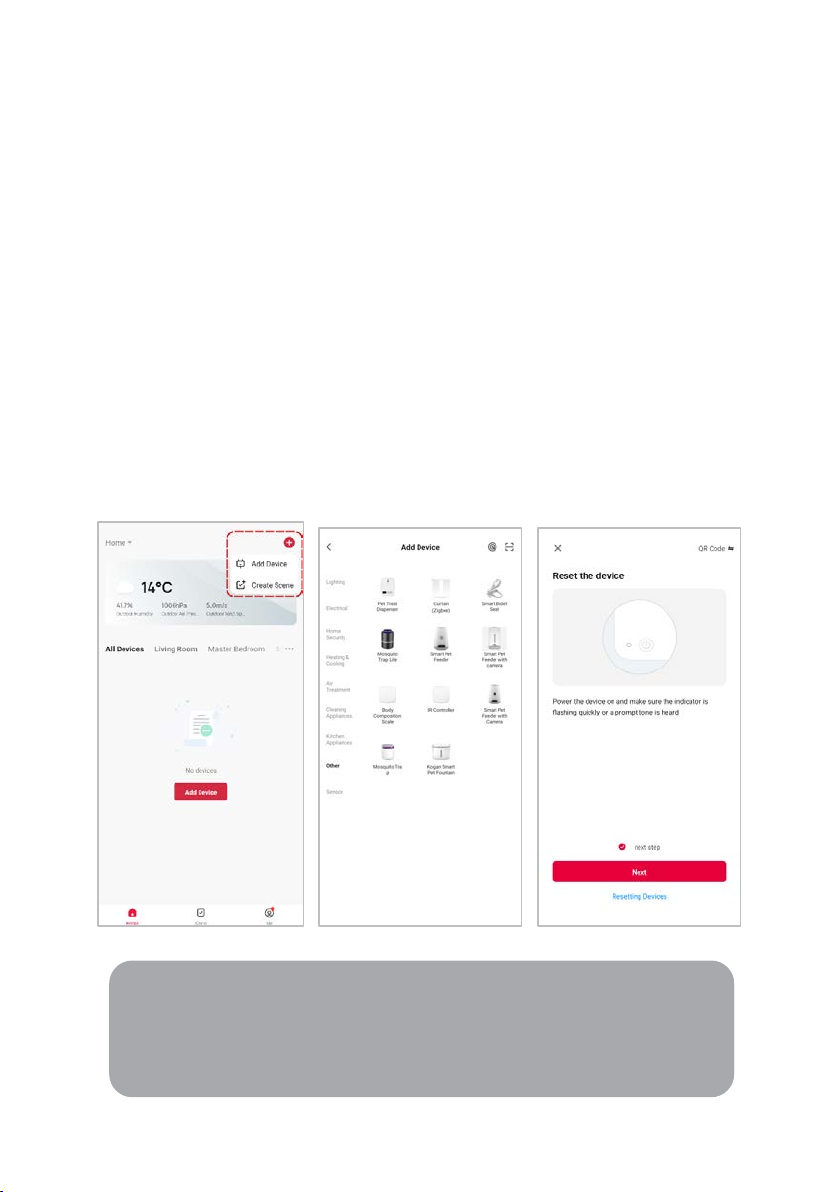
Set device in pairing mode
Notes:
• The device and the app have to use the same Wi-Fi network.
• The device is only compatible with 2.4Ghz networks.
• Depending on the product, Steps 3 and 4 may be in opposite order.
When the device is first turned on, it may automatically enter pairing mode (Wi-Fi indicator
is slowly flashing blue).
If not automatically in pairing mode when powered on, you can manually set the device in
pairing mode by pressing and holding the set button for 5 seconds. You will hear an audio
tone and both indicators will light up. When the Wi-Fi indicator is slowly flashing blue, the
feeder is now in pairing mode.
Add device through network
1. Once registered, tap “Add Device” on the app’s home page, or the “+” in the upper
right corner, to add a new device through the network.
2. Select the product type from the list of options in the app (Other > Smart Pet
Feeder with Camera).
3. Ensure that the device is in pairing mode, with the Wi-Fi indicator slowly flashing
blue, and tap “Next”.
4. Enter your Wi-Fi details. It is important that your SmarterHome™ device and the
app are connected to the same Wi-Fi network during setup.
11
Page 12
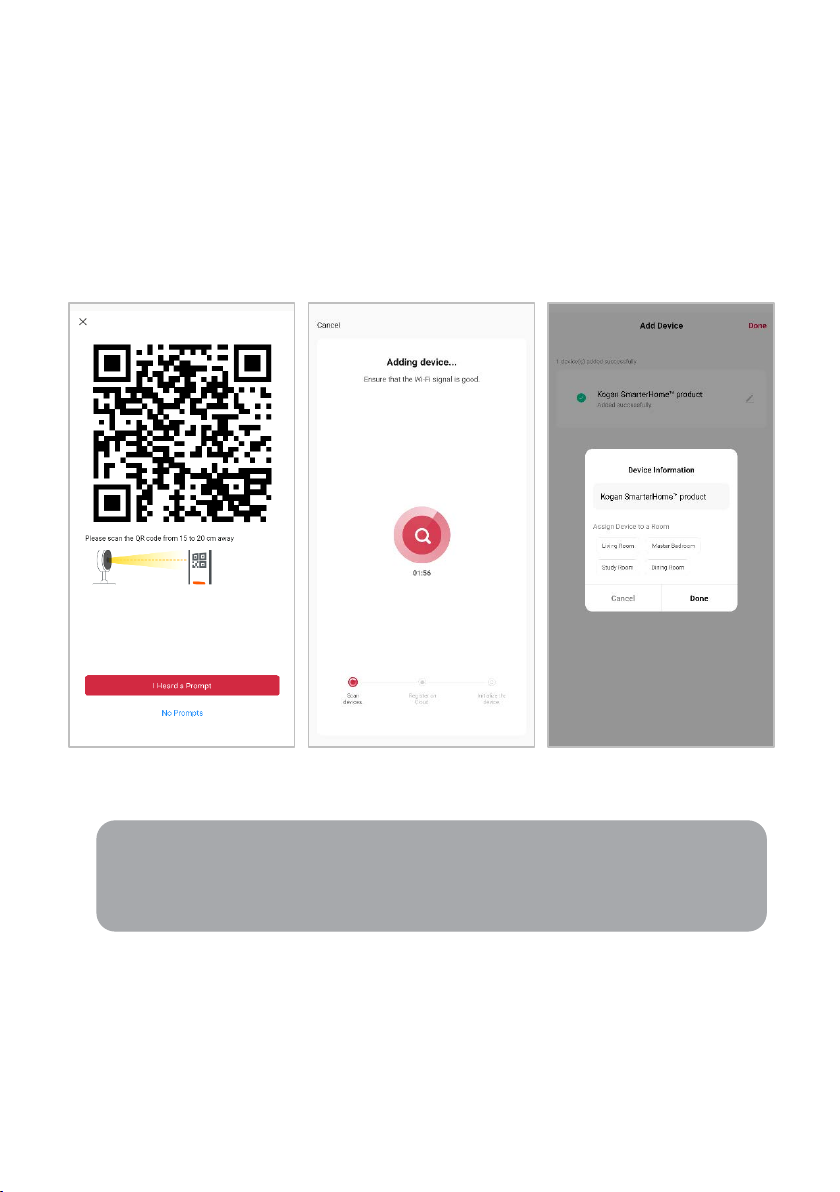
5. Calibrate the smart camera by holding your smartphone 15-20cm away from the
Note:
Once connected, you can select Create Scene from the “+” in the upper right
corner (or from the Scene tab) to group connected SmarterHome™ products
and automate their functions.
camera lens until it successfully scans the QR code shown on the following screen
of the setup. The device will make a prompt sound to confirm, click “I heard a
prompt” to proceed to the next screen.
6. The device will commence the pairing process and connect to the app. Ensure
your Wi-Fi router, mobile phone, and the SmarterHome™ device are kept close
until connection is complete.
7. After successfully being added, you will have the option to rename the device and
assign it to a location. It will now be listed on the app’s home page. Tap the device
listing to enter its control page.
12
Page 13
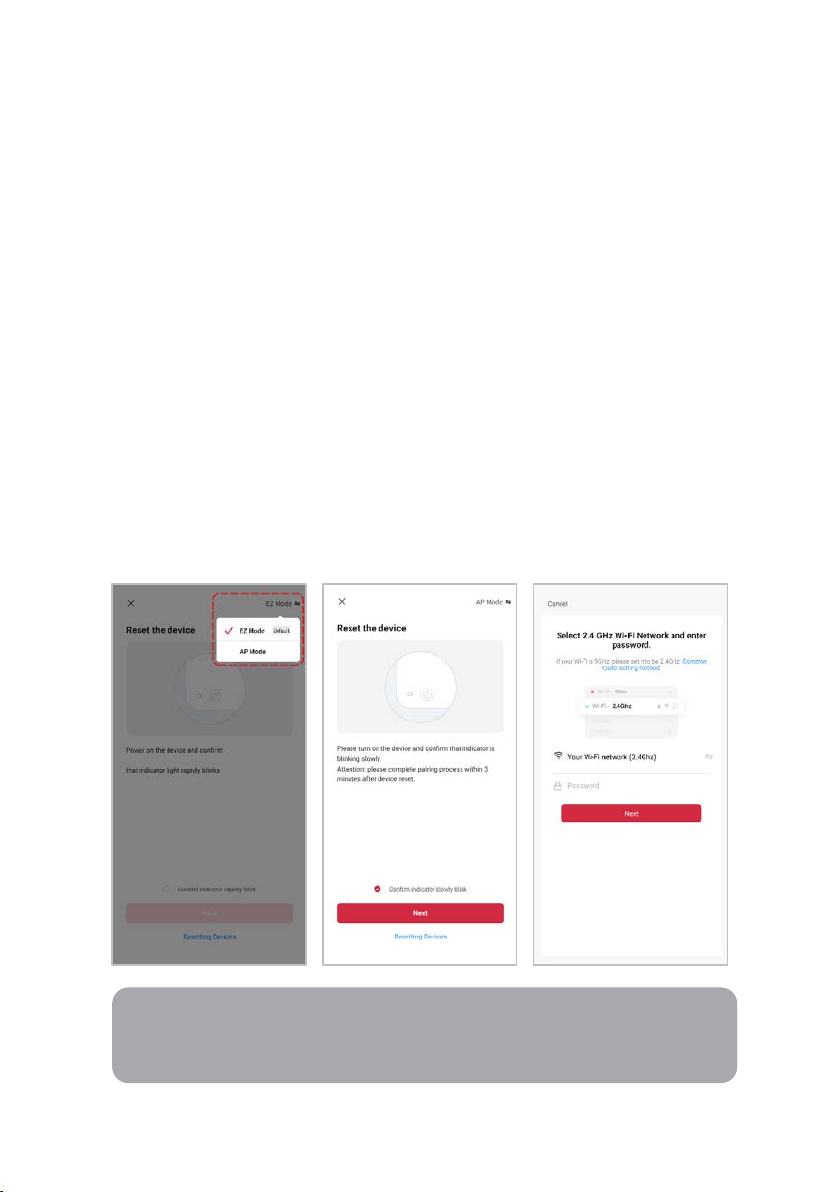
Having trouble connecting?
Notes:
• The device and the app have to use the same Wi-Fi network.
• The device is only compatible with 2.4Ghz networks.
The prior steps detail the process for “QR Mode” connection. If that does not work for your
connection, we suggest trying it again, and if still no success, attempting the following
method for AP Mode connection.
Set device in AP pairing mode
Set the device in pairing mode by pressing and holding the set button for 5 seconds. You
will hear an audio tone and both indicators will light up. When the Wi-Fi indicator is slowly
flashing blue, the feeder is now in pairing mode.
Using AP Mode to add device
1. Follow the previous steps to select your product type (Other > Smart Pet Feeder
with Camera)
8. Adjust your connection method by tapping on the mode type in the top-right
corner of the screen. Select “AP Mode” for the set-up type.
9. Ensure that the device is in pairing mode, with the Wi-Fi indicator slowly flashing
blue, and tap “Next”.
10. Enter your Wi-Fi details. It is important that your SmarterHome™ device and the
app are connected to the same Wi-Fi network during setup.
13
Page 14
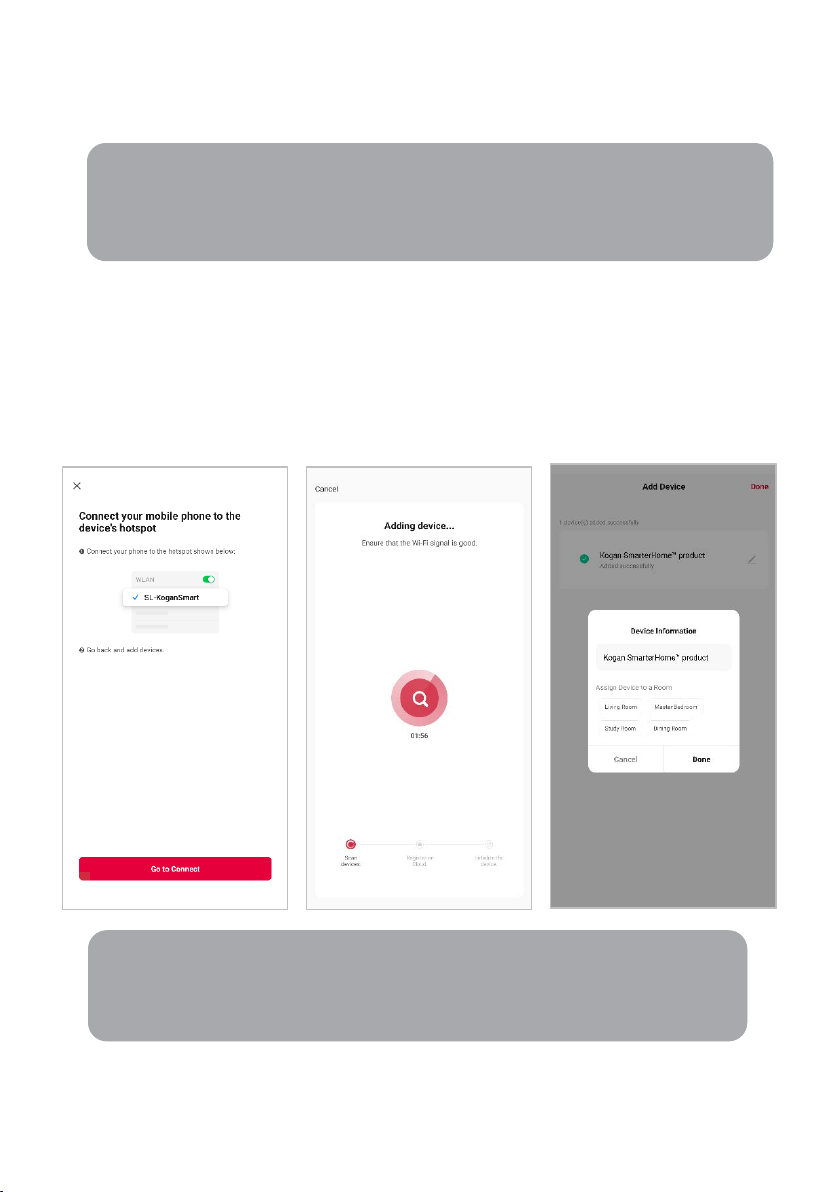
11. Follow the in-app prompts to continue AP Mode connection, which will pair your
Note:
If the Wi-Fi hotspot does not appear on your phone in the list of available
networks, your device may not be set in AP Pairing Mode correctly. Try
repeating the steps outlined above to ensure your device is ready for
Note:
Once connected, you can select Create Scene from the “+” in the upper
right corner (or from the Scene tab) to group connected SmarterHome™
products and automate their functions.
mobile phone to the device’s Wi-Fi hotspot to ensure a connection. This may be
named “SL-KoganSmart”, “SmartLife-XXXX”, or another similar name.
12. The device will commence the pairing process and connect to the app. Ensure
your Wi-Fi router, mobile phone, and the SmarterHome™ device are kept close
until connection is complete.
13. After successfully being added, you will have the option to rename the device and
assign it to a location. It will now be listed on the app’s home page. Tap the device
listing to enter its control page.
14
Page 15
Note:
You will need to have set up a Google Home account prior to linking
your Kogan SmarterHome™ device.
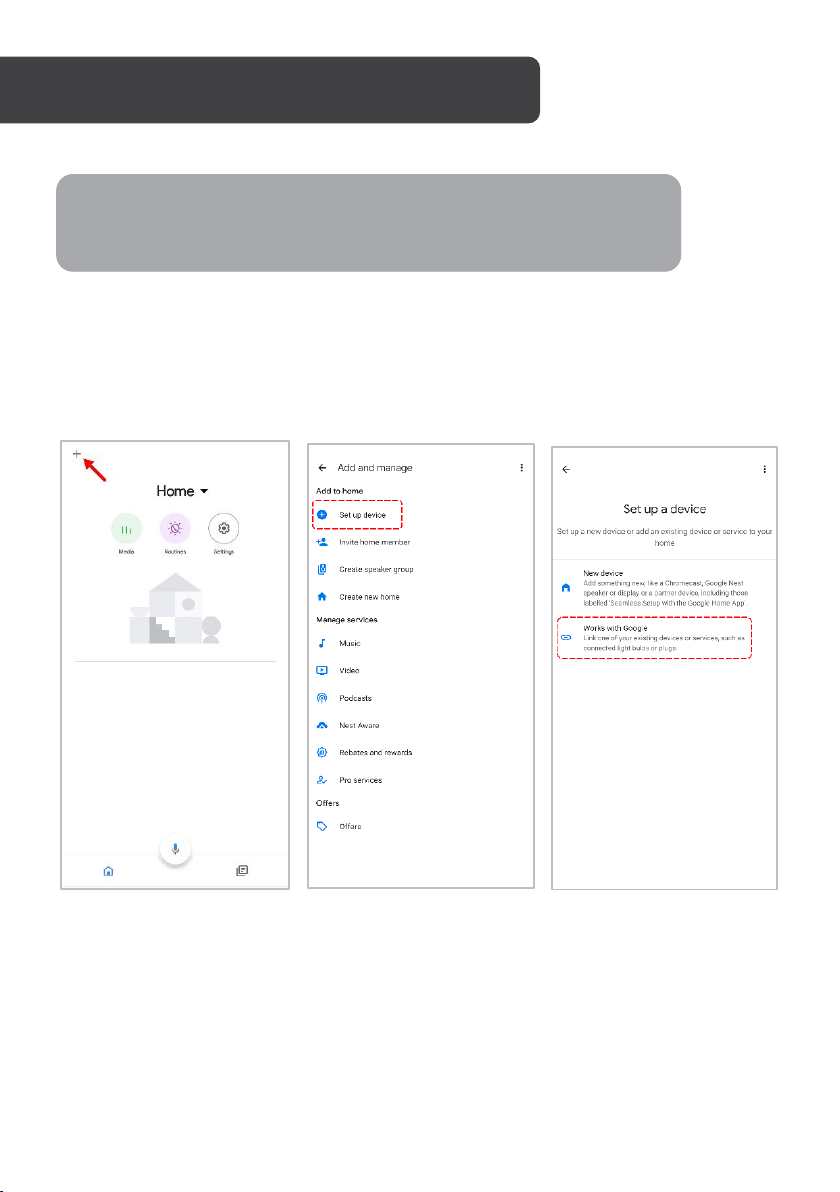
Adding “SmarterHome” to the Google Home app
1. From the home page of the Google Home app, select the “+” icon (top left corner,
see arrow in the below screenshot) to access the ‘Add and manage’ page.
2. Select ‘Set up device’, then select the ‘Works with Google’ option.
15
Page 16
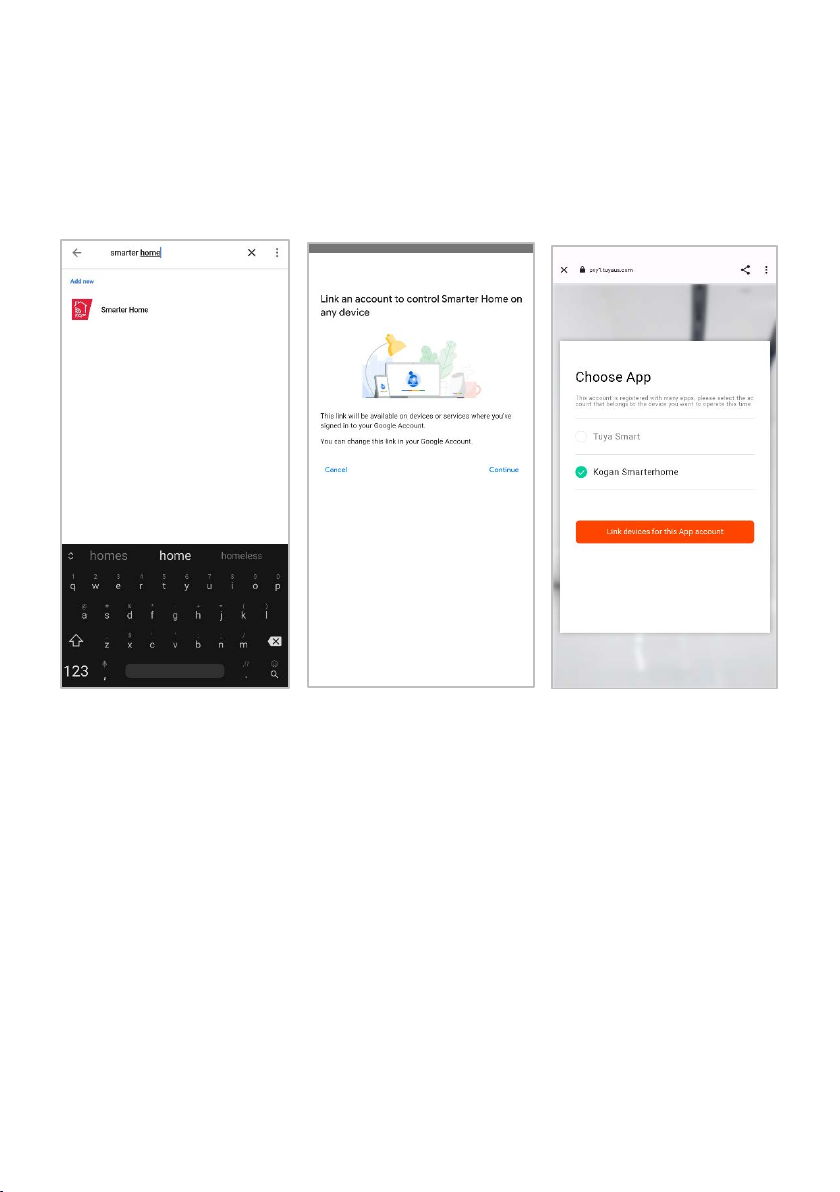
3. Select the search bar and type ‘Smarter Home’ to locate the Kogan
SmarterHome™ service.
4. From here, you will be prompted to sign into your SmarterHome™ account using
either your email or mobile phone number, depending on which method you used
to register your account.
5. Select “Kogan SmarterHome™” from the app options.
16
Page 17
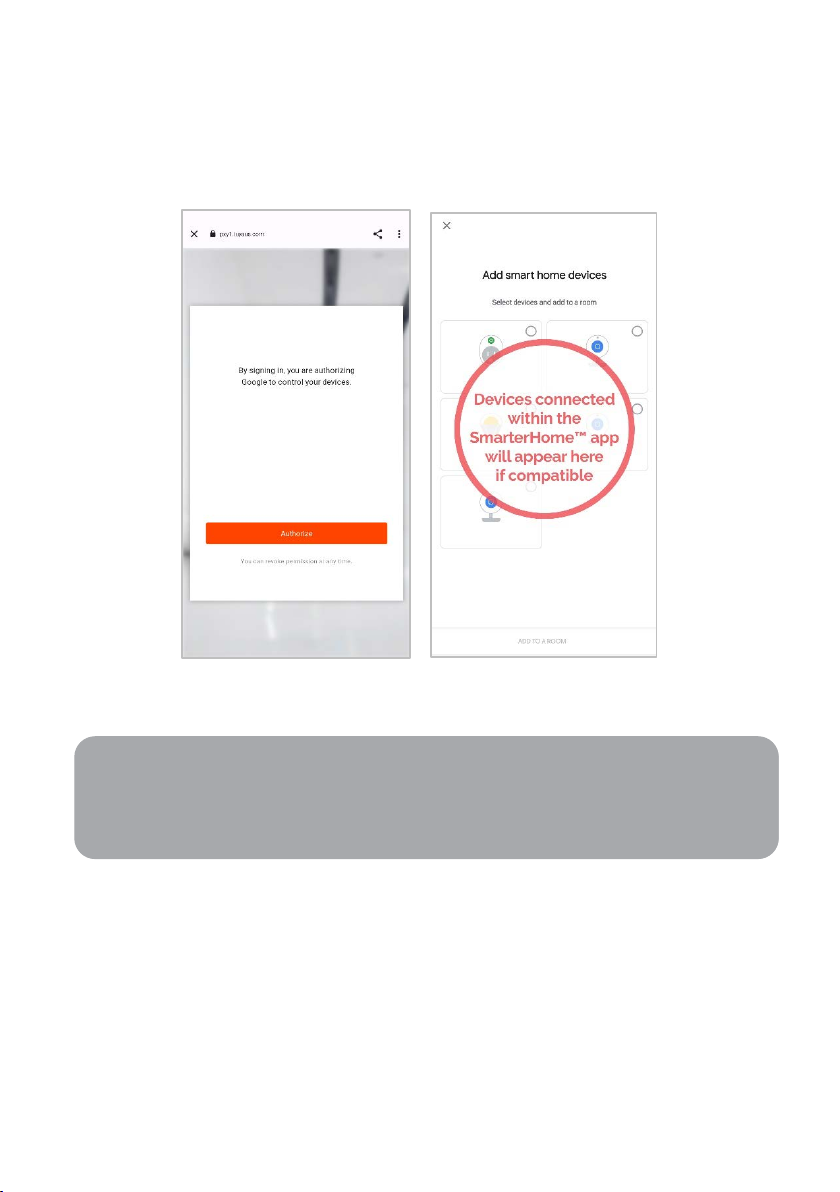
6. Tap ‘Authorise’ to grant Google permission to access the SmarterHome™ app and
Note:
Please note that Google Home can only control the base/core functions of any
compatible SmarterHome™ devices. To make full use of this product’s smart
functionality, please use the Kogan SmarterHome™ app.
your devices.
7. Once connected, the app will display any compatible devices linked to your
SmarterHome™ account. From here you can assign them to rooms and set up any
routines. Tap on any of the devices to view a list of available commands.
17
Page 18
Note:
Yo u w i l l n e ed t o h a ve s et u p a n Al e xa account prior to linking your Kogan
SmarterHome™ device.
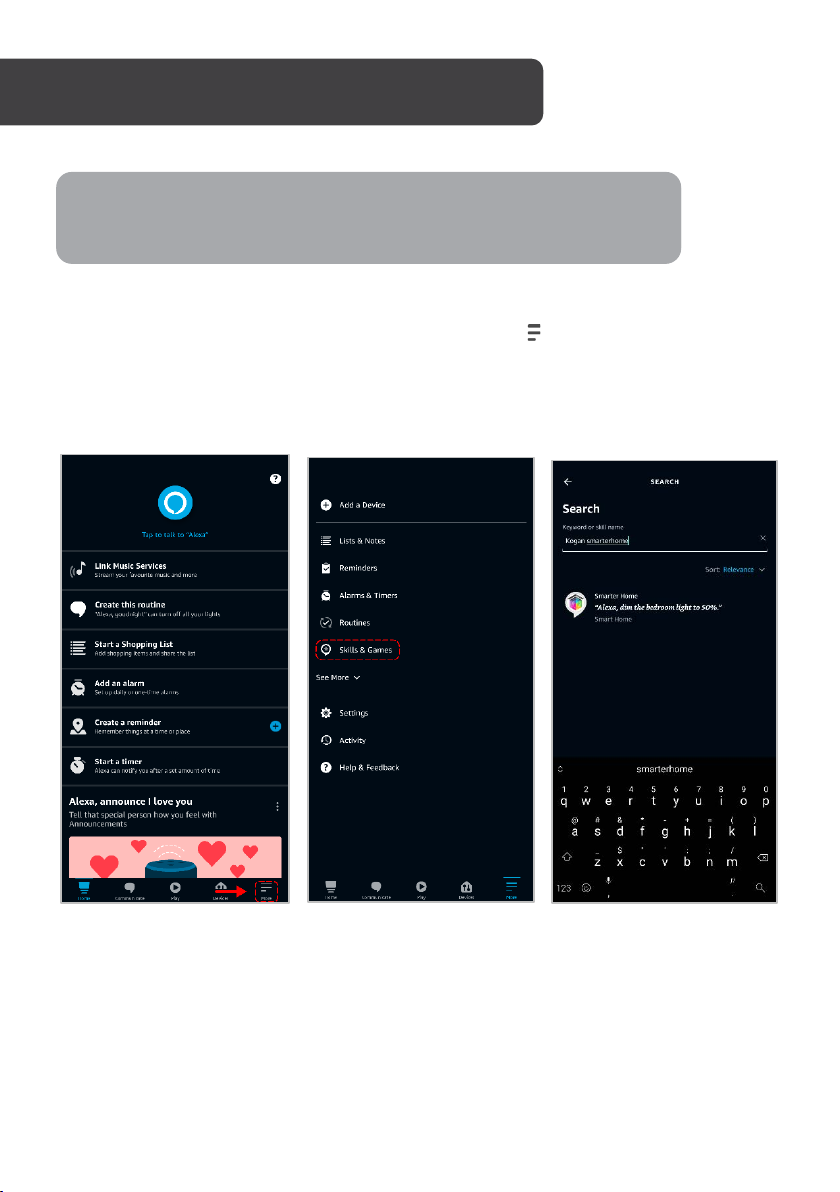
Adding “SmarterHome” to the Alexa app
1. From the home page of the Alexa app, select the “ ” icon in the bottom-right and
select “Skills & Games” from the sidebar.
2. Select the search bar and type ‘Smarter Home’ to locate the Kogan
SmarterHome™ skill.
18
Page 19
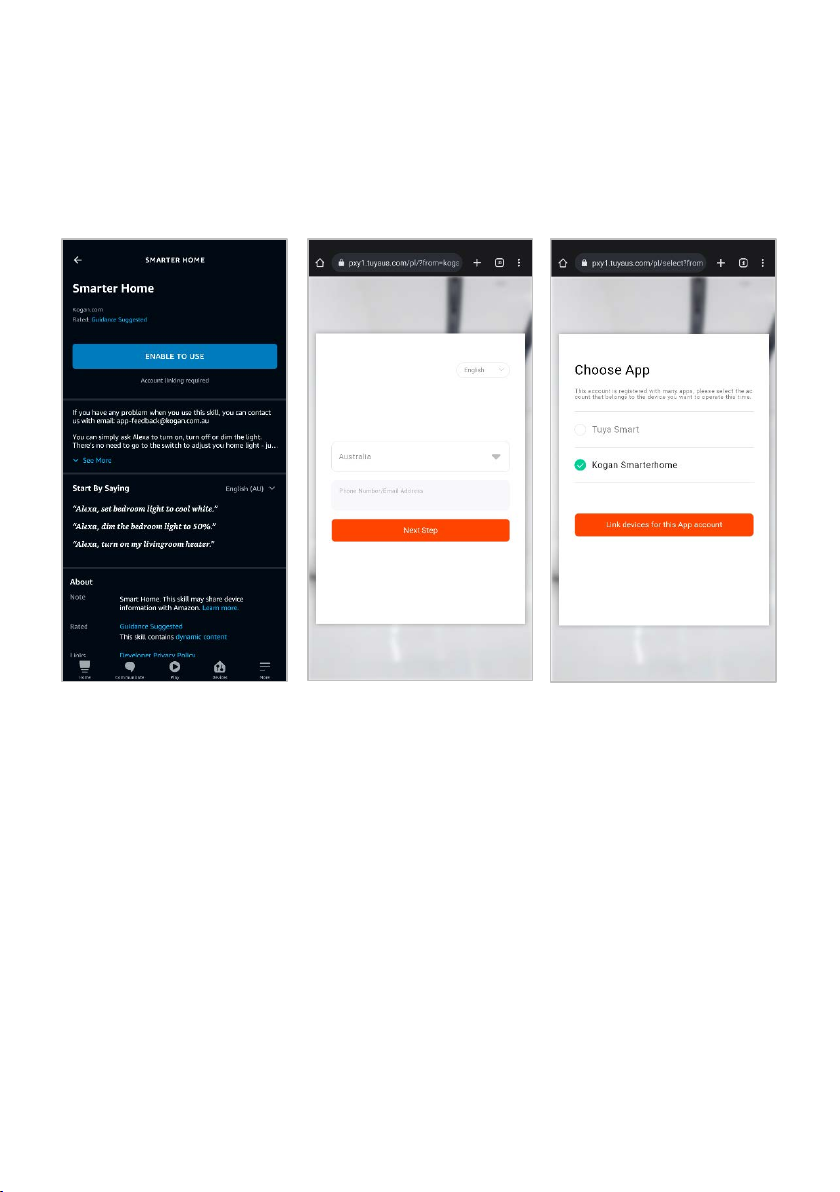
3. Tap ‘Enable to Use’ to add the Kogan SmarterHome™ skill to Alexa.
4. From here, you will be prompted to sign into your SmarterHome™ account using
either your email or mobile phone number, depending on which method you used
to register your account.
5. Select “Kogan SmarterHome™” from the app options.
19
Page 20
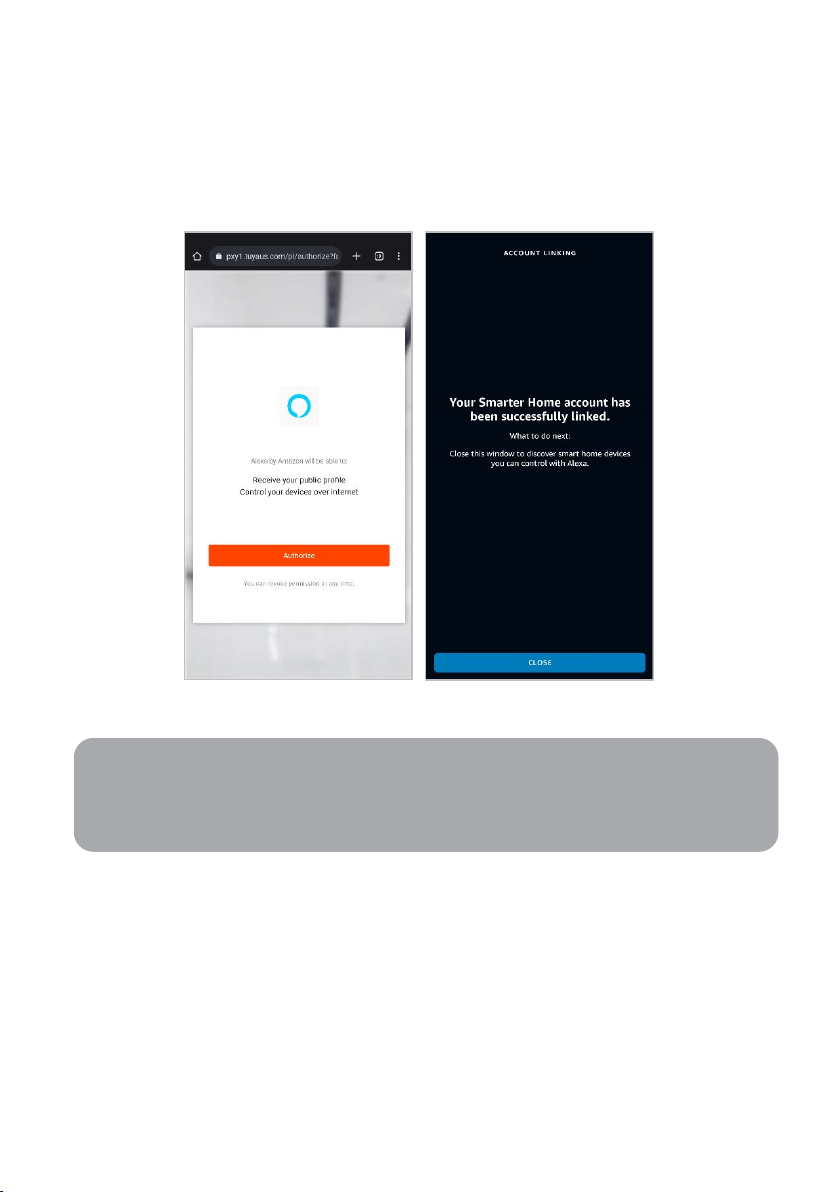
6. Tap ‘Authorise’ to grant Alexa permission to access the SmarterHome™ app and
Note:
Please note that Alexa can only control the base/core functions of any
compatible SmarterHome™ devices. To make full use of this product’s smart
functionality, please use the Kogan SmarterHome™ app.
your devices.
7. Once connected, the app will perform a search and display the devices linked to
your SmarterHome™ account. When your devices have successfully connected to
the Alexa app, you will be able to control your Kogan SmarterHome™ devices via
Alexa’s voice commands.
20
Page 21
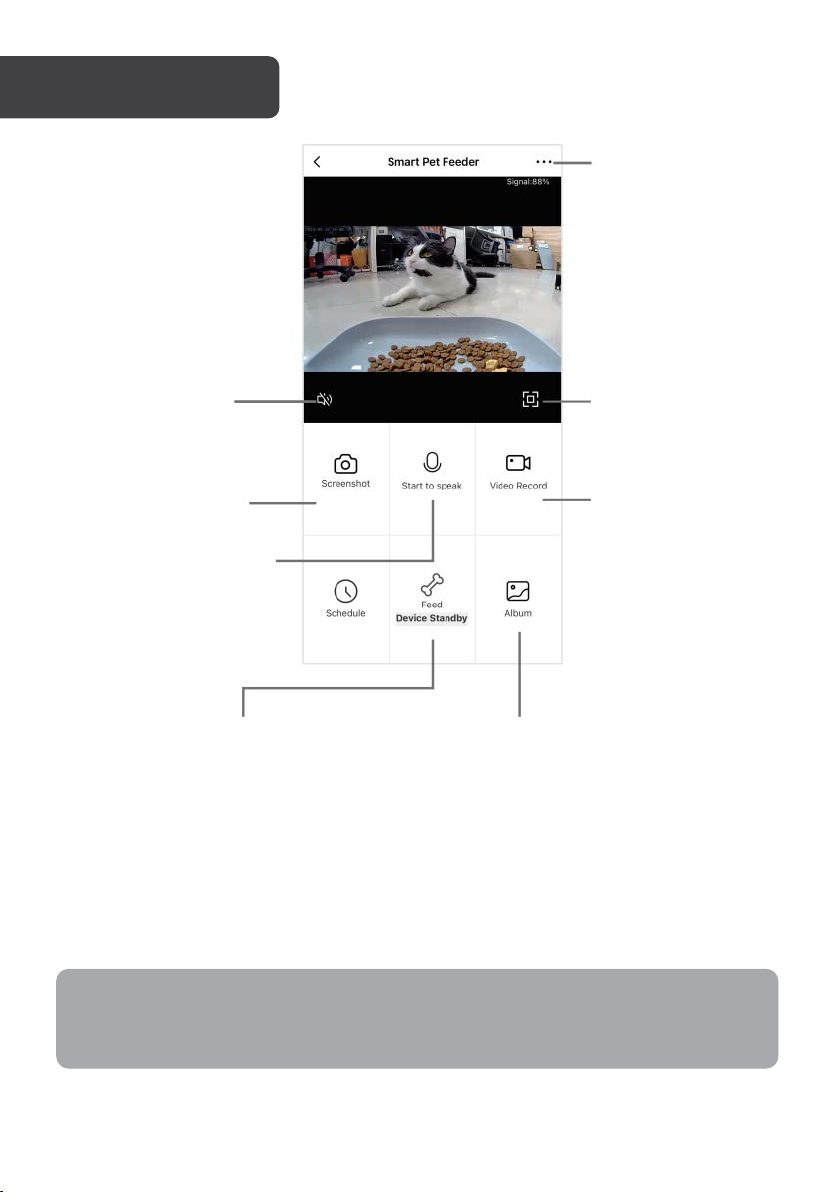
Settings
Take a screenshot
Talk to your pet
Record a video
Manual feed/Voice recording
View saved photos/videos
Mute audio
Full screen
Note:
Remote feeding is not available when the feeder is powered by batteries or offline.
Remote Feeding
1. Enter device setting page and tap "Feed", select the number servings and click
“Feed” to dispense the food.
2. By pressing “Voice recording” you can record a 10-second audio message. This will
be played at mealtime to get your pet' s attention.
21
Page 22
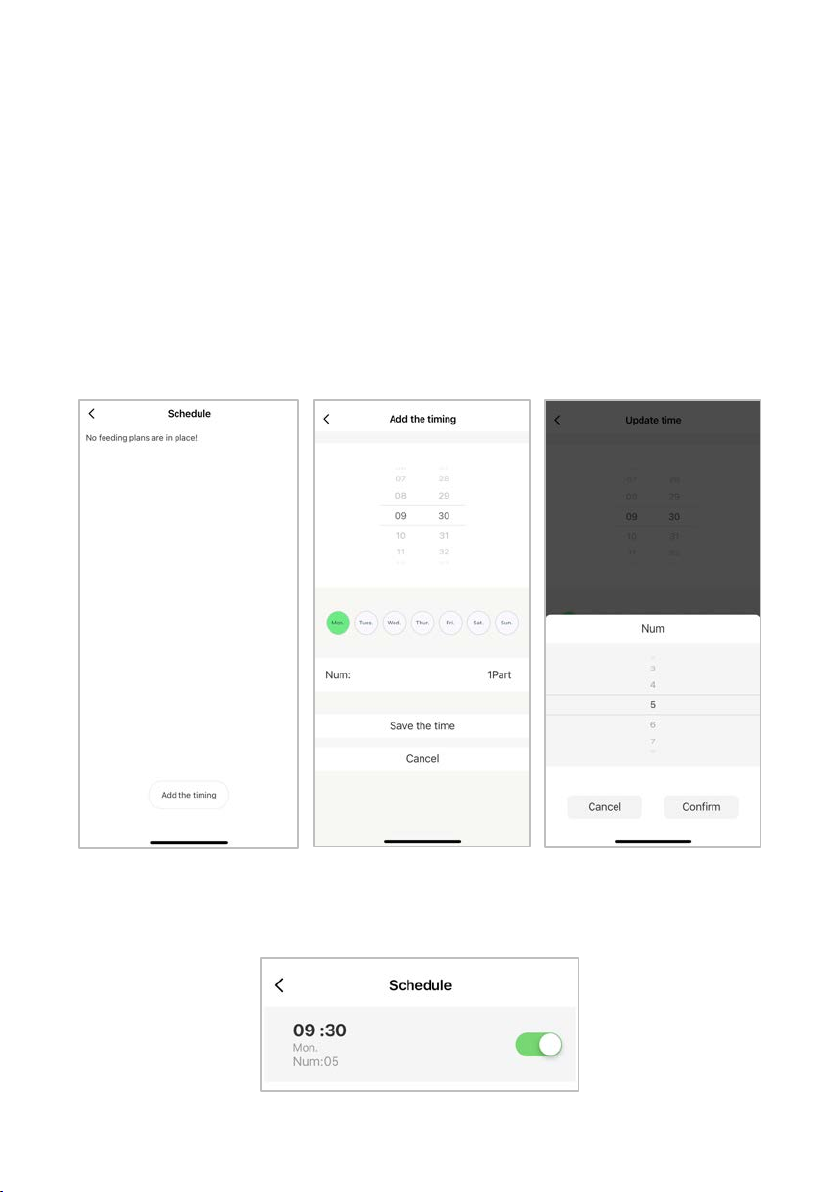
Schedule Feeding
TM
Using the SmarterHome
your pet.
1. Open the device’s settings by tapping on it in the list of connected devices and tap
“Schedule”.
2. Tap “Add the timing”
3. Select the desired time and the day of the week.
4. Tap “Num” to set how many servings of food you wish to dispense and then tap
“Confirm”
5. To save the schedule, tap “Save the time”
app you can set up a feeding schedule to automatically feed
6. Once you have set up your feeding schedules (up to 10), you can toggle them
ON/OFF from the Schedule screen.
22
Page 23
Manual Feeding
Status Indicator
Off
Stand-by
Flashing RED
Lack of food & food Jam
Low Battery
Solid RED
Powered by batteries
Wi-Fi Indicator
Off
Powered by batteries
Flashing BLUE
Awaiting network
connection
Solid BLUE
Connected to network
Open the lid and press the Set button once, then the feeder will dispense one serving of
food (Approx. 10g). Repeat the above step until the desired amount of food has been
dispensed.
Pairing Mode
To reset the feeder and place it in to pairing mode. Press and hold the set button for 5
seconds. You will hear an audio tone and both indicators will light up. When the Wi-Fi
indicator is slowly flashing blue, the feeder is now in pairing mode.
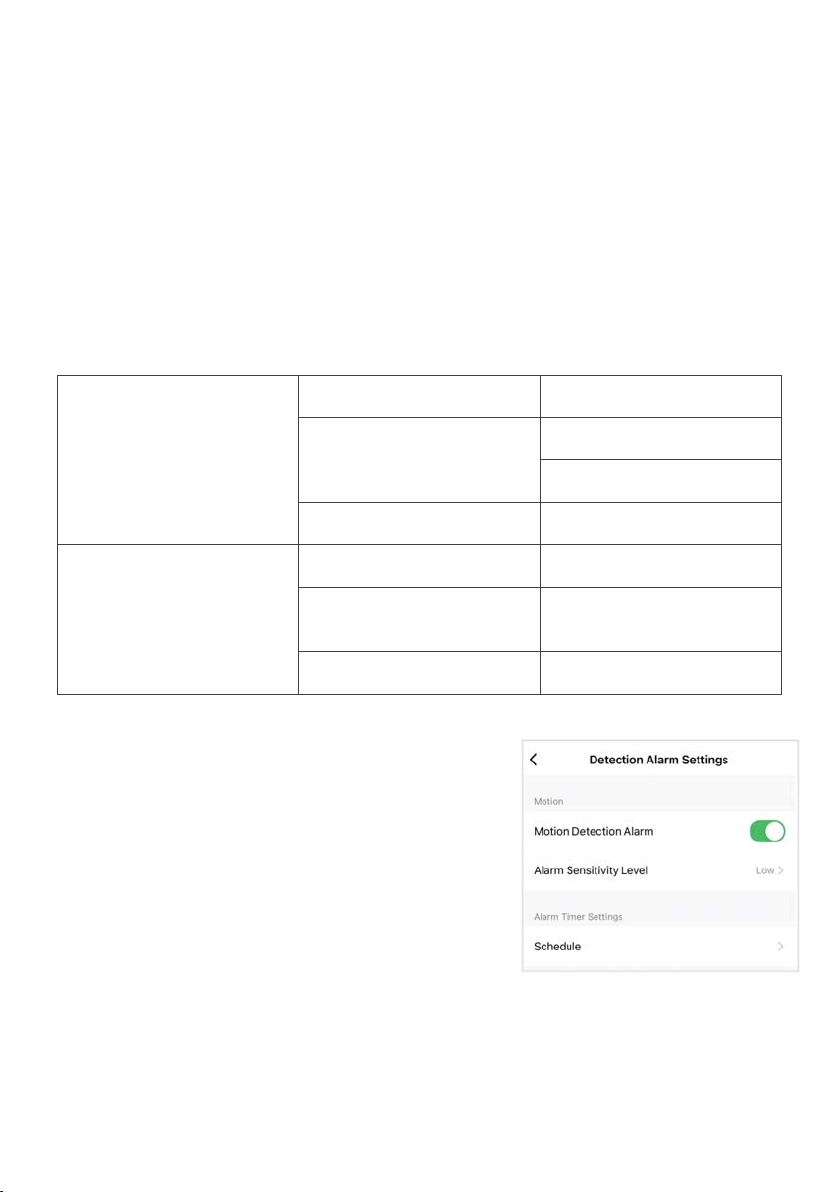
Indicator
Motion detection
Open the settings menu and select “Detection Alarm
Settings”. Turn the “Motion Detection Alarm” on to
receive pop-up notifications when your pet approaches
the dispenser.
Other settings
You can access additional features by tapping
“Settings” to go to the settings menu. These include:
• Checking the feeder’s status.
• Activating IR (night) vision
• Flipping the display on the screen
• Sharing the pet feeder with other users (for example, others living in the household).
• Setting one or two-way audio.
23
Page 24

CLEANING & CARE
• Ensure the pet feeder is turned off and the power is disconnected before attempting to
clean.
• Ensure food is replaced on a regular basis. (Refer to the food packaging for safe storage
instructions).
• For optimal results, clean and maintain this product on a regular basis.
Clean the Food Bowl
The food bowl can be washed in the dishwasher once it has been removed from the main
body.
Clean the Body
Use the dry soft cloth to wipe the body. The body is not waterproof, do not use wet cloth.
Replace the Desiccant
Open the desiccant box cover and replace the desiccant pack. It is recommended to
replace the desiccant every two months.
Replace Alkaline Batteries
Unplug the power adaptor and open the battery cover. Replace the batteries with 3 new
alkaline ‘D’ battery paying close attention to the orientation of the polarity “+, -” symbols.
Clean the Food Hopper
1. To disassemble, hold both sides of the hooper and lift upwards.
2. Disassemble the impeller/ feeding slice and feeding mechanism.
3. The main body of the feeder is not dishwasher safe. Do not immerse the main
body in water. This could damage the internal electronics and cause the batteries
to short out, create an electrical shock or catch fire.
Note: Ensure all parts of the feeder are completely clean and dry before
reassembling and filling with food.
24
Page 25
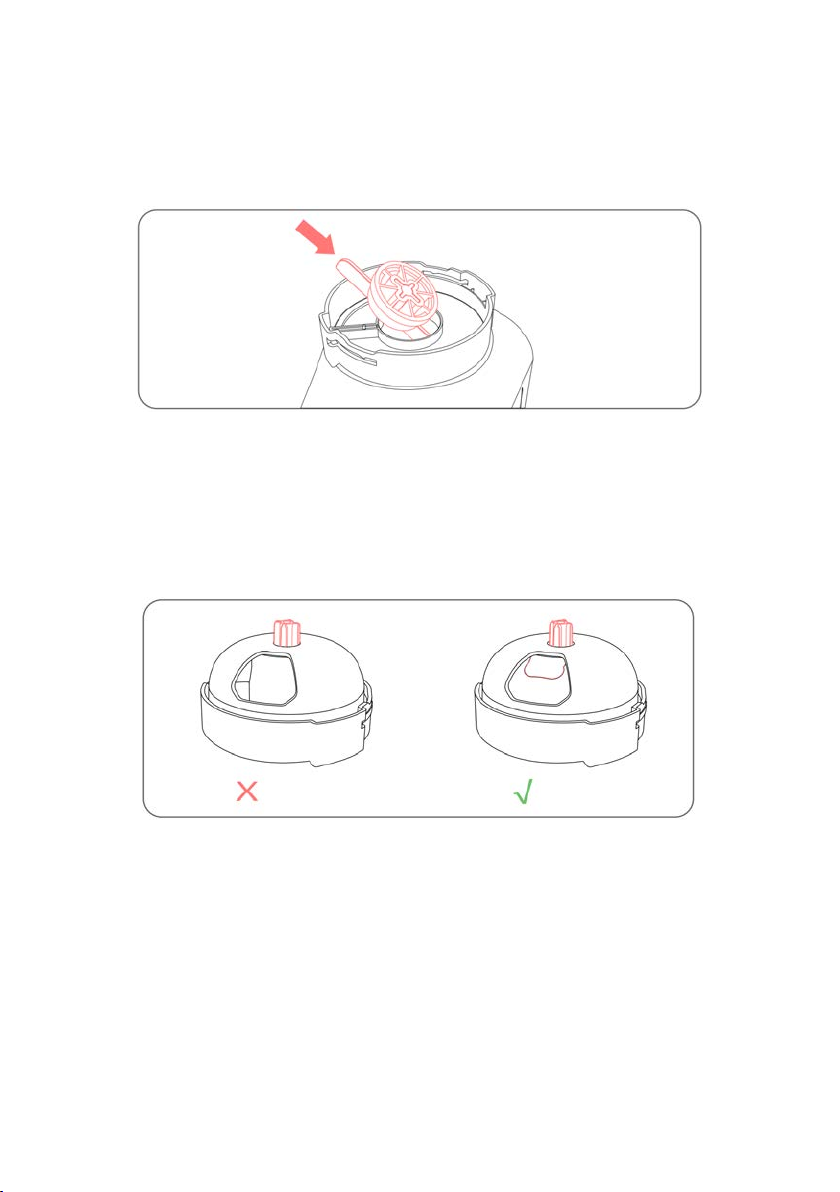
Assemble the Food Hopper
Incorrect
Correct
1. Align the food hopper with slots in the main body and press down.
2. Attach the feeding slice and impellers (as shown below). Pay close attention to the
orientation of the “+”.
3. Align the impeller bottom cover with the slots and rotate in anticlockwise direction
until you hear a ‘click’.
4. Adjust the impeller ensuring the rubber part is covering the food outlet (as shown
below). Note: If the impeller is not installed correctly, it will not dispense food.
25
Page 26

Dimensions (LxWxH)
317 x 240 x 370mm (with food tray)
Material
Food-grade ABS
Net weight
Around 2.6kg
Food
5-15mm dry food
Capacity
4.5L
Power
DC 5V2A Adapter / x3 ‘D’ Batteries
Rated voltage
DC 5V
Rated power
2.5W
Operating temperature
5°C-50°C
26
Page 27
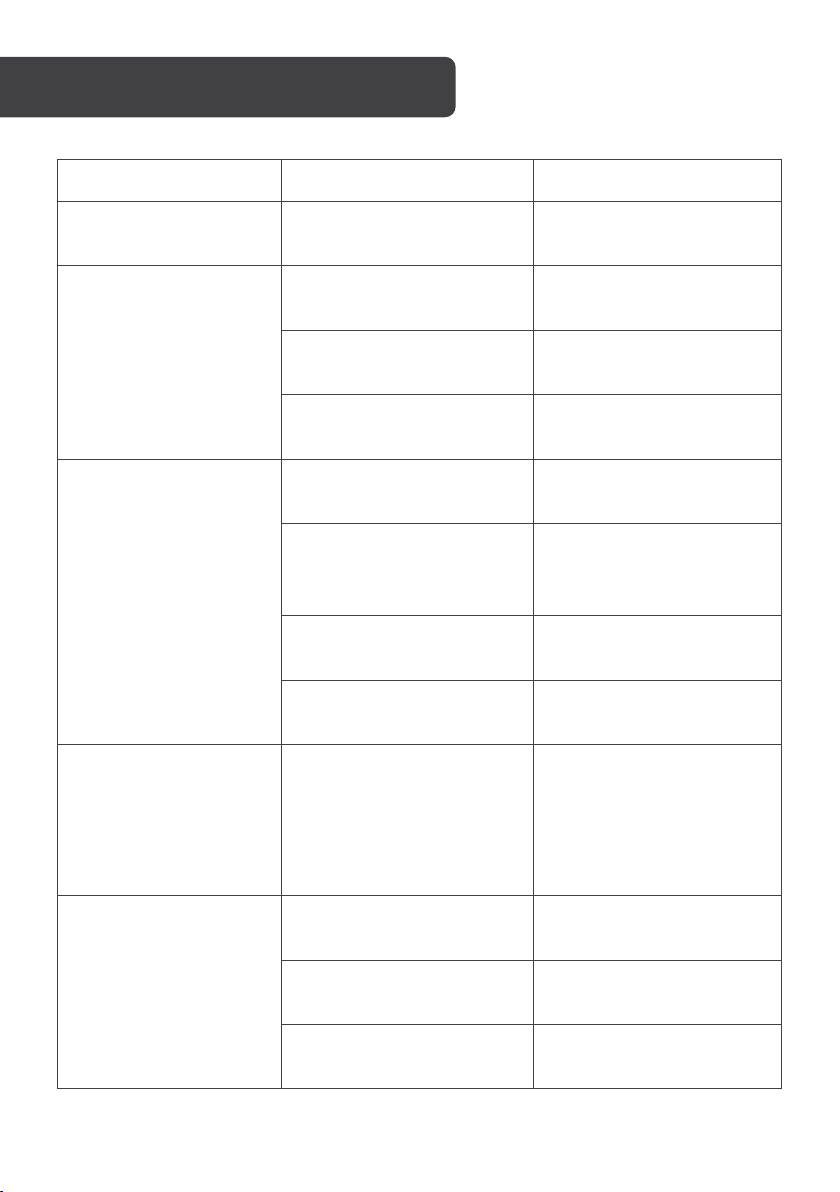
Problem
Cause
Solution
Unable to reassemble
the food hooper
Impellers not aligned
properly
Check and realign the
impeller.
Product is operating
abnormally
Obstructions inside food
hopper
Clean the obstructions
inside of the food hopper.
Food size is unsuitable
Ensure to use 5-15mm2 dry
food.
Motor faulty
Contact help.Kogan.com
for support.
Food jam
Excess food inside in food
tray
Empty the food tray.
Food outlet blocked
Remove and clean the food
outlet. Ensure to use 515mm
2
dry food.
Food outlet is not clean
Use a soft cloth to clean the
food outlet.
Infrared sensor defective
Contact help.Kogan.com
for support.
Feeder did not dispense
the correct amount of
food.
Food hopper is not installed
correctly.
Remove the food hooper
and ensure all the
components are assembled
properly.
Device is offline
Device is in battery mode
Ensure the power adapter is
properly connected.
Network or router fault
Check your router and reset
if necessary.
Product is faulty
Contact help.Kogan.com
for support.
27
Page 28

Need more information?
We hope that this user guide has given you
the assistance needed for a simple set-up.
For the most up-to-date guide for your product,
as well as any additional assistance you may require,
head online to help.kogan.com
28
 Loading...