

Page 1
Page 2

Table of Contents
Safety & Warnings ............................................................................................................... 1
Product Overview.................................................................................................................2
Assembly.................................................................................................................................3
Usage.......................................................................................................................................4
Product Maintenance...........................................................................................................6
Disposal...................................................................................................................................6
Safety & Warnings
・Read all instructions before using this appliance.
・Do not leave vacuum cleaner when plugged in. Unplug from outlet when not
in use.
・To reduce the risk of electric shock, do not use outdoors or on wet surfaces.
・Use only as described in this manual. Use only attachments recommended by
the manufacturer.
・Cease usage and contact the manufacturer immediately if the vacuum
cleaner is not working as it should, has been dropped, damaged, left outdoors,
dropped into water or the cord or plug is damaged.
・Do not pull or carry by the power cord or allow the power cord to be to be
damaged by objects, doors or heat.
・Do not handle plug or vacuum cleaner with wet hands.
・Do not allow any opening to be blocked or obstructed. Keep free of dust, lint,
hair and anything that may reduce airflow.
・Keep hair, loose clothing, fingers and all parts of body away from openings
and moving parts.
・Turn all controls o before unplugging.
・Use extra care when cleaning on stairs.
・Do not use to pick up flammable or combustible liquids, such as gasoline, or
use in areas where they may be present
・Unplug before connecting the hose.
・Do not allow the appliance to pick up anything that is burning or smoking,
such as cigarettes, matches, or hot ashes.
・This appliance is not intended for use by persons (including children) with
reduced physical, sensory or mental capabilities, or lack of experience and
knowledge, unless they have been given supervision or instruction concerning
use of the appliance by a person responsible for their safety.
・Children should be supervised to ensure that they do not play with the
appliance.
1
Page 3
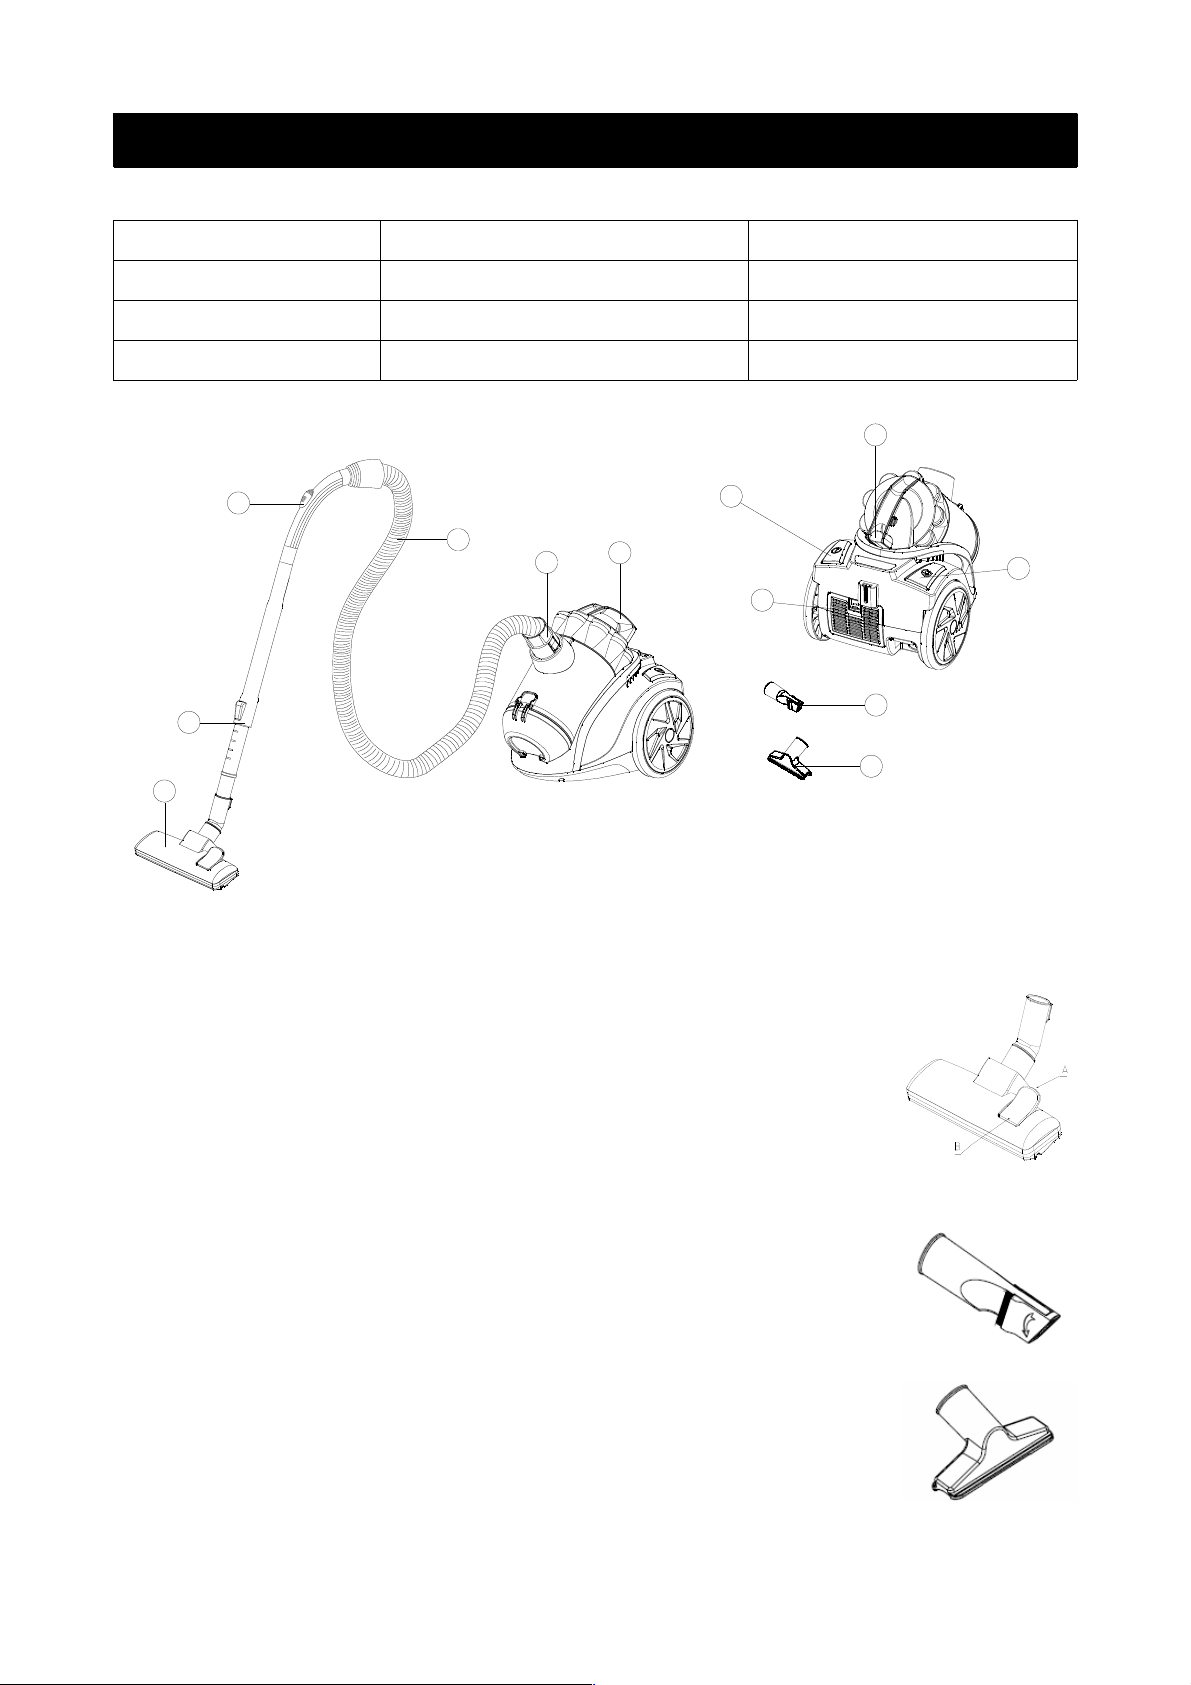
Product Overview
1. Floor Nozzle 5. Suction Hose Connection 9. Cord Retraction
2. Telescopic Tube 6. Carrying Handle 10. Exhaust Filter Button
3. Air Slide 7. ON/OFF Button 11. Crevice Nozzle
4. Suction Hose 8. Dust Release Button 12. Furniture Nozzle
Floor Nozzle
The floor nozzle has two settings. When cleaning hard
surfaces (parquet flooring, flooring tiles, etc.), the nozzle
brushes should be extended. When cleaning carpets and
mats, the brushes should be retracted into the nozzle.
Press the brush change button to switch between the two
settings.
Floor Nozzle
For radiators, corners, skirtings, etc.
Furniture Nozzle
For furniture, curtains, drapes, etc.
2
2
1
3
4
6
5
11
12
7
10
9
8
Page 4

Assembly
Vacuum Cleaning
1. Attach the hose to the vacuum cleaner
by inserting the rotating hose connection
into the vacuum cleaner until you hear a
click. To remove the hose, press the
button at the side of the hose connection
and pull it out.
2. Assembling the telescope tube and
accessories
2.1: Fit the telescopic tube into the other
end of the hose.
2.2: Adjust the length of the telescopic
tube by pushing the locking mechanism
down and pulling in the bottom section of
the tube to a suitable length. When
parking, shorten the tube as far as
possible.
2.3: Fit the floor brush into the telescope
tube.
3
Page 5

Usage
Vacuum Cleaning
1. Before using the device, first extend the
power cable to the appropriate length and
plug into the mains socket. The yellow mark
is the maximum length that must not be
exceeded.
To switch on the device, press the foot
pedal button.
2. To retract the power cable, press the
button with one hand and guide the cable
with the other hand to ensure that it does
not whip, causing damage.
Emptying Dust Container
Ensure to empty the dust container when the “MAX” indicator is reached or a
drop in suction power is observed.
1. Switch o the vacuum cleaner and
disconnect the plug from the mains.
2. Release the dust container by pressing
down the release button.
4
Page 6

3. Lift the dust container forwards out of the
cylinder vacuum cleaner.
4. When emptying the dust container, hold it low over a dustbin.
5. Press the “open” button. The base opens and the dust runs into the dustbin.
6. Carefully knock the remaining dust loose.
7. Close the base.
8. Replace the dust container and ensure it is securely attached.
Cleaning the Motor Filter
IMPORTANT: Never use the vacuum cleaner without a motor filter.
1. Turn o and unplug cleaner.
2. Remove the dust container.
3. Open the dust container cover and
remove the filter.
4. Hold the protective motor filter over a dustbin. For a rough clean, gently
knock over a dustbin.
5
Page 7

5. Insert the dry protective motor filter back into its holder.
6. Replace the filter cover by aligning it from above and pressing until it audibly
clicks into place.
7. Close the dust container base.
8. Replace the dust container and ensure it is securely attached.
Cleaning the Exhaust Air Filter
The exhaust air filter is the final step of filtration. It can be cleaned as follows:
1. Turn o and unplug cleaner.
2. Remove the dust container.
3. Open exhaust filter cover.
4. Rinse the HEPA filter under cold running water and allow dry.
5. Replace the exhaust air filter.
6. Close the exhaust filter cover.
7. Close the dust container base.
8. Replace the dust container and ensure it is securely attached.
Product Maintenance
Clean the vacuum cleaner by wiping it with a damp cloth. Do not use any form
of strong, solvent or abrasive cleaning agent.
Disposal
Once the product has reached the end of its useful lifespan, it should be
disposed of responsibly, in accordance with the regulations of your local
authority. In most cases, you can take such products to your local recycling
station.
6
 Loading...