

Page 1
USER GUIDE
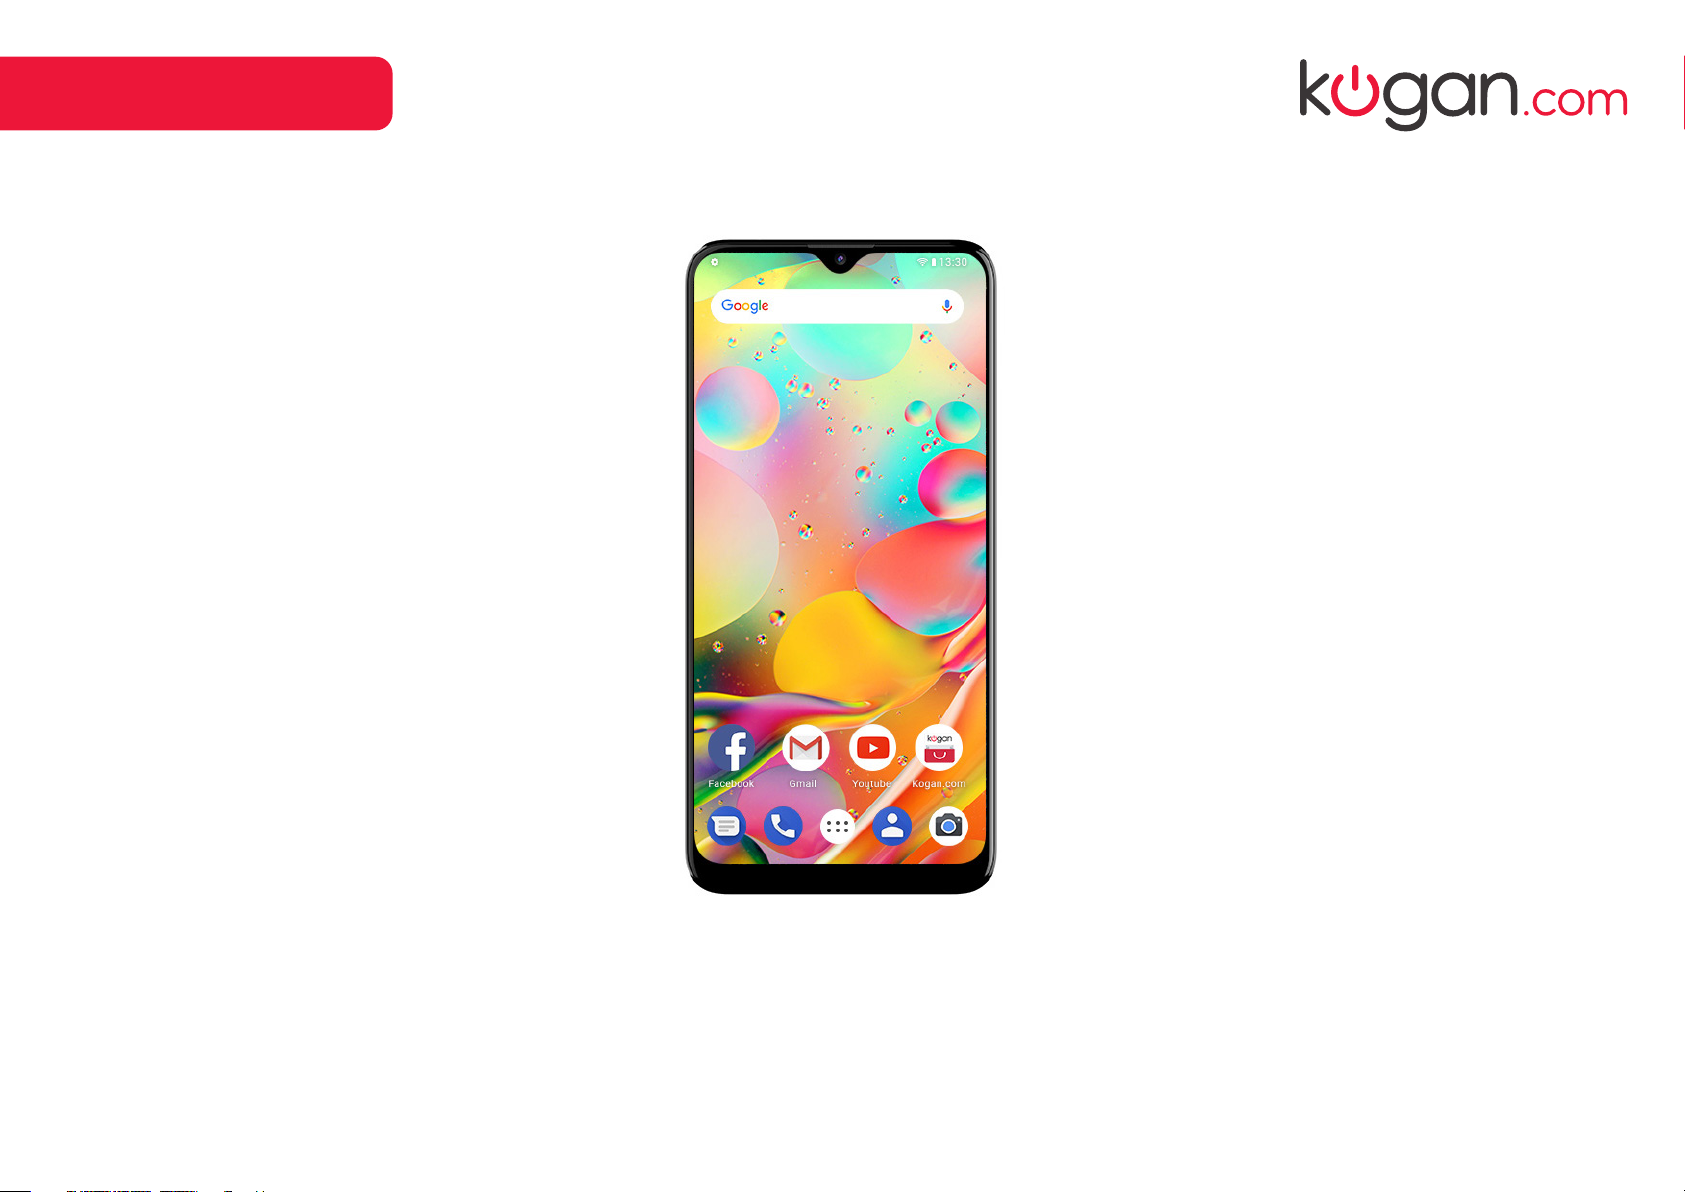
KOGAN AGORA XI
ANDROID SMARTPHONE (KAPH4GX11MA)
Page 2

CONTENTS
SAFETY AND WARNINGS
Safety and warnings ....................02 - 04
Components .......................................... 05
Product overview ...................................06
Getting started ...................................... 07
First time setup ......................................08
Home ................................................09 - 10
Apps ...................................................... 11-12
Dual SIM use ........................................... 13
Camera ............................................. 14 - 15
Quick features .........................................16
Specifications ...........................................17
Troubleshooting ...................................... 18
Safety notices ......................................... 19
Thank you for buying this Kogan product. Please read all safety instructions before
using your smartphone.
Handle with care and inspect regularly to ensure product is in good working
order.
If this product, power supply cord or plug shows any signs of damage: Stop use,
unplug the product and contact Kogan.com support.
• Read all instructions before using the appliance and retain for reference.
• This appliance is not intended for use by persons (including children) with reduced
physical, sensory or mental capabilities, or lack of experience and knowledge, unless
they have been given supervision or instruction concerning use of the appliance by a
person responsible for their safety.
• This appliance is designed for consumer use: follow directions and use only as
described.
• Do not use with an extension cord unless necessary, and if so, ensure it is suitably
rated and it is handled safely as is the product’s own power cord:
• Do not allow the power cord to be exposed to water, heat, direct sunlight or overhang
where it can be pulled or otherwise be damaged or pose a hazard.
• This appliance contains no user-serviceable parts. If it suers any failure or damage,
cease usage and contact Kogan Support aer consulting the Troubleshooting
section of this manual.
• Please do not expose the phone or the battery to extreme hot or cold conditions.
Any extreme temperature will lead to deformation of the phone and reduce charging
capacity and battery life.
• Please only use the custom designed and approved battery and provided charging
cable by Kogan. Incompatible battery or charging cable use may cause damage to
the phone. When disposing of used batteries and phones, please abide by Australian
(or local) law.
• Please do not place the battery or the phone onto or inside heating devices such as a
microwave, oven, or radiator. The battery may explode if it gets too hot.
• Please do not crush or pierce the battery. Prevent exposing the battery to any sort of
external high pressure, this may cause internal short circuiting and overheating.
THIS USER GUIDE COVERS THE FOLLOWING MODELS
Kogan Agora XI smartphone (KAPH4GX11MA)
General Safety
• Do not ever make/receive handheld calls or text while driving.
• Keep your phone at least 15mm away from your ear or body while making calls.
• Do not place any part of the phone or accessories into your mouth.
• Your phone can produce loud, startling sounds.
2
Page 3

SAFETY AND WARNINGS cont’d
• Keep phone away from pacemakers and other electronic medical devices.
• Switch o when requested to inside hospitals and medical facilities.
• Switch o when told to in aircras and airports.
• Switch o when near explosive materials or liquids.
• Do not rely solely on your phone for emergency communications.
• Do not use the phone at petrol stations.
• The phone may produce a bright light when taking photographs.
• Do not dispose of the phone in a fire.
• Avoid contact with magnetic devices.
• Avoid extreme temperatures.
• Avoid contact with liquids. Keep your phone dry.
• Do not take your phone apart. There are no user serviceable parts inside.
• Only use approved accessories.
• Do not listen to audio media at high volumes for long periods of time.
Distractions
Driving
Full attention must be given to driving at all times in order to reduce the risk of an
accident. Using a phone while driving (even while using a hands-free kit) can cause
distractions and lead to an accident. You must comply with local laws and regulations
restricting the use of wireless devices while driving. Kogan.com is not liable for any
loss or damages caused by users paying attention to their phones while in control of a
motor vehicle.
Operating Machinery
Full attention must be given to the operation of machinery. Do not touch or use your
phone when in charge of any form of machinery.
Product Handling
General Statement on Handling and Use
• You alone are responsible for how you use your phone and any consequences of its
use.
• You must always switch o the phone wherever the use of a phone is prohibited.
Use of your phone is subject to safety measures designed to protect users and the
environment.
• Always treat your phone and accessories with care. Keep them in a clean, dust-free
environment.
• Do not expose your phone or accessories to open flames.
• Do not expose your phone or accessories to liquids, moisture or high humidity.
• Do not drop, throw or try to bend your phone.
• Do not use harsh chemicals or solvents to clean the phone or accessories.
• Do not paint your phone or accessories.
• Do not carry your phone in your back pocket, as it may break when you sit down.
• Do not use your phone camera or microphone for illegal purposes.
Small Children
Do not leave your phone or accessories within the reach of small children.
Demagnetisation
To avoid the risk of demagnetisation, do not allow electronic devices or magnetic
media close to your phone for a long time.
Electrostatic Discharge (ESD)
Do not touch the SIM card’s metal connectors.
Antenna
Do not touch the antenna unnecessarily.
Normal Use Position
When placing or receiving a phone call, hold your phone to your ear, with the bottom
towards your mouth.
Air Bags
• Do not place a phone in the area over an air bag or in the air bag deployment area.
• Store the phone safely before driving your vehicle.
Seizures/Blackouts
The phone can produce a bright or flashing light.
Loud Noise
This phone is capable of producing loud noises, which may damage your hearing. Turn
down the volume before using headphones, Bluetooth stereo headsets or other audio
devices.
Repetitive Motion Injuries
To minimise the risk of RSI when texting or playing games with your phone:
• Do not grip the phone too tightly.
• Press the buttons lightly.
• Use the special features which are designed to minimise the times of pressing
3
Page 4

SAFETY AND WARNINGS cont’d
buttons, such as Message Templates and Predictive Text.
• Take lots of breaks to stretch and relax.
Emergency Calls
This phone, like any wireless phone, operates using radio signals, which cannot
guarantee connection in all conditions. Therefore, you must never rely solely on any
wireless phone for emergency communications.
Phone Heating
Your phone may become warm during charging and during normal use.
Electrical Safety
Accessories
• Use only approved accessories.
• Do not connect with incompatible products or accessories.
• Take care not to touch or allow metal objects, such as coins or key rings, to contact or
short-circuit in the battery terminals.
Connection to a Car
Seek professional advice when connecting a phone interface to the vehicle electrical
system.
Faulty and Damaged Products
• Do not attempt to disassemble the phone or its accessory.
• Only qualified personnel can service or repair the phone or its accessory.
• If your phone or its accessory has been submerged in water, punctured, or subjected
to a severe fall, do not use it until you have contacted the Kogan.com customer
support team.
4
Page 5

COMPONENTS
B C D
A
A Kogan Agora XI
smartphone
B USB adaptor
C USB to USB-C cable
D Tray ejection tool
E Earphones
F Quick-start guide
G Warranty card
GFE
NOT INCLUDED
SIM card, microSD card
5
Page 6

PRODUCT OVERVIEW
1 2
3
4
5
6
7
8
9
13 14
10
1211
1 Front camera
2 Speaker
3 Dual SIM card and
microSD card tray
4 Tray hole
5 Volume buttons
(up/down)
6 Power button
7 Touchscreen display
8 Rear cameras
9 Flash
10 Fingerprint sensor
11 Speaker
12 USB-C input
13 Earphone jack
14 Microphone
6
Page 7

GETTING STARTED
Navigation bar
321
1 SIM card 1 (primary)
2 SIM card 2 (secondary)
3 microSD card
CAUTION
Ensure you use only Nano size SIM cards.
Do not cut larger SIM cards to fit.
1. Insert SIM card(s)
a. Remove tray
Insert ejection tool into the tray hole and push to eject tray for SIM and
microSD cards. This tray is designed to fit two Nano SIM cards and one
microSD card (not supplied).
b. Replace tray
Place your desired cards (at least one SIM is required for phonecall and
SMS functionality) into the tray in the appropriate position, and carefully
slide the tray back into the phone.
2. Charge your phone battery & Power on
a. Charging battery
Connect the USB-C cable to the phone via the USB-C input,
and connect the cable to the USB power adaptor provided.
When o, the phone will display an on-screen graphic to
show that it is charging. Remove charger when phone is at
100%.
b. Power on
Press and hold the power button until the touchscreen
display turns on.
Back
Open the last screen you visited, or return one level back in a
submenu. You can go back more than once, all the way until
you hit the home screen.
Home
Return directly to your phone’s home screen, from any app.
Overview
Displays all recently viewed apps that are still open in the
background. From the overview screen, you can go to apps,
close apps, and also access app info and screen pinning.
Guide to gestures
Below is a quick guide to some of the terms you’ll encounter when using this
smartphone and the apps within.
Tap: To select something (an app, menu item, anything), tap it.
Touch and hold: To see more options for an item, touch and hold on it. When
the item responds, release your finger.
Drag: Same as touch and hold, but instead of releasing your finger, continue
to hold and move your finger across the screen. You can relocate apps and
widgets on the home screen by dragging them.
Swipe: Quickly slide your finger across the touchscreen in one motion.
Pinch / Spread: With two or more fingers on the screen, pinch your fingers
together or spread them apart. In some apps this will allow you to zoom in and
out.
Double tap: Same as the tap, but twice quickly. In some apps this will also
allow you to zoom in and out.
Twist / Tilt: In some apps, such as maps, you can use two fingers to rotate
and tilt items on the screen.
7
Page 8
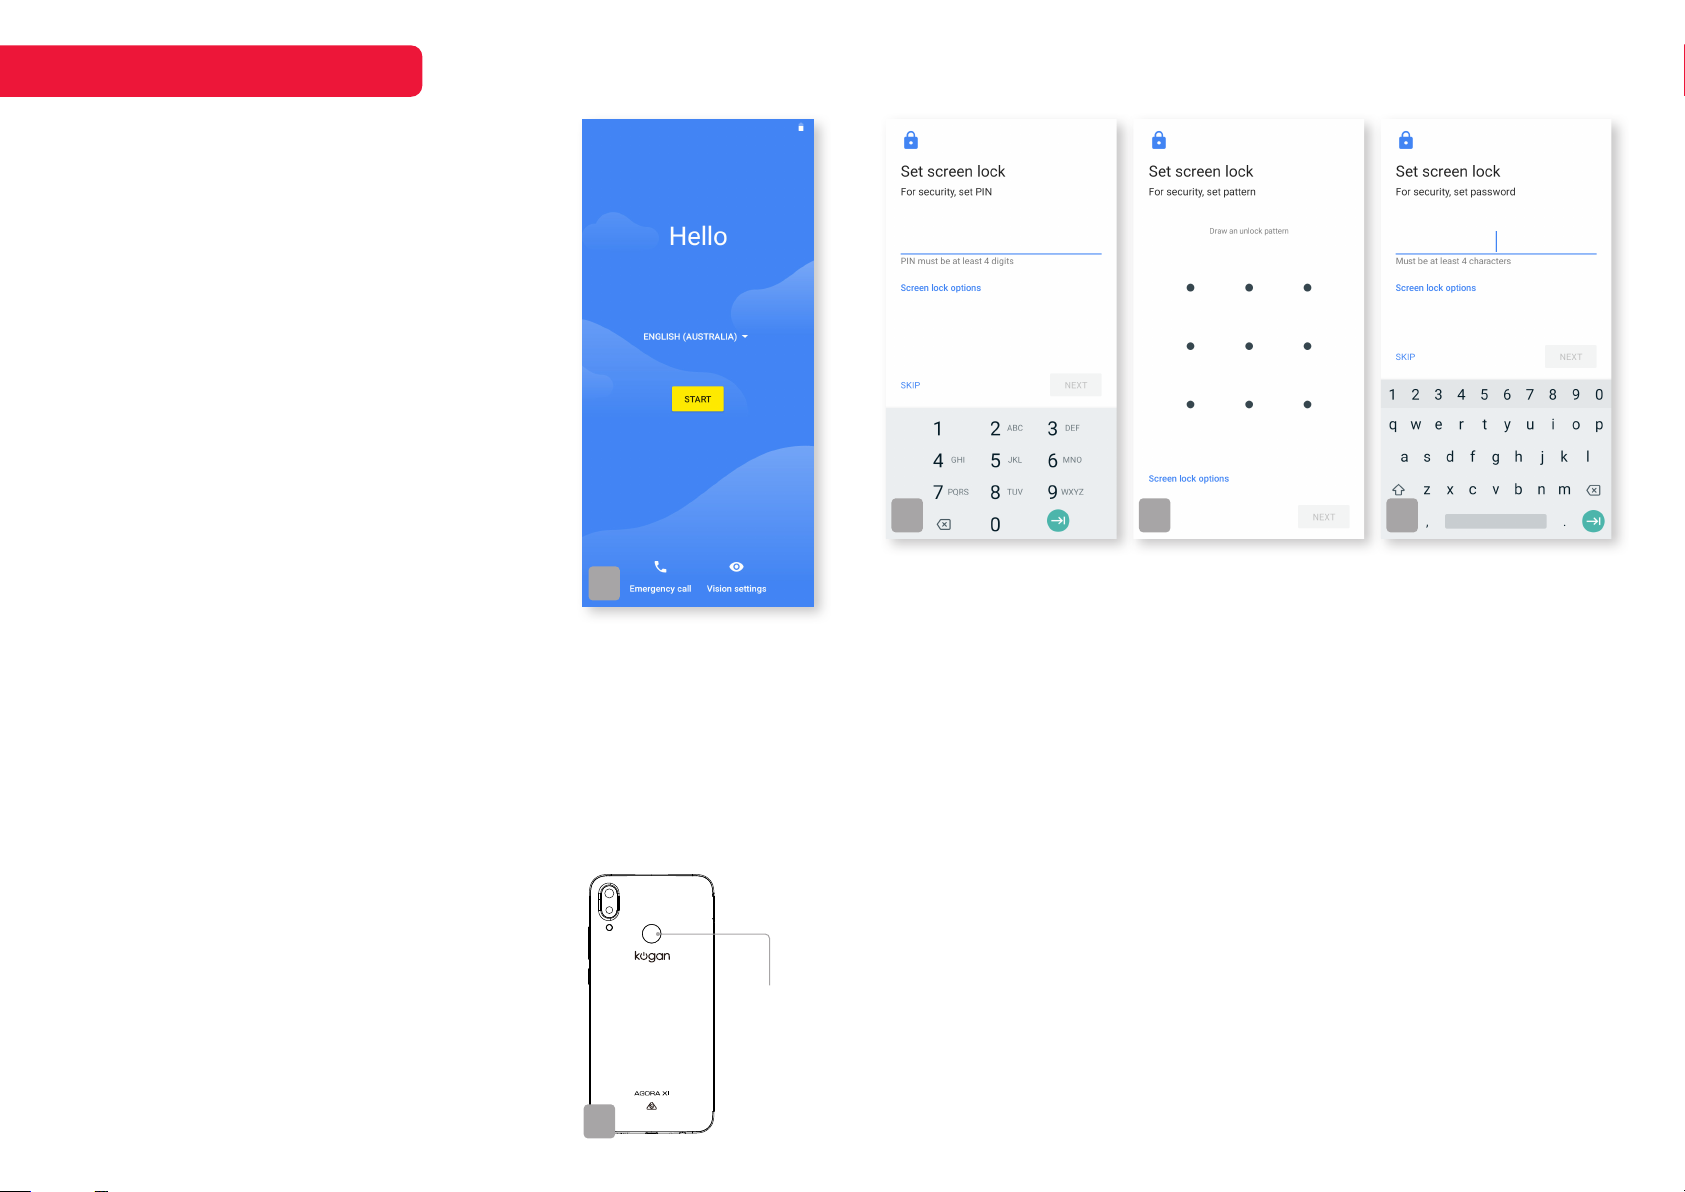
FIRST TIME SETUP
When turning your phone on for the first time, you will
be guided through the following setup options.
Language
Select your menu language (1a).
Connect to mobile network
Follow steps on page 7 if you do not have SIM cards
inserted. This phone allows for dual SIM use.
Connect to Wi-Fi
Your phone will automatically scan for wireless
networks nearby. Ensure the phone is within range
of your wireless modem or router, and have your
password handy. Follow the prompts to input your
password and connect your phone to your selected
network.
If you do not connect to a Wi-Fi network, you may
not be able to set up some device features during the
initial setup, including soware and security updates.
Copy apps & data
Transitioning from an old phone? You can bring over your old apps and data
from an Android phone, iPhone® device, and also cloud backups.
Google account
If you use Gmail, you already have a Google account – if not, you can create
an account during setup. Signing in to your Google account lets you access,
sync and back up your data, including contacts, calendar, photos and more.
Date & time
Adjust the timezone and date settings. If you do not
wish to use your local timezone, the settings can be
manually adjusted.
1a
1c 1d 1e
Select between PIN, pattern, or text password for basic screen lock.
Set screen lock
If using fingerprint recognition, you will need to select a back-up screen lock
method. Choose between a PIN (personal identification number, 1c), pattern
(1d), or text password (1e). If not using fingerprint recognition, these additional
screen lock methods are optional.
Google Assistant (Note: This feature may not be available in all languages.)
Set reminders and open apps with voice commands. Google Assistant is a
built-in virtual assistant that can answer questions, manage tasks, and help
you plan your day in a variety of ways.
Following these steps, your phone will complete the setup and take you to the
home screen. Your phone is now ready to go!
Add fingerprint data
You can add optional security locks to your phone,
including fingerprint recognition using the built-in
fingerprint sensor (1b). Register your fingerprint data to
set this function.
Fingerprint
sensor
1b
8
Page 9
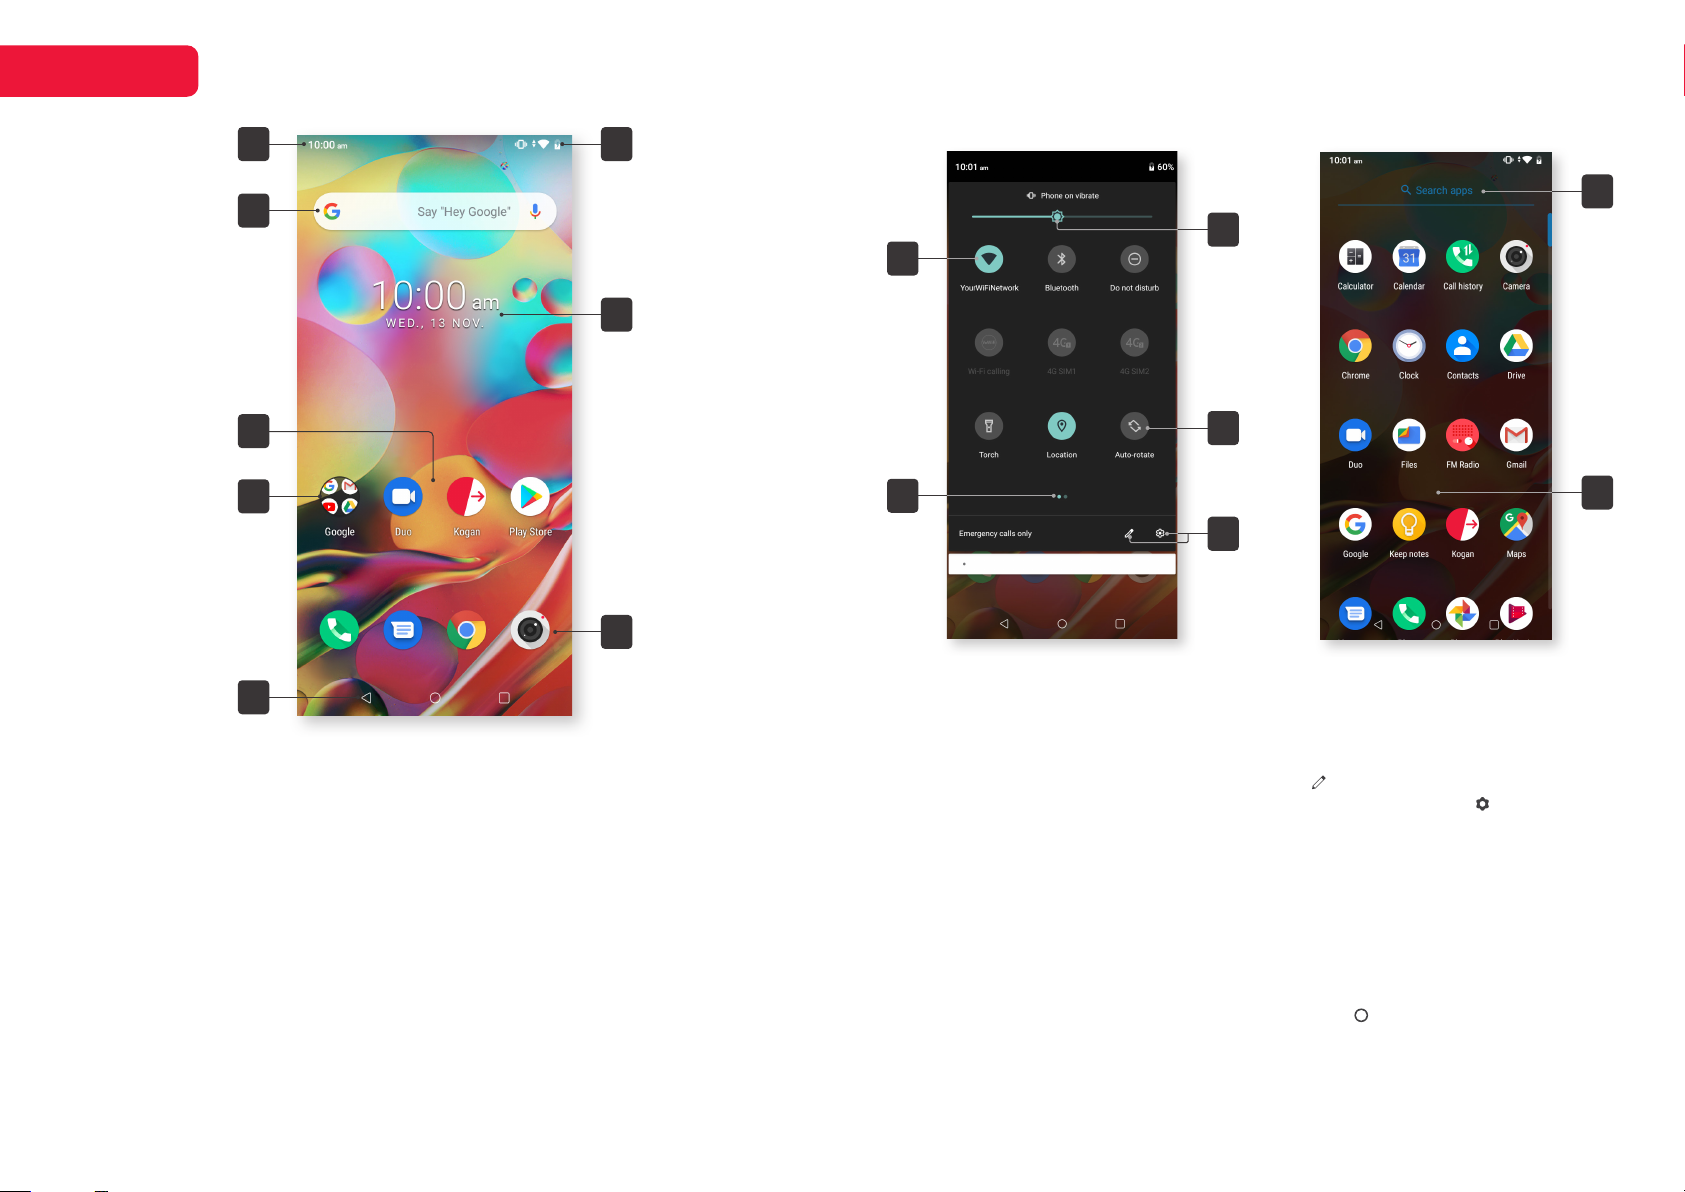
HOME
Quick settings App drawer
1
2
3
5
6
8
1 Notifications
Your app notifications will appear here, swipe
down to see more information. Click on a
notification to open it, or swipe le or right to
remove it.
2 Status bar
Icons here will tell you about the phone’s
status, such as battery, network strength,
Wi-Fi connection, and more.
3 Google widget
Tapping dierent icons on this widget will
open the Google homepage, a new Google
search, or Google Assistant.
4 Widget
This is a default example of a widget
that you can add to your home screen or
4
7
customise to your preference. Hold down to
reposition or remove this widget.
5 Apps on page
These apps shortcuts will appear only on the
page they are placed on. Hold down on an
app to reposition or remove it.
6 App folder
Apps can be grouped together in folders by
simply trying to place one on top of the other.
7 Apps in dock
Your docked apps will stay in the same
position no matter which home screen page
you are on.
8 Navigation bar
Back, Home and Overview buttons. See
page 7 for our guide to these buttons.
10
12
Swipe down Notification / Status
bar to access Quick Settings.
9 Screen brightness
Manually set screen brightness. Adaptive
brightness can be enabled in the Display
settings, which will adjust automatically.
10 Active icon
These apps or functions are ‘on’, and can
be turned ‘o’ with a tap. Hold down for
settings.
11 Inactive icon
These apps or functions are ‘o’. Tap to turn
‘on’, or hold down for settings.
12 Page indicator
Displays which page of the quick settings
menu you are viewing. Swipe le or right to
cycle pages.
14
9
11
15
13
Swipe up from home screen dock
to access the full App Drawer.
13 Edit and Settings
Tap Edit to add, remove, and reorder
quick settings items. Tap Settings to view
all phone settings.
14 Search apps
Type in the name of an app to search
15 Apps
Tap an app to open it. Hold down to access
app info, drag it to the home screen, or
uninstall the app.
Press the Home button or swipe down
to exit the app drawer.
9
Page 10

HOME (cont’d)
Notifications
In the top le corner, icons display to let you know about new messages and
alerts. Swipe down from above to see the notifications, and choose what
to do with it. Tap to open the message or app, swi le or right to clear the
notification, or hold down to access notification options.
Status icons
The icons in the status bar and quick settings menu are indicators for the
phone’s status. Refer below for a guide to some of the icons you may see:
Network strength Do not disturb
Sound mode
Tap to cycle between standard, mute, and vibrate
Wi-Fi connected Silent mode
Bluetooth Vibrate
Aeroplane mode Location
Battery full Wi-Fi calling
Battery charging Torch
4G on SIM 1 Auto-rotate
4G on SIM 2
Volume
To adjust the volume level for any sound,
use the up and down volume buttons (2a).
If no audio or alert is occurring at the time,
this adjustment will default to media
volume. If an incoming call is occurring,
or an alarm is sounding, then the volume
buttons will apply to that sound.
volume up
volume down
2b
2c
Media volume slider
Toggle media volume on/o
Sound settings
Sound settings
Tapping the Settings icon will open this menu,
where you can manually set the volume for media,
calls, ringtone, and alarms (2c).
Settings to customise your ringtone, notification
and alarm tones, and all other sound and vibration
options can also be found here.
2a
10
Page 11

APPS
Calculator
A fully functioning standard calculator in Portrait mode. Switch to
Landscape mode to use scientific calculator functions.
Calendar
Keep track of your events in one easy place. Calendar can be synced with
Gmail accounts to include your work and personal meetings, as well as
local holidays.
Call history
Here you can find a full log of your call history, including tabs for incoming,
outgoing and missed calls. This is a more detailed version of the Most
Recent tab in the Phone app.
Camera
The Kogan Agora XI comes with rear-facing and front-facing cameras,
with photo and video recording functionality. See pages 14-15 for a
detailed guide to using the camera app.
Chrome
Google Chrome is a fast, easy to use, and secure web browser. To access
websites or browse the internet, Chrome is the default browser on this
phone.
Clock
Open the clock app to find options for local and world clock options,
alarms, countdown timer, and stopwatch.
Contacts
Store and manage your contacts. Include multiple number options along
with email, IM, website, company and additional notes fields.
Drive
Use Drive to store files online and share access them from any
smartphone, tablet, or computer. Choose to share files with others, or just
back them up to be accessed and edited by yourself.
FM Radio
Listen to live FM radio broadcasts with your earphones (supplied with
phone).
Gmail
Using Google’s web-based email service, you can send and receive email
eortlessly. You can manage all of your email accounts, even if they’re not
Gmail accounts, and switch easily between them without needing to log
in and out every time.
Google
Create a personalised feed of content that interests you, from all over the
online world. Search and browse anything, such as nearby shops, sports
scores, movie reviews, and much more.
Keep
Write notes and simple to-do lists. Share notes with collaborators, and
even add photos and drawings to make things easier.
Kogan.com
Australia’s premier shopping destination. The Kogan.com app makes it
easier to purchase from your mobile device with the ability to save your
details for faster shopping.
Maps
More than just a map, Google Maps takes the stress out of travel with
real-time GPS navigation, detailed routes depending on your mode of
transit, and plenty of other features to make exploration easy.
Messages
This is your default app for texting (SMS & MMS). See page 13 for a quick
guide to using Messages.
Phone
The Phone app is your hub for making and receiving phone calls. See
page 13 for a quick guide to using the Phone app.
Duo
Google’s app for video calls, Duo can be used on computers, tablets, and
smartphones (Android and iOS). Duo supports video calls, group calls,
video messages, and voice calls.
Files
A file management app that frees up space on your phone’s internal
storage while allowing easy backup to the cloud.
Photos
View, edit and share all of the photos and videos on your device, whether
they’ve been created by the camera app or downloaded from the internet.
Create photo albums for easier file management, or let the app manage
your library automatically.
11
Page 12

APPS (cont’d)
Play Movies & TV
Watch movies and TV shows direct from Google Play’s massive library.
You can also play any of the videos saved on your phone.
Play Music
Play music and audio files, either saved on your phone, or streamed by
Google Play’s streaming service.
Play Store
Find new apps, games, music, movies and TV shows, books and
magazines on the Google Play store. There are paid and free options in all
categories.
Screen Capture
This is a function for recording your screen as a video. To begin recording,
simply select ‘Screen Capture’, and to select ‘stop’ from the notification
panel when you’re ready to end the video.
Settings
Here you’ll find the global options for your phone and many of the apps. If
experiencing any diculty with network and internet connectivity, SIM use,
sound settings, security and location, or many more categories, be sure
to check through all of the Settings menus. At the very top of all settings
screens, there is a search option – type a keyword here to find exactly
what you’re looking for.
Installing new apps
To install apps to your device, open the Play Store app. Here you will be able
to use your Google account to browse through the many apps and games
available to download.
Use the search bar to look for an item, or browse the many categories to find
an item you’d like to download (3a). Please note that the Play Store contains
both free and paid content, so some apps and games will require purchase to
download. The example in the screenshots below is a free app.
Once you have selected an item (3b), select ‘install’ to download. Apps
take up storage space on your device, and each app will vary on size. If you
do not have enough storage space, you will be notified that the installation
was unsuccessful. As the app installs, you can view its progress or continue
browsing apps (3c).
Once an app is installed, it will be available to open from its Play Store page,
your App Drawer, and the home screen.
SmarterHome
Remotely control your compatible Kogan Smart devices. Connect via
Google Home or Amazon Echo, set up automated actions which are
triggered by temperature or time, and get real-time notifications straight
to your smartphone.
Sound Recorder
Record and save voice memos using your phone’s internal microphone.
YouTube
Enjoy the videos and music you love, upload original content, and share it
all with friends, family, and the world on YouTube.
3a 3b 3c
12
Page 13

DUAL SIM USE
Installing SIM cards
Refer to page 7 for SIM tray ejection and SIM card
install.
Set SIM preferences
There are a few options you can set to make dual
SIM card use smooth and easy.
Open the Settings from the app drawer and select
Network & Internet from the list of options. Here you
will then find the submenu SIM Cards (4a).
This will list all inserted SIM cards, allowing you to
enable and disable them to your choosing, as well
as to assign preferred SIMs for certain actions.
These options include mobile data, outgoing calls,
SMS messages, and access to mobile network
during calls.
Making phonecalls
When the icon of network server appears in the
status bar, you will be able to dial or receive
callings. The network icon in the status bar
displays the strength of network signal.
4a
2 3
Sending SMS & MMS
Open the Messages app from the homescreen dock
(default location) or the app drawer.
Tap “Start chat” to launch a new conversation (4d).
Upon entering a recipient’s phone number or email
address, or selecting a name from the existing
contacts, you will be able to start composing a
message.
When two SIM cards are installed, the text box
will display the name of the default SIM card for
messages. To change to the other SIM, tap the SIM
card icon and select from the two options (4e).
Tap the “+” icon to add multimedia objects such as
images or video.
Tap to send. The send icon will display if your
4d
message will be sent as an SMS or MMS message.
41
Open the Phone app (4b) from the homescreen
dock (default location) or the app drawer.
Here you can select between tabs for favourites
(most called) (2), most recent (3), or your contacts
list (4). At the top, there is a search bar for all three
tabs (1), and at the bottom, the dialler to manually
enter a phone number (5).
When placing a call with two SIM cards inserted, if
you have set the SIM preference to “ask every time,”
or not set a default, you will be prompted to choose
a SIM for that call (4c).
5
4b
4e
4c
13
Page 14
CAMERA
1 4
2
5
6
7
1 Flash
Select between auto, on, and o modes.
If set to ‘auto’, the phone will use light
sensors to determine if the flash is required.
2 HDR mode
High Dynamic Range photography eect
can be replicated with this setting. Select
between auto, on, and o.
3 Beauty mode
Apply adjustable settings for smooth,
brighten, enlarge, and slim. These filters are
for fun and shouldn’t be taken seriously.
4 Settings
Tap to enter camera Settings menu. The
options dier depending on the current mode
(photo and video, front and rear camera, etc)
3
8
5 Camera mode
Select between the several camera modes.
Photo, Night, Blur, Filter and Panorama are
all photo modes, while Video is for recording
videos.
6 Gallery
This will provide a thumbnail of your most
recent photo or video, and tapping it will take
you to it in the Gallery app.
7 Take photo/ Record video
When you’re ready to go, tap here to take a
photo or to begin recording video. Tap again
to stop recording.
8 Swap camera
Tap here to swap between the rear-facing
and front-facing cameras.
CAMERA MODES
Photo
This is the standard mode for still photos. Use pinch
and spread gestures (as per page 7) to zoom in and
out, while tapping on items on the screen will force
the camera to focus upon the selected are. Swiping
le and right will cycle through camera modes.
Night (Rear-facing camera only)
For taking photos at night or in low-light areas, the
night setting will allow for a clearer image.
Video
To begin recording a video, you need only to tap the
record button once. Once recording, you’ll see that
the options for gallery and swapping the camera have
been replaced by buttons for pausing the recording,
and for taking a photo while continuing to record the
video (5a).
Blur
Add an enhanced background blur to your photos
with this setting. The ‘F’ numbers are in reference to
a camera’s aperture settings – the lower the number,
the more ‘blur’ will be added to the out-of-focus
details.
Filter
There are nine built-in colour filters that can be
automatically applied to your photos (5b).
Panorama (Rear-facing camera only)
The panorama mode allows you to create an ultrawide image comprised of several photos stitched
together to make one long landscape photograph.
Start with your phone directed towards the far-le of
the subject, and press the take photo button (5c).
Then, slowly pan your phone towards the right hand
side until complete. Be sure to move with a constant
speed.
Stop video
Pause Take photo
5a
5b
5c
14
Page 15

CAMERA (cont’d)
CAMERA SETTINGS
Storage path
Select between saving to internal phone storage or an added memory card.
Volume key function
Select between shutter, volume and zoom functions for the phone’s physical
volume buttons. Shutter is the ‘take photo’ option. Selecting volume option will
adjust audio volume as normal.
Camera sound
Toggle shutter sound eect on/o.
Save location
Toggle geotagging for saved images on/o. This is set independently to the
Location option in your phone’s settings.
PHOTO SETTINGS
Picture size
Set picture size, as both megapixel usage and image aspect ratio.
NOTE
Note that the camera this setting applies to will differ depending on which
camera was selected when the Settings menu was opened. To switch between
the cameras selected, you must exit the settings, change selected camera,
and re-enter camera settings.
Picture quality
Choose between normal, fine and super fine picture quality.
Countdown duration
Set the length of the countdown timer, selecting between o, 3 seconds,
or 10 seconds.
Composition line
Add a faint grid/line to assist with image composition. This appears on the
image preview only and will not be saved to the photo. Select between grid,
golden section, reticle, box, or select ‘close’ to hide the lines.
AI detect
This setting allows for the camera to automatically take photos when it can
detect faces or smiles. Choose between o, face-detect, and smile-shutter.
Antibanding
This setting prevents the appearance of “banding” (vertical or horizontal lines
that appear when taking photos of TV screens or computer monitors). Select
between auto, 50hz or 60hz.
AI scene recognition (Rear-facing camera only)
This feature will automatically identify scenes and optimse shots accordingly.
Save normal pic for HDR
When using HDR mode, this feature will save two copies of each photo taken
– one with the HDR eect, and one without.
Touching photograph
With this setting enabled, simply tapping on the image preview to focus on an
item will automatically take a photo when ready. This is ideal for capturing fast
moving moments.
Mirror reflection (Front-facing camera only)
When using the front-facing camera, the preview image is automatically
flipped to create a mirror-like eect (for instance, words or logos on clothing
will appear backwards) but the image will save without this eect. With mirror
reflection enabled, the photos will now be saved with the mirror eect on.
Restore defaults
This will return all settings back to their default options.
VIDEO SETTINGS
Most options remain the same as the above photo settings, but the following
options will appear in video mode:
Video size
Set between HD or SD format and resolution size.
White balance
Manually override the automatic white balance for a specific setting. Select
from daylight, cloudy, incandescent, fluorescent, or the default auto setting.
Microphone switch
Turn the microphone on/o for recording video.
15
Page 16
QUICK FEATURES
Double tap to recall apps
From any page, double tapping the Overview
button will recall the previously opened app. This
is useful when quickly swapping
between two full-page apps.
Split screen
To show two apps concurrently
on one screen, the split screen
function can be used (6a). Please
note that this is not functional on all
applications, and will vary depending
on the app. To create a split screen, press the
Overview button to display the recent apps. Tap
the first desired app’s icon and select “Split screen”
from the list. This will create the top half of the
split, allowing you to select the lower half from the
overview list.
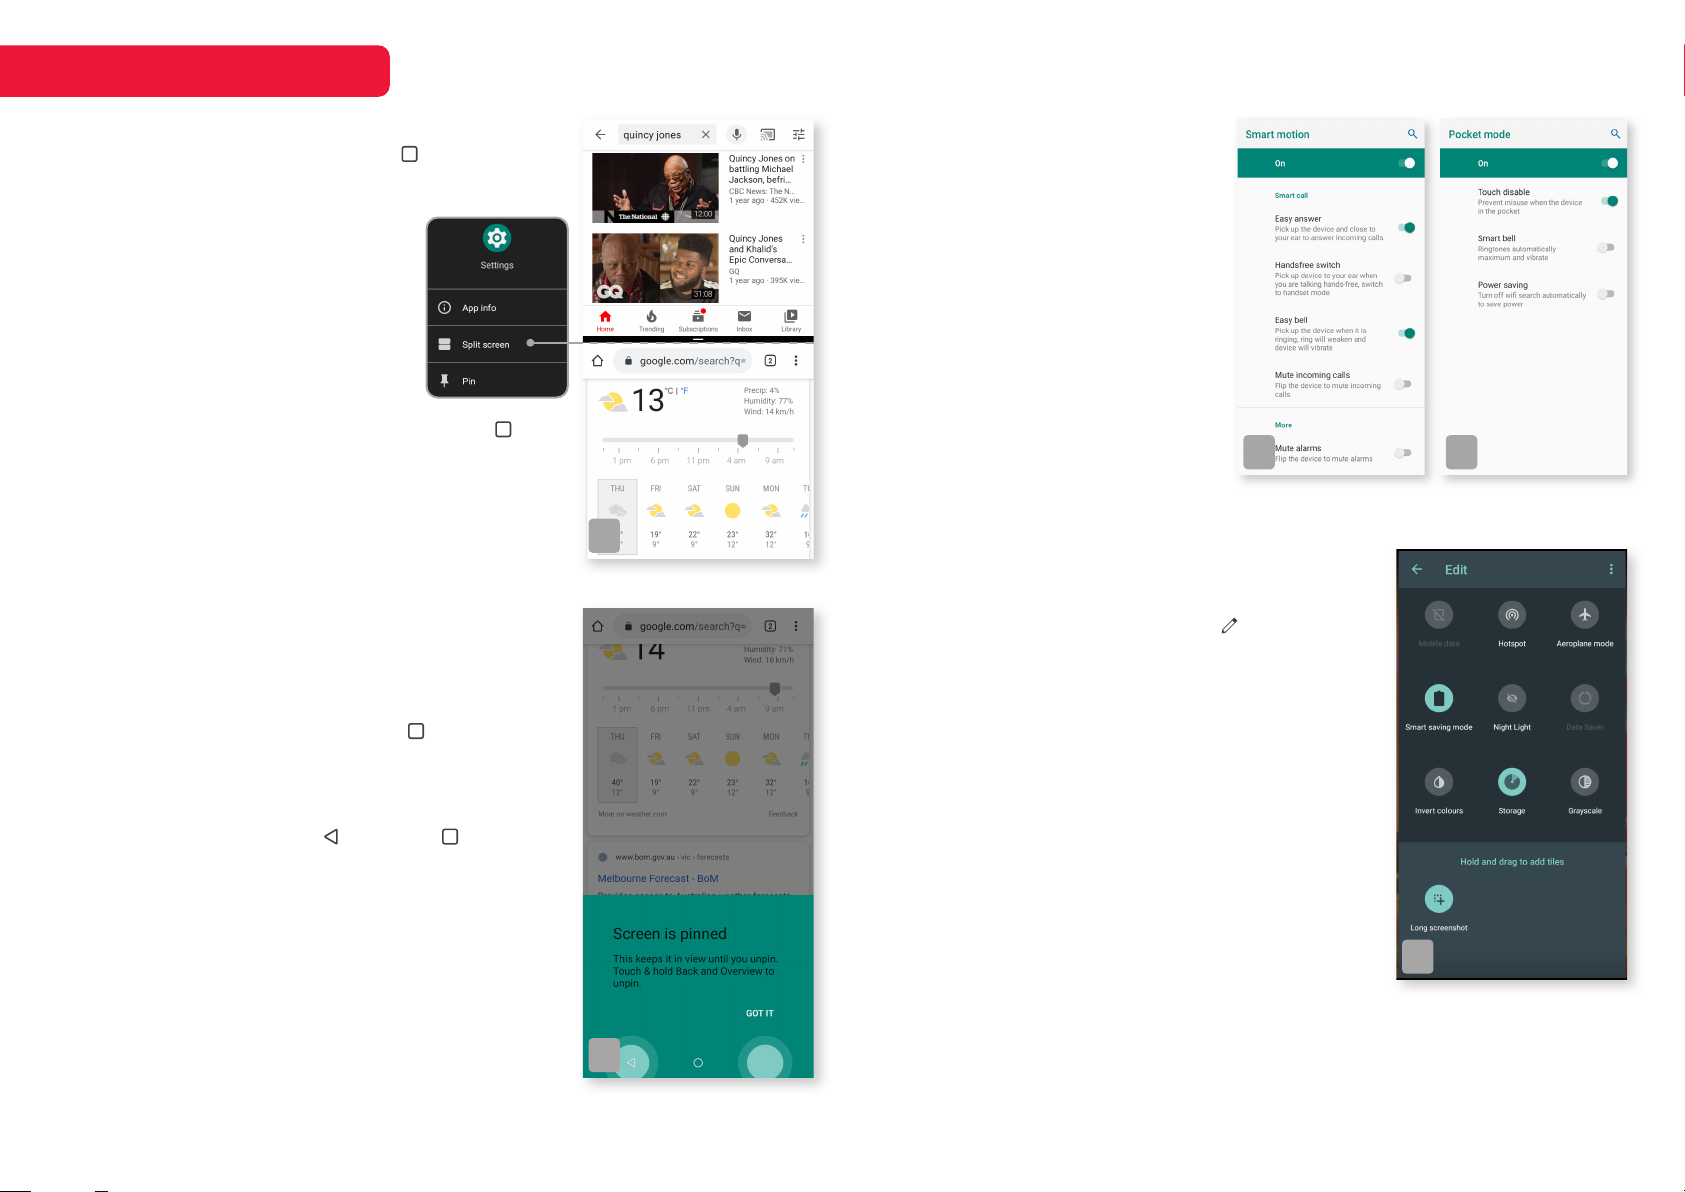
Screen pinning
To keep important apps onscreen, you can enable
the screen pin option in the settings. Head over
to Settings > Security & Location > Advanced to
toggle Screen pinning ‘on’ to enable the setting
for use. Once it is enabled, press the Overview
button to display the recent apps. Tap the app’s
icon and select “Pin” from the list. The pinned app
will remain in view until it is unpinned. To unpin the
screen, hold down both the Back and Overview
buttons simultaneously (6b).
SMART CONTROLS
In the Settings menu, select smart controls to view
the submenu of available functions. All are disabled
by default, and can be switched on from this menu.
6a
Smart motion
Pick up, flip or shake device to
control relevant apps. Tap to pick
the specific actions, such as picking
up for easy answer, switching easily
from hands-free to handset, flipping
to mute incoming calls, and more
(6c).
Pocket mode
A selection of features to assist if
your phone is regularly placed in
a pocket or bag. Here you will find
options to disable touch, increasing
6c 6d
ringtone and vibration settings, or
disabling automatic Wi-Fi searches
when placed in your pocket (6d).
Long screenshot
Add the function of a long, extended screenshot
to the Quick Settings menu. Tap the Edit button
to add, remove, or re-organise the layout of the
Quick Setting (6e). Scroll to the bottom of the list to
find options that can be added by simply holding
and dragging the icon into position. The available
functions will dier depending on your installed apps.
Adding the long screenshot function to your quick
settings menu will give the ability to swipe down and
select this function from any screen.
Standard screenshots can be performed by
holding the volume down and power buttons
simultaneously.
6e
Li to check phone
This function allows the user to view quick
notifications without unlocking the phone, simply by
raising it up from a lowered point or flat surface.
6b
16
Page 17

SPECIFICATIONS
Camera
Auto Focus Yes | Rear
Flash Yes, >1A | Rear
Front 8MP
Rear 13MP + 2MP
Connectivity
2G Network 850 / 900 / 1800 / 1900
3G Network B1 / 5 / 8
4G Network FDD: B1 / 3 / 5 / 7 / 8 / 28A / 28B
Bluetooth 4.2
GPS Yes
Kogan Mobile 4G Ready Yes
SIM Type Nano SIM + Nano SIM + Micro-SD
USB Type-C
Wi-Fi 802.11 b/g/n, 2.4G
Dimensions
Dimensions 155 x 75 x 8.5mm
Weight 150g
Display
Contrast Ratio 1200:1 (min.) | 1500:1 (type)
Resolution 1520 x 720
Size 6.2”
Type IPS
RAM 3GB
Sensors
Fingerprint Sensor Yes
G-Sensor Yes
Storage
Card Slots Micro SD, up to 128GB
Internal Storage 32GB
Features
Phone Features USB Type-C, Dual Camera,
Fingerprint Sensor
Outputs
3.5mm Stereo Audio Yes
Performance
Battery 3800mAh
Chipset SPRD9863, Octa Core
OS Android
OS Version P (VoLTE)
Note:
• Design and specifications are subject to change without notice.
• Weight and dimension shown are approximate.
17
Page 18

BASIC TROUBLESHOOTING
INSUFFICIENT BATTERY LIFE
For most smartphones, it is not
uncommon to experience a battery life
of one day or less, depending on your
usage.
To help increase your phone’s battery
life, try the following steps:
• Turn off unused functions such as Wi-
Fi, GPS, Bluetooth and mobile data
• Restrict the amount of time used on
games and streaming services such as
YouTube, Netflix and Stan
• Turn on power-saving mode
• Close background applications
• Turn off auto-sync services
CHARGING ISSUES
If your phone is not charging, the first
thing you should check is that your
cable and adapter are working well.
Please check the following things to
determine if the issue is with the phone
or charger.
• Try charging another compatible
device
• Try using a different power outlet
• Try replacing the cable
• Try using a different charger
• Check your cable and adapter for any
damage
• Check your phone’s charge port for any
damage, dust or debris
Gently clean any dirt, dust or debris
from the port as this may be causing
an insufficient connection.
Please let the phone sit on charge for
at least an hour before attempting to
turn it on.
BAD RECEPTION
Infrastructure and environment can
play a heavy role in impacting and
reducing signal strength including the
following factors:
• Heavily wooded or mountainous areas
• Freeways or train lines
• Some types of building materials and
insulations
• Some appliances such as microwaves
• Heavily crowded areas such as
concerts or festivals - many people
will be attempting to connect to the
same mobile tower, and this frequently
results in network congestion
• Distance from mobile towers - please
note, not all towers disperse signal in
an equal range in all directions
If your phone is physically damaged,
this may impact the internal antenna
in the unit.
HEADPHONE JACK ISSUES
Please check for the following if you
are experiencing any issues with your
headphone jack:
• Do the headphones work with another
device?
• Does a different pair of headphones
have the same issue with the phone?
• Is there any dirt or debris in the port or
on the plug?
If you do notice any dirt or debris, please
safely and gently remove this from
the unit, as this can cause connection
issues. A small brush, such as a
toothbrush, can be used to remove dirt
from the headphone jack.
WIFI CONNECTION ISSUES
Wi-Fi connection or speed issues can
happen for a range of reasons.
• Distance and obstacles
• Signal type
• Age
• Range extenders
• Wi-Fi chips
• Service Outages
• Network Outages
For our full TV troubleshooting guide,
head online to help.kogan.com
18
Page 19

SAFETY NOTICES
INTERFERENCE
General Statement on Interface
Care must be taken when using the
phone in close proximity to personal
medical devices, such as pacemakers
and hearing aids.
Pacemakers
Pacemaker manufacturers recommend
that a minimum separation of 15 cm be
maintained between a mobile phone
and a pacemaker to avoid potential
interference with the pacemaker. To
achieve this, use the phone on the
opposite ear to your pacemaker and do
not carry it in a breast pocket.
Hearing Aids
People with hearing aids or other
cochlear implants may experience
interfering noises when using wireless
devices or when one is nearby.
The level of interference will depend
on the type of hearing device and the
distance from the interference source,
increasing the separation between
them may reduce the interference.
You may also consult your hearing aid
manufacturer to discuss alternatives.
Medical Devices
Please consult your doctor and the
device manufacturer to determine if
operation of your phone may interfere
with the operation of your medical
device.
Hospitals
Switch off your wireless device when
requested to do so in hospitals, clinics
or health care facilities. These requests
are designed to prevent possible
interference with sensitive medical
equipment.
Aircraft
Switch off your wireless device whenever
you are instructed to do so by airport or
airline staff.
Consult the airline staff about the use
of wireless devices on board the aircraft.
If your device offers a ‘flight mode’, this
must be enabled prior to boarding an
aircraft.
Interference in Cars
Please note that because of possible
interference to electronic equipment,
some vehicle manufacturers forbid the
use of mobile phones in their vehicles
unless a hands-free kit with an external
antenna is included in the installation.
EXPLOSIVE ENVIRONMENTS
Petrol Stations and Explosive
Atmospheres
In locations with potentially explosive
atmospheres, obey all posted signs to
turn off wireless devices such as your
phone or other radio equipment.
Areas with potentially explosive
atmospheres include fuelling areas,
below decks on boats, fuel or chemical
transfer or storage facilities, areas where
the air contains chemicals or particles,
such as grain, dust, or metal powders.
Blasting Caps and Areas
Power off your mobile phone or wireless
device when in a blasting area or
in areas posted power off “two-way
radios” or “electronic devices” to avoid
interfering with blasting operations.
RF EXPOSURE
Specific Absorption Rate (SAR)
Your mobile device is a radio transmitter
and receiver. It is designed not to
exceed the limits for exposure to radio
waves recommended by international
guidelines. These guidelines were
developed by the independent scientific
organisation ICNIRP and include
safety margins designed to assure the
Body Worn Operation
Important safety information regarding
radio frequency (RF) radiation exposure.
To ensure compliance with RF exposure
guidelines the phone must be used with
a minimum of 10 mm separation from
the body.
Failure to observe these instructions
could result in your RF exposure
exceeding the relevant guideline limits.
protection of all persons, regardless of
age and health.
As SAR is measured utilising the device’s
highest transmitting power, the actual
SAR of this device while operating is
typically below that indicated above.
This is due to automatic changes to the
power level of the device to ensure it only
uses the minimum power required to
communicate with the network.
System Update
System supports firmware upgrade only
from official website or server. If user
uses 3rd party ROM image and/or any
other root method to upgrade firmware,
it will cause phone instability and raise
further security risks and pitfalls.
Please note that users are responsible
for all software installed onto the phone
after it has been received.
* The tests are carried out in accordance
with EN 62209-1:2006.
If you have further questions or need assistance,
head online to help.kogan.com
Certain features, services and applications are network-dependent and may not be
available in all areas; additional terms, conditions and/or charges may apply. Contact your
service provider for details.
All features, functionality and other product specifications, as well as the information
contained in this guide, are based upon the latest available information and believed to
be accurate at the time of printing. Kogan.com reserves the right to change or modify any
information or specifications without notice or obligation.
Note: the images in this guide are examples only.
© Copyright 2019, Kogan.com – KAPH4GX11MA UM 11-19
19
 Loading...