

Kofax Image Products VRS3, VirtualReScan 3.5, VRS 3.5 Installation Manual

VirtualReScan® 3.5
Installation Guide
10300408-000
Revision A

Copyright
Copyright © 2004 Kofax Image Products. All Rights Reserved. Printed in the U.S.A.
The information contained in this document is the property of Kofax Image Products.
Neither receipt nor possession hereof confers or transfers any right to reproduce or
disclose any part of the contents hereof, without the prior written consent of Kofax
Image Products. No patent liability is assumed, however, with respect to the use of
the information contained herein.
Trademarks
VirtualReScan, Kofax, ImageControls, and Adrenaline are registered trademarks of
Kofax Image Products.
ISIS and PixTools are trademarks of Pixel Translations, a division of Captiva Software
Corporation.
TWAIN is a registered trademark of the TWAIN Working Group.
All other product names and logos mentioned herein are the property of their
respective companies.
Disclaimer
The instructions and descriptions contained in this document were accurate at the
time of printing. However, succeeding products and documents are subject to change
without notice. Therefore, Kofax Image Products assumes no liability for damages
incurred directly or indirectly from errors, omissions, or discrepancies between the
product and this document.
An attempt has been made to state all allowable values where applicable throughout
this document. Any values or parameters used beyond those stated might have
unpredictable results.

VRS Installation Guide iii
Contents
How to Use This Guide. . . . . . . . . . . . . . . . . . . . . . . . . . . . . . . . . . . . . . . . . . . . . . . . . . v
Introduction . . . . . . . . . . . . . . . . . . . . . . . . . . . . . . . . . . . . . . . . . . . . . . . . . . . . . . . . . . . . . . v
How this Guide is Organized . . . . . . . . . . . . . . . . . . . . . . . . . . . . . . . . . . . . . . . . . . . . . . . v
Related Documentation . . . . . . . . . . . . . . . . . . . . . . . . . . . . . . . . . . . . . . . . . . . . . . . . . . . vii
Technical Support Information . . . . . . . . . . . . . . . . . . . . . . . . . . . . . . . . . . . . . . . . . . . . viii
1 VRS Overview . . . . . . . . . . . . . . . . . . . . . . . . . . . . . . . . . . . . . . . . . . . . . . . . . . . . . . . . . 1
Introduction . . . . . . . . . . . . . . . . . . . . . . . . . . . . . . . . . . . . . . . . . . . . . . . . . . . . . . . . . . . . . . 1
Using VRS with Your Scanner . . . . . . . . . . . . . . . . . . . . . . . . . . . . . . . . . . . . . . . . . . . . . . . 1
VRS Scanners: Certified vs. Non-Certified . . . . . . . . . . . . . . . . . . . . . . . . . . . . . . . . . 2
VRS Component Installers . . . . . . . . . . . . . . . . . . . . . . . . . . . . . . . . . . . . . . . . . . . 2
Using VRS with the Adrenaline Image Processing Engine . . . . . . . . . . . . . . . . . . . 3
Minimum and Recommended System Requirements . . . . . . . . . . . . . . . . . . . . . . . 3
Minimum Requirements . . . . . . . . . . . . . . . . . . . . . . . . . . . . . . . . . . . . . . . . . . . . 3
Recommended Requirements . . . . . . . . . . . . . . . . . . . . . . . . . . . . . . . . . . . . . . . . 3
TWAIN and ISIS Considerations . . . . . . . . . . . . . . . . . . . . . . . . . . . . . . . . . . . . . . . . . 4
USB and FireWire Considerations . . . . . . . . . . . . . . . . . . . . . . . . . . . . . . . . . . . . . . . . 4
Certified Operating Systems . . . . . . . . . . . . . . . . . . . . . . . . . . . . . . . . . . . . . . . . . . . . . 4
Certified Interfaces . . . . . . . . . . . . . . . . . . . . . . . . . . . . . . . . . . . . . . . . . . . . . . . . . . . . . 4
Certified SCSI Scanner Controllers . . . . . . . . . . . . . . . . . . . . . . . . . . . . . . . . . . . . . . . 4
2 Installation. . . . . . . . . . . . . . . . . . . . . . . . . . . . . . . . . . . . . . . . . . . . . . . . . . . . . . . . . . . . 5
Overview . . . . . . . . . . . . . . . . . . . . . . . . . . . . . . . . . . . . . . . . . . . . . . . . . . . . . . . . . . . . . . . . . 5
Installation Sequence for Personal, Professional, and Low-Volume Scanners . . . 5
Installation Sequence For Mid-Volume and High-Volume Scanners . . . . . . . . . . . 6
Install the SCSI Scanner Controller . . . . . . . . . . . . . . . . . . . . . . . . . . . . . . . . . . . . . . . . . . . 6
Attach the Scanner . . . . . . . . . . . . . . . . . . . . . . . . . . . . . . . . . . . . . . . . . . . . . . . . . . . . . . . . 8
TWAIN Installations . . . . . . . . . . . . . . . . . . . . . . . . . . . . . . . . . . . . . . . . . . . . . . . . . . . 8
USB and FireWire Installations . . . . . . . . . . . . . . . . . . . . . . . . . . . . . . . . . . . . . . . . . . 9
Post USB/FireWire Driver Installation Procedure . . . . . . . . . . . . . . . . . . . . . . . 9
Verify the Scanner Connection . . . . . . . . . . . . . . . . . . . . . . . . . . . . . . . . . . . . . . 10
Resolve the Found New Hardware Wizard Event . . . . . . . . . . . . . . . . . . . . . . . . . . . . . 12
Install the Scan Application . . . . . . . . . . . . . . . . . . . . . . . . . . . . . . . . . . . . . . . . . . . . . . . . 13

Contents
iv VRS Installation Guide
Install the VRS Software . . . . . . . . . . . . . . . . . . . . . . . . . . . . . . . . . . . . . . . . . . . . . . . . . . . 14
Attach the VRS Hardware Key . . . . . . . . . . . . . . . . . . . . . . . . . . . . . . . . . . . . . . . . . . . . . . 22
3 Testing Your Installation . . . . . . . . . . . . . . . . . . . . . . . . . . . . . . . . . . . . . . . . . . . . . . . .23
Overview . . . . . . . . . . . . . . . . . . . . . . . . . . . . . . . . . . . . . . . . . . . . . . . . . . . . . . . . . . . . . . . . 23
Starting VRS with an ImageControls Application . . . . . . . . . . . . . . . . . . . . . . . . . . . . . . 23
Starting VRS with a TWAIN Application . . . . . . . . . . . . . . . . . . . . . . . . . . . . . . . . . . . . . 25
Starting VRS with an ISIS Application . . . . . . . . . . . . . . . . . . . . . . . . . . . . . . . . . . . . . . . 26
4 VRS Removal Procedures . . . . . . . . . . . . . . . . . . . . . . . . . . . . . . . . . . . . . . . . . . . . . . .27
Overview . . . . . . . . . . . . . . . . . . . . . . . . . . . . . . . . . . . . . . . . . . . . . . . . . . . . . . . . . . . . . . . . 27
Removing VRS . . . . . . . . . . . . . . . . . . . . . . . . . . . . . . . . . . . . . . . . . . . . . . . . . . . . . . . . . . . 27
A Kofax Product Installation Guideline . . . . . . . . . . . . . . . . . . . . . . . . . . . . . . . . . . . . . .29
Installation Scenarios . . . . . . . . . . . . . . . . . . . . . . . . . . . . . . . . . . . . . . . . . . . . . . . . . . . . . . 29
Ascent Capture . . . . . . . . . . . . . . . . . . . . . . . . . . . . . . . . . . . . . . . . . . . . . . . . . . . . . . . 29
Other Kofax Products . . . . . . . . . . . . . . . . . . . . . . . . . . . . . . . . . . . . . . . . . . . . . . . . . . 29
B Configuring Non-Certified Scanners . . . . . . . . . . . . . . . . . . . . . . . . . . . . . . . . . . . . . .31
Overview . . . . . . . . . . . . . . . . . . . . . . . . . . . . . . . . . . . . . . . . . . . . . . . . . . . . . . . . . . . . . . . . 31
Creating a Scan Source for a Non-Certified Scanner . . . . . . . . . . . . . . . . . . . . . . . . . . . 31
C VRS Restore Default Values Utility. . . . . . . . . . . . . . . . . . . . . . . . . . . . . . . . . . . . . . . .37
Overview . . . . . . . . . . . . . . . . . . . . . . . . . . . . . . . . . . . . . . . . . . . . . . . . . . . . . . . . . . . . . . . . 37
Installation Instructions . . . . . . . . . . . . . . . . . . . . . . . . . . . . . . . . . . . . . . . . . . . . . . . . . . . .37
Restoring VRS Settings . . . . . . . . . . . . . . . . . . . . . . . . . . . . . . . . . . . . . . . . . . . . . . . . . . . . 39
Changing the Default VRS Scanner . . . . . . . . . . . . . . . . . . . . . . . . . . . . . . . . . . . . . . . . . . 40
D VRS Non-Interactive Mode. . . . . . . . . . . . . . . . . . . . . . . . . . . . . . . . . . . . . . . . . . . . . . .41
Non-Interactive Mode vs. Interactive Mode . . . . . . . . . . . . . . . . . . . . . . . . . . . . . . . . . . 41
E Installing USB Drivers . . . . . . . . . . . . . . . . . . . . . . . . . . . . . . . . . . . . . . . . . . . . . . . . . .43
Overview . . . . . . . . . . . . . . . . . . . . . . . . . . . . . . . . . . . . . . . . . . . . . . . . . . . . . . . . . . . . . . . . 43
Installing Visioneer 9650 USB Drivers . . . . . . . . . . . . . . . . . . . . . . . . . . . . . . . . . . . . . . . 43
Installing Fujitsu USB Drivers . . . . . . . . . . . . . . . . . . . . . . . . . . . . . . . . . . . . . . . . . . . . . . 44
Index . . . . . . . . . . . . . . . . . . . . . . . . . . . . . . . . . . . . . . . . . . . . . . . . . . . . . . . . . . . . . . . .45

VRS Installation Guide v
How to Use This Guide
Introduction
VirtualReScan (VRS) works with a wide range of scanning applications in a variety of
settings—from single-user desktop systems to large-scale enterprise solutions.
Whether you are an expert at image processing or have no special knowledge of
scanning, the VRS Installation Guide provides the information you need to successfully
install and test VRS.
How this Guide is Organized
This guide consists of the following chapters and appendices:
Chapter 1 - VRS Overview gives an overview of the VirtualReScan application
and outlines the requirements for running VRS.
Chapter 2 - Installation includes the VRS installation sequence, along with stepby-step procedures.
Chapter 3 - Testing Your Installation describes how to test your VRS installation
with an ImageControls-based application, a TWAIN application, and an ISIS
application.
Chapter 4 - VRS Removal Procedures explains how to remove the VRS
application and related components.
Appendix A - Kofax Product Installation Guideline discusses installation of VRS
with other Kofax products.
Appendix B - Configuring Non-Certified Scanners explains how to set up a noncertified scanner to work with VRS.
Appendix C - VRS Restore Default Values Utility explains how to restore VRS
default settings and change the default VRS scanner.

How to Use This Guide
vi VRS Installation Guide
Appendix D - VRS Non-Interactive Mode explains how to disable VRS noninteractive mode in connection with Böwe Bell & Howell 8000 B/C series
scanners.
Appendix E - Installing USB Drivers outlines special USB driver installation
procedures required by some scanners.

How to Use This Guide
VRS Installation Guide
vii
Related Documentation
The VRS Installation Guide is just one piece in the VRS documentation set. Your VRS
product package also includes related documentation, as outlined in this section.
VRS User’s Manual
The VRS User’s Manual includes instructions for using VRS and explains the product
features in detail. The manual is intended for all potential scan operators, regardless
of their scanning expertise.
VRS Online Help
VRS online help provides online assistance with your application. You can access the
online help by pressing F1 from any VRS dialog box.
VRS Quick Reference
The VRS Quick Reference contains screen shots, shortcuts, and basic user tips.
VRS Release Notes
Late-breaking product information is available from the release notes. You should
read the release notes carefully, as they contain information that may not be available
in the other VRS documentation.

How to Use This Guide
viii VRS Installation Guide
Technical Support Information
For additional technical information about Kofax products, visit the Kofax Web site at
www.kofax.com and select an appropriate option from the Support menu. The Kofax
Support pages provide product-specific information, such as current revision levels,
the latest drivers and software patches, online documentation and user manuals,
updates to product release notes (if any), technical tips, and an extensive searchable
knowledgebase. You can find VRS FAQs on the VRS Support pages.
The Kofax Web site also contains information that describes support options for Kofax
products. Please review the site for details about the available support options. If you
need to contact Kofax Technical Support, please have the following information
available:
• VRS software version
• Scanning application
•Operating system
• Scanner make and model
• Scanner engine (board) type
• SCSI Scanner controller (if applicable)
• Special/custom configuration or integration information

VRS Installation Guide 1
Chapter 1
VRS Overview
Introduction
This guide gives you instructions for installing VirtualReScan (VRS).
Using VRS with Your Scanner
Since its first release, VRS has grown to accommodate a wide range of certified
scanners. This was accomplished initially with two distinct versions of VRS:
Hardware VRS and Software VRS. Now there is only one version of VRS to
accommodate throughput for a range of scanners, including Personal, Professional,
Low-Volume, Mid-Volume, and High-Volume.
Personal, Professional, and Low-Volume scanners are designed to support low to
moderate throughput. Mid-Volume and High-Volume production scanners are
specifically designed for large numbers of scans per day. For this reason, production
scanners are equipped with the Kofax SCSI driver, which supports heavy scan
workloads while maintaining rated speed.
Table 1-1. Scanners Supported by VRS
Scanner Throughput (Pages Per Minute)
Personal Less than 10 PPM
Professional 11-40 PPM
Low-Volume Up to 59 PPM
Mid-Volume 60 - 90 PPM
High-Volume More than 90 PPM

Chapter 1
2 VRS Installation Guide
Your VRS package will indicate whether you have VRS for Personal, Professional,
Low-Volume, Mid-Volume, or High-Volume scanners.
VRS Scanners: Certified vs. Non-Certified
When a scanner is certified for VRS, it goes through a rigorous testing process during
which the best default settings are identified and selected. For this reason, we
recommend that you use VRS only with certified scanners. You can use the product
page on the Kofax Web site to view the list of VRS-certified scanners. In addition to
listing the scanner name and manufacturer, the VRS product page includes the
following information:
• Driver used for VRS 3.5 (TWAIN, ISIS, or Kofax SCSI)
• Black or white background (black borders are necessary for automatic
cropping)
• Additional memory required for optimal performance (if applicable)
• Interface certified by VRS (SCSI, USB, or FireWire)
VRS is also capable of working with certain non-certified “compatible” scanners,
provided that they have been configured with the Kofax Source Manager (KSM). It is
important to be aware that you may experience less than optimal image quality when
using a non-certified scanner with VRS. Not every scanner can be used with VRS. To
be configured as compatible with VRS, a non-certified scanner must meet the
following requirements:
• Ability to output a 256-level grayscale image as a single image.
• Provide a TWAIN driver or an ISIS driver. While VRS works best with an ISIS
driver, it also supports some scanners with TWAIN drivers.
Note For more information about using non-certified scanners with VRS, refer to
Configuring Non-Certified Scanners on page 31.
VRS Component Installers
During the standard VRS installation, you will be prompted to select the name of your
scanner from a list of certified scanners. The VRS installer uses the name to identify
the appropriate drivers to install for your scanner. Because the list of VRS-certified
scanners is updated on a regular basis, some certified scanners may not appear on the
list that you see during the installation. In this case, you may need to download a
“VRS Component Installer” update to obtain the drivers required for your VRScertified scanner. To locate the appropriate VRS Component Installer for your
scanner, select the VRS product link from the Kofax Web site Support pages.

VRS Overview
VRS Installation Guide
3
Component Installers are available only for scanners that have been certified for use
with VRS. Non-certified scanners can be used with VRS only if they meet the
requirements outlined in the preceding section.
Using VRS with the Adrenaline Image Processing Engine
The VRS product bundle for Personal, Professional, or Low-Volume Scanners with
the Adrenaline Image Processing Engine (AIPE) offers image processing features such
as standard bar code reading, forms recognition, line removal, and much more. AIPE
also provides Enhanced Bar Code recognition. See the Enhanced Bar Code Engine
appendix in the VRS User’s Manual for more information on how to take full
advantage of this feature.
Note Because the Adrenaline Image Processing Engine (AIPE) only works with
ImageControls-based applications, the AIPE capabilities in the VRS+AIPE bundle will
NOT work with TWAIN and ISIS applications. If you need these capabilities and you
are using a TWAIN application, you can download the Adrenaline TWAIN Data
Source from the Kofax Web site.
Minimum and Recommended System Requirements
So that VRS can be used to its maximum potential, Kofax provides both minimum
and recommended system requirements. Ensure that you meet the minimum
requirements before attempting to install VRS. Using the recommended requirements
will help to assure the fastest and best VRS performance.
Minimum Requirements
• Pentium 4, 1.4 GHz processor, 256 MB RAM
• Hard drive with 300 Mbytes free disk space for installation
• Monitor resolution: 800 x 600
Recommended Requirements
• Pentium 4, 2.0 GHz processor, 512 MB of RAM for Color
• Hard drive with 300 Mbytes free disk space for installation
• Monitor resolution: 1024 x 768

Chapter 1
4 VRS Installation Guide
TWAIN and ISIS Considerations
All VRS scanners are supported by either TWAIN or ISIS drivers. Although some of
these scanners will work with both ISIS and TWAIN drivers, only the driver that
works best with VRS will be certified for use. If your scanner is certified with a
TWAIN driver, refer to TWAIN Installations on page 8 and follow the instructions that
apply to your scanner. It is not necessary to install an ISIS driver, as VRS includes all
the necessary ISIS software to control the certified scanners. For details, select the VRS
Supported Configurations link from the Support area of the Kofax Web site.
USB and FireWire Considerations
Some VRS scanners are supported by a USB or FireWire interface. If your scanner
requires a USB or FireWire interface, there may be specific installation instructions
that apply to your scanner. Refer to USB and FireWire Installations on page 9 for more
information.
Certified Operating Systems
VRS has been certified to work on the following operating systems:
•Windows XP Professional
• Windows 2000 Professional
Certified Interfaces
Only USB, SCSI, and FireWire interfaces are certified with VRS at this time.
Certified SCSI Scanner Controllers
You can consult the Kofax Web site for updates to VRS-supported SCSI scanner
controllers.

VRS Installation Guide 5
Chapter 2
Installation
Overview
This chapter explains the basic VRS installation sequence, which consists of five basic
steps. The sequence of steps may vary slightly, according to the throughput
supported by the scanner that you plan to use with VRS. Personal, Professional, and
Low-Volume scanners require one installation sequence, while Mid-Volume and
High-Volume production scanners require another sequence (both are outlined
below). If you have any question about which installation sequence is appropriate for
your scanner, refer to Table 1-1 on page 1.
Before you start the VRS installation process, gather the required materials:
• VRS installation CD
• VRS-certified scanner
• SCSI scanner controller and supporting documentation (if applicable)
• VRS hardware key (if applicable)
• An appropriate (preferably Kofax) scanner cable
Installation Sequence for Personal, Professional, and Low-Volume
Scanners
If your scanner is classified as a Personal, Professional, or Low-Volume scanner, you
should complete the VRS installation sequence in this order:
1 Install the SCSI Scanner Controller (refer to page 6)
2 Attach the Scanner (refer to page 8)
3 Install the Scan Application (refer to page 13)
4 Install the VRS Software (refer to page 14)
5 Attach the VRS Hardware Key (refer to page 22)

Chapter 2
6 VRS Installation Guide
Installation Sequence For Mid-Volume and High-Volume Scanners
If your scanner is classified as a Mid-Volume or High-Volume scanner, you should
complete the VRS installation sequence in this order:
1 Install the VRS Software (refer to page 14)
2 Install the SCSI Scanner Controller (refer to page 6)
3 Attach the Scanner (refer to page 8)
4 Resolve the Found New Hardware Wizard Event (refer to page 12)
5 Install the Scan Application (refer to page 13)
Install the SCSI Scanner Controller
This step describes how to install the SCSI scanner controller.
X To install the SCSI scanner controller
1 Shut down your PC and unplug the PC power cord.
2 Install the SCSI scanner controller on your PC according to the installation
instructions supplied by the controller manufacturer.
Note If you are using a Kofax Adrenaline 450, 650, or 650i SCSI scanner
controller, refer to the installation instructions in the Getting Started Guide that
came with the controller.
3 Once the SCSI scanner controller has been installed, plug in the PC power
cord, start your PC, and open Windows Explorer.
Installation
VRS Installation Guide
7
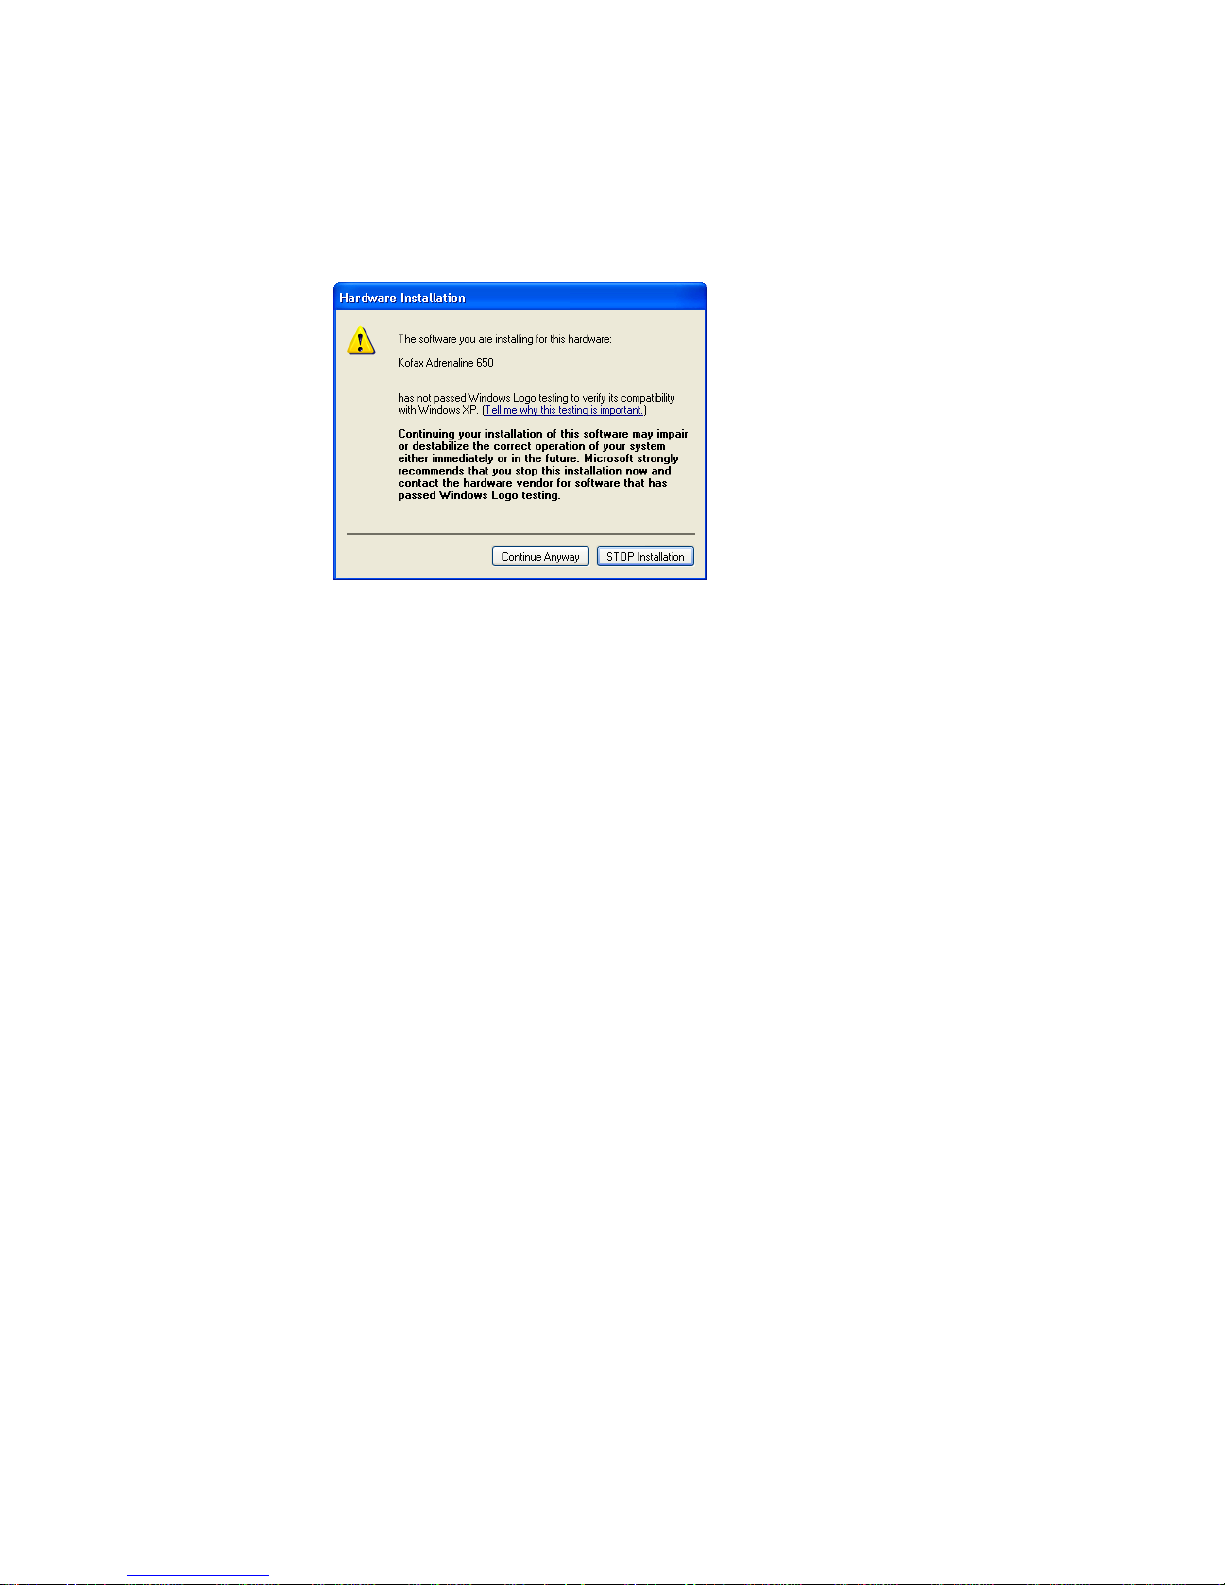
4 If you have Windows XP, a compatibility message will appear. Click
Continue Anyway to clear the message and proceed to the next step.
Figure 2-1. Windows Logo Compatibility Message
5 Right-click on My Computer and select Properties| Hardware | Device
Manager.
6 Once the list of devices appears, select SCSI and RAID Controllers and
expand the node to verify that the name of your SCSI scanner controller
appears. For Kofax SCSI scanner controllers, the name will probably be listed
as Kofax Adrenaline 450/650/650i.
Chapter 2
8 VRS Installation Guide
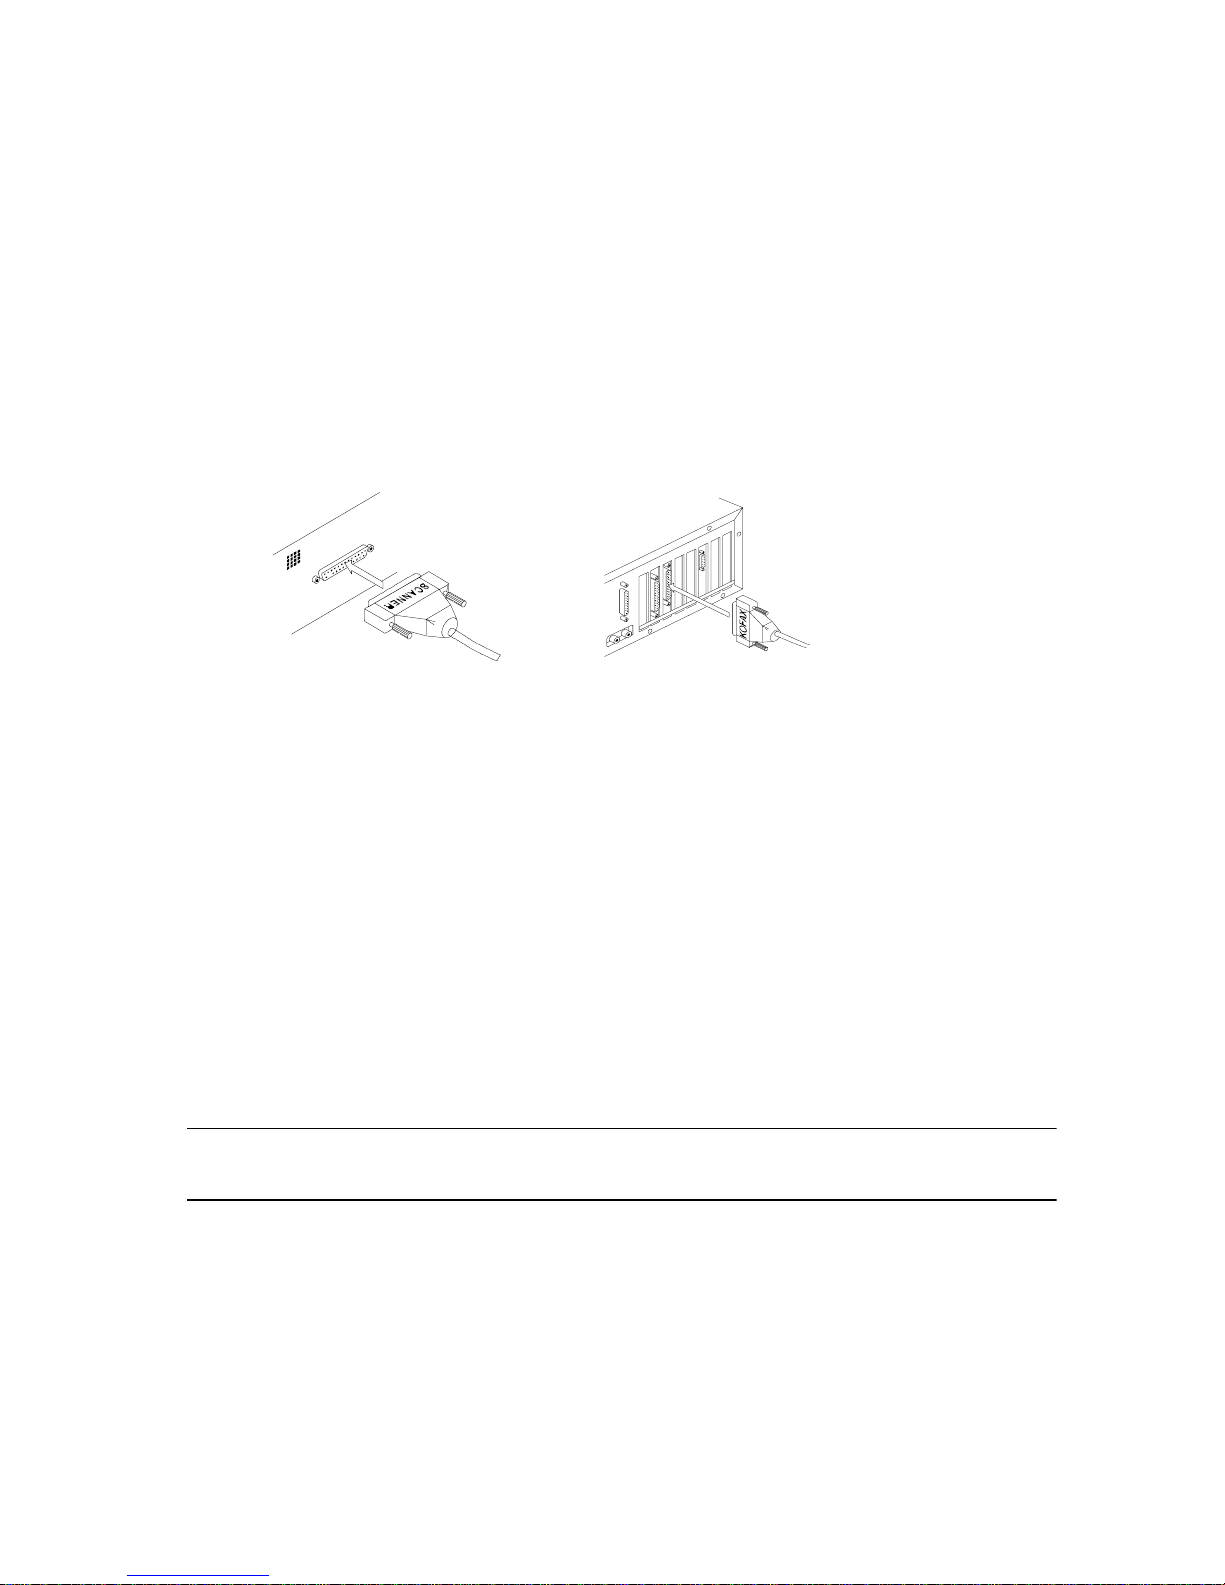
Attach the Scanner
Once you have installed your SCSI scanner controller, you can attach your scanner.
X To connect the scanner to your PC
1 Make sure to power off the scanner and PC and unplug the power cord for
both.
2 Attach the scanner cable to the scanner.
3 Attach the scanner cable to the SCSI port on your PC.
Figure 2-2. Attaching the Scanner to Your PC
4 Plug in the power cord for your scanner.
5 Plug in the power cord for your PC and then start it. Windows may launch
the Found New Hardware Wizard. If so, proceed to Resolve the Found New
Hardware Wizard Event on page 12 and follow the instructions. Otherwise,
VRS will be ready to use once your scan application is installed.
TWAIN Installations
If you need to install the TWAIN driver for a VRS-certified scanner, follow the
manufacturer-provided TWAIN driver installation instructions particular to your
scanner. The TWAIN driver can be installed before or after the VRS software
installation.
Note To install a non-certified (compatible) VRS scanner, refer to “Configuring Non-
Certified Scanners” on page 31.
During the VRS installation process, you may be reminded to install the TWAIN
driver. If you have already installed the required TWAIN driver, click OK to clear the
message and continue. If necessary, install the TWAIN driver after the VRS software
installation is done.

Installation
VRS Installation Guide
9
USB and FireWire Installations
This section covers the general procedure for installing and configuring USB or
FireWire scanners with VRS. You should also refer to the manufacturer-provided
installation instructions because some scanners have unique requirements.
Note For some scanners with unique requirements, the USB driver installation
process differs from the standard procedure outlined here. For more information,
refer to Installing USB Drivers on page 43.
X To install and configure USB or FireWire scanners
1 Do one of the following, as applicable:
• Plug in the USB cable from your scanner to the USB port.
• Plug in the FireWire cable from your scanner to the FireWire port.
Windows will detect the new device and launch the New Hardware Found
wizard.
2 Follow the on-screen instructions to locate the necessary driver on the
installation CD supplied with your scanner.
3 Verify that the scanner is installed correctly. Refer to Verify the Scanner
Connection on page 10.
4 Review the Post USB/FireWire Driver Installation Procedure below.
5 Install your scanning application. Refer to Install the Scan Application on
page 13.
6 Install VRS. For details, refer to Install the VRS Software on page 14.
7 Attach the VRS hardware key to the USB port of your PC.
Post USB/FireWire Driver Installation Procedure
Some scanners are designed to perform particular actions when triggered. For
example, some scanners are set to automatically launch the Microsoft imaging
application when paper is inserted into the automatic document feeder. For best
results, we recommend that you disable all such device events before installing/using
VRS.
X To disable device events
1 From the Windows Start menu, select Settings | Control Panel.
2 Open Scanners and Cameras.
 Loading...