

Page 1
Size - A5
Size - A5
13
Minibackofen
KMO 4341
DE
Gebrauchsanweisung
EN
User manual
ES
Manual de instrucciones
FR
Mode d'emploi
GR
Οδηγίες χρήσης
HU
Használati leírás
IT
Manuale dell'utente
NL
Gebruiksaanwijzing
PL
Instrukcja obsługi
PT
Manual de utilização
SE
Användarhandbok
TR
Kullanım Kılavuzu
Deutsch 3 - 11
English 12 - 20
Español 21 - 29
Français 30 - 38
Ελληνικά 39 - 47
Magyar 48 - 56
Italiano 57 - 65
Nederlands 66 - 74
Polski 75 - 83
Português 84 - 92
Svenska 93 - 101
Türkçe 102 - 110
Imtron GmbH
Wankelstraße 5
IM_KMO 4341_180306_V05
85046 Ingolstadt
Germany
www.imtron.eu
www.koenic-online.com
IM_KMO4341_180306_V05_HR.indb 1 6/3/18 2:00 pm
Page 2
Size - A5
R
Q
P
O
N
M
L
A
1
B
12
cm
30 cm
12
cm
2
3
C
12
D
cm
E
4 65
F
K
7
1
2
8
9
2
2
1
1
J
2
11
1210
I
1
H
G
IM_KMO4341_180306_V05_HR.indb 2 6/3/18 2:01 pm
Page 3
Deutsch
Sicherheitshinweise
Achtung! Heiße Oberfläche! Verbrennungsgefahr! Die heißen Oberflächen des Produktes
nicht berühren. Während des Betriebes besteht aufsteigende Hitze über dem Produkt.
•Das Produkt darf nicht mit einer externen Zeitschaltuhr oder
mit einem separaten Fernwirksystem betrieben werden.
•Dieses Produkt kann von Kindern ab 8 Jahren
sowie von Personen mit reduzierten physischen,
sensorischen oder mentalen Fähigkeiten oder Mangel
an Erfahrung und/oder Wissen benutzt werden, wenn
sie beaufsichtigt werden oder bezüglich des sicheren
Gebrauchs des Produktes unterwiesen wurden und die
daraus resultierenden Gefahren verstanden haben.
•Kinder dürfen nicht mit dem Produkt spielen.
•Reinigung und Benutzer-Wartung dürfen nicht durch
Kinder durchgeführt werden, es sei denn, sie sind
älter als 8 Jahre und beaufsichtigt.
•Kinder jünger als 8 Jahre sind vom Produkt und dem
Netzkabel fernzuhalten.
•Die Netzanschlussleitung muss regelmäßig auf
Zeichen von Beschädigungen untersucht werden,
und falls die Netzanschlussleitung beschädigt ist,
darf das Produkt nicht mehr benutzt werden.
•Das Produkt muss an eine Steckdose mit
Schutzleiter angeschlossen werden (bei Geräten der
Schutzklasse I).
3
IM_KMO4341_180306_V05_HR.indb 3 6/3/18 2:01 pm
Page 4
Size - A5
Deutsch
Sicherheitshinweise
•Dieses Produkt ist für die Verarbeitung
haushaltsüblicher Mengen im Haushalt oder
in haushaltsähnlichen, nicht-gewerblichen
Anwendungen bestimmt. Haushaltsähnliche
Anwendungen umfassen z.B. die Verwendung
in Mitarbeiterküchen von Läden, Büros sowie die
Nutzung durch Gäste von Pensionen, kleinen Hotels
und ähnlichen Wohneinrichtungen.
•Um Gefährdungen zu vermeiden, darf ein
beschädigtes Netzkabel nur vom Hersteller, einer
von ihm beauftragten Werkstatt oder einer ähnlich
qualifizierten Person ersetzt werden.
•Reinigen Sie das Produkt und die übrigen
Zubehörteile nach jedem Gebrauch.
•Beachten Sie das Kapitel Reinigung und Pflege.
4
IM_KMO4341_180306_V05_HR.indb 4 6/3/18 2:01 pm
Page 5

Deutsch
SicherheitshinweiseSicherheitshinweise
• Lesen Sie diese Bedienungsanleitung
vor dem ersten Gebrauch gründlich
durch. Sie enthält wichtige Informationen für Ihre Sicherheit sowie zum Gebrauch und zur Pflege des Produktes.
• Heben Sie die Bedienungsanleitung
zum späteren Nachschlagen auf und
geben Sie sie mit dem Produkt weiter.
• Beachten Sie alle Warnungen
auf dem Produkt und in dieser
Bedienungsanleitung.
• Benutzen Sie das Produkt nur für den
vorgesehenen Zweck. Unsachgemäßer
Gebrauch könnte zu Gefährdungen
führen.
• Wenn Sie das Produkt nicht
bestimmungsgemäß verwenden
oder falsch bedienen, kann für daraus
resultierende Schäden keine Haftung
übernommen werden.
• Die Verwendung von Zubehör und
Produktteilen, die vom Hersteller nicht
ausdrücklich empfohlen werden, kann
Verletzungen oder Schäden verursachen
und führt zum Verlust der Garantie.
• Lassen Sie das Produkt nie unbeaufsichtigt, solange es eingeschaltet ist.
• Stellen Sie keine Gegenstände auf das
Produkt.
• Tauchen Sie elektrische Teile des
Produktes während des Reinigens oder
des Betriebs nie in Wasser oder andere
Flüssigkeiten. Halten Sie das Produkt
nie unter fließendes Wasser.
• Versuchen Sie niemals das Produkt
selbst zu reparieren. Geben Sie das
Produkt zur Wartung und Reparatur
an einen Fachhändler oder einen
qualifizierten Kundendienst.
• Die Netzspannung muss mit den
Angaben auf dem Typenschild des
Produktes übereinstimmen.
• Der Netzstecker dient als
Trennvorrichtung. Achten Sie darauf,
dass der Netzstecker immer gut
zugänglich und erreichbar ist.
• Nur der Netzstecker kann das Produkt
vollständig vom Stromnetz trennen.
• Vermeiden Sie die Beschädigung des
Netzkabels durch Knicken oder Kontakt
mit scharfen Kanten.
• Halten Sie das Produkt, einschließlich
Netzkabel und Netzstecker, von
Hitzequellen, wie z. B. Heizkörpern,
Öfen und anderen Hitze erzeugenden
Produkten, fern.
• Ziehen Sie den Netzstecker nur am
Netzstecker selbst aus der Steckdose.
Ziehen Sie nicht am Netzkabel.
• Ziehen Sie den Netzstecker aus der
Steckdose, ...
- wenn das Produkt nicht benutzt wird,
- wenn Funktionsstörungen auftreten,
- bevor Sie Zubehör anbringen /
entfernen und
- bevor Sie das Produkt reinigen.
• Wenn das Netzkabel oder das Gehäuse
des Produktes beschädigt oder das
Produkt heruntergefallen ist, darf das
Produkt nicht benutzt werden, bis
es von einem Fachmann überprüft
worden ist.
• Verwenden Sie das Produkt nur in
trockenen Innenräumen, niemals im
Freien.
• Schützen Sie das Produkt vor extremer
Hitze und Kälte, direktem Sonnenlicht
und Staub.
5
IM_KMO4341_180306_V05_HR.indb 5 6/3/18 2:01 pm
Page 6

Size - A5
Deutsch
Sicherheitshinweise
• Um das Risiko von Feuer und
elektrischem Schlag zu reduzieren,
setzen Sie das Produkt weder Feuer
(Kamin, Grill, Kerzen, Zigaretten,
usw.) noch Wasser (Tropfwasser,
Spritzwasser, Vasen, Wannen, Teiche,
usw.) aus.
• Warnung! Benutzen Sie dieses
Produkt nicht in der Nähe von Wasser
oder starker Feuchtigkeit, z. B. in einem
feuchten Keller oder neben einem
Schwimmbecken oder der Badewanne.
• Das Produkt nur in gemäßigten
Breitengraden verwenden. Vermeiden
Sie tropische und besonders feuchte
Klimaregionen.
• Produkt vor jeglicher Nässe, d.h. auch
Spritzwasser und Feuchtigkeit schützen.
• Es muss eine ausreichende
Luftzirkulation gewährleistet sein.
Daher dürfen keine Gegenstände auf
das Gerät gelegt werden und zu den
Wänden müssen folgende Abstände
eingehalten werden:
- Seitlich: 12 cm
- Hinten: 12 cm
- Oben: 30 cm
• Das Gerät darf nicht in Möbel
eingebaut werden. Die Montage des
Gerätes direkt unter einer Platte oder
einem Schrank ist nicht erlaubt.
• Die Standfüße des Gerätes dürfen
nicht entfernt werden.
• Stellen Sie das Gerät auf
eine wärmebeständige und
spritzunempfindliche Unterlage. Das
Gerät nicht auf heiße Oberflächen (z.B.
Herdplatten o.ä.) oder in die Nähe von
oenen Gasflammen stellen.
• Das Produkt darf nicht mit leicht
entzündlichem Material, z.B. Vorhängen,
Textilien, Wandverkleidungen u.ä.,
in Berührung kommen oder damit
zugedeckt werden. Achten Sie bitte
darauf, dass immer ein ausreichender
Sicherheitsabstand zu entzündlichen
Materialien eingehalten wird.
• Keine Gegenstände in das Produkt
einführen.
• Dieses Produkt ist nur für die Nutzung
im Haushalt konzipiert. Es ist nicht für
kommerziellen Gebrauch geeignet.
• Stellen Sie das Produkt nicht auf Kochplatten (Gas-, Elektro-, Kohleherd usw.).
• Brandgefahr! Brot und andere
Lebensmittel können brennen!
Verwenden Sie kein Brot mit hohem
Zuckergehalt, da dies zu Bränden
führen kann. Das Produkt daher nie
unbeaufsichtigt lassen.
• Verbrennungsgefahr! Berühren
Sie keine heißen Oberflächen des
Produktes. Fassen Sie es immer am
Handgri bzw. am Drehschalter an.
• Teile des Produktes werden sehr heiß.
Lassen Sie das Produkt ausreichend
abkühlen, bevor Sie es reinigen oder
verstauen.
• Berühren Sie nicht die Heizelemente.
• Das Krümelblech muss bei jedem
Gebrauch benutzt werden.
• Öle und Fette können sich leicht
entzünden. Fett oder Öl darf nicht auf
die heißen Heizelemente tropfen.
6
IM_KMO4341_180306_V05_HR.indb 6 6/3/18 2:01 pm
Page 7
Deutsch
Herzlichen Glückwunsch!
Vielen Dank, dass Sie sich für ein KOENICProdukt entschieden haben. Bitte lesen Sie die
Bedienungsanleitung aufmerksam durch und
bewahren Sie sie für späteres Nachschlagen auf.
Bestimmungsgemäße Benutzung
Das Produkt ist nur für das Zubereiten von
Nahrungsmitteln gedacht. Jeglicher anderer
Gebrauch kann zu Schäden am Produkt oder
Verletzungen führen.
Die Imtron GmbH übernimmt keine Haftung
für Schäden am Produkt, Sachschaden, oder
Verletzung von Personen aufgrund von
unachtsamer, unsachgemäßer, falscher oder
nicht dem vom Hersteller angegebenen Zweck
entsprechender Verwendung des Produkts.
Vor dem ersten Gebrauch
Entfernen Sie das Produkt und das Zubehör
vorsichtig aus der Originalverpackung. Es
empfiehlt sich die Originalverpackung für
späteres Verstauen aufzubewahren.
Möchten Sie die Originalverpackung
entsorgen, so tun Sie dies nach den geltenden
gesetzlichen Bestimmungen.
Überprüfen Sie den Verpackungsinhalt auf
Vollständigkeit und Beschädigungen.
Sollte der Verpackungsinhalt unvollständig oder
Beschädigungen feststellbar sein, kontaktieren
Sie umgehend Ihre Verkaufstelle.
Reinigen Sie das Produkt nach dem Auspacken;
siehe Abschnitt Reinigung und Pflege.
Um Produktionsrückstände zu entfernen,
nehmen Sie das Produkt für ca. 10 Minuten
ohne Lebensmittel in Betrieb. Benutzen Sie
dafür Ober- und Unterhitze bei max. Temperatureinstellung. Beachten Sie zur Einstellung
das Kapitel Bedienung. Bitte sorgen Sie für
eine ausreichende Belüftung, da es zur leichten
Geruchsbildung und Rauchentwicklung kommen kann, was aber unbedenklich ist und nach
kurzer Zeit verschwindet.
Lieferumfang
1 x Minibackofen
1 x Backrost mit Gri
1 x Backblech
1 x Drehspieß mit Klammern und Gri
1 x Krümelblech
1 x Bedienungsanleitung
Technische Daten
Netzspannung : 220 - 240 V~
Leistungsaufnahme : 1350 - 1650 W
Frequenz : 50/60 Hz
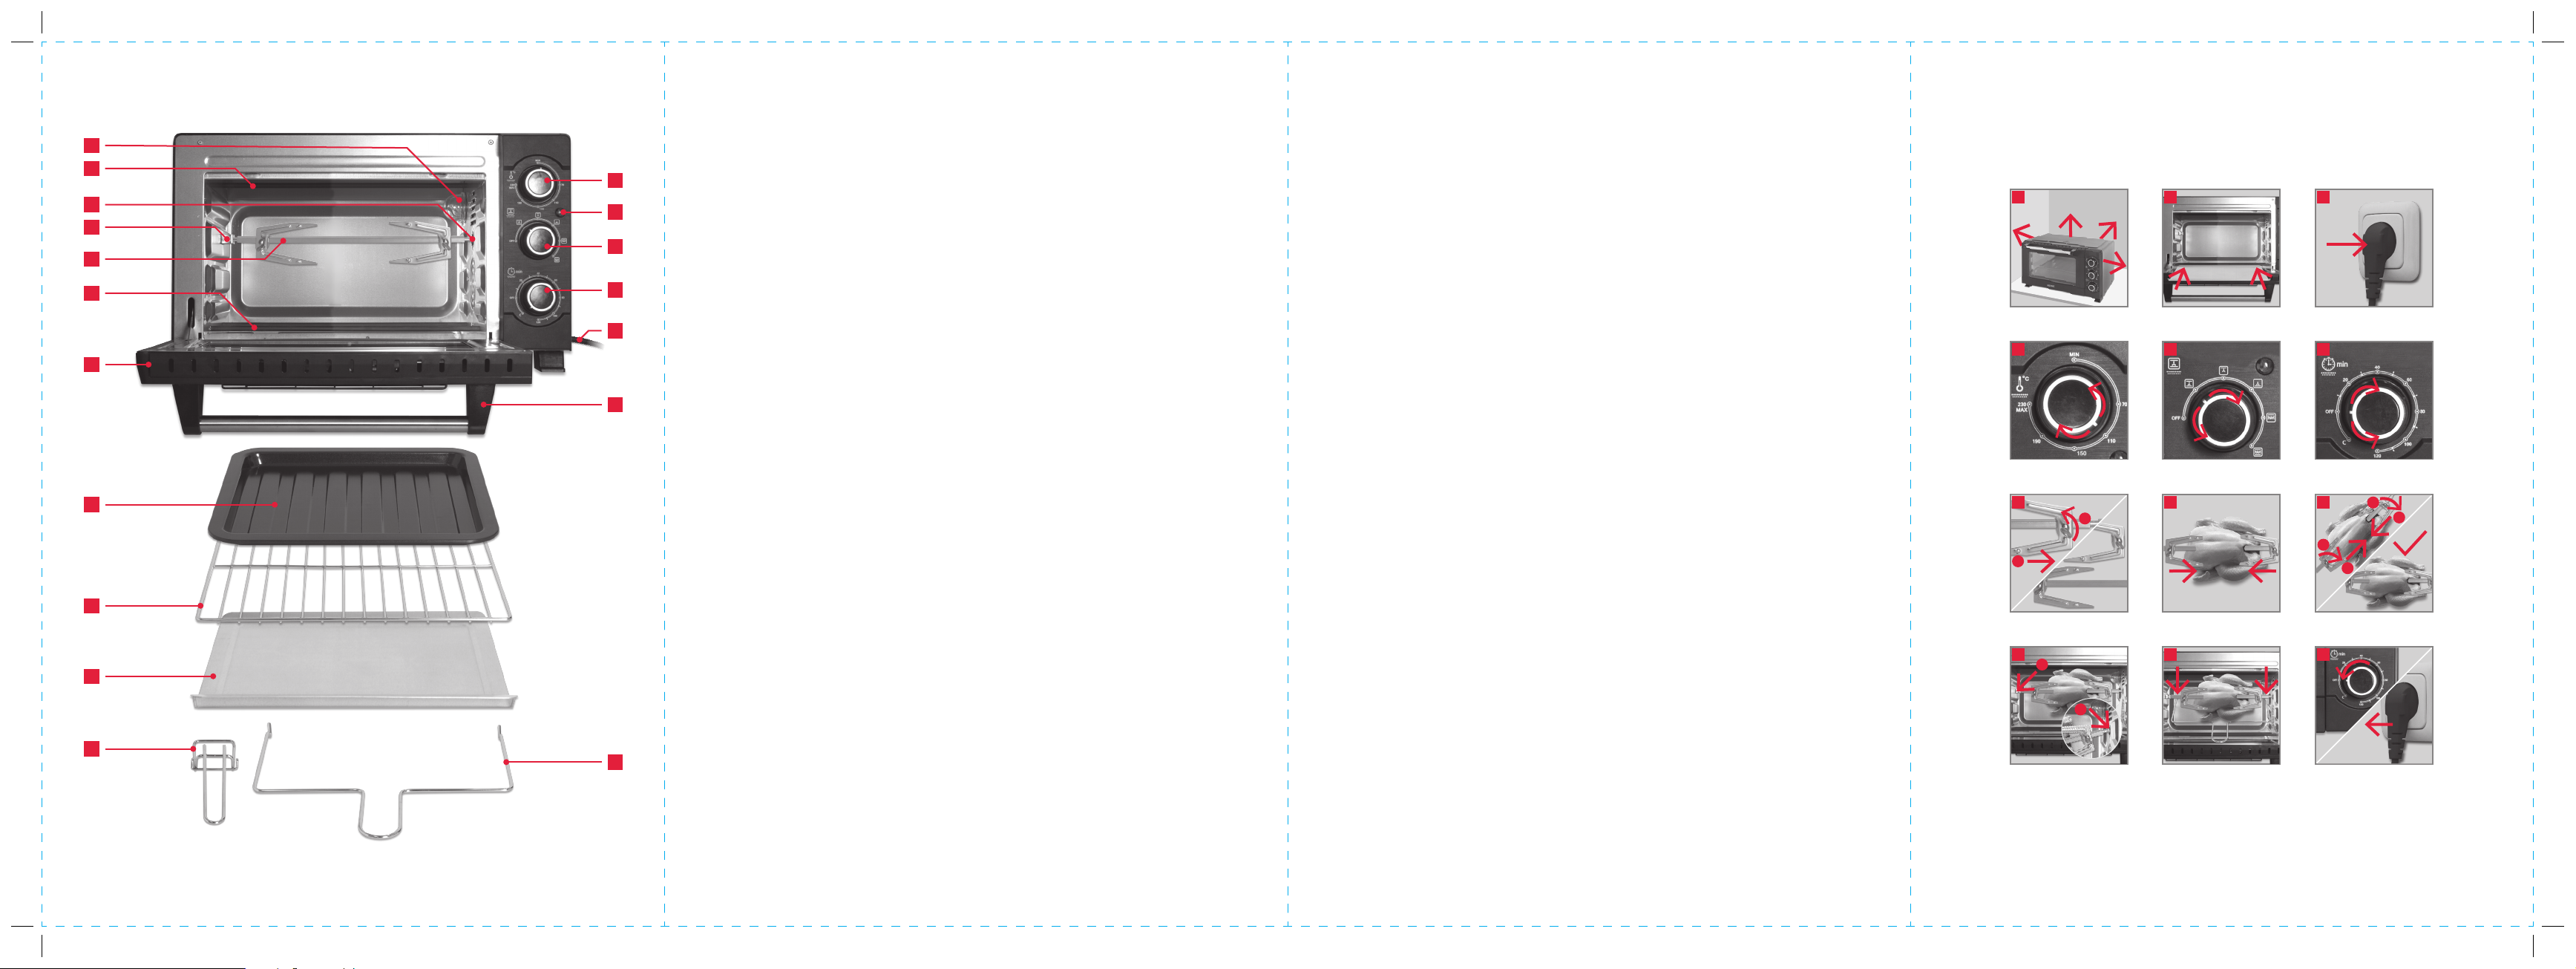
Bedienelemente
A
Temperaturregler
B
Kontrollleuchte
C
Programmwahlschalter
D
Timer/ Ein (C) /Aus (OFF)
E
Netzkabel mit Netzstecker
F
Türgri
G
Drehspießgri
H
Backrostgri
I
Krümelblech
J
Backrost
K
Backblech
L
Backofentür
M
Unteres Heizelemente
N
Drehspieß mit Klammern
O
Aufnahme Lagerung
P
Aufnahme Antrieb
Q
Oberes Heizelemente
R
Garraumbeleuchtung
Dieses Gerät nicht im unsortierten
Hausmüll entsorgen. An einer ausgewie-
senen Sammelstelle für Elektro- und Elektronikaltgeräte entsorgen. Dadurch tragen Sie
zum Schutz der Ressourcen und der Umwelt bei.
Für weitere Information wenden Sie sich bitte an
Ihren Händler oder die örtlichen Behörden.
7
IM_KMO4341_180306_V05_HR.indb 7 6/3/18 2:01 pm
Page 8
Size - A5
Deutsch
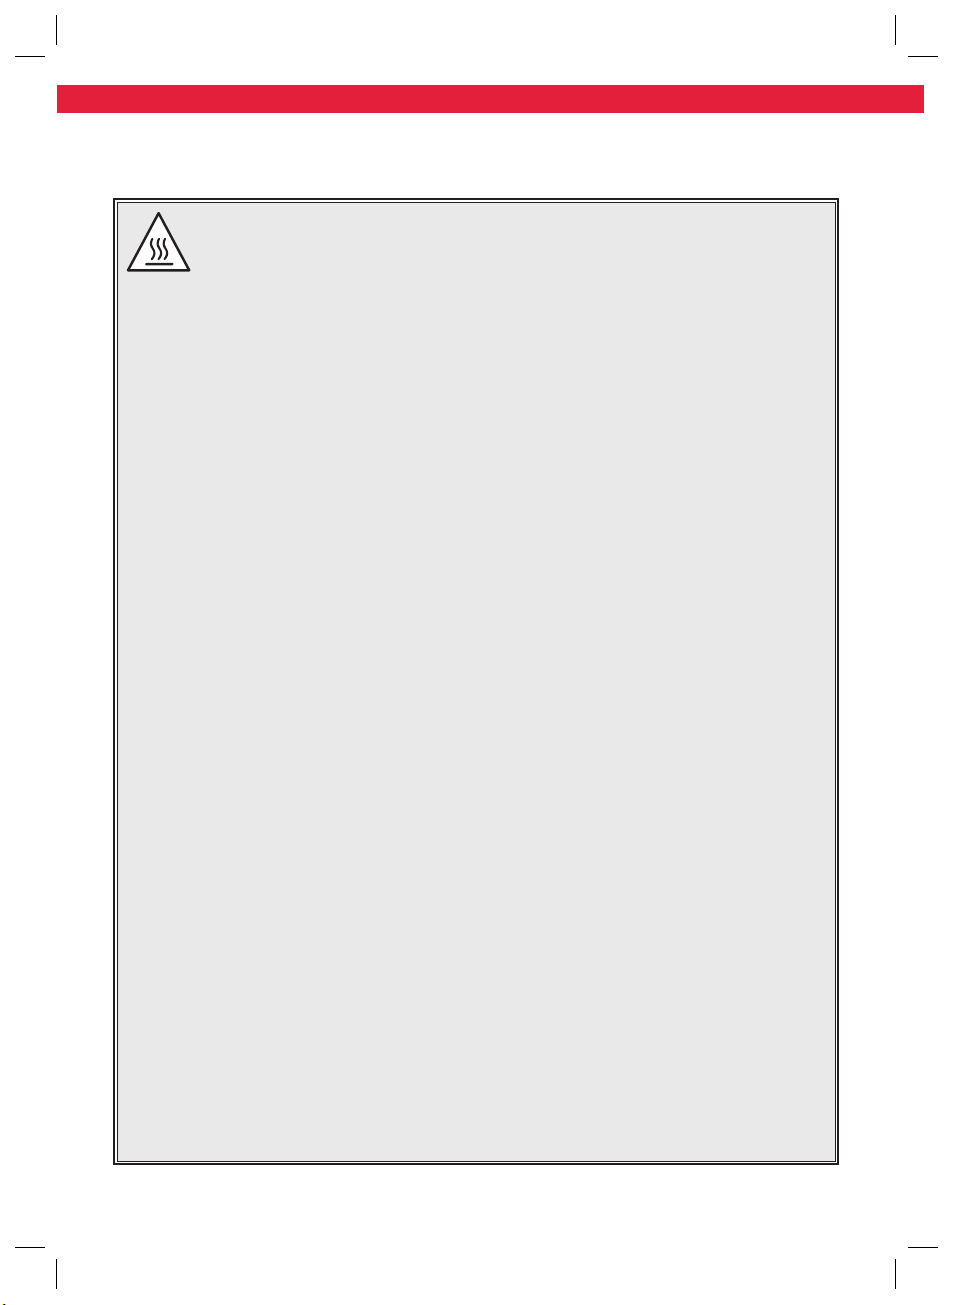
Aufstellung
Stellen Sie das Gerät auf eine ebene,
1
Abb.
feste und hitzebeständige Unterlage.
Beachten Sie den Abstand zur nächsten
Steckdose.
Um eine ausreichende Luftzirkulation zu
gewährleisten, müssen folgende Abstände
eingehalten werden:
Seitlich: 12 cm
Hinten: 12 cm
Oben: 30 cm
Achtung
Das Gerät darf nicht in Möbel eingebaut oder
in diesen aufgestellt werden. Das Aufstellen
des Gerätes direkt unter einer Platte oder
einem Schrank ist nicht erlaubt.
Setzten Sie das Krümelblech unter den
2
Abb.
unteren Heizelementen ein.
Stecken Sie den Netzstecker in eine
3
Abb.
geeignete Steckdose.
Bedienung
Temperaturregler
Stellen Sie mit dem Temperaturregler
4
Abb.
die gewünschte Temperatur bis zu 230
°C ein.
Auswahl der Funktion Programmwahlschalter
Hinweis:
Das Umluftgebläse läuft bei allen Funktionen
automatisch mit und kann nicht ein- oder
ausgeschaltet werden.
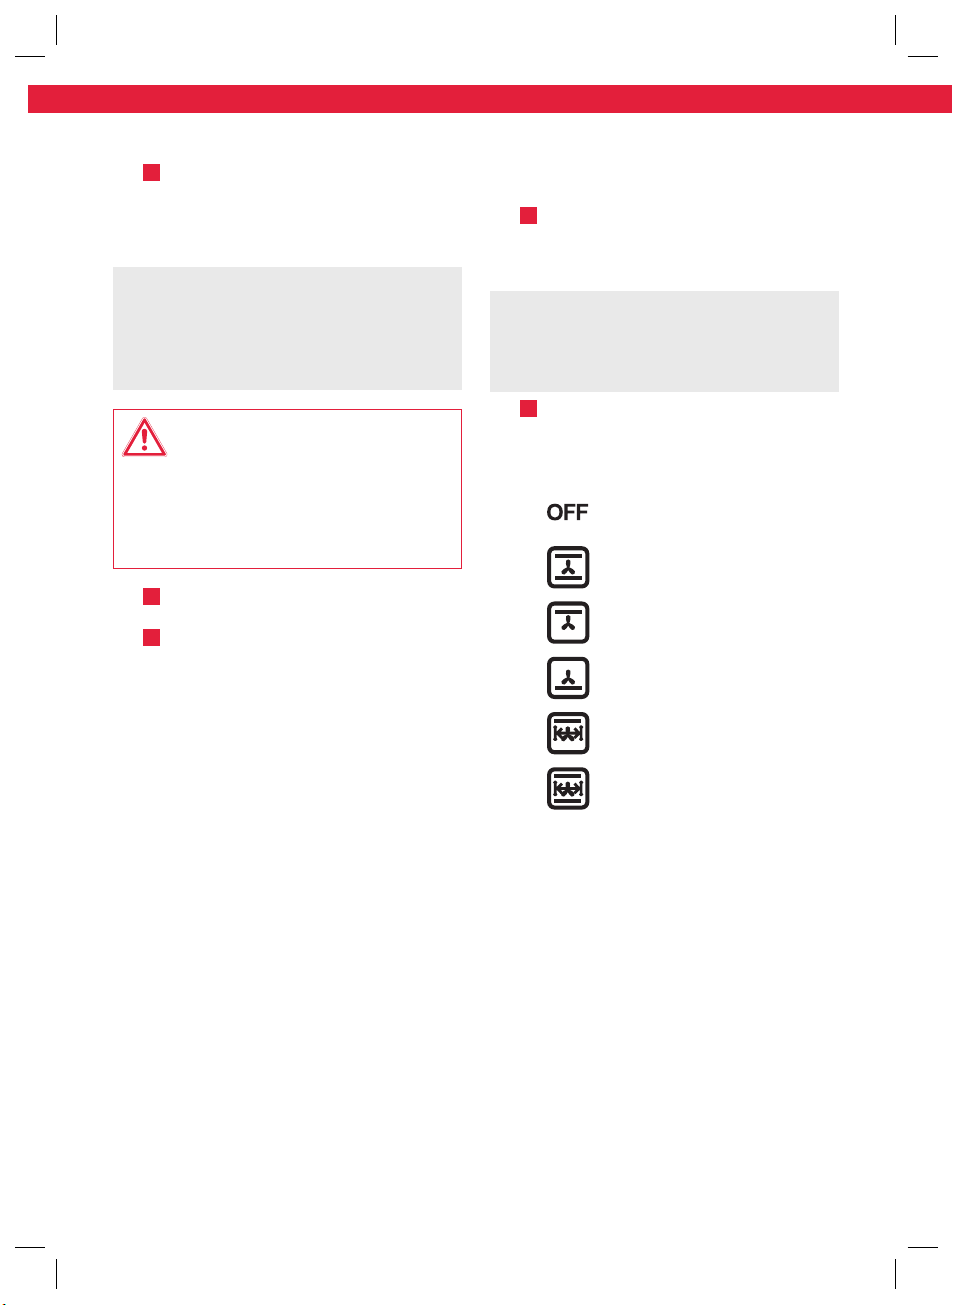
Stellen Sie mit dem
5
Abb.
Programmwahlschalter die gewünschte
Funktion ein. Beachten Sie dazu
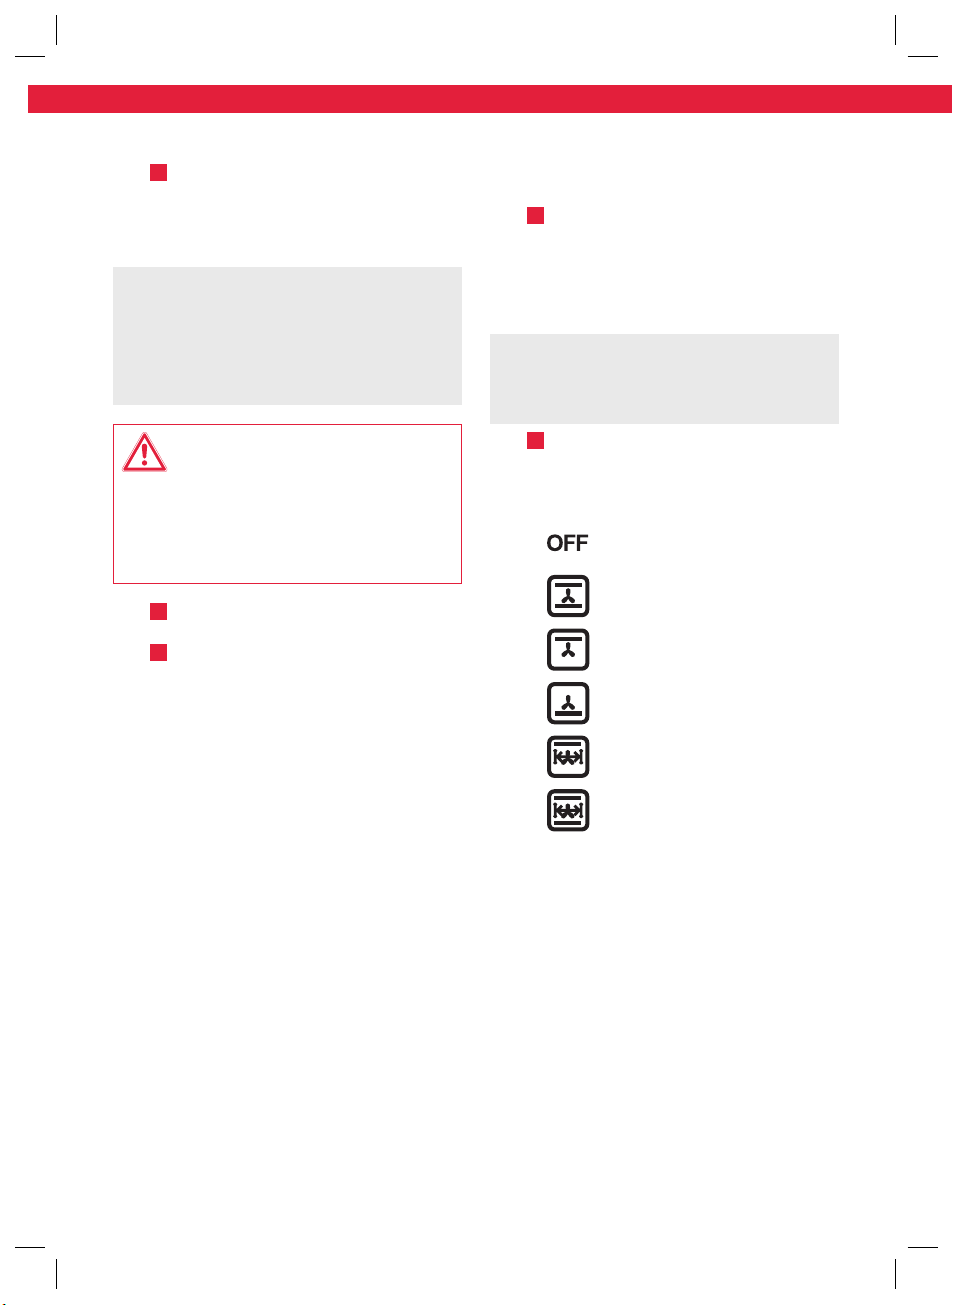
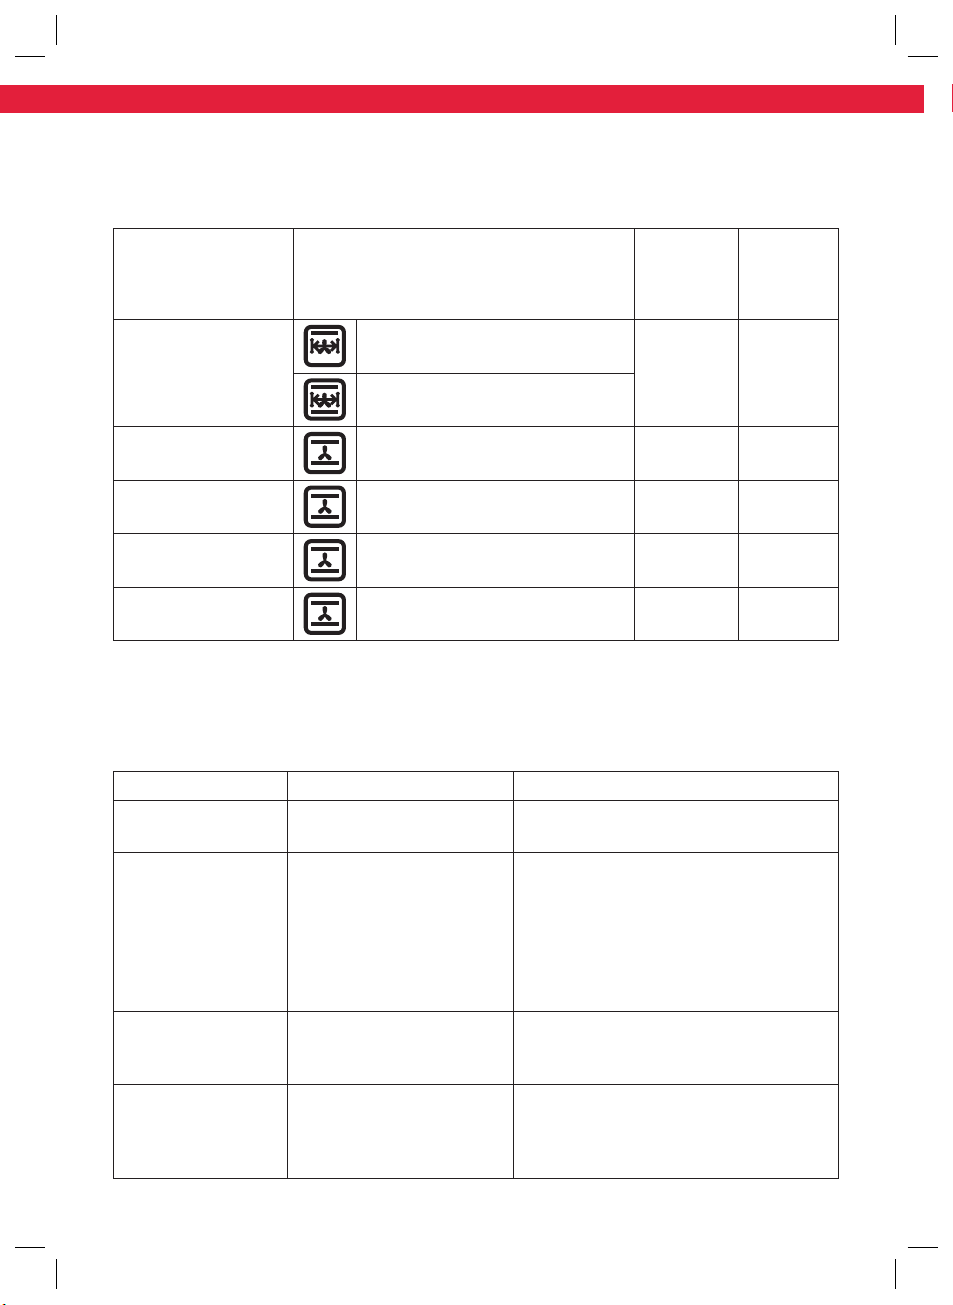
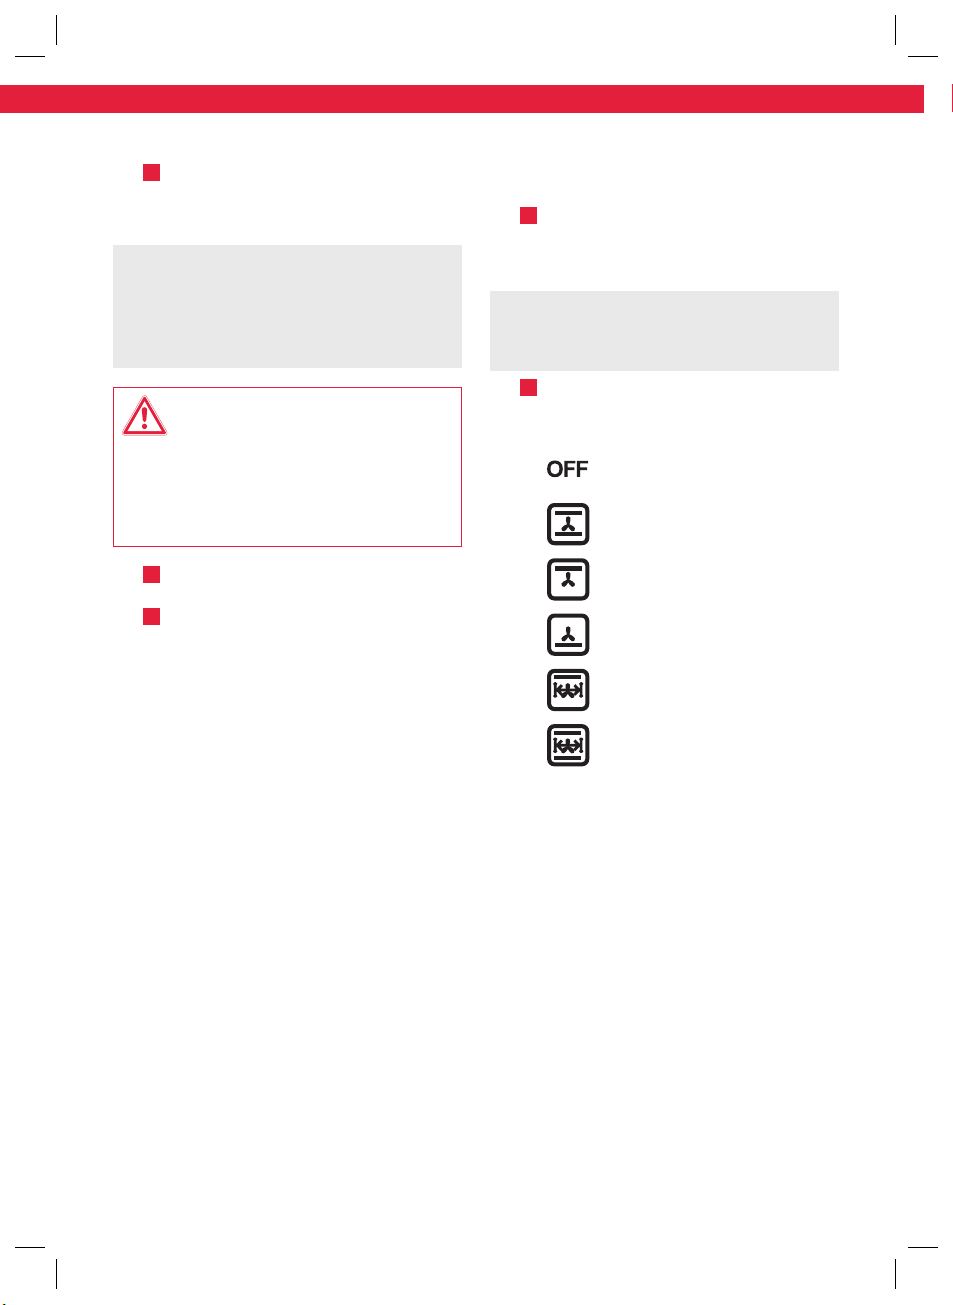
nachfolgende Erklärungen der Symbole:
Aus
Ober- und Unterhitze
Oberhitze
Unterhitze
Oberhitze mit Drehspießantrieb
Ober- und Unterhitze mit
Drehspießantrieb
Der Betrieb des Minibackofens beginnt erst
wenn die Zeitschaltuhr bzw. der Ein-/AusSchalter dementsprechend eingestellt wird.
8
IM_KMO4341_180306_V05_HR.indb 8 6/3/18 2:01 pm
Page 9
Deutsch
Gerät einschalten – dauerhaft oder mit
Zeitschaltuhr
Drehen Sie den Regler im Uhrzeigersinn
6
Abb.
um eine Betriebszeit bis zu 120Minuten
auszuwählen und den Backofen dadurch
einzuschalten.
Zum Einschalten des Backofens ohne
Zeitschaltuhr drehen Sie den Regler
gegen den Uhrzeigersinn auf C. Die
Kontrollleuchte leuchtet rot und der
Backofen wird aufgeheizt.
Hinweis
Die Kontrollleuchte zeigt nicht an, dass
das Gerät aueizt oder die eingestellte
Temperatur erreicht wurde, sondern leuchtet
wenn das Gerät mit dem Ein-/Aus-Schalter
bzw. der Zeitschaltuhr eingeschaltet wurde.
Nach Ablaufen der Zeitschaltuhr oder
wenn das Gerät ausgeschaltet wird
(
OFF), erlischt die Kontrollleuchte.
Benutzung des Drehspießes
Die Benutzung des Drehspießes ist bei
Oberhitze sowie bei Ober- und Unterhitze
möglich.
Lösen Sie die Flügelschraube der
7
Abb.
Klammer an der abgerundeten Seite
des Drehspießes und ziehen Sie die
Klammer ab.
Durchstechen Sie das Grillgut mit dem
8
Abb.
Drehspieß so mittig wie möglich, damit
es einen gleichmäßigen Abstand zu den
Heizelementen hat.
Anschließend mit den Klammern das
9
Abb.
Gargut in der Mitte des Drehspießes
fixieren. Dafür die gelösten Klammern
zusammenschieben und, wenn
das Grillgut fest sitzt, mit den
Flügelschrauben die Klammern auf dem
Drehspieß festschrauben.
Hinweis
Achten Sei darauf, dass das Grillgut so auf dem
Drehspieß platziert ist, dass der Abstand zum
Antrieb und zur Führung hin gleich groß ist.
10
Abb.
Einsetzen des Drehspießes: 1 Das
abgerundete Ende des Drehspießes in
die Aufnahme des Antriebes schieben.
2
Anschließend das andere Ende des
Drehspießes auf die Aufnahme der
Lagerung setzen.
Beachten Sie die Größe des Grillgutes
(z.B. Brathähnchen). Dieses darf in
keiner Lage die oberen oder unteren
Heizelemente berühren.
Hinweis:
Es wird empfohlen bei Benutzung des
Drehspießes nur Brathähnchen bis zu 3,5 kg
zu verwenden.
Verwenden Sie zur Entnahme des
11
Abb.
Drehspießes den Drehspießgri.
Verfahren Sie in umgekehrter
Reihenfolge wie beim Einsetzen des
Drehspießes.
Backen und Grillen
• Kontrollieren Sie vor jeder Inbetriebnahme,
ob das Krümelblech unter den unteren
Heizelementen liegt.
• Heizen Sie den Backraum mit eingeschalteter
Ober- und Unterhitze bei geschlossener Tür
einige Minuten vor. Drehen Sie dazu den Temperaturregler auf die gewünschte Temperatur
und schalten den Backofen der Zeitschaltuhr
bzw. dem Ein- / Ausschalter ein.
• Bereiten Sie die zu backenden Lebensmittel
vor, legen Sie sie auf den Backrost oder auf
das Backblech.
• Benutzen Sie bei fetthaltigen oder feuchten
Speisen das Backblech, damit kein Fett oder
Flüssigkeit abtropft.
• Schieben Sie den Backrost oder das
Backblech in der gewünschten Höhe in
den Ofen. Drei Einschubhöhen stehen zur
Verfügung.
• Schließen Sie die Tür, passen Sie u.U. die
Temperatur nochmals an und drehen Sie die
Zeitschaltuhr auf die gewünschte Garzeit
bzw. schalten Sie das Gerät ein.
9
IM_KMO4341_180306_V05_HR.indb 9 6/3/18 2:01 pm
Page 10
Size - A5
Deutsch
Vorsicht
Das Produkt wird an der Oberseite des
Gehäuses und an anderen Stellen sehr heiß.
Berühren Sie während des Heizens und
auch unmittelbar danach niemals die heißen
Oberflächen des Produktes.
• Die Funktionen können Sie während des
Backvorganges ändern.
• Im Zeitschaltuhrbetrieb werden nach Ablauf
der eingestellten Garzeit die Heizelemente
automatisch abgeschaltet.
• Zum manuellen Ausschalten drehen Sie die
Zeitschaltuhr bzw. den Ein- / Ausschalter
auf OFF.
• Benutzen Sie zum Önen der eventuell
heißen Tür nur den Gri.
Vorsicht
Beim Önen der Tür kann heißer Dampf
entweichen. Daher die Tür immer vorsichtig
und langsam önen.
• Verwenden Sie zur Entnahme des
Backbleches oder -rostes Topflappen oder
-handschuhe oder den mitgelieferten
Backrostgri. Ein heißes Backblech oder
-rost darf nur auf eine wärmebeständige
Unterlage gestellt werden.
• Verwenden Sie zur Entnahme des
Drehspießes den Drehspießgri.
• Ziehen Sie nach der Benutzung des Gerätes
den Netzstecker.
Vorsicht
Je nach Art und Beschaenheit des Grillguts
kann dieses sehr heiß werden! Insbesondere
werden stark wasserhaltige Lebensmittel, wie
Tomaten, sehr heiß. Daher bei der Verwendung
und insbesondere bei der Entnahme dieser
Lebensmittel sehr vorsichtig vorgehen.
10
Reinigung und Pflege
Vorsicht
Vor der Reinigung den Netzstecker aus der
Steckdose ziehen und das Produkt vollständig abkühlen lassen.
Vor jeder Reinigung den Netzstecker
12
Abb.
ziehen und das Gerät abkühlen lassen.
•Entfernen Sie gegebenenfalls Fett,
dass auf das untere Heizelement
getropft ist, mit einem feuchten Tuch.
•Backblech, Backrost, Drehspieß und
Klammern können mit einem milden,
handelsüblichen Spülmittel gereinigt
werden.
•Entfernen Sie das Krümelblech und
reinigen Sie es. Größere Mengen an
Fett auf dem Blech können Sie mit
einem Küchentuch abwischen.
•Nach der Reinigung setzen Sie das
Krümelblech wieder ein.
•Keine scharfen und scheuernden
Reinigungsmittel oder Backofenspray
verwenden. Das Gehäuse mit einem
leicht angefeuchteten Tuch reinigen
und anschließend gut abtrocknen.
Austausch der Garraumlampe
Warnung
Lassen Sie das Produkt vollständig abkühlen.
Vor dem Auswechseln der Lampe den
Netzstecker aus der Steckdose ziehen, um einen
möglichen elektrischen Schlag zu vermeiden.
Sollte die Garraumbeleuchtung defekt sein,
muss die Glühlampe ausgetauscht werden.
Entfernen Sie zuerst die Lampenab-
13
Abb.
deckkappe und danach die Glühbirne
durch Drehen gegen den Uhrzeigersinn.
Tauschen Sie die Glühlampe gegen
eine Lampe gleichen Typs (230V 25W
T300, E14) aus. Der Einbau erfolgt in
umgekehrter Reihenfolge. Stellen Sie
sicher, dass Glühbirne und Lampenabdeckkappe richtig sitzen.
IM_KMO4341_180306_V05_HR.indb 10 6/3/18 2:01 pm
Page 11
Deutsch
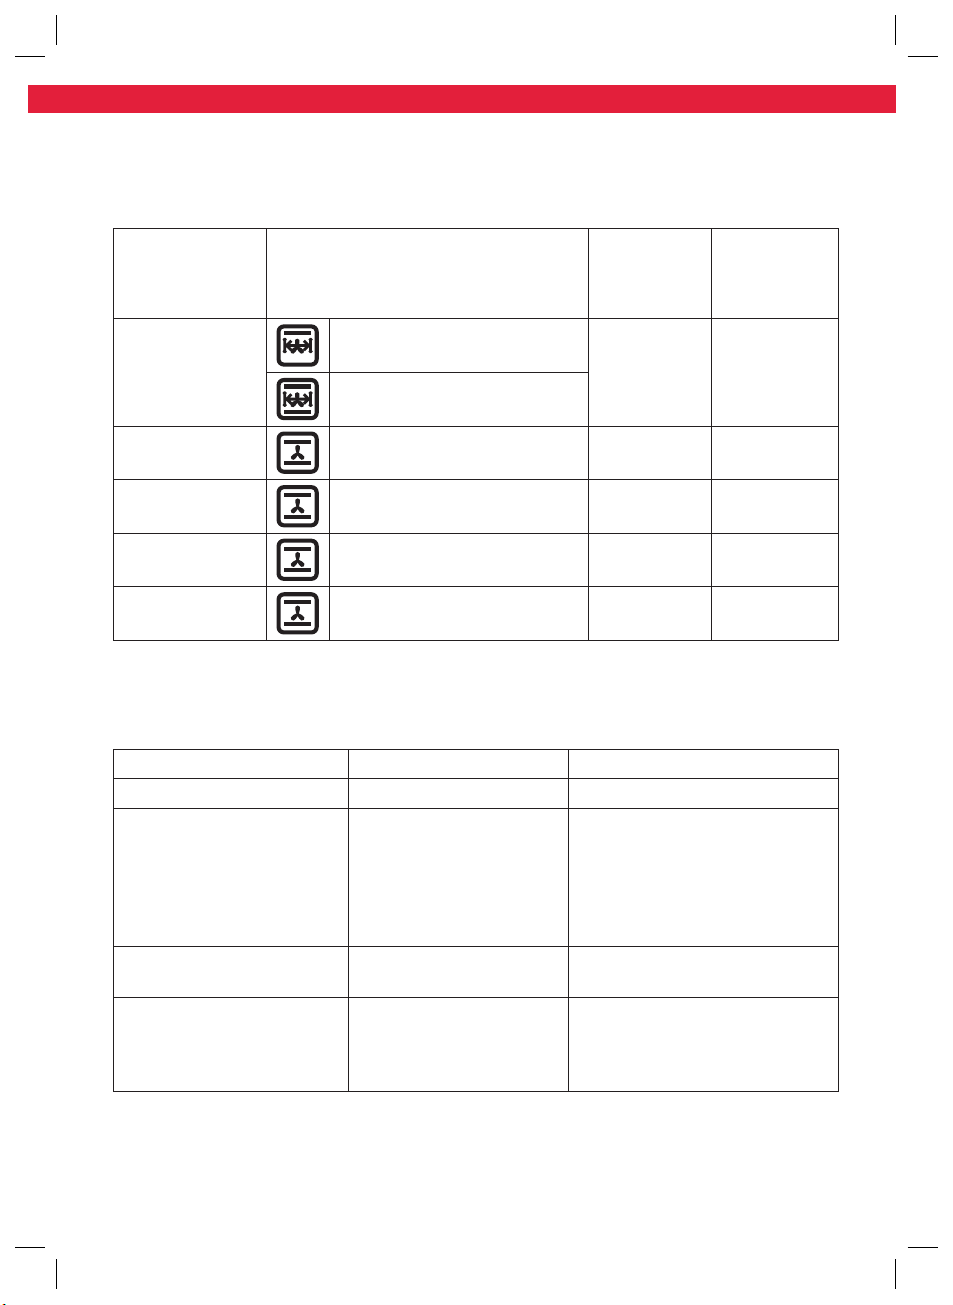
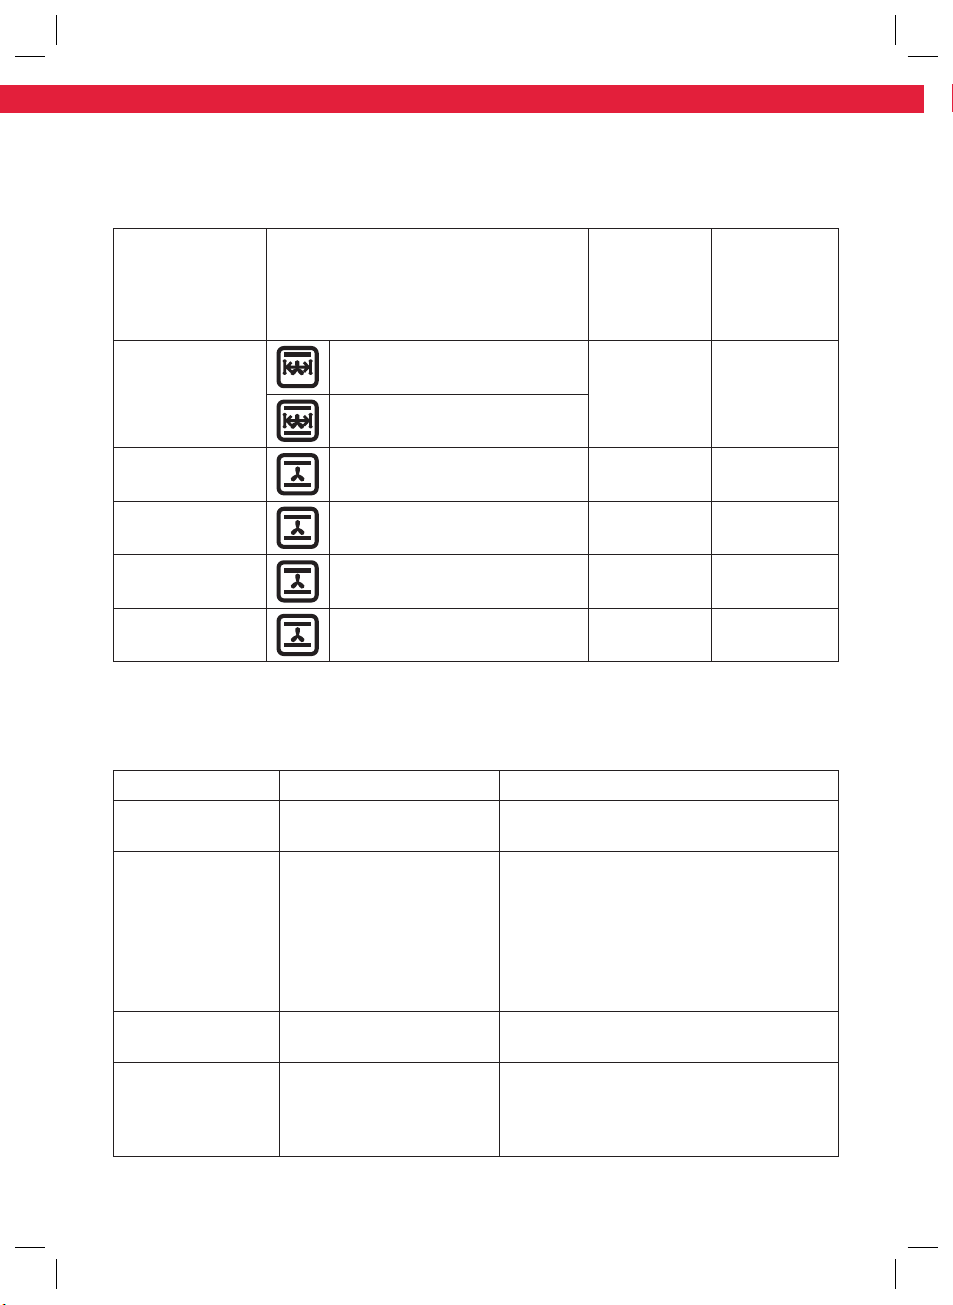
Garzeiten
Beachten Sie die Garzeiten in der Tabelle. Dies ist jedoch nur eine kleine Auswahl. Weitere
Informationen finden Sie in Kochbüchern usw. Die genaue Garzeit ist abhängig von der Größe und
Menge der Lebensmittel. Beachten Sie dazu auch die Angaben auf der jeweiligen Verpackung.
Gericht
Funktion
Hinweis: Das Umluftgebläse läuft bei allen
Funktionen automatisch mit und kann nicht
ein- oder ausgeschaltet werden.
Temperatur
in °C
Garzeit in
Minuten
(nach dem
Vorheizen)
Grillhähnchen, am
Drehspieß
Oberhitze mit Drehspießantrieb
Ober- und Unterhitze mit
220-230 50-80
Drehspießantrieb
Pizza, tiefgekühlt
Toast Haiwaii
Baguette, tiefgekühlt
Nicht gefrorene
Lebensmittel, Kuchen
Ober- und Unterhitze 220-230 20-40
Ober- und Unterhitze 200-210 15-20
Ober- und Unterhitze 220-230 10-14
Ober- und Unterhitze 180-200 25-40
Fehlerbehebung
Sollte es während des Betriebs zu Störungen kommen, beachten Sie nachfolgende Tabelle. Sollten
die Probleme wie unter Behebung angegeben nicht abgestellt werden können, wenden Sie sich
an Ihren Händler.
Problem Mögliche Ursache Behebung
Produkt
•Keine Stromversorgung •Überprüfen der Stromversorgung
funktioniert nicht
Produkt heizt
nicht auf
•Zeitschaltuhr steht auf
Aus (OFF)
•Sicherung im Haus defekt
•Netzsteckdose defekt
•Produkt defekt
•Zeitschaltuhr auf eine Zeit größer
0Minuten oder C einstellen
•Überprüfen der Haushaltssicherungen
•Eine andere Steckdose ausprobieren
•Netzstecker ziehen und Produkt
vom authorisierten Kundendienst
überprüfen lassen
Abschalten des
Produktes nicht
möglich
Drehspieß dreht
sich nicht
•Ein elektronisches Bauteil
defekt
•Funktion ohne Drehspießanantrieb gewählt
•Drehspieß nicht korrekt
eingesetzt / klemmt
•Netzstecker ziehen und Produkt durch
authorisierten Kundendienst überprüfen
lassen
•Wählen Sie eine Funktion mit
Drehspießantrieb
•Entnehmen Sie den Drehspieß und
setzen Sie ihn korrekt ein
11
IM_KMO4341_180306_V05_HR.indb 11 6/3/18 2:01 pm
Page 12
Size - A5
English
Safety instructions
from the product during use.
•Do not operate the product by means of an external
timer or separate remote control system.
•This product can be used by children aged from 8 years
and above and persons with reduced physical, sensory
or mental capabilities or lack of experience and
knowledge if they are being supervised or have been
given instructions concerning the use of the product in
a safe way and understand the hazards involved.
Caution! Hot surface! Risk of burning! Do
not touch the product’s hot surfaces. Heat rises
•Children shall not play with the product. Cleaning
and user maintenance shall not be carried out by
children unless they are old than 8 years and being
supervised..
•Keep this product and its power cord out of reach of
children under the age of 8 years.
•The product is to be connected to a socket-outlet
having an earthing contact (class I).
•The supply cord should be regularly examined for
signs of damage, and if the cord is damages, the
product must not be used.
12
IM_KMO4341_180306_V05_HR.indb 12 6/3/18 2:01 pm
Page 13
Safety instructions
•The product is designed for the preparation of
normal household quantities in the home, or in
household-like, non-commercial environments.
Household-like environments include sta
kitchens in shops, oces, agricultural and other
small businesses or for use by guests at bed-andbreakfast establishments, small hotels and similar
residential facilities.
•A damaged power cord may only be replaced by the
authorised service agent in order to avoid hazards.
•Clean the product and all other accessories after
each use.
•Follow the instructions in the chapter Cleaning
and care.
English
13
IM_KMO4341_180306_V05_HR.indb 13 6/3/18 2:01 pm
Page 14

Size - A5
English
Safety instructions
• Read this manual before first use
thoroughly. It contains important
information for your safety as well as
for the use and maintenance of the
equipment.
• Keep this manual for future reference
and pass it on with the product.
• Pay particular attention to the warnings
on the product and in this manual.
• Use the product only for its intended
purpose. Improper use may lead to
hazards.
• In the event of improper use or wrong
operation, we do not accept any
liability for resulting damages.
• The use of accessories and
components not expressly
recommended by the manufacturer
may result in injuries or damages and
voids the warranty.
• Never leave the product unsupervised
while it is switched on.
• Do not place any objects on top of the
product.
• Never immerse electrical parts of the
product in water or any other fluid
during cleaning or operation. Never
hold the product under running water.
• Do not under any circumstances
attempt to repair the product yourself.
For servicing and repairs, please
consult an authorised service agent.
• The mains voltage must match the
information on the rating label of the
product.
• The power plug is used as the
disconnect device. Please be sure
that the power plug is in operable
condition.
• Only unplugging from the power
socket can separate the product
completely from the mains.
• Avoid damages to the power cord that
may be caused by kinks or contact
with sharp corners.
• Keep this product including its power
cord and power plug away from all
heat sources such as, ovens, hot plates
and other heat-producing devices/
objects.
• Only unplug from the power socket by
the plug itself. Do not pull on the cord.
• Unplug the product ...
- when the product is not being used,
- in case of malfunctions,
- before attaching / detaching
accessories and
- before cleaning the product.
• If the power cord or the casing of the
product is damaged or if the product
has been dropped, the product may
not be used before it is examined by
an authorised service agent.
• Use this product in dry indoor areas
only and never outdoors.
• Protect this product from extreme
heat and cold as well as from direct
sunlight and dust.
• In order to reduce the risk of fire and
electric shock, do not expose the
product to fire (fireplace, grill, candles,
cigarettes and so on) or water (water
drops, water splashes, vases, tubs,
ponds and so on).
14
IM_KMO4341_180306_V05_HR.indb 14 6/3/18 2:01 pm
Page 15

Safety instructions
Safety instructions
English
• Warning! Do not use this product
near water or heavy moisture; e.g. in a
damp basement or beside a swimming
pool or bathtub.
• Use this product in temperate
latitudes only. Avoid tropical and
especially humid climatic regions.
• Protect this product from all moisture
including spray water and humidity.
• Ensure sucient air circulation.
Therefore do not place any objects
onto the appliance and keep
clearances to the walls as given below:
- Sides: 12 cm
- Back: 12 cm
- Up: 30 cm
• The appliance shall not be build into
furniture. The appliance must not
be installed directly below a plate,
cupboard or cabinet.
• The feet of the appliance shall not be
removed.
• Place the appliance on a surface
resistant to heat and splashes. Do not
place the appliance on hot surface
(e.g. cooktops) or open flames (e.g. gas
stoves).
• The product may not come into
contact with or be covered by highly
flammable materials, such as curtains,
textiles, wall cladding, etc. Please make
sure that sucient safety clearance is
kept to flammable materials.
• Do not insert any objects into the
product.
• This product is not suitable for
commercial use. It is designed for
household use only.
• Do not place the product on hotplates
(gas, electric, coal stoves, etc.). Keep
the product away from all open
flames. Operate the product on an
even, stable, clean, fireproof and dry
surface.
• Fire hazard! Bread and other
foodstus can burn! Do not use
bread with a high sugar content since
this may cause fire. Never leave the
product unattended.
• Risk of burning! Do not touch the
product’s hot surfaces. Touch the
product only by its handle or control
knobs.
• Parts of the product become very hot.
Let the product cool down well before
cleaning or storing.
• Do not touch the heating elements.
• Always use the crumb tray when
operating the appliance.
• Oil and grease is easily inflammable. Oil
and grease must not drip onto the hot
heating elements.
15
IM_KMO4341_180306_V05_HR.indb 15 6/3/18 2:01 pm
Page 16
Size - A5
English
Congratulations!
Thank you for your purchase of a KOENIC
product. Please read this manual carefully and
keep it for future reference.
Intended use
This product is suitable for preparing foods
only. Any other use may result in damage to
the product or injuries.
The Imtron GmbH assumes no liability for
damage to the product, for property damage or
for personal injury due to careless or improper
usage of the product, or usage of the product,
which does not meet the manufacturer’s
specified purpose.
Before first time use
Carefully take the product and its accessories
out of the original packaging. Retain the
original packaging in case you would like to
store the product away or transport it at a
later date. If you choose to dispose of the
original packaging, then do so according to the
applicable legal regulations.
Check the packaging contents for
completeness and damages. Should the
contents in the packaging not be complete or
damaged, do not use the product. Return it to
your retail outlet immediately.
After unpacking, please refer to chapter
Cleaning and care.
To remove production residue, run the product
for approx. 10 minutes without foodstus. For
doing so use upper and lower heat setting at
max. temperature. For setting follow chapter
USE. Make sure there is sucient ventilation as
a slight odor and some smoke may occur. This is
harmless and will disappear shortly.
Content
1 x Mini oven
1 x Baking grate with handle
1 x Baking tray
1 x Rotisserie incl. clamps and handle
1 x Crumb tray
1 x Instruction manual
Technical Data
Rated voltage : 220 - 240 V~
Rated input power : 1350 - 1650 W
Rated frequency : 50/60 Hz
Control elements
A
Temperature control
B
Operation indicator lamp
C
Mode selection control
D
Timer/ On (C) / OFF
E
Power cord with plug
F
Door handle
G
Rotisserie handle
H
Grate handle
I
Crumb tray
J
Baking grate
K
Baking tray
L
Oven door
M
Lower heating elements
N
Rotisserie with clamps
O
Holding bracket
P
Receptacle drive
Q
Upper heating elements
R
Oven lighting
Do not dispose of this product as
unsorted municipal waste. Return it to a
designated collection point for the
recycling of WEEE. By doing so, you will help to
conserve resources and protect the
environment. Contact your retailer or local
authorities for more information.
16
IM_KMO4341_180306_V05_HR.indb 16 6/3/18 2:01 pm
Page 17
English
Installation
Place the product on an even, solid and
Fig.
1
heat resistant surface. Consider the
distance to the next socket outlet.
To ensure sucient air circulation follow
minimum clearances as given below:
Sides: 12 cm
Back: 12 cm
Up: 30 cm
Warning
The product must not be installed and placed
into furniture. The product must not be
installed directly below a plate, cupboard or
cabinet.
Insert the crumb tray below the lower
Fig.
2
heating elements.
Connect the power plug to a suitable
Fig.
3
mains socket.
Use
Temperature control
Adjust the desired temperature up to
Fig.
4
230 °C using the temperature control.
Mode selection
Note:
The convection fan runs automatically with all
modes and cannot be switched on or o.
Select the desired mode using the
Fig.
5
mode selection control. Consider
following symbols and explanations:
O
Upper and lower heat
Upper heat
Lower heat
Upper heat with rotisserie
activated
Upper and lower heat with
rotisserie activated
The mini oven starts to operate only
after the Timer or On/O switch is set
accordingly.
17
IM_KMO4341_180306_V05_HR.indb 17 6/3/18 2:01 pm
Page 18
Size - A5
English
Switching on – permanently or using timer
Turn the control clockwise to set an
Fig.
6
operation time of up to 120 minutes
and to switch on the oven.
To switch on the oven without setting
a time, turn the control anti-clockwise
to C.
The operation indicator lamp lights up
red and the oven is heating up.
Note
The operation indicator lamp does not indicate
whether the oven is heating up or the preset
temperature has been reached. The operation
indicator lamp lights up when the product was
switched on or the timer has been set and the
product is operating.
After expiration of the preset time or
when switching the product OFF the
operation indicator lamp turns o.
Using the rotisserie
The rotisserie can be used at upper and lower
heat.
Loosen the wing screws of the
Fig.
7
clamps at the rounded end side of the
rotisserie and take o the clamps.
Push the rotisserie through the middle
Fig.
8
of the food for grilling to get an even
distance between food and heating
elements.
Fix the food in the middle of rotisserie
Fig.
9
using the two clamps. In doing so
push both clamps together and once
the food is properly fixed tighten the
wing screws to fix the clamps to the
rotisserie.
Note
Make sure that the food for grilling is placed
in the middle of the rotisserie with an equal
distance to both the drive as well as the duct.
Fig.
10
Inserting rotisserie: 1 Push the
rounded end of the spit into the
receptacle drive. 2 Then put the other
end of the spit on the holding bracket.
Consider the size of the food for grilling
(e.g. roast chicken). It shall not touch
the upper or lower heating elements at
any position.
Note:
When using the rotisserie, please only use
chicken with a maximum weight of 3.5 kg.
Use the provided handle to remove the
Fig.
11
rotisserie in reverse order of inserting.
Baking and grilling
• Before each use make sure the crumb tray is
inserted below the lower heating element.
• Preheat the oven for a few minutes with the
door closed. To do so, turn the temperature
control to the desired temperature and
switch on the oven using the timer or On/
O switch.
• Prepare the food for baking. Put them on
the baking grate or baking tray.
• For fatty or wet foods use the baking tray
to avoid grease or liquids dripping o.
• Insert the baking grate or tray at the desired
height. Three insertion heights are available.
• Close the door, turn the temperature control
to the desired temperature and switch on
the product by using the timer or On/O
switch.
Caution
The upper enclosure and other parts of the
product may become very hot during use.
During operation and directly afterwards do
not touch the hot surfaces of the product.
18
IM_KMO4341_180306_V05_HR.indb 18 6/3/18 2:01 pm
Page 19
English
• The baking mode (function) can be changed
during baking process.
• When using the timer control the heating
elements are automatically switched o
after the preset time has expired.
• For switching the oven o manually, turn
the timer/ on/o switch to position OFF.
• For opening the possibly hot door use the
handle only.
Caution
Hot steam could be emitted when opening
the oven door. Thus always open the door
carefully.
• Use oven mitts or some cloth or the
provided baking grate handle when taking
out the baking grate or tray. A hot baking
grate or tray shall only be placed on a heat
resistance surface.
• For taking out the rotisserie use the handle
provided.
• Unplug the product after use.
Caution
Depending on the type and quality of the
food, it could become very hot during grilling
/ baking. Especially foods with a high water
content, such as tomatoes, will become very
hot. Be extremely careful when grilling and
especially when removing these types of
foods.
Cleaning and care
Caution
Always unplug the product from the power
outlet and let it cool down before cleaning.
Before each cleaning unplug the
Fig.
12
product and let it cool down.
•Remove grease which possibly
dropped onto the lower heating
element with a damp cloth.
•Clean baking tray, grate, rotisserie and
clamps with a mild standard dish liquid.
•Remove the crumb tray and clean it.
Use paper towels to wipe o larger
amounts of grease.
•After cleaning insert the crumb tray
again.
•When cleaning, never use solvents
or abrasive materials, hard brushes,
metallic or sharp objects. Solvents
are harmful to human health and can
attack plastic parts, while abrasive
cleaning mechanisms and tools may
scratch the surface(s).
Replacing the oven light
Warning
Let the product cool down. Unplug the
product from the power outlet before
replacing the lamp to avoid the possibility of
electric shock.
If the oven lighting is defective, the bulb must
be replaced.
First remove the lamp cap and then
Fig.
13
turn the light bulb counterclockwise.
Replace the bulb with a lamp of the
same type (230V 25W T300, E14).
The installation is done in reverse order.
Make sure the light bulb and lamp cover
are properly in place.
19
IM_KMO4341_180306_V05_HR.indb 19 6/3/18 2:01 pm
Page 20
Size - A5
English
Cooking times
Consider the cooking times as shown in below table. This is only a small selection and further
information can be found in cookbooks. The cooking time depends on size and amount of food.
Follow the instructions on package.
Function
Dish
Note: The convection fan runs
automatically with all modes and cannot
Temperature
in °C
be switched on or o.
Upper heat with rotisserie
Roast chicken,
using rotisserie
activated
Upper and lower heat with
220-230 50-80
rotisserie activated
Cooking time
in minutes
(after
preheating)
Pizza, deep frozen
Toast Haiwaii
Baguette, deep
frozen
Non frozen food,
cake
Upper and lower heat 220-230 20-40
Upper and lower heat 200-210 15-20
Upper and lower heat 220-230 10-14
Upper and lower heat 180-200 25-40
Troubleshooting
If there are any problems during operation, please refer to the following table. If problems cannot
be solved as indicated under Solution, please contact your manufacturer.
Problem Possible causes Solution
Product does not work •Interrupted power supply •Check the power supply
Product does not heat up •Timer is in OFF position
•Household fuse defect
•Mains socket defect
•Product defect
•Set the Timer to a time more
than 0 minutes or C
•Check the household fuse
•Try to use another main socket
•Unplug the product and let an
authorized service agent check it
Product cannot be switch o•An electronic element is
defect
Rotisserie does not rotate •Selected function without
rotisserie activated
•Rotisserie not correctly
inserted/jammed
•Unplug the product and let an
authorized service agent check it
•Choose function with rotisserie
activated
•Remove rotisserie and insert
correctly
20
IM_KMO4341_180306_V05_HR.indb 20 6/3/18 2:01 pm
Page 21
Instrucciones de seguridad
¡Precaución! Superficie caliente. ¡Riesgo
de quemaduras! No toque las superficies
calientes del producto. Durante el uso el producto
emite calor.
•No use el producto mediante un temporizador
externo o sistema de control remoto independiente.
•Este producto puede ser usado por niños de más
de 8 años de edad y personas con capacidades
físicas, sensoriales o mentales reducidas, o falta de
experiencia y conocimientos, si reciben supervisión
o instrucciones sobre el uso del producto de forma
segura y comprenden los riesgos que implica.
Español
•Los niños no deben jugar con el aparato.
•La limpieza y el mantenimiento no deben ser
realizados por niños a menos que tengan más de 8
años y reciban supervisión.
•Mantenga el producto y su cable fuera del alcance
de niños menores de 8 años de edad.
•El producto debe enchufarse a una toma de
corriente con toma de tierra (clase I).
•El cable de alimentación debe examinarse con
regularidad para detectar indicios de daños; si el
cable está dañado, no debe utilizarse el aparato.
21
IM_KMO4341_180306_V05_HR.indb 21 6/3/18 2:01 pm
Page 22
Size - A5
Español
Instrucciones de seguridad
•El producto está diseñado para la preparación de las
cantidades propias del uso doméstico, o de entornos
similares al doméstico, y no es adecuado para uso
comercial. Los entornos similares al doméstico
incluyen cocinas para el personal en tiendas, oficinas
y otros negocios pequeños, o para los huéspedes
en albergues, hoteles pequeños e instalaciones
residenciales parecidas.
•Un cable de alimentación dañado sólo puede ser
reemplazado por el agente autorizado de servicio
para evitar peligros.
•Limpie el producto y los demás accesorios después
de cada uso.
•Siga las instrucciones del capítulo Limpieza y
cuidados.
22
IM_KMO4341_180306_V05_HR.indb 22 6/3/18 2:01 pm
Page 23

Instrucciones de seguridad
Español
• Lea este manual completamente antes
del primer uso. Contiene información
importante para su seguridad así como
para el uso y el mantenimiento del
equipo.
• Guarde estas instrucciones para
futuras consultas y transmítalo con el
producto.
• Preste atención particular a las
advertencias que hay en el producto y
en este manual.
• Utilice el producto sólo para el
propósito para el que está pensado. Un
uso inapropiado puede ser peligroso.
• En caso de uso inapropiado o
manejo equivocado, no aceptamos
responsabilidad por los daños
resultantes.
• El uso de accesorios y componentes
no expresamente recomendados por el
fabricante puede tener como resultado
heridas o daños e invalidación de la
garantía.
• Nunca deje el producto sin supervisión
mientras esté encendido.
• No coloque objetos pesados encima
del producto.
• Nunca sumerja las partes eléctricas del
producto en agua durante la limpieza
ni el manejo. Nunca mantenga el
producto bajo agua corriente.
• Bajo ninguna circunstancia intente
reparar el producto usted mismo.
Para recibir asistencia y reparaciones,
consulte a un agente autorizado de
servicio.
• El voltaje de la red debe coincidir con la
información de la etiqueta de valores
nominales del producto.
• El enchufe de alimentación se utiliza
como dispositivo de desconexión.
Asegúrese de que el enchufe de
alimentación está en una condición
operativa.
• Sólo desenchufe del enchufe de la
toma de alimentación para separar el
producto completamente de la red.
• Evite daños en el cable de
alimentación que podrían ser causados
por torceduras o el contacto con
rincones afilados.
• Mantenga este producto incluido el
cable de alimentación y el enchufe
de alimentación lejos de fuentes de
calor como por ejemplo, hornos, platos
calientes y otros dispositivos/objetos
que produzcan calor.
• Sólo desenchufe de la toma de
alimentación tirando del propio
enchufe. No tire del cable.
• Desenchufe el producto cuando el
producto no esté en uso, en caso de
disfunción, antes de conectar o quitar
accesorios y antes de cada limpieza.
• Si el cable de alimentación o la
carcasa del producto están dañados
o si el producto se ha caído, no debe
utilizarse el producto antes de que sea
examinado por un agente autorizado
de servicio.
• Utilice este producto sólo en zonas
interiores secas y nunca fuera.
• Proteja este producto del calor y del
frío extremos así como de la luz directa
del sol y del polvo.
23
IM_KMO4341_180306_V05_HR.indb 23 6/3/18 2:01 pm
Page 24

Size - A5
Español
Instrucciones de seguridad
• Para reducir el riesgo de incendio y
electrocución, no exponga el producto
al fuego (chimenea, barbacoa, velas,
cigarrillos y similares) ni agua (goteo
de agua, salpicaduras, jarrones,
bañeras, estanques y similares).
• ¡Advertencia! No utilice este
producto cerca del agua o de mucha
humedad; por ejemplo en un sótano
húmedo o al lado de una piscina o una
bañera.
• Use este producto solamente en
climas templados. Evite las zonas
climáticas tropicales y especialmente
húmedas.
• Proteja el producto de la humedad,
incluyendo salpicaduras de agua y
humedad ambiental.
• Garantice una circulación adecuada
de aire. Por lo tanto, no ponga objetos
sobre el aprato y mantenga las
siguientes separaciones respecto a la
pared:
- Lateral: 12 cm
- Posterior: 12 cm
- Superior: 30 cm
• El aparato no debe integrarse en
muebles. El aparato no debe instalarse
directamente bajo una plancha,
armario o mueble.
• Las patas del aparato no deben
retirarse.
• Ponga el aparato sobre una superficie
resistente al calor y las salpicaduras.
No ponga el aparato sobre superficies
calientes (como cocinas) ni llamas
abiertas (como fogones de gas).
• El producto no debe entrar en
contacto con ni cubrirse con materiales
inflamables, como cortinas, tejidos,
paredes, etc. Asegúrese de que exista
un espacio de seguridad suficiente con
materiales inflamables.
• No introduzca ningún objeto en el
producto.
• Este producto no es adecuado
para uso comercial. Está diseñado
solamente para uso doméstico.
• No ponga el producto sobre fogones
(de gas, eléctricos, de carbón, etc.).
• ¡Riesgo de incendio! El pan y otros
alimentos pueden arder. No use pan
con un contenido elevado de azúcar,
ya que podría causar fuego. No deje
nunca el producto sin supervisión.
• ¡Riesgo de quemaduras! No toque
las superficies calientes del producto.
Toque el producto solamente por el
asa o dial de temperatura.
• Las planchas y otras partes del
producto se calientan mucho. Deje
enfriar bien el producto antes de
limpiarlo o guardarlo.
• No toque los elementos calentadores.
• Use siempre la bandeja para migas
cuando use el aparato.
• El aceite y la grasa arden con facilidad.
No deben gotear sobre los elementos
calentadores calientes.
24
IM_KMO4341_180306_V05_HR.indb 24 6/3/18 2:01 pm
Page 25
Español
Felicidades!
Gracias por adquirir un producto KOENIC. Lea
atentamente este manual y consérvelo como
referencia en el futuro.
Uso pretendido
Este producto solo es adecuado para preparar
alimentos. Cualquier otro uso puede producir
lesiones o daños en el producto.
Imtron GmbH no asume ninguna
responsabilidad por daños producidos al
producto, a la propiedad o por lesiones
personales debidas al uso inadecuado del
producto o por su utilización para una finalidad
distinta a la especificada por el fabricante.
Antes del primer uso
Saque el producto y sus accesorios
cuidadosamente del embalaje original. Se
recomienda conservar el embalaje original
para guardarlo. Si quiere desechar el embalaje
original, tenga en cuenta las normas legales
aplicables. Si tiene dudas sobre una eliminación
adecuada, contacte con su centro de gestión
de residuos local.
Compruebe que el contenido entregado esté
completo y sin daños. Si el contenido está
incompleto o dañado, contacte de inmediato
con su lugar de adquisición.
Tras desembalarlo, consulte el capítulo
Limpieza y cuidados.
Para eliminar los residuos de producción, haga
funcionar el producto aproximadamente 10
minutos sin alimentos. Consulte el capítulo Uso.
Asegúrese de tener una ventilación adecuada,
ya que se puede producir un leve olor y humo.
Es inofensivo y desaparecerá en breve.
Contenido
1 x Mini horno
1 x Rejilla de horneado con asa
1 x Bandeja de horneado
1 x Rustidor incl. fijaciones y mango
1 x Bandeja para migas
1 x Manual de instrucciones
Datos técnicos
Tensión nominal : 220 - 240 V~
Potencia nominal de entrada : 1350 - 1650 W
Frecuencia nominal : 50/60 Hz
Elementos de control
A
Control de temperatura
B
Testigo de funcionamiento
C
Control de selección de modo
D
Temporizador / Encendido (C)/ OFF
E
Cable de alimentación con enchufe
F
Asa de la puerta
G
Mango de rustidor
H
Mango de la rejilla
I
Bandeja para migas
J
Rejilla de horneado
K
Bandeja de horneado
L
Puerta del horno
M
Elementos calentadores inferiores
N
Rustidor con fijaciones
O
Soporte
P
Receptáculo del impulsor
Q
Elementos calentadores superiores
R
Luz
No deseche este aparato como residuo
doméstico convencional. Devuélvalo a un
punto de recogida de reciclado de piezas
eléctricas y electrónicas WEEE. Con ello
ayudará a preservar los recursos naturales y a
proteger el medio ambiente. Contactar con su
vendedor o las autoridades locales para
obtener más información.
25
IM_KMO4341_180306_V05_HR.indb 25 6/3/18 2:01 pm
Page 26
Size - A5
Español
Instalación
Ponga el producto sobre una superficie
Fig.
1
plana, sólida y resistente al calor. Tenga
en cuenta la distancia a la toma de
corriente.
Para garantizar una circulación de aire
adecuada respete las distancias siguientes:
Laterales: 12 cm
Posterior: 12 cm
Superior: 30 cm
Advertencia
El producto no debe instalarse ni colocarse
en muebles. El producto no debe instalarse
directamente bajo una plancha, armario ni
mueble.
Introduzca la bandeja para migas bajo
Fig.
2
los elementos calentadores inferiores.
Conecte el enchufe de corriente a una
Fig.
3
toma de corriente adecuada.
Uso
Control de temperatura
Ajuste la temperatura deseada hasta
Fig.
4
230 ºC con el control de temperatura.
Selección de modo
Nota:
El ventilador de convección funciona
automáticamente en todos los modos y no se
puede apagar.
Seleccione el modo deseado con el
Fig.
5
control de selección de modo. Tenga
en cuenta los siguientes símbolos y
explicaciones:
Apagado
Calor superior e inferior
Calor superior
Calor inferior
Calor superior con rustido activado
Calor superior e inferior con
rustido activado
El mini horno comenzará a funcionar
solamente si se ha puesto el
conmutador Timer (Temporizador)
On (Encendido)/O (Apagado)
correctamente.
26
IM_KMO4341_180306_V05_HR.indb 26 6/3/18 2:01 pm
Page 27

Español
Encendido – permanente o con temporizador
Gire el mando en el sentido de las
Fig.
6
agujas del reloj para establecer un
tiempo de funcionamiento de hasta
120 minutos y activar el horno.
Para encender el horno sin establecer
un tiempo, gire el control en sentido
contrario a las agujas del reloj hasta C.
El testigo se encenderá en rojo y se
calentará el horno.
Nota
El testigo de funcionamiento no indica si el
horno se está calentando o si se ha alcanzado
la temperatura establecida. El testigo de
funcionamiento se enciende cuando se
enciende el aparato o se ha establecido el
temporizador y el aparato está funcionando.
Cuando transcurra el tiempo
establecido o se apague el OFF, el
testigo se apagará.
Uso del rustidor
El rustidor se puede usar con calor superior e
inferior.
Afloje el tornillo de la fijación en el
Fig.
7
lado con punta del rustidor y saque la
fijación.
Pase el rustidor por el centro del
Fig.
8
alimento que vaya a asar para obtener
una distancia homogénea entre el
alimento y los elementos calentadores.
Fije el alimento en el centro del rustidor
Fig.
9
usando las dos fijaciones. Al hacerlo,
presione las dos fijaciones y, cuando
el alimento esté correctamente fijado,
apriete los tornillos para fijar las
fijaciones al rustidor.
Nota
Asegúrese de colocar el alimento que vaya a
asar en el centro del rustidor, manteniendo
la misma distancia por cada lado y de los
elementos calentadores.
Fig.
10
Cómo insertar el rustidor: 1 Empuje el
extremo redondeado del pincho en el
receptáculo del impulsor. 2 Ponga el
otro extremo del pincho en el soporte.
Tenga en cuenta el tamaño de
los alimentos que va a asar (por
ejemplo, pollo a l’ast). No debe entrar
en contacto con los elementos
calentadores superiores ni inferiores en
ninguna posición.
Nota:
Cuando use el rustidor, use pollos de un peso
máximo de 3,5 kg.
Use el mango incluido para sacar
Fig.
11
el rustidor en el orden inverso a la
inserción.
Horneado y grill
• Antes de cada uso asegúrese de que la
bandeja para migas esté introducida bajo el
elemento calentador inferior.
• Precaliente el horno unos minutos con la
puerta cerrada. Para hacerlo gire el control de
temperatura hasta la temperatura deseada
y encienda el horno con el interruptor de
temporizador o encendido/apagado.
• Prepare los alimentos que va a hornear.
Póngalos sobre la rejilla o bandeja de horneado.
• En caso de alimentos con grasa o humedad,
use la bandeja de horneado para evitar que
la grasa o los líquidos caigan.
• Introduzca la rejilla de horneado o la bandeja
a la altura deseada. Dispone de tres alturas
de inserción.
• Cierre la puerta, gire el control de
temperatura hasta la temperatura deseada
y encienda el horno con el interruptor de
temporizador o encendido/apagado.
27
IM_KMO4341_180306_V05_HR.indb 27 6/3/18 2:01 pm
Page 28
Size - A5
Español
Precaución
El chasis superior y otras partes del producto
pueden calentarse mucho durante el uso. No
toque las superficies calientes del producto
durante el uso ni directamente después.
• El modo (función) de horneado puede
modificarse durante el proceso de cocción.
• Cuando use el control temporizador
los elementos calentadores se apagan
automáticamente cuando haya transcurrido
el tiempo establecido.
• Para apagar manualmente gire el interruptor
temporizador / encendido/apagado a
APAGADO.
• Para abrir la puerta, que puede estar
caliente, use exclusivamente el asa.
Precaución
Puede salir vapor caliente al abrir la puerta
del horno. Abra siempre la puerta con
cuidado.
Limpieza y mantenimiento
Precaución
Desenchufe siempre el producto de la toma
de corriente y deje que se enfríe el producto.
Antes de limpiarlo, desenchufe el
Fig.
12
producto y deje que se enfríe.
•Saque la grasa que pueda haber caído
sobre el elemento calentador inferior
con una gamuza humedecida.
•Limpie la bandeja, rejilla de horneado,
rustidor y fijaciones con un
detergente lavavajillas suave.
•Saque la bandeja para migas y límpiela.
Use papel de cocina para eliminar
restos de mayor tamaño de grasa.
•Después de limpiar vuelva a introducir
la bandeja para migas.
•Los disolventes son dañinos para la
salud humana y pueden afectar a las
piezas de plástico, mientras que los
mecanismos y herramientas de limpieza
abrasivos pueden rayar las superficies.
• Use mitones o agarraderas para horno
Cambiar la luz del horno
o el mango de la rejilla de horneado que
se incluye cuando saque la rejilla o la
bandeja de horneado. La rejilla o bandeja de
horneado solamente debe colocarse sobre
una superficie resistente al calor.
• Para sacar el rustidor use el mango incluido.
• Desenchufe el producto después del uso.
Precaución
Según el tipo y calidad de los alimentos se
pueden calentar mucho durante la cocción. Los
alimentos con un alto contenido en agua, como
los tomates, se calentarán especialmente.
Tenga un cuidado extremo cuando cocine,
especialmente al retirar este tipo de alimentos.
Deje que el producto se enfríe. Desenchufe
el producto de la toma de corriente antes
de reemplazar la lámpara para evitar la
posibilidad de descarga eléctrica.
Si la luz del horno no funciona correctamente,
debe cambiar la bombilla.
Fig.
Advertencia
Primero retire la tapa de la bombilla
13
y luego gire la bombilla en sentido
contrario a las agujas del reloj. Sustituya
la bombilla por otra del mismo tipo
(230V 25W T300, E14). Coloque la
bombilla y la tapa en el orden inverso.
Asegúrese de que la bombilla y la tapa
estén bien colocadas.
28
IM_KMO4341_180306_V05_HR.indb 28 6/3/18 2:01 pm
Page 29
Español
Tiempos de cocción
Tenga en cuenta los tiempos de cocción indicados en la tabla siguiente. Es solamente una pequeña
selección, puede encontrar más información en libros de cocina. El tiempo de cocción depende del
tamaño y cantidad de alimentos. Siga las instrucciones del embalaje.
Tiempo de
cocción en
minutos
(después de
precalentar)
Plato
Función
Nota: El ventilador de convección
funciona automáticamente en todos los
modos y no se puede apagar.
Temperatura
en ºC
Calor superior con rustido
Pollo a l’ast, con
rustidor
activado
Calor superior e inferior con
220-230 50-80
rustido activado
Pizza, congelada
Tostada Hawaii
Baguette,
congelada
Pastel no
congelado
Calor superior e inferior 220-230 20-40
Calor superior e inferior 200-210 15-20
Calor superior e inferior 220-230 10-14
Calor superior e inferior 180-200 25-40
Resolución de problemas
Si aparecen problemas de funcionamiento, consulte la siguiente tabla. Si los problemas no se
pueden resolver como se indica en Solución, contacte con el fabricante.
Problema Causas posibles Solución
El producto no
funciona
El producto no se
calienta
El producto no
puede apagarse
El rustidor no gira
•Suministro de corriente
interrumpido
•Temporizador en posición
OFF (APAGADO)
•Fusible de la instalación
doméstica defectuoso
•Toma de corriente
defectuosa
•Producto defectuoso
•Elemento electrónico
defectuoso
•Función seleccionada sin
rustido activado
•Rustidor introducido
•Compruebe el suministro de corriente
•Ponga el temporizador a más de 0
minutos o C
•Compruebe el fusible de la instalación
doméstica
•Pruebe a usar otra toma de corriente
•Desenchufe el producto y haga que un
agente de servicio autorizado lo examine
•Desenchufe el producto y haga que un
agente de servicio autorizado lo examine
•Elija la función con rustido activado
•Saque el rustidor e introdúzcalo
correctamente
incorrectamente/encallado
29
IM_KMO4341_180306_V05_HR.indb 29 6/3/18 2:01 pm
Page 30
Size - A5
Français
Consignes de securite
Attention ! Surface chaude ! Risque de
brûlure! Ne touchez pas les surfaces caudes du
produit. La chaleur s’élève du produit lors de l’utilisation.
•N'utilisez pas le produit avec un minuteur externe
ou d'un système de commande à distance séparé.
•Ce produit peut être utilisé par des enfants âgés
de plus de 8 ans et par des personnes à capacités
physiques, sensorielles ou mentales réduites,
ou inexpérimentées et sans connaissances, s'ils
sont surveillées ou s’ils ont reçu des instructions
concernant l'utilisation en toute sécurité du produit
et s’ils comprennent les risques qui en découlent.
•Les enfants ne doivent pas jouer avec l'appareil.
•Le nettoyage et l'entretien courant ne doivent pas
être réalisés par des enfants à moins qu'ils ne soient
âgés de plus de 8 ans et surveillés.
•Conservez l'appareil et son cordon hors de portée
des enfants de moins de 8 ans.
•Ce produit est prévu pour être connecté à une
prise électrique munie d'un circuit de mise à la terre
(classe I).
•Le cordon d'alimentation doit être régulièrement
examiné à la recherche de dommage éventuel. Si
c'est le cas, ne pas utiliser l'appareil.
30
IM_KMO4341_180306_V05_HR.indb 30 6/3/18 2:01 pm
Page 31

Français
Consignes de securite
•Ce produit est conçu pour la préparation de quantités
adaptées à un domicile, ou à un environnement
similaire, non commercial. Les environnements
similaires au domicile peuvent être la cuisine du
personnel d’un magasin, un bureau, de petites
entreprises agricoles et autres, une chambre d’hôte,
un petit hôtel ou des logements résidentiels de même
importance.
•Un cordon d’alimentation détérioré ne peut être
remplacé que par un service après-vente agréé afin
de ne pas s’exposer à d’éventuels risques.
•Nettoyez l’appareil et tous les autres accessoires
après chaque utilisation.
•Suivez les instructions de la section Nettoyage et
entretien.
31
IM_KMO4341_180306_V05_HR.indb 31 6/3/18 2:01 pm
Page 32

Size - A5
Français
Consignes de securite
• Veuillez lire attentivement cette
notice avant d’utiliser votre appareil.
Y figurent des informations
importantes pour votre sécurité ainsi
que pour l’utilisation et l’entretien de
l’équipement.
• Veuillez conserver cette notice pour
pouvoir vous y référer ultérieurement
et la transmettre éventuellement avec
l’appareil.
• Prêtez une attention particulière aux
avertissements figurant sur l’appareil
et dans cette notice.
• N’utilisez l’appareil que pour l’usage
auquel il est destiné. Une utilisation non
conforme peut entraîner des risques.
• En cas d’usage non conforme ou
d’erreur de manipulation, nous
déclinons toute responsabilité pour les
dommages en résultant.
• L’utilisation d’accessoires ou de pièces
non expressément recommandés
par le fabricant peut occasionner
des blessures ou des dommages et
invalider la garantie.
• Ne laissez jamais l’appareil sans
surveillance lorsqu’il est sous tension.
• Ne posez pas d’objets lourds sur
l’appareil.
• N’immergez jamais les pièces électriques
de l’appareil dans l’eau au cours du
nettoyage ou de l’utilisation. Ne passez
jamais l’appareil sous l’eau courante.
• Ne tentez en aucun cas de réparer
l’appareil par vos propres moyens.
Pour toute intervention ou réparation,
adressez-vous à un service aprèsvente agréé.
• La tension du secteur doit
correspondre à celle indiquée sur la
plaque signalétique.
• La fiche électrique sert de sectionneur.
Assurez-vous qu’elle est facilement
accessible.
• Seul le débranchement de la fiche
électrique au niveau de la prise de
courant peut interrompre l’alimentation
de l’appareil par le secteur.
• Évitez de détériorer le cordon
d’alimentation en le pliant ou par
contact avec des angles vifs.
• Veuillez tenir l’appareil, y compris
son cordon d’alimentation et sa fiche
électrique, à l’écart de toute source de
chaleur, telle qu’un poêle, une plaque
chauante ou tout autre appareil/
équipement générant de la chaleur.
• Pour débrancher l’appareil de la prise
de courant, tirez sur la fiche électrique
et non pas sur le cordon.
• Débranchez l’appareil lorsqu’il n’est pas
utilisé, en cas de dysfonctionnement,
avant de monter ou de démonter les
accessoires et avant chaque nettoyage.
• Si le cordon d’alimentation ou la carcasse
de l’appareil sont abîmés, ou si l’appareil
est tombé, celui-ci ne doit pas être
utilisé avant de l’avoir fait examiner par
un service après-vente agréé.
• Utilisez cet appareil dans un lieu
en intérieur non humide et jamais à
l’extérieur.
• Protégez cet appareil de la chaleur
ou du froid extrême ainsi que de
la lumière directe du soleil et de la
poussière.
• Afin de réduire les risques d’incendie
et d’électrocution, n’exposez
pas le produit au feu (foyer, grill,
bougies, cigarettes, etc.) ou à l’eau
(flaques d’eau, éclaboussures, vases,
baignoires, bassins, etc.).
32
IM_KMO4341_180306_V05_HR.indb 32 6/3/18 2:01 pm
Page 33

Consignes de securite
Français
• Avertissement ! N’utilisez pas cet
appareil à proximité de l’eau ou dans
un endroit fortement humide, par
exemple dans un sous-sol humide
ou à proximité d’une piscine ou d’une
baignoire.
• Utilisez ce produit uniquement
sous les lattitudes tempérées.
Évitez les régions tropicales, tout
particulièrement les régions humides.
• Protégez ce produit de toutes les
sources d’humidité. y compris des
pulvérisation d’eau et d’humidité.
• Assurez-vous que la circulation d’air
est susante. Par conséquent, ne
posez pas d’objet sur l’appareil et
laissez un espace avec les murs
comme indiqué ci-dessous :
- Côtés : 12 cm
- Arrière : 12 cm
- Haut : 30 cm
• L’appareil ne doit pas être encastré
dans un meuble. L’appareil ne doit pas
être installé directement sous une
plaque, un placard ou une armoire.
• Les pieds de l’appareil ne doivent pas
être démontés.
• Placez l’appareil sur une surface
résistante à la chaleur et aux
éclaboussures. Ne placez pas l’appareil
sur une surface chaude (par ex. des
plaques de cuisson) ou une flamme
nue (par ex. une gazinière).
• Le produit ne doit pas entrer en
contact ou être recouvert par des
matière inflammables, comme des
rideaux, des tissus, murs, etc. Veuillez
vous assurer qu’une distance de
sécurité susante est préserver par
rapport aux matériaux inflammables.
• N’insérez pas d’objets dans le produit.
• Ce produit n’est pas adapté à une
utilisation commerciale. Il est conçu
uniquement pour une utilisation
domestique.
• Ne placez pas le produit sur des
plaques chauantes (réchaud à gaz,
électrique, charbon, etc.)
• Risque d’incendie! Le pain et les
autres aliments peuvent prendre
feu! N’utilisez pas de pain ayant une
teneur en sucre élevée, cela pourrait
provoquer un incendie. Ne laissez
jamais le produit sans surveillance.
• Risque de brûlure! Ne touchez
pas les surfaces caudes du produit.
Touchez uniquement les poignées du
produit ou le cadran de température.
• Les plaques du grill et les autres
parties du produit deviennent très
chaudes. Laissez refroidir le produit
avant de le nettoyer ou de le ranger.
• Ne touchez pas les éléments
chauants.
• Utilisez toujours le ramasse-miettes
quand vous utilisez l’appareil.
• L’huile et la graisse s’enflamment
facilement. L’huile et la graisse ne
doivent pas goutter sur les éléments
chauants.
33
IM_KMO4341_180306_V05_HR.indb 33 6/3/18 2:01 pm
Page 34

Size - A5
Français
Félicitations!!
Merci d’avoir acheté un produit KOENIC.
Veuillez lire soigneusement ce manuel et le
conserver pour une consultation future.
Usage prévu
Ce produit convient uniquement à la
préparation des aliments. Toute autre
utilisation peut provoquer l’endommagement
de l’appareil ou des blessures.
Imtron GmbH n’assume aucune responsabilité
quant à des dommages au produit, à des
dommages matériels ou à des blessures
corporelles dus à une négligence ou un usage
inapproprié du produit, ou à un usage du produit
non indiqué par le fabricant.
Avant de l’utiliser pour la premiere fois
Retirez soigneusement le produit et les
accessoires de leur emballage d’origine. Il est
conseillé de conserver l’emballage d’origine
pour le rangement. Si vous souhaitez disposer
de l’emballage d’origine, veuillez respecter les
recommandations légales en vigueur. Si vous
avez des questions concernant le rebut approprié,
contactez le service de déchetterie local.
Vérifiez que le contenu est complet et qu’il
n’est pas endommagé. Si le contenu livré
est incomplet ou endommagé, contactez
immédiatement votre revendeur.
Après avoir déballé, veuillez consulter la section
Nettoyage et entretien.
Pour éliminer les résidus de fabrication, faites
fonctionner le produit pendant environ 10
minutes sans aucun aliment. Veuillez consulter
la section Utilisation. Assurez-vous qu’il y
a une ventilation susante dans la mesure
où le produit peut émettre une légère odeur
ainsiq ue de la fumée. Cela est sans danger et
disparaitra rapidement.
Contenu du produit
1 x mini-four
1 x grille de cuisson avec poignée
1 x plaque de cuisson
1 x rôtissoire avec fixations et poignée
1 x ramasse-miettes
1 x mode d’emploi
Données techniques
Tension nominale : 220 - 240 V~
Puissance nominale : 1350 - 1650 W
Fréquence nominale : 50/60 Hz
Éléments de commande
A
Sélecteur de température
B
Voyant d'état
C
Sélecteur de mode
D
Minuteur/Marche (C) / OFF
E
Cordon d'alimentation avec prise
F
Poignée de la porte
G
Poignée de la rôtissoire
H
Poignée de la grille
I
Ramasse-miettes
J
Grille de cuisson
K
Plaque de cuisson
L
Porte du four
M
Éléments chauants inférieurs
N
Rôtissoire avec fixations
O
Support de maintien
P
Entraînement du réceptacle
Q
Éléments chauants supérieurs
R
Éclairage du four
Ne pas éliminer cet appareil dans les
déchets ménagers municipaux non triés.
Les retourner au point de collecte
désigné pour le recyclage des WEEE. Se
conduire ainsi aidera à préserver les ressources
et à protéger l’environnement. Contacter votre
revendeur ou les autorités locales pour de plus
amples informations.
34
IM_KMO4341_180306_V05_HR.indb 34 6/3/18 2:01 pm
Page 35

Français
Installation
Posez l’appareil sur une surface plane,
Fig.
1
solide et résistante à la chaleur. Prenez
en compte la distance avec la prise
secteur la plus proche.
Afin d’assurer une circulation d’air susante,
observez les espaces minimum indiqués
ci-dessous :
Côtés : 12 cm
Arrière : 12 cm
Haut : 30 cm
Mise en garde
L’appareil ne doit pas être installé et placé
sur un meuble. L’appareil ne doit pas être
installé directement sous une plaque, un
placard ou une armoire.
Insérez le ramasse-miettes sous les
Fig.
2
éléments chauants inférieurs.
Branchez la fiche d’alimentation à une
Fig.
3
prise secteur adéquate.
Utilisation
Réglage de la température
Réglez la température à votre
Fig.
4
convenance jusqu’à 230 °C grâce à la
molette de température.
Sélection du mode
Remarque:
Le ventilateur de convection est actif
automatiquement sous tous les modes, et ne
peut pas être allumé ou éteint.
Sélectionnez un mode grâce au
Fig.
5
sélecteur de mode. Prenez en compte
les symboles et explications suivants :
Désactivé
Chaleur en haut et en bas
Chaleur en haut
Chaleur en bas
Chaleur en haut avec rôtissoire
activée
Chaleur en haut et en bas avec
rôtissoire activée
Le mini-four se met en marche
seulement si le minuteur ou
l’interrupteur On/O (marche/arrêt)
est réglé en conséquence.
35
IM_KMO4341_180306_V05_HR.indb 35 6/3/18 2:01 pm
Page 36

Size - A5
Français
Mise en marche permanente ou à l’aide
du minuteur
Tournez le bouton dans le sens des
Fig.
6
aiguilles d’une montre pour régler une
durée de fonctionnement allant jusqu’à
120 minutes, ce qui mettra en marche
le four.
Pour mettre en marche le four sans
régler de durée, tournez le bouton
dans le sens inverse des aiguilles d’une
montre jusqu’à C.
Le voyant d’état rouge s’allume et le
four chaue.
Remarque
Le voyant d’état n’indique pas si le four
chaue ou si la température de consigne est
atteinte. Le voyant d’état s’allume quand
l’appareil est mis en marche ou si le minuteur a
été réglé et que l’appareil est en marche.
Après expiration de la durée préréglée
ou quand vous arrêtez le produit en
le réglant sur OFF, le voyant d’état
s’éteint.
Utilisation de la rôtissoire
La rôtissoire peut être utilisée à chaleur haute
ou basse.
Desserrez la vis à oreilles de la fixation
Fig.
7
du côté pointu de la rôtissoire, puis
enlevez la fixation.
Poussez la rôtissoire pour qu’elle traverse
Fig.
8
le milieu de l’aliment pour le griller afin
d’obtenir une distance égale entre
l’aliment et les éléments chauants.
Fixez l’aliment au milieu de la rôtissoire
Fig.
9
grâce aux deux fixations. En ce
faisant, poussez les deux fixations
ensemble, puis, une fois que l’aliment
est correctement fixé, serrez les vis
à oreilles pour fixer les fixations de la
rôtissoire.
Fig.
10
Insertion de la rôtissoire : 1 Poussez
l’extrémité arrondie de la broche dans
l’entraînement du réceptacle. 2 Ensuite,
mettez l’autre extrémité de la broche
sur le support de maintien.
Prenez en compte la taille de l’aliment
à griller (par ex. poulet rôti). Il ne doit
toucher les éléments chauants du
haut et du bas dans aucune position.
Remarque
Utilisez la rôtissoire uniquement avec un
poulet pesant au maximum 3,5 kg.
Utilisez la poignée fournie pour enlever
Fig.
11
la rôtissoire dans l’ordre inverse de
l’insertion.
Cuire et griller
• Avant chaque utilisation, vérifiez que le
ramasse-miettes est inséré sous l’élément
chauant inférieur.
• Préchauez le four pendant quelques
minutes avec la porte fermée. Réglez donc la
molette de température à votre convenance
et mettez en marche le four grâce au
minuteur ou à l’interrupteur marche/arrêt.
• Préparez les aliments à cuire. Mettez-les sur
la plaque ou la grille de cuisson.
• Pour les aliments gras ou humides, utilisez
la plaque de cuisson afin d’éviter que de la
graisse ou des liquides ne s’égouttent.
• Insérez la grille de cuisson ou le plateau à la
hauteur voulue. Trois hauteurs d’insertion
sont disponibles.
• Fermez la porte, réglez la molette de
température à votre convenance et mettez
en marche l’appareil grâce au minuteur ou à
l’interrupteur marche/arrêt.
Remarque
Assurez-vous que les aliments à griller sont
placés au centre de la rôtissoire, à distance
égale de l’entraînement et du conduit.
36
IM_KMO4341_180306_V05_HR.indb 36 6/3/18 2:01 pm
Page 37

Attention
L’enveloppe supérieure et les autres parties
de l’appareil peuvent devenir brûlantes
pendant le fonctionnement. Pendant le
fonctionnement et juste après, ne touchez
pas les surfaces chaudes de l’appareil.
• Vous pouvez changer le mode (la fonction)
de cuisson pendant le procédé de cuisson.
• Quand vous actionnez le minuteur, les éléments
chauants s’arrêtent automatiquement une
fois que la durée préréglée a expiré.
• Pour arrêter l’appareil, réglez manuellement
le minuteur/l’interrupteur marche/arrêt en
position OFF (arrêt).
• Pour ouvrir la porte qui est peut-être
chaude, utilisez uniquement la poignée.
Attention
De la vapeur chaude peut s’échapper quand
vous ouvrez la porte du four. Vous devez
donc ouvrir la porte avec prudence.
Français
Nettoyage et entretien
Attention
Débranchez l’appareil de la prise secteur et
laissez refroidir l’appareil.
Avant chaque nettoyage, débranchez
Fig.
12
l’appareil et laissez-le refroidir.
•Enlevez la graisse qui a pu goutter sur
l’élément chauant inférieur avec un
chion humide.
•Nettoyez la plaque de cuisson, la grille
de cuisson, la rôtissoire et les fixations
avec du liquide-vaisselle standard doux.
•Enlevez le ramasse-miettes et
nettoyez-le. Utilisez un essuie-tout
en papier pour le débarrasser des plus
grandes quantités de graisse.
•Après le nettoyage, réinsérez le
ramasse-miettes.
•Les solvants sont dangereux pour la
santé humaine et peuvent ronger les
éléments en plastique, alors que des
mécanismes et des outils de nettoyage
agressifs peuvent rayer les surfaces.
• Utilisez des maniques, un torchon ou la
poignée incluse pour sortir la grille ou la
Remplacer la lampe du four
plaque de cuisson. Une grille ou une plaque
de cuisson chaudes doivent être placées
uniquement sur une surface résistante à la
chaleur.
• Pour sortir la rôtissoire, utilisez la poignée
fournie.
• Débranchez l’appareil après utilisation.
Laissez l’appareil refroidir. Débranchez
l’appareil de la prise secteur avant de
remplacer l’ampoule pour éviter le risque de
choc électrique.
Avertissement
Si la lampe du four cesse de fonctionner
Attention
Selon le type et la qualité de la nourriture, elle
peut devenir très chaude pendant la grillade.
Les aliments avec un contenu élevé d’eau, telles
que les tomates, deviendront particulièrement
chaudes. Par conséquent, soyez extrêmement
prudent pendant la grillade et en particulier en
retirant ces types d’aliments.
correctement, remplacez l’ampoule.
Retirez d’abord le cache de la lampe,
Fig.
13
puis dévissez l’ampoule dans le sens
inverse des aiguilles d’une montre.
Remplacez l’ampoule par un modèle du
même type (230V 25W T300, E14).
Installez le tout en suivant les étapes
inverses. Assurez-vous de l’installation
correcte du cache de l’ampoule.
37
IM_KMO4341_180306_V05_HR.indb 37 6/3/18 2:01 pm
Page 38

Size - A5
Français
Durées de cuisson
Tenez compte des durées de cuisson figurant dans le tableau suivant. Ce n’est qu’une petite
sélection. Les livres de recettes donnent davantage d’informations. La durée de cuisson dépend de
la taille et de la quantité de nourriture. Suivez les instructions sur l’emballage.
Fonction
Plat
Remarque : Le ventilateur de
convection est actif automatiquement
sous tous les modes, et ne peut pas
Température
en °C
être allumé ou éteint.
Chaleur en haut avec rôtissoire
Poulet rôti,
en utilisant la
rôtissoire
activée
220-230 50-80
Chaleur en haut et en bas avec
rôtissoire activée
Durée de
cuisson en
minutes (après
préchauage)
Pizza surgelée
Toast Hawaï
Baguette surgelée
Gâteau non
surgelé
Chaleur en haut et en bas 220-230 20-40
Chaleur en haut et en bas 200-210 15-20
Chaleur en haut et en bas 220-230 10-14
Chaleur en haut et en bas 180-200 25-40
Dépannage
En cas de problèmes pendant le fonctionnement, veuillez consulter le tableau suivant. Si les problèmes
ne peuvent pas être résolus tels indiqués dans Solutions, veuillez contacter votre fabricant.
Problème Causes possibles Solution
L'appareil ne fonctionne
pas
L'appareil ne chaue pas
•Alimentation électrique
interrompue
•Le minuteur est en
position OFF (arrêt)
•Fusible à remplacer
•Prise secteur défectueuse
•Appareil défectueux
•Vérifiez l'alimentation électrique
•Réglez le minuteur sur une durée
supérieure à 0 minute ou C
•Vérifiez le fusible
•Essayez d’utiliser une autre prise
secteur
•Débranchez l’appareil et faites-le
inspecter par un réparateur
agréé
Impossible d'arrêter
l'appareil
La rôtissoire ne tourne
pas
•Un élément électronique
est défectueux
•Fonction sélectionnée sans
la rôtissoire activée
•La rôtissoire est bloquée/
mal installée
•Débranchez l'appareil et faites-le
inspecter par un réparateur
agréé
•Choisir la fonction avec la
rôtissoire activée
•Enlevez la rôtissoire et installezla correctement
38
IM_KMO4341_180306_V05_HR.indb 38 6/3/18 2:01 pm
Page 39

Ελληνικά
Οδηγίες ασφαλείας
Προσοχή! Καυτή επιφάνεια! Κίνδυνος
εγκαύματος! Μην αγγίζετε τις καυτές
επιφάνειες της συσκευής. Κατά τη διάρκεια της
χρήσης εκπέμπεται θερμότητα από τη συσκευή.
•Μη θέτετε σε λειτουργία το προϊόν μέσω εξωτερικού
χρονοδιακόπτη ή ξεχωριστού τηλεχειριστηρίου.
•Το προϊόν αυτό μπορεί να χρησιμοποιηθεί από
παιδιά ηλικίας από 8 ετών και άνω και από άτομα
με μειωμένες σωματικές, αισθητήριες ή διανοητικές
ικανότητες ή έλλειψη εμπειρίας και γνώσεις εφόσον
τους έχουν δοθεί καθοδήγηση ή οδηγίες που αφορούν
τη χρήση του προϊόντος κατά ένα ασφαλή τρόπο και
κατανοούν τους εμπλεκόμενους κινδύνους.
•Τα παιδιά δεν μπορούν να παίζουν με το προϊόν.
•Καθαρισμός και συντήρηση χρήστη δεν θα γίνονται
από παιδιά εκτός αν αυτά είναι ηλικίας μεγαλύτερης
των 8 και βρίσκονται υπό παρακολούθηση.
•Φυλάξτε το προϊόν και το καλώδιό του μακριά από
παιδιά κάτω των 8 ετών.
•Το προϊόν προορίζεται για σύνδεση σε πρίζα η οποία
διαθέτει γείωση (κατηγορίας I).
•Θα πρέπει να εξετάζετε τακτικά το καλώδιο
ρεύματος για σημάδια φθοράς και σε περίπτωση
που το καλώδιο παρουσιάζει φθορές, δεν πρέπει να
χρησιμοποιήσετε το προϊόν.
39
IM_KMO4341_180306_V05_HR.indb 39 6/3/18 2:01 pm
Page 40

Size - A5
Ελληνικά
Οδηγίες ασφαλείας
•Το προϊόν έχει σχεδιαστεί για την προετοιμασία
ποσοτήτων καφέ που συνηθίζονται στην οικιακή
χρήση ή σε παρόμοιες μη επαγγελματικές χρήσεις.
Στις συνήθεις οικιακές χρήσεις περιλαμβάνονται
οι κουζίνες προσωπικού σε καταστήματα, γραφεία,
γεωργικές και άλλες μικρές επιχειρήσεις, ή
για χρήση από ενοίκους πανδοχείων, μικρών
ξενοδοχείων και παρόμοιων χώρων διαμονής.
•Τα χαλασμένα καλώδια τροφοδοσίας πρέπει να αντικαθίστανται μόνο από τον εξουσιοδοτημένο αντιπρόσωπο
του σέρβις ώστε να αποφεύγονται τυχόν κίνδυνοι.
•Καθαρίστε τη συσκευή και όλα της τα εξαρτήματα
μετά από κάθε χρήση.
•Ακολουθήστε τις οδηγίες της παραγράφου
Καθαρισμός και φροντίδα.
40
IM_KMO4341_180306_V05_HR.indb 40 6/3/18 2:01 pm
Page 41

Ελληνικά
• Διαβάστε πλήρως το εγχειρίδιο αυτό
πριν από την πρώτη χρήση . Περιέχει
σημαντικές πληροφορίες για την
ασφάλειά σας καθώς και για τη χρήση
και τη συντήρηση του εξοπλισμού.
• Φυλάξτε τις οδηγίες αυτές για
μελλοντική αναφορά και δώστε τις
μαζί με το προϊόν.
• Δώστε ιδιαίτερη προσοχή στις
προειδοποιήσεις πάνω στο προϊόν και
σε αυτό το εγχειρίδιο.
• Χρησιμοποιήστε το προϊόν μόνο
για την ενδεδειγμένη του χρήση.
Τυχόν ακατάλληλη χρήση μπορεί να
οδηγήσει σε κινδύνους.
• Στην περίπτωση ακατάλληλης
χρήσης ή εσφαλμένης λειτουργίας,
δεν δεχόμαστε καμία ευθύνη για
προκύπτουσες ζημιές.
• Η χρήση αξεσουάρ και εξαρτημάτων, που
δεν συνιστώνται από τον κατασκευαστή
μπορεί να οδηγήσει σε τραυματισμούς ή
ζημιές και ακυρώνει την εγγύηση.
• Μην αφήνετε ποτέ το προϊόν δίχως
επίβλεψη ενώ είναι ενεργοποιημένο.
• Μην τοποθετείτε βαριά αντικείμενα
στο πάνω μέρος του προϊόντος.
• Μη βυθίζετε ποτέ τα ηλεκτρικά
μέρη του προϊόντος στο νερό κατά
τον καθαρισμό ή τη λειτουργία. Μην
κρατάτε ποτέ το προϊόν κάτω από
τρεχούμενο νερό.
• Μην προσπαθήσετε σε καμία περίπτωση να επισκευάσετε το προϊόν μόνοι
σας. Για σέρβις και επισκευές, παρακαλείστε να συμβουλευθείτε έναν εξουσιοδοτημένο αντιπρόσωπο του σέρβις.
• Η τάση δικτύου πρέπει να αντιστοιχεί
στις πληροφορίες στην ετικέτα
ονομαστικής ισχύος του προϊόντος.
• Το βύσμα τροφοδοσίας
χρησιμοποιείται ως η διάταξη
αποσύνδεσης. Βεβαιωθείτε ότι το
βύσμα τροφοδοσίας βρίσκεται σε
λειτουργική κατάσταση.
• Μόνο με την αποσύνδεση από την
πρίζα μπορεί να επιτευχθεί πλήρης
διαχωρισμός του προϊόντος από την
τάση τροφοδοσίας.
• Αποφύγετε τις ζημιές στο καλώδιο
τροφοδοσίας που μπορεί να
προκληθούν από συστροφές ή από
επαφή με αιχμηρές γωνίες.
• Κρατήστε το προϊόν αυτό
συμπεριλαμβανομένων του καλωδίου
και του βύσματος τροφοδοσίας μακριά
από όλες τις πηγές θερμότητας όπως
για παράδειγμα, φούρνους, εστίες
μαγειρέματος και άλλες συσκευές/
άλλα αντικείμενα που παράγουν
θερμότητα.
• Βγάζετε το βύσμα από την πρίζα μόνο
από αυτό καθαυτό το βύσμα. Μην
τραβάτε το καλώδιο.
• Βγάλτε το προϊόν από την πρίζα όταν
το προϊόν δεν βρίσκεται σε χρήση,
σε περίπτωση δυσλειτουργιών,
πριν να συνδέσετε ή να αφαιρέσετε
εξαρτήματα και πριν από κάθε
καθαρισμό.
• Αν το καλώδιο τροφοδοσίας ή η
θήκη του προϊόντος έχει υποστεί
ζημιά ή το προϊόν έχει πέσει κάτω,
το προϊόν μπορεί να μη μπορεί να
χρησιμοποιηθεί πριν να εξεταστεί από
έναν εξουσιοδοτημένο αντιπρόσωπο
του σέρβις.
• Χρησιμοποιήστε το προϊόν μόνο σε
στεγνούς εσωτερικούς χώρους και
ποτέ σε εξωτερικούς χώρους.
• Προστατέψτε το προϊόν αυτό από
την υπερβολική θερμότητα και το
υπερβολικό κρύο καθώς και από το
άμεσο ηλιακό φως και από τη σκόνη.
• Για να μειωθεί ο κίνδυνος πυρκαγιάς
και ηλεκτροπληξίας, μην εκθέτετε το
προϊόν σε φωτιά (τζάκι, σχάρα, κεριά,
τσιγάρα κ.ο.κ) ή σε νερό (σταγόνες
νερού, πιτσιλιές νερού, βάζα,
μπανιέρες, δεξαμενές κ.ο.κ.).
41
IM_KMO4341_180306_V05_HR.indb 41 6/3/18 2:01 pm
Page 42

Size - A5
Ελληνικά
Οδηγίες ασφαλείας
• Προειδοποίηση! Μην χρησιμοποιείτε
αυτό το προϊόν κοντά σε νερό ή βαριά
υγρασία· π.χ. σε ένα υγρό υπόγειο ή
δίπλα σε μια πισίνα ή σε μια μπανιέρα.
• Χρησιμοποιήστε την παρούσα
συσκευή σε εύκρατες ζώνες μόνο.
Αποφύγετε τροπικές και ιδιαιτέρα
υγρές περιοχές.
• Προστατέψτε το προϊόν
από κάθε μορφή υγρασίας
συμπεριλαμβανομένων υδρατμών και
ατμοσφαιρικής υγρασίας.
• Βεβαιωθείτε ότι υπάρχει ελεύθερη
κυκλοφορία αέρα. Γι’ αυτό μην
τοποθετείτε αντικείμενα πάνω στη
συσκευή και τηρείτε τις αποστάσεις
ασφαλείας από τους τοίχους όπως
φαίνεται παρακάτω:
- Πλευρικά: 12 εκ.
- Πίσω: 12 εκ.
- Πάνω: 30 εκ.
• Η συσκευή δεν πρέπει να εντοιχίζεται.
Η συσκευή δεν πρέπει να εγκαθίσταται
απευθείας κάτω από πάγκο κουζίνας
ή να ακουμπά στο έσω επάνω μέρος
του ντουλαπιού.
• Τα πόδια της συσκευής να μην
αφαιρούνται.
• Τοποθετήστε τη συσκευή πάνω σε
επιφάνεια ανθεκτική στη θερμότητα
και στο πιτσίλισμα. Μην τοποθετείτε
τη συσκευή πάνω σε καυτή επιφάνεια
(π.χ. εστίες κουζίνας) ή σε γυμνές
φλόγες (π.χ. εστίες γκαζιού).
• Το προϊόν δεν πρέπει να έρχεται
σε επαφή ή να καλύπτεται από
ιδιαιτέρως εύφλεκτα υλικά, όπως
κουρτίνες, υφάσματα, τοίχους, κλπ.
Παρακαλούμε, φροντίστε να υπάρχει
επαρκής απόσταση ασφαλείας από
εύφλεκτα υλικά.
• Μην εισάγετε αντικείμενα στο
εσωτερικό της συσκευής.
• Το προϊόν αυτό δεν είναι κατάλληλο
για εμπορική χρήση. Είναι σχεδιασμένο
μόνο για οικιακή χρήση.
• Μην τοποθετείτε τη συσκευή πάνω
σε μάτια κουζίνας (αερίου, ηλεκτρική,
κάρβουνου, κλπ.).
• Κίνδυνος πυρκαγιάς! Το ψωμί
και άλλα τρόφιμα μπορεί να καούν!
Μη χρησιμοποιείτε ψωμί με υψηλή
περιεκτικότητα σε ζάχαρη διότι
μπορεί να προκληθεί φωτιά. Ποτέ
μην αφήνετε τη συσκευή από την
επιτήρησή σας.
• Κίνδυνος εγκαύματος! Μην αγγίζετε
τις καυτές επιφάνειες της συσκευής.
Πιάστε τη συσκευή μόνο από το
χερούλι της ή το διακόπτη ρύθμισης
θερμοκρασίας.
• Οι πλάκες ψησίματος και άλλα μέρη
της συσκευής αναπτύσσουν υψηλή
θερμοκρασία. Αφήστε τη συσκευή να
κρυώσει καλά πριν την καθαρίσετε ή
την αποθηκεύσετε.
• Μην αγγίζετε τα θερμαντικά στοιχεία.
• Χρησιμοποιείτε πάντα το δίσκο
για ψίχουλα όταν λειτουργείτε τη
συσκευή.
• Το λάδι και το λίπος είναι εύφλεκτα.
Το λάδι και το λίπος δεν πρέπει
να στάζουν πάνω στα θερμαντικά
στοιχεία.
42
IM_KMO4341_180306_V05_HR.indb 42 6/3/18 2:01 pm
Page 43

Ελληνικά
Συγχαρητήρια!
Σας ευχαριστούμε για την αγορά ενός
προϊόντος KOENIC. Παρακαλούμε διαβάστε
προσεκτικά το παρόν εγχειρίδιο και φυλάξτε το
για μελλοντική αναφορά.
Προτιθέμενη χρήση
Το παρόν προϊόν προορίζεται μόνο για την
επεξεργασία τροφίμων. Οποιαδήποτε άλλη
χρήση ενδέχεται να προκαλέσει βλάβη στο
προϊόν ή τραυματισμό.
Η Imtron GmbH δεν φέρει καμία ευθύνη για
βλάβη στο προϊόν, για καταστροφή περιουσίας
ή για προσωπικό τραυματισμό εξαιτίας
απρόσεκτης ή ακατάλληλης χρήσης του
προϊόντος ή χρήση που δεν είναι σύμφωνη με
τον συγκεκριμένο σκοπό χρήσης όπως ορίζεται
από τον κατασκευαστή.
Πριν την πρωτη χρηση
Βγάλτε το προϊόν και τα εξαρτήματα από την
αρχική συσκευασία. Συνιστάται να φυλάξετε και
να αποθηκεύσετε την αρχική συσκευασία. Αν
επιθυμείτε τη διάθεση (απόρριψη) της αρχικής
συσκευασίας, παρακαλείστε να λάβετε υπόψη
σας την ισχύουσα νομοθεσία. Σε περίπτωση
που έχετε τα οποιαδήποτε ερωτήματα
σχετικά με τη σωστή διάθεση (απόρριψη) του
προϊόντος παρακαλείστε να επικοινωνήσετε με
το τοπικό σας κέντρο διαχείρισης αποβλήτων.
Επιθεωρήστε τα περιεχόμενα που σας έχουν
παραδοθεί σε ό,τι αφορά πληρότητα και ζημιές.
Εφόσον τα περιεχόμενα της παράδοσης δεν είναι
πλήρη ή έχουν υποστεί ζημιές, επικοινωνήστε με
το γραφείο των πωλήσεών σας αμέσως.
Μετά την αποσυσκευασία, παρακαλείστε να
ανατρέξετε στο κεφάλαιο Καθαρισμός και
φροντίδα.
Περιεχόμενο
1 x Μίνι φούρνος
1 x Σχάρα ψησίματος με λαβή
1 x Ταψί ψησίματος
1 x Σούβλα περιλ. σφιγκτήρες και λαβή
1 x Δίσκος για ψίχουλα
1 x Εγχειρίδιο οδηγιών
Τεχνικά Χαρακτηριστικά
Ονομαστική τάση : 220 - 240 V~
Ονομαστική ισχύς εισόδου : 1350 - 1650 W
Ονομαστική συχνότητα : 50/60 Hz
Στοιχεία ελέγχου
A
Χειριστήριο θερμοκρασίας
B
Ενδεικτική λυχνία λειτουργίας
C
Χειριστήριο επιλογής λειτουργιών
D
Χρονοδιακόπτης/ Ενεργοποίηση (C) / OFF
E
Καλώδιο τροφοδοσίας με φις
F
Λαβή πόρτας
G
Λαβή σούβλας
H
Λαβή σχάρας
I
Δίσκος για τα ψίχουλα
J
Σχάρα ψησίματος
K
Ταψί ψησίματος
L
Πόρτα φούρνου
M
Κάτω αντιστάσεις
N
Σούβλα με σφιγκτήρες
O
Βραχίονας συγκράτησης
P
Οδηγός σκεύους μαγειρέματος
Q
Επάνω αντιστάσεις
R
Φωτισμός φούρνου
Για να απομακρύνετε αυτά τα υπολείμματα
της διαδικασίας παραγωγής, λειτουργήστε τη
συσκευή για περίπου 10 λεπτά χωρίς τρόφιμα.
παρακαλείστε να ανατρέξετε στο κεφάλαιο
Χρήση. Βεβαιωθείτε ότι υπάρχει επαρκής
αερισμός καθώς ενδέχεται να προκληθεί μια
ελαφρά οσμή και καπνός. Πρόκειται για κάτι
αβλαβές που θα εξαφανιστεί σύντομα.
Μην πετάτε αυτή τη συσκευή μαζί με τα
χύδην οικιακά απορρίμματα. Επιστρέψτε
την σε ένα καθορισμένο σημείο
περισυλλογής για την ανακύκλωση ηλεκτρικού και
ηλεκτρονικού εξοπλισμού. Με αυτό τον τρόπο,
συμβάλλετε στη διατήρηση των πόρων και την
προστασία του περιβάλλοντος. Απευθυνθείτε
στον αντιπρόσωπο της περιοχής σας ή στις
αρμόδιες αρχές για περισσότερες πληροφορίες.
43
IM_KMO4341_180306_V05_HR.indb 43 6/3/18 2:01 pm
Page 44

Size - A5
Ελληνικά
Εγκατάσταση
Τοποθετήστε τη συσκευή σε μια
Εικ.
1
οριζόντια, σταθερή και ανθεκτική στη
θερμότητα επιφάνεια. Λάβετε υπόψη
σας την απόσταση από την κοντινότερη
πρίζα.
Για να εξασφαλίσετε επαρκή ροή αέρα
ακολουθήστε τις ελάχιστες αποστάσεις
ασφαλείας ως κάτωθι:
Πλευρικά: 12 εκ.
Πίσω: 12 εκ.
Επάνω: 30 εκ.
Προειδοποίηση
Το προϊόν δεν πρέπει να εγκαθίσταται ως
εντοιχισμένο. Το προϊόν δεν πρέπει να
εγκαθίσταται απευθείας κάτω από πάγκο
κουζίνας ή να ακουμπά στο έσω άνω μέρος
του ντουλαπιού.
Εισάγετε το δίσκο για ψίχουλα κάτω
Εικ.
2
από τα κάτω θερμαντικά στοιχεία.
Συνδέστε το φις σε κατάλληλη πρίζα.
Εικ.
3
Χρήση
Έλεγχος θερμοκρασίας
Ρυθμίστε στην επιθυμητή θερμοκρασία
Εικ.
4
έως 230 °C χρησιμοποιώντας το
θερμοστάτη.
Επιλογή λειτουργίας
Σημείωση:
Ο ανεμιστήρας θερμού αέρα λειτουργεί
αυτόματα με όλους τους τρόπους λειτουργίας
και δεν είναι δυνατή η ενεργοποίησή του ή η
απενεργοποίησή του.
Επιλέξτε την επιθυμητή λειτουργία
Εικ.
5
χρησιμοποιώντας τον επιλογέα
ρύθμισης. Λάβετε υπόψη τα ακόλουθα
σύμβολα και επεξηγήσεις:
Απενεργοποίηση
Επάνω και κάτω αντίσταση
Επάνω αντίσταση
Κάτω αντίσταση
Επάνω αντίσταση με ενεργοποιημένη τη σούβλα
Επάνω και κάτω αντίσταση με
ενεργοποιημένη τη σούβλα
Το φουρνάκι αρχίζει να λειτουργεί
μόνο αφού ρυθμιστεί ο TIMER
(Χρονοδιακόπτης) ή ο διακόπτης On/
Off ρυθμιστεί αντίστοιχα.
44
IM_KMO4341_180306_V05_HR.indb 44 6/3/18 2:01 pm
Page 45

Ελληνικά
Ενεργοποίηση - μόνιμα ή με χρήση του
χρονοδιακόπτη
Γυρίστε το χειριστήριο δεξιόστροφα
Εικ.
6
για να ρυθμίσετε ένα χρόνο
λειτουργίας έως 120 λεπτά και για να
ενεργοποιήσετε το φούρνο.
Για να ενεργοποιήσετε το φούρνο
χωρίς να ρυθμίσετε χρόνο, στρέψτε
το χειριστήριο αριστερόστροφα στη
θέση C.
Η ενδεικτική λυχνία λειτουργίας ανάβει
κόκκινη και ο φούρνος θερμαίνεται.
Σημείωση
Η ενδεικτική λυχνία λειτουργία δεν
υποδεικνύει εάν ο φούρνος θερμαίνεται ή
εάν φθάσει στην καθορισμένη θερμοκρασία.
Η ενδεικτική λυχνία λειτουργίας ανάβει
όταν η συσκευή έχει ενεργοποιηθεί ή ο
χρονοδιακόπτης έχει ρυθμιστεί και η συσκευή
λειτουργεί.
Μετά τη λήξη του καθορισμένου
χρόνου ή όταν η συσκευή
απενεργοποιηθεί OFF, η ενδεικτική
λυχνία λειτουργίας σβήνει.
Σημείωση
Βεβαιωθείτε ότι το φαγητό για ψήσιμο είναι
τοποθετημένο στη μέση της σούβλας με ίση
απόσταση και από τους δύο οδηγούς, καθώς
και από τον αγωγό.
Εικ.
10
Τοποθέτηση της σούβλας:1 Σπρώξτε
το στρογγυλεμένο άκρο της σούβλας
μέσα στον οδηγό του σκεύους
μαγειρέματος. 2 Στη συνέχεια,
τοποθετήστε το άλλο άκρο της
σούβλας στο βραχίονα συγκράτησης.
Λάβετε υπόψη σας το μέγεθος του
τροφίμου για ψήσιμο (π.χ. ψητό
κοτόπουλο). Δεν πρέπει να ακουμπά
στα άνω ή στα κάτω θερμαντικά
στοιχεία από οποιαδήποτε θέση.
Σημείωση:
Όταν χρησιμοποιείτε τη σούβλα, ψήνετε
κοτόπουλο μόνο έως μέγιστου βάρους 3,5 κιλού.
Χρησιμοποιείστε τη λαβή για να
Εικ.
11
αφαιρέσετε τη σούβλα με αντίστροφα
βήματα από όταν την τοποθετήσατε.
Χρήση της σούβλας
Η σούβλα μπορεί να χρησιμοποιηθεί με την
επάνω και την κάτω αντίσταση.
Ξεσφίξτε τις πεταλούδες που
Εικ.
7
συγκρατούν τους σφιγκτήρες και
βρίσκονται στη μυτερή πλευρά της
σούβλας. Αφαιρέστε το σφιγκτήρα.
Σπρώξτε τη σούβλα να διαπεράσει
Εικ.
8
το τρόφιμο που θέλετε να ψήσετε και
φροντίστε να υπάρχει ίση απόσταση
μεταξύ τροφίμου και θερμαντικού
στοιχείου.
Στερεώστε καλά το τρόφιμο στο
Εικ.
9
κέντρο της σούβλας χρησιμοποιώντας
τους δυο σφιγκτήρες. Καθώς το κάνετε
σπρώξτε και τους δύο σφιγκτήρες μαζί
και μόλις το τρόφιμο έχει στερεωθεί
καλά σφίξτε τις πεταλούδες για να
σταθεροποιηθούν οι σφιγκτήρες πάνω
στη σούβλα.
Ψήσιμο στο φούρνο και ψήσιμο στο γκριλ
• Πριν από κάθε χρήση βεβαιωθείτε ότι ο
δίσκος για ψίχουλα έχει τοποθετηθεί κάτω
από το κάτω θερμαντικό στοιχείο.
• Προθερμάνετε το φούρνο για μερικά
λεπτά με κλειστή την πόρτα. Γι’ αυτό
ρυθμίστε το θερμοστάτη στην επιθυμητή
θερμοκρασία και θέστε σε λειτουργία
(θέση on) το φούρνο χρησιμοποιώντας το
χρονοδιακόπτη ή το διακόπτη On/Off.
• Προετοιμάστε το τρόφιμο για ψήσιμο.
Τοποθετήστε το στη σχάρα ψησίματος ή στο
δίσκο ψησίματος.
• Για λιπαρά ή υγρά τρόφιμα χρησιμοποιήστε
το δίσκο ψησίματος ώστε να αποφύγετε τη
διαρροή λίπους ή υγρών.
• Τοποθετήστε τη σχάρα ψησίματος ή το δίσκο
στο ύψος που θέλετε. Υπάρχουν τρεις θέσεις
ύψους τοποθέτησης.
• Κλείστε την πόρτα, γυρίστε το θερμοστάτη
στην επιθυμητή θερμοκρασία και θέστε σε
λειτουργία τη συσκευή χρησιμοποιώντας
τον χρονοδιακόπτη ή το διακόπτη On/Off.
45
IM_KMO4341_180306_V05_HR.indb 45 6/3/18 2:01 pm
Page 46

Size - A5
Ελληνικά
Προσοχή
Το άνω εξωτερικό περίβλημα καθώς και τα
υπόλοιπα μέρη της συσκευής μπορεί να γίνουν
πολύ καυτά κατά τη χρήση. Κατά τη διάρκεια της
λειτουργίας και αμέσως μετά μην ακουμπάτε τις
καυτές επιφάνειες της συσκευής.
• Μπορείτε να αλλάξετε τη λειτουργία ψησίματος κατά τη διάρκεια της διαδικασίας ψησίματος.
• Όταν χρησιμοποιείτε τον χρονοδιακόπτη
τα θερμαντικά στοιχεία απενεργοποιούνται
αυτόματα μόλις περάσει ο προκαθορισμένος
χρόνος.
• Για χειροκίνητη απενεργοποίηση γυρίστε
τον χρονοδιακόπτη ή το διακόπτη On/off
στη θέση OFF.
• Για να ανοίξετε την πιθανώς καυτή πόρτα
χρησιμοποιείτε πάντα και μόνο τη λαβή πόρτας.
Προσοχή
Μπορεί να εκλυθεί κατά το άνοιγμα της
πόρτας του φούρνου. Γι’ αυτό πάντα να
ανοίγετε την πόρτα προσεκτικά.
• Χρησιμοποιήστε γάντια φούρνου ή κάποιο
πανί ή την παρεχόμενη λαβή της σχάρας
ψησίματος για να αφαιρέσετε τη σχάρα
ψησίματος ή το δίσκο. Τοποθετήστε τη
ζεστή σχάρα ψησίματος ή το ζεστό ταψί
μόνο πάνω σε μια επιφάνεια ανθεκτική στη
θερμότητα.
• Για να αφαιρέσετε τη σούβλα
χρησιμοποιείτε πάντα τη λαβή που υπάρχει.
• Αποσυνδέστε τη συσκευή από την πρίζα
μετά τη χρήση.
Προσοχή
Ανάλογα με τον τύπο και την ποιότητά του, το
φαγητό μπορεί να γίνει πολύ καυτό κατά το
ψήσιμο. Φαγητά με υψηλή περιεκτικότητα σε
νερό, όπως οι ντόματες, γίνονται ιδιαίτερα
πολύ καυτερά. Να είστε λοιπόν εξαιρετικά
προσεκτικοί όταν ψήνετε και ιδιαίτερα όταν
αφαιρείτε αυτούς τους τύπους φαγητών.
Καθαρισμος και φροντιδα
Προσοχή
Πάντα αποσυνδέετε τη συσκευή από την
πρίζα και αφήστε τη συσκευή να κρυώσει.
Πριν από κάθε καθαρισμό αποσύνδεστε
Εικ.
12
τη συσκευή από την πρίζα και αφήστε
τη να κρυώσει εντελώς.
•Με ένα υγρό πανί αφαιρέστε το λίπος
που πιθανώς έχει στάξει πάνω στα
κάτω θερμαντικά στοιχεία.
•Καθαρίστε το δίσκο ψησίματος, τη
σχάρα, τη σούβλα και τους σφιγκτήρες
με ήπιο καθαριστικό υγρό πιάτων.
•Αφαιρέστε το δίσκο για ψίχουλα
και καθαρίστε τον. Χρησιμοποιήστε
χαρτί κουζίνας για να καθαρίσετε
μεγαλύτερες ποσότητες λίπους.
•Μετά τον καθαρισμό τοποθετήστε στη
θέση του ξανά το δίσκο για ψίχουλα.
•Οι διαλύτες είναι επιβλαβείς για την
ανθρώπινη υγεία και μπορούν να
προσβάλλουν τα πλαστικά μέρη,
ενώ οι μηχανισμοί διαβρωτικού
καθαρισμού και τα εργαλεία μπορεί να
χαράξουν την(τις) επιφάνεια(-ες).
Αντικατάσταση λαμπτήρα φούρνου
Προειδοποίηση
Αφήστε το προϊόν να κρυώσει. Αποσυνδέστε
το προϊόν από την πρίζα πριν την
αντικατάσταση της λυχνίας ώστε να
αποφύγετε το ενδεχόμενο ηλεκτροπληξίας.
Αν ο φωτισμός φούρνου είναι ελαττωματικός,
πρέπει να αντικαταστήσετε τον λαμπτήρα.
Πρώτα αφαιρέστε το κάλυμμα του
Εικ.
13
λαμπτήρα και, στη συνέχεια, γυρίστε το
λαμπτήρα αριστερόστροφα. Αντικαταστήστε τον λαμπτήρα με άλλον του ίδιου
τύπου (230V 25W T300, E14).
Η τοποθέτηση γίνεται ακολουθώντας
την αντίστροφη σειρά. Βεβαιωθείτε
ότι ο λαμπτήρας και το κάλυμμα του
λαμπτήρα είναι τοποθετημένα σωστά
στη θέση τους.
46
IM_KMO4341_180306_V05_HR.indb 46 6/3/18 2:01 pm
Page 47

Ελληνικά
Χρόνοι μαγειρέματος
Λάβετε υπόψη σας τους χρόνους μαγειρέματος που εμφανίζονται στον πίνακα παρακάτω.
Αυτό είναι μόνο μια μικρή επιλογή. Περισσότερες πληροφορίες μπορείτε να βρείτε στα βιβλία
μαγειρικής. Ο χρόνος μαγειρέματος εξαρτάται από το μέγεθος και την ποσότητα του τροφίμου.
Ακολουθήστε τις οδηγίες που βρίσκονται στη συσκευασία.
Πιάτο
Σημείωση: Ο ανεμιστήρας θερμού αέρα
Λειτουργία
λειτουργεί αυτόματα με όλους τους
τρόπους λειτουργίας και δεν είναι δυνατή η
ενεργοποίησή του ή η απενεργοποίησή του.
Θερμοκρα-
σία σε °C
Χρόνος μα-
γειρέματος σε
λεπτά (μετά την
προθέρμανση)
Άνω θέρμανση με
Ψητό κοτόπουλο
με τη χρήση της
σούβλας
ενεργοποιημένη τη σούβλα
220-230 50-80
Άνω και κάτω θέρμανση με
ενεργοποιημένη τη σούβλα
Πίτσα
κατεψυγμένη
Χαβανέζικο τοστ
Μπαγκέτα
κατεψυγμένη
Μη κατεψυγμένο
κέικ
Επάνω και κάτω αντίσταση 220-230 20-40
Επάνω και κάτω αντίσταση 200-210 15-20
Επάνω και κάτω αντίσταση 220-230 10-14
Άνω και κάτω θέρμανση 180-200 25-40
Αντιμετώπιση προβλημάτων
Εάν υπάρξουν προβλήματα κατά τη λειτουργία, ανατρέξτε στον παρακάτω πίνακα. Εάν δεν είναι δυνατή
η επίλυση των προβλημάτων όπως υποδεικνύεται στη στήλη Λύση, επικοινωνήστε με τον κατασκευαστή.
Πρόβλημα Πιθανές αιτίες Λύση
Η συσκευή
δεν λειτουργεί
Η συσκευή
δεν ζεσταίνει
Η συσκευή
δεν σβήνει
(θέση off)
Η σούβλα δεν
περιστρέφεται
•Διακεκομμένη
τροφοδοσία ρεύματος
•Ο χρονοδιακόπτης
βρίσκεται στη θέση OFF
•Βλάβη στην ασφάλεια
του κεντρικού ηλεκτρικού
πίνακα του σπιτιού
•Βλάβη στην πρίζα
•Ελαττωματική συσκευή
•Υπάρχει ένα
ελαττωματικό
ηλεκτρονικό στοιχείο
•Η επιλεγμένη λειτουργία
χωρίς τη σούβλα
ενεργοποιημένη
•Η σούβλα δεν έχει τοπο-
•Ελέγξτε την τροφοδοσία
•Ρυθμίστε το χρονο- διακόπτη σε ένδειξη
χρόνου μεγαλύτερη των 0 λεπτών ή σε C
•Ελέγξτε τις ασφάλειες του κεντρικού
ηλεκτρολογικού πίνακα
•Δοκιμάστε να χρησιμοποιήσετε μια άλλη πρίζα
•Αποσυνδέστε τη συσκευή από την πρίζα και κα-
λέστε εξουσιοδοτημένο τεχνικό να την ελέγξει.
•Αποσυνδέστε τη συσκευή από την πρίζα και
καλέστε εξουσιοδοτημένο τεχνικό να την ελέγξει.
•Επιλέξτε λειτουργία με τη σούβλα
ενεργοποιημένη
•Αφαιρέστε τη σούβλα και ξανατοποθετήστε τη
σωστά
θετηθεί /ακινητοποιηθεί
σωστά
47
IM_KMO4341_180306_V05_HR.indb 47 6/3/18 2:01 pm
Page 48

Size - A5
Magyar
Biztonsági utasítások
Figyelem! Forró felület! Égésveszély! Ne
érintse meg termék forró felületeit. A használat
során hő távozik a készülékből.
•Ne működtesse a terméket külső időzítővel vagy
külön távirányítós rendszerrel.
•A terméket 8 éves és idősebb gyerekek, illetve
csökkent fizikai, érzékszervi vagy értelmi képességű
személyek, vagy akiknek nincs meg a tapasztalatuk és
tudásuk ehhez, csak akkor használhatják, ha felügyelik
őket vagy megtanították őket a termék biztonságos
használatára és tisztában vannak a veszélyekkel.
•Gyerekek nem játszhatnak a készülékkel.
•A tisztítást és karbantartást nem végezhetik
gyerekek, kivéve a 8 évnél idősebbeket, és ők is csak
megfelelő felügyelet mellett.
•A terméket és kábelét tartsa távol a 8 év alatti
gyerekektől.
•A terméket csak földelő érintkezővel (I. Osztály)
rendelkező aljzathoz szabad csatlakoztatni.
•A tápkábelt rendszeresen át kell vizsgálni sérülések
tekintetében, és amennyiben a kábel megsérült, a
terméket tilos használni.
48
IM_KMO4341_180306_V05_HR.indb 48 6/3/18 2:01 pm
Page 49

Magyar
•A termék normál háztartási mennyiség készítésére
alkalmas otthoni vagy ehhez hasonló, nem
kereskedelmi környezetben. Ilyen környezetnek
számítanak például a személyzeti konyhák
üzletekben, irodákban, illetve mezőgazdasági
célú és hasonló kisvállalkozásokban, valamint a
magánszállások, kisebb szállodák és bentlakásos
otthonok.
•A sérült áramvezetéket csak szakképzett szerelő
cserélheti, a veszélyek elkerülése érdekében.
•Minden használat után tisztítsa meg a terméket és
az összes tartozékot.
•Kövesse a Tisztítás és karbantartás fejezetben
leírt utasításokat.
49
IM_KMO4341_180306_V05_HR.indb 49 6/3/18 2:01 pm
Page 50

Size - A5
Magyar
Biztonsági utasítások
• Első használat előtt figyelmesen
olvassa el ezt a használati útmutatót.
A készülék karbantartásáról illetve
biztonságos használatáról lényeges
információkat tartalmaz.
• Tartsa meg a használati utasítást, hogy
később is fellapozhassa, ha pedig a
készüléket továbbadja, ezt is adja vele.
• Fordítson kiemelt figyelmet a
használati utasításban és a terméken
található figyelmeztetésekre.
• Csak rendeltetésszerűen használja a
készüléket. A nem rendeltetésszerű
használat veszélyeket rejt.
• A helytelen használatból származó
sérülésekért vagy meghibásodásért a
gyártó felelősséget nem vállal.
• Ha olyan kiegészítő alkatrészeket
használ, melyek nem szerepelnek a
gyártó által ajánlottak között, akkor az
a garancia elvesztésével jár, valamint
veszélyeket rejt magában.
• Bekapcsolt állapotban soha ne hagyja
felügyelet nélkül a készüléket.
• Ne helyezzen nehéz tárgyakat a
készülék tetjére.
• Soha ne merítse a készülék elektromos
alkatrészeit víz alá működtetés vagy
tisztítás közben. Soha ne tartsa
folyóvíz alá a készüléket.
• Soha, semmilyen körülmények
között ne próbálja javítani a
készüléket. Javítási vagy szervizelési
munkálatokkal a hivatásos szervizcéget keresse meg.
• Az otthonában található hálózati
feszültségnek meg kell egyeznie
a készüléken olvasható hálózati
feszültséggel.
• A készülék áramtalanításához húzza
ki a konnektorból. Ellenőrizze, hogy a
hálózati aljzat megfelelő állapotban van.
• Csak a csatlakozó kihúzása után
lehet biztos benne, hogy a készüléket
teljesen áramtalanította.
• Vigyázzon, hogy az áramvezeték
ne sérüljön, ha éles sarkokkal vagy
kiszögellésekkel kerül kapcsolatba.
• Tartsa távol a készüléket, beleértve
az áramvezetéket és a csatlakozót is,
mindenféle hőforrástól, mint például
sütők, főzőlapok, vagy más hőtermelő
készülékek/tárgyak.
• Csak a csatlakozónál fogva húzza
ki a készüléket a konnektorból. A
vezetéket ne húzza.
• A készüléket húzza ki a konnektorból,
ha nem használja, ha hibát észlel,
ha tisztítja, vagy mielőtt kiegészítő
alkatrészeket szerel fel vagy le.
• Ha az áramvezeték, vagy a készülék
külső borítása megsérül, vagy ha
leejtette, a készülék addig nem
használható, míg egy szakképzett
szerelő meg nem győződik annak
használhatóságáról.
• Csak száraz beltéri helységben
használja a készüléket, odakint soha.
• Védje a terméket az extrém
hőmérsékletektől, valamint a közvetlen
napfénytől és porosodástól is.
• Az áramütés kockázatának
csökkentése érdekében ne tegye
ki a terméket tűznek (kandalló, grill,
gyertyák, cigaretta stb.), illetve víznek
(vízcseppeknek, fröccsenő víznek, ne
használja vázák, kádak, tavak mellett
stb.).
50
IM_KMO4341_180306_V05_HR.indb 50 6/3/18 2:01 pm
Page 51

Magyar
• Vigyázat! Ne használja a terméket
víz vagy nedvesség közelében,
mint például párás pincében,
úszómedencében vagy fürdőkádban.
• Csak mérséklet égövön használja
a terméket. Kerülje a trópusi és a
különösen párás klímájú régiókat.
• Óvja a terméket minden nedvességtől,
köztük a vízpermettől és a
páratartalomtól is.
• Biztosítson elégséges szellőzést.
Ezért ne helyezzen semmilyen tárgyat
a készülékre, és tartson a falaktól a
lentiek szerint megadott távolságot:
- Oldalt: 12 cm
- Hátul: 12 cm
- Fent: 30 cm
• A készüléket nem építhető be bútorba.
A készülék nem helyezhető üzembe
közvetlenül bútorlap, konyhaszekrény
vagy szekrény alatt.
• A készülék lábai nem távolíthatók el.
• Helyezze a készüléket hő- és
fröccsenésálló felületre. Ne helyezze a
készüléket forró felületre (pl. főzőlap)
vagy nyílt lángra (pl. gázsütő).
• A termék nem érintkezhet, illetve
nem takarható le nagyon gyúlékony
anyagokkal, mint függöny, szövetek,
falak stb. Ügyeljen rá, hogy elégséges
biztonsági távolságot tartson a
gyúlékony anyagoktól.
• Ne helyezzen semmilyen tárgyat a
termékbe.
• Ez a termék nem alkalmas
kereskedelmi használatra. Csak otthoni
használatra való.
• Ne tegye a terméket sütőlapokra (gáz,
elektromos, szénkályhákra stb.).
• Tűzveszély! A kenyér és más ételek
meggyulladhatnak! Ne használja
magas cukortartalmú kenyeret, mivel
tüzet okozhat. Ne hagyja a terméket
felügyelet nélkül.
• Égésveszély! Ne érintse meg
termék forró felületeit. A terméket
csak a fogantyújánál vagy a
hőmérsékletszabályozó tárcsánál
érintse meg.
• A grillező lapok és a termék más
részei nagyon forróvá válnak. Tisztítás
vagy tárolás előtt hagyja jól lehűlni a
terméket.
• Ne érintse meg a fűtőelemeket.
• Mindig használja a morzsatálcát a
készülék használatakor.
• Az olaj és a zsír nagyon gyúlékony. Az
olaj és a zsír nem csepeghet a forró
fűtőelemekre.
51
IM_KMO4341_180306_V05_HR.indb 51 6/3/18 2:01 pm
Page 52

Size - A5
Magyar
Gratulálunk!
Köszönjük, hogy KOENIC terméket vásárolt.
Kérjük, fi gyelmesen olvassa el ezt a használati
útmutatót és tartsa meg későbbi használatra.
Rendeltetésszerű használat
A termék kizárólag ételkészítésre használható.
Minden más használat a termék károsodását
vagy sérüléseket okozhat.
Az Imtron GmbH nem vállal felelősséget a
termék nem körültekintő, illetve helytelen
használatából, valamint a gyártó által
meghatározott rendeltetéstől eltérő
használatból eredő, a készülékben vagy az
Ön értékeiben bekövetkezett károkért, vagy
személyi sérülésekért.
Az első használat előtt
Óvatosan vegye ki a terméket és az
alkatrészeket az eredeti csomagolából.
Ajánlatos az eredeti csomagolást megőrizni,
hogy abban tárolhassa a készüléket. Ha kidobja
az eredeti csomagolást, legyen tekintettel a
hatályos jogszabályokra. Ha bármilyen kérdése
van a hulladékkezeléssel kapcsolatban, lépjen
kapcsolatba a helyi hulladékkezelési központtal.
Ellenőrizze, hogy a szállított alkatrészek
hiánytalanul és épen megvannak-e. Ha a
szállított termékek hiányosak vagy sérültek,
azonnal lépjen kapcsolatba a viszonteladóval.
A kicsomagolás után a Tisztítás és
karbantartás fejeztben leírtak szerint járjon el.
A gyártási maradékanyagok eltávolításához
ételek nélkül működtesse a készüléket kb. 10
percig. Használat fejeztben leírtak szerint
járjon el. Biztosítson elégséges szellőzést, mivel
némi szag és füst képződhet. Ez veszélytelen
és hamar eltűnik.
A csomag tartalma
1 x Minisütő
1 x Sütőrács fogantyúval
1 x Sütőtepsi
1 x Nyárs kapcsokkal és fogantyúval
1 x Morzsatálca
1 x használati útmutató
Műszaki adatok
Névleges feszültség : 220 - 240 V~
Névleges teljesítmény : 1350 - 1650 W
Névleges frekvencia : 50/60 Hz
Kezelőszervek
A
Hőmérsékletszabályozó
B
Működés jelzőlámpa
C
Üzemmódválasztó
D
Időzítő / Be (C) / OFF
E
Hálózati kábel csatlakozódugasszal
F
Ajtó fogantyú
G
Nyársfogantyú
H
Rács fogantyú
I
Morzsatálca
J
Sütőrács
K
Sütőtepsi
L
Sütőajtó
M
Alsó fűtőelemek
N
Nyárs kapcsokkal
O
Tartókeret
P
Forgó meghajtó
Q
Felső fűtőelemek
R
Sütő világítása
Ne tegye ezt a készüléket a válogatás
nélküli kommunális hulladékba. Vigye el
a villamos és elektronikus készülékek
számára kijelölt WEEE gyűjtőpontba. Ha így
tesz, segít megőrizni a természeti erőforrásokat
és védi a környezetet. További információért
vegye fel a kapcsolatot az értékesítőjével vagy
a helyi hatósággal.
52
IM_KMO4341_180306_V05_HR.indb 52 6/3/18 2:01 pm
Page 53

Magyar
Üzembe helyezés
Helyezze a terméket egy sima, szilárd,
ábra
1
hőálló felületre. Vegye figyelembe
a legközelebbi csatlakozóaljzat
távolságát.
A szükséges levegőáramlás biztosításához
tartsa be a lent megadott minimális
távolságokat:
Oldalt: 12 cm
Hátul: 12 cm
Fent: 30 cm
Vigyázat
A termék nem helyezhető üzembe bútorba
építve. A termék nem helyezhető üzembe
közvetlenül bútorlap, konyhaszekrény vagy
szekrény alatt.
Helyezze be a morzsatálcát az alsó
ábra
2
fűtőelemek alá.
Csatlakoztassa a tápkábelt a megfelelő
ábra
3
hálózati aljzatba.
Használat
Hőmérséklet-szabályozás
Állítsa a kívánt hőmérsékletet
ábra
4
legfeljebb 230 °C-ra a hőmérsékletszabályozó segítségével.
Üzemmód kiválasztása
Megjegyzés:
A konvenciós ventilátor automatikusan
működik minden üzemmódban, és nem
kapcsolható be vagy ki.
Válassza ki a kívánt üzemmódot
ábra
5
az üzemmódválasztóval. Vegye
figyelembe a következő szimbólumokat
és magyarázatokat:
Ki
Felső és alsó sütés
Felső sütés
Alsó melegítés:
Felső sütés aktivált nyársakkal
Felső és alsó sütés aktivált
nyársakkal
A minisütő csak akkor kezd el működni,
ha az Időzítő vagy az On/O (Be/Ki)
kapcsoló megfelelően van beállítva.
53
IM_KMO4341_180306_V05_HR.indb 53 6/3/18 2:01 pm
Page 54

Size - A5
Magyar
Bekapcsolás – állandóan vagy időzítő
segítségével
Forgassa a vezérlőt az óramutató
ábra
6
járásának irányába egy legfeljebb 120
perces működési idő beállításához és a
sütő bekapcsolásához.
A sütő időzítő nélküli bekapcsolásához
fordítsa a vezérlőt az óramutató
járásával ellentétes irányban C állásba.
A működés jelzőlámpa piros színben
gyullad ki, és a sütő melegedni kezd.
Megjegyzés
A működés jelzőlámpa nem jelzi, hogy a sütő
melegít vagy elérte a beállított hőmérsékletet.
A működés jelzőlámpa kigyullad, ha a termék
be van kapcsolva vagy ha az időzítő be volt
állítva és a termék működik.
A beállított idő letelte után vagy a
készülék OFF (KI) állapotba kapcsolása
után a működés jelzőlámpa kialszik.
A nyárs használata
A nyárs felső és alsó sütéssel használható.
Lazítsa meg a kapocs szárnyascsavarját
ábra
7
a nyárs hegyes oldalán, és vegye le a
kapcsot.
Tolja át a nyársat a grillezendő
ábra
8
élelmiszer közepén, hogy egyforma
távolságot kapjon az élelmiszer és a
sütőelemek között.
Rögzítse az élelmiszert a nyárs közepén
ábra
9
a két kapocs segítségével. Ennek során
nyomja össze a két kapcsot, és amikor
az élelmiszer megfelelően rögzült,
húzza meg a szárnyas anyákat a
kapcsok nyárshoz rögzítéséhez.
Megjegyzés
Ügyeljen arra, hogy a grillezni kívánt élelmiszer
a nyárs közepére legyen helyezve, egyenlő
távolságra a meghajtástól és a csatornától.
ábra
10
A nyárs behelyezése:
1
Nyomja be a
nyárs kerek végét a forgó meghajtóba.
2
Ezután helyezze a nyárs másik végét
a tartókeretre.
Vegye tekintetbe a grillezni kívánt
élelmiszer méretét (pl. sült csirke).
Semmilyen helyzetben nem érintkezhet
a felső és az alsó fűtőelemekkel.
Megjegyzés:
A nyárs használatakor maximum csak 3,5 kg
súlyú csirkét használjon.
A mellékelt fogantyú segítségével
ábra
11
távolítsa el a nyársat a fordított irányú
behelyezéshez.
Sütés és grillezés
• Minden használat előtt ellenőrizze, hogy
a morzsatálca be legyen helyezve az alsó
fűtőelem alá.
• Néhány percig zárt ajtónál melegítse elő
a sütőt. Ehhez fordítsa a hőmérsékletszabályozót a kívánt hőmérsékletre, és az
időzítővel vagy a Be-/Kikapcsolóval kapcsolja
be a sütőt.
• Készítse elő az élelmiszert a sütéshez.
Helyezze a sütőrácsra vagy a sütőtepsire.
• A zsíros vagy lédús élelmiszerekhez
használja a sütőtepsit, hogy elkerülje a zsír
vagy a folyadékok lecsöpögését.
• Helyezze be a sütőrácsot vagy tepsit a
kívánt magasságba. Három behelyezési
magasság közül választhat.
• Zárja be az ajtót, fordítsa a hőmérsékletszabályozót a kívánt hőmérsékletre, és az
időzítővel vagy a be-/kikapcsolóval kapcsolja
be a terméket.
Figyelem
A termék felső burkolata és egyéb részei a
használat során nagyon felforrósodhatnak.
A használat során és közvetlenül utána ne
érintse meg a termék forró felületeit.
54
IM_KMO4341_180306_V05_HR.indb 54 6/3/18 2:01 pm
Page 55

Magyar
• A sütő üzemmód (funkció) a sütés során
módosítható.
• Az időzítő vezérlő használatával a
fűtőelemek a beállított idő elteltével
automatikusan kikapcsolnak.
• A sütő manuális kikapcsolásához fordítsa az
időzítőt / be-/kikapcsolót OFF (KI) állásba.
• A feltehetően forró ajtó kinyitásához csak a
fogantyút használja.
Figyelem
Forró gőz áramolhat ki a sütő ajtajának
kinyitásakor. Ezért mindig óvatosan nyissa ki
az ajtót.
• Használjon sütőkesztyűt vagy ruhát, vagy
a mellékelt sütórács fogantyút a sütőrács
vagy tepsi kivételekor. A forró sütőrács vagy
tepsi csak hőálló felületre helyezhető el.
• A nyárs eltávolításához használja a mellékelt
fogantyút.
• Használat után húzza ki a terméket.
Figyelem
Az étel a típusától és minőségétől függően
a grillezés során nagyon forróvá válhat. A
nagy víztartalmú ételek, mint a paradicsom,
különösen felforrósodnak. Ezért grillezéskor és
különösen ezen típusú ételeknek a grillről való
levételekor legyen nagyon körültekintő.
Tisztítás és ápolás
Figyelem
Mindig húzza ki a készüléket a hálózatból, és
hagyja lehűlni.
Minden tisztítás előtt húzza ki és
ábra
12
hagyja teljesen lehűlni a terméket.
•Egy nedves ruhával távolítsa el az alsó
fűtőelemre esetlegesen rácsöpögött
zsírt.
•Tisztítsa meg a sütőtepsit, a rácsot,
a nyársat és a kapcsokat enyhe
mosogatószerrel.
•Távolítsa el a morzsatálcát, és
tisztítsa meg. Papírtörlővel törölje le a
nagyobb mennyiségű zsírt.
•Tisztítás után helyezze vissza a
morzsatálcát.
•Az oldatok károsak lehetnek az
emberi szervezetre és a műanyag
alkatrészekre, míg a súrolószerek és
eszközök felsérthetik a felszín(eke)t.
A sütő világításának cseréje
Vigyázat
Hagyja a terméket teljesen kihűlni. A lámpa
cseréje előtt húzza ki a hálózati csatlakozót
a konnektorból, hogy elkerülje a lehetséges
áramütést.
Ha a sütő világítása nem működik, ki kell
cserélni az izzót.
Előbb vegye le a lámpa fedelét, majd
ábra
13
forgassa az izzót az óramutató járásával
ellentétesen. Cserélje ki az izzót egy
ugyanolyan típusúra (230V 25W
T300, E14). Szerelje össze a fordított
sorrendben. Ügyeljen arra, hogy az izzó
és a lámpa fedele a helyére kerüljön.
55
IM_KMO4341_180306_V05_HR.indb 55 6/3/18 2:01 pm
Page 56

Size - A5
Magyar
Főzési idő
Tekintse át a főzési időket a lenti táblázat szerint. Ez csak tájékoztató jellegű, további információ a
szakácskönyvben található. A főzési idő az élelmiszer méretétől és mennyiségétől függ. Kövesse a
csomagoláson lévő utasításokat.
Funkció
Fogás
Megjegyzés: A konvenciós ventilátor
automatikusan működik minden üzemmódban, és nem kapcsolható be vagy ki.
Hőmérséklet
°C-ban
percekben (elő-
melegítés után)
Főzési idő
Sült csirke,
nyárssal
Felső sütés aktivált nyársakkal
Felső és alsó sütés aktivált
220-230 50-80
nyársakkal
Pizza, mirelit
Haiwaii pirítós
Baguette, mirelit
Nem fagyasztott torta
Felső és alsó sütés 220-230 20-40
Felső és alsó sütés 200-210 15-20
Felső és alsó sütés 220-230 10-14
Felső és alsó sütés 180-200 25-40
Hibaelhárítás
Amennyiben üzemeltetés közben bármilyen rendellenességet tapasztal, tekintse át a következő
táblázatot. Amennyiben a probléma nem oldódik meg a Megoldás, részben foglaltak elvégzését
követően, vegye fel a kapcsolatot a forgalmazóval.
Hiba Lehetséges okok Megoldás
A készülék nem indul el
A termék nem melegszik
fel
•Megszakadt az
áramellátás
•Az időzítő OFF (KI)
állapotban van
•Biztosíték hiba
•Hálózati aljzat hiba
•Termékhiba
•Ellenőrizze az áramellátást
•Állítsa az időzítőt 0 percnél
többre vagy C állásba
•Ellenőrizze a biztosítékot
•Próbáljon ki másik hálózati aljzatot
•Húzza ki a terméket, és egy
hivatalos szervizszakemberrel
vizsgáltassa meg
A termék nem
kapcsolható ki
A nyárs nem forog
•Elektronikus elem
meghibásodása
•A kiválasztott funkció
nyárs nélkül van aktiválva
•A nyárs nem megfelelően
van behelyezve/megakadt
•Húzza ki a terméket, és egy
hivatalos szervizszakemberrel
vizsgáltassa meg
•Válasszon funkciót aktivált
nyárssal
•Vegye ki a nyársat, és helyezze
be megfelelően
56
IM_KMO4341_180306_V05_HR.indb 56 6/3/18 2:01 pm
Page 57

Italiano
Istruzioni di sicurezza
Attenzione! Superficie calda! Rischio di scottature! Non toccare le superfici calde dell’appa-
recchio. Calore emerge dal prodotto durante l’uso.
•L’apparecchio non dovrebbe essere utilizzato mediante
timer esterno o sistema di controllo remoto separato.
•Questo apparecchio può essere utilizzato da bambini
di età superiore agli 8 anni e persone con ridotte
capacità mentali, fisiche o sensoriali o prive di
esperienza e conoscenze in merito, in presenza di
altre persone che ne sorveglino l'operato o ricevano
istruzioni sull'uso dell'apparecchio in modo sicuro e
ne comprendano i pericoli.
•I bambini non devono giocare con l'apparecchio.
•Pulizia e manutenzione non deve essere eettuata
da bambini a meno che non abbiamo oltre 8 anni e
sotto supervisione.
•Tenere l'apparecchio e il cavo fuori dalla portata dei
bambini al di sotto degli 8 anni.
•Il prodotto deve essere collegato a una presa di rete
dotata di contatto di messa a terra (classe I).
•Il cavo di alimentazione deve essere ispezionato
regolarmente per verificare l'eventuale presenza di
danni; nel caso risultasse danneggiato, il prodotto
non deve essere utilizzato.
57
IM_KMO4341_180306_V05_HR.indb 57 6/3/18 2:01 pm
Page 58

Size - A5
Italiano
Istruzioni di sicurezza
•Il prodotto è progettato per la preparazione di
normali quantità in ambiente domestico, o ambienti
simili non commerciali. Ambienti comparabili a quello
domestico includono cucine per sta nei negozi,
uci, ambito agricolo o altre piccole attività o per
l’uso da parte degli ospiti presso costruzioni bed &
breakfast, piccoli hotel e strutture residenziali simili.
•Se il cavo è danneggiato, è necessario farlo
sostituire dal produttore o dall’assistenza o
personale qualificato per evitare pericoli.
•Pulire l’apparecchio e gli altri accessori dopo ciascun
utilizzo.
•Seguire le istruzioni nel capitolo Pulizia e cura.
58
IM_KMO4341_180306_V05_HR.indb 58 6/3/18 2:01 pm
Page 59

Italiano
Istruzioni di sicurezzaIstruzioni di sicurezza
• Leggere con cura questo manuale
prima dell’uso. Contiene importanti
informazioni per la sicurezza, nonché
indicazioni di funzionamento e
manutenzione.
• Conservare queste istruzioni per
uso futuro e consegnarle a terzi se il
prodotto viene consegnato a terzi.
• Fare attenzione alle avvertenze sul
prodotto e nel manuale.
• Utilizzare il dispositivo solo per lo
scopo previsto. L’uso non corretto può
portare a pericoli.
• Nel caso di utilizzo improprio o
funzionamento errato, non ci
assumiamo responsabilità dei danni
derivanti.
• L’uso di accessori e componenti
non espressamente consigliati dal
produttore può determinare lesioni e
danni e invalidare la garanzia.
• Non lasciare mai l’apparecchio
incustodito durante l’utilizzo.
• Non posizionare oggetti pesanti
sull’apparecchio.
• Non immergere mai le parti elettriche
in acqua durante la pulizia. Non tenere
mai il dispositivo sotto acqua corrente.
• Non riparare mai da soli il dispositivo.
Per assistenza e riparazioni, contattare
un centro autorizzato.
• Il voltaggio deve corrispondere alle
informazioni presenti sull’etichetta del
modello del prodotto.
• La presa è usata per scollegare il
dispositivo. Accertarsi che la presa sia
in condizioni buone.
• Scollegare la corrente tirando dalla
spina dalla presa.
• Evitare guasti del cavo di
alimentazione causati da
calpestamento o contatto con angoli
taglienti.
• Conservare il dispositivo e il cavo
di alimentazione lontano da fonti
di calore come forni, piastre e altri
dispositivi/oggetti che producono
calore.
• Tirare sempre la spina e non il cavo di
alimentazione. Non tirare mai dal cavo.
• Scollegare il dispositivo se non in uso,
prima di montare o smontare accessori
e prima di pulirlo.
• Se il cavo di alimentazione o
l’alloggiamento del prodotto sono
danneggiati o se il prodotto è caduto,
questo non deve essere utilizzato se
non prima controllato da un tecnico
autorizzato.
• Usare questo prodotto in ambienti
chiusi e mai all’aperto.
• Proteggere il prodotto da calore
esterno e da freddo nonché dalla luce
solare diretto dal sole.
• Per prevenire il rischio di incendio o di
scossa elettrica, non esporre questo
apparecchio al fuoco (focolai, griglie,
candele, sigarette ecc.) o all’acqua
(gocce, spruzzi, vasi, lavandini, laghetti
ecc.).
• Avvertenza! Non usare questo
prodotto vicino ad acqua o umidità
forte; ad es. in una cantina o accanto a
piscina o lavandino.
• Utilizzare questo prodotto solo a
latitudini temperate. Evitare regioni
climatiche tropicali e particolarmente
umide.
59
IM_KMO4341_180306_V05_HR.indb 59 6/3/18 2:01 pm
Page 60

Size - A5
Italiano
Istruzioni di sicurezza
• Proteggere questo apparecchio
dall’umidità e dagli spruzzi d’acqua.
• Assicurare una suciente circolazione
dell’aria. Quindi non posizionare oggetti
sull’apparecchio e mantenere la distanza
dalle pareti come indicato qui sotto:
- Lati: 12 cm
- Posteriore: 12 cm
- Superiore: 30 cm
• L’apparecchio non deve essere
posizionato dentro la mobilia. Il
prodotto non deve essere installato
direttamente sotto una piastra,
credenza o armadietto.
• Non rimuovere i piedini
dell’apparecchio.
• Posizionare l’apparecchio su una
superificie resistente a calore e schizzi.
Non posizionare l’apparecchio su
una superficie calda (ad es. Piano di
cottura) o fiamme aperte (ad es. cucina
a gas).
• L’apparecchio può non venire a
contatto o essere coperto da materiale
altamente infiammabile come tende,
tessuti, pareti ecc. Assicurarsi che
vi sia una distanza di sicurezza
suciente dai materiali infiammabili.
• Non inserire alcun oggetto nel
prodotto.
• Questo apparecchio non è idoneo
per uso commerciale. Esso è stato
progettato solo per uso domestico.
• Non porre l’apparecchio su superfici
calde (fornellini a gas, elettrici, a legna
ecc.).
• Pericolo di incendio! Pane e altri
alimenti possono bruciare! Non
utilizzare pane con elevato contenuto
di zucchero in quanto può provocare
incendio. Non lasciare il prodotto
incustodito.
• Rischio di scottature! Non toccare
le superfici calde dell’apparecchio.
Toccare l’apparecchio solo per la
sua impugnatura o manopola della
temperatura.
• Le piastre della griglia e altre
parti dell’apparecchio diventano
molto calde. Lasciar rareddare
completamente l’apparecchio prima di
pulirlo o conservarlo.
• Non toccare gli elementi di
riscaldamento.
• Usare sempre il vassoio per le briciole
quando l’apparecchio è in funzione.
• Olio e grasso sono facilmente
infiammabili. Olio e grasso non devono
cadere sugli elementi di riscaldamento
caldi.
60
IM_KMO4341_180306_V05_HR.indb 60 6/3/18 2:01 pm
Page 61

Italiano
Congratulazioni!
Grazie per aver acquistato un prodotto KOENIC.
Leggere questo manuale con attenzione e
conservarlo per futura consultazione.
Uso previsto
Questo prodotto è adatto solo per la
preparazione di alimenti. Qualsiasi altro utilizzo
può arrecare danni all’apparecchio o infortuni.
Imtron GmbH non si assume alcuna
responsabilità in caso di danni al prodotto, alle
cose o in caso di lesioni personali dovuti a usi
inappropriati o impropri , o per usi del prodotto
che non rispondono alle finalità indicate dal
costruttore.
Prima messa in funzione
Rimuovere accuratamente il prodotto e gli
accessori dalla confezione originale. Si consiglia
di conservare la confezione originale per
l’immagazzinamento. Se si desidera smaltire la
confezione originale, osservare le disposizioni di
legge applicabili. In caso di domande relative al
corretto smaltimento, contattare il centro locale
di gestione dei rifiuti.
Ispezionare i contenuti della consegna per
verificarne la completezza e l’eventuale
presenza di danni. Nel caso in cui il contenuto
sia incompleto o danneggiato, contattare
immediatamente il punto vendita.
Dopo il disimballaggio, fare riferimento al
capitolo sulla Pulizia e cura.
Per rimuovere i residui di produzione, far
funzionare l’apparecchio per ca. 10 min. senza
alimenti. Dopo il disimballaggio, fare riferimento
al capitolo sulla Usa. Assicurarsi che ci sia una
ventilazione suciente in quanto potrebbe
generarsi cattivo odore e fumo. Ciò è innocuo e
sparirà a breve.
Sommario
1 x mini forno
1 x griglia di cottura con maniglia
1 x teglia di cottura
1 x spiedo con manico e morsetti
1 x vassoio per briciole
1 x manuale di istruzioni
Dati tecnici
Tensione nominale : 220 - 240 V~
Potenza nominale : 1350 - 1650 W
Frequenza nominale : 50/60 Hz
Elementi di controllo
A
Controllo temperatura
B
Spia di funzionamento
C
Controllo selezione modalità
D
Timer/ On (C) / OFF
E
Cavo di alimentazione con spina
F
Maniglia sportello
G
Maniglia spiedo
H
Maniglia griglia
I
Vassoio per briciole
J
Griglia di cottura
K
Teglia di cottura
L
Sportello forno
M
Elementi del riscaldamento inferiore
N
Spiedo con pinze
O
Staa di tenuta
P
Recesso del motore
Q
Elementi del riscaldamento superiore
R
Luce del forno
Non smaltire questi apparecchi con i
rifiuti domestici. Consegnarlo presso un
punto di raccolta per il riciclo WEEE. Così
aiutate a risparmiare le risorse ed a proteggere
l’ambiente. Contattare le autorità o il rivenditore
locale per ulteriori informazioni.
61
IM_KMO4341_180306_V05_HR.indb 61 6/3/18 2:01 pm
Page 62

Size - A5
Italiano
Installazione
Posizionare il prodotto su una superficie
Fig.
1
piana, solida e resistente al calore.
Considerare la distanza alla presa di
corrente più vicina.
Per assicurare suciente circolazione d’aria,
seguire la distanza minima qui sotto indicata:
Lati: 12 cm
Retro: 12 cm
Alto: 30 cm
Avvertenza
Il prodotto non deve essere installato e
collocato su mobili. Il prodotto non deve
essere installato direttamente sotto una
piastra, credenza o armadietto.
Inserire la teglia per briciole sotto gli
Fig.
2
elementi di riscaldamento inferiori.
Collegare la spina ad una presa di
Fig.
3
alimentazione adeguata .
Usa
Controllo per temperatura
Regolare la temperatura desiderata
Fig.
4
ino a 230 °C usando il controllo
temperatura.
Selezione modalità
Nota:
La ventola di convezione del calore funziona
automaticamente con tutte le modalità e non
può essere disattivata.
Selezionare la modalità desiderata
Fig.
5
tramite il controllo della modalità di
selezione. Considerare i seguenti
simboli e spiegazioni:
Spento
Riscaldamento superiore e
inferiore
Riscaldamento superiore
Riscaldamento inferiore
Riscaldamento superiore con
spiedo attivato
Riscaldamento superiore e inferiore con spiedo attivato
Il mini forno inizia a funzionare solo
dopo che l’interruttore Timer o On/O
è impostato di conseguenza.
62
IM_KMO4341_180306_V05_HR.indb 62 6/3/18 2:01 pm
Page 63

Italiano
Accensione – permanentemente o con timer
Girare il controllo in senso orario per
Fig.
6
impostare il funzionamento fino a 120
minuti e per accendere il forno.
Per accendere il forno senza impostare
il timer, girare il controllo in senso
antiorario verso C.
La spia di funzionamento diventa rossa
e il forno si accende.
Nota
La spia di funzionamento non indica se il forno
si riscalda o se la temperatura preimpostata è
stata raggiunta. La spia di funzionamento si
accende quando si accende il prodotto oppure
quando è stato impostato il timer e il prodotto
è in funzione.
Trascorso il tempo impostato sul timer o
quando il prodotto viene OFF, la spia di
funzionamento si spegne.
Utilizzo dello spiedo
Lo spiedo può essere utilizzato sul
riscaldamento superiore e inferiore.
Allentare la vite ad alette del morsetto
Fig.
7
nella parte appuntita dello spiedo e
togliere il morsetto.
Spingere lo spiedo fino al centro
Fig.
8
dell’alimento da grigliare e arrivare
ad una distanza equa fra alimento ed
elementi di riscaldamento.
Fissare l’alimento nel centro dello
Fig.
9
spiedo usando i due morsetti. In questo
modo spingere l’uno verso l’altro
entrambi morsetti e dopo che l’alimento
è ben fissato, stringere le viti ad alette
per fissare i morsetti allo spiedo.
Nota
Accertarsi che i cibi da grigliare siano collocati
a metà dello spiedo a una distanza uguale sia
dal motore sia dal condotto.
Fig.
10
Inserimento dello spiedo: 1 Spingere la
parte appuntita dello spiedo nel recesso
del motore. 2 Quindi inserire l’altro
terminale dello spiedo sulla staa di
tenuta.
Considerare la dimensione dell’alimento
da grigliare ( ad es. pollo arrosto).
Non deve toccare gli elementi di
riscaldamento superiori o inferiori in
qualsiasi posizione.
Nota:
Quando si usa lo spiedo, usare solo polli con
peso massimo di 3,5 kg.
Usare la maniglia in dotazione per
Fig.
11
rimuovere lo spiedo nell’ordine contrario
di inserimento.
Cottura al forno e alla griglia
• Prima di ogni uso assicurarsi che il vassoio
per le briciole sia inserito sotto l’elemento di
riscaldamento inferiore.
• Preriscaldare il forno per alcuni minuti con
lo sportello chiuso. Quindi posizionare il
controllo temperatura sulla temperatura
desiderata e accendere il forno usando il
timer o l’interruttore On/o.
• Preparare l’alimento per la cottura al forno
Posizionare l’alimento sulla griglia o sul
vassoio di cottura.
• Per gli alimenti grassi o umidi, usare
il vassoio di cottura per evitare lo
sgocciolamento di grasso o liquidi.
• Inserire la griglia o la teglia di cottura
all’altezza desiderata. Sono disponibili tre
altezze di inserimento.
• Quindi posizionare il controllo temperatura
sulla temperatura desiderata e accendere il
forno usando il timer o l’interruttore On/o.
63
IM_KMO4341_180306_V05_HR.indb 63 6/3/18 2:01 pm
Page 64

Size - A5
Italiano
Attenzione
La parte superiore e altri parti del prodotto
potrebbero surriscaldarsi durante l’uso.
Durante il funzionamento e subito dopo, non
toccare le superfici calde del prodotto.
• La modalità di cottura (funzione) può essere
modificata durante il processo di cottura.
• Quando si usa il timer, gli elementi
di riscaldamento si spengono
automaticamente dopo che è scaduto il
tempo prestabilito.
• Per spegnere manualmente spegnere il
timer (On/O) e posizionarlo su OFF.
• Per aprire lo sportello possibilmente caldo,
usare solo la maniglia.
Attenzione
Potrebbe fuoriuscire del vapore caldo quando
si apre lo sportello del forno. Quindi aprire lo
sportello con cautela
Pulizia e manutenzione
Attenzione
Staccare sempre il prodotto dalla presa di
corrente e lasciarlo rareddare.
Pima di ogni pulizia togliere la pulizia e
Fig.
12
lasciar rareddare.
•Rimuovere il grasso che è
eventualmente caduto sull’elemento di
cottura inferiore con un panno umido.
•Pulire il vassoio, la griglia, lo spiedo e
i morsetti di cottura con un detersivo
media standard liquido.
•Rimuovere il vassoio per le briciole e
pulirlo. Usare strofinacci di carta per
pulire grossi quantitativi di grasso.
•Dopo la pulizia, inserire nuovamente il
vassoio delle briciole.
•I solventi sono pericolosi alla salute
umana e possono attaccare le parti in
plastica, mentre i meccanismi di pulizia
e gli utensili potrebbero graare la
superficie.
• Utilizzare presine o uno strofinaccio,
oppure la maniglia della griglia di cottura in
Sostituzione della lampadina del forno
dotazione per estrarre la griglia o teglia di
cottura. La griglia o teglia di cottura calda
deve essere collocata solo su una superficie
resistente al calore.
• Per tirare fuori lo spiedo, usare la maniglia
fornita.
• Scollegare dalla rete elettrica dopo l’uso.
Attenzione
In base al tipo e alla qualità degli alimenti, questi
potrebbero diventare molto caldi durante la
cottura. Gli alimenti con alto contenuto d’acqua,
come i pomodori, diventeranno particolarmente
caldi. Quindi fare particolarmente attenzione
quando si griglia, in particolare quando si
rimuove questo tipo di alimento..
Lasciare rareddare il prodotto. Staccare
il prodotto dalla presa di corrente prima di
sostituire la lampadina al fine di evitare la
possibilità di scosse elettriche.
Se l’illuminazione del forno si presenta
difettosa, è necessario sostituire la lampadina.
Fig.
Avviso
Rimuovere anzitutto il cappuccio
13
della lampadina, quindi ruotare
quest’ultima in senso antiorario.
Sostituire la lampadina con una dello
stesso tipo (230V 25W T300, E14).
L’installazione deve essere eseguita
nell’ordine inverso. Accertarsi che la
lampadina e il relativo cappuccio sino
collocati correttamente in posizione.
64
IM_KMO4341_180306_V05_HR.indb 64 6/3/18 2:01 pm
Page 65

Italiano
Tempi di cottura
Considerare I tempi di cottura nella tabella qui sotto. SI tratta di una piccola selezione e ulteriori
informazioni sono nei libri di ricette. Il tempo di cottura dipende dalla dimensione e quantità di
alimento. Seguire le istruzioni sulla confezione.
Piatto
Funzione
Nota: La ventola di convezione del calore
funziona automaticamente con tutte le
modalità e non può essere disattivata.
Temperatura
in °C
Tempi di cot-
tura in minuti
(dopo pre-ri-
scaldamento)
Riscaldamento superiore con spiedo
Pollo arrosto
con spiedo
attivato
Riscaldamento superiore e inferiore
220-230 50-80
con spiedo attivato
Pizza,
surgelati
Riscaldamento superiore e inferiore 220-230 20-40
Toast Haiwaii
Baguette,
surgelati
Non congelati,
torte
Riscaldamento superiore e inferiore 200-210 15-20
Riscaldamento superiore e inferiore 220-230 10-14
Riscaldamento superiore e inferiore 180-200 25-40
Risoluzione dei problemi
Se ci sono problemi durante il funzionamento, fare riferimento alla seguente tabella. Se i problemi
non possono essere risolti come indicato sotto Soluzione, si prega di contattare il produttore.
Problema Possibili cause Soluzione
Il prodotto non funziona •Alimentazione interrotta •Controllare alimentazione elettrica
Il prodotto non si scalda
•Il timer è su OFF
(SPENTO)
•Difetto del fusibile
dell’elettrodomestico
•Difetto della presa
principale
•Difetto del prodotto
•Posizionare il timer su un tempo
superiore a 0 minuti o C
•Controllare il fusibile
dell’elettrodomestico
•Cercare di usare un’altra presa
principale
•Togliere il prodotto e farlo esaminare
da un agente autorizzato per la
manutenzione
Il prodotto non si
spegne
Lo spiedo non gira
•Un elemento elettronico
è difettoso
•Funzione selezionata
senza spiedo, attivato
•Spiedo non inserito
correttamente/inceppato
•Togliere il prodotto e farlo esaminare
da un agente autorizzato per la
manutenzione
•Funzione selezionata con spiedo,
attivato
•Rimuovere lo spiedo e inserirlo
correttamente.
65
IM_KMO4341_180306_V05_HR.indb 65 6/3/18 2:01 pm
Page 66

Size - A5
Nederlands
Veiligheidsinstructies
Let op! Warm oppervlak! Risico op brandwonden! Raak de warme oppervlakken van het
apparaat niet aan. Er komt warmte af van het apparaat
tijdens de werking.
•Gebruik het product niet op een externe timer of
een apart afstandsbedieningsysteem.
•Dit product kan worden gebruikt door kinderen in de
leeftijd vanaf 8 jaar en ouder en personen met verminderde lichamelijke, zintuiglijke of geestelijke vermogens
of gebrek aan ervaring en kennis als zij onder toezicht
staan of worden geïnstrueerd over het veilige gebruik
van het product en de betrokken gevaren begrijpen.
•Kinderen mogen niet met het product spelen.
•Het reinigen en onderhoud door de gebruiker mag
niet door kinderen worden verricht, tenzij ze ouder
dan 8 jaar zijn en begeleid worden.
•Houd het product en het snoer buiten bereik van
kinderen jonger dan 8 jaar.
•Het product moet worden aangesloten op een
stopcontact met randaarde (klasse I).
•Het netsnoer moet regelmatig worden
gecontroleerd op tekenen van beschadiging en
als het snoer beschadigd is, mag het product niet
worden gebruikt.
66
IM_KMO4341_180306_V05_HR.indb 66 6/3/18 2:01 pm
Page 67

Nederlands
Veiligheidsinstructies
•Het product is ontworpen voor de bereiding
van normale hoeveelheden thuis of in
huishoudelijke niet-commerciële omgevingen zoals
personeelskeukens in winkels, kantoren, boeren- en
kleine bedrijven of door gasten bij een bed&brakfast,
kleine hotels en soortgelijke verblijfsomgevingen.
•Een beschadigde stroomkabel dient uitsluitend
te worden vervangen door bevoegde
onderhoudsinstanties om gevaar te voorkomen.
•Reinig het product en andere onderdelen na elk gebruik.
•Volg de aanwijzingen in het hoofdstuk Reiniging
en Onderhoud.
67
IM_KMO4341_180306_V05_HR.indb 67 6/3/18 2:01 pm
Page 68

Size - A5
Nederlands
Veiligheidsinstructies
• Lees deze handleiding voor het gebruik
aandachtig door. De handleiding
omvat belangrijke informatie m.b.t.
uw veiligheid en het gebruik en
serviceonderhoud van het apparaat.
• Bewaar deze voorschriften voor
toekomstige referentie en geef ze
samen met het product door.
• Neem met name de waarschuwingen
die zich op het apparaat en in deze
handleiding bevinden in acht.
• Gebruik het apparaat uitsluitend voor
de beoogde doeleinden. Oneigenlijk
gebruik kan leiden tot gevaar.
• In het geval van oneigenlijk of verkeerd
gebruik, stellen wij ons op geen enkele
wijze aansprakelijk voor eventueel
hieruit voortvloeiende schade.
• Het gebruik van accessories en
onderdelen die niet uitdrukkelijk zijn
aangeraden door de fabrikant, kan
leiden tot letsel of schade en leidt tot
de nietigheid van de garantie.
• Laat het apparaat nooit zonder
toezicht als het is ingeschakeld.
• Plaats geen zware voorwerpen op de
bovenkant van het apparaat.
• Dompel de elektrische onderdelen van
het apparaat nooit onder water tijdens
het reinigen of de bediening. Houd het
apparaat nooit onder stromend water.
• Probeer onder geen enkele
omstandigheden het apparaat zelf
te repareren. Wij verzoeken u voor
serviceonderhoud en reparaties een
bevoegde onderhoudsinstantie te
raadplegen.
• De netspanning dient overeen te
komen met de informatie die staat
vermeld op het kenplaatje van het
apparaat.
• De stroomkabel wordt gebruikt als
uitschakelapparaat. Zorg ervoor dat de
stroomkabel gemakkelijk te bedienen
is.
• Het apparaat kan uitsluitend geheel
van het voedingsnet worden
gescheiden door de stekker uit het
stopcontact te trekken.
• Vermijd schade aan de stroomkabel
door knikken of contact met scherpe
hoeken.
• Houd dit apparaat, met inbegrip van
de stroomkabel en de stekker, uit de
buurt van alle hittebronnen, zoals
bijvoorbeeld ovens, kookplaten en
andere hitteproducerende apparaten/
voorwerpen.
• Verwijder de stroomkabel uit het
stopcontact door aan de stekker te
trekken. Niet aan het snoer trekken.
• Koppel het apparaat los van het
voedingsnet als het apparaat niet
in gebruik is of als er sprake is van
storingen en alvorens accessoires te
verbinden of te verwijderen en voor
elke reinigingshandeling.
• Als de stroomkabel of de behuizing
van het apparaat is beschadigd of
als het apparaat is gevallen, dient
het apparaat niet meer te worden
gebruikt, totdat het apparaat is
onderzocht door een bevoegde
onderhoudsinstantie.
• Gebruik dit apparaat uitsluitend
op droge plaatsen en binnen, niet
geschikt voor gebruik buiten.
• Bescherm dit apparaat tegen extreme
hitte en kou, direct zonlicht en stof.
68
IM_KMO4341_180306_V05_HR.indb 68 6/3/18 2:01 pm
Page 69

Veiligheidsinstructies
Nederlands
• Om het risico van brand en elektrische
schokken te verkleinen, stel het
product niet bloot aan vuur (open
haard, grill, kaarsen, sigaretten
enzovoort) of water (waterdruppels,
waterspatten, vazen, kuipen, vijvers en
enzovoort).
• Waarschuwing! Gebruik dit apparaat
niet in de buurt van water of onder
zeer vochtige omstandigheden; bijv.
in een vochtige kelder of naast een
zwembad of badkuip.
• Gebruik dit apparaat uitsluitend bij
gematigde temperaturen. Voorkom
tropische en met name vochtige
klimaten.
• Bescherm het apparaten tegen vocht,
inclusief opspetterend water en
vochtigheid.
• Zorg voor voldoende luchtcirculatie.
Plaats daarom geen voorwerpen op
het toestel en houd de vrije ruimte
tot de muren aan zoals hieronder
aangegeven:
- Zijkanten: 12 cm
- Achterkant: 12 cm
- Bovenkant: 30 cm
• Het toestel mag niet in meubilair
worden ingebouwd. Het toestel mag
niet direct onder een plaat, een kast of
een behuizing worden geïnstalleerd.
• De pootjes van het toestel mogen niet
worden verwijderd.
• Plaats het apparaat op een hitte- en
spatbestendig oppervlak. Plaats het
toestel niet op een heet oppervlak
(bijvoorbeeld kookplaten) of open
vlammen (bijvoorbeeld gasovens).
• Het apparaat dient niet in aanraking te
komen of bedekt te worden met zeer
licht ontvlambare materialen, zoals
gordijnen, stoen, muren, enz. Wees er
zeker van dat er voldoende afstand is
tussen het apparaat en ontvlambare
materialen.
• Voer geen voorwerpen in het apparaat
in.
• Dit product is niet geschikt voor
commercieel gebruik. Het is alleen
ontworpen voor huishoudelijk gebruik.
• Plaats het apparaat niet op kookplaten
(gas, elektrisch, kolenkacheltjes, enz.).
• Brandgevaar! Brood en andere
etenswaren kunnen verbranden!
Gebruik geen brood met een hoog
suikergehalte, daar dit brandgevaar
kan opleveren. Laat het apparaat nooit
onbeheerd achter.
• Risico op brandwonden! Raak de
warme oppervlakken van het apparaat
niet aan. Hanteer het apparaat
uitsluitend m.b.v. de handgrepen of de
temperatuurdraaiknoppen.
• De grillplaten en de andere onderdelen
van het apparaat worden erg warm. Laat
het apparaat goed aoelen alvorens het
te reinigen of op te bergen.
• Raak de verwarmingselementen niet
aan.
• Gebruik altijd de kruimellade wanneer
het toestel wordt gebruikt.
• Olie en vet zijn gemakkelijk ontvlambaar.
Olie en vet mogen niet op de hete
verwarmingselementen druppelen.
69
IM_KMO4341_180306_V05_HR.indb 69 6/3/18 2:01 pm
Page 70

Size - A5
Nederlands
Gefeliciteerd!!
Bedankt voor uw aankoop van een KOENIC
product. Lees het zorgvuldig en bewaar het
voor toekomstig gebruik.
Beoogd gebruik
Met dit product kan alleen voedsel worden
bereid. Elk ander gebruik kan tot schade aan het
product of tot letsel leiden.
Imtron GmbH aanvaardt geen aansprakelijkheid voor schade aan het product, schade aan
eigendommen of lichamelijk letsel als gevolg
van onzorgvuldig of oneigenlijk gebruik van het
product, of gebruik van het product die niet voldoet aan het doel opgegeven door de fabrikant.
Voor het eerste gebruik
Verwijder het apparaat en de accessoires
voorzichtig uit de verpakking. Het is
aangeraden om de originele verpakking
te bewaren voor opslag. Als u de originele
verpakking wenst weg te gooien, dient u dit in
overeenkomst met de wettelijke bepalingen te
doen. Voor vragen over de correcte wijze van
afvalverwerking, kunt u contact opnemen met
uw lokale afvalverwerkingscentrum.
Controleer de inhoud van de verpakking op
compleetheid en schade. Indien de inhoud
incompleet of beschadigd is, dient u direct contact op te nemen met uw lokale verkooppunt.
Raadpleeg het hoofdstuk ‘Reiniging en zorg’
nadat u de verpakking heeft verwijderd.
Om productieresten te verwijderen, dient het
apparaat ca. 10 minuten lang in werking te
worden gesteld zonder etenswaren. Raadpleeg
het hoofdstuk Gebruik nadat u de verpakking
heeft verwijderd. Zorg ervoor dat er voldoende
wordt geventileerd, daar er een onaangename
geur en rook kan worden afgegeven. Dit is niet
schadelijk en verdwijnt op den duur.
Inhoud
1 x Mini-oven
1 x Bakrooster met handgreep
1 x Bakplaat
1 x Draaispit incl. klemmen en handvat
1 x Kruimellade
1 x Gebruiksaanwijzing
Bedieningselementen
Toegekende spanning : 220 - 240 V~
Toegekend ingangsvermogen : 1350 - 1650 W
Toegekende frequentie : 50/60 Hz
Bedieningselementen
A
Temperatuurregelaar
B
Controlelampje
C
Modusselectieknop
D
Timer/AAN (C)/OFF
E
Stroomsnoer met stekker
F
Deurhendel
G
Handgreep draaispit
H
Roostergreep
I
Kruimellade
J
Bakrooster
K
Bakplaat
L
Ovendeur
M
Onder-verwarmingselementen
N
Draaispit met klemmen
O
Draaispitbeugel
P
Draaispitaandrijving
Q
Boven-verwarmingselementen
R
Ovenverlichting
Gooi dit apparaat niet weg bij het
huisafval. Lever het in bij een inzamelpunt
voor de recycling van elektrische en
elektronische apparatuur. Op deze manier helpt u
bronnen te sparen en het milieu te beschermen.
Neem contact op met uw detailhandelaar of met
de lokale autoriteiten voor meer informatie.
70
IM_KMO4341_180306_V05_HR.indb 70 6/3/18 2:01 pm
Page 71

Nederlands
Installatie
Plaats het product op een vlakke,
Fig.
1
stevige en hittebestendige ondergrond.
Denk aan de afstand tot het
dichtstbijzijnde stopcontact.
Om voor voldoende luchtcirculatie te zorgen,
houd de minimale vrije afstanden aan zoals
hieronder aangegeven:
Zijkanten: 12 cm
Achterkant: 12 cm
Bovenkant: 30 cm
Waarschuwing
Het product mag niet in meubilair worden
geïnstalleerd en geplaatst. Het product mag
niet direct onder een plaat, een kast of een
behuizing worden geïnstalleerd.
Plaats de kruimellade onder de onder-
Fig.
2
verwarmingselementen.
Steek de stekker in een geschikt
Fig.
3
stopcontact.
Gebruik
Temperatuurregelaar
Stel de gewenste temperatuur
Fig.
4
in tot 230 °C met behulp van de
temperatuurregelaar.
Modusselectie
Opmerking:
De convectieventilator draait automatisch
met alle modi en kan niet worden in- of
uitgeschakeld.
Selecteer de gewenste modus met behulp
Fig.
5
van de modusselectieknop. Raadpleeg de
volgende symbolen en uitleg:
Uit
Boven- en onderwarmte
Bovenwarmte
Onderwarmte:
Bovenwarmte met draaispit
geactiveerd
Boven- en onderwarmte met
draaispit geactiveerd
De mini-oven begint te werken nadat
de Timer/On (Ann)/O (Uit)schakelaar overeenkomstig is ingesteld.
71
IM_KMO4341_180306_V05_HR.indb 71 6/3/18 2:01 pm
Page 72

Size - A5
Nederlands
Inschakelen - permanent of met behulp
van de timer
Draai de knop rechtsom om een
Fig.
6
bewerkingstijd tot 120 minuten in te
stellen en de oven in te schakelen.
Om de oven in te schakelen zonder een
tijd in te stellen, draai de knop linksom
naar C.
Het controlelampje zal rood branden en
de oven zal opwarmen.
Opmerking
Het controlelampje geeft niet aan of de oven
opwarmt of de vooraf ingestelde temperatuur
is bereikt. Het controlelampje gaat branden
wanneer het product wordt ingeschakeld of
de timer is ingesteld en het product werkt.
Na het verstrijken van de vooraf
ingestelde tijd of wanneer het product
wordt uitgeschakeld (timer naar OFF),
gaat het controlelampje uit.
Het draaispit gebruiken
Het draaispit kan worden gebruikt bij boven- en
onderwarmte.
Draai de vleugelschroef van de klem
Fig.
7
aan de puntige kant van het draaispit
los en verwijder de klem.
Duw het draaispit door het midden
Fig.
8
van het te grillen voedsel om een
gelijkmatige afstand tussen het voedsel
en verwarmingselementen te krijgen.
Bevestig het voedsel in het midden
Fig.
9
van het draaispit met behulp van de
twee klemmen. Schuif daarbij beide
klemmen naar elkaar toe en draai de
vleugelschroeven vast wanneer het
voedsel vastgezet is.
Opmerking
Zorg ervoor dat het te grillen voedsel in het
midden van het draaispit wordt geplaatst met
een gelijke afstand tot zowel de aandrijving
als het kanaal.
Fig.
10
Draaispit plaatsen: 1 Steek het
ronde uiteinde van het spit in de
draaispitaandrijvingen. 2 Zet
vervolgens het andere uiteinde van het
spit op de draaispitbeugel.
Houd rekening met de grootte van
het te grillen voedsel (bijvoorbeeld
gebraden kip). Het mag in geen
enkele stand de boven- of onderverwarmingselementen raken.
Opmerking:
Het wordt aangeraden om bij gebruik van
het draaispit alleen braadkippen tot 3,5 kg te
gebruiken.
Gebruik het meegeleverde hendel om
Fig.
11
het draaispit te verwijderen en ga in de
omgekeerde volgorde van het plaatsen
te werk.
Bakken en grillen
• Zorg vóór elk gebruik ervoor dat de kruimellade onder het onder-verwarmingselement
is geplaatst.
• Verwarm de oven met gesloten deur voor
ongeveer 5 minuten voor. Draai daarvoor
de temperatuurregelaar naar de gewenste
temperatuur en schakel de oven in met
behulp van de Timer/On/O-schakelaar.
• Bereid het te bakken voedsel voor. Leg het
voedsel op het bakrooster of de bakplaat.
• Voor vet of nat voedsel gebruik de bakplaat
om het afdruipen van vet of vloeistoen te
voorkomen.
• Plaats het bakrooster of de plaat op de
gewenste hoogte. Drie inschuioogtes zijn
beschikbaar.
• Sluit de deur, draai de temperatuurregelaar
op de gewenste temperatuur en schakel de
oven in met behulp van de Timer/On/Oschakelaar.
72
IM_KMO4341_180306_V05_HR.indb 72 6/3/18 2:01 pm
Page 73
Opgelet
De bovenkant van de behuizing en andere
delen van het product kunnen tijdens het
gebruik erg heet worden. Tijdens het gebruik
en direct daarna, raak de hete oppervlakken
van het product niet aan.
• De bakmodus (functie) kan tijdens het
bakproces worden gewijzigd.
• In de timermodus worden de
verwarmingselementen automatisch
uitgeschakeld na de ingestelde tijd.
• Voor het handmatig uitschakelen, draai de
timer/On/O-schakelaar naar de OFF (UIT)stand.
• Gebruik alleen het hendel voor het openen
van de eventueel hete deur.
Opgelet
Bij het openen van de ovendeur kan hete
stoom ontsnappen. Open daarom de deur
altijd voorzichtig.
Nederlands
Reiniging en zorg
Opgelet
Haal de stekker van het product altijd uit het
stopcontact en laat het product aoelen.
Vóór elke reiniging, trek de stekker van
Fig.
12
het product uit het stopcontact en laat
het volledig aoelen.
•Verwijder vet die eventueel op het
onder-verwarmingselement gevallen
is met een vochtige doek.
•Reinig de bakplaat, het rooster, het
draaispit en de klemmen met een
standaard mild vaatwasmiddel.
•Verwijder de kruimellade en reinig
het. Gebruik papieren handdoeken om
grotere hoeveelheden vet af te vegen.
•Plaats de kruimellade na reiniging terug.
•Oplosmiddelen zijn schadelijk voor de
gezondheid en kunnen de kunststof
onderdelen van het apparaat aantasten, terwijl schurende reinigingsmiddelen krassen kunnen veroorzaken op
het oppervlakte/de oppervlaktes.
• Gebruik ovenhandschoenen of een doek
of de meegeleverde handgreep bij het
Ovenlamp vervangen
uitnemen van het bakrooster of de bakplaat.
Een heet bakrooster of hete bakplaat mag
alleen op een hittebestendig oppervlak
worden geplaatst.
• Gebruik het hendel voor het uitnemen van
het draaispit.
• Haal na gebruik de stekker van het product
uit het stopcontact.
Opgelet
Aankelijk van de soort en kwaliteit van
het voedsel, kan het erg heet worden tijdens
het grillen. Levensmiddelen met een hoog
watergehalte, zoals tomaten, zullen vooral
erg heet worden. Wees dus erg voorzichtig bij
het grillen en vooral bij het verwijderen van
deze soorten voedsel.
Laat het product aoelen. Haal de stekker
uit het stopcontact wanneer u de lamp
vervangt om de kans op een elektrische
schok te vermijden.
Als de ovenlamp defect is, dan moet de lamp
worden vervangen.
Fig.
Waarschuwing
Verwijder eerst de lampenkap en draai
13
vervolgens de lamp linksom. Vervang
de lamp met een lamp van hetzelfde
type (230V 25W T300, E14). Het
terugzetten wordt in omgekeerde
volgorde gedaan. Zorg dat de lamp
en de lampenkap goed op hun plaats
zitten.
73
IM_KMO4341_180306_V05_HR.indb 73 6/3/18 2:01 pm
Page 74

Size - A5
Nederlands
Kooktijden
Raadpleeg de kooktijden zoals weergegeven in onderstaande tabel. Dit is slechts een kleine
selectie en verdere informatie kan in kookboeken worden gevonden. De kooktijd hangt af van de
grootte en hoeveelheid voedsel. Volg de instructies op de verpakking.
Functie
Gerecht
Opmerking: De convectieventilator
draait automatisch met alle modi en
Temperatuur
in °C
kan niet worden in- of uitgeschakeld.
Gebraden kip, met
behulp van het
draaispit
Pizza,
diepgevroren
Bovenwarmte met draaispit
geactiveerd
Boven- en onderwarmte met
220-230 50-80
draaispit geactiveerd
Boven- en onderwarmte 220-230 20-40
Kooktijd in mi-
nuten (na voor-
verwarming)
Toast Hawaï
Baguette,
diepgevroren
Niet bevroren
voedsel taart
Boven- en onderwarmte 200-210 15-20
Boven- en onderwarmte 220-230 10-14
Boven- en onderwarmte 180-200 25-40
Problemen oplossen
Als zich problemen voordoen tijdens het gebruik, raadpleeg de volgende tabel. Als problemen niet
kunnen worden opgelost zoals aangegeven onder Oplossing, neem contact op met de fabrikant.
Probleem Mogelijke oorzaken Oplossing
Het product
werktniet
Product warmtniet op
•Onderbroken
stroomvoorziening
•De timer staat in de
OFF (UIT)-stand
•Zekering in de
groepenkast is defect
•Stopcontact is defect
•Product is defect
•Controleer de stroomvoorziening
•Stel de timer in op een tijd langer dan 0
minuten of op C
•Controleer de zekering in de groepenkast.
•Probeert een ander stopcontact te gebruiken
•Haal de stekker van het product uit het
stopcontact en laat het door een erkend
servicecentrum controleren
Product kan niet
worden uitgeschakeld
Draaispit draait niet
•Een elektronisch
onderdeel is defect
•Geselecteerde
functie zonder
draaispit geactiveerd
•Haal de stekker van het product uit het
stopcontact en laat het door een erkend
servicecentrum controleren
•Kies een functie met draaispit geactiveerd
•Verwijder het draaispit en plaats het correct
•Draaispit niet correct
geplaatst/klemt
74
IM_KMO4341_180306_V05_HR.indb 74 6/3/18 2:01 pm
Page 75

Instrukcje bezpieczeństwa
Uwaga! Gorące powierzchnie! Ryzyko poparzeń! Nie dotykać gorących powierzchni pro-
duktu. W trakcie eksploatacji istnieje ryzyko nagrzania
się produktu.
•Nie należy użytkować produktu za pomocą
zewnętrznego czasomierza czy osobnego pilota.
•Produkt ten może być obsługiwany przez dzieci w wieku
od 8 lat i przez osoby o zmniejszonych możliwościach
psychicznych, sensorycznych i umysłowych czy braku
doświadczenia i wiedzy, jeśli będą pod nadzorem
lub zostaną dokładnie poinstruowane w zakresie
użytkowania produktu w bezpieczny sposób i
zrozumieją związane z tym zagrożenia.
Polski
•Nie wolno dopuszczać, aby dzieci bawiły się produktem.
•Czyszczenie i konserwacja produktu nie mogą być
dokonywane przez dzieci, o ile nie są one starsze niż
8 lat i są pod opieką.
•Produkt wraz z kablem zasilania trzymać z dala od
dzieci w wieku poniżej 8 lat.
•Urządzenie należy podłączać do gniazdka
sieciowego z uziemieniem (klasa I).
•Kable zasilania powinien być regularnie sprawdzany
pod kątem uszkodzeń i jeśli jest uszkodzony, nie
wolno używać urządzenia.
75
IM_KMO4341_180306_V05_HR.indb 75 6/3/18 2:01 pm
Page 76

Size - A5
Polski
Instrukcje bezpieczeństwa
•Urządzenie to jest przeznaczone do parzenia kawy
w ilościach typowych dla gospodarstw domowych
lub niekomercyjnych obiektów zbliżonych do
gospodarstw domowych. Obiekty zbliżone do
gospodarstw domowych obejmują kuchnie dla
personelu w sklepach, biurach, gospodarstwach
rolnych prowadzących działalność gospodarczą i
innych małych firmach, a także miejsca wyznaczone
dla gości w placówkach oferujących zakwaterowanie
ze śniadaniem, małych hotelach itp.
•Uszkodzony przewód zasilający może wymienić
wyłącznie autoryzowany agent serwisowy w celu
uniknięcia zagrożeń.
•Urządzenie i pozostałe części należy czyścić po
każdym użyciu.
•Prosimy zwracać uwagę na rozdział Czyszczenie i
pielęgnacja.
76
IM_KMO4341_180306_V05_HR.indb 76 6/3/18 2:01 pm
Page 77

Instrukcje bezpieczeństwa
Polski
• Najpierw należy uważnie przeczytać tę
instrukcję. Zawiera ona istotne informacje dotyczące bezpieczeństwa, jak też
użytkowania i konserwacji sprzętu.
• Zachować tę instrukcję na przyszłość i
przechowywać ją wraz z produktem.
• Zwrócić szczególną uwagę na ostrzeżenia na produkcie oraz te w instrukcji.
• Produkt użytkować tylko zgodnie z
jego przeznaczeniem. Niewłaściwe
użytkowanie może prowadzić do
powstawania zagrożeń.
• W przypadku niewłaściwego używania
czy złej obsługi, producent nie ponosi
odpowiedzialności za wynikłe usterki.
• Użycie akcesoriów i elementów
składowych w sposób niezgodny
z zaleceniami producenta może
spowodować uszkodzenie ciała lub
szkody materialne oraz utratę gwarancji.
• Nigdy nie pozostawiać włączonego
produktu bez nadzoru.
• Nie kłaść na produkcie żadnych
ciężkich przedmiotów.
• W trakcie czyszczenia czy użytkowania
nigdy nie zanurzać podzespołów
elektrycznych produktu w wodzie.
Nigdy nie wkładać produktu pod
strumień bieżącej wody.
• Nie próbować samemu naprawiać
produktu. W celu przeprowadzenia
obsługi i napraw należy
kontaktować się z przedstawicielem
autoryzowanego serwisu.
• Napięcie sieci zasilania musi być
zgodne z informacją o napięciu
nominalnym, znajdującą się na
tabliczce znamionowej produkt.
• Jako wyłącznik produktu służy
wtyczka zasilania. Należy upewnić się,
czy wtyczka zasilania jest sprawna.
• Tylko wyjęcie wtyczki z gniazdka
zasilania całkowicie odłącza produkt
od sieci zasilania.
• Unikać uszkodzeń kabla zasilania, które
mogą być spowodowane skręceniem
się kabla czy jego kontaktu z ostrymi
krawędziami.
• Produkt ten wraz z jego kablem
zasilania i wtyczką trzymać z dala od
wszystkich źródeł ciepła, takich jak np.:
kuchenki mikrofalowe, płyty grzejne i
inne urządzenia/obiekty wytwarzające
ciepło.
• Odłączać z gniazdka zasilania tylko
poprzez chwyt dłonią za wtyczkę. Nie
ciągnąć za kabel.
• Wyjmować wtyczkę z gniazdka, gdy
produkt nie jest używany, w przypadku
uszkodzenia, przed podłączeniem lub
odłączeniem akcesoriów oraz przed
każdym czyszczeniem.
• W przypadku uszkodzenia kabla
zasilania lub upadku samego
produktu, nie należy go używać,
zanim nie będzie sprawdzone przez
autoryzowanego przedstawiciela
serwisowego.
• Produkt użytkować tylko w suchych
pomieszczeniach, nigdy na otwartym
powietrzu.
• Produkt ten chronić przed skrajnie
wysokimi, jak i niskim temperaturami
jak też i przed bezpośrednim
działaniem promieni słonecznych i
pyłu.
• W celu zmniejszenia ryzyka pożaru i
porażenia prądem elektrycznym, nie
wystawiać produktu na działanie
ognia (kominek, grill, świece, papierosy,
itp.) czy wody (krople wody, rozbryzgi
wody, wazony, wanny, stawy, itp.).
77
IM_KMO4341_180306_V05_HR.indb 77 6/3/18 2:01 pm
Page 78

Size - A5
Polski
Instrukcje bezpieczeństwa
• Ostrzeżenie! Nie użytkować produktu
w pobliżu wody czy w pomieszczeniu
o dużej wilgotności; np. w wilgotnej
piwnicy lub obok basenu czy wanny.
• Produkt używać tylko w
umiarkowanych szerokościach
geograficznych. Unikać regionów
tropikalnych i szczególnie wilgotnych.
• Chronić produkt przed wilgocią, tj.
odpryskami wodą itp.
• Zapewnij odpowiednią cyrkulację
powietrza. W związku z tym nie należy
umieszczać żadnych przedmiotów
na urządzeniu i zachować odstęp od
ścian, jak podano poniżej:
- Boki: 12 cm
- Tył: 12 cm
- Góra: 30 cm
• Urządzenie nie powinno być
wbudowane w meble. Urządzenie nie
może być instalowane bezpośrednio
pod płytą lub szaą.
• Nóżki urządzenia nie mogą zostać
usunięte.
• Umieść urządzenie na powierzchni
odpornej na ciepło i ochlapania. Nie
należy umieszczać urządzenia na
gorącej powierzchni (np.: kuchenek)
lub przy nieosłoniętym płomieniu (np.:
kuchenek gazowych).
• Produkt nie może mieć styczności
z łatwopalnymi materiałami, np.
zasłonami, tekstyliami, ściankami
itp. ani być nimi zakrywany. Zawsze
zachować odpowiedni odstęp
bezpieczeństwa od łatwopalnych
materiałów.
• Nie wprowadzać do produktu żadnych
ciał obcych.
• Produkt ten nie nadaje się do
zastosowań komercyjnych. Jest
przeznaczony jedynie do użytkowania
w gospodarstwie domowym.
• Nie ustawiać produktu na płycie
grzewczej (gazowej, elektrycznej,
piecu węglowym itd.).
• Ryzyko pożaru! Chleb i wszystkie
inne produkty spożywcze mogą
się palić! Nie stosować chleba o
wysokiej zawartości cukru, ponieważ
może on spowodować pożar. Nigdy
nie pozostawiać uruchomionego
urządzenia bez nadzoru.
• Ryzyko poparzenia! Nie dotykać
gorących powierzchni produktu.
Zawsze chwytać go za uchwyt lub
pokrętło obrotowe.
• Płyty do grillowania oraz inne części
produktu silnie się nagrzewają.
Odczekać aż produkt ostygnie
przed jego czyszczeniem lub
przechowywaniem.
• Nie dotykaj elementów grzejnych.
• Podczas pracy urządzenia zawsze
używaj tacy na okruchy.
• Olej i tłuszcz są łatwopalne. Olej i
tłuszcz nie może kapać na gorące
elementy grzejne.
78
IM_KMO4341_180306_V05_HR.indb 78 6/3/18 2:01 pm
Page 79

Polski
Gratulacje!
Dziękujemy za zakup produktu KOENIC.
Prosimy o uważne przeczytanie tej instrukcji I
zachowanie jej na przyszłość.
Przeznaczenie
Ten produkt jest przeznaczony jedynie do
przygotowywania żywności. Jakikolwiek inny
sposób użytkowania może doprowadzić do
uszkodzenia urządzenia lub obrażeń.
Imtron GmbH bierze żadnej odpowiedzialności
za uszkodzenie produktu, szkody majątkowe
czy jakiekolwiek obrażenia ciała spowodowane
nieostrożnym użytkowaniem produktu czy
użytkowaniem produktu do celu innego niż ten
określony przez producenta.
Przed pierwszym użyciem
Produkt wraz z wyposażeniem należy ostrożnie
wyjąć z oryginalnego opakowania. Zaleca
się zachowanie oryginalnego opakowania
dla późniejszego przechowywania. W celu
wyrzucenia oryginalnego opakowania należy
postępować zgodnie z obowiązującymi
przepisamia dotyczącymi utylizacji. W
przypadku pytań dotyczących prawidłowej
utylizacji należy zasięgnać porady w miejscowej
gminie.
Zawartość opakowania należy sprawdzić
pod względem kompletności i uszkodzeń.
W przypadku braku części w opakowaniu
lub w razie stwierdzenia uszkodzeń należy
skontaktować się z punktem sprzedaży.
Po wypakowaniu urządzenia zapoznaj się z
rozdziałem Czyszczenie i pielęgnacja.
Zawartość
1 x mini piekarnik
1 x ruszt do pieczenia
1 x blacha do pieczenia
1 x rożen z zaciskami i uchwytem
1 x taca na okruchy
1 x instrukcja użytkownika
Dane techniczne
Napięcie szacunkowe : 220 - 240 V~
Szacunkowa moc wejściowa : 1350 - 1650 W
Szacunkowa częstotliwość : 50/60 Hz
Elementy kontrolne
A
Regulator temperatury
B
Lampka kontrolna
C
Pokrętło wyboru trybu
D
Wyłącznik czasowy/On (C) / OFF
E
Kabel zasilania z wtyczką
F
Rączka drzwiczek
G
Rączka rożna
H
Rączka rusztu
I
Tacka na okruchy
J
Ruszt do pieczenia
K
Blacha do pieczenia
L
Drzwiczki piekarnika
M
Dolne elementy grzejne
N
Rożen z zaciskami
O
Wspornik rożna
P
Gniazdo na rożen
Q
Górne elementy grzejne
R
Oświetlenie piekarnika
Aby usunąć pozostałości po produkcji, włączyć
produkt na ok. 10 minut bez potraw wewnątrz.
Po wypakowaniu urządzenia zapoznaj się z
rozdziałem Użytkowanie. Sprawdzić, czy
jest odpowiednia wentylacja, jako że może
pojawić się delikatny odór i trochę dymu. Jest to
nieszkodliwe i szybko zanika.
Nie wyrzucać urządzenia do ogólnego
domowego kosza na śmieci. Należy je
oddać w specjalnym punkcie zbiórki
elektrycznego i elektronicznego
przeznaczonego do recyklingu. W ten sposób
przyczynią się Państwo do redukcji zużycia
zasobów oraz do ochrony środowiska. Aby
uzyskać więcej informacji na ten temat, proszę
skontaktować się ze sprzedawcą lub
odpowiednim urzędem.
79
IM_KMO4341_180306_V05_HR.indb 79 6/3/18 2:01 pm
Page 80

Size - A5
Polski
Instalacja
Umieścić produkt na równej, solidnej
Rys.
1
i odpornej na ciepło powierzchni. Weź
pod uwagę odległość do najbliższego
gniazdka.
Aby zapewnić wystarczający przepływ
powietrza, przestrzegaj minimalnych
odstępów, jak podano poniżej:
Boki: 12 cm
Tył: 12 cm
Góra: 30 cm
Ostrzeżenie
Produkt nie może być instalowany i
umieszczany w meblach. Urządzenie nie
może być instalowane bezpośrednio pod
płytą lub szaą.
Włóż tacę na okruchy poniżej dolnych
Rys.
2
elementów grzejnych.
Włóż wtyczkę kabla zasilania
Rys.
3
do odpowiedniego gniazdka
elektrycznego.
Użytkowanie
Regulator temperatury
Ustaw żądaną temperaturę do 230 °C
Rys.
4
za pomocą regulatora temperatury.
Wybór trybu
Uwaga:
Wentylator konwekcyjny działa automatycznie
we wszystkich trybach i nie można go włączać
ani wyłączać.
Wybierz żądany tryb pracy przy pomocy
Rys.
5
pokrętła wyboru trybu. Zwróć uwagę
na następujące symbole i objaśnienia:
Wyłączony
Grzanie z góry i z dołu
Grzanie z góry
Grzanie z dołu
Grzanie z góry z włączonym
rożnem
Włączone górne i dolne grzanie
oraz rożen
Mini piekarnik zaczyna działać dopiero
po ustawieniu odpowiednio wyłącznika
czasowego lub przełącznika On/O
(WŁĄCZONY/WYŁĄCZONY).
80
IM_KMO4341_180306_V05_HR.indb 80 6/3/18 2:01 pm
Page 81

Polski
Włączanie - na stałe lub przy użyciu
wyłącznika czasowego
Przekręć pokrętło w prawo, aby ustawić
Rys.
6
czas pracy do 120 minut, i aby włączyć
piekarnik.
Aby włączyć piekarnik bez użycia
wyłącznika czasowego, przekręć
pokrętło w lewo do C.
Lampka kontrolna zaświeci się na
czerwono, a piekarnik zacznie się
nagrzewać.
Uwaga
Lampka kontrolna nie wskazuje na to, czy
piekarnik nagrzewa się lub czy żądana
temperatura została osiągnięta. Lampka
kontrolna zapala się, gdy urządzenie zostało
włączone lub gdy został ustawiony wyłącznik
czasowy i urządzenie pracuje.
Po upływie zaprogramowanego czasu
lub po wyłączeniu urządzenia (OFF),
lampka kontrolna zgaśnie.
Korzystanie z rożna
Rożen można stosować przy górnym i
dolnymogrzewaniu.
Odkręć śrubę motylkową zacisku po
Rys.
7
spiczastej stronie rożna i zdejmij zacisk.
Przepchnij rożen przez środek żywności,
Rys.
8
którą chcesz grillować tak, aby zachować
równomierną odległość między
jedzeniem, a elementami grzewczymi.
Zabezpiecz jedzenie na środku rożna za
Rys.
9
pomocą dwóch zacisków. Popchnij oba
elementy do siebie, a gdy żywność jest
odpowiednio zabezpieczona, dokręć
śruby motylkowe, aby przymocować
zaciski do rożna.
Uwaga
Upewnij się, że potrawa do grillowania jest
umieszczona na środku rożna w jednakowej
odległości zarówno od napędu, jak i od kanału.
Rys.
10
Wkładanie rożna: 1 Wepchnij
szpiczasty koniec rożna do gniazda. 2
Następnie umieść drugi koniec rożna
we wsporniku.
Zwróć uwagę na rozmiar żywności do
grillowania (np.: pieczonego kurczaka).
W żadnym przypadku nie może ona
dotykać górnego lub dolnego elementu
grzejnego.
Uwaga:
Podczas korzystania z rożna, używaj tylko
kurczaka o maksymalnej masie 3,5 kg.
Za pomocą dołączonego uchwytu
Rys.
11
wyjmij rożen, wykonując czynności
wkładania w odwrotnej kolejności
Pieczenie i grillowanie
• Przed każdym użyciem należy upewnić się,
że tacka na okruchy znajduje się poniżej
dolnego elementu grzejnego.
• Rozgrzej piekarnik przez kilka minut przy
zamkniętych drzwiczkach. Aby to zrobić,
przekręć regulator temperatury do żądanej
temperatury i włącz piekarnik za pomocą
wyłącznika czasowego lub włącznika On/
O.
• Przygotuj jedzenie do pieczenia. Umieść je
na ruszcie lub blasze do pieczenia.
• Przy mokrych lub tłustych pokarmach
używaj blachy, aby uniknąć ociekającego
tłuszczu lub soków.
• Włóż ruszt do pieczenia lub tacę na żądanej
wysokości. Dostępne są trzy wysokości.
• Zamknij drzwiczki, przekręć regulator
temperatury do żądanego ustawienia i
włącz urządzenie za pomocą wyłącznika
czasowego lub włącznik On/O.
81
IM_KMO4341_180306_V05_HR.indb 81 6/3/18 2:01 pm
Page 82

Size - A5
Polski
Ostrożnie
Górna obudowa oraz inne elementy
produktu mogą bardzo się rozgrzać podczas
użytkowania. Podczas pracy i bezpośrednio
po pieczeniu nie dotykaj gorących
powierzchni urządzenia.
• Tryb pieczenia (funkcja) może zostać
zmieniony w trakcie procesu pieczenia.
• Gdy korzystasz z wyłącznika czasowego,
elementy grzejne zostaną automatycznie
wyłączone po upływie określonego czasu.
• Aby wyłączyć urządzenie manualnie, ustaw
pokrętło wyłącznika czasowego/wyłącznika
On/O w pozycji OFF (WYŁĄCZONY).
• Aby otworzyć gorące drzwiczki użyj rączki.
Ostrożnie
Podczas otwierania drzwiczek piekarnika może
wydostać się z niego gorąca para. Zawsze
należy otwierać drzwiczki bardzo ostrożnie.
• Przy wyjmowaniu rusztu lub blachy używaj
rękawic kuchennych, ręcznika lub rączki
rusztu. Gorący ruszt lub blachę należy
stawiać na żaroodpornej powierzchni.
• Do wyciągania rożna używaj dostarczonego
uchwytu.
• Po użyciu odłącz urządzenie od prądu.
Ostrożnie
W zależności od rodzaju i jakości żywności,
może ono stać się bardzo gorące podczas
grillowania. Żywność o wysokiej zawartości
wody, jak pomidory, stanie się szczególnie
gorąca. Należy więc być bardzo ostrożnym
przy grillowaniu, a zwłaszcza przy
wyciąganiu tych rodzajów żywności.
Czyszczenie i konserwacja
Ostrożnie
Zawsze należy odłączyć urządzenie od
gniazdka zasilania i pozwolić, aby ostygło.
Przed każdym czyszczeniem należy
Rys.
12
odłączyć urządzenie i pozostawić do
ostygnięcia.
•Usuń tłuszcz, który prawdopodobnie
spadł na dolny element grzejny za
pomocą wilgotnej ściereczki.
•Wyczyść blachę do pieczenia, ruszt,
rożen i zaciski łagodnym, normalnym
płynem do mycia naczyń.
•Wyjmij tacę na okruchy i oczyścić
ją. Użyj ręczników papierowych, aby
zetrzeć większe ilości tłuszczu.
•Po jej wyczyszczeniu, włóż z
powrotem tacę na okruchy.
•Rozpuszczalniki są szkodliwe dla
zdrowia ludzkiego i mogą uszkodzić
plastikowe części; silne środki i
przybory do czyszczenia mogą
natomiast porysować powierzchnię.
Wymiana żarówki w piekarniku
Ostrzeżenie
Pozwól urządzeniu ostygnąć. Aby uniknąć
porażenia prądem, wyłącz urządzenie przed
wymianą żarówki.
Jeśli oświetlenie piekarnika jest uszkodzone,
należy wymienić żarówkę.
Najpierw zdejmij pokrywę lampy, a
Rys.
13
następnie wykręć żarówkę kręcąc
w lewo. Wymień ją na żarówkę
tego samego typu (230V 25W
T300, E14). Montaż wykonuje się
w odwrotnej kolejności. Upewnij
się, że żarówka i pokrywa lampy są
prawidłowo umieszczone na swoim
miejscu.
82
IM_KMO4341_180306_V05_HR.indb 82 6/3/18 2:01 pm
Page 83

Polski
Czas gotowania
Zwróć uwagę na czasy gotowania jakie podano w poniższej tabeli. Jest to tylko mała próbka i
więcej informacji można znaleźć w książkach kucharskich. Czas gotowania zależy od wielkości i
ilości żywności. Proszę postępować według wskazówek znajdujących się na opakowaniu.
Danie
Funkcja
Uwaga: Wentylator konwekcyjny
działa automatycznie we wszystkich
trybach i nie można go włączać ani
wyłączać.
Temperatura
w °C
Czas gotowania
w minutach
(po rozgrzaniu
piekarnika)
Grzanie z góry z włączonym
Pieczony kurczak
z rożna
rożnem
Włączone górne i dolne
220-230 50-80
grzanie oraz rożen
Pizza, głęboko
zamrożona
Grzanie z góry i z dołu 220-230 20-40
Grzanka Hawaii
Bagietka, głęboko
zamrożona
Nie zamrożone
ciasta
Grzanie z góry i z dołu 200-210 15-20
Grzanie z góry i z dołu 220-230 10-14
Grzanie z góry i z dołu 180-200 25-40
Wykrywanie i usuwanie usterek
Jeśli istnieją jakiekolwiek problemy podczas użytkowania, należy zapoznać się z poniższą tabelą.
Jeśli problemów nie można rozwiązać według wskazań w kolumnie Rozwiązanie, należy
skontaktować się z Producentem.
Problem Możliwa przyczyna Rozwiązanie
Produkt nie działa •Przerwanie zasilanie •Sprawdź zasilanie
Produkt nie
nagrzewa się
•Wyłącznik czasowy jest w
pozycji OFF (WYŁĄCZONY)
•Awaria bezpiecznika w
mieszkaniu/domu
•Gniazdko jest uszkodzone
•Awaria urządzenia
•Ustaw wyłącznik czasowy na czas
dłuższy niż 0 minut lub C
•Sprawdź bezpiecznik w mieszkaniu/
domu
•Spróbuj użyć innego gniazdka
elektrycznego
•Odłącz urządzenie od zasilania i niech
sprawdzi go autoryzowany serwisant
Urządzenia nie
można wyłączyć
Rożen nie obraca
się
•Element elektroniczny jest
uszkodzony
•Włączona jest funkcja bez
rożna
•Rożen został nieprawidłowo
•Odłącz urządzenie od zasilania i niech
sprawdzi go autoryzowany serwisant
•Wybierz funkcję z rożnem
•Wyjmij rożen i włóż go poprawnie
włożony/blokuje się
83
IM_KMO4341_180306_V05_HR.indb 83 6/3/18 2:01 pm
Page 84

Size - A5
Português
Instruções de segurança
Cuidado! Superfície quente! Risco de queimadura! Não toque nas superfícies quentes do
aparelho. O aparelho emana calor durante o seu funcionamento.
•Não opera o produto através de um temporizador
externo ou sistema de controlo remoto separado.
•Este produto pode ser utilizado por crianças com mais
de 8 anos e por pessoas com capacidades físicas,
sensoriais ou mentais reduzidas ou sem experiência,
se forem supervisionadas ou instruídas relativamente
à utilização segura do produto e se compreenderem os
perigos envolvidos.
•As crianças não devem brincar com o produto.
•A limpeza e manutenção de utilização não devem ser
executadas por crianças, a menos que tenham mais
de 8 e recebam supervisão.
•Mantenha o produto e o respectivo cabo for a do
alcance das crianças com menos de 8 anos.
•O produto deve ser ligado a uma tomada com
contacto de ligação à terra (classe I).
•O cabo de alimentação deve ser inspecionado
regularmente relativamente a sinais de danos e,
em caso de danos no cabo, o produto não pode ser
usado.
84
IM_KMO4341_180306_V05_HR.indb 84 6/3/18 2:01 pm
Page 85

Português
Instruções de segurança
•O produto está conceibdo para a prepração de
quantidades normais domésticas, numa habitação
ou em ambientes semelhantes a habitações, não
comerciais. Os ambientes semelhantes a habitações,
incluem copas em lojas, escritórios, negócios
agrícolas e outros pequenos negócios ou para
ser utilizado por hóspedes em estabelecimentos
de cama e pequeno-almoço, pequenos hotéis e
instalações residenciais semelhantes.
•Para evitar perigos, um cabo de alimentação
danificado só pode ser substituído pelo agente de
serviços autorizado.
•Limpe o aparelho e os respectivos acessórios após
cada utilização.
•Siga as instruções no capítulo Limpeza e manutenção.
85
IM_KMO4341_180306_V05_HR.indb 85 6/3/18 2:01 pm
Page 86

Size - A5
Português
Instruções de segurança
• Leia este manual na íntegra antes de
utilizar o produto pela primeira vez.
Contém informações importantes
para sua segurança, bem como
para a utilização e manutenção do
equipamento.
• Mantenha estas instruções para
referência futura e transmita-as
juntamente com o produto.
• Tome especial atenção aos avisos
que se encontram no produto e neste
manual.
• Utilize o produto apenas para a
finalidade a que se destina. A utilização
incorrecta poderá conduzir a perigos.
• No caso de funcionamento
inadequado ou incorrecto, não
aceitamos qualquer responsabilidade
pelos danos resultantes.
• A utilização de acessórios e
componentes não recomendados
expressamente pelo fabricante poderá
resultar em ferimentos ou danos e
anula r a garantia.
• Nunca deixe o produto sem supervisão
enquanto estiver ligado.
• Não coloque objectos pesados sobre o
produto.
• Nunca mergulhe peças eléctricas do
produto na água durante a respectiva
limpeza ou funcionamento. Nunca
segure o produto debaixo de chuva.
• Não tente, em nenhuma circunstância,
reparar o produto sozinho. Para serviço
e reparações, consulte um agente de
serviços autorizado.
• A tensão do sector tem de
corresponder às informações na
etiqueta de classificação do produto.
• O cabo de alimentação é utilizado
como dispositivo de desligamento.
Certifique-se de que o cabo de
alimentação se encontra em condições
de funcionamento.
• Só desligando da tomada é que
é possível separar o produto
completamente da rede.
• Evite danos no cabo de alimentação
que possam ser originados por nós
ou pelo contacto com extremidades
pontíagudas.
• Mantenha este produto, incluindo o cabo
de alimentação, longe de todas as fontes
de calor como, por exemplo, fornos,
placas quentes e outros dispositivos/
objectos que produzam calor.
• Desligue apenas o cabo de
alimentação através da respectiva
ficha. Não puxe o cabo.
• Desligue o produto quando este não
estiver a ser utilizado, em caso de
funcionamento incorrecto, antes de
ligar ou remover acessórios e antes de
cada limpeza.
• Se o cabo de alimentação ou a caixa
do produto estiver danificado ou se o
produto cair, não poderá ser utilizado
antes de ser examinado por um agente
de serviços autorizado.
• Utilize este produto apenas em áreas
internas e secas e nunca no exterior.
• Proteja este produto do calor e frios
extremos e da luz solar directa e poeira.
• Para reduzir o risco de incêndio e choque
eléctrico, não exponha o produto a
chamas (lareira, grelha, velas, cigarros,
etc.) ou à água (pingos de água, salpicos
de água, copos, tubos, tanques, etc.).
86
IM_KMO4341_180306_V05_HR.indb 86 6/3/18 2:01 pm
Page 87

Instruções de segurança
Português
• Aviso! Não utilize este produto
próximo da água ou elevada humidade;
por exemplo, numa cave húmida ou ao
lado de uma piscina ou banheira.
• Utilize este aparelho apenas em climas
temperados. Evite regiões tropicais e
especialmente húmidas.
• Proteja este aparelho de toda a
humidade, incluindo água pulverizada.
• Certifique-se de que existe circulação
de ar suficiente. Deste modo, não
coloque nenhum objeto no aparelho e
mantenha uma distância das paredes,
conforme abaixo:
- Lados: 12 cm
- Parte posterior: 12 cm
- Parte superior: 30 cm
• O aparelho não deve ser colocado
sobre móveis. O aparelho não pode ser
instalado diretamente abaixo de uma
placa, armário ou móvel.
• Os pés do aparelho não devem ser
removidos.
• Coloque o aparelho numa superfície
resistente ao calor e salpicos. Não
coloque o aparelho em superfícies
quentes (por ex., placas) ou chamas
abertas (por ex., fornos a gás).
• O aparelho não deve entrar em
contacto com, ou ser coberto por,
materiais altamente inflamáveis,
como cortinas, têxteis, paredes, etc.
Certifique-se de que existe uma
distância de segurança adequada para
materiais inflamáveis.
• Não insira quaisquer objectos no
aparelho.
• Este produto não é adequado para uso
comercial. Foi concebido apenas para
uso doméstico.
• Não coloque o aparelho sobre placas
de fogão (gás, eléctrico, carvão, etc.).
• Perigo de incêndio! Pão e outros
alimentos podem arder! Não utilize pão
com alto teor de açúcar dado que isto
poderá provocar um incêndio. Nunca
deixe o aparelho sem supervisão.
• Risco de queimadura! Não toque
nas superfícies quentes do aparelho.
Toque no aparelho apenas pela pega
ou pelo botão de temperatura.
• As placas de grelha e outras partes do
aparelho ficam muito quentes. Deixe
o aparelho arrefecer antes de o limpar
ou guardar.
• Não toque nos elementos de
aquecimento.
• Use sempre o tabuleiro de migalhas
quando estiver a operar o aparelho.
• O óleo e a gordura são facilmente
inflamáveis. O óleo e a gordura não
podem escorrer para os elementos de
aquecimento quentes.
87
IM_KMO4341_180306_V05_HR.indb 87 6/3/18 2:01 pm
Page 88

Size - A5
Português
Parabéns!
Agradecemos a aquisição de um aparelho
KOENIC. Leia este manual cuidadosamente e
guarde-o para consultas futuras.
Finalidade de utilização
Este produto é adequado apenas para preparar
alimentos.. Qualquer outra utilização poderá
resultar em danos no aparelho ou lesões
pessoais.
A Imtron GmbH não se responsabiliza por danos
ao produto, danos a propriedade ou ferimentos
pessoais devido a negligência ou utilização
indevida do produto, ou utilização do produto
fora da finalidade especificada pelo fabricante.
Antes de utilizar pela primeira vez
Remova o produto e os acessórios com
cuidado da embalagem original. Recomendase que guarde a embalagem original para
armazenamento. Se pretender eliminar a
embalagem original, cumpra os regulamentos
legais aplicáveis. Se tiver qualquer questão
relativamente à eliminação correcta, contacte o
seu centro de gestão de resíduos local.
Inspeccione o conteúdo fornecido e verifique
se está completo e sem danos. Se o conteúdo
fornecido estiver incompleto ou com danos,
contacte imediatamente o seu ponto de venda.
Depois de desembalar, consulte o capítulo
Limpeza e cuidado.
Para remover resíduos de película, ligue o
aparelho durante cerca de 10 minutos sem
alimentos. Depois de desembalar, consulte
o capítulo Utilização. Certifique-se de que
existe ventilação suficiente ou poderá ocorrer
um ligeiro odor ou fumo. Estes são inofensivos
e desaparecerão rapidamente.
Conteúdo
1 x Mini-forno
1 x Grelha de cozedura com pega
1 x Tabuleiro de cozedura
1 x Churrasqueira incl. pinças e pega
1 x Tabuleiro de migalhas
1 x Manual de instruções
Dados técnicos
Tensão nominal : 220 - 240 V~
Potência de entrada nominal : 1350 - 1650 W
Frequência nominal : 50/60 Hz
Elementos de controlo
A
Controlo de temperatura
B
Luz de indicação de funcionamento
C
Controlo de seleção do modo
D
Temporizador/Ligação (C) / OFF
E
Cabo de alimentação com ficha
F
Pega da porta
G
Pega da churrasqueira
H
Pega da grelha
I
Tabuleiro de migalhas
J
Grelha de cozedura
K
Tabuleiro de cozedura
L
Porta do forno
M
Elementos de aquecimento inferior
N
Churrasqueira com pinças
O
Suporte de retenção
P
Unidade do recetáculo
Q
Elementos de aquecimento superior
R
Iluminação do forno
Não elimine o aparelho no lixo doméstico
não separado. Retorne-o a um ponto de
recolha destinado à reciclagem de lixo
electrónico (WEEE). Dessa forma, estará
ajudando a preservar recursos e proteger o
meio ambiente. Para mais informações, entre
em contacto com o seu revendedor ou as
autoridades locais.
88
IM_KMO4341_180306_V05_HR.indb 88 6/3/18 2:01 pm
Page 89

Português
Instalação
Coloque o produto numa superfície
Fig.
1
plana, sólida e resistente ao calor.
Considere a distância até à próxima
tomada.
Para garantir uma circulação de ar suficiente,
siga os espaços mínimos como descrito abaixo:
Lados: 12 cm
Parte posterior: 12 cm
Parte superior: 30 cm
Aviso
O produto não pode ser instalado e colocado
em móveis. O produto não pode ser instalado
diretamente abaixo de uma placa, armário ou
móvel.
Insira o tabuleiro de migalhas por baixo
Fig.
2
dos elementos de aquecimento inferior.
Ligue a ficha de alimentação a uma
Fig.
3
tomada adequada.
Utilização
Controlo de temperatura
Ajuste a temperatura pretendida
Fig.
4
até 230 °C usando o controlo de
temperatura.
Seleção de modo
Nota:
A ventoinha de convecção funciona
automaticamente com todos os modos e não
pode ser ligada nem desligada.
Selecione o modo pretendido usando o
Fig.
5
controlo de seleção de modo. Considere
os seguintes símbolos e explicações:
Desligar
Aquecimento superior e inferior
Aquecimento superior
Aquecimento inferior
Aquecimento superior com churrasqueira ativada
Aquecimento superior e inferior
com churrasqueira ativada
O mini-forno começa a funcionar
apenas após o interruptor
Temporizador ou On (Ligado)/O
(Desligado) estar ajustado.
89
IM_KMO4341_180306_V05_HR.indb 89 6/3/18 2:01 pm
Page 90

Size - A5
Português
Ligar – permanentemente ou usando o
temporizador
Rode o controlo no sentido dos
Fig.
6
ponteiros do relógio para definir um
tempo de funcionamento de até 120
minutos e para ligar o forno.
Para ligar o forno sem definir o tempo,
rode o controlo no sentido contrário ao
dos ponteiros do relógio para C.
A luz de indicação de funcionamento
acende uma luz vermelha e o forno
começa a aquecer.
Nota
A luz de indicação de funcionamento não
indica se o forno está a aquecer ou se a
temperatura predefinida foi atingida. A luz de
indicação de funcionamento acende quando o
produto é ligado ou o temporizador é definido
e o produto está a funcionar.
Quando o tempo predefinido expirar ou
quando rodar o botão OFF (DESLIGAR)
do produto, a luz de indicação de
funcionamento apagará.
Utilizar a churrasqueira
A churrasqueira pode ser usada no
aquecimento superior e inferior.
Desaperte o parafuso de orelhas da
Fig.
7
pinça no lado marcado da churrasqueira
e retire a pinça.
Empurre a churrasqueira para o meio
Fig.
8
da grelha da comida para obter uma
distância uniforme entre a comida e os
elementos de aquecimento.
Coloque a comida no meio da
Fig.
9
churrasqueira usando as duas pinças.
Ao fazê-lo, empurre ambas as pinças
juntas e, quando a comida estiver
devidamente fixa, aperte os parafusos
de orelhas para fixar as pinças na
churrasqueira.
Fig.
10
Inserir a churrasqueira: 1 Empurre a
extremidade redonda do espeto para a
unidade do recetáculo. 2 Em seguida,
coloque a outra extremidade do espeto
no suporte de fixação
Considere o tamanho dos alimentos
para grelhar (por ex., frango assado).
Não deverão tocar nos elementos de
aquecimento superior e inferior em
nenhuma posição.
Nota:
Ao usar a churrasqueira, use apenas frangos
com um peso máximo de 3,5 kg.
Use a pega fornecida para remover a
Fig.
11
churrasqueira pela ordem inversa de
inserção.
Cozer e grelhar
• Antes de cada utilização, certifique-se de
que o tabuleiro de migalhas está inserido
abaixo do elemento de aquecimento inferior.
• Pré-aqueça o forno durante alguns minutos
com a porta fechada. Deste modo, rode o
controlo de temperatura para a temperatura
pretendida e ligue o forno usando o
temporizador ou o interruptor Ligar/Desligar.
• Prepare os alimentos para cozer. Coloqueos na grelha de cozedura ou tabuleiro de
cozedura.
• Para alimentos gordos ou húmidos, use
o tabuleiro de cozedura para evitar que a
gordura ou líquidos escorram.
• Insira a grelha de cozedura ou o tabuleiro na
altura pretendida. Estão disponíveis três alturas
de inserção.
• Feche a porta, rode o controlo de
temperatura para a temperatura pretendida
e ligue o produto, usando o temporizador ou
o interruptor Ligar/Desligar.
Nota
Certifique-se de que os alimentos para grelhar
são colocados no dentro da churrasqueira com
uma distância igual para a unidade e o canal.
90
IM_KMO4341_180306_V05_HR.indb 90 6/3/18 2:01 pm
Page 91

Atenção
O suporte superior e as outras peças do
produto poderão ficar muito quentes durante
a utilização. Durante o funcionamento e
imediatamente a seguir não toque nas
superfícies quentes do produto.
• O modo de cozedura (função) pode ser
alterado durante o processo de cozedura.
• Ao usar o controlo do temporizador,
os elementos de aquecimento são
automaticamente desligados depois de o
tempo predefinido expirar.
• Para desligar manualmente, rode o
interruptor do temporizador/Ligar/desligar
para a posição OFF (DESLIGAR).
• Para abrir a porta possivelmente quente, use
apenas a pega.
Atenção
Poderá ser emitido vapor quente quando
abrir a porta do forno. Assim, abra sempre a
porta com cuidado.
• Use luvas de forno, panos ou a pega de
grelha fornecida quando retirar a grelha
ou tabuleiro de cozedura. Uma grelha ou
tabuleiro de cozedura quente só deve ser
colocado numa superfície resistente ao
calor.
• Para retirar a churrasqueira, use a pega
fornecida.
• Retire a ficha do produto da tomada depois
de usar.
Atenção
Dependendo do tipo e qualidade dos alimentos,
poderá ficar bastante quente durante a grelha.
Os alimentos com um teor de água elevado, tais
como, tomates, ficarão especialmente muito
quentes. Deste modo, tenha bastante cuidado
quando grelhar e, especialmente, quando
remover estes tipos de alimentos.
Português
Limpeza e manutenção
Atenção
Retire sempre a ficha do produto da tomada
e deixe-o arrefecer.
Antes de cada limpeza, retire a ficha do
Fig.
12
produto da tomada e deixe-o arrefecer.
•Remova a gordura que possa ter escorrido para o elemento de aquecimento
inferior com um pano húmido.
•Limpe o tabuleiro de cozedura, grelha
de cozedura, churrasqueira e pinças
com um detergente de loiça suave.
•Remova o tabuleiro de migalhas e limpe-
-o. Use papel de cozinha para retirar as
quantidades maiores de gordura.
•Depois de limpar, insira novamente o
tabuleiro de migalhas.
•Os solventes são prejudiciais à saúde
humana e podem danificar as peças
de plástico, enquanto os materiais e
instrumentos de limpeza abrasivos
podem deixar riscos na(s) superfície(s).
Substituição da luz do forno
Aviso
Deixe o produto arrefecer. Retire a ficha
do produto da tomada de alimentação
antes de substituir a lâmpada, para evitar a
possibilidade de choque elétrico.
Se a iluminação for forno possuir um defeito,
terá de substituir a lâmpada.
Remova primeiro o casquilho da
Fig.
13
lâmpada e, em seguida, rode a
lâmpada no sentido contrário ao dos
ponteiros do relógio. Volte a colocar
o casquilho com uma lâmpada do
mesmo tipo (230V 25W T300,
E14). A instalação é executada pela
ordem inversa. Certifique-se de que a
lâmpada e o casquilho estão colocados
corretamente.
91
IM_KMO4341_180306_V05_HR.indb 91 6/3/18 2:01 pm
Page 92

Size - A5
Português
Tempos de cozedura
Considere os tempos de cozedura indicados na tabela abaixo. Trata-se apenas de uma pequena
seleção e poderá encontrar mais informações nos livros de culinária. O tempo de cozedura depende
do tamanho e quantidade de alimentos. Siga as instruções na embalagem.
Prato
Função
Nota: A ventoinha de convecção
funciona automaticamente com todos
os modos e não pode ser ligada nem
Temperatura
em °C
Tempo de coze-
dura em minutos
(após pré-aqueci-
desligada.
Frango assado,
usando a
churrasqueira
Pizza, ultra
congelada
Torrada
Havaiana
Baguete, ultra
congelada
Bolo não
congelado
Aquecimento superior com
churrasqueira ativada
Aquecimento superior e inferior
220-230 50-80
com churrasqueira ativada
Aquecimento superior e inferior 220-230 20-40
Aquecimento superior e inferior 200-210 15-20
Aquecimento superior e inferior 220-230 10-14
Aquecimento superior e inferior 180-200 25-40
mento)
Resolução de problemas
Se houver algum problema durante o funcionamento, consulte a tabela seguinte. Se os problemas
não forem solucionados conforme indicado em Solução, contacte o seu fabricante.
Problema Causas possíveis Solução
O produto não
funciona
O produto não aquece
Não é possível
desligar o produto
A churrasqueira não
gira
•Fonte de alimentação
interrompida
•O temporizador está
na posição OFF
(DESLIGADO)
•Fusível com defeito
•Tomada de alimentação
com defeito
•Produto com defeito
•Defeito num elemento
eletrónico
•Função selecionada sem a
churrasqueira ativada
•Churrasqueira inserida
incorretamente/encravada
•Verifique a fonte de alimentação
•Defina o Temporizador para mais de 0
minutos ou C
•Verifique o fusível
•Tente usar outra tomada de alimentação
•Retire a ficha do produto da tomada
e solicite a um agente de reparação
autorizado que o examine
•Retire a ficha do produto da tomada
e solicite a um agente de reparação
autorizado que o examine
•Função selecionada com a
churrasqueira ativada
•Remova a churrasqueira e insira-a
corretamente
92
IM_KMO4341_180306_V05_HR.indb 92 6/3/18 2:01 pm
Page 93

Svenska
Säkerhetsinstruktioner
Varning! Het yta! Risk för brännskador!
Värme stiger från produkten under användning.
•Använd inte produkten med en extern timer eller ett
separat ärrstyrt kontrollsystem.
•Denna produkt kan användas av barn över 8 års ålder
och personer med reducerad fysisk, sensorisk eller
mental hälsa eller saknar erfarenhet och kunskap om
de har fått instruktion eller övervakas beträande
produktens användning på ett säkert sätt samt förstår
risken förknippade med detta.
•Barn ska inte leka med produkten.
•Rengöring och användarskötsel ska inte göras av barn
om de inte är över 8 år samt sker under överinseende.
•Håll produkten och dess sladd oåtkomligt för barn
under 8 år.
•Produkten skall anslutas till ett uttag som är jordat
(klass I).
•Den medföljande kabeln skall regelbundet
kontrolleras om det finns tecken på skador och om
kabeln är skadad skall inte produkten användas.
93
IM_KMO4341_180306_V05_HR.indb 93 6/3/18 2:01 pm
Page 94

Size - A5
Svenska
Säkerhetsinstruktioner
•Produkten är avsedd för att förbereda normala
hushållsmängder i hemmet, eller i hushållslika
ickekommersiella miljöer. Hushållslika miljöer är t.ex.
personalkök i aärer, kontor, jordbruk och andra
mindre företag, eller för användning av gäster hos
bed-and-breakfast-anläggningar, små hotell eller
liknande bostadsanläggningar.
•En skadad nätsladd får bara ersättas av en
auktoriserad serviceagentur för att förhindra skador.
•Rengör produkten och alla andra tillbehör efter varje
användning.
•Följ instruktionerna i kapitlet Rengöring och skötsel.
94
IM_KMO4341_180306_V05_HR.indb 94 6/3/18 2:01 pm
Page 95

Svenska
SäkerhetsinstruktionerSäkerhetsinstruktioner
• Läs denna bruksanvisning nogrant
före användning. Den innehåller
viktig information om din säkerhet
liksom om användning och skötsel av
utrustningen.
• Spara dessa anvisningar för framtida
referens och lämna den vidare med
produkten.
• Var uppmärksam på varningarna på
produkten och i denna bruksanvisning.
• Använd bara produkten för dess
avsedda användning. Olämplig
användning kan orsaka skador.
• Vid felaktig användning eller
felfunktion, ansvarar vi inte för några
skador orsakade av detta.
• Användning av tillbehör och delar
ej uttryckligen rekommenderade av
tillverkaren kan orsaka skador och
annulera garantin.
• Lämna aldrig produkten utan uppsikt
när den är påslagen.
• Placera inga tunga objekt ovanpå
produkten.
• Doppa aldrig ner elektriska delar i
vatten i samband med rengöring
eller under användning. Håll aldrig
produkten under rinnande vatten.
• Under inga omständigheter försök
reparera din produkt på egen hand.
För service och reparation kontakta en
auktoriserad service agentur.
• Nätspänningen måste stämma med
informationen som anges på etiketten
på produkten.
• Nätkontakten används som
urkopplingsenhet. Se till att kontakten är
i funktionsdugligt tillstånd.
• Det är bara genom att dra ut
kontakten från uttaget som produkten
kan helt kopplas bort från huvudnätet.
• Undvik skador på nätsladden som kan
orsakas av knutar eller kontakt med
skarpa hörn.
• Håll produkten inklusive nätsladden
och kontakten borta från alla
värmekällor som t ex ugnar,
värmeplattor och andra varma objekt/
föremål.
• Dra bara ut kontakten från
vägguttaget med kontakten själva. Dra
inte i nätsladden.
• Dra först ut nätkontakten innan
tillbehör monteras eller tas bort och
före rengöring samt vid felfunktion.
• Om kontakten eller höljet på produkten
är skadat eller om produkten tappats
får produkten inte användas innan
den kontrollerats av en auktoriserad
service representant.
• Använd bara denna produkt inomhus
och aldrig utomhus.
• Skydda produkten mot extrem värme
och kyla liksom från direkt solljus och
damm.
• För att minska risken för brand och
elektrisk stöt, utsätt inte produkten
för eld (öppen spis, grill, ljus, cigaretter
osv) eller vatten (vattendroppar,
vattenstänk, vasar, tuber, dammar osv).
• Varning! Använd inte denna produkt i
närheten av vatten eller kraftig fukt; t
ex i en fuktig källare eller vid sidan av
en pool eller ett badkar.
• Använd endast denna produkt i
tempererade klimat. Undvik tropiska
och särskilt fuktiga klimatregioner.
95
IM_KMO4341_180306_V05_HR.indb 95 6/3/18 2:01 pm
Page 96

Size - A5
Svenska
Säkerhetsinstruktioner
• Skydda produkten från alla typer
av fukt, inklusive vattenstrålar och
vattenånga.
• Se till att ventilationen är tillräcklig.
Placera därför inga föremål på
utrustningen och håll de avstånd till
väggarna som ges nedan:
- Sidor: 12 cm
- Baksida: 12 cm
- Uppåt: 30 cm
• Produkten får inte byggas in i
möblemang. Utrustningen får inte
installeras direkt under en hylla eller
skåp.
• Utrustningens fötter får inte tas bort.
• Placera utrustningen på en yta som
tål värme och stänk. Placera inte
utrustningen på en varm yta (t.ex.
spisplatta) eller öppen eld (t.ex.
gasspis).
• Produkten får inte komma i kontakt
eller täckas med brännbara material,
såsom gardiner, tyger, väggar etc. Se
till att det alltid finns ett tillräckligt
säkerhetsavstånd till alla brännbara
material.
• Stick aldrig in några föremål i
produkten.
• Denna produkt är inte lämplig för
kommersiellt bruk. Den är designad för
hushållbruk och inget annat.
• Ställ inte produkten på någon
värmeplatta (gas, elektrisk, kolspis
etc.).
• Brandrisk! Bröd och andra matvaror
kan brinna! Använd inte bröd med hög
sockerhalt, eftersom detta kan orsaka
en brand. Lämna aldrig produkten utan
tillsyn.
• Risk för brännskador! Rör inte
vid de heta ytorna på produkten.
Vidrör inga andra delar än produktens
handtag eller temperaturreglage.
• Grillplattan och andra delar av
produkten kan bli mycket varma. Låt
produkten svalna ordentligt innan du
rengör den eller ställer undan den för
förvaring.
• Rör inte vid värmeelementen.
• Använd alltid spillbrickan när du
använder utrustningen.
• Olja och fett är lättantändligt. Olja och
fett får inte droppa ner på de varma
värmeelementen.
96
IM_KMO4341_180306_V05_HR.indb 96 6/3/18 2:01 pm
Page 97

Svenska
Grattis!
Tack för ditt köp av en KOENIC produkt. Läs
denna bruksanvisning noggrant och spara den
för framtida referens.
Avsedd användning
Denna produkt är endast avsedd för
matberedning. All annan användning kan leda
till skador på produkten eller personskador.
Imtron GmbH tar inget ansvar för skador
på produkten, för skador på egendom eller
personskador på grund av vårdslös eller felaktig
användning av produkten eller användning
av produkten som inte uppfyller tillverkarens
angivna ändamål.
Innan första användning
Ta försiktigt upp produkten och tillbehören
ur originalförpackningen. Du rekommenderas
att behålla originalförpackningen för
framtida förvaring. Om du vill slänga
originalförpackningen måste du iaktta gällande
bestämmelser. Om du har några frågor om
återvinningen kan du kontakta din lokala
återvinningscentral.
Kontrollera leveransens innehåll, så att alla
delar finns med och att delarna inte är skadade.
Om leveransens innehåll är ofullständigt eller
skadat bör du kontakta din återförsäljare
omedelbart.
När du har packat upp produkten, läs vidare i
kapitlet Rengöring och skötsel.
För att ta bort resterna från tillverkningen kan
du låta produkten vara igång under cirka 10
minuter utan matvaror. När du har packat upp
produkten, läs vidare i kapitlet Användning. Se
till att ventilationen är god, eftersom en svag
lukt och lite rök kan uppstå. Detta är ofarligt
och kommer att försvinna inom kort.
Innehåll
1 x Miniugn
1 x Ugnsgaller med handtag
1 x Ugnsbricka
1 x Roterande grillspett inkl. klämmor och handtag
1 x Spillbricka
1 x Bruksanvisning
Tekniska uppgifter
Märkspänning : 220 - 240 V~
Ingående märkeekt : 1350 - 1650 W
Märkfrekvens : 50/60 Hz
Kontrollelement
A
Temperaturkontroll
B
Driftindikeringslampa
C
Lägesväljarreglage
D
Timer/ På (C) / AV
E
Strömkabel med kontakt
F
Luckhandtag
G
Roterande grillspetthandtag
H
Gallerhandtag
I
Spillbricka
J
Ugnsgaller
K
Ugnsbricka
L
Ugnslucka
M
Undre värmeelement
N
Roterande grillspett med klämmor
O
Hållarfäste
P
Mottagningsdrivning
Q
Övre värmeelement
R
Ugnslampa
Denna apparat får inte kastas med
hushållsavfallet. Lämna in den på
återvinningsstationen för återvinning av
elektroniskt och elektriskt avfall. Genom att
göra detta hjälper du till att bevara resurserna
och skydda miljön. Kontakta din återförsäljare
eller lokala myndigheter för mer information.
97
IM_KMO4341_180306_V05_HR.indb 97 6/3/18 2:01 pm
Page 98

Size - A5
Svenska
Installation
Placera produkten på en jämn, stabil och
Fig.
1
värmetålig yta. Tänk på avståndet till
närmaste eluttag.
För att säkerställa tillräcklig luftcirkulation,
följ de minimiavstånd som ges nedan:
Sidor: 12 cm
Baksida: 12 cm
Uppåt: 30 cm
Varning
Produkten får inte installeras och placeras
i möblemang. Produkten får inte installeras
direkt under en hylla eller skåp.
Sätt i spillbrickan under de nedre
Fig.
2
värmeelementen.
Anslut kontakten till ett lämpligt
Fig.
3
eluttag.
Användning
Temperaturreglering
Justera den önskade temperaturen upp
Fig.
4
till 230 °C med temperaturreglaget.
Lägesval
Obs:
Konvektionsfläkten körs automatiskt i alla
lägen och kan inte slås på eller stängas av.
Välj önskat läge med
Fig.
5
lägesväljarreglaget. Notera följande
symboler och förklaringar:
Av
Övre och undre värme
Övervärme
Undervärme
Övervärme med roterande grillspett aktiverat
Över- och undervärme med roterande grillspett aktiverat
Miniugnen startas endast efter att
Timer eller On/O (På/Av)-knappen
ställts in.
98
IM_KMO4341_180306_V05_HR.indb 98 6/3/18 2:01 pm
Page 99

Svenska
Slå på – permanent eller med timern
Vrid reglaget medurs för att ställa in en
Fig.
6
användningstid på upp till 120 minuter
och slå på ugnen.
För att slå på ugnen utan att använda
timern, vrid reglaget moturs till C.
Driftindikeringslampan tänds och lyser
rött, och ugnen värms upp.
Obs
Driftindikeringslampan visar inte
om ugnen värms upp eller om den
förinställda temperaturen har nåtts.
Driftindikeringslampan tänds när produkten
slås på på eller timern har ställts in och ugnen
är påslagen.
När den förinställda tiden gått ut
eller ugnen ställts in på AV slocknar
driftindikeringslampan.
Använda rotisserien
Roterande grillspett kan användas med överoch undervärme.
Lossa vingskruven på klämman vid den
Fig.
7
spetsiga sidan på rotisserien och ta
bort klämman.
Tryck rotisserien genom mitten av
Fig.
8
maten som ska grillas för att få ett
jämnt avstånd mellan maten och
värmeelementen.
Fäst maten mitt i rotisserien med de två
Fig.
9
klämmorna. När du gör detta, tryck ihop
båda klämmorna, och när maten sitter
fast ordentligt, dra åt vingskruvarna för
att fästa klämmorna vid rotisserien.
Obs
Se till att maten som skall grillas är placerad
i mitten av roterande grillspettet med likas
stort avstånd till båda drivenheterna samt
väggarna.
Fig.
10
Sätta in roterande spettet: 1 Skjut
den runda änder av spettet in i
honuttagdrivenheten. 2 Placera sedan
spettets andra ände mot hållarfästet.
Tänk på storleken på maten som ska
grillas (t.ex. grillad kyckling). Den får
aldrig röra vid det övre eller undre
värmeelementet på något plats.
Obs:
Använd endast rotisserien med kyckling som
väger max 3,5 kg.
Använd det medföljande handtaget för
Fig.
11
att ta bort rotisserien i omvänd ordning
mot när den sattes in.
Tillagning och grillning
• Se till att spillbrickan är isatt under det
undre värmeelementet varje gång du
använder ugnen.
• Förvärm ugnen i några minuter med luckan
stängd. Vrid därför temperaturreglaget till
önskad temperatur och slå på ugnen med
timern eller På/Av-knappen.
• Förbered maten för tillagning. Lägg den på
ugnsgallret eller ugnsbrickan.
• Med fet eller blöt mat, använd ugnsbrickan
för att undvika att fett eller vätska droppar
ner.
• Sätt i ugnsgallret eller brickan på önskad
höjd. Tre olika höjder finns tillgängliga.
• Stäng luckan, vrid temperaturreglaget till
önskad temperatur och slå på ugnen med
timern eller På/Av-knappen.
Försiktighet
Det övre höljet och andra delar av ugnen kan
bli mycket varma under användningen. Rör
inte vid ugnens varma delar när den används
eller direkt efteråt.
99
IM_KMO4341_180306_V05_HR.indb 99 6/3/18 2:01 pm
Page 100

Size - A5
Svenska
• Tillagningsläget (funktionen) kan ändras
under tillagningsprocessen.
• När timerreglaget används stängs
värmeelementen av automatiskt när den
förinställda tiden gått ut.
• För att stänga av manuellt, vrid timern/på/
av-knappen till läge OFF (AV).
• Använd endast handtaget för att öppna
luckan, som kan vara varm.
Försiktighet
Varm ånga kan släppas ut när ugnsluckan
öppnas. Öppna därför alltid luckan försiktigt.
• Använd en ugnsvante eller tyg eller den
medföljande ugnsgallerhandtaget duk när
du tar ut ugnsgallret eller -brickan. Ett varmt
ugnsgaller eller -bricka får endast placeras
på en värmetålig yta.
• Använd det medföljande handtaget för att
ta ut rotisserien.
• Koppla ur produkten efter användningen.
Försiktighet
Beroende på matens typ och mängd kan den
bli mycket varm under grillningen. Mat med
högt vatteninnehåll, t.ex. tomater, blir speciellt
varm. Så var mycket försiktig när du grillar och
speciellt när du tar ut dessa typer av mat.
Rengöring och vård
Försiktighet
Koppla alltid bort produkten från eluttaget
och låt den svalna.
Innan du rengör produkten, koppla ur
Fig.
12
den och låt den svalna.
•Ta bort eventuellt fett som droppat
ner på det undre värmeelementet med
en fuktig trasa.
•Rengör ugnsbrickan, gallret,
rotisserien och fästena med ett milt
diskmedel.
•Ta ut spillbrickan och rengör den.
Använd hushållspapper för att torka
bort större mängder fett.
•Sätt tillbaka spillbrickan igen efter
rengöringen.
•Lösningsmedel är skadliga för
människors hälsa och kan angripa
plastdelarna, medan slipande
rengöringsmedel och verktyg kan repa
ytan(-orna).
Byte av ugnens lampa
Varning
Låt produkten svalna. Koppla bort produkten
från eluttaget innan du byter ut lampan för
att undvika risken för elektriska stötar.
Om ugnslampan är defekt måste lampan bytas.
Ta först bort lamplocket och vrid
Fig.
13
sedan lampan moturs. Byt lampan till
en lampa av samma typ (230V 25W
T300, E14). Installationen görs i
omvänd ordning. Se till att lampan och
lamplocket sitter ordentligt på plats.
100
IM_KMO4341_180306_V05_HR.indb 100 6/3/18 2:01 pm
 Loading...